Widget: SIP Call Design and Components
Overview
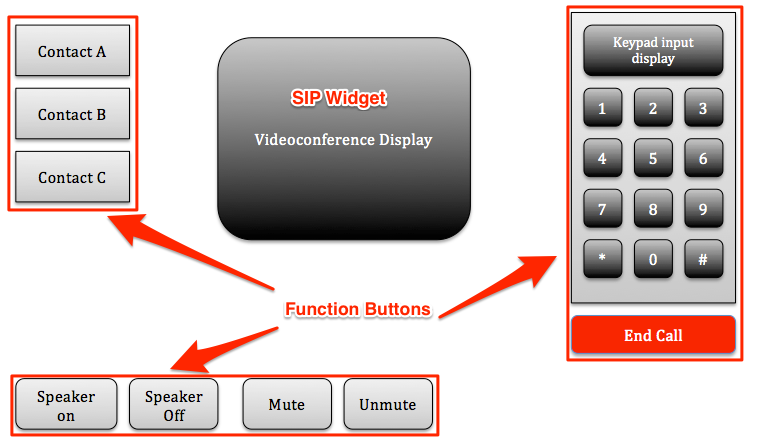
This article will guide you through the steps to add and configure a SIP Call Widget (along with all of its components) to create a fully functional SIP interface. A complete SIP application can be broken down into two main components:
- SIP Call Widget- used to establish connection with the Cisco Unified Communication Manager (CUCM) server and to act as a video display for video conferencing
- Function Buttons – used for interactions between users and the SIP client for telephony functions (i.e. ending a call, muting the microphone) The following sections in this article will guide you through the creation and configuration of an application that will be comprised of both components described above to provide an interface for users to interact with.
The following is an example overview of those components that make up the SIP widget:
Pre-requisites
The following pre-requisites must be met/followed in order for all elements of the SIP widget to function properly:
- Appspace server version 5.1.x
- Cisco Unified Communication Manager (CUCM) credentials
- All image files to be used for the operational interface
- Images for each numeric keypad number (0 to 9)
- Images for keypad symbols (* and #)
- Images for functional buttons (mute/unmute, speaker on/off, end call)
Adding and Configuring a SIP Call Widget
This section goes through the steps to configure the SIP call widget. It should be noted that the SIP call widget itself will act/perform as a video zone whenever a video conference has been detected to be available on the receiving end.
Step 1
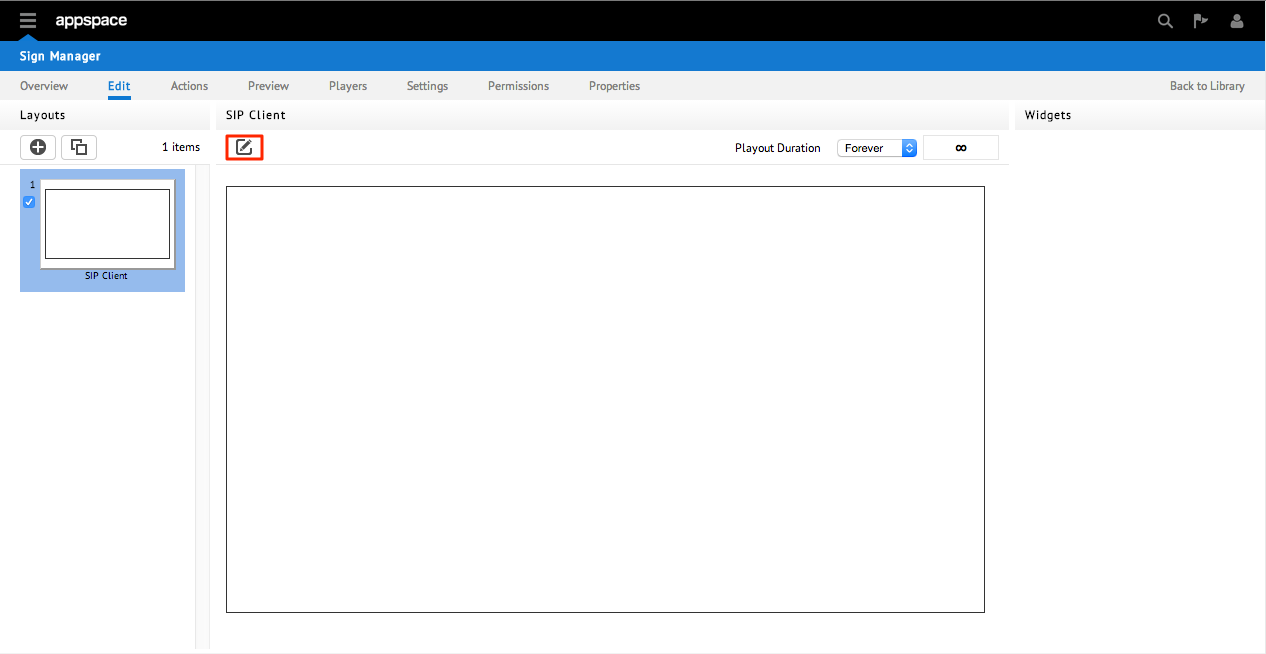
From the Sign Manager extension begin by creating an application with one layout. Give the layout a name (i.e. SIP Client) From the Playout Duration drop-down menu, select Forever.

Step 2
Click on the Visual Editor button to enter the edit page.
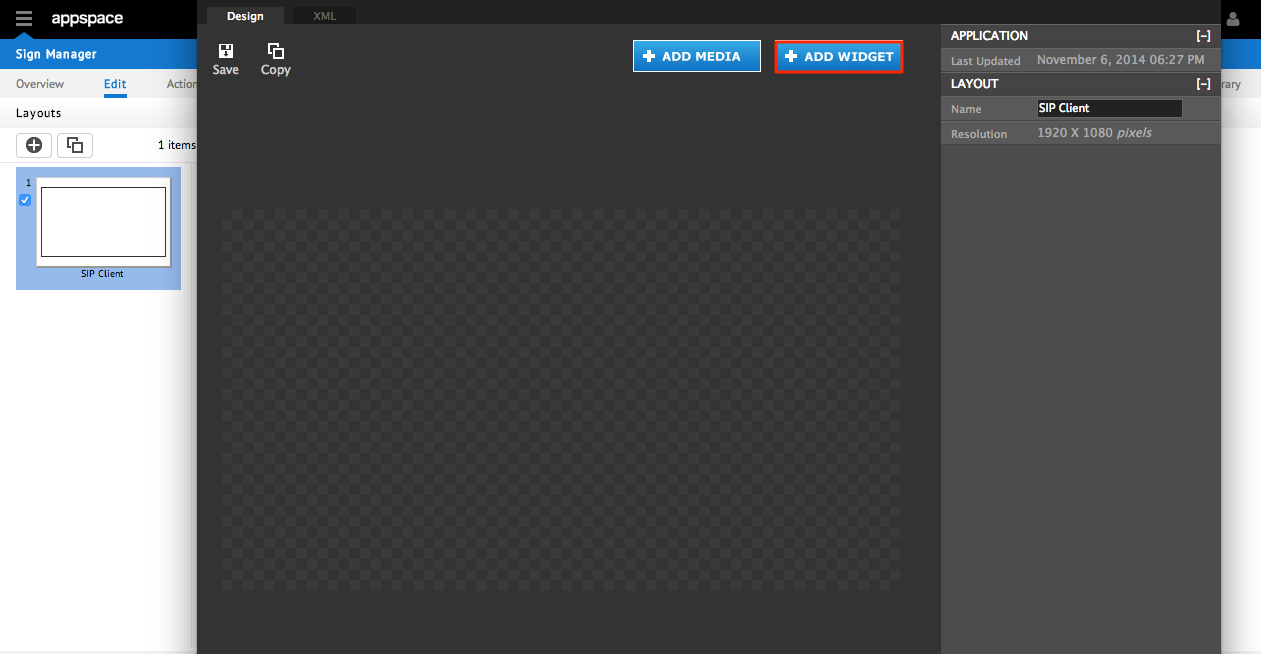
Step 3
Once the Visual Editor has been loaded, click on the + ADD WIDGET button.
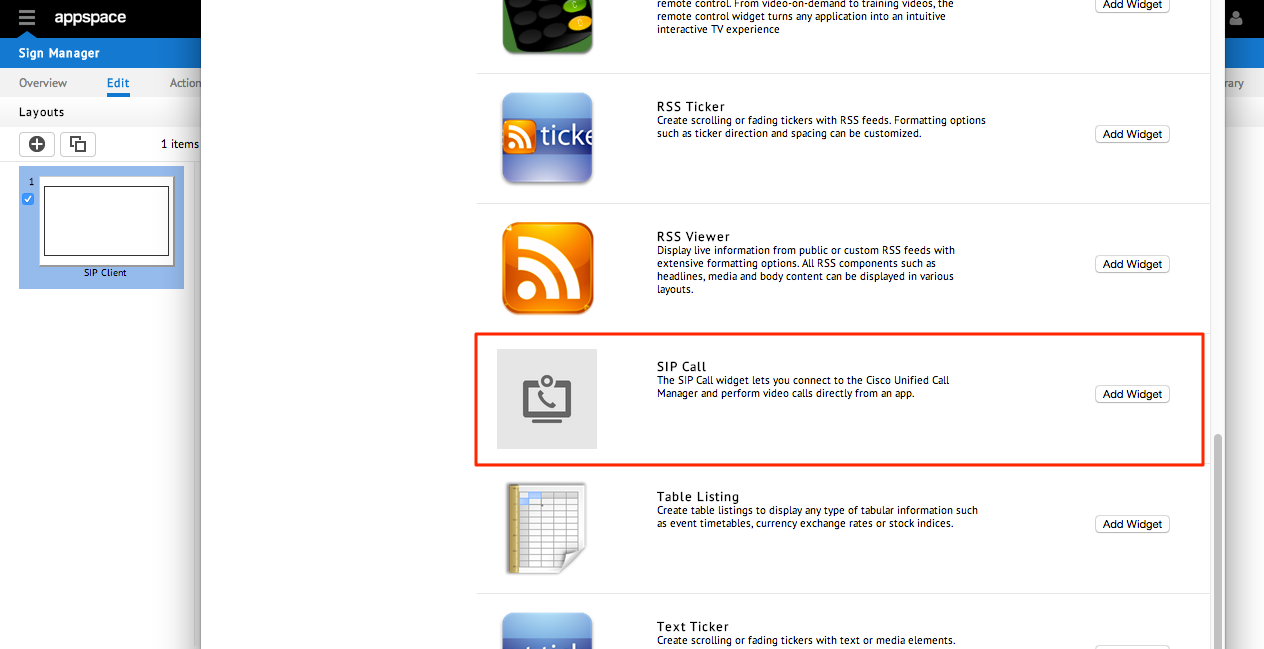
Step 4
Find the SIP Call widget from the widget list and click Add Widget to continue.
Step 5
Once the SIP Call widget has been added, size and position the widget appropriately. Make sure to leave enough room for the other widget elements that will also be inserted.

Note
The SIP widget will act/perform as a video zone whenever a video conference has been detected to be available on the receiving end. It is important to ensure and allocate an appropriate size to perform that function. Baseline coordinates and size that can be used for reference: Left: 588, Top: 202, Width: 494, Height: 395
Step 6
Double click on the SIP widget to access additional property fields that will allow you to enter CUCM credentials (this can also be accessed by clicking on the Properties button on the right-hand side menu). Slide both the Microphone and Audio levels up to to 100. Click the Apply button and then Save to finish adding the widget.

Note
Please refer to your Admin for more information or configuration for CUCM.
Function Button Configurations
The following sections will guide you through the steps required to build several important function keys that will allow users to perform basic telephony operations such as:
- Numeric keypad and display used for dialling
- End call button for terminating sessions
- Speaker buttons for enabling or disabling audio
- Microphone buttons for muting/unmuting
- Contact buttons for address book speed-dials
Creating a Numeric Keypad and Display
The numeric keypad is used in the event DTMF (dual-tone multi-frequency) signalling or IVR (interactive voice response) input is necessary. Each number or symbol on the keypad is essentially an image that will be mapped to the SIP widget’s built-in actions that will execute a number of possible functions within the widget.
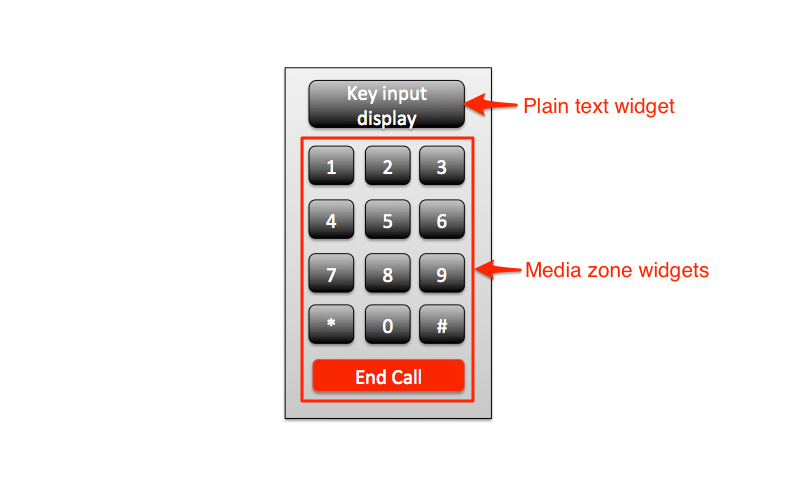
In the above example, the numeric display will be a plain text widget while all keypad buttons will be media zones. Using media zones for keypad buttons will give users the creative flexibility in designing a keypad that can be customized to match their own application theme.
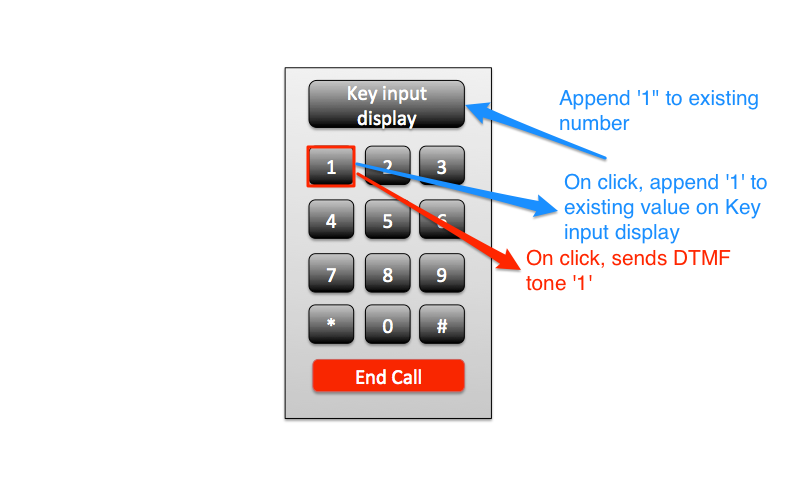
Each individual keypad button may have a number of actions associated to it. In the above example, there are two actions per keypad button. The first action sends the DTMF tone for IVF usage, while the second action appends the clicked number to the numeric display – thus granting the user a display of clicked numbers.
Step 1
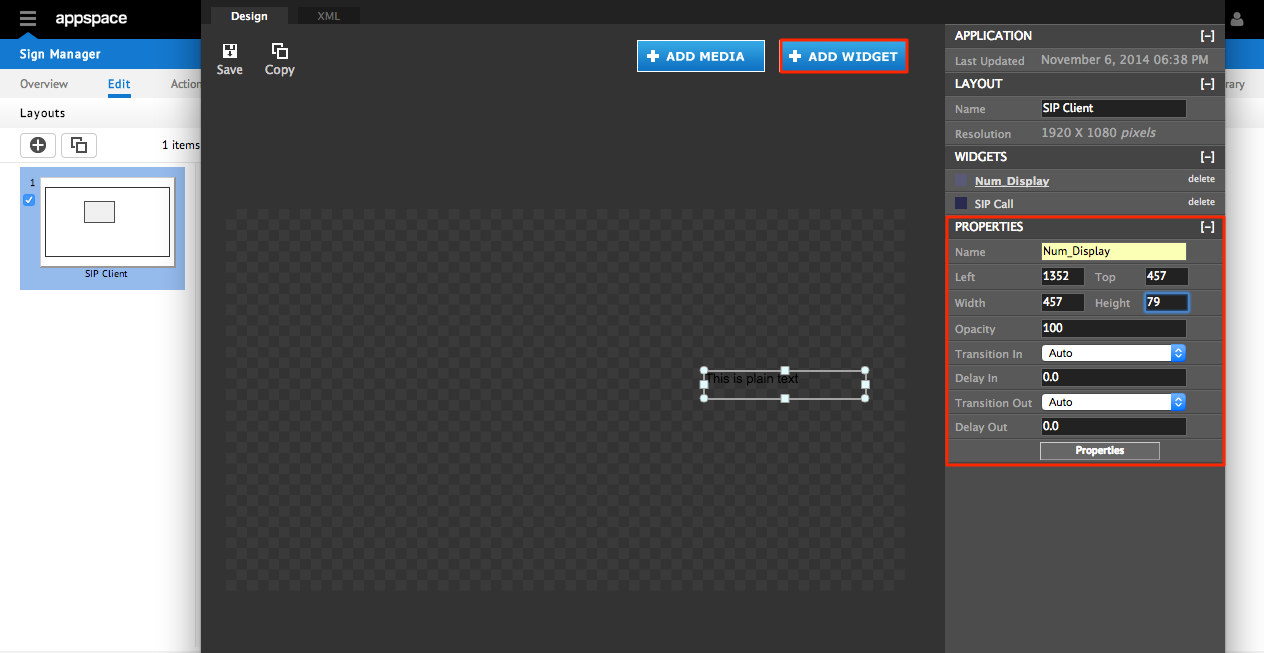
From within the Visual Editor, click on the + ADD WIDGET button and select the Plain Text widget. Give the widget a name (i.e. Num_Display).
Note
Baseline coordinates and size that can be used for reference: Left: 1352, Top: 119, Width: 457, Height: 79
Step 2
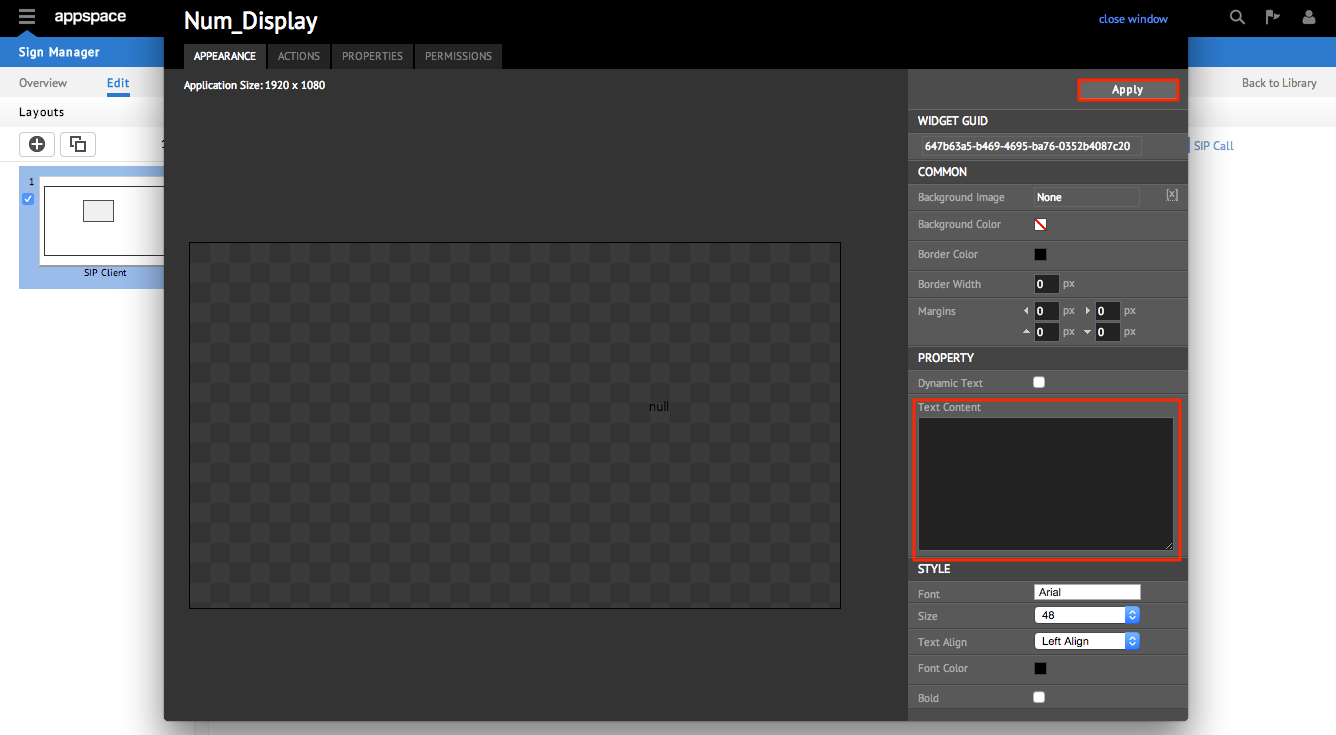
Double click on the Plain Text widget to access additional property fields (this can also be accessed by clicking on the Properties button on the right-hand side menu). Delete the default text content and click the Apply button and then Save.
Step 3
Click on the + ADD WIDGET button and select the Media Zone widget. Give the widget a name (i.e. Num1).

Note
Baseline coordinates and size that can be used for reference: Left: 1408, Top: 238, Width: 90, Height: 90
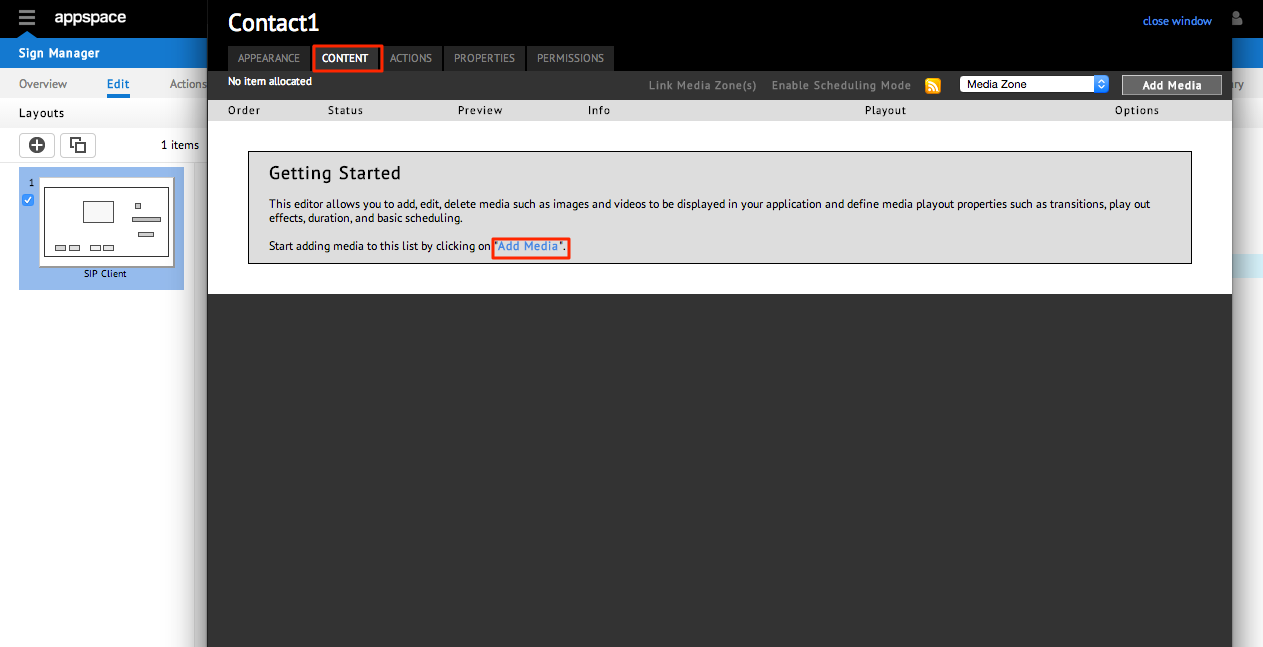
Step 4
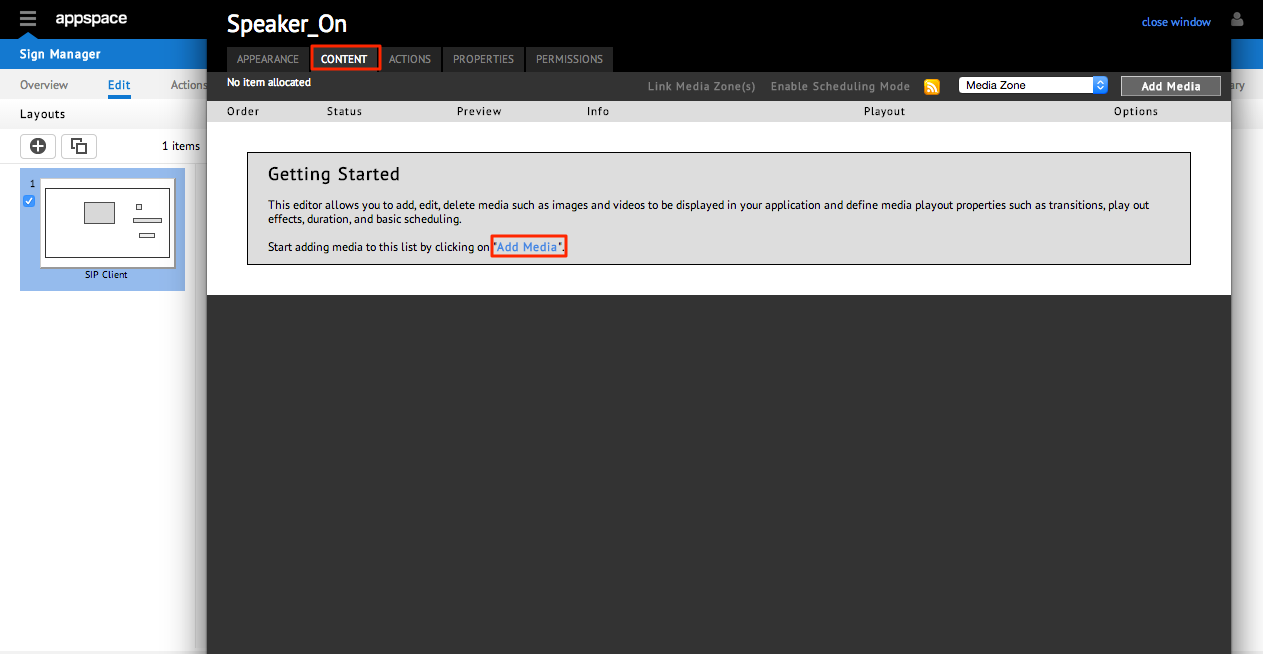
Double click on the Media Zone widget to access additional property fields (this can also be access by clicking on the Properties button on the right-hand side menu). Click on the Content tab and click Add Media in the middle of the page. Select the desired media to represent this particular keypad button (in this example, the button for 1) and click the APPLY button.

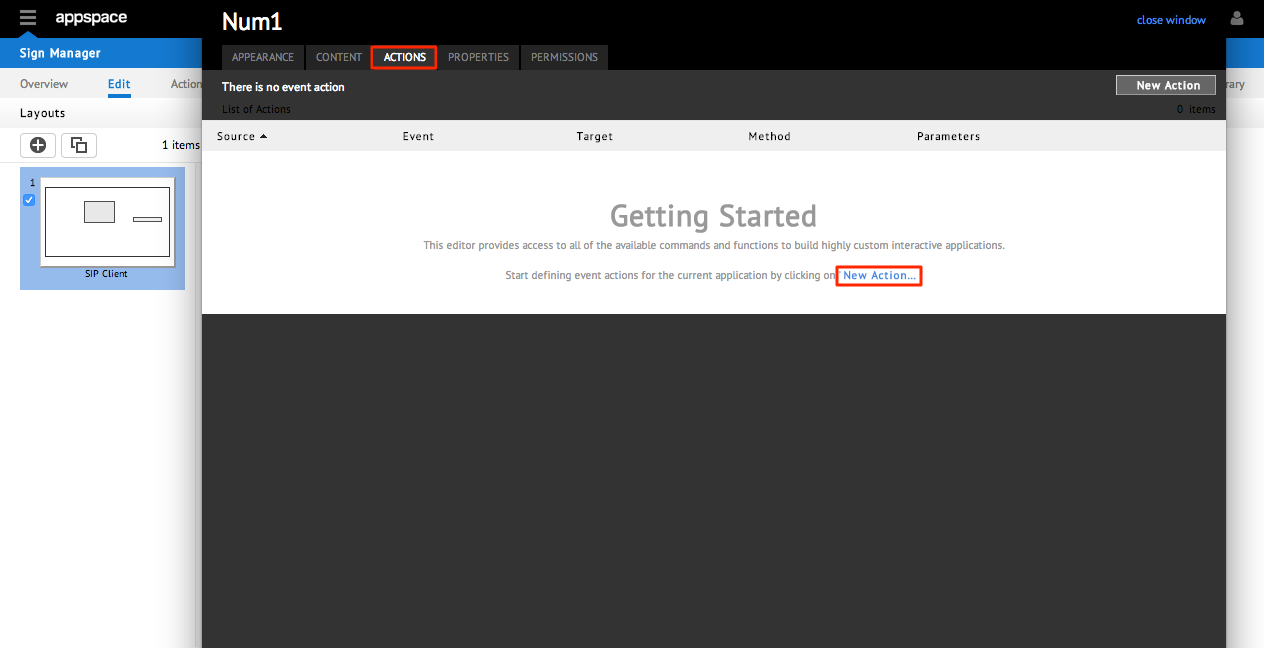
Step 5
Click on the Actions tab and click New Action in the middle of the page.
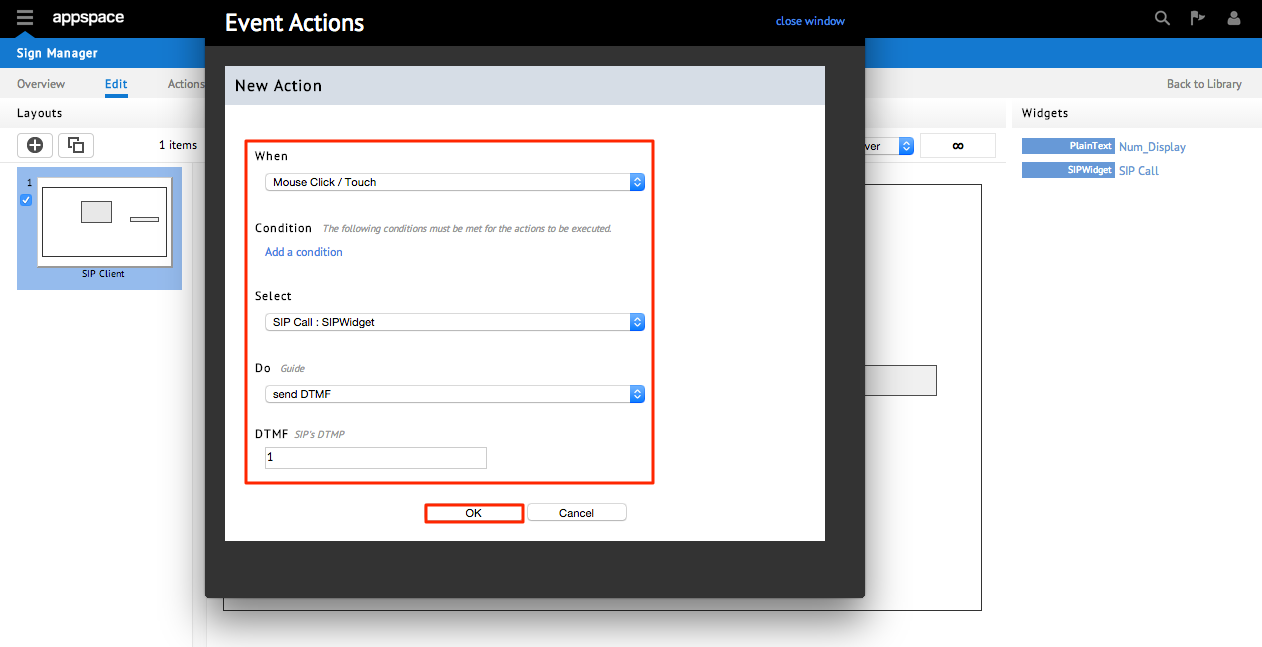
Step 6
Configure the event Actions and click OK and then Save.
Note
- From the When drop-down menu: select Mouse Click/touch
- From the Select drop-down menu: select SIP Call: SIPWidget
- From the Do drop-down menu: select send DTMF
- In the DTMF field, fill in with the desired tone (in this example, the tone for 1)
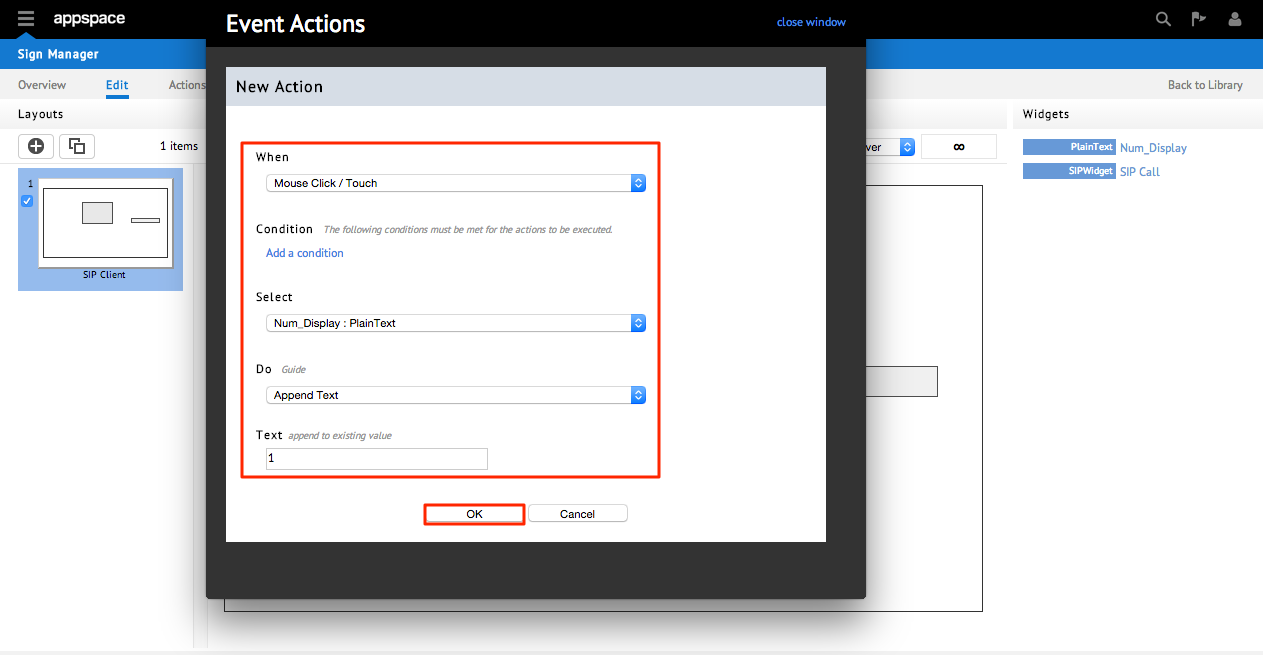
Step 7
On the Actions tab, click New Action to add another action and configure the event Actions. When finished, click OK. Return to the Visual Editor and click the Save icon in the upper left.
Note
- From the When drop-down menu: select Mouse Click/touch
- From the Select drop-down menu: select Numdisplay: Plain Text
- From the Do drop-down menu: select Append Text
- In the Text field, fill in with the action to append (in this example, the number 1)
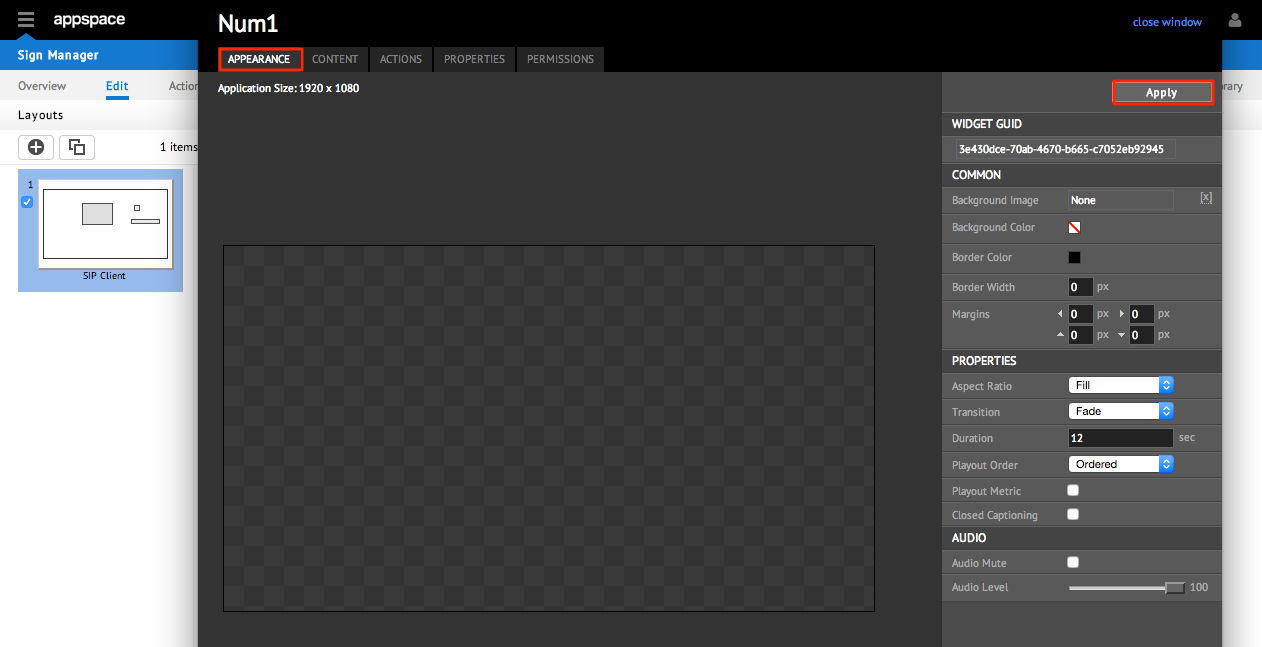
Step 8
From within the Visual Editor, select the Appearance tab. Click the Apply button. Repeat Steps #1 through #7 for all needed buttons such as numbers 1 through 9, hash/pound (#), and asterisk (*).
Note
Ensure that all media zones created for the keypad buttons are of the same size.
Creating an End Call Button
The end call button is primarily used to terminate an active telephony (or video conference) session. The end call button is essentially an image that will be mapped to terminate the current session of the SIP widget.
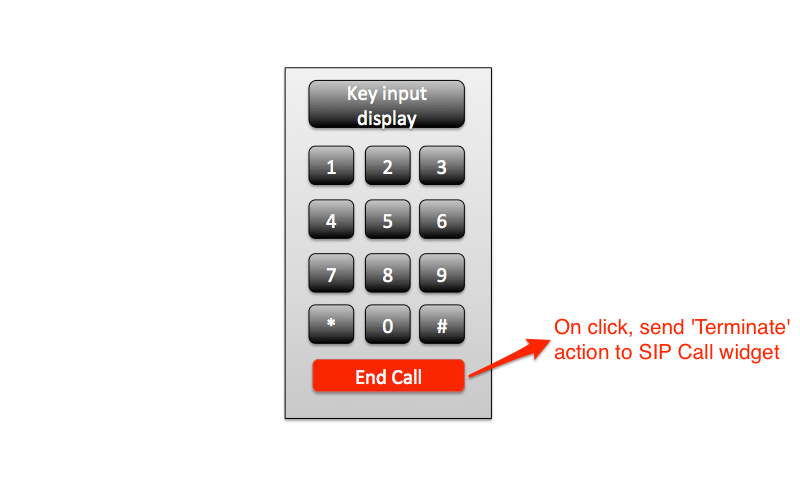
In the above example, the End Call button will be created as a media zone. Using media zones for keypad buttons will give users the creative flexibility in designing a keypad that can be customized to match their own application theme.
Step 1
From within the Visual Editor, click on the + ADD WIDGET button. Select the Media Zone widget and give the widget a name (i.e. End_Call). Position the widget just below the last row of the keypad buttons that were previous created.
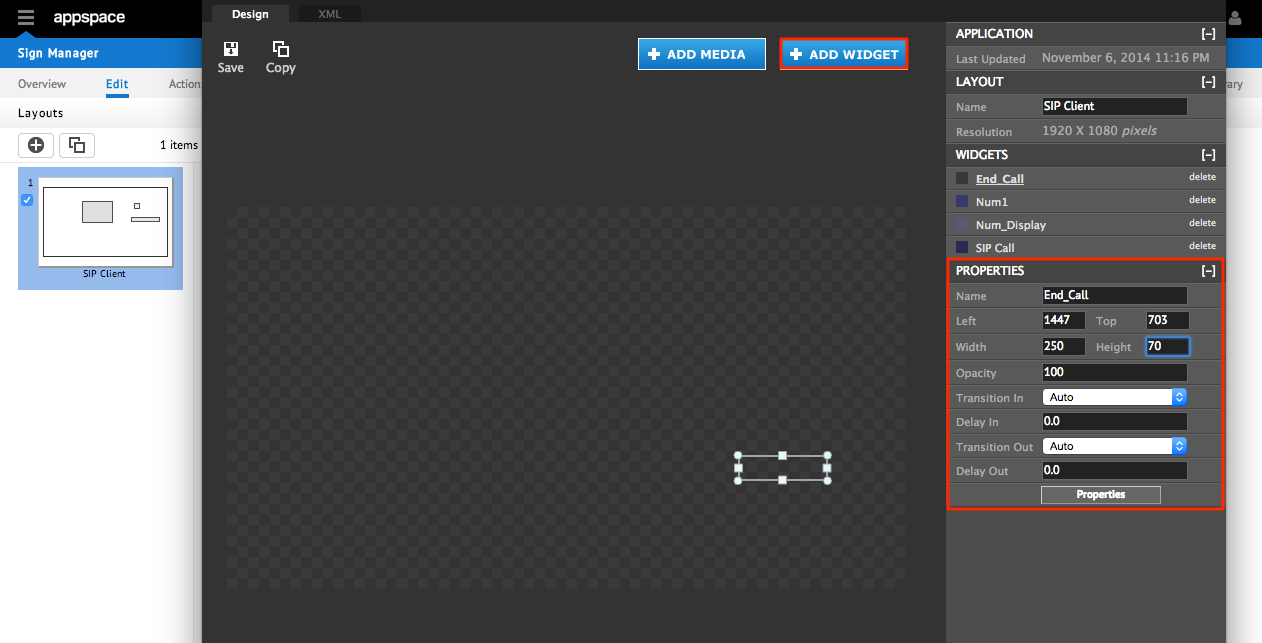
Note
Baseline coordinates and size that can be used for reference: Left: 1447, Top: 703, Width: 250, Height: 70
Step 2
Double click on the Media Zone widget to access additional property fields (this can also be access by clicking on the Properties button on the right-hand side menu). Click on the Content tab followed by Add Media in the middle of the page. Select the desired media to represent the end call button and click APPLY.

Step 3
On the Actions tab, click New Action to add another action and configure the Event Actions. When finished, click OK. Return to the Visual Editor and click the Save icon in the upper left.

Note
- From the When drop-down menu: select Mouse Click/touch
- From the Select drop-down menu: select SIP Call: SIPWidget
- From the Do drop-down menu: select Terminate
Creating On/Off Speaker Buttons
The speaker on and off buttons are used to turn/set the volume of the loud speaker to 0 and 100 respectively. The buttons are essentially images that will be mapped to the volume maximum or minimum via the SIP widget.
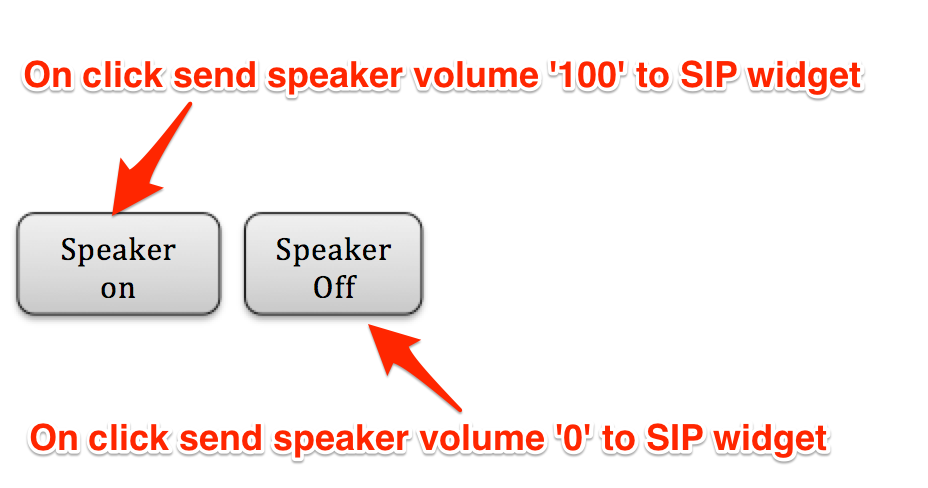
In the above example, the Speaker on and Speaker off buttons will be created as media zones. Using media zones for keypad buttons will give users the creative flexibility in designing a keypad that can be customized to match their own application theme.
Step 1
From within the Visual Editor, click on the + ADD WIDGET button. Select the Media Zone widget and give the widget a name (i.e. Speaker_On).
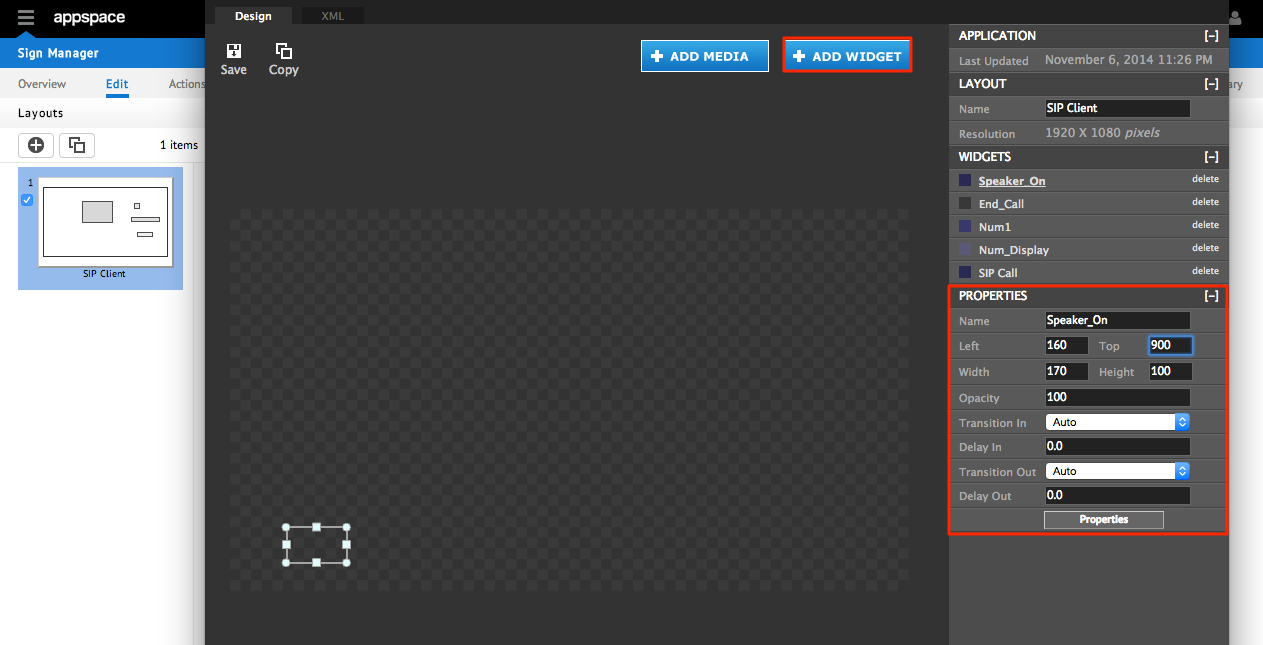
Note
Baseline coordinates and size that can be used for reference: Left: 160, Top: 900, Width: 170, Height: 100
Step 2
Double click on the Media Zone widget to access additional property fields (this can also be access by clicking on the Properties button on the right-hand side menu). Click on the Content tab followed by Add Media in the middle of the page. Select the desired media to represent the speaker on button and click APPLY.
Step 3
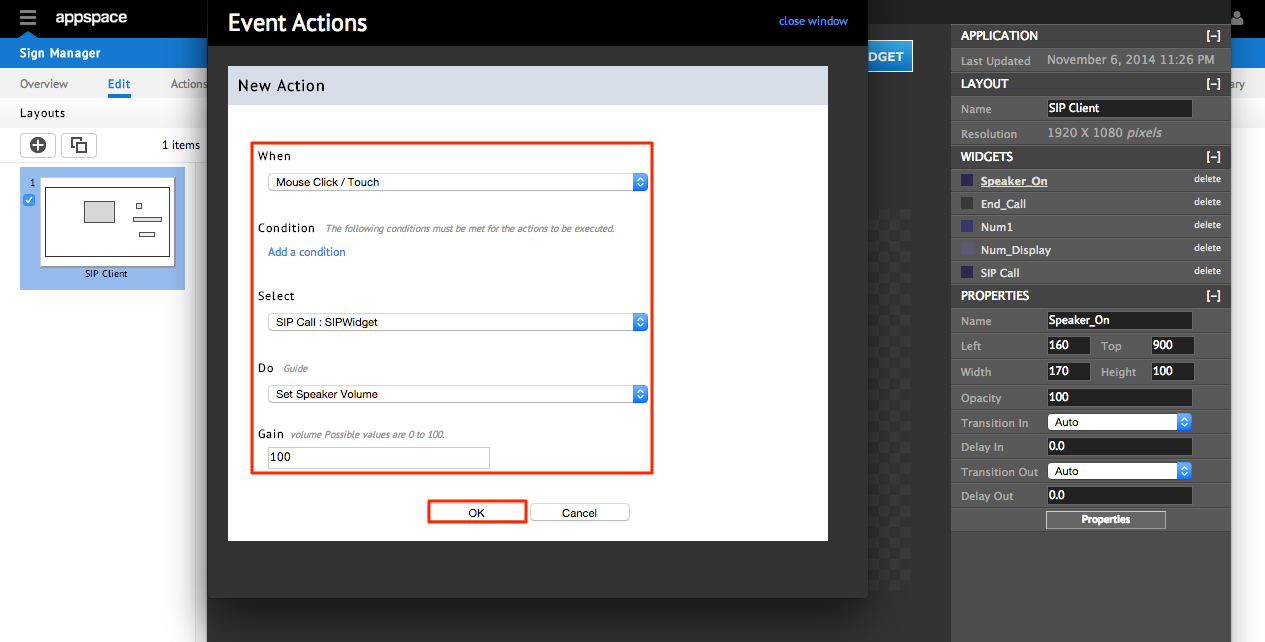
On the Actions tab, click New Action to add another action and configure the Event Actions. When finished, click OK. Return to the Visual Editor and click the Save icon in the upper left.
Note
- From the When drop-down menu: select Mouse Click/touch
- From the Select drop-down menu: select SIP Call: SIPWidget
- From the Do drop-down menu: select Set Speaker Volume
- In the Gain field, enter the value 100
Step 4
Return to the Visual Editor and click on the + ADD WIDGET button. Select the Media Zone widget and give the widget a name (i.e. Speaker_Off).
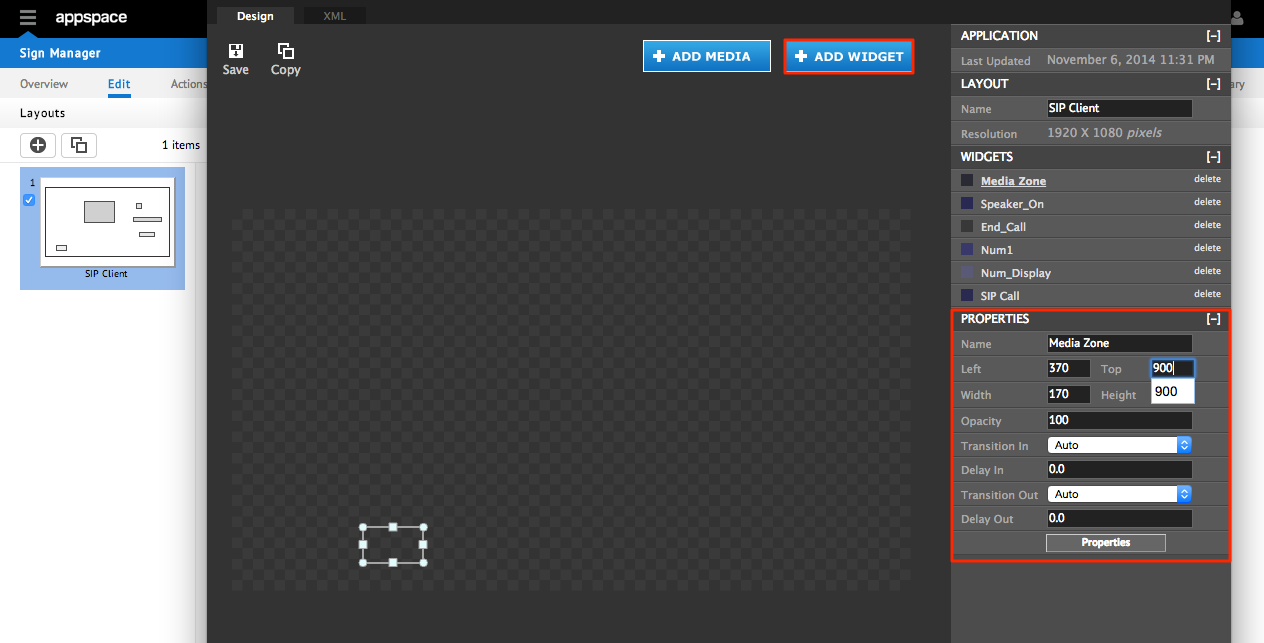
Note
Baseline coordinates and size that can be used for reference: Left: 370, Top: 900, Width: 170, Height: 100
Step 5
Double click on the Media Zone widget to access additional property fields (this can also be access by clicking on the Properties button on the right-hand side menu). Click on the Content tab followed by Add Media in the middle of the page. Select the desired media to represent the speaker off button and click APPLY.

Step 6
On the Actions tab, click New Action to add another action and configure the Event Actions. When finished, click OK. Return to the Visual Editor and click the Save icon in the upper left.
Note
- From the When drop-down menu: select Mouse Click/touch
- From the Select drop-down menu: select SIP Call: SIPWidget
- From the Do drop-down menu: select Set Speaker Volume
- In the Gain field, enter the value 0
Creating Mute/Unmute Microphone Buttons
The mute and unmute buttons are used to turn the microphone on and off respectively. The buttons are essentially images that will be mapped to execute the mute and unmute actions of the SIP widget.

In the above example, the Mute and Unmute buttons will be created as media zones. Using media zones for keypad buttons will give users the creative flexibility in designing a keypad that can be customized to match their own application theme.
Step 1
From within the Visual Editor, click on the + ADD WIDGET button. Select the Media Zone widget and give the widget a name (i.e. Mute).

Note
Baseline coordinates and size that can be used for reference: Left: 700, Top: 900, Width: 170, Height: 100
Step 2
Double click on the Media Zone widget to access additional property fields (this can also be access by clicking on the Properties button on the right-hand side menu). Click on the Content tab followed by Add Media in the middle of the page. Select the desired media to represent the speaker on button and click APPLY.

Step 3
On the Actions tab, click New Action to add another action and configure the Event Actions. When finished, click OK. Return to the Visual Editor and click the Save icon in the upper left.
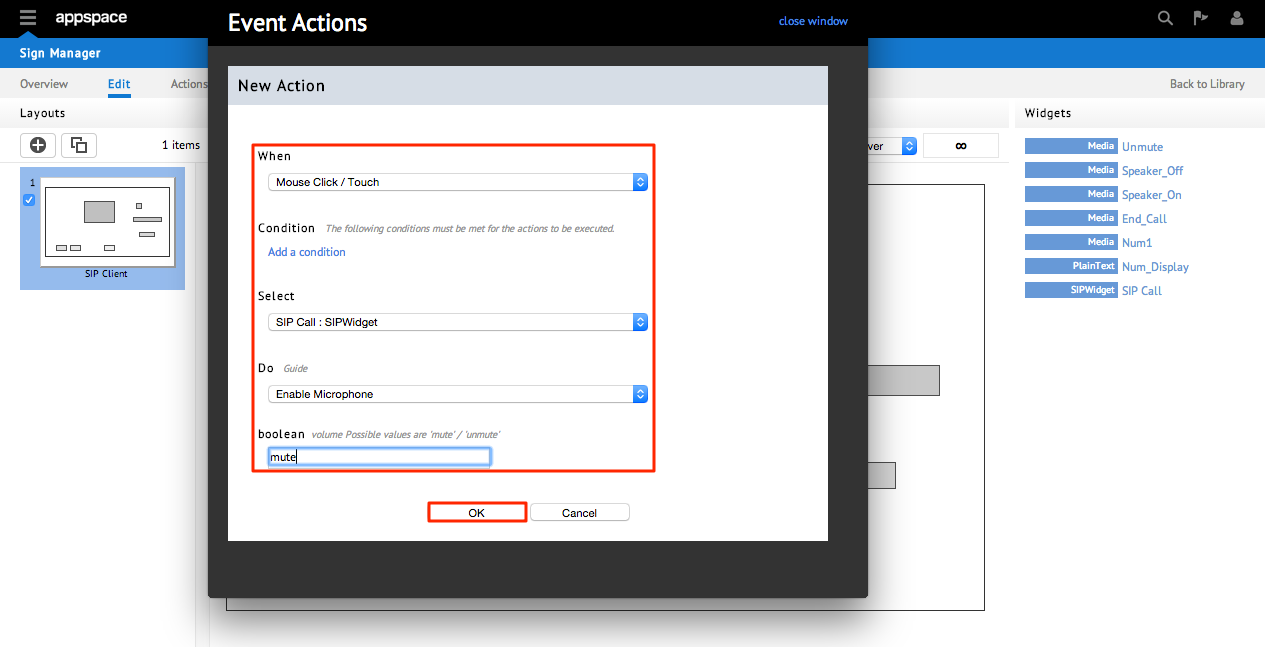
Note
- From the When drop-down menu: select Mouse Click/touch
- From the Select drop-down menu: select SIP Call: SIPWidget
- From the Do drop-down menu: select Enable Microphone
- In the Boolean field, enter the value mute
Step 4
Return to the Visual Editor and click on the + ADD WIDGET button. Select the Media Zone widget and give the widget a name (i.e. Unmute).

Step 5
Double click on the Media Zone widget to access additional property fields (this can also be access by clicking on the Properties button on the right-hand side menu). Click on the Content tab followed by Add Media in the middle of the page. Select the desired media to represent the speaker off button and click APPLY.

Step 6
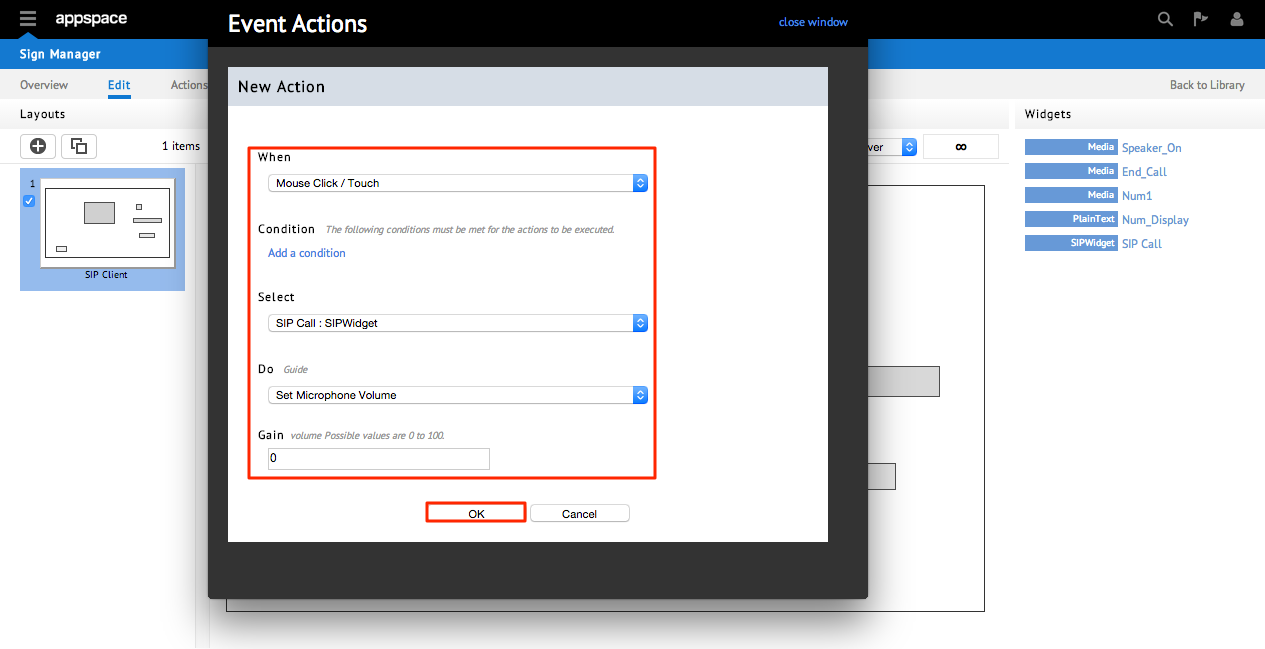
On the Actions tab, click New Action to add another action and configure the Event Actions. When finished, click OK. Return to the Visual Editor and click the Save icon in the upper left.

Note
- From the When drop-down menu: select Mouse Click/touch
- From the Select drop-down menu: select SIP Call: SIPWidget
- From the Do drop-down menu: select Enable Microphone
- In the Boolean field, enter the value unmute
Creating Contact Buttons
Individual contact buttons are used to call predefined numbers (speed dial). The buttons are essentially images that will be mapped to call a predefined (saved) numbers via the SIP widget.
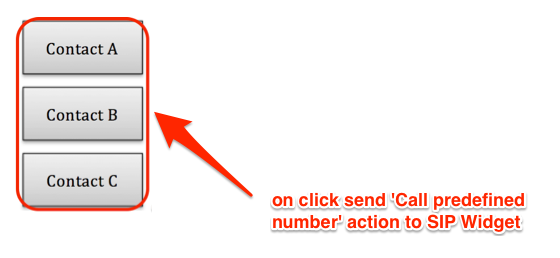
In the above example, the Contact X buttons will be created as media zones. Using media zones for keypad buttons will give users the creative flexibility in designing a keypad that can be customized to match their own application theme.
Step 1
From within the Visual Editor, click on the + ADD WIDGET button. Select the Media Zone widget and give the widget a name (i.e. Contact1).
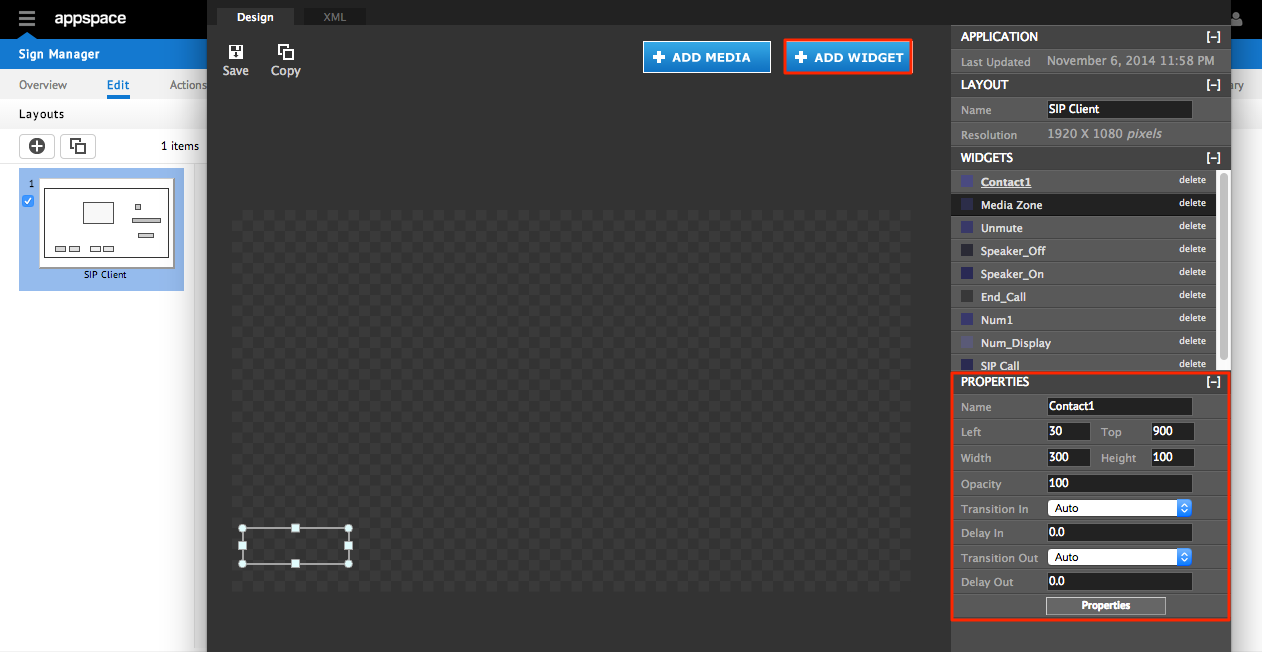
Note
Baseline coordinates and size that can be used for reference: Left: 30, Top: 900, Width: 300, Height: 100
Step 2
Double click on the Media Zone widget to access additional property fields (this can also be access by clicking on the Properties button on the right-hand side menu). Click on the Content tab followed by Add Media in the middle of the page. Select the desired media to represent the Contact A and click APPLY.
Step 3
On the Actions tab, click New Action to add another action and configure the Event Actions. When finished, click OK. Return to the Visual Editor and click the Save icon in the upper left.
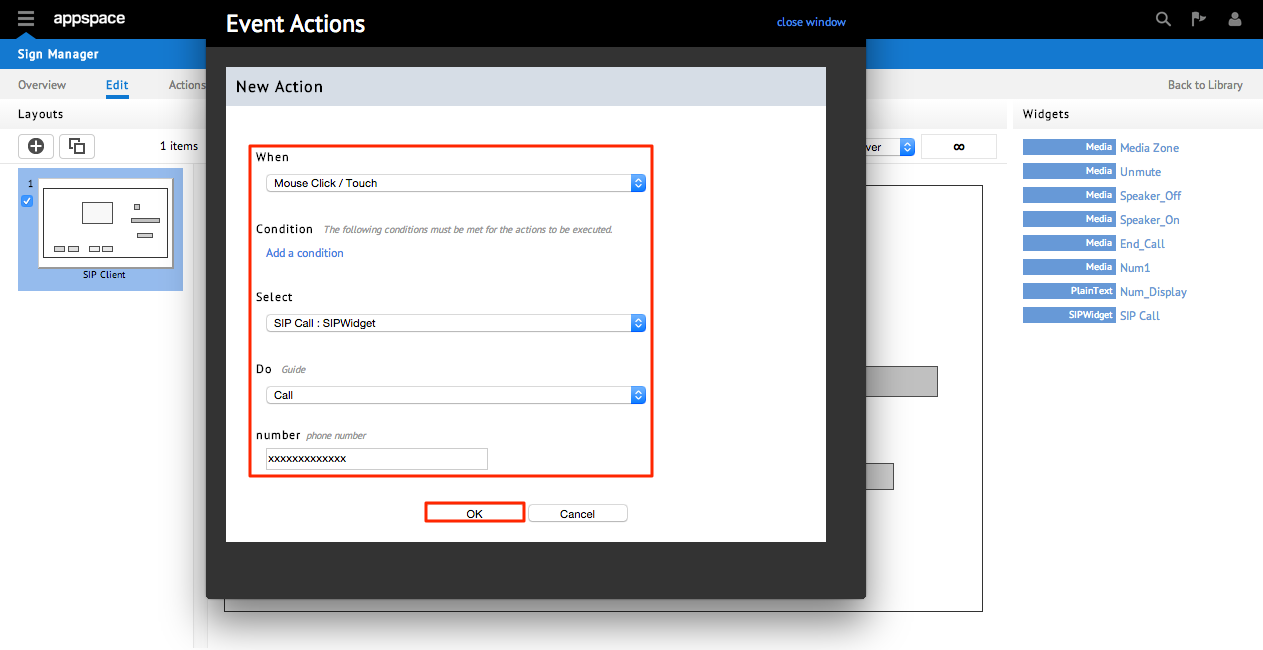
Note
- From the When drop-down menu: select Mouse Click/touch
- From the Select drop-down menu: select SIP Call: SIPWidget
- From the Do drop-down menu: select Call
- In the Number field: enter the phone number to be associated with this contact
- Repeat all 3 steps above to add additional contacts as many times as needed.