This article provides administrators with instructions on how to configure and manage registered Appspace App devices on the Appspace platform.
Prerequisites
- An Appspace Account Owner or Location Admin assigned a Platform User license.
- Supported Appspace App Devices and Operating Systems.
Device Overview
The Device Overview provides users with the relevant device details, device preview, and also the channel, channel groups, or content that has been assigned to the device.
To access the Device Overview, click the device name link of the selected device in the Devices dashboard.
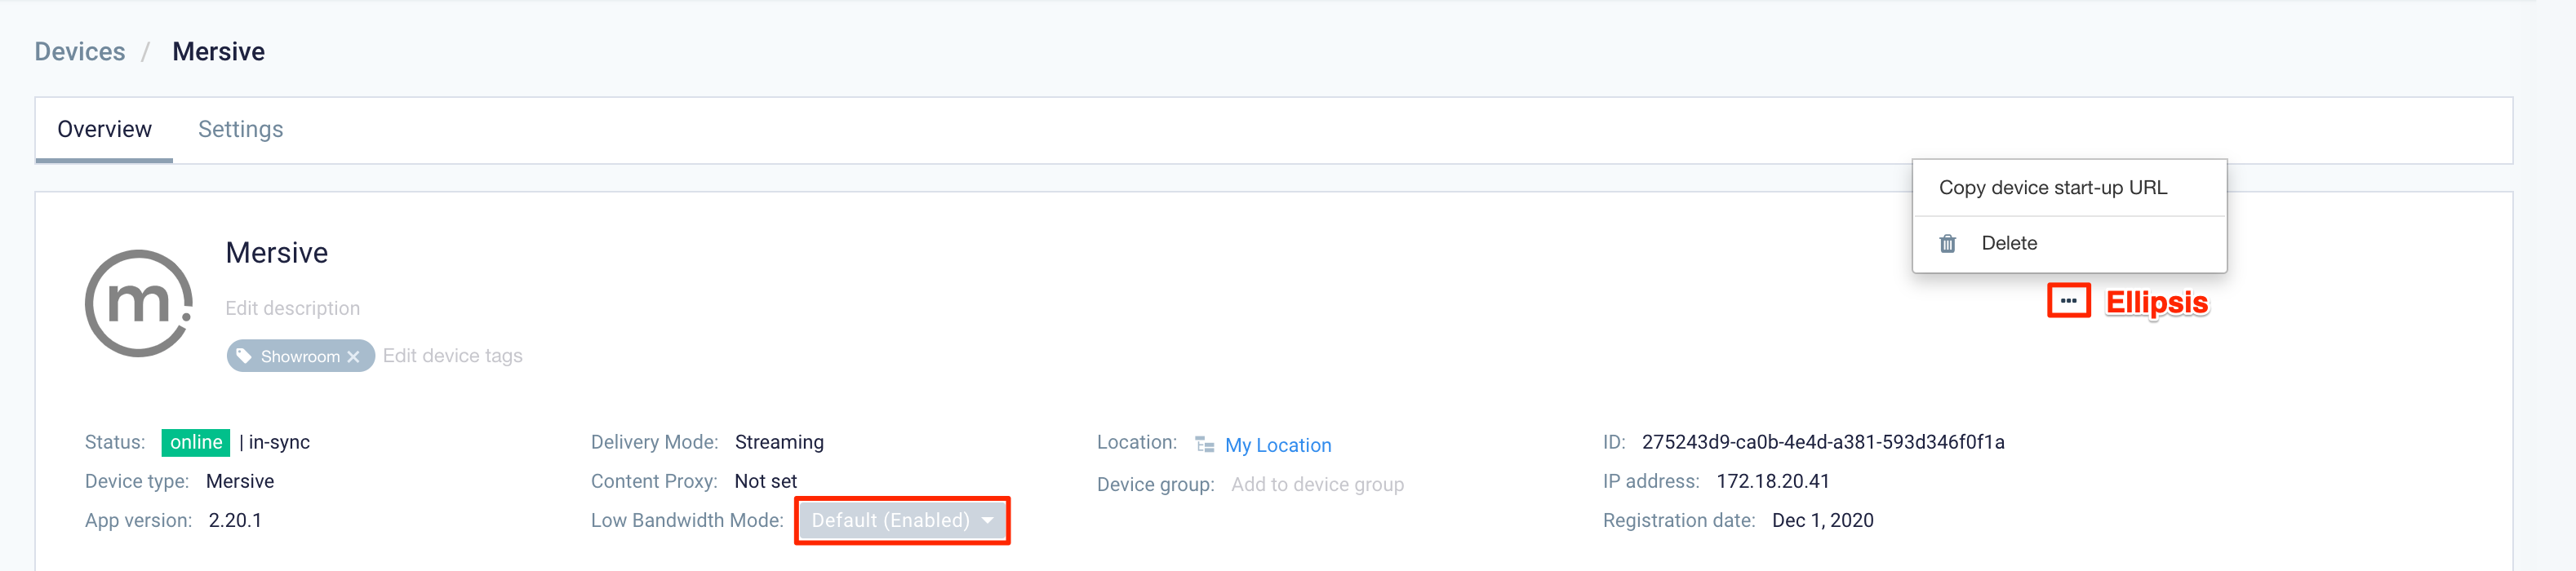
The first section of the Device Overview provides users with device details, and clicking the ellipsis allows you to obtain the device start-up URL that is used to assign pre-registered devices to physical devices. The following device details are displayed:
- Device Name
- Description
- Tags
- Status
- Device Type
- App Version
- Delivery Mode
- Content Proxy
- Low Bandwidth Mode
- Location
- Device Group
- ID
- Registration Date
Edit Device Name, Description, and Tags
The device name, description, and device tags can be easily added or edited by clicking the respective fields, and making the necessary edits.
Configure Low Bandwidth Mode
To help customers optimize bandwidth usage, Appspace automatically enables Low Bandwidth Mode on streaming devices that support video. For more information, please refer to our Low Bandwidth Mode Content Delivery article.
The Low Bandwidth Mode is enabled by default, however, you may choose to disable it:
- On the Devices dashboard, click the desired device name link.
- Select Disable from the Low Bandwidth mode drop-down menu.
Change Device Location
A device is typically added to a location during the device registration process. However, you may choose to change the location as follows:
- On the Devices dashboard, click the desired device name link.
- Click the Location name link, and select the desired location.
Change Device Group
- On the Devices dashboard, click the desired device name link.
- Click the Device group name link, and select the desired device group the device will be assigned to.
Start-up URL for Pre-registering Devices
The device start-up URL allows users to assign pre-registered devices to physical devices running Appspace PWA app on web browsers. It can also be used to view how channels are displayed via your web browser on existing devices.
To pre-register a device, follow the instructions in the Advanced Registration: Preregister Devices with Appspace article.
To obtain the device start-up URL, follow the instructions below:
- On the Devices dashboard, click the pre-registered device name link.
- Click the Ellipses, and select Copy device start-up URL.
- Once done, paste the link on a web browser of the physical device, which will then launch and register the Appspace PWA app.
- The device will start displaying the channels previously assigned to it. If no channels are displayed, proceed to publish channels to the device by following the Publish Content to Devices instructions.
Content Preview
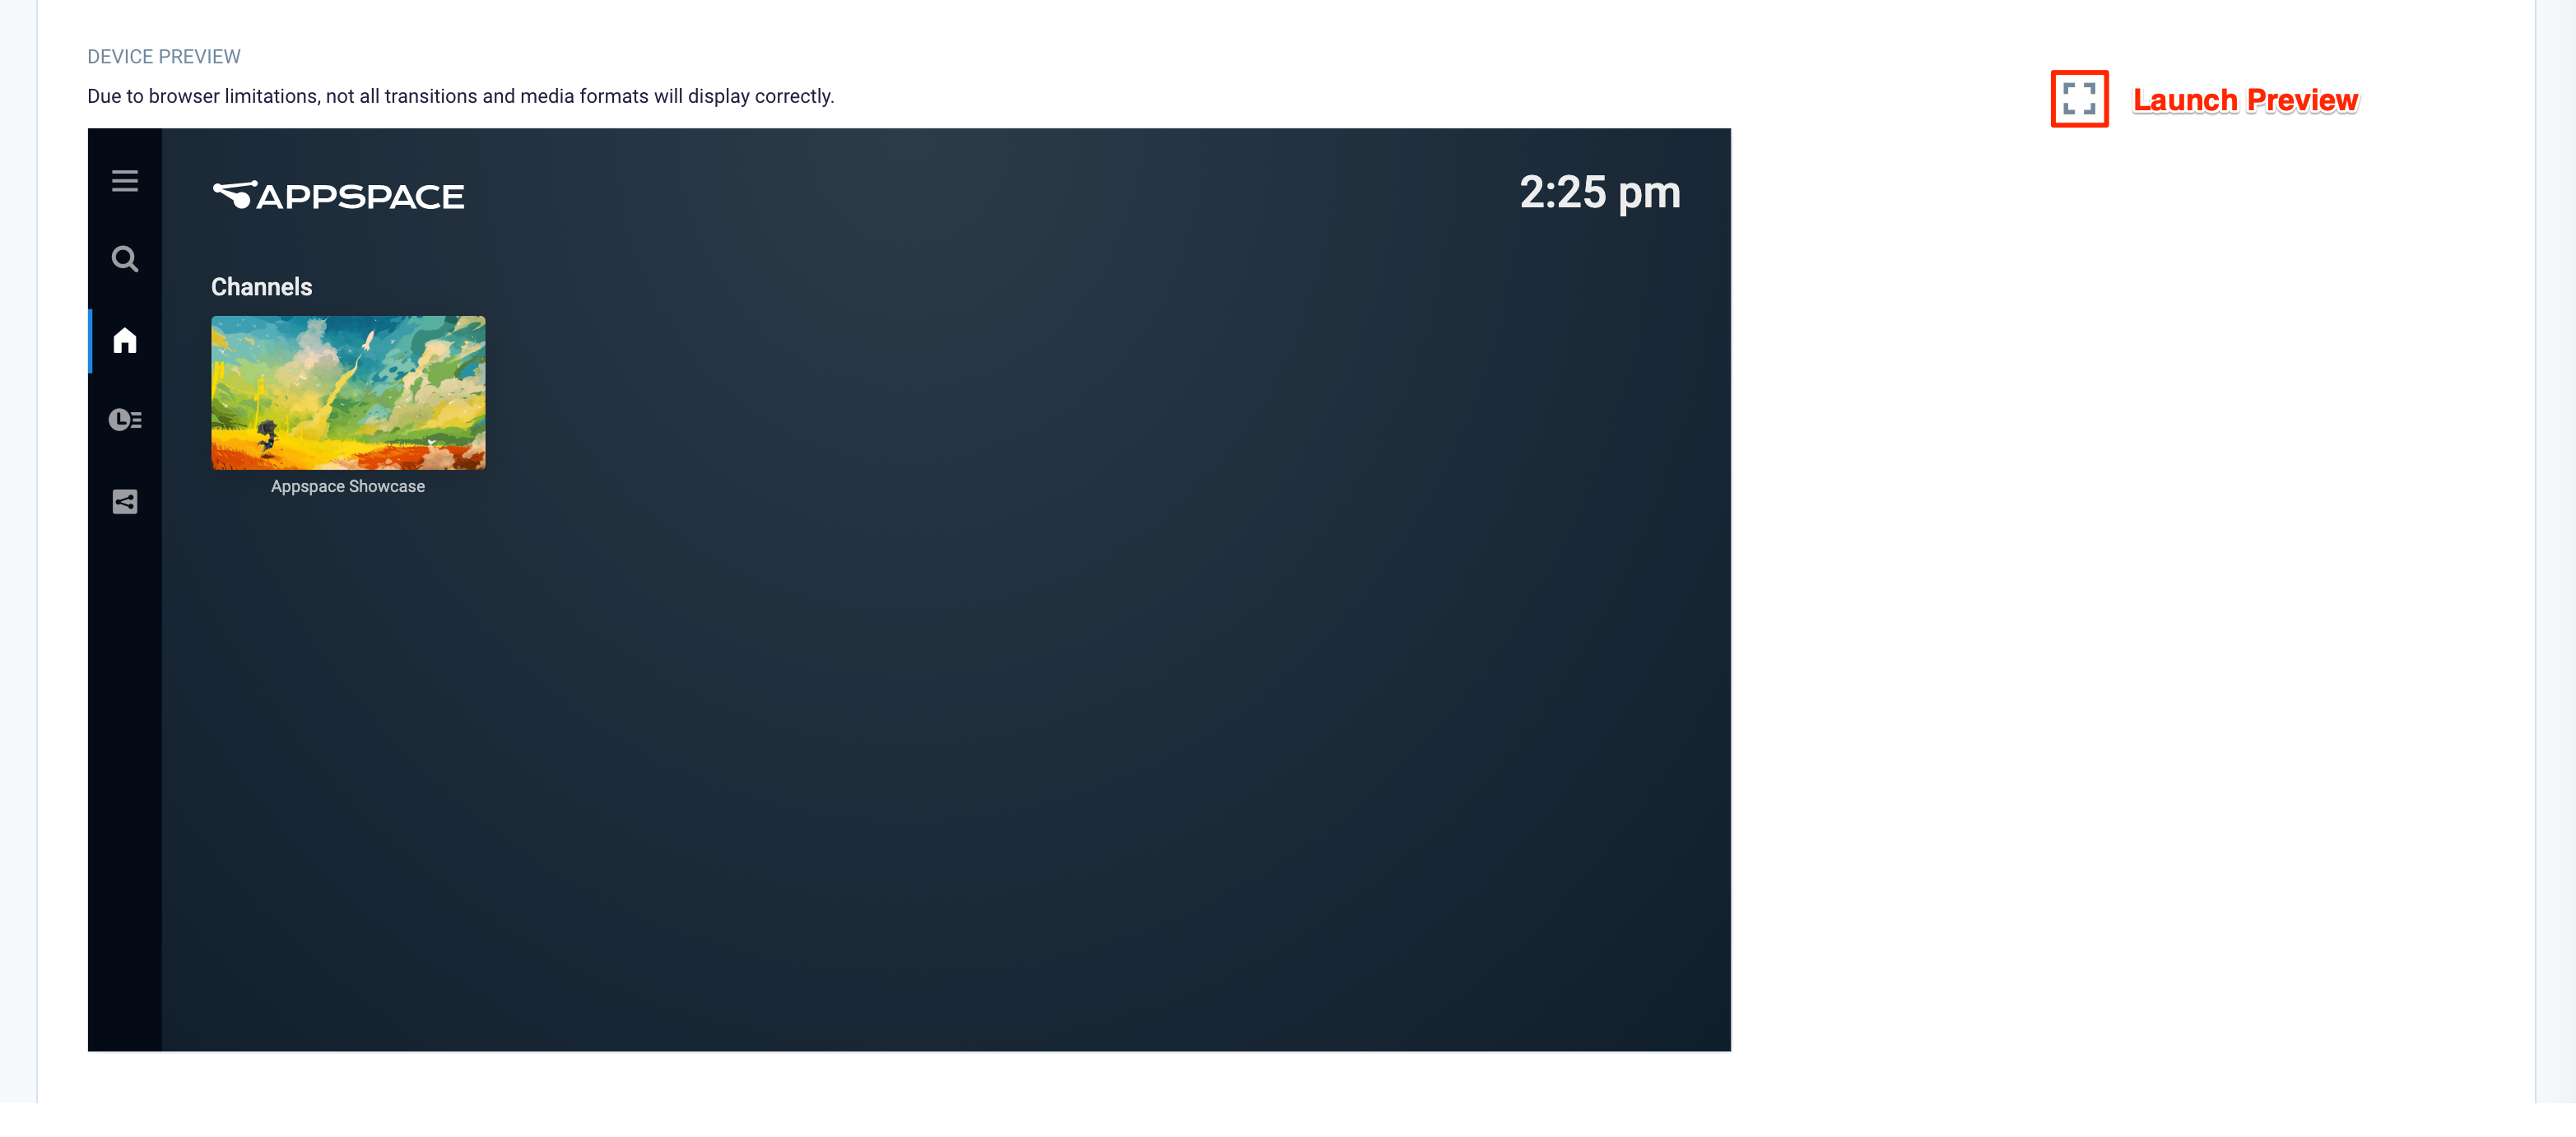
The second section of the Device Overview page displays the device preview, where you can browse and view channels that have been assigned to the device.
You may click the Launch Preview icon to launch the channel on a browser.
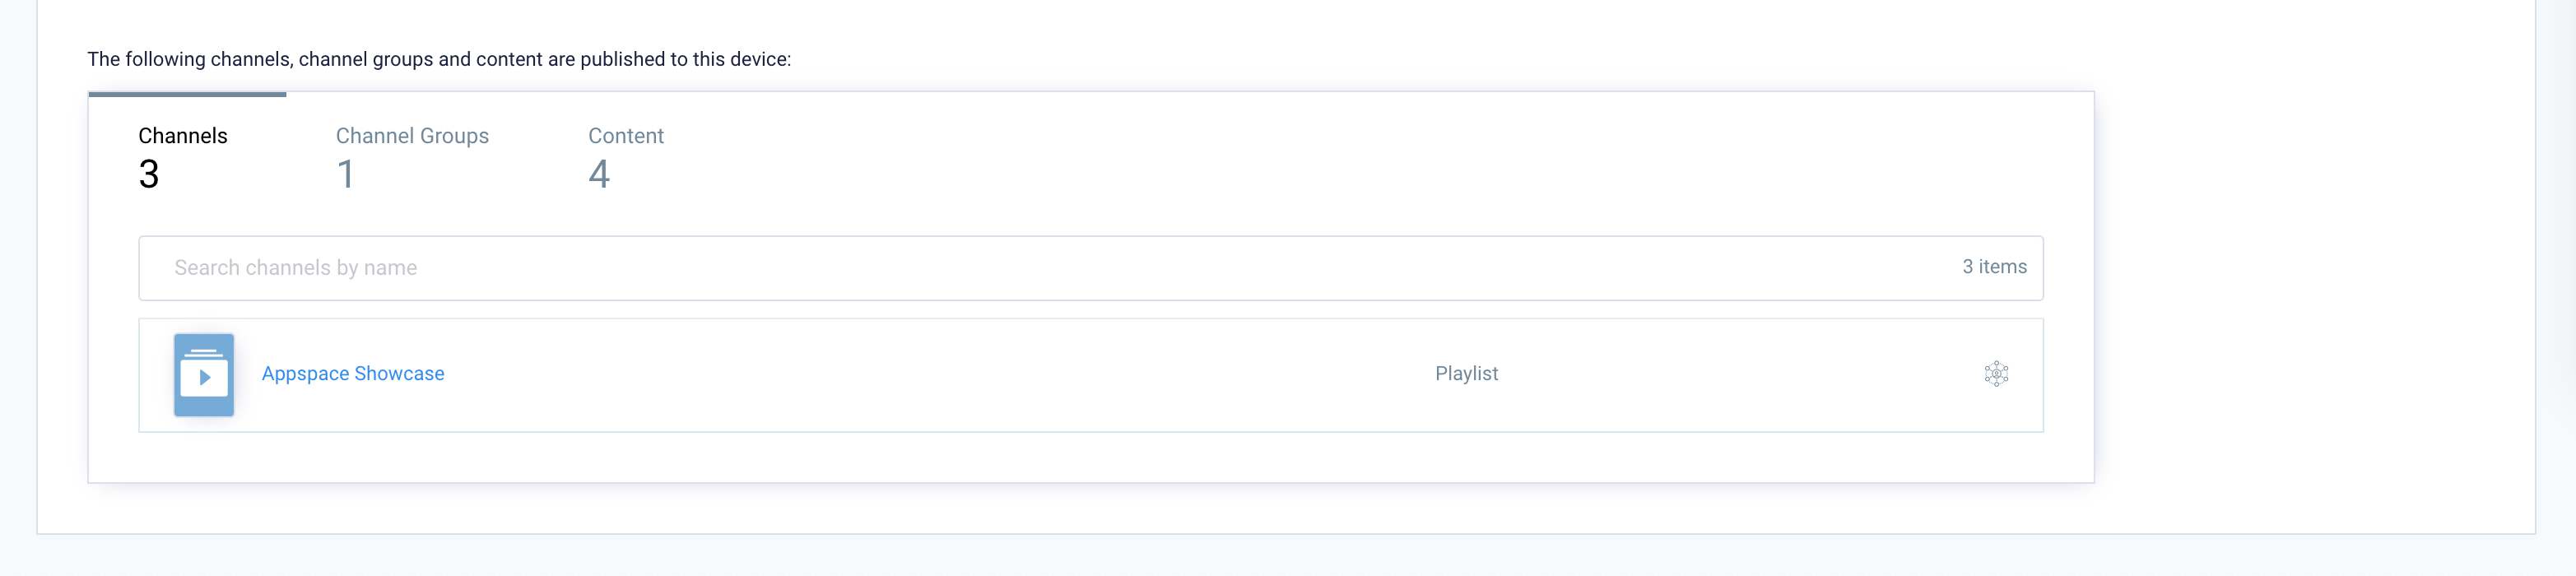
Below the preview section, there is a list of channels, channel groups, and content assigned to the device. Publishers may click on each channel to view the channel details.
Device Settings
The Settings tab contains both the Configuration and Device Properties sub-tabs that allow administrators to perform various device configurations and manage device properties.
To access the Settings tab, click the device name link of the selected device from the Devices dashboard. From here, the Configuration and Device Properties sub-tabs are located within the left-side panel.
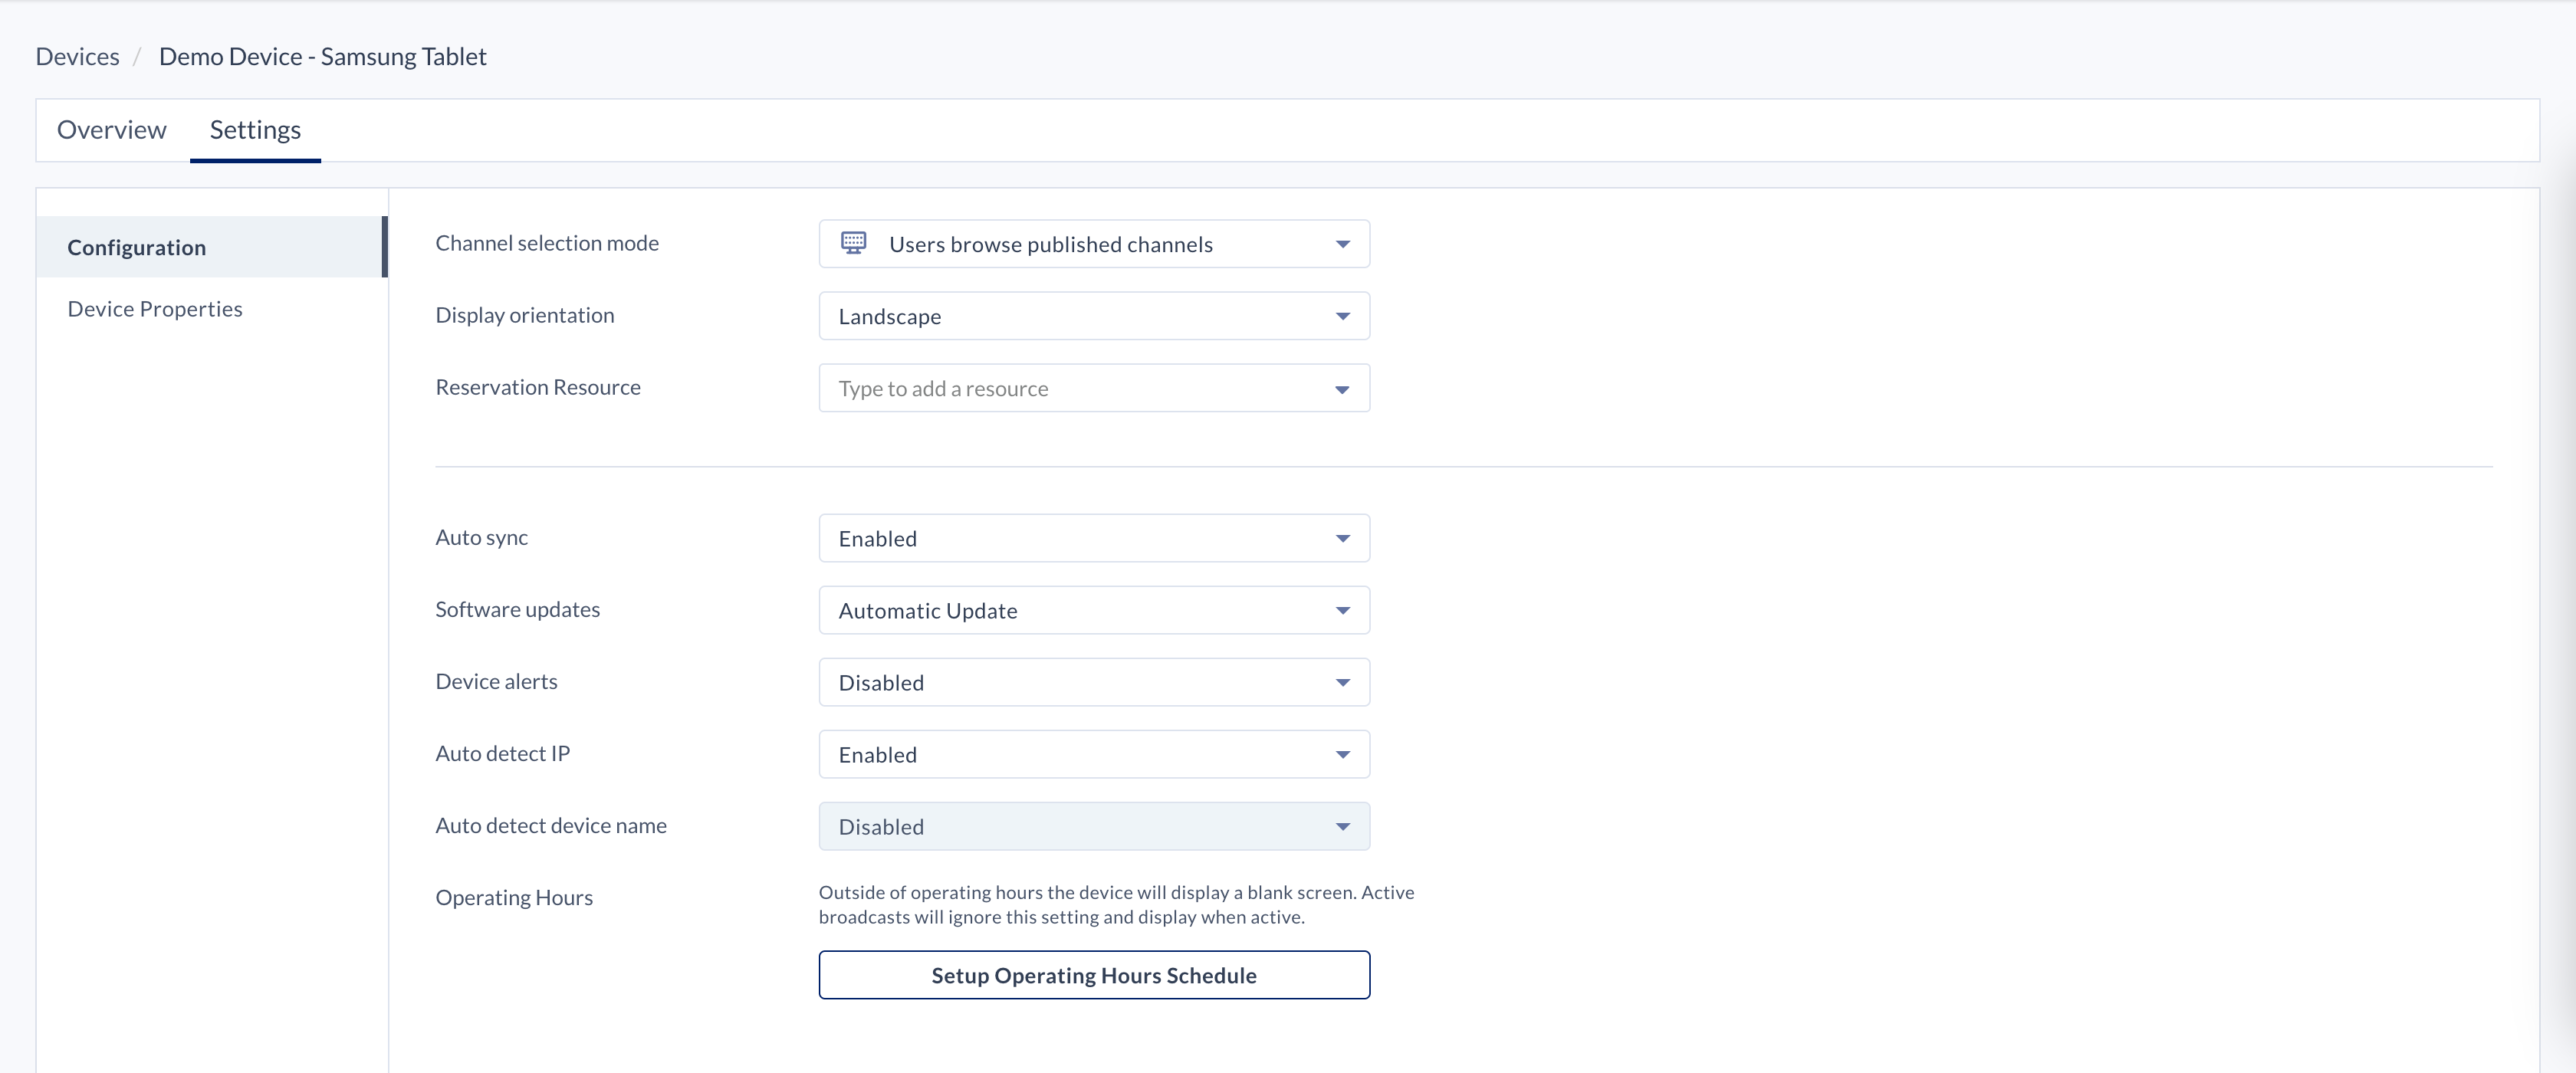
Configuration
The Configuration sub-tab here allows device configurations focused on display and firmware updates.
Configure Channel Selection Mode
The Channel Selection Mode configuration refers to the channel playback option for a device and allows administrators to change channel selection even after it has been set or skipped during the device registration process.
For detailed instructions, please refer to the Assign Channel to Devices article.
Configure Display Orientation
The Display Orientation configuration allows administrators to configure the display orientation of the device during playback.
- Log in to your Appspace console.
- Navigate to Devices from the Appspace menu.
- Click the desired device name link from the Devices dashboard.
- Click the Settings > Configuration tabs, and select the orientation of the device from the Display Orientation drop-down menu:
- Landscape (default)
- Portrait
- Inverse Landscape
- Inverse Portrait
- Click Save once done.
Configure Reservation Resource
The Reservation Resource configuration allows administrators to assign the device to a reservation resource for the Room Schedule card to utilize.
- Log in to your Appspace console.
- Navigate to Devices from the Appspace menu.
- Click the desired device name link from the Devices dashboard.
- Click the Settings > Configuration tabs, and select the Room Schedule card resource assigned to the device from the Reservation Resource drop-down menu.
- Click Save once done.
Configure Auto Sync Settings (Schedule Sync Mode)
By default, Appspace App devices regularly communicate with the Appspace server every minute in order to check for content updates. However, administrators that wish to converse bandwidth or limit network bandwidth to off-peak hours have the option to disable, and manually configure the device sync schedule to when the device should perform synchronization and content updates.
- Log in to your Appspace console.
- Navigate to Devices from the Appspace menu.
- Click the desired device name link from the Devices dashboard.
- Click the Settings > Configuration tabs, and select Disabled from the Auto Sync drop-down menu.
- Enabled (default)
- Disabled
- Select the sync frequency from the Frequency drop-down menu, and determine the duration for when the device synchronization begins and ends in the Between drop-down menu.

NoteThe time values configured follow the device’s local time. - Click Save once done.
- Navigate back to the Devices dashboard, and check the device’s checkbox.
- Click the Sync Now button, and click Yes to confirm.
Note
- Only devices in Scheduled Sync mode with assigned channels will be synced.
- The device will remain Out Of Sync, should there be any changes to the channel (intentional or unintentional)
- External content or feeds (RSS) will cause the device to be Out Of Sync, till the next sync cycle. You would need to click the Sync Now button to update the device with the latest content.
Configure Software Updates
- Log in to your Appspace console.
- Navigate to Devices from the Appspace menu.
- Click the desired device name link from the Devices dashboard.
- Click the Settings > Configuration tabs, and select Manual Update from the Software Updates drop-down menu.
- Automatic Update (default)
- Manual Update
- Click Save once done.
Configure Device Alerts / Notifications
- Log in to your Appspace console.
- Navigate to Devices from the Appspace menu.
- Click the desired device name link from the Devices dashboard.
- Click the Settings > Configuration tabs, and select Enabled from the Device Alerts drop-down menu.
- Disabled (default)
- Enabled
- Select the notification frequency from the Frequency drop-down menu, and determine the duration for when the device notification begins and ends in the Between drop-down menu.
NoteThe time values configured follow the device’s local time.
- Click Save once done.
Configure Auto Detect IP / Device IP
- Log in to your Appspace console.
- Navigate to Devices from the Appspace menu.
- Click the desired device name link from the Devices dashboard.
- Click the Settings > Configuration tabs, and select Disabled from the Auto Detect IP drop-down menu to manually configure the device IP address.
- Enabled (default)
- Disabled
- Proceed to enter the device IP address in the IP Address field.
- Click Save once done.
Configure Auto Detect Device Name
- Log in to your Appspace console.
- Navigate to Devices from the Appspace menu.
- Click the desired device name link from the Devices dashboard.
- Click the Settings > Configuration tabs, and select Enabled from the Auto Detect Device Name drop-down menu to manually configure the device name.
- Disabled (default)
- Enabled
- Proceed to enter the device name in the Device Name field.
- Click Save once done.
Configure Device Operating Hours
- Log in to your Appspace console.
- Navigate to Devices from the Appspace menu.
- Click the desired device name link from the Devices dashboard.
- Click the Settings > Configuration tabs, and click the Setup Operating Hours Schedule button.
- In the Edit Operating Hours Schedule window, proceed to schedule the operating hours of the device by selecting the time slots indicated for the respective days. Each time slot duration can be set to a minimum of a minute to a maximum of an hour.
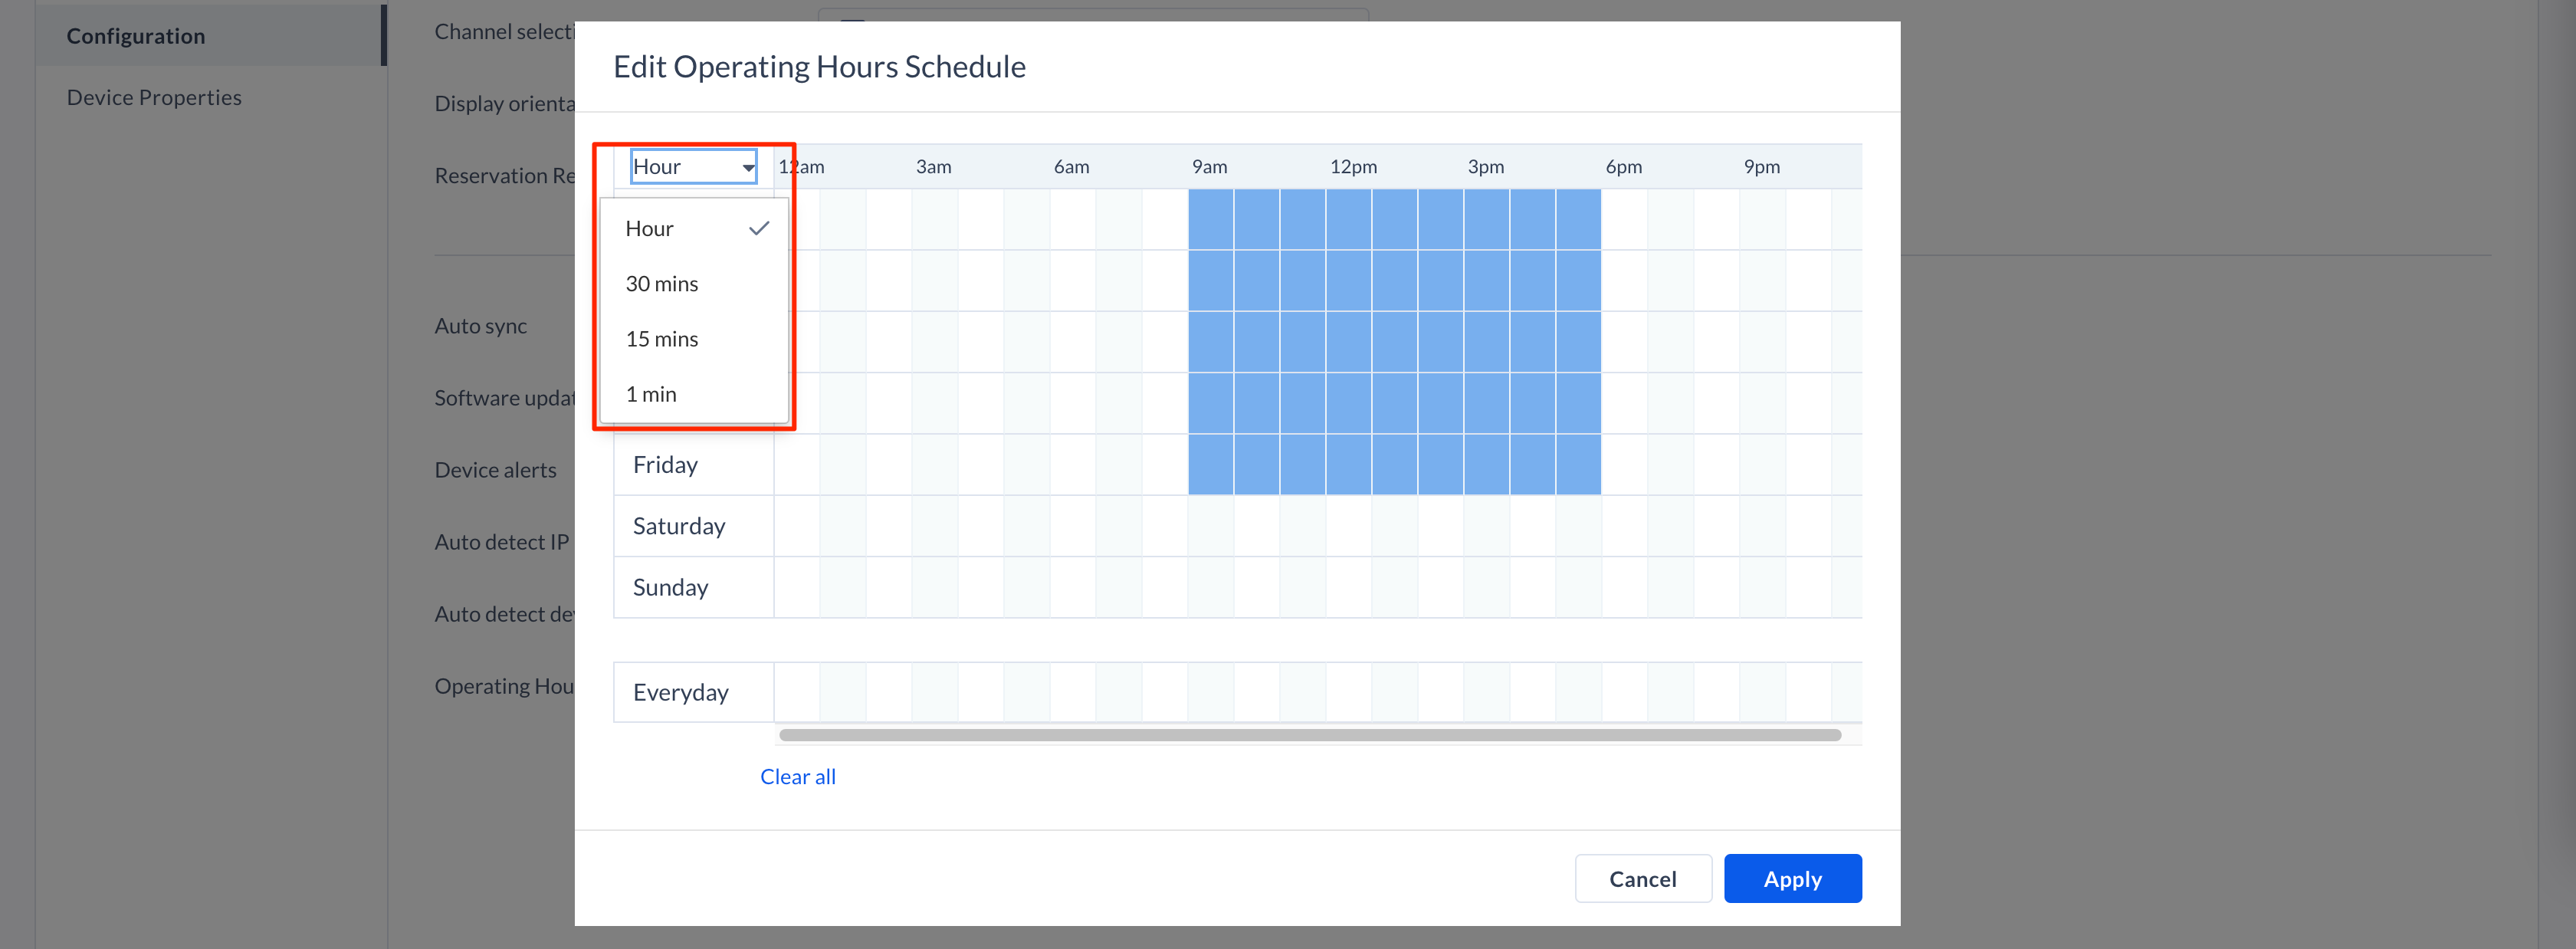
NoteOutside of operating hours the device will display a blank screen. Active broadcasts will ignore this setting and display when active. - Click Apply once done, and click Save.
Device Properties
The Device Properties sub-tab here allows for non-visual settings to be configured directly to your device locally. These properties include numerous device configurations and settings such as device display rotation and kiosk mode. Administrators may also define custom device properties to be used in Event Actions in Advanced Channels (Sign).
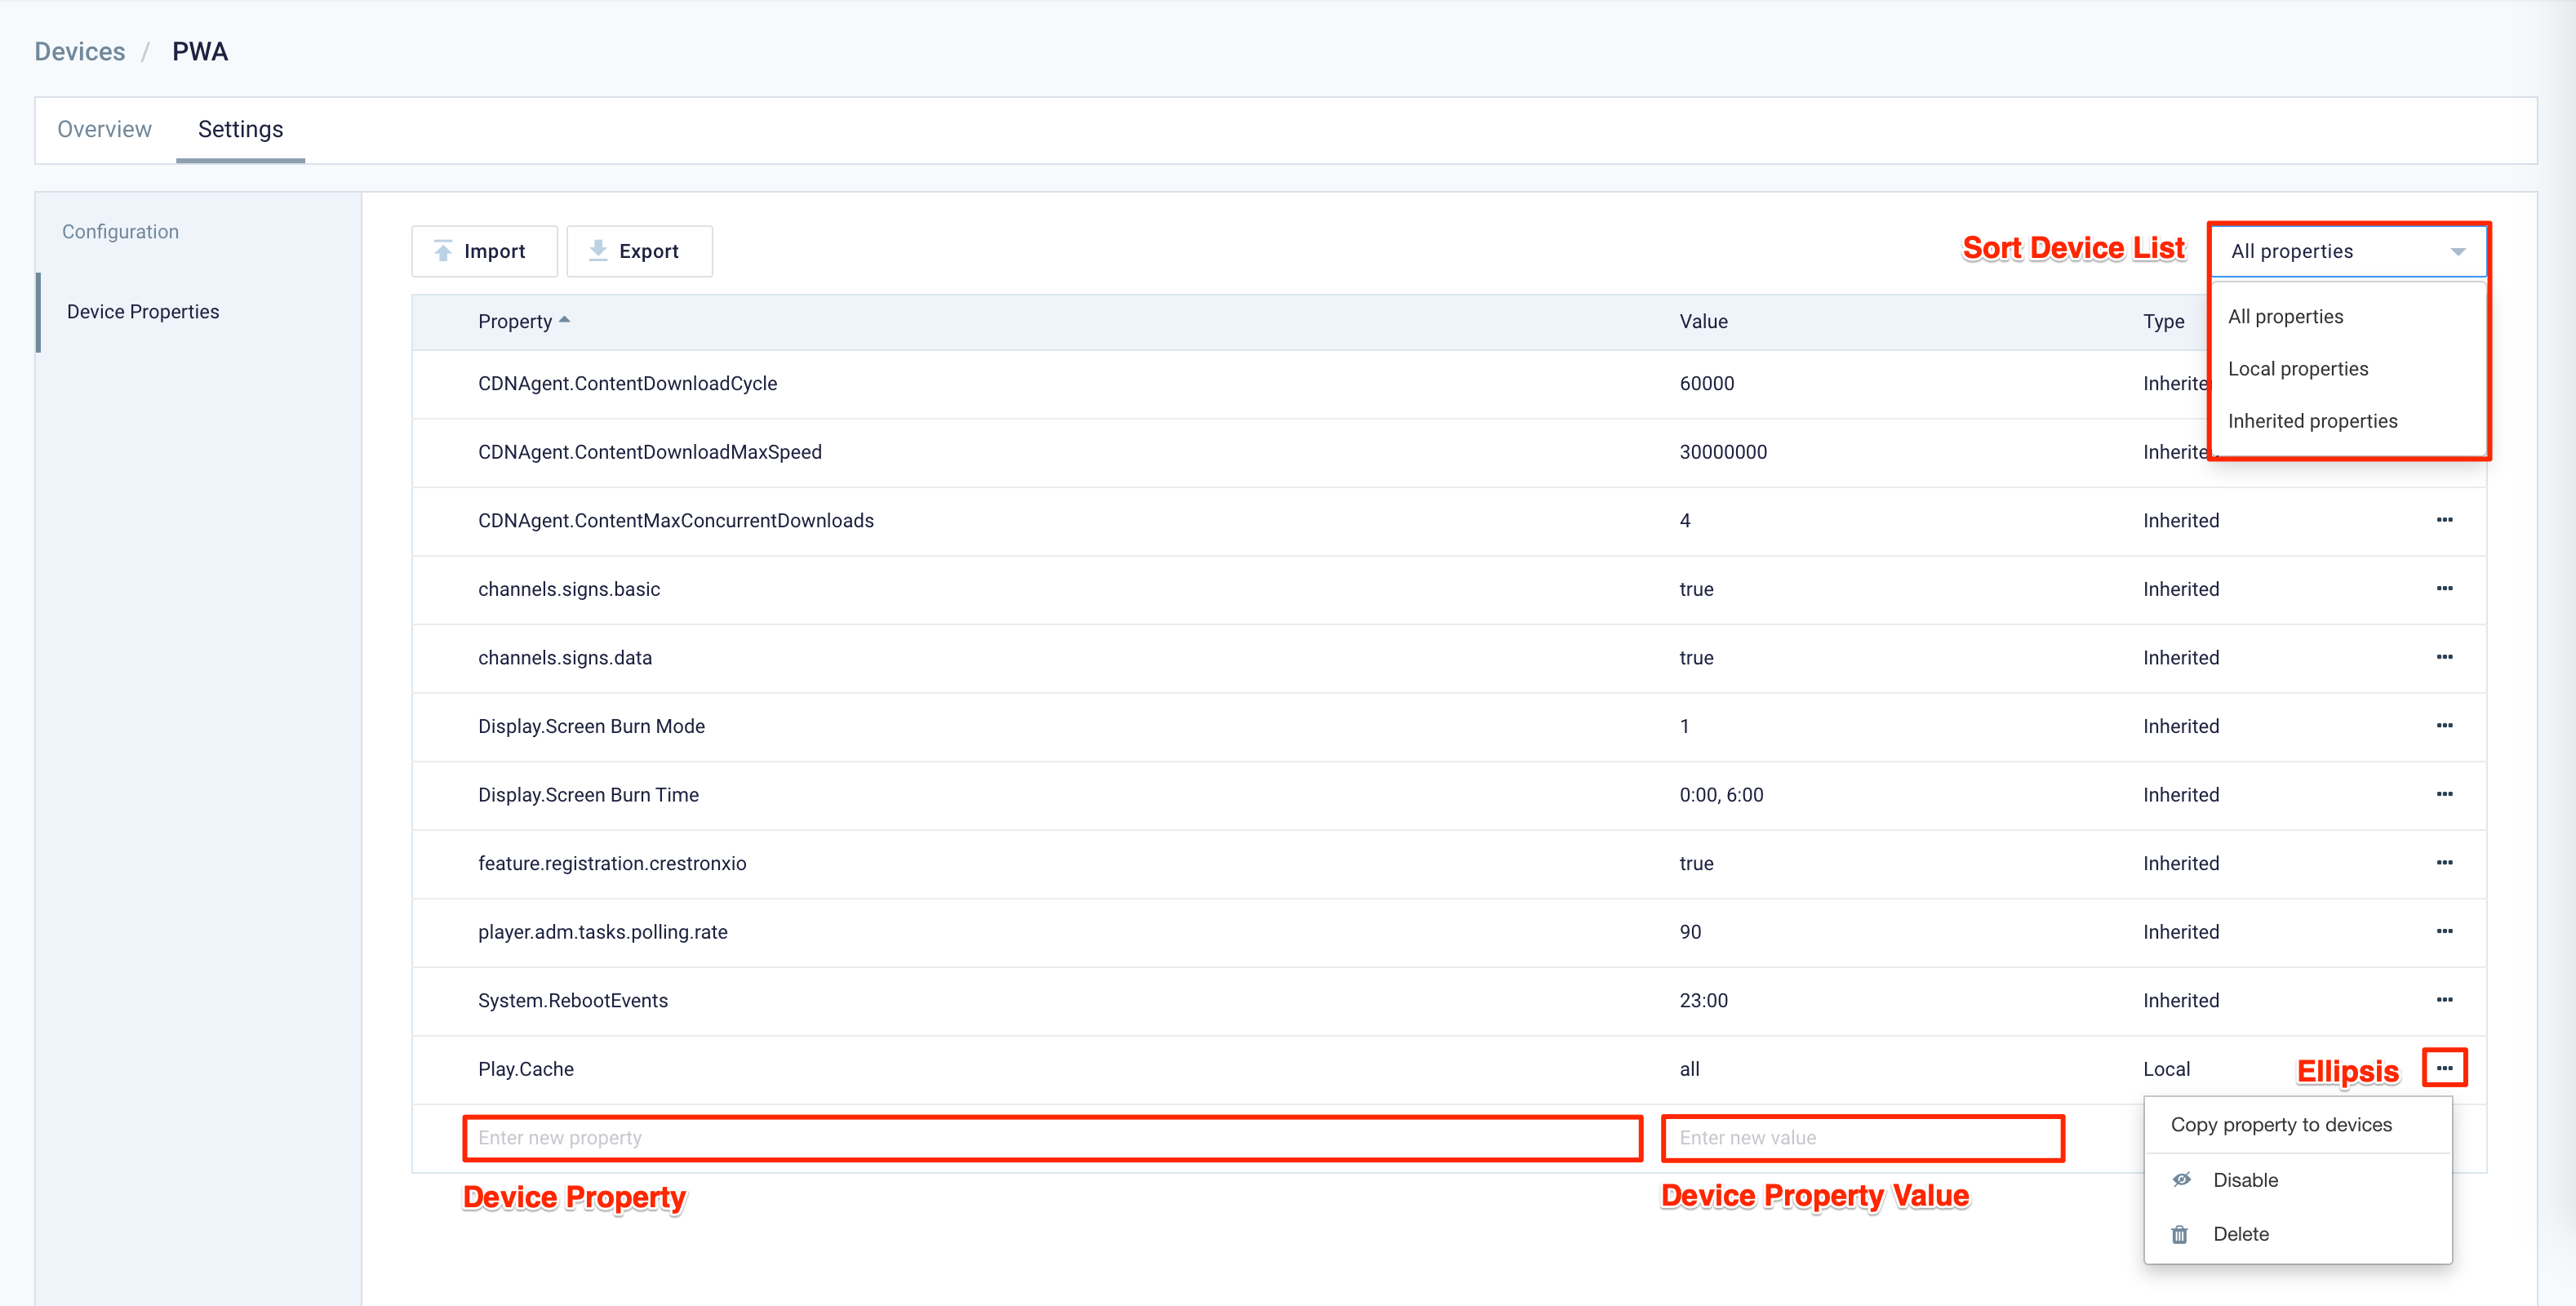
The Device Properties dashboard displays the following columns:
- Property – Displays the device property.
- Value – Displays the device property value.
- Type:
- Inherited – This device property is inherited by the system or location, and is applied to all devices. Inherited device properties can’t be disabled or deleted from the device. However, if the device property is inherited from a location, it can be disabled or deleted directly from the location.
- Local – Any device property that been added to only affect the selected device. Local device properties can be disabled or deleted from this page.