Introducing the all-new Reports feature within the Appspace 8.1 platform delivering operational and behavioral data organizations require to make informed decisions and optimize the workplace experience to enhance efficiency and user satisfaction across the Appspace platform.
Reports provide a wealth of benefits to organizations, including the following key advantages:
- Monitor device trends to adapt to your evolving technology landscape – Stay ahead of the curve by tracking device usage patterns, ensuring your Appspace deployment aligns with your team’s evolving technology preferences.
This article provides Administrators with instructions to create (generate) and schedule reports based on the Devices report templates available in Analytics.
Prerequisites
- An Account Owner or Locations Admin role, assigned with a Platform user license.
- Optional – Enterprise Messaging has been configured for notifications.
Create and Schedule Devices Reports
- Log in to your Appspace console.
- Click the ☰ Appspace menu, and select Analytics from the menu.
- Click the Reports tab, and click the + Create button.
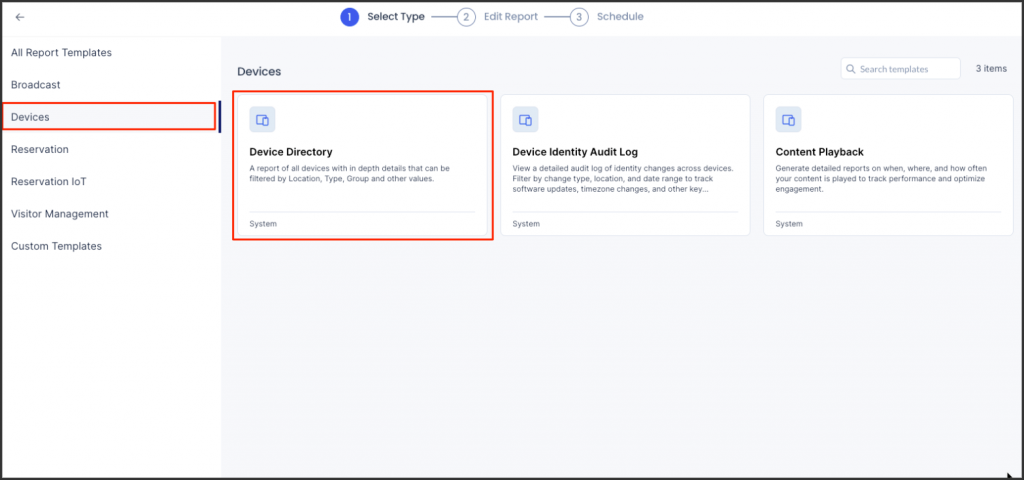
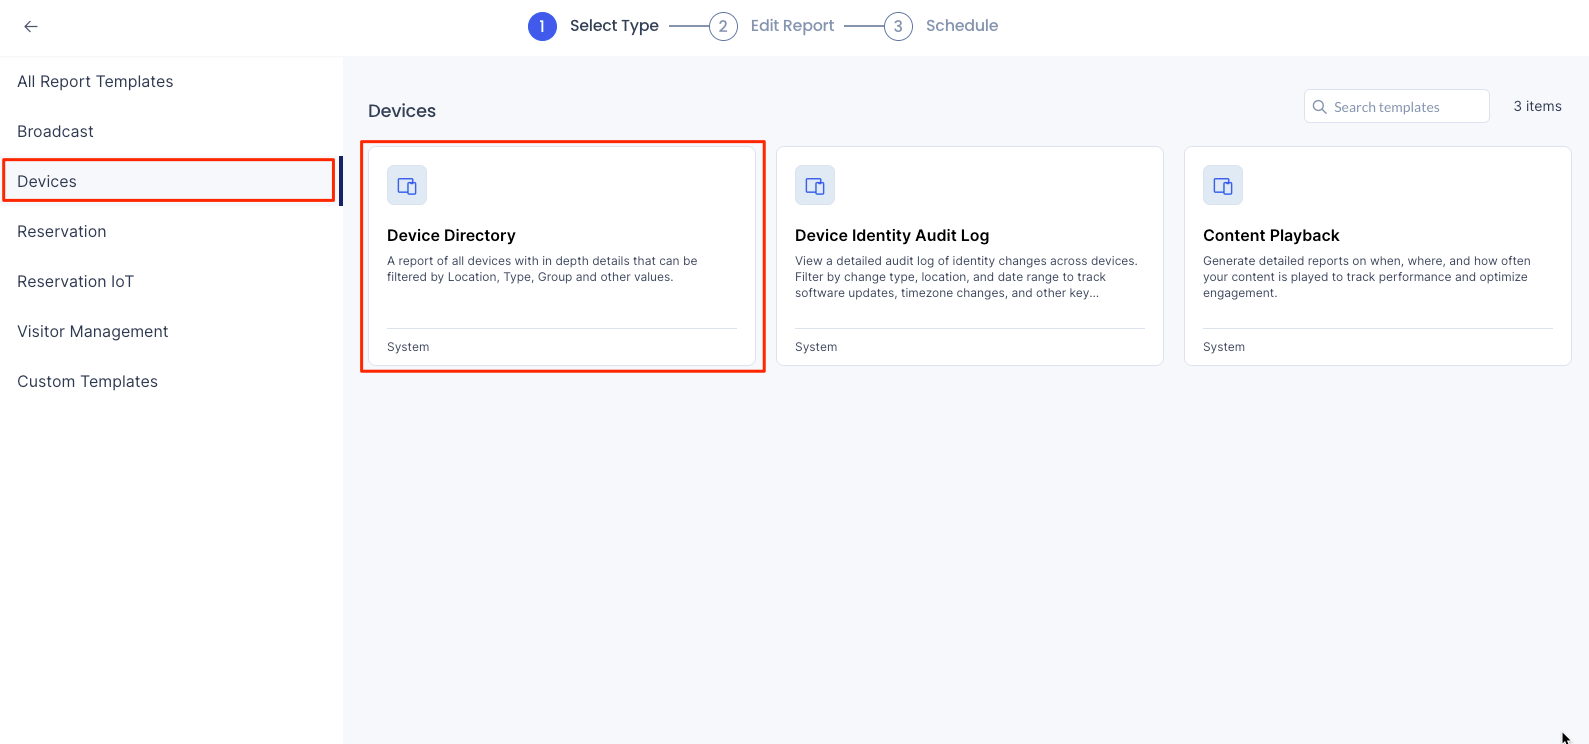
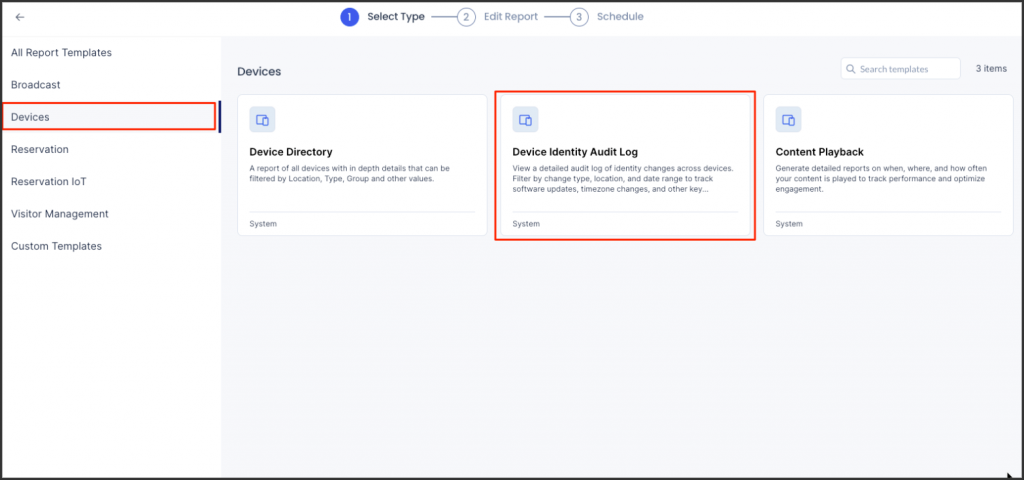
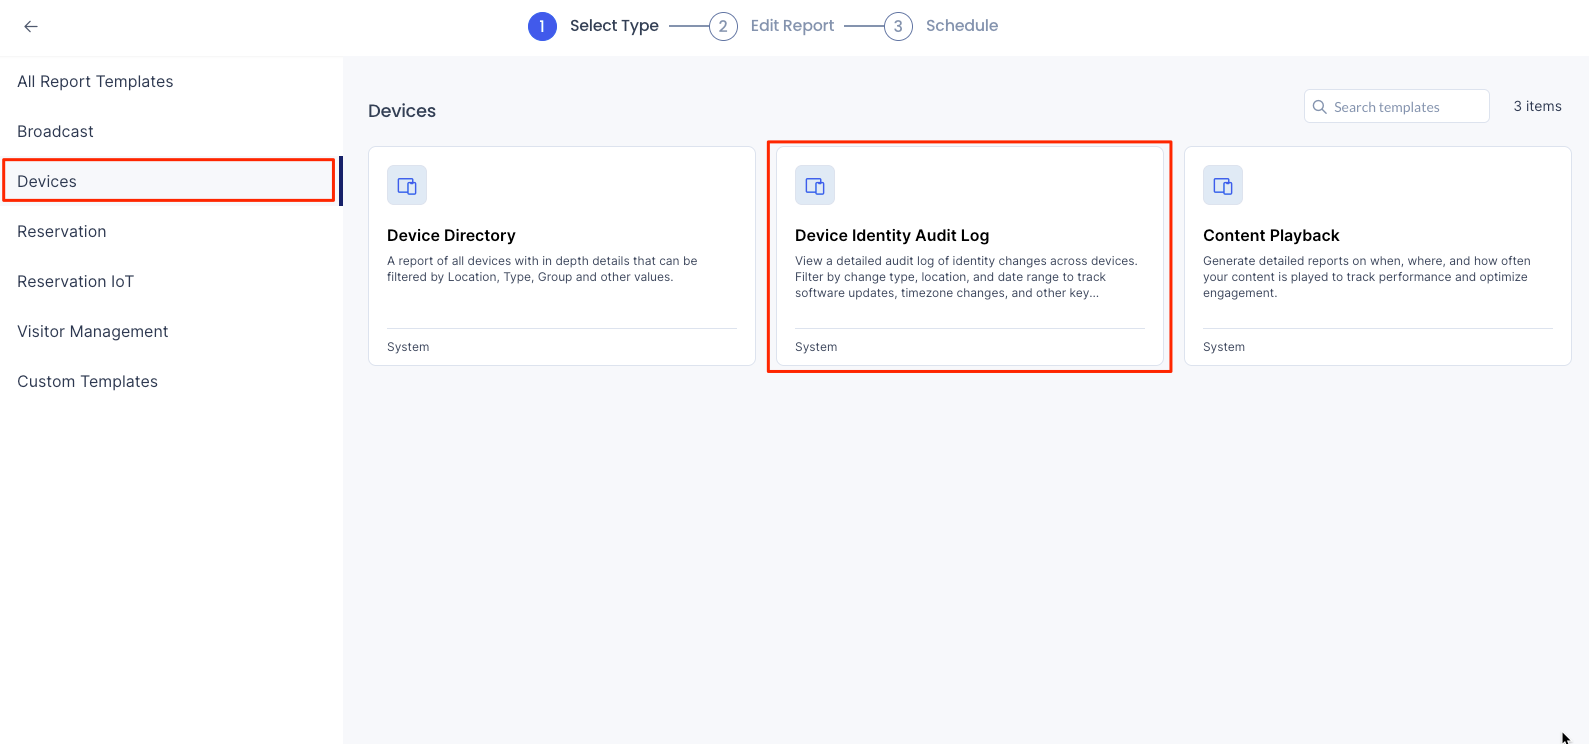
- In the Select Type step, search and select the desired Devices Report Template available.
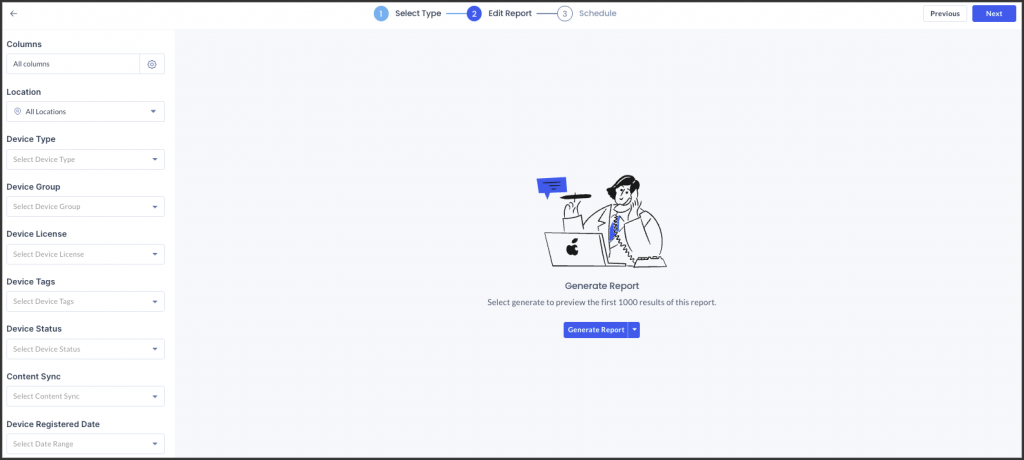
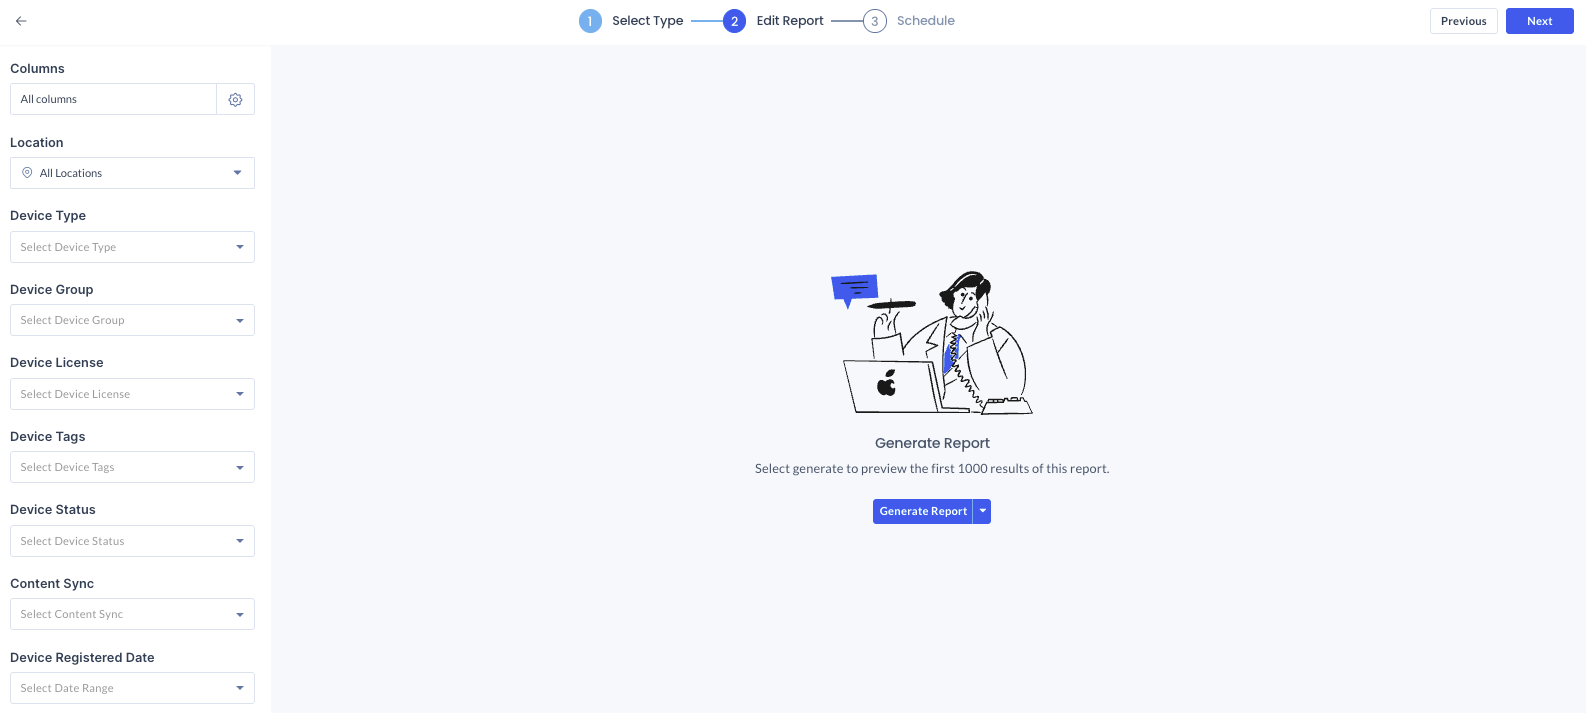
- In the Edit Report step, proceed to configure the following reporting fields from the drop-down based on the Devices report template selected:
- Device Directory
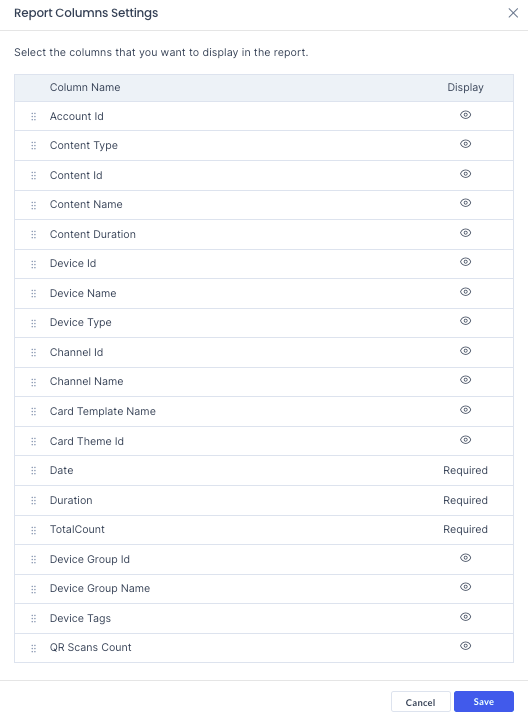
- Columns – All Columns (Default) or customize the columns generated in the report.
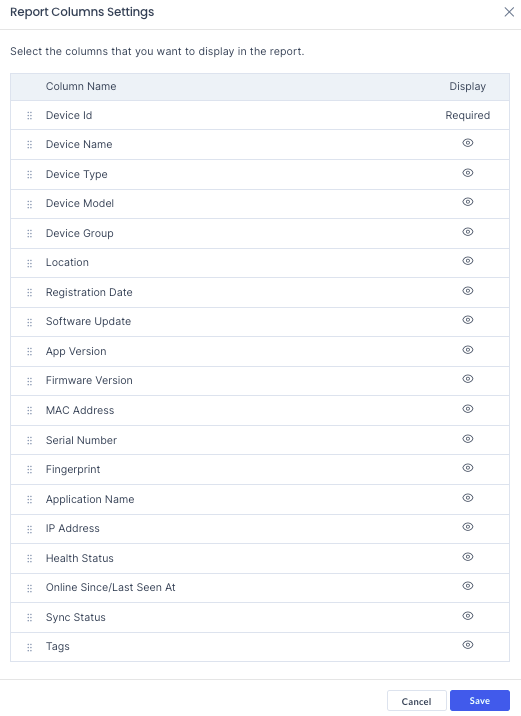
- Customize Columns – Click the ⚙ Gear icon to customize, and select the fields you wish to include, exclude, or rearrange the order of the fields for a customized report format. Once done, click Save.
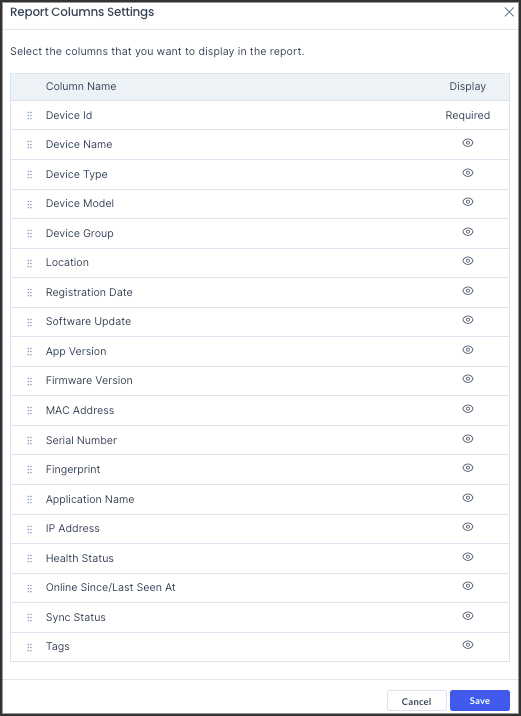
- Customize Columns – Click the ⚙ Gear icon to customize, and select the fields you wish to include, exclude, or rearrange the order of the fields for a customized report format. Once done, click Save.
- Location – All Locations (Default), or select the location of the devices.
- Device Type – All Devices (Default), or select the specific device type.
- Device Group – Select the device group.
- Device License – Select the device license.
- Device Tags – Choose the device tags.
- Device Status – Select the device status.
- Content Sync – Select the content sync.
- Device Registered – Select Date range.
- Columns – All Columns (Default) or customize the columns generated in the report.
- Device Directory
- Once configured, click the Generate Report button to generate a preview of the first 1000 results, or Download the Full Report by clicking the drop-down arrow. The generated report (in .xlsx format) will be automatically downloaded to your default download folder. Alternatively, you may also download the full report in preview mode.
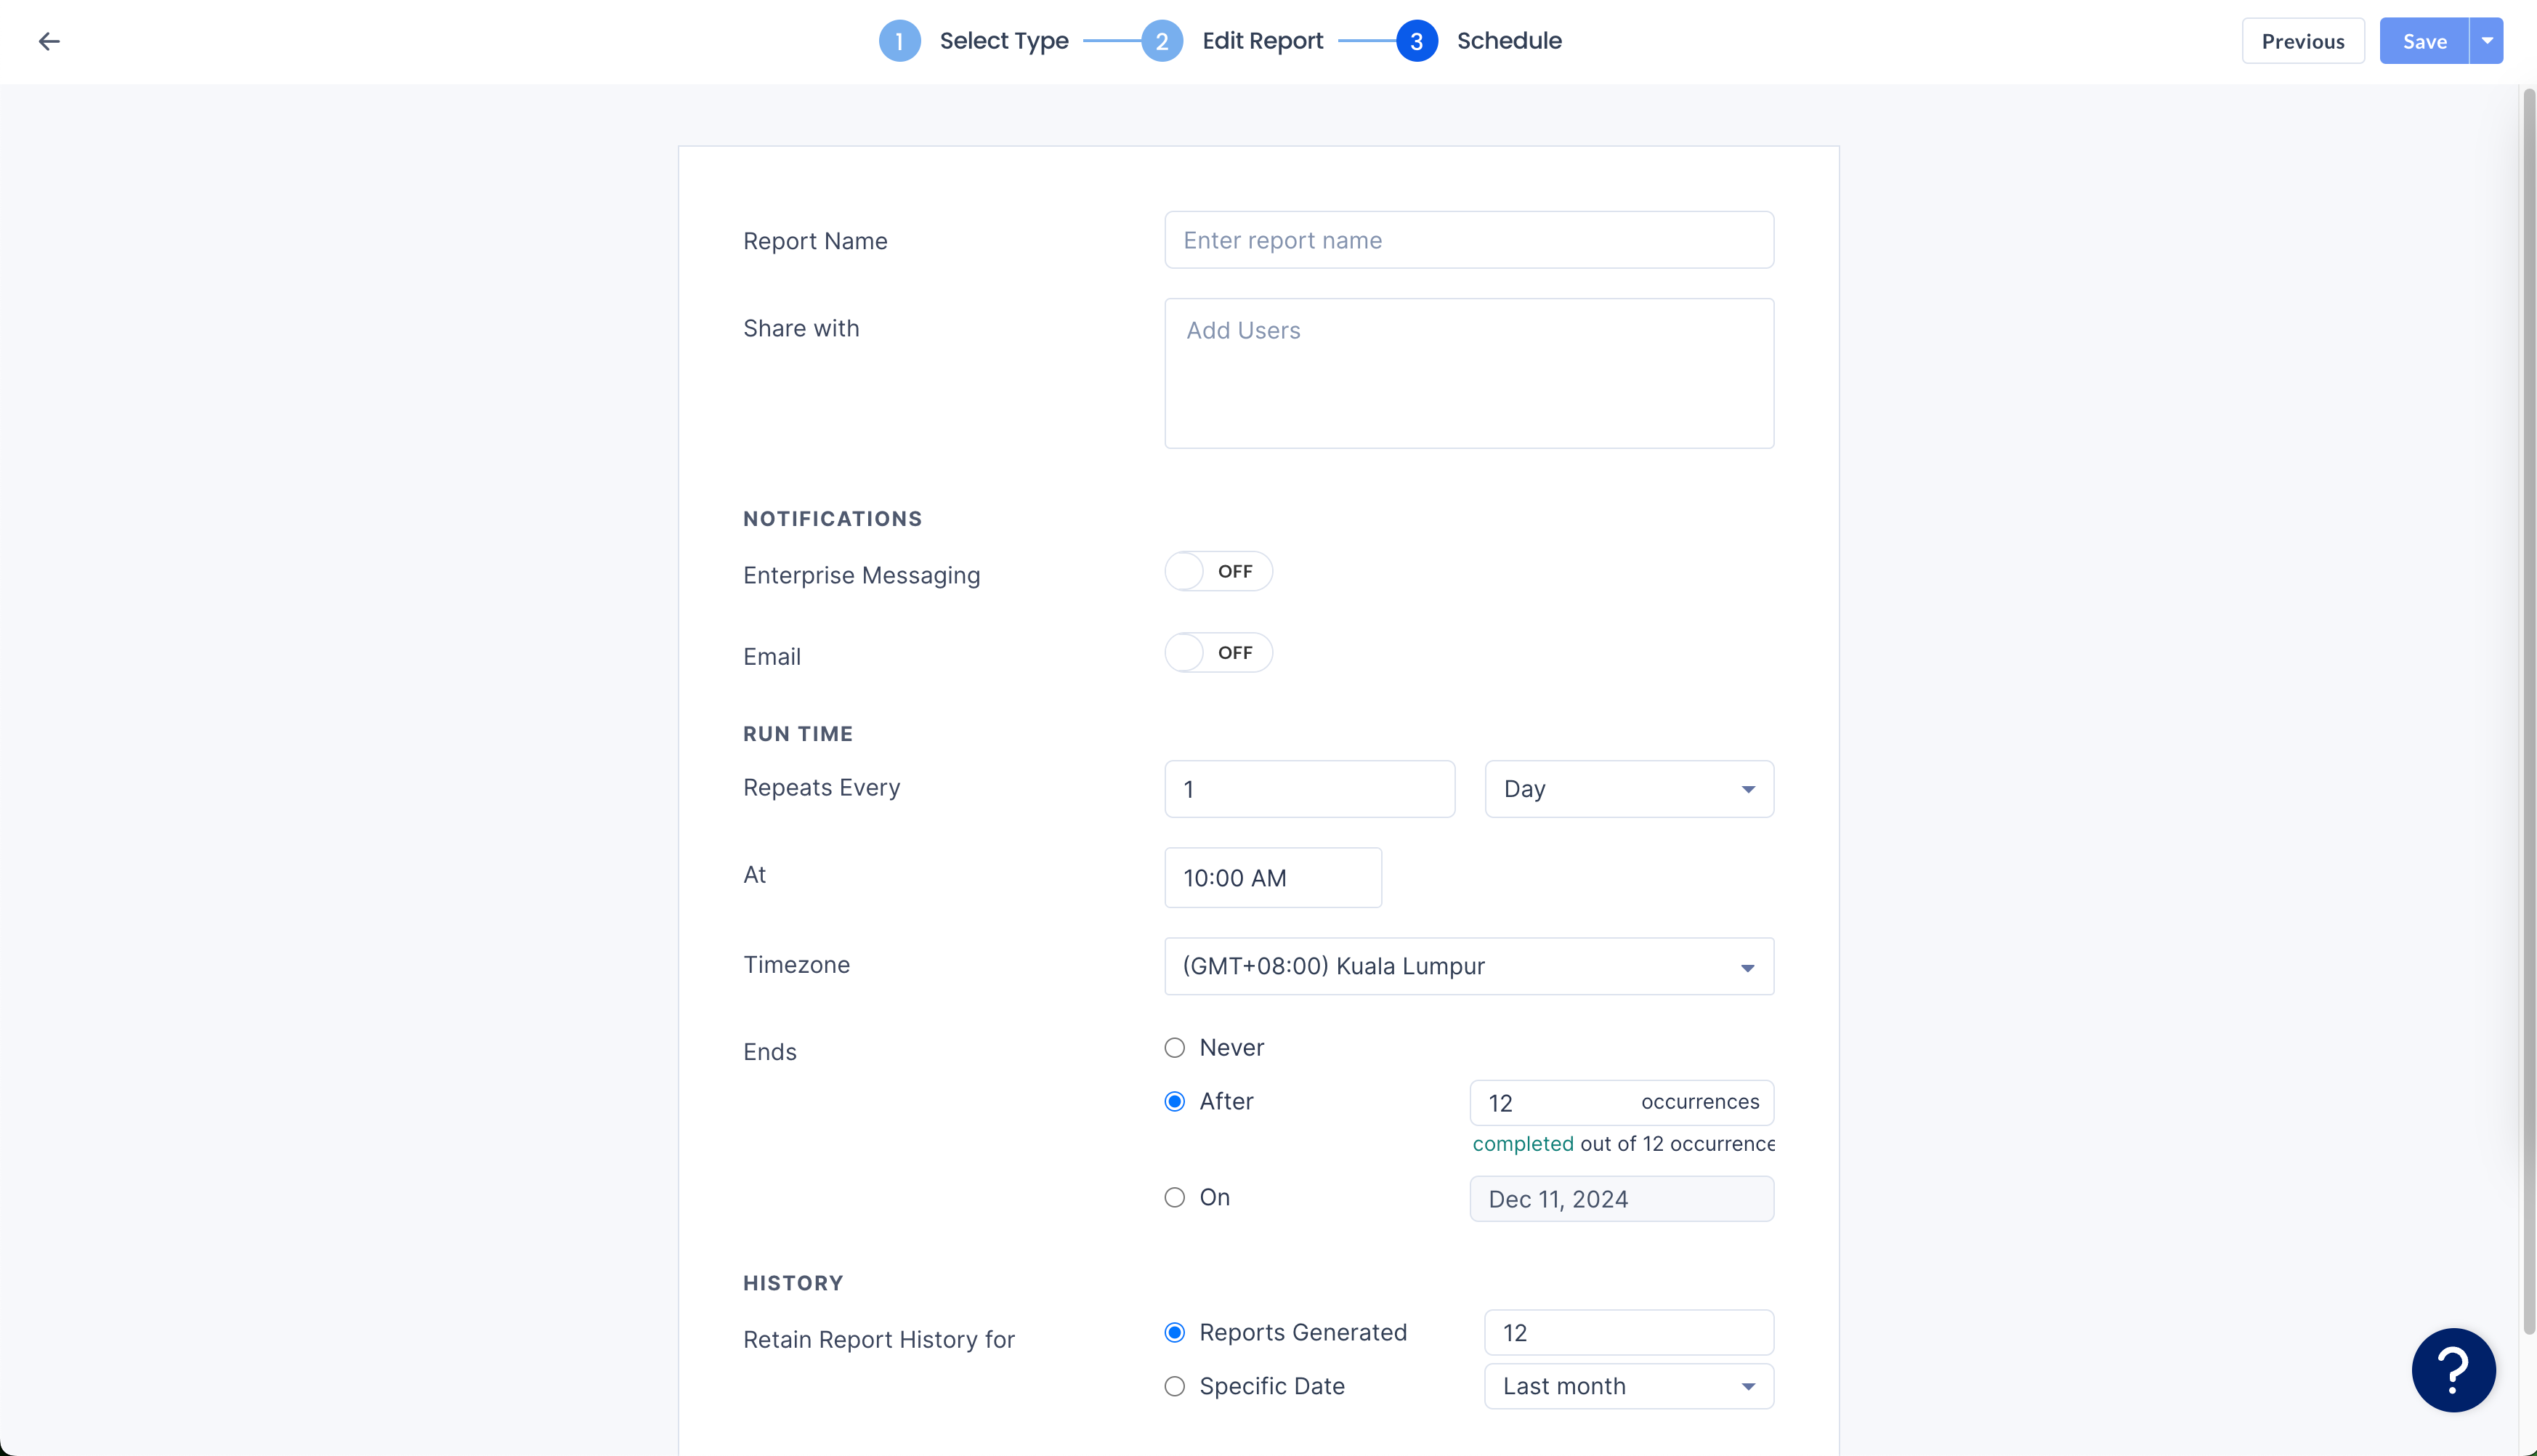
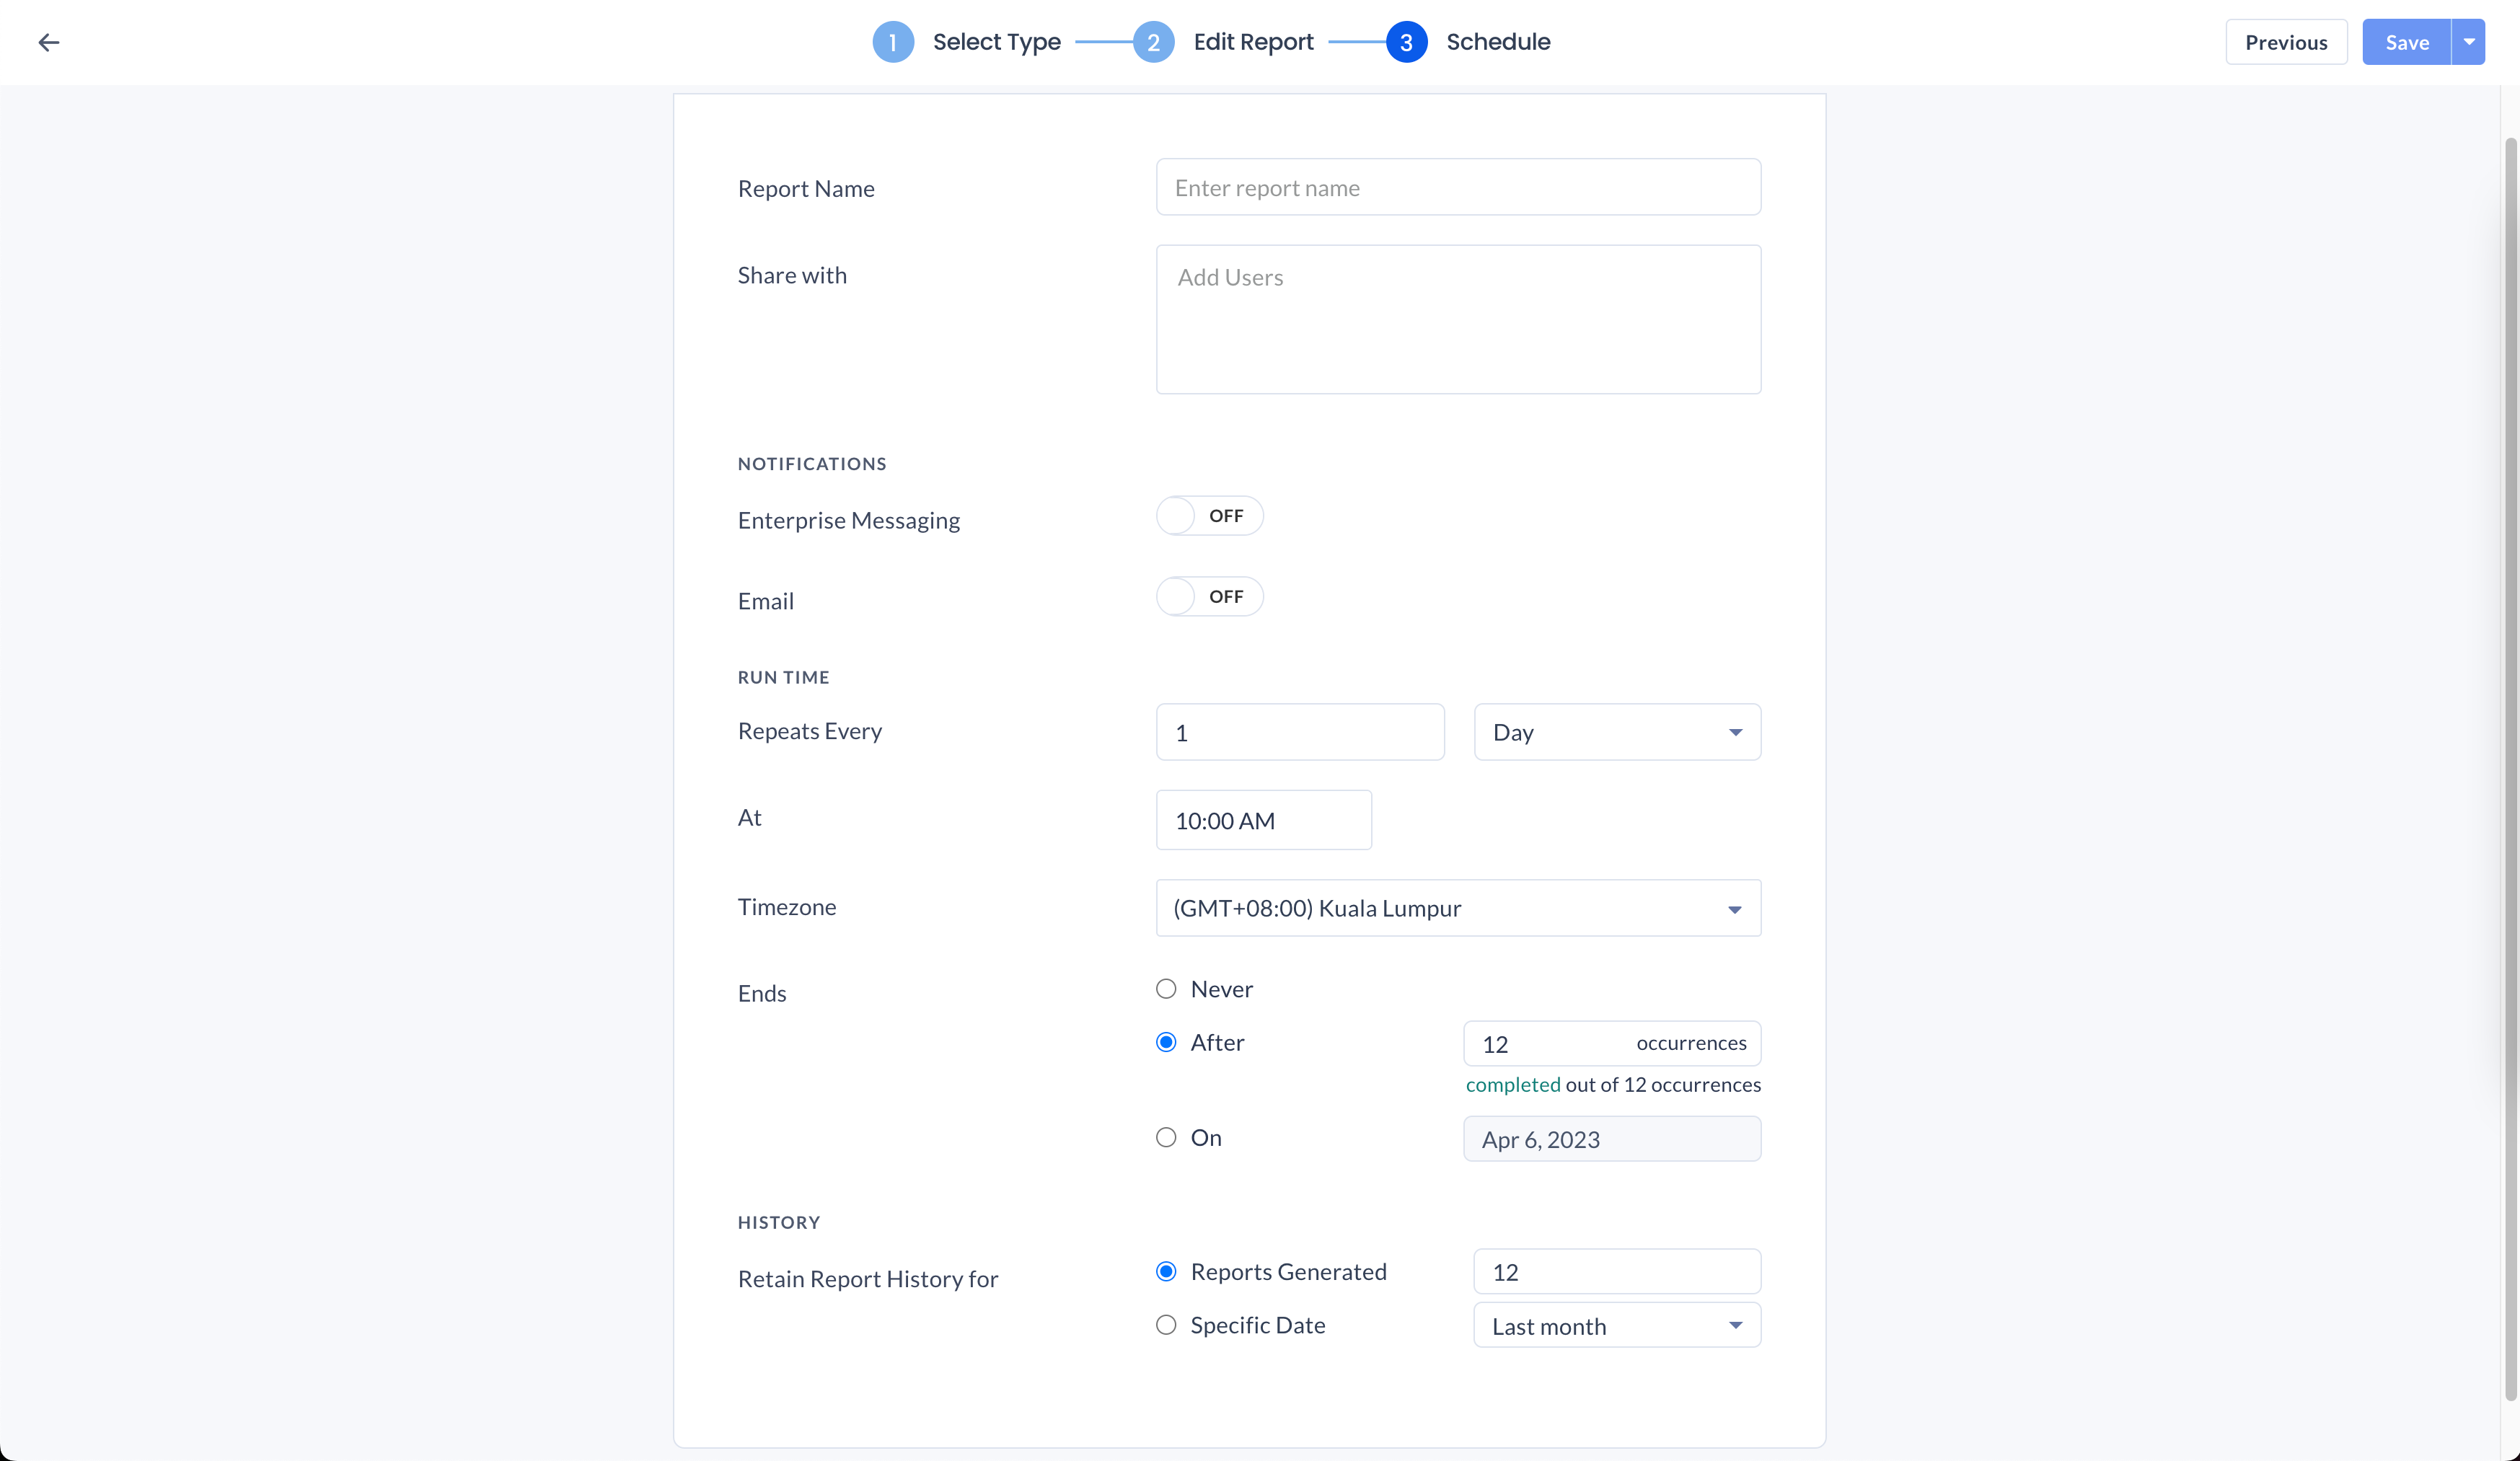
- Click Next, and in the Schedule step, proceed to configure the following scheduling fields:
-
- Report Name – Enter the report name.
- Share with – Add the users to share the report with.
- NOTIFICATIONS – Send a notification with a download link to the report.
- Enterprise Messaging – Slide the toggle switch to ON to enable sending notifications via the enterprise messaging app. OFF to disable.
- Email – Slide the toggle switch to ON to enable sending notifications via email. OFF to disable.
- RUN TIME – Define the report schedule run time.
- Repeats Every – Select the number of times per Day, Week, Month, or Year the report is run from the dropdown.
- Repeats On – Appears only when week, month, or year is selected.
- If Week is selected, choose the day(s) of the week from the available options for example: M, T, W, T, F, S, S.
- If Month is selected, choose a specific day, the first day of the month, or customize the day from the dropdown.
- If Year is selected, select the date, or the day of the month from the dropdown.
- At – Determine the time the report is run from the dropdown.
- Timezone – Select the timezone for the report from the dropdown.
- Ends – Define when the report ends.
- Never –
- After – Enter the number of occurrences before it ends.
- On – Select the specific date for the report to end.
- HISTORY – Define how long the report is retained.
- Retain Report History for
- Reports Generated – Select the number of reports to be kept from the dropdown.
- Specific Date – Select Last month, Last 2 months, or Last Year of reports to be kept from the dropdown.
- Retain Report History for
-
- Once configured, click Save. Alternatively, you may also click the dropdown arrow to Save and Download the report, or Save as Template to generate future reports based on the saved report template.
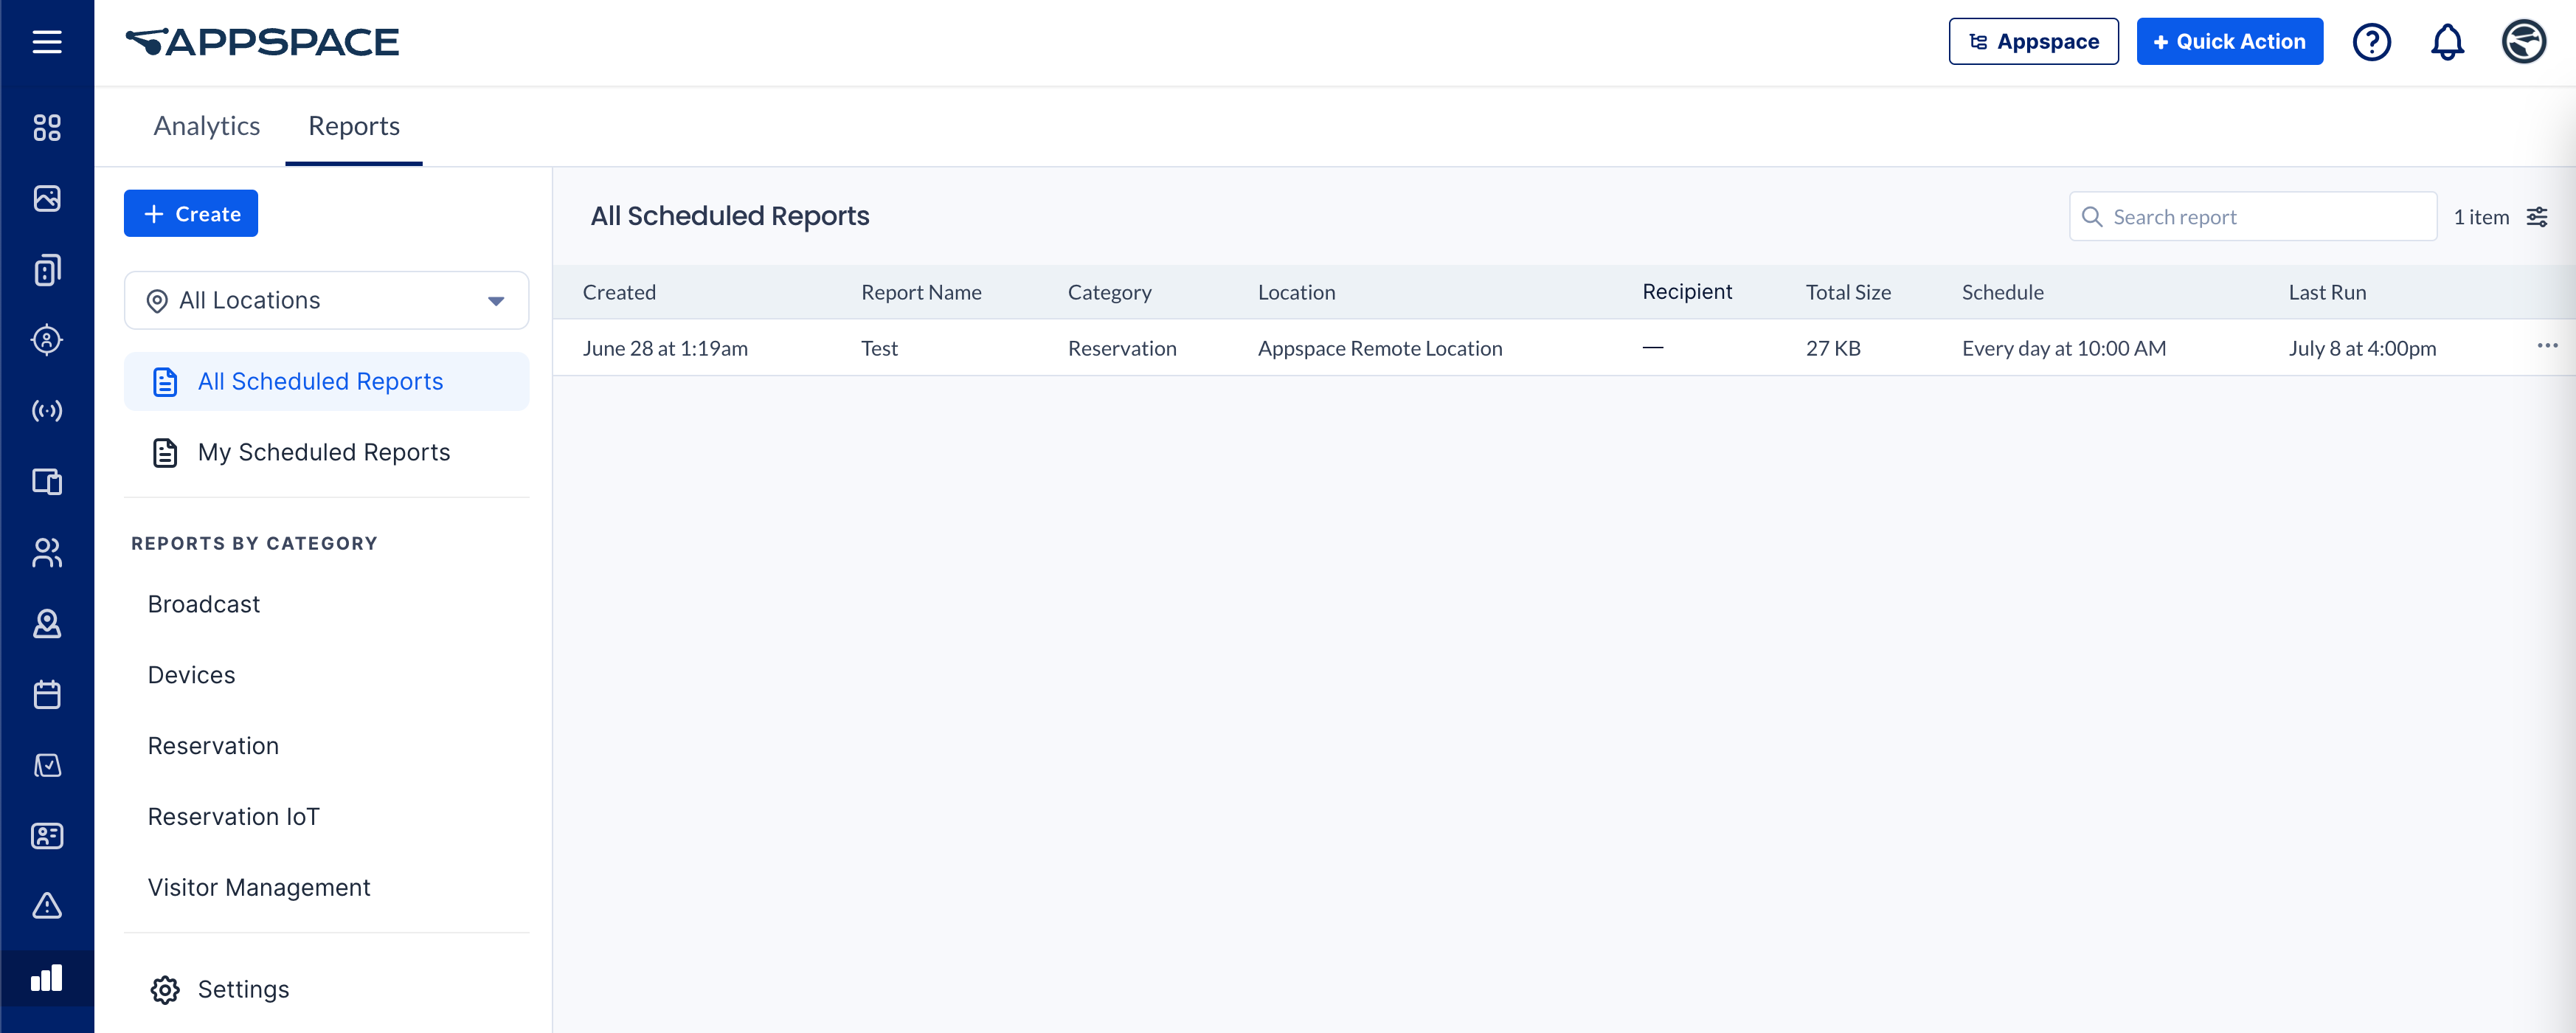
- Saved reports will be listed and displayed within the All Scheduled Reports section, while the saved report templates will be listed in the All Report Templates section when creating and scheduling reports.
Create and Schedule Device Identity Audit Log Reports
- Log in to your Appspace console.
- Click the ☰ Appspace menu, and select Analytics from the menu.
- Click the Reports tab, and click the + Create button.
- In the Select Type step, search and select the desired Devices Report Template available.
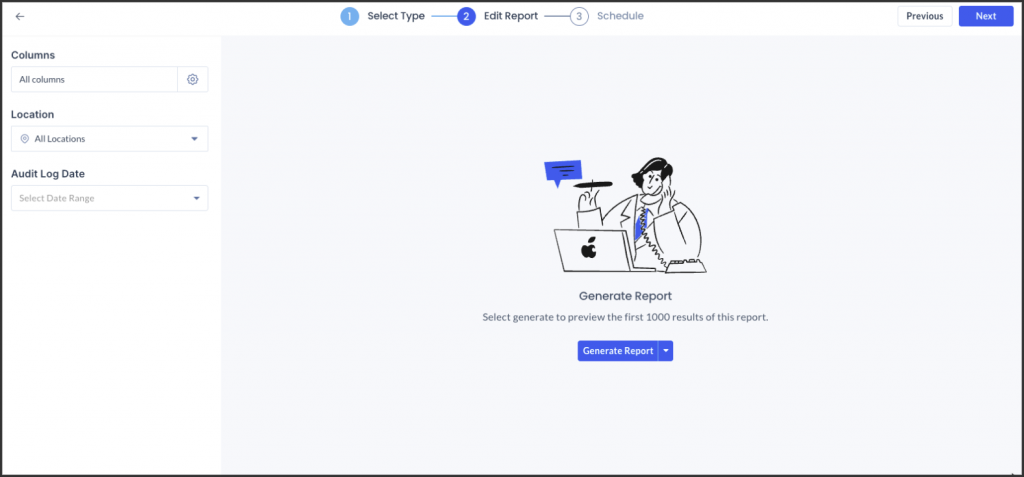
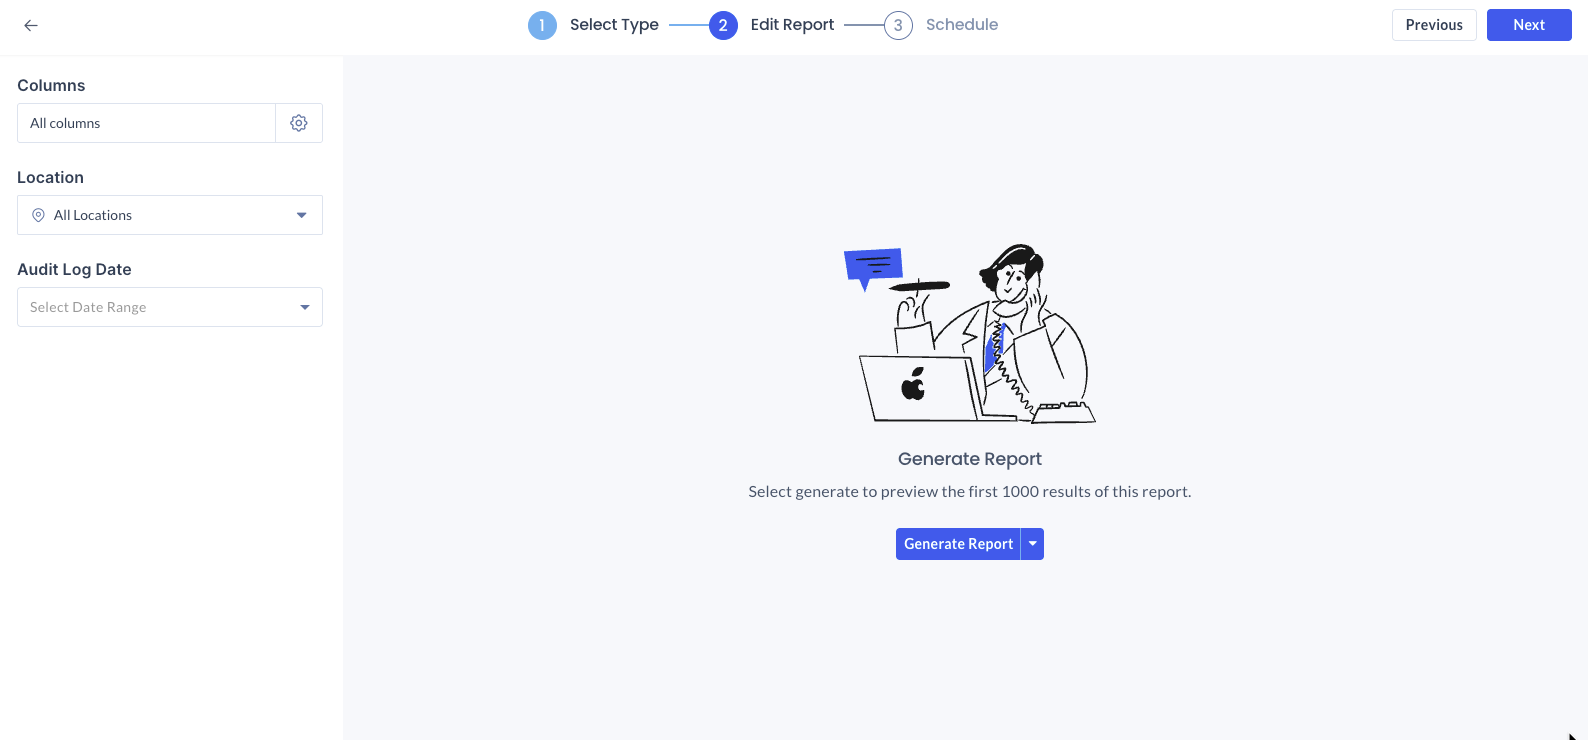
- In the Edit Report step, proceed to configure the following reporting fields from the drop-down based on the Devices report template selected:
- Device Identity Audit Log
- Columns – All Columns (Default) or customize the columns generated in the report.
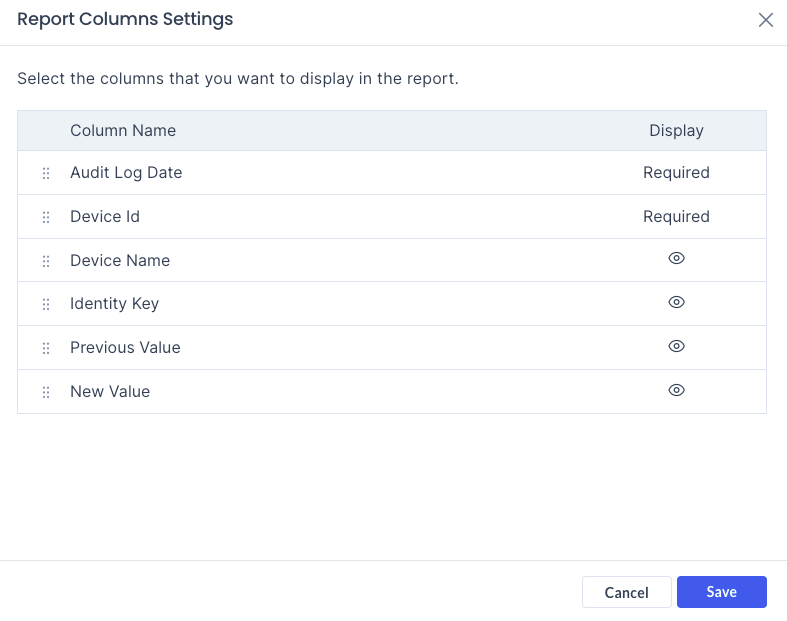
- Customize Columns – Click the ⚙ Gear icon to customize, and select the fields you wish to include, exclude, or rearrange the order of the fields for a customized report format. Once done, click Save.
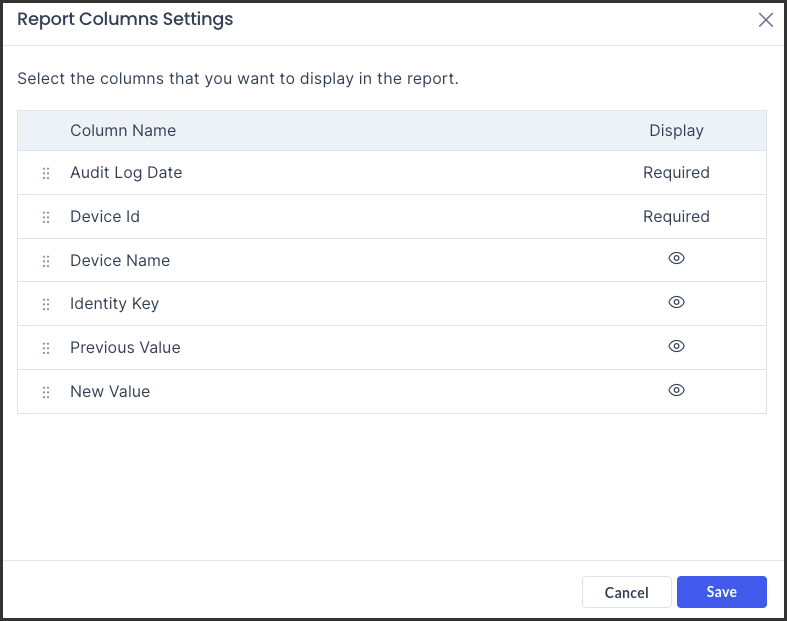
- Customize Columns – Click the ⚙ Gear icon to customize, and select the fields you wish to include, exclude, or rearrange the order of the fields for a customized report format. Once done, click Save.
- Location – All Locations (Default), or select the location of the devices.
- Audit Date Range – Select date range.
- Columns – All Columns (Default) or customize the columns generated in the report.
- Device Identity Audit Log
- Once configured, click the Generate Report button to generate a preview of the first 1000 results, or Download the Full Report by clicking the drop-down arrow. The generated report (in .xlsx format) will be automatically downloaded to your default download folder. Alternatively, you may also download the full report in preview mode.
- Click Next, and in the Schedule step, proceed to configure the following scheduling fields:
-
- Report Name – Enter the report name.
- Share with – Add the users to share the report with.
- NOTIFICATIONS – Send a notification with a download link to the report.
- Enterprise Messaging – Slide the toggle switch to ON to enable sending notifications via the enterprise messaging app. OFF to disable.
- Email – Slide the toggle switch to ON to enable sending notifications via email. OFF to disable.
- RUN TIME – Define the report schedule run time.
- Repeats Every – Select the number of times per Day, Week, Month, or Year the report is run from the dropdown.
- Repeats On – Appears only when week, month, or year is selected.
- If Week is selected, choose the day(s) of the week from the available options for example: M, T, W, T, F, S, S.
- If Month is selected, choose a specific day, the first day of the month, or customize the day from the dropdown.
- If Year is selected, select the date, or the day of the month from the dropdown.
- At – Determine the time the report is run from the dropdown.
- Timezone – Select the timezone for the report from the dropdown.
- Ends – Define when the report ends.
- Never –
- After – Enter the number of occurrences before it ends.
- On – Select the specific date for the report to end.
- HISTORY – Define how long the report is retained.
- Retain Report History for
- Reports Generated – Select the number of reports to be kept from the dropdown.
- Specific Date – Select Last month, Last 2 months, or Last Year of reports to be kept from the dropdown.
- Retain Report History for
-
- Once configured, click Save. Alternatively, you may also click the dropdown arrow to Save and Download the report, or Save as Template to generate future reports based on the saved report template.
- Saved reports will be listed and displayed within the All Scheduled Reports section, while the saved report templates will be listed in the All Report Templates section when creating and scheduling reports.
Create and Schedule Content Playback Reports
Note
- The minimum app version required to report Content Playback analytics is 2.82.0.
- Content Playback Reports only extract data from the past 90 days, regardless of the selected date range. If a user selects a broader range for example, the current year, the report will still only display data available within the last 90 days.
- Log in to your Appspace console.
- Click the ☰ Appspace menu, and select Analytics from the menu.
- Click the Reports tab, and click the + Create button.
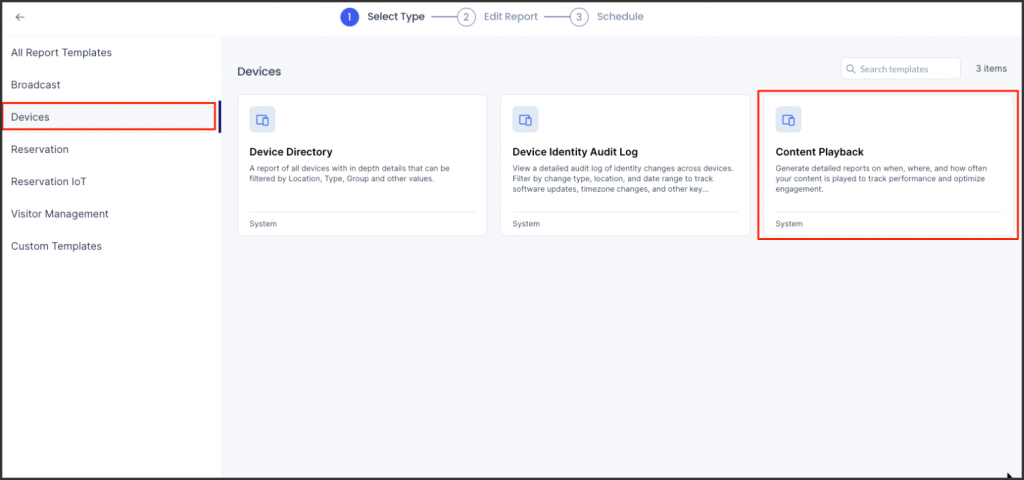
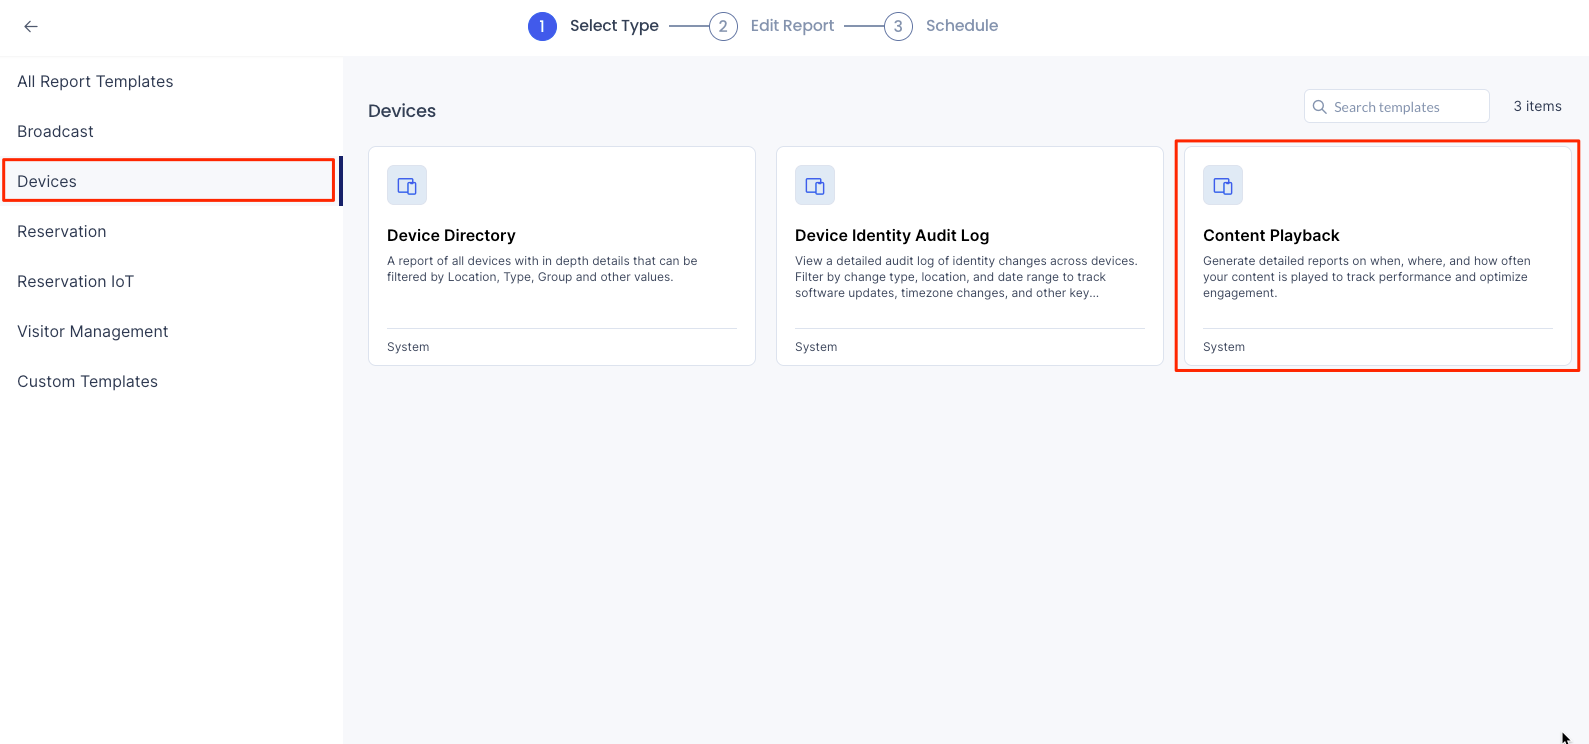
- In the Select Type step, search and select the desired Devices Report Template available.
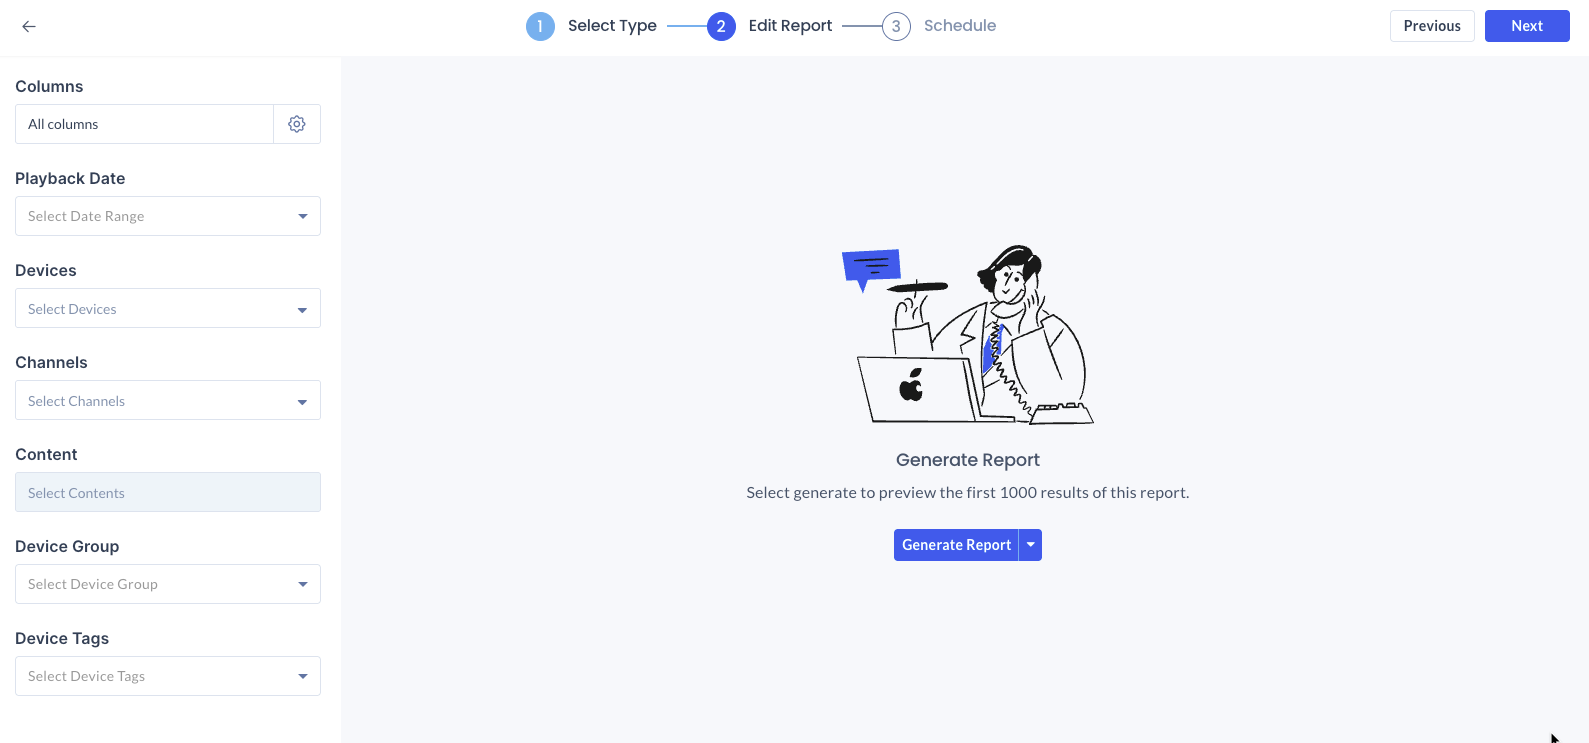
- In the Edit Report step, proceed to configure the following reporting fields from the drop-down based on the Devices report template selected:
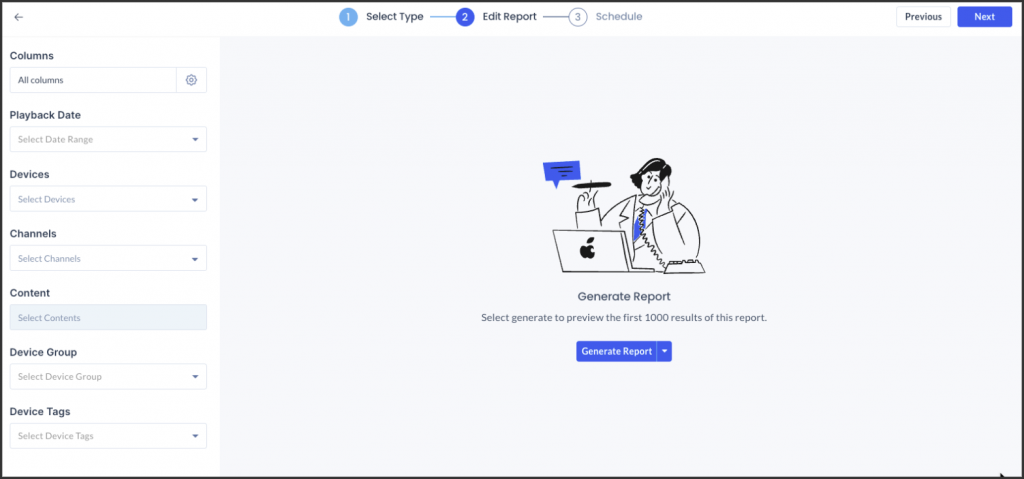
- Content Playback
- Columns – All Columns (Default) or customize the columns generated in the report.
- Customize Columns – Click the ⚙ Gear icon to customize, and select the fields you wish to include, exclude, or rearrange the order of the fields for a customized report format. Once done, click Save.
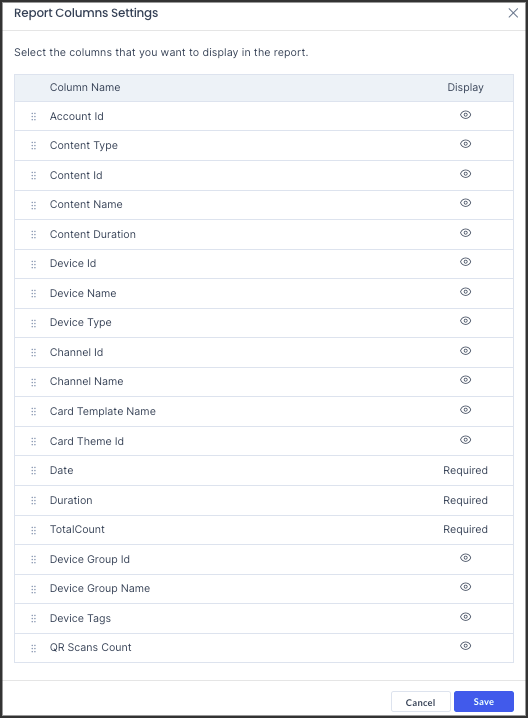
- Customize Columns – Click the ⚙ Gear icon to customize, and select the fields you wish to include, exclude, or rearrange the order of the fields for a customized report format. Once done, click Save.
- Playback Date – Select date range.
- Devices – Select devices.
- Channels – Select channels.
- Content – Select contents.
- Device Group – Select the device group.
- Device Tags – Choose the device tags.
- Columns – All Columns (Default) or customize the columns generated in the report.
- Content Playback
- Once configured, click the Generate Report button to generate a preview of the first 1000 results, or Download the Full Report by clicking the drop-down arrow. The generated report (in .xlsx format) will be automatically downloaded to your default download folder. Alternatively, you may also download the full report in preview mode.
- Click Next, and in the Schedule step, proceed to configure the following scheduling fields:
-
- Report Name – Enter the report name.
- Share with – Add the users to share the report with.
- NOTIFICATIONS – Send a notification with a download link to the report.
- Enterprise Messaging – Slide the toggle switch to ON to enable sending notifications via the enterprise messaging app. OFF to disable.
- Email – Slide the toggle switch to ON to enable sending notifications via email. OFF to disable.
- RUN TIME – Define the report schedule run time.
- Repeats Every – Select the number of times per Day, Week, Month, or Year the report is run from the dropdown.
- Repeats On – Appears only when week, month, or year is selected.
- If Week is selected, choose the day(s) of the week from the available options for example: M, T, W, T, F, S, S.
- If Month is selected, choose a specific day, the first day of the month, or customize the day from the dropdown.
- If Year is selected, select the date, or the day of the month from the dropdown.
- At – Determine the time the report is run from the dropdown.
- Timezone – Select the timezone for the report from the dropdown.
- Ends – Define when the report ends.
- Never –
- After – Enter the number of occurrences before it ends.
- On – Select the specific date for the report to end.
- HISTORY – Define how long the report is retained.
- Retain Report History for
- Reports Generated – Select the number of reports to be kept from the dropdown.
- Specific Date – Select Last month, Last 2 months, or Last Year of reports to be kept from the dropdown.
- Retain Report History for
-
- Once configured, click Save. Alternatively, you may also click the dropdown arrow to Save and Download the report, or Save as Template to generate future reports based on the saved report template.
- Saved reports will be listed and displayed within the All Scheduled Reports section, while the saved report templates will be listed in the All Report Templates section when creating and scheduling reports.
Device Report Glossary
Below is the glossary of terms defining each column header within the report template:
Device Directory
- Device ID – Displays the Device ID (Required)
- Device Name – Displays the Device name
- Device Type – Displays the Device type
- Device Model – Displays the Device model
- Device Group – Displays the Device Group
- Location – Displays the Device Location
- Registration Date – Displays the Appspace App registration date
- App Version – Displays the Appspace App version
- Firmware Version – Displays the Device firmware version
- MAC Address – Displays the Device MAC address
- Serial Number – Displays the Device serial number
- Fingerprint – Displays the Device Fingerprint
- Application Name – Displays the assigned Channel
- IP Address – Displays the Device IP Address
- Health Status – Displays the Device Health Status
- Online Since/Last Seen At – Displays when the Device was last seen online
- Sync Status – Displays the Device Sync Status
- Tags – Displays Tags assigned to the Device
Device Identity Audit Log
- Software.firmware – The firmware version of the device’s software.
- Software.OSVersion – The operating system version installed on the device.
- Software.appVersion – The version of the Appspace application installed on the device.
- Software.runtimeEnvironments – The browser runtime environments used by the device.
- Software.appPackageType – The type of software package used by the app. (e.g. Google Meet device should have “PWA” as the package type)
- Hardware.ipAddress – The IP Address of the device.
- Hardware.fingerprint.fingerprint – The unique identifier of the device.
- Hardware.fingerprint.type – Indicates the source of the device’s unique identifier: ‘generated’ if a random GUID was assigned due to lack of hardware fingerprinting support, or ‘hardware’ if a unique identifier from the device’s hardware was used (e.g., MAC Address, device (vendor) reference ID, serial number).
- Hardware.model – The model of the device.
- Hardware.storage – The total storage on the device.
- Hardware.resolution – The display resolution (width x height) of the device.
- Hardware.macAddress – The mac address of the device.
- Hardware.memory – The memory capacity of the device.
- Hardware.serialNumber – The serial number of the device.
- Appspace.integrationType – The integration type of the device (e.g., Webex Control Hub, Microsoft Teams Rooms)
- Appsapce.deviceType – The type of the device.
- Appspace.deviceGuid – A device ID that uniquely identifies the device within a specific account and server instance.
- Appspace.accountId – The unique identifier for the account associated with the device.
- Appsapce.instanceGuid – A unique identifier for the Appspace instance the device is connected to.
- Appspace.instanceUrl – The URL for the Appspace instance the device is connected to.
- Appspace.referenceDeviceId – The reference ID of the device. (e.g., Webex Control Hub integration reference device ID, Google Meet integration ID)
- Appspace.referenceDeviceName – The reference name of the device. (e.g., Webex Control Hub integration reference device name, Microsoft Teams Rooms integration device name)
- Appspace.features.pushHealthStatus – Indicates if the device supports health status reporting (e.g. Online, Offline, Lost Communications) using Push Notification Service (PNS)
- Capabilities.appUpdate.downgrade – Indicates if the device supports app updating even if the target version is lower than the current version.
- Capabilities.appUpdate.frequency – Indicates if the device supports app updates checks at a set recurrence.
- Capabilities.appUpdate.scheduling – Indicates if the device supports scheduled app updates.
- Capabilities.supportFileCaching – Indicates if the device supports caching assigned content.
- version – The version on the device identity payload.
- claimableIds – Identifiers that can be used to register or claim a device, including: MAC address, device-generated fingerprint, serial number, and device vendor reference ID.
Was this article helpful?