A location is a construct that enables administrators to replicate their organization’s geographical structure within the Appspace platform, for better organizing of devices and resources within Appspace (in releases prior to Appspace 8.0, this was known as networks). When devices, users, maps and floor plans, or user groups are grouped and organized according to their geographical or building location, targeted content and device updates can be distributed easily, while simultaneously providing a high-level overview of the structure and resources they contain for easy maintenance.
The Locations tab dashboard is accessed via Devices from the ☰ Appspace menu on the console sidebar. Here, you’ll be able to view, add, and manage device locations within the Appspace console. A device is primarily assigned to a location during or after device registration, while users are assigned to a location during or after user invitations.

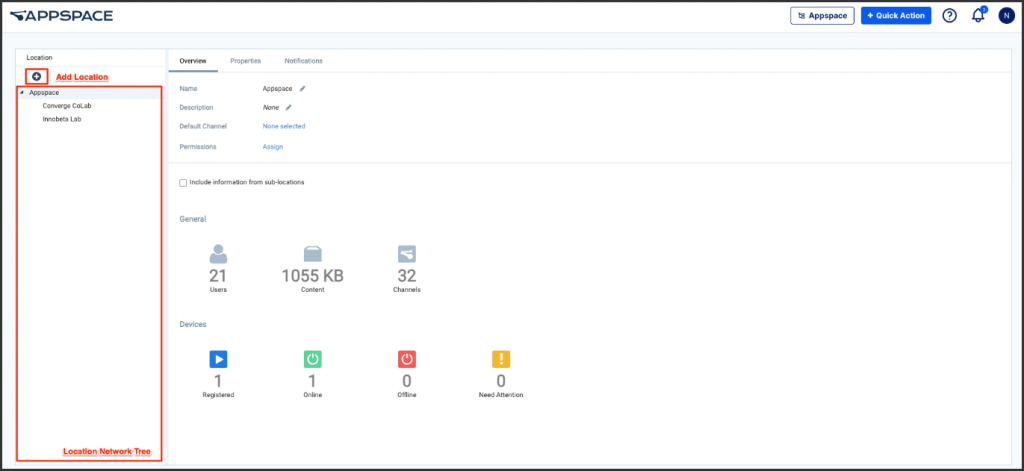
The Locations network tree on the sidebar displays the same location structure found on the Locations module, where you create and configure maps and floors plans.
This article provides the instructions to add and manage device locations as follows:
Prerequisites
- Portal Administrator, Account Owner, or Location Admin role in an on-prem or private cloud deployment.
- Account Owner or Location Admin role in a cloud deployment.
Create Location
Follow the instructions below to create a location to organize devices and other resources:
- Log in to the Appspace console.
- Click Devices > Locations from the ☰ Appspace menu.
- Click the Add icon, and enter the name of the location.
 NoteA sub-location can be added to an existing location.
 - Click OK to confirm.
- Proceed to Manage Location section below to configure the settings.
Manage Location
Follow the instructions below to configure location settings, assign a channel, or add permissions:
- Log in to the Appspace console.
- Click Devices > Locations from the ☰ Appspace menu.
- Select the desired location from the Locations network tree, and you may perform the following actions in the Overview tab:

- Name – Edit the location name. Click the Edit icon to make changes.
- Description – Edit the location description. Click the Edit icon to make changes.
- Default Channel – Assign a default channel for devices registered to this location. Please refer to the Assign Default Channel to Location article for instructions.
- Permissions – Assign Location Admin and Publisher permissions to users on this location. We recommend assigning Roles and Permissions via the Users module.
- Parent Location – Change or move the location to another parent location. Click the Change link, and select the desired parent location from the parent locations list. Click OK to confirm.
- Delete – Delete the location. Click the Delete Location link, and click OK to confirm. WarningDeleting a location which contains sub-locations, will also delete all sub-locations and related assets (users, user groups, channels) from Appspace.
Create Location Property
Follow the instructions below to add a location property that is applied to all devices within the selected location :
- Log in to the Appspace console.
- Click Devices > Locations from the ☰ Appspace menu.
- Select the desired location from the Locations network tree, and click the Properties sub-tab.
- Click the +ADD button, and enter the Property and Value of the location property that will be applied to all devices within the location and sub-locations.

- Once done, click the Save icon. Note
- You can also edit any existing property by clicking the property row.
- All devices in this location and its sub-locations will inherit these properties.
Create Notifications
Appspace can be configured to send email alerts to administrators in the event of device failures, communication loss, or errors during content download or a sync. When a failure has been detected and no response is made within 15 minutes, a failure alert email will be sent to the administrators. The system will continue to monitor the device and if the failure persists, email alerts will be sent in 15 minute, 45 minute, 1 hour, 3 hour, 6 hour, and 24-hour intervals. There are two types of device failures:
- Communication Lost – this indicates that the device has lost network connection with the Appspace server for two weeks or less. The device will still be playing the application but any updates made will not be received.
- Failed – this status requires urgent attention as it may be a critical failure that could result in an application not being displayed on the screen at all. This could be caused by a number of reasons such as on-site power or hardware failure.
Follow the instructions below to create alerts for devices in a location:
- Click Devices > Locations from the ☰ Appspace menu.
- Click the desired device name link, and click the Settings tab.
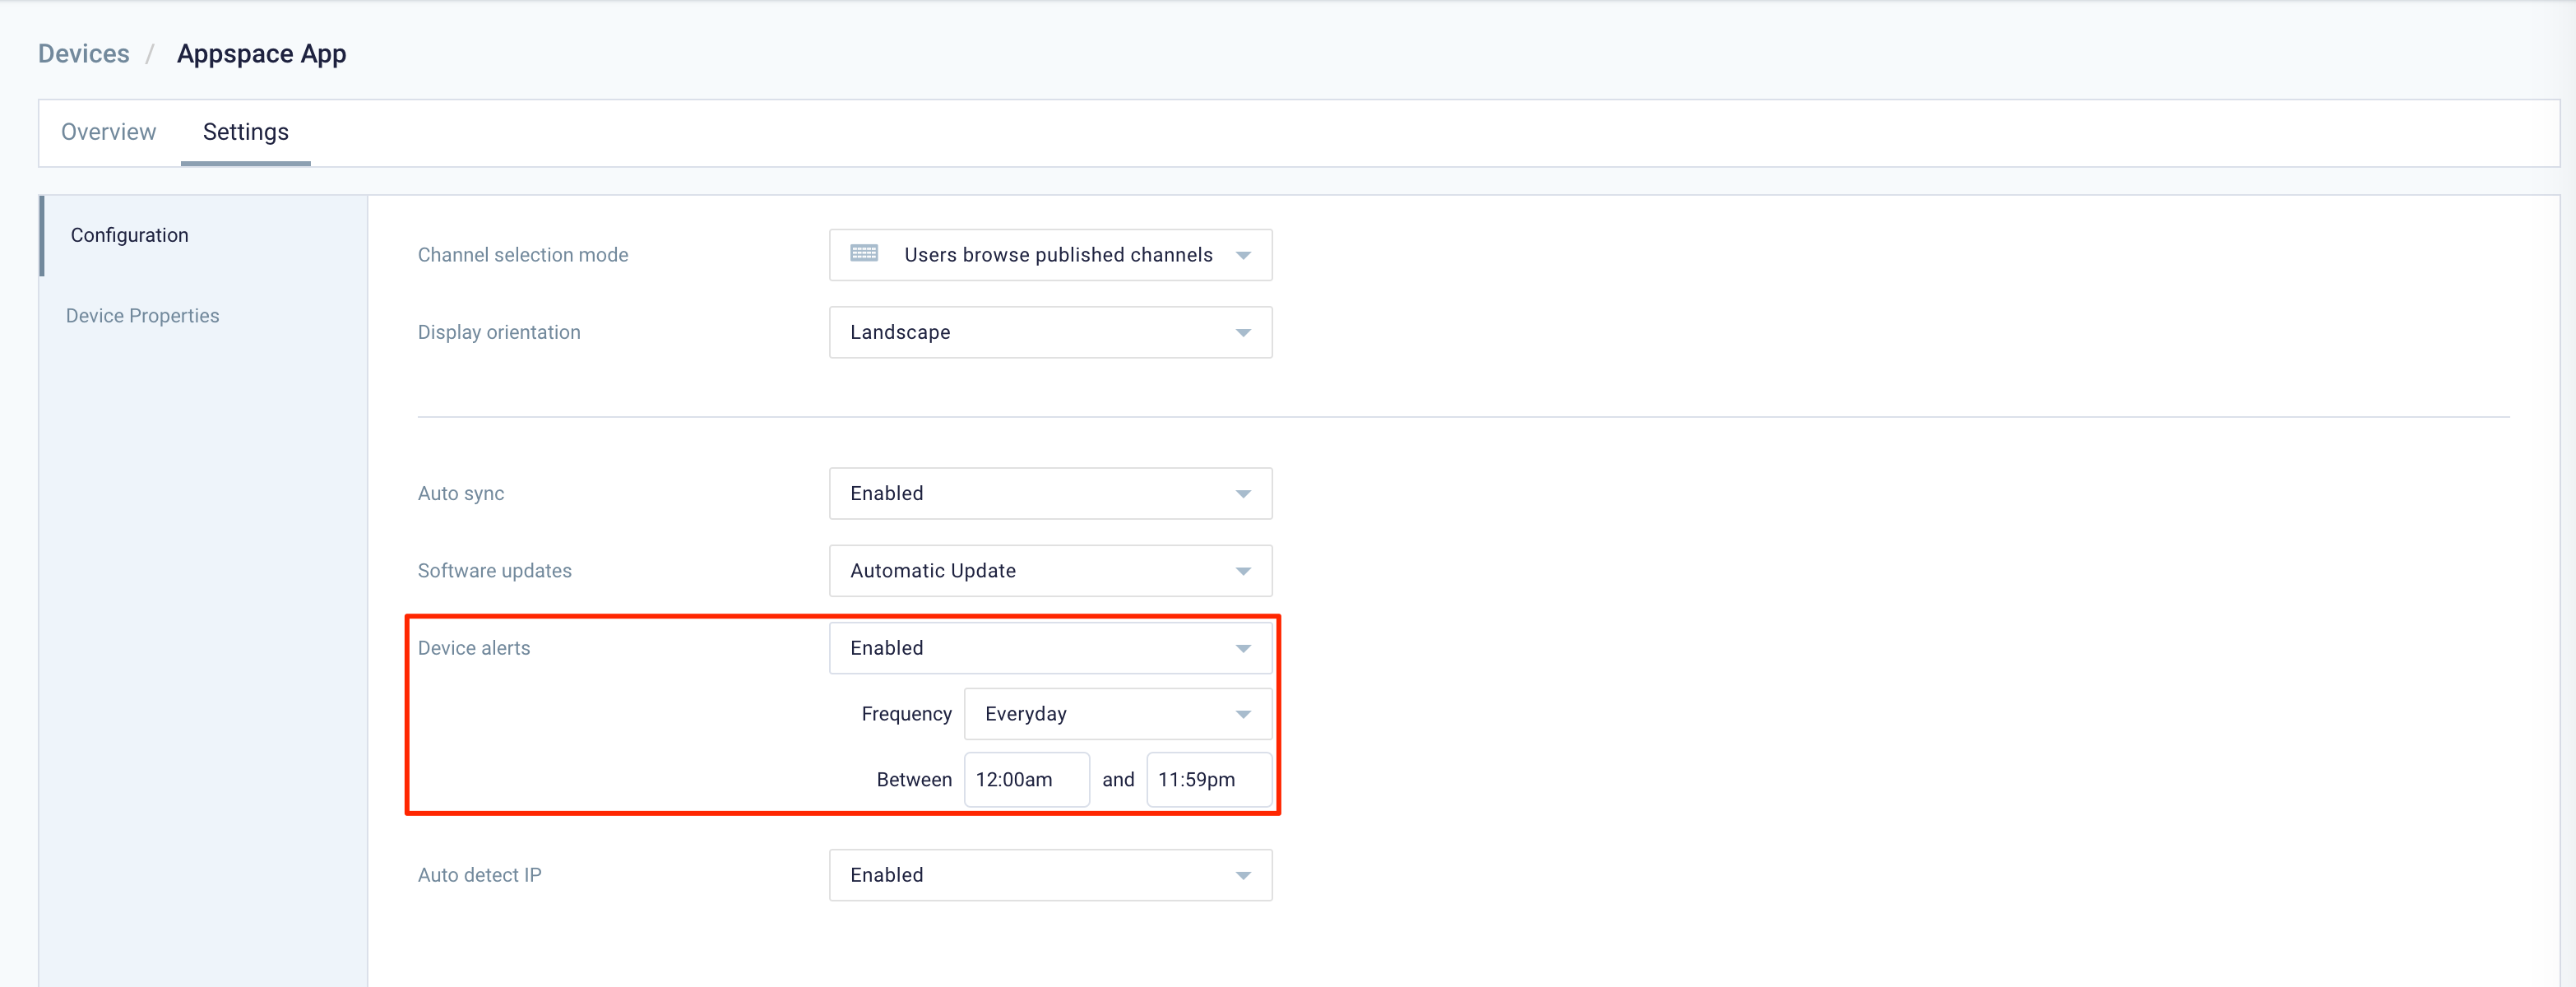
- Click the Configuration sub-tab, and ensure the Device alerts drop-down menu is Enabled.
- Click SAVE.

- Back on the Devices dashboard, click the Locations tab.
- Select the desired location from the locations network tree, and click the Notifications sub-tab.
- Click the +ADD button.
- In the Location Notifications Details page, select the Notification Type:

- Live Alert – Live Alert notifications trigger immediately after an event happens (e.g. device loses communication or fails).
- Summary – Summary notifications provide timely reports on your network status.
- The Location displays the default location of the devices to monitor. You may change locations by clicking the Change Location link, and selecting the desired location for the Locations lists.
- Enter the Name of this notification alert.
- Configure the Trigger duration for the notification depending on the Notification Type selected:
- The Enforce Time Zone Configuration is Enabled by default, allowing alert notifications to be sent to recipients based on Trigger time zone set above. If Disabled, the time zones of the recipients would be set manually.
- To add Recipients that will receive alert notifications, search or enter the user name of the recipient, and click the Add icon.
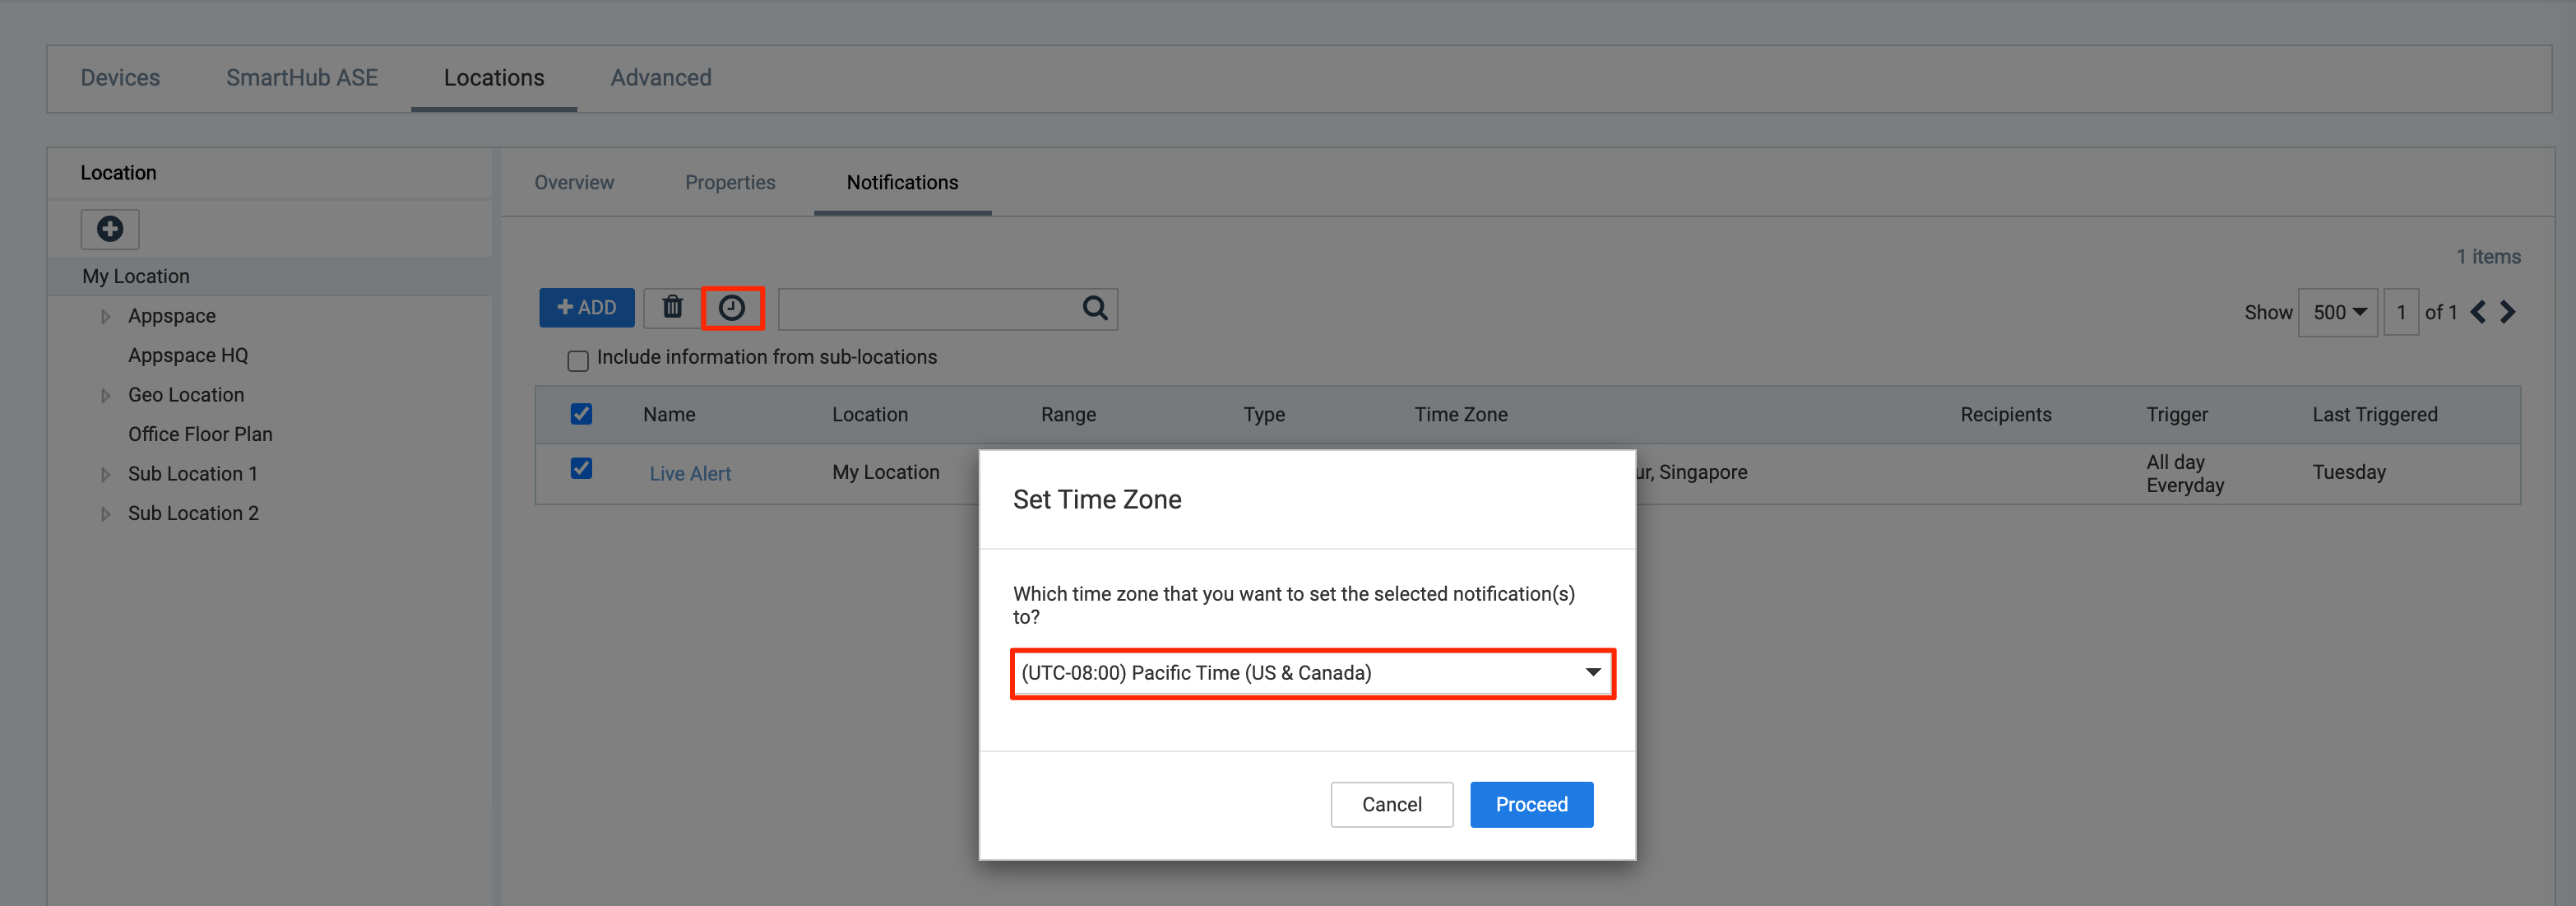
 NoteIf the Enforce Time Zone Configuration was set to Disabled, select by checking the user’s check box, and click the Set time zone button. Next, select the desired time zone from the drop-down, and click Proceed to con.
 - Once done, click Save.
Change Time Zone for Notification
Follow the instructions below to change the time zone:
- Log in to the Appspace console.
- Click Devices > Locations from the ☰ Appspace menu.
- Click the Notifications sub-tab, and check the location notification checkbox that requires the time zone to be changed.
- Click the Set time zone button, and select the desired time zone from the drop-down menu, and click Proceed to confirm.

Was this article helpful?

