The Users module in the Appspace console is where administrators invite and manage user accounts and roles. Appspace 8.x introduces a completely redesigned user interface with streamlined workflows, and new operative functions, and boasts of significant improvements to the performance and overall user experience.

This article provides Administrators with an introduction to navigating the user interface and features available within the Users module on the Admin console.
New & Improved Features
Redesigned User Interface
The Users dashboard is now considerably faster, highly responsive, easier to navigate, and more user-friendly.
Updated User Creation Workflows
Improvements and new functionality added are as follows:
- During the user invitation process, administrators can simultaneously invite multiple users, assign specific user roles, user groups, and home location (network).
- Assign any type of user role easily in one consolidated place. Previously different roles could be assigned from other modules.
- Batch-invite multiple users using an XLSX file (Microsoft Excel Spreadsheet).
- The +Add button on the dashboard to invite a user, create a user group, or simply export the current user list.
- Bird’s eye view of all users, pending users (yet to accept user invitation), and suspended users from the sidebar.
- Sort and filter users using the Role drop-down menu available at the top of the dashboard.
- A consolidated User Profile page that includes personal information including a telephone number, assigned roles, locations, and a list of channels and channel groups the user has permissions to.
Improved Functionality
User interactivity improvements include new click operations and improved search and filter functionalities as follows:
- Ability to click the ellipsis on any listed user and perform operations such as Manage Membership, Edit User, Suspend User, and Delete. If you click the ellipsis for a suspended user, then you can Activate User or Delete.
- Perform batch operations. You may click to select more than one user, and either manage the membership (to add one role to all the selected users), suspend them all, or delete them – with just a few clicks.
- Improved search functionality. Corresponding results appear in the search field as you type a keyword.
- Multiple filter options throughout the dashboard, where you can filter by:
- name (ascending and descending order) or login timeframe (recent or oldest).
- location using the locations filter menu on the sidebar.
- All Users, Pending Users, Suspended Users, on the sidebar.
- user status (Active, Pending, Suspended) and by Enrollment Dates using the filter icon.
Updated User Roles
User roles in the Appspace platform have been given an uplift to make it easier for users (administrators) new to Appspace, to easily assign roles based on function. These are the current roles available in the platform:
- Portal Admin
- Account Admin
- Account Owner
- Location Admin
- Publisher
- Author
- Viewer
New User Licensing
With the introduction of the Appspace Employee App, which includes newer features such as space reservation and employee communications, Appspace users are no longer just administrators who need access to the Appspace console. Users can now be any employee in an organization who can use the Employee App to make a reservation, check-in to a building, or simply view content.
To provide a clear distinction between end users who browse content and make workspace reservations, and administrators who need access to the console to perform content management, and administrative duties, Appspace introduces two user licensing types:
- Premium Users
- A Premium user license is assigned to employees, for access to the Appspace Employee App to view employee content and make workspace reservations within the organization, either through their mobile devices, or from a web browser.
- Platform Users
- A Platform user license is assigned to users who will be administrators or content creators in the Appspace console, such as team leads, department heads, IT administrators that require access to administer devices, or create, manage, and publish content. There are several platform user roles that can be assigned, such as Account Owner, Location Admin, and Publisher. Refer to the Introduction to User Licenses & Roles in Appspace 8.0 article for more information.
User Interface and Navigation
Users Dashboard
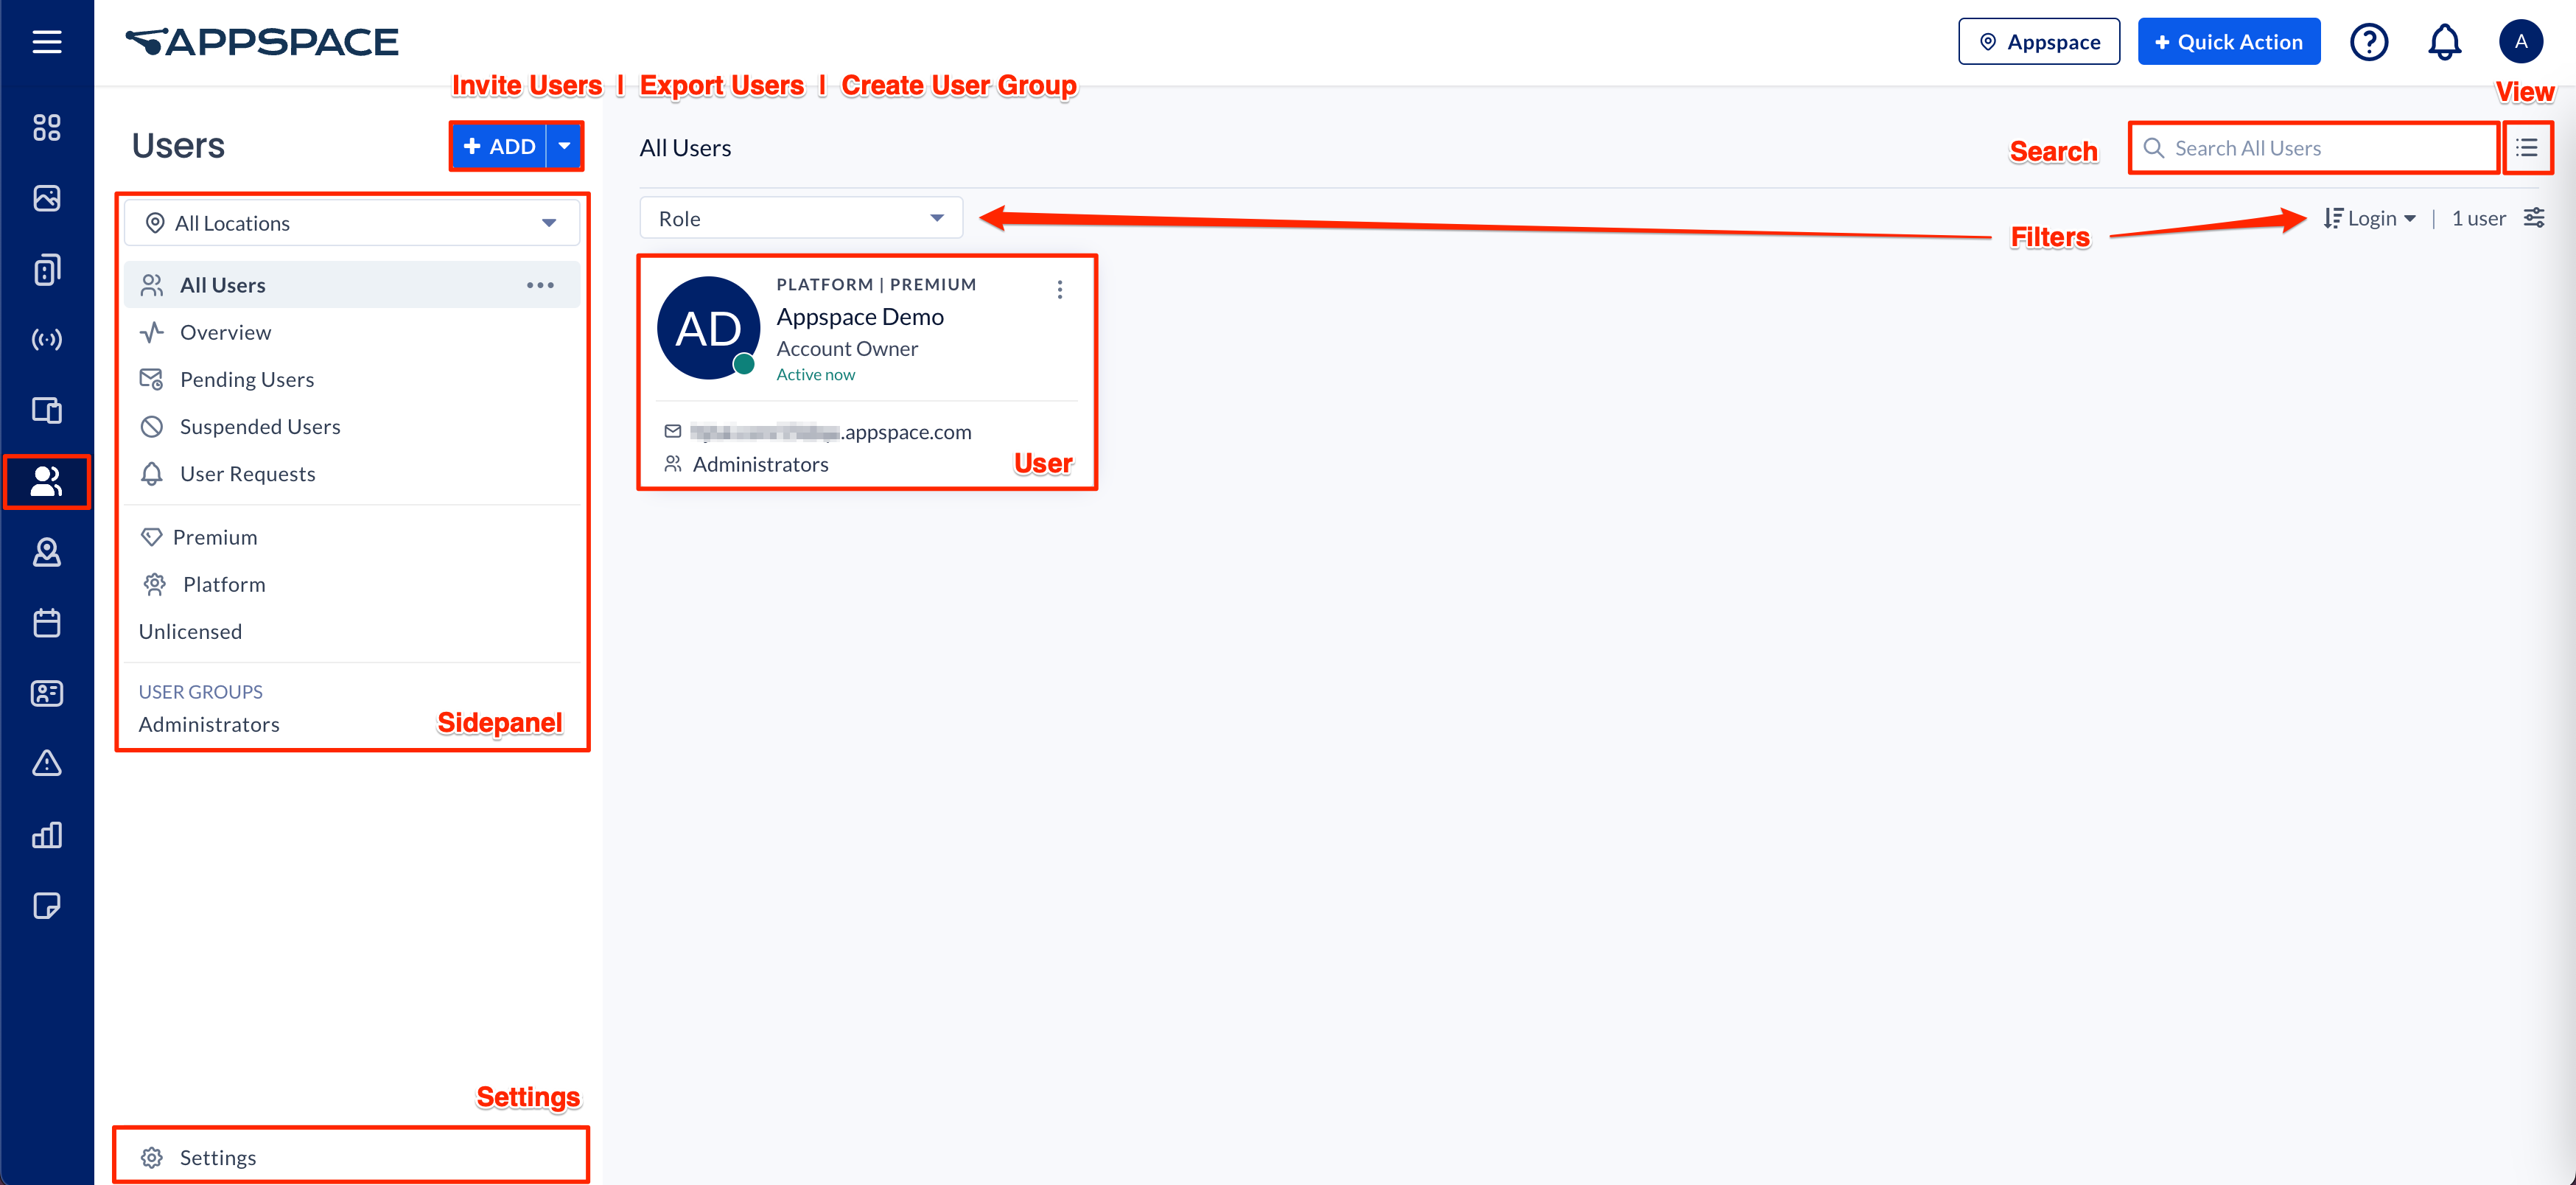
- The Users dashboard is accessed via the ☰ Appspace menu on the console sidebar. Here, you’ll be able to view, invite, and manage users within the Admin console. All invited users and user accounts are displayed on the dashboard, listing important user details at a glance, such as:
- User license
- Name (first, last)
- Image
- Role
- Email address
- Assigned user groups
- Account or login status (i.e. Active now, Last logged in <date>, Suspended, or Pending, etc.)
- The dashboard includes the +ADD button to quickly Invite Users, Export Users, or Create User Group.
- The user navigation tree displays all users invited into the Appspace platform. You can choose to view:
- All Users – All users on the Appspace console. Clicking the All Users ellipsis allows users to configure the common library.
- Overview – Displays the statistical user licensing data and most active users.
- Pending Users – Users that have been invited, but have not accepted the invitation or logged on to the Appspace console.
- Suspended Users – Users that have been suspended from the Appspace console.
- Premium – Users that have been assigned with the Premium License, and only have access to the Employee App.
- Platform – Users that have been assigned with the Platform License, and have access to the Appspace console.
- Unlicensed – Users that are not licensed, or failed to be licensed.
- User Groups – all user groups in this account.
Search
The Search field is used to search user accounts based on the name. The corresponding user accounts appear in the field as you type a keyword, and when you click on a name in the search result, the User Profile window is automatically displayed.
If the user account is not displayed in the search drop-down menu, then click the Enter or Return button on your keyboard, and the search results are listed on the dashboard.
Filters
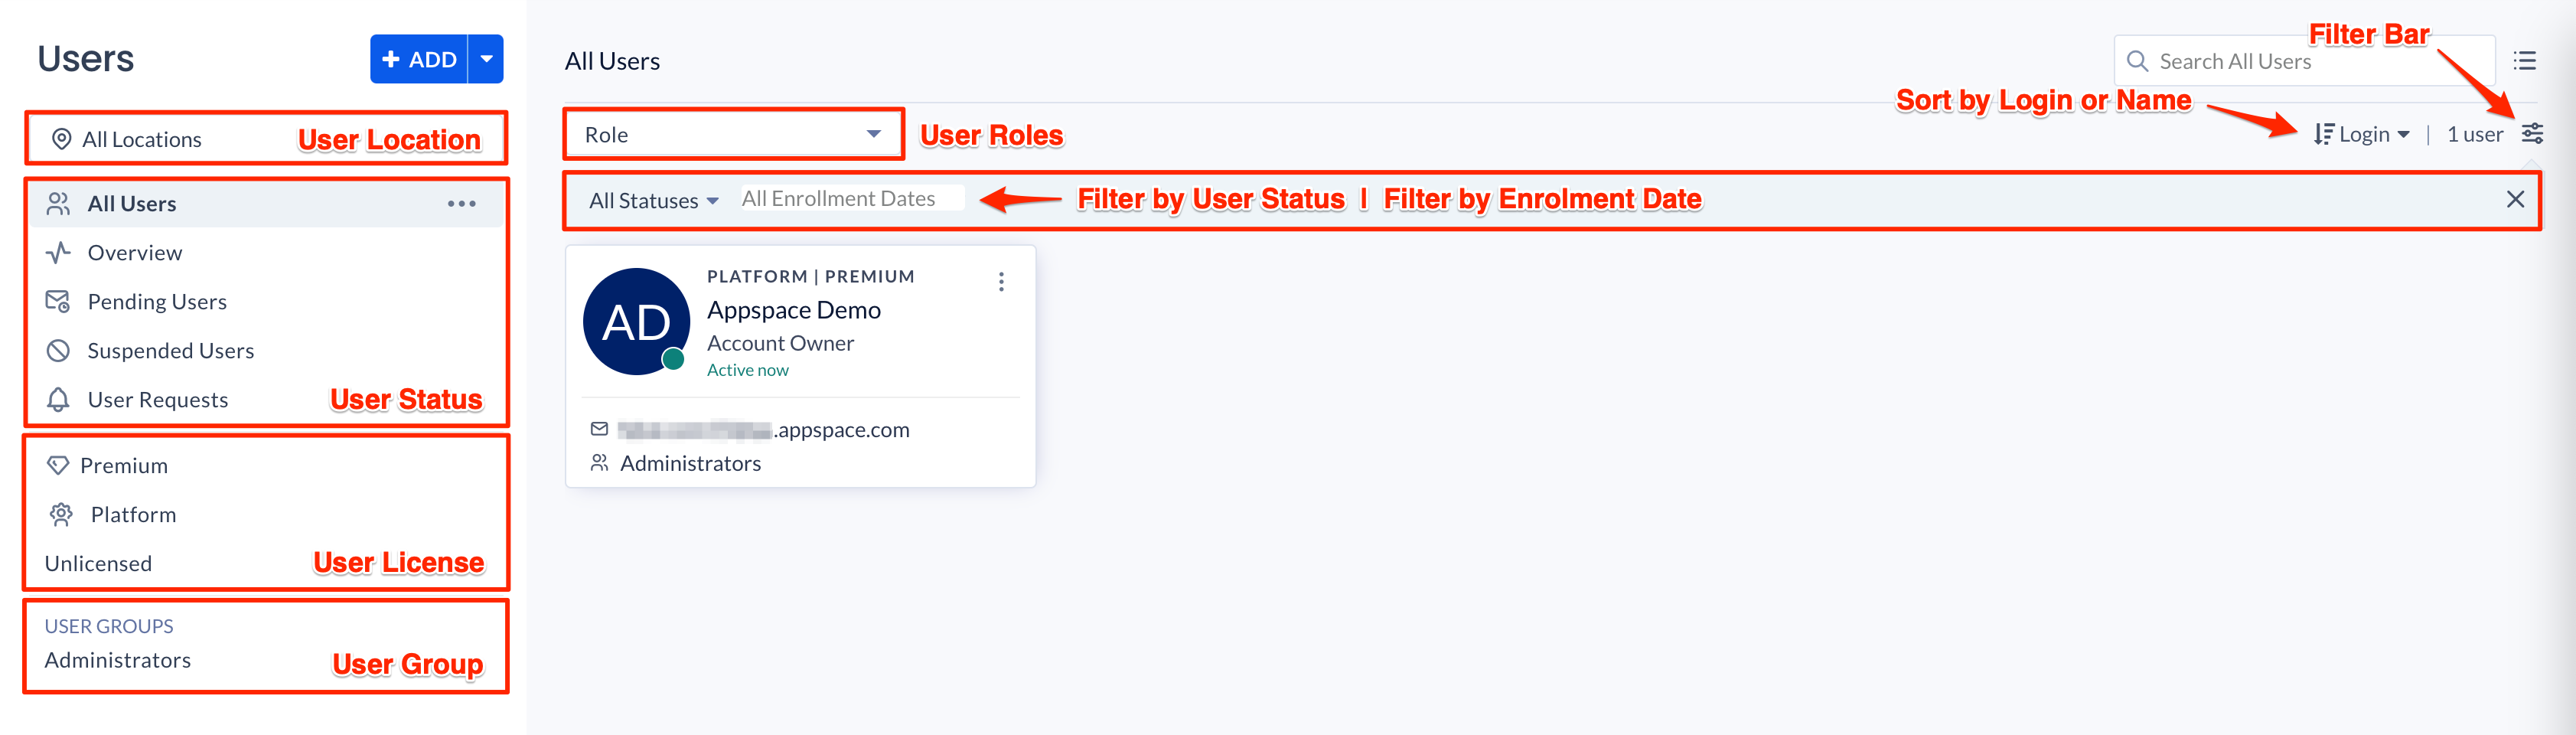
Locations
The Locations drop-down menu displays a list of locations created earlier, allowing to filter users and user groups by geographical location.
User License
The User License section displays the users that have been assigned to either the Premium or Platform licenses, or that have not been licensed.
User Groups
The User Groups section displays a list of user groups, and the users assigned to that particular user group. You can also create and manage user groups here.
List or Grid View
The List View or Grid View icons on the far right of the dashboard display the user accounts in a list or grid layout.
Sort
Sort the listed user accounts by name in ascending and descending order, or the user’s login timeframe by recent or oldest.
Filter Icon
Click the Filter icon to display the filter bar. Filter users based on user status (Active, Pending, Suspended) or enrollment date. To filter by enrollment date, select the available options such as Yesterday, Current month, Previous year, etc., or choose a custom date.
User Invitation Workflow
The user creation workflows have been streamlined into a single workflow, ensuring that you’ll always encounter the same UI and workflow, no matter where you start inviting a user or editing a user profile from, within the Appspace console.
Invite User
Users can be invited from the console, using one of the following ways:
- Users dashboard – Click the +Add button, and select Invite Users.
- Console dashboard – Click the +QUICK ACTION button on the console toolbar, and select Invite Users.
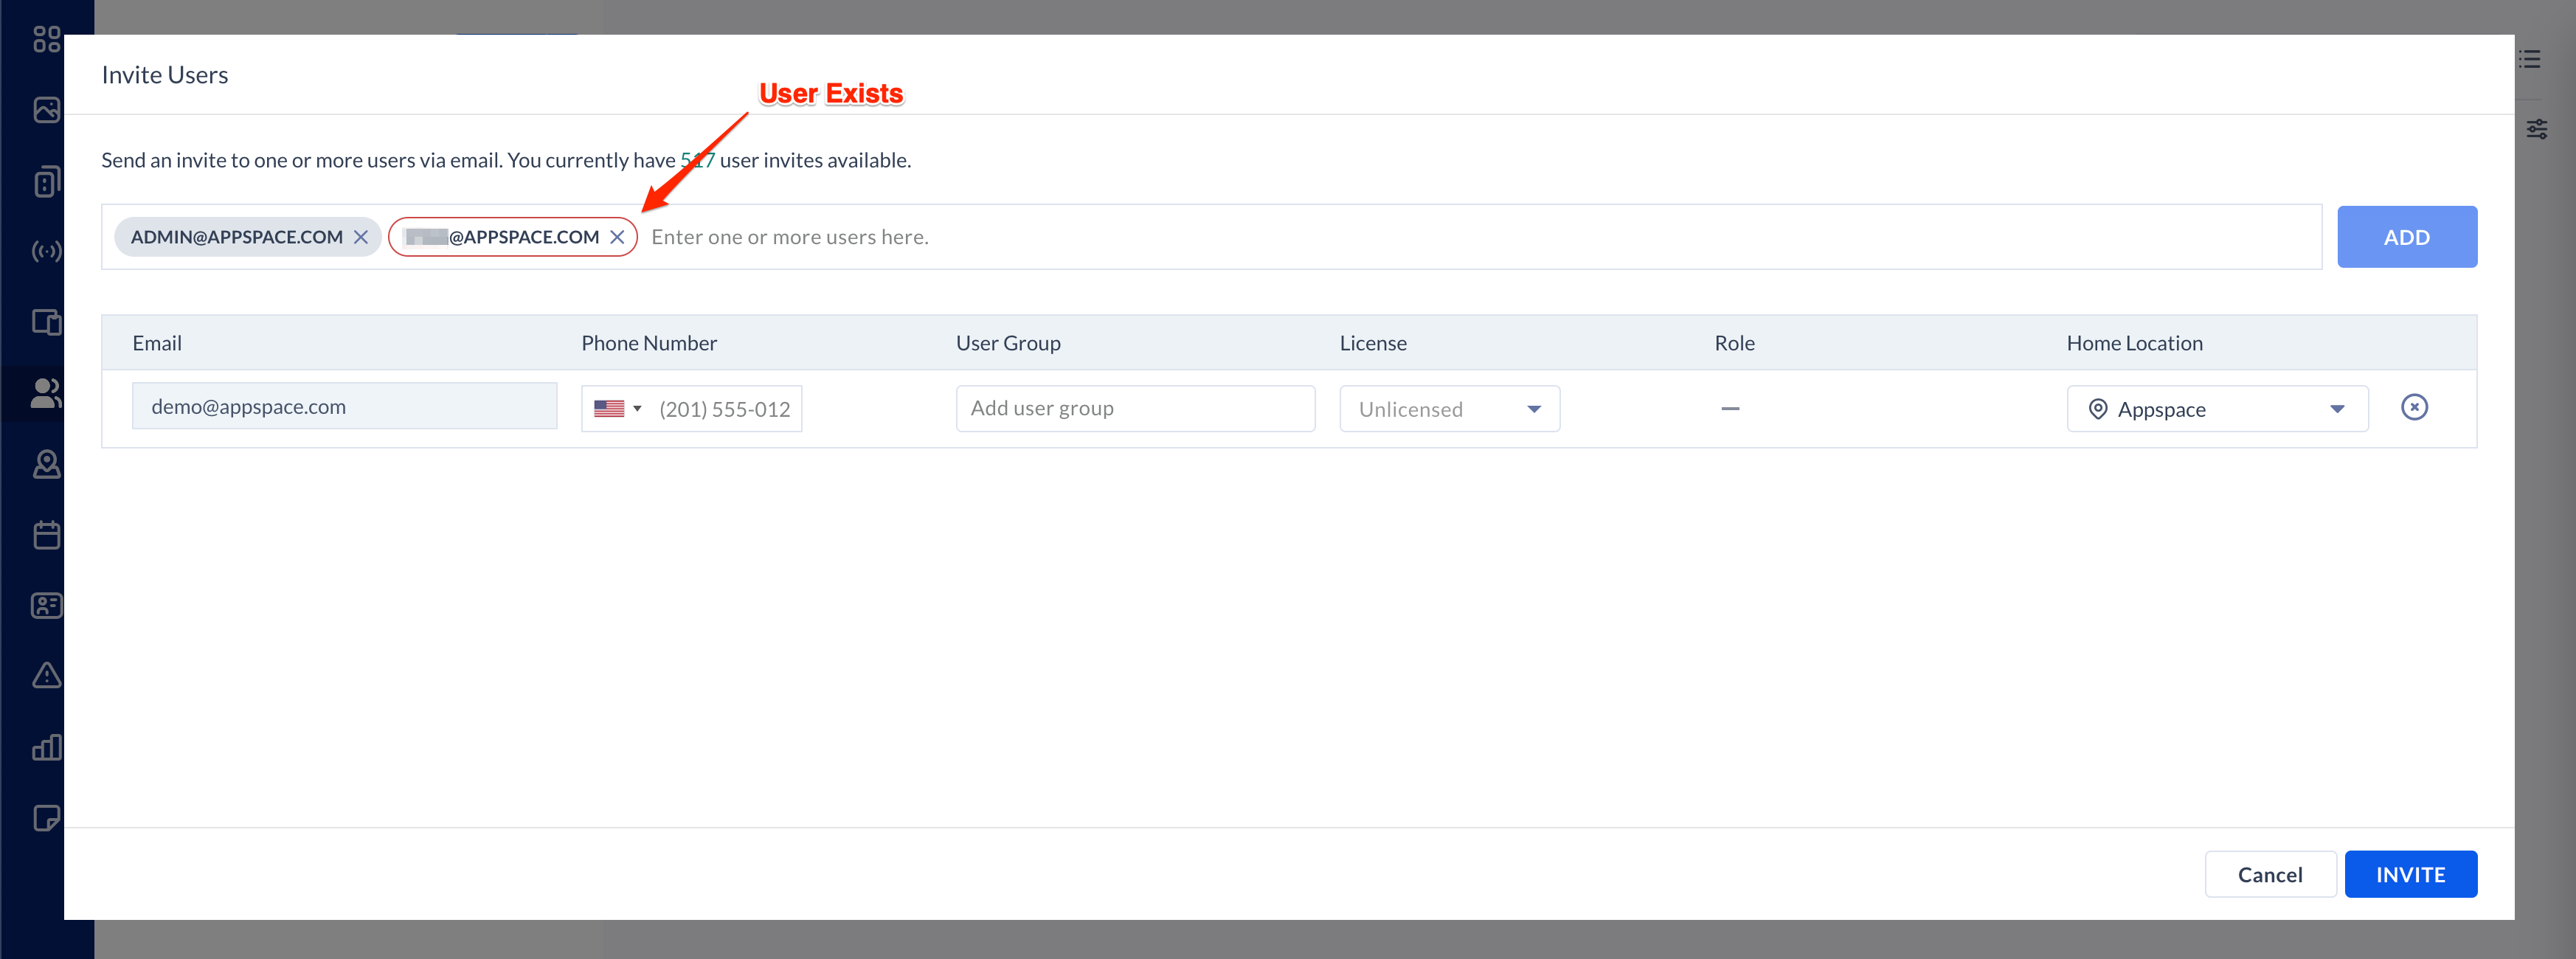
During the user invitation process, administrators can do the following:
- invite one or more users
- assign a user group to each user
- assign a specific user license to each user
- assign a specific user role to each user
- assign a home location (network) to each user
- batch invite multiple users using an XLSX file (Microsoft Excel Spreadsheets). The first column of the first row must contain the “email” header, with the email addresses in the rows below. Once the list is imported, then you can proceed to assign the user role, user group, and assign a home location.
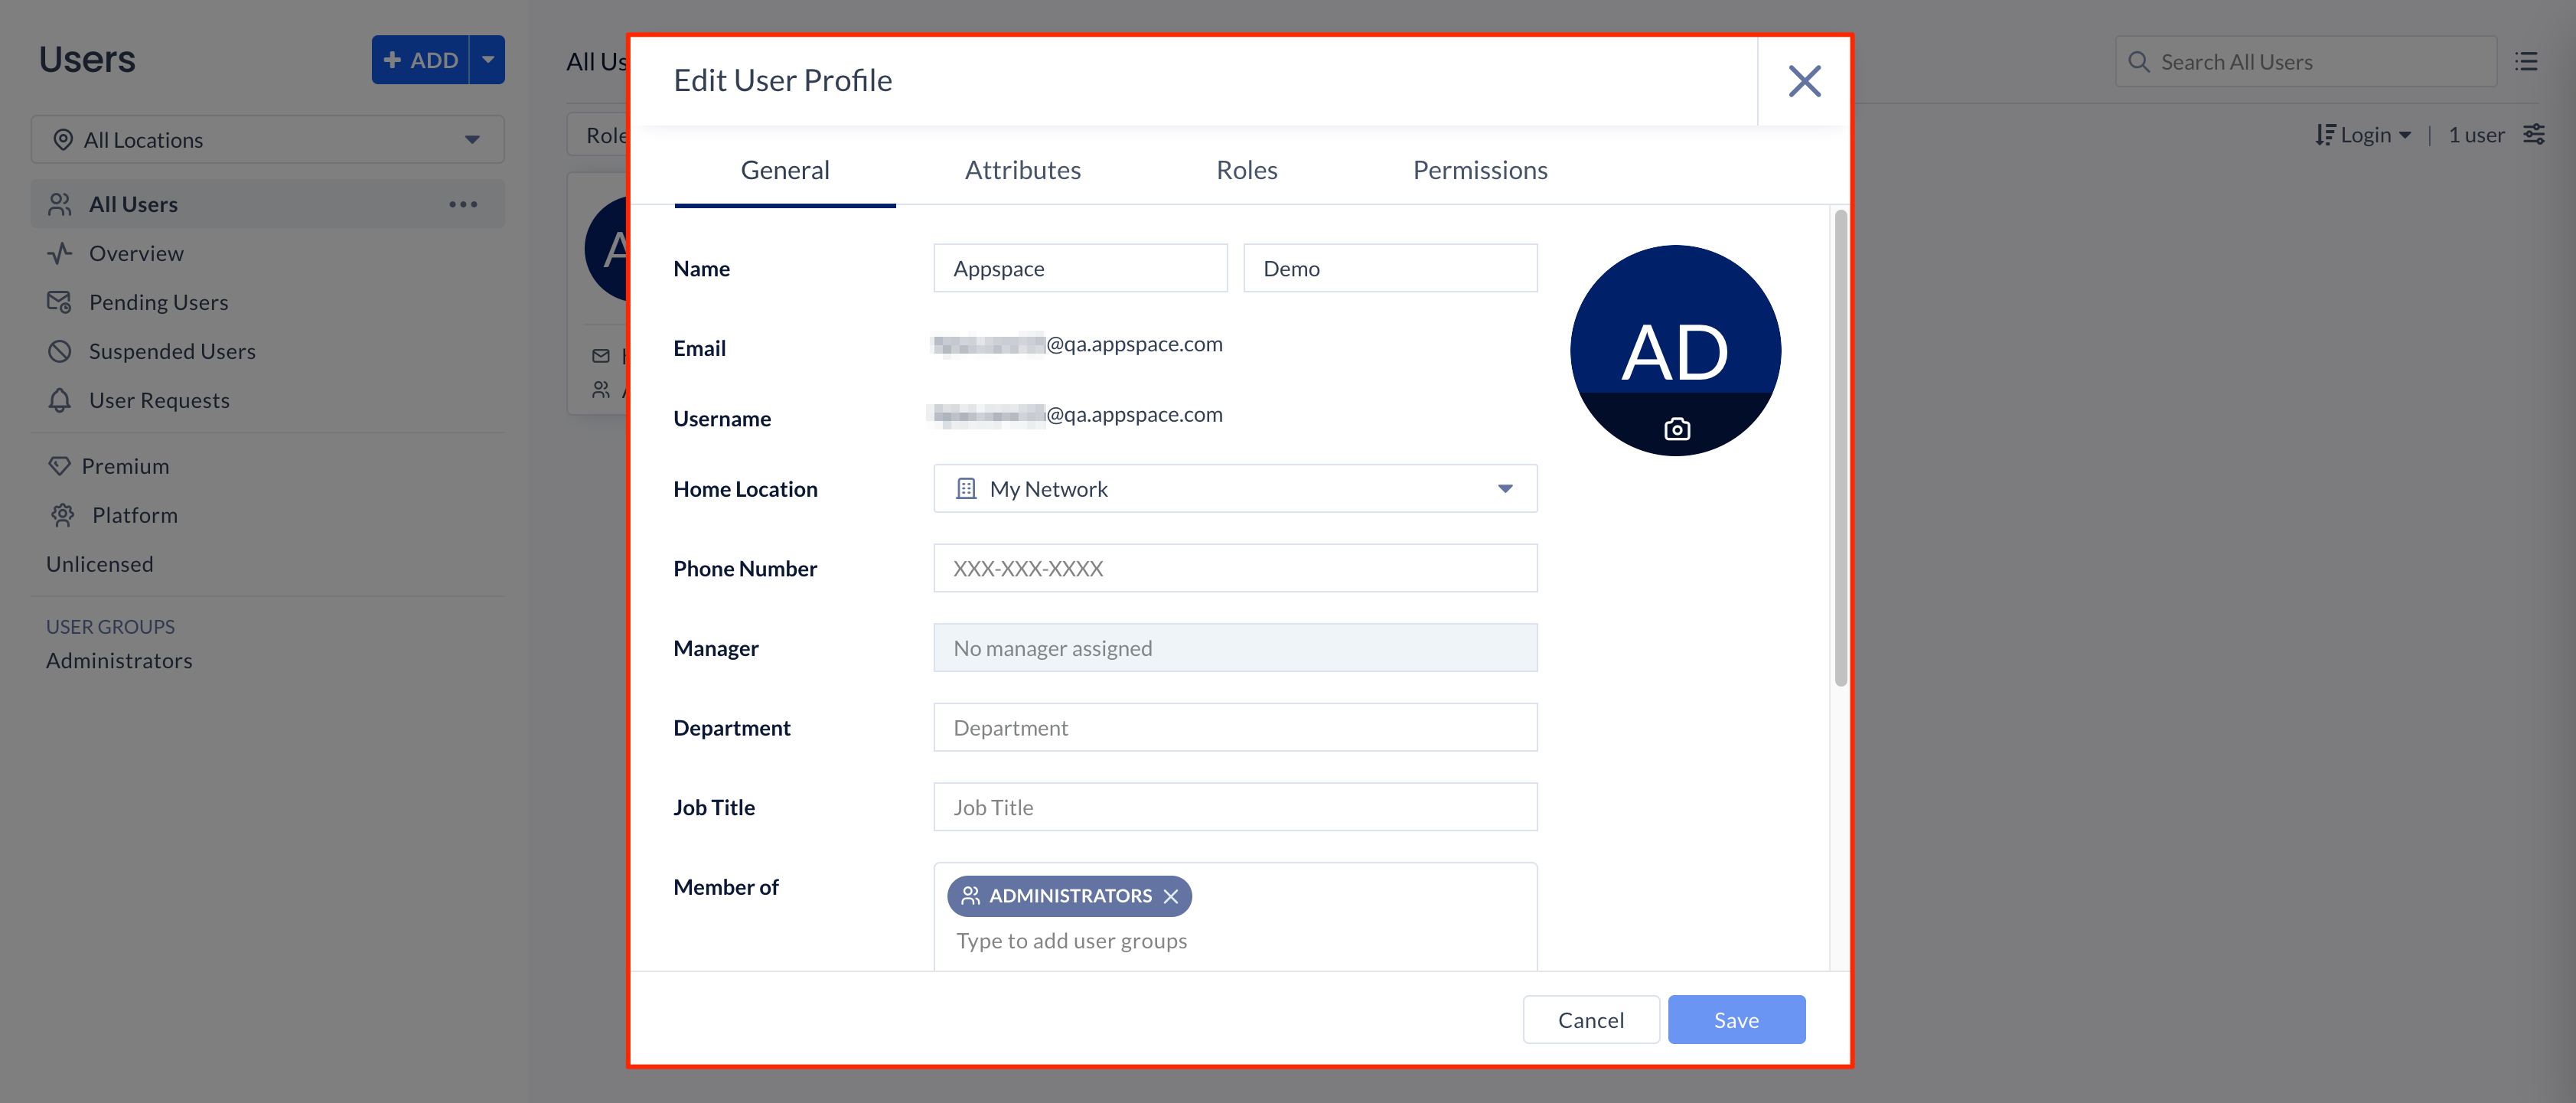
Manage User Profile
A user profile is automatically created for any user who has accepted the user invitation.
You can edit a user’s profile in the following ways:
- Users dashboard – Click the ellipsis on any listed user account, and click Edit User.
- Console dashboard – Click the user profile icon or name on the far right of the console toolbar, to edit your own user profile.
The user profile page sees a new consolidated look in Appspace 8.0. Apart from the user’s first name, last name, and email address, in the General tab, we’ve also included a field for phone numbers. This field will be crucial for upcoming features that we are developing. You can also change your user password here.
When viewing your own user profile, in the Roles tab, you will see a list of roles that have been assigned to you specifically or roles that you’ve inherited from a user group(s). If you are an administrator viewing the user profile of other users in your account, then you will be able to add or remove roles to that user profile.
In the same user profile window, you can see all the channels and channel groups this user has permissions to, under the Permissions tab. No actions are available here, however.
With the latest SAML enhancement introduced in Appspace 8.1 ac.19, the Attributes tab displays all the user’s attributes that are linked from the external IdP source. This tab is only available for SSO users that have been provisioned via the Just-In-Time provisioning feature, with SAML attributes configured.
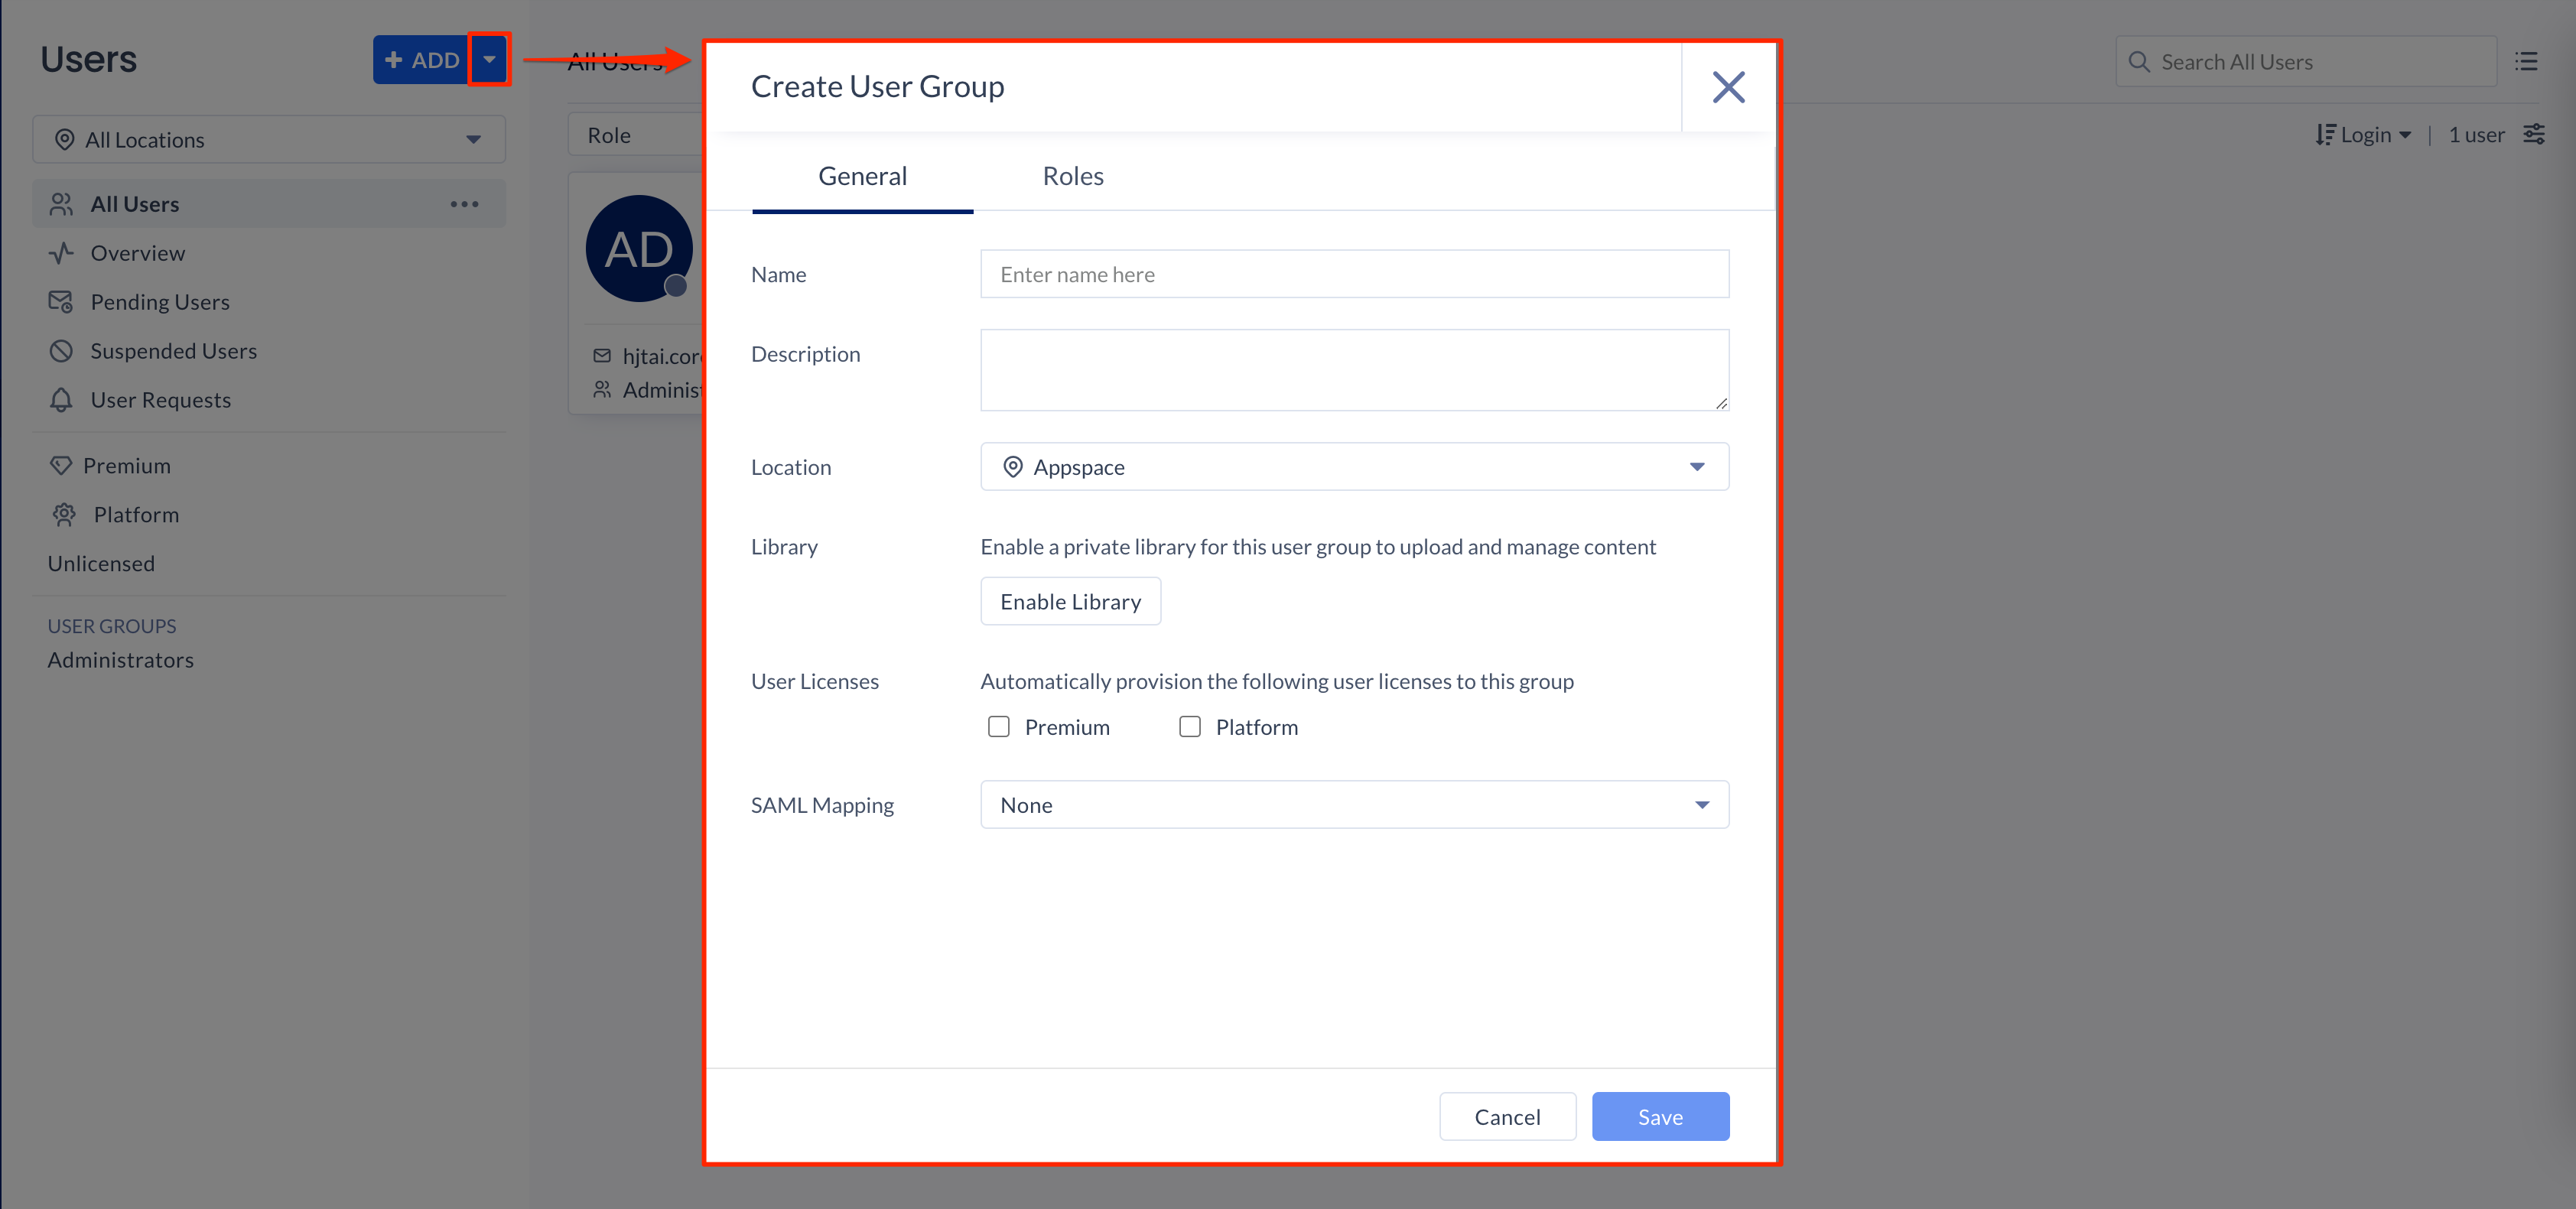
Manage User Groups
User groups are ideal for grouping users according to function, project, or locations, when you have a large number of users in the organization. You can perform bulk operations to a user group such as assigning locations, roles, or channel permissions, and all users in the group will inherit the permissions. Administrators can enable a single shared library for each user group, and configure read, write, or only view, permissions allowing users assigned to the user group to view and manage content together.
With the latest SAML enhancement introduced in Appspace 8.1 ac.19, the SAML Mapping feature allows administrators to automatically assign users to user groups based on custom rules that utilize the Just-In-Time provisioning feature.
On the Users dashboard, click the +ADD button, and select Create User Group to create a user group.
Common Library
An Account Owner may create one common library for all users under his account, by clicking the All Users ellipsis on the Users dashboard and selecting Configure Common Library. The Account Owner can configure read, write, or only view, permissions allowing users to view and manage content together in the common library.

Was this article helpful?