Craft a seamless Space Reservations experience tailored to your unique needs and preferences with Appspace’s comprehensive Reservation Settings. Whether you’re looking to manage privacy, set restrictions, or streamline notifications, our intuitive controls empower you to create an environment that fosters collaboration and productivity.
This article provides Administrators with instructions to configure various global reservation settings for the Reservations module.
Prerequisites
- An Account Owner or Location Admin user role with the Platform User license assigned.
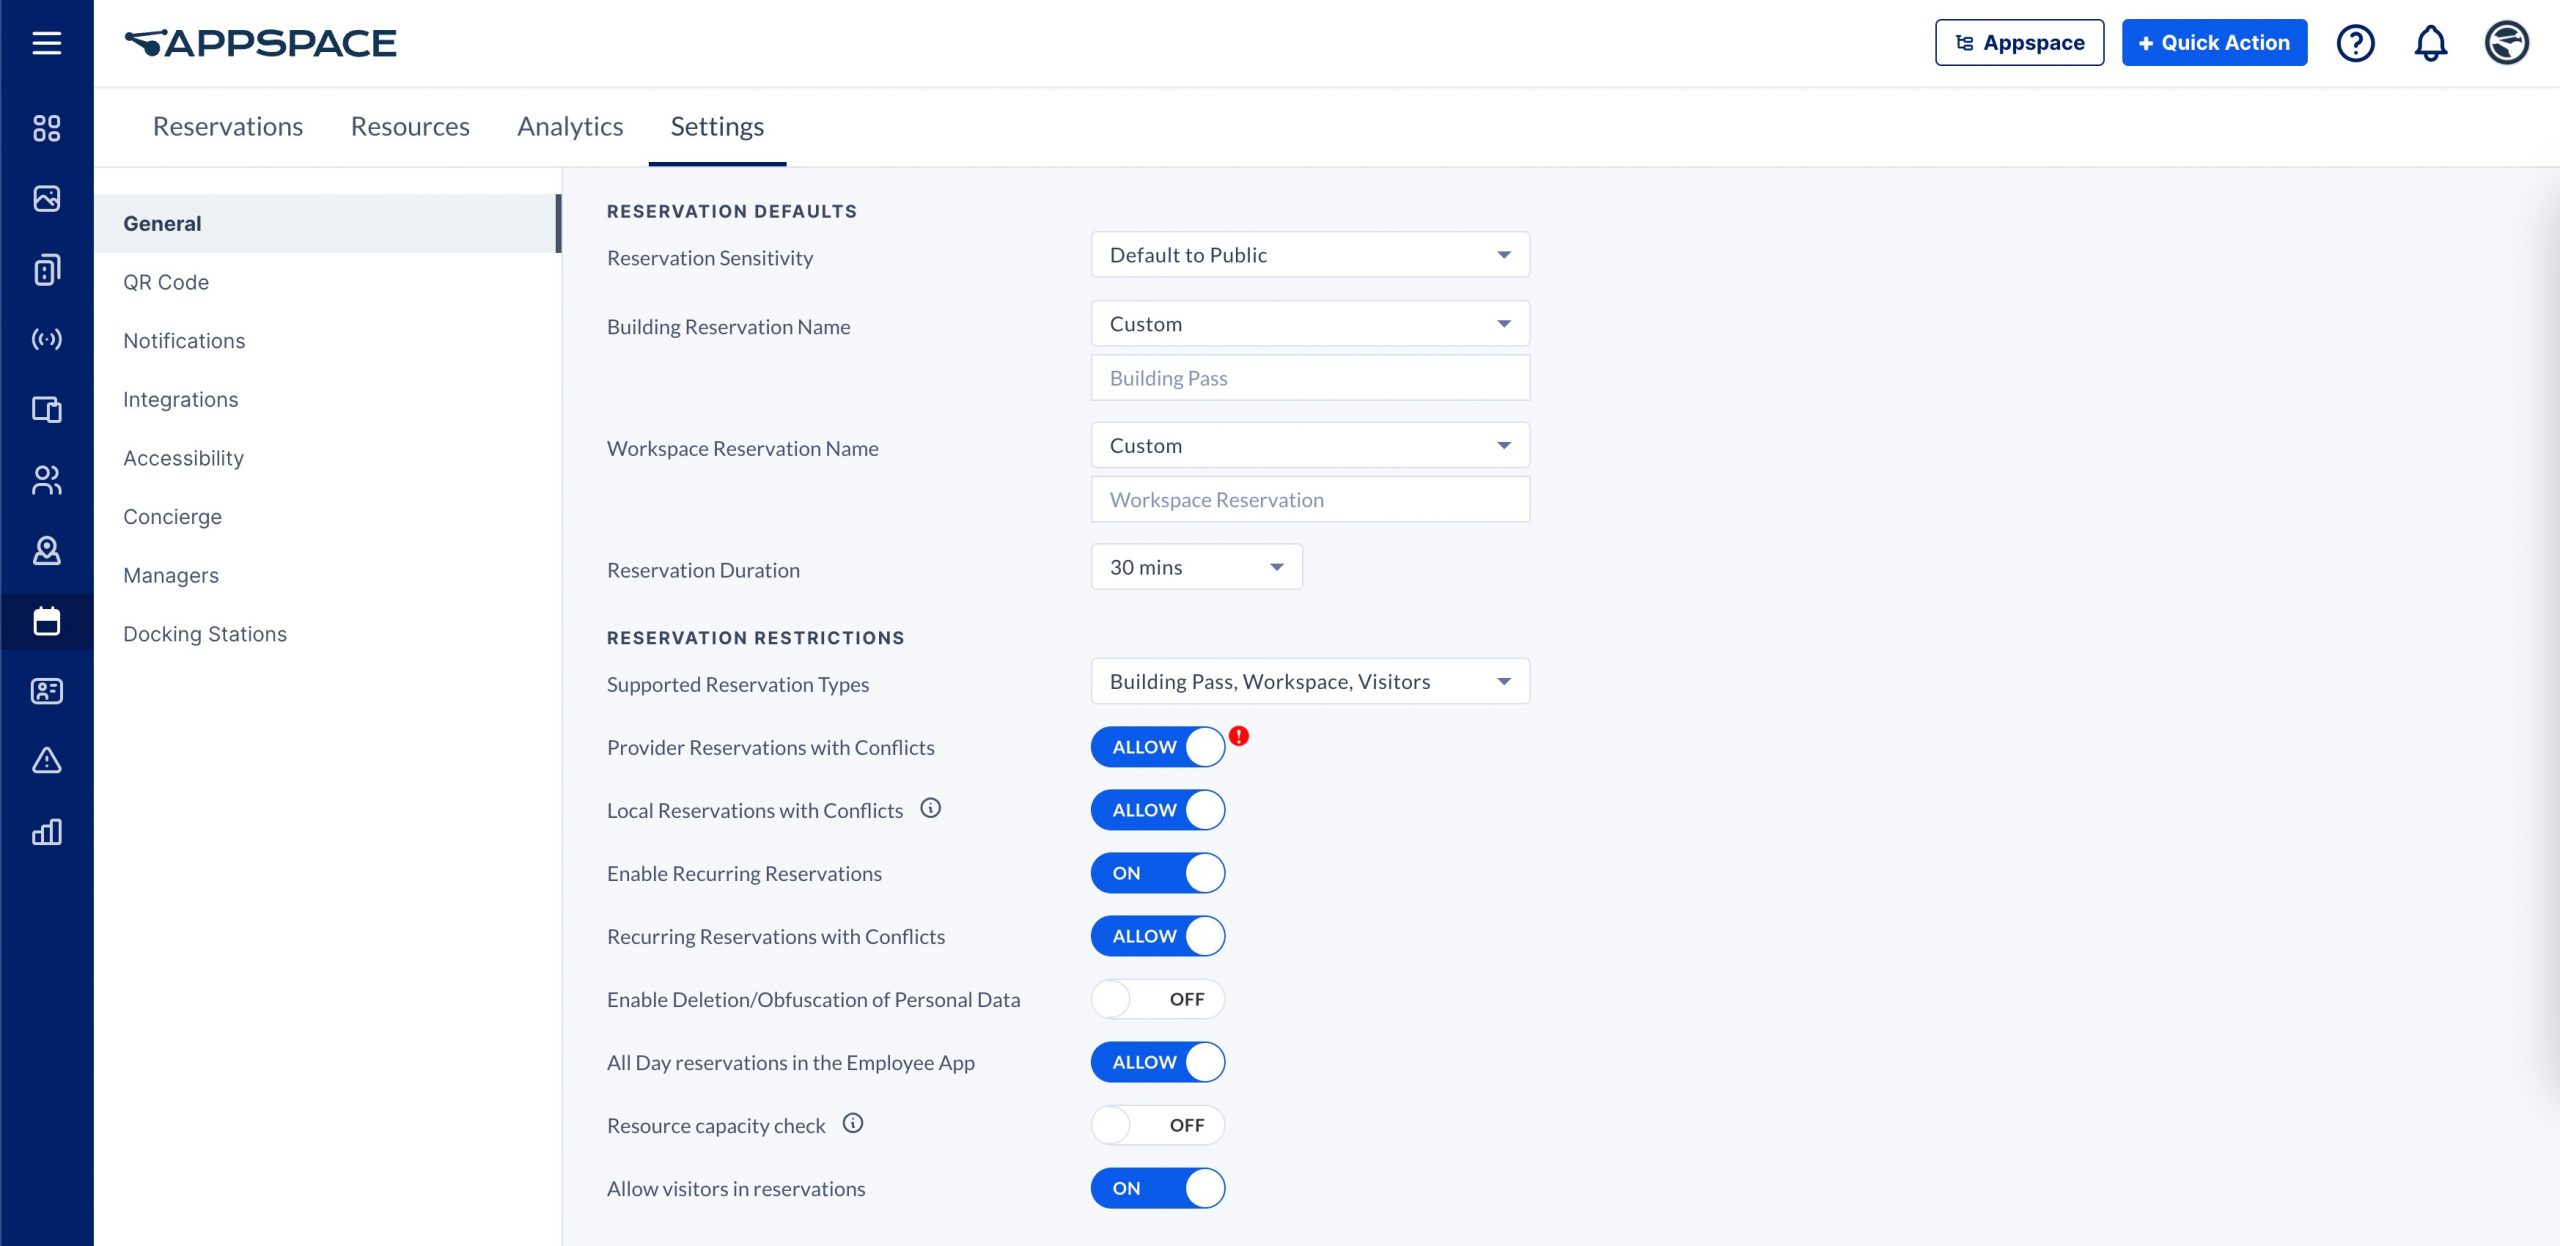
General Settings for Reservations
The General settings listed below contain settings focused on reservation defaults and restrictions applied to resources within the Space Reservations module.
The General Reservation settings can be accessed via the Settings > General tab within the Reservations module.
RESERVATION DEFAULTS
Configure Reservation Sensitivity (Privacy)
The Reservation Sensitivity setting option allows Admins to establish the default reservation privacy settings for all reservations throughout the organization. These settings can be configured to make reservations always public, private, or allow the organizers to determine the privacy settings when making the reservation.
To configure the Reservation Sensitivity setting, select the desired option from the drop-down menu:
- Default to Public – Reservations are made public (by default), with the option to change privacy settings during the reservation process.
- Default to Private – Reservations are made private (by default), with the option to change privacy settings during the reservation process.
- Always Public – Reservations are always made public, without the option to change privacy settings during the reservation process.
- Always Private – Reservations are always made private, without the option to change privacy settings during the reservation process.
Configure Free/Busy Reservation
The Free/Busy Reservation setting option allows Admins to determine the default employee availability on their calendars when making reservations. These settings can be configured to make employee availability on reservations free or busy by default. However, employees still have the option to determine their availability during the reservation process.
To configure the Free/Busy Reservation setting, select the desired option from the drop-down menu:
- Default to Free – Employee availability is Free (by default), with the option to change during the reservation process.
- Default to Busy – Employee availability is Busy (by default), with the option to change during the reservation process.
Configure Building Reservation Name
The Building Reservation Name setting option allows Admins to determine the default reservation name for Building Passes when left blank by the organizers.
To configure the Building Reservation Name setting, select the desired option from the drop-down menu:
- Organizer Name – Displays the reservation name as: <Organizer’s Name>, ie. “John Smith”.
- Organizer Email – Displays the reservation name as: <Organizer’s Email>, ie. “johnsmith@appspace.com”.
- Custom – Displays the reservation name as the desired text entered within the text field, however, it defaults to “Building Pass” if left blank.
Configure Workspace Reservation Name
The Workspace Reservation Name setting option allows Admins to determine the default reservation name displayed for Reservations when left blank by the organizers.
To configure the Workspace Reservation Name setting, select the desired option from the drop-down menu:
- Organizer Name – Displays the reservation name as: <Organizer’s Name>, ie. “John Smith”.
- Organizer Email – Displays the reservation name as: <Organizer’s Email>, ie. “johnsmith@appspace.com”.
- Custom – Displays the reservation name as the desired text entered within the text field, however, defaults to “Workspace Reservation” if left blank.
Configure Reservation Duration
The Reservation Duration setting option allows Admins to re-define the default duration for reservations, which the system sets at 30 minutes.
To configure the Reservation Duration setting, select the desired option from the drop-down menu:
- <x> mins/hrs – Defines a duration between 15 mins to 2 hrs time slots.
- Office Hours – Defines Office Hours as the default duration, which can be configured here. (ie. 9 am to 5 pm).
- All Day – Defines All Day as the default duration.
- Custom – Defines a custom duration.
Example:
If the Reservation Duration is set at 1 hr, organizers will be able to reserve workspace resources at a minimum of an hour, or in 1-hour increments only, ie. 1 pm – 2 pm, 2 pm – 3 pm.
Configure Hide Reservations In User Profile
The Hide Reservations In User Profile setting option allows Admins to increase user privacy (while reducing distractions) by hiding the Reservations tab in user profiles on the Employee App.
To configure the Hide Reservations In User Profile setting, slide the toggle switch to the preferred option:
- ON – Hides the Reservations tab in user profiles.
- OFF – Displays the Reservations tab in user profiles.

RESERVATION RESTRICTIONS
Configure Supported Reservation Types
The Supported Reservation Types setting option allows Admins to enable the Space Reservations or Visitor Management features on the Employee App.
To configure the Supported Reservation Types setting, select the desired feature(s) from the drop-down menu:
- Building Pass – Enables Building Pass reservations on the Employee App.
- Workspace – Enables Workspace reservations on the Employee App.
- Visitors – Enables Visitor invitations on the Employee App.
Configure Provider Reservations with Conflicts
The Provider Reservation with Conflicts setting option allows Admins to configure how reservation conflicts are handled within the calendar provider. This setting is supported on both Microsoft 365 (Office 365) and Google Workspace (Google Calendar) providers.
To configure the Provider Reservation with Conflicts setting, slide the toggle switch to the preferred option:
- ALLOW – Permits multi-resource reservations even if conflicts exist. Conflicted reservations will be marked with a “Conflict” status, while non-conflicted reservations will be successfully created and confirmed on the Reservations dashboard.
- CANCEL – Removes conflicted resources from the entire multi-resource reservation, maintaining an “Active” status on the Reservations dashboard. If the final resource or a single resource reservation remains in conflict, the reservation will be Canceled.
Limitations:
- The Microsoft 365 (Office 365) calendar provider does not support privacy updates on resources within a recurring reservation. This means that changing the privacy settings for a recurring reservation will only affect future occurrences, while past reservations will retain their original privacy settings.
Configure Local Reservations with Conflicts
The Local Reservation with Conflicts setting option allows Admins to configure how reservation conflicts are handled within the Appspace provider (local).
To configure the Local Reservation with Conflicts setting, slide the toggle switch to the preferred option:
- ALLOW – Permits multi-resource reservations even if conflicts exist. Conflicted reservations will be marked with a “Conflict” status, while non-conflicted reservations will be successfully created and confirmed on the Reservations dashboard.
- CANCEL – Removes conflicted resources from the entire multi-resource reservation, maintaining an “Active” status on the Reservations dashboard. If the final resource or a single resource reservation remains in conflict, the reservation will be Canceled.
Configure Enable Recurring Reservations
The Enable Recurring Reservations setting option allows Admins to configure recurring reservations for the Appspace provider (local).
To configure the Enable Recurring Reservations setting, slide the toggle switch to the preferred option:
- ON – Enable recurring reservations for Appspace provider resources.
- OFF – Disables the feature.
When enabled (ON), the following settings are available:
Configure Recurring Reservations with Conflicts
The Recurring Reservations with Conflicts setting option allows Admins to configure how recurring reservation conflicts are handled.
To configure the Recurring Reservations with Conflicts setting, slide the toggle switch to the preferred option:
- ALLOW – Permits recurring reservations even if conflicts exist. Conflicted reservations will be marked with a “Conflict” status, while non-conflicted reservations will be successfully created and confirmed on the Reservations dashboard.
- BLOCK – Prevents any reservations from being made if there are any conflicts.
Configure Enable Deletion/Obfuscation of Personal Data
The Enable Deletion/Obfuscation of Personal Data setting option allows Admins to configure the removal or masking of reservation data containing personal information, such as attendee names and email addresses, after a specified retention period. This feature is ideal for meeting regulatory and business requirements related to data privacy.
To configure the Enable Deletion/Obfuscation of Personal Data setting, slide the toggle switch to the preferred option:
- ON – Enable the deletion or obfuscation of personal data.
- Delete all personal data – Reservation data records older than the specified retention period will be permanently deleted. You will not have access to these records beyond the retention period, and there is no recovery option for deleted reservation records.
- Obfuscate all personal data – Reservation data records will have all personal identification information masked. While the reservation records will still exist, they will not contain any personal data that can be traced back to an individual.
- After <number> days – Retention period can be set from 0 – 180 days max, defaulted at 30 days.
- OFF – Disable the deletion or obfuscation of personal data feature.
Configure All Day Reservations
The All Day Reservations setting option allows Admins to enable All Day reservations to be made on the Employee App.
To configure the All Day Reservations setting, slide the toggle switch to the preferred option:
- ALLOW – Enable All Day reservations in the Employee App.
- BLOCK – Disables the feature.
Configure Resource Capacity Check
The Resource Capacity Check setting option allows Admins to enforce capacity checks on all resources with capacity limits during reservations.
To configure the Resource Capacity Check setting, slide the toggle switch to the preferred option:
- ON – Enforce resource capacity checks for all resources with capacity limits..
- OFF – Disables the feature.
Configure Allow Visitors in Reservations
The Allow Visitors in Reservations setting option allows Admins to enable visitors to be added as attendees in reservations.
To configure the Allow Visitors in Reservations setting, slide the toggle switch to the preferred option:
- ON – Allows visitors to be added as attendees in reservations.
- OFF – Restricts visitors as attendees in reservations.
Configure Default Attendees to Virtual
The Default Attendees to Virtual setting option allows Admins to set the default attendees as “Virtual” for reservations.
To configure the Default Attendees to Virtual setting, slide the toggle switch to the preferred option:
- ON – Set default attendees to be virtual.
- OFF – Disables the feature.
Configure Lock Resource Availability While Reserving
The Lock Resource Availability While Reserving setting option allows Admins to set the resource lock for reservations.
To configure the Lock Resource Availability While Reserving setting, slide the toggle switch to the preferred option:
- ON – Enable the lock feature for resources.
- OFF – Disables the feature.
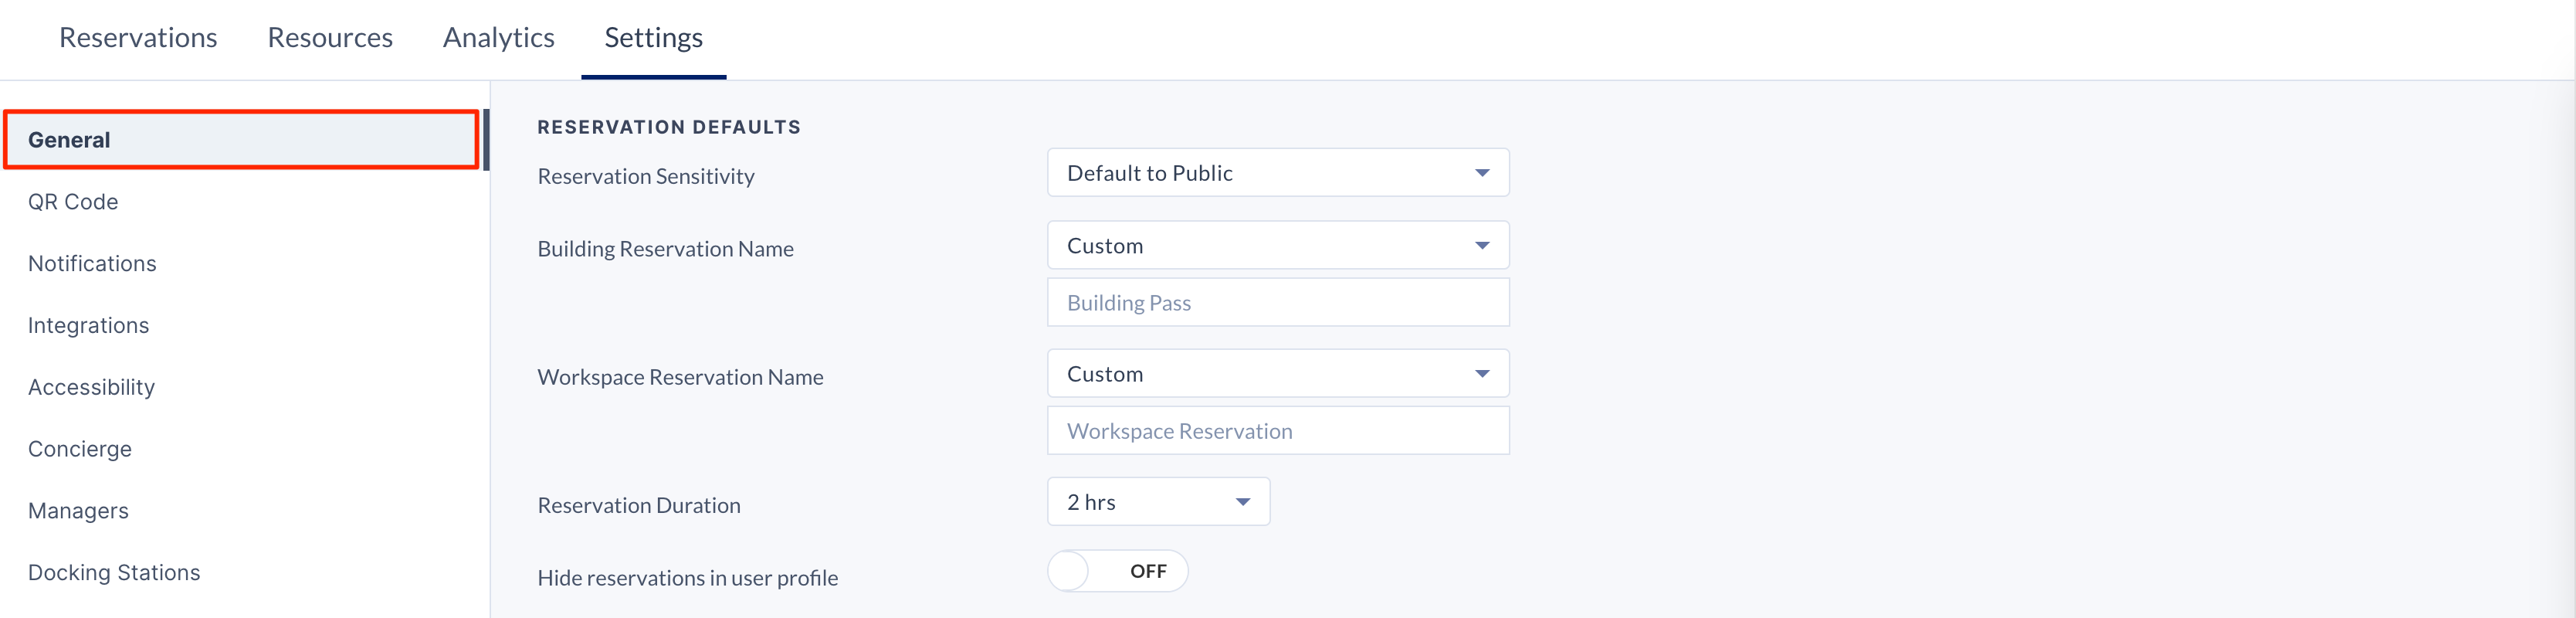
QR Code Settings for Reservations
The QR Code settings listed below contain settings focused on QR Codes displayed within the Space Reservations module.
The QR Code Reservation settings can be accessed via the Settings > QR Codes tab within the Reservations module.
Configure Resource QR Code
The Resource QR Code setting option allows Admins to display QR Codes for resources.
To configure the Resource QR Code setting, select the desired option from the drop-down menu:
- Default to Enabled – Displays QR codes by default, with the option to hide.
- Default to Disabled – Hides QR codes by default, with the option to display.
- Always Enabled – Displays QR codes on resources.
- Always Disabled – Hides QR codes on resources.
Configure Reservation QR Code
The Reservation QR Code setting option allows Admins to display QR Codes for reservations.
To configure the Reservation QR Code setting, select the desired option from the drop-down menu:
- Enabled – Displays QR Codes for reservations.
- Disabled – Hides QR Codes for reservations.
Notifications Settings for Reservations
The Notifications settings listed below contain settings focused on notifications within the Space Reservations module.
The Notifications settings can be accessed via the Settings > Notification tab within the Reservations module.

NOTIFICATIONS
Configure Provider Notifications
The Provider Notifications setting option allows Admins to enable Appspace notifications for specific reservation events on provider resources.
To configure the Provider Notifications setting, select the desired reservation events from the drop-down menu:
- Created –
- Updated –
- Canceled –
- Checkpoints –
- Check-in –
- Attendee Responses –
Configure Email Notifications
The Email Notifications setting option allows Admins to enable email notifications for reservations.
To configure the Email Notifications setting, slide the toggle switch to the preferred option:
- ON – Enable email notifications for reservations.
- OFF – Disables the feature.
Configure Weekly Digest Notifications
The Weekly Digest Notifications setting option allows Admins to enable weekly digest notifications for reservations. Email Notifications must be enabled for this feature.
To configure the Weekly Digest Notifications setting, slide the toggle switch to the preferred option:
- ON – Enable weekly digest notifications for reservations.
- OFF – Disables the feature.
Configure Enterprise Messaging Notifications
The Enterprise Messaging Notifications setting option allows Admins to assign the enterprise messaging app, notifications are sent based on the following reservation events:
- Reservation Creation
- Reservation Cancellation
- Reservation Change of Status
- Attendee Confirmation Notification
- Attendee Decline Notification
- Checkpoint Notification
- Check-In Notification
To configure the Enterprise Messaging Notifications setting, select the desired option from the drop-down menu:
- Select a Passport – Select a pre-existing enterprise messaging app passport.
- Create a New Passport – Create a new enterprise messaging passport.
Configure Push Notifications
The Push Notifications setting option allows Admins to enable push notifications on Appspace App mobile devices.
To configure the Push Notifications setting, slide the toggle switch to the preferred option:
- ON – Enable push notifications for Appspace App mobile devices.
- OFF – Disables the feature.
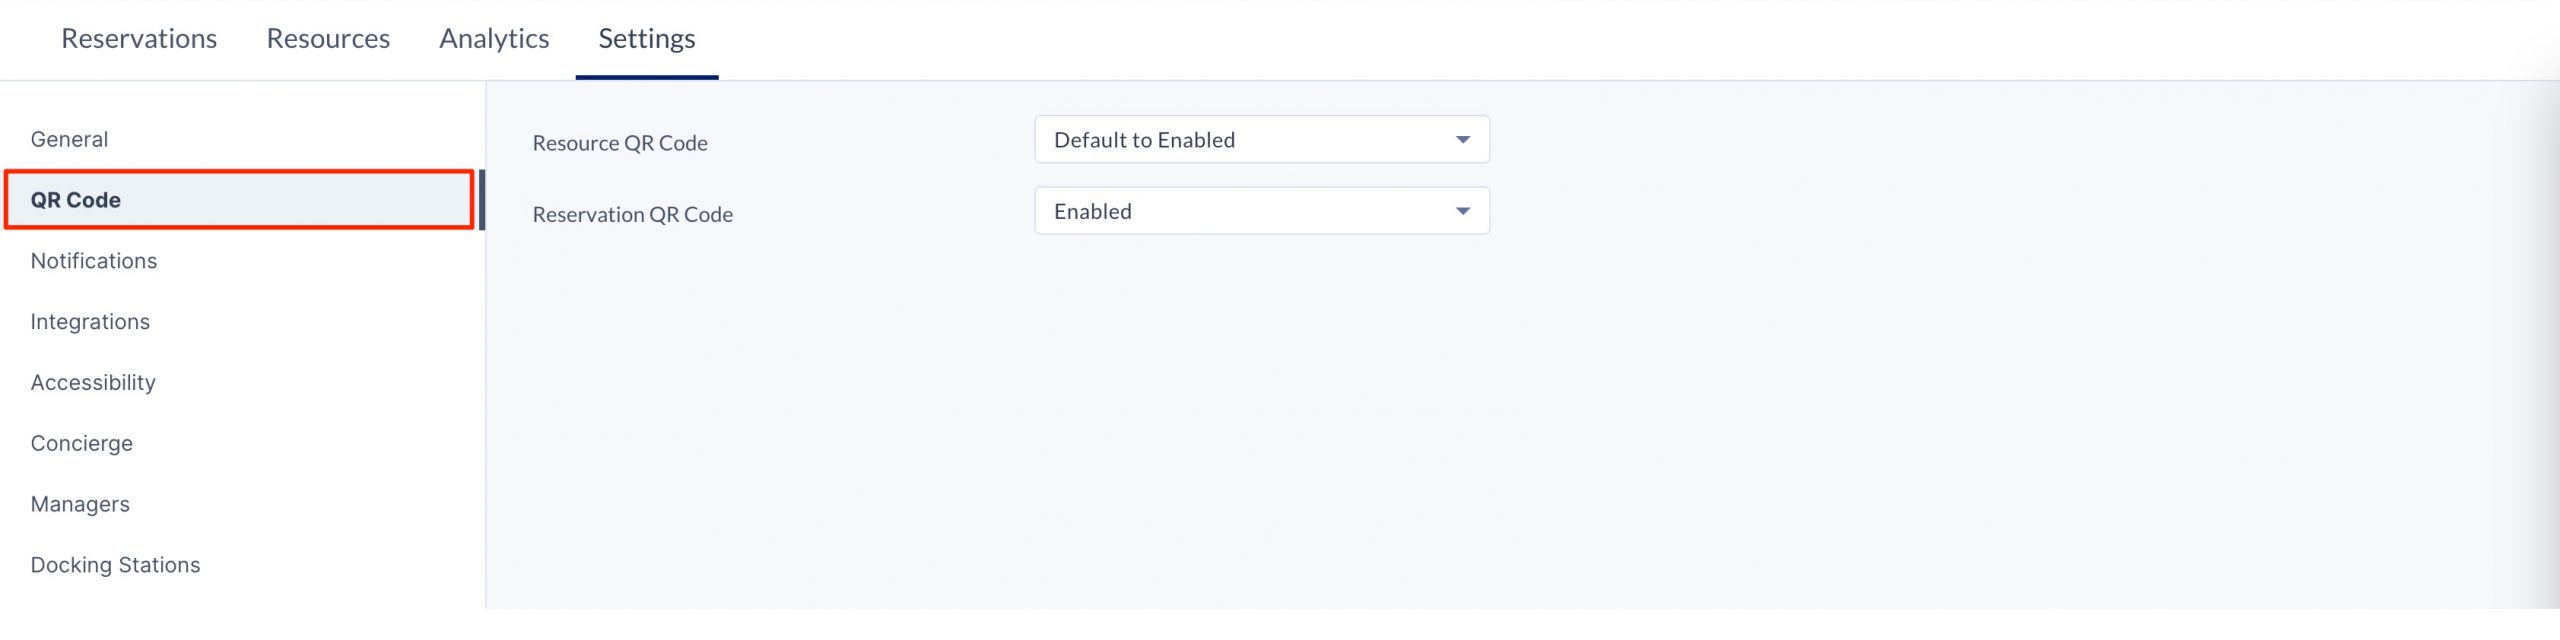
Configure the Global Notification Template
The Global Notification Template allows Admins to customize the email notifications layout to match the organization’s branding theme.
To configure the Global Notification Template, click the Edit icon on the Global Settings template:
- In the Global Notification Template window, proceed to configure the following customizations in the Details section:
- Enable Attendance Block – Enable (default) the display of the response options (Yes, No, Maybe) for the recipient.
- Accent Color – Customize the accent color to match the organization’s branding theme, by selecting from the color picker or entering the color’s hex code.
- Sender Display Name – Customize the sender’s name, or leave it blank to display “Appspace Reservations” by default.
- Additional Text – Displays additional text to be included in the notification, such as important notices, or disclaimers.
- None – Disables additional text.
- Top – Displays additional text at the top of the notification, above the logo and event title.
- Middle – Displays additional text in the middle of the notification, below the reservation information and above the attendance block.
- Bottom – Displays additional text at the bottom of the notification.
- Logo – Displays the organization’s logo on the email notification, by uploading an image or browsing for the image in the Library.
The Preview section on the right displays the customizations made to the Global Notification template.
Create and Configure Location-Based Notification Templates
The Location-based Notification Templates allows Admins to customize the email notifications layout to match the organization’s branding theme.
To configure the Location-based Notification Templates, click the Edit icon on the desired Location-based template:
- In the Location-based Notification Template window, proceed to select the Location and inheritance of the notification template from the dropdown menus.
- Next, configure the location-based email and weekly digest notifications in the Location Notifications section:
- Email –
- Weekly Digest –
- Once done, proceed to configure the following customizations in the Details section:
- Enable Attendance Block – Enable (default) the display of the response options (Yes, No, Maybe) for the recipient.
- Accent Color – Customize the accent color to match the organization’s branding theme, by selecting from the color picker or entering the color’s hex code.
- Sender Display Name – Customize the sender’s name, or leave it blank to display “Appspace Reservations” by default.
- Additional Text – Displays additional text to be included in the notification, such as important notices, or disclaimers.
- None – Disables additional text.
- Top – Displays additional text at the top of the notification, above the logo and event title.
- Middle – Displays additional text in the middle of the notification, below the reservation information and above the attendance block.
- Bottom – Displays additional text at the bottom of the notification.
- Logo – Displays the organization’s logo on the email notification, by uploading an image or browsing for the image in the Library.
The Preview section on the right displays the customizations made to the Location-based template.
Integrations Settings for Reservations
The Integrations settings listed below contain settings focused on resource and conferencing integrations within the Space Reservations module.
The Integrations settings can be accessed via the Settings > Integrations tab within the Reservations module.
Configure Book on Behalf / Plugin Passport
The Book on Behalf / Plugin Passport setting option allows Admins to ensure reservations made through the calendar provider, can be edited via the Appspace platform (Appspace console or Employee App).
To configure the Book on Behalf / Plugin Passport setting, select the desired option from the drop-down menu:
- Select a Passport – Select a pre-existing calendar provider passport.
- Create a New Passport – Create a new calendar provider passport.
Limitations:
- When configured with the Google Workspace (Google Calendar) calendar provider, the following behavior is expected for recurring reservations when switching the resource privacy from Private to Public.
*Ability to restore to “Public” via the ‘Restore to original event’ from the Google Workspace (Google Calendar) calendar provider.
Single Event Updates Recurring Event Updates On Behalf Enabled On Behalf Disabled On Behalf Enabled On Behalf Disabled Organizer Calendar Updated to Public Remains Private, not updated* Updated to Public Remains Private, not updated Attendee Calendar Updated to Public Remains Private, not updated* Remains Private, not updated Remains Private, not updated Room Calendar Remains Private, not updated* Updated to Public Remains Private, not updated Updated to Public
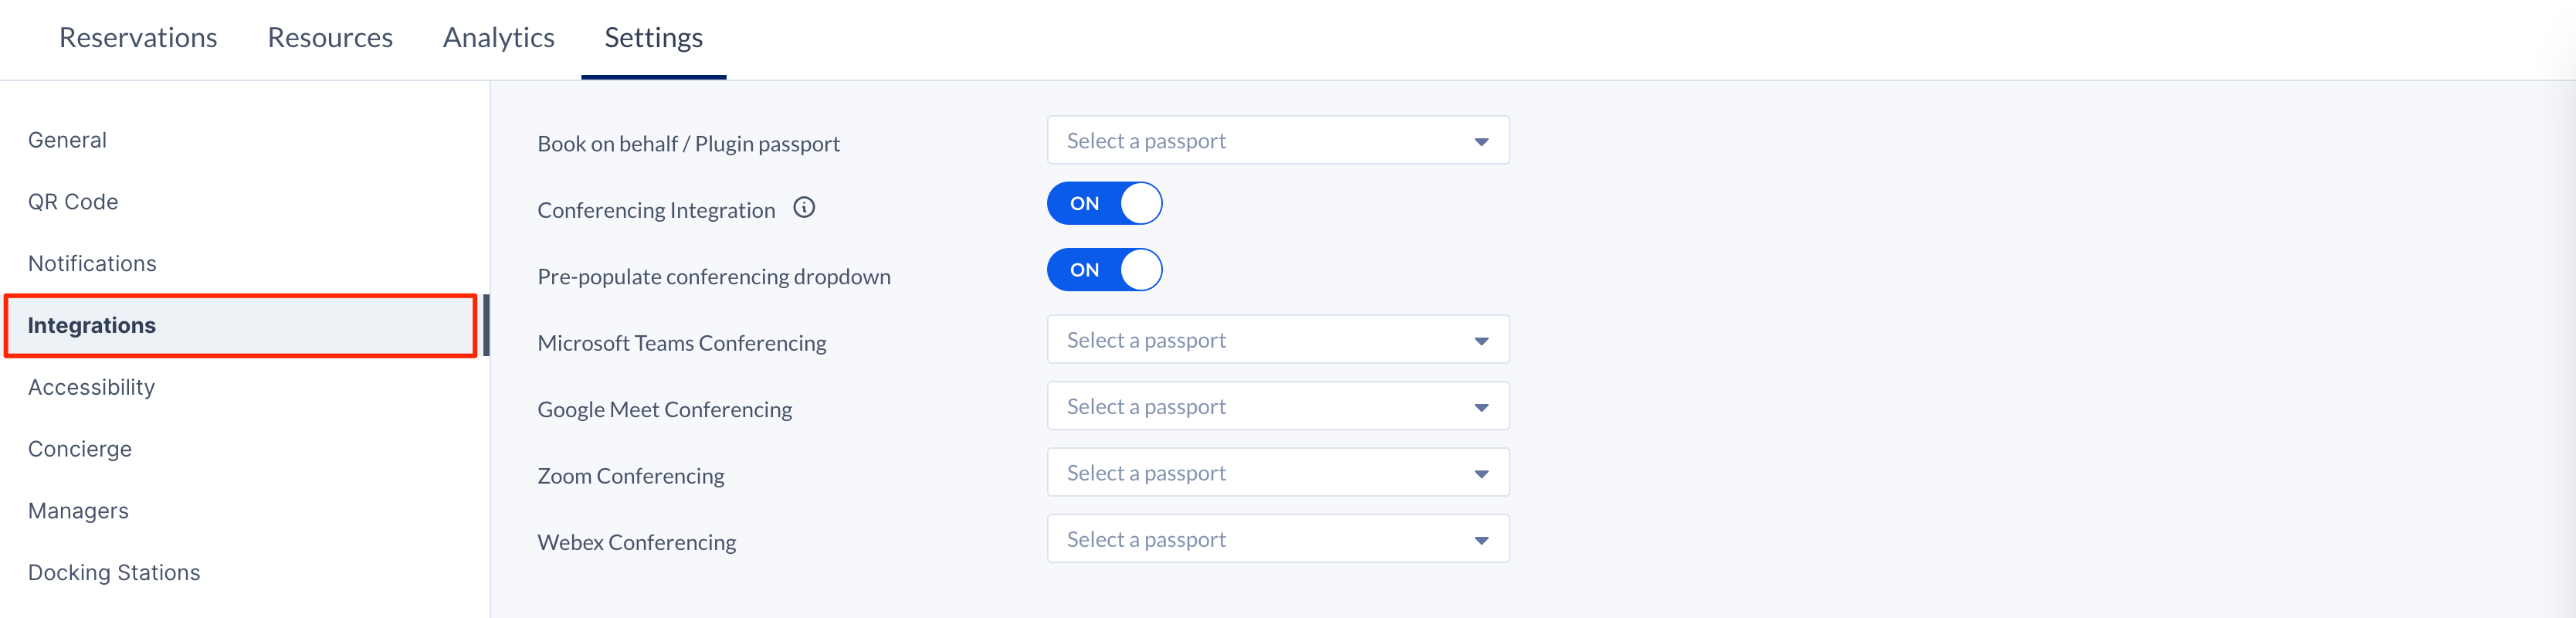
Configure Conferencing Integration
The Conferencing Integration setting option allows Admins to configure conferencing capabilities on resources during reservations.
To configure the Conferencing Integration setting, slide the toggle switch to the preferred option:
- ON – Enable conferencing options on resources.
- OFF – Disables the feature.
When enabled (ON), the following settings are available:
- Microsoft Teams Conferencing – Select a pre-existing Microsoft Teams Conferencing passport, or create a new passport.
- Google Meet Conferencing – Select a pre-existing Google Meet Conferencing passport, or create a new passport.
- Zoom Conferencing – Select a pre-existing Zoom Conferencing passport, or create a new passport.
- Webex Conferencing – Select a pre-existing Webex Conferencing passport, or create a new passport.
Configure Pre-Populate Conferencing Dropdown
The Pre-Populate Conferencing Dropdown setting option allows Admins to pre-populate the 1st conferencing option as the default option in the Conferencing dropdown when creating reservations.
To configure the Pre-Populate Conferencing Dropdown setting, slide the toggle switch to the preferred option:
- ON – The Conferencing dropdown is pre-populated with the 1st conferencing option available.
- OFF – Disables the feature.
Accessibility Settings for Reservations
The Accessibility settings listed below contain settings focused on accessibility within the Space Reservations module.
The Accessibility settings can be accessed via the Settings > Accessibility tab within the Reservations module.

Configure Default Zone Display
The Default Zone Display setting option allows Admins to displays Zones (Neighborhoods) when viewing maps in Reservations.
To configure the Default Zone Display setting, select the desired option from the drop-down menu:
- Default Show – Displays Zones (Neighborhoods) by default, allowing employees to enable or disable viewing zones on maps.
- Default Hide – Hides Zones (Neighborhoods) by default, allowing employees to enable or disable viewing zones on maps.
- Always Show – Displays Zones (Neighborhoods) on maps.
- Always Hide – Hides Zones (Neighborhoods) on maps.
Concierge Settings for Reservations
The Concierge settings listed below contain settings focused on Concierge features within the Space Reservations module.
The Concierge settings can be accessed via the Settings > Concierge tab within the Reservations module.
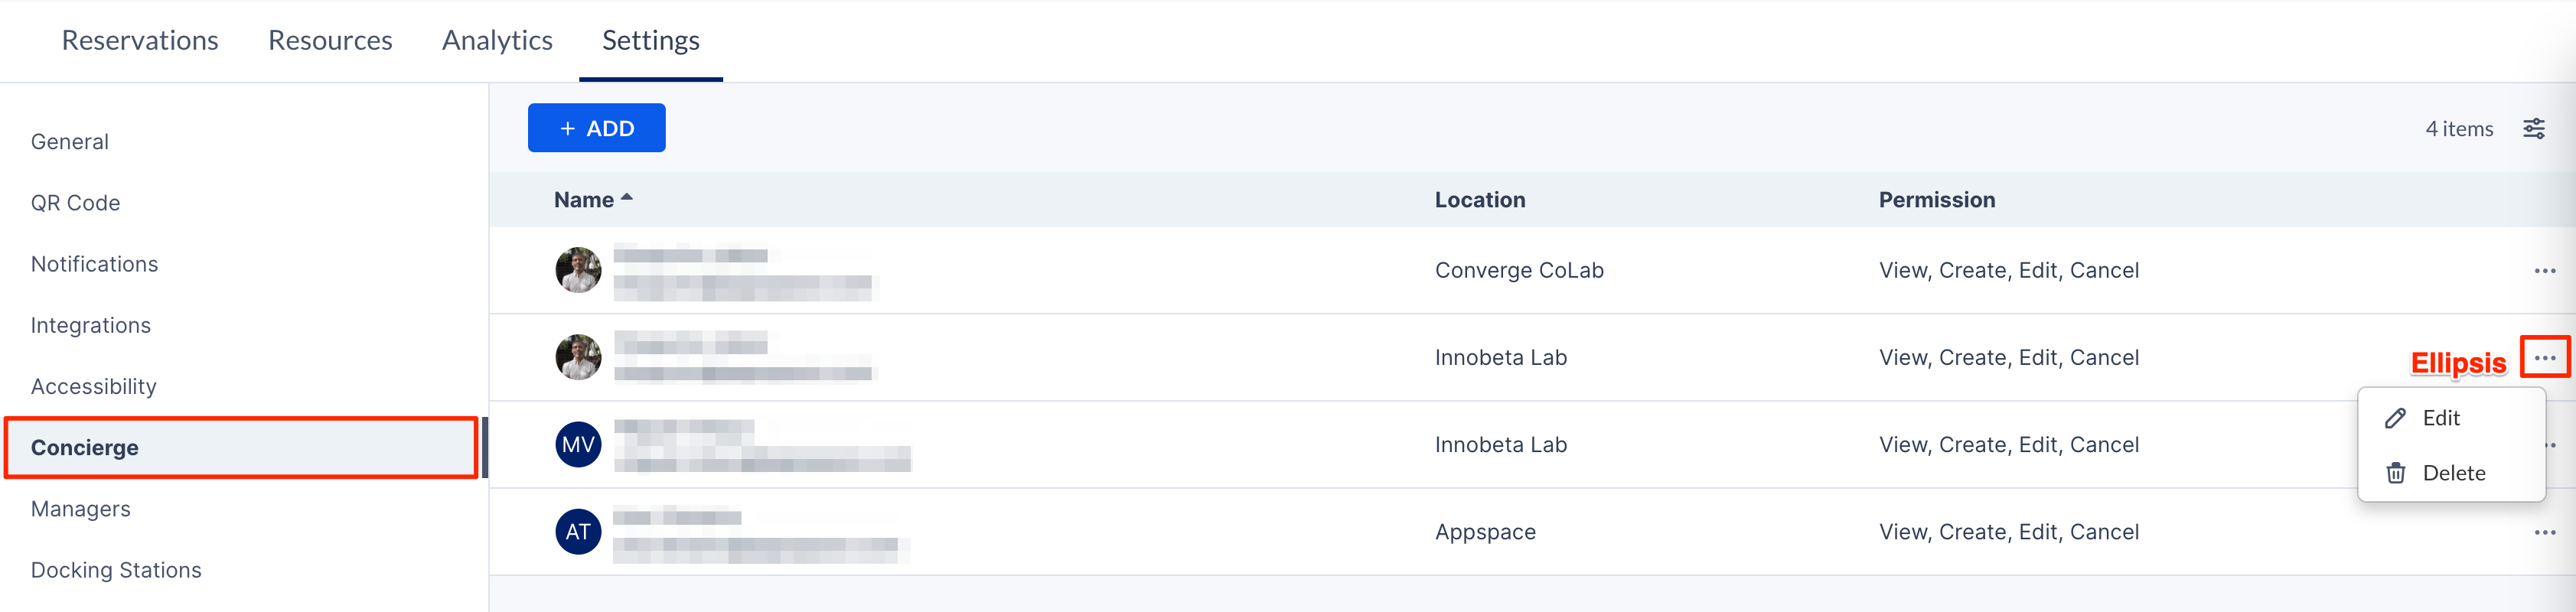
Assign and Configure Concierge Permissions
The Concierge Permissions setting option allows Admins to assign and configure Concierge permissions to users, providing them access and permissions to manage reservations through the Concierge dashboard.
To configure the Assign and Configure Concierge Permissions setting, click the + ADD button and configure the following:
- Users – Assign Concierge permissions to users.
- Locations – Assign the location of workspaces the Concierge has access to.
NoteConcierge only has visibility and access to reservations of workspaces within their location they have access to.
- Permissions –
- View (default) – Permits the Concierge to view the Concierge dashboard.
- Create – Permits the Concierge to create reservations from the Concierge dashboard.
- Edit – Permits the Concierge to edit reservations from the Concierge dashboard.
- Cancel – Permits the Concierge to cancel reservations from the Concierge dashboard.
- Override – Permits the Concierge to override reservations from the Concierge dashboard.
Once configured, the Concierge has access to the Concierge dashboard on the Employee App.
Managers Settings for Reservations
The Managers settings listed below contain settings focused on Manager features within the Space Reservations module.
The Managers settings can be accessed via the Settings > Managers tab within the Reservations module.
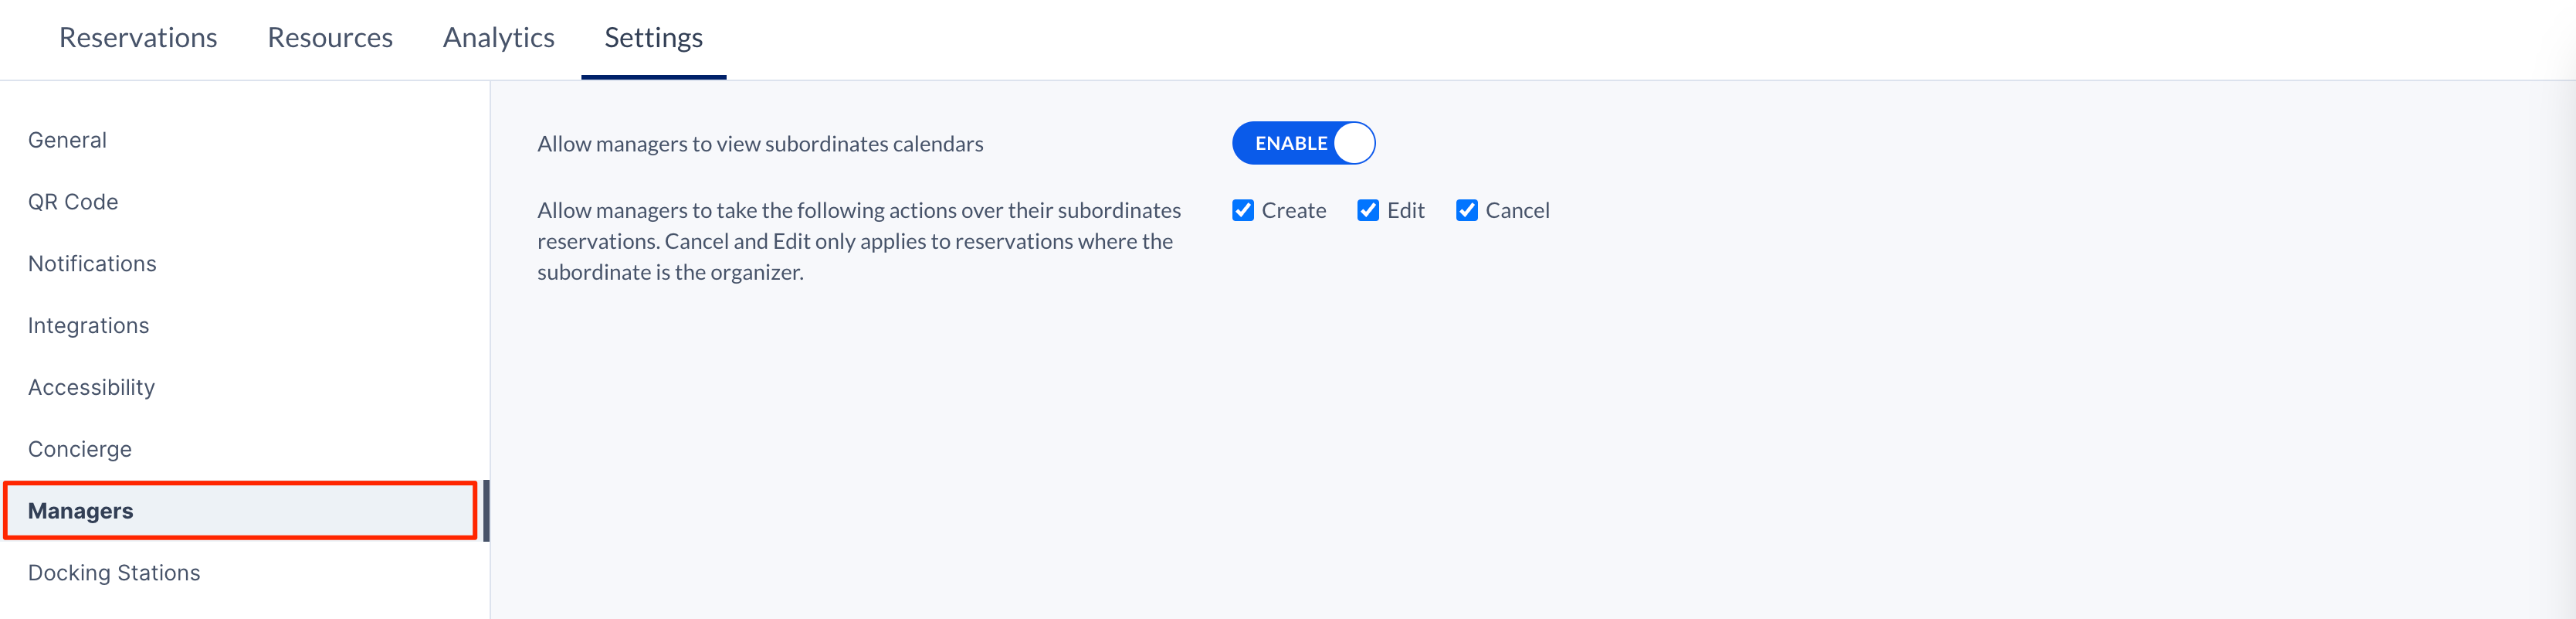
Configure Allow Managers to View Subordinates Calendars
The Allow Managers to View Subordinates Calendars setting option allows Admins to assign and configure Manager permissions to users, providing them access and permissions to manage their subordinates’ reservations through the My Team dashboard.
To configure the Allow Managers to View Subordinates Calendars setting, slide the toggle switch to the preferred option:
- ENABLE – Permits Managers to view their subordinate’s calendars.
- DISABLE – Disables the feature.
When Enabled, check the permissions checkboxes to allow Managers to take the following actions over their subordinate’s reservations :
Allow Managers to take the following actions over their subordinate’s reservations. Cancel and Edit only applies to reservations where the subordinate is the organizer.
- Create – Permits Managers to create reservations on behalf of their subordinates.
- Edit – Permits Managers to edit reservations on behalf of their subordinates.
- Cancel – Permits Managers to cancel reservations on behalf of their subordinates.
Once configured, the Manager has access to the My Team dashboard on the Employee App.
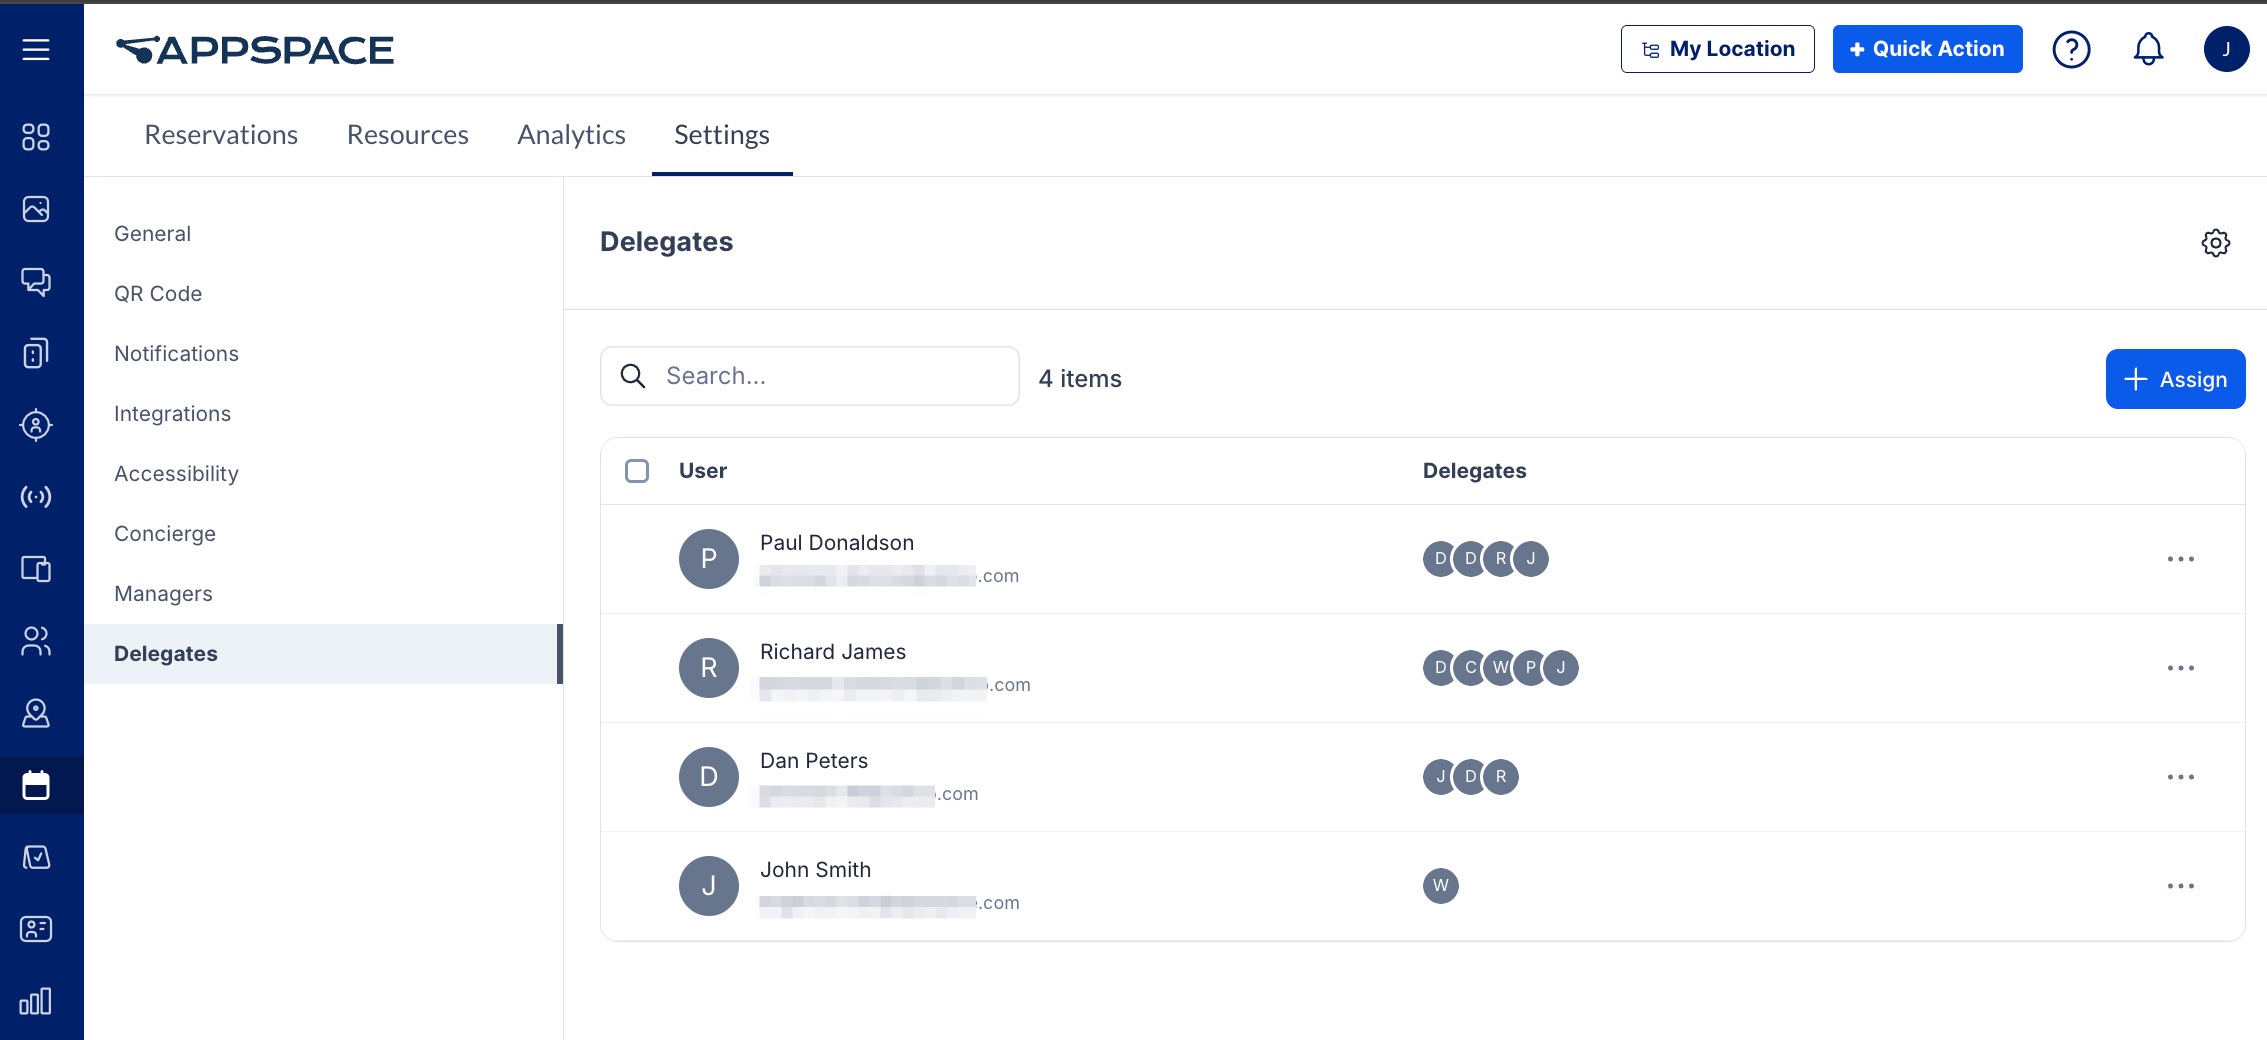
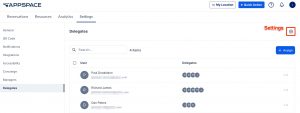
Delegate Settings for Reservations
The Delegates settings listed below contain settings focused on delegation features within the Space Reservations module. Delegates are users who have been granted permissions to view, manage, and create reservations on behalf of other meeting hosts (delegators).
The Delegate settings can be accessed via the Settings > Delegates tab within the Reservations module.
Select Passport for Delegate Settings
This setting allows Admins to select a passport to a calendar service to import its Delegation information and settings. To select a passport, follow these steps:
- A Delegations passport must be created first. Refer to this article on how to create a passport for delegation.
- Only one passport can be selected at a time.
-
- Log in to the Appspace console.
- Click Reservations from the ☰ Appspace menu, and click the Settings tab.
- Click Delegates from the left bar.
- Click the Settings icon.
- Select a passport from the drop-down list and click Save.
- You can also remove a passport after one is added. Select None from the drop-down list in the first step above.
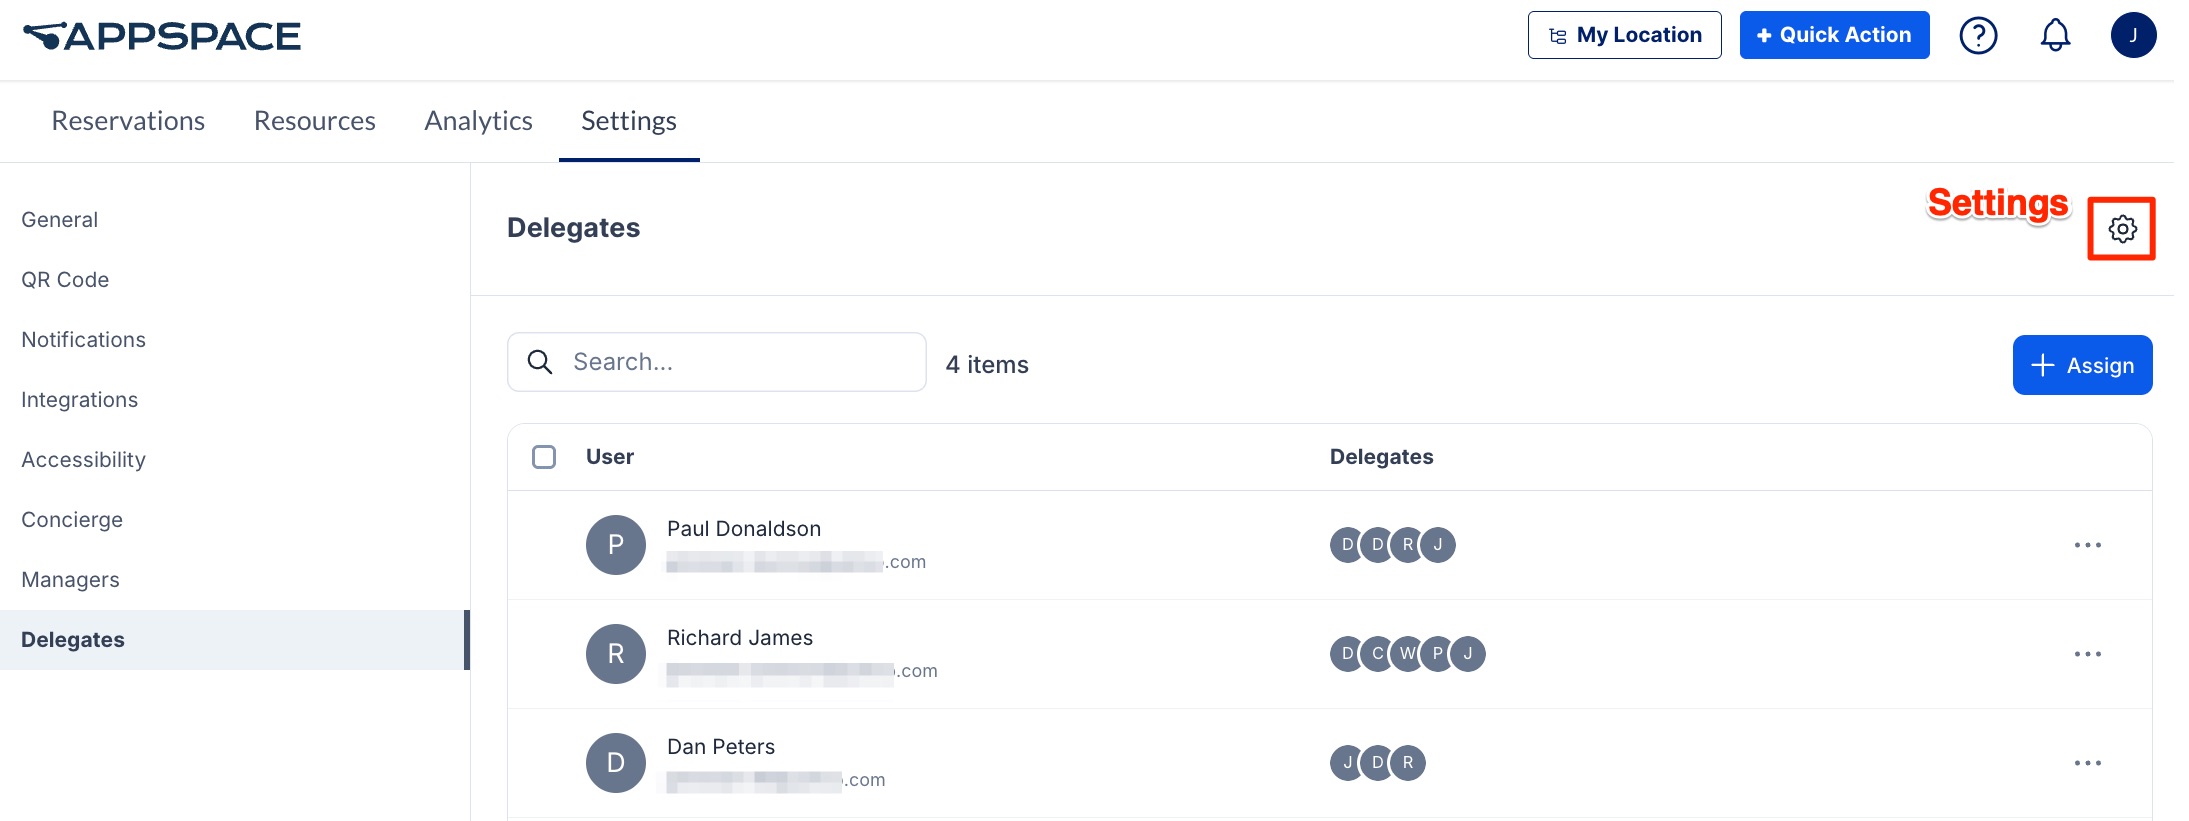
Assign and Configure Delegate Permissions
The Delegations setting page allows Location admins to assign users the delegation permissions to manage reservations through the My Delegations dashboard. To assign and configure delegates, follow these steps:
-
- Log in to the Appspace console.
- Click Reservations from the ☰ Appspace menu, and click the Settings tab.
- Click Delegates from the left bar.
- Click the + Assign button and enter the following:
- User – Click the field and type in the name or email of the user who will be the meeting organizer, or select from the drop-down list. NoteUsers who have already been added as meeting organizers will have a tick next to their name in the list and cannot be selected. You may look for their entry in the table and edit their delegates in the rows instead.
- Delegates – Enter the name or email of the user(s) who will serve as the delegate for the meeting organizer. You may enter several users at a time.Note
- If a Delegations passport has been added in the section above, the Sync delegates from passport checkbox appears. Leave it checked to include and sync delegates from the calendar service.
- If a Delegations passport is removed, the synced delegates from the calendar service will also be removed from the delegates list. However, they will be added (resynced) back if the same passport is re-added.
- User – Click the field and type in the name or email of the user who will be the meeting organizer, or select from the drop-down list.
- Click Save (or Save & Sync if a passport has been selected).
Once configured, assigned Delegates will be able to view, manage, and create reservations on behalf of the meeting organizer through the My Delegations tab in Employee Experience > Reservations.
The My Delegations tab will only appear to users who have been added as delegates.
IoT Sensor Settings
(New) The settings listed below contain settings on IoT Sensors displayed within the Space Reservations module.
The IoT Sensor settings can be accessed via the Settings > IoT Sensors tab within the Reservations module.
Add and Configure IoT Sensors
The IoT Sensors tab allows Admins to add and configure IoT Sensors for reservations.
- Log in to the Appspace console.
- Click Reservations from the ☰ Appspace menu, and click the Settings tab.
- Click IoT Sensors from the left bar. Ensure that the IoT Sensors tab from the top is selected.
- Click +Add to add the IoT Sensor. Enter the following for the sensor:
- Name (required) – Enter a name for the sensor.
- Select Driver (required) – Select the driver installed in the Drivers tab.
- Manufacturer (optional) – Enter the manufacturer name.
- Model (optional) – Enter the model of the sensor.
- Identifier (required) – Enter a unique identifier for the device.
- Serial Number (optional) – Enter a serial number for the device.
- Location (required) – Select the location where the device is located.
- Resource (required) – Select the resource (room, workspace, or POI) that contains the sensor.
- Description – Enter a description for the device, if needed.
- Click Save.
Import IoT sensors using a Spreadsheet
The IoT Sensors tab allows Admins to add and configure IoT Sensors for reservations
- Log in to the Appspace console.
- Click Reservations from the ☰ Appspace menu, and click the Settings tab.
- Click IoT Sensors from the left bar. Ensure that the IoT Sensors tab from the top is selected.
- Click the down arrow next to +Add and select Download import template.
- For each line, enter the following information for the item. The information is similar to the Add and Configure Sensor section above unless specified.
- Name (required) – Enter a name for the sensor.
- Driver ID (required) – Enter the ID of the driver installed in the Drivers tab. To obtain the driver ID, click on the ellipsis (…) on the corner of the installed driver and select Copy ID.
- Manufacturer
- Model
- Identifier (required) – Enter a unique identifier for the device.
- Serial Number
- Location ID (required) – Enter the ID of the location where the device is located.
- Resource Id
- Description
- Click the down arrow next to +Add and select Import Sensors.
- Click Browse and select the spreadsheet you saved.
- Click Import.
Upload or Install Drivers for IoT Sensors
The Drivers tab allows Admins to install drivers for IoT Sensors.
- Log in to the Appspace console.
- Click Reservations from the ☰ Appspace menu, and click the Settings tab.
- Click IoT Sensors from the left bar. Select the Drivers tab from the top.
- To add a driver package for the IoT sensor, click Upload Drivers and browse for the file.
- After the driver is added, click Install on the driver.
Was this article helpful?