Sharebox in Appspace SharePoint Intranet is a powerful content-sharing tool that enables users to quickly post updates, share files, and collaborate within their organization. It provides a seamless way to create and distribute content, ensuring that important information is easily accessible.
With Sharebox, users can upload documents, add rich text, and share updates directly within SharePoint Intranet. This feature enhances internal communication, helping teams stay informed and engaged with relevant content. Whether it’s an announcement, a project update, or a shared resource, Sharebox simplifies content sharing, making collaboration more efficient.
This article provides instructions on how to create posts, ask questions, praise colleagues, start polls, create events, write blogs, and create a wiki in Sharebox on the Appspace SharePoint Intranet.
Prerequisites
- A user must have the appropriate permissions, and the community settings must allow posts, in order for the user to post in that community.
- Supported file types:
- Images: JPEG, PNG, and GIF
- Video: only MP4
Create Post
Follow the instructions below to create a Post in Sharebox on the Appspace SharePoint Intranet.
- Log in to your Appspace SharePoint Intranet account.
- In My Newsfeed, click “What do you want to share?” text box.
- In the What do you want to share window, select Post an update .
- In the Post an update window, you may do the following:
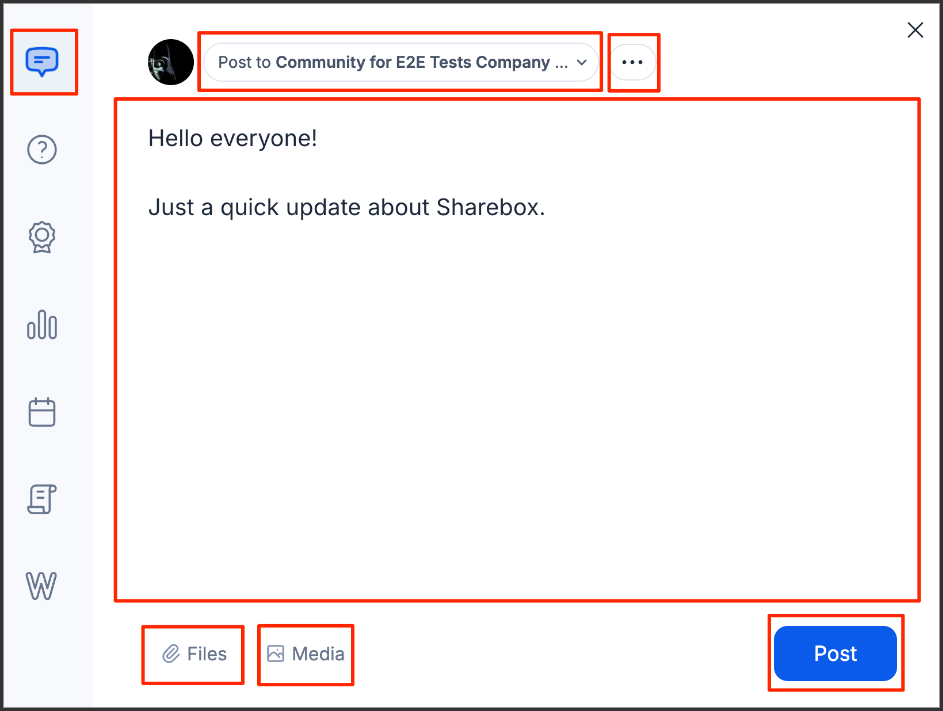
- Post to: Published your post to your desired community.
- Ellipsis (…): Add relevant tags under the settings section.
- Text box: Add post in the text box.
- Files: Upload a document file.
- Media: Upload a media file.
- Once done, click Post to published.

Create Ask A Question Post
Follow the instructions below to create an ‘Ask a Question‘ post in Sharebox on the Appspace SharePoint Intranet.
- Log in to your Appspace SharePoint Intranet account.
- In My Newsfeed, click “What do you want to share?” text box.
- In the What do you want to share window, select Ask a Question.
- In the Ask a Question window, you may do the following:
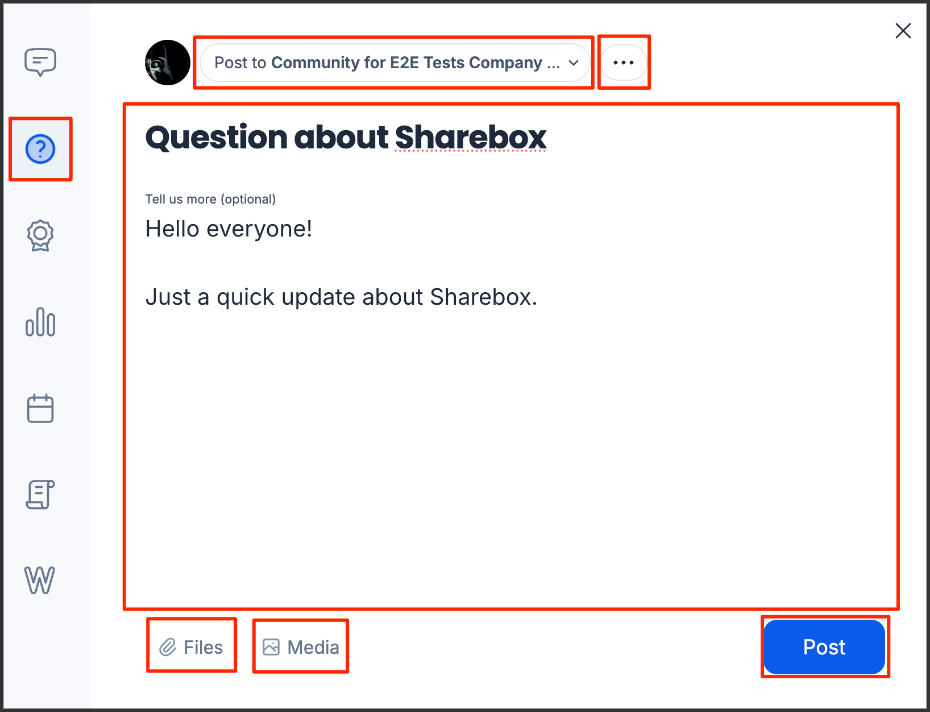
- Post to: Publish your question to your desired community.
- Ellipsis (…): Add relevant tags under the settings section.
- Text box: Add question in the text box.
- Files: Upload a document file.
- Media: Upload a media file.
- Once done, click Post to published.
Create Praise Post
Follow the instructions below to create a Praise post in Sharebox on the Appspace SharePoint Intranet.
- Log in to your Appspace SharePoint Intranet account.
- In My Newsfeed, click “What do you want to share?” text box.
- In the What do you want to share window, select Praise your colleague.
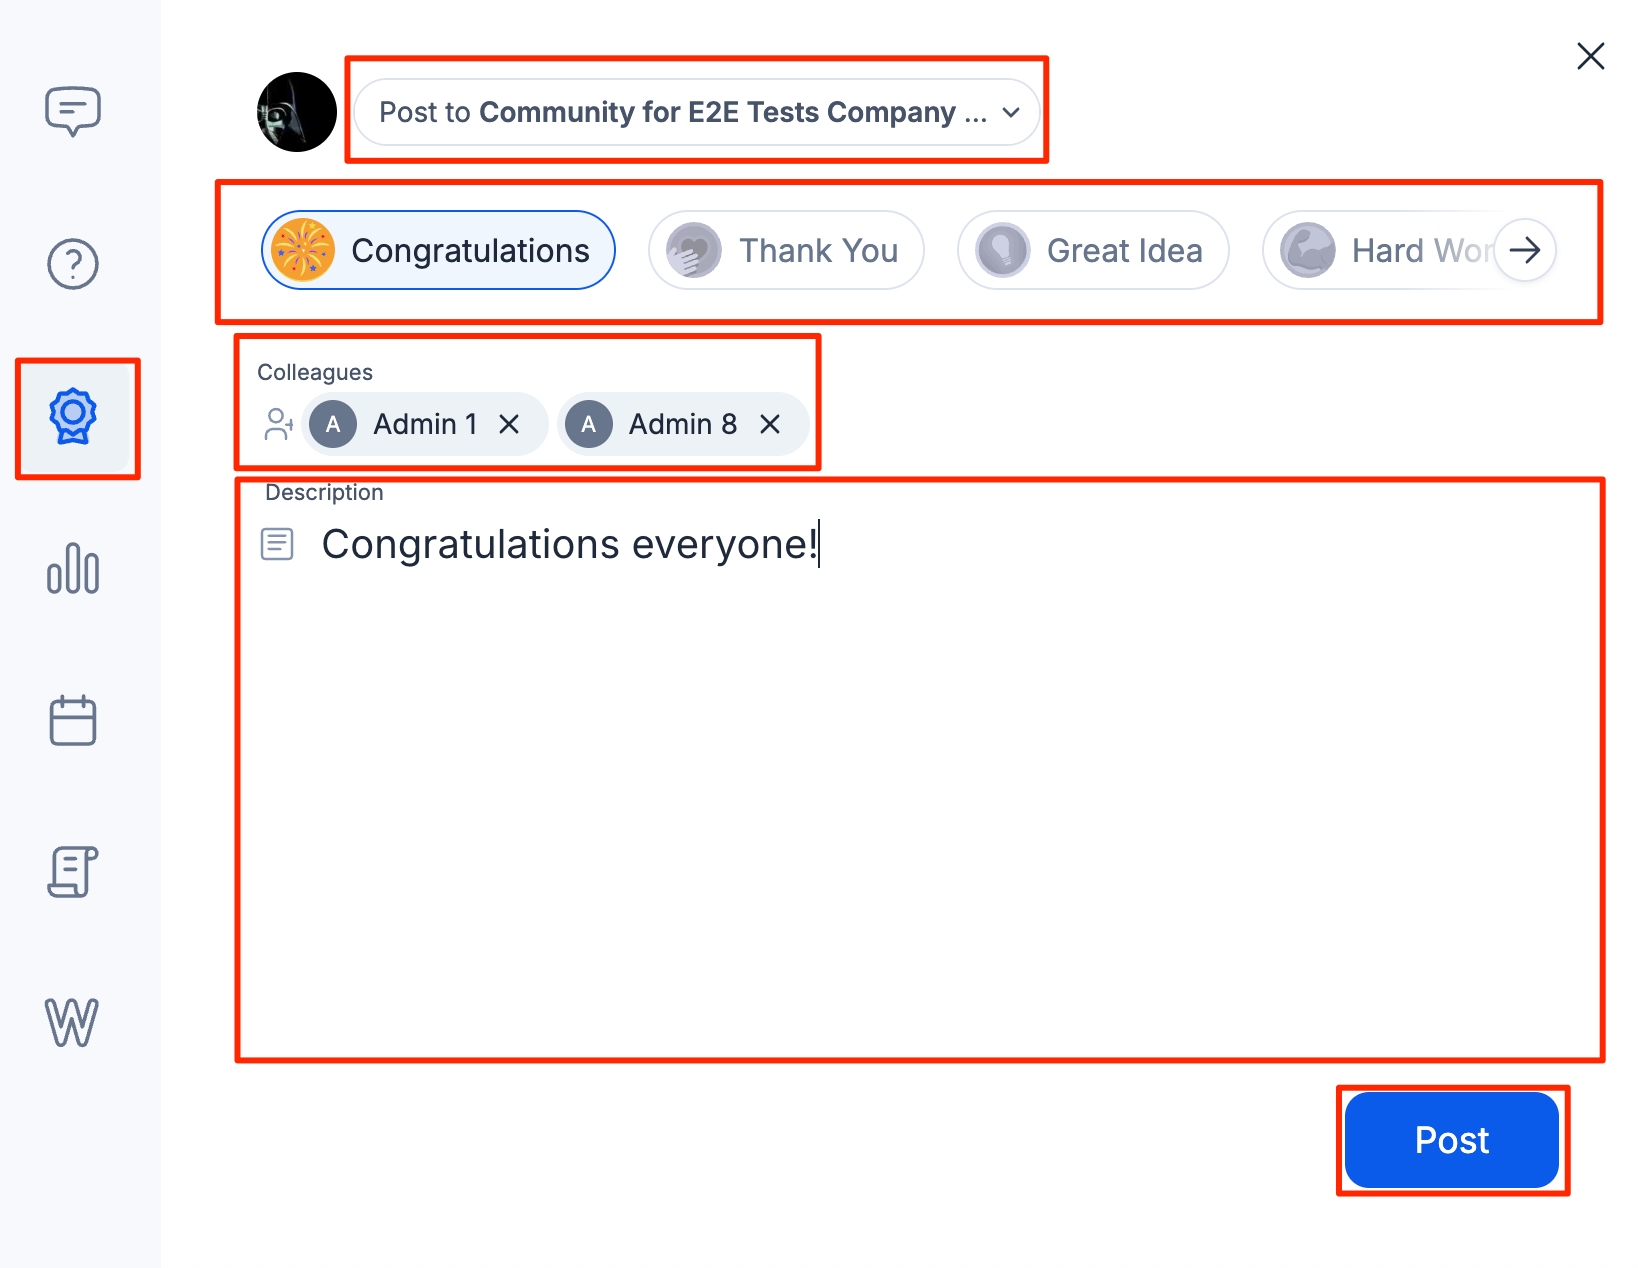
- In the Praise your colleague window, you may do the following:
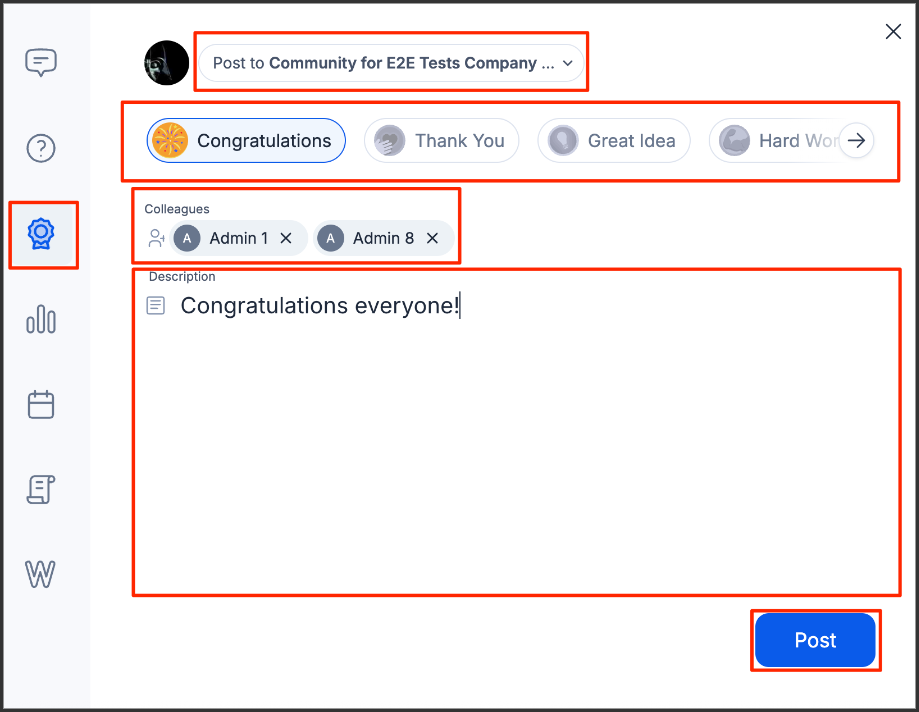
- Post to: Publish your praise post to your desired community.
- Praises: Praises include the following options: Congratulations, Thank You, Great Idea, Hard Worker, Successful Project, Task Well Done, and Valuable Employee.
- Colleagues: Add colleagues.
- Text box: Add description to the text box.
- Once done, click Post to published.
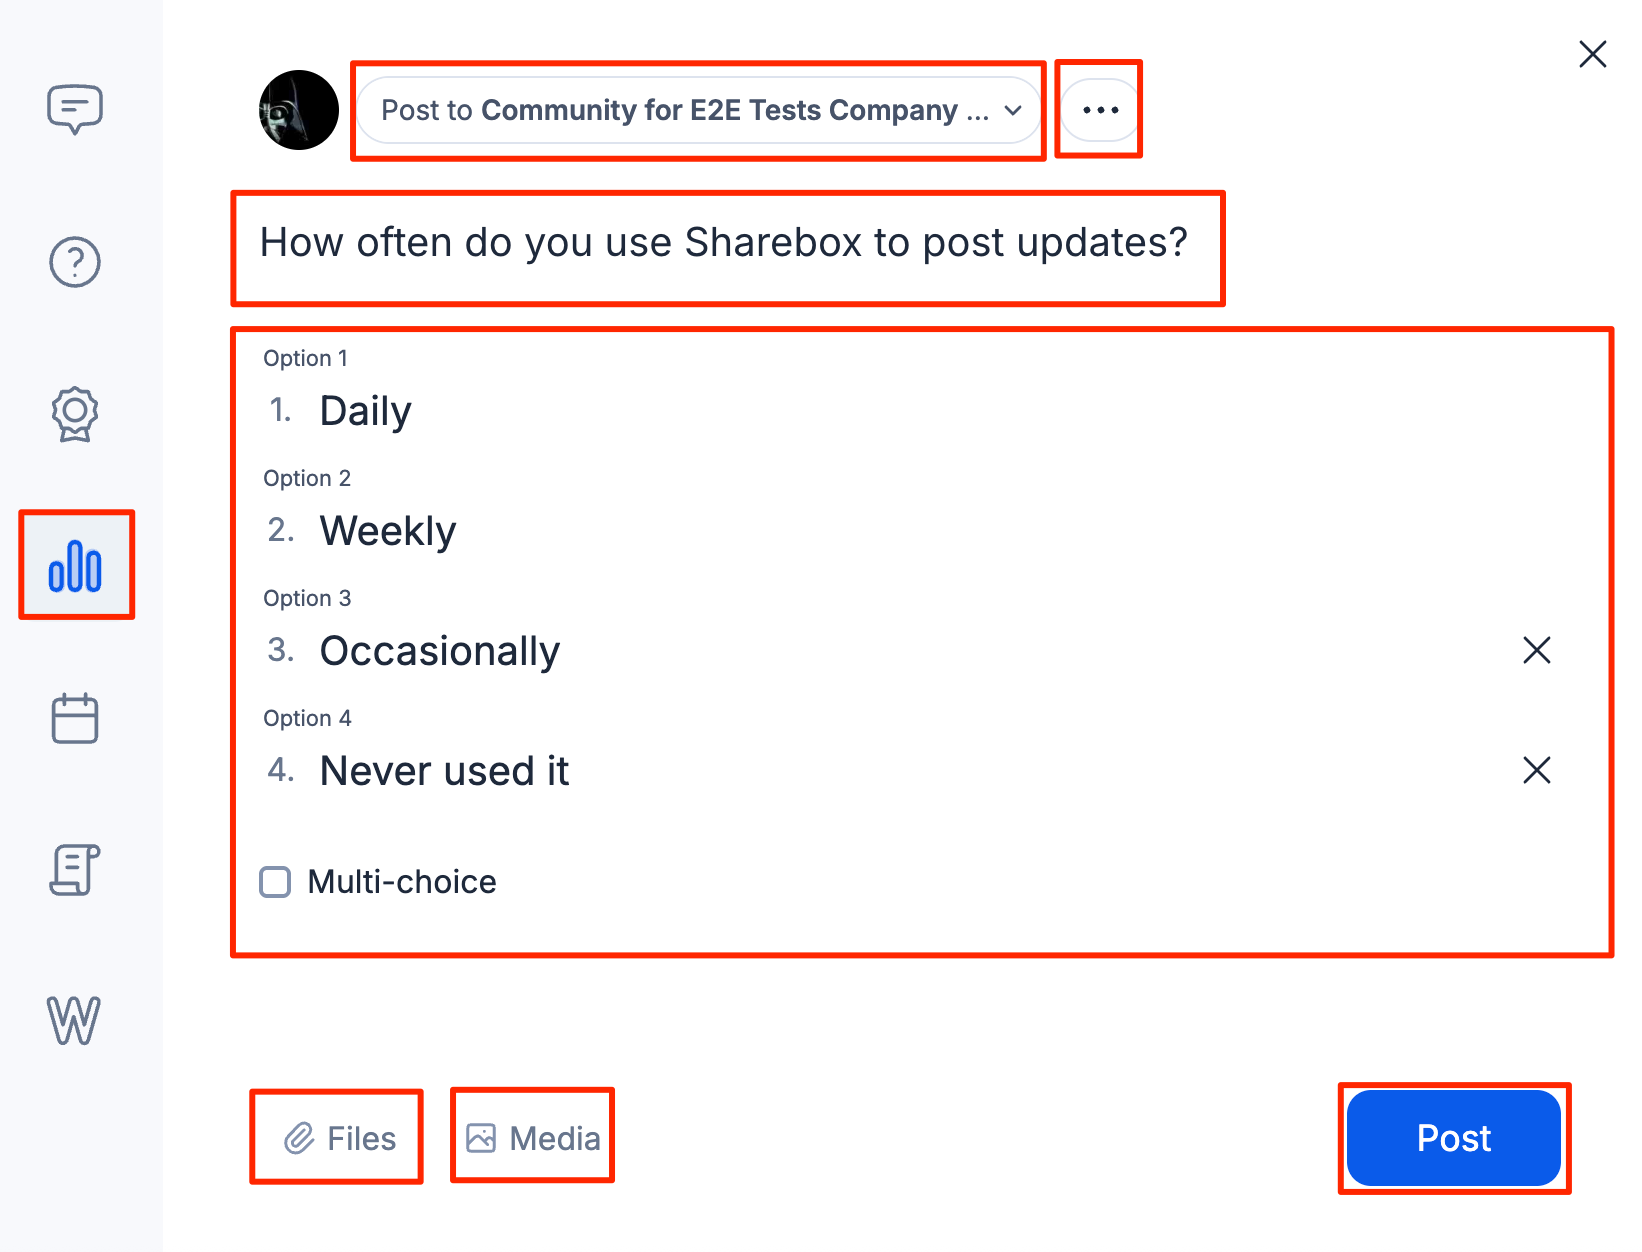
Create Poll Post
Follow the instructions below to create a Poll post in Sharebox on the Appspace SharePoint Intranet.
- Log in to your Appspace SharePoint Intranet account.
- In My Newsfeed, click “What do you want to share?” text box.
- In the What do you want to share window, select Start a Poll.
- In the Start a Poll window, you may do the following:
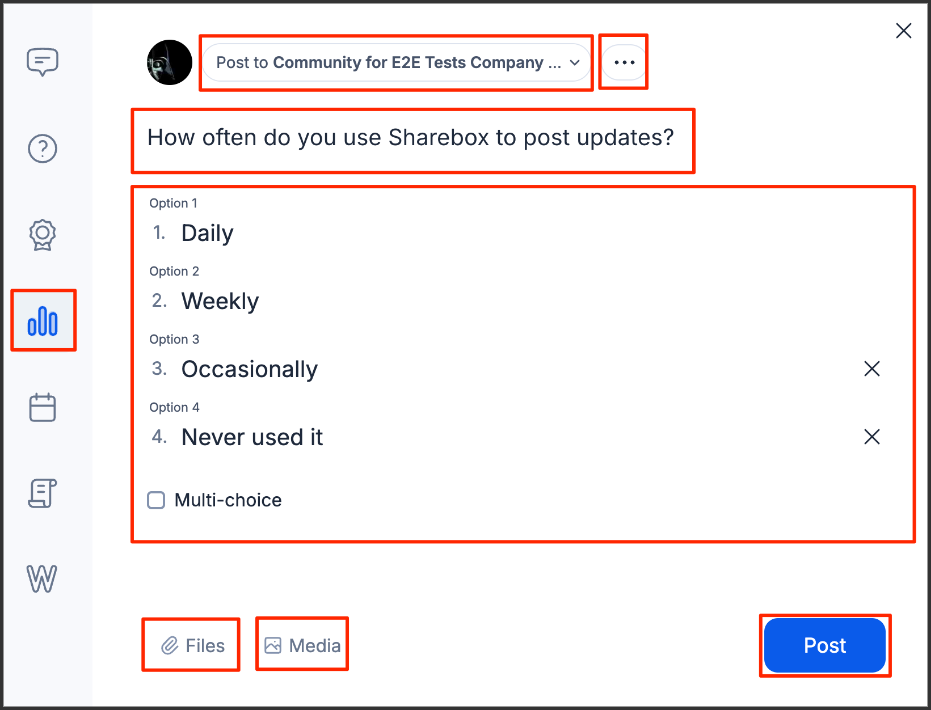
- Post to: Published your poll post to your desired community.
- Ellipsis (…): Add relevant tags under the settings section.
- Poll title: Add a poll title to the post.
- Text box: Add answer options for the poll post.
- Files: Upload a document file.
- Media: Upload a media file.
- Once done, click Post to published.
Create Event Post
Follow the instructions below to create an Event post in Sharebox on the Appspace SharePoint Intranet.
- Log in to your Appspace SharePoint Intranet account.
- In My Newsfeed, click “What do you want to share?” text box.
- In the What do you want to share window, select Create an Event.
- In the Create an Event window, you may do the following:
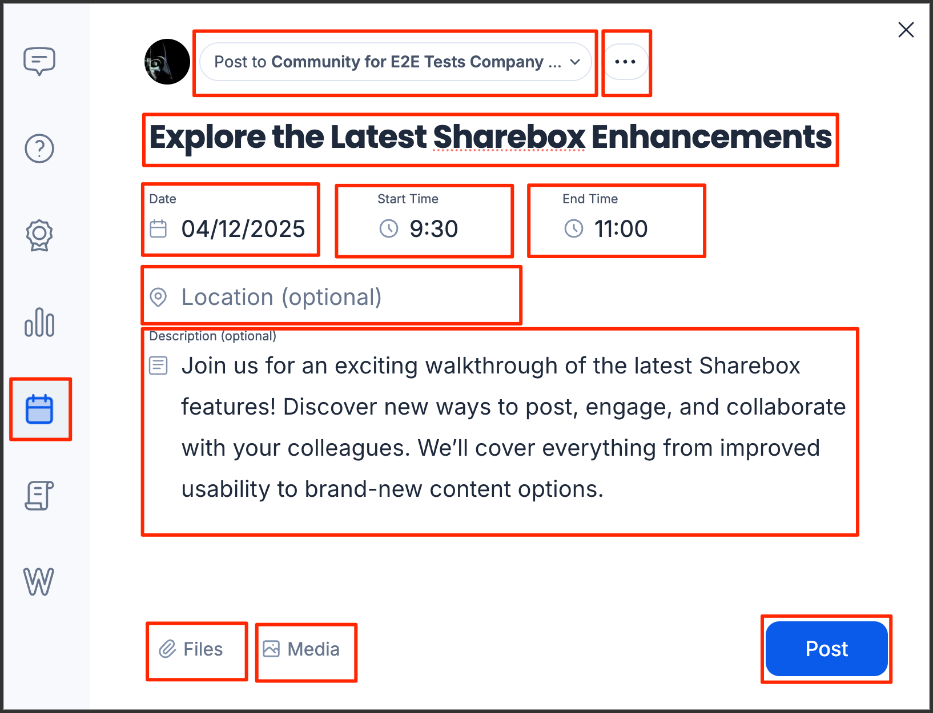
- Post to: Published your event post to your desired community.
- Ellipsis (…): Add relevant tags under the settings section.
- Event title: Add an event title to the post.
- Date: Set the event date.
- Start Time: Set the event start time.
- End Time: Set the event end time.
- Location: Set the event location.
- Text box: Add a description of the event.
- Files: Upload a document file.
- Media: Upload a media file.
- Once done, click Post to published.
Create Blog Post
Follow the instructions below to create a Blog post in Sharebox on the Appspace SharePoint Intranet..
- Log in to your Appspace SharePoint Intranet account.
- In My Newsfeed, click “What do you want to share?” text box.
- In the What do you want to share window, select Write a blog.
- In the Write a blog window, you may do the following:
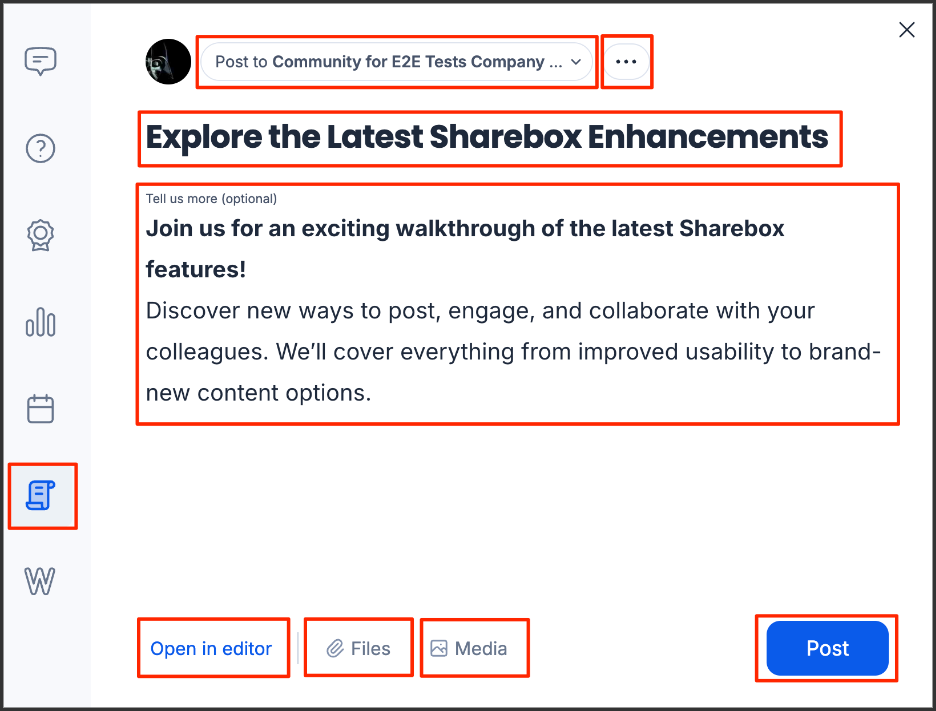
- Post to: Published your blog post to your desired community.
- Ellipsis (…): Add relevant tags under the settings section.
- Blog title: Add a blog title to the post.
- Text box: You may add a description of the blog post in this text box or in the editor view.
- Open in editor: You can edit the blog post in editor view.
- Files: Upload a document file.
- Media: Upload a media file.
- Once done, click Post to published.
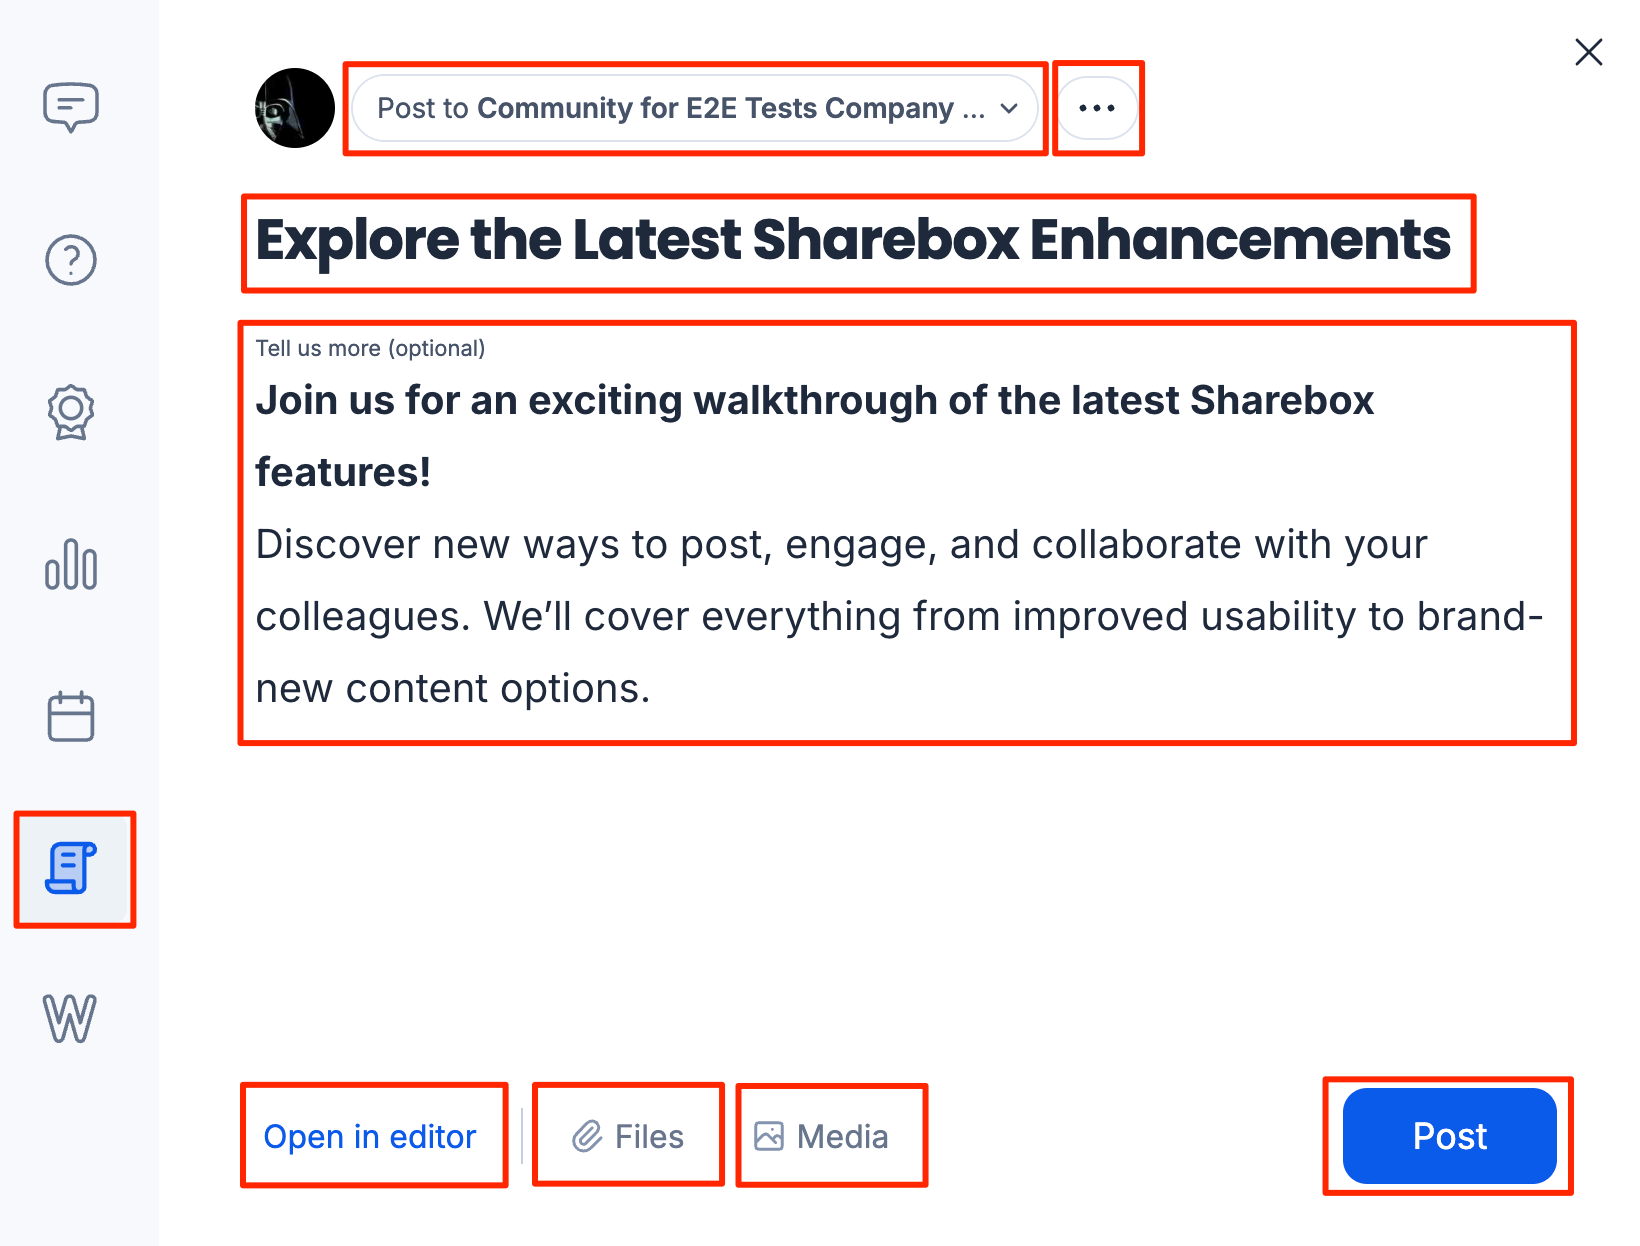
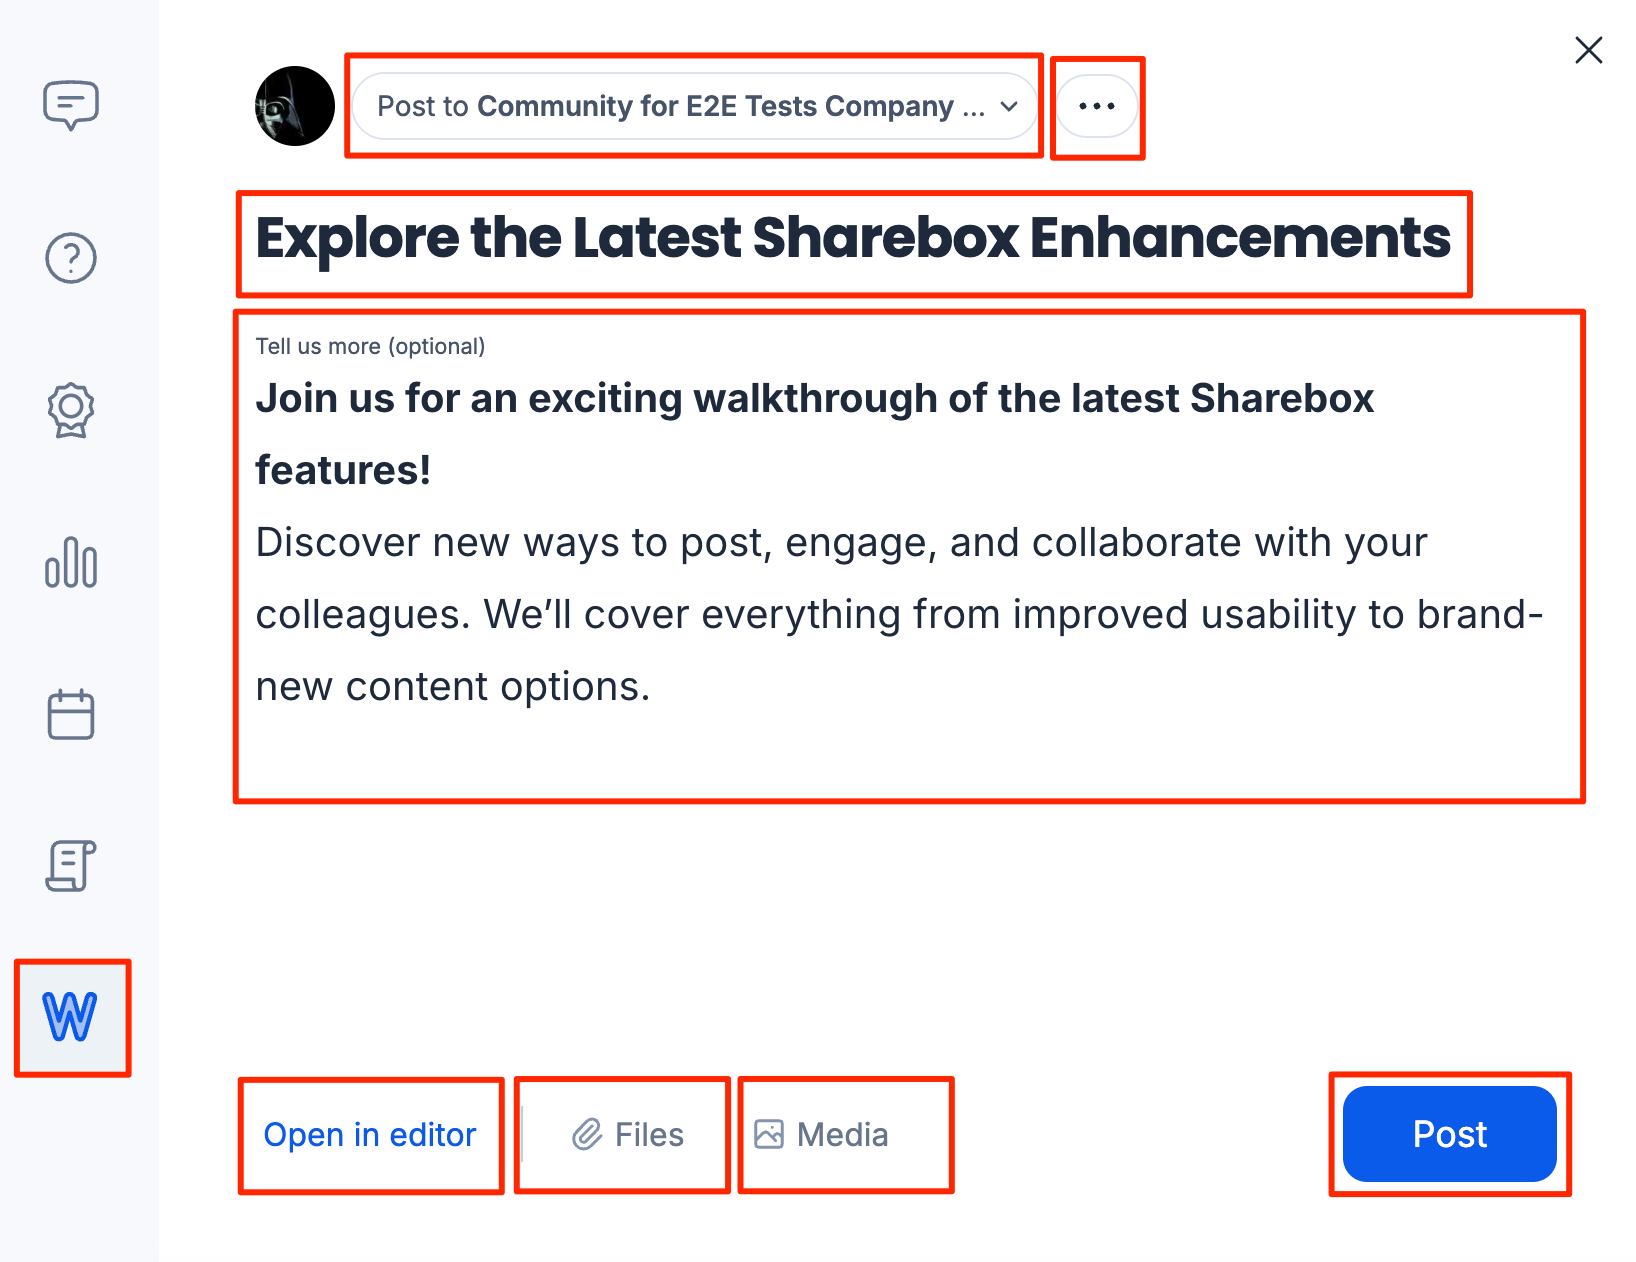
Create Wiki Post
Follow the instructions below to create a Wiki post in Sharebox on the Appspace SharePoint Intranet.
- Log in to your Appspace SharePoint Intranet account.
- In My Newsfeed, click “What do you want to share?” text box.
- In the What do you want to share window, select Create a wiki.
- In the Create a wiki window, you may do the following:
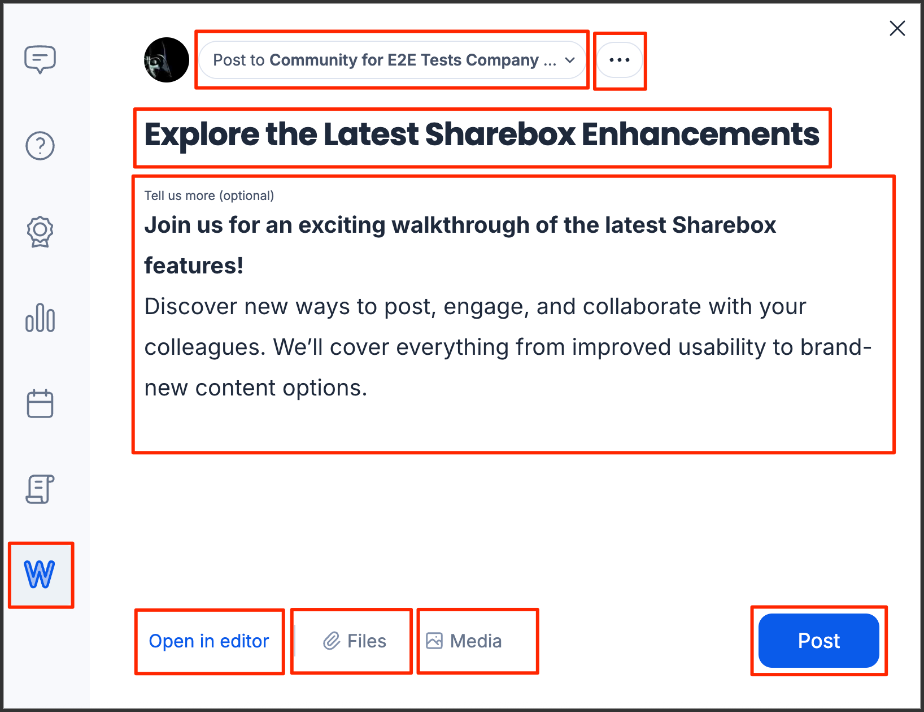
- Post to: Published your wiki post to your desired community.
- Ellipsis (…): Add relevant tags under the settings section.
- Wiki title: Add a wiki title to the post.
- Text box: You may add a description of the wiki in this text box or in the editor view.
- Open in editor: You can edit the wiki post in editor view.
- Files: Upload a document file.
- Media: Upload a media file.
- Once done, click Post to published.
Was this article helpful?