Registering a SmartHub ASE with Appspace
The following guide outlines the overall deployment process (installation and registration) of the SmartHub ASE. This guide contains four sections:
- Server Requirements
- Downloading and Installing SmartHub ASE
- Registering SmartHub ASE with Appspace
- SmartHub ASE Services Hardening
Server Requirements
The following table lists the recommended server specifications for deploying a SmartHub ASE server.
Important
These are recommended guidelines and are not definitive or mandatory requirements. Exact specifications may vary from deployment to deployment depending on the services and design requirements of each installation. It is up to the administrator/system integrator to define the required hardware specifications to support and sufficiently scale to support the overall server load.
| Feature | SmartHub ASE |
|---|---|
| OS | Windows Server 2012 R2 |
| CPU | 2 x Intel Xeon E5520 @ 2.26 GHz or equivalent |
| Memory | 8GB RAM, 1333MHz |
| System Storage (Appspace and SQL Database) | 50GB |
| Storage (Content) | No minimum requirement, end user dependent |
Note
Virtualization is supported on VMware, provided the virtualized environment is configured to match the recommended server specification listed above.
Downloading and Installing SmartHub ASE
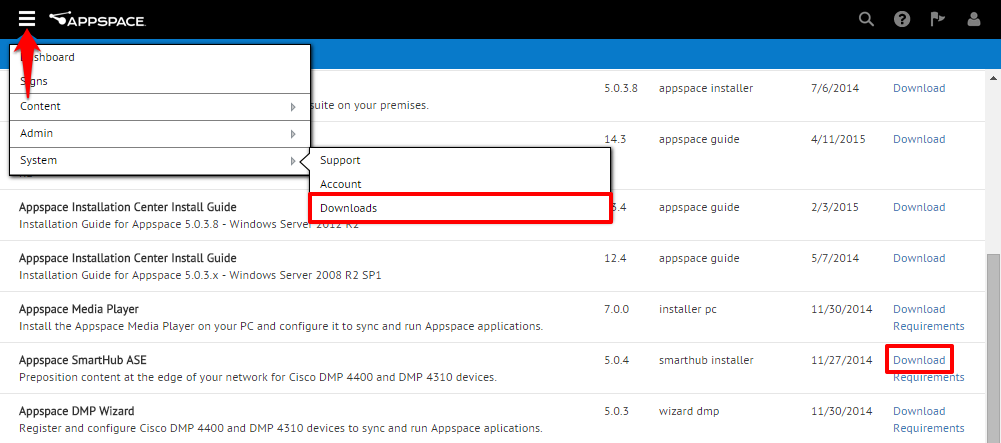
You will need to first acquire the SmartHub ASE installation wizard from Appspace Cloud (https://cloud.appspace.com). Once you have successfully logged in,
Click System > Downloads in the Appspace menu, and select the latest Appspace SmartHub ASE installer and click the Download link.
When prompted, check the box to agree to the Appspace Terms of Service and EULA.
Double-click the AppspaceSmarthubASESetup installer to begin the installation.
At the Welcome to Appspace Smarthub ASE Setup Wizard screen, click Next.
Check the box to accept the License Agreement and click Next to continue.
When asked to choose the setup type, select Typical.
Click Install to begin the installation.
Once installation has completed, click Finish to exit the installer.
Double-click the Appspace SmartHub ASE icon on your desktop (or alternatively from your Start Menu, within Programs) to launch the SmartHub Configuration Wizard.
The SmartHub Configuration Wizard will display a list of installation tasks. Click the Install button.
During the installation, the wizard will display the progress of each step with a status bar and icons. Completed tasks are marked GREEN, tasks in progress are marked BLUE, and pending tasks are GREY.
Once the setup has completed, all tasks should have full progress bars and GREEN icons. Click Finish to proceed.
The wizard will automatically launch the SmartHub Registration Wizard. Follow the instructions in the next section – Registering a SmartHub ASE to register the SmartHub ASE with your Appspace account.
Registering SmartHub ASE with Appspace
Upon the successful installation of SmartHub, a web browser will likely have auto-launched and directed you to the SmartHub Setup Wizard. To manually access the SmartHub Setup Wizard, you may access it at “localhost/smarthub/setupwizard.aspx” or “http://[SmartHub IP]/smarthub/login.aspx” via a web browser.
On the SmartHub Setup Wizard welcome page, click Next.
At the Login page, provide an IP Address along with a Username/Password.
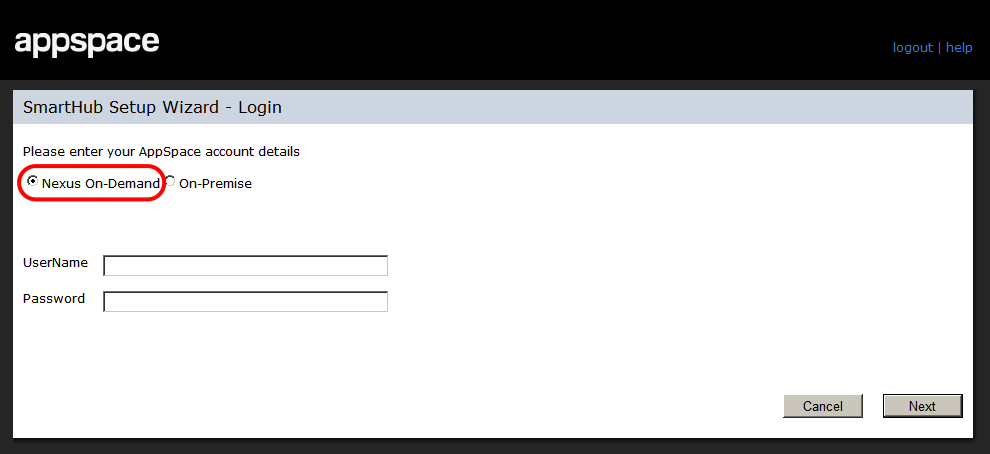
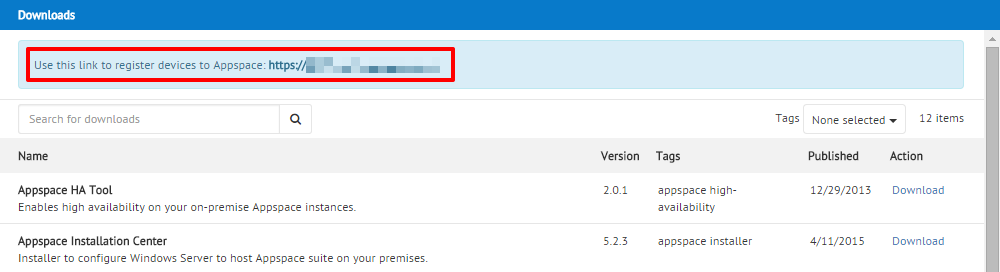
If you are registering your SmartHub to Appspace Cloud, you will need to obtain a registration link from the Downloads page of your Appspace Cloud account. You will find this link at the top of the Downloads page. Use that link along with your Appspace Cloud credentials for the setup wizard and click Next to continue.
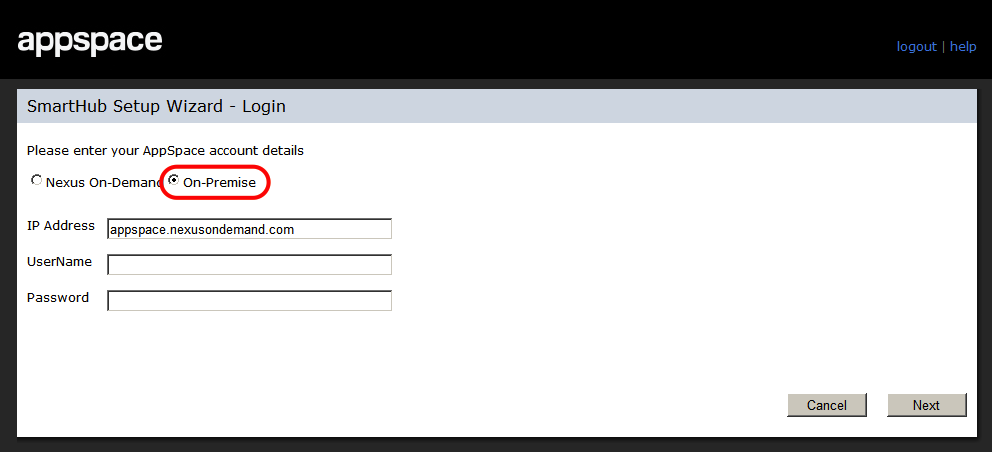
If you are registering your SmartHub to a local on-premises Appspace server instance, select the On-Premise option, and enter the server’s IP address along with credentials used to access your Appspace server and click Next to continue.
Provide a name for identification purposes within Appspace, and click Next to continue.
When completed, the wizard will display a confirmation message with the Registration Status: Activated. You may also see a summary of the number of SmartHub licenses remaining in your account. Click the Finished button to continue.
The system will default to the Configuration tab where you can change the configuration settings if needed (be sure to click the Update button to apply any changes). If the default settings are to be used, simply click Cancel.
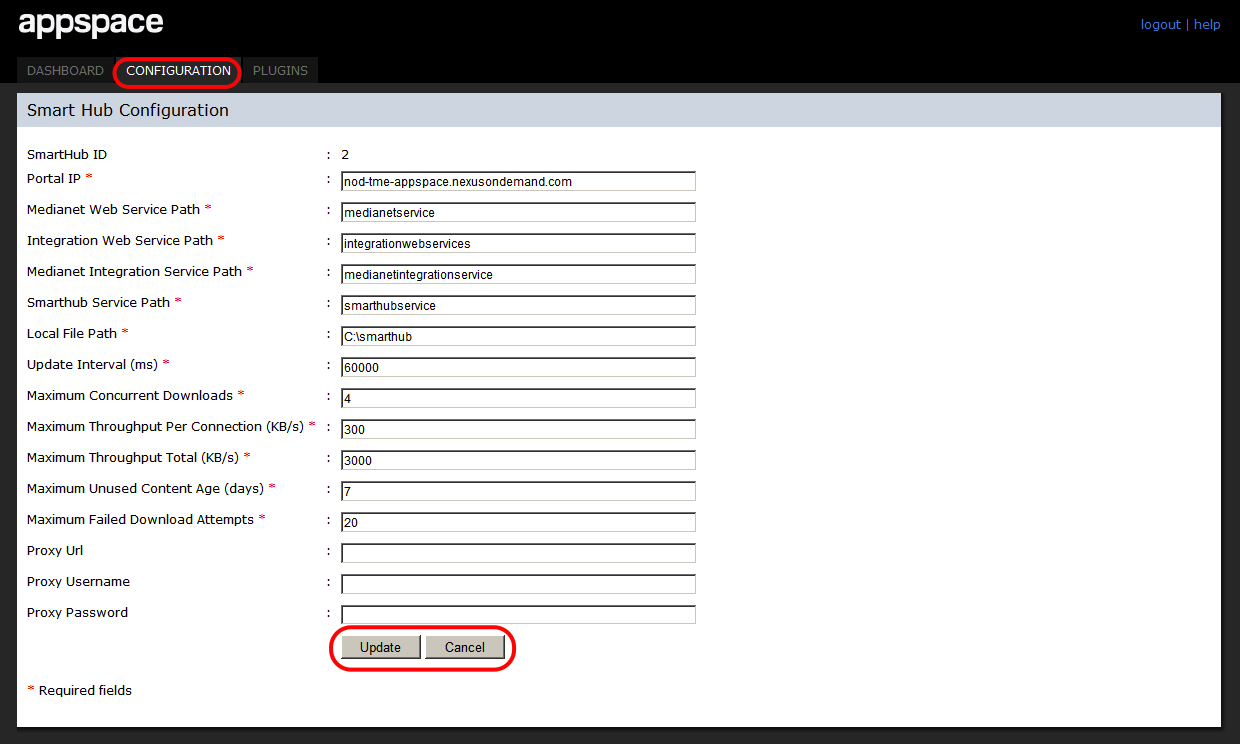
The following table lists the settings that can be used to control the bandwidth used by SmartHub ASE to download content from Appspace.
Properties Details Update Interval (ms) SmartHub ASE makes a periodic check with Appspace to check for any updates. The frequency is determined by this property expressed in milliseconds. Each check to Appspace consumes a nominal amount of bandwidth. Use a smaller value to respond quicker to application updates. This is suitable when applications accelerated have frequently updated content. Use a higher value to increase the duration between checks and reduce bandwidth usage. This is suitable when you need to control the number of times SmartHub makes a check to Appspace. Maximum Concurrent Downloads When a content update is active, SmartHub ASE will make multiple concurrent connections to Appspace to download content files. This property defines the maximum number of concurrent downloads SmartHub will use to download content from Appspace. Use a higher value if network bandwidth is large to optimize download speeds. Conversely, use a smaller value to limit bandwidth usage. Maximum Throughput Per Connection (KB/s) For every download connection as defined in the previous property, this property defines the maximum throughput bandwidth that SmartHub ASE can use. This value does not exceed the actual physical available bandwidth. Maximum Throughput Total (KB/s) This property defines the total throughput bandwidth that SmartHub ASE can use for all active concurrent downloads. This value does not exceed the actual physical available bandwidth.
SmartHub ASE Services Hardening
The following steps should be performed on your SmartHub ASE server in order to properly harden/configure it for failure and recovery scenarios.
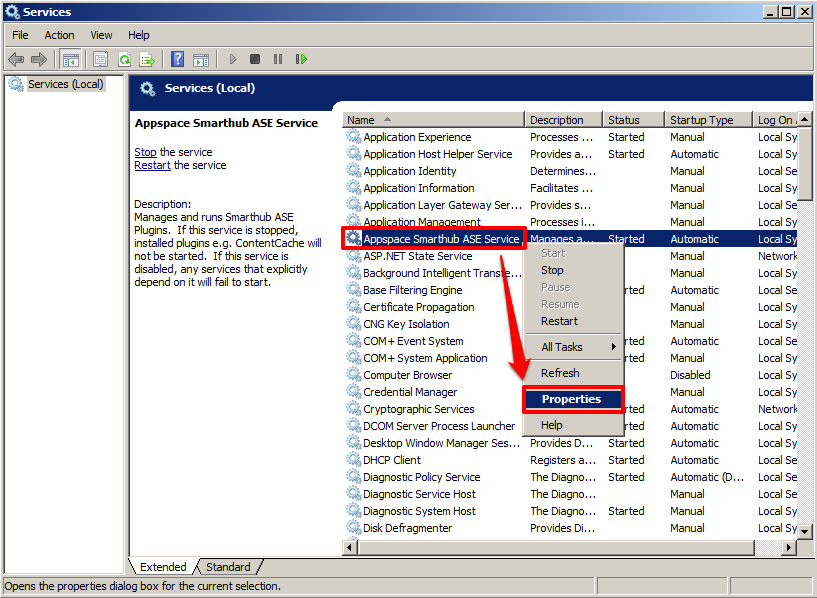
From the Windows Start menu, open the Administrative Tools and proceed to access Services.
Within the Services menu, locate the Appspace SmartHub ASE Service line and right-click to select Properties.
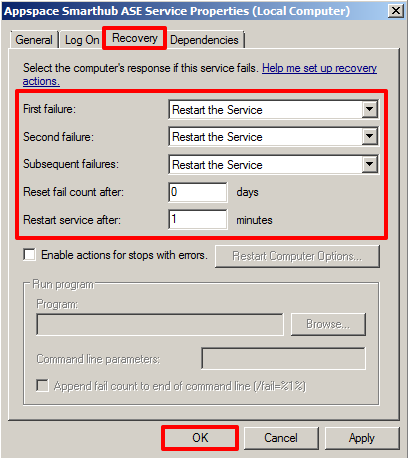
In Appspace SmartHub ASE Service Properties, select the Recovery tab. Configure all three failures (first, second, and subsequent) with ‘Restart the Service’ from each respective drop-down menu. Ensure that 0 is set as the reset fail count and that services are restarted after 1 minute. Click the OK button to save your changes and exit.
Important
Once you have completed the installation, registration, and SmartHub server hardening processes, you must restart the server for all configuration settings to take effect.