This widget displays user-defined calendar data in chronological order. The scheduled information can be presented in hour, day, week, or month format. It is commonly used for:
- Displaying the agenda of the current day/week/month for a specific event or location.
- Enabling easy, instant announcements on changes to events scheduled during a particular time-period.
- Sharing of new content and updates for rapid deployment to event participants/ viewers of the widget.
This article provides the instructions to add and configure the Event Calendar widget in Advanced Channel.
Adding an Event Calendar Widget
To add a Event Calendar widget to your advanced channel, follow the instructions in the Adding Widgets section in the Widget: Add Widget to Advanced Channel article and select the Event Calendar widget in the Widget Library.
Configuring the Event Calendar Widget
To configure an event calendar widget’s properties, please follow the instructions below:
Configuring the Properties tab
-
In your advanced channel layout, click the Event Calendar widget under the Widgets section.
-
In the Widget Properties window, configure the common tabs as per this article: Widget: ConfigureWidget Properties.
-
In the Widget Properties window, click the APPEARANCE tab, and edit the PROPERTIES section as per description below:
- Template: Preset layouts to display the event information.
- Resolution: The dimensions of the text.
- Context: The option to display events in the current hour, the current day, current week or current month.
NoteThe below is a description of how the widget timing works when you select one of the available options in the context field:-
Day
- Start: Start of the current day
- End: End of the current day
- Week
- Start: 7 days before the current day (from 00:00)
- End: 7 days after the current day (to 11:59pm)
-
Month
- Start: 30 days before the current day
- End: 31 days after the current day
- Preroll Time: How long before the start of an event will the event be displayed, expressed in minutes. For example if the event starts at 9am, specifying 30 minutes as Preroll Time means that the event will be displayed starting at 8.30am.
- No of Events: Number of events to display per page. If there are more events, the widget will cycle through all the events.
- Item Range: The total range of calendar items to display.
- No Event Msg: What message to display when there are no events scheduled in the calendar.
- Rotate Duration: Duration to display each page of calendar events.
- Show Past Event: The option of displaying past events.
- Filter Location: The ability to display events based on the location property. (Location names must not have spaces).
- FONT: Utilizes tabs for customizing the look of the calendar.
- EVENT and TIME: using a variety of formatting options, including font type, size, alignment and color.
Configuring Additional Field Names
Field names are additional configurable fields that can be used for event related information. For example, you can add the number of people involved in an event’ as a field name. To add and configure field names:
-
In the Widget Properties window, click the CONFIGURATION tab.
-
In the Additional Fields section, enter in the field name and select a field type. Click the green tick to add.

Repeat the step to add more fields.
-
Click Save once done.
You will see a notification when the field name has been successfully saved.
-
This field name will be available when adding a new event.
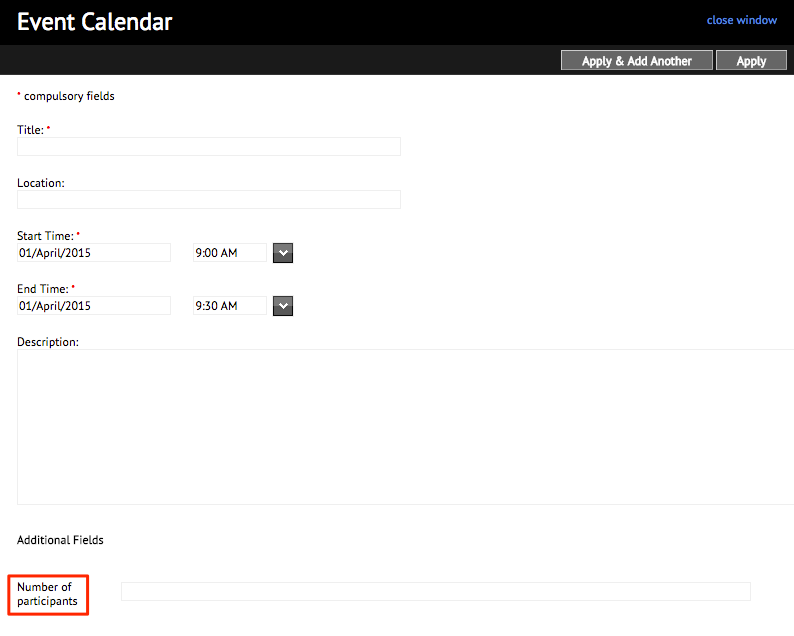
Adding a New Event
To add an event to the calendar widget:
-
In the Widget Properties window, click the CONTENT tab.
-
Click the Add New Event link from the selected month and year.

-
Fill in your event details and click Apply to save. You can choose to add another event by clicking the Apply & Add Anotherbutton.

Editing or Deleting an Event
To edit or delete an event:
-
In the Widget Properties window, click the CONTENT tab.
-
Select the event to be edited or deleted from the calendar.
-
To edit the event, make your changes to any field and click Apply.
-
To delete the event, click Delete followed by OK when the confirmation window pops up.
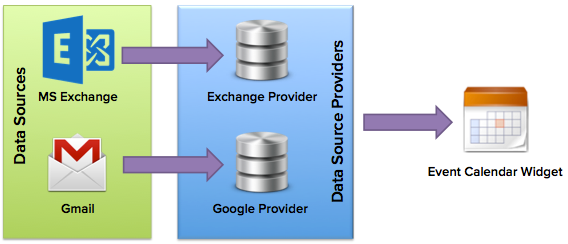
Integrating with External Data Sources
You can integrate the Event Calendar Widget with external data sources such as Microsoft Exchange and Google Mail. Event calendar maps the calendar data sources to its internal representation of calendar data as illustrated in the following diagram.
Google Calendar Integration
To integrate Google Calendar with the Event Calendar widget, follow the instructions below.
A. Enable Google API
-
Login to https://console.developers.google.com using your Gmail credentials.
-
In the Google Developer Console, select an existing project, or create a new project.

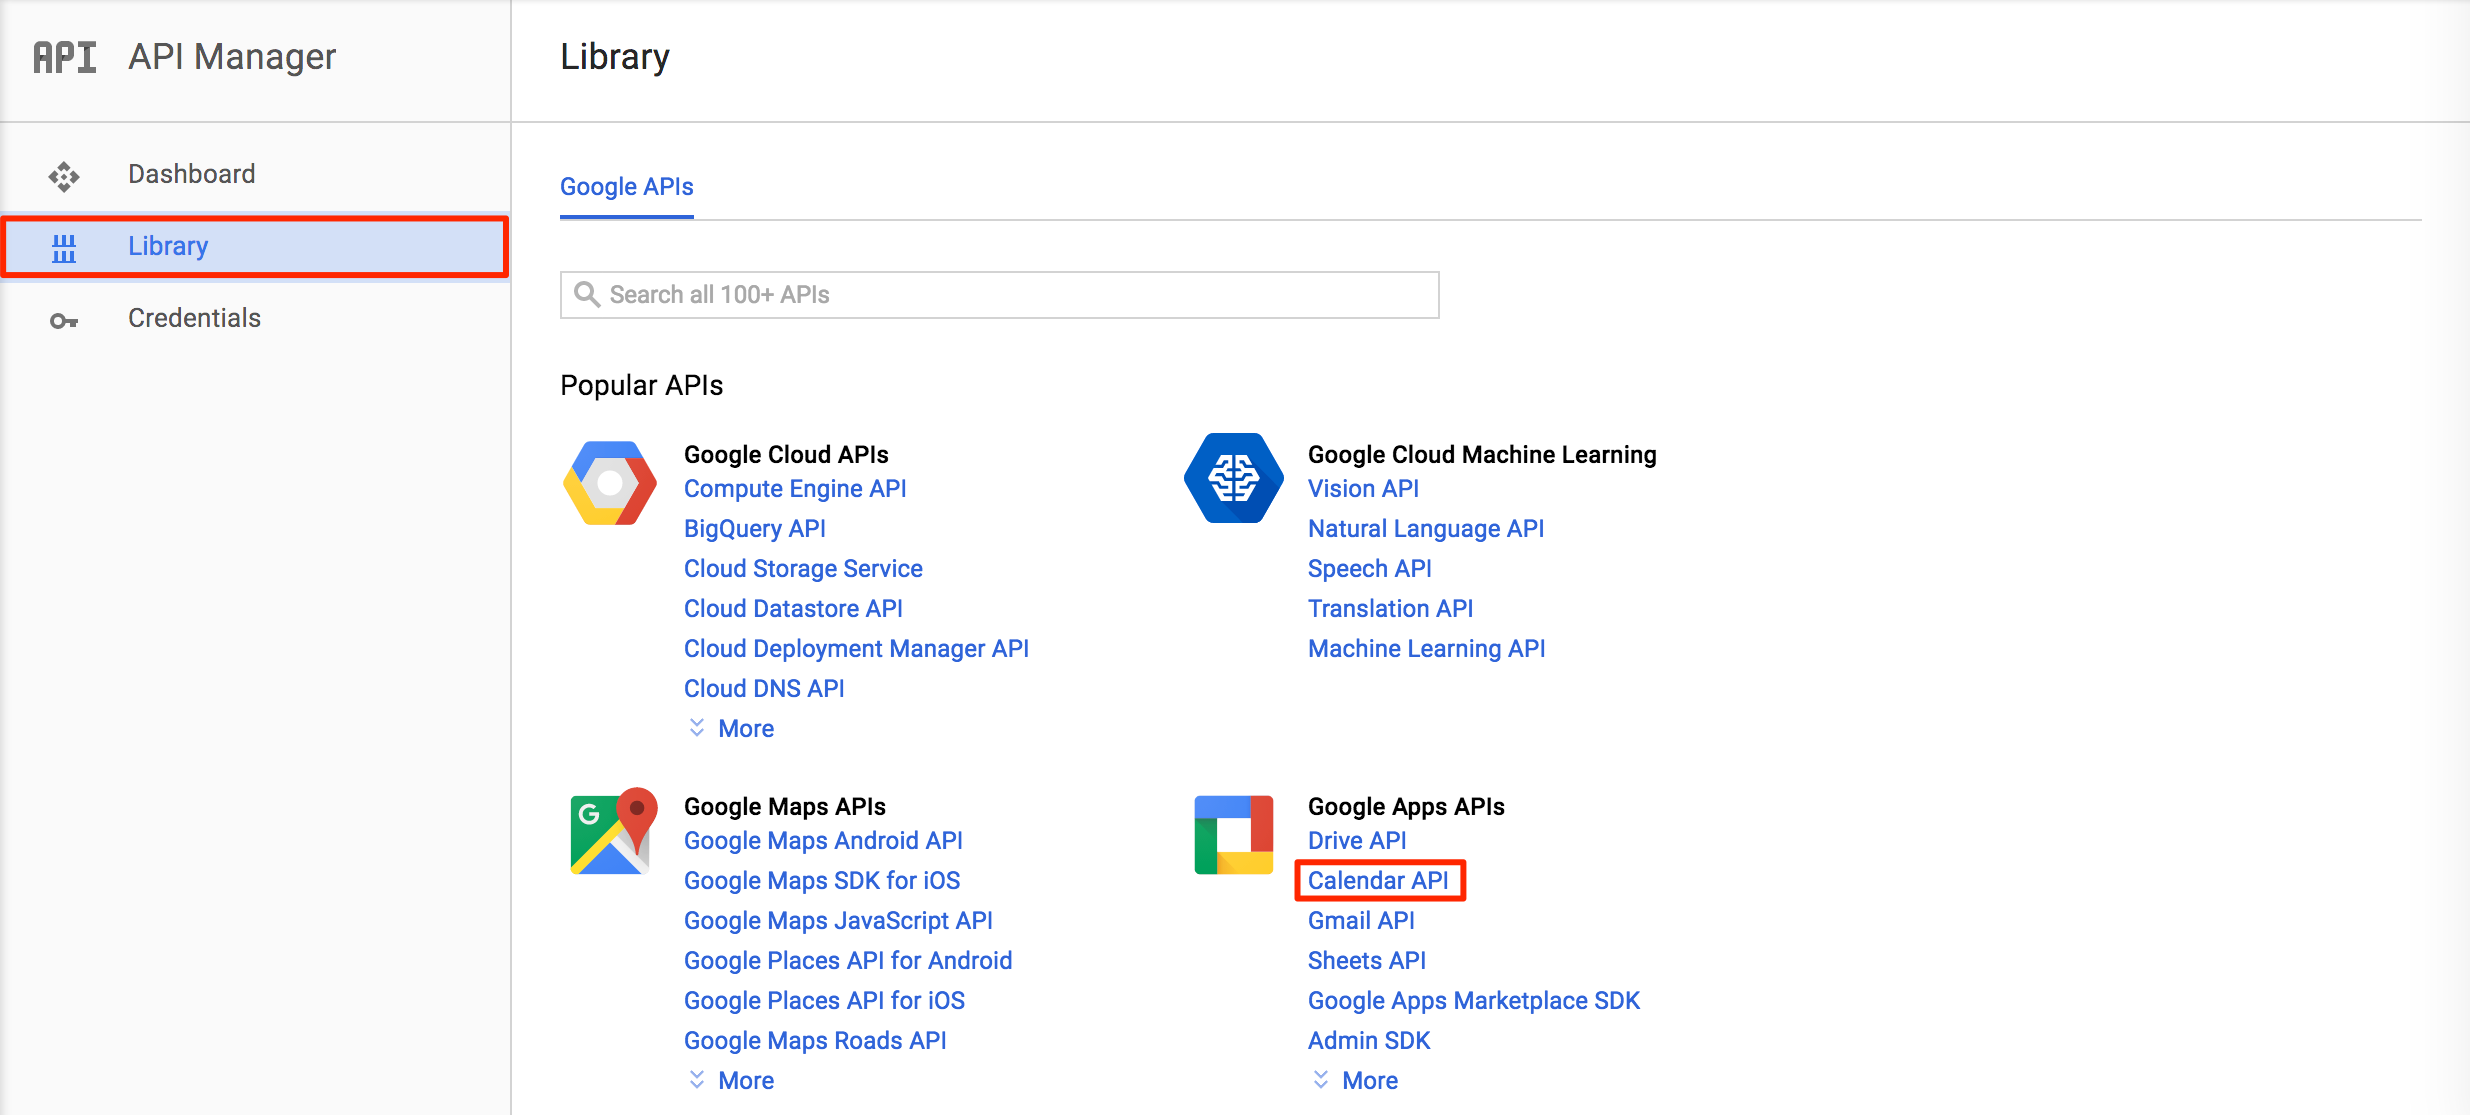
-
Once a project has been selected or created, in the API Manager, select Library, and click the Calendar API link.
-
In the Google Calendar API dashboard, click ENABLE.
-
Once the Google Calendar API has been enabled, click Create credentials to access the Credentials page.
-
In the Find out what kind of credentials you need section, select the following answers to the questions below:

-
In the Create an OAuth 2.0 client ID section, fill in the required information as per the fields below, and click the Create client ID button once complete.
Field Information Name {Product Name} Authorized JavaScript origins http://{server URL}. If you are on Appspace Cloud, please use the URL specific to you at: https://{prefix}.cloud.appspace.com Authorized redirect URIs http://{server URL}/app/application-widget-properties.asp 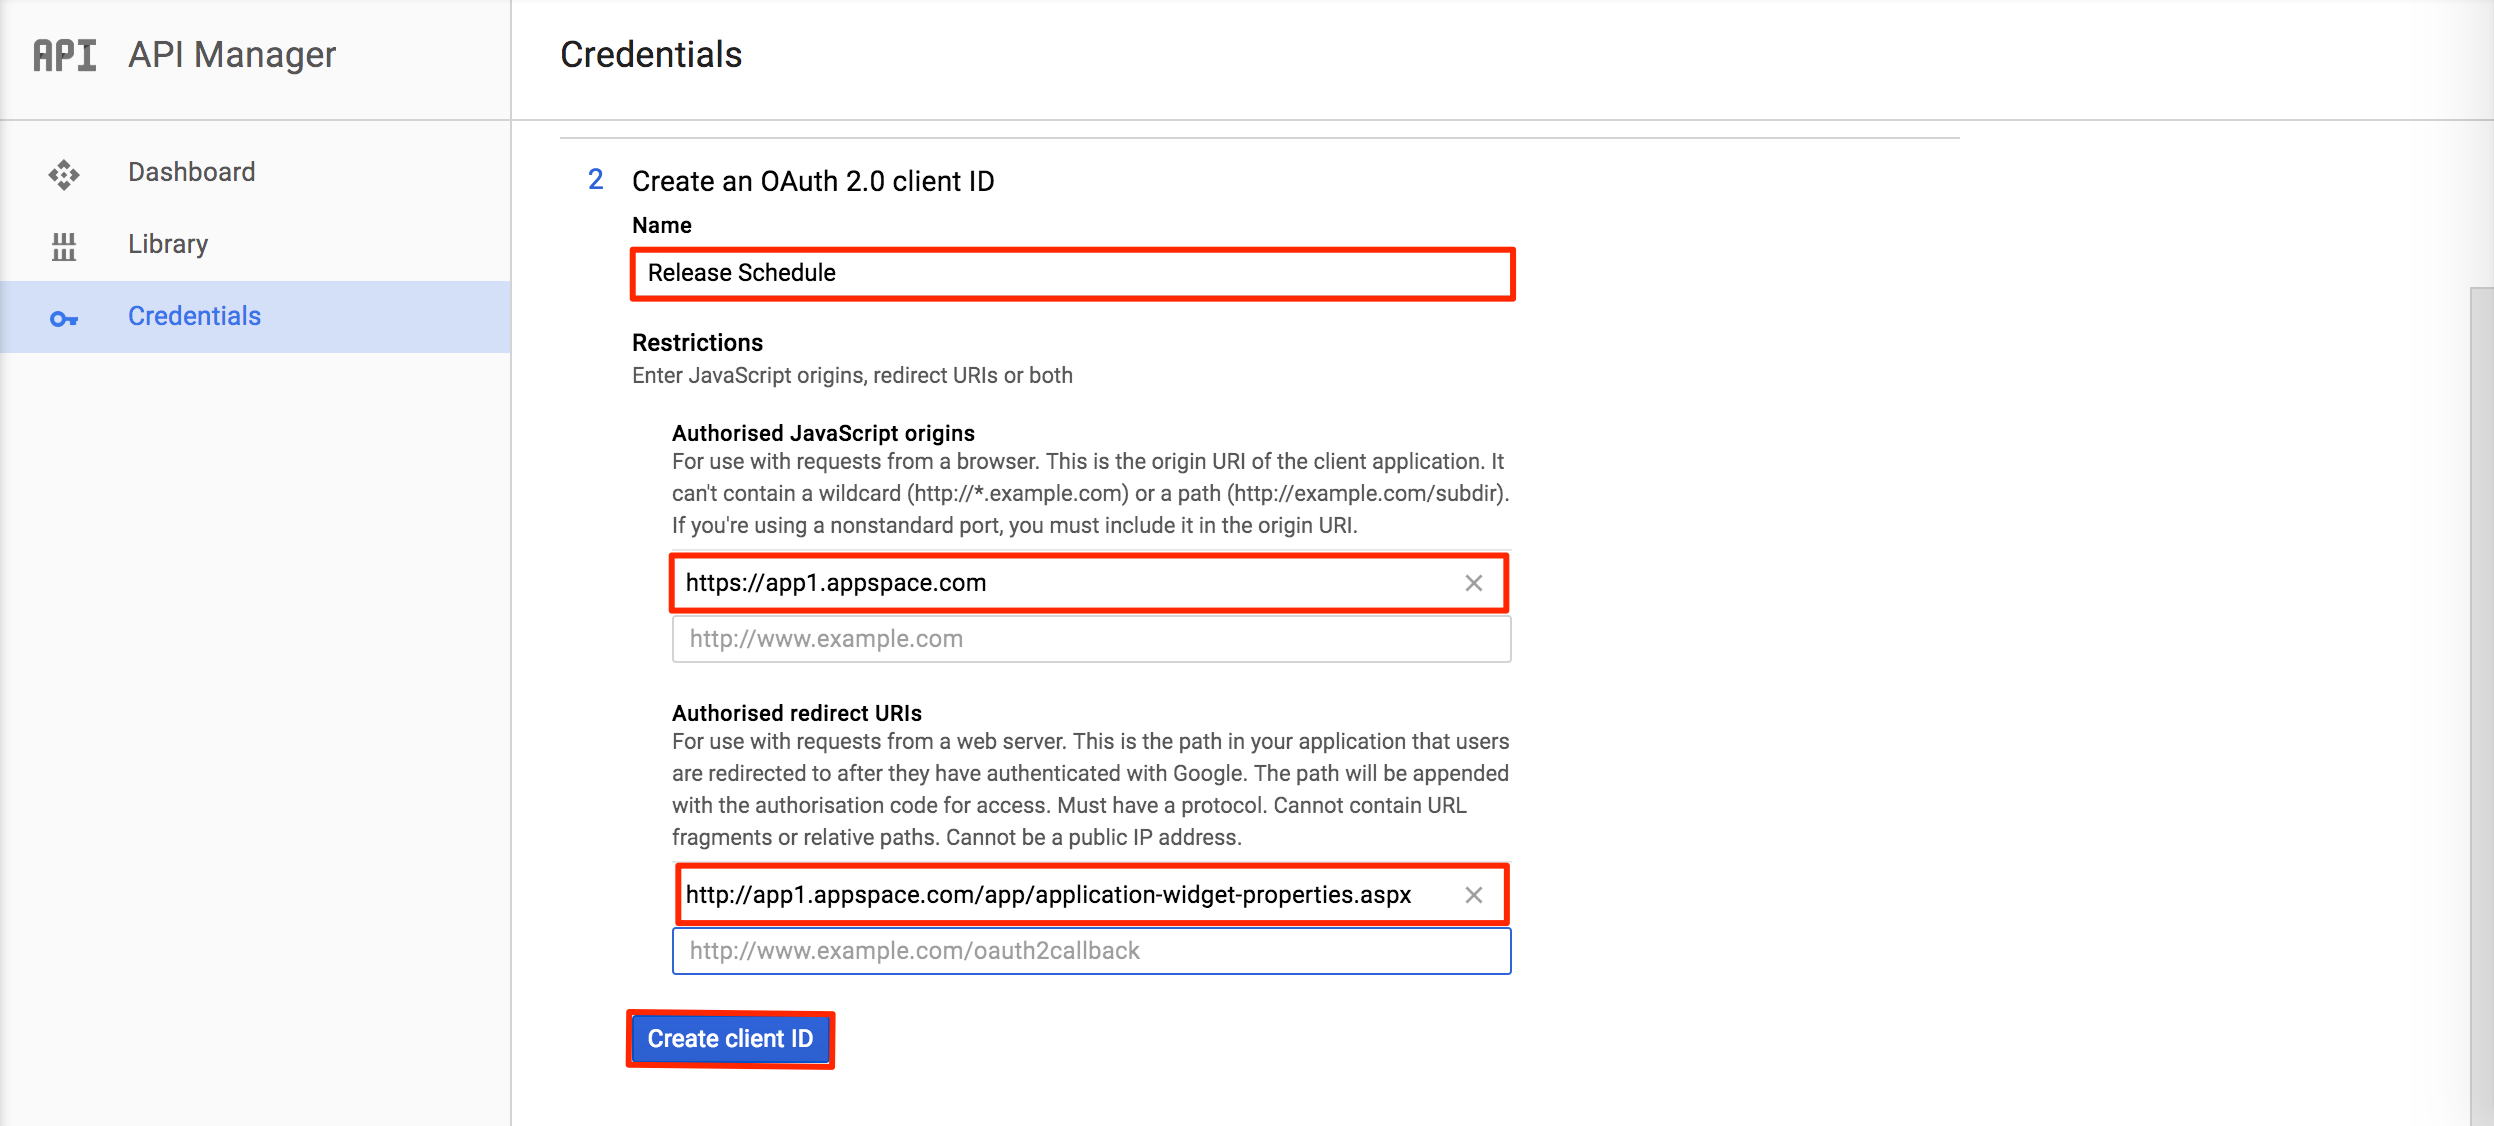
-
In the Set up the OAuth 2.0 consent screen, select the Email address, and enter in the Product Name. Click the Continuebutton once complete.

-
Click Done.
-
Click the newly created OAuth Client ID, and take note of the Client ID, and Client secret.

B. Configure Event Calendar for Google Calendar
-
In the Widget Properties window, click the CONFIGURATION tab.
-
In the Type drop-down menu, select Google Calendar as your provider type.
-
Fill in the Google Username, Client ID, and Client Secret. You would have obtained the client ID and secret from the previous section.
-
Proceed to set the Time Display, Time Zone and Frequency fields.
-
Click Save on the top right. You will see a notification when the configuration has been successfully saved.
NoteMinimum frequency setting is 15 minutes.
Microsoft Exchange Integration
To integrate Microsoft Exchange with the Event Calendar widget, follow the instructions below.
-
In the Widget Properties window, click the CONFIGURATION tab.
-
In the Type drop-down menu, select Exchange 2007 – 2010 (for all versions stated in the Note above) as your provider type.
-
Fill in the Exchange URL, Username, and Password.
ImportantFor users on Exchange 2013 and above, you must utilize OWA (Outlook Web Access) authentication rather than EWS (Exchange Web Services). The service account used to fetch calendar data MUST also have a mailbox associated with it, which is required to retrieve and book meeting rooms (Step 4 below).Configuration values should resemble the following:
- URL: http://outlookserver.mycompany.com/owa
- Username: username (without @domain)
-
Additionally, you can also add a Room Calendar to retrieve events from.
-
Proceed to set the Time Display, Time Zone, Frequency and Look Ahead fields.
-
Click Save on the top right. You will see a notification when the configuration has been successfully saved.
Was this article helpful?