With the introduction of the new Library architecture in Appspace 8.x, the Playout Properties for content can now be accessed and configured directly from the Library during content creation, or whilst adding a playlist channel to the content.
This article provides Administrators with instructions to configure the various content Playout Properties (playback properties) such as Dayparting, Scheduling, and other playback properties that are available for playlist channels.
Configure Transitions
Transitions provide a smooth shift effect between content items within the playlist.
The instructions below show you how to configure the transition setting.
- In the Playout Properties window, select the desired transition effect from the Transition drop-down menu. The Fade transition is selected by default. A list of available transitions can be found in the section below.

- Click SAVE once done.
Available Transitions
- None
- Fade – Default
- Left Swipe
- Right Swipe
- Top Swipe
- Bottom Swipe
- Center Horizontal Expand
- Center Vertical Expand
- Center Rotate Fade Transition
- Fade Equal
- Fade Fully
- Left Swipe Fade
- Right Swipe Fade
- Left Switch
- Right Switch
- Left Switch
- Right Switch
- Top Switch
- Bottom Switch
- Center Vertical
- Left Switch
- Right Switch
- Top Switch
- Bottom Switch
- Left Push
- Right Push
- Zoom In From Back
- Zoom In From Front
- Top Push
- Bottom Push
- Left Rotate
- Right Rotate
- Cube Left
- Cube Right
- Cube Up
- Cube Down
- Cube Random
Configure Aspect Ratio
Aspect Ratio determines how content is stretched in ratio to the source content during playback.
The instructions below show you how to configure the aspect ratio setting.
- In the Playout Properties window, select the desired aspect ratio from the Aspect Ratio drop-down menu. The Uniform Fill aspect ratio is selected by default.
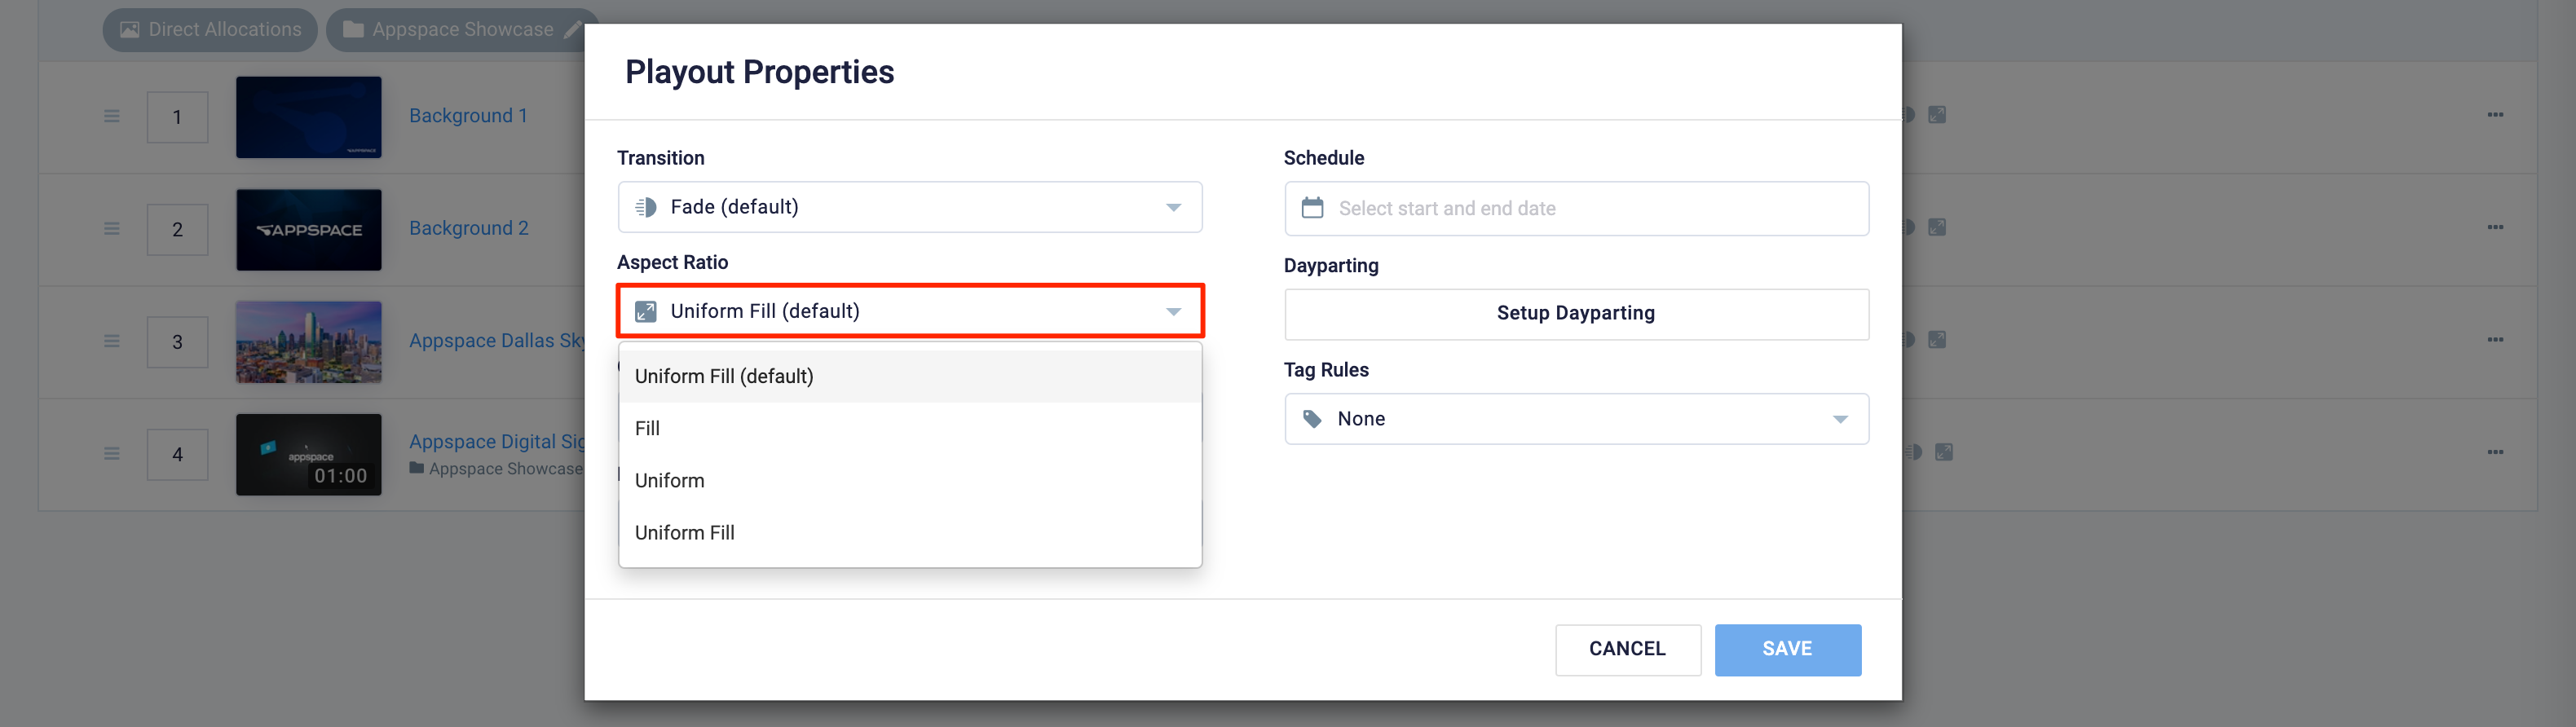
- Fill – Stretches the content to fill the screen, while disregarding the original aspect ratio of the content.
- Uniform – Stretches the content to fill the screen, while maintaining the aspect ratio of the content (pillar box)
- Uniform Fill – Stretches the content to fill the screen, while maintaining the aspect ratio of the content.
- Click SAVE once done.
Configure Content Duration
Duration determines the amount of time the content is displayed, before displaying the next content. Video content however is defaulted to the native duration of the video file.
The instructions below show you how to configure the duration setting.
- In the Playout Properties window, enter the content playback duration in the Duration field. The default duration is 8 seconds.
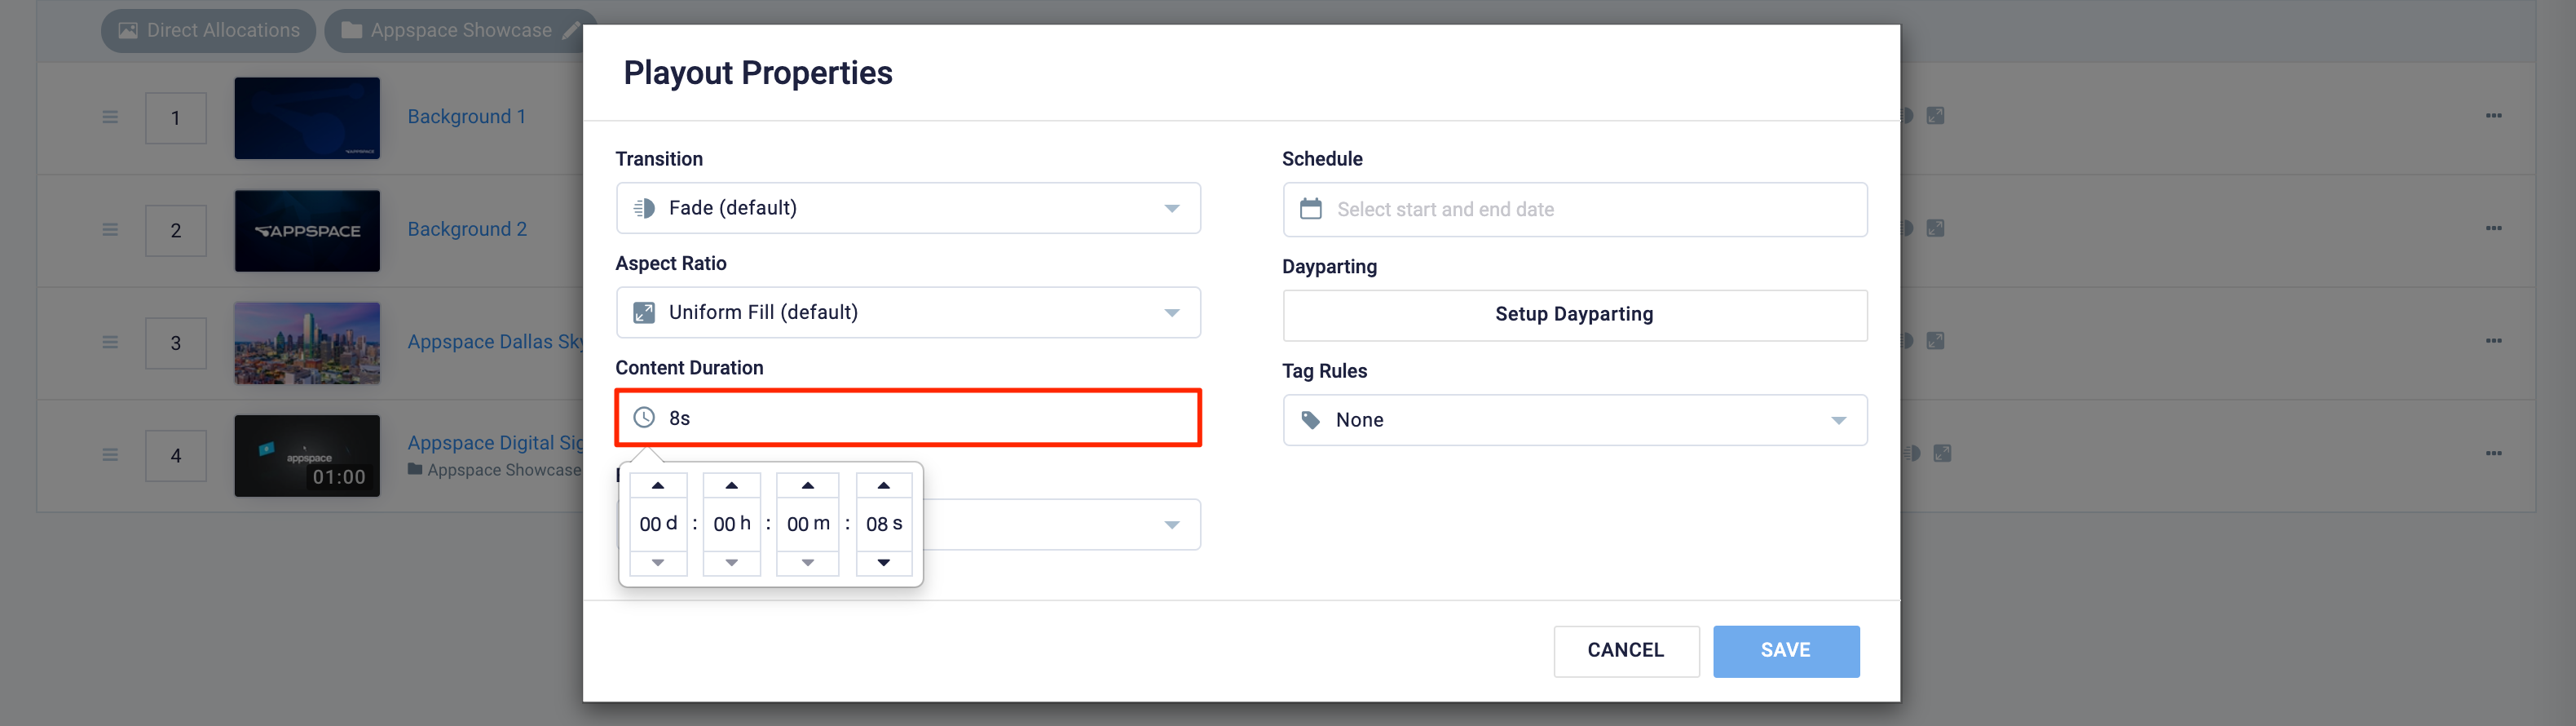
- Click SAVE once done.
Configure Content Audio
Content Audio determines the volume of the video content when displayed, allowing devices to support per-content volume properties.
- In the Playout Properties window, slide the Content Audio controller to the desired volume level (0-100), where 100 is the loudest while 0 (zero) is mute. You may also click the audio icon to mute the content audio.
- Click SAVE once done.
Configure Frequency Restrictions
The Frequency Restrictions setting is essentially a validation check for content playback duration. The content becomes invalid if it has reached the defined frequency duration (minute, hourly, or daily).
To configure Frequency Restrictions, follow the instructions below:
- In the Playout Properties window, select the desired frequency from the Frequency Restrictions drop-down menu:

- None – No frequency restriction (default).
- At most – Maximum number of playout loops for selected setting.
- X times a minute (e.g. 3 times per minute)
- X times hourly (e.g. 3 times per hour)
- X times daily (e.g. 3 times per day)
- Skip loops – Number of playout loops to be skipped before content is included in the playlist.
- Skip X loop(s) (e.g. Skip 3 loops)
- Exactly – Content will be played the number of times defined in the setting.
- X times a minute (e.g. 3 times per minute)
- X times hourly (e.g. 3 times per hour)
- X times daily (e.g. 3 times per day) NoteThe advanced channel will automatically build another playlist for content with the “Exactly” setting, and always check the “Exactly” playlist every time it finishes playing a content, to see if there is any valid content before checking the default or scheduled playlists, if any. The advanced channel will try its best to ensure content gets played exactly as the defined setting.
- Air Time % – Content will be played to a percentage amount of the Media Zone playout duration as defined in the setting. ImportantThe Air Time % option only works on Appspace App 1.20 and later.
- Click SAVE once done.
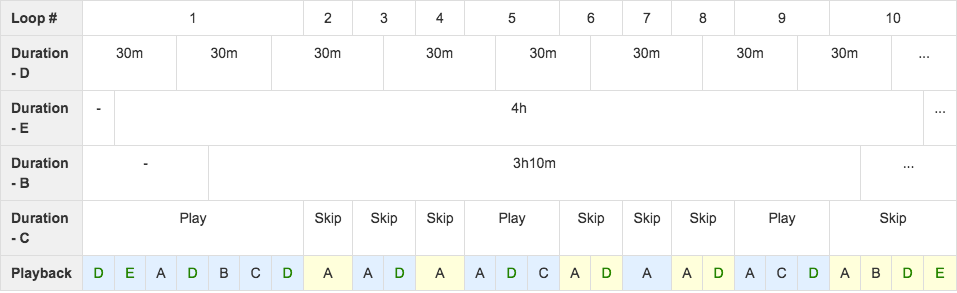
Frequency Restrictions
Listed below are several key scenarios to help you understand how the selected options will impact all the content in a playlist, with the following assumptions set:
Note: Content A is skipped in Loop 3 because it was played in Loop 2 less than 100 seconds ago.
= 86400s/25s x 10s But due to the playout duration of other content in the playlist, Content A plays every 30s instead of 25s. Therefore, Content A will play for a total time of only: Theoretically, if the Media Zone is scheduled to play for a total duration of 24 hours, Content B will play for a total time of: Due to the playout duration of other content in the playlist, Content B plays every 60s instead of 50s. Therefore, Content B will play for a total time of only:
Scenario 1

Scenario 2

Scenario 3


Scenario 4

Scenario 5

Scenario 6

Scenario 7

So if the Media Zone playlist is scheduled to play for a total duration of 24 hours, Content A will be playing for a total time of:
= Total duration/Display time x Duration for Content A
= 86400s/20s x 10s
= 12 hours/day
= 50% of air time per day. Scenario 8
Display time = 10s/10% = play once every 100s.
= Total duration/Display time x Duration for Content A
= 86400s/100s x 10s
= 8640s
= 2.4 hours/day
= 10% of air time per day. Scenario 9

= Total duration/Display time x Duration for Content A
= 9.6 hours/day
= 40% of air time per day.
= 86400s/30s x 10s
= 8 hours/day
= 33.33% of air time per day.
= Total duration/Display time x Duration for Content B
= 86400s/50s x 10s
= 4.8 hours/day
= 20% of air time per day.
= 86400s/60s x 10s
= 4 hours/day
= 16.67% of air time per day.
Configure Schedule
Scheduling allows content to be displayed at a predetermined time.
The instructions below show you how to configure content scheduling.
- In the Playout Properties window, click the Schedule field, and select the desired start and end time from the calendar drop-down.

- Click SAVE once done.
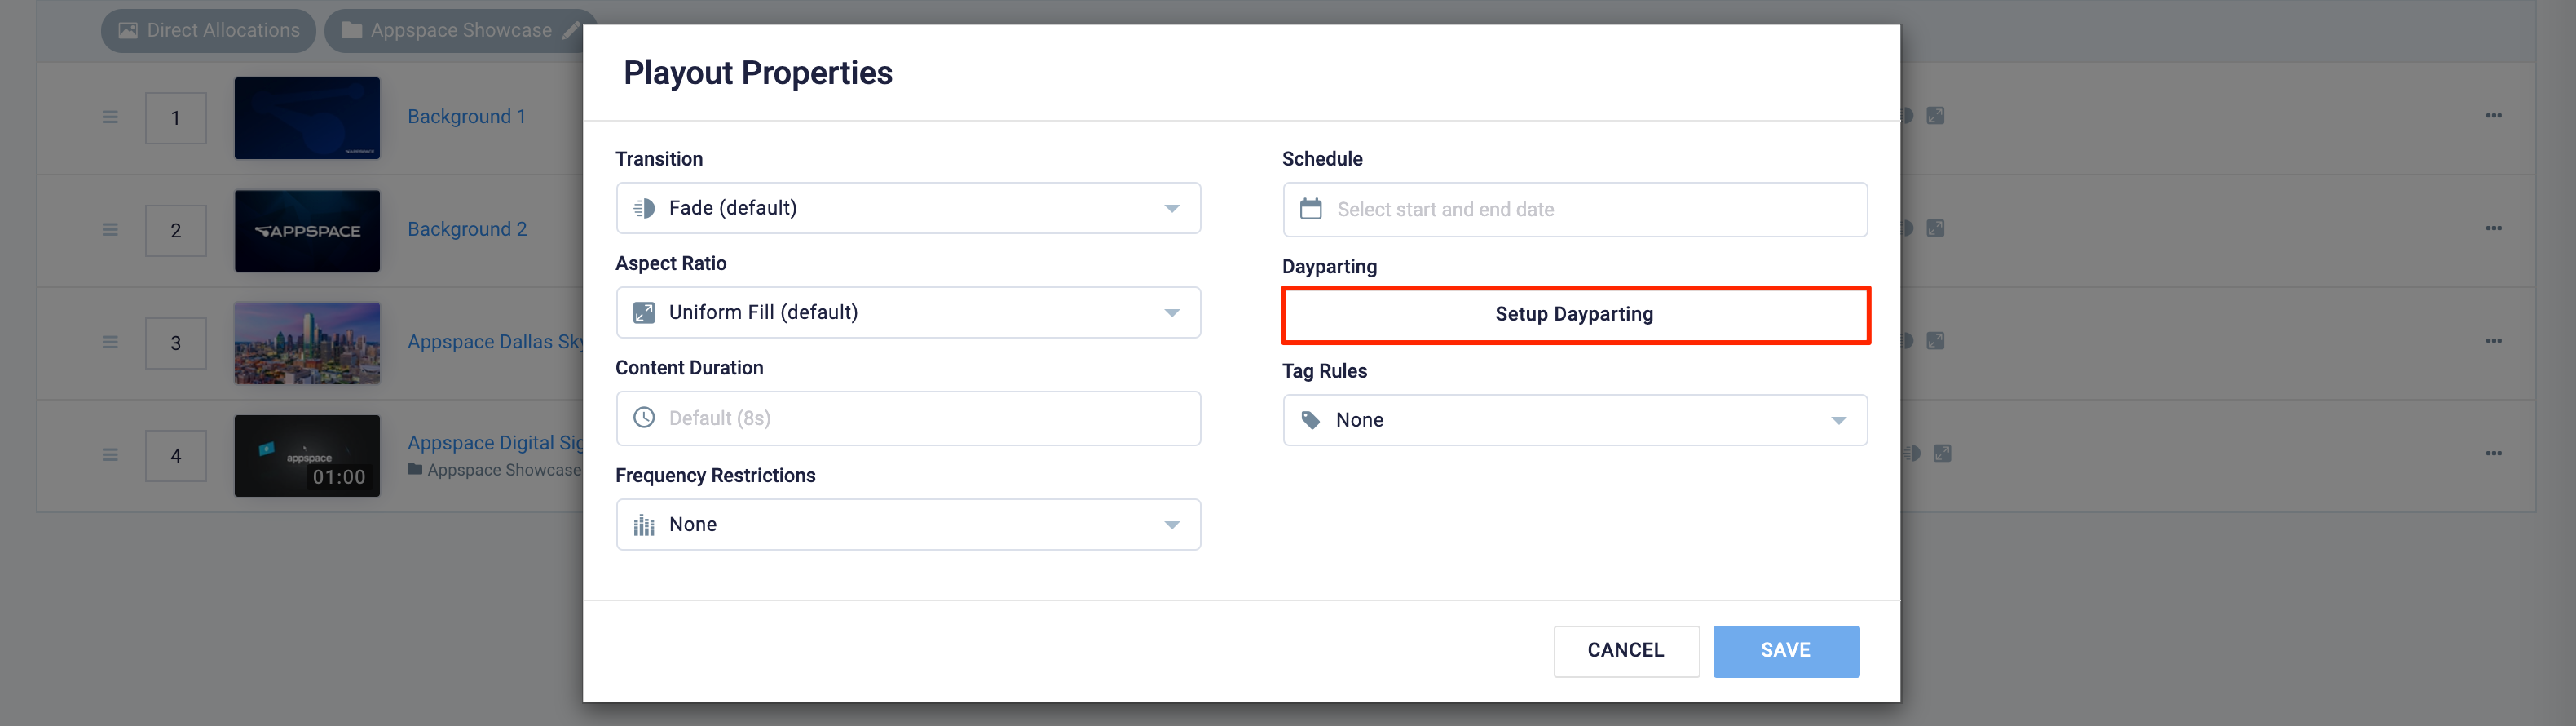
Configure Dayparting
The Dayparting feature allows you to schedule different content playback at different times in a day or week. The dayparting schedule can be applied to a single content, or a folder with multiple content, with adjustable durations for each time slot.
To configure Dayparting, follow the instructions below:
- Ensure the content or a folder with multiple content has been added to the playlist channel.
- All content within the folder will inherit the dayparting configuration.
- In the Playout Properties window, click the Setup Dayparting button.
- In the Edit Daypart Schedule window, select the time slot duration. Each time slot duration can be set to a minimum of 1 minute or a maximum of 1 hour.

- Click on the desired time blocks to highlight and select the time slots, for a specific day, or an entire week.
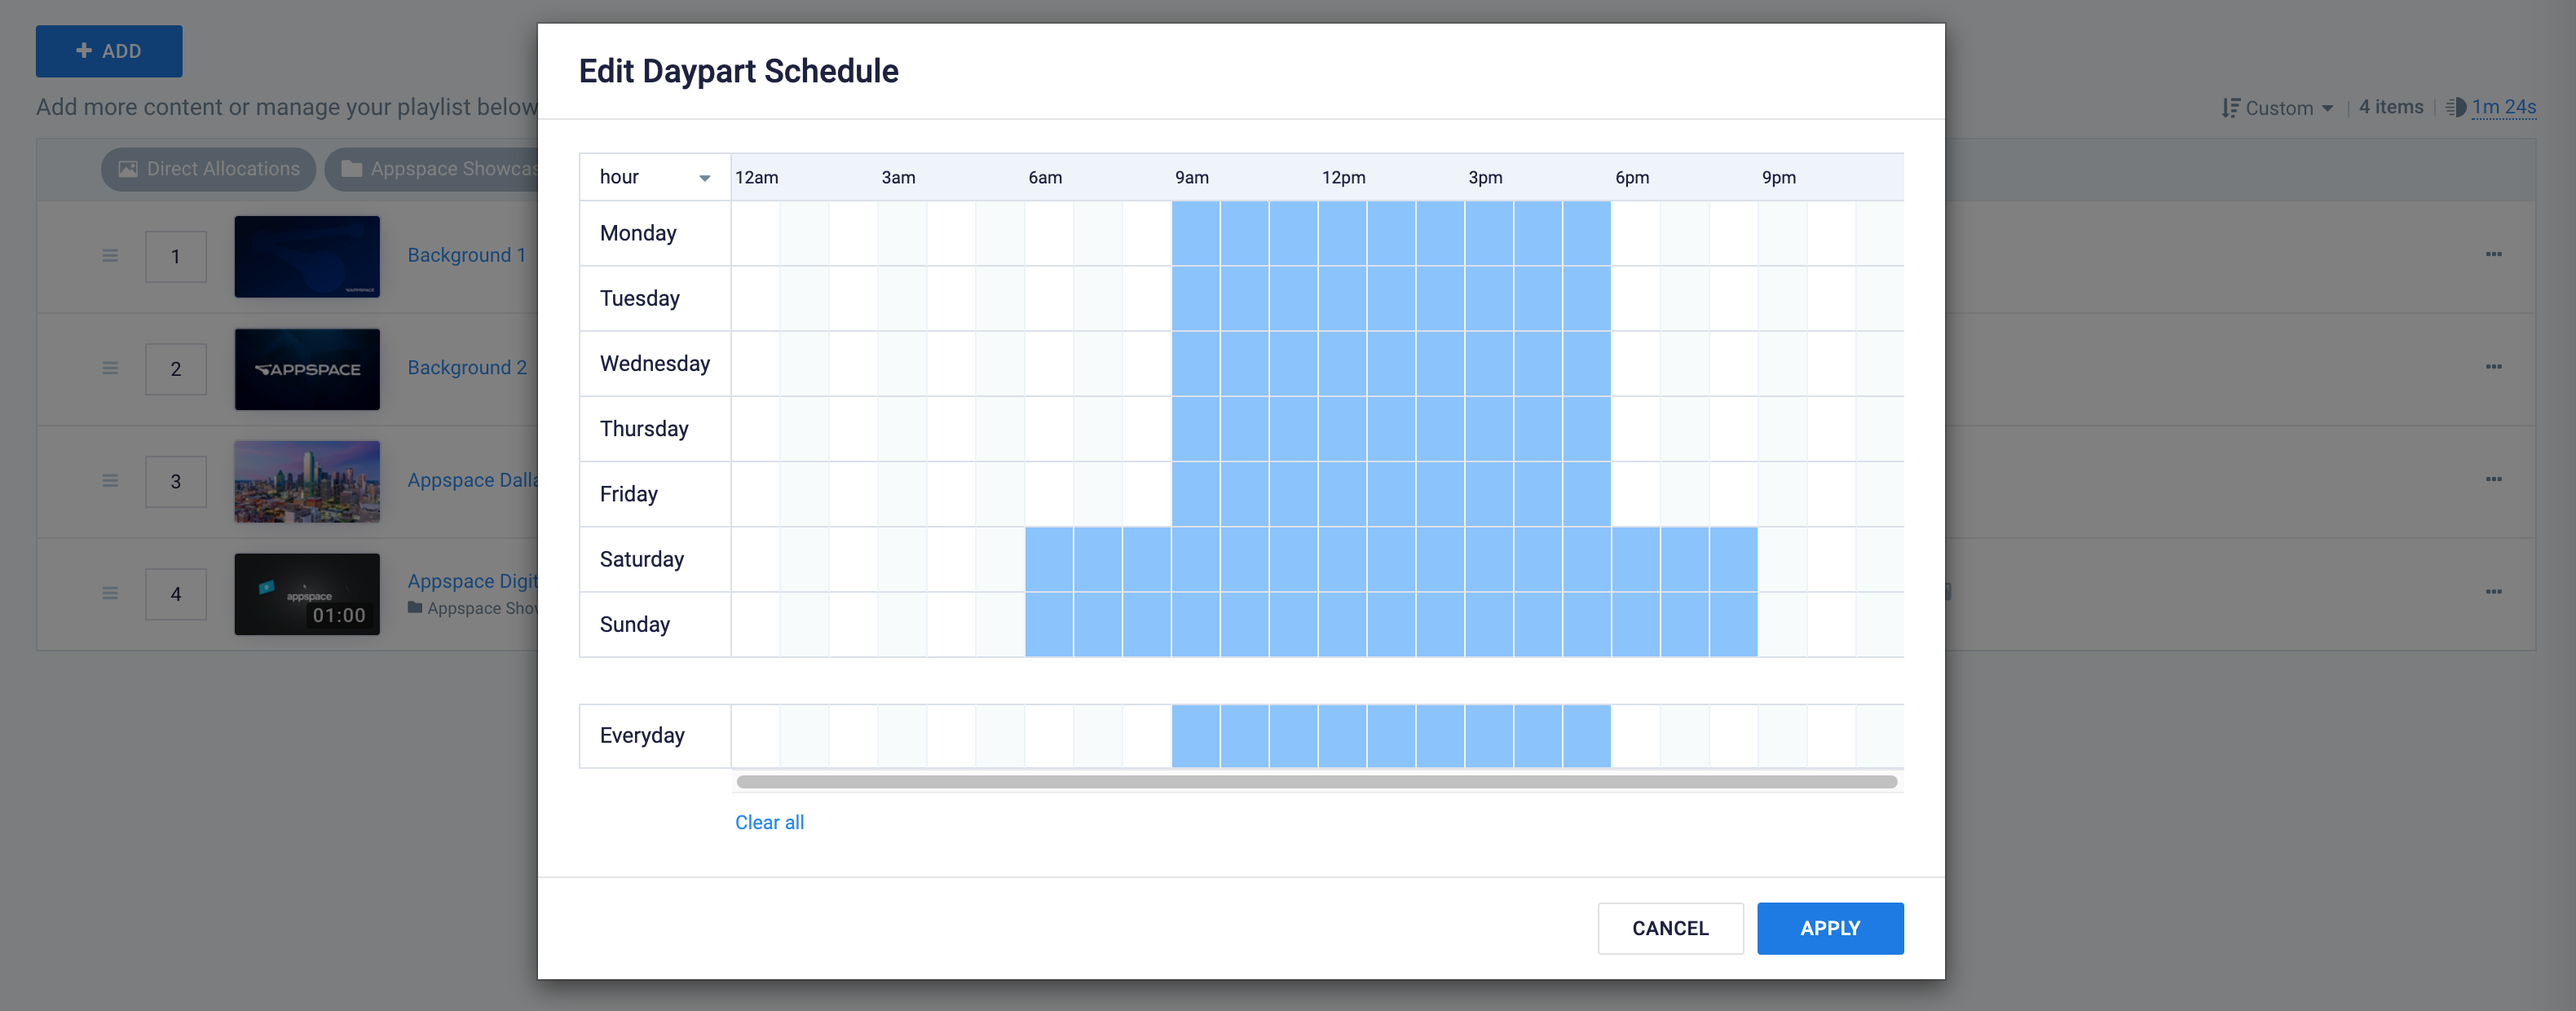
- Click Apply, and click SAVE once done.
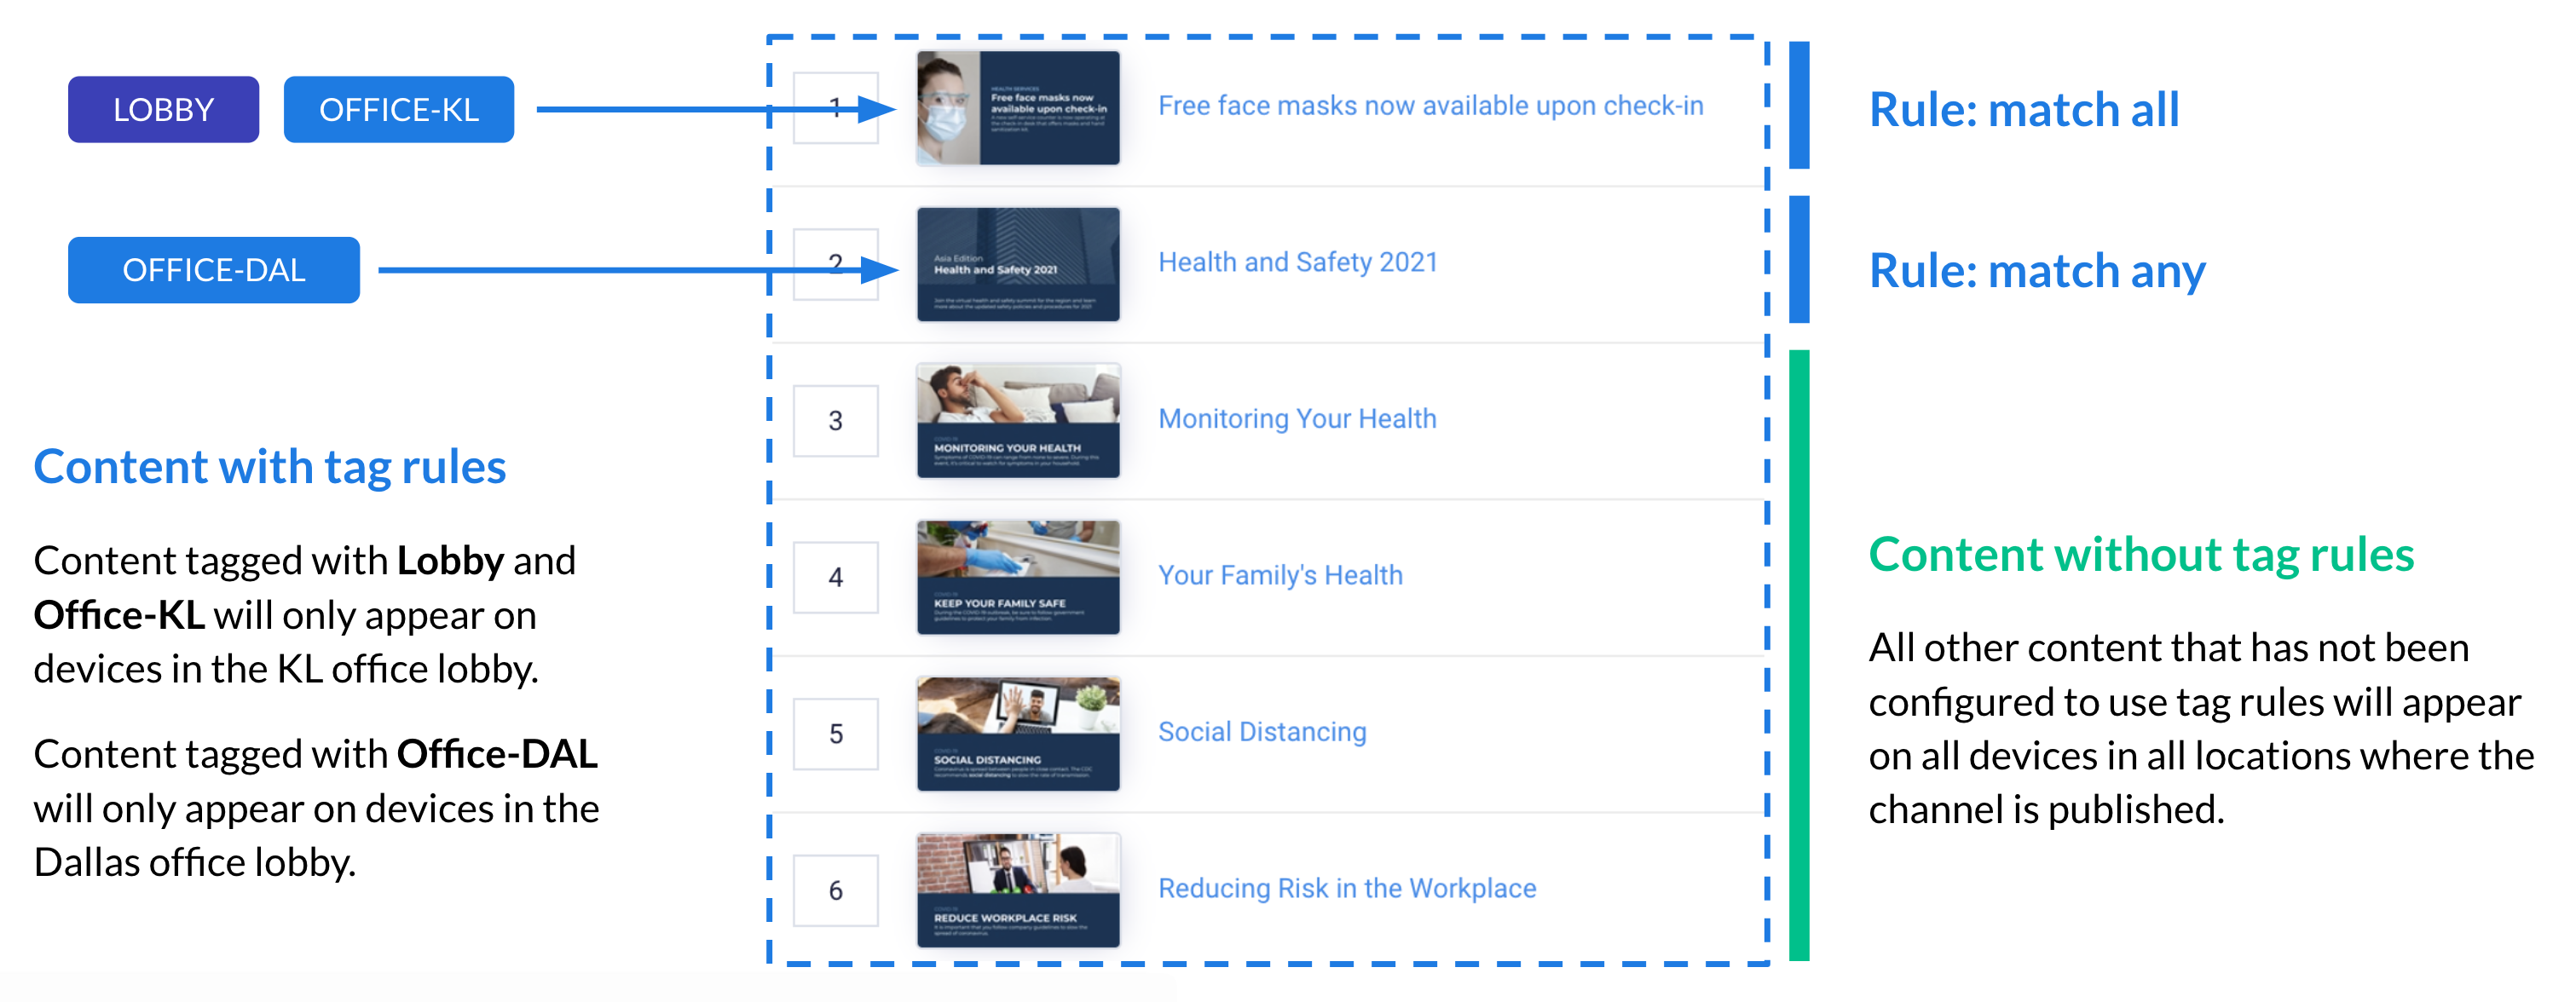
Configure Tag Rules
The Tag Rules functions by cross-referencing tags as a way to automatically allocate specific or localized content to targeted devices via tag rules within the channel to matching device tags. This allows organizations to manage a single or main playlist that is published to devices in all locations, while still being able to control the content that is displayed in these locations, allowing for specific or localized content to be displayed.
For instance, an organization’s human resource department is able to manage a single playlist channel to display HR content globally across all devices located in all their locations, such as regional offices, data centers, support centers, etc. In addition to the global content, the department can also add region-specific or localized content that will only appear in locations where the devices are tagged with the appropriate regional or localized tags.
Prerequisites
- Ensure that your devices have been defined and organized across your workplace with device tags.
- Ensure that your content have been assigned with the relevant content tags.
To configure Tag Rules, follow the instructions below:
- In the Playout Properties windows, select the desired tag rules from the Tag Rules drop-down menu:
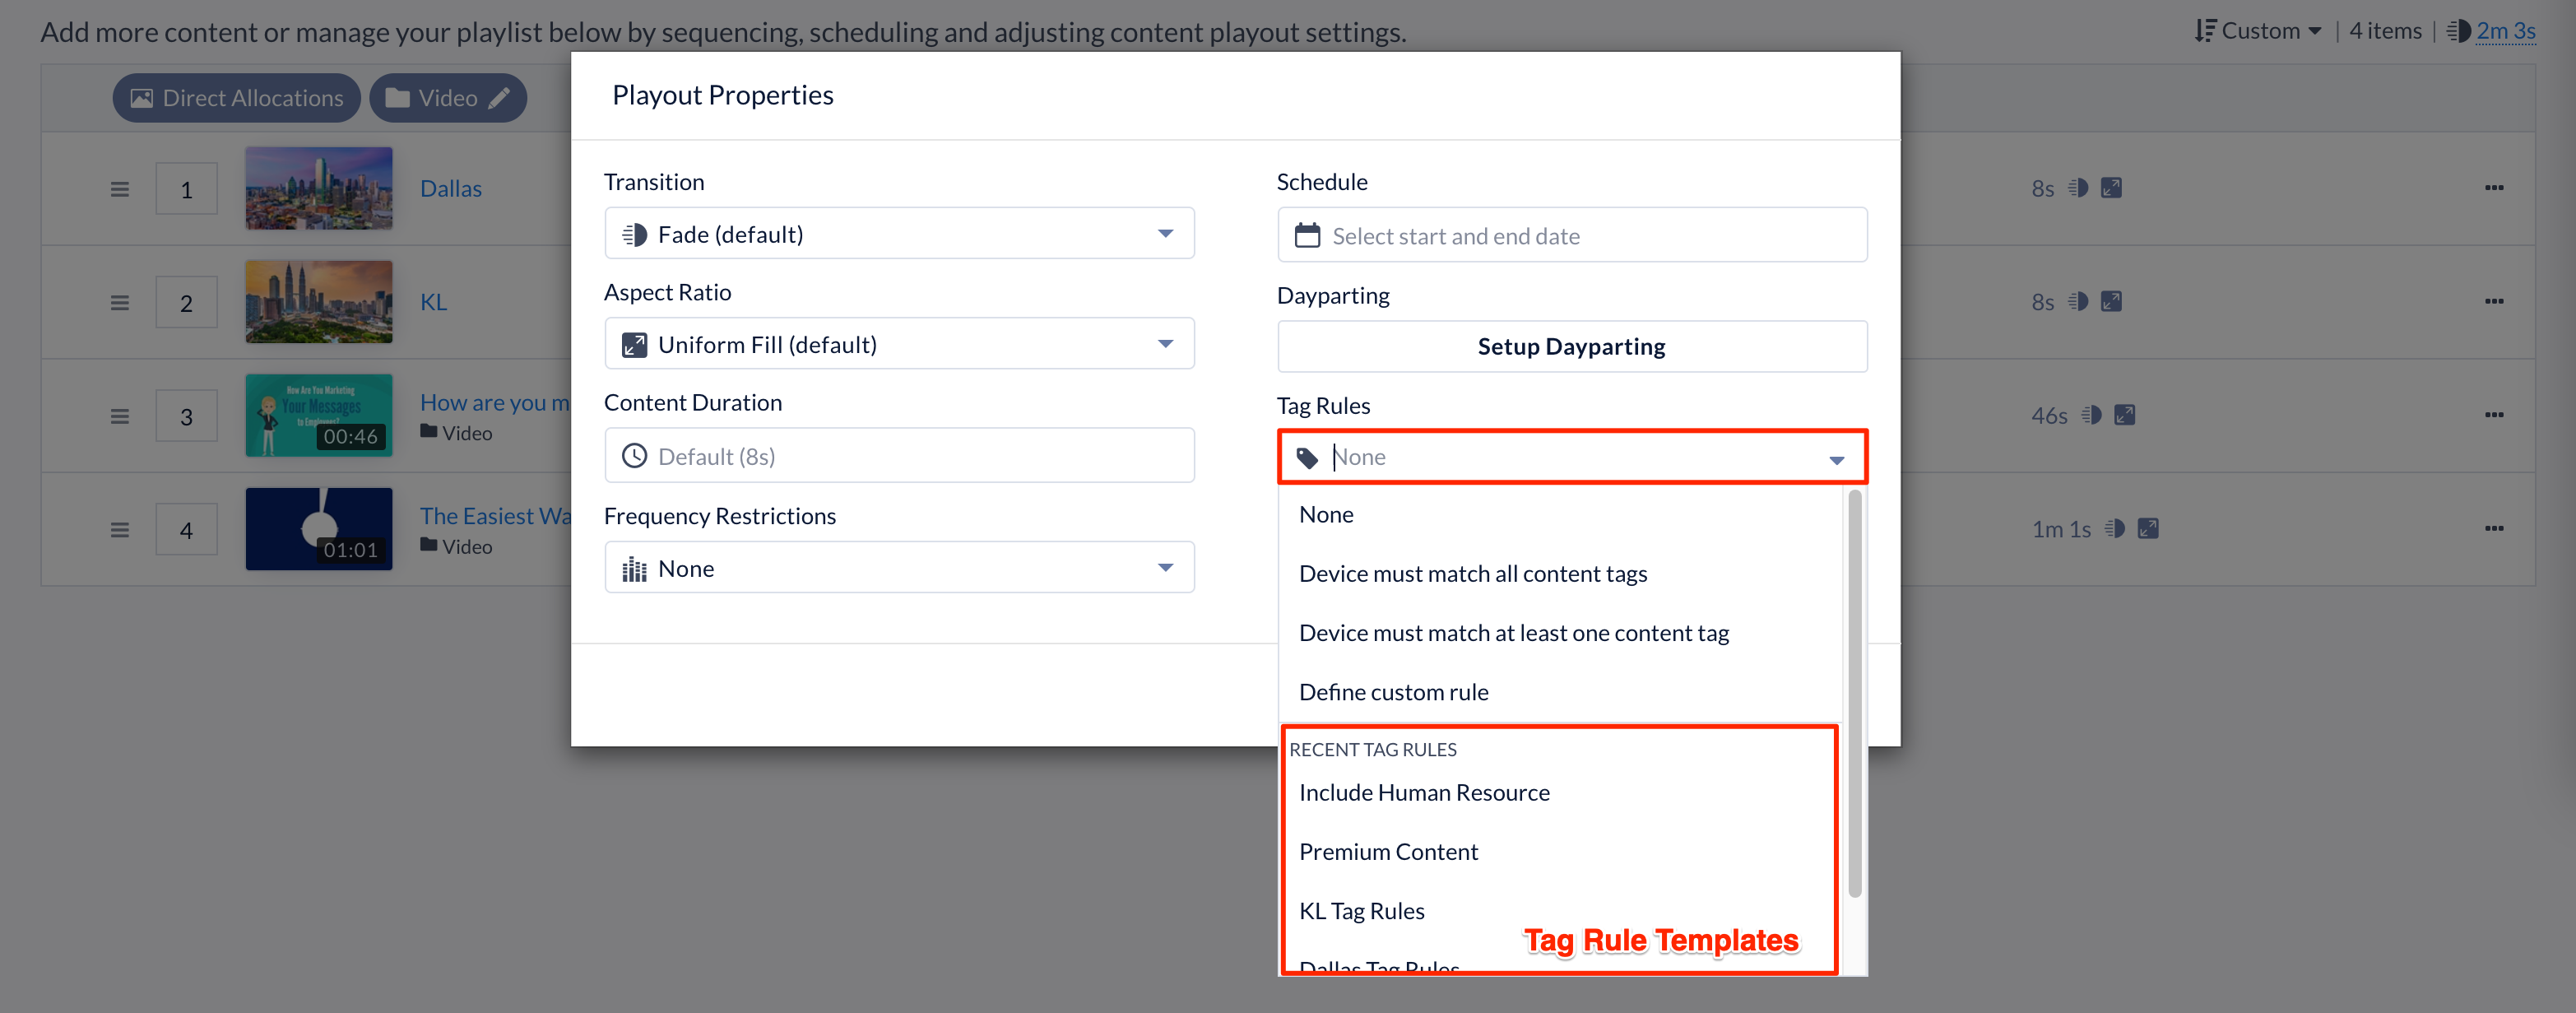
- None (default)
- Device must match all content tags – Allows content to be displayed, only when all content tags match all the device tags.
- Device must match at least one content tag – Allows content to be displayed, as long as any content tag matches the device tags
- Define custom tag rules – Allows content to be displayed, based on a collection of tag rules that may include multiple operations, such as “include” and “exclude” operations.
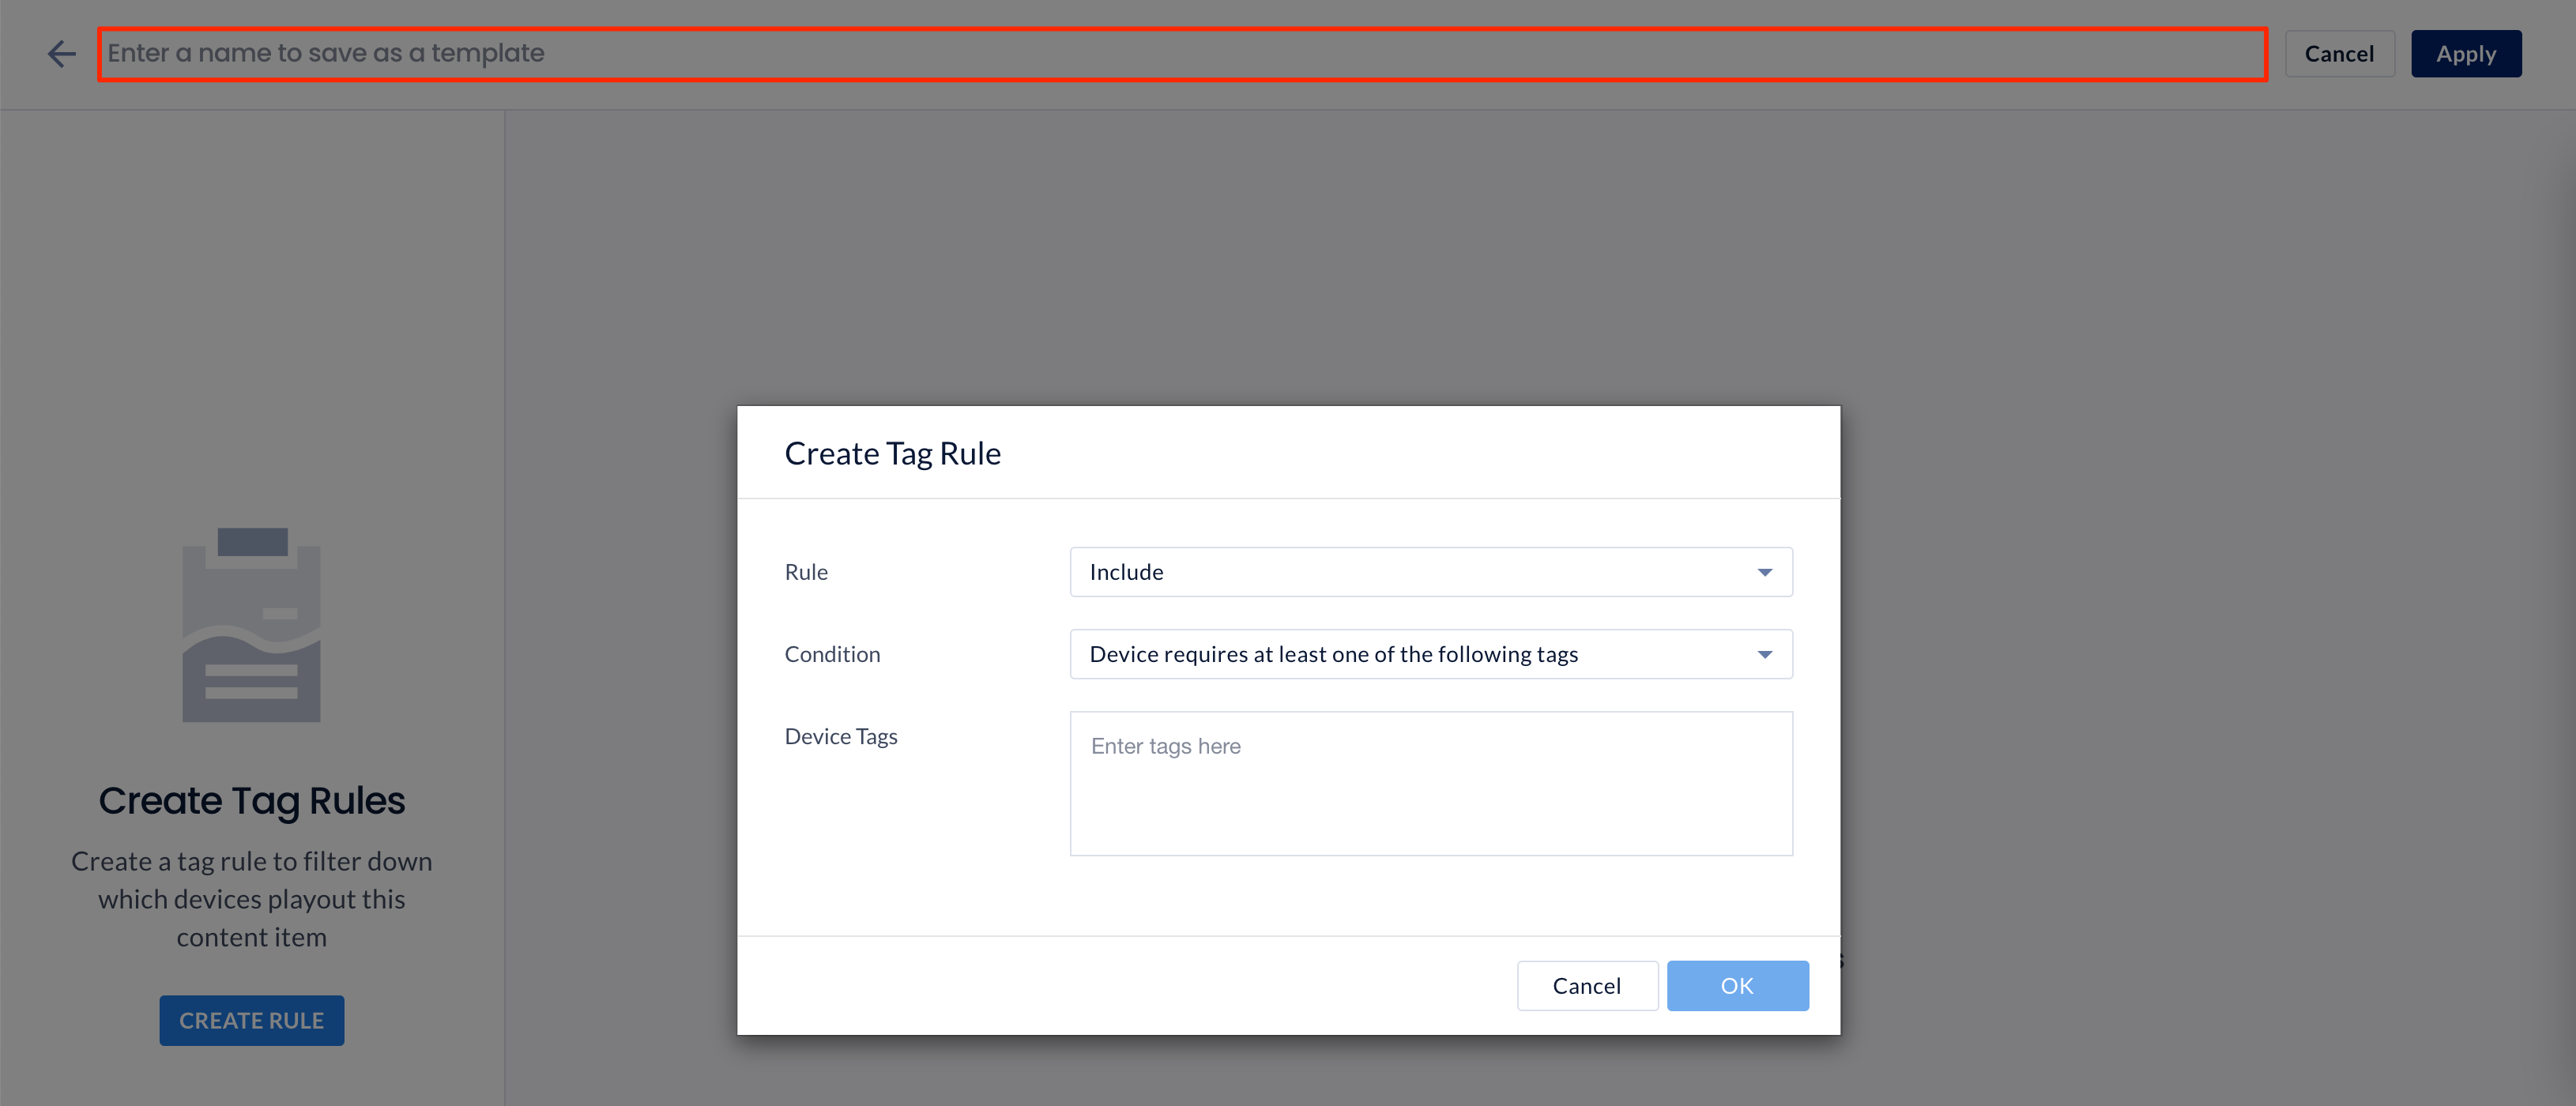
- If the Define custom tag rules option is selected, click the CREATE RULE button to begin creating your tag rules.
- Select the tag rule type from the Rule drop-down menu:
- Include
- Exclude
- Enter the relevant tags that should be included or excluded depending on the Rule type in the Tags field.
- Select the tag rule condition from the Requires drop-down menu:
- All – Requires all content tags to match all device tags.
- At least one – Requires any content tag to match a device tag.
- If you would like to save the custom tag rules to be used for other content, enter the Tag Rule Template name and click Save.
- Selecting a Tag Rule Template from the RECENT TAGS section:
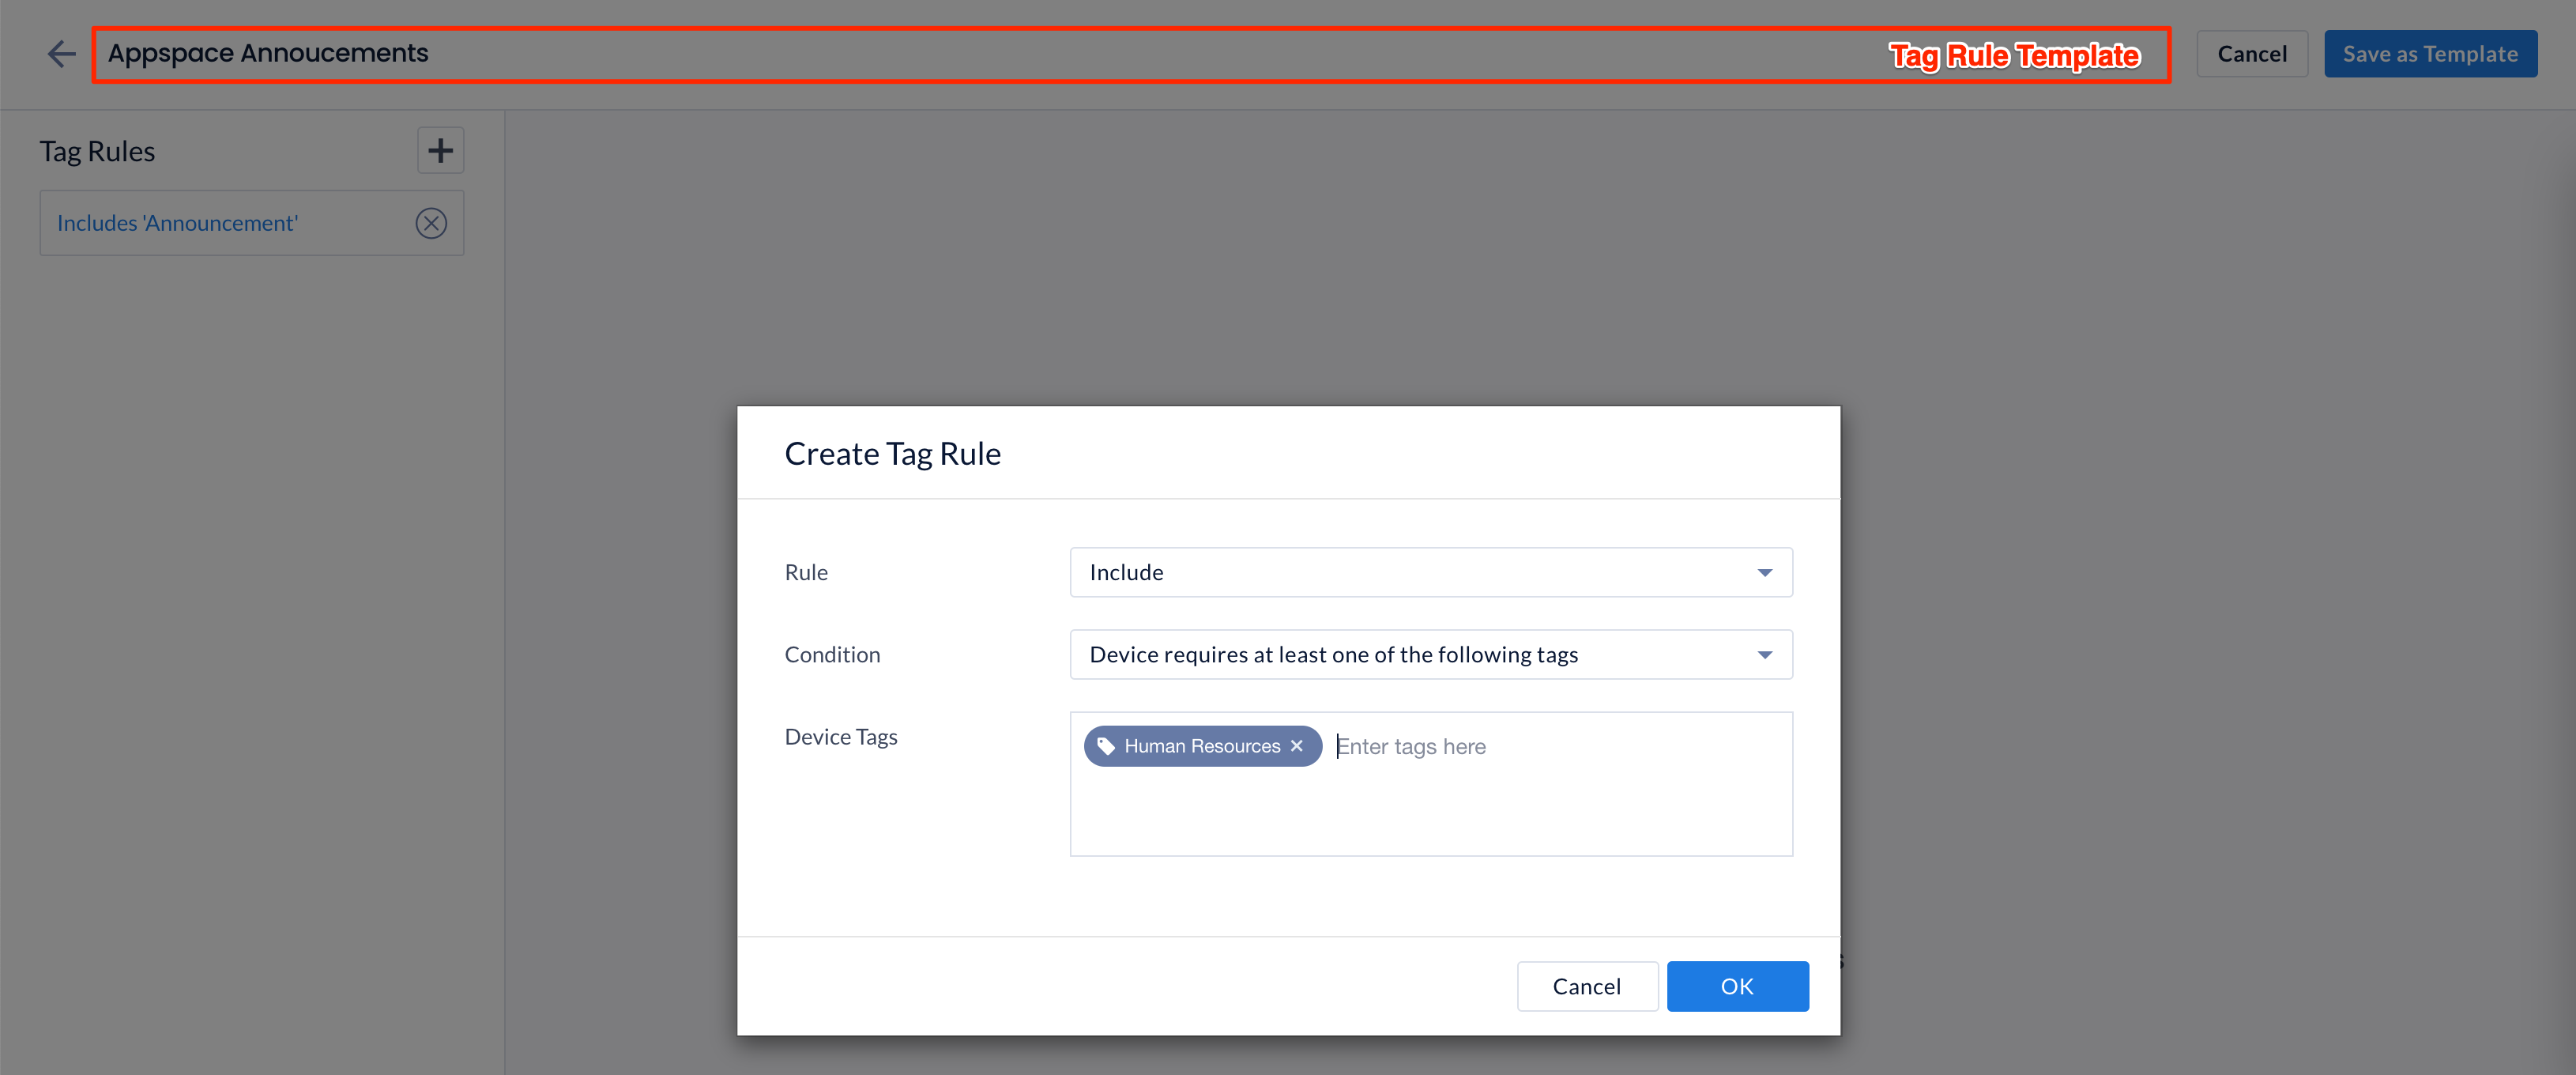
- If you would like to edit or view the Tag Rules within the template, click the Tag Rule Template name link.
- You may view existing tag rules from the left side panel.
- You may edit the Tag Rule template, the same way as creating the Tag Rule Template.
- You may delete the Tag Rule template, by clicking the Tag Rule Template name, and clicking Delete Template.
- If you would like to edit or view the Tag Rules within the template, click the Tag Rule Template name link.
- Click SAVE once done.
Configure Playlist Interleave Playback
When multiple playlist channels are published to a device, the default content playback behaviour when in autoplay mode, is to display all content items from a single playlist channel first, before proceeding to display the content items in the next playlist channel. With the Playlist Interleave device property, you may configure and control the number of content items from a playlist channel during playback, before switching to display content items from the next playlist channel. This back and forth sequence will go on until all content items from all playlist channels are displayed before starting over again.
Currently, the following interleave sequencing options are supported:
- Option 1 – Displays x number of content in an interleave sequence between each playlist channel continuously.
- Option 2 – Display a single content in an interleave sequence between each playlist channel, until there is no remaining content to be displayed, while also skipping playlist channels that have completed playback.
- Option 3 – Displays a single content in an interleave sequence between each playlist channel, ensuring that I completed all playlist channels at the same time, based on the count of each playlist channel items and average skips per playlist.
The Playlist Interleave device property is only supported on Appspace App for Devices 2.48 and above.
To configure the Playlist Interleave on devices, follow the instructions in the Add Device Properties article, to add the following device property and value:
- Add the following Playlist Interleave device property to Enable the feature, and desired interleave option value to define the playlist channel playback behavior:
-
Option 1: custom.playlist.interleave = {"option": 1, "contentCount" : 2}The contentCount property is optional, and is used to define the number of content items to display, before switching to the next playlist channel. If none is specified, the default content count will be 1.NoteEntering the following device property custom.playlist.interleave = true will default to custom.playlist.interleave = {“option”: 1} -
Option 2: custom.playlist.interleave = {"option": 2} -
Option 3: custom.playlist.interleave = {"option": 3}
-
Listed below are several key scenarios to help you understand how the selected options will impact all the content in a playlist, with the following assumptions set:
- Option 1 – Displays x number of content in an interleave sequence between each playlist channel continuously.
- Example with 2 Playlist Channels

- Example with 3 Playlist Channels

- Example with 2 Playlist Channels
- Option 2 – Display a single content in an interleave sequence between each playlist channel, until there is no remaining content to be displayed, while also skipping playlist channels that have completed playback.
- Example with 2 Playlist Channels

- Example with 3 Playlist Channels

- Example with 2 Playlist Channels
- Option 3 – Displays a single content in an interleave sequence between each playlist channel, ensuring that I completed all playlist channels at the same time, based on the count of each playlist channel items and average skips per playlist.
- Example with 2 Playlist Channels

- Example with 3 Playlist Channels

- Example with 2 Playlist Channels
Was this article helpful?