This article provides admins with instructions to create and configure library passports to integrate with third-party platforms and services to display external content.
Prerequisites
- Account Owner permissions that have been assigned Platform User licenses.
- Account Owner role in Appspace.
- A service account for the third-party system authentication.
Prerequisites for Beezy Passport
The following instructions are configured using the Beezy account.
- Account Owner, Publisher, or Author role to create or edit card in the Library.
- Account Owner or Publisher role to configure account authentication in Integrations > Passport.
- Ensure your device is compatible. Refer to the Supported Appspace Cards article.
Prerequisites for SharePoint Passport
The following instructions are configured using the Microsoft 365 SharePoint Online account.
- Account Owner, Publisher, or Author role to create or edit card in the Library.
- Account Owner or Publisher role to configure account authentication in Integrations > Passport.
- Appspace App 2.56.0 and later.
- Appspace 8.2.0-ac.1 and later.
- A Microsoft 365 SharePoint Online account for the organization domain.
- When setting up a SharePoint passport for the first time, an administrator will see a window requesting permissions for SharePoint passport to access organizational data. If the window has a check box for consent on behalf of the organization, the administrator needs to enable it before clicking Accept. Failure to do so will result in SharePoint passports not working with SharePoint cards for users within the organization.
- Ensure your device is compatible. Refer to the Supported Appspace Cards article.
NoteCurrently news articles, links, and video playback are not supported.
Prerequisites for Webex Meetings
The following instructions are configured using the Webex Control Hub by an Administrator.
- Service Account (Passport Authentication)
- Create a new user account with the Webex Site Administrator admin role assigned.
- Ensure to Enable the Assign Meeting content admin for all eligible sites.
- Normal User (Host Meetings)
- Create a new user account using the same email as an Appspace user, to be used to host meetings.
- Assign the user account with a free or paid (recommended) meeting license.
Prerequisites for Zoom Meetings
Important
This is an Appspace Limited Release feature. Contact your Appspace Customer Success Manager to be a part of this Limited Release program and enable this feature.
The following instructions are configured using the Zoom Web Portal by an Administrator.
- Create a service account and ensure that the Role has the Edit option enabled for the Users row in User and Permissions Management.
Create Library Passport
Follow the instructions below to authenticate your service account with the desired library passport:
- Log in to your Appspace console.
- Click the ☰ Appspace menu, and select Integrations.
- In the Passports tab, click the +ADD button, and click the LIBRARY filter.

- Select the desired library passport and click Connect.
- Beezy
- SharePoint
- Webex Meetings
- Zoom Meetings
- Follow the on-screen instructions to authenticate the conferencing passport with your service account, and grant Appspace the necessary permissions to access the service account.
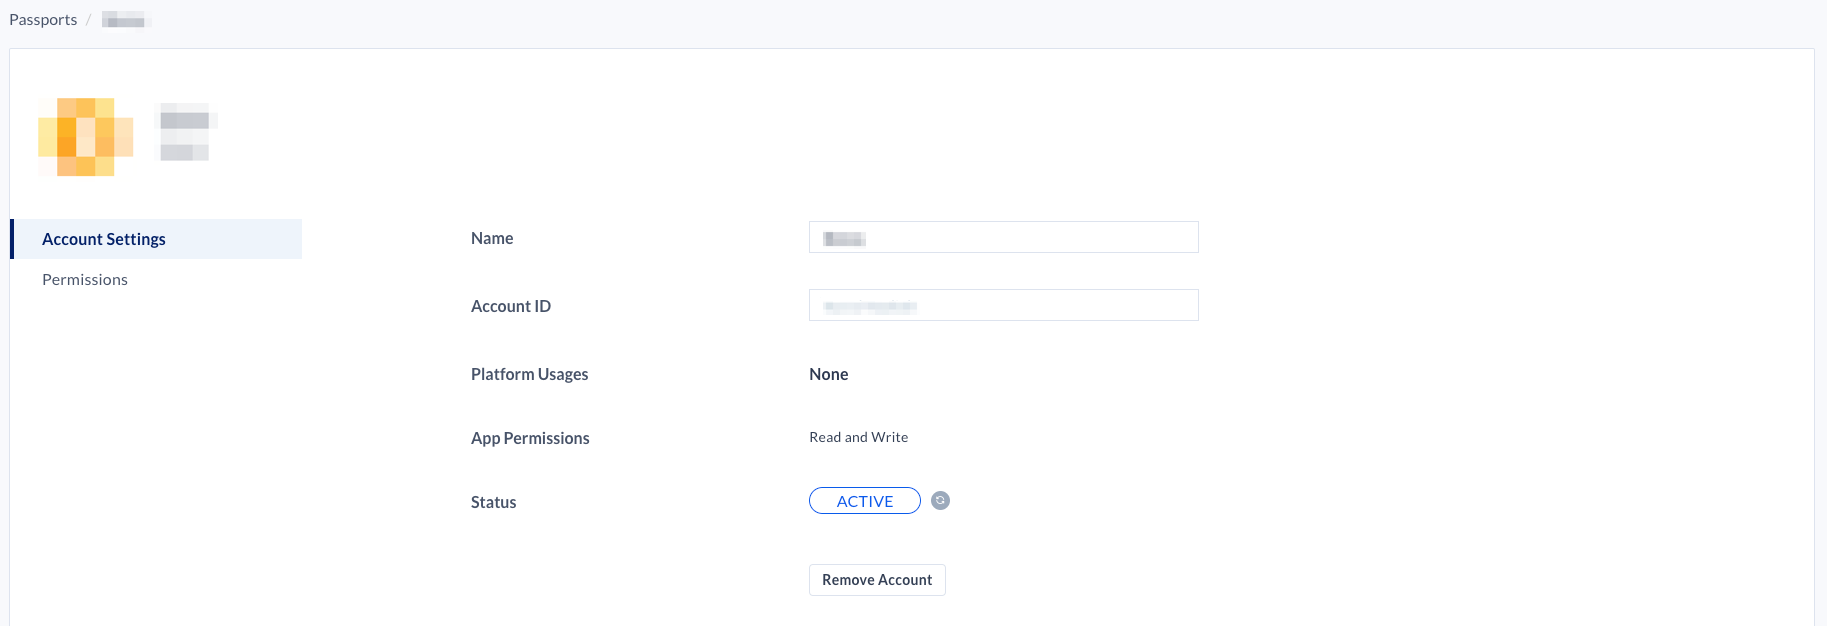
- Once authenticated, In the Account Settings tab, you may perform the following actions:

- Name – Name of the passport, that you may change when using multiple passports.
- Account ID – Displays the service account ID used to authenticate the passport.
- Platform Usages –
- App Permissions – Displays the granted Read and Write app permissions.
- Status – Displays the status of the passport.
- Remove Account – Removes the account from the passport.
- In the Permissions tab, you may grant permissions to users or user groups to view and edit the passport:
- Enter and select the user(s) or user group(s) from the drop-down list, or click the Find users or user groups link, and select the desired user(s) or user group(s). Proceed to grant either Can Manage or Can View permissions by clicking the Select permissions drop-down menu.
- You may also view or remove the user(s) or user group(s) that have already been granted permissions by clicking the ⨂ delete icon.

Was this article helpful?