(New) This article provides administrators with the instructions to create and manage Services in the Admin Console. The Services module in the Appspace Console enables you to configure and manage both business and catering services within Appspace Reservations:
- Business Services: Includes requests, forms, and payment-related activities.
- Catering Services: Includes menus, ordering, and payment-related activities.
This article is for configuring Business or Catering Services in the Admin Console. For an introduction to the Services module, see this article.
Services enhances Appspace Reservations with a dedicated Business or Catering Management module, offering a complete set of tools for configuring, ordering, tracking, and managing services. Users can customize their orders based on preferences, and specific requirements, allowing them to select items, specify quantities, and add special instructions. The module also links with checkpoints to ensure seamless menu selection and ordering within the reservation process, and allows hosts and attendees to track their submitted orders.
Prerequisites
- An Appspace Platform user license.
- An active Appspace public/private cloud user account.
- Account Owner or Location Admin role.
- Buildings and locations with floor plan(s) created in Locations for resource mapping.
- Users and user groups.
Create Business Service
A Service refers to the name or title assigned to a business, a restaurant, or a food caterer. Once a Business service is set up, it can be used to create checkpoints to display business request forms, such as for stationery, office furniture, or lighting services for workplace reservations. To create a business service, follow these steps:
- Log in to the Appspace console.
- Click the ☰ Appspace menu, and click Services.
- Click +Create on the upper-left corner.
- For Type of business, select Business.
- In the Create Service window, enter the Name and Notes of the service.
- Click Save.
- The service is listed under All Services.
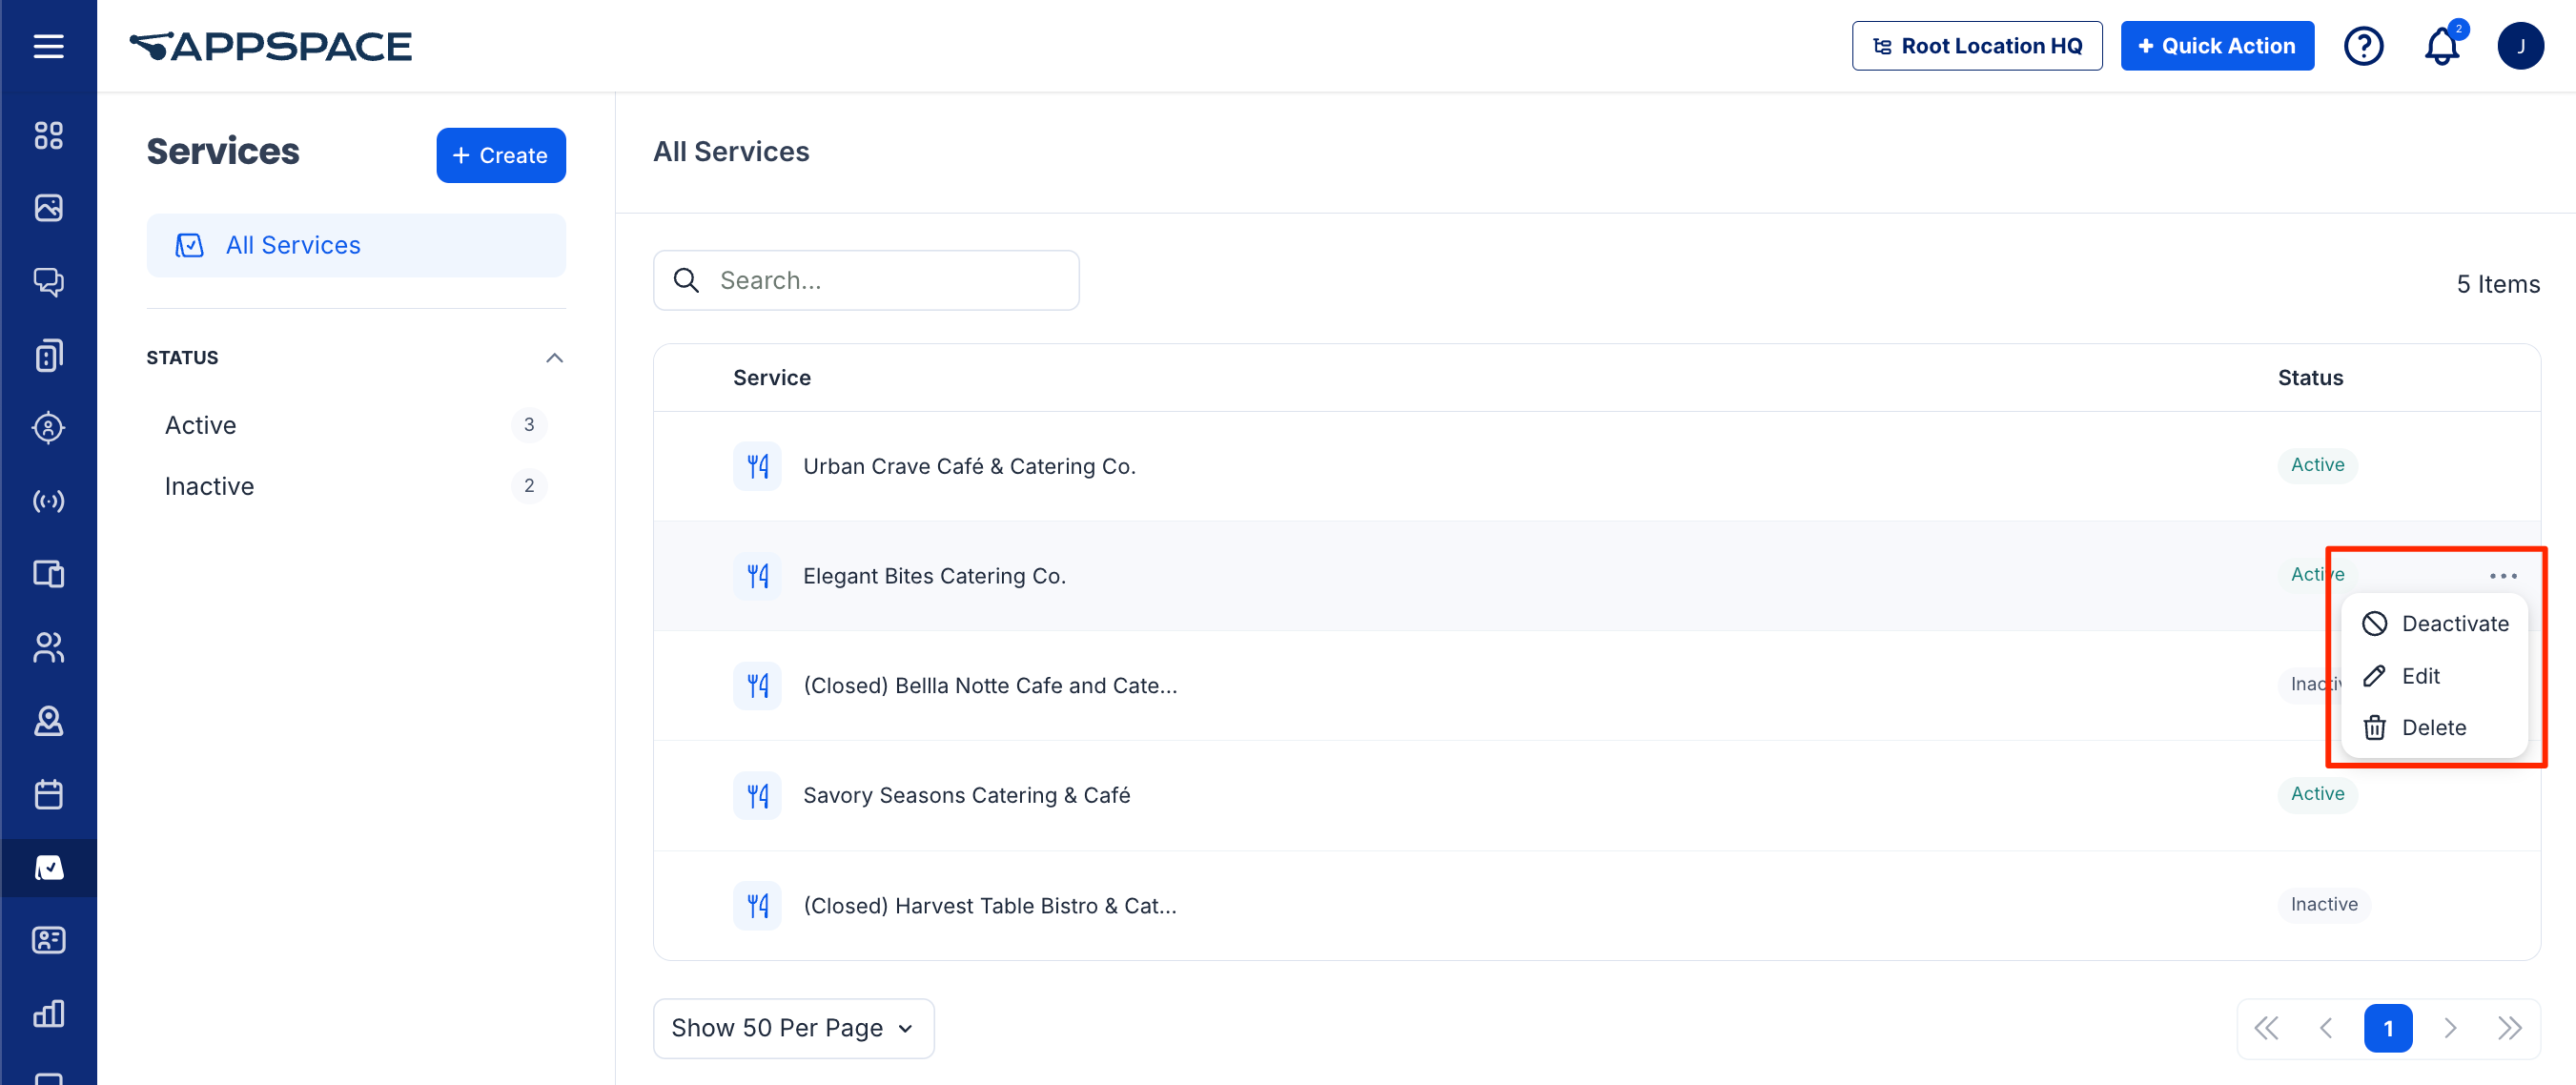
Edit Business Service
To edit or delete a business service, perform the following steps:
- Log in to the Appspace console.
- Click the ☰ Appspace menu, and click Services.
- From the left bar, select Business Services to view available business services.
- Move your mouse over a Service in the list and click the ellipsis (…) at the end of the row. If the service is not listed, you can perform a search using the Search bar.
- Select to Activate or Deactivate the Service. Inactive services and their menus are not available to be set in the services checkpoint or viewed by the employee.
- Select Edit to edit the service. Proceed to edit the Name and/or Notes and click Save.
- Select Delete to delete the service. The confirmation window will appear. Select the check box and click Delete. ImportantWhen you delete a service, you will also delete all forms and Settings associated with the service. This action cannot be undone.
Create Request Form
To create a business request form, perform the following steps:
- Log in to the Appspace console.
- Click the ☰ Appspace menu, and click Services.
- From the left bar, select Business Services to view available business services.
- On the Business Services page, select the business service in which you want to create a request form.
- Select the Form tab.
- Click +New at the top-right corner. In the New Request Form window, enter the following information:
- Enter the Name and Notes of the form.
- For the Preparation time, set the days, hours, and minutes. This determines how far in advance a request must be placed before the meeting starts.
- Enable the Payment Required option to display prices in the form during reservation check-in.
- Select the Currency for the menu from the drop-down list. This option appears only if the Payment Required option is enabled.
- Enable the Active option to set the request form as visible for orders by employees.
- Click Save.
- The request form is listed under Forms.
Add Questions on the Form
Questions are options for employees to select from the request form during check-in for a reservation. To create question for a form, follow these steps::
- Log in to the Appspace console.
- Click the ☰ Appspace menu, and click Services. Select Business Services from the left bar to view available business services..
- Select the business service. On the Service page, select the Forms tab.
- Select a form from the Request form list. If the form is not listed, you can perform a search using the Search bar.
- If this is the first Question in the form, click + Add first question on the form. Otherwise, proceed to the next step.
- Click +New at the top-right corner. In the Add Question window, enter the following information:
- Enter the Question for the item that will appear on the form.
- Enter a Description of the item.
- For the Type, select how the question can be answered by the meeting attendee on the form.ImportantA question’s Type cannot be changed after it is created. To change it, you must delete and recreate the question.
- Single Choice – allow the requester to select a single option from the question. Select the options available in the next step.
- Multiple Choice – allow the requester to select a single option from the question. Select the options available in the next step.
- Yes/No – allow the requester to select only a yes or no option for the question.
- Dropdown – allow the requester to select a single option from a dropdown list. Select the options available in the next step. Note that only one option can be selected by the user.
- Number – allow the requester to enter a number in the field.
- Short text – allow the requester to enter free-form text in a field.
- Long text – allow the requester to enter free-form text in a field, as a longer sentence or paragraph.
- If you selected Single Choice, Multiple Choice, or Dropdown for Type, enter the options for the question:
- Enter a name for the option that will appear under the question.
- Enter the price of the option. This will follow the currency of the form.
- Upload an image for the option by uploading an image or browsing for the image file.
- Click + Add a new option to add another option to the question.
- Rearrange the order that the options appear in by clicking on the rearrange (⋮⋮) icon when you mouse over an option.
- Remove an option by clicking on the delete (⊖) icon when you mouse over an option.
- Click Save.
- The question item and its options are listed in the form.
Add Sections on the Form
A section acts like a header in a form that groups relevant questions under it. To create a section, follow these steps::
- Log in to the Appspace console.
- Click the ☰ Appspace menu, and click Services. Select Business Services from the left bar to view available business services.
- Select the business service. On the Service page, select the Forms tab.
- Select a form from the Request form list. If the form is not listed, you can perform a search using the Search bar.
- Select the Form tab.
- Click +Add Section at the bottom of the page. Enter the name of the new section in the field and press ENTER.
- The new section is created. Click on Untitled Section in the new section to enter the header that will be displayed for the section.
- Click + Add item at the bottom of the section to add a question to the section. In the Add Question window, the information for the question as outlined in the Add Questions section:
- Click Save.
- The section is listed on the form.
Edit Forms and Questions
-
- If the Payment required option is switched OFF for a form, all item prices in the form will be removed. Turning the Payment required option ON again will reset all prices to 0.00 in the selected menu’s specified currency.
- Deactivating, editing, or deleting Forms and Questions will not affect any orders that have already been placed. These changes will only apply to new orders. Any previous orders will remain the same, unless the user reenters their order.
To edit or delete a question, perform the following steps:
- Log in to the Appspace console.
- Click the ☰ Appspace menu, and click Services.
- Click the ☰ Appspace menu, and click Services. Select Business Services from the left bar to view available business services.
- Select the business service. On the Service page, select the Forms tab.
- Select a form from the Request form list. If the form is not listed, you can perform a search using the Search bar.
- Move your mouse over a form in the list and click the ellipsis (…) at the end of the row.
- Select to Activate or Deactivate the form. Inactive forms are not available to be set in the services checkpoint or selected by the employee.
- Select Edit to edit the form. Proceed to edit the Name, Notes, Preparation time, and other details. Click Save.
- Select Delete to delete the form. The confirmation window will appear. Select the check box and click Delete. ImportantWhen you delete a form, you will also delete all questions within the form. This action cannot be undone.
- After editing the form, you may proceed to edit the questions in the form. With the form still selected, move your mouse over a question within the form and click the ellipsis (…) at the end of the row.
- Select Edit to edit the question. Proceed to edit the Question, Description, and other details. Click Save.ImportantA question’s Type cannot be changed after it is created. To change it, you must delete and recreate the question.
- Select Delete to delete the question. The confirmation window will appear. Select the check box and click Delete.
- Select Edit to edit the question. Proceed to edit the Question, Description, and other details. Click Save.
Create Catering Service
A Service refers to the name or title assigned to a business, a restaurant, or a food caterer. Once a Catering service is set up, it can be used to create checkpoints to display food catering options for workplace reservations. To create a catering service, follow these steps:
- Log in to the Appspace console.
- Click the ☰ Appspace menu, and click Services.
- Click +Create on the upper-left corner.
- For Type of business, select Catering.
- In the Create Service window, enter the Name and Notes of the service.
- Click Save.
- The service is listed under All Services.
Edit Catering Service
To edit or delete a catering service, perform the following steps:
- Log in to the Appspace console.
- Click the ☰ Appspace menu, and click Services.
- From the left bar, select Catering Services to view available catering services.
- Move your mouse over a Service in the list and click the ellipsis (…) at the end of the row. If the service is not listed, you can perform a search using the Search bar.
- Select to Activate or Deactivate the Service. Inactive services and their menus are not available to be set in the services checkpoint or viewed by the employee.
- Select Edit to edit the service. Proceed to edit the Name and/or Notes and click Save.
- Select Delete to delete the service. The confirmation window will appear. Select the check box and click Delete. ImportantWhen you delete a catering service, you will also delete all menus, menu items, and categories associated with the service. This action cannot be undone.
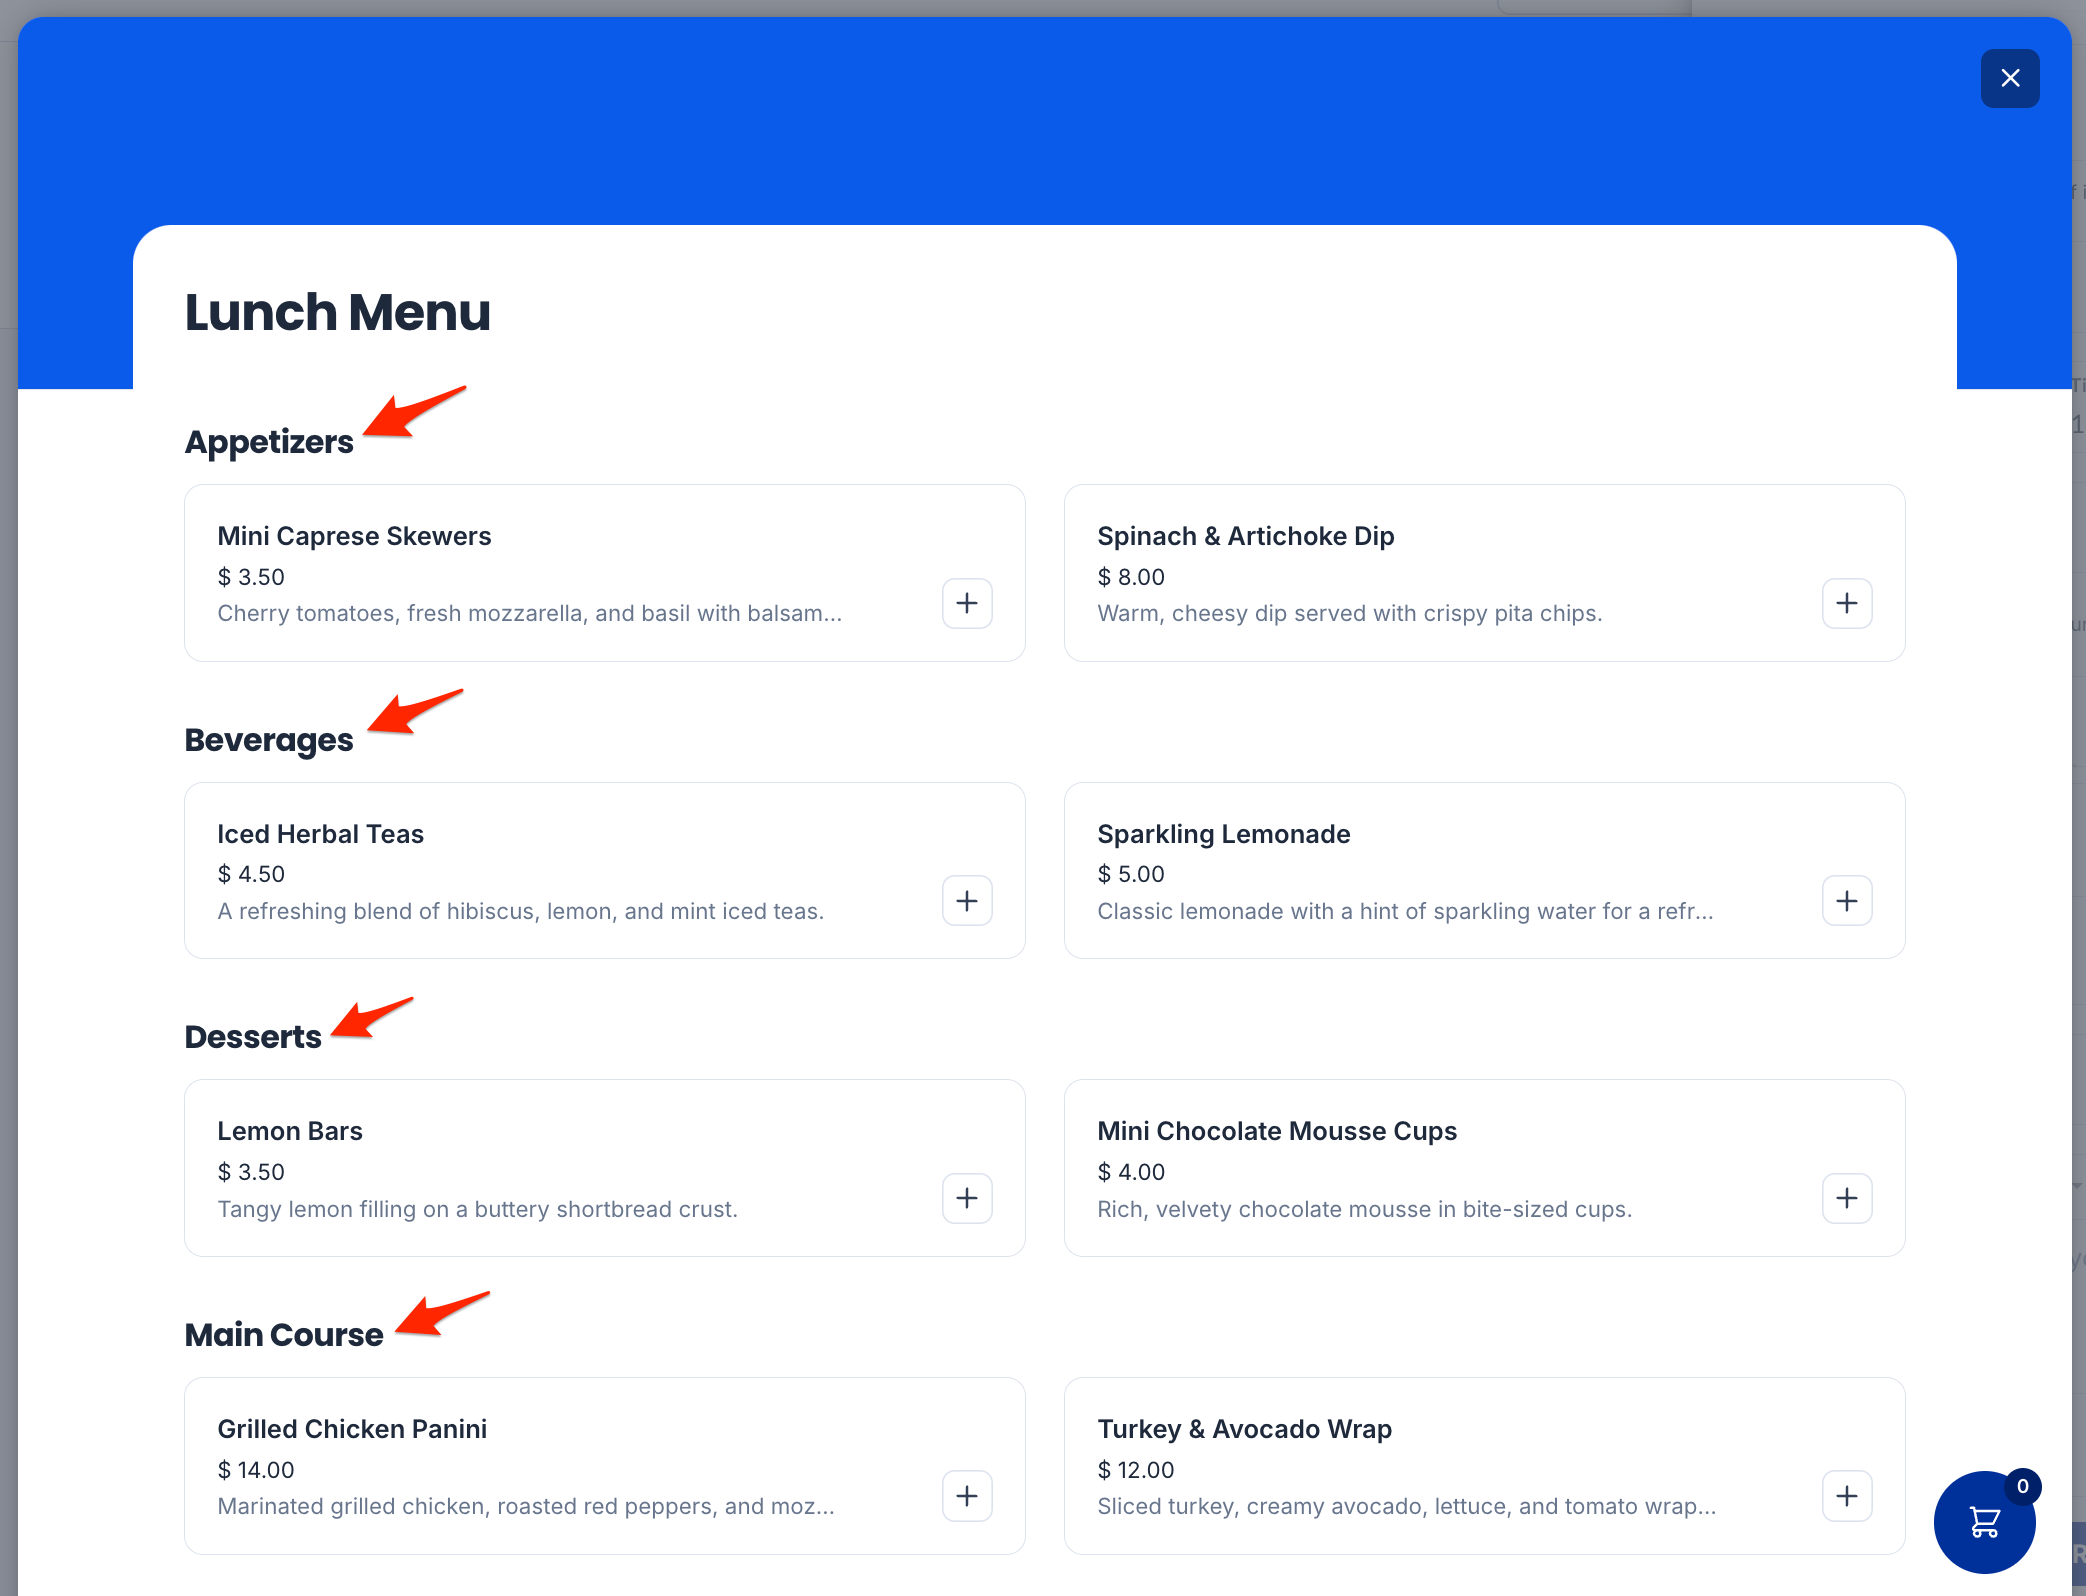
Create Category
A Category is a method of organizing menu items within a menu and can be reused across multiple menus within a catering service. Categories must be set up prior to creating menu items. Examples of categories include:
- Appetizers
- Entrees
- Sides
- Beverages
- Desserts
Menu items will be displayed under categories in the Admin Console and when an attendee fills a food ordering form at reservation check-in with catering service checkpoints.
To create a category, perform the following steps:
- Log in to the Appspace console.
- Click the ☰ Appspace menu, and click Services.
- On the All Services page, click on a catering service in which you want to create a category. If the service is not listed, you can search services using the Search bar at the top or filter using the Status drop-down.
- On the Service page, select the Categories tab.
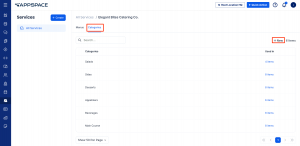
- Click +New at the top-right corner. In the New Category window, enter the Name and Notes for the category.
- Click Save.
- The category is listed under Categories.

Edit Category
To edit or delete a category, perform the following steps:
- Log in to the Appspace console.
- Click the ☰ Appspace menu, and click Services.
- From the left bar, select Catering Services to view available catering services.
- Click on a catering service in which you want to edit a category.
- On the Service page, select the Categories tab.
- Move your mouse over a Category in the list and click the ellipsis (…) at the end of the row. If the category is not listed, you can perform a search using the Search bar.
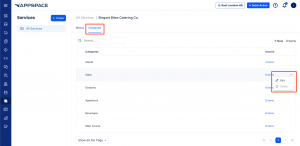
- Select Edit to edit the category. Proceed to edit the Name and/or Notes and click Save.
- Select Delete to delete the category. In the confirmation window, click Delete. NoteThe Delete option will be greyed out if the category contains menu items. You need to delete all menu items associated with the category before you can delete the category itself.
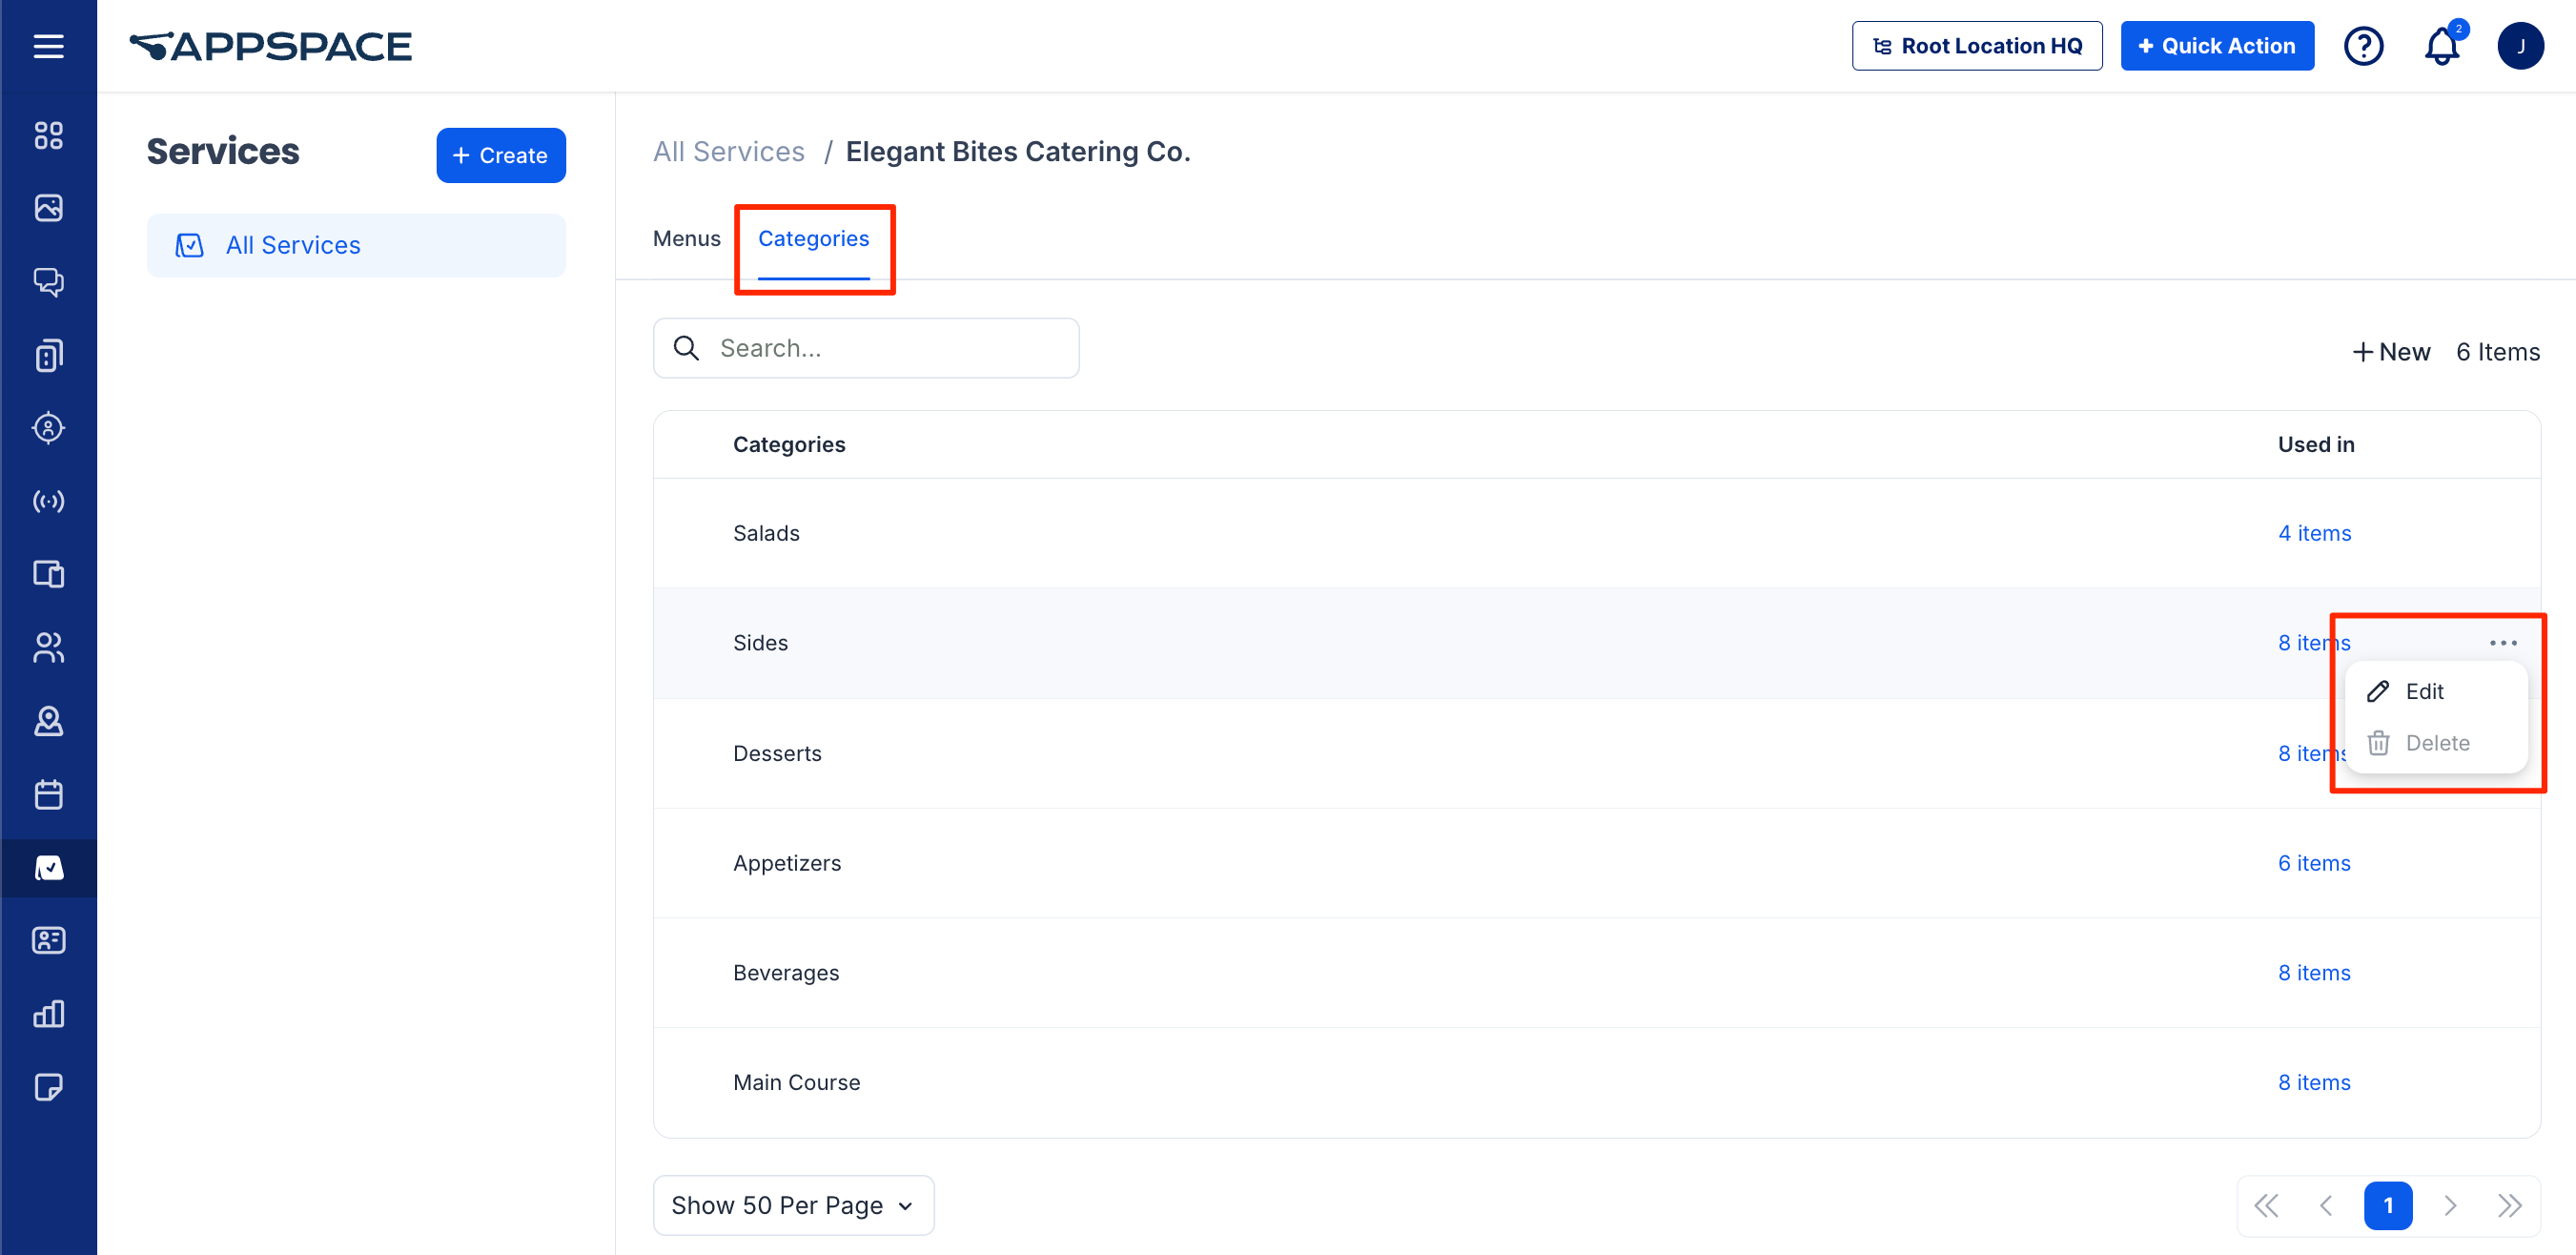
Create Modifier
A Modifier allows users to select additional options within menu items, giving them the flexibility to personalize their orders. Modifiers can be reused across multiple menus and items within a service. Individual options within a modifier can also include additional costs on top of the original menu item price. The following are examples of modifiers that can be applied to menu items:
Example 1:
Select your preferred form of protein:
- Lamb +$2
- Chicken
- Fish +$3
- Mushroom (Vegan friendly)
Example 2:
Select your preferred level of spiciness:
- Not spicy
- Mildly spicy
- Medium spiciness (Recommended) +$1
- Very spicy (May not be suitable for all guests) +$2
Modifiers will be displayed as options under the menu item when an attendee fills a food ordering form at reservation check-in with Service checkpoints.
To create a modifier, perform the following steps:
- Log in to the Appspace console.
- Click the ☰ Appspace menu, and click Services.
- On the All Services page, click on a service in which you want to create a modifier. If the service is not listed, you can search services using the Search bar at the top or filter using the Status drop-down.
- On the Service page, select the Modifier tab.
- Click +New at the top-right corner. In the Create Modifier window, enter the Name and Menu Instructions.
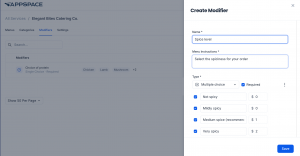
- For Type, select how the options for the modifier will be displayed to the user:
- Single Choice – allow the requester to select a single option from a list of choices. Select the options available in the next step.
- Multiple Choice – allow the requester to select a multiple option from a list of choices. Select the options available in the next step.
- Yes/No – allow the requester to select only a yes or no option.
- Set if the option is Required or optional.
- If you selected Single Choice or Multiple Choice for Type, enter the options for the modifier:
- Enter a name for the option.
- Enter a price for the option. This will follow the currency of the menu. A price higher than zero will add additional costs on top of the original menu item price.
- Upload an image for the option by uploading an image or browsing for the image file.
- Click + Add a new option to add another option to the checkout field.
- Remove an option by clicking on the delete (⊖) icon when you mouse over an option.
- If you selected Multiple Choice for Type, you can click on the ellipsis (⋮) and select + Add validation to set conditions on the number of items that the requester can select. You can set the validation to Exactly, Greater Than, or Less Than, or Between specific amounts. For example, you can set the amount Greater Than 1 if you want requesters to select at least 2 options for the modifier before they can proceed.
- Click Save.
- The modifier is listed under Modifiers.
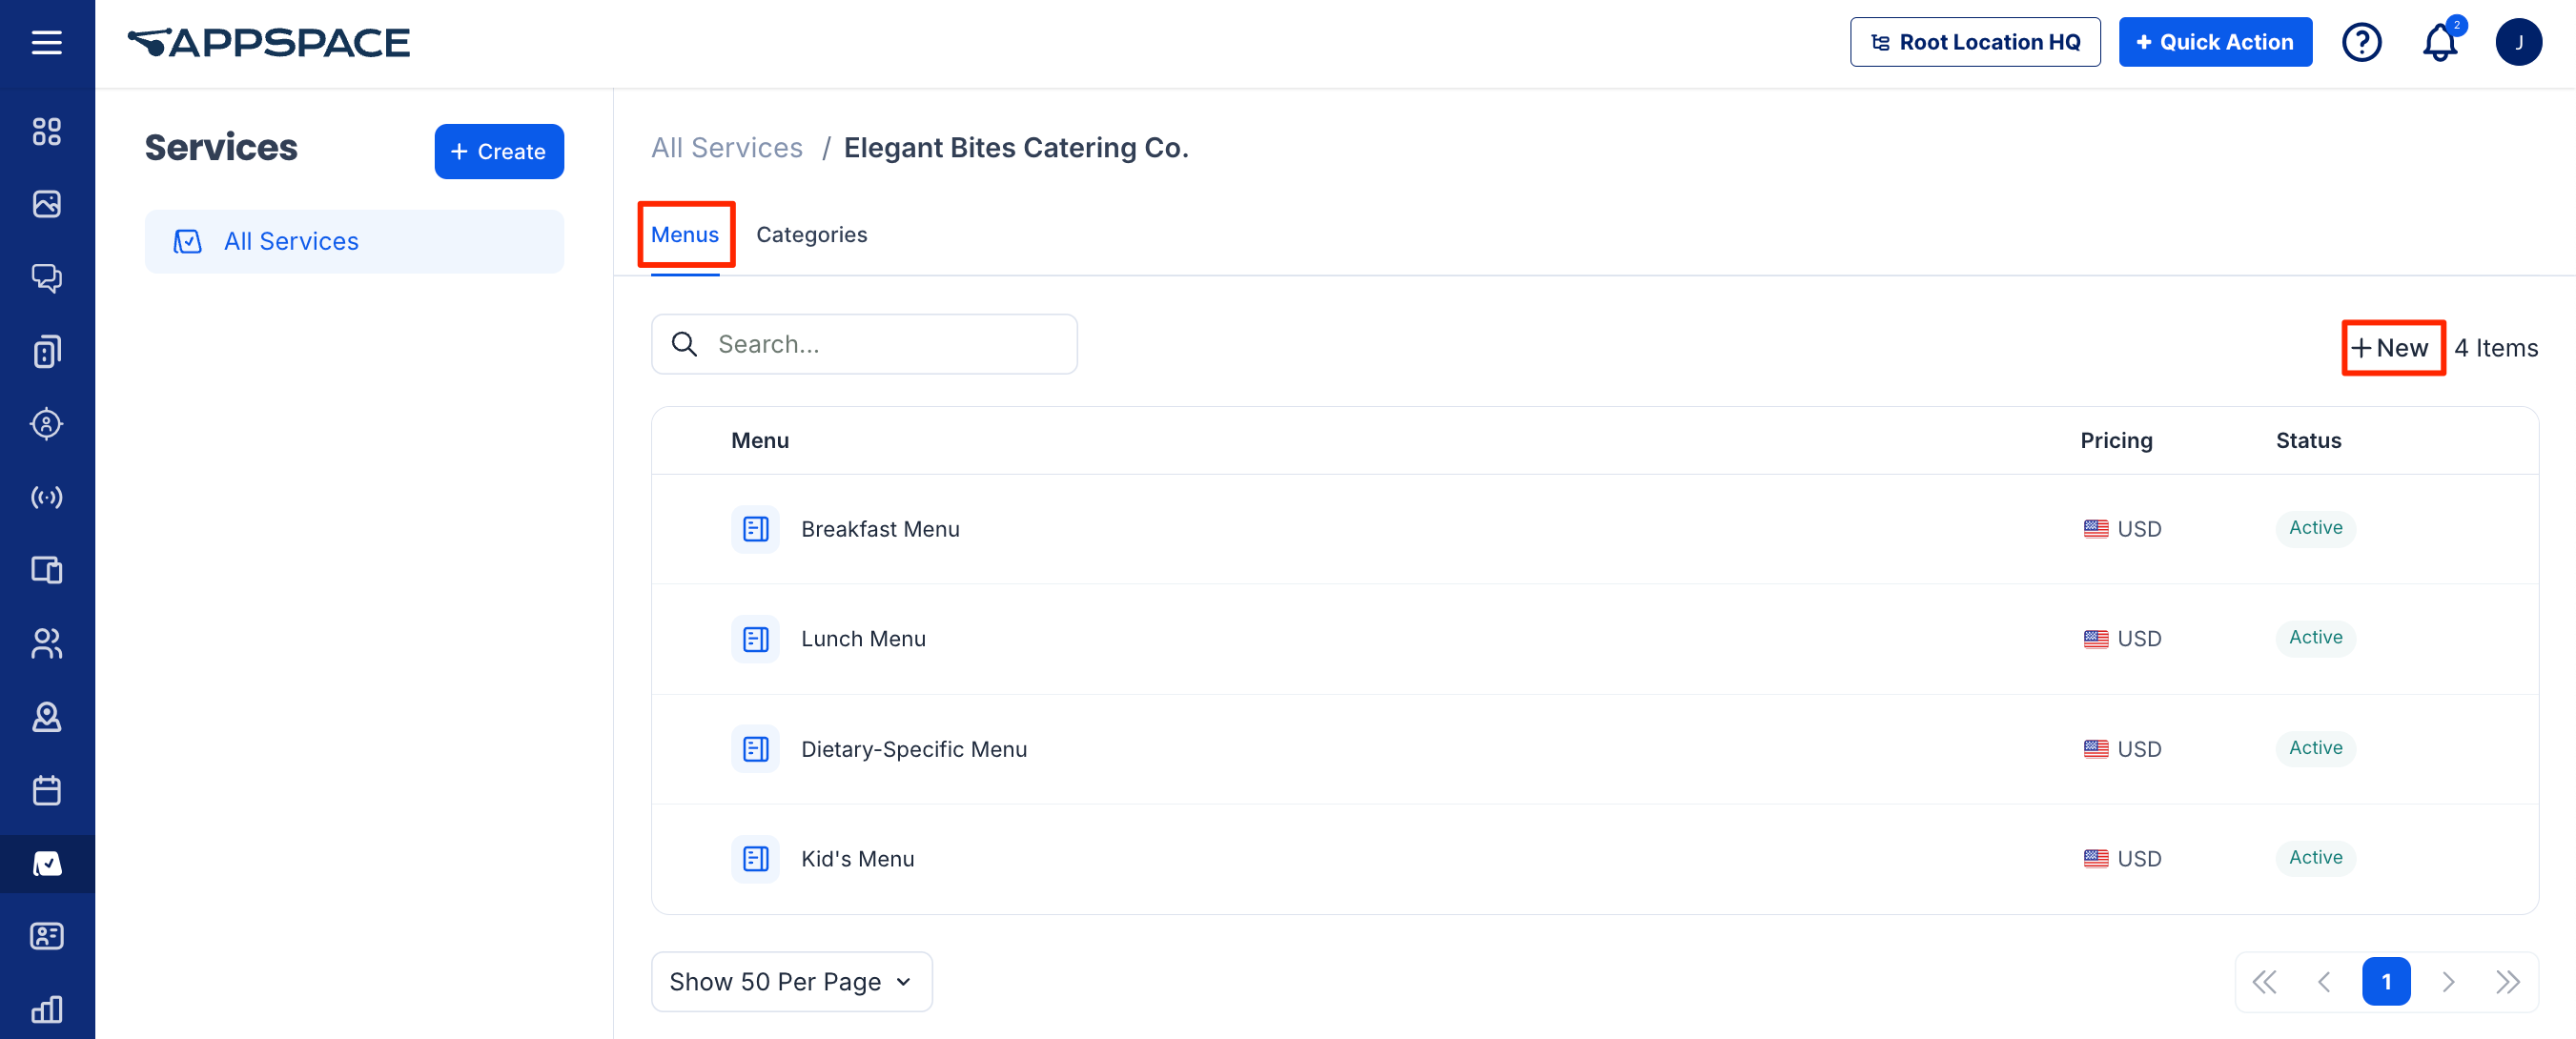
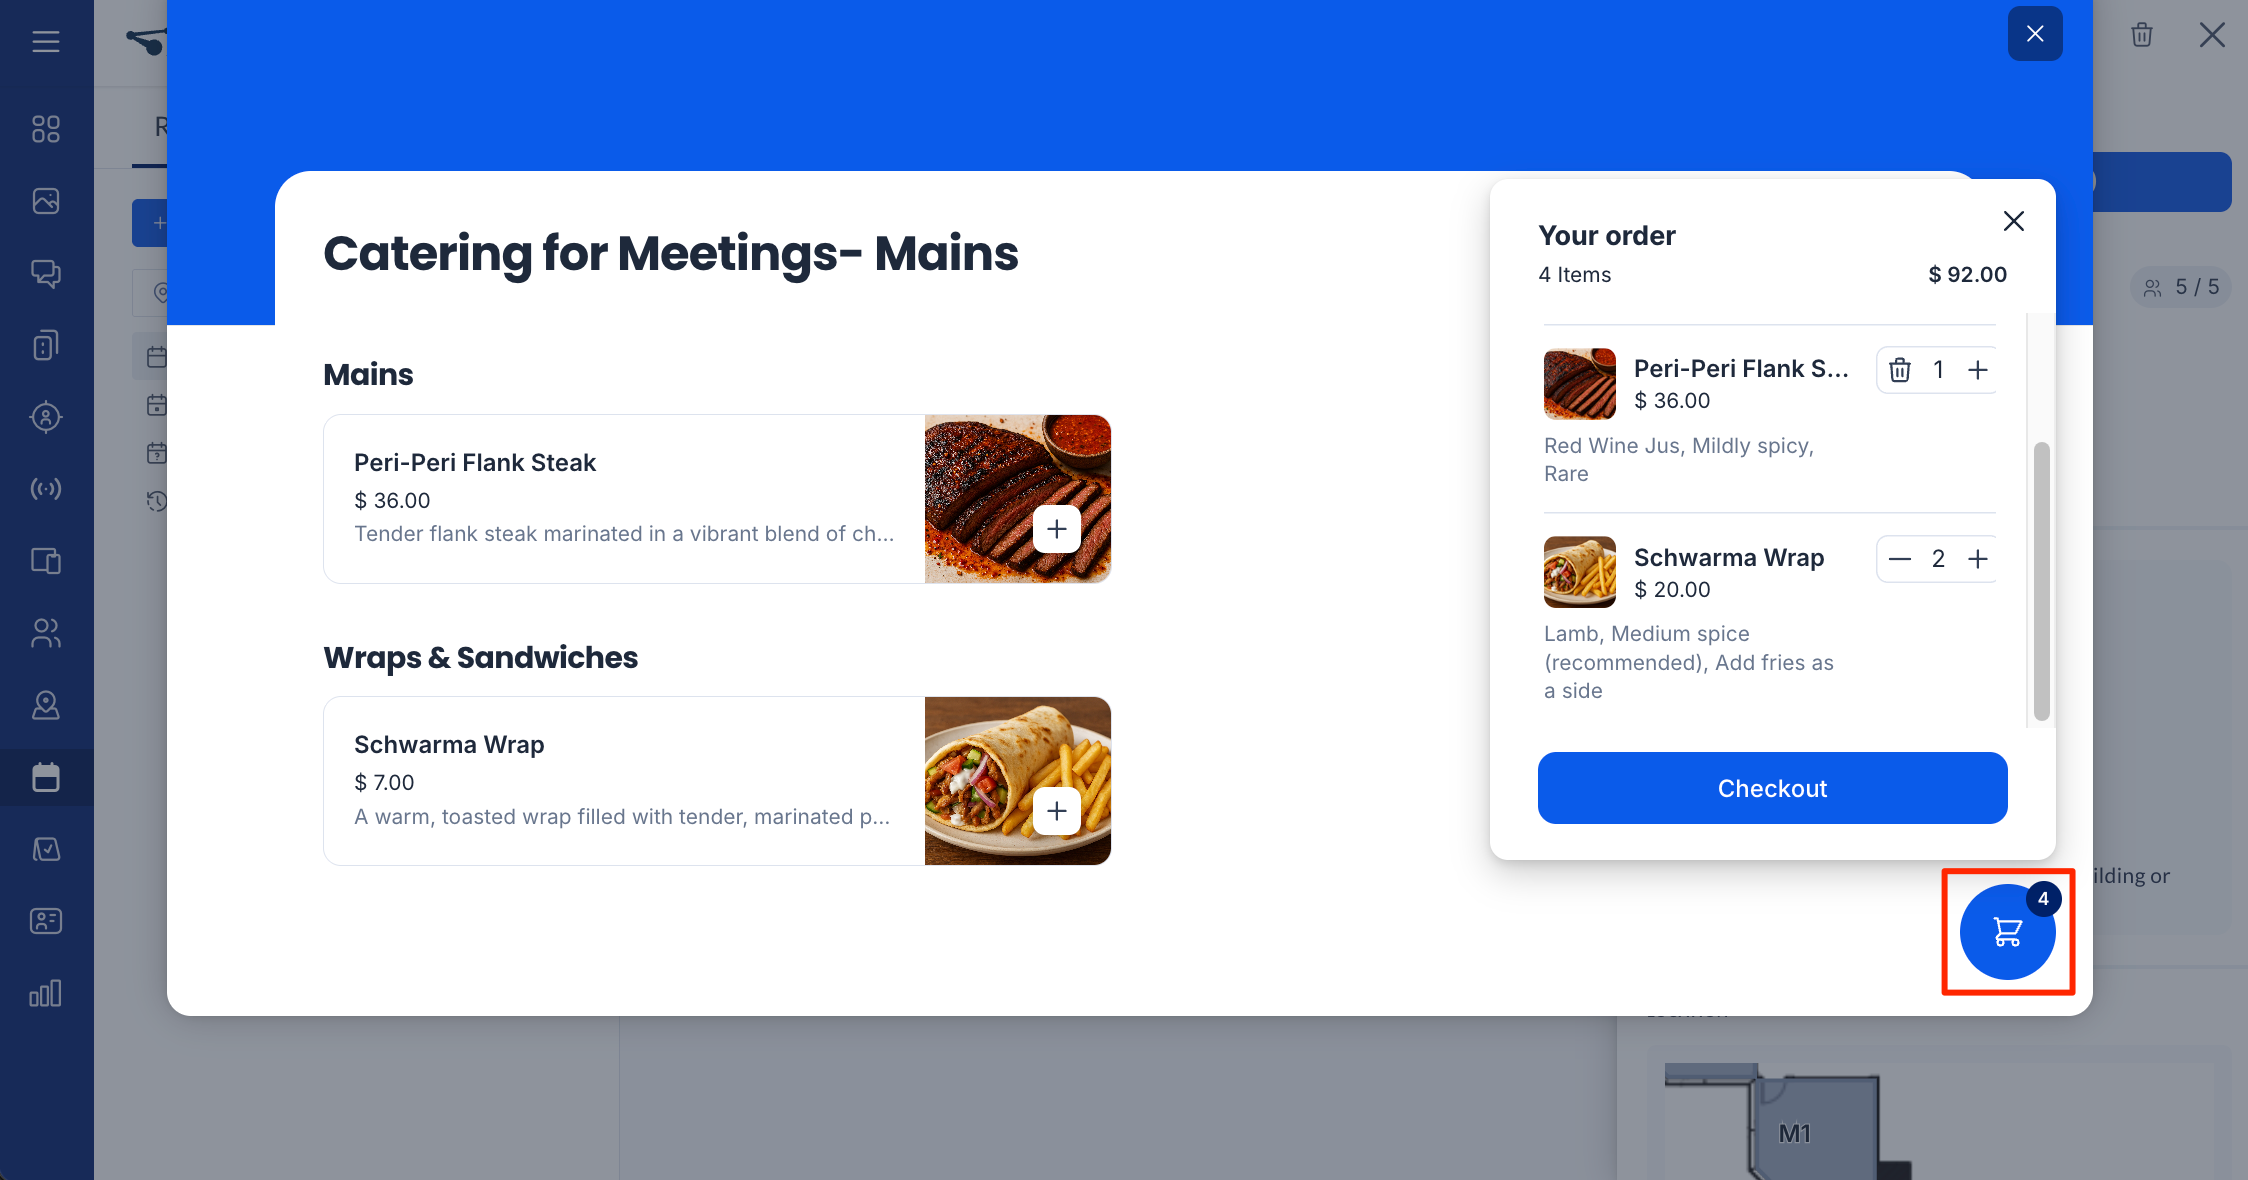
Create Menu
Menus are displayed to the employee as a food order form during employee check-in when attending a reservation. A service (such as a restaurant or catering) can have multiple menus. Examples of menus include:
- Breakfast Menus
- Lunch Menus
- Dietary-Specific Menus
- Kids’ Menus
To create a menu, perform the following steps:
- Log in to the Appspace console.
- Click the ☰ Appspace menu, and click Services.
- On the All Services page, click on a service in which you want to create a menu.
- On the Service page, select the Menu tab.
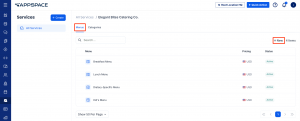
- Click +New at the top-right corner. In the New Menu window, enter the following information:
- Enter the Name and Notes of the menu.
- For the Preparation time, set the days, hours, and minutes. This determines how far in advance a food order from the menu must be placed before the meeting starts. If the order is not confirmed before this preparation time during reservation check-in, the menu items will no longer be available in the food order form.
- Disable the Free Menu option to display prices in the food order form during reservation check-in.
- Select the Currency for the menu from the drop-down list. This option appears only if the Free Menu option is disabled.
- Enable the Active option to set the menu as visible for food orders by employees.
- Click Save.
- The menu is listed under Menus.
Create Menu Item
Menu items are food options for employees to select from the food order form during check-in for a reservation. To create menu items for a menu, follow these steps::
- Log in to the Appspace console.
- Click the ☰ Appspace menu, and click Services.
- On the All Services page, click on a service in which you want to create a menu. On the Service page, select the Menu tab.
- Select a menu from the list. If the menu is not listed, you can perform a search using the Search bar.
- Click +New at the top-right corner. In the New Menu Item window, enter the following information:
- Enter the Name of the menu item.
- Enter text to search on the Category field and select a category from the drop-down.
- Enter a Description of the menu item.
- For the Price, enter the amount in the currency set for the menu.
- Set a Photo for the menu item by uploading an image or browsing for the image file.
- Enable the In stock option to allow employees to order this menu item in the food order form during reservation check-in. Disabling this option hides the menu item from the order form. The Status of the item is also listed as Out of stock in the Admin console.
- Click the Modifiers tab. Click the field and type in or select the modifiers for the menu item. You can select more than one modifier.If you add more than one modifier, you can rearrange the order in which they appear on a menu item by selecting the rearrange (⋮⋮) icon on a modifier and dragging it up or down.
- Click Save.
- The menu item is listed in the menu.
Edit Menu and Menu Item
-
- If the Free Menu option is switched ON for a menu, all menu item prices will be removed. Turning the Free Menu option OFF again will reset all prices to 0.00 in the selected menu’s specified currency.
- Deactivating, editing, or deleting Menus and Menu Items will not affect any orders that have already been placed. These changes will only apply to new orders. Any previous orders will remain the same, unless the user reenters their order.
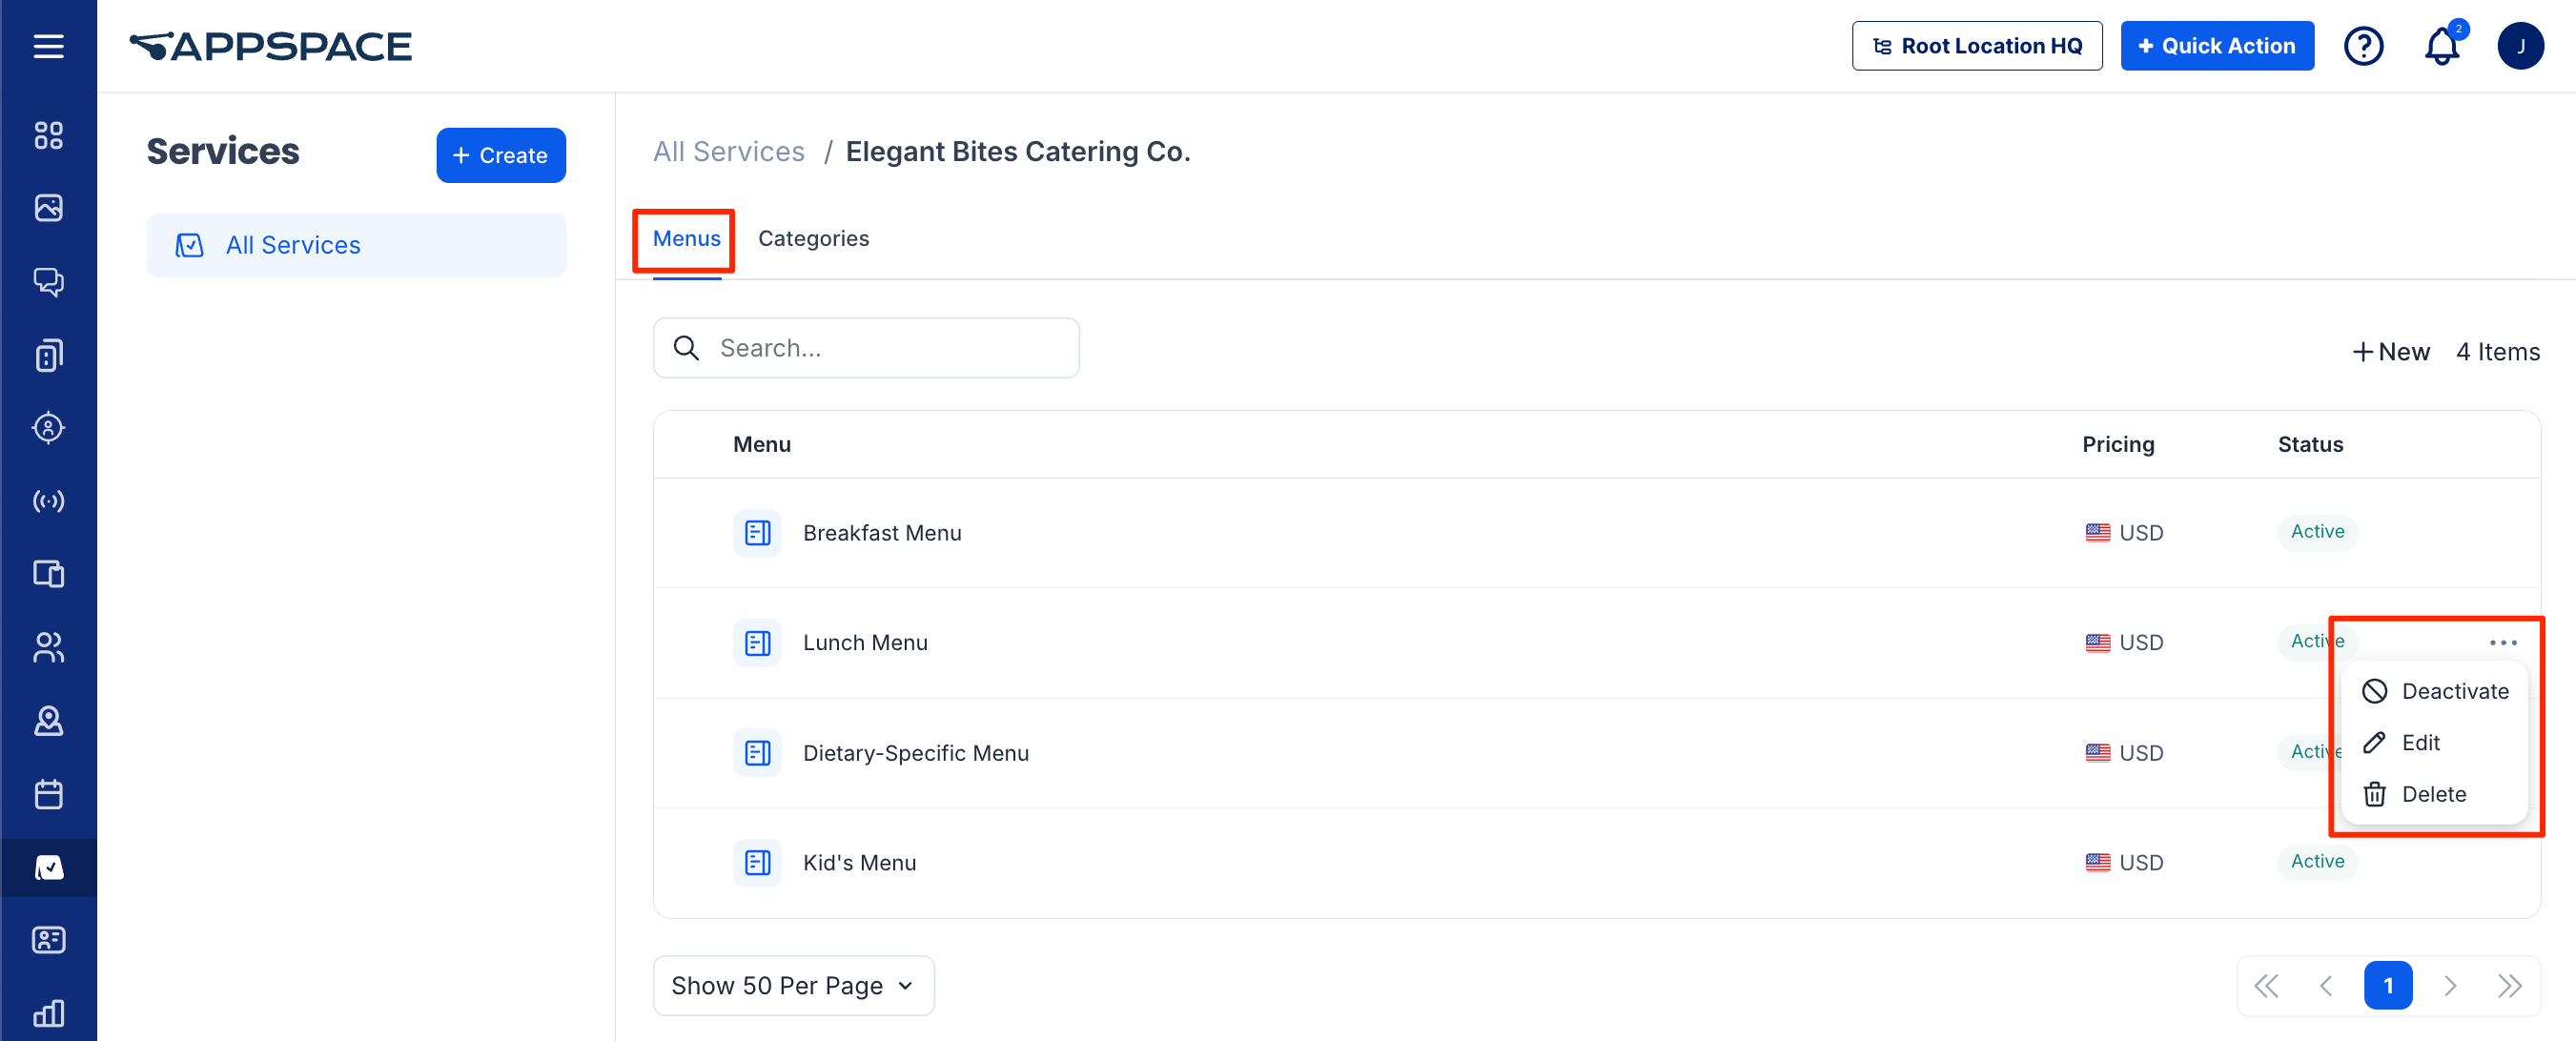
To edit or delete a menu, perform the following steps:
- Log in to the Appspace console.
- Click the ☰ Appspace menu, and click Services.
- On the All Services page, click on a service in which you want to create a menu. On the Service page, select the Menu tab.
- Select a menu from the list. If the menu is not listed, you can perform a search using the Search bar.
- Move your mouse over a menu in the list and click the ellipsis (…) at the end of the row.
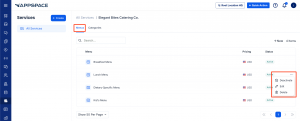
- Select to Activate or Deactivate the menu. Inactive menus are not available to be set in the services checkpoint or selected by the employee.
- Select Edit to edit the menu. Proceed to edit the Name, Notes, Preparation time, and other details. Click Save.
- Select Delete to delete the menu. The confirmation window will appear. Select the check box and click Delete. ImportantWhen you delete a menu, you will also delete all menu items within the menu. This action cannot be undone.
- After editing the menu, you may proceed to edit the menu item. With the menu still selected, move your mouse over a menu item within the menu page and click the ellipsis (…) at the end of the row.
- Select to set the menu item as In Stock or Out of Stock. Select In Stock to allow employees to order this menu item in the food order form during reservation check-in. Selecting Out of Stock hides the menu item from the order form.
- Select Edit to edit the menu item. Proceed to edit the Name, Category, Description, and other details. Click the Modifiers tab to view, add, or remove modifiers. Click Save.
- Select Delete to delete the menu item. The confirmation window will appear. Select the check box and click Delete.
Configure Settings for Service
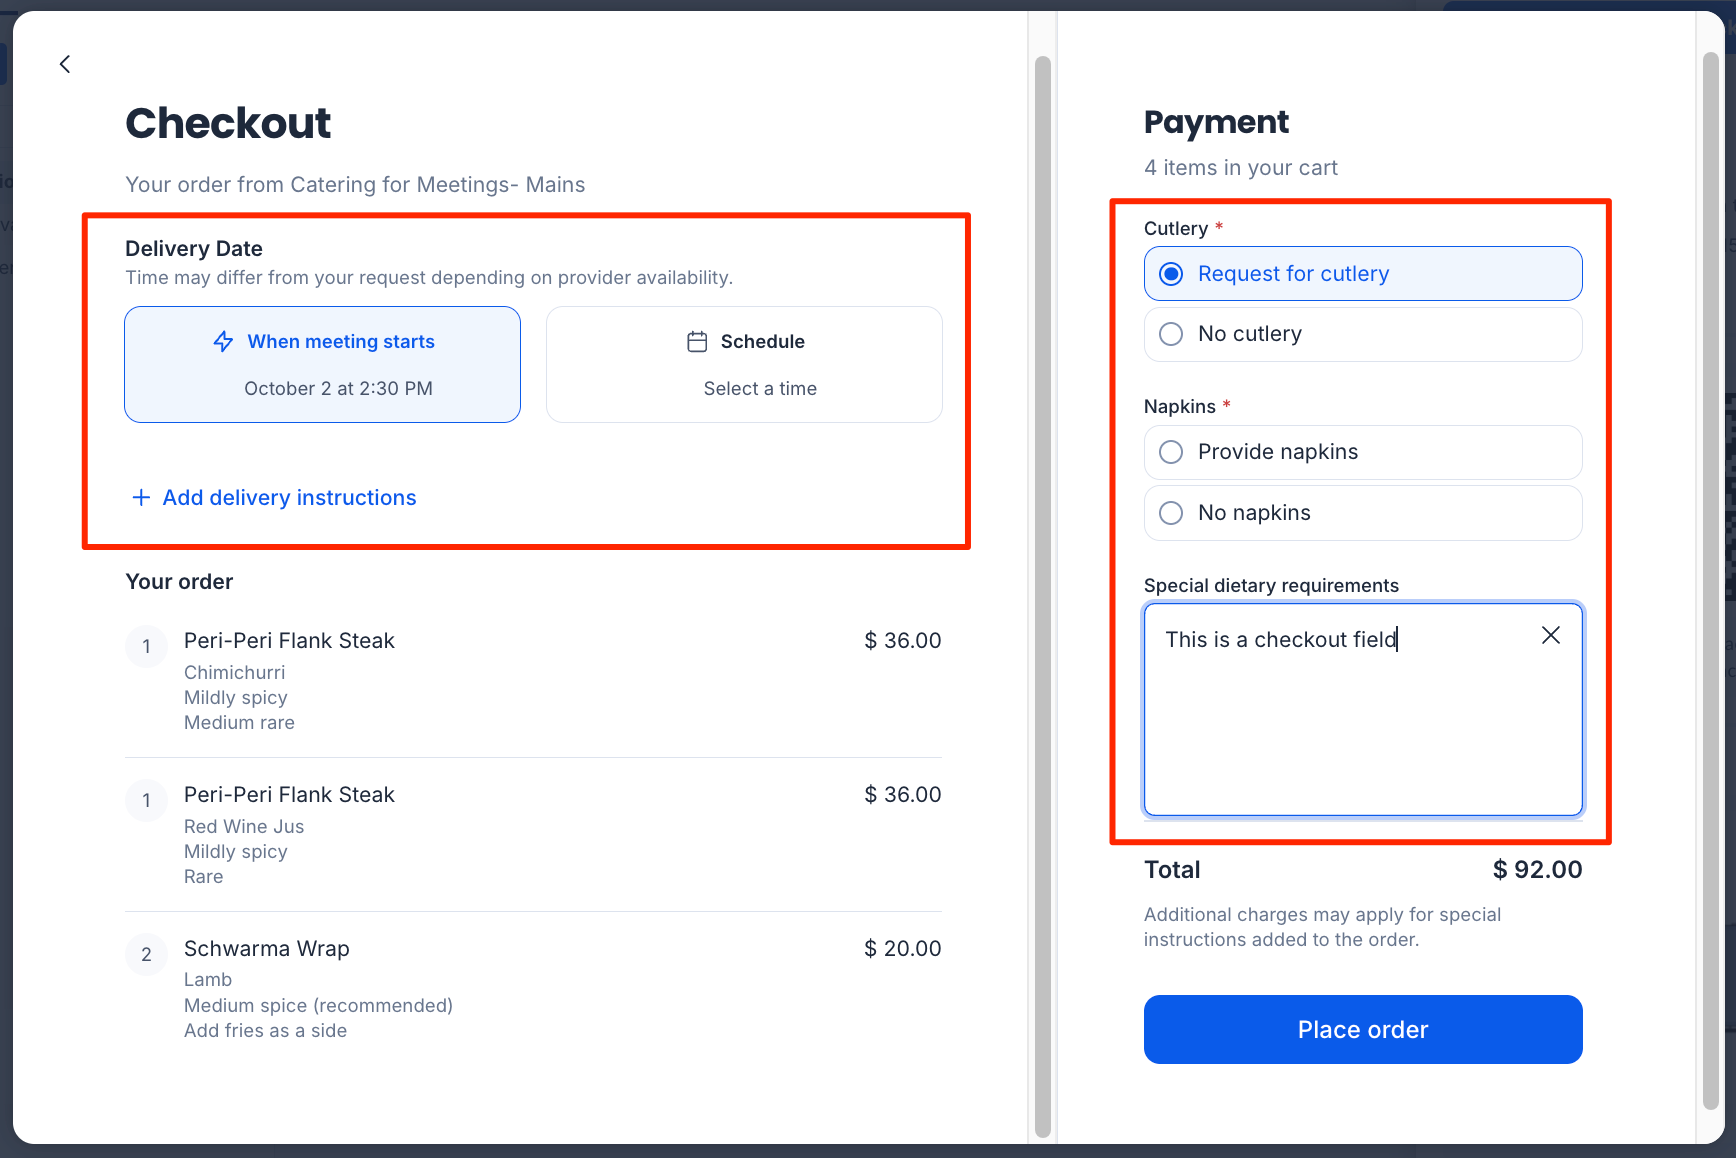
The Settings section of a service allows you to enable or disable additional fields for delivery dates and instructions, and add custom payment fields displayed during checkout.
 To configure these settings, follow the steps below:
Add Order Information
The Order information section allows you to enable or disable additional standard fields that are applied to checkout forms under a business or catering service. To configure these settings, follow the steps below:
- Log in to the Appspace console.
- Click the ☰ Appspace menu, and click Services. Select All Services from the left bar.
- Select the business or catering service. On the Service page, select the Settings tab.
- In the Order Information Section, configure the following options.For Business services:
- Enable Special Instructions – this displays an additional field for special instructions (such as additional delivery or other instructions) on the request form.
- Setup Date – this displays an additional Date field (which can be set for delivery, for example) on the request form.
These settings will be applied automatically to all forms created under the Business service by default.For Catering services:
- Enable Delivery Instructions – this displays an additional field for special instructions (such as additional delivery or other instructions) on the request form.
- Delivery Date – this displays an additional Date field (which can be set for delivery, for example) on the request form.
These settings will be applied automatically to all menus created under the Catering service by default.For Business services:
- Click Save. [su_spacer size=”10″]
Add Checkout fields
The Checkout feature improves the attendee experience by letting you add custom payment fields that are displayed during checkout. This allows you to customize the reservation flow for data collection at the end of a reservation. Checkout fields appear when attendees complete a reservation that includes service requests for a particular service.
To add checkout fields for a business or catering service, follow these steps:
- Log in to the Appspace console.
- Click the ☰ Appspace menu, and click Services. Select All Services from the left bar.
- Select the business or catering service. On the Service page, select the Settings tab.
- Under the Checkout information section, click + Add field.
- In the Create Checkout Field, enter the following information:
- Enter the Name for the checkout field.
- For the Type, select how the checkout field can be answered by the meeting attendee.ImportantA checkout field Type cannot be changed after it is created. To change it, you must delete and recreate the checkout field.
- Single Choice – allow the requester to select a single option from a list of choices. Select the options available in the next step.
- Multiple Choice – allow the requester to select a multiple option from a list of choices. Select the options available in the next step.
- Yes/No – allow the requester to select only a yes or no option.
- Dropdown – allow the requester to select a single option from a dropdown list. Select the options available in the next step. Note that only one option can be selected by the user.
- Number – allow the requester to enter a number in the field.
- Short text – allow the requester to enter free-form text in a field.
- Long text – allow the requester to enter free-form text in a field, as a longer sentence or paragraph.
- If you selected Single Choice, Multiple Choice, or Dropdown for Type, enter the options for the checkout field:
- Enter a name for the option that will appear under the checkout field.
- Enter the price of the option. This will follow the currency of the form or menu.
- Upload an image for the option by uploading an image or browsing for the image file.
- Click + Add a new option to add another option to the checkout field.
- Rearrange the order that the options appear in by clicking on the rearrange (⋮⋮) icon when you mouse over an option.
- Remove an option by clicking on the delete (⊖) icon when you mouse over an option.
- Click Save. The checkout information is created.
Configure Service to a Checkpoint for a Resource
After creating a Business Service or a Catering Service, a checkpoint needs to be created to present business request forms or food catering menus to the end-user. A checkpoint is a rule designed to display information and provide interaction to the end-user, such as in an order form, during the reservation check-in of a resource.
- You must be an account admin with a platform user license to create a checkpoint and assign a service to a resource.
- Before creating a Service checkpoint, you must configure at least the following:”
- For Business Services, ensure that Forms and Questions are created and set as Active for the Service checkpoint.
- For Catering Services, ensure that Menus, Categories, and Menu items are created and set as Active for the Service checkpoint.
When setting up a service checkpoint, an administrator can assign only one form or menu from a service. To allow attendees to choose from multiple forms or menus, separate checkpoints must be created for each.For example, if an administrator wants attendees to choose from four different forms/menus across different services, four checkpoints must be set up for the resource.
Refer to the Create checkpoint article for the explanation and steps to create Service checkpoints under a resource.
-
- When selecting the Requirement for the checkpoint, select Service and proceed to follow the instructions, selecting a Service and Form/Menu.
Service form at Check-In
After an organizer creates a reservation for the resource, attendees of the reservation will be able to view the configured services and forms/menus at check-in.
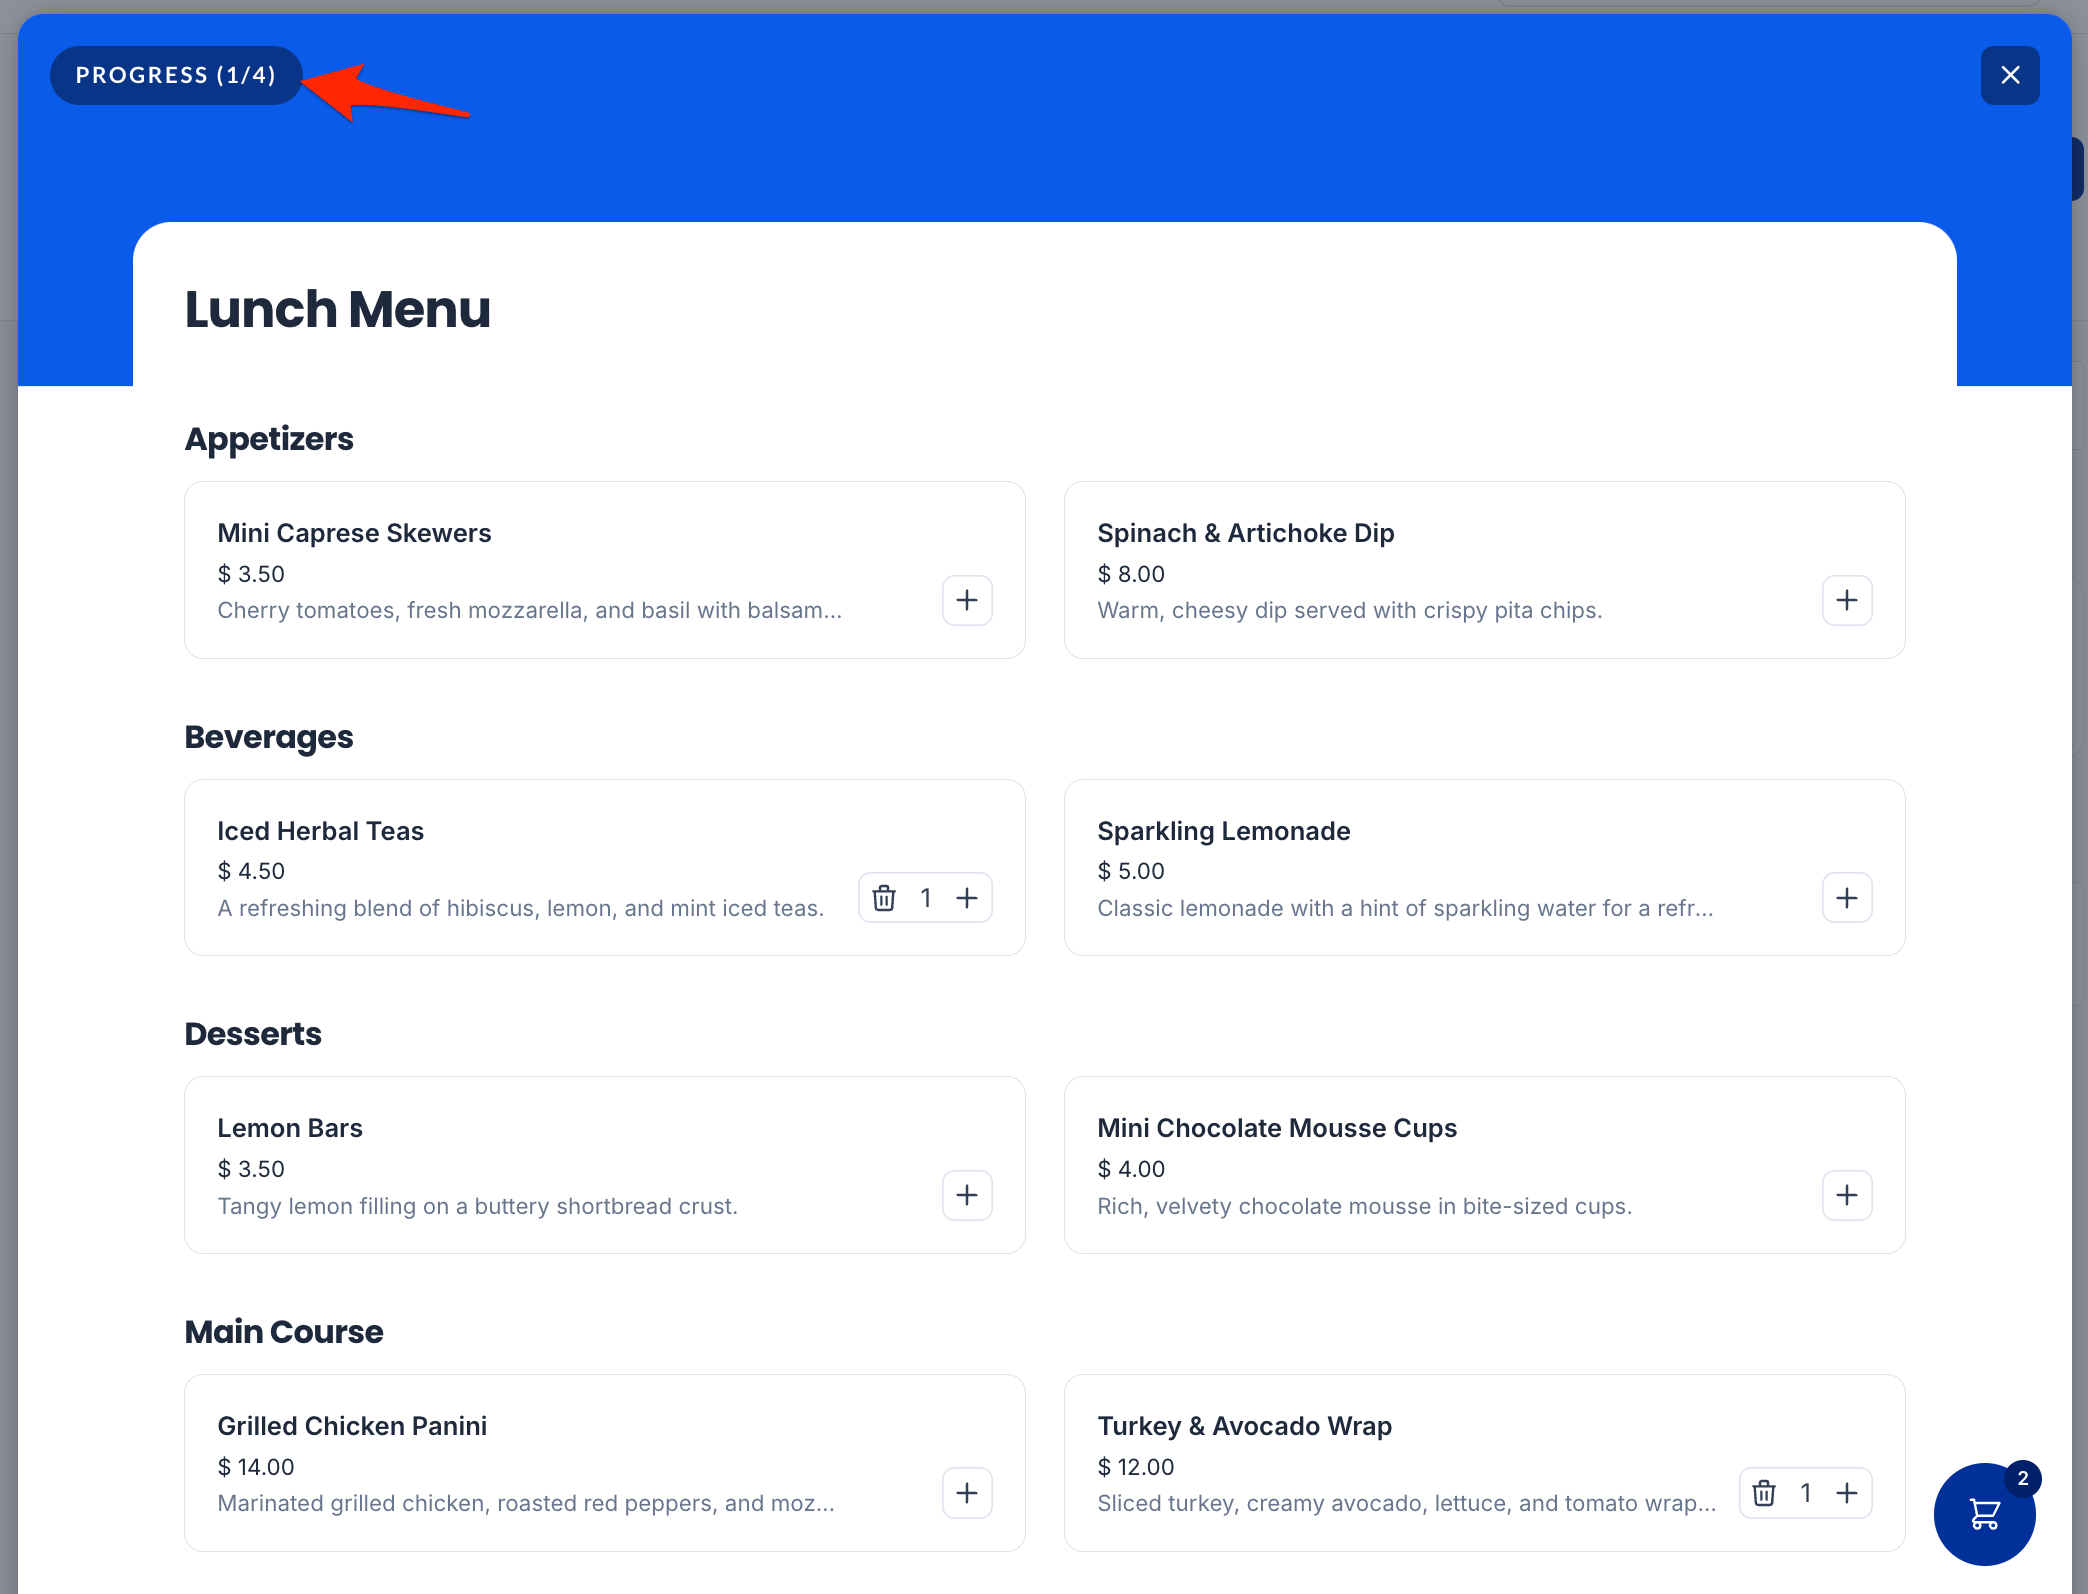
- When an attendee checks in to the reservation, a service form will be displayed, allowing them to view the available services from checkpoints. The attendee can then select which business or catering services are needed.
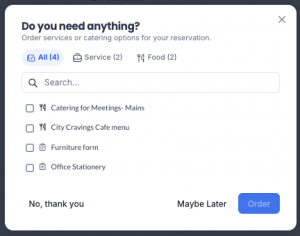
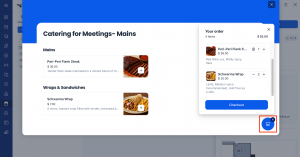
- The forms or menus of the selected services will then be presented sequentially, with a progress indicator (current checkpoint/total checkpoints) displayed in the upper left corner.

- After an attendee has entered orders from a menu or form, the checkout icon becomes available. Clicking the icon displays an order summary.
- Clicking Checkout will display the Checkout window. The checkout window will contain the fields added/configured in the Order Information and Checkout fields section above. The attendee can use these fields for additional requests as configured.
- The attendee can then click Place order.

Was this article helpful?