Appspace enables Publishers and Authors to quickly create posts (including event posts, questions, polls, and praises), pages, and stories within the Appspace Employee App, providing an improved content creation workflow experience that allows authors to quickly post articles with text and media without the need to leave the Employee App (and go to the Appspace console).
Authors, Publishers, and Account Owners can create posts, pages, stories, upload media, and publish it to a channel, directly from the Home dashboard or from within any channel in the Employee App.
The Appspace platform will automatically translate the post’s content to digital signage and enterprise messaging formats. Users may create a post with any of these combinations:
- Video + Article: Plays only the video in a signage playlist.
- Image + Article: Generates a card with an image and article.
- Article Only: Generates a card with the article.
This article provides instructions to create and publish posts, pages, and stories in the Appspace Employee App.
Prerequisites
- Account Owner, Publisher, or Author with channel publishing permissions.
- Premium user license to access the Appspace Employee App.
- A channel must include at least one playlist for the Quick Post functionality to be shown.
- Supported file types:
- Images: JPEG, PNG, and GIF
- Video: only MP4
Create Post
Follow the instructions below to create a post in your Employee App:
- Log in to your Appspace Employee App.
- To create a post, in the Home tab you can either click the + sign next to the notifications bell button or click the “What do you want to share?” text box.
NoteNotifications will alert authors and co-authors about upcoming content expirations, including an in-app reminder seven days before a post expires and an “Expiring Soon” indicator visible in both view and editor modes for authors, co-authors, and admins.
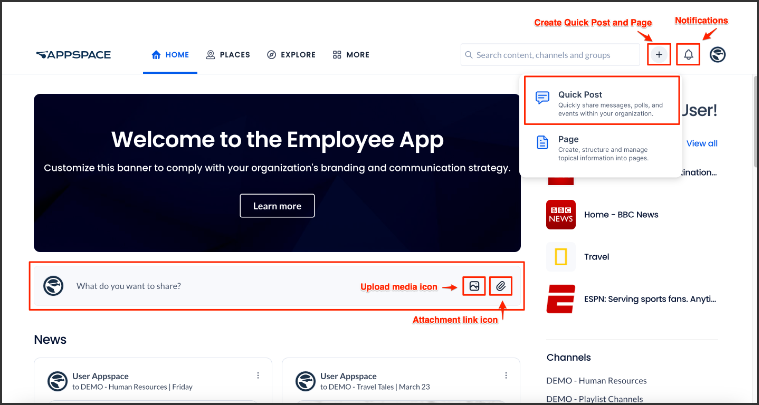
- You may also click the Files icon to upload a file, or
- Click the Media icon to upload media such as images and videos.
- In the Create Post window, click the Share with drop-down menu to select the desired community or channel.
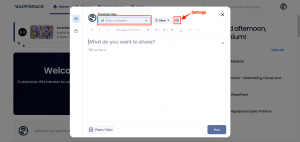
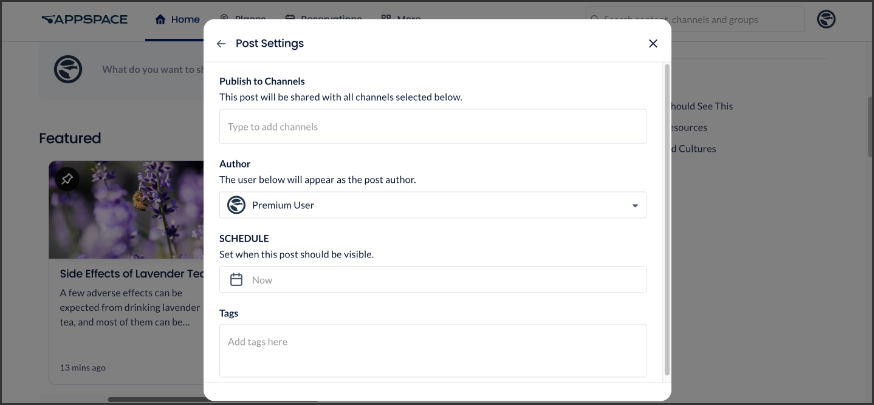
- Click the ellipsis (…) icon to open the Settings window, where you may set the following options:
- Spaces – Click and type in the community or channels where the post will be shared.
- Tags – You may include any relevant tags in the post.
- Schedule – This is set to Now by default. You can perform one of the following options:
- Leave this setting to Now (default) for the post to go live immediately to its audience once you publish it.
- Click and select a date range to schedule the publishing of this post. To remove the scheduled date range, click X.
- Author – Choose the author you want to appear in the post.
NoteOnly Account Owners have the option to select Authors, hence this field is hidden to employees without the required permissions. - Featured – Set the post as a Featured post in the Employee App.
- Social features: You may turn on or off this post’s social settings, or set them to inherit the behavior from the community or channel the post is in:
- Click the “Start a post…” text to type in your post content.
- Click the Files icon to upload a file, or the Media icon to add an image or video. NoteWe support .jpeg, .png, and .gif image formats. For video, only .mp4 files are supported.
- Click the Post button.
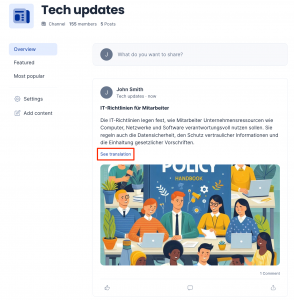
- Your post will be published under the News section on the Home tab.NotePosts, event posts, questions, polls, praises, and comments displayed to users with a different language setting in the Employee App will include a See translation option below the text. Users can click this option to view an auto-translation of the content. This feature requires the AI Translation setting to be enabled in the Administrative Console.
Global Mentions in Posts
The Global Mentions feature in the Employee App allows People, Spaces (Communities, Topics, or Channels), Pages, Stories, Events, and Resources to be mentioned in the Sharebox, editor, and comments section.
To use this feature in a post (including event post, question, poll, or praise), story, page, or comment, perform the following steps:
- Edit or create a post, story, page, or comment on an article.
- In the content of the article or comment, type ‘@’ followed by the name of the person or resource, or the title of the space (community, topic, channel), page, story, or event. The drop-down list will suggest the top three matching results from each category.
- Select the item from the list.
- Continue to edit the article. Once the article is posted, the following steps will occur:
- The person, space, page, story, event post, or resource is highlighted in the article after it is posted. Moving the mouse over the highlight will display a pop-up with a summary of the person or item. Clicking the highlighted item or the link in the pop-up will display the relevant item, such as the People profile, space, page, story, event reservation, or reservation page for the resource.
- People who are tagged will receive notifications in their User Notifications within the Appspace Employee app.
Link Previews in Posts
(New) The Link Preview feature in the Employee View allows links to external articles to be displayed as a preview, with thumbnail and title, when entered in the sharebox or editor.
To use this feature in a post or event post, perform the following steps:
- Edit or create a post or event post.
- In the content or description, type or paste in a URL to an external article. If the URL has valid content, it will be displayed as a link preview with thumbnail and title below the post content.
Post Reactions
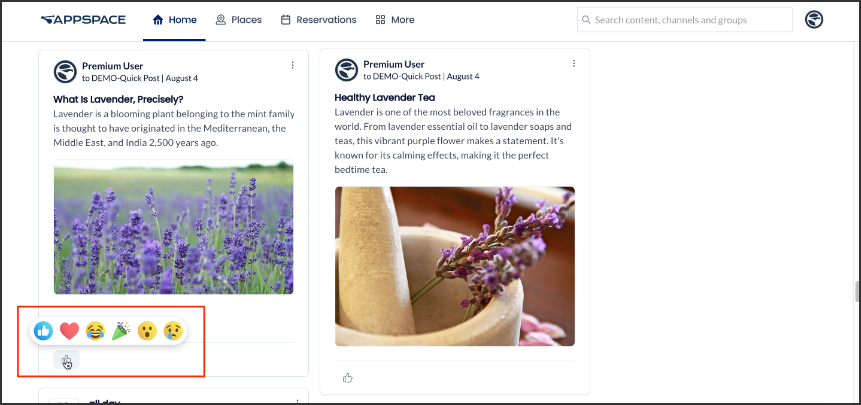
You can react to any post, story, or page in your Employee App, with “Like,” “Love,” “Laugh,” “Celebrate,” “Surprise,” or “Sad,” emoticons, to express your emotions regarding the message content.
You can:
-
React to any post, story, or page in the main news feed or channel feed.
-
React to the post, story, or page from inside the article view.
-
Add, change, or remove a reaction to a post, story, or page. You just need to tap on the reaction button to like a post, and tap it again to unlike. When reacting to a post, story, or page with a single tap, the Like reaction is the default selection.
-
See how many reactions a post, story, or page has received. Just tap on the number of reactions on a post to view a list of everyone who has reacted to the post.
Comments and Share on Post
As an Employee App user, you can add posts, stories, pages, and comments on feeds. All comments will be communicated to the author of the article via Employee App notifications. Post, story, and page authors have the option to moderate or remove comments made on their posts. Additionally, Employee App users can copy the URL of a post, story, or page’s detail page and share its contents. The user can share the URL if the share setting is enabled.
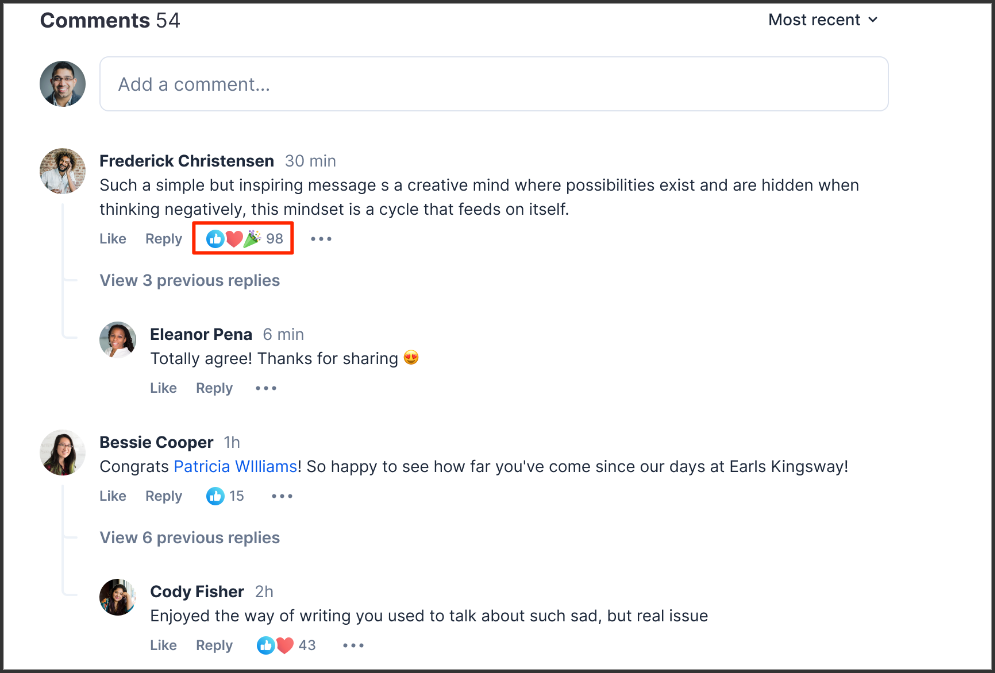
Reactions to comments added to posts are now available. Users are now able to click on the responses to the comments.
Reactions Notifications
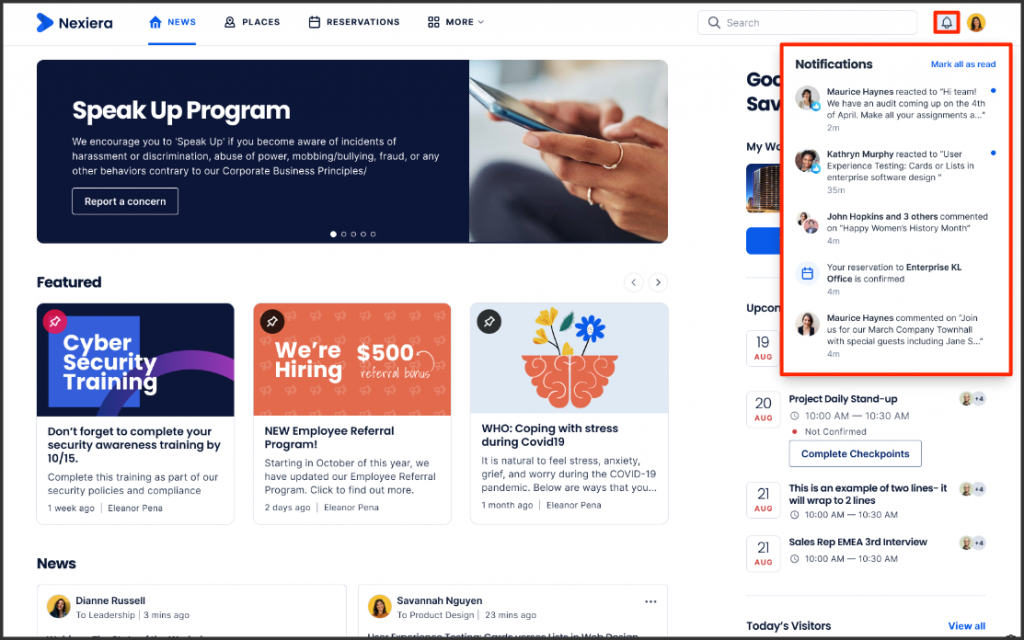
You receive notifications when a post, story, or page you are an author of gets a reaction or comment, or when you receive praise. When the Notifications bell button is clicked, the Notifications dropdown opens to show the list of notifications.
View Quick Post Insights
Follow the instructions below to view post analytics in your Employee App:
- Log in to your Appspace Employee App.
- Select the post in the Newsfeed to view the details.
- In the selected post, scroll down to the Insights section to view and filter post data.
- Click View more to access additional details in the Post Insights, including:
- Filters for post duration: All Time, Last 7 Days, Last 30 Days, and Year to Date.
- Key metrics and charts:
- Impressions – Impressions indicate the total number of times your post has been displayed to users, regardless of whether it was interacted with.
- Audience Reach – Audience Reach represents the percentage of unique users from your total audience that have seen or engaged with your post, providing insight into how effectively your content is reaching its intended audience.
NoteAn XLSX file can be downloaded for Impressions and Audience Reach. - Engagement Rate – Engagement Rate reflects the percentage of users who have interacted with your post by either commenting or reacting, offering a measure of how engaging your content is to your audience.
- Media Views – Media Views refer to the percentage of users who have viewed media content in a post, providing insight into how much users are engaging with media content.
- Referral Sources – Referral Source indicates how users are finding your content. This could be from a link within the Employee App, an email, or third-party app such as Microsoft Teams.
Create Event Post and Event Reservation
Follow the instructions below to create an event post and an event reservation in your Employee App:
- Log in to your Appspace Employee App.
- In the Home tab, click the “What do you want to share?” text box. Alternatively, go to More > Events and click the Create button.
- In the Create Post window, select the Event Post icon below the Create Post icon.
- In the Event Post window, customize according to preference. You may do any of the following:
- Click Share with drop-down to select the desired channel.
- Click the Ellipsis (…) to view the Settings. You may do the following:
- Spaces – Post will be shared with the desired communities and topics.
- Tags – You may include any relevant tags in the post.
- Schedule – This is set to Now by default. You can perform one of the following options:
- Leave this setting to Now (default) for the post to go live immediately to its audience once you publish it.
- Click and select a date range to schedule the publishing of this post. To remove the scheduled date range, click X.
- Author: Only available for certain roles:
- Channels – Feed publisher and feed editors, location publisher, and account owners.
- Communities – Owner and moderators, location publisher, and account owners.
- Featured – Set the post as a Featured post in the Employee App.
- Social features : You may configure this post’s social settings below:
- Reactions: Inherit (On) by default , On, Off
- Comments: Inherit (On) by default , On, Off
- Share: Inherit (On) by default , On, Off
- Click Drop image here or browse to upload an image for the event.
- Type in an Event title.
- Set the date.
- Select the starting time.
- Set the duration of the event.
- Type in and select a location for the event.
- Add a description for the event (optional).
- Add the conferencing link. This option allows you to select either Microsoft Teams, Google Meet, Zoom, and Webex for video conferencing.
- Switch the Requires RSVP toggle option to ON to display the attendance option in the event post. This option allows employees to indicate if they plan to attend the event (Attending or Not attending).
- Click the Files icon to upload a file, or the Media icon to add an image or video. NoteWe support .jpeg, .png, and .gif image formats. For video, only .mp4 files are supported.
- Click Post. Your post will appear in the Newsfeed section on the Home tab as well as in the More > Events also Reservations section.
- Refer to the Edit Post section for instructions on how to edit or remove your event post.
View and Indicate your Attendance for Event Post
As an Employee App user, you can view event posts in the Home > News section of the Employee App, or by navigating to the More > Events tab.
- The event post allows you to indicate if you plan on attending the displayed event.
- To view the list of attendees for the event, click on the event post. Employee App users who indicated that they will be attending the event (by selecting Attending) will be displayed in the Attending section of the event post view.
Click on an event post to view it in full. The line below the header displays the channels that the post is part of, and the published date and time. The right section displays the details of the event, such as the organizer. If the event post is set to require an RSVP, the attendance buttons (Attending, Not attending) and the list of attendees will also be displayed.
The event post view allows you to perform the following actions:
- Select the Attending or Decline option in the post to indicate your attendance for the event (this option will only be available if the event post is set to require an RSVP).
- View the information about the event (Date, time, Location, and description), as well as download the ICS file for the event to add it to your calendar.
- If you are the creator of the post, you may click the Ellipsis (…) option on the upper-right of the article to Edit or Remove the event post.
- Click the Organizer under the Organizer section to view the profile of the person in the People tab.
- View the list of attendees for the event in the Going section (this option will only be available if the event post is set to require an RSVP). If the location has a set capacity (the maximum number of attendees the resource can accommodate), both the current number of attendees and the maximum capacity will be shown.
- You can like, comment, and share the post if you scroll down to the end of the article.
Create Question
You can create and publish a question within communities using the Question post feature to obtain answers from community members, and encourage community participation and knowledge sharing.
Community members can answer questions, view, and vote on the most helpful responses, and even change their answers if needed. Community owners can then mark a response as the best answer, ensuring it is prominently displayed and officially recognized.
Follow the steps in this article to use the question feature in the Employee App.
Create Poll
You can create and publish a poll in communities using the Poll feature to engage users for feedback on various topics within the organization. Users can vote, view results, and even change their votes if needed.
Follow the steps in this article to use the poll feature in the Employee App.
Send Praise
You can send a message of appreciation or congratulations to a colleague or group using the praise feature, and display it in communities. Follow these steps to use the praise feature in the Employee App:
-
- Log in to your Appspace Employee App.
- You can click the + sign next to the notifications bell button in the Home tab, or click the “What do you want to share?” text box.

- Select the Praise tab on the left to go to the Praise window.
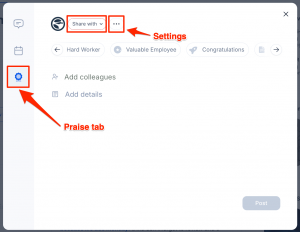
- In the Praise window, click the Share with drop-down menu to select the desired community. You may also type in the name of the community to search.
- Click the ellipsis (…) icon to open the Settings window, where you may set the following options:
- Spaces – Click and type in the communities where the praise will be shared with.
- Tags – You may include any relevant tags for the praise.
- Schedule – This is set to Now by default. You can perform one of the following options:
- Leave this setting to Now (default) for the praise to go live immediately to its audience once you publish it.
- Click and select a date range to schedule the publishing of the praise. To remove the scheduled date range, click X.
- Author – Choose the person you want to be the author of the praise.NoteOnly Account Owners have the option to select Authors, hence this field is hidden to employees without the required permissions.
- Featured – Set the item as a Featured post in the Employee App.
- Social features: You may turn on or off this praise’s social settings, or set them to inherit the behavior from the community the praise is in:
- Select the praise badge that you wish to send to your colleague (s), e.g. Awesome Teammate, Thank You, Hard Worker, Valuable Employee, etc.
- Click the “Add colleagues” text and type in the names of the colleagues you wish to praise.
- Click the “Add details” text to type in content for your praise.
- Click the Post button.
- After posting a Praise, the following results will be displayed:
- The colleague(s) will receive a notification of your praise in the Employee App.
- Your praise will be published on the selected Communities page, and the Home section of the Employee App of community members.
- Users who open the praise in a window are able to click on the name of the person (s) to go to the People profile.
NoteAuthors and administrators can edit and delete Praises, just like posts.
Was this article helpful?
