The Appspace Visitor Management system enables employees using the Appspace Space Reservation system to configure visitor and check-in information for events with the new Visitors module in the Appspace console, allowing you to then invite external users (visitors) to a meeting or event held in your company using the Appspace Employee App. These visitors could be an employee from another facility/division/subsidiary within your company or other corporate entities from outside the company
Configure the Appspace Visitor Management System to allow your visitors to self-check-in for events using Appspace visitor kiosks.
Personas
There are 4 key personas involved in the operation of the Visitor Management solution:
- Administrator – An Appspace user responsible for setting up the Visitors system, administering visitor and system behavior, setting up the kiosk, and configuring interfaces with any external systems (calendars, watchlists, printing services, etc.).
- Host – An employee or administrator in an organization (an Appspace user), who initiates any visitor activity by inviting an external user to an event/meeting via the Appspace Employee App. Once an employee sends an invitation, they automatically become the event/meeting host.
- Facilitator – An employee or administrator in an organization (an Appspace user), who will be the initial point of contact for visitors, and who will typically be tasked with managing and facilitating the registration or badge printing for all visitors scheduled to enter the facility and attend the event.
- Visitor – A visitor to the facility who has received an invitation from the event/meeting host. We also accept drop-in visitors who do not have a prior invitation on some occasions. Visitors must complete registration activities (if available) before attending the event/meeting. These visitors do not need to be an Appspace user.
Workflows
The following describes the key workflows in a Visitor Management system:
- Configuration – Administrators configure the Appspace Reservation and Visitor Management systems, and define integrations with 3rd party systems (calendars, watchlists, printing services, etc.) to enable the Visitor Management functionality.
- Invitation – Hosts initiate the visitor invitation as part of a meeting/event reservation activity. We introduce a new permission-controlled, interactive visitor dashboard within the Employee App (Visitor tab), with access to some of the visitor management functions.
- Registration – Visitors receive the invitation and are notified of any registration tasks that need to be completed via a portal. Both the host and the visitor will have visibility of the completed registration tasks.
- Registration/Check-In –
- The Visitor Kiosk card will be deployed to kiosk devices and used for self-guided visitor registration and check-in at the event facility.
- The Facilitator will be the initial point of contact for visitors on-site, with a complete view of all upcoming events and visitor details. Facilitators will help visitors verify the Registration activities have been completed, and help with the check-in processes on-site if needed.
- If the Visitor has not completed the Registration tasks, the visitor may complete them on-site and then proceed to check-in.
- Visitors must check-in for the event on-site, and complete any last-minute tasks (such as ID confirmation, badge printing, etc.) at the kiosk.
- The Host is automatically notified upon completion of the check-in process by visitors to the event.
Features & Functions
The following lists the main features and functions in the Appspace Visitor Management system:
- Host & Visitor Invitation Features
- Invite visitors to a room, space, or building.
- Enter visitor data to invite using a spreadsheet (bulk import).
- Configurable registration workflows for admins, hosts, and visitors.
- Calendar and email reminders for all visitor registration checkpoints.
- Visitor check-in notifications to email and enterprise messaging apps.
- Visitor registration activity completion notifications.
- Manual registration of drop-in visitors for last-minute events.
- Visitor Registration & Check-in Features
- Submit registration information in advance.
- Submit a photo for visual verification in advance.
- Calendar and email reminders for the completion of registration items.
- Auto-filling of information for returning visitors.
- Option for on-site self-guided registration and check-in.
- Option to complete end-to-end registration on-site without registration.
- Administrator & Facilitator Dashboard Features
- Access to all admin functions in a separate admin console.
- Calendar and list view of expected visitors and historic records of past visitors.
- Review visitor details including, but not limited to: Name and contact details, company, host, date, time, duration, photo, and much more.
- Option to enable/disable touchless check-ins and manually check-in visitors.
- Select multiple visitors to perform check-in/check-out, print badges, or cancel/delete invitations in bulk.
- Option to enable/disable pre-registration, notifications, and checkpoints (this feature is currently behind a feature flag and not available to the public).
- System Configuration & Administration
- Access to visitor registration through a downloadable app/client.
- Configure, enable, and disable required registration fields.
- Option to make email required or optional for visitors. (new)
- Set a data retention period for visitor data and invitations to meet data privacy requirements.
- Option to allow hosts to view only visitors they have previously invited, and not the visitors of other hosts.
- Set visitor types and purposes to be recorded in visitor profiles and invitations.
- Native integration with Appspace Space Reservation system.
- Support for SSO and IdP.
- Roles & License Requirements:
- Administrator – User assigned with Account Owner or Location Admin role, and an Appspace Platform user license. To access the Employee App a Premium user license is required.
- Host & Facilitator – Hosts and facilitators will use the Appspace Employee App to invite visitors and to review and check-in visitors. The Employee App requires Premium user licenses.
- Kiosk – Devices running the Visitor Kiosk card for the self-service check-in will require a standard device license.
- Notifications
- Once a visitor has completed registration details, the visitor’s event status becomes confirmed. Visitors will be notified via email.
- Hosts will be notified via email and their configured enterprise messaging app, when a visitor:
- Accepts, Declines, or responds Maybe to an invitation.
- Completes registration details and is confirmed for their visit.
- Checks out onsite.
This article provides Administrators with the instructions to configure the Appspace Visitor Management System with the Visitors module in the console, to allow your visitors to self-check-in for events using Appspace visitor kiosks:
- Administrators looking for information on navigating the Visitors module in the console, refer to Browse and Navigate Visitor Management in Appspace 8.x.
- Administrators who would like to setup the Visitor Kiosk card on a kiosk for self-check-ins, refer to Cards: Visitor Kiosk Check-Ins.
- Hosts and Facilitators looking for guidance to send and manage event invitations, refer to Manage Visitor Invitations – Hosts & Facilitators.
- Visitors looking for guidance for self check-in and registration, refer to Event Check-In and Registration.
Prerequisites
- Appspace 8.1-ac.25 and later.
- An active Appspace public/private cloud account.
- The Space Reservations system configured with buildings, locations, resources, and a booking calendar provider.
- Account Owner or Location Admin role, with an Appspace Platform user license to configure the Visitors system.
- To access the Appspace Employee App, a Premium user license is required.
Additional Equipment Requirements:
- Camera – QR Code functionality for touchless check-ins, check-outs, and also visitor photo capture requires devices that are supported by the Appspace Card Library.
- Printing – If badge printing is required, please ensure a supported printer is connected to the visitor kiosk, or to the device the facilitator dashboard is displayed on.
ImportantIn this release, only the following devices support the following features:
- Visitor photo capture is currently only supported on iOS 15 devices.
- Visitor badge printing is currently only supported on iOS 15 devices configured with Brother QL Series printers.
- Device Property – Configure iOS devices with the following device property if Visitor badge printing is enabled:
ImportantDue to formatting issues, we advise customers to remove and re-enter the quotation marks when copying and pasting from this article.
- For Brother QL Series Printers
-
Printer Type: device.printer.type = brother
-
Printer Options: device.printer.options = {"model": "<printer model>", "modelName": "<printer model name>", "ipAddress": "<ip address>"}or
-
Printer Options: device.printer.options = {"model": "<printer model>", "modelName": "<printer model name>", "ipAddress": "<ip address>", "paperLabelName": "<paper label>"}Example: {“model”: “QL_820NWB”, “modelName”: “Brother QL-820NWB”, “ipAddress”: “<ipAddress>”, “paperLabelName”: “W60H86”}
The model property defines the specific printer device, thus please refer to the following reference link to determine how to list your device model property: https://support.brother.co.jp/j/s/support/html/mobilesdk/reference/android/printerinfo.html#model The paper label property defines the paper label used in the roll printer, based on the width and height of the label. If it is not specified, it is set to W62 as the default value. Please use the correct paper label property as supported by your Brother Labeller model, as provided in this reference link: https://support.brother.co.jp/j/s/support/html/mobilesdk/reference/android/labelinfo.html
-
- For Generic Printers
-
Printer Type: device.printer.type = generic
-
Printer Options: device.printer.options = {"printer":"ipp://<printer ip>/ipp/print"}or
Printer Options: device.printer.options = {"printer":"ipp://<printer ip>/ipp/print" , "paper" :{"length" : "6cm"}}The paper length property indicates how long the paper is until it gets cut off on a roll printer. If it is not specified, it is set to 10cm as the default value.
-
- For Brother QL Series Printers
Enable Visitor Management
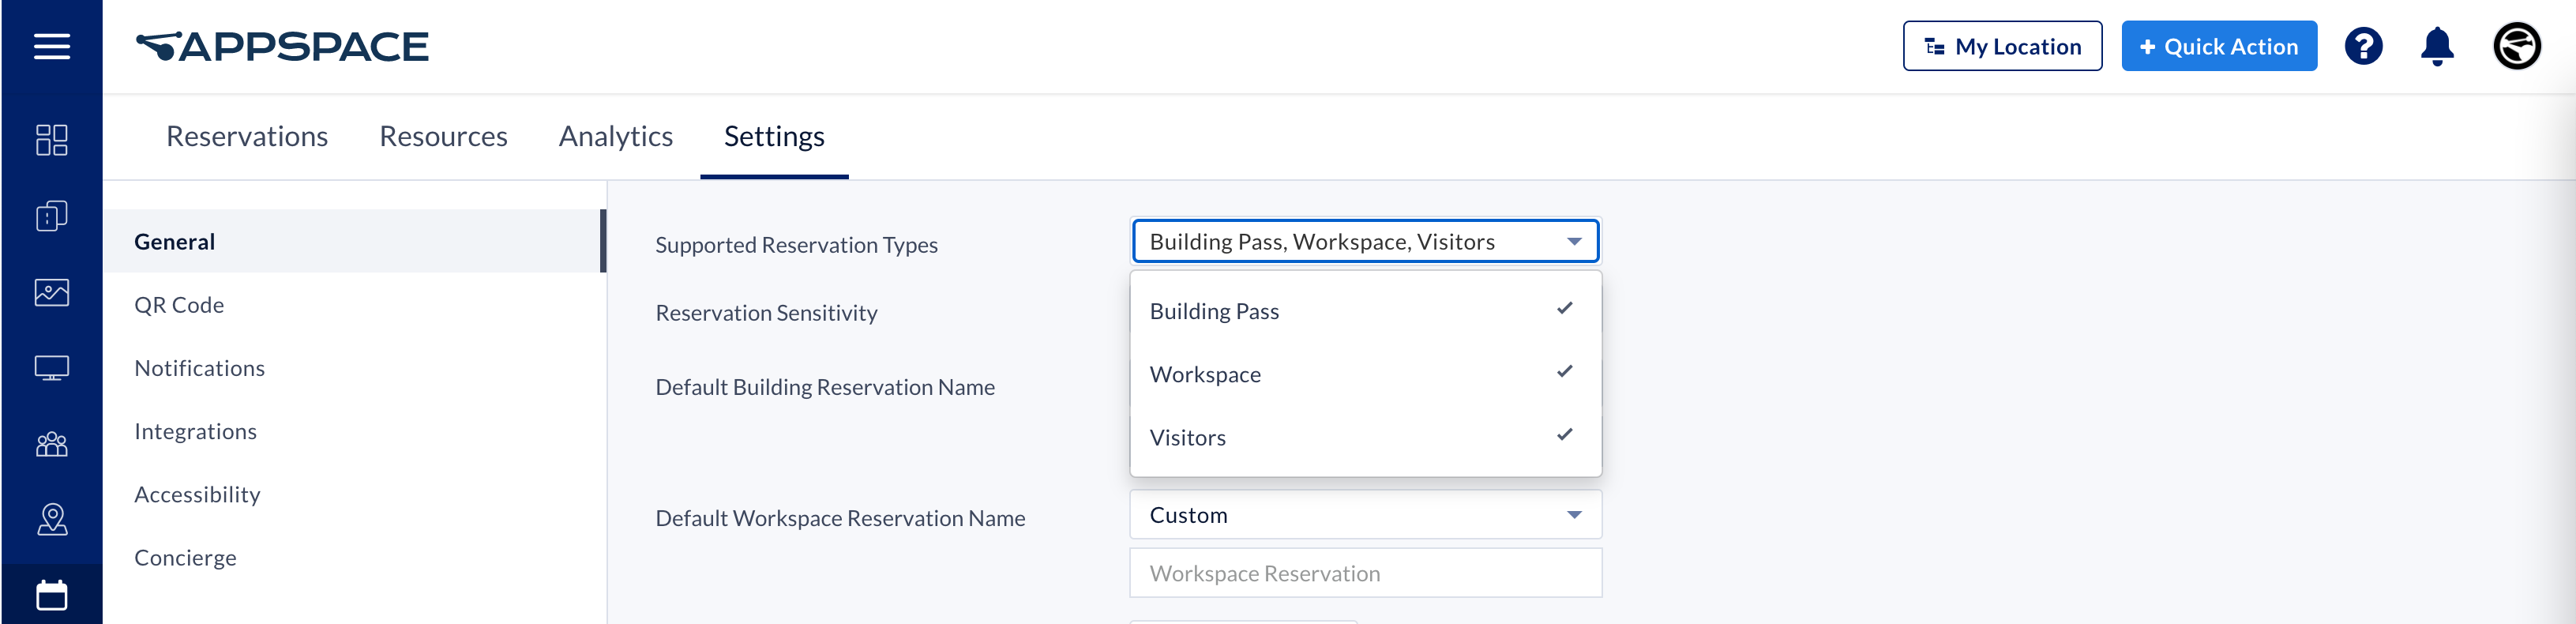
- Log in to the Appspace console.
- Click Reservations from the ☰ Appspace menu, and click the Settings > General tab.
- Select Visitors from the Supported Reservation Types drop-down menu to enable the Visitor Management system.
Configure Building Resources for Visitors in Reservations
Follow the instructions below to ensure the resource accepts visitor invitations:
- Log in to the Appspace console.
- Click Reservations from the ☰ Appspace menu, and click the Resources tab.
- Select a building that you want to enable for Visitor Reservations, then click the ellipsis (…). Make sure you’re selecting the building itself, not a resource within it, as only buildings support the Allow Visitor Reservations rule. Select Edit.
- In the Edit Building window, ensure the following settings and constraints are added:
- In the General tab, ensure the following setting is selected:
- Reservable – Select User can reserve this resource from the drop-down menu.
- In the Rules tab, click the + Add Rule button to add the following constraints:
- Allow Visitor Reservations
- Category – Select Constraint from the drop-down menu.
- Type – Select Allow visitor reservations from the drop-down menu.
- Allow Visitor Reservations – Slide the toggle to YES.
- Allow Visitor Drop-In
- Category – Select Constraint from the drop-down menu.
- Type – Select Allow visitor drop-in from the drop-down menu.
- Allow Visitor Drop-in – Slide the toggle to YES.
- Require Confirmation By – Select the roles responsible to confirm drop-in visitors from the drop-down menu. You may select Host, Facilitator, or both Hosts or Facilitator.
- Timeout After – Select the timeout duration for the drop-in visit confirmation. Defaulted at 30 mins.
- Timeout Action – Select the action in the event the drop-in request is not confirmed within the timeout duration. Defaulted at None (no action taken). Selecting Cancel automatically cancels the drop-in request after the timeout duration.
- Allow Visitor Reservations
- In the General tab, ensure the following setting is selected:
Manage Visitors and Invitations
Send Visitor Invitations
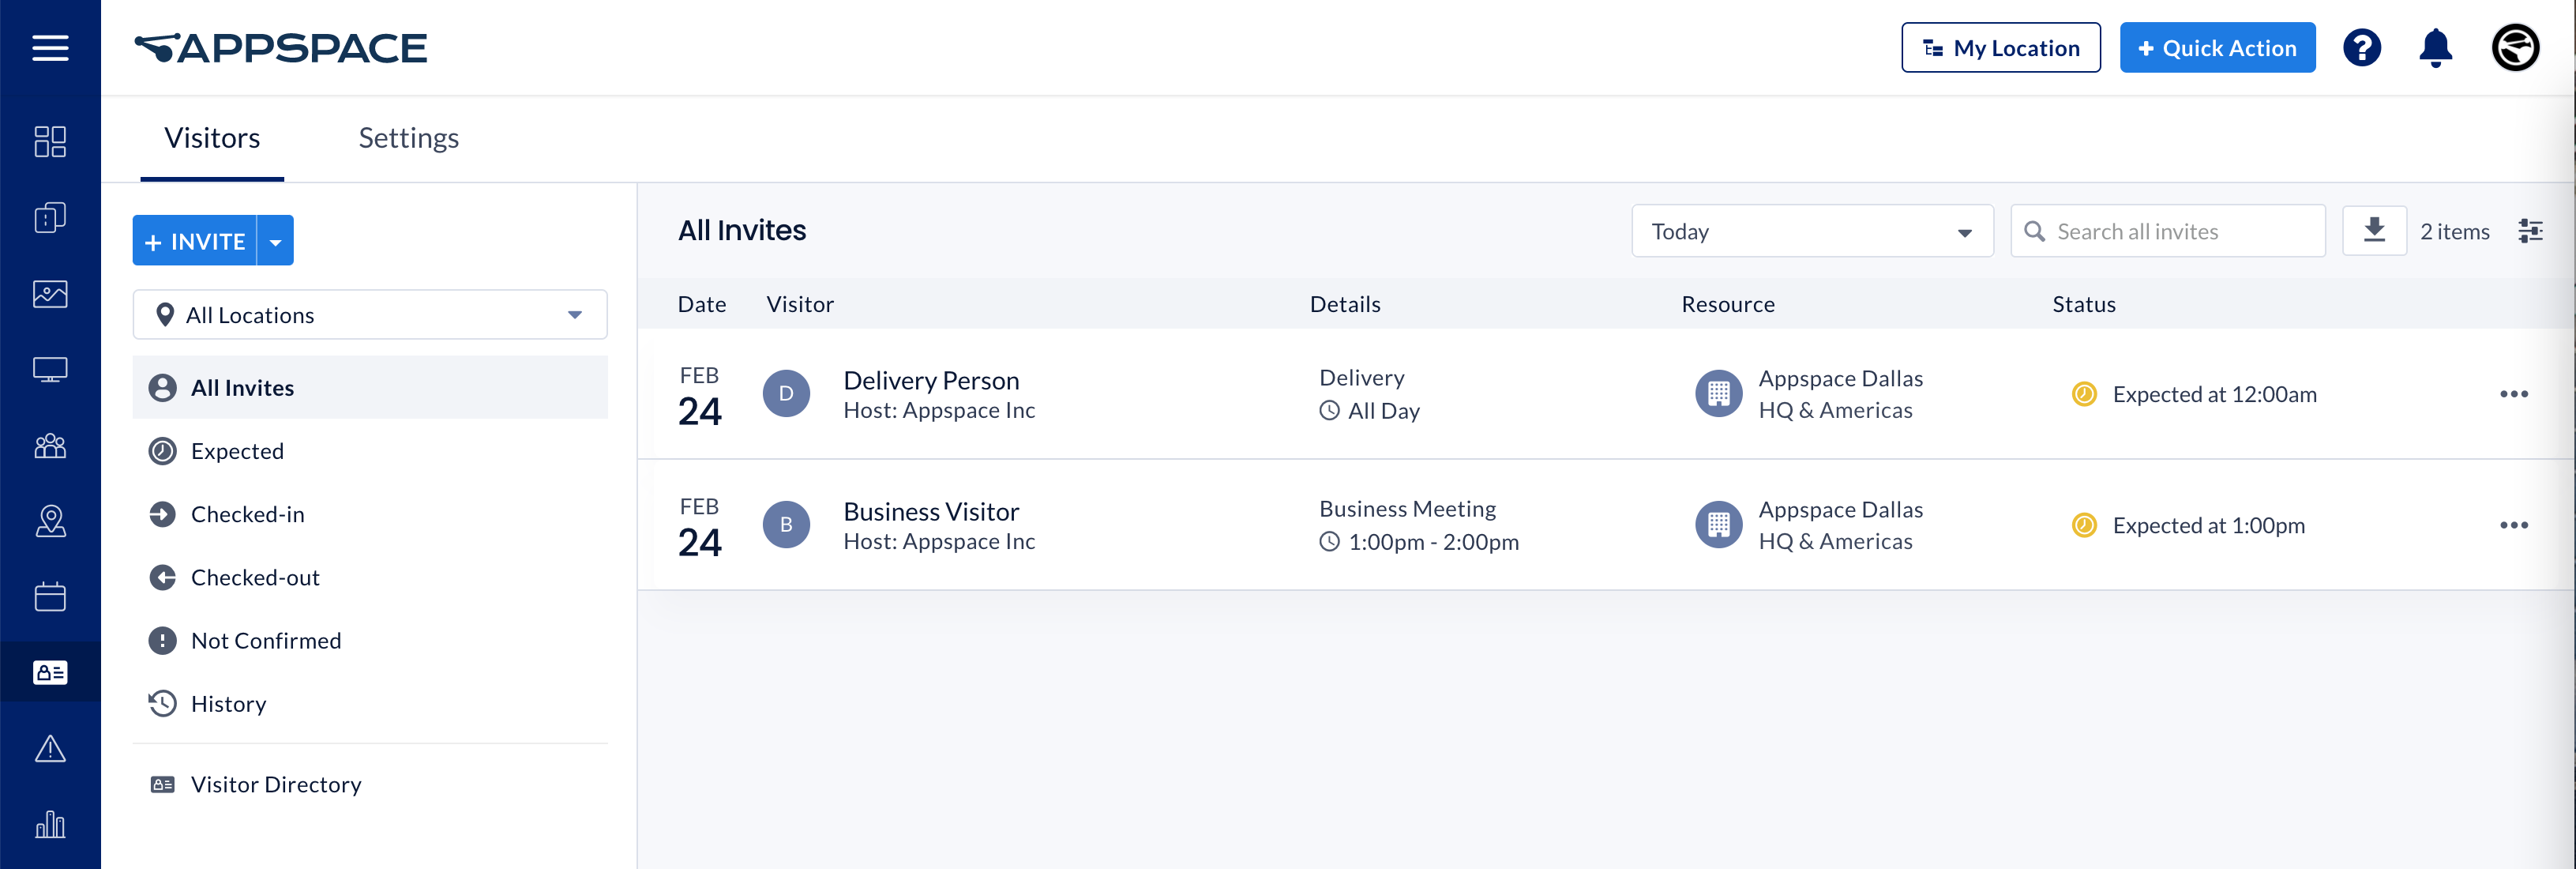
Follow the instructions to send a visitor invitation as an Administrator via the Appspace console:
- Log in to the Appspace console.
- Click Visitors from the ☰ Appspace menu, and click the Visitors tab.
- Click the +INVITE button to create a visitor invitation.
- In the Invite Visitors window, enter the following information:
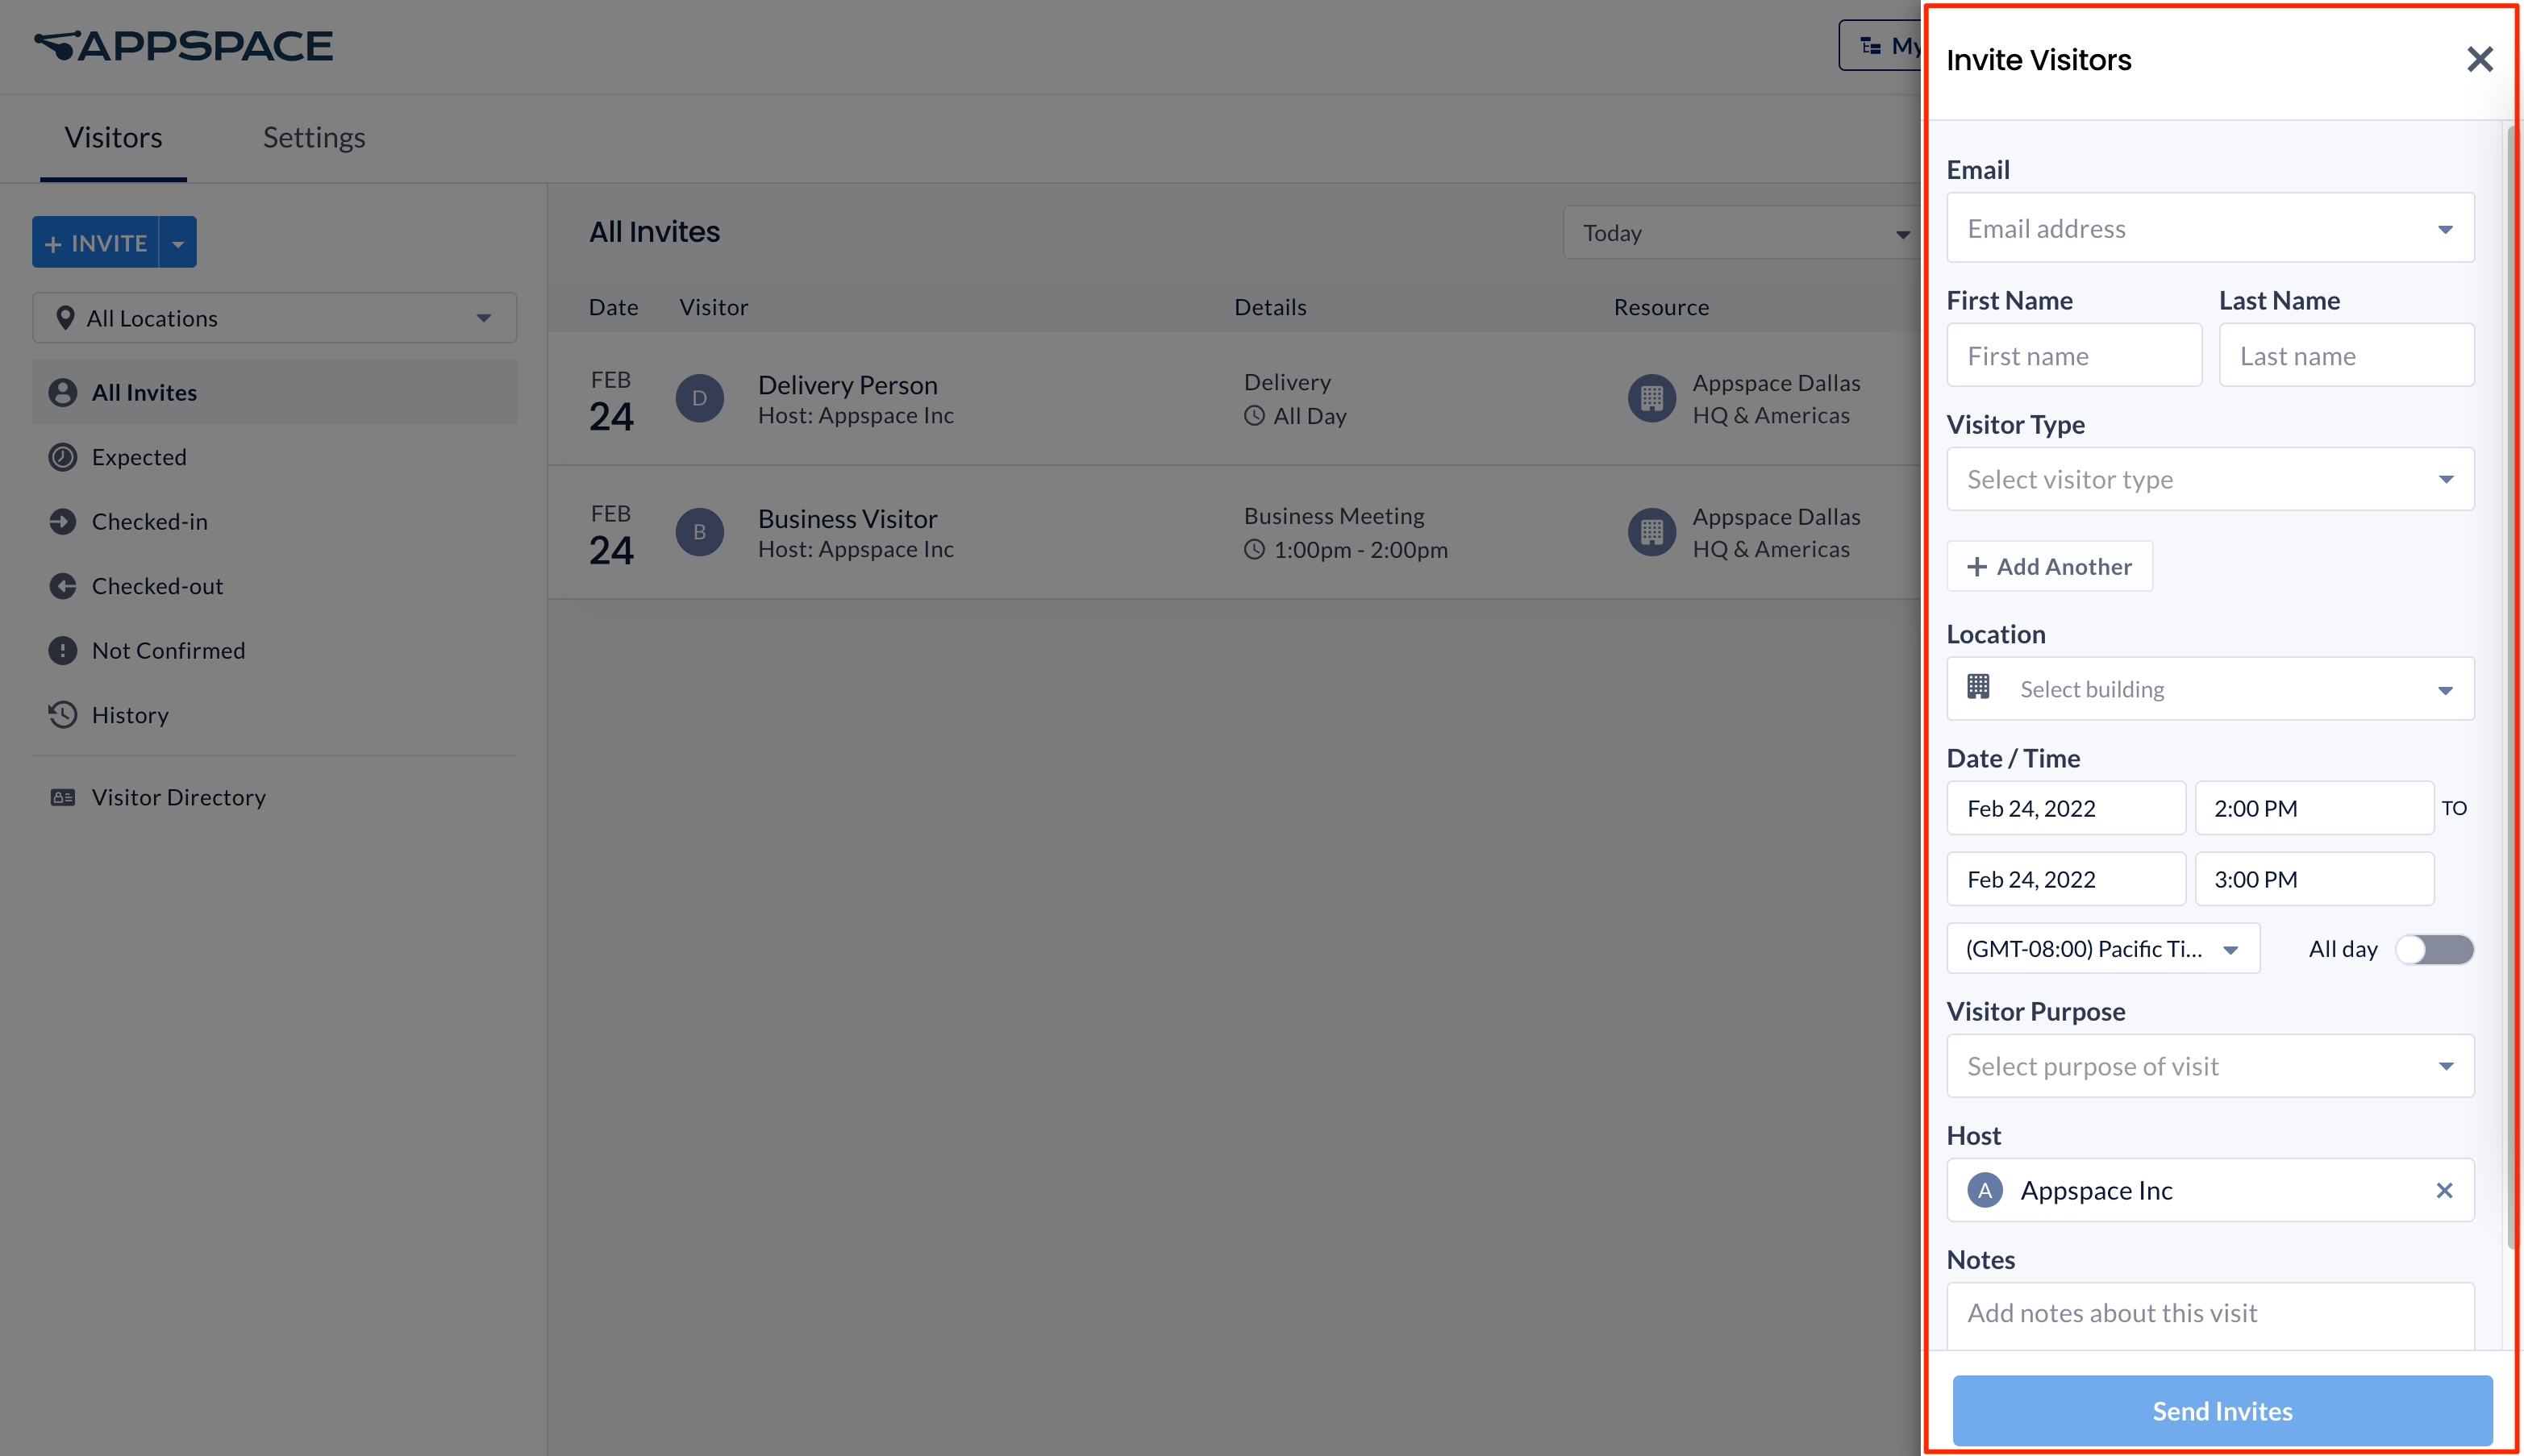
- Visitor – Enter the visitor’s email or first name / last name to search for an existing visitor, or select + Add new visitor to create a new visitor by entering the following information:
- EmailNoteThis field can be set to be required or optional by an administrator, following organizational requirements to check in visitors with their email address. If the email field is set to optional and is not filled when adding the new visitor, a symbol is displayed to indicate that the visitor does not have an email registered.
- First Name, Last Name
- Visitor Type – Select if the visitor is a Contractor, Delivery Personnel, Family Member, Business Guest, New Hire, or Other from the dropdown menu.
- Email
- + Add Another – you may add another visitor to the visitor invitation, using the same methods above.
- Optionally, you may import visitor data using a spreadsheet (bulk import), using the following steps. If not, skip to the Location step below.
- If you have not yet entered a visitor, click the Visitor field and click + Add new visitor from the drop-down. If you have already entered a visitor, click Add Another.
- Under Add Visitor, click the + Add Another button drop-down, and select + Download Import Template. Download the file.
- Open the downloaded spreadsheet template file. Enter the visitor information following the columns in the template:
- First Name
- Last Name
- Visitor Type – Specify if the visitor is a Contractor, Delivery Personnel, Family Member, Business Guest, New Hire, or Other.
- Save the file.
- In Invite Visitors, Click the + Invite button drop-down, and select + Import from xlsx. Select the saved file.
- After the file is uploaded, the information of the imported visitors is displayed in the Invite Visitors window.
- An error message appears if there are errors in the imported visitor information. Click the error message to go straight to the next field with an error.
- Correct the fields that have an error, or click – to remove that visitor entirely.
- Click Next.
- Location – Select the building location of the visit.
- Date/Time – Select the duration of the visit.
- Start Date / Time
- End Date / Time
- Timezone
- All day – If the invitation is for an all day visit, slide the toggle to enable.
- Visitor Purpose – Select the purpose of the visit by the visitor, such as for a Business Meeting, or a Job Interview.
- Host – Select the Host if other than you.
- Notes – Allows you to record details about the visit.
- Require pre-registration – Enable this to require visitors to perform event pre-registration and set them as Pending for the event. Disabling this will set them as Expected for the event and not send out the invitation email.
- Enable notifications – Enables or disables the email notifications for the invite, update, removal, or cancellation of the event sent to the visitor. This does not affect emails sent to the host.
- Require checkpoints – Enable this to require the visitor to use checkpoints using the Employee App. Disabling this will set the visitor as Expected at checkpoints.
- Visitor – Enter the visitor’s email or first name / last name to search for an existing visitor, or select + Add new visitor to create a new visitor by entering the following information:
- Once done, click Send Invites.
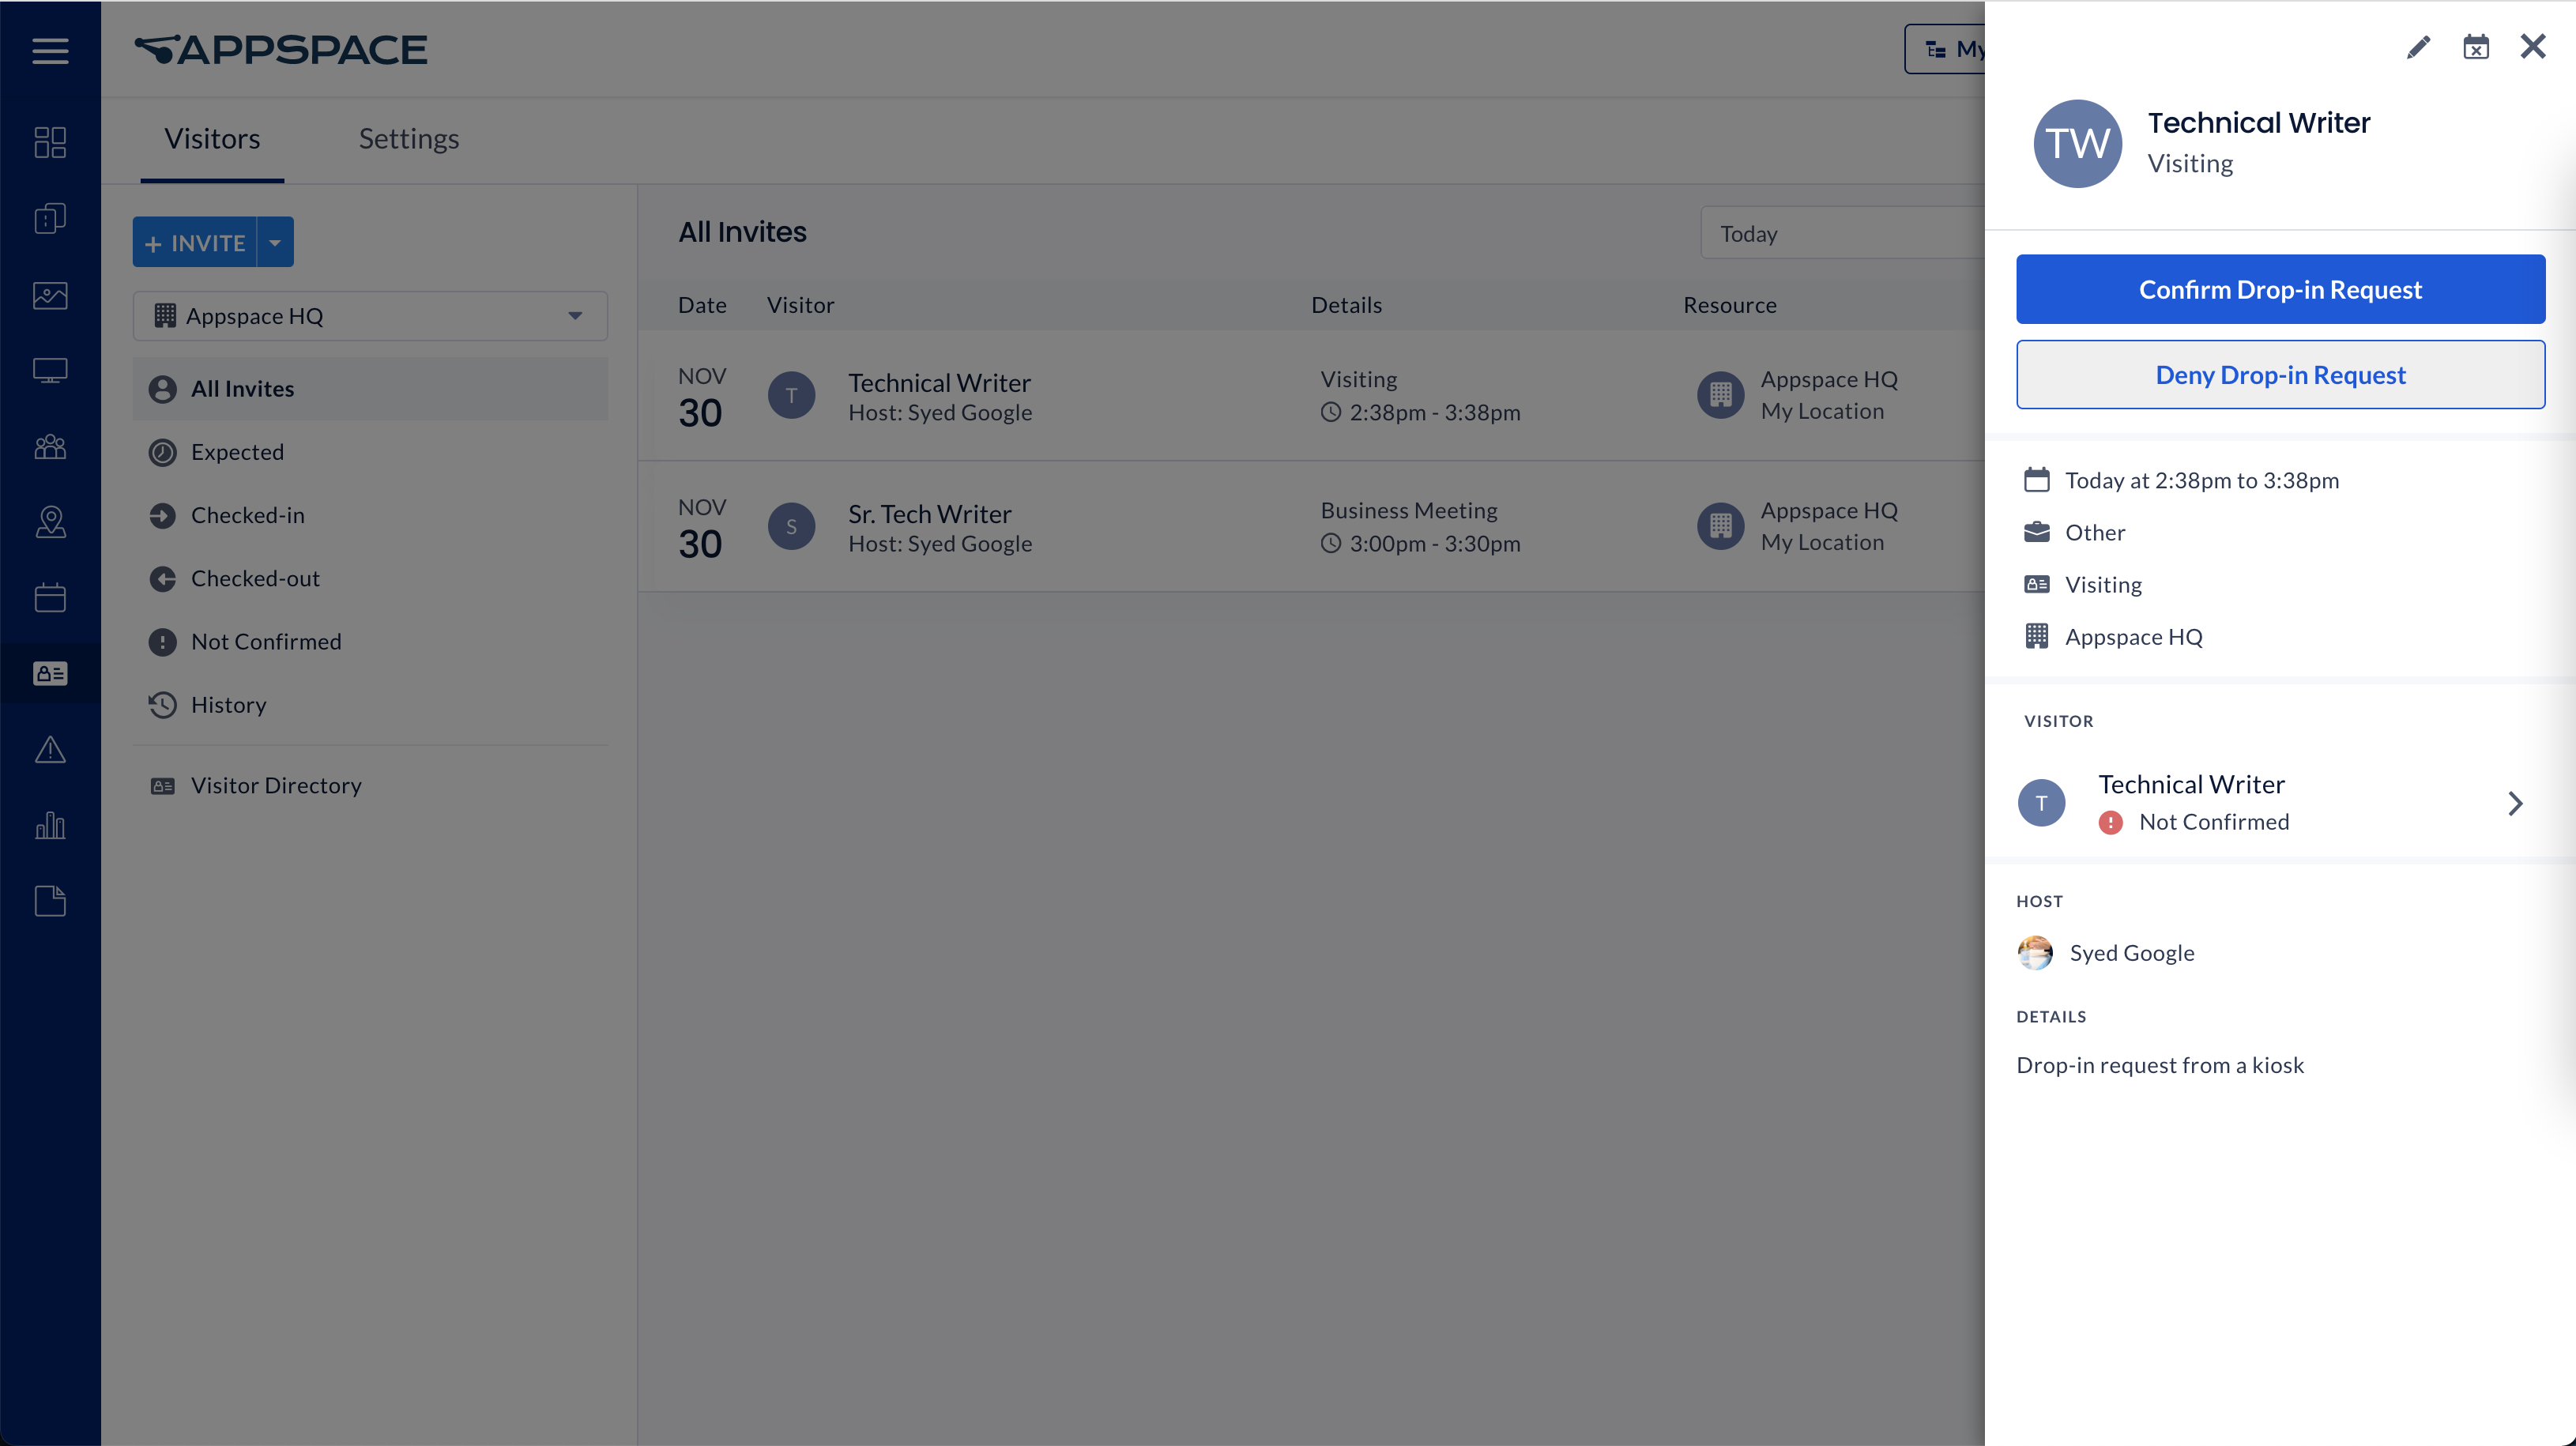
Confirm Visitor Invitation via Drop-In Request
Follow the instructions to confirm the visitor invitation via drop-in request as an administrator or facilitator via the Appspace console:
- Log in to the Appspace console.
- Click Visitors from the ☰ Appspace menu, and click the Visitors tab.
- Click the ellipsis of the visitor’s name you received the drop-in request notification from, and click Preview.
- Click the Confirm Drop-in Request button to confirm the visitor’s request, which will notify and send an invite to the visitor. You may also deny the drop-in request, which will reject the drop-in request and notify the visitor.
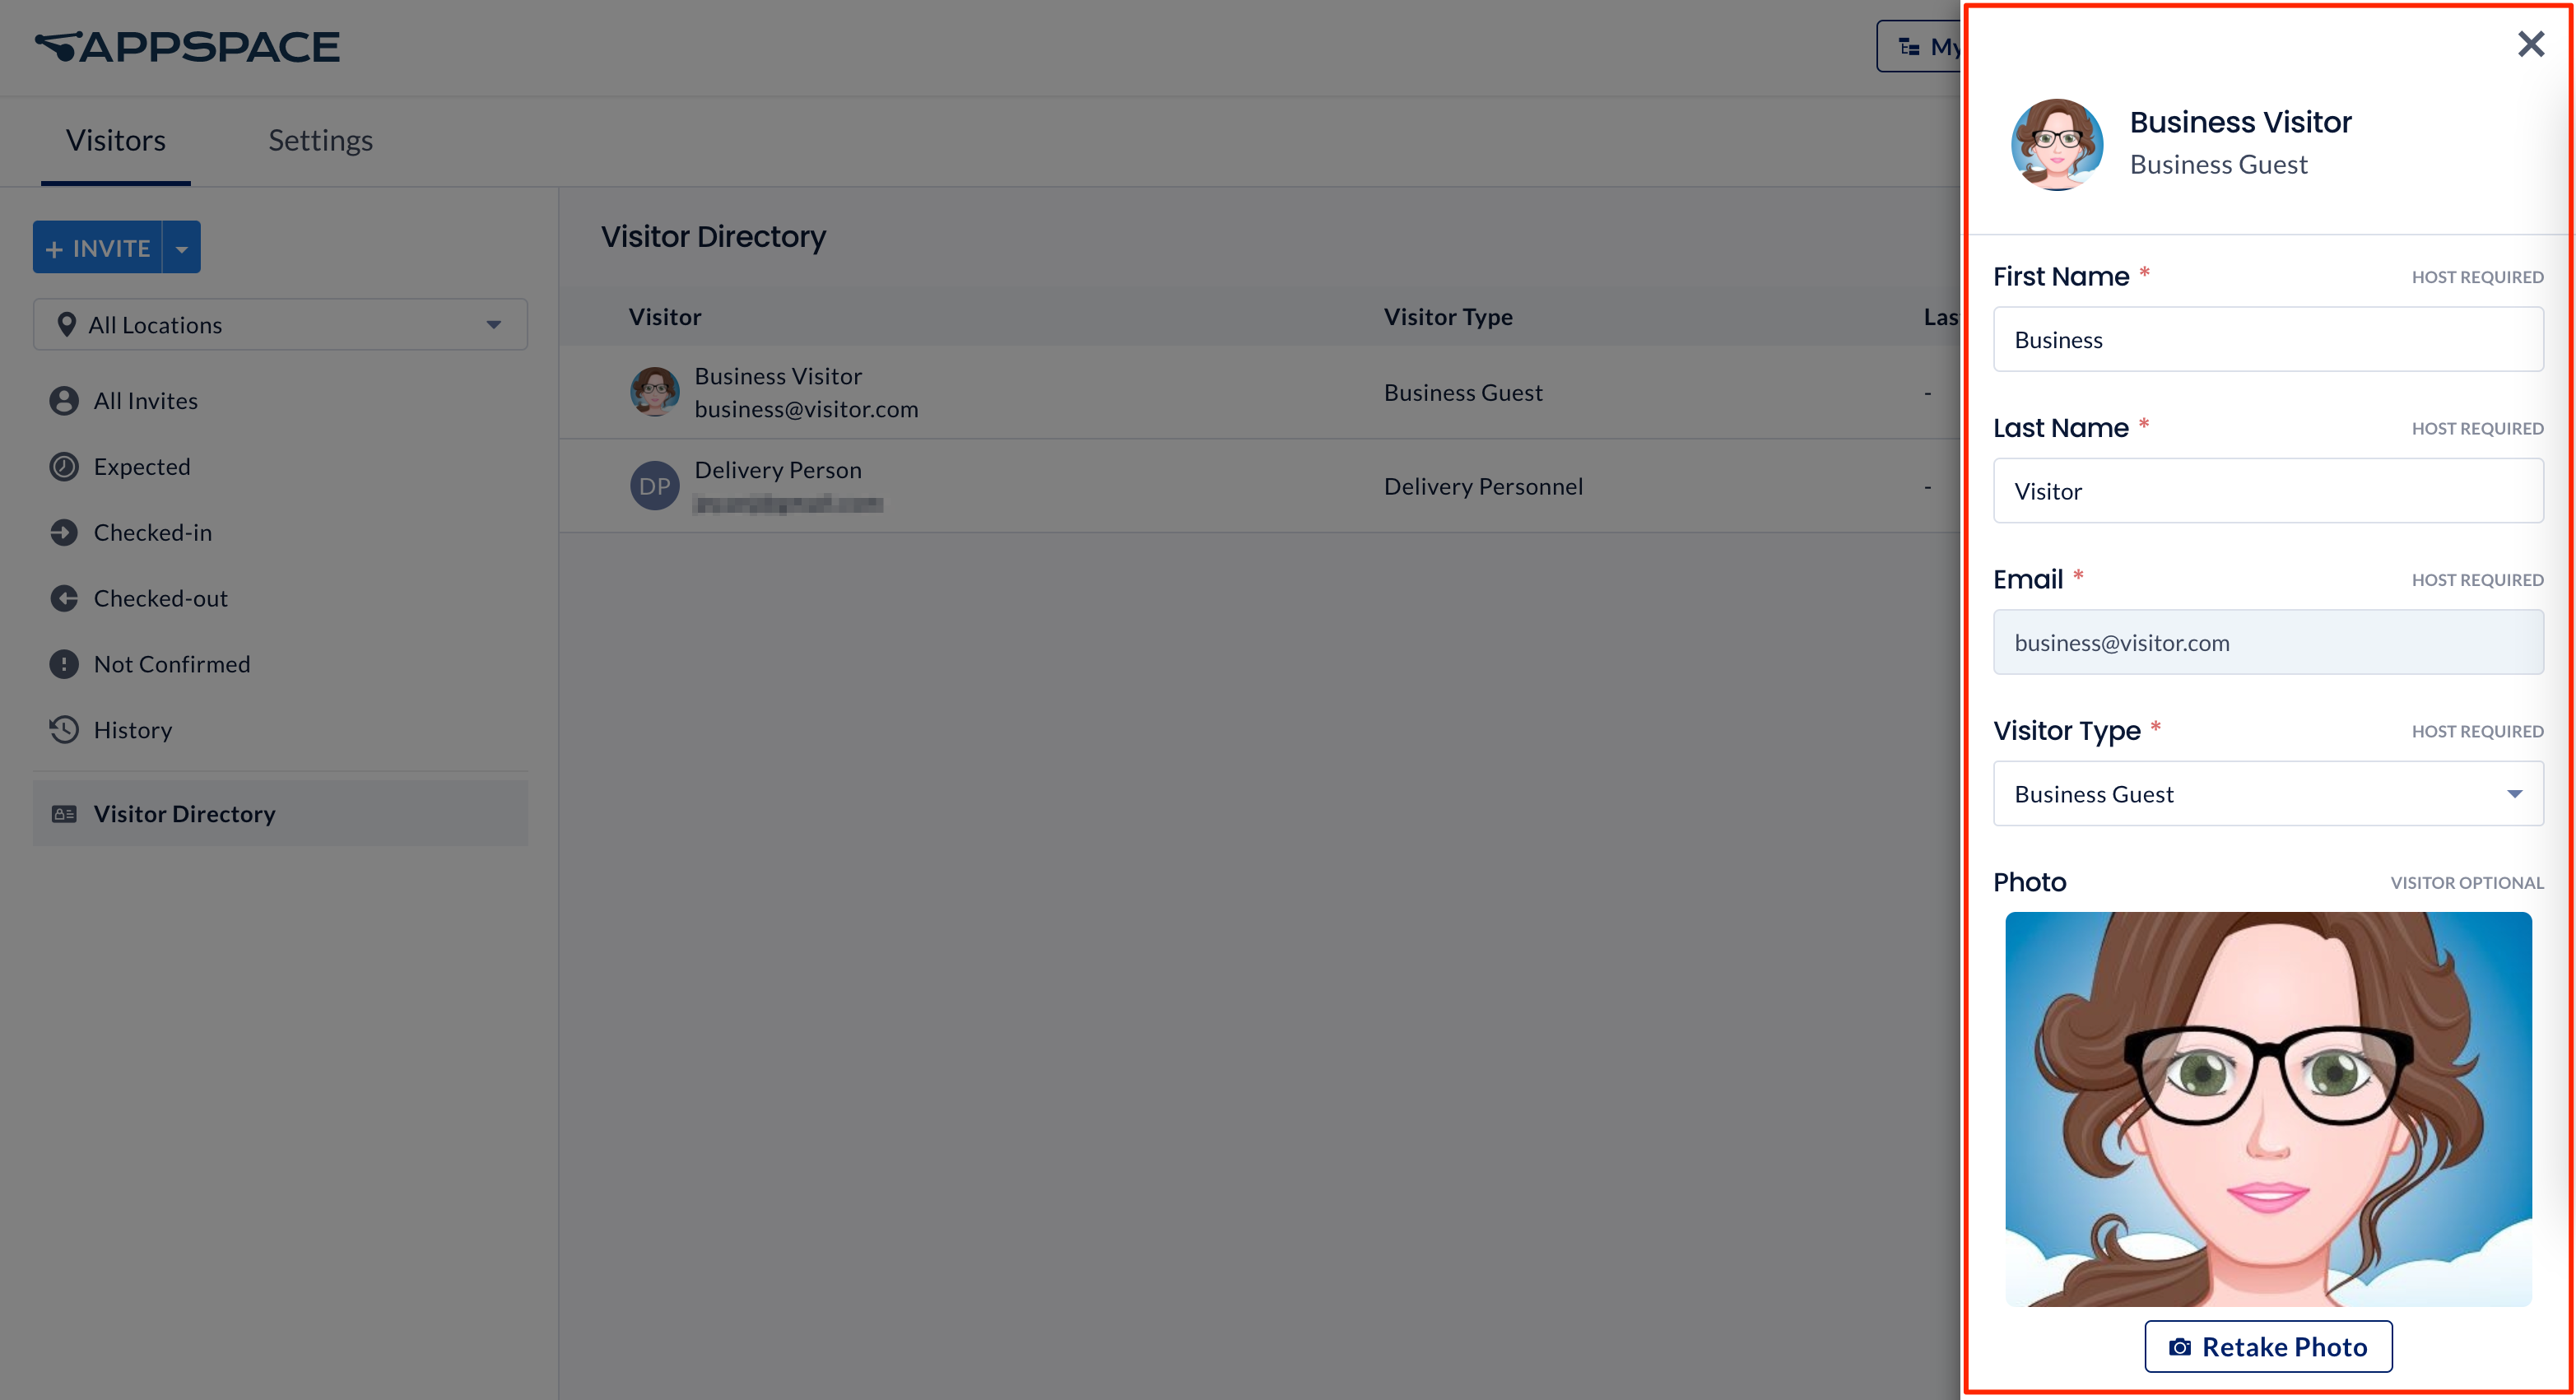
Create Visitor Profiles
Follow the instructions below to create visitor profiles.
- Log in to the Appspace console.
- Click Visitors from the ☰ Appspace menu, and click the Visitors tab.
- Click the + INVITE button drop-down, and select + Create Visitor.
- In the Create Visitor window, enter the following visitor information:
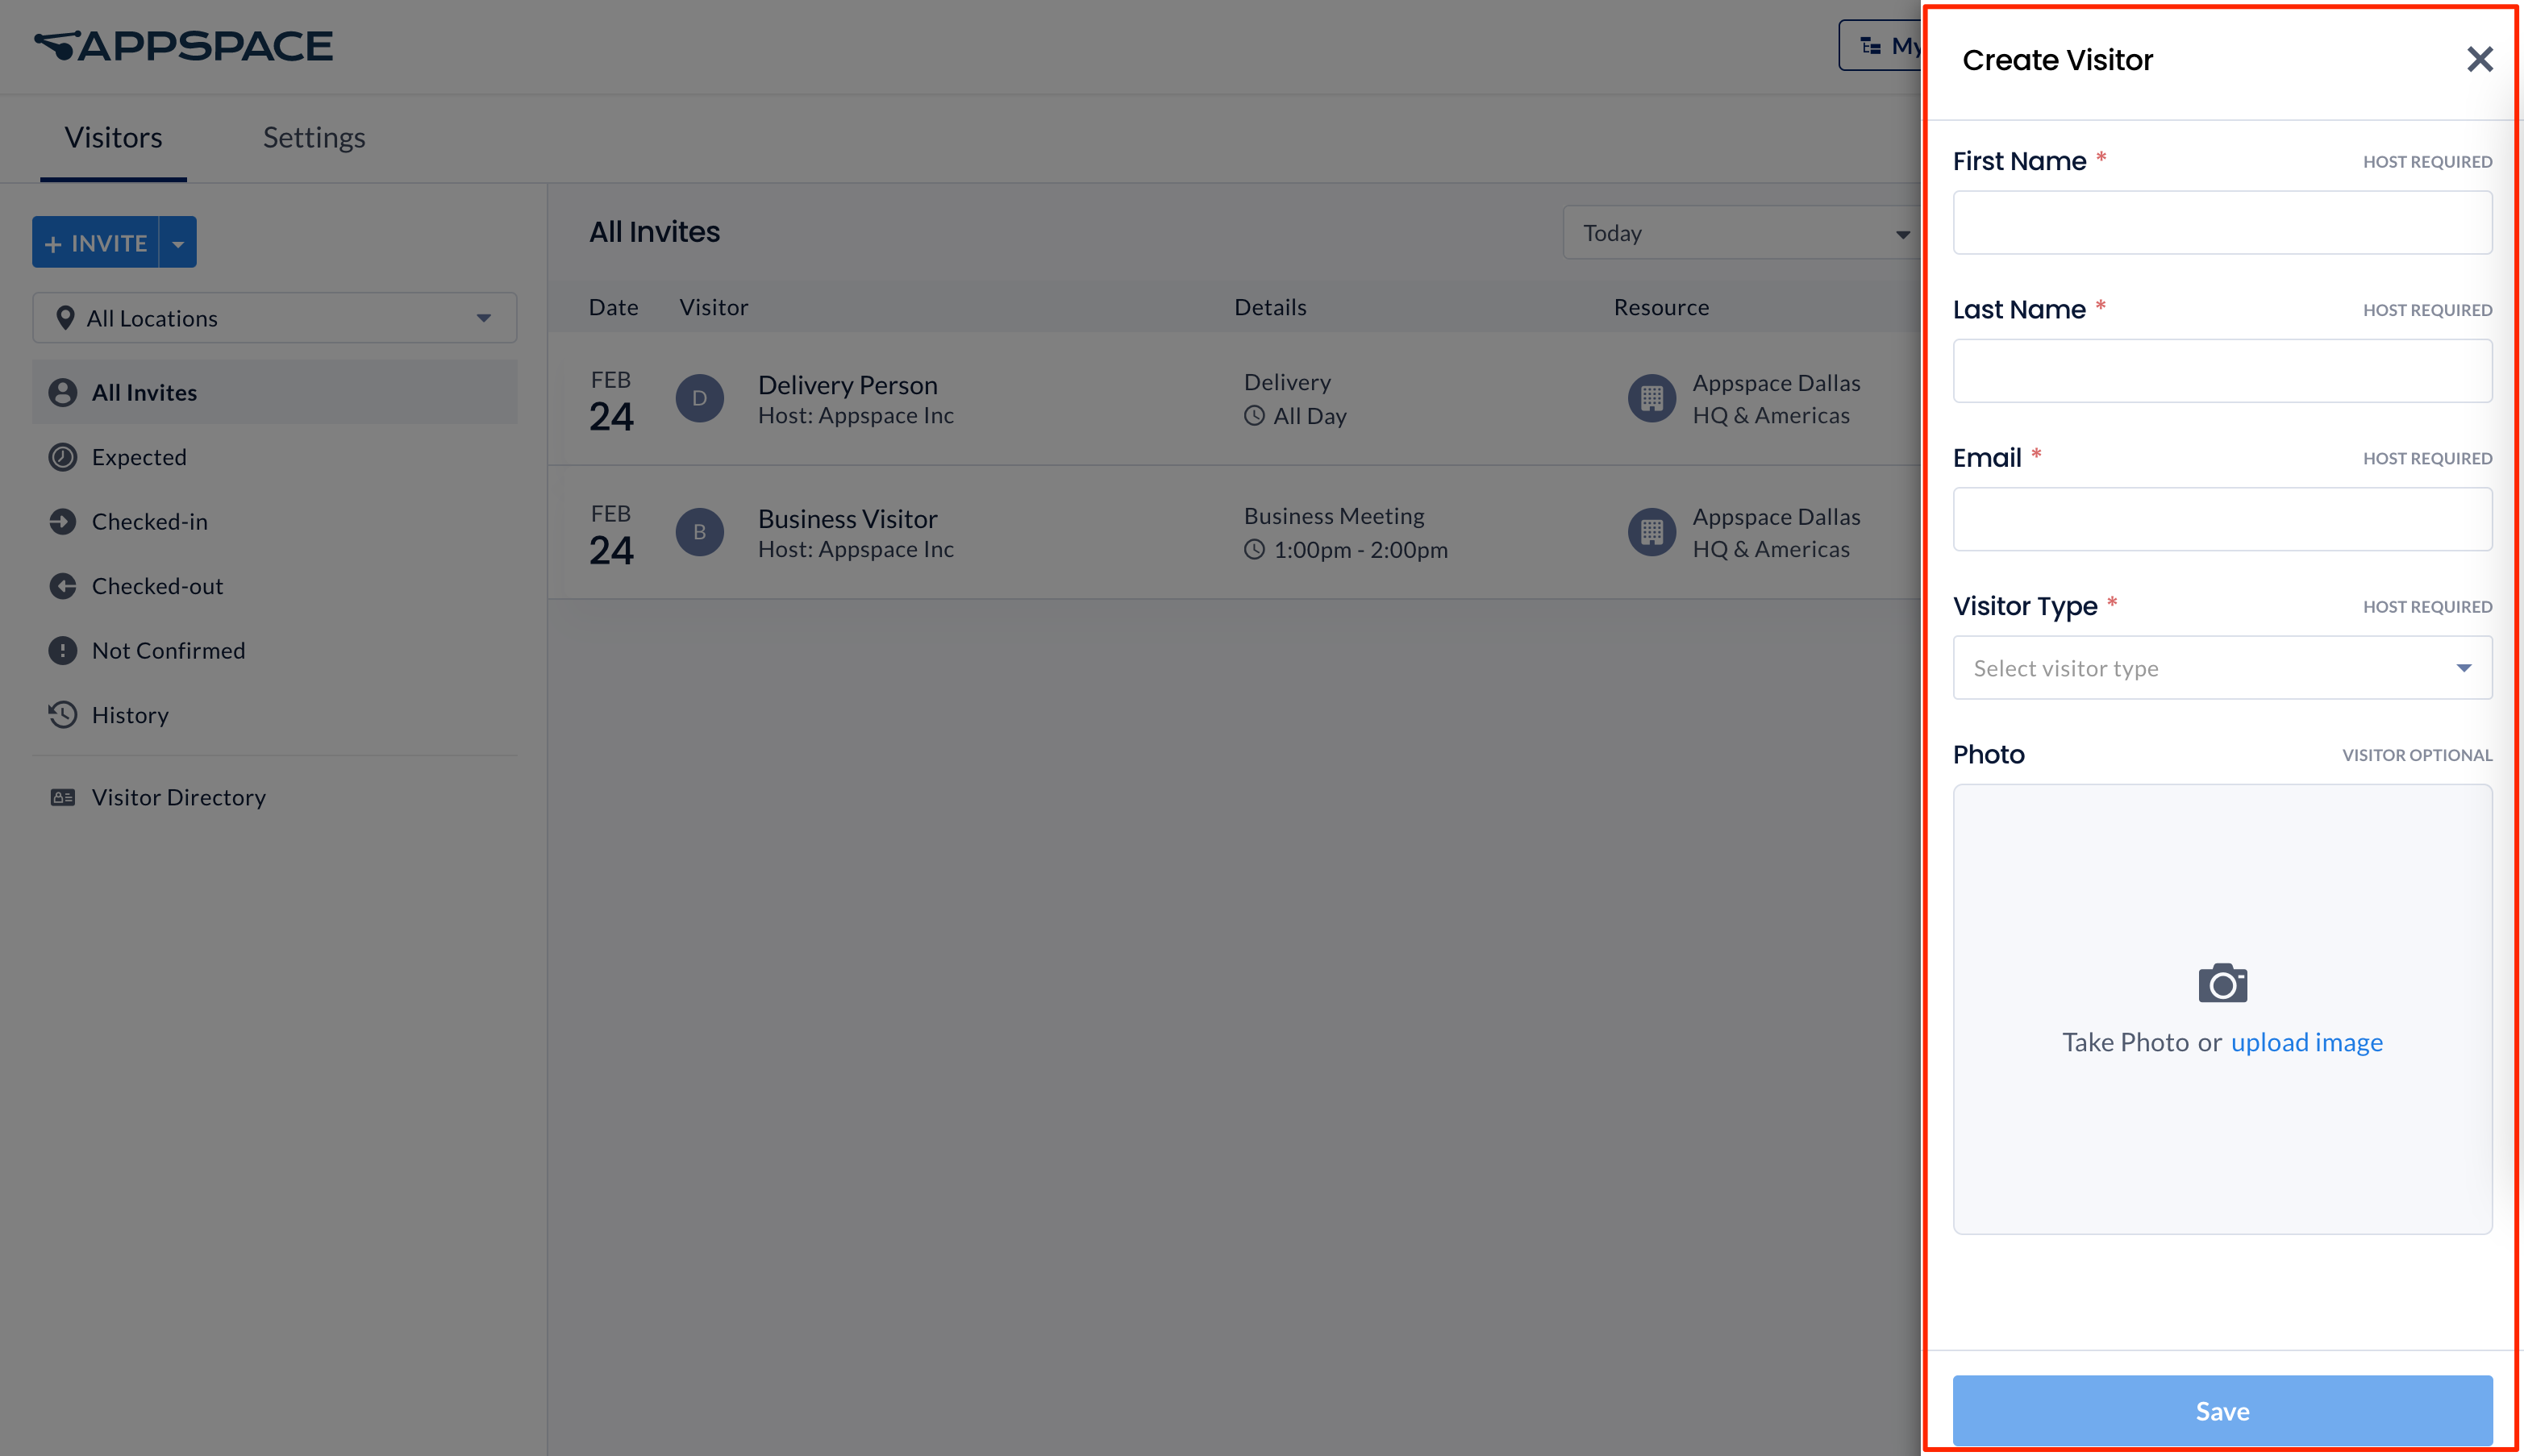
- First Name
- Last Name
- Email NoteThis field can be set to be required or optional by an administrator, following organizational requirements to check in visitors with their email address. If the email field is set to optional and not entered, a symbol is displayed to indicate that the visitor does not have an email registered.
- Visitor Type – Select if the visitor is a Contractor, Delivery Personnel, Family Member, Business Guest, New Hire, or Other from the dropdown menu.
- Photo – Take a photo, or upload an image of the visitor from the device. This field is optional.
- Click Save to create the visitor profile in the Visitor Directory.
Manage Visitor Profiles
Follow the instructions below to manage visitor profiles.
- Log in to the Appspace console.
- Click Visitors from the ☰ Appspace menu, and click the Visitors tab.
- Click the Visitor Directory tab from the side panel, and select or search for the visitor you wish to edit.
- Click the ellipsis, and select Edit.
- Make the necessary changes to the Visitor profile, and click Save once done.

Configure Visitor Settings
Configure General Visitor Settings
Configure Visitor Directory Data Deletion and Obfuscation
This feature allows organizations to delete and obfuscate visitor directory data that include personal data such as visitor names, and email addresses, based on a specific retention period, ideal for meeting both regulatory and business requirements related to data privacy:
- Delete – Visitor directory data records older than the specified retention period will be deleted. You will not have access to the visitor directory data records beyond the provided retention period.
- Obfuscate – Visitor directory data records older than the specified retention period will be obfuscated/masked. The visitor directory data records will continue to exist, however they will not be personally traceable back to a specific individual.
The retention period for visitor directory data is determined by the number of days from the visitor’s created date, however visitor directory data records will not be deleted if it’s associated with any upcoming reservations, even when it has passed its retention period.
Follow the instructions below to configure the retention periods for visitor directory data.
- Log in to the Appspace console.
- Click Visitors from the ☰ Appspace menu, and click the Settings tab.
- Click the General tab from the side panel to configure the retention periods for the visitor directory data.
- Slide the Enable Deletion/Obfuscation of Visitor Directory toggle switch to ON, and click CONTINUE to confirm deletion of visitor directory data records.
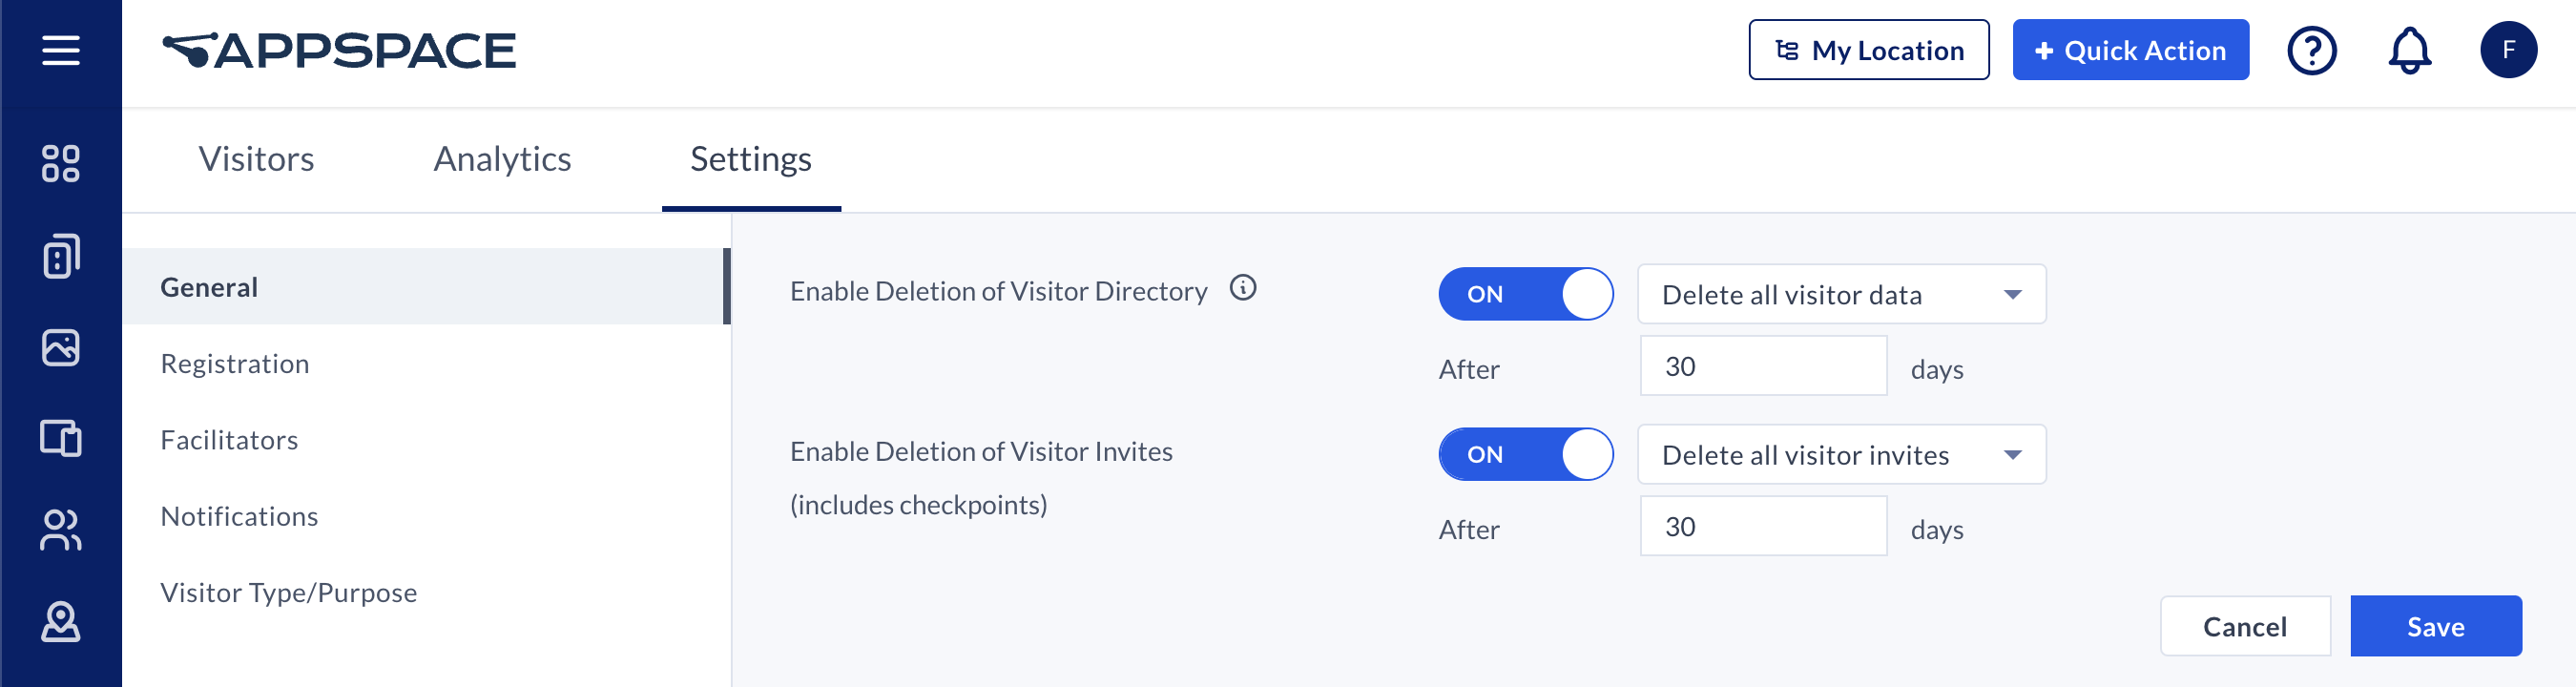
- Select the option to determine if visitor directory data records are deleted or obfuscated after the retention period:
- Delete all visitor data – Visitor directory data records are deleted, with no recovery option.
WarningCustomers enabling the Delete functionality will lose all data associated with visitors beyond the specified retention period.
- Obfuscate all visitor data – Visitor directory data records exist, however they will not contain any personal data that can be traceable.
- Delete all visitor data – Visitor directory data records are deleted, with no recovery option.
- Enter the duration of the retention period in days, defaulted at 30 days from the created date of the visitor directory data record, while the maximum retention period is 180 days.
- Once done, click Save.
Configure Visitor Invitation Data Deletion and Obfuscation
This feature allows organizations to delete and obfuscate visitor invitation data that include personal data such as visitor names, and email addresses, based on a specific retention period, ideal for meeting both regulatory and business requirements related to data privacy:
- Delete – Visitor invitation data records older than the specified retention period will be deleted. You will not have access to the visitor invitation data records beyond the provided retention period.
- Obfuscate – Visitor invitation data records older than the specified retention period will be obfuscated/masked. The visitor invitation data records will continue to exist, however they will not be personally traceable back to a specific individual.
Follow the instructions below to configure the retention periods for visitor invitation data.
- Log in to the Appspace console.
- Click Visitors from the ☰ Appspace menu, and click the Settings tab.
- Click the General tab from the side panel to configure the retention periods for the visitor invitation data.
- Slide the Enable Deletion/Obfuscation of Visitor Invites toggle switch to ON, and click CONTINUE to confirm deletion of visitor invitation data records.
- Select the option to determine if visitor invitation data records are deleted or obfuscated after the retention period:
- Delete all visitor data – Visitor invitationdata records are deleted, with no recovery option.
WarningCustomers enabling the Delete functionality will lose all data associated with visitor invitations beyond the specified retention period.
- Obfuscate all visitor data – Visitor invitation data records exist, however they will not contain any personal data that can be traceable.
- Delete all visitor data – Visitor invitationdata records are deleted, with no recovery option.
- Enter the duration of the retention period in days, defaulted at 30 days, while the maximum retention period is 180 days.
- Once done, click Save.
Configure Host Privacy Setting (New)
This feature allows organizations to restrict the visibility of visitors and their personal data, such as email addresses and names, only to the respective hosts.
When this setting is enabled, hosts are able to search and view only visitors they have previously invited, and are not able to view other visitors invited by other hosts. This is ideal for organizations that need to meet regulatory and business requirements related to data privacy.
Follow the instructions below to configure the host privacy setting.
- Log in to the Appspace console.
- Click Visitors from the ☰ Appspace menu, and click the Settings tab.
- Click the General tab from the side panel to configure the host privacy setting.
- Slide the Restrict host visibility to only their visitors toggle switch to ON.
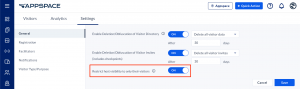
- Once done, click Save.

Configure the Visitor Registration Form
Visitor Management configurations can only be performed by Appspace administrators; a user with Account Owner or Location Admin permissions.
Follow the instructions below to configure the Visitor Registration Form that will be sent when inviting visitors:
- Log in to the Appspace console.
- Click Visitors from the ☰ Appspace menu, and click the Settings tab.
- Click the Registration tab from the side panel to configure the Visitor Registration form.
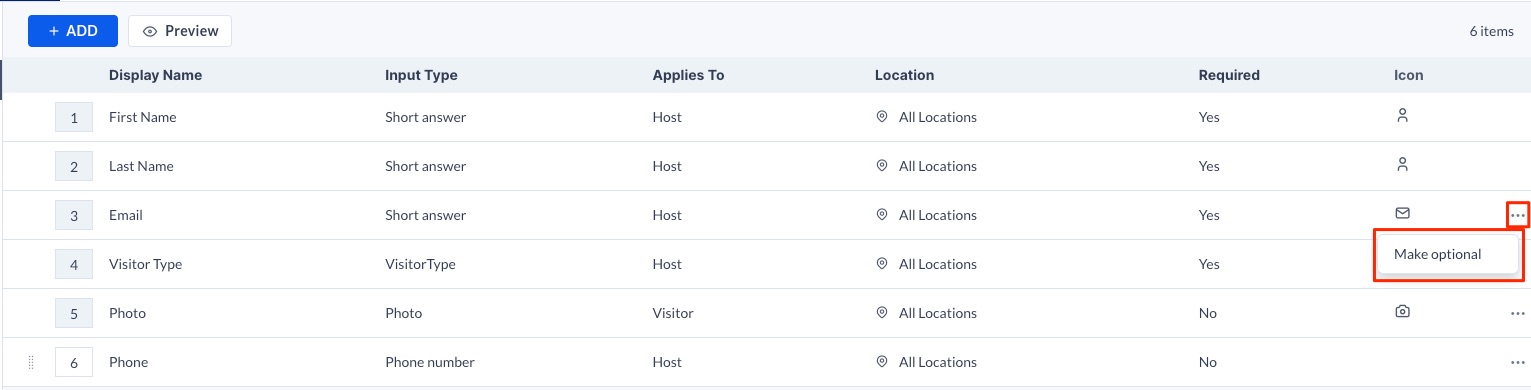
- The following system fields displayed are used as the default Visitor Registration form base, thus cannot be deleted or re-ordered:
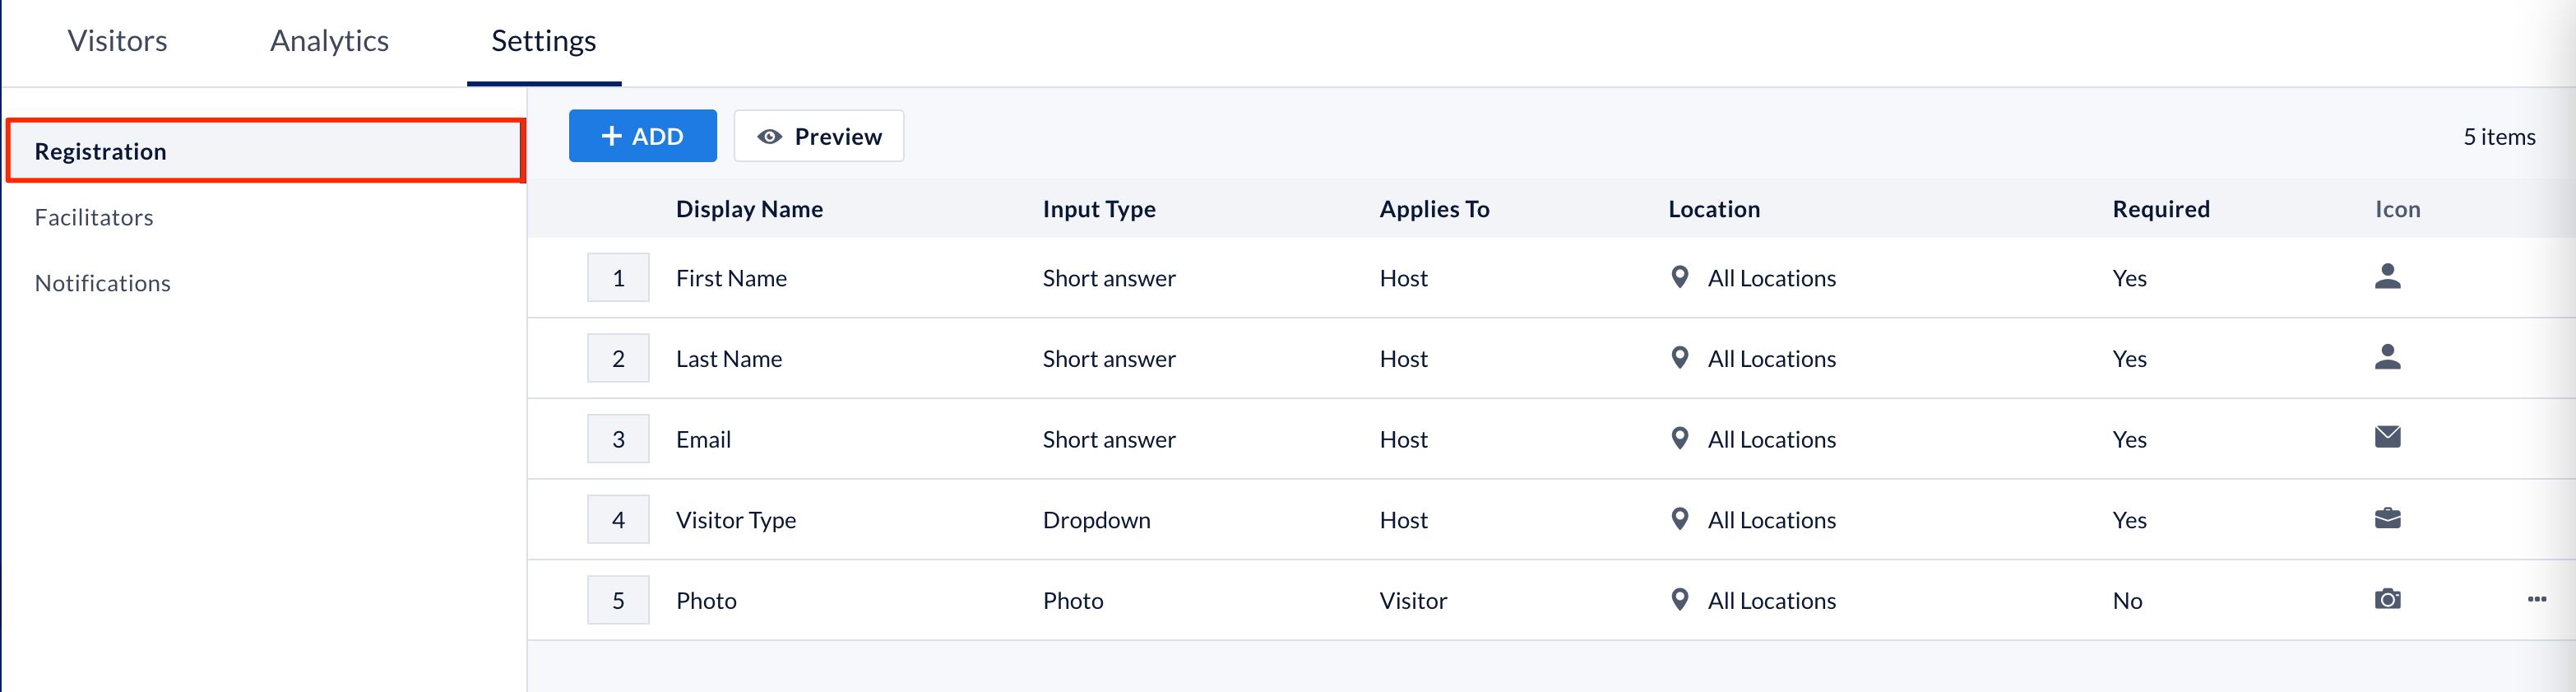
- First Name – Required, to be filled by the Host.
- Last Name – Required, to be filled by the Host.
- Email – Can be set as Required or Optional (new) and is to be filled in by the Host. Visitors also have the option to enter their email at the kiosk during check-in, where a registration form lets them review and confirm their details. To set the field as optional, click the ellipsis (…) and select Make as Optional. ImportantIf the administrator changes the email field from Optional to Required and there are existing unregistered visitors, those visitors will remain listed in the Visitor Directory. However, if they are invited to a future meeting, they will be unable to check in, as the previous option to use their first and last name to check in (instead of their email) will not appear. Additionally, without an email associated with their registration, they will not receive a check-in code or QR code.
- Visitor Type – Required, to be filled by the Host.
- Photo – Can be set as Required or Optional, to be filled by the Visitor. To set the field as optional, click the ellipsis (…) and select Make as Optional.
- To further customize the Visitor registration form to include other visitor registration details, click the +ADD button.
- In the Add Field window, enter the following information:
NoteFields may be configured to be displayed or restricted based on the following visitor criteria:
- Applies To
- Location
- Visitor Type
- Required Completion
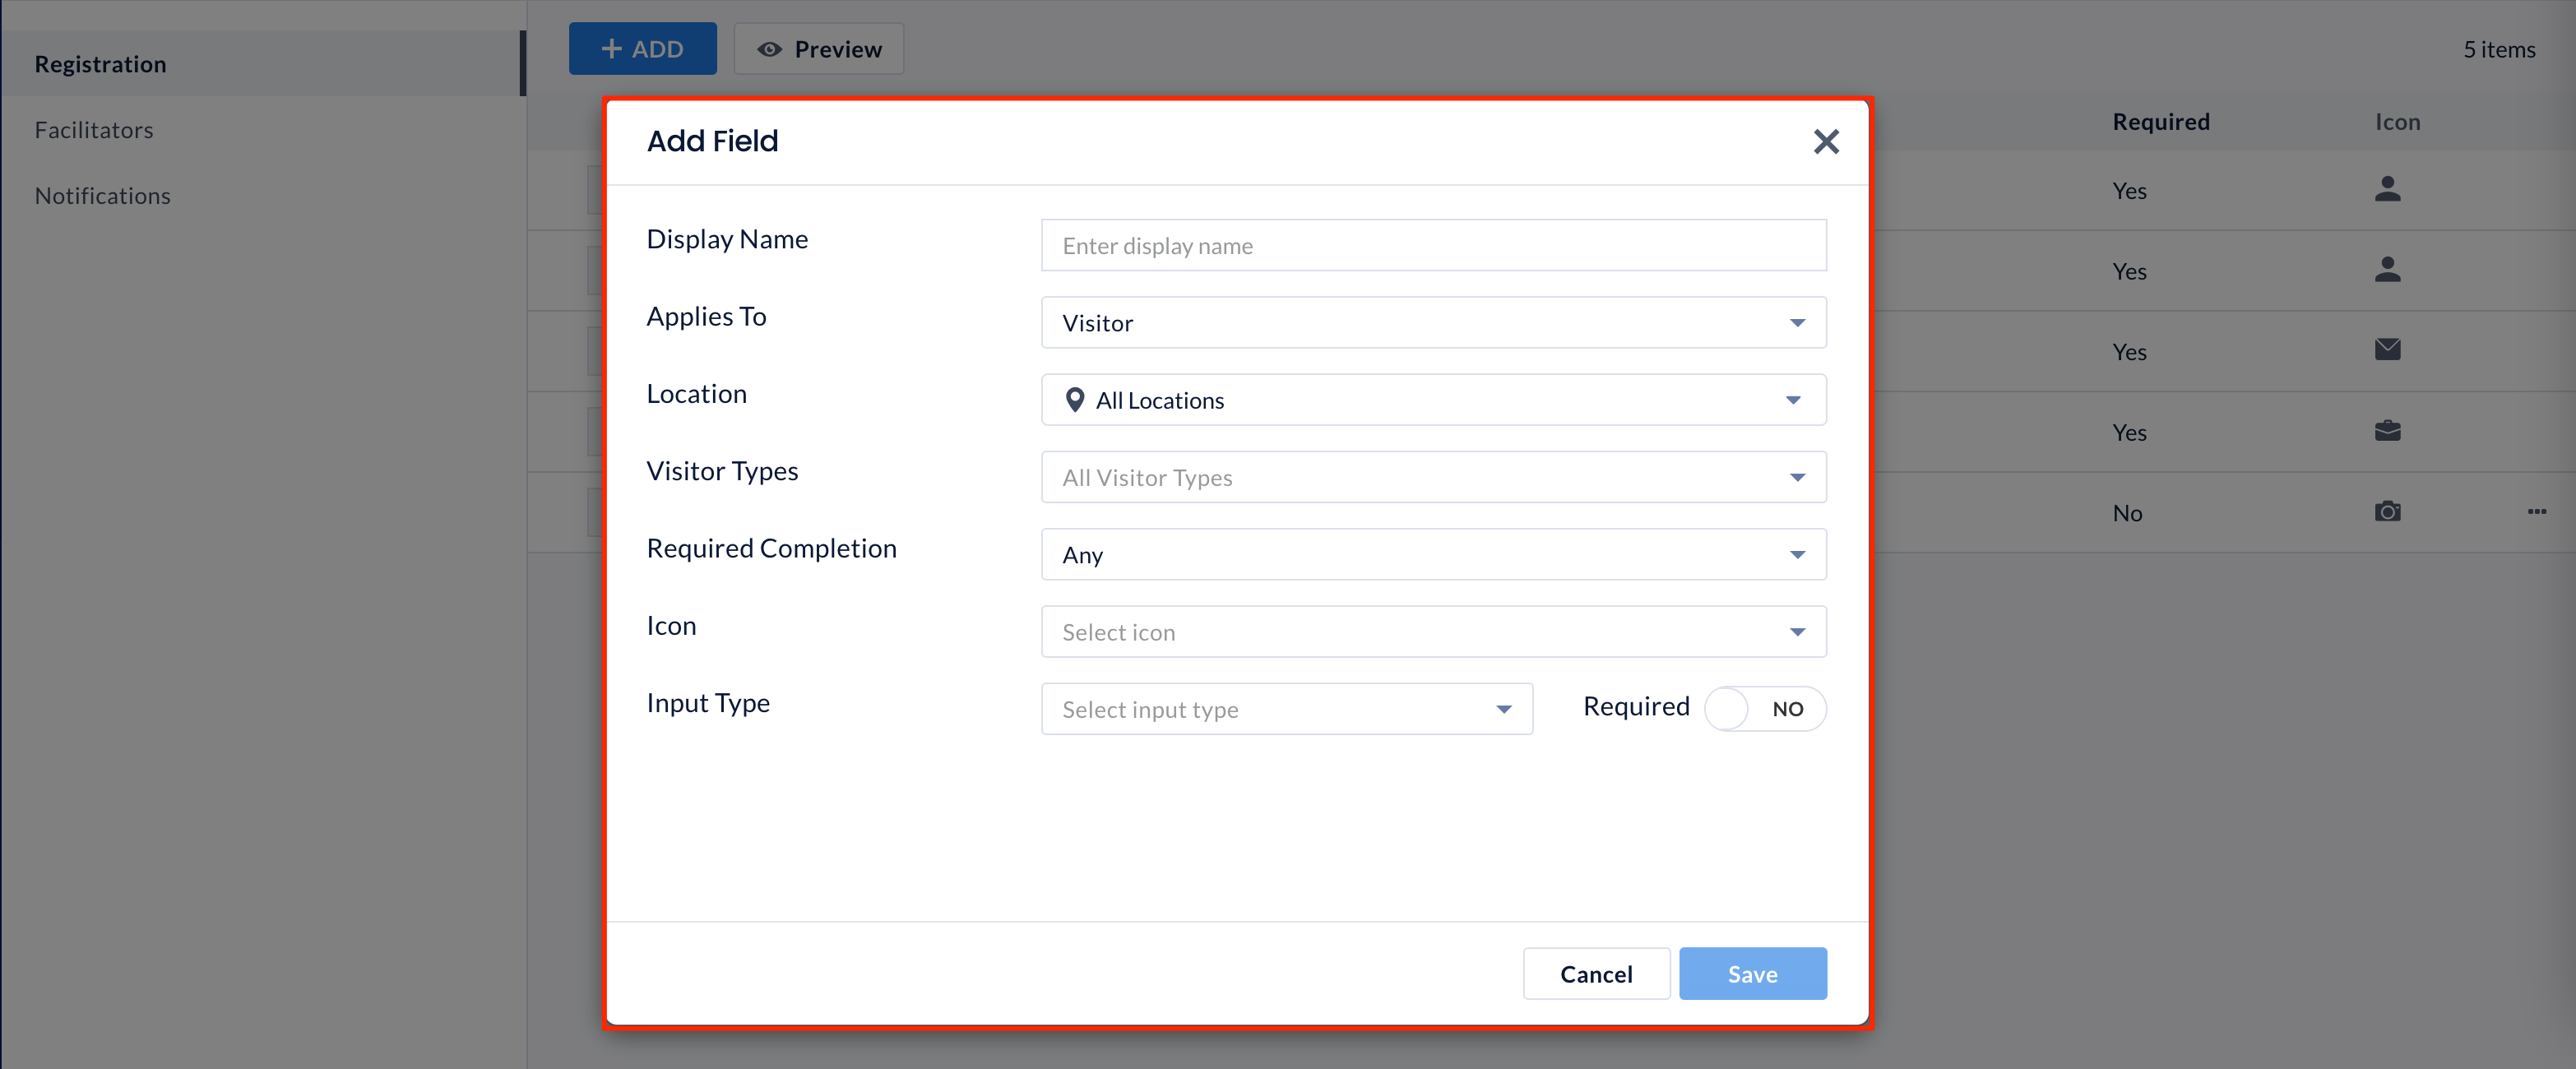
- Display Name – Enter the field name to be displayed.
- Applies To – Select if the field is to be filled by the Visitor, Host, or Admin.
- Location – Select the location this field will be displayed in.
- Visitor Types -Select the visitor types (you can select more than one) this field will be displayed to, or leave as All Visitor Types by default.
- Required Completion – Select the platform this field is required to be completed by the visitor.
- Any – Both the Visitor Portal site and on-site at the Visitor Kiosk.
- At Visitor Portal – On the Visitor Portal site.
- On Site – On the Visitor Kiosk.
- Icon – Select an icon as a graphical representation of the field.
- Input Type – Select the input field type. Additional fields may appear depending on the selected Input Type:
- Short answer or Paragraph
- Placeholder
- Maximum Length
- Minimum Length
- Checkboxes, Dropdown, or Multiple choice
- Options
- Placeholder
- Address or Phone number
- Short answer or Paragraph
- Required – Switch the toggle to YES to ensure the field must be filled, and NO to make it optional.
- Once done, click Save.
- The recently added custom field will be displayed, and can be reordered either by entering the order number in the numeric box, or by dragging and dropping the field within the list.
- Click the custom field ellipsis to either Edit or Delete the custom field.
Assign Visitor Management Facilitators
Visitor Management configurations can only be performed by Appspace administrators; a user with Account Owner or Location Admin permissions.
Follow the instructions below to assign users or user groups as Facilitator that will manage visitors check-ins and invitations:
- Log in to the Appspace console.
- Click Visitors from the ☰ Appspace menu, and click the Settings tab.
- Click the Facilitator tab from the side panel to assign users or user groups as facilitators.
- Click the +ADD button, and in the Add Facilitator window, enter the following information:

- User – Enter the user name or user group of the facilitators.
- Location – Select the location of the facilitator.
- Permissions – Select the permissions to be granted to the facilitator.
-
- View all events at this location – the facilitator can only view visitor events for the assigned location(s). This is enabled for all facilitators and cannot be disabled.
- Check-in / Check-out Visitor – the facilitator can check in and check out visitors to the assigned location.
- Edit Invite – the facilitator can edit visitor invitations.
- Edit Visitor Info – the facilitator can edit information about the visitor.
- Can disable pre-registration – The facilitator can enable/disable visitor pre-registration for events. Disabling pre-registration for an event will set visitors as Expected for the event and not send out the invitation email.
- Can disable notifications – The facilitator can enable/disable email notifications for the invite, update, removal, or cancellation of events sent to the visitor. This does not affect emails sent to the host.
- Can disable checkpoints – The facilitator can enable/disable the use of checkpoints for events.
-
- Once done, click Save.
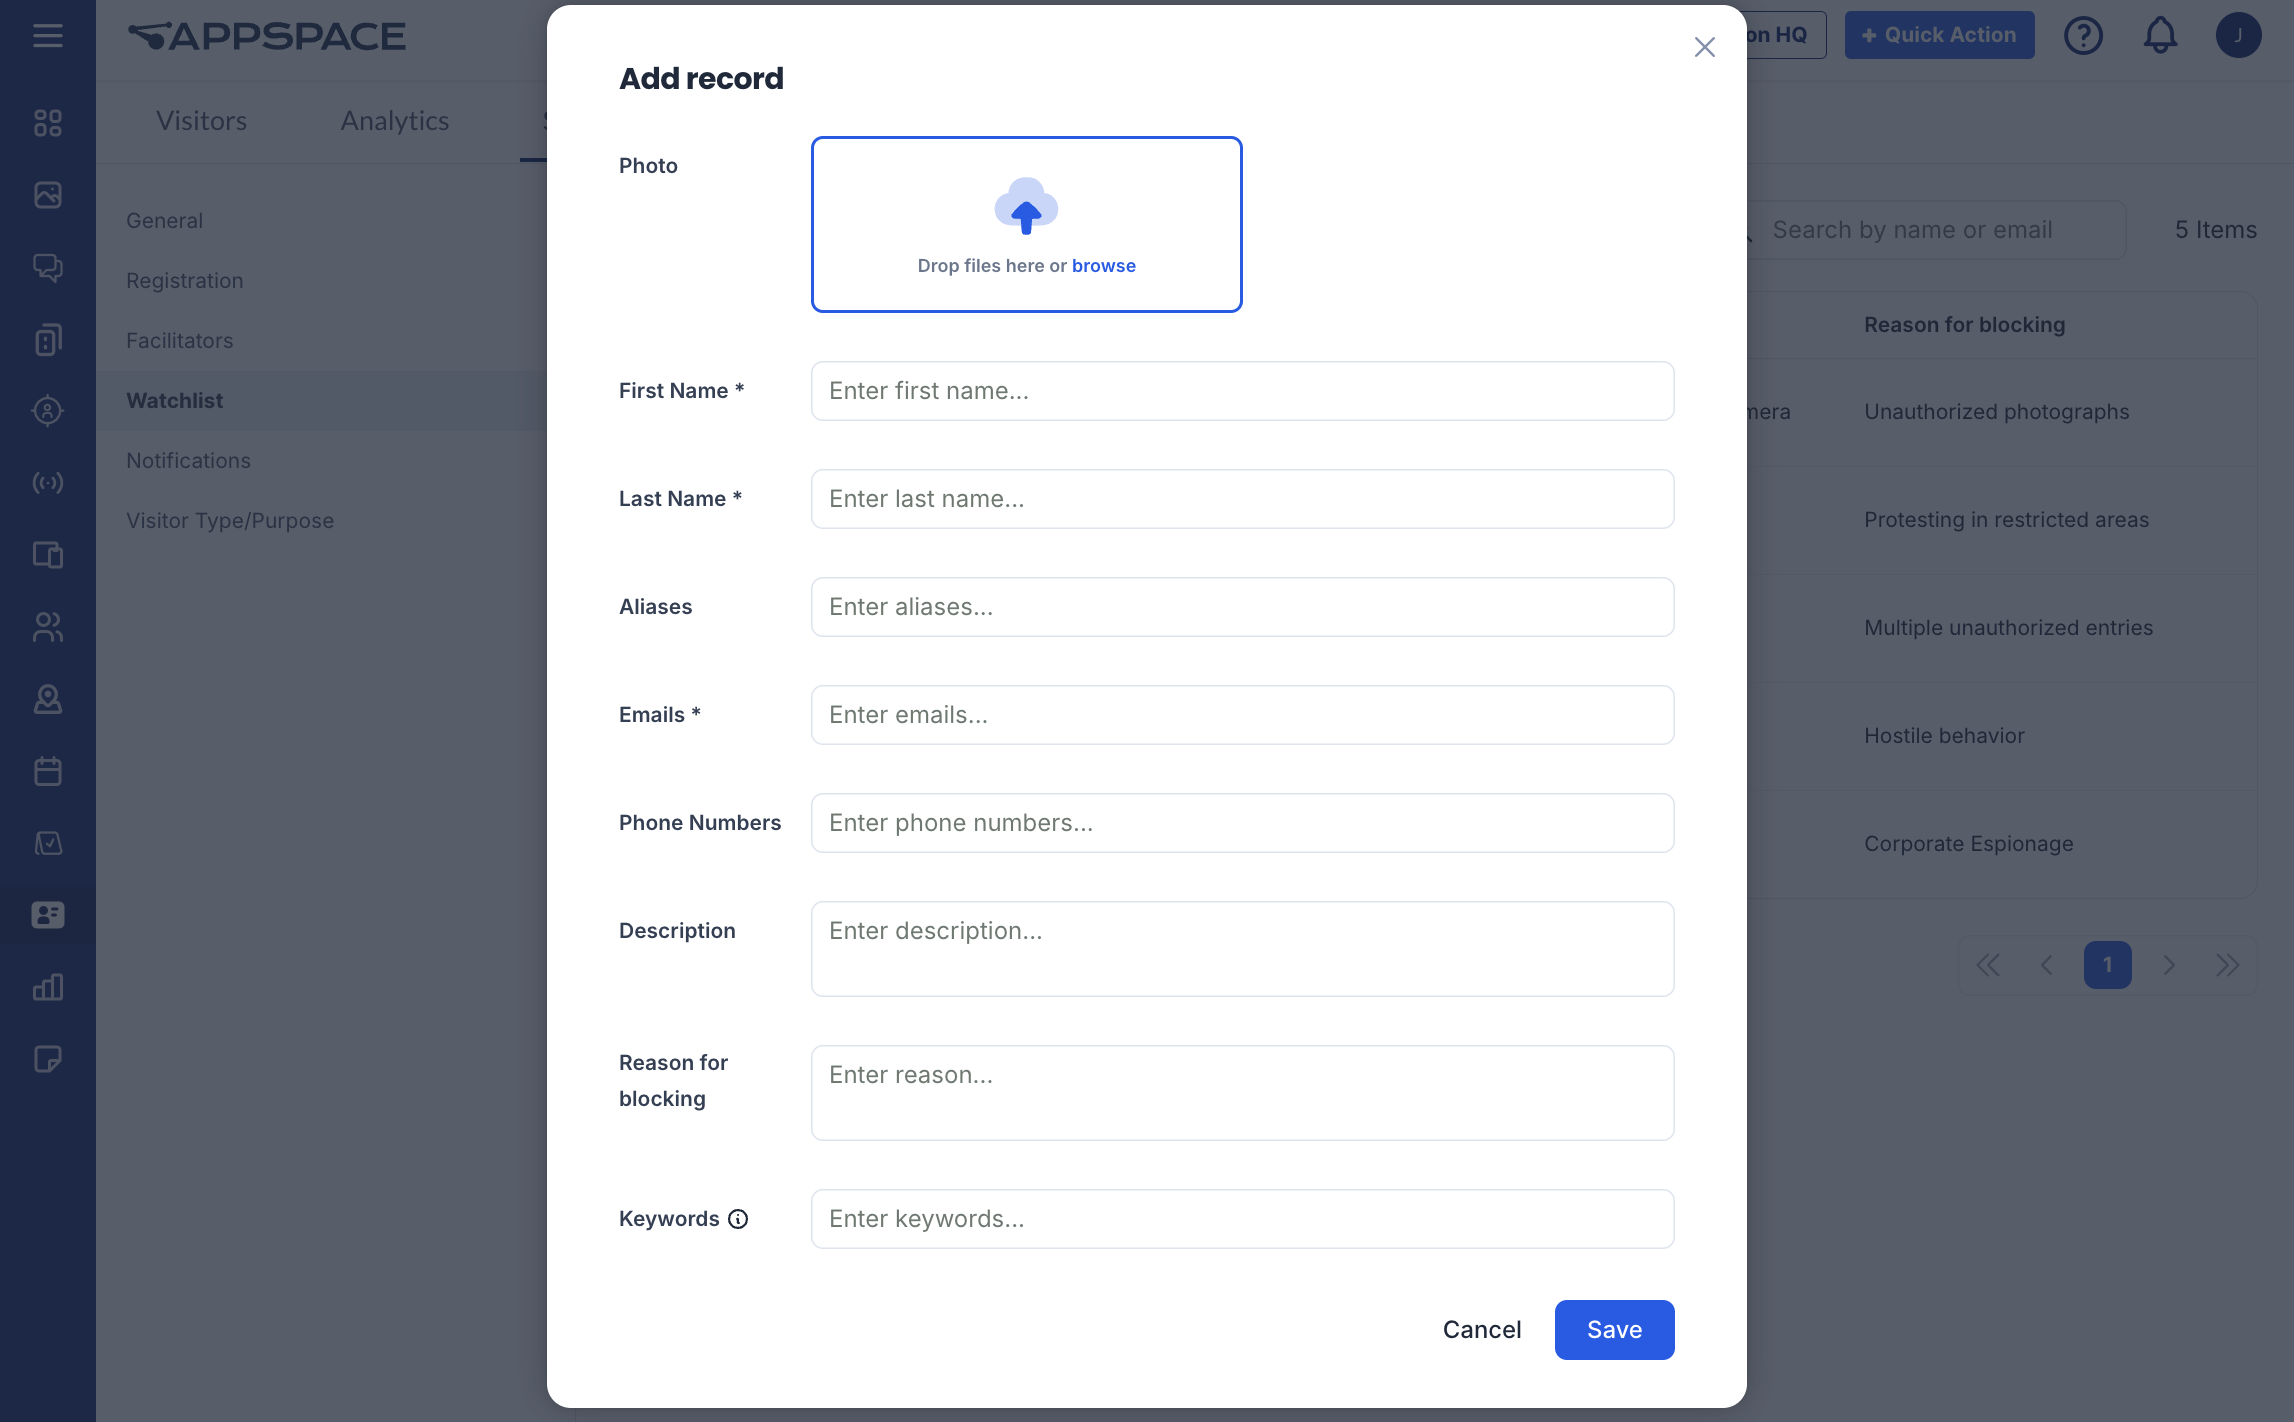
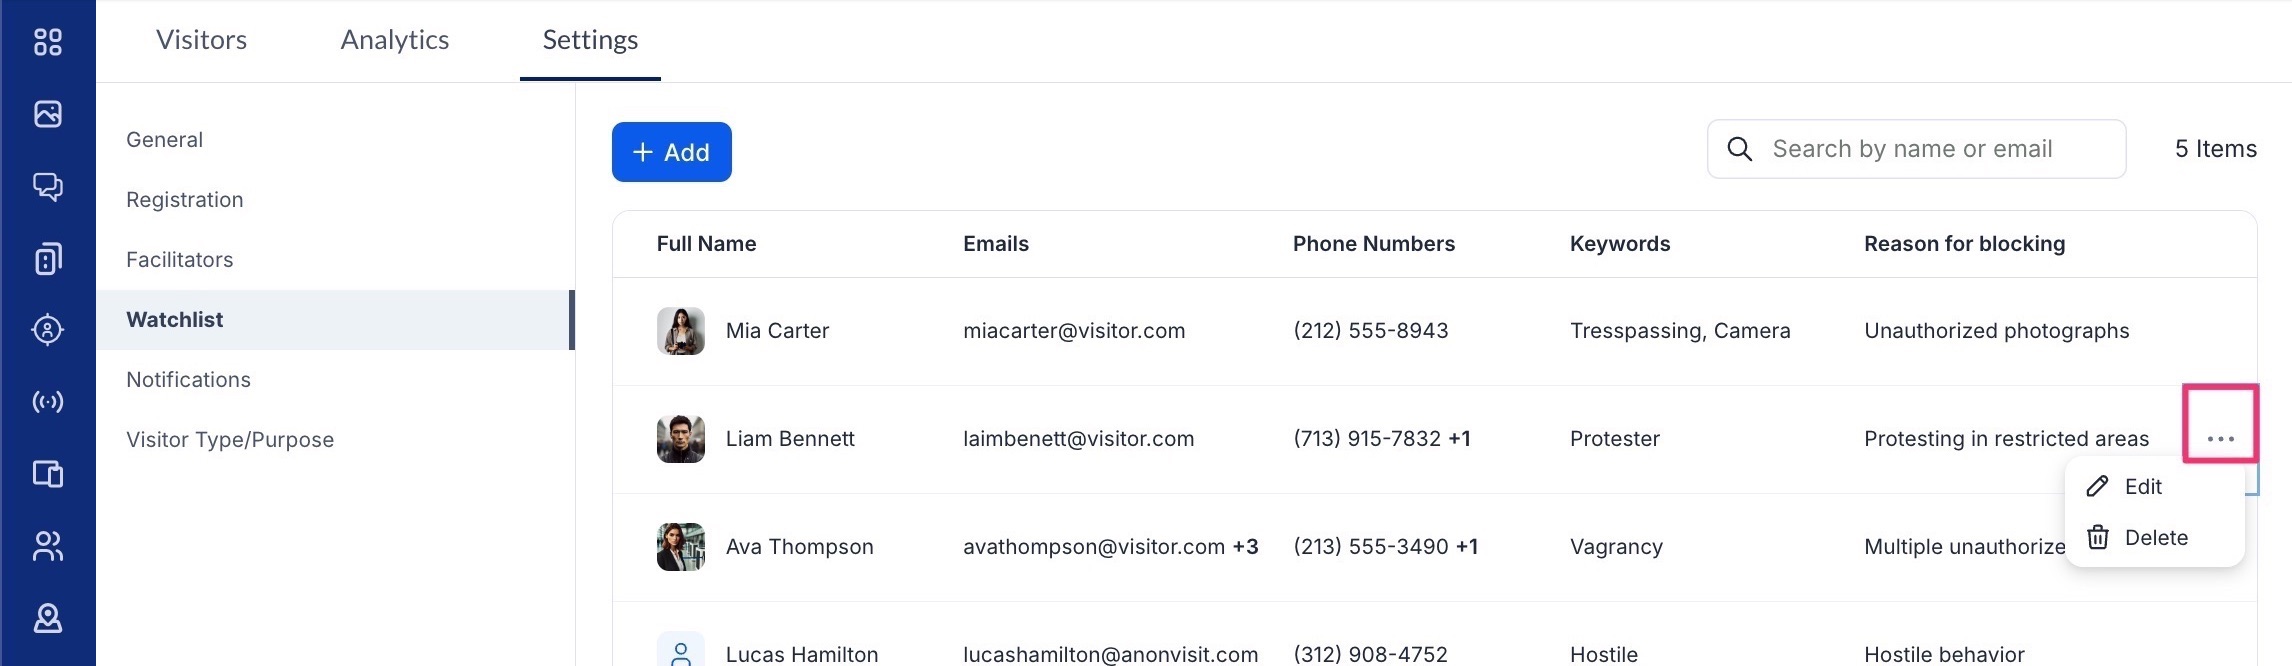
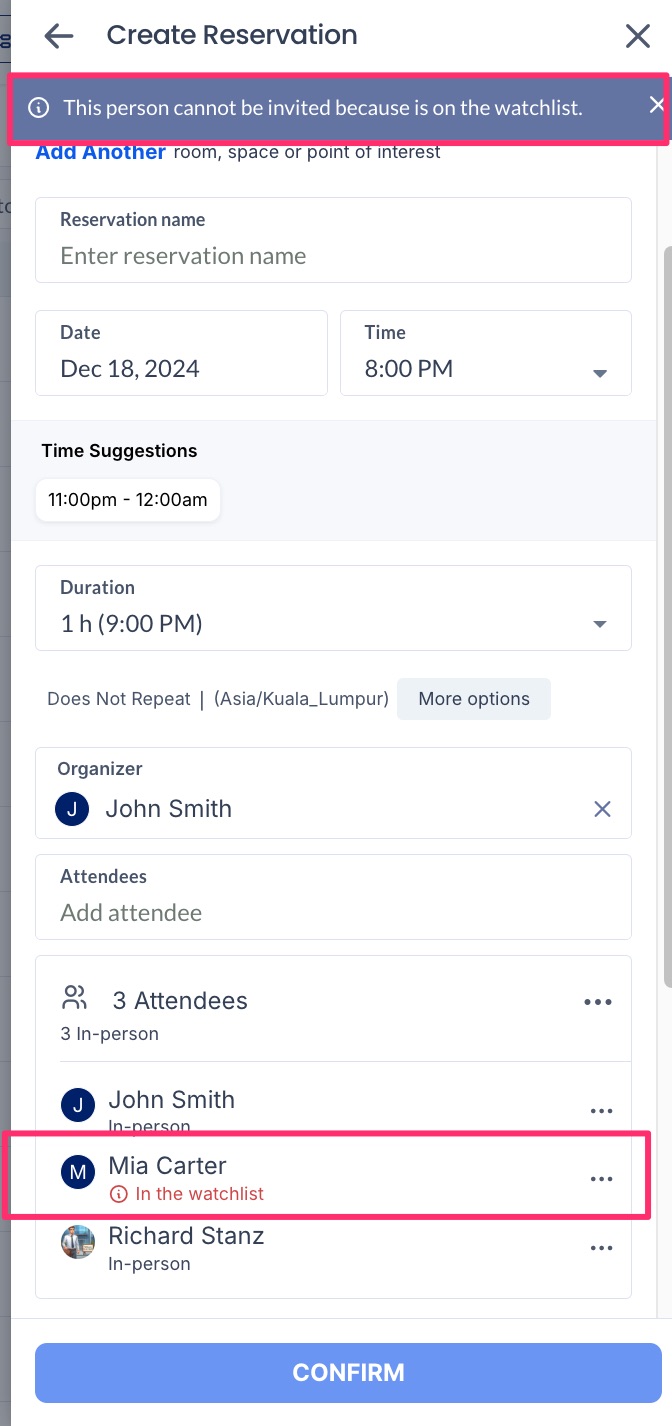
Add Visitors to Watchlist
(New) The Watchlist module allows administrators to manage a list of individuals prohibited from entering the building premises. It ensures these individuals cannot be invited as visitors through the Reservations and Visitor Management systems. If a facilitator tries to add someone on the watchlist to a meeting reservation or visitor invitation, a notification will highlight their watchlist status, and the reservation cannot be confirmed until the visitor is removed.
Follow the instructions below to add visitors to the Watchlist.
- Log in to the Appspace console.
- Click Visitors from the ☰ Appspace menu, and click the Settings tab.
- Click the Watchlist tab from the side panel to assign users or user groups as facilitators.
- Click the +ADD button, and in the Add Record window, enter the following information:
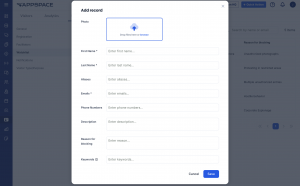
- Photo – You can upload a visitor’s photo file (in jpg or png).
- First Name and Last Name– Enter the first and last name of the visitor.
- Aliases – Type in any known aliases of the person, pressing Enter after each one. You can add multiple aliases.
- Emails – Type in any known emails of the person, pressing Enter after each one. You can add multiple emails.
- Phone Numbers – Type in a phone or mobile number associated with the person, and press Enter. You can add multiple numbers.
- Description– Enter a description of the person.
- Reason for blocking– Enter a reason for the visitor’s restriction.
- Keywords – Type in a keyword for the person, pressing Enter after each one. You can add multiple keywords.
- Once done, click Save.
- You can click the ellipsis at the end of each row to either Edit or Delete a visitor on the watchlist.

- If a visitor on the watchlist is added to a new or existing reservation or visitor invitation, a note will appear indicating their watchlist status. The reservation cannot be confirmed until the visitor is removed.
Configure Visitor Management Notifications
Follow the instructions below to configure the notifications that will be sent to both Visitor and Host via email:
- Log in to the Appspace console.
- Click Visitors from the ☰ Appspace menu, and click the Settings tab.
- Click the Notifications tab from the side panel to configure the email notifications that are sent to both visitors and hosts.
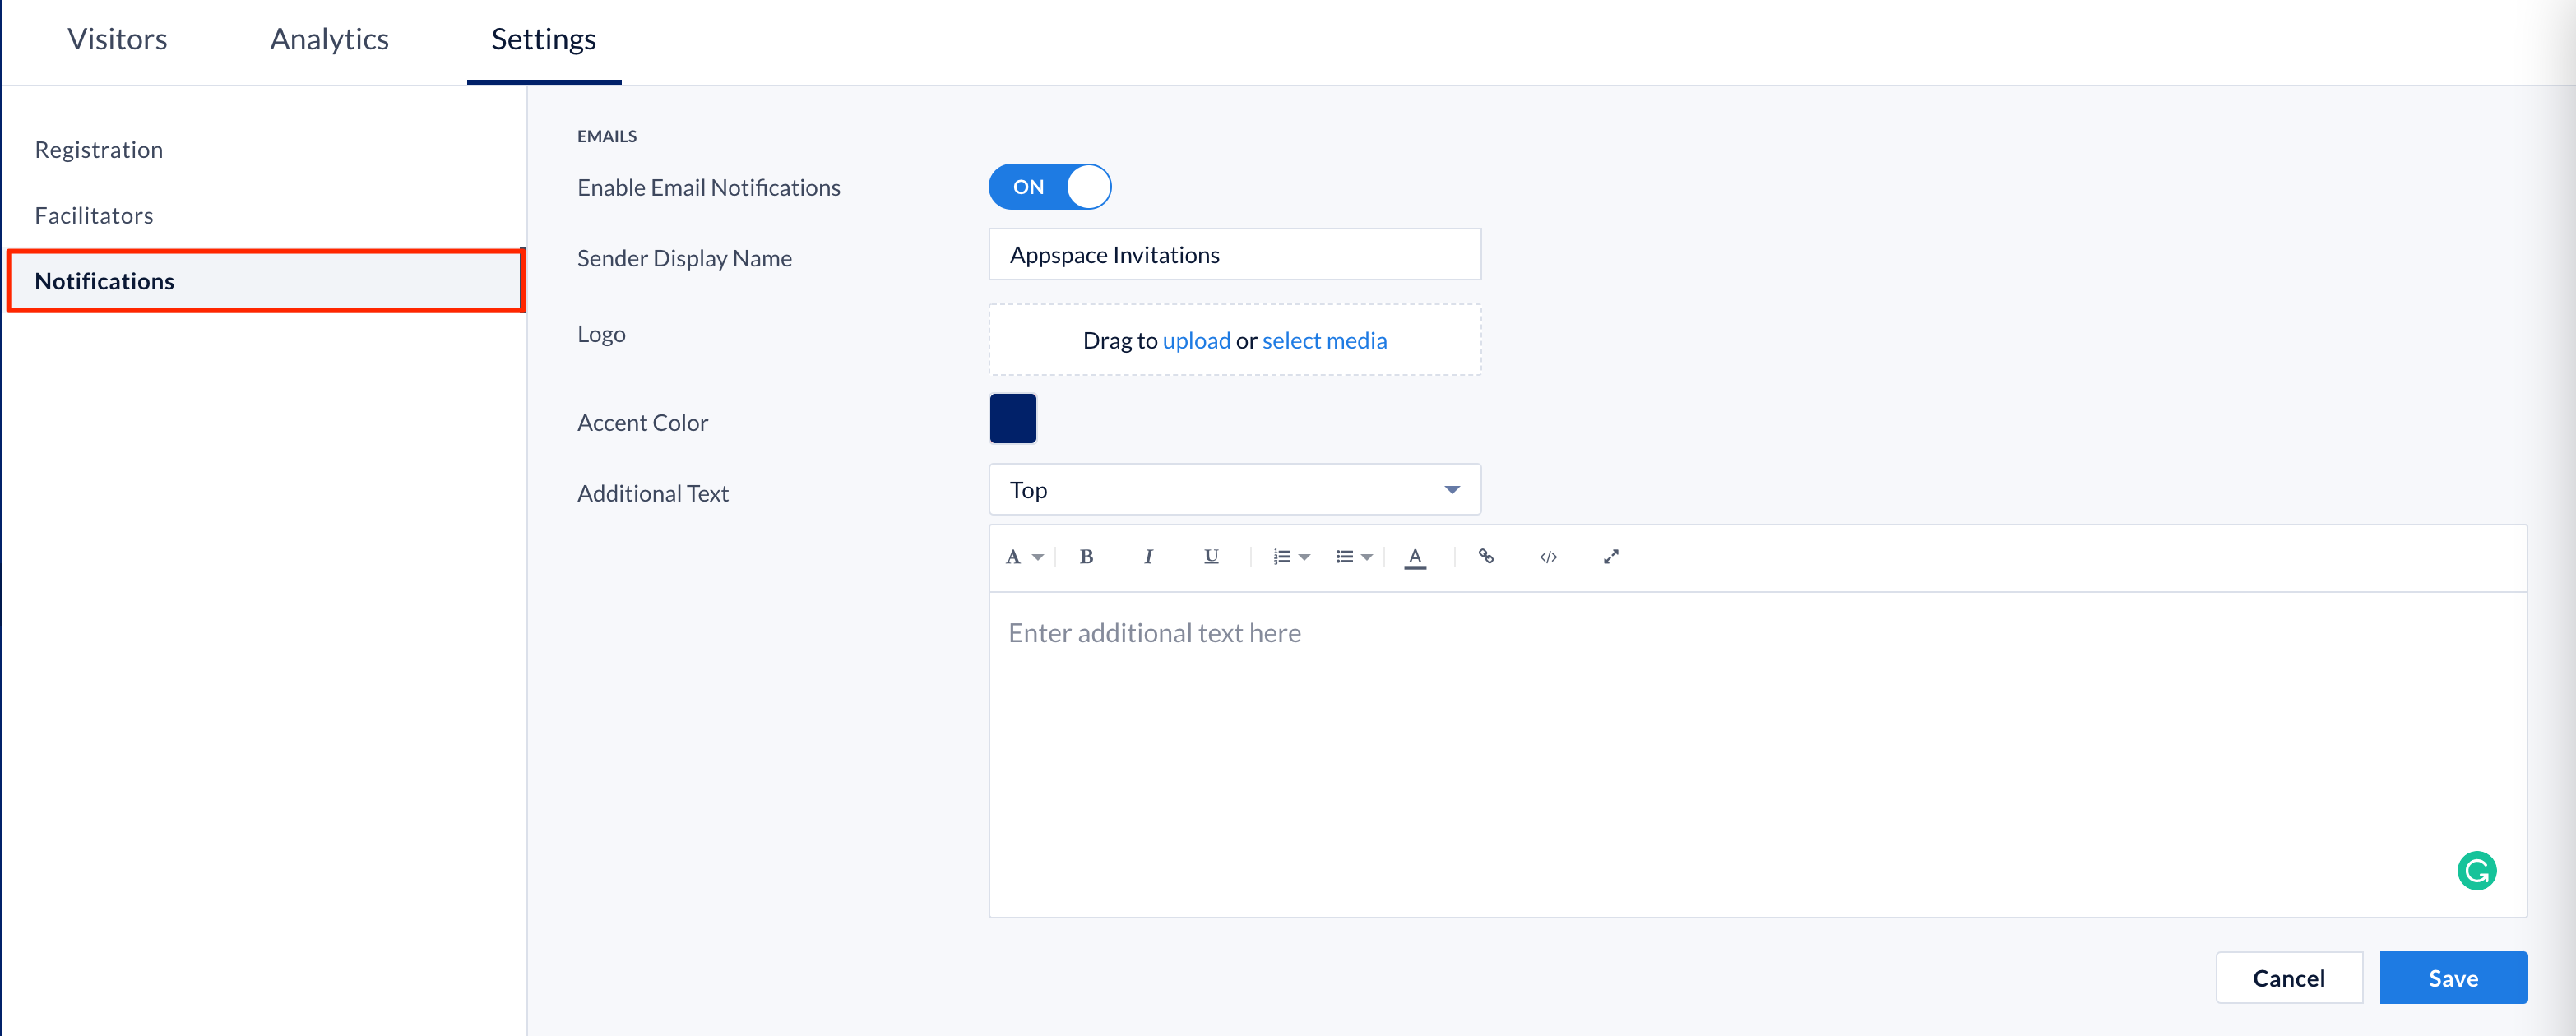
- Slide the Enable Email Notifications toggle to ON to enable visitor notifications.
- Proceed to configure the following visitor notification fields:
- Sender Display Name – Enter the name you wish displayed as the sender name when sending out the email notification.
- Logo – Upload or select a logo from the library to be added as the logo for the email notification.
- Accent Color – Select the accent color from the color picker to match your organization’s branding theme.
- Additional Text – Additional text such as important notices can be included within the notification by entering the text to be displayed in the Additional Text editor, and selecting the alignment of where the text is displayed from the drop-down menu.
- Once done, click Save.
Configure Visitor Types and Visitor Purposes
Organizations are now able to customize and manage a list of Visitor Types and Visitor Purposes that are specific to their organization and daily operations.
The option to delete will be available in the upcoming release.
- Log in to the Appspace console.
- Click Visitors from the ☰ Appspace menu, and click the Settings tab.
- Click the Visitor Type/Purpose tab from the side panel, and select either Visitor Type or Visitor Purpose from the drop-down menu to be configured:
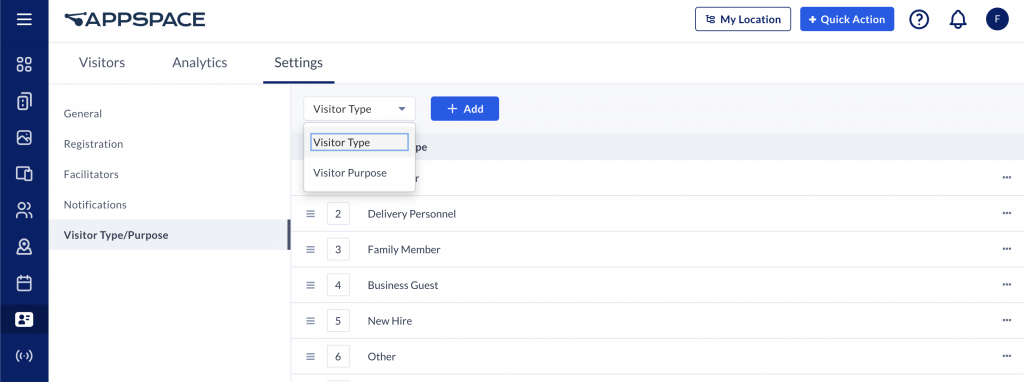
NoteThe maximum number of Visitor Type and Visitor Purpose that can be added is 30 items.- Visitor Type
- Click the + Add button, and enter the desired visitor type. Once done, click Save.
- Visitor Purpose
- Click the + Add button, and enter the desired visitor purpose. Once done, click Save.
- Visitor Type
- Once the visitor types and purposes have been added, you may perform the following actions by clicking the specific Visitor Type or Visitor Purpose ellipsis:
- Edit – Rename the visitor type or purpose. (Only applicable to custom visitor types or purposes)
- Disable – Disable the visitor type of purpose.
- Move to Top/Move to Bottom – Rearrange the visitor type or purpose that is displayed in the drop-down menu. Optionally, you may also rearrange the visitor type or purpose order by dragging the (☰) burger icon.

Configure Visitor Kiosks
Organizations wanting to utilize a self-service visitor kiosk in their buildings can configure their devices to display our Visitor Kiosk card. This allows visitors that have received invitations to self check-in via QR code or a 6-digit unique code, or use the visitor drop-in feature to create on-the-spot invitations.
Below is a workflow to display the Visitor Kiosk card on kiosks device that would be placed at entry points within your organization.
- Log in to the Appspace console.
- Create the Visitor Kiosk card by following the instructions in the Cards: Display Visitor Kiosk article.
- Assign the Visitor Kiosk card to a playlist channel by following the instructions in the Create a Playlist Channel article.
- Register or enable Appspace App on the kiosk device. In the Channel selection mode field in step 6 of the registration process, select the following option only:
-
- Administrators can select a single channel – assign the playlist channel with the Visitor Kiosk card from step 3 above to the kiosk device.
View Visitor Management Analytics
In the Visitors module, click the Analytics tab. You will be able to view statistical data of all the visitor invitations that have been made using the Appspace Employee App either via the portal or your mobile app, or from the Visitor Kiosk card. Prior to the deployment of your visitor management application, this tab will be empty.

You may view all analytics for your visitor visits based on the Activity Period, which can be changed from the drop-down calendar. You can also filter your data by the location within your environment.
Administrators looking for information on the Analytics tab, refer to Browse and Navigate Visitors Module in Appspace 8.0.
Was this article helpful?