The Reservations module is ideal for configuring space reservations in a flexible, hybrid workplace. You can configure our system for reserving rooms, workspaces, desks, and even building passes for limiting access to offices on certain days.
You may choose to import room and other resource details from supported external calendar providers such as Google or Office 365, or simply add new resources using Appspace’s built-in calendar provider services introduced with this reservations system. The Appspace calendar provider will be ideal to add desks and points of interest (POIs) that are not available in a regular calendar provider.
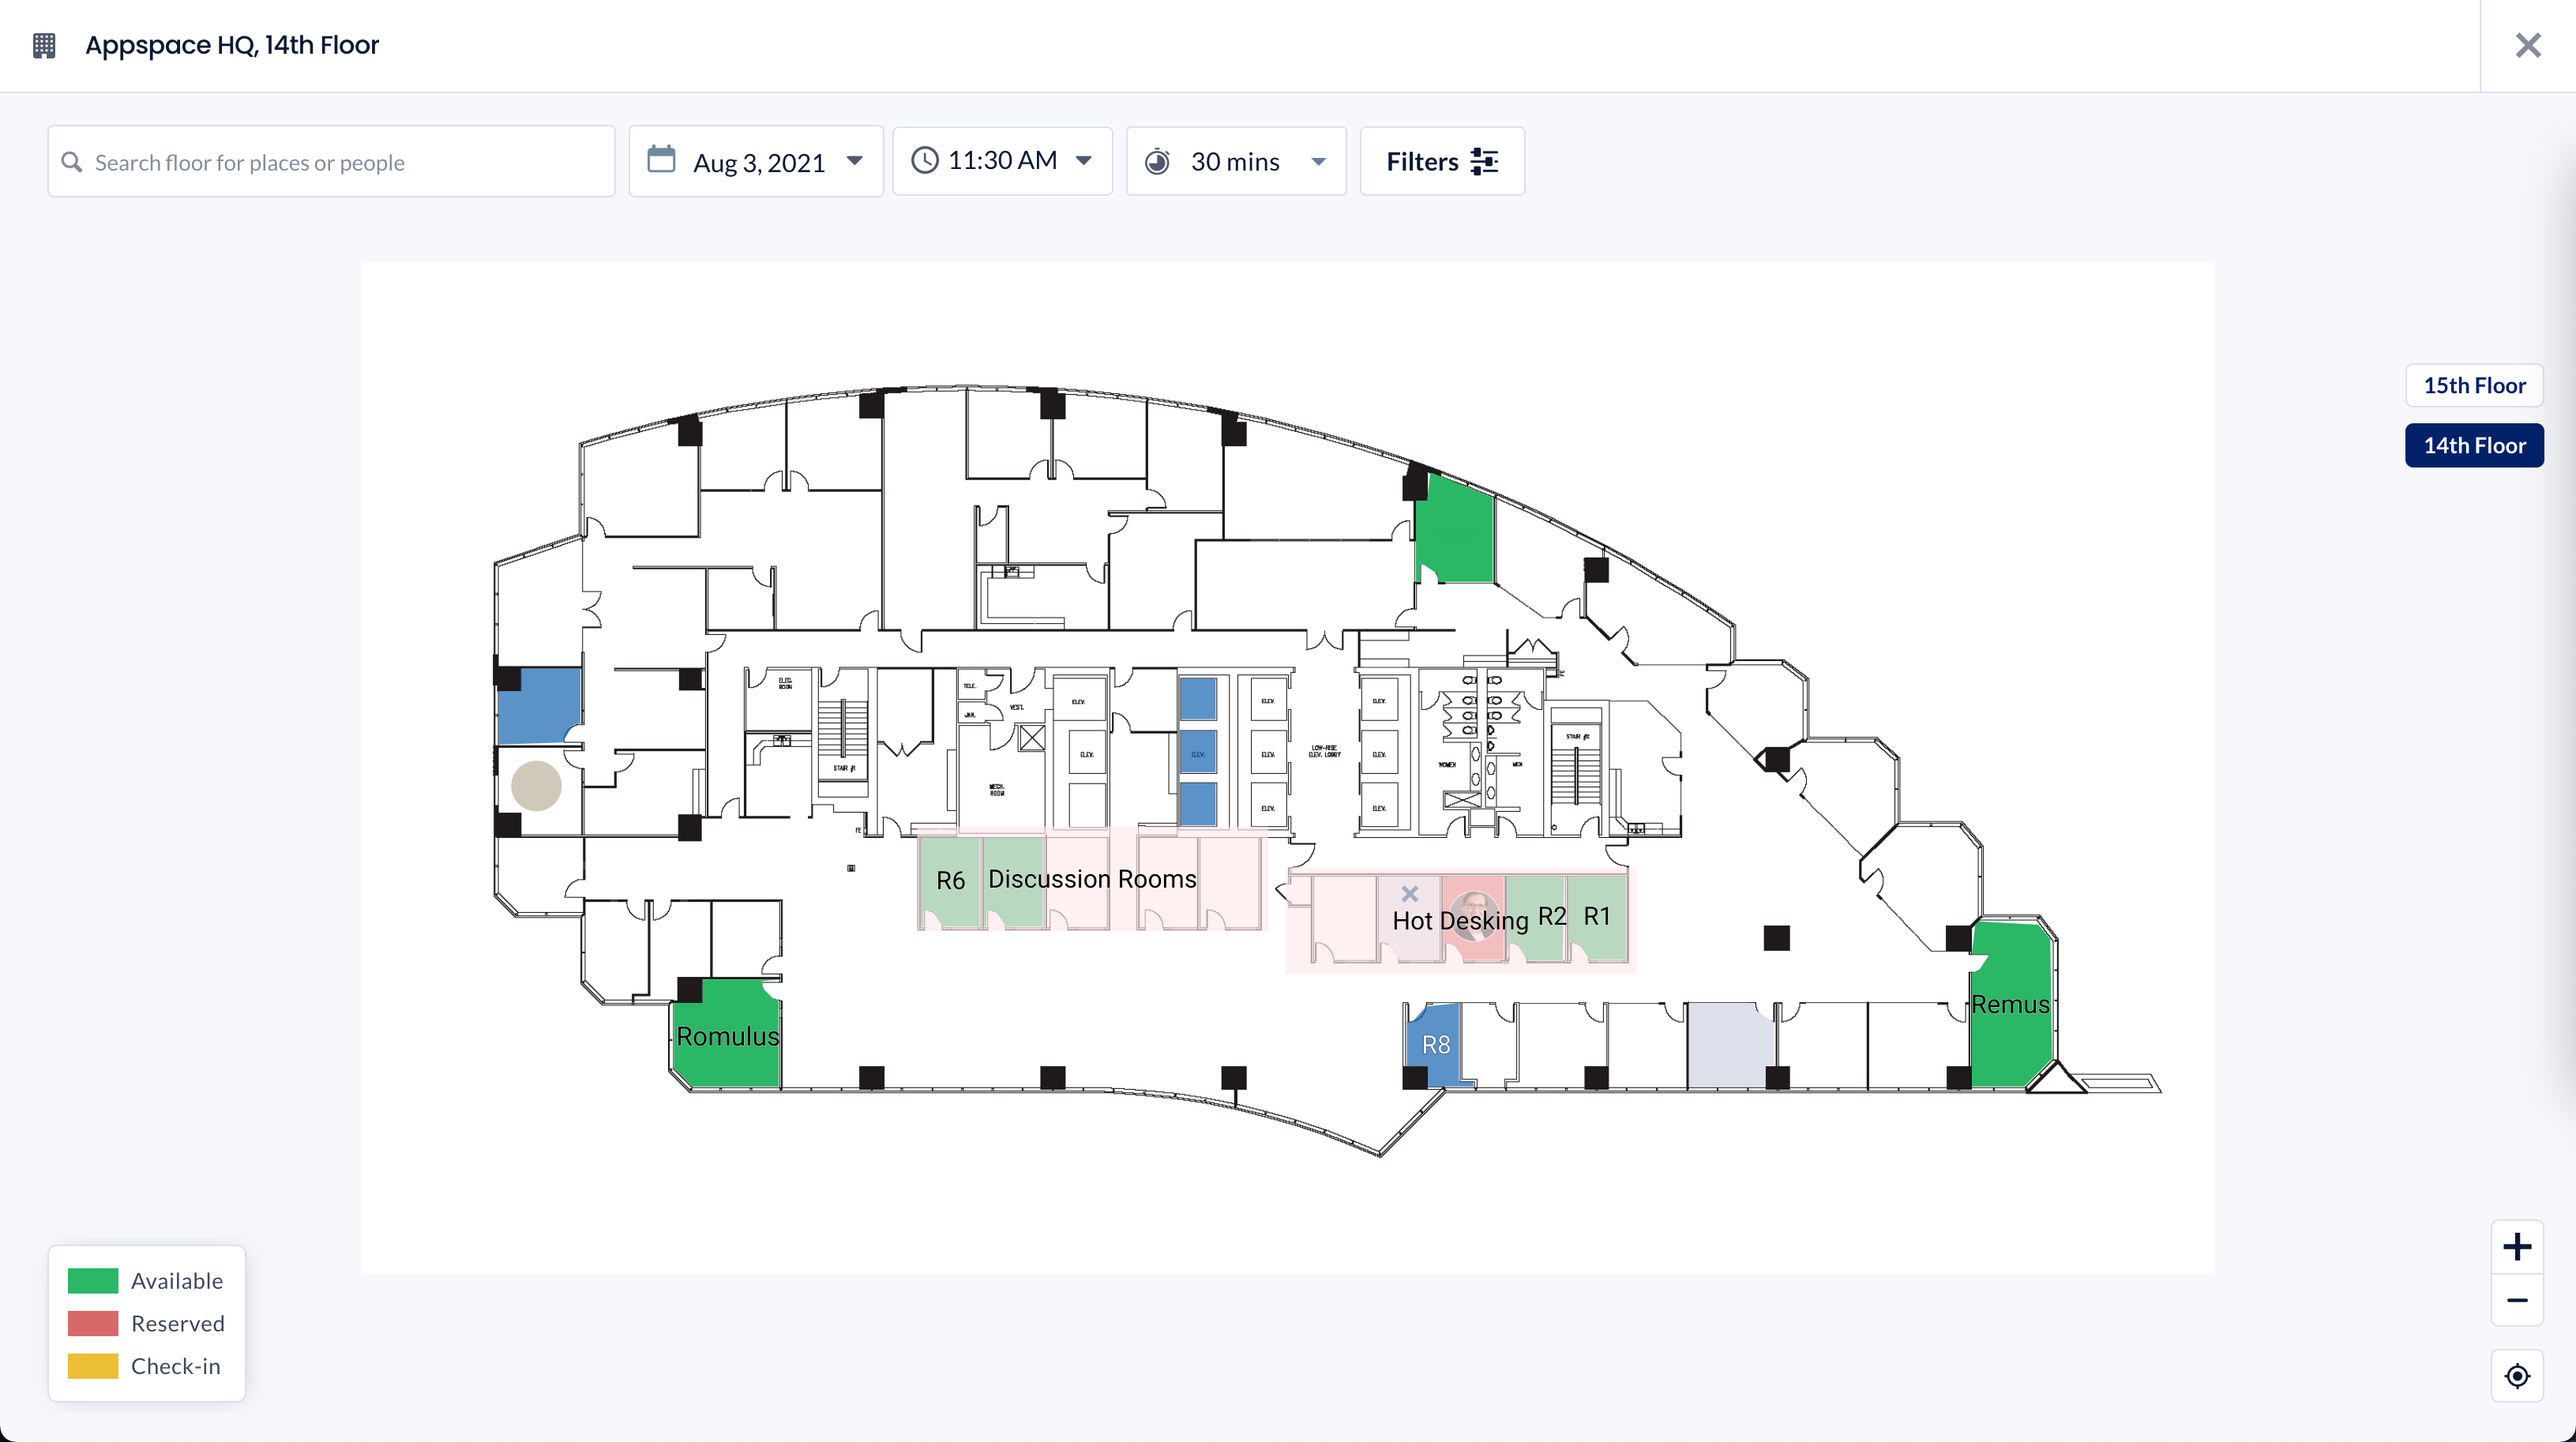
Administrators can use our Locations module to upload floor plans to a building, campus, or individual floors, and map resources and points of interest to these floor plans and link them to the Appspace Reservations system. They can also choose to upload the floor plans in the Locations module, and thereafter do the resource mapping directly in the Reservations module. providing a clear visual guide and experience for employees and visitors when making reservations later on.
Space Reservation Elements
Account Owners or Location Admins will have the ability to establish a hierarchy of locations in the Appspace console, as a way to organize the geographical distribution of reservable resources. Within Appspace, a resource is something that can be given a reservable status such as desks, rooms, or offices.
We recommend that this hierarchy closely represents your corporate environment/domain, allowing your end-users the ability to clearly recognize your locations, buildings, and floor plans and the reservable resources available to them.
This can be accomplished by creating your space reservation environment in the Reservations module using the following application elements:
- Geo – Geographical location (country, state, city, etc.). This is helpful for organizations that have multiple locations across the country and/or world.
- Campus – A collection of buildings within a Geo location.
- Building – Building(s), in which the reservable resources are located, are created within a Geo location or a Campus.
- Floors/floor plans – Floors are located within a building and host the reservable resources. You may upload floor plan maps for each floor, in each building.
- Points of Interest (POIs) – POIs are wayfinding identifiers such as the ATM, Elevators, Rest Rooms, etc.
- Themes – You may configure the default colors which are applied to reservable spaces and points of interest within your floor plans. This makes it easy to identify the different resources available.
All administrative tasks are performed in the Reservations module in the Appspace console, as follows:
- Create reservable resources – Import room resources from a calendar provider, or create them directly in Appspace.
- Manage workspaces & resources – Implement reservation rules, set employee permissions, manage reservations.
- Upload floor plans and link resources – Upload floor plans and map workspaces to resources to provide a better visual guide and experience to employees and visitors.
- Analytics & reports – Measure your workplace utilization, and monitor and track users’ access.
Once the system is set up, reservations can be made via the Appspace Employee App portal or the mobile device (Android or iOS), or via touch screen devices displaying the Room Schedule card or the Schedule Board card.
This article provides administrators with the instructions to configure workspace resources, rules, and permissions in the Reservations module.
- Administrators looking for information on navigating the Reservations module in the console, refer to Browse and Navigate Reservations Module in Appspace 8.0.
- Administrators who would like to reserve a workspace directly in the Reservations module in the console for themselves or on behalf of someone else, refer to Reserve Workspace & Building Pass in Console – Administrators.
- Employees looking for guidance on making a reservation, refer to Reserve a Workspace, Desk, or Room – Employees.
- Administrators looking for instructions to configure a building pass, refer to Configure & Manage Building Passes – Administrators.
- Employees looking for guidance for reserving building passes, refer to Reserve A Building Pass – Employees.
- Administrators looking for instructions to configure the Schedule Board card with Appspace built-in provider settings to enable space, room, or desk reservations, on the card, refer to Cards: Schedule Board (Multi-Rooms) with Appspace Reservations.
Features released in Appspace 8.8.0-ac.2 Lynx
-
- Resource Lock allows companies to activate a mechanism that reserves a resource for a user while they are organizing a meeting.
Prerequisites
- An Appspace Platform user license.
- An active Appspace public/private cloud user account.
- Account Owner or Location Admin role.
- Buildings and locations with floor plan(s) created in Locations for resource mapping.
- Users and user groups.
- Appspace App 2.20.2 or later for QR code check-ins.
Configure Reservations System
To configure resources for reservations, you may choose to connect to an Appspace supported calendar provider used by your organization, to import, configure, and enable booking for corporate meeting rooms and such.
To enable reservations for hot desks, huddle spaces, or any points of interest (POI), which don’t typically exist as a resource in the calendar provider configuration, you can create the resource directly in the reservations system using the Appspace calendar provider.
Calendar Provider
To use resources from an external calendar provider such as Office 365 or Google Calendar, a provider must first be added into the Reservation resources module by creating an authentication passport to enable a secure connection between Appspace and the calendar provider.
Authenticate Calendar Provider
Follow the instructions below to create an authentication passport for your desired calendar provider:
- Log in to your Appspace console.
- Click the ☰ Appspace menu, and click Integrations.
- Click the Passports tab, and click the +ADD button.
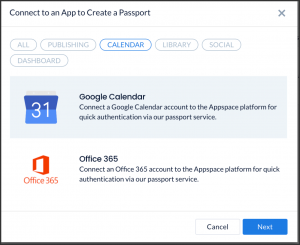
- Select one of the following calendar provider passports, and click Next:
- Google Calendar
- Office 365
- Proceed to select the required permissions for the calendar provider passport as described below:
- Google Calendar
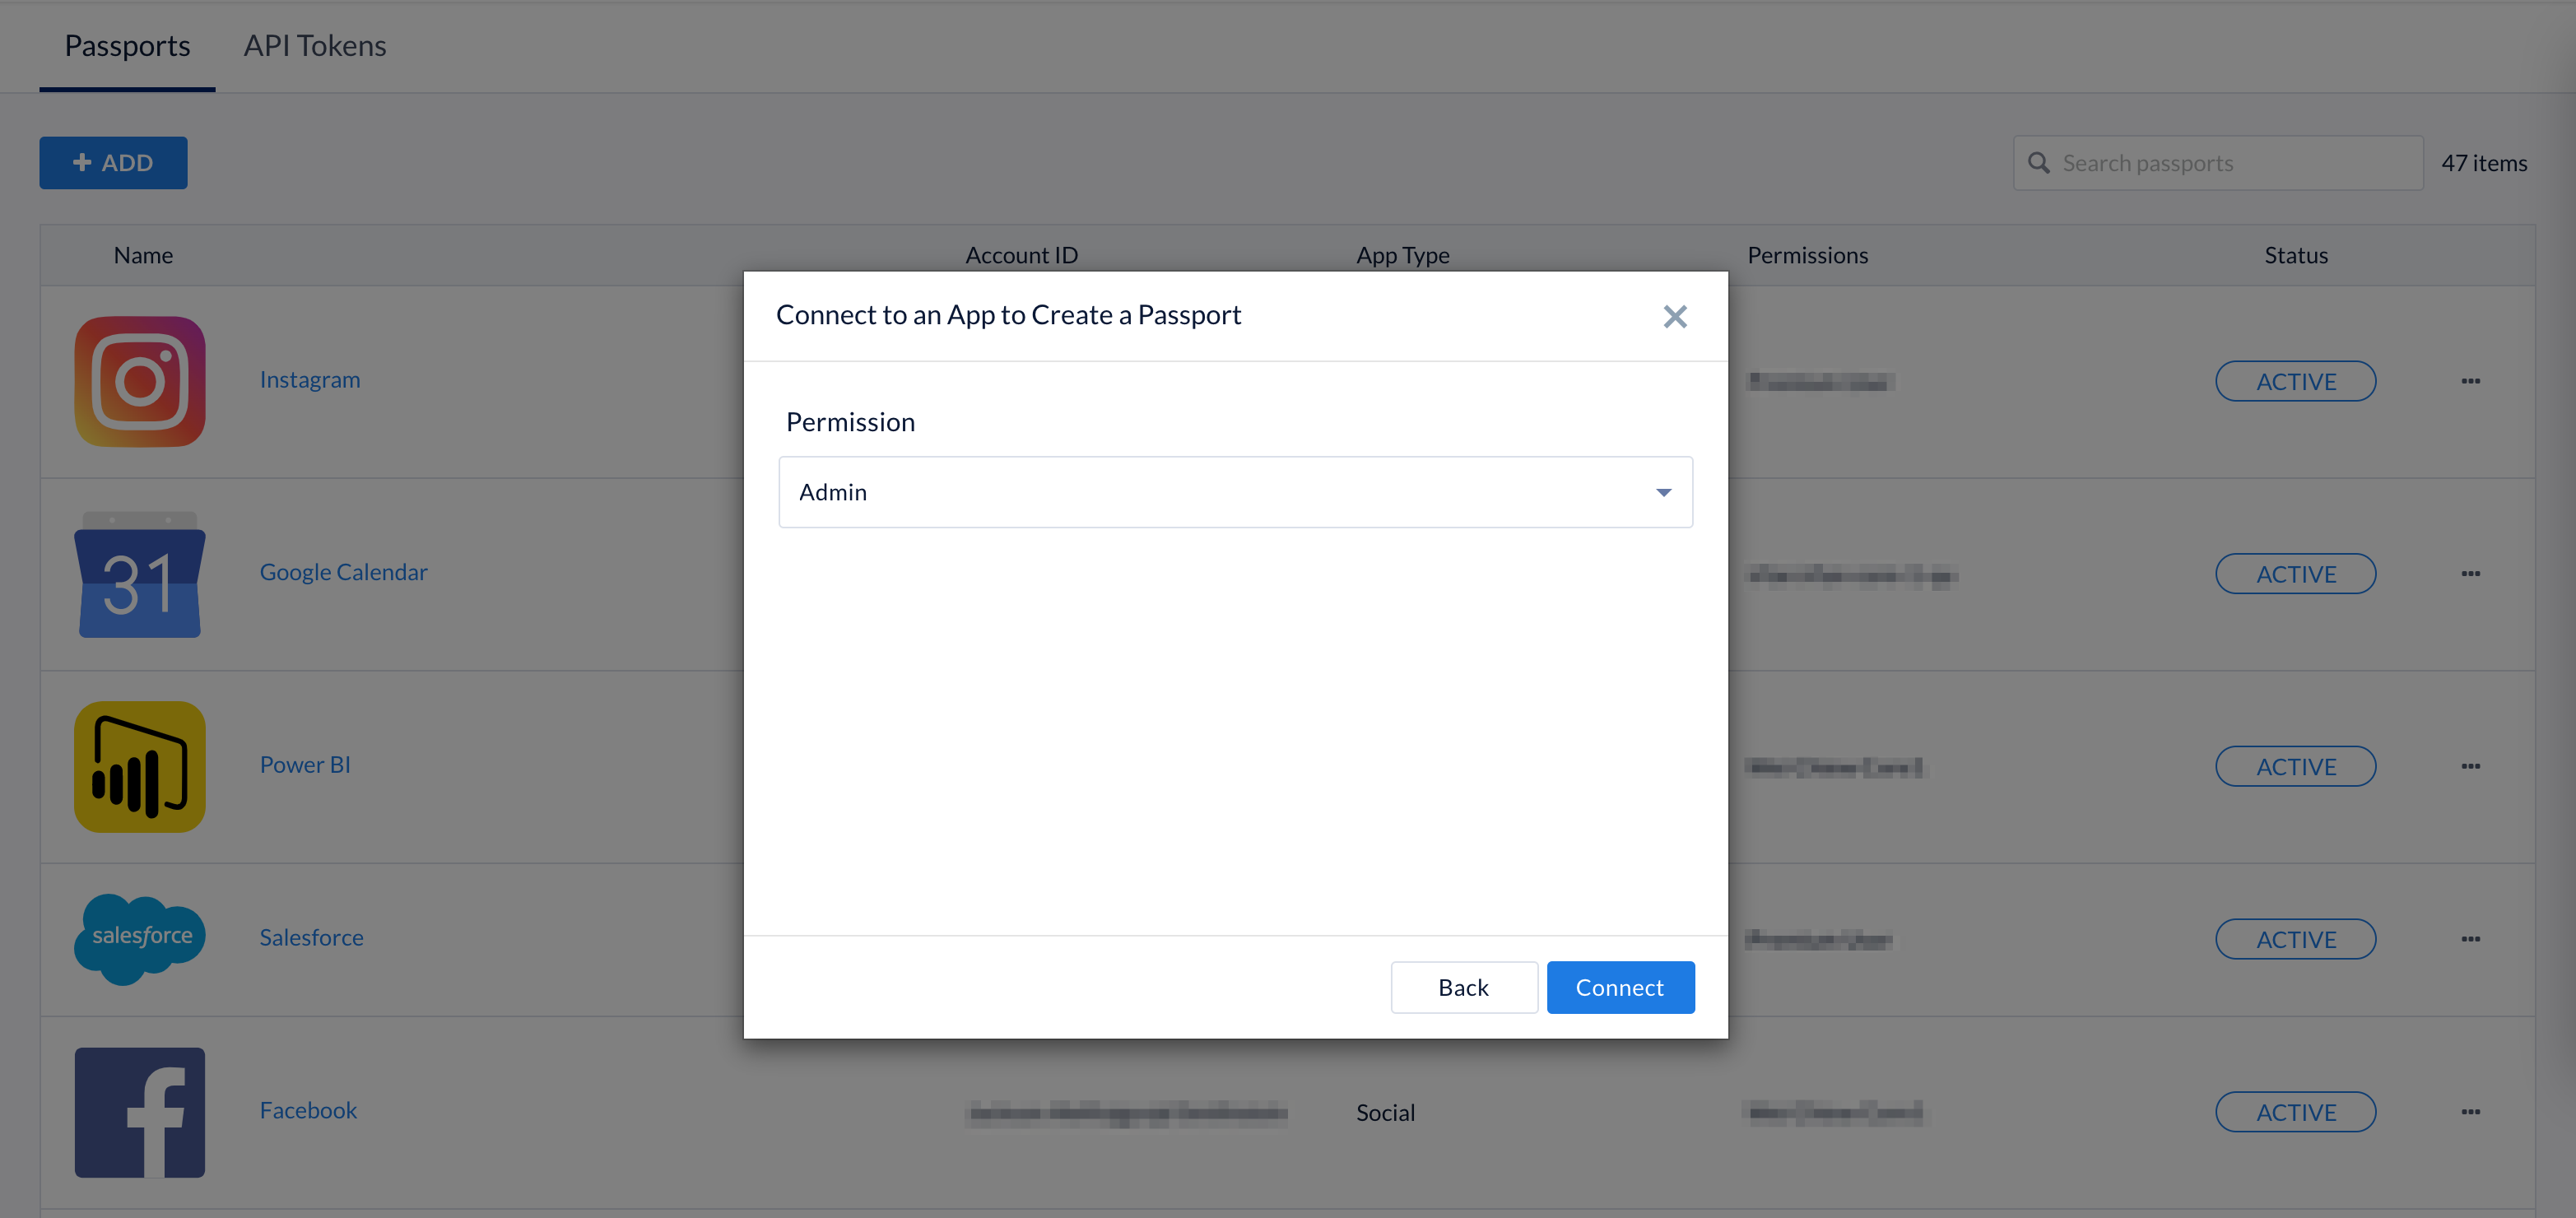
- Admin – Admin permission gives Appspace access to GSuite calendar resources based on the permissions of the service account you use to authorize the passport. This will require the service account to be added as a full delegate to each calendar resource needed to sync the information from and to Appspace and G Suite.
- Basic – Basic permission uses the user permission model and is very similar to the Admin Permission option, however, this option only includes access to users’ calendars based on delegated access to each user’s calendar.
- Office 365
ImportantPrerequisites:
- Ensure to Disable the ‘-removeprivateproperty‘ settings in Office 365, in order for resource reservations to be made private.

- Application Permissions – Application permissions are the recommended approach to connecting Appspace to Microsoft Office 365 as this will natively allow you to sync any meeting room calendar resource to Appspace. You will also have the ability to use the Outlook Add-in and book on behalf of features within the Appspace platform without having a complicated O365 configuration.
You will still have full control over the resources you would like to sync when setting up the provider. You can also use Microsoft Application Access policies configured in O365 to restrict the scope that the Appspace application has access to.
NoteApplication permissions enable apps to run without a signed-in user present, allowing it to run in the background. An administrator account however is needed to just authenticate this passport and the permissions.
- Delegated Permissions – Delegated permission gives Appspace access to Microsoft Office Calendar Resources based on the permissions of the service account you use to authorize the passport. This will require the service account to be added as a full delegate to each calendar resource needed to sync the information from and to Appspace and Office 365. This can include Meeting Room Calendars as well as possibly users’ calendars if utilizing the Outlook Add-in and book-on-behalf feature.
- User Permissions Only (Does not sync resources ) – User permissions uses the delegated permission model and is very similar to the Delegated Permission option. But this option only includes access to users’ calendars based on delegated access to each user’s calendar. Use this option if you want a dedicated passport for the Outlook Add-in and book-on-behalf.
- Google Calendar
- Click CONNECT.
- Proceed to authenticate the passport, and grant permissions to access the calendar provider account. You may be required to sign in with your calendar provider credentials if you are currently signed out.
- Follow the on-screen instructions to continue to configure the calendar provider passport.
- Once authenticated, in the Account Settings tab, you may perform the following actions:
- Change the name of the passport, by entering a different name in the Name field.
- View the Account ID of the passport.
- View the App Permissions granted to the passport.
- View and refresh the Status of the passport.
- Remove the passport, by clicking the Remove Account button.
- In the Permissions tab, you may grant the following users or user groups permissions to view or edit this passport configuration at any time:
- Enter and select the user(s) or user group(s) from the drop-down list, or click the Find users or user groups link, and select the desired user(s) or user group(s). Proceed to grant either Can Manage or Can View permissions by clicking the Select permissions drop-down menu.
- You may also view or remove the user(s) or user group(s) that have already been granted permissions, by clicking the delete icon.
- You may proceed to the Configure Calendar Provider Integration For Reservations section below.
Configure Calendar Provider Integration For Reservations
Follow the instructions below to configure the authentication passport for your desired calendar provider:
- Log in to the Appspace console.
- Click Reservations from the ☰ Appspace menu, and click the Resources tab.
- Click the + CREATE button arrow, and select Add Provider.
- Click the CREATE PASSPORT button to create a new provider or select your provider from the Select Provider drop-down menu.

- Click Next.
- Proceed to Configure Locations, by selecting one of the following options for the building resources:

- Do not Import
- Import as a new building – If this option is selected, proceed to select the location the building will be created in.
- Import to an existing location – if this option is selected, proceed to select the building the resources will be imported to.
NoteEach building displays the number of floors and resources it has been configured with. When importing the resources, you have the option to import the resources from a particular floor, and to either have these resources newly created or added to an existing floor in your building in Locations.
- Once done, click Next.
- The Configure Resources section displays all resources that will be added. Optionally you may use the filter to further narrow the resources to be imported.
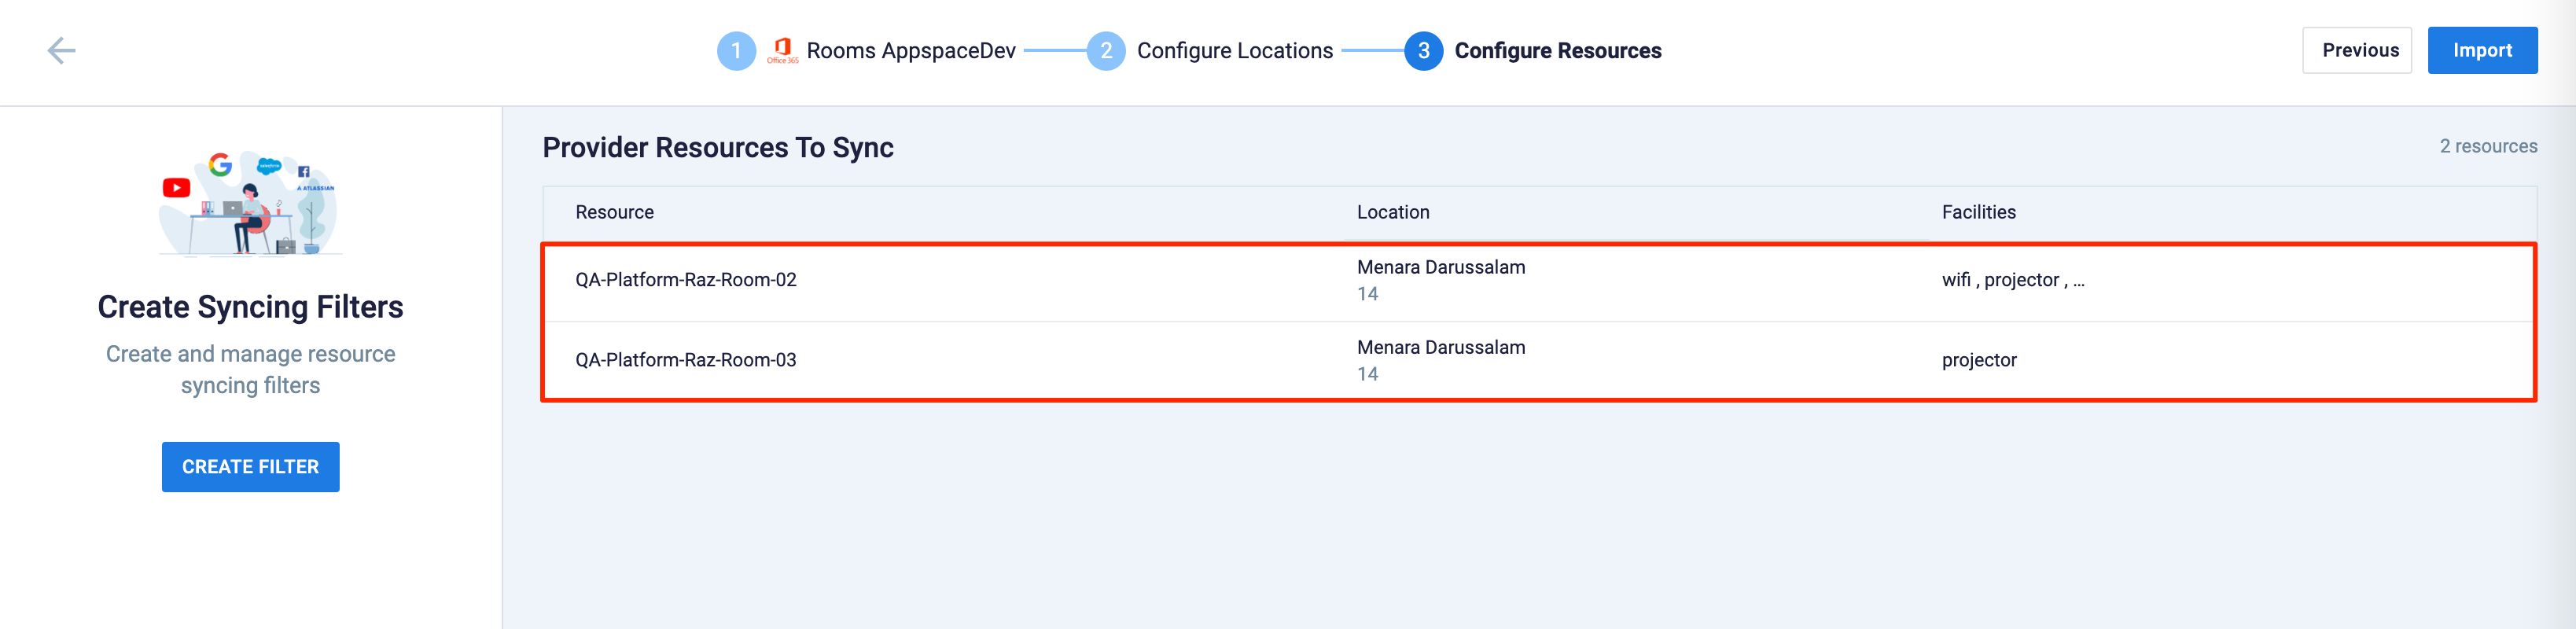
- Once all resources have been confirmed, click the Import button. The imported resources will be displayed in the Resources tab.
- If you chose to create new resources, proceed to Step 4 in the Create Resource section below.
Update/Re-Sync Calendar Provider Data
Once you have imported resources from a supported calendar provider and created bookable resources that are then assigned to various buildings or floors, you may choose to periodically sync the calendar provider resources with the Appspace Reservations system.
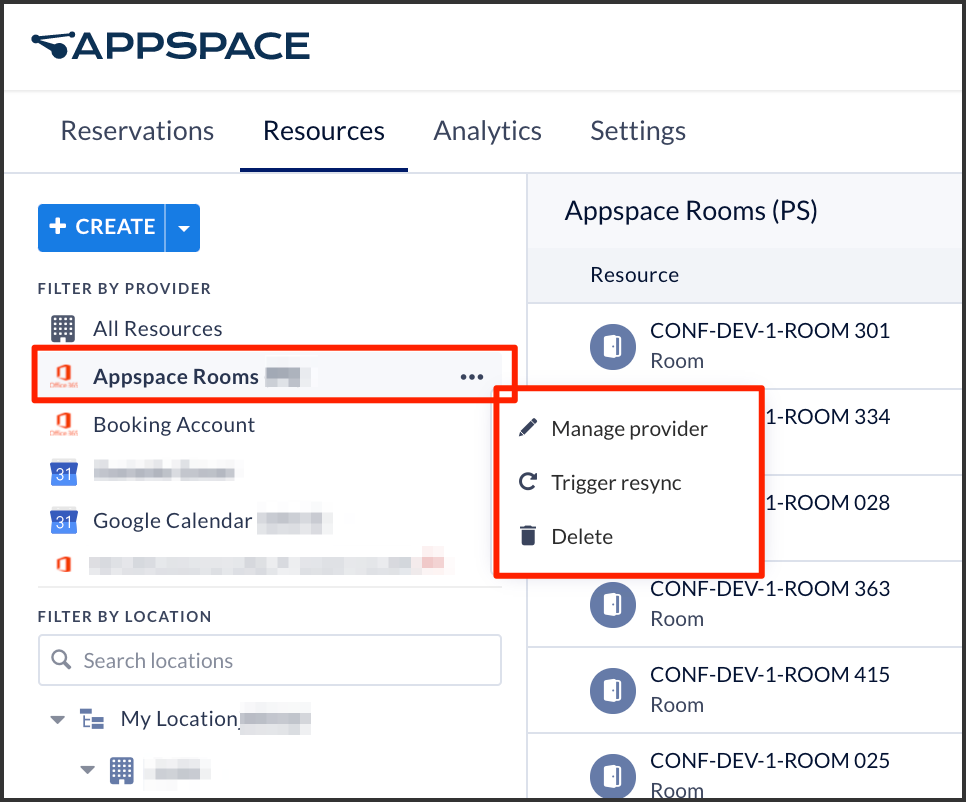
Account Owners or Location Admins will have two options to update resources for a calendar provider:
- Manage provider – set or update import rules and configure how resources from your calendar service are imported to a location or building. This option will re-run the rules engine.
- Trigger resync – trigger an automatic resync of resources from your calendar provider. This option checks for changes in the calendar service, and only updates the changes (resources added or removed).
When you update or sync the calendar provider service, only new resources are updated, ensuring existing resource configuration and mappings remain intact, with the following rules:
- If there is an existing resource, the building and floor ID will not be updated.
- If the resource does not exist, the building and floor ID is set based on the sync rule.
If the calendar passport has been deleted or the resource do not match during sync, or experience a sync issue, the Reservations system will display an alert icon next to the affected calendar provider or resources:
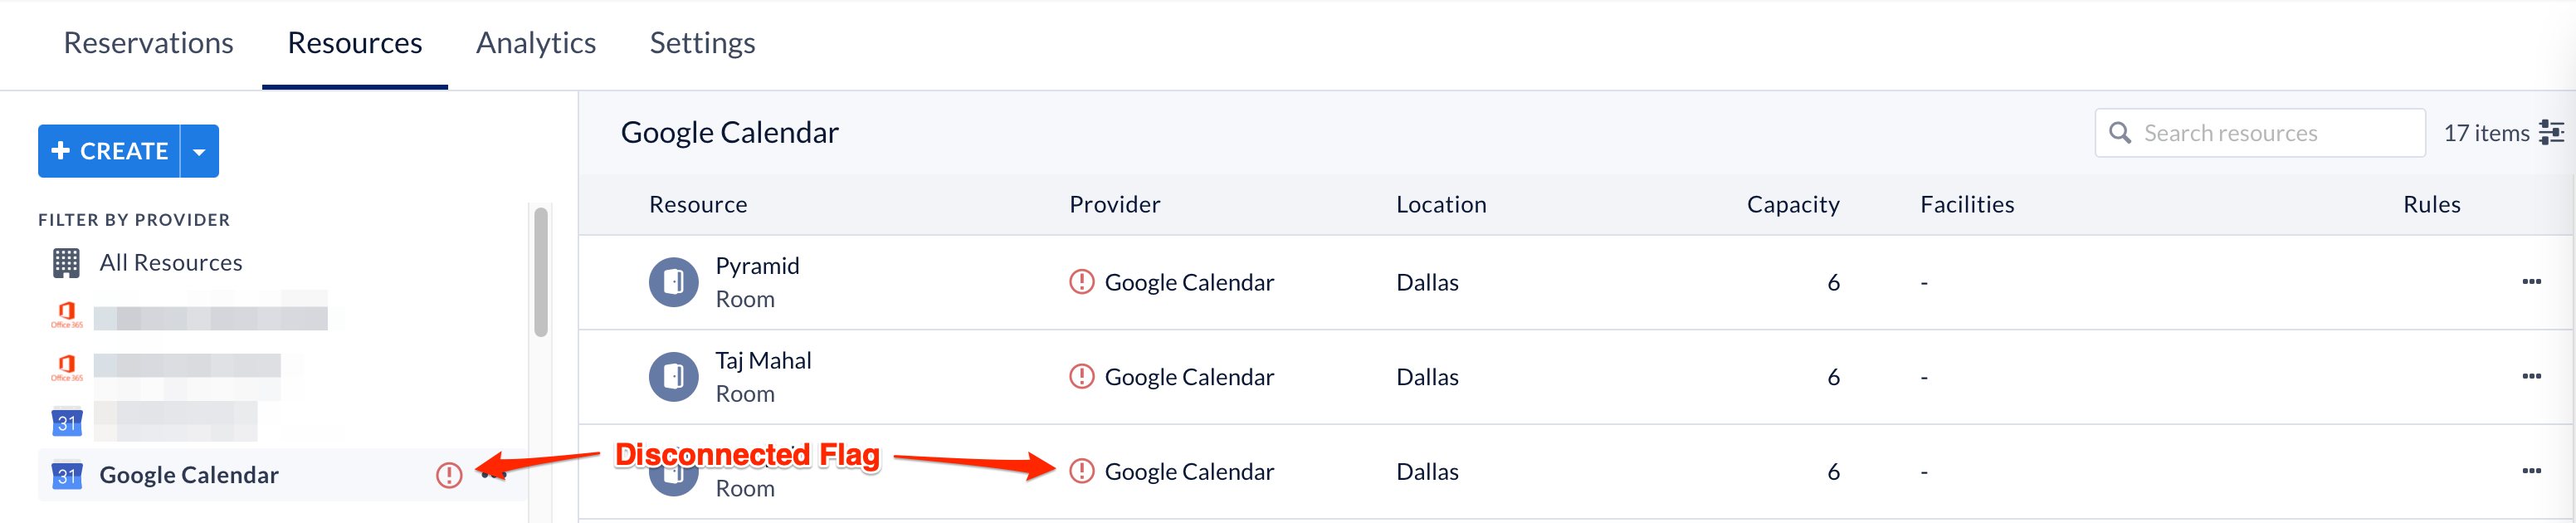
- If the calendar provider passport gets unauthenticated from the Integrations >Passport module, all related resources will be intact but require re-authentication by the administrator.
- If the calendar provider passport is deleted from the Integrations > Passport module, all related resources will be disconnected, but not deleted.
- If the calendar provider passport is deleted directly from the Reservations module, all related resources will not be deleted.
Follow the instructions below to update or resync your desired calendar provider data:
- Log in to the Appspace console.
- Click Reservations from the ☰ Appspace menu, and click the Resources tab.
- Click the ellipsis of the desired calendar provider, and select one of the following options:

- Manage provider
- In the Configure Locations screen, select one of the following options for the resources you wish to update:
- Do not Import
- Import as a new building – If this option is selected, proceed to select the location the building will be created in.
- Import to an existing location – if this option is selected, proceed to select the building the resources will be imported to.
NoteEach building displays the number of floors and resources it has been configured with. When importing the resources, you have the option to import the resources from a particular floor, and to either have these resources newly created or added to an existing floor in your building in Locations.
- Once done, click Next.
- The Configure Resources section displays all resources that will be added. Optionally you may use the filter to further narrow the resources to be imported.
- Once all resources have been confirmed, click the Import button. The imported resources will be displayed in the Resources tab.
- In the Configure Locations screen, select one of the following options for the resources you wish to update:
- Trigger resync
- The Appspace console will initiate a resync with your desired calendar provider, which may take up to 15 mins to be completed.
- Manage provider
Resources
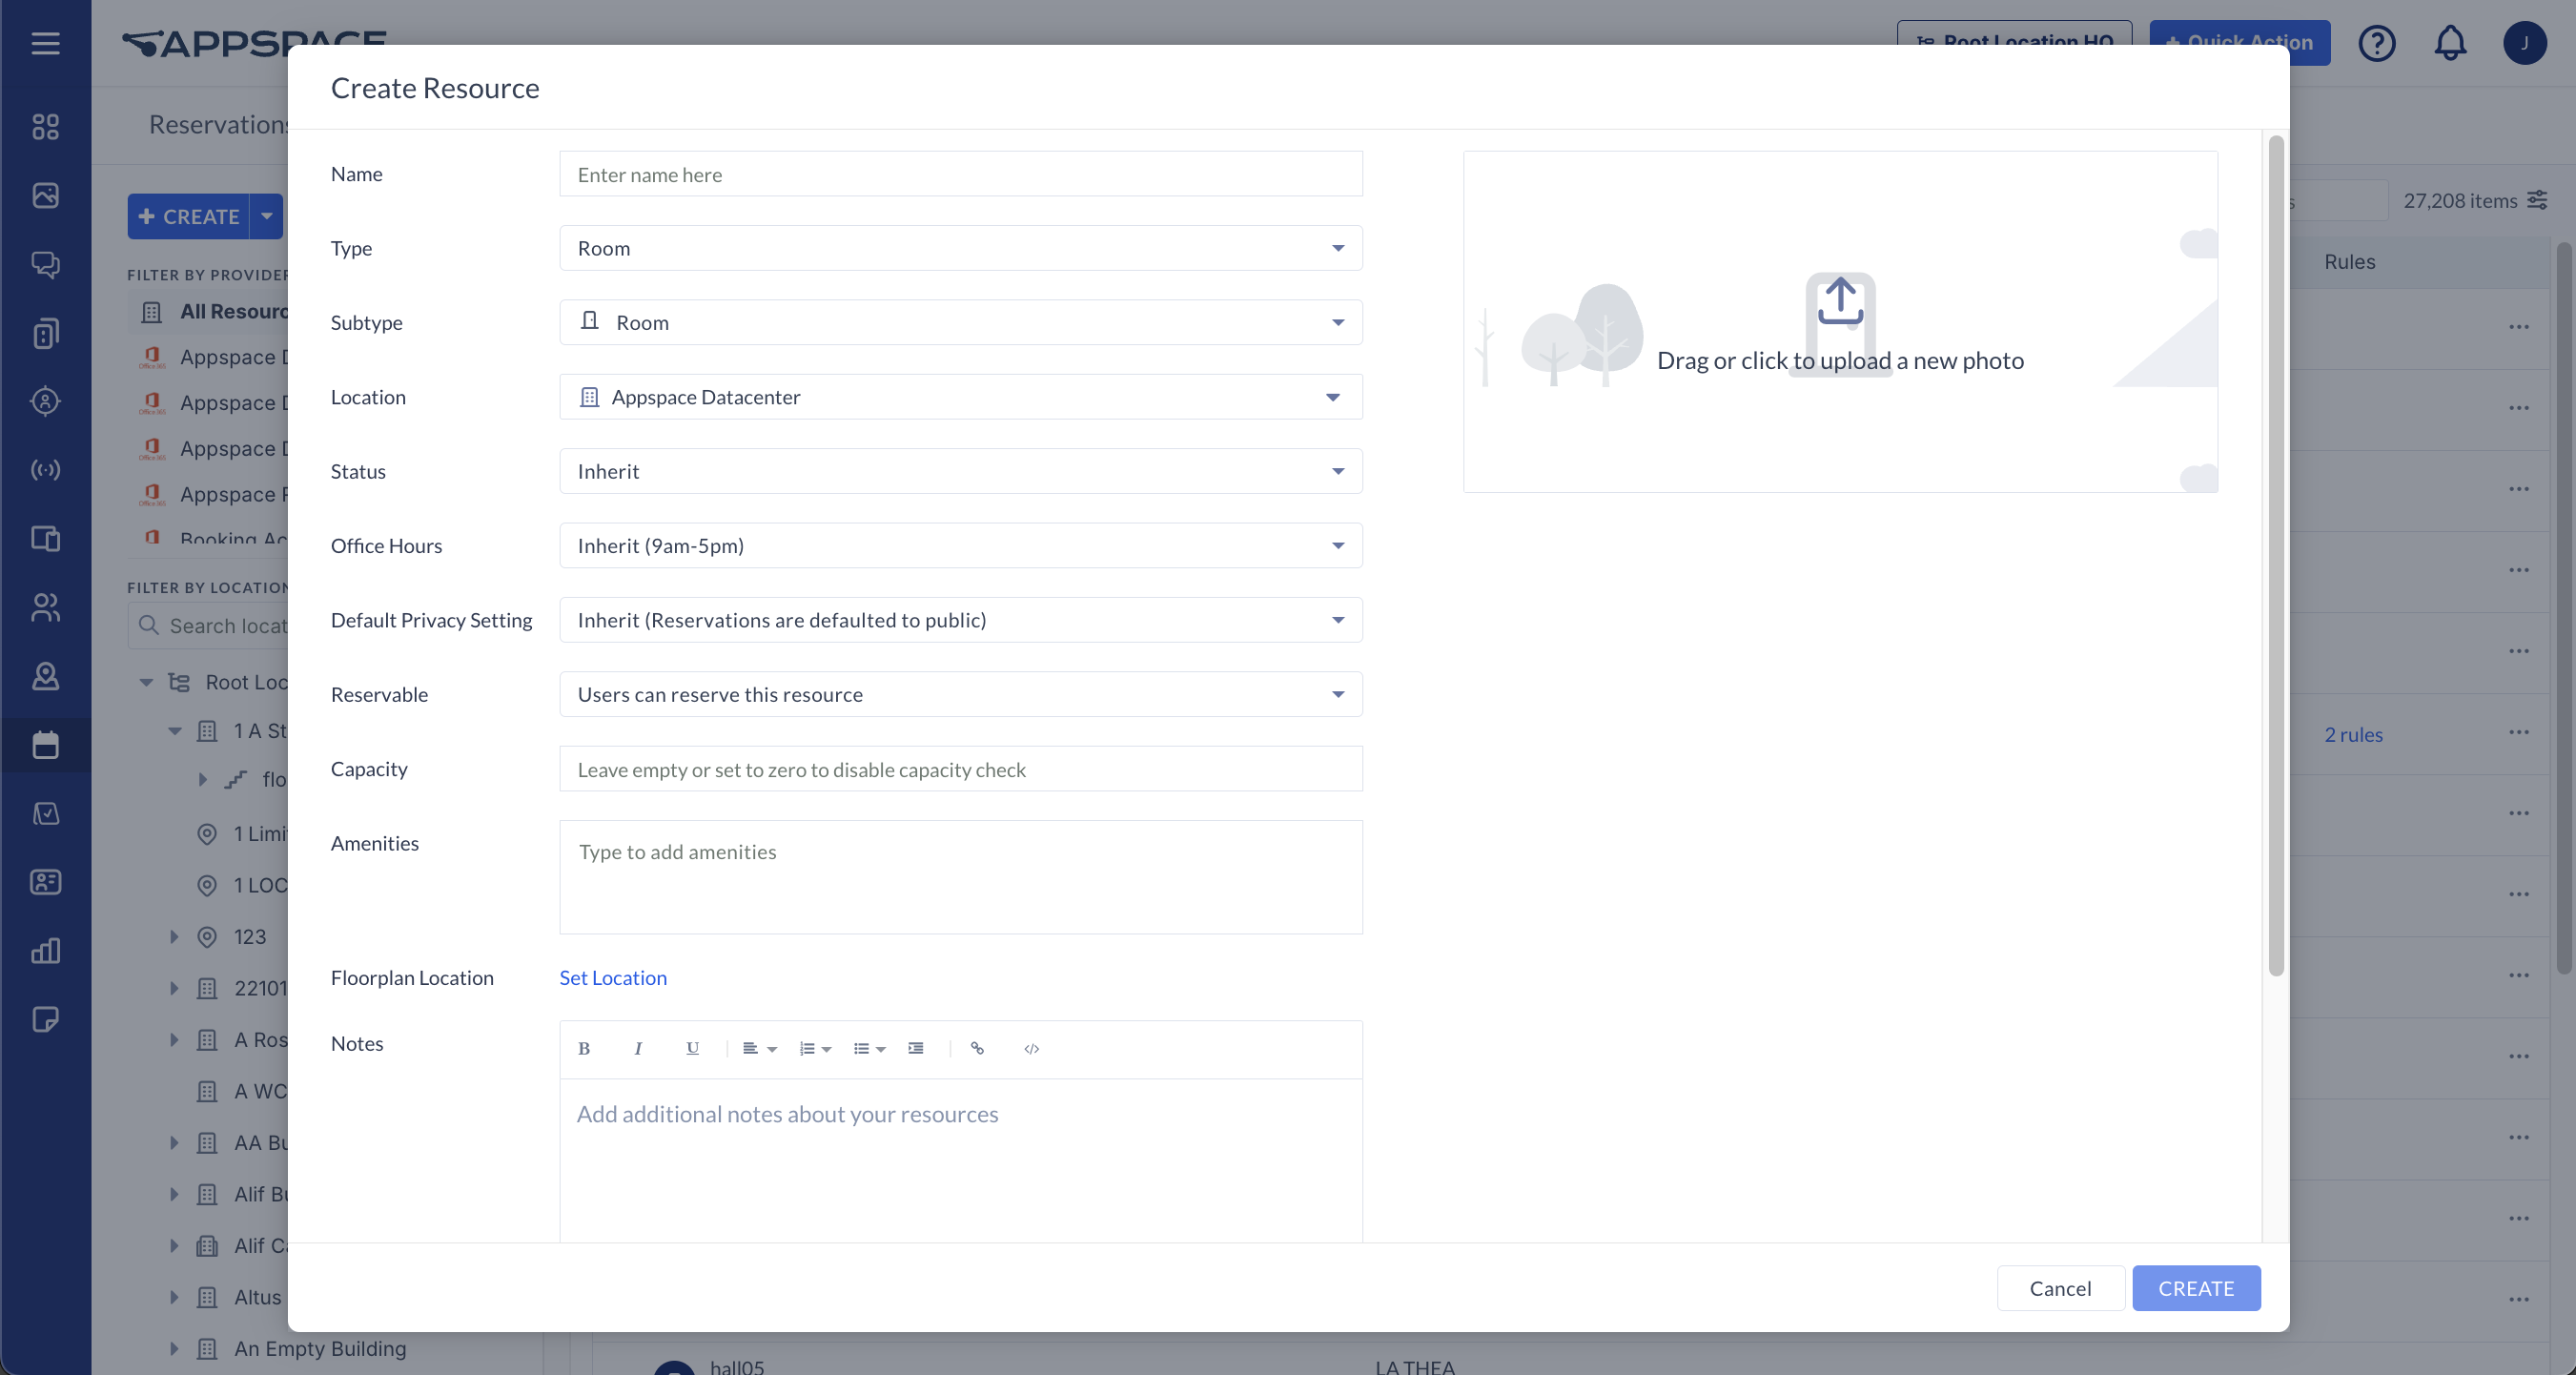
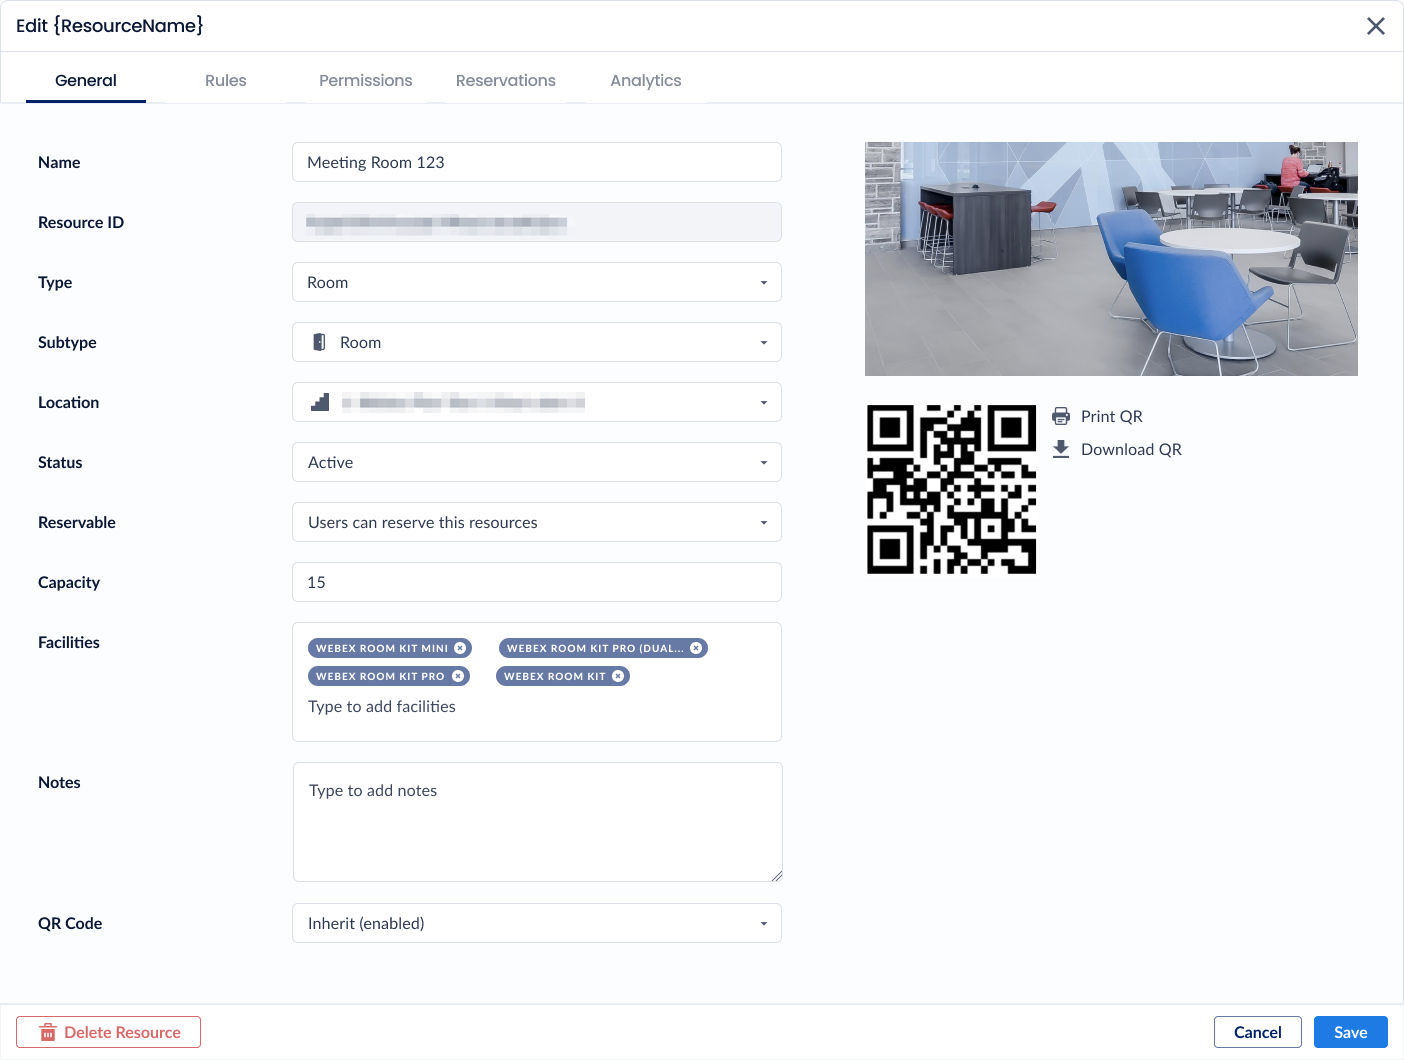
Create Resource
Follow the instructions below to create a resource:
- Select the Resources tab on the Reservations dashboard, click the + CREATE button, and select Create Resource.
-
- Name – Enter a name for the resource.
- Type – Select as Room, Space, POI, or Connected Resource. Refer to the section below for steps on how to create a connected resource.
- Subtype – Select a sub-type for the resource. The options listed differ based on the Type (Room/Space) selected above.
- Location – Select the building, campus, or floor, where the resource is located from the location tree.
- Status – Select the status of the resource i.e. Active, Inactive, Inherit.
NoteAdministrators have the ability to set the Floor Status to Inactive, which hides the floor, and corresponding inactive resources from being displayed and listed in the Map view on the Employee App.
- Office Hours – Set the office hours for the resource. When reserving the resource, you can set the Duration of the reservation to office hours.
- Inherit – The office hours are inherited from the building or location level (parent resource). If there are no office hours to inherit, the setting would default to 9 am to 5 pm.
- Custom – Manually set the office hours for the resource. In the Create Resource window, enter the following details:
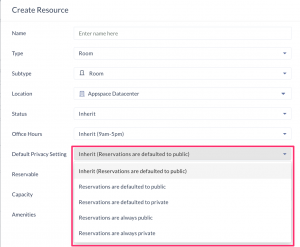
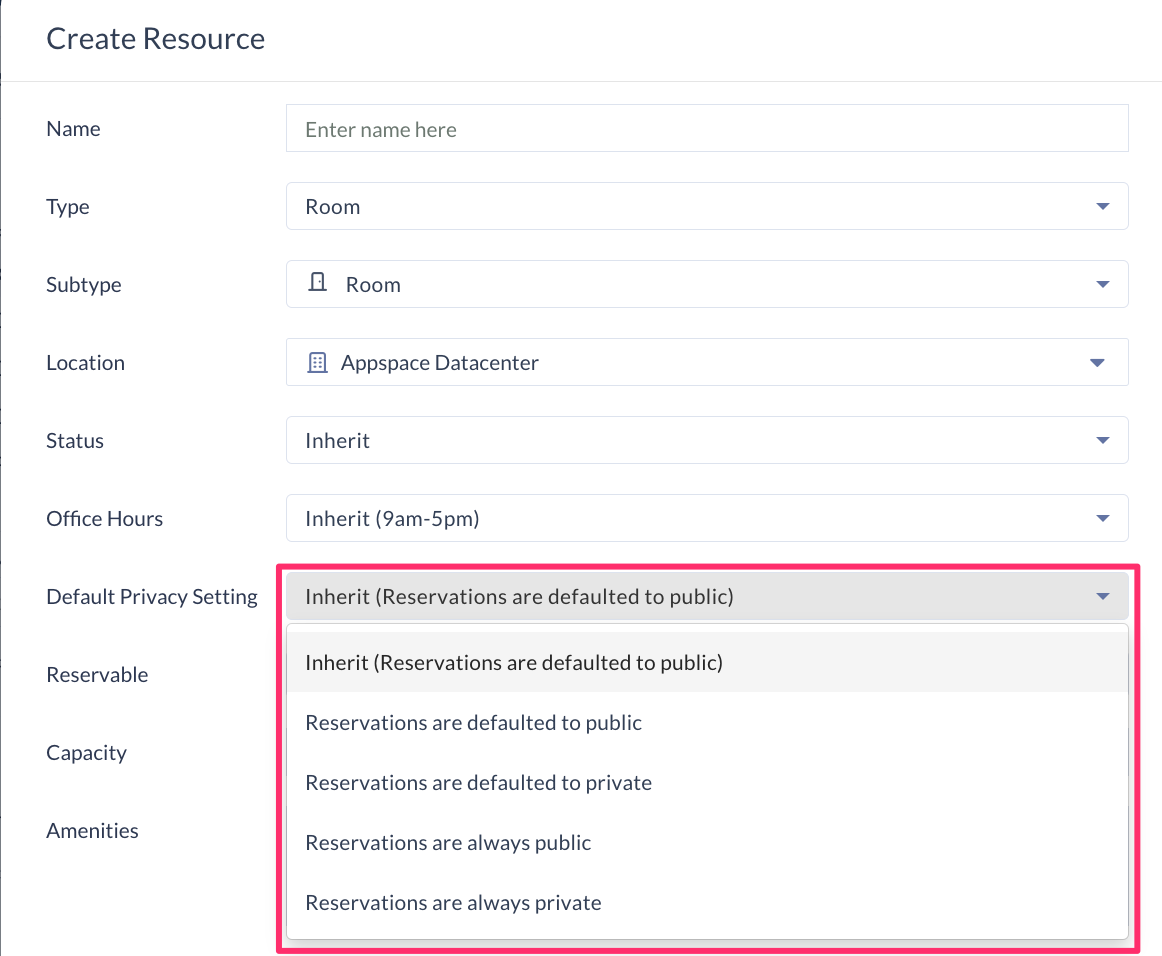
- Default Privacy Setting (New) – Set the privacy of reservations that use this resource.
- Inherit – The reservation privacy setting is inherited from the location, building, or floor level (parent resource). If there is no setting to inherit, the Reservation privacy setting is set to OFF default.
- Reservations are defaulted to public – Reservations are made public (by default), with the option to change the Reservation privacy setting during the reservation process.
- Reservations are defaulted to private – Reservations are made private (by default), with the option to change the Reservation privacy setting during the reservation process.
- Reservations are always public – Reservations are always made public, without the option to change the Reservation privacy setting during the reservation process.
- Reservations are always private – Reservations are always made private, without the option to change the Reservation privacy setting during the reservation process.
- Reservable – If you want this resource to be reservable in the Employee App, slide the slider to YES to enable it. If the resource is disabled (default), users may still view the resource displayed on the map, but will be unable to reserve it. If an external provider is used, this option is disabled by default and follows the external provider’s default configuration settings.
-
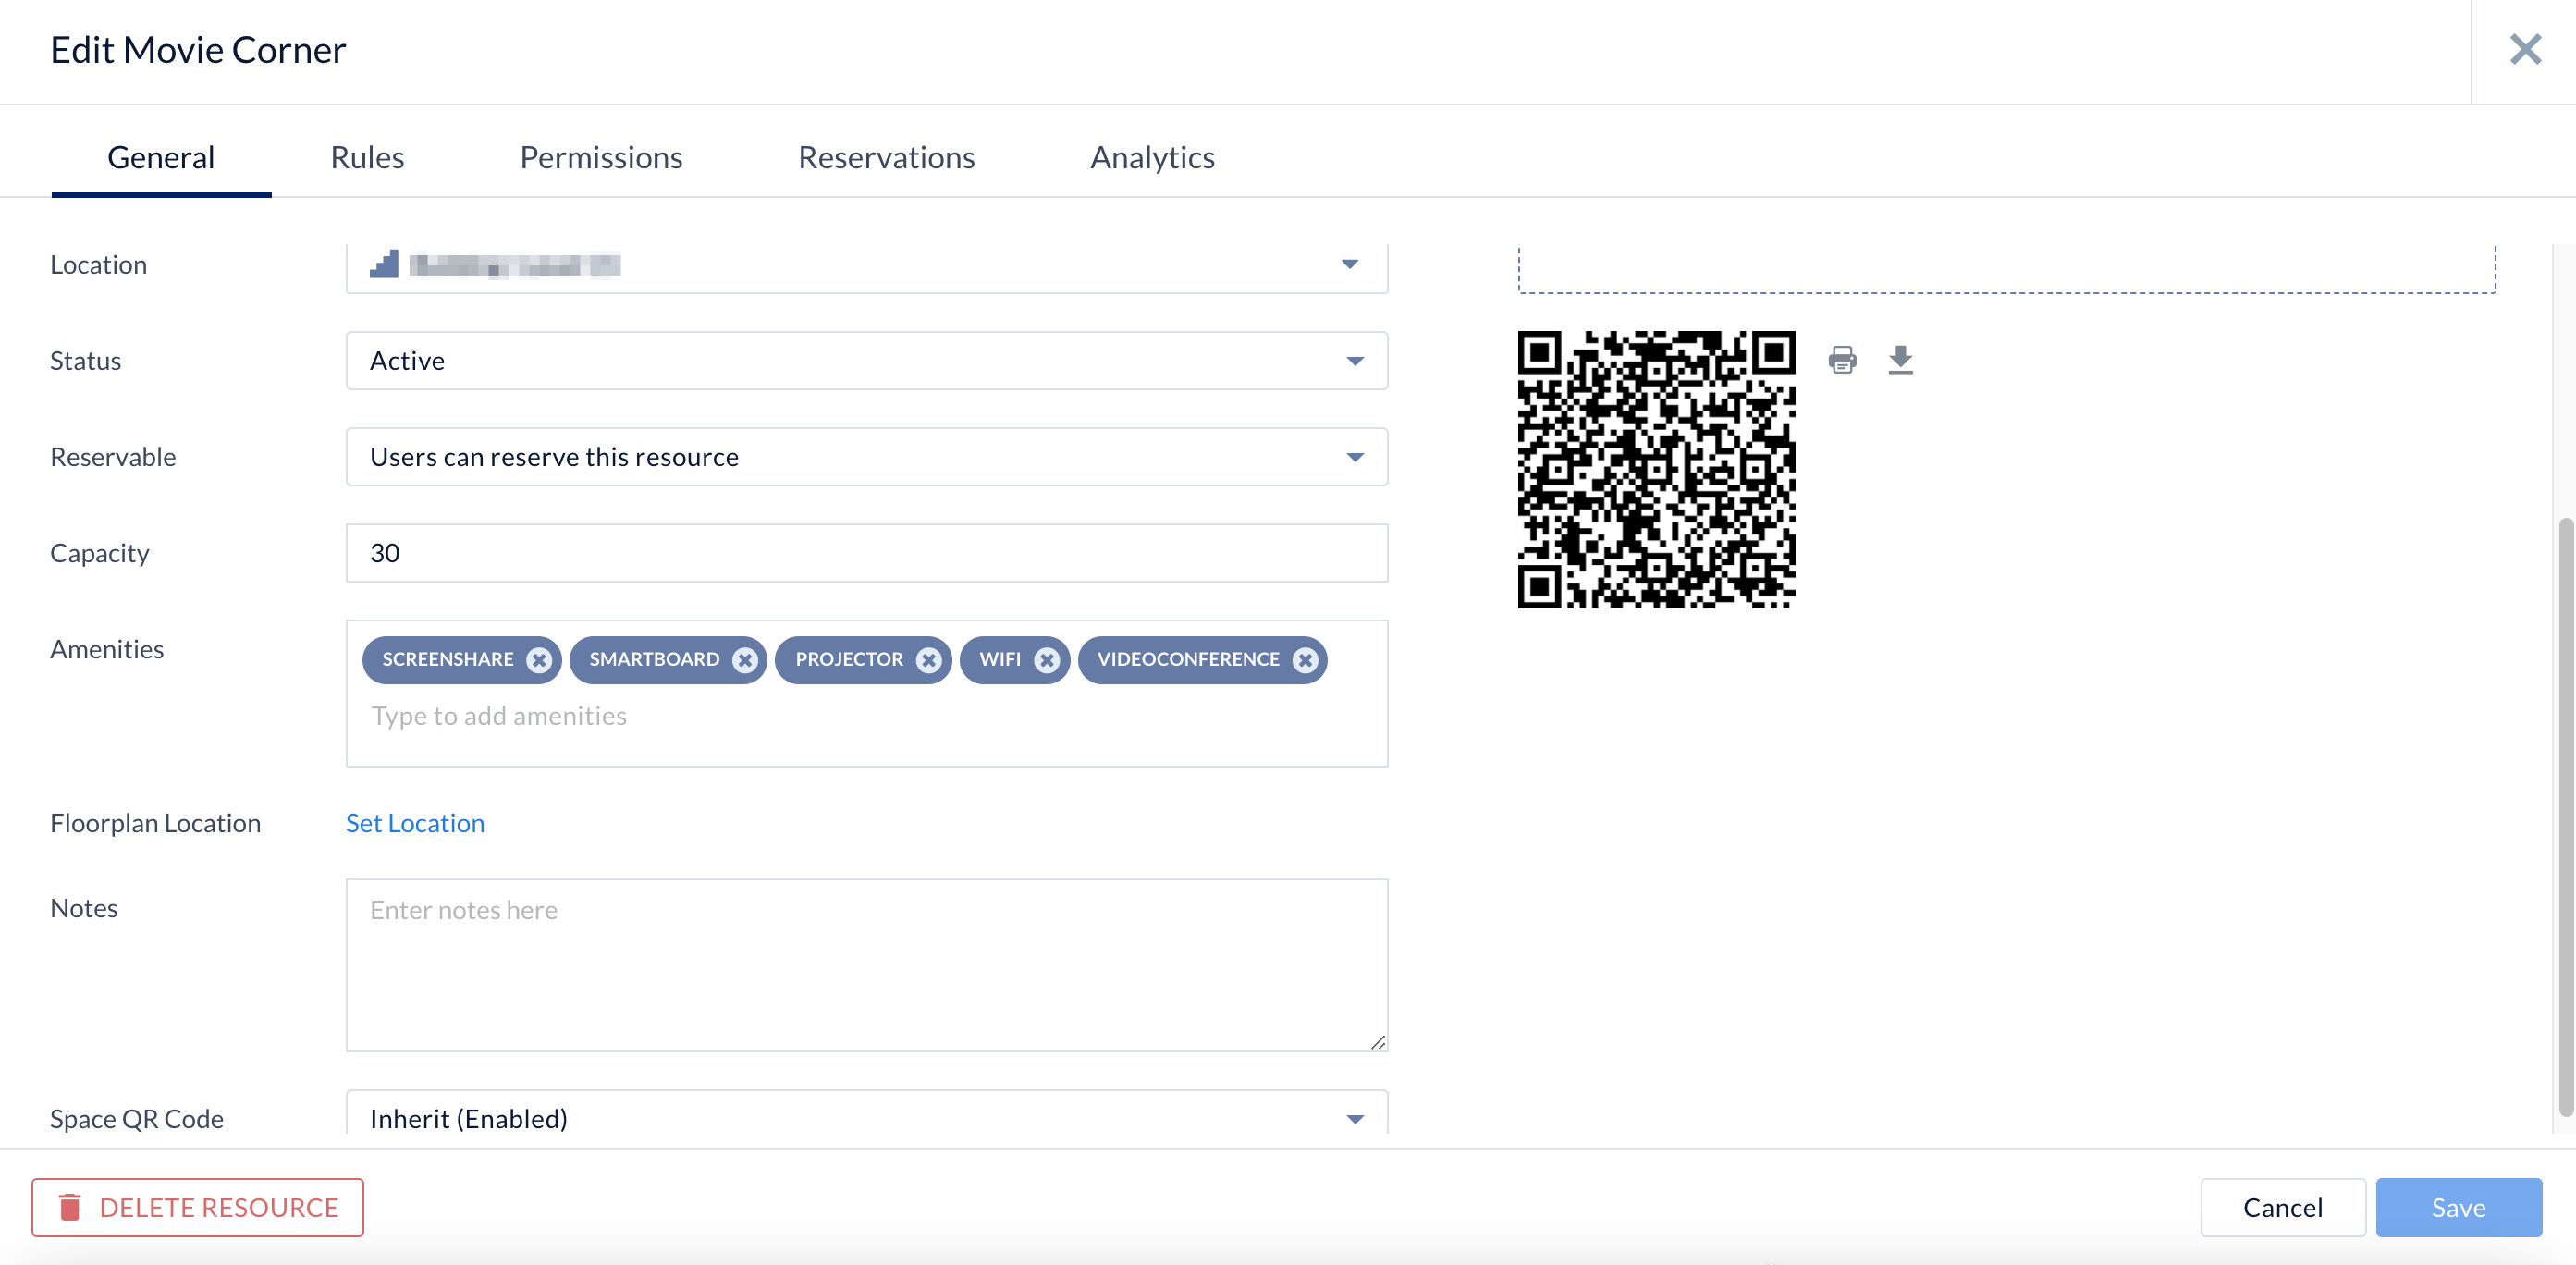
- Capacity – Enter the maximum number of attendees that are able to attend or fit in the resource room or space. The Add attendees field will be disabled if the resource capacity has been configured to be equal or less than two (2).
- All Resources – If left unconfigured or blank, it would default to zero (0), and the in-person capacity will not be enforced. When making reservations, users will be able to add one or more in-person attendees to the reservation.
- Desk Resources – If left unconfigured or blank, it would default to one (1), and the in-person capacity of one (1) will be enforced. When making reservations, users will be able to add only one in-person attendee to the reservation.
- Amenities – Type in any amenities that are available in this resource, such as wifi, whiteboards, projectors, etc. Press Enter on the keyboard after each keyword to add multiple words.
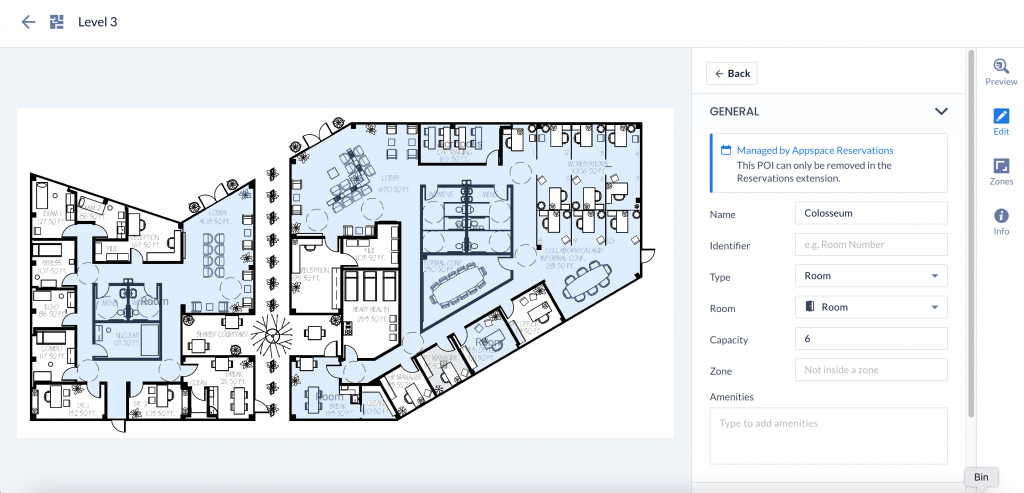
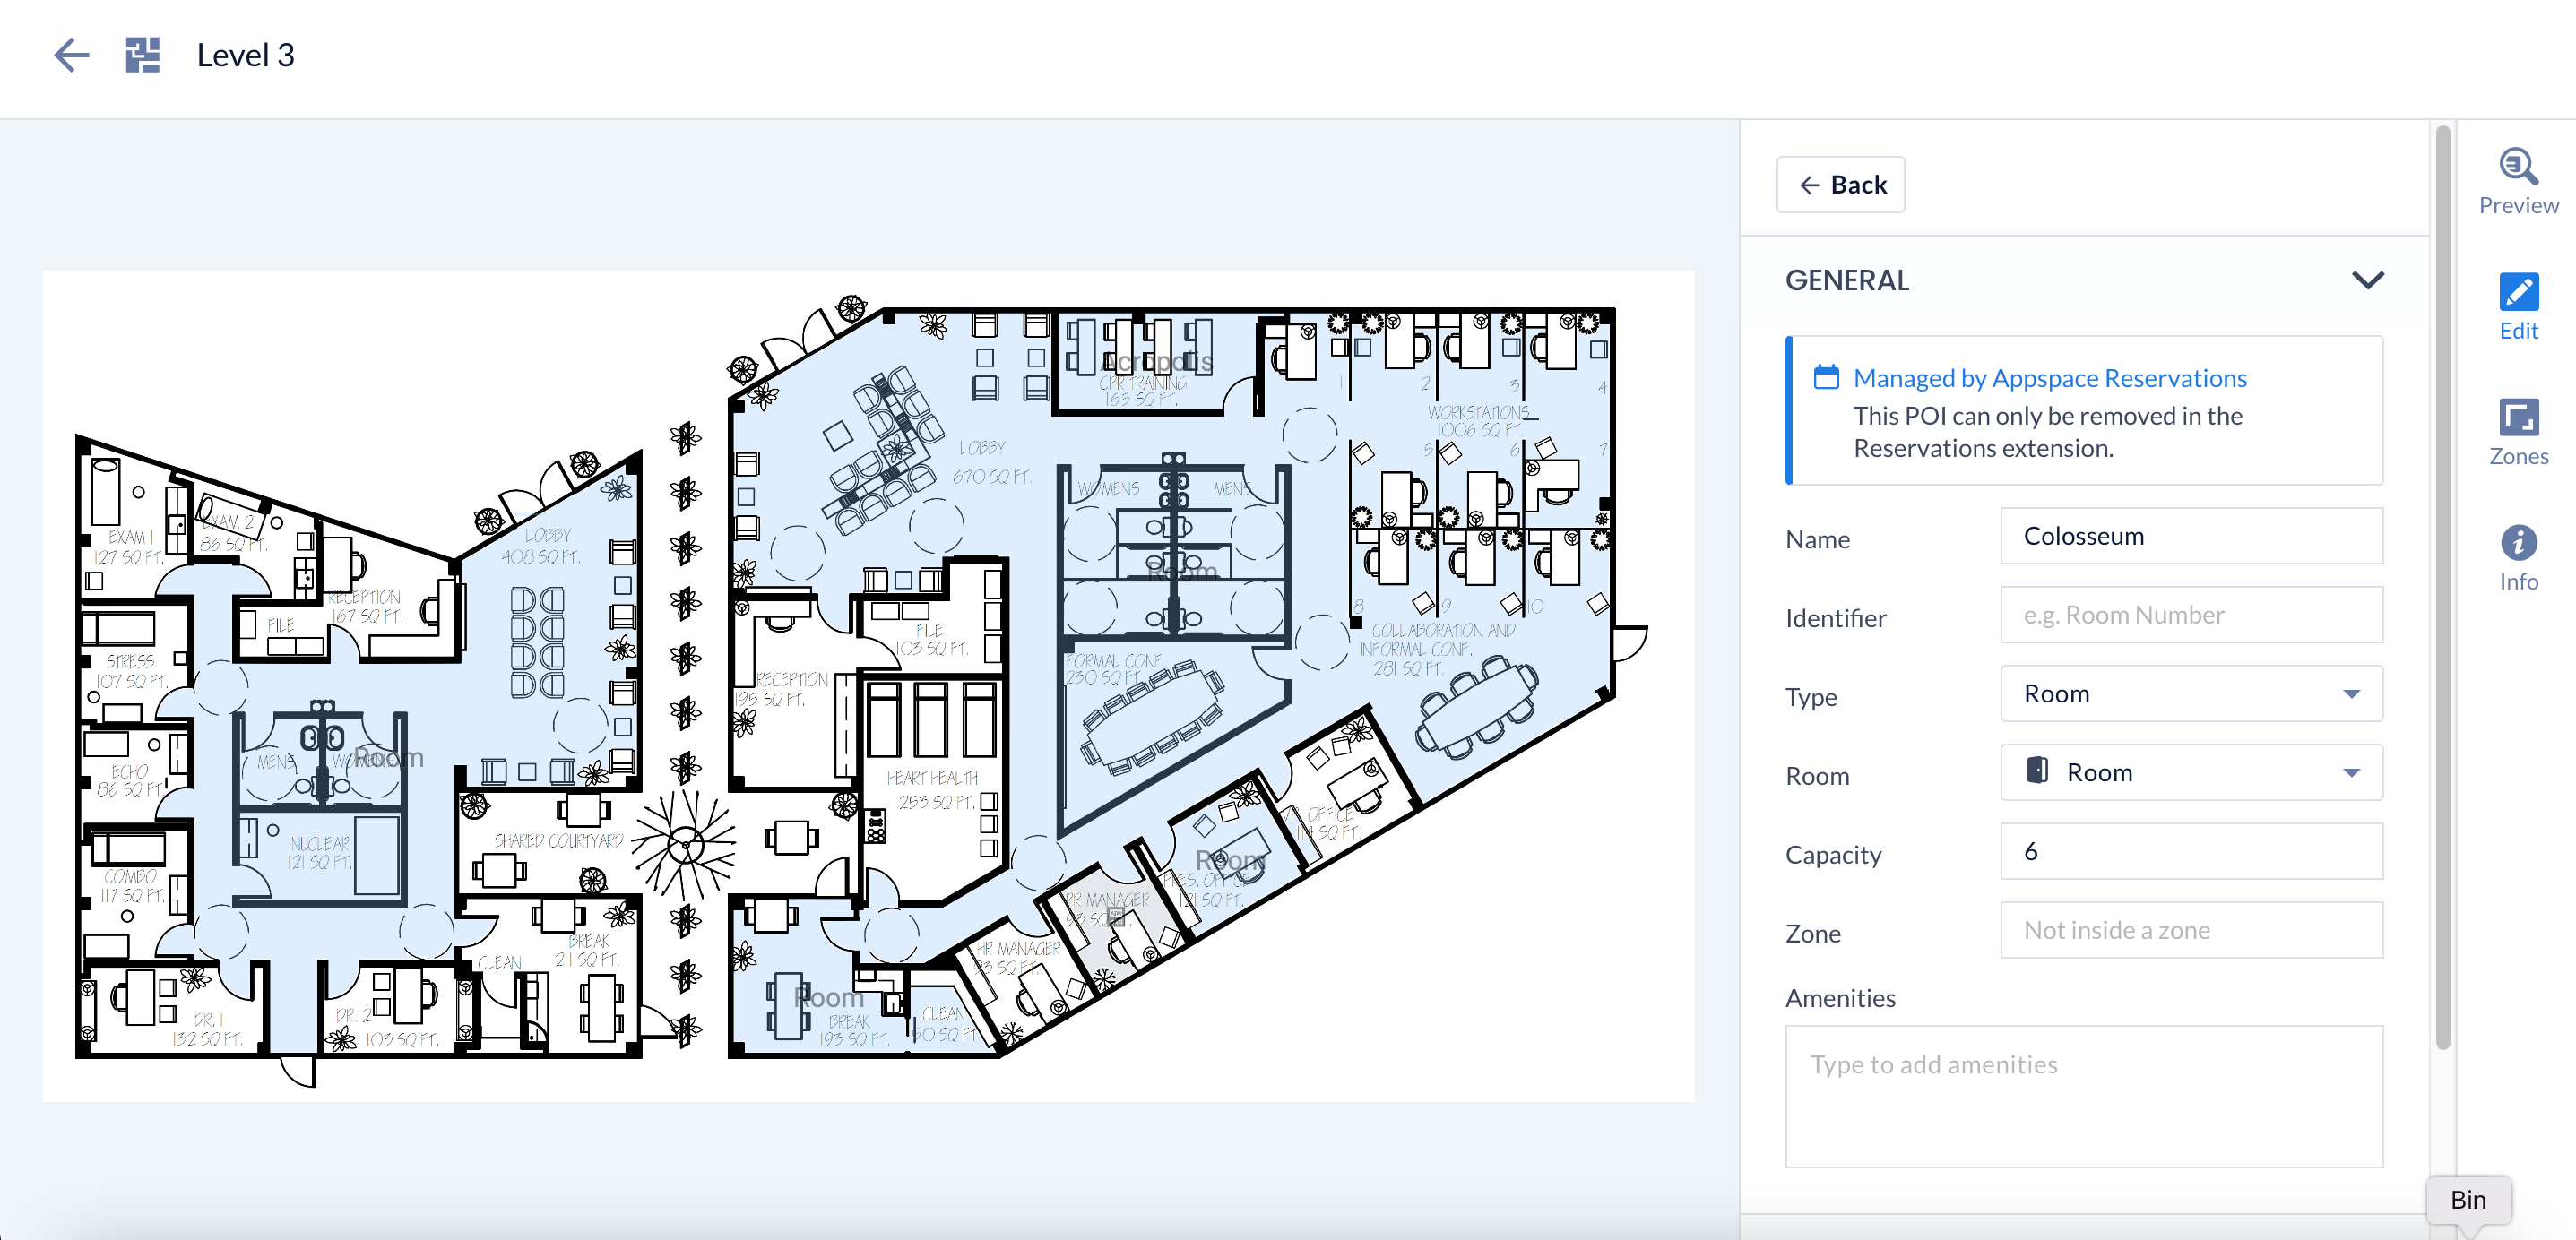
- Floorplan Location – Click the Set Location link to identify and select this resource on a map. If there is no floorplan configured prior to this, skip this step now. You may come back and update this section after you Add Reservable Resources to Floorplan.
- Photo – Upload an image of the resource.
- Notes – Enter additional notes regarding the resource.
- The QR Code Settings for the resource is set to Inherit (Enabled) by default, and can be disabled from the drop-down menu.
- (New) The Enforce sub-location management rights option needs to be enabled to allow the assignment of the management of the resource or location for specific location administrators.
- Click the CREATE button.
- To edit or update this resource click the resource name in the Resources tab on the Reservations dashboard.
- Select the General tab to make any edits. See descriptions in Step 2 above for details.
- You may now PRINT or DOWNLOAD the resource QR Code for reservations.

- Click SAVE to make changes.
- Proceed to the Configure Resource Rules section below.
Create Connected Resource
(New) Connected resources allow users to reserve multiple resources as a single, unified area. This functionality is used for accommodating larger numbers of attendees, such as by merging two or more rooms or spaces.
Follow the instructions below to create a connected resource and link resources (such as room, spaces, or POIs) to it:
- Select the Resources tab on the Reservations dashboard, click the + CREATE button, and select Create Resource.
-
- Name – Enter a name for the connected resource.
- Type – Select Connected Resource.
- Location – Select the building, campus, or floor where the resource is located from the location tree.
- Connect – Select the resources that will be linked to the connected resource. This will be known as a linked resource.
Note
- A connected resource can have up to six linked resources.
- A connected resource must be in the same location and/or floor as its linked resources.
- Linked resources (such as rooms, spaces, or POIs) will be removed from a connected resource when:
- The location of either the linked resource or connected resource is changed.
- The connected resource is changed to another type or resource (e.g. room, space or POI).
-
- Continue with the instructions in the Create Resource section above.
Import Resources
Follow the instructions below to import resources from a .xlsx file:
- Log in to the Appspace console.
- Click Reservations from the ☰ Appspace menu, and click the Resources tab.
- Select the Location you wish to import the resources to.
- Click + CREATE, and select Import Resources.
- In the Import Resources screen, you may drop the resource file containing the resources, or click the Browse link to select the resource file.
- Once the resource .xlsx file has been added, the Import Resources screen will display the summary of resources that will be imported to Reservations. Here, you may identify if the imported resource is a new resource, an update to an existing resource, or if the resource is invalid due to an incorrect value.

- Proceed to also select the default building or floor from the drop-down menu, to import the resources to, if the Location for the resource was provided in the resource .xlsx file.
- Once done, click Import to confirm importing the resources.
Export Resources
Follow the instructions below to export resources from a .xlsx file:
- Log in to the Appspace console.
- Click Reservations from the ☰ Appspace menu, and click the Resources tab.
- Select the Location you wish to export the resources from.
- Click + CREATE, and select Export Resources.
- The resources file will be automatically downloaded to your default download folder with the .xlsx file extension.
- Listed below are the Resources that may be found in the.xlsx file:
- ID
- Name
- Type
- Subtype
- Location ID
- Location Identifier
- Location Name
- Floor ID
- Floor Name
- Zone ID
- Zone Name
- Status
- Capacity
- Reservable
- Facilities
Configure Resource Rules
Constraints and Checkpoints
A constraint is a rule that limits or controls how end-users can interact with a reservable resource. It can define maximum reservation duration, capacity limits, or the requirement to impose check-in. Below is a list of constraints available:
-
- Allow visitor reservations (New – Only available at the Building Level) – Allows visitors to be invited to buildings that are not reservable.
- Allow visitor drop-in (New – Only available at the Building Level) – Allow visitor drop-ins to check-in with a different host, if the original host had not responded to the guest arrival notification within a certain duration.
- Min advance reservation period
- Max advance reservation period
- Min reservation duration
- Max reservation duration
- Max capacity
- Min duration between reservations
- Only available on specific days / times
- Recurring reservation limits (New)
NoteCurrently, the default maximum meeting recurrences that can be configured is 730.
- If the Default Recurrence > the Max # of Recurrences, then the Max # of Recurrences will be increased to match the Default Recurrences.
- If the Max # of Recurrences < the Default Recurrence, then the Default Recurrences will be decreased to match the Max # of Recurrences.
- Concurrent reservation limits (New)
- Mutually exclusive resource reservations (New)
NoteThis rule prevents users from booking specific resource types concurrently.
- Administrators can define which resource types cannot be booked together (e.g., a user can book a meeting room OR a private office, but not both).
- Once the rule is in effect, if a user tries to reserve a mutually exclusive resource, a message will appear stating that the resource is unavailable. If a resource is already reserved for the selected time, the user won’t be able to choose that resource type. The user must select a different resource to proceed with the reservation.
- Requires Check-in
- Zombie Meetings – Unattended Recurring Meetings
NoteAdministrators may now set a constraint to auto-cancel future recurring meetings and send a notification to meeting organizers after an (X) number of consecutive recurring meetings are missed or unattended. Thus, when an organizer sets a recurring meeting, but fails to check-in resulting in an auto-cancellation for that meeting, and if repeated an X number of times consecutively, then all future recurring meetings will be automatically canceled, and a notification sent to the organizer. However, if a check-in does occur within an X number of times, then the missed meeting counter resets to zero (O). This also applies to recurring meetings that are manually canceled a day in advance.
- In-Person QR Code Actions
NoteAdministrators may now set constraints to ensure resources are only reserved, checked-in, extended, etc via the Room Scheduling QR Code only when the employee is physically at the location. Attempts to check-in via the Employee App will be denied.This constraint is only supported on resources created by the Appspace provider.
- Visitor multi check-in/check-out (New)
NoteAdministrators may set a constraint (only at the building level) for hosts and facilitators to allow visitors to check-in and check-out multiple times throughout the duration of the event, using the same QR code/code. The host is notified whenever a check-in/check-out action is done. The rule ends when the set active period is ended, regardless of having a check-in or check-out pending.
- Lock resources while reserving (New)
NoteAdministrator may now set constraints to ensure that resources are only reserved by one user at a time. Once a resource is locked, it cannot be released until the locking period expires, and other users must wait. The only alternative to release the resource during event creation is to deselect it. The locking period begins when a resource is selected, and even after the event is created, the lock remains until it is manually released, regardless of concurrent reservation rules. If the organizer does not complete the event creation within the locking period, the lock will be automatically released and the resource may be occupied by another user. Lock extensions will apply when the event’s date, time, or timezone is edited. This constraint only supported on resources created by the Appspace provider.
A checkpoint is a rule designed to provoke interaction with the end-user. Information can be displayed or an acknowledgment may be required before a team member can reserve the resource.
How the Checkpoint and Constraint rules work:
- A rule targets specific users or user groups. If no target is selected, the rule applies to all.
- A rule can be applied more than once e.g. the “Restricted Days/Times” constraint applied twice but with different targets. If same targets, the target’s existing rule is overwritten.
- If a user is targeted by multiple rules of the same type, the following logic is applied.
- Priority
- The inherited rule is lower in priority than the direct rule.
- The target user is higher than the target user group that the user belongs to.
- If priority is the same, then the last rule created (sort based on date) is used.
- These rule types are replaced based on priority:
- Min duration, max duration, min book time, max advance book time, capacity.
- These rule types are replaced based on the OR rule:
- Restricted Days/Times
- Priority
Create Constraint Rule
Follow the instructions below to configure constraint rules for any building, floor, zone, or resource:
- In Reservations, click the Resources tab, and select a specific resource, or location to configure the constraint rule.
- To configure a constraint rule on a specific resource, click the resource name from the All Resources listing page.
- To configure a constraint rule on a location (all resources within the location will inherit the constraint rule), click the ellipsis of the selected resource from the location tree in the side panel, and click Edit.
- In the Edit resource window, select the Rules tab to configure the resource rules, or to view inherited rules.
- Click the ADD button or the + icon to create a rule for the resource.
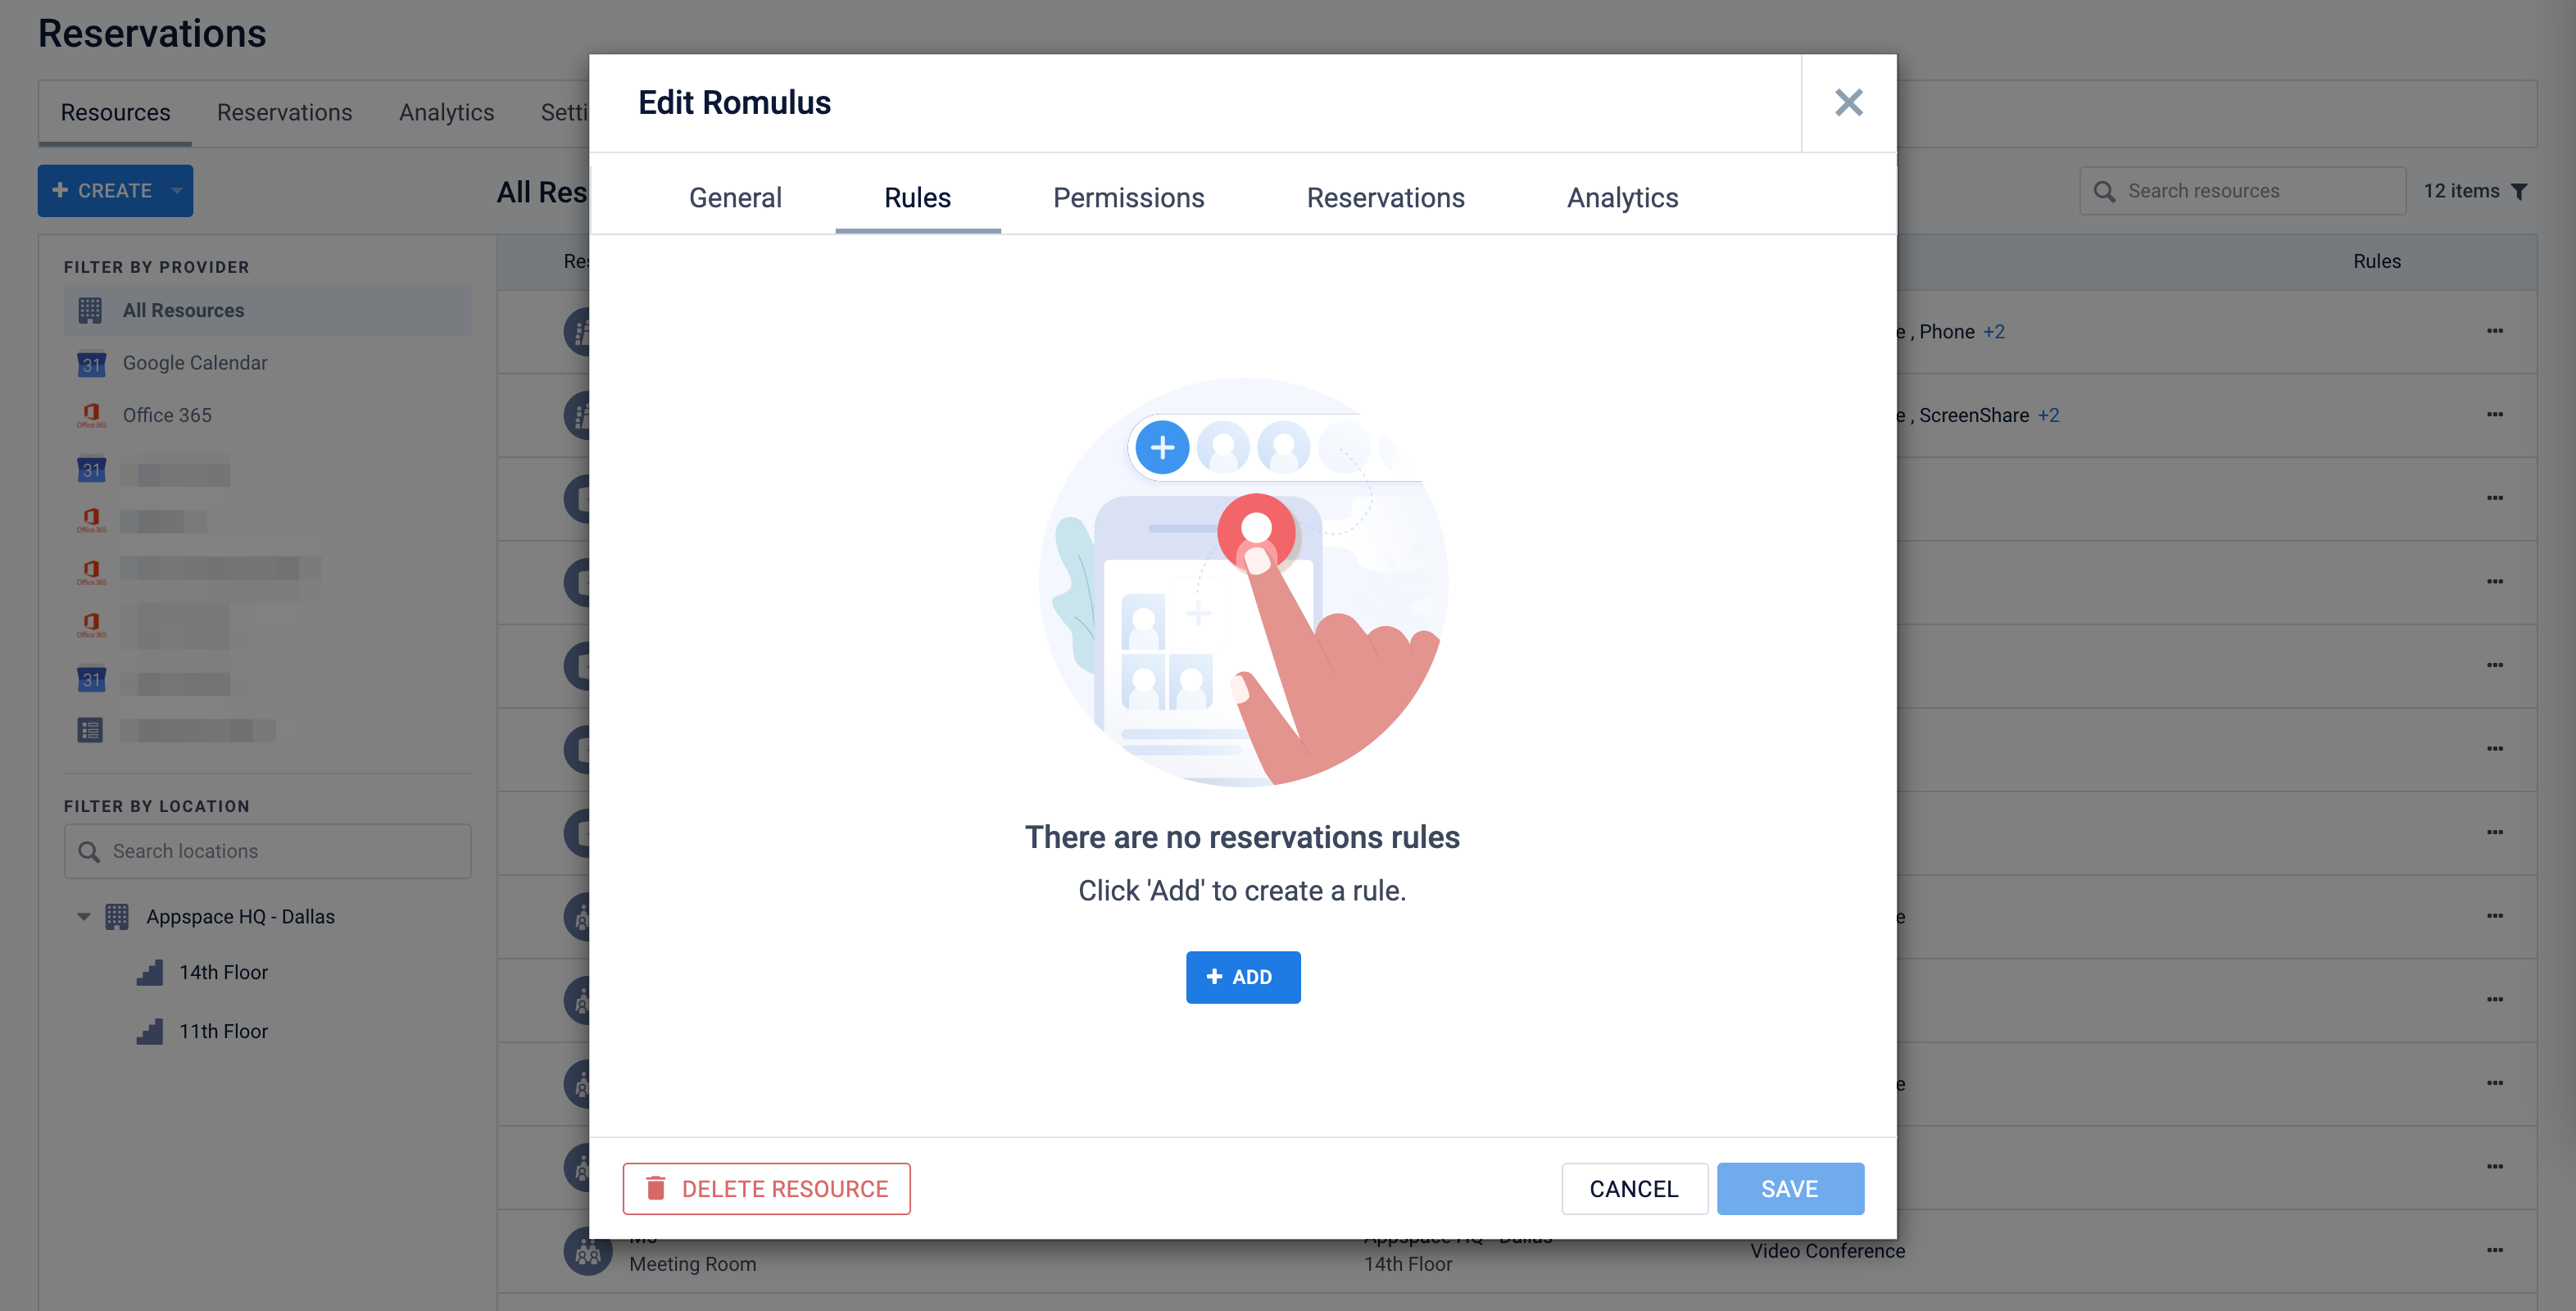
- In the Create Rule window, select Constraint as the Category type. Constraints will be processed when employees search for and attempt to reserve an available resource.

- Select a constraint Type from the drop-down menu, and proceed to configure the constraint fields based on the type selected:
- Allow visitor reservations
- Target Resource – Building
- Allow Visitor Reservations – Slide the toggle to YES to enable visitor reservations, or NO to disable visitor reservations.
- Target Users – Assign the user or user groups.
- Active Period – Determine the Start and End date based on the UTC timezone.
- Description – Enter the description of the constraint.
- Allow visitor drop-ins
- Target Resource – Building
- Allow Visitor Drop-In – Slide the toggle to YES to enable, No to disable.
- Require Confirmation By – Determine if confirmation is required by the Host or Facilitators.
- Target Users – Assign the user or user groups.
- Active Period – Determine the start and end date.
- Description – Enter the description of the constraint.
- Min / Max advance reservation period, Min / Max reservation duration, or Min duration between reservations
- Duration – Enter the Duration of how long the constraint is.
- Booking Period – Select if the booking period Must Start Before or Must Be Complete By, the advanced reservation period. This field is only available when Max advance reservation period is selected.
- Max capacity
- Capacity – Enter the Capacity value, and select if the value is based on per person or percentage from the drop-down menu. This field is only available when Max Capacity is selected.
- Only available on specific days / times
- Setup Availability – Select the timeblocks where reservations will be permitted.
- Recurring reservation limits – Administrators can establish limits for recurring reservations, including setting the maximum number of recurrences, suggesting default recurrence options, and enabling or disabling never-ending recurring events.
- Default Recurrence: How many recurrences will be suggested to users when booking this room.
- Max # of Recurrences: The maximum number of recurrences that will be permitted to be scheduled. Doing it will remove the never-ending option in the reservation panel.
- Max Time period: Define for how long a recurrence sequence can span out.
- Concurrent reservation limits
- Administrators can customize the system to limit the number of concurrent users who can reserve Spaces, Rooms, or Points of Interest.
- Mutually exclusive resource reservations (New) – Administrators can define which resource types cannot be booked together (e.g., a user can book a meeting room OR a private office, but not both) under a location (such as a location, building, or floor).NoteThis rule is only available for locations, buildings, or floors. It is unavailable if a resource is selected.
- Target Resource – Set the rule to apply to Rooms, Spaces, and/or Points of Interest.
- Sub-Types – Select one or more specific sub-types that the rule will apply to, or leave the field blank for the rule to apply to all sub-types under the resources selected above.
- Target Users – You can add specific users or user groups that this rule will apply to. Leave the field blank to apply the rule to all users for the location.
- Active Period – Choose the start and end dates during which the rule will be in effect.
- Description – Provide a description for the rule.
- Requires Check-in Note
- If a reservation is created for a resource between the Allow Before time and the event start time, the rule is bypassed and the resource is automatically set to checked-in for the current event.
- If the reservation is set to Office Hours, the reservation will start at the beginning of Office Hours for the resource. Thus the check-in time (Allow Before and Timeout After) will follow the beginning of office hours.
- In a reservation that has more than one resource (multi-resource reservation), the organizer will be able to view the check-in status of all the scheduled resources and will see an asterisk (*) next to their assigned resource. The organizer will also have the option to check in for all resources. Attendees will only be able to check in their assigned resources.
Important- In a reservation that has more than one resource (multi-resource reservation), if a resource needs to be checked in but isn’t
- The resource will be removed from the event. The organizer and attendees will be notified of this via email.
- In-person attendees assigned to the resource will be converted to virtual attendees.
- The multi-resource event is not affected and the status remains as confirmed.
- If all resources except one have been removed or canceled, and the remaining resource needs to be checked in but isn’t, the event will be automatically canceled. The organizer and attendees (including virtual attendees) will be notified via email.
- Allow Before – Enter the number of minutes the Check-in option will be displayed before the reservation starts.
- Check-in Action –
- Timeout After – Enter the number of minutes the Check-in option will timeout after the reservation starts.
- Timeout Action – Select the Timeout Action from the dropdown menu.
- None
- Auto Cancel
- Auto Check-in
- Auto-Cancel, if virtual conference link is not provided (New) – Releases the resource, while keeping the virtual conference link present in calendars
- (New) Visitor multi check-in/check-out
NoteAdministrators may set a constraint (only at the building level) for hosts and facilitators to allow visitors to check-in and check-out multiple times throughout the duration of the event, using the same QR code/code. The host is notified whenever a check-in/check-out action is done.This rule ends when the set active period is ended, regardless of having a check-in or check-out pending. After the period is ended the host is notified of users who have not completed their pending check-ins or check-outs.- Target Resource – This is set as Building.
- Visitor multi check-in/check-out – Enable this option to set the rule.
- Zombie Meetings
NoteAdministrators may now set a new constraint to auto-delete or send a notification to the meeting organizer, when zombie meetings occur, with the option to set when the constraint will be triggered (i.e. cancellation of multiple consecutive meetings after X number of times). Thus, when an organizer sets recurring meetings, but does not check-in resulting in auto-cancellation for that date, and this is repeated X number of times for the same meeting, then all the recurring meetings are either auto-deleted or a notification is sent to the organizer.Important- In a reservation that has more than one resource (multi-resource reservation), if a resource within a multi-resource event hits the maximum number of allowed consecutive misses, resulting in auto cancellation:
- The resource will be removed from the event. The organizer and attendees will be notified of this via email.
- In-person attendees assigned to the resource will be converted to virtual attendees.
- The multi-resource event is not affected and the status remains as confirmed.
- In a multi-resource reservation, if all resources except one have been removed or canceled, and the remaining resource hits the maximum number of allowed consecutive misses, the event will be auto-canceled. The organizer and attendees (including virtual attendees) will be notified via email.
- After – Enter the number of missed consecutive meetings before executing the action.
- Action – Select the action to be taken:
- Auto cancel the recurring event series.
- Send a notification to the organizer.
- In-Person QR Code Actions
NoteAdministrators may now set constraints to ensure resources are only reserved, checked-in, extended, etc via QR Code only when the employee is physically at the location. This constraint only supported on resources created by the Appspace provider.- Action – Select the action to be taken:
- Create
- Edit / Extend
- Cancel
- Check-In
- End
- Action – Select the action to be taken:
- Lock resources while reserving
NoteAdministrator may now set constraints to ensure that resources are only reserved by one user at a time. Once a resource is locked, it cannot be released until the locking period expires, and other users must wait. The only alternative to release the resource during event creation is to deselect it. The locking period begins when a resource is selected, and even after the event is created, the lock remains until it is manually released, regardless of concurrent reservation rules. If the organizer does not complete the event creation within the locking period, the lock will be automatically released and the resource may be occupied by another user. Lock extensions will apply when the event’s date, time, or timezone is edited. This constraint only supported on resources created by the Appspace provider.
- Duration – To lock the resource, the duration is limited to one hour.
- Description – Enter the description as a remark.
- In a reservation that has more than one resource (multi-resource reservation), if a resource within a multi-resource event hits the maximum number of allowed consecutive misses, resulting in auto cancellation:
- Allow visitor reservations
- In the Target Resource drop-down menu, select the location or resource type the constraint rule applies to. Multiple locations or resource types may be selected from the drop-down menu. This field is hidden if you’re configuring the constraint rule for a specific resource.
- Buildings
- Floors
- Zones
- Rooms
- Sub-Types – You may narrow down the list of resources the constraint rule is applied by selecting the desired Room Sub-type from the drop-down menu.
- Spaces
- Sub-Types – You may narrow down the list of resources the constraint rule is applied by selecting the desired Spaces Sub-type from the drop-down menu.
- In the Target Users field, enter the user or user groups the constraint rule applies to. This field is hidden if Max Capacity is selected.
- In the Active Period calendar field, select the start and end date of the constraint rule duration.
- Enter a Description for the constraint rule.
- Click the ADD button.
- Once a constraint rule has been added, click SAVE in the Edit resource window.
Create Checkpoint Rule
Checkpoints configured here will be displayed to the employee during a reservation or check-in.
You can set the type of checkpoint for the reservation:
- At reservation – the checkpoint rule is set when the reservation is created for the resource.
- On-demand – the checkpoint rule is optional when first creating the reservation and can be added later (but not removed) when editing the reservation. When creating the reservation, these checkpoints will be displayed as options under the Services section. The checkpoint rule is only applicable to the meeting organizer and only the meeting organizer will be able to view these options and receive notifications from the checkpoints.
Below is a description of the types of checkpoints you can configure:
- Consent – Input the text for a consent form that will be displayed during a check-in/reservation. The employee/visitor must choose to either Accept or Decline the content of this form during a reservation. If the consent form is declined by the employee, they cannot proceed with the check-in/reservation.
- Notice – Input the text for a notice that will be displayed during a check-in/reservation. The employee only needs to read the text and click Done to proceed with the reservation/check-in.
- Form – Include a custom card or a URL (HTTPS recommended) pointing to a form, both with a checklist that returns data for validation. During a check-in/reservation, the checklist form is displayed, and the employee must select the options for each item, and click Submit. If the user does not meet any one of the items listed in the checklist, they cannot proceed with the check-in/reservation.
- (New) Service – During check-in or reservation, a form will appear asking if the employee wants to order food from a catering service menu (which must be set up in the Services module). The Service option is only available At reservation and not for On-demand, and is only for Appspace users.NoteThe employee can select one of three options:
- Yes I’ll order now – the employee can select food options from a menu for the reservation / meeting / conference.
- I’ll order later – the employee chooses to perform the order later when completing the check-in process.
- No, I don’t want to order – The employee does not perform an order from any menu. This option is available only if Attendee Compliance for the checkpoint is set to Optional.
After the checkpoint is completed, attendees will be able to view their own food order.
Options for configuration checkpoints on the Room Booking card are as follows:
- Resource checkpoints will only be shown if they match the following conditions:
- Applies to > “All”
- Valid From
- Valid Until
- Active Period
- Inherited checkpoints will only be shown if they match the following conditions:
- Valid From
- Valid Until
- Applies to > “All”
- Target Resources > “Rooms” / “Spaces”
- Active Period
- Sub-Types > applicable only if the resource subtype matches
Follow the instructions below to configure the checkpoint:
-
-
-
- In Reservations, click the Resources tab, and select a specific resource, or location to configure the checkpoint.
- To configure a checkpoint on a specific resource, click the resource name from the All Resources listing page.
- To configure a checkpoint on a location (all resources within the location will inherit the checkpoint), click the ellipsis of the selected location from the location tree in the side panel, and click Edit.
- In the Edit resource window, select the Rules tab to configure the resource rules, or to view inherited rules.
- Click the +Add Rule button to create a rule for the resource.
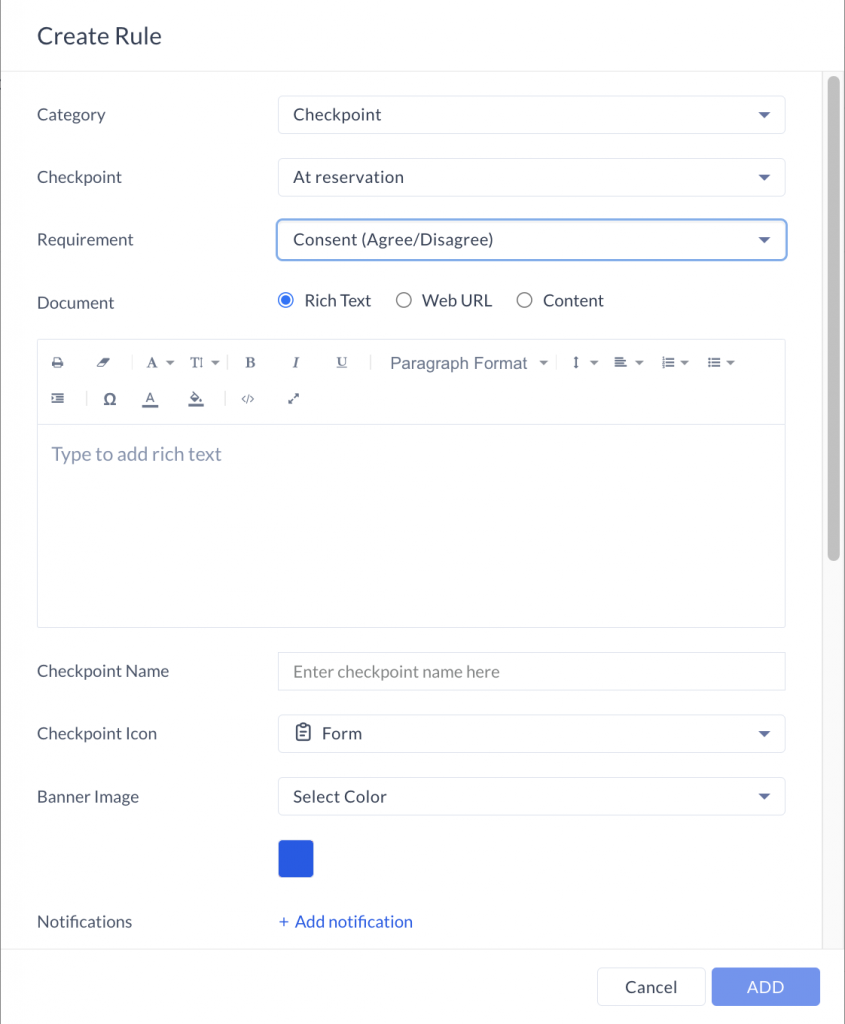
- In the Create Rule window, select Checkpoint as the Category type. Checkpoints will be processed and displayed to the employee during a reservation or check-in.
- Select when the Checkpoint should be displayed. Default is At reservation. NoteSetting the Requirement as Service in the next step will set the checkpoint to At reservation.
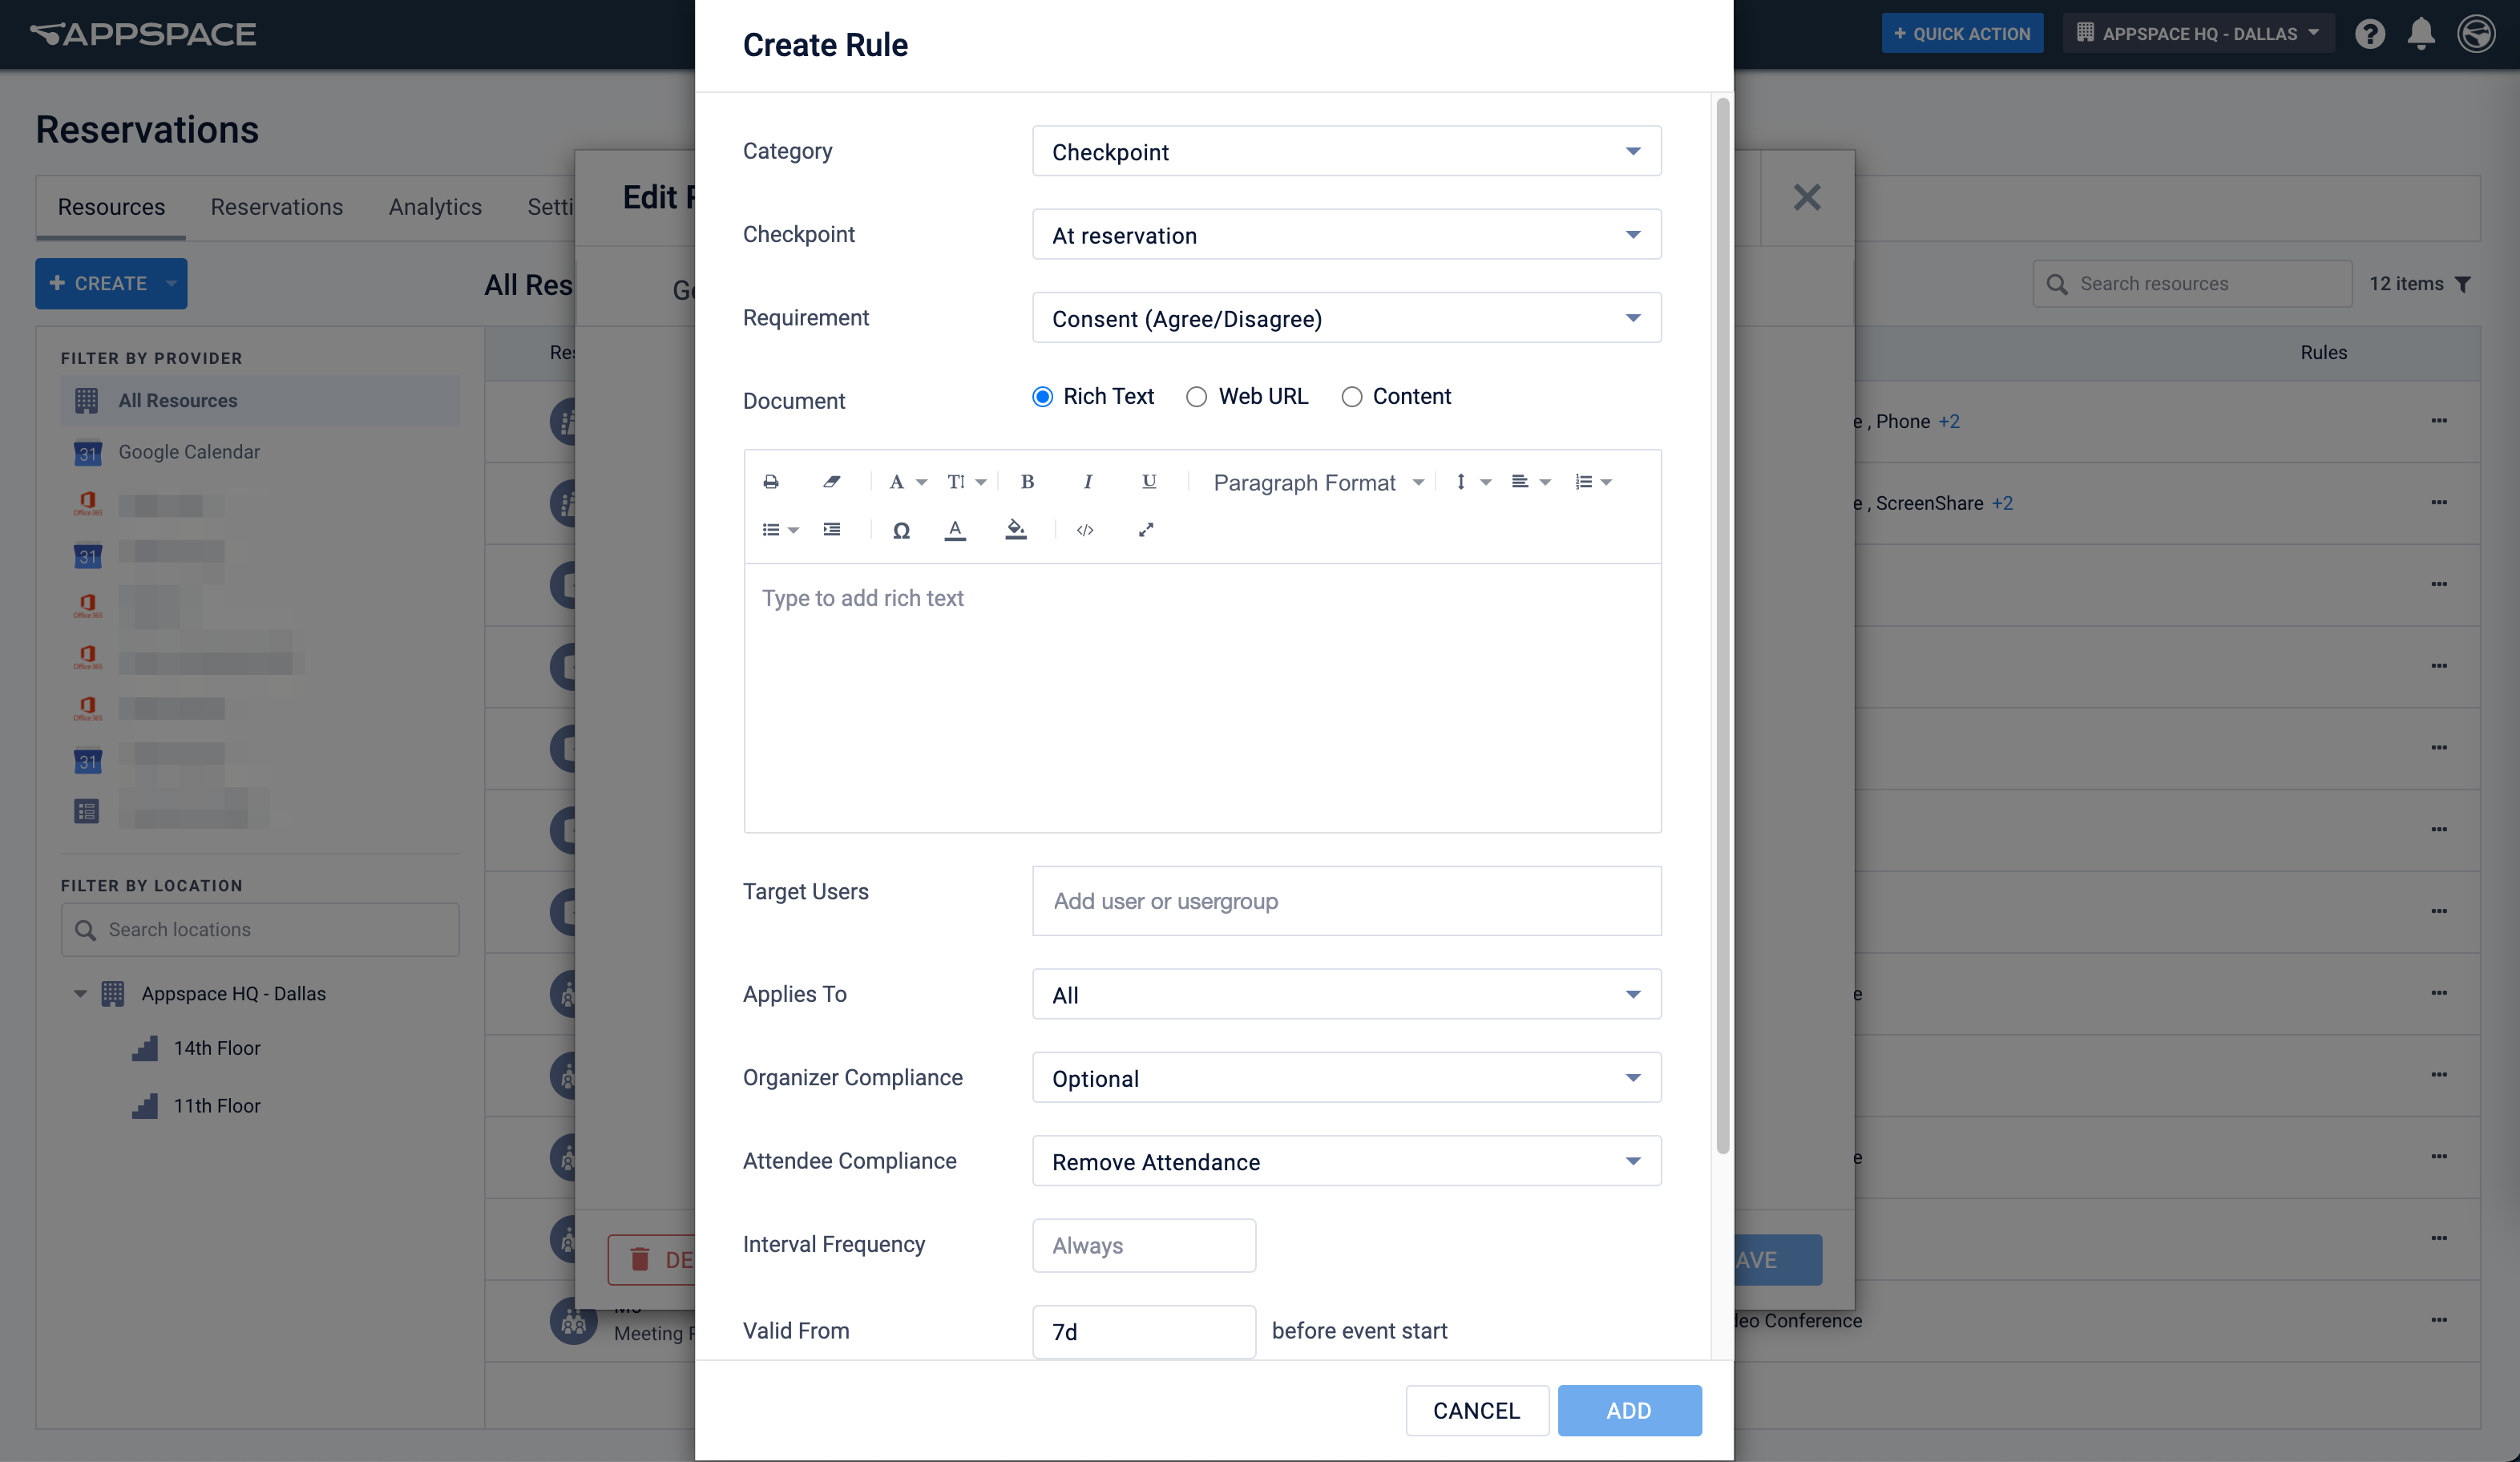
- Select a checkpoint type under Requirement. The employee will need to fulfill this requirement before being able to make a reservation or check-in via the Appspace Employee App (as described above):
- Consent (Agree/Disagree) – The consent form must be declined or accepted by the user before proceeding with check-in/reservation.
- Notice – A notice is displayed to the user. The check-in/reservation will proceed once Done is clicked.
- Form – A validation form is displayed, and the employee must pass the validation to proceed with check-in/reservation.
- (New) Service – A form will appear asking if the employee wants to order food from a catering service (configured in the Services module). The employee can choose to order immediately from a menu for the reservation / meeting / conference, or to complete the order later when completing the check-in process. If the checkpoint is set as Optional, the employee can choose to decline to order. ImportantEnsure that a Service and Menu have been set up in the Services module and that both are set as Active if selecting Service in this step.NoteIf Service is selected, skip the next step (Document), and proceed to Step 8 below.
- Select the desired Document format for entering the checkpoint requirement information:
- Rich Text – Enter the desired text using the rich text editor.
- Web URL – Enter the website URL link that would be displayed to the user.
- Content – Select content from the Library that can return a validation such as a Custom Form Card.
Note
- It is recommended that Web URL links are in HTTPS.
- If using the Form option, we recommend using only the Web URL or Content document format at this point. Ensure the Web URL website or Content using a custom card is able to return a Pass or Fail validation in order for the checkpoint to proceed.
- (New) In the Service field, type in and select a service from the drop-down. For the Menu field, proceed to also type in and select a menu. The Service and Menu fields are only available if Requirement is set as Service above.
- In the Checkpoint Name field, you may provide the name and description of the checkpoint that will be shown during the checkpoint.
- Select the Checkpoint Icon which will be displayed in the Reservations module to represent this checkpoint.
- For Banner image, select a color or upload an image to be displayed at the top of the checkpoint.
- Select Color – Select a background color for the banner of the checkpoint.
- Upload Image – Upload an image to be displayed as the banner of the checkpoint.
- If the Requirement field for the checkpoint is selected as Form or Service above, the Allow Response Editing option is displayed. Select Yes to allow organizers or attendees to edit their respective checkpoint answers after submitting their checkpoints. If Yes is selected, the following options will be displayed:
- Editable Until – Enter the minutes before or after the reservation event is started and select one of the following options.
- After event start – The checkpoint answers are editable for the number of minutes after the event has started. This option is hidden if Service is selected for Requirement above.
- Before event start – The checkpoint answers are editable until the number of minutes before the event starts.
- Editable Until – Enter the minutes before or after the reservation event is started and select one of the following options.
- For Notification, you may add custom notifications for the checkpoint. The notification can be triggered by a set of rules within the checkpoint.
- Name – Name the notification to identify it in a list within the checkpoint rule.
- Event – Select the event that causes the notification to trigger:
- Checkpoint Passed – The checkpoint was completed successfully.
- Checkpoint Failed – The checkpoint was not completed by the end of the validation period.
- Event Updated – The reservation event was updated by the organizer.
- Event Cancelled – The reservation event was canceled by the organizer.
- Operator – The condition for the notification trigger. Select Contains or Does not contain.
- Labels – Enter labels in the form data that will trigger the notification.
- Notification Type – Select the type of notification:
- User Notification – The notification is sent via Email and/or Enterprise Message. Enter the Users that will be notified below.
- HTTP endpoint – Sends the checkpoint information to a 3rd party HTTP endpoint.
- In the Target Resource drop-down menu, select the location or resource type the checkpoint applies to. Multiple locations or resource types may be selected from the drop-down menu. This field is hidden if you’re configuring the checkpoint to a specific resource, or if Requirement is set as Service above.NoteIn a reservation that has more than one resource (multi-resource reservation), in-person attendees will receive, see and fill checkpoints only for their assigned resources.
- Buildings
- Floors
- Zones
- Rooms
- Sub-Types – You may narrow down the list of resources the checkpoint is applied to by selecting the desired Room Sub-type from the drop-down menu.
- Spaces
- Sub-Types – You may narrow down the list of resources the checkpoint is applied to by selecting the desired Spaces Sub-type from the drop-down menu.
- In the Target Users field, enter the user or user groups the checkpoint rule applies to.
- In the Applies To drop-down menu, select if the checkpoint rule is applied to the following:
- All
- Attendees Only
- Organizers Only
- Select the Organizer Compliance: Optional or Required.
- Select the Attendee Compliance: Optional, Remove Attendance, or Required.Note
- When Remove Attendance is selected, if the attendee does not complete the checkpoint during a reservation, the attendee will be removed from the attendees list. If completed, a QR code is generated for reservations.
- If Requirement is set as Service above, the Remove Attendance option is unavailable. Selecting Required removes the option to not order a menu item during check-in.
- Select the Attendee Type: All, Appspace Users Only, or Visitors Only. Attendee type is set to Appspace Users only if Requirement is set as Service above.
- The Visitor Types option is available if Attendee Type is selected as All or Visitors Only. Click to select the visitor types that the checkpoint rule will apply to (you can select more than one option).
- In the Interval Frequency field, select days, hours, or minutes. This will determine at which interval or how often you are required to complete the checkpoint document when reserving a resource. NoteThe Interval Frequency, Valid From, and Valid Until fields are not displayed if Requirement is set as Service above.
- In the Valid From field, select the duration in days, hours, or minutes, to determine when the checkpoint is in effect before the start of the event.
- In the Valid Until field, select the duration in days, hours, or minutes, to determine when the checkpoint is in effect after the start of the event, before the start of the event, or after a checkpoint is valid. Ideal for displaying a checklist a few days prior to a meeting.
Note
- Ensure the Valid Until value is less than the Valid From value date to be able to create a checkpoint.
- If the Valid Until value is the same or greater than the Valid From value date, the Valid Until value will be automatically updated to be less than 10 mins from the Valid From value date.
NoteIf a reservation is set to Office Hours, the event will start at the beginning of Office Hours for the resource. Thus the time the checkpoint is in effect (Valid From and Valid Until) will follow the beginning of office hours. - (New) The Preparation time is set based on the same setting for Menu in the Services module and cannot be changed in this step. This field is only displayed if Service is selected for Requirement above.
- In the Active Period calendar field, select the start and end date of the checkpoint duration.
- Enter a Description for the checkpoint rule.
- Click the ADD button.
- Once a constraint or checkpoint rule has been added, click SAVE in the Edit resource window.
- Proceed to the Create Approval Workflow section if you wish to specify approvers for the resource. Otherwise, proceed to the Configure Resource Permissions section below.
- In Reservations, click the Resources tab, and select a specific resource, or location to configure the checkpoint.
-
-

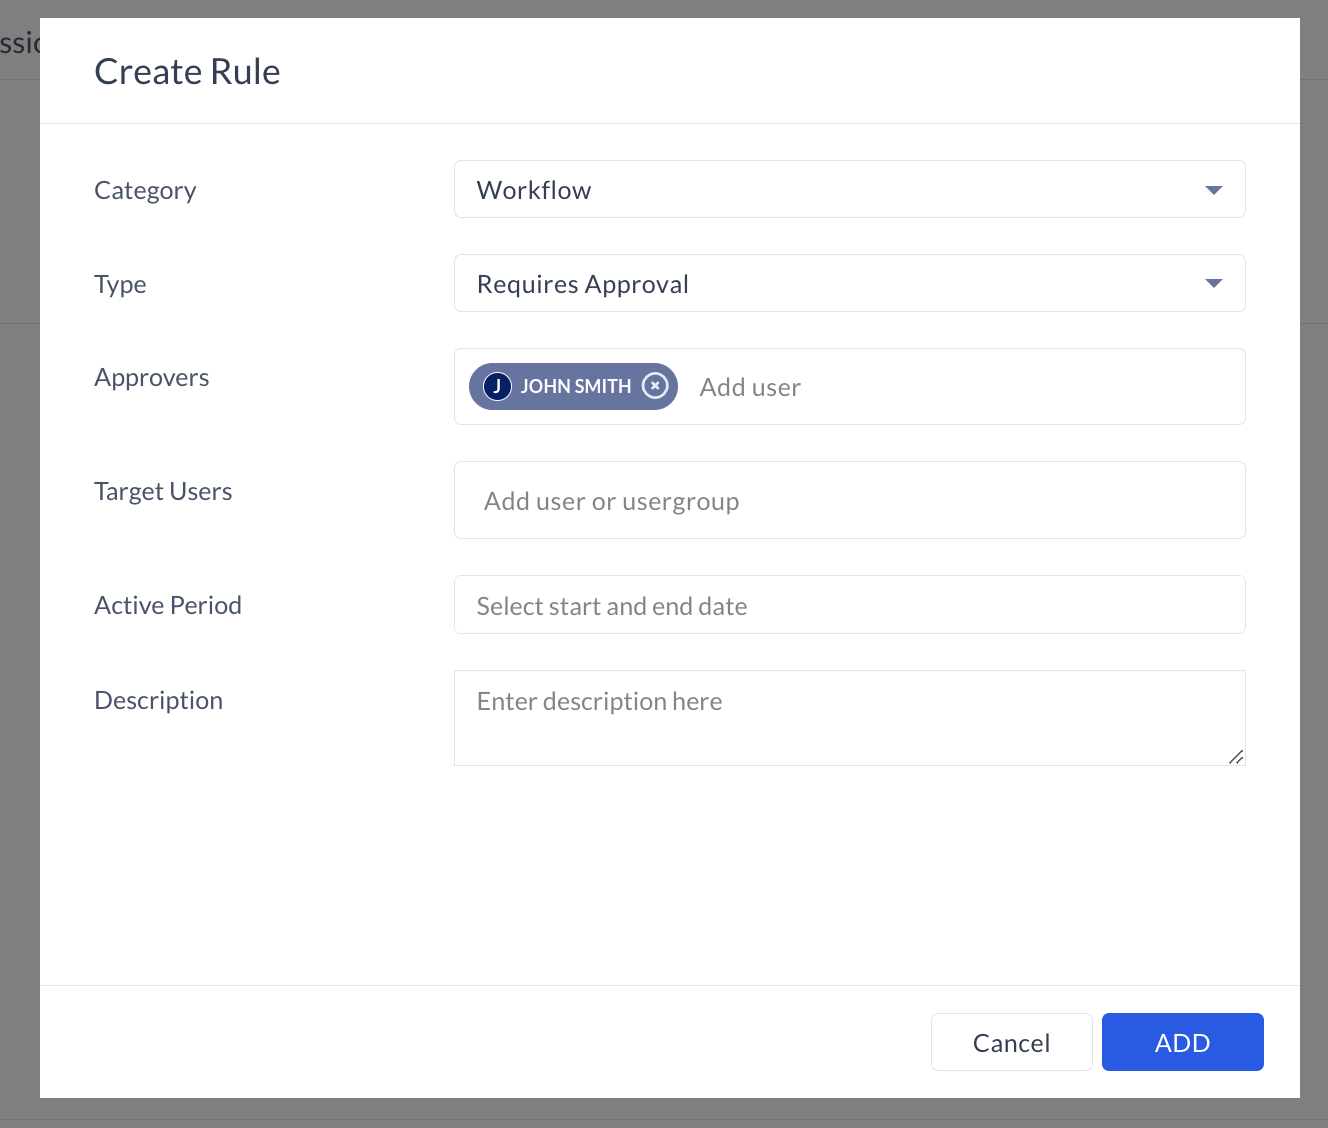
Create Approval Workflow
Approval workflows enable organizations to specify that meeting organizers must go through an approval process when attempting to reserve certain resources (e.g., rooms, workplaces, buildings, or locations). Administrators can configure an approval workflow for a resource similar to a rule/constraint, and assign approvers for the resource. The approval workflow is started when the organizer creates the reservation for a resource that requires approval. The assigned approver is notified that the reservation is pending approval and can choose to approve the reservation of the resource or decline it. When the allocation is approved, the resource status is changed from pending approval to reserved. The organizer is notified through email that the reservation is approved. Follow the instructions below to add and configure approval workflow rules to a resource:
Configure Resource Permissions
You may configure permissions of a resource to restrict the reservation of the resource to only certain users or user groups. This ensures that only authorized users can reserve the resource in the Appspace Employee App.
Follow the instructions below to configure permissions for your resource:
- In Reservations, click the Resources tab, and select a specific resource, or location to configure the permission.
- To configure permissions on a specific resource, click the resource name from the All Resources listing page.
- To configure permissions on a location (all resources within the location will inherit the constraint rule), click the ellipsis of the selected location from the location tree in the side panel, and click Edit.
- In the Edit resource window, click the Access Permissions tab to configure the resource permissions or view inherited permissions.
- Click +Add Permissions and select the desired users or user groups to provide them with access to reserve this resource.
- Click Save.
- You may disable inherited permissions by sliding the Inherited Access Control Permissions slider to NO for this resource.
 NoteDisabling Inherited Permissions on a location, floor, or zone does not impact resources within the location, floor, or zone. The resources within these places will still have the Inherited Permission toggled ON by default.
 - Click SAVE.
- The resource can now only be reserved by the selected users or user groups in the Appspace Employee App.
- Once you have made any reservation, you may proceed to the View Resource Reservations section below.
- You may also proceed to configure the global settings for your reservations. Proceed to the Configure Reservation Public/Private View (Sensitivity) section below.

Configure Resource and Location Management
(New) You may configure permissions for a location (campus, buildings, or floors) or resource (rooms, workspaces) to restrict the administration of the resource to certain users or user groups. This ensures that only authorized location administrators can manage the resource in the Admin Console.
Follow the instructions below to configure permissions for your resource:
- In Reservations, click the Resources tab, and select a specific resource or location to configure the permission.
- To configure permissions on a specific resource, click the resource name from the All Resources listing page.
- To configure permissions on a location (all resources within the location will inherit the constraint rule), click the ellipsis of the selected location from the location tree in the side panel, and click Edit.
- In the Edit resource window, click the Management Controls tab to configure the resource permissions or view inherited permissions.
- Click +Add Permissions and select the desired location admins or user groups to provide them with access to reserve this resource.
- Click Save.
- You may disable inherited permissions by sliding the Inherited Access Control Permissions slider to NO for this resource.
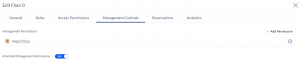
NoteDisabling Inherited Permissions on a location, floor, or zone does not impact resources within the location, floor, or zone. The resources within these places will still have the Inherited Permission toggled ON by default. - Click SAVE.
- The resource or location can now only be managed by the selected location admins or user groups in the Admin Console.
- Once you have made any reservation, you may proceed to the View Resource Reservations section below.
- You may also proceed to configure the global settings for your reservations. Proceed to the Configure Reservation Public/Private View (Sensitivity) section below.
View Resource Reservations
To view all the reservations that have been made for this selected resource, do the following:
- Click a resource name in the Resources tab on the Reservations dashboard.
- In the Edit resource window, click the Reservations tab.

- You may view all reservations for the resource based on the default Period, which can be changed from the drop-down calendar.
- You may search for a specific reservation by entering a keyword in the Search field, or by clicking the Filter icon to filter reservations by the user.
- To directly edit any reservation, click the ellipsis next to the reservation, and click Edit.
- In the Edit Reservation window, you may adjust reservation dates, view the rules, or cancel the reservation.
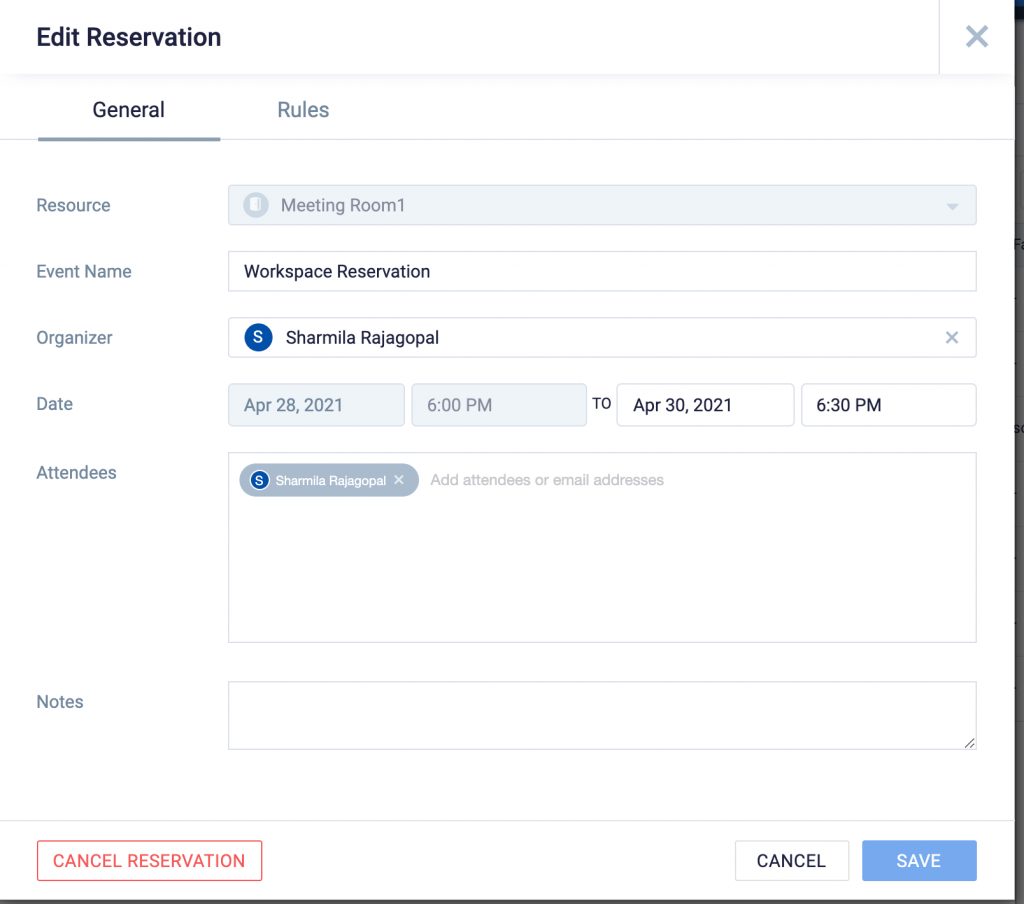
- Once done, click SAVE.
Manage Multiple Resources
Resources can be managed by directly clicking the resource, or selecting multiple resources to edit in bulk.
- On the Resources dashboard, select multiple resources.
- The bulk edit toolbar is displayed at the bottom of the screen.
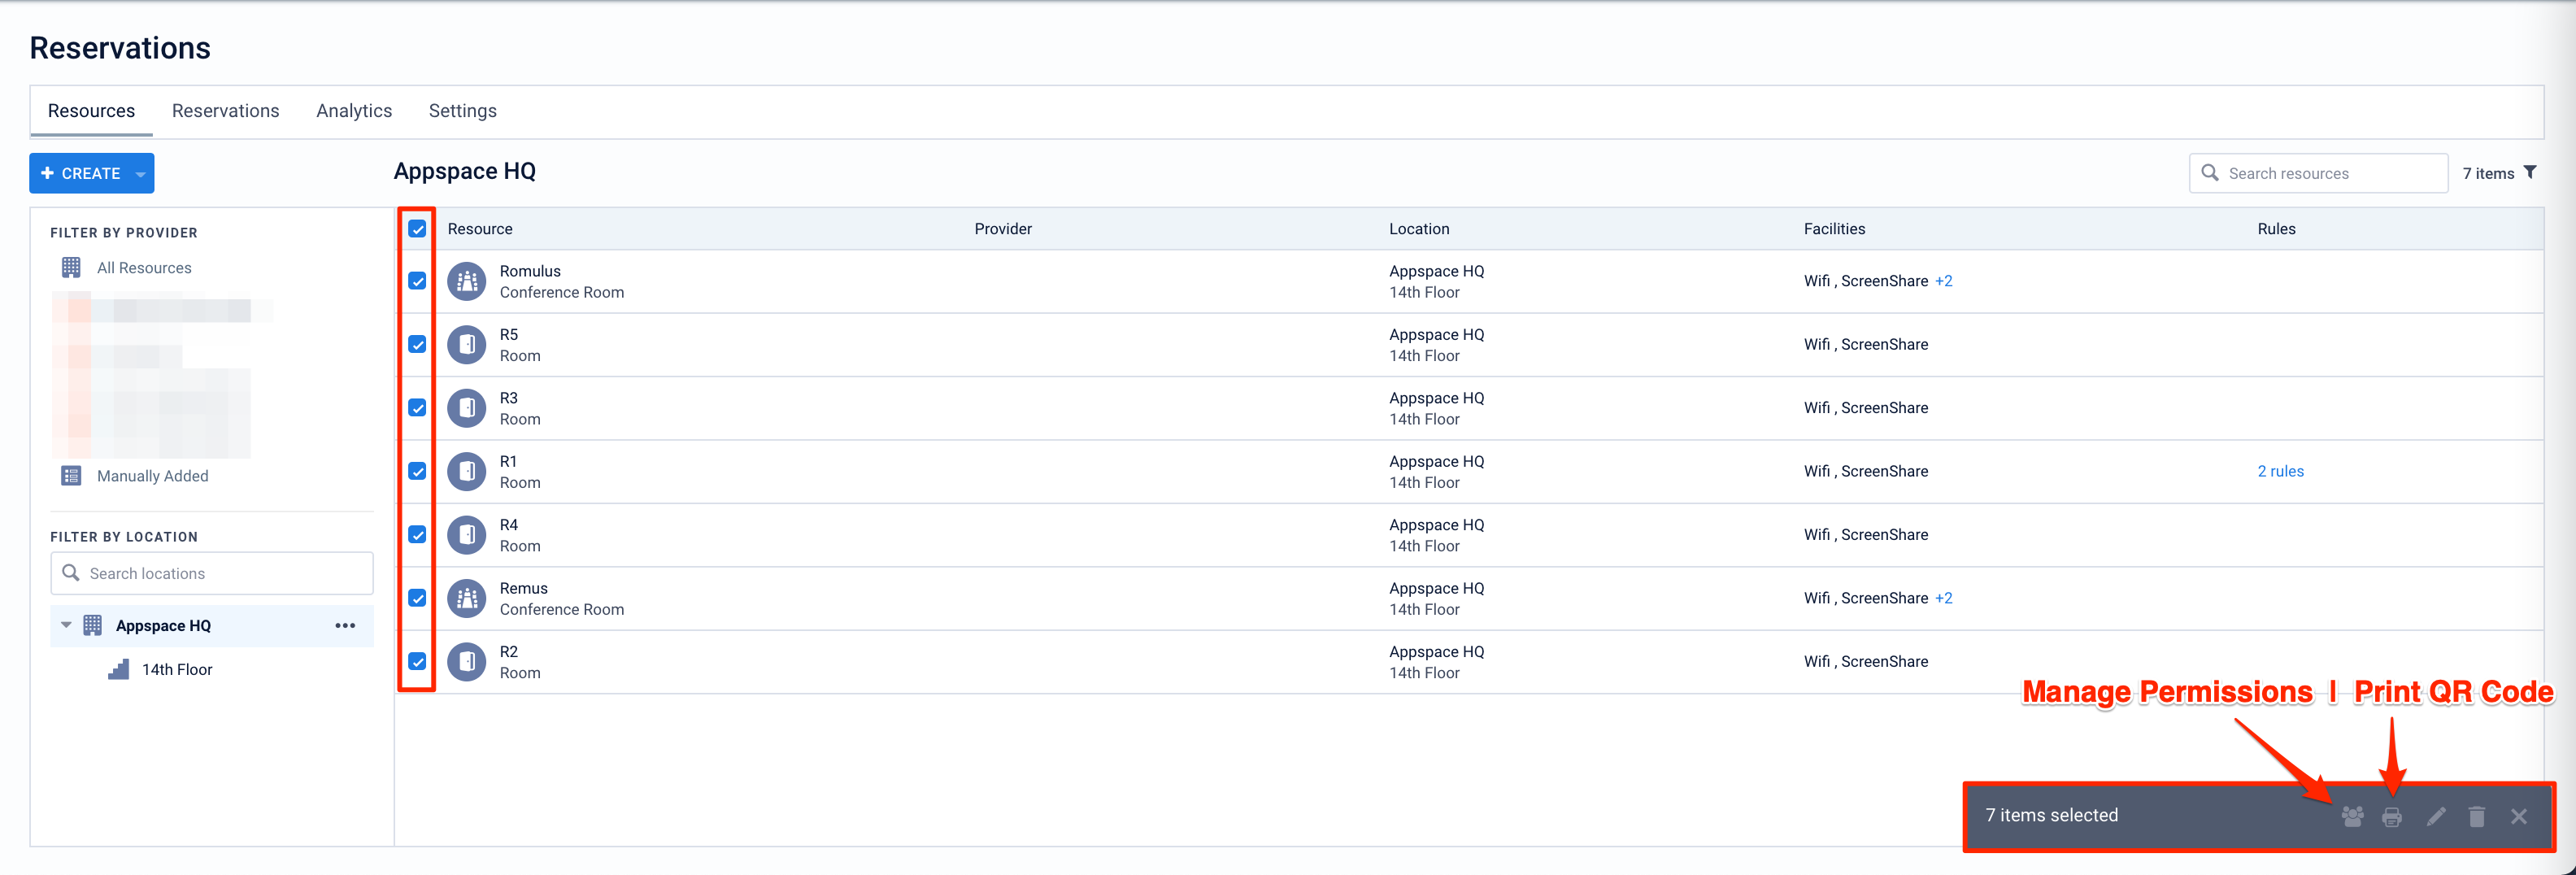
- Click any desired icon to perform one of the following actions:
- Manage Permissions – Manage the permissions for the selected resources.
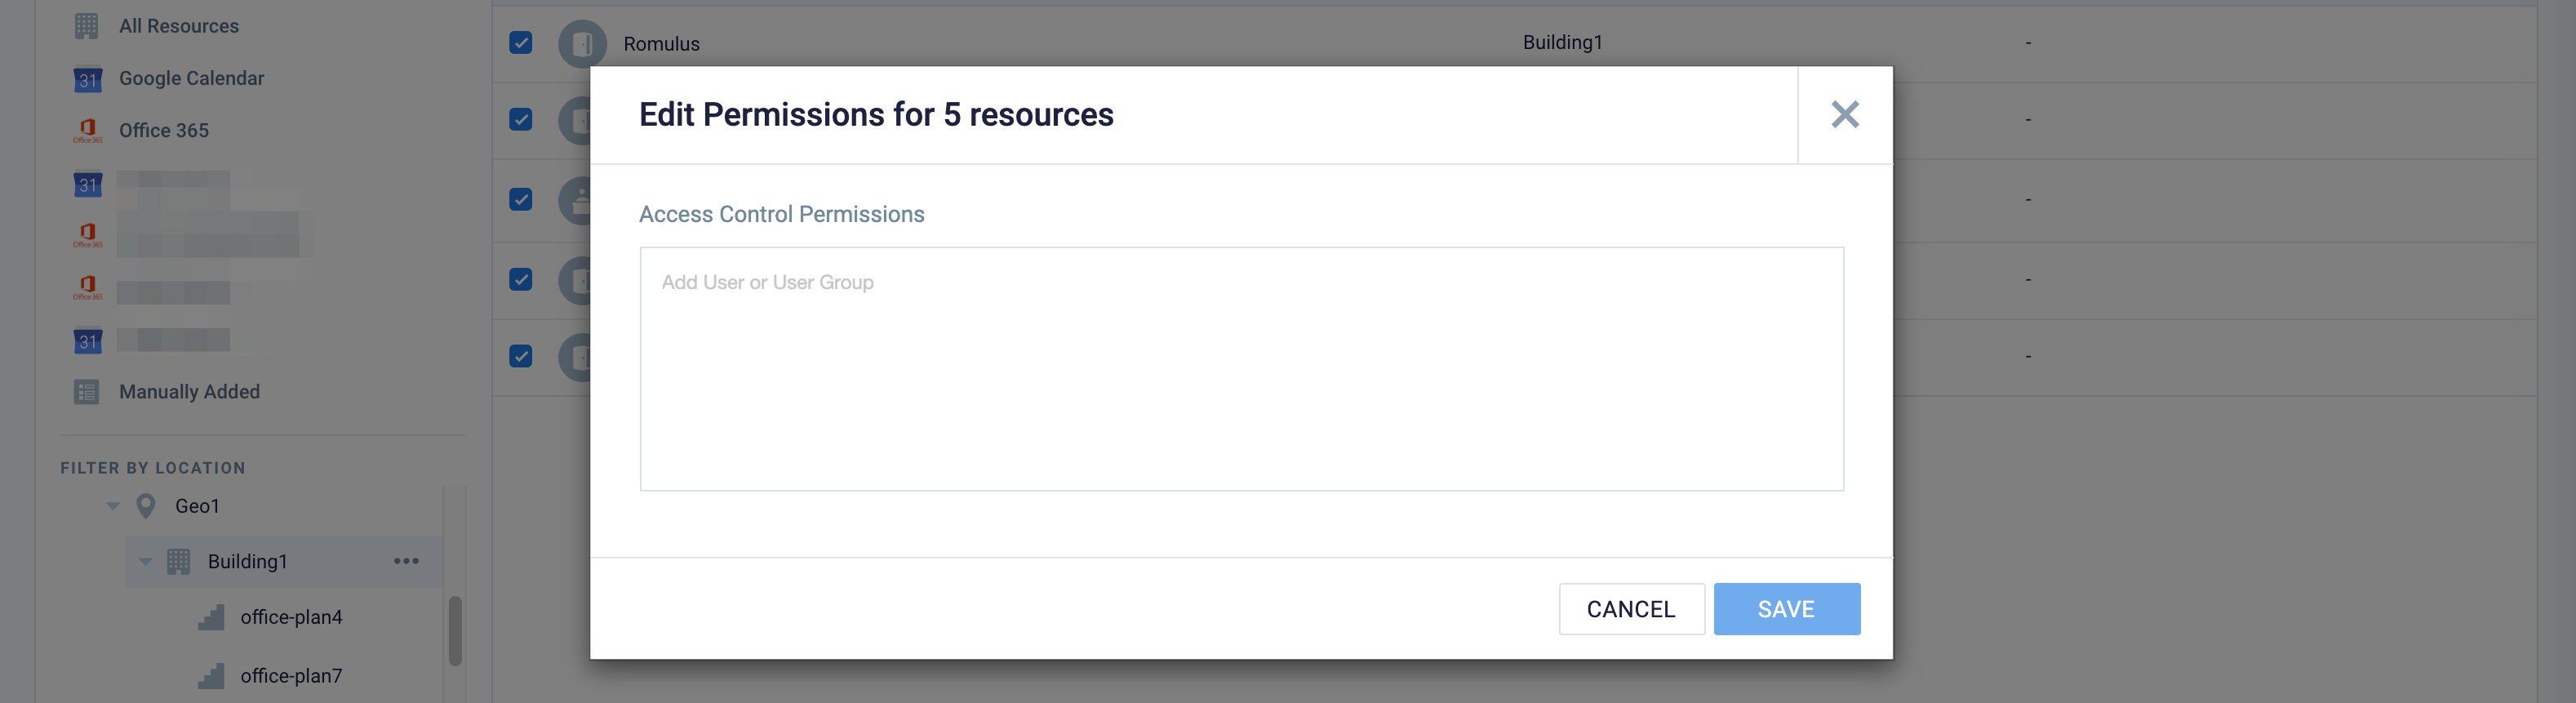
- Manage Permissions – Manage the permissions for the selected resources.
- In the Access Control Permissions field, enter the User or User Groups that would be given access to the selected resources.
- Click SAVE to make the changes to all the selected resources.
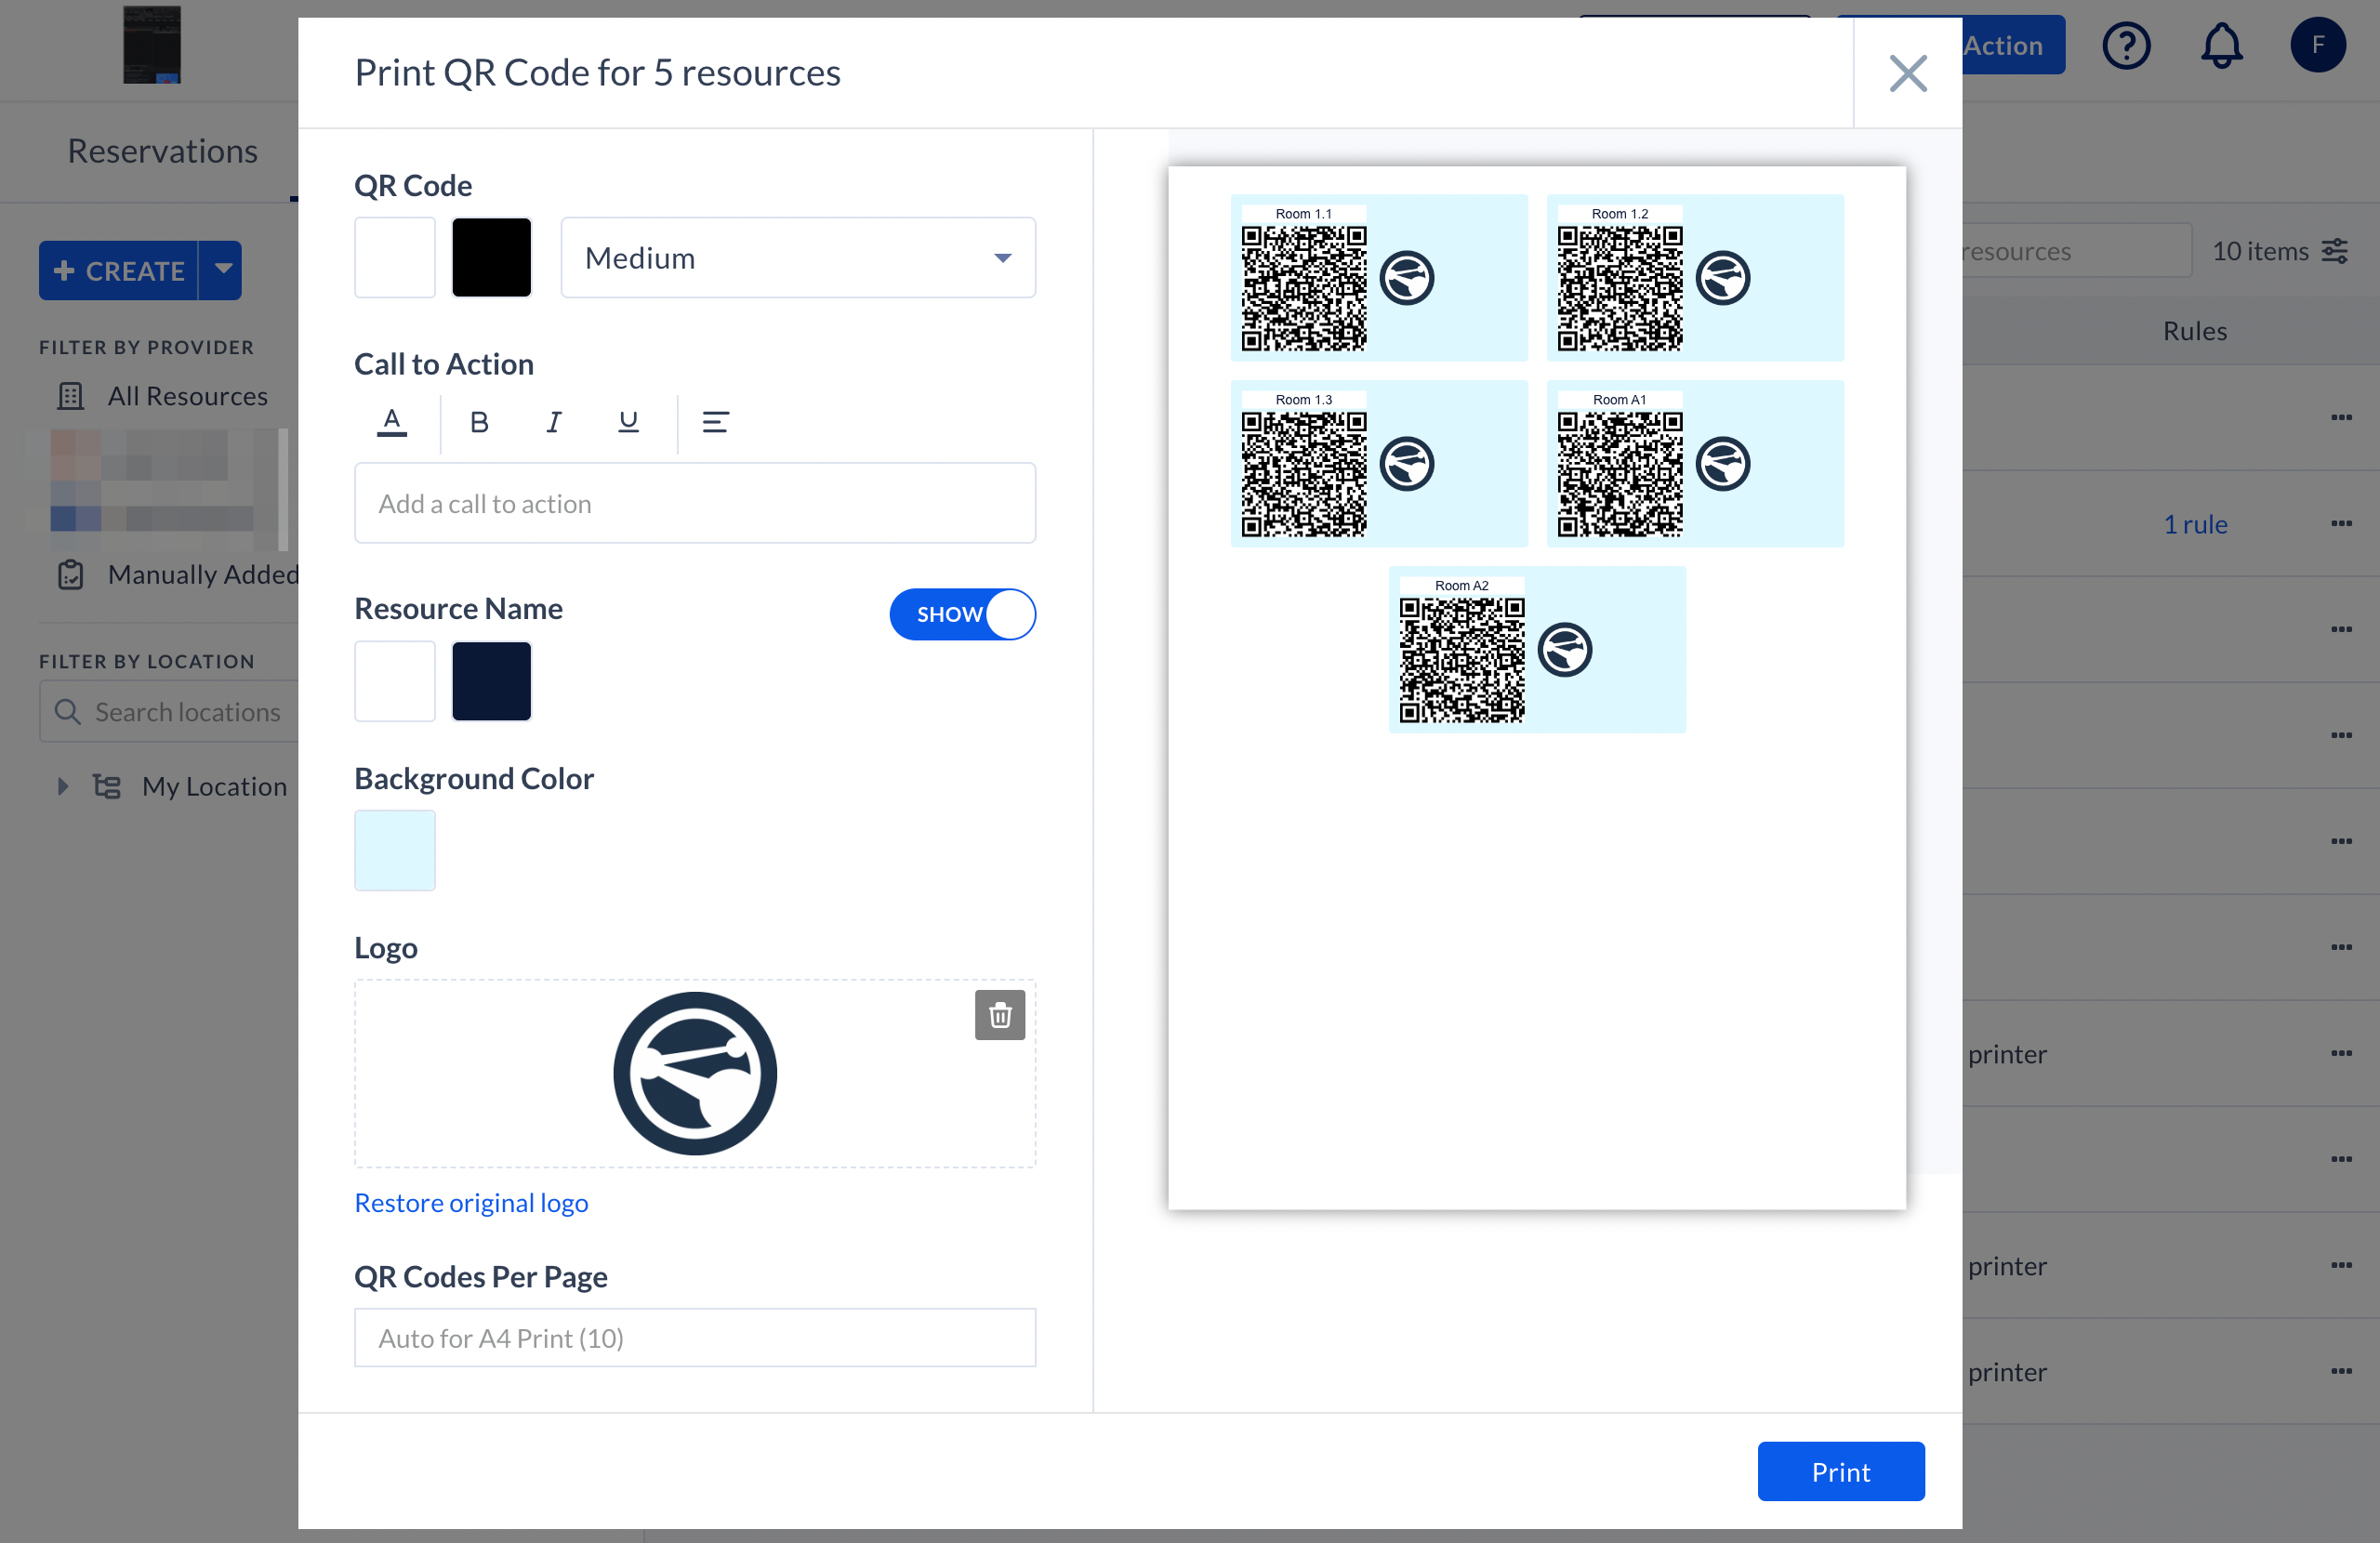
- Print QR Code – Print the QR Codes for the selected resources. You may also perform the following customizations:
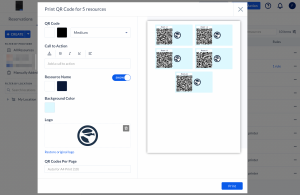
- QR Code – Select the QR code foreground and background color, and select the size from the drop-down menu.
- Call to Action Text – Select the text color and formatting, and enter the desired call to action text.
- Resource Name – Select the text color and background color for the resource name, or disable showing the resource name via the SHOW toggle option.
- Background Color – Select the background color for the resource sections on the page.
- Logo – Upload the logo to be displayed next to each QR code for the resources on the page.
- QR Codes Per Page – Select a number of QR codes to print per page. Defaults at 12 per page for A4 paper size.
- Edit – Bulk manage the selected resources.
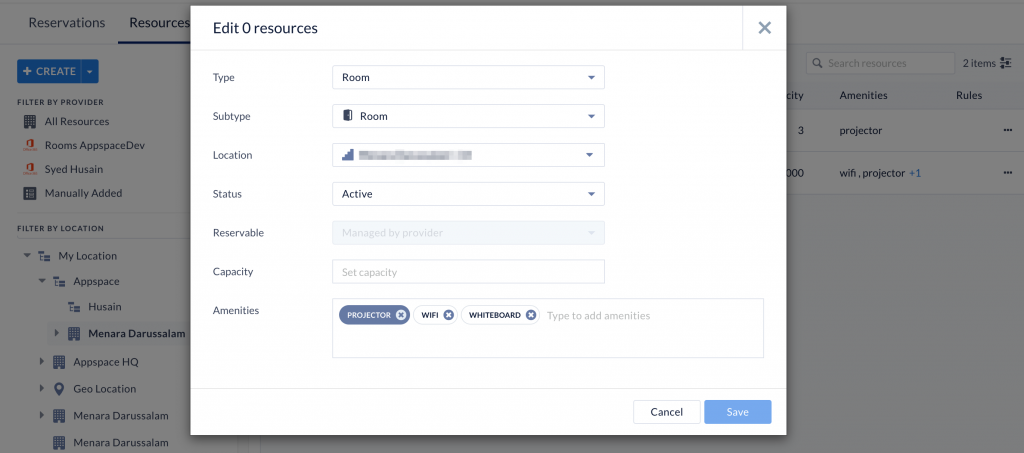
- Proceed to make the following changes to the selected resources:
- Type – Select the type of the resources.
- Subtype – Select the subtype of the resources.
- Location – Select the location of the resources.
- Status – Select the status of the resources.
- Reservable – Select if the resources are reservable.
- Capacity – Enter the capacity of the resource.
- Amenities – Enter all amenities available in the resources.
- Click SAVE to make changes to all the selected resources.
- Proceed to make the following changes to the selected resources:
- Delete – Delete the selected resources.

Add Reservable Resources to a Floorplan
Prerequisites
The following objects should be created before you begin adding reservable spaces:
- locations
- buildings
- floor plans
- additional floor layers (optional)
Add Reservable Resource
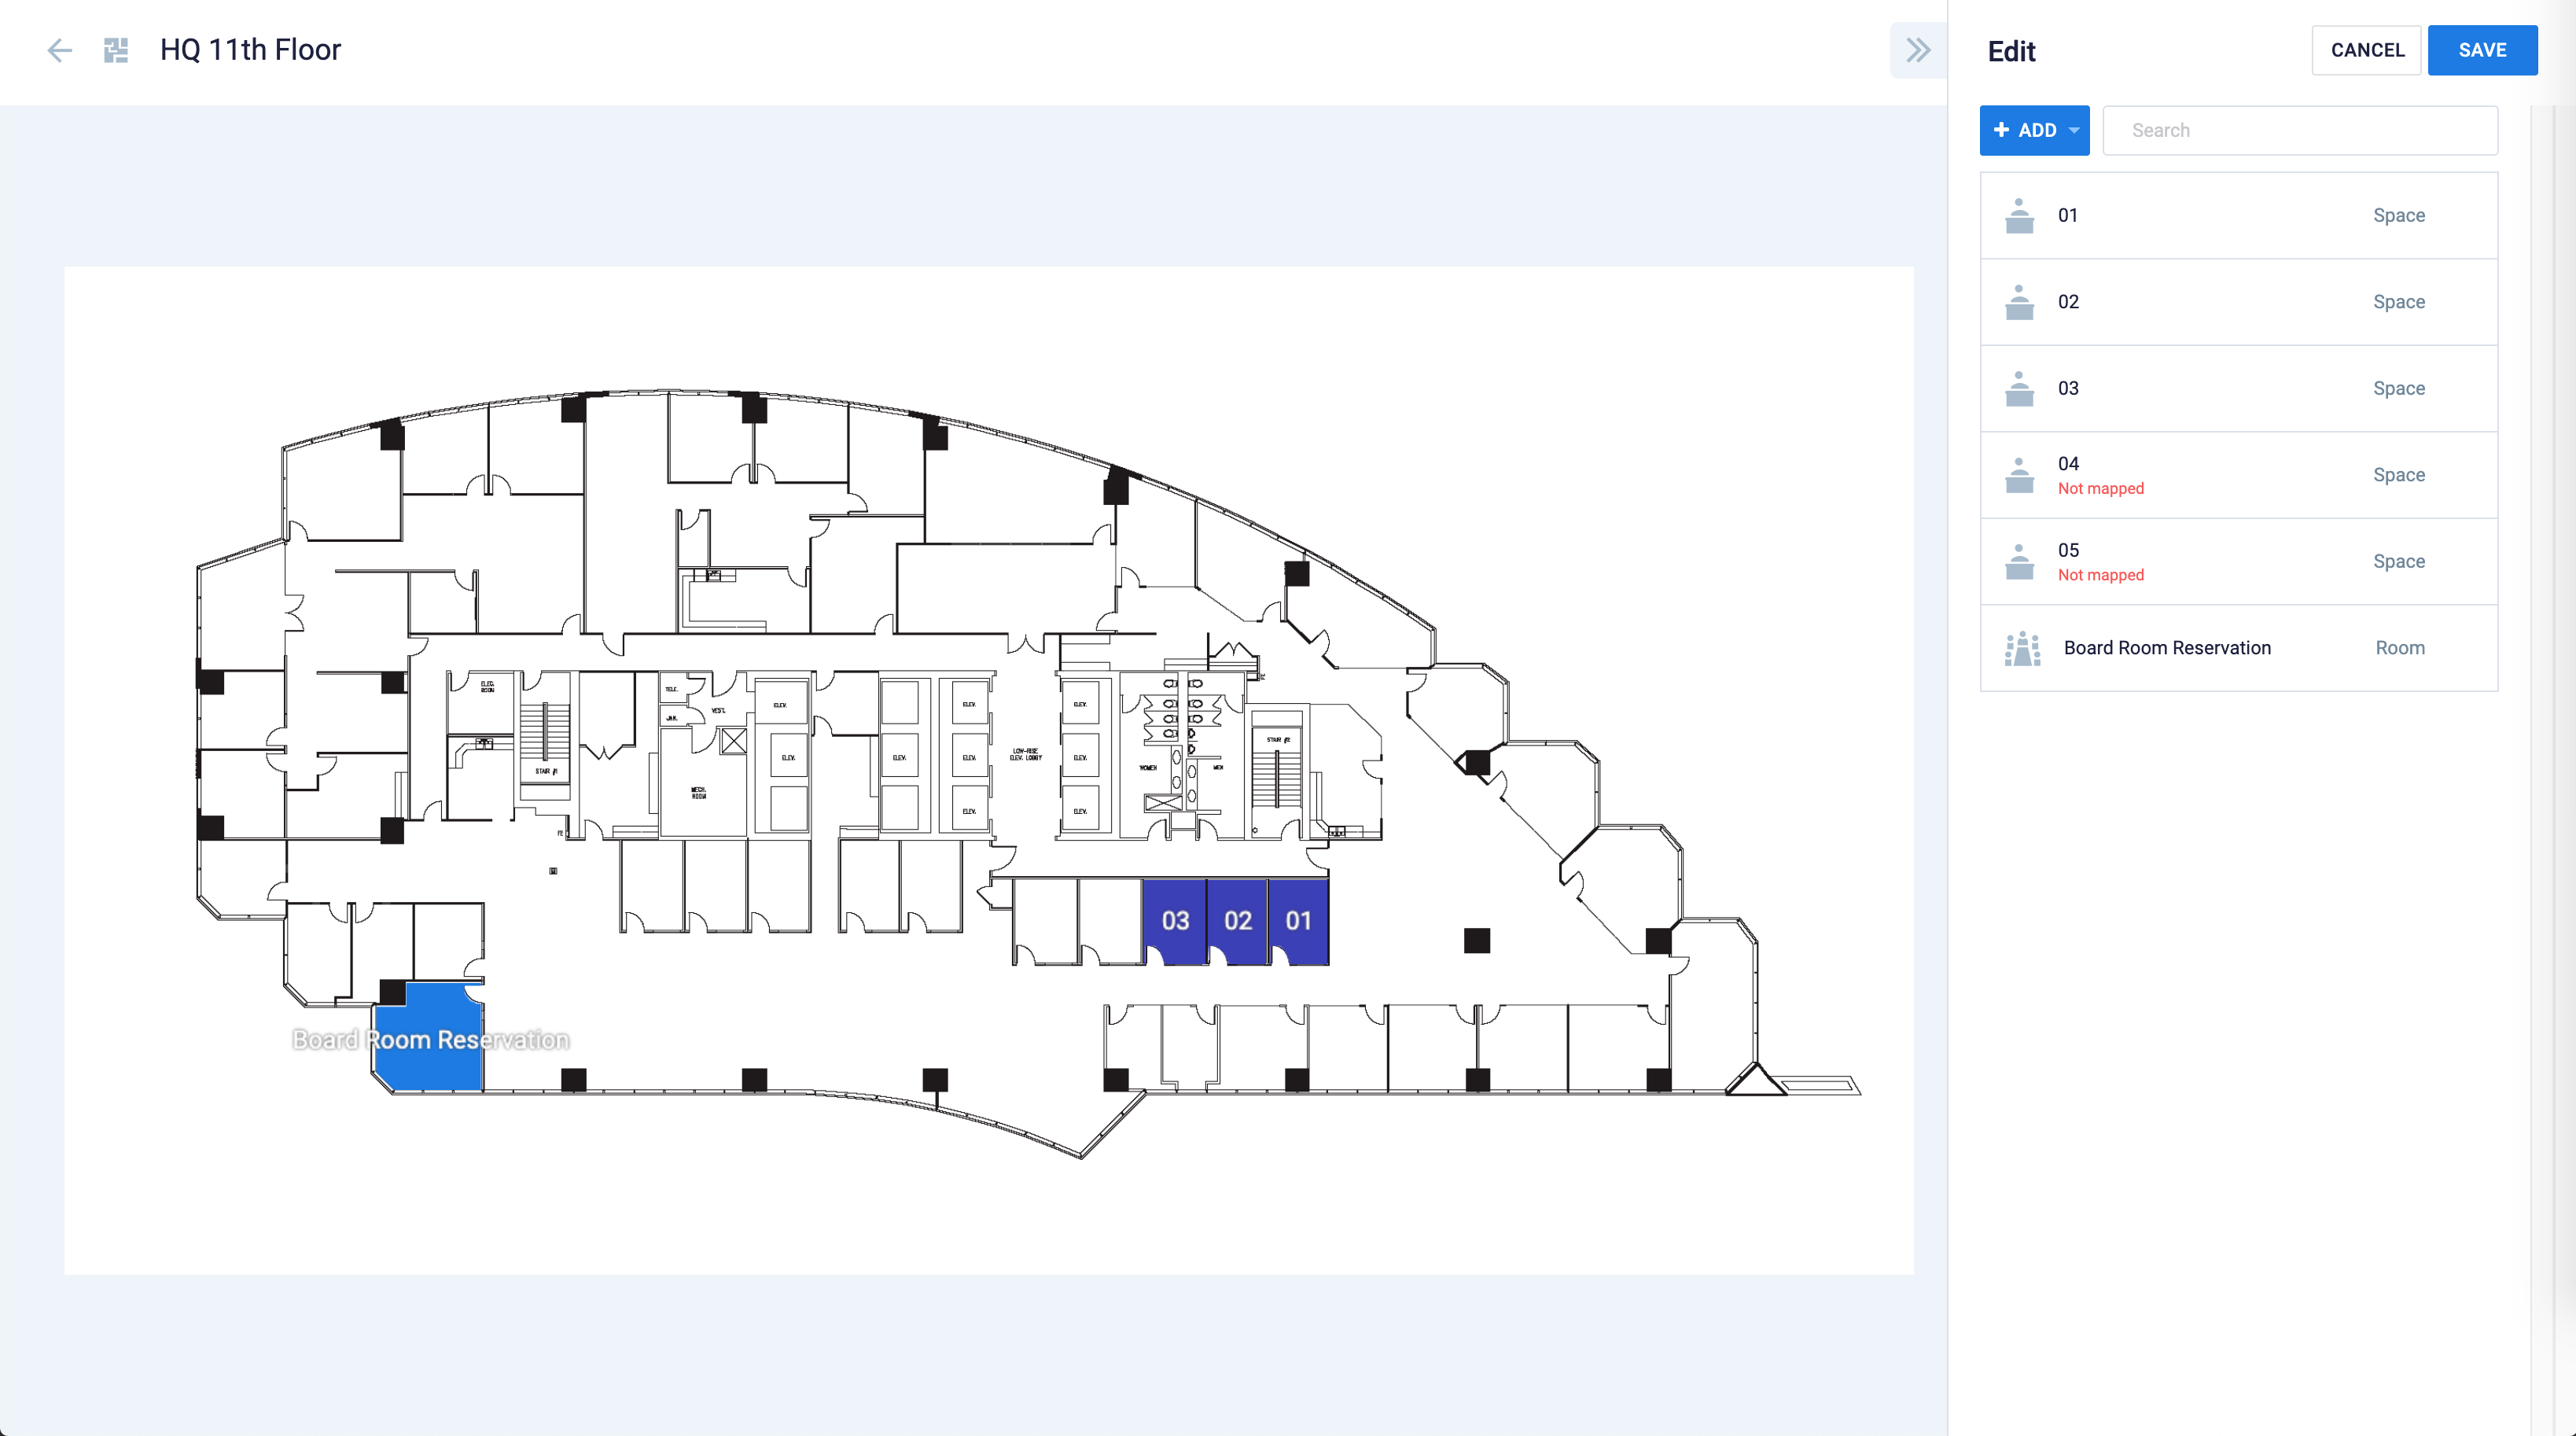
Follow the instructions below to add resources to a floor plan:
- Click Locations from the ☰ Appspace menu.
- Select and click the floor plan you wish to configure. New- If multiple floor layers are available, select the layer that you wish to configure under Floor Layers.
- Click the Resources icon, and select the “not mapped” resource.
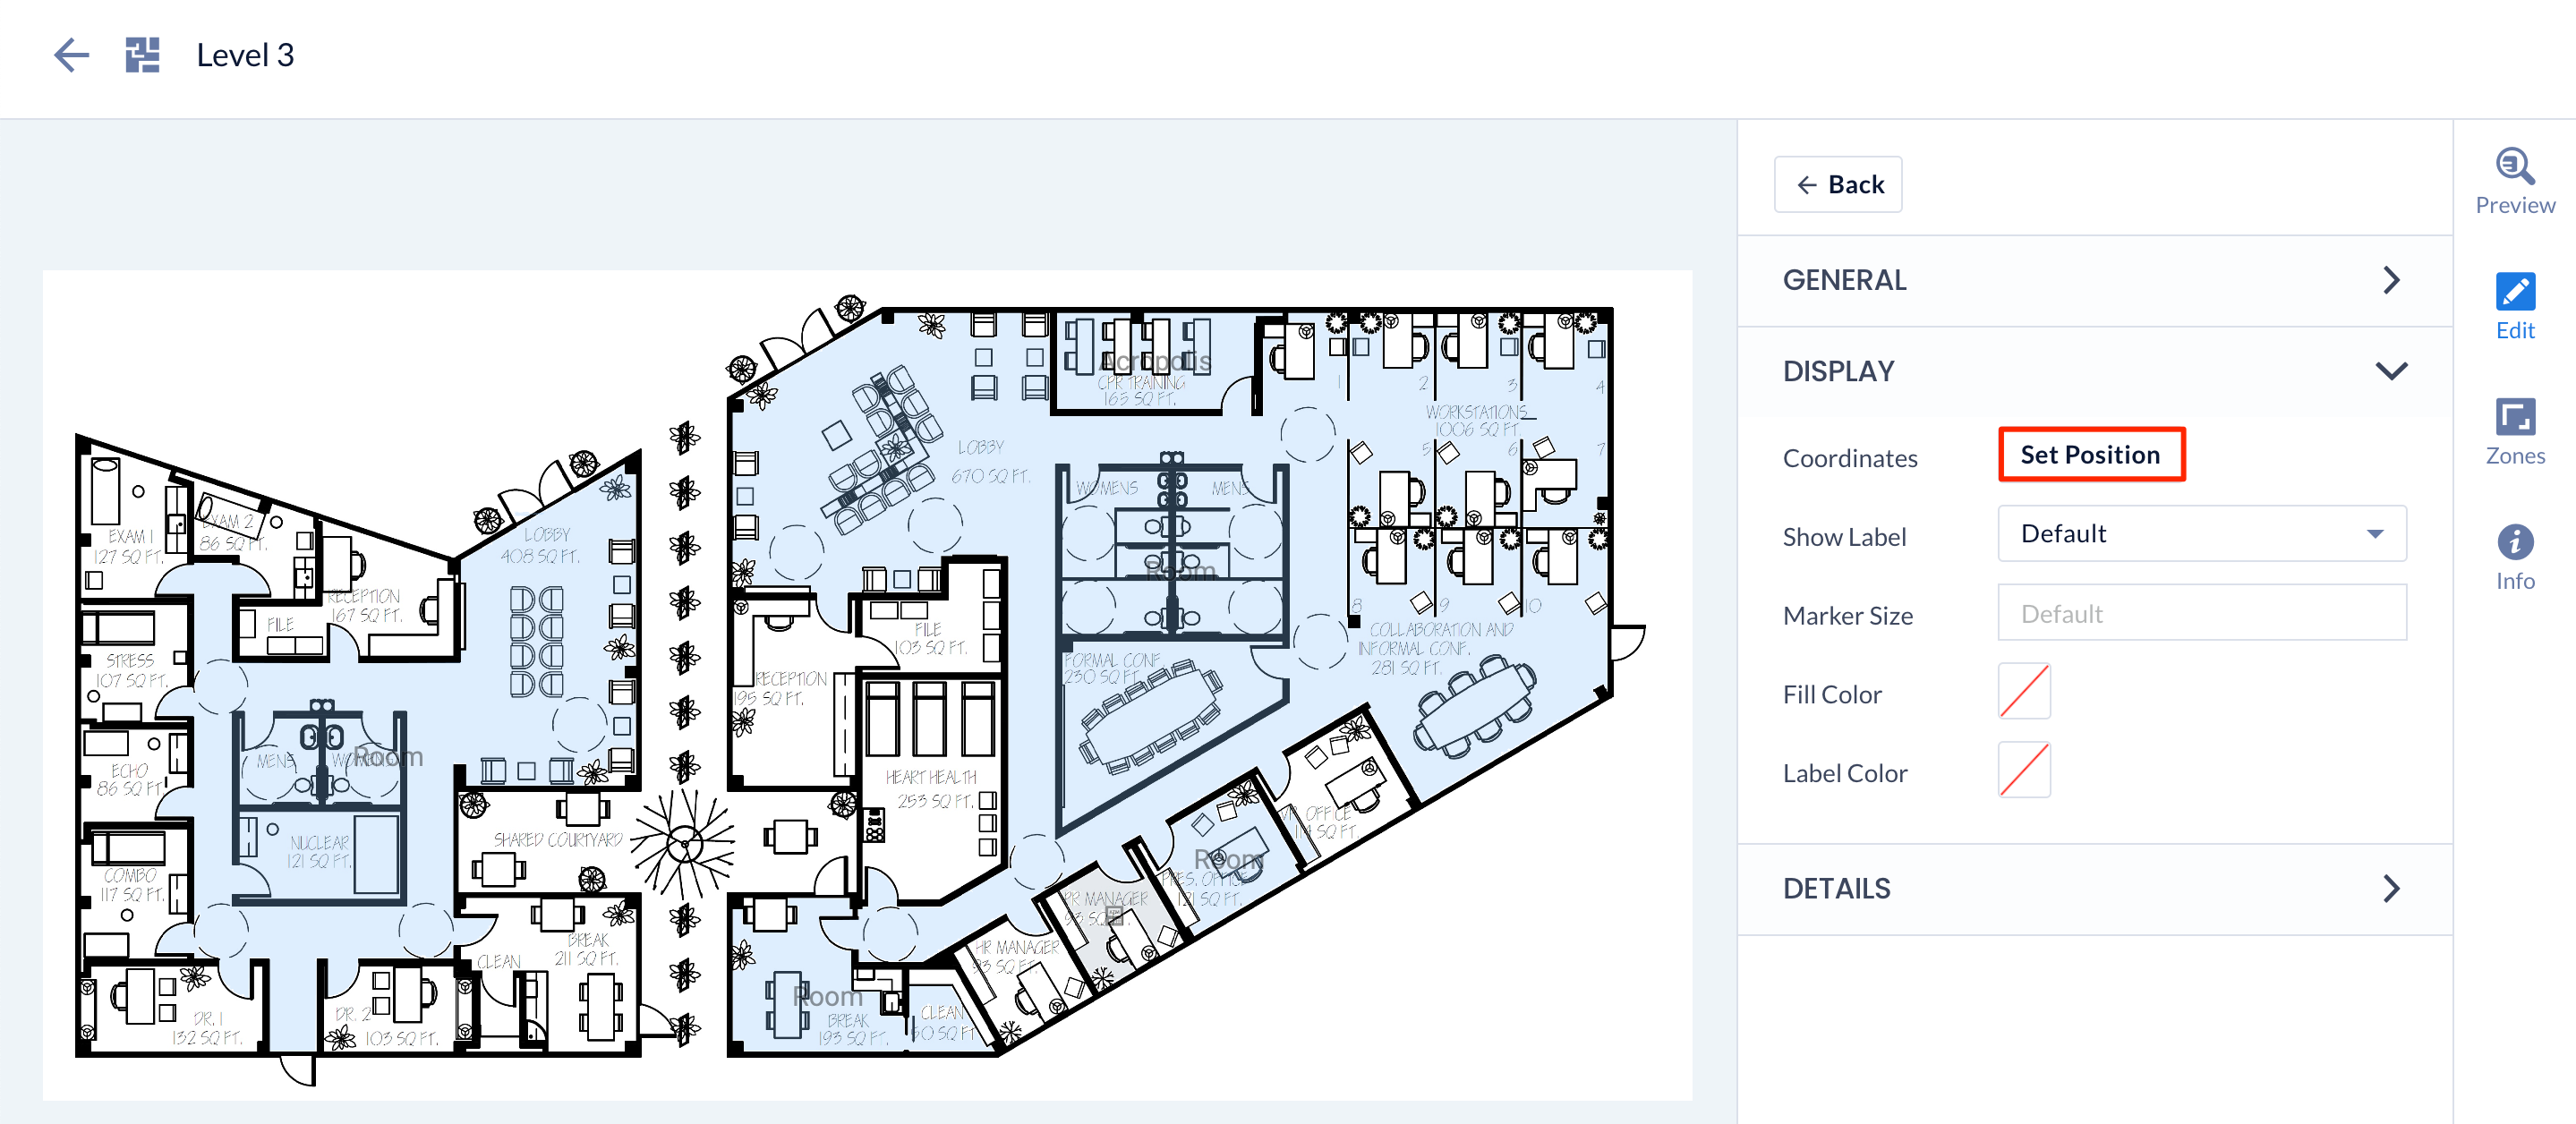
- Click the Set Position button, and select one of the map tracing options:

- AUTO TRACE – Automatically traces the borders of the room. This is the preferred method when the space on your floor plan has clearly defined borders on all sides.
- Polygon – Manually trace the borders of the room using your mouse pointer. This is useful when the space on your floor plan does not have clearly defined borders or the border has large openings in it.
- Marker – Manually highlights a location with an icon. This is useful when identifying points of interest within your floor plan.
- Click on a room or space on the floor plan to complete the position on the floor plan.
- Once set, proceed to configure the following attributes of the reservable resource:
- Name – Enter the name of the room or point of interest, if not auto-filled by the calendar resource.
- Identifier – Enter the room number or specific location of the area.
- Type – Select the type of mapping.
- Room – To define rooms in the floor plan, such as offices, conference rooms, auditoriums, etc.
- Space – To define spaces in the floor plan, such as training areas, social areas, huddle spaces, etc.
- Point of Interest – To define points of interest in the floor plan, such as sanitization stations, elevators, bathrooms, etc.
- Room / Space – Select the type of room, space. For a list of complete options that are available, refer to Floor Plan Rooms, Spaces, and Points Of Interest Options.
- Capacity – Enter the capacity of the room.
- Reservable – Slide the slider to “YES” to enable reservation in the Employee App. If enabled, users may see the resource on the map but not reserve it. This feature is deactivated by default for external providers. -New
- Amenities – Add the amenities available in the room.
- Coordinates – Enter the coordinates of the room to the floor plan.
- Photo – Add a photo of the room.
- Click SAVE.
Manage Floor Plan Resources
Follow the instructions below to bulk manage the rooms, spaces, or points of interest on a floor plan:
- Click Locations from the ☰ Appspace menu.
- Select the floor plan you wish to manage, and click the Resources icon. New- If multiple floor layers are available, select the layer that you wish to configure under Floor Layers.
- Check the rooms, spaces, or points of interest that you wish to manage.
- Click the ellipsis, and select one of the following actions:
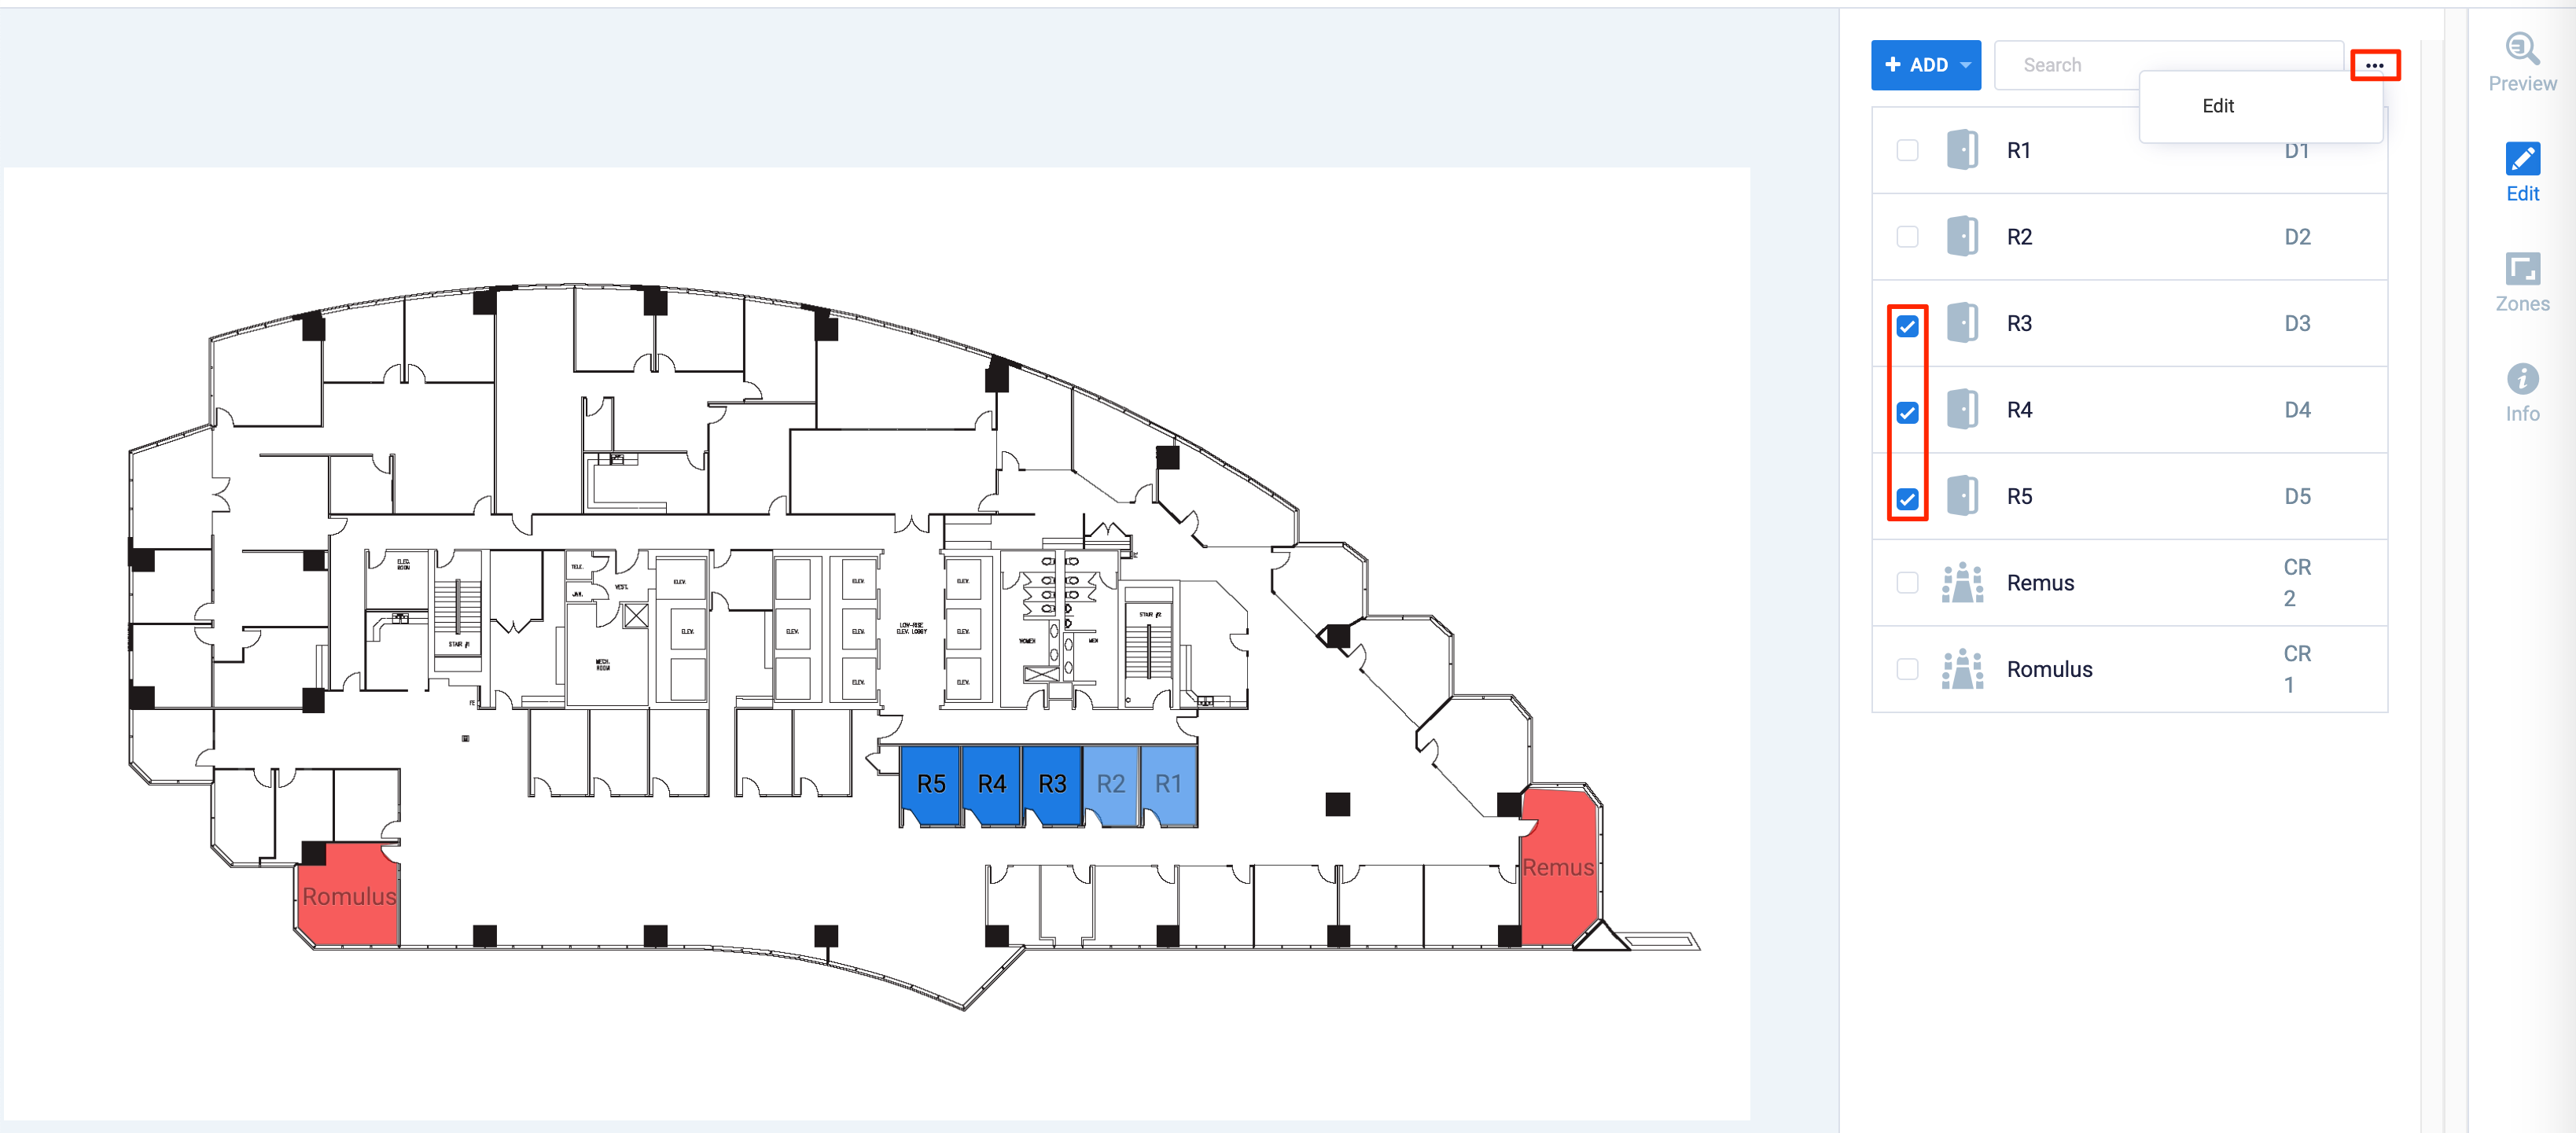
- Change Type/Amenities – Change the type, sub-type, or amenities of the rooms, spaces, and points of interest.
- Link to Appspace Reservations – Links all the selected rooms, spaces, and points of interest to this Reservations module.
- Delete – Delete the selected rooms, spaces, and points of interest.
- Click Save.
View Created Reservations
The Reservations tab on the Reservations dashboard, is where administrators with access to this module, are able to view all reservations made under this account.
Administrators are able to filter reservations based on:
For more information, refer to Browse and Navigate Reservations Module in Appspace 8.0.
Administrators can also directly create a reservation here for themselves or on behalf of someone else. For instructions, refer to Reserve Workspace & Building Pass in Console – Administrators.
Export Reservations
Reservations can be exported based on the filter selection, and by selecting multiple or all reservations in the list, and exported in an .xlsx file format containing the following columns:
- Meeting Name
- Resource Name
- Resource Type
- Resource SubType
- Organizer
- Organizer Type (user, external)
- Organizer Email
- Start Time
- End Time
- IsAllDay
- Recurrence (use the recurrence label)
- Location
- Floor
- Status
- Sensitivity
- Origin (Provider or Appspace)
- Attendees (comma delimitated email string)
- Attendees Count
- Check-in Status (not-required, user-checkin, auto-checkin, expired, pending)
- Amenities (comma delimitated string)
To export reservations that have been made, do the following:
- Log in to the Appspace console.
- Click Reservations from the ☰ Appspace menu, and click the Reservations tab.
- Select the reservations you wish to export or click the checkbox to select all reservations.

- Click the Export icon in the batch menu.
- The reservations listings displayed in Reservations will be exported to a .xlsx file and downloaded to your default download folder.
View Resource & Reservation Analytics
Overall Analytics
In the Reservations module, click the Analytics tab. You will be able to view statistical data of all the reservations that have been made using the Appspace Employee App either via the portal or your mobile app. Prior to the deployment of your space reservation application, this tab will be empty.
You may view all analytics for your reservable resources based on the Activity Period, which can be changed from the drop-down calendar. You can also filter your data by the location within your environment.
Administrators looking for information on the Analytics tab, refer to Browse and Navigate Reservations Module in Appspace 8.0.
Individual Building, Floor, or Workspace Resource Analytics
You may also view detailed analytics for an individual building, floor, or workspace resource by clicking the Analytics tab when editing the resource from the Resources tab.
- Click a resource name in the Resources tab on the Reservations dashboard.
- In the Edit Resource window, click the Analytics tab.

- You may view all analytics for the resources here based on the Activity Period, which can be changed from the drop-down calendar.
Depending on the resource type (building, floor, workspace) selected, different analytical widgets will be displayed. For more information, refer to Browse and Navigate Reservations Module in Appspace 8.x.
Enable Building Pass
The Building Pass feature allows organizations to monitor and limit the number of users who can access the building in a single day, week, or month. Building passes are automatically applied for users who make a reservation on a resource, however, the building pass can also be applied on its own and used only for visitor registration.
Was this article helpful?