Activating a legacy add-on license
Important
As of September 9th 2017, the instructions below are no longer valid with the release of our new licensing workflow and Account Management Portal at https://account.appspace.com. Please refer to our introductory article here: Account Management Portal.
For new instructions to activate your license, please refer to the Activating Appspace on-premises article available in version 6.2 of this Knowledge Center.
This article provides instructions to apply additional legacy license keys (i.e. Pro, Pro+, or Enterprise) to your on-premise Appspace server, using the following two methods:
Offline Add-on License Activation, when you do not have an active Internet connection.
Online Add-on License Activation, when you have an active Internet connection,
Important
Online Add-on License Activation is currently not available.
Prerequisites
- A Cloud user account on a legacy Cloud subscription plan (Pro, Pro+, or Enterprise).
- Your on-premise Appspace server instance must already be fully licensed and accessible.
- Portal Administrator privileges on your Appspace server.
- A unique 16-character Appspace product license key. If you have not obtained the product license key, please contact your local Appspace sales team or reseller to obtain the key.
Note
You can check your subscription information from your Cloud account via System > Account > Subscription.
Offline Add-on License Activation
Follow the instructions below to activate an Appspace on-premises server without an active Internet connection, or with security policies in place that limit Internet access.
Login to your Appspace Cloud account on https://cloud.appspace.com and access the System > Account page from the Appspace menu.
Click the Licenses tab and click the ‘Assign license key’ link.

Note
If you do not see the Licenses tab, it is because your Cloud user account has not yet been upgraded to the needed subscription level to manage license keys. Please contact your local Appspace sales team or support team for assistance.
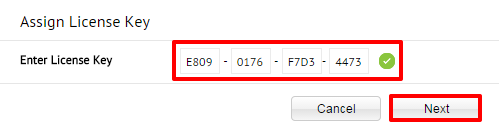
In the Assign License Key window, input the 16-character product license key. If the key is valid, a green check is displayed. Click Next to continue.
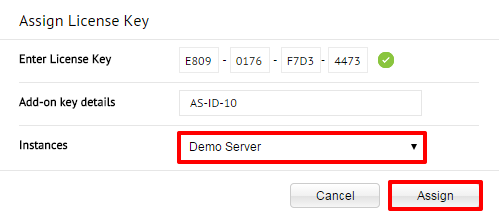
The add-on key details is displayed in the Assign License Key window. Select the Appspace instance from the drop-down menu, and click the Assign button.
If successful, a green confirmation message is displayed. You may now return to the Licenses tab.

The new add-on key will be listed as a new row below the master product license key of the selected server instance. Click the ‘Download license file’ link next to the server instance with the new add-on key. This will download the Product Activation file, <Product Key Number>.bin. Save this file to your local machine.

Login to your Appspace Cloud account on https://cloud.appspace.com, and click System > Account in the Appspace menu.
Select the Licenses tab and click the ‘Proceed to Manual Activation’ link.

On the Manual License Activation page, click Choose File to browse and select the downloaded Product Activation file (<Product Key Number>.bin). Click Submit.
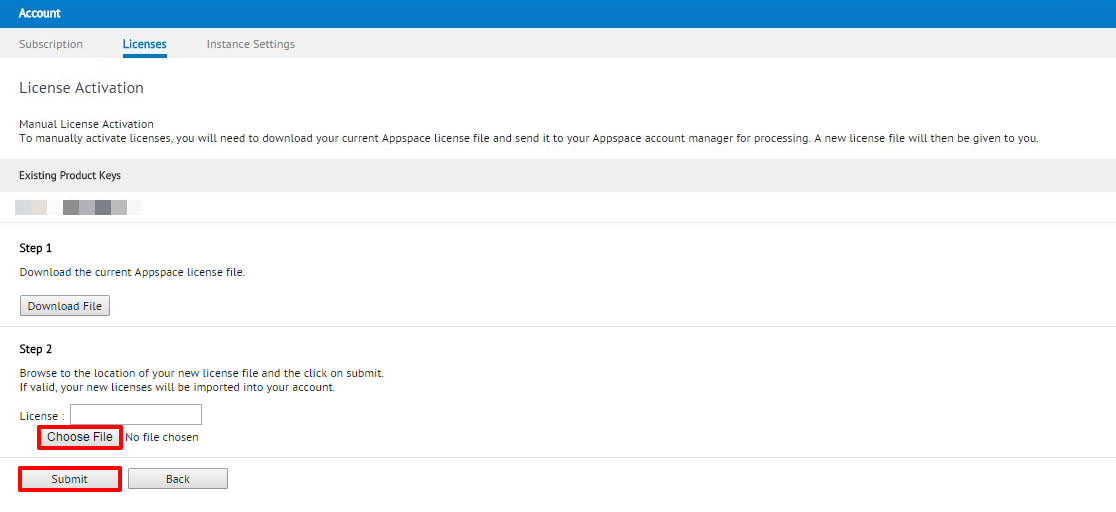
If successful, a confirmation message is displayed and the new product license key is displayed under the Existing Product Keys section.
