Appspace has developed the Visitor Registration module as we expand the offering of a unified experience for customers wishing to deploy a single platform for signage, corporate communications, room booking, and wayfinding. The feature is now available as a separate paid module customers can purchase a yearly subscription for, via https://visitor.cloud.appspace.com.
The Appspace Guest Registration card runs on an Appspace hardware endpoint, presenting the experience to the customer. The card is linked to the corresponding visitor registration services on kiosks that the customer has set up, which tie to the Visitor Registration module. Communications are handled by an Appspace instance.
Prerequisites
- Contact an Appspace representative to enable this feature. Appspace will create an account for customers. Customers will receive an email instructing them to set up their password once an instance under their corporate email address has been created.
- An active Appspace account, with sufficient device IDs and user IDs.
- An Appspace supported device to display the Guest Registration card. The device must meet the manufacturer’s minimum hardware and technical specifications. Please refer to Supported Devices & Operating Systems.
- Account Owner, Publisher, Author role to create the Guest Registration in the Appspace Library.
Navigating the Visitor Registration Module
Similar to the Appspace cloud login page, the Visitor Registration module login page requires its own individual credentials. It is NOT tied to the Appspace cloud, and when the customer instance is created, the main contact will receive a “change password” notification email, so they may proceed to log in to https://visitor.cloud.appspace.com for the first time.
Dashboard
Upon the user’s login to the Visitor Registration module, users are presented with the Visitor Registration dashboard which provides summary information of total visits, total employees, total kiosks, and a graph of total visits per month by building.
The Dashboard can be accessed via the ☰ Appspace menu.
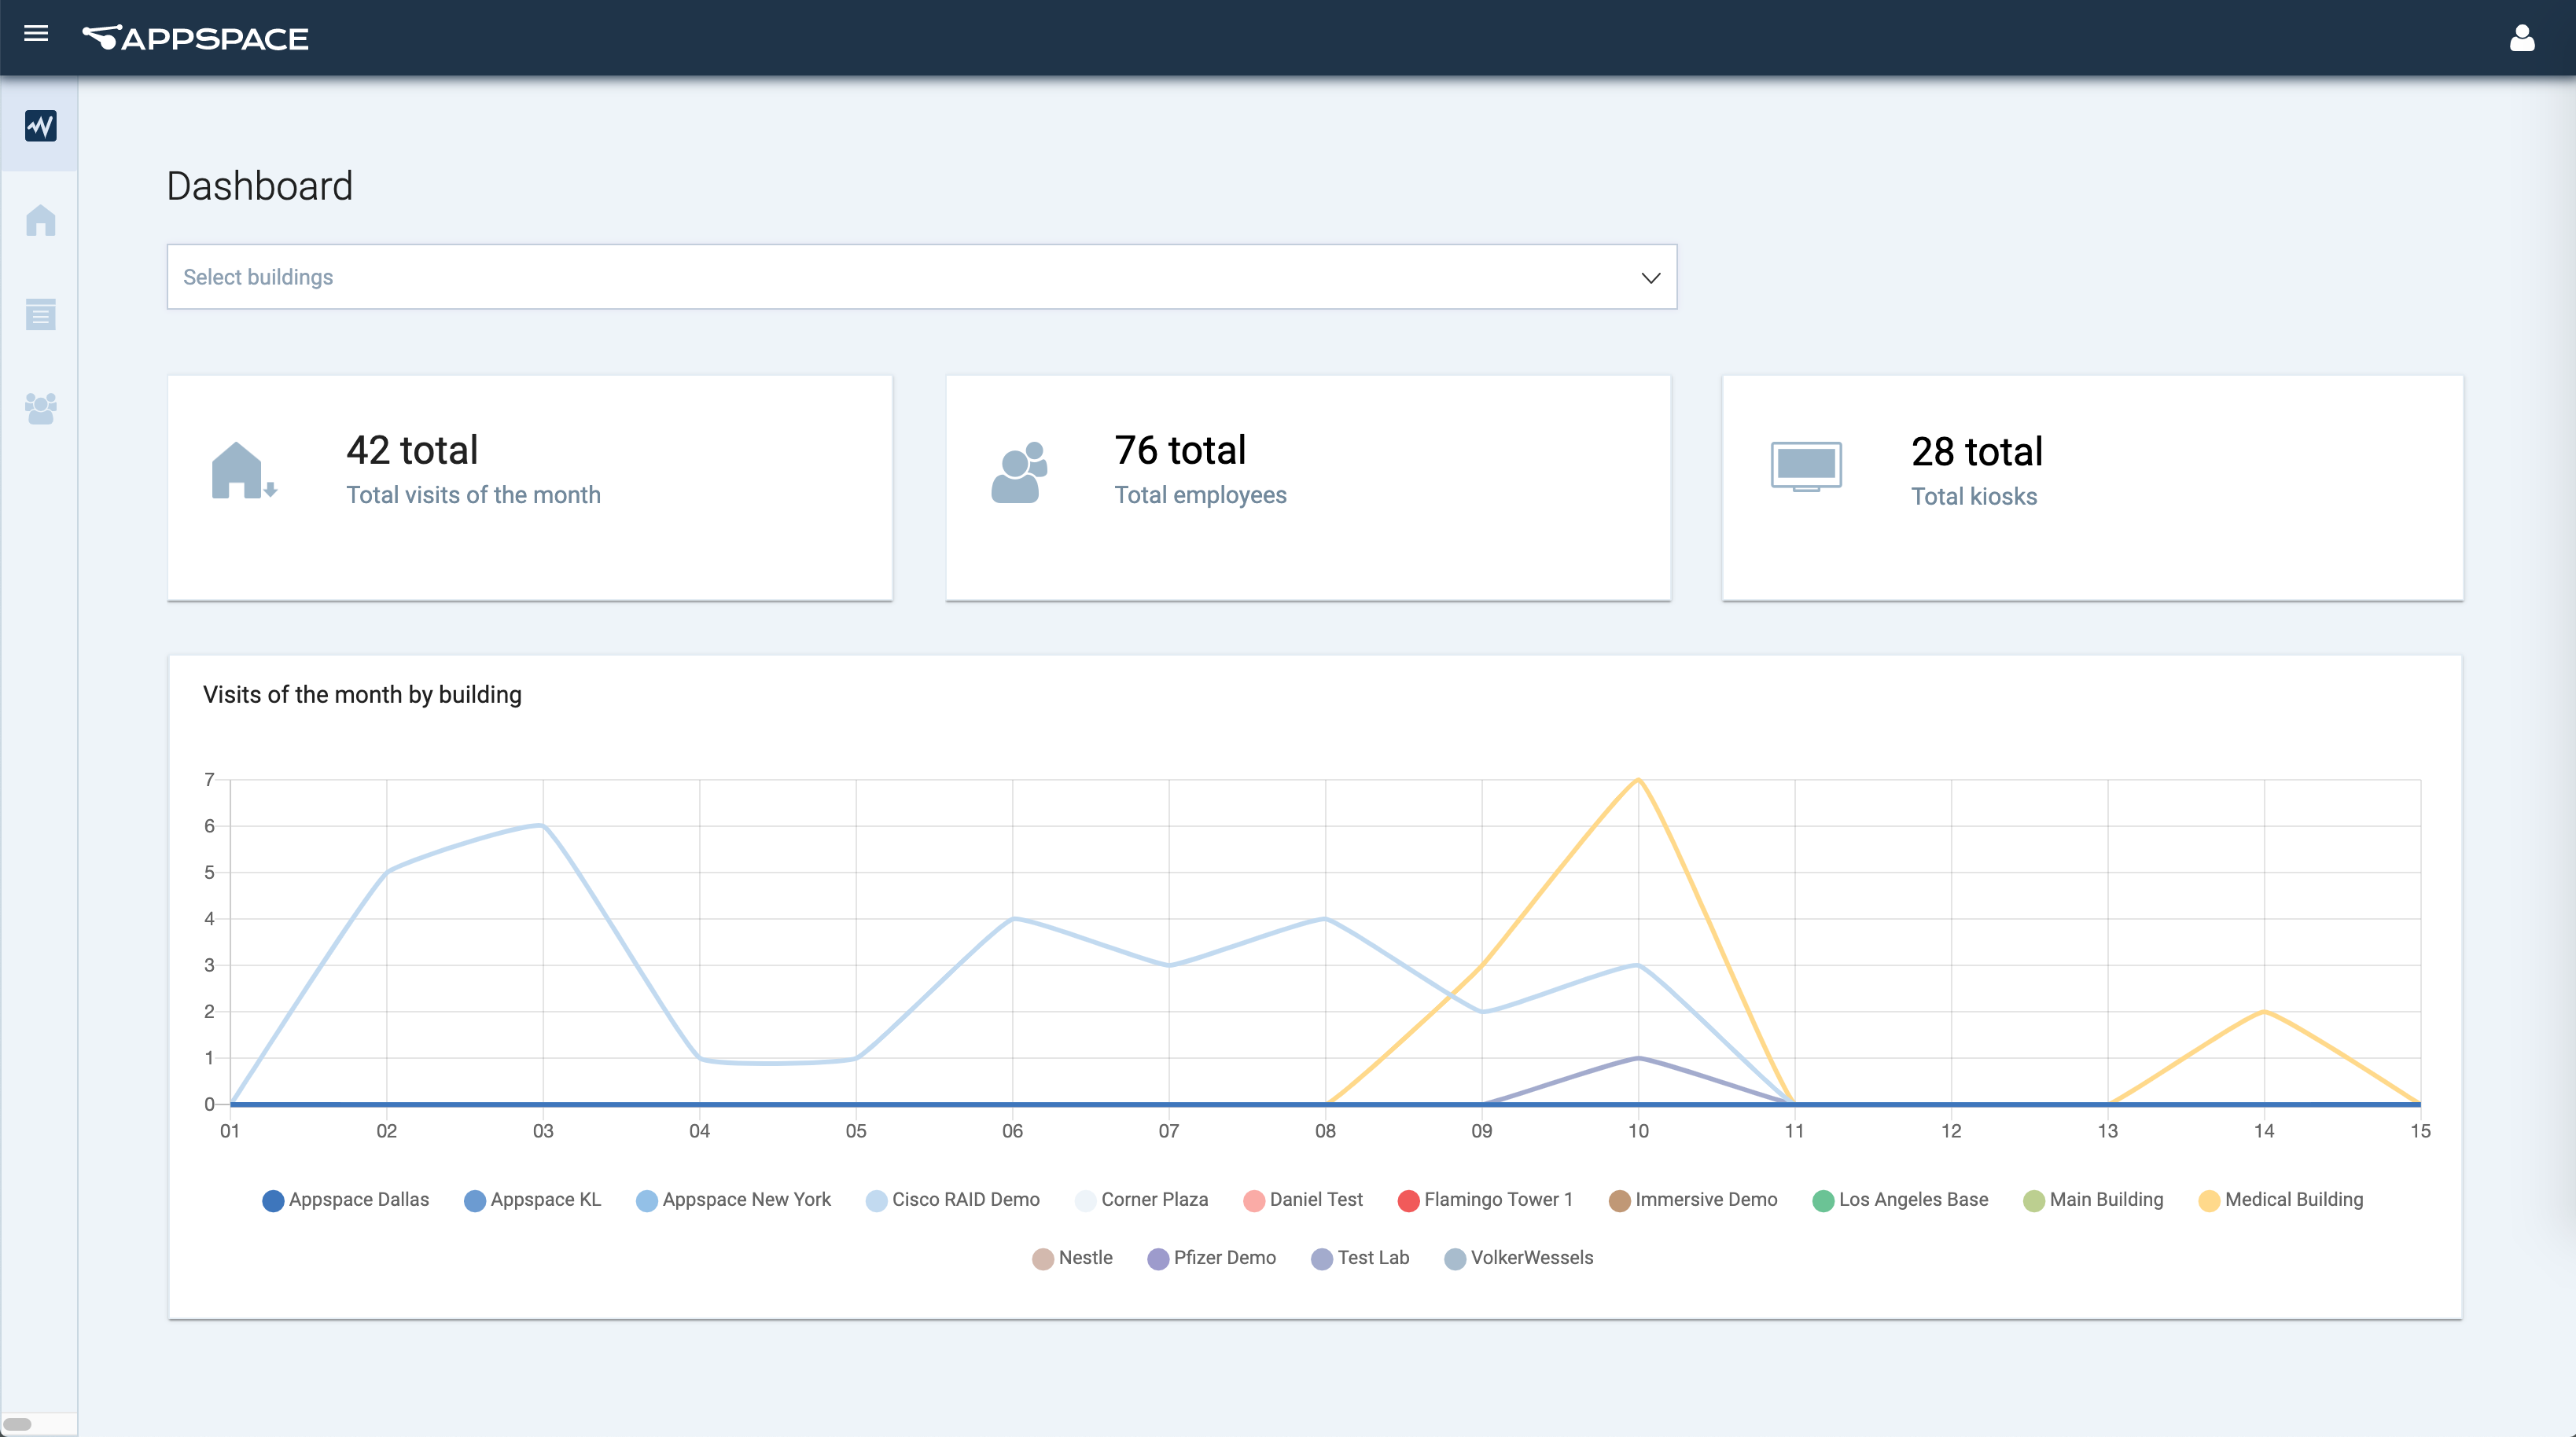
Once the Visitor Registration dashboard has been set up and in use, the following widgets are displayed:
- Total visits of the month.
- Total employees.
- Total kiosks.
- Visits of the month by building – You may hover the mouse cursor over the date to view the number of visits on that particular date.
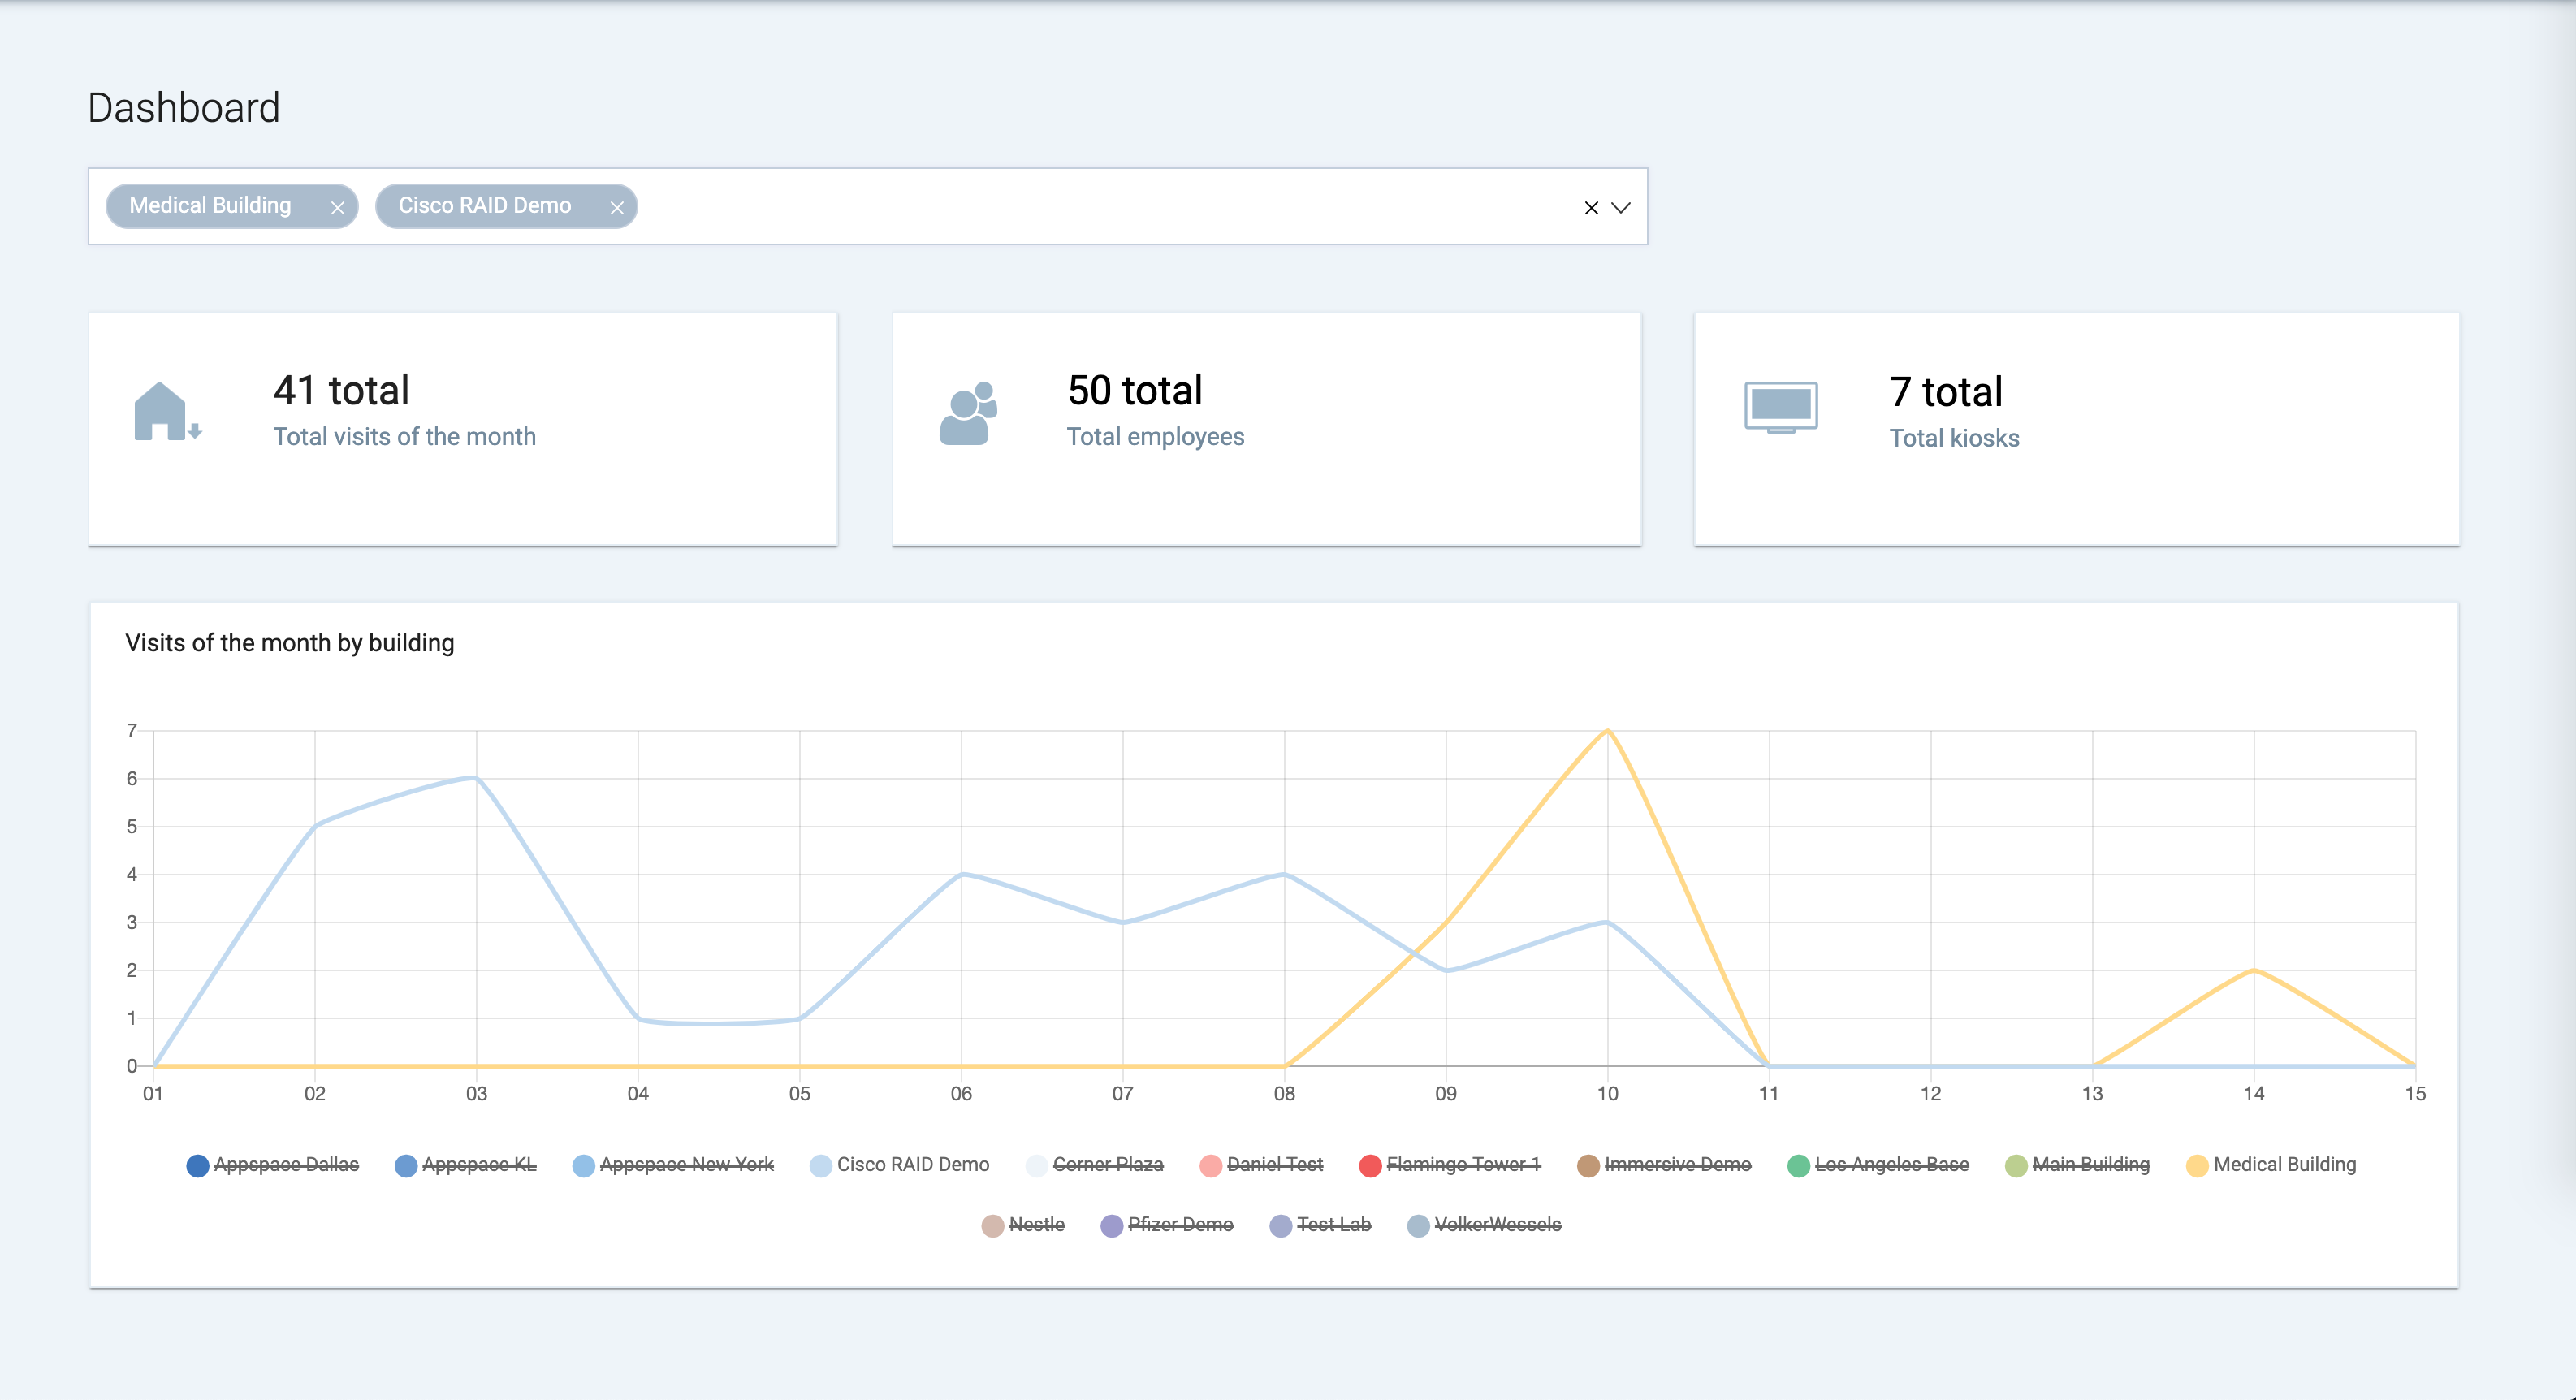
Filter Dashboard Visits of the Month by Building Graph
To display total visits information on specific buildings, you may use the Select buildings drop-down menu.
- Click Dashboard from the ☰ Appspace menu.
- Select the desired building(s) from the Select buildings drop-down menu.
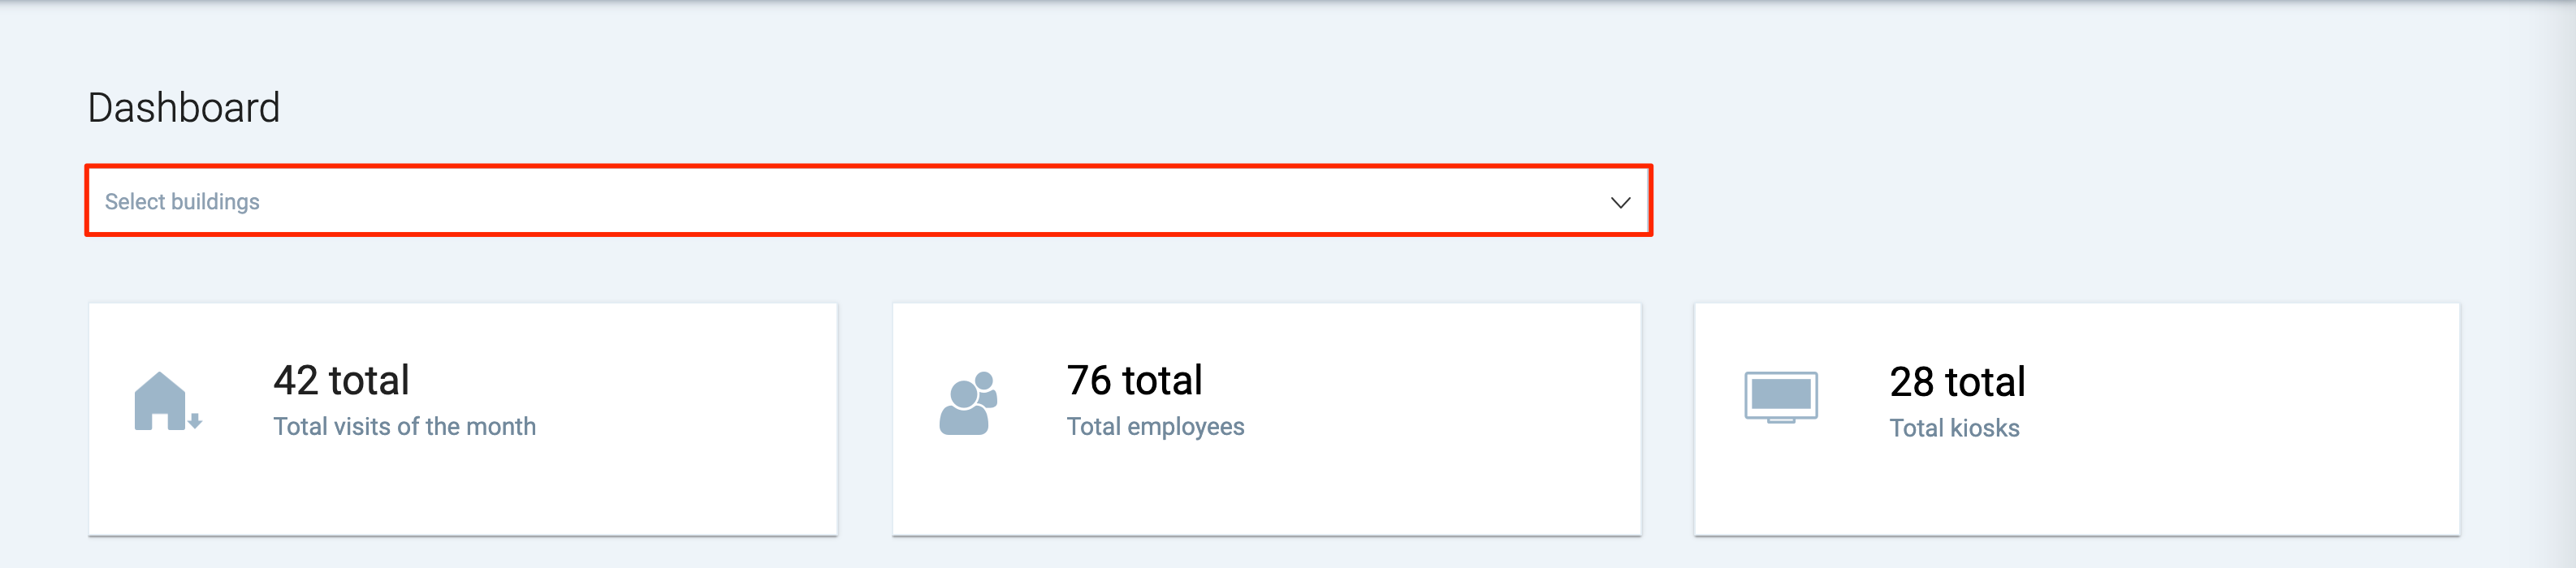
- The Visits of the month by building graph will only display data from the selected buildings.
Integrations
The Appspace Visitor Registration module is able to manage integrations used for notifications. This must be configured first before you can add email for employees or users.
Currently, the only integration available for sending notifications is email (system default email from the Appspace domain).
The Integrations options can be accessed by clicking the User Profile icon on the top right corner of the menu bar.

Apart from adding employees, users may also perform the following actions:
- Search Integrations – Enter the name of the integration to search.
- Edit Integration – Click the edit icon.
- Delete Integration – Click the delete icon.
Buildings
Managing Buildings
Users may create as many buildings as required to represent the physical installation of the visitor registration kiosks that will be deployed. Each building contains both kiosks and employees that can be defined, thus enabling both the Guest Registration card (kiosks) and organization’s employee directory functionality (find an employee).
The Buildings section can be accessed via the ☰ Appspace menu.
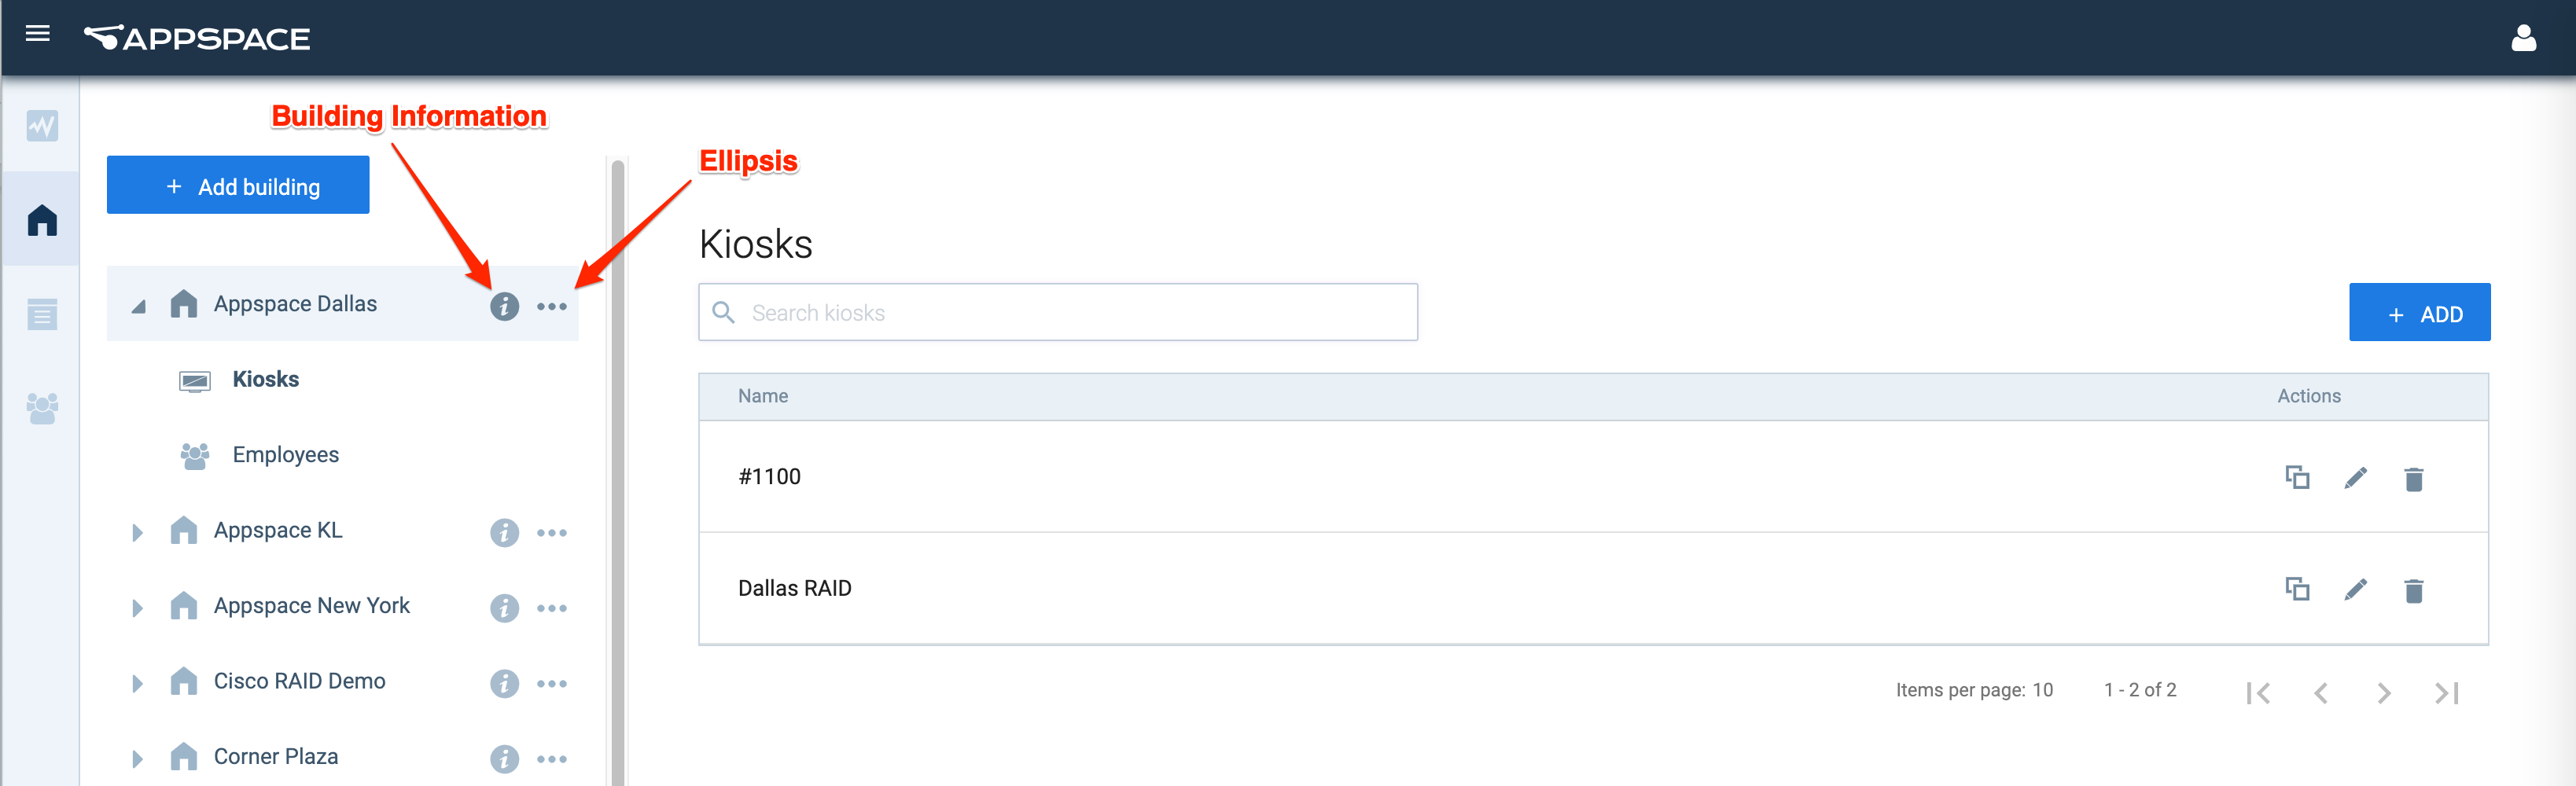
Apart from adding buildings, users may also perform the following actions:
- View building information – Click the information icon.
- Edit building information – Click the ellipsis, and select Edit.
- Delete building – Click the ellipsis, and select Delete.
Managing Kiosks
A kiosk represents an entry tied to the Guest Registration card. In this fashion, there can be multiple kiosks per building, with each tied to its own Guest Registration card in the Appspace console.
The list of kiosks is displayed by clicking the Kiosks of the selected building.
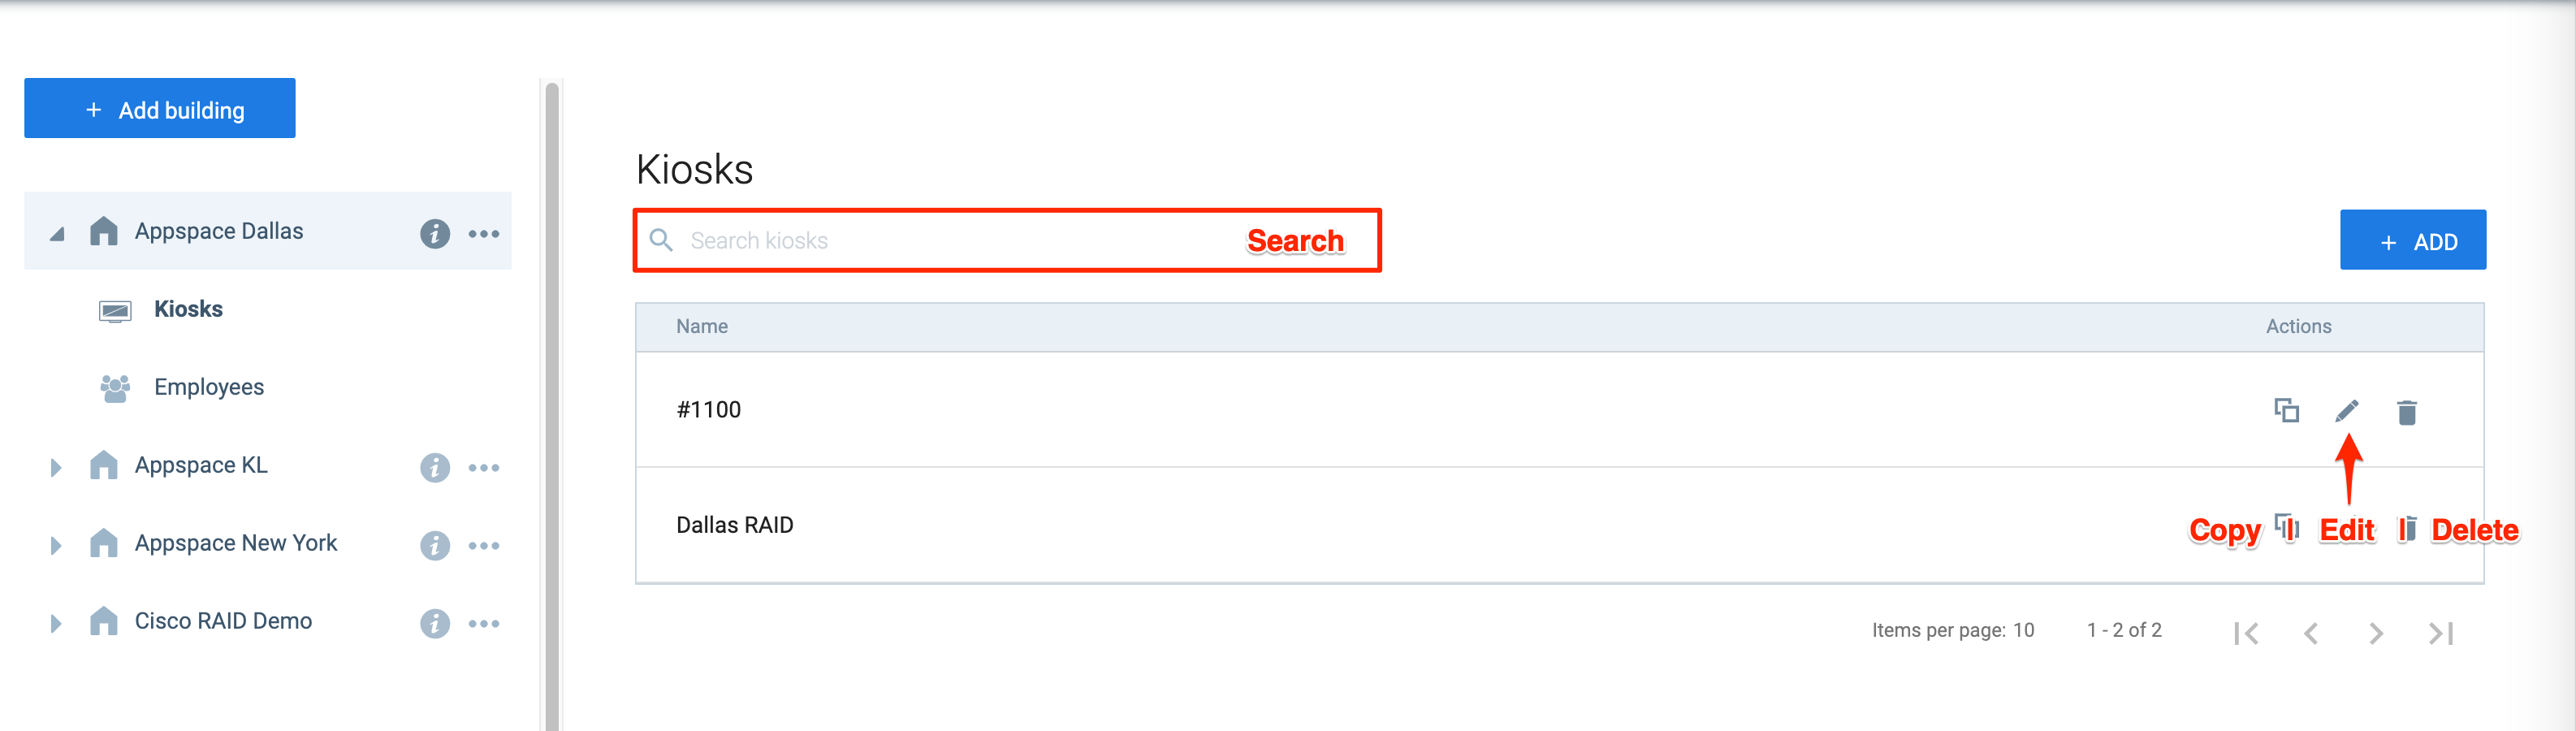
Apart from adding kiosks, users may also perform the following actions:
-
- Search Kiosk – Enter the name of the kiosk to search.
- Copy Kiosk ID – Click the copy icon.
- Edit Kiosk – Click the edit icon.
- Delete Kiosk – Click the delete icon.
Managing Employees
The Appspace Visitor Registration module allows you to display the organization’s employee directory. Employees can be added individually, or via a CSV file upload for bulk entries.
The list of employees is displayed by clicking the Employees of the selected building.
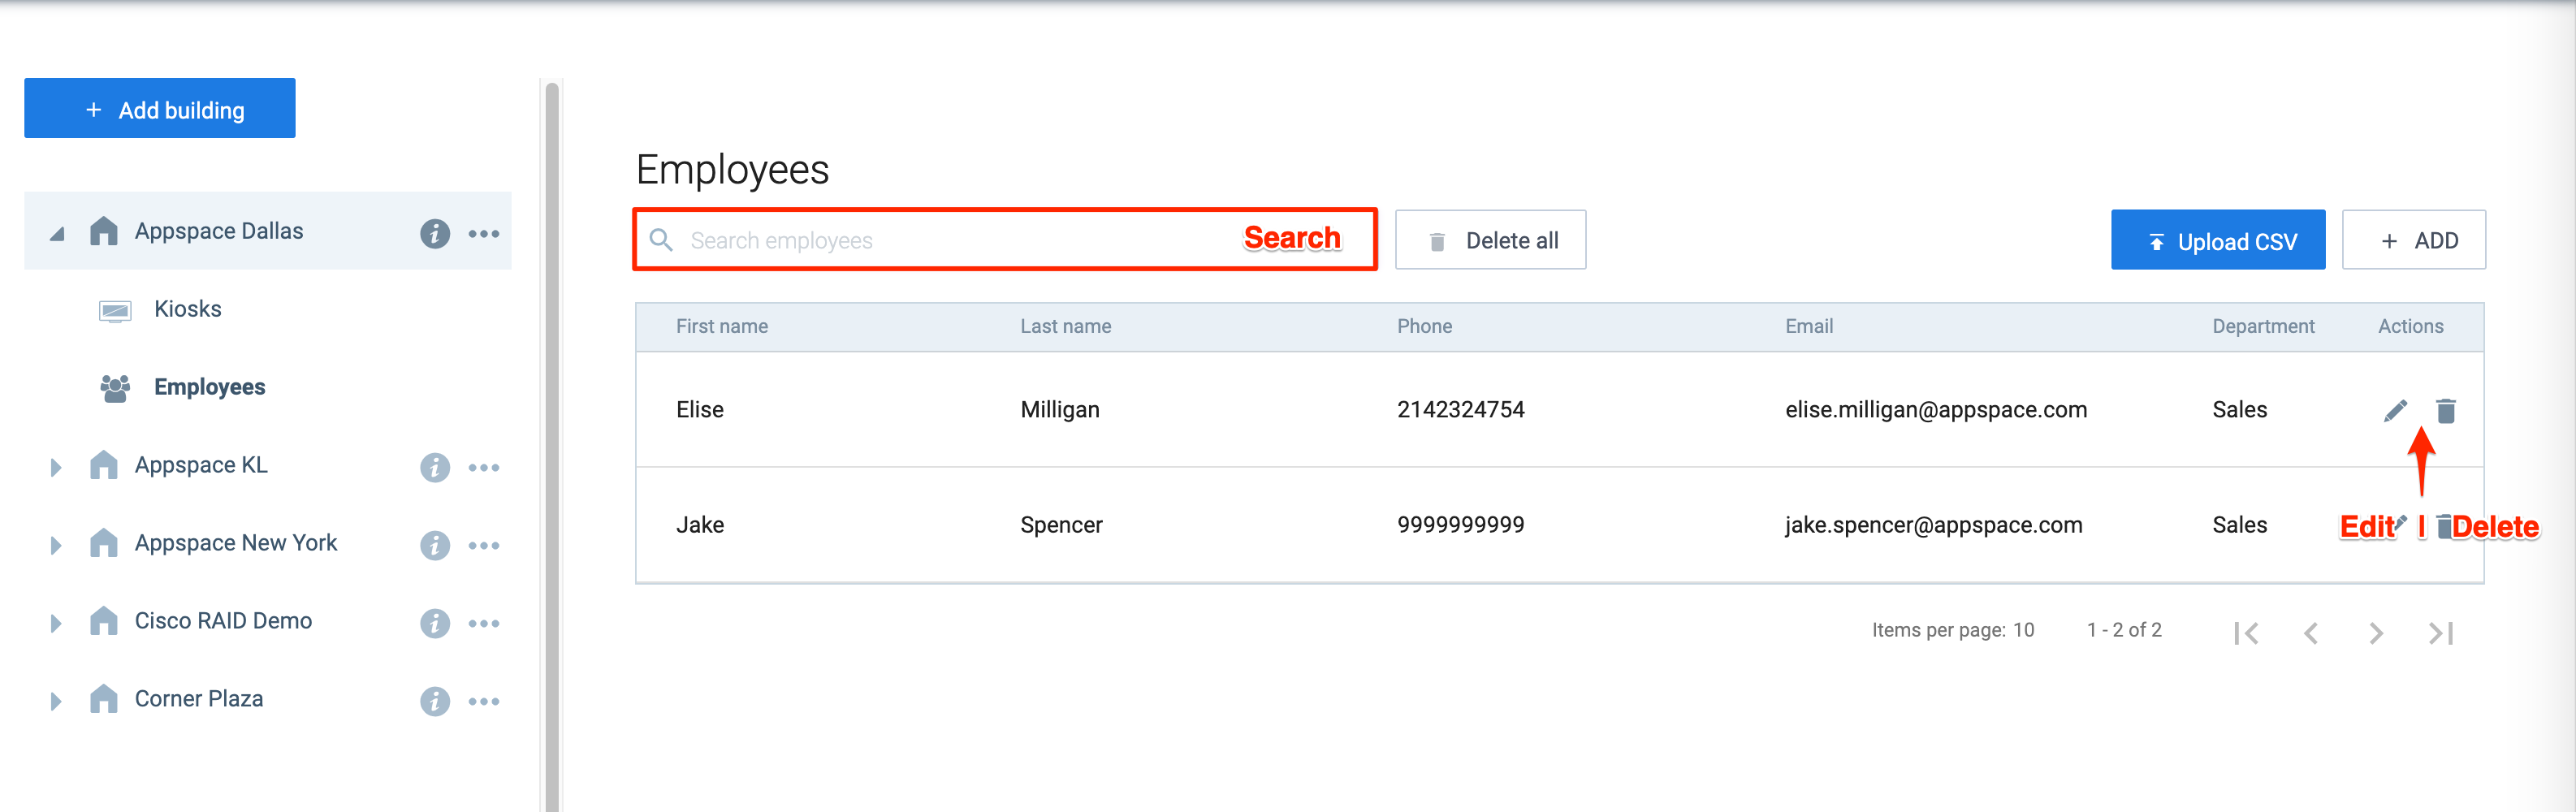
Apart from adding employees, users may also perform the following actions:
-
- Search Employee – Enter the name of the employee to search.
- Delete All Employees – Click the Delete all button to deletes all employees from the building.
- Edit Employee – Click the edit icon.
- Delete Employee – Click the delete icon.
- Upload CSV – Users may upload a .csv format file to add users into the building.
Reports
Reports provides users with visitor information, while allowing administrators to download the NDA (Non-Disclosure Agreement) documents that have been acknowledged by visitors. Users may also download the collected data in a CSV file format.
The Reports section can be accessed via the ☰ Appspace menu.
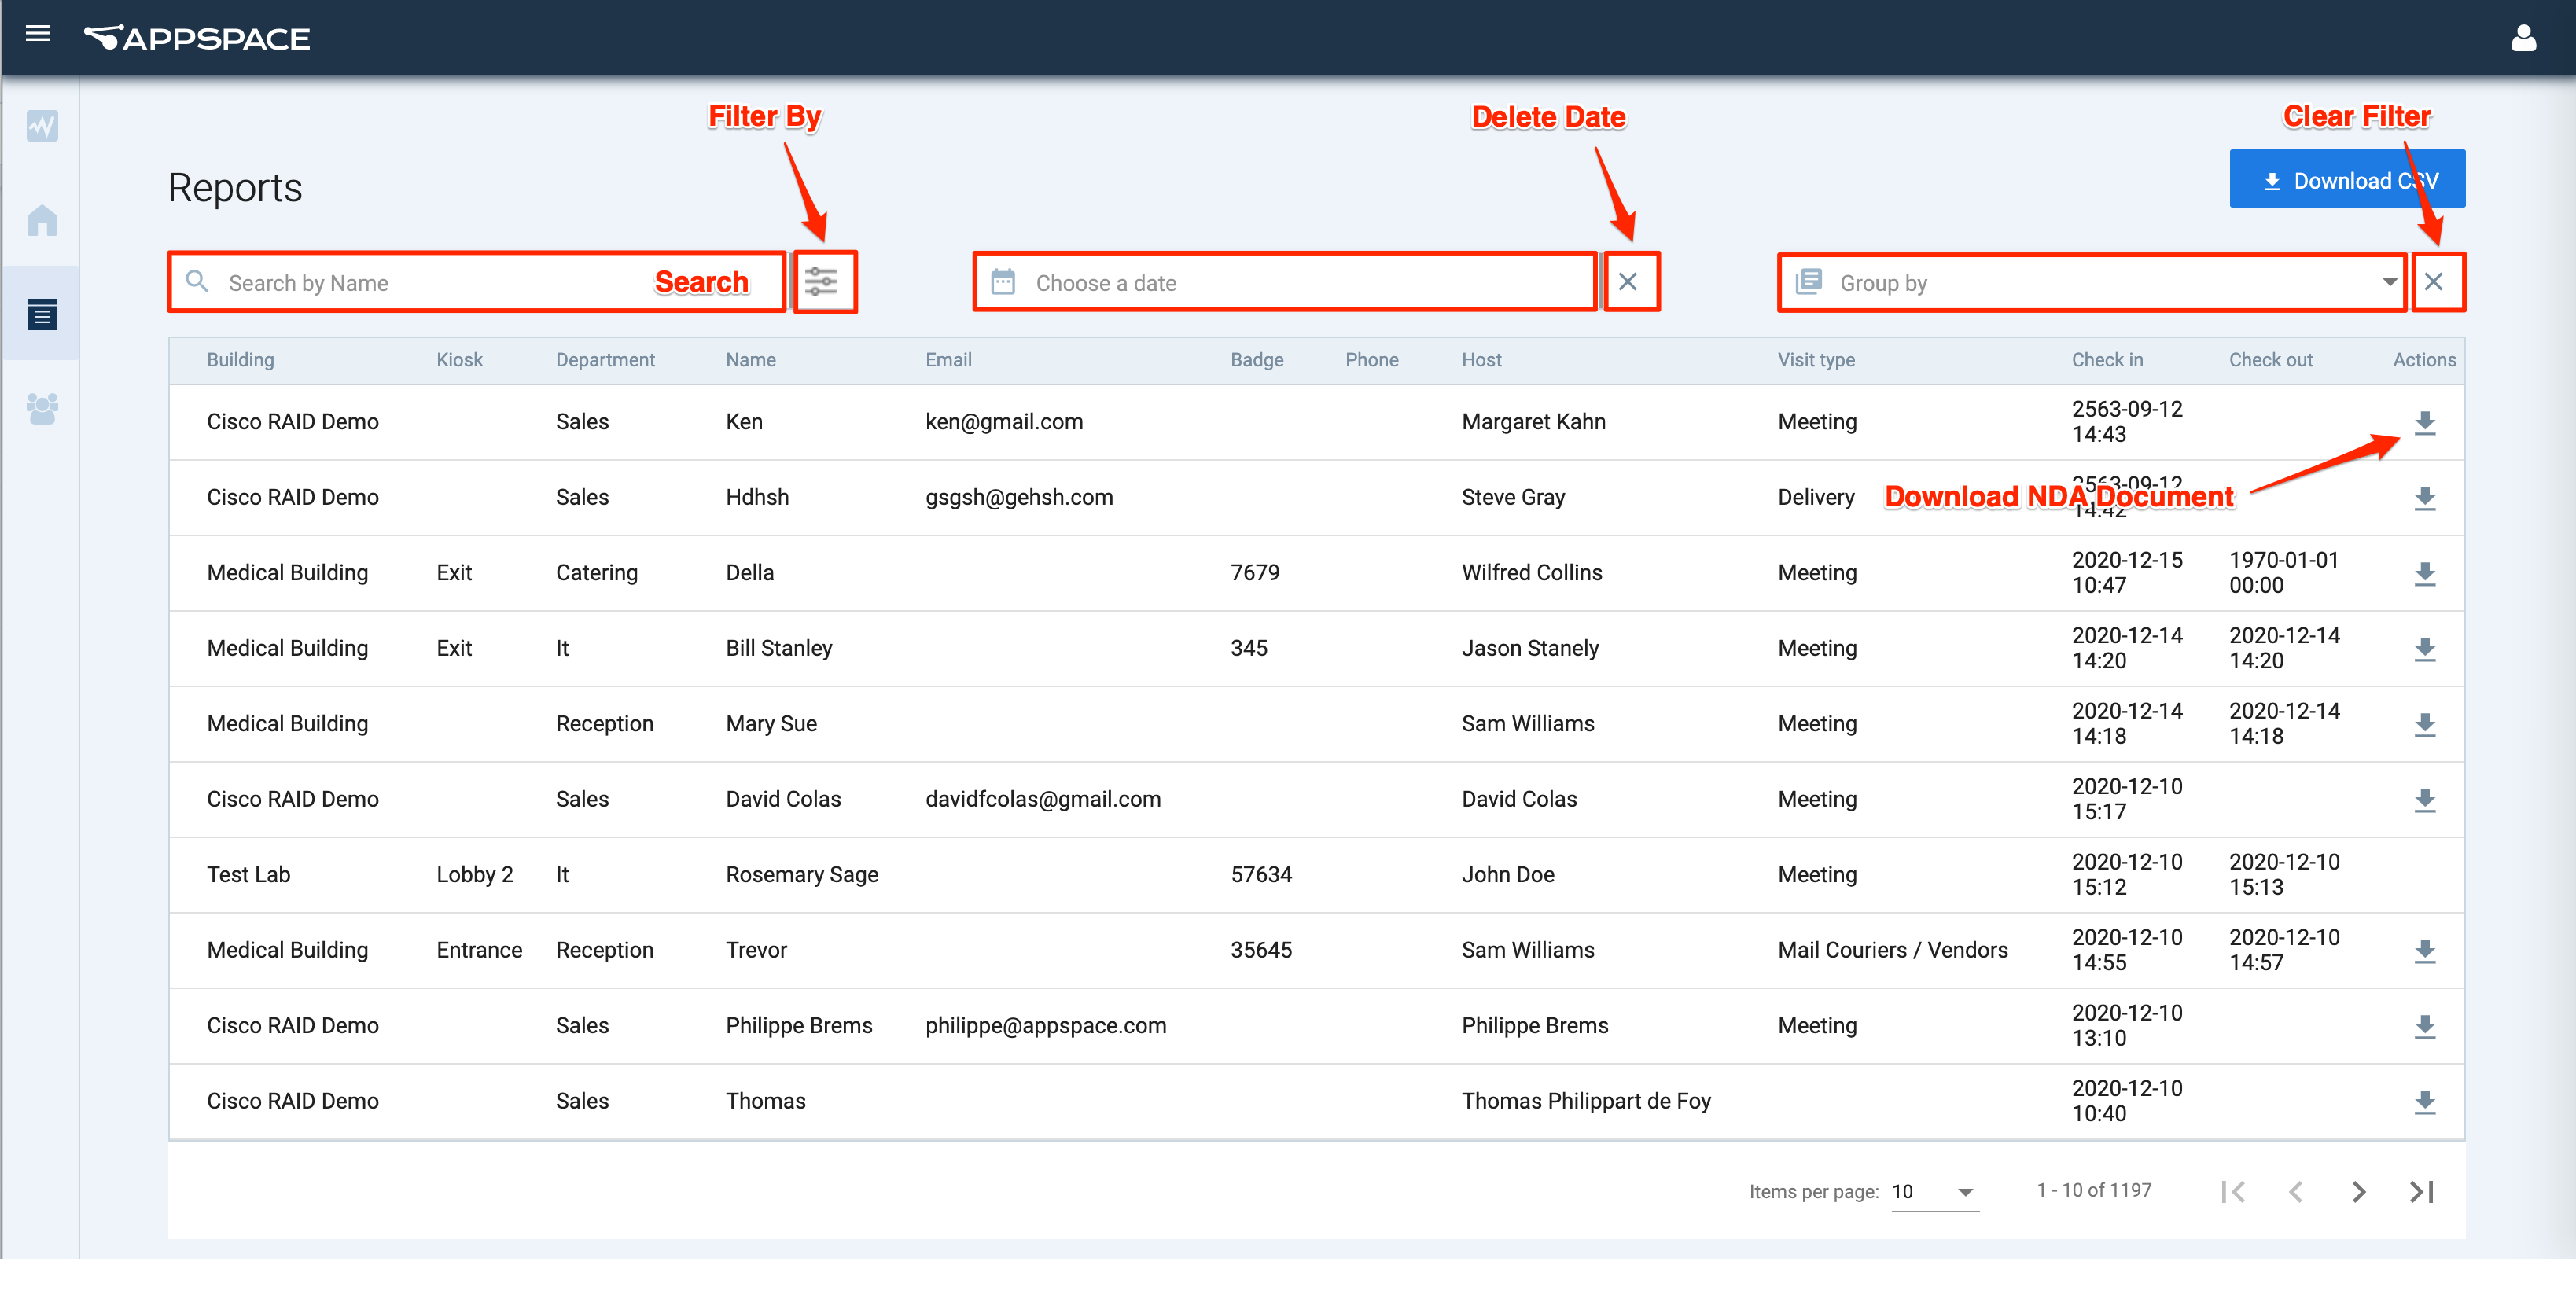
Reports tracks and collects the following visitor information:
- Building
- Kiosk
- Department
- Name
- Badge No.
- Phone No.
- Host
- Visit type
- Check In time and date
- Check out time and date
- Acknowledged NDA (Non-Disclosure Agreement) documents
Users
The Users section can be accessed via the ☰ Appspace menu. The list of users that are able to access the Visitor Registration module is displayed in a listing format.

Apart from adding users, administrators may also perform the following actions:
- Search Users – Enter the name of the integration to search.
- Edit Users – Click the edit icon.
- Delete Users – Click the delete icon.
Configuration
Set Up Visitor Registration Module
Add Integration
Follow the instructions below to add integrations:
- Click the User Profile icon, and select Integrations from the menu bar.
- Click the +ADD button.
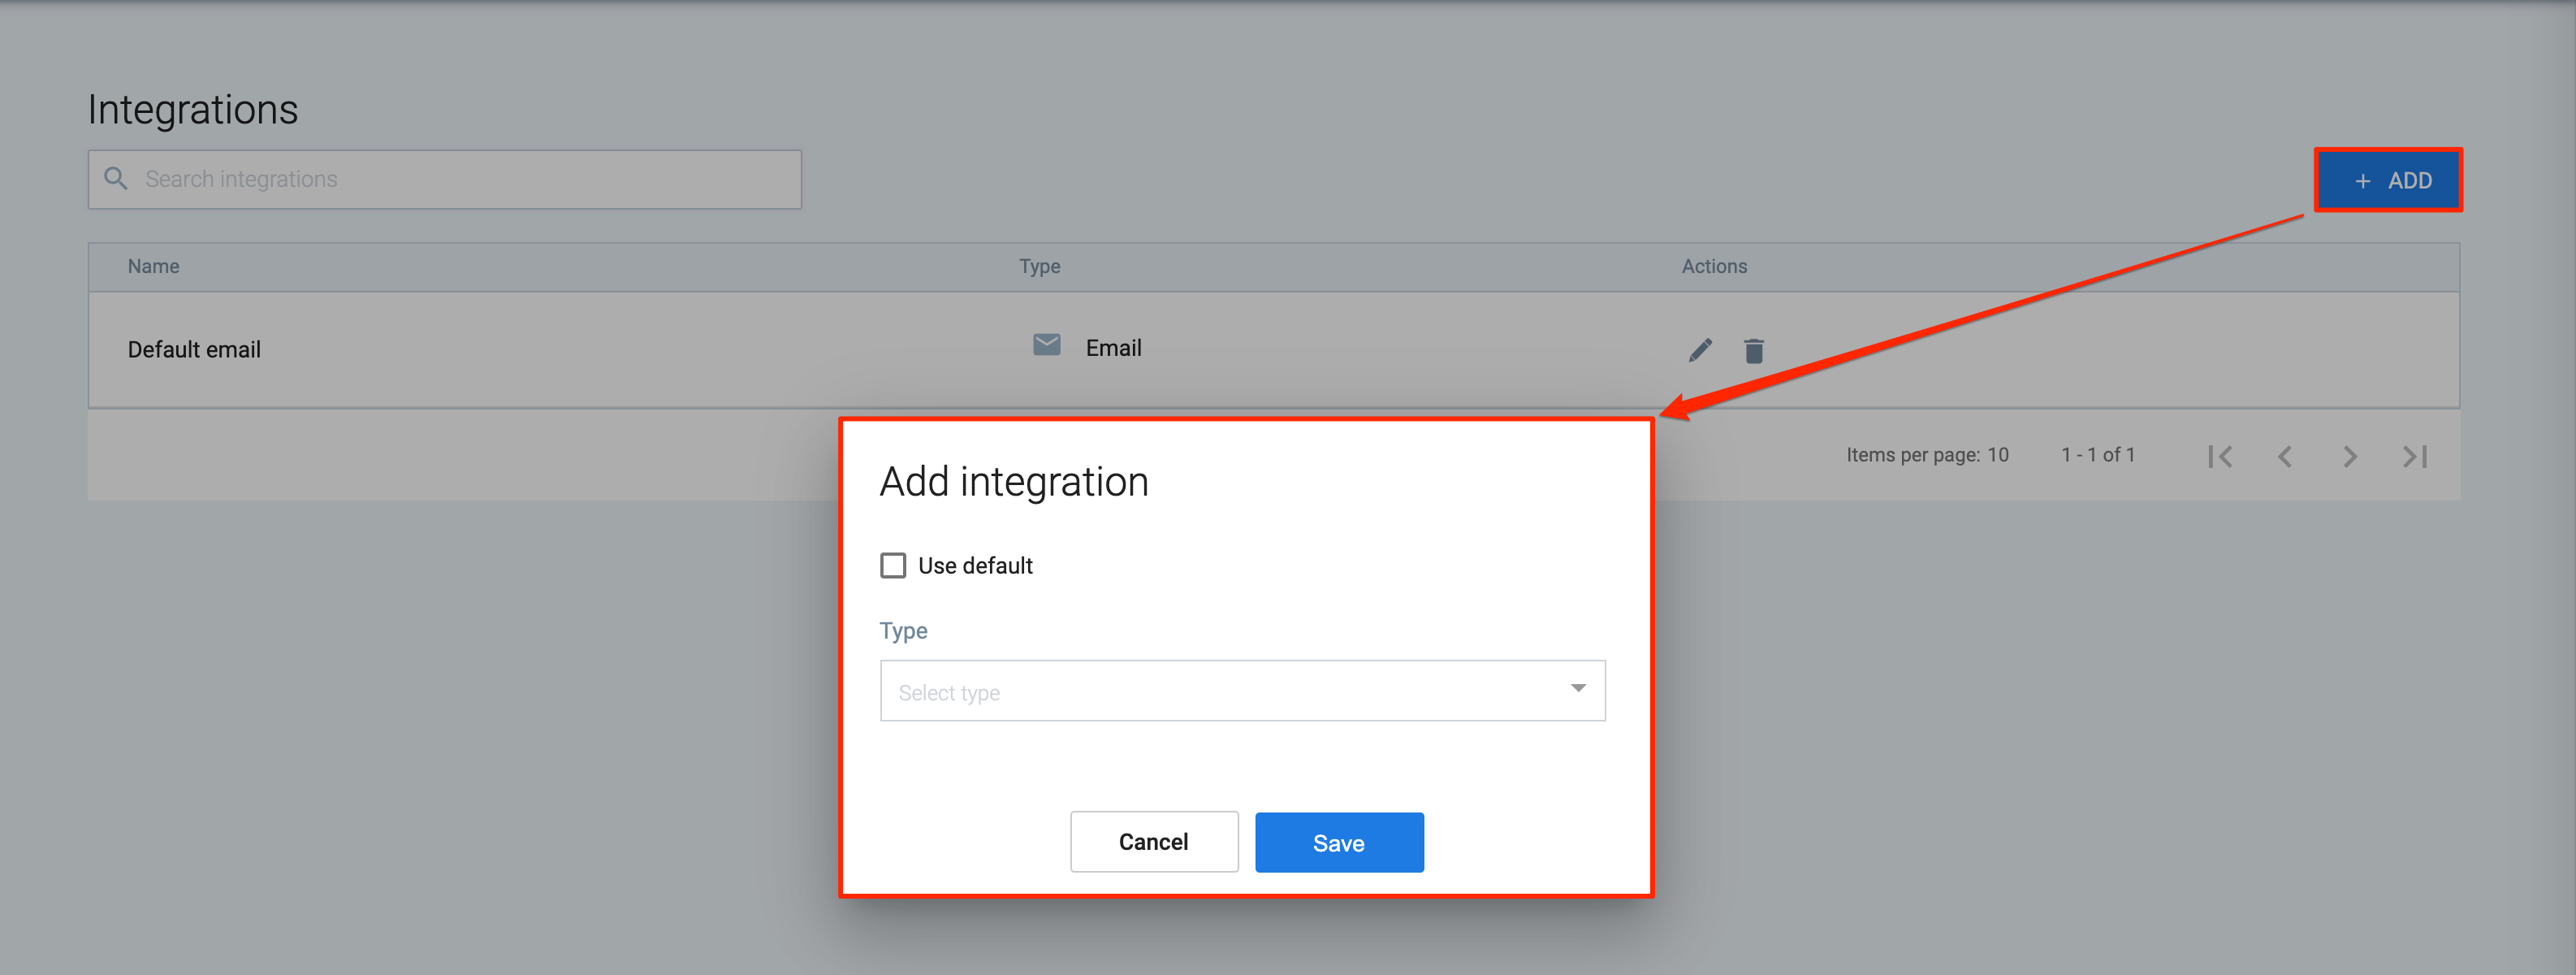
- In the Add integration window, select one of the following options to add an integration:
- Check the Use default checkbox if the notification type uses the system default, and select the notification Type from the drop-down menu. For instance, if the integration type is an email, then an email will be sent from the Appspace domain.
- If the Use default checkbox isn’t checked, select the notification Type from the drop-down menu, and enter the custom notification configuration in the respective fields.
- Click Save.
- Once the integration has been added, you may perform the following options:
- Edit integration information
- Delete integration.
Add Building
Follow the instructions below to set up buildings:
- Click Buildings from the ☰ Appspace menu.
- Click the + Add building button, and enter the Name and Location (optional) of the facility.
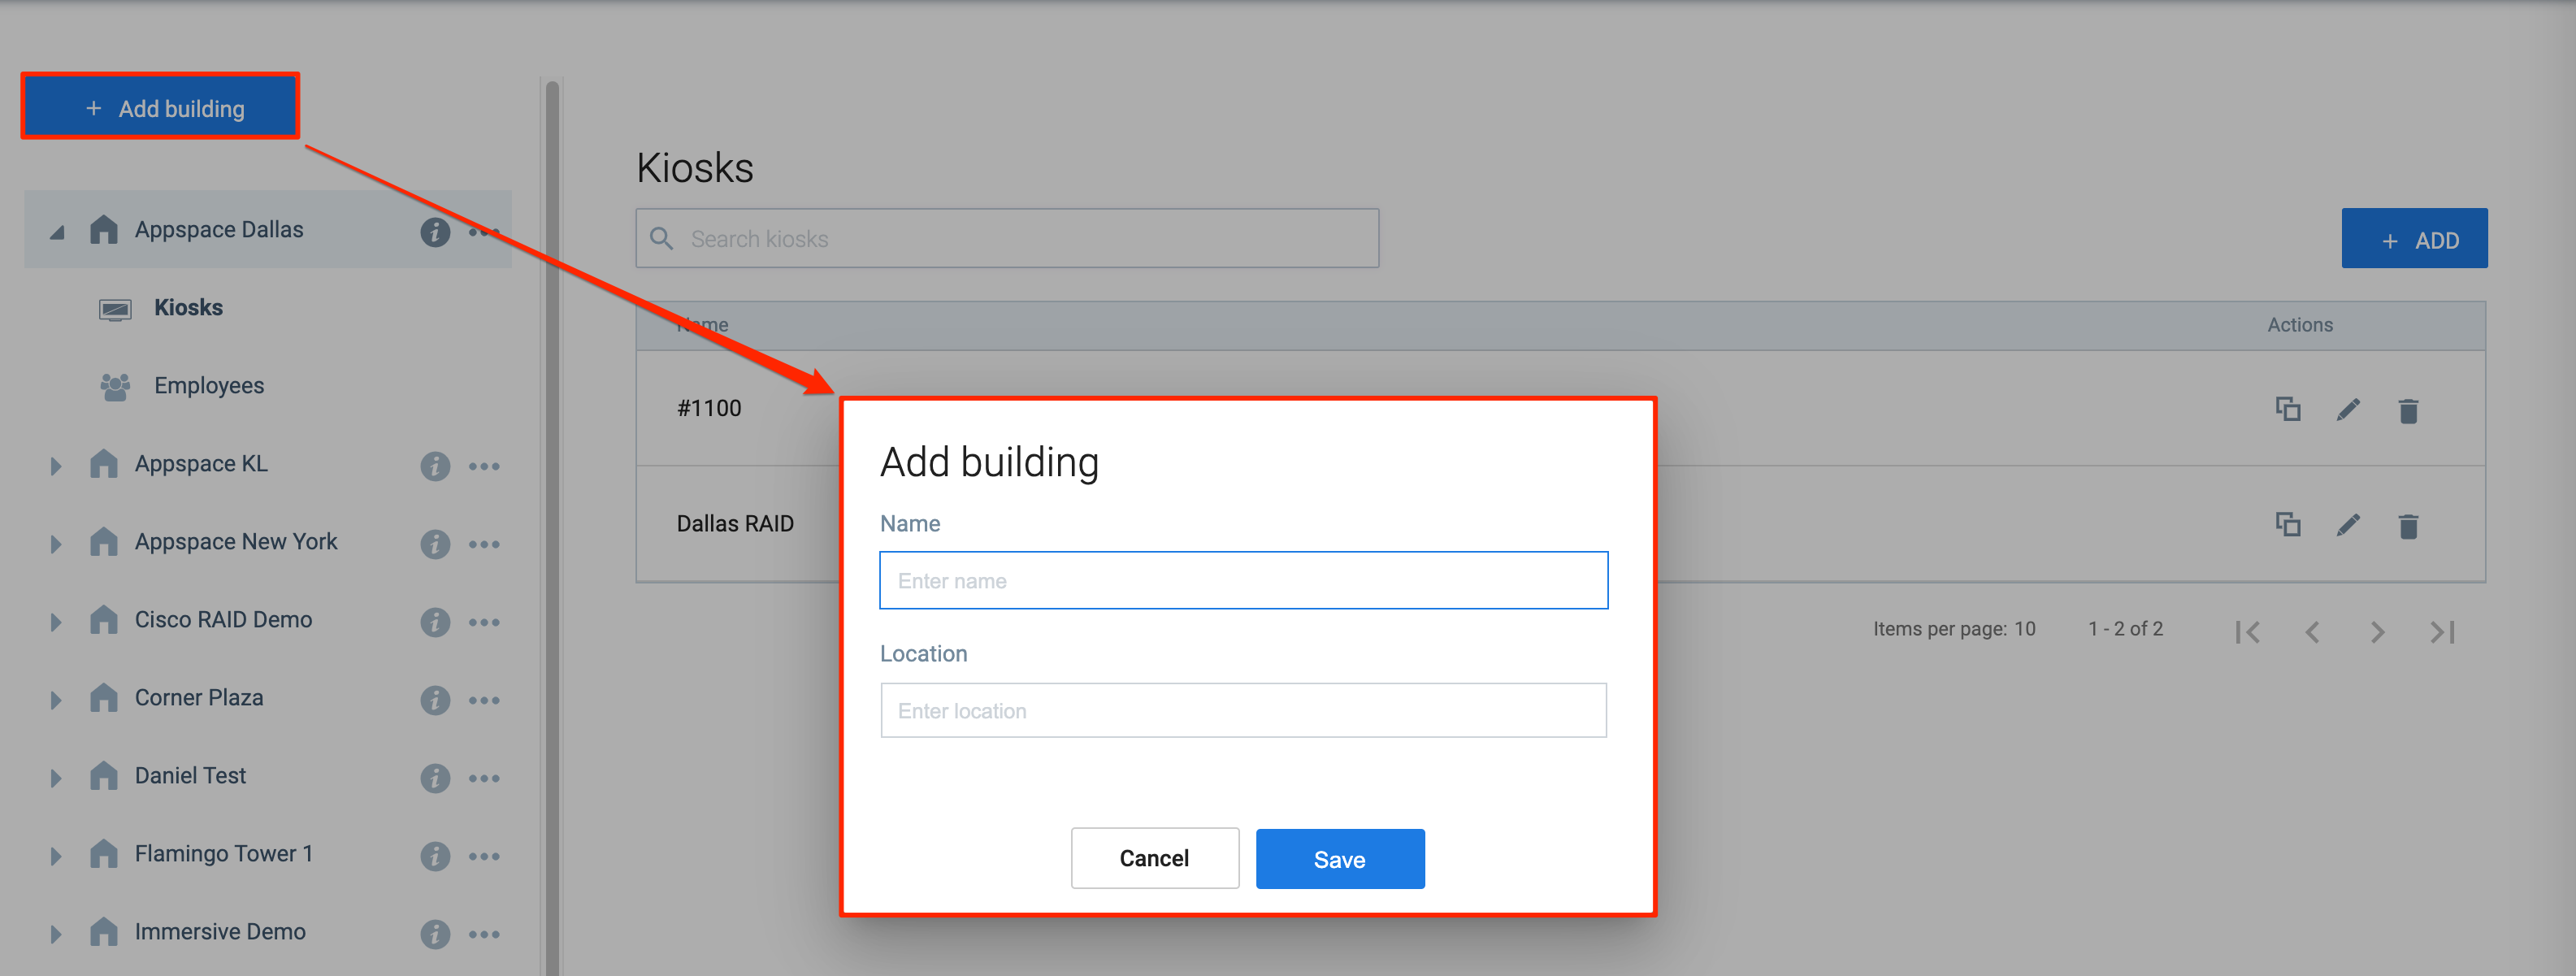
- Once done, click Save.
- The building will be displayed on the list.
- Once the building has been added, you may perform the following options:
- View building information.
- Edit building name.
- Delete building.
Add Kiosk
Follow the instructions below to add kiosks to the building:
- Click Buildings from the ☰ Appspace menu.
- Select Kiosks from the side panel, and click the +ADD button.
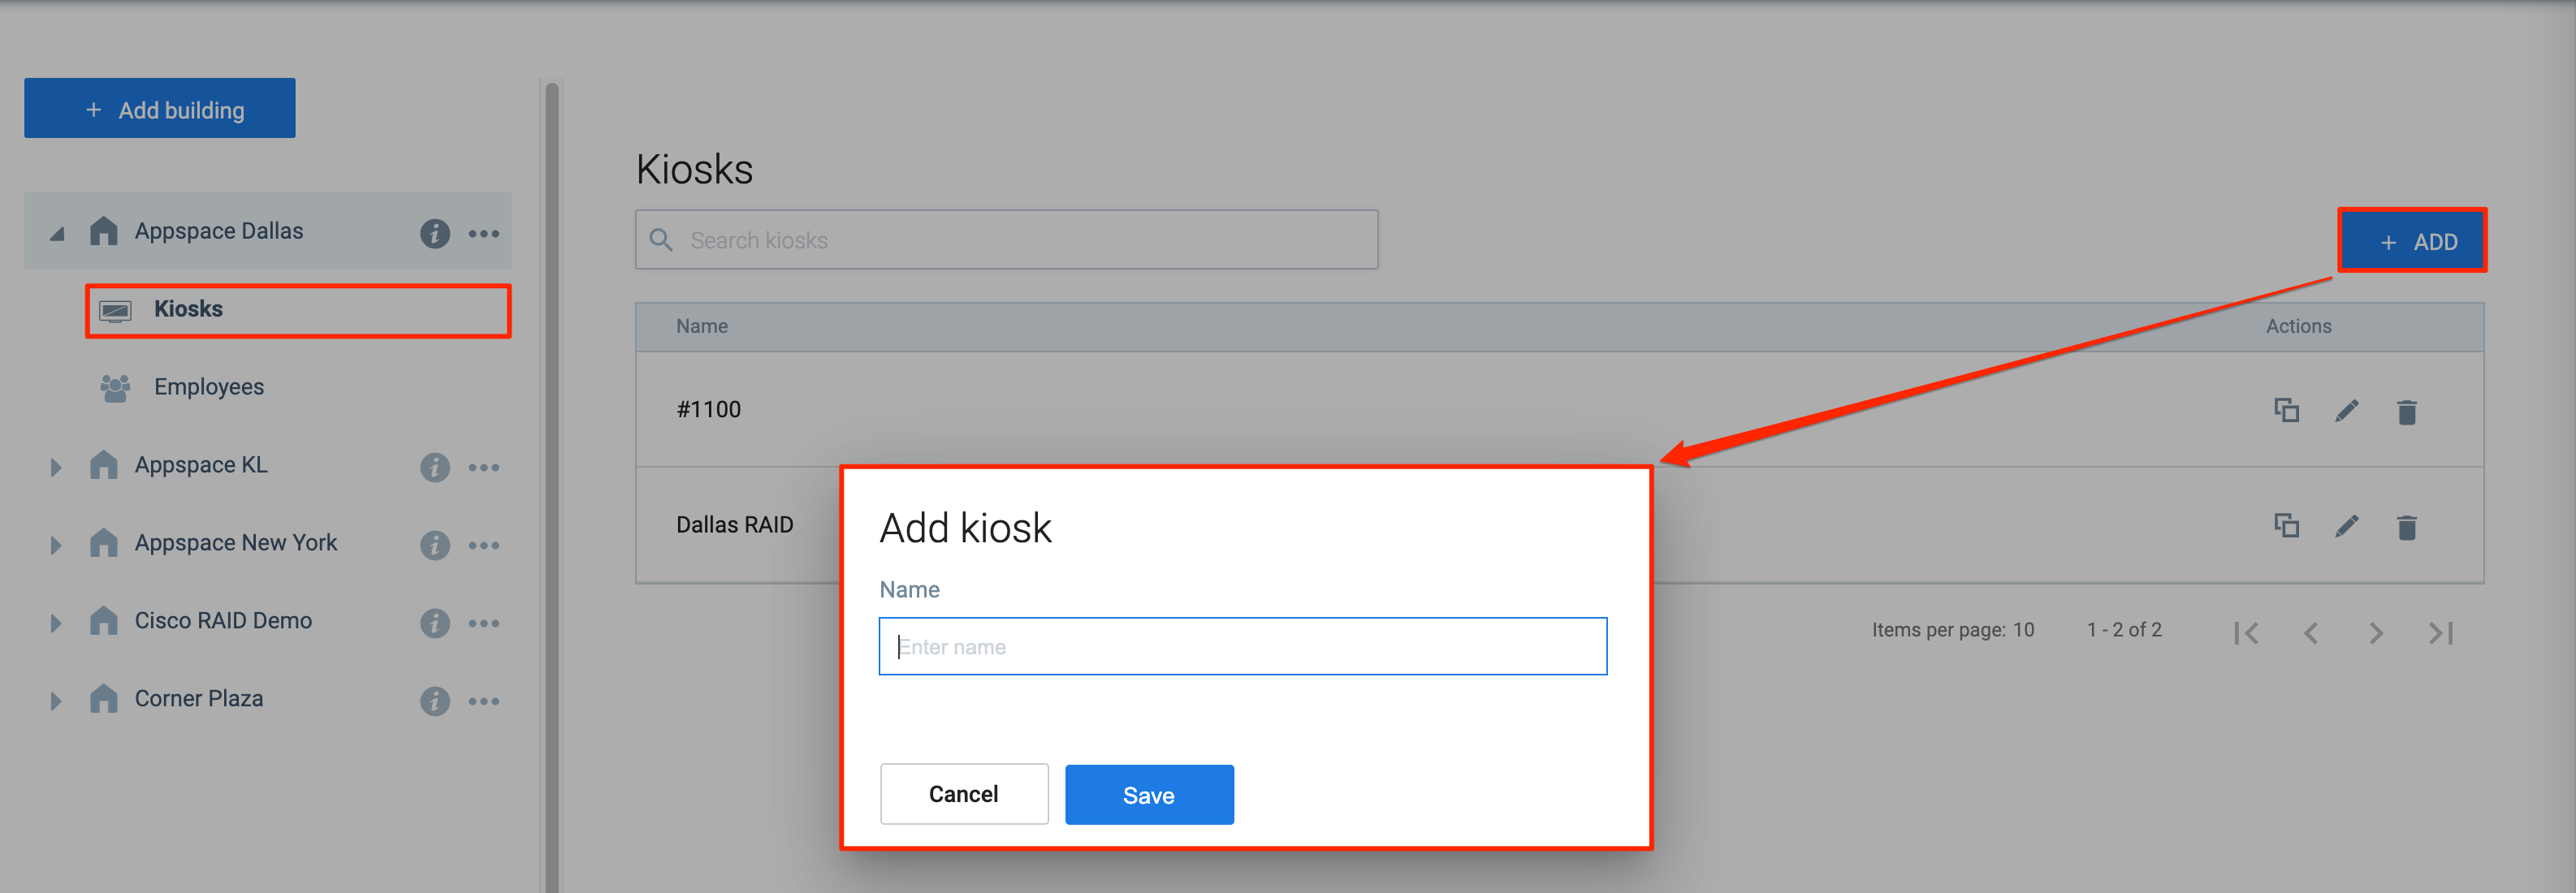
- Enter the name of the kiosk, and click Save.
- Once the kiosk has been added, you may perform the following options:
- Copy the Kiosk ID – This is required for linking the Guest Registration card to the Visitor Registration portal.
- Edit kiosk name.
- Delete kiosk.
Add Employee
Follow the instructions below to add employees to the building:
- Click Buildings from the ☰ Appspace menu.
- Select Employees from the side panel, and click the +ADD button.

- Enter the following employee’s photo and information, and select the Department and Contact method from the respective drop-down menus. Click Save.
NoteIf the Department for the employee is not listed in the drop-down menu, you may enter the department name to add it to the list ad-hoc.
- Once the employee has been added, you may perform the following options:
- Edit employee information.
- Delete employee.
Optionally, you may also upload a .csv file format containing employee information to be imported into the building.
- Click Buildings from the ☰ Appspace menu.
- Select Employees from the side panel, and click the Upload CSV button.
- Browse and select the employee information .csv file to upload.
NoteEnsure the following CSV file follows one of the following formats:
- Semicolon-separated value CSV file
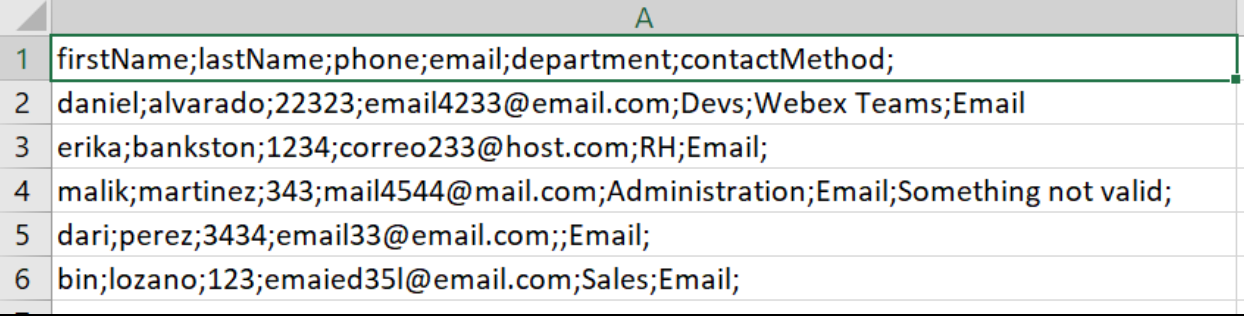
- Organized CSV file

- Semicolon-separated value CSV file
Add User
Follow the instructions below to add users:
- Click Users from the ☰ Appspace menu.
- Click the +ADD button.
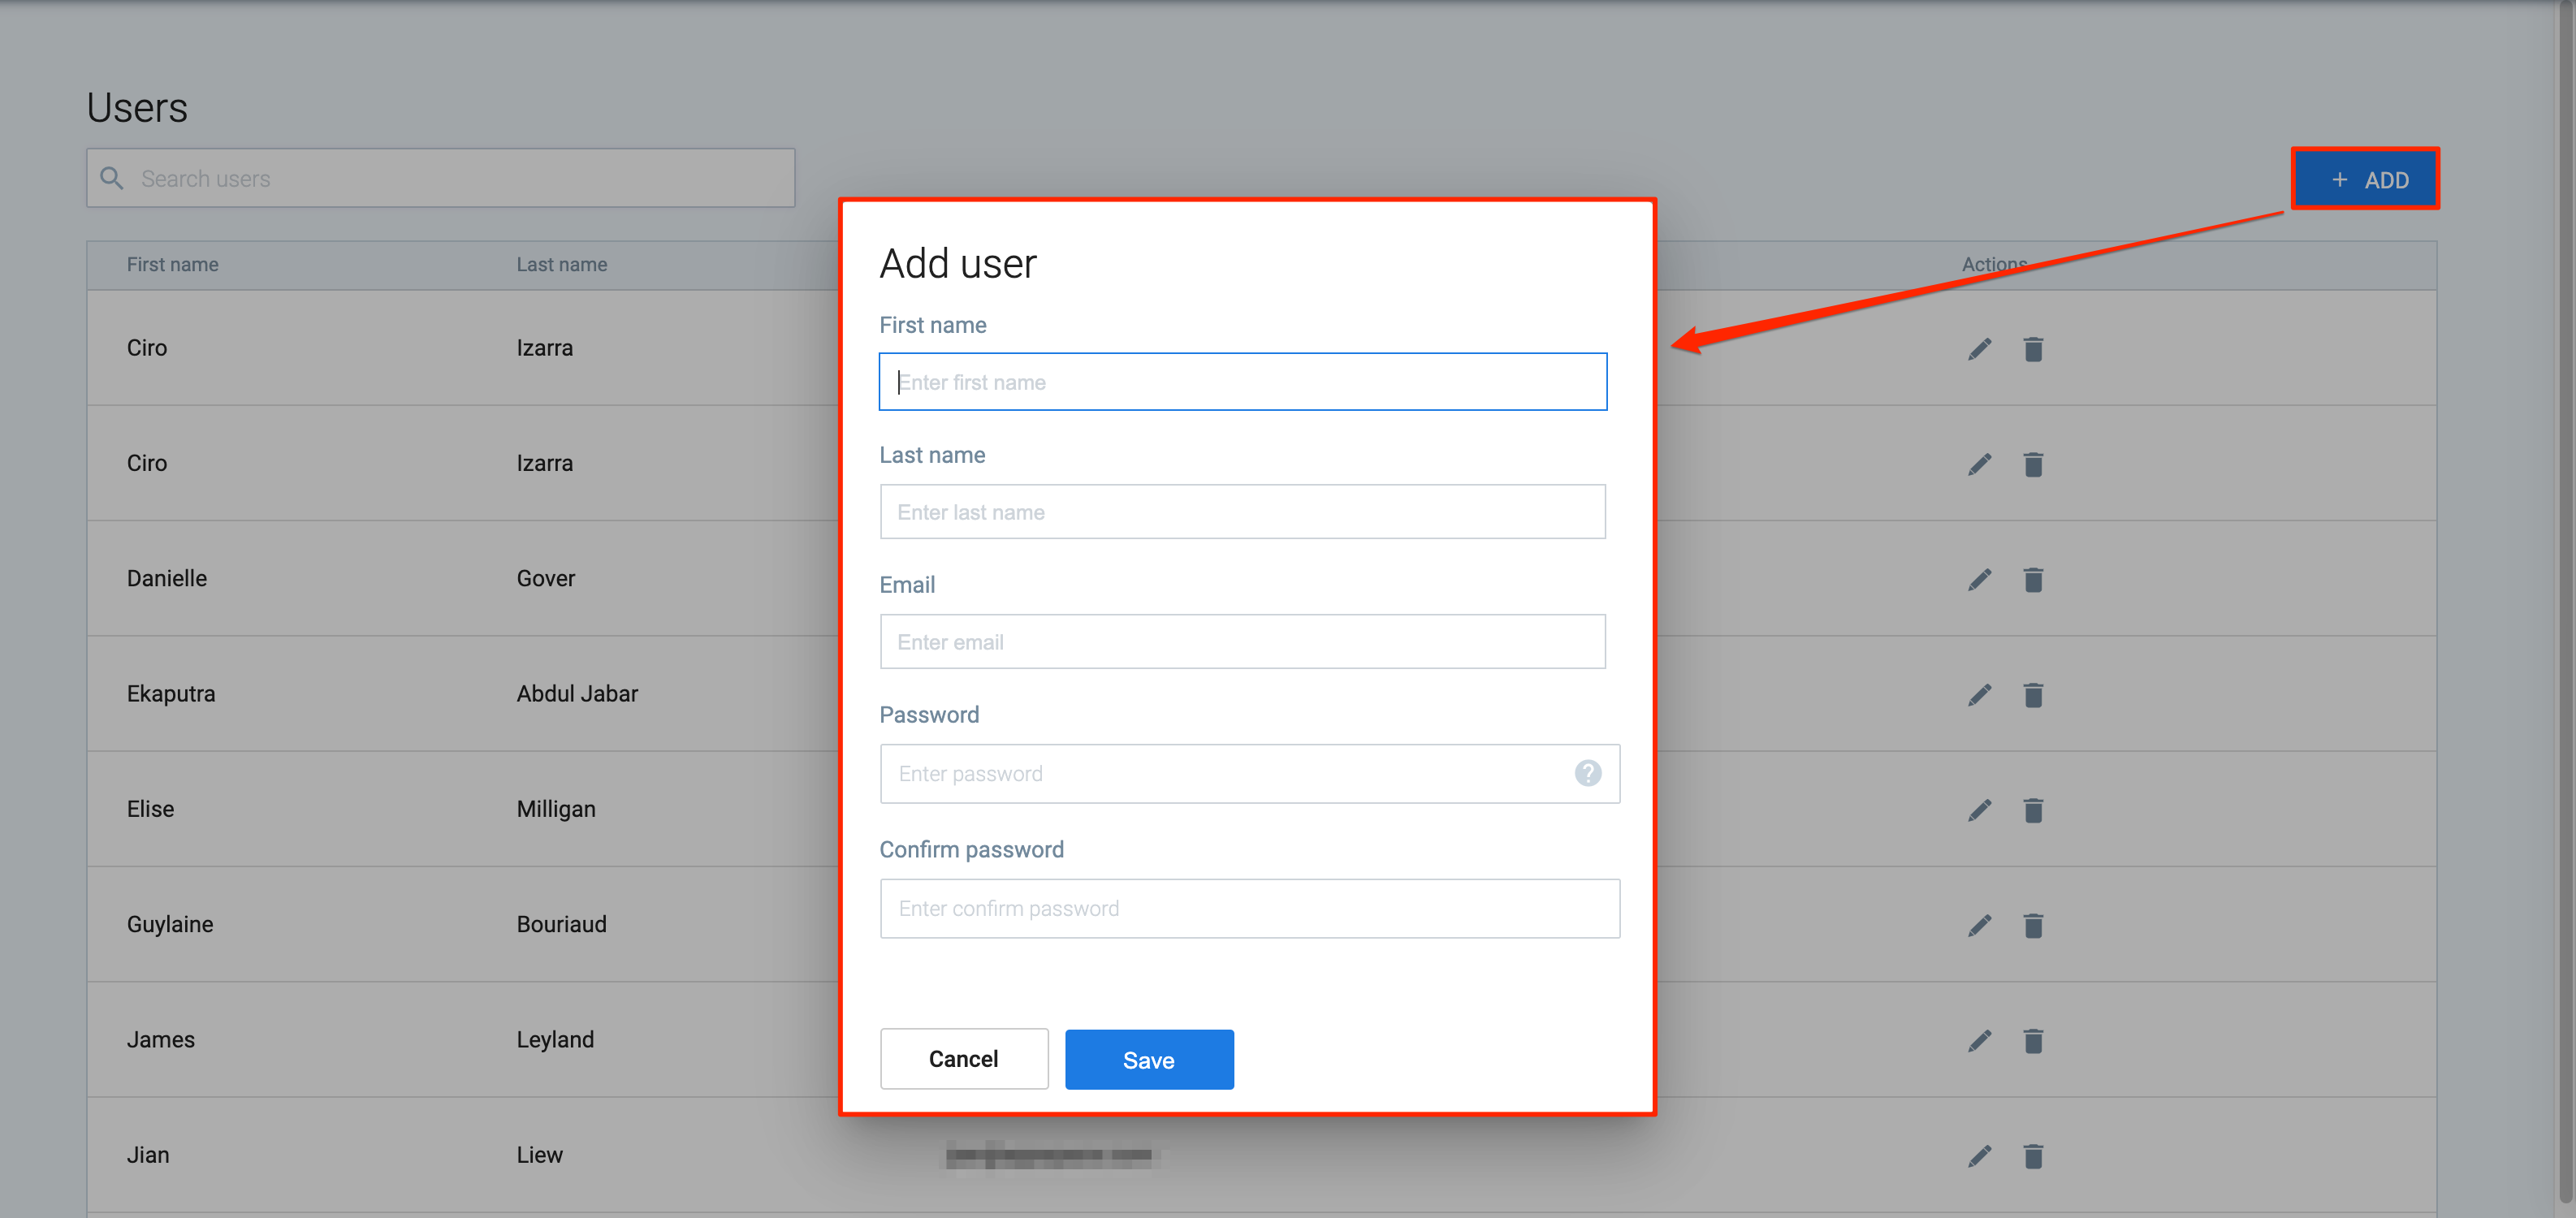
- Enter the following user’s name, email, and password. Click Save.
NoteThe administrator will set a password for the new user. The user will then receive a reset password email, which contains instructions on how to change the password, or the user may keep using the password assigned by the Administrator.
- Once the user has been added, administrators may perform the following options:
- Edit user information.
- Delete user.
Create Appspace Guest Registration Card
Follow the instructions below to create the card:
- To create this card, select one of the following options:

- Click +QUICK ACTION from the Appspace menu bar on the top right, and select Create Content.
- Click Library from the ☰ Appspace menu, and select a library or folder you wish to create the content in. Click +CREATE, and select Content.
- Select the Guest Registration card.
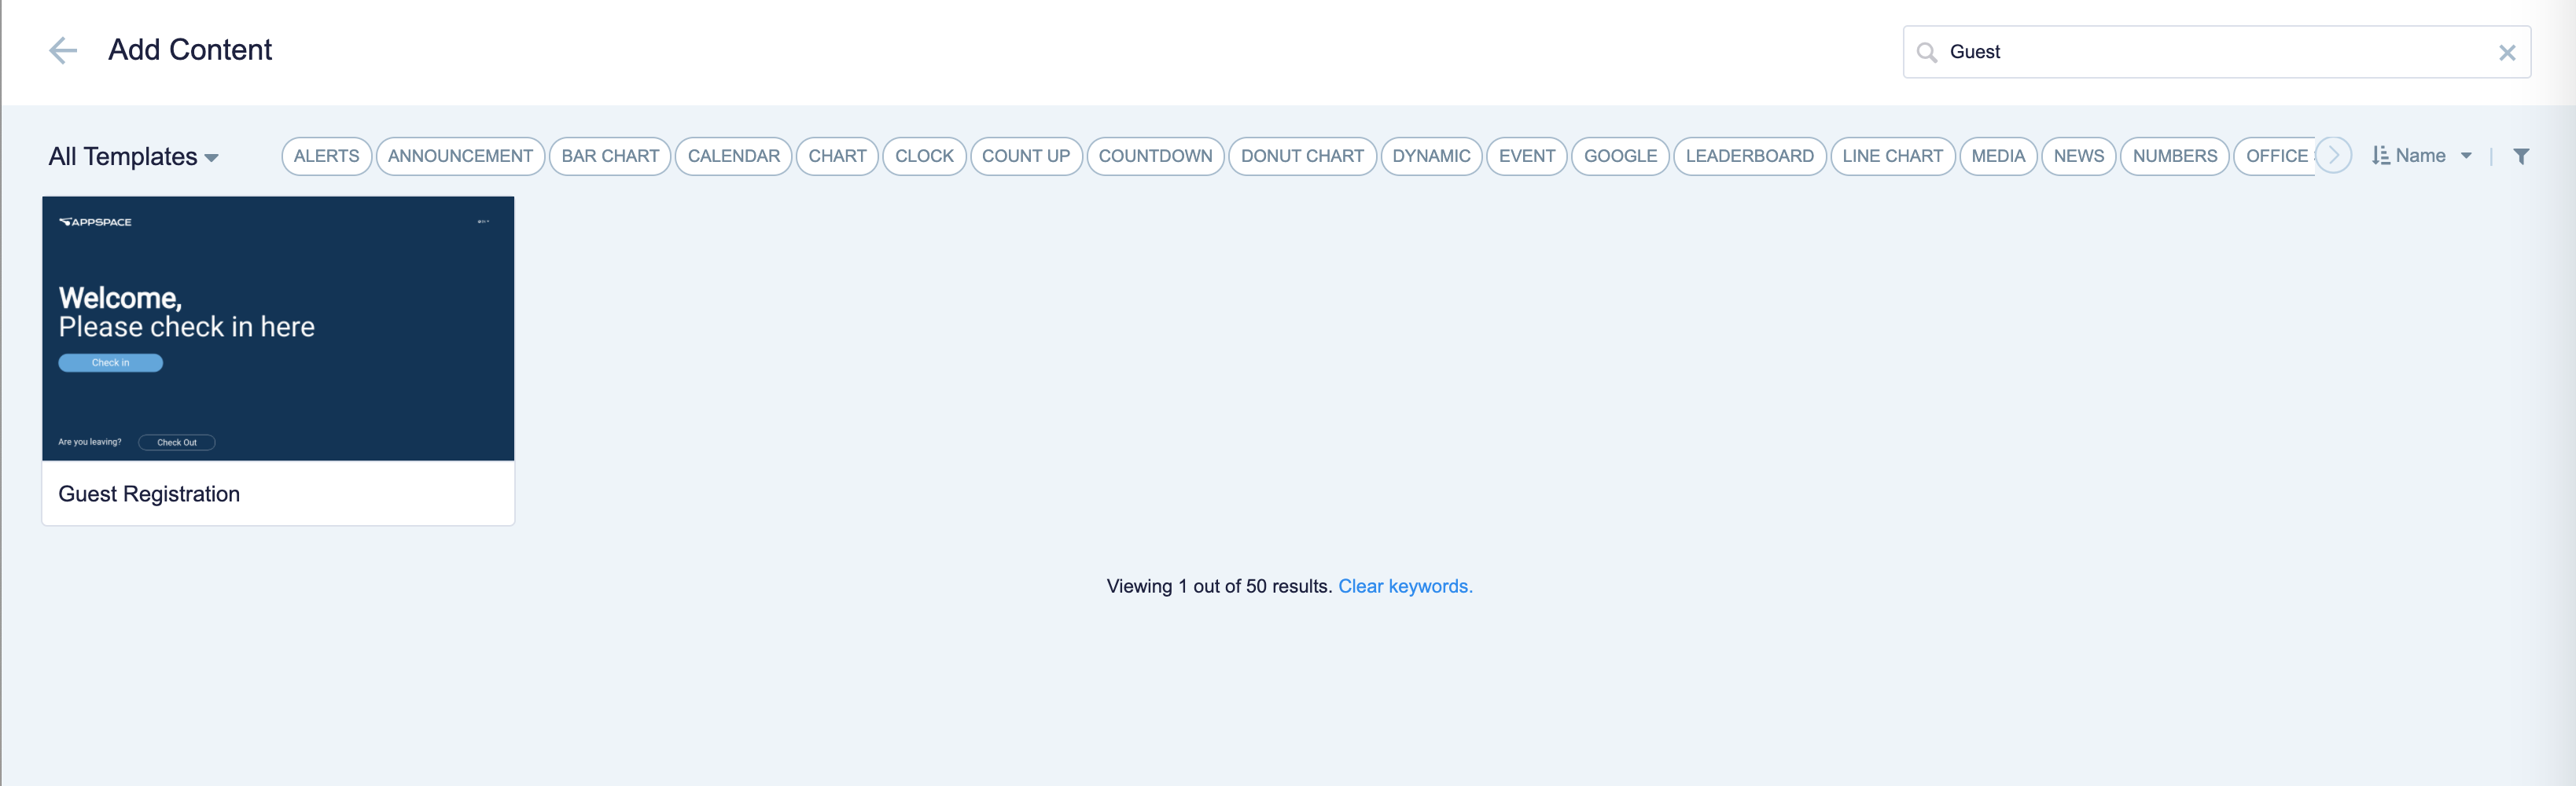
ImportantIf you are unable to locate the content, try using either the Search bar, the Order by, or Filter icon to narrow down the content that you are looking for. - Enter the Title of the content as this will also act as the filename for the content. This is a mandatory field.
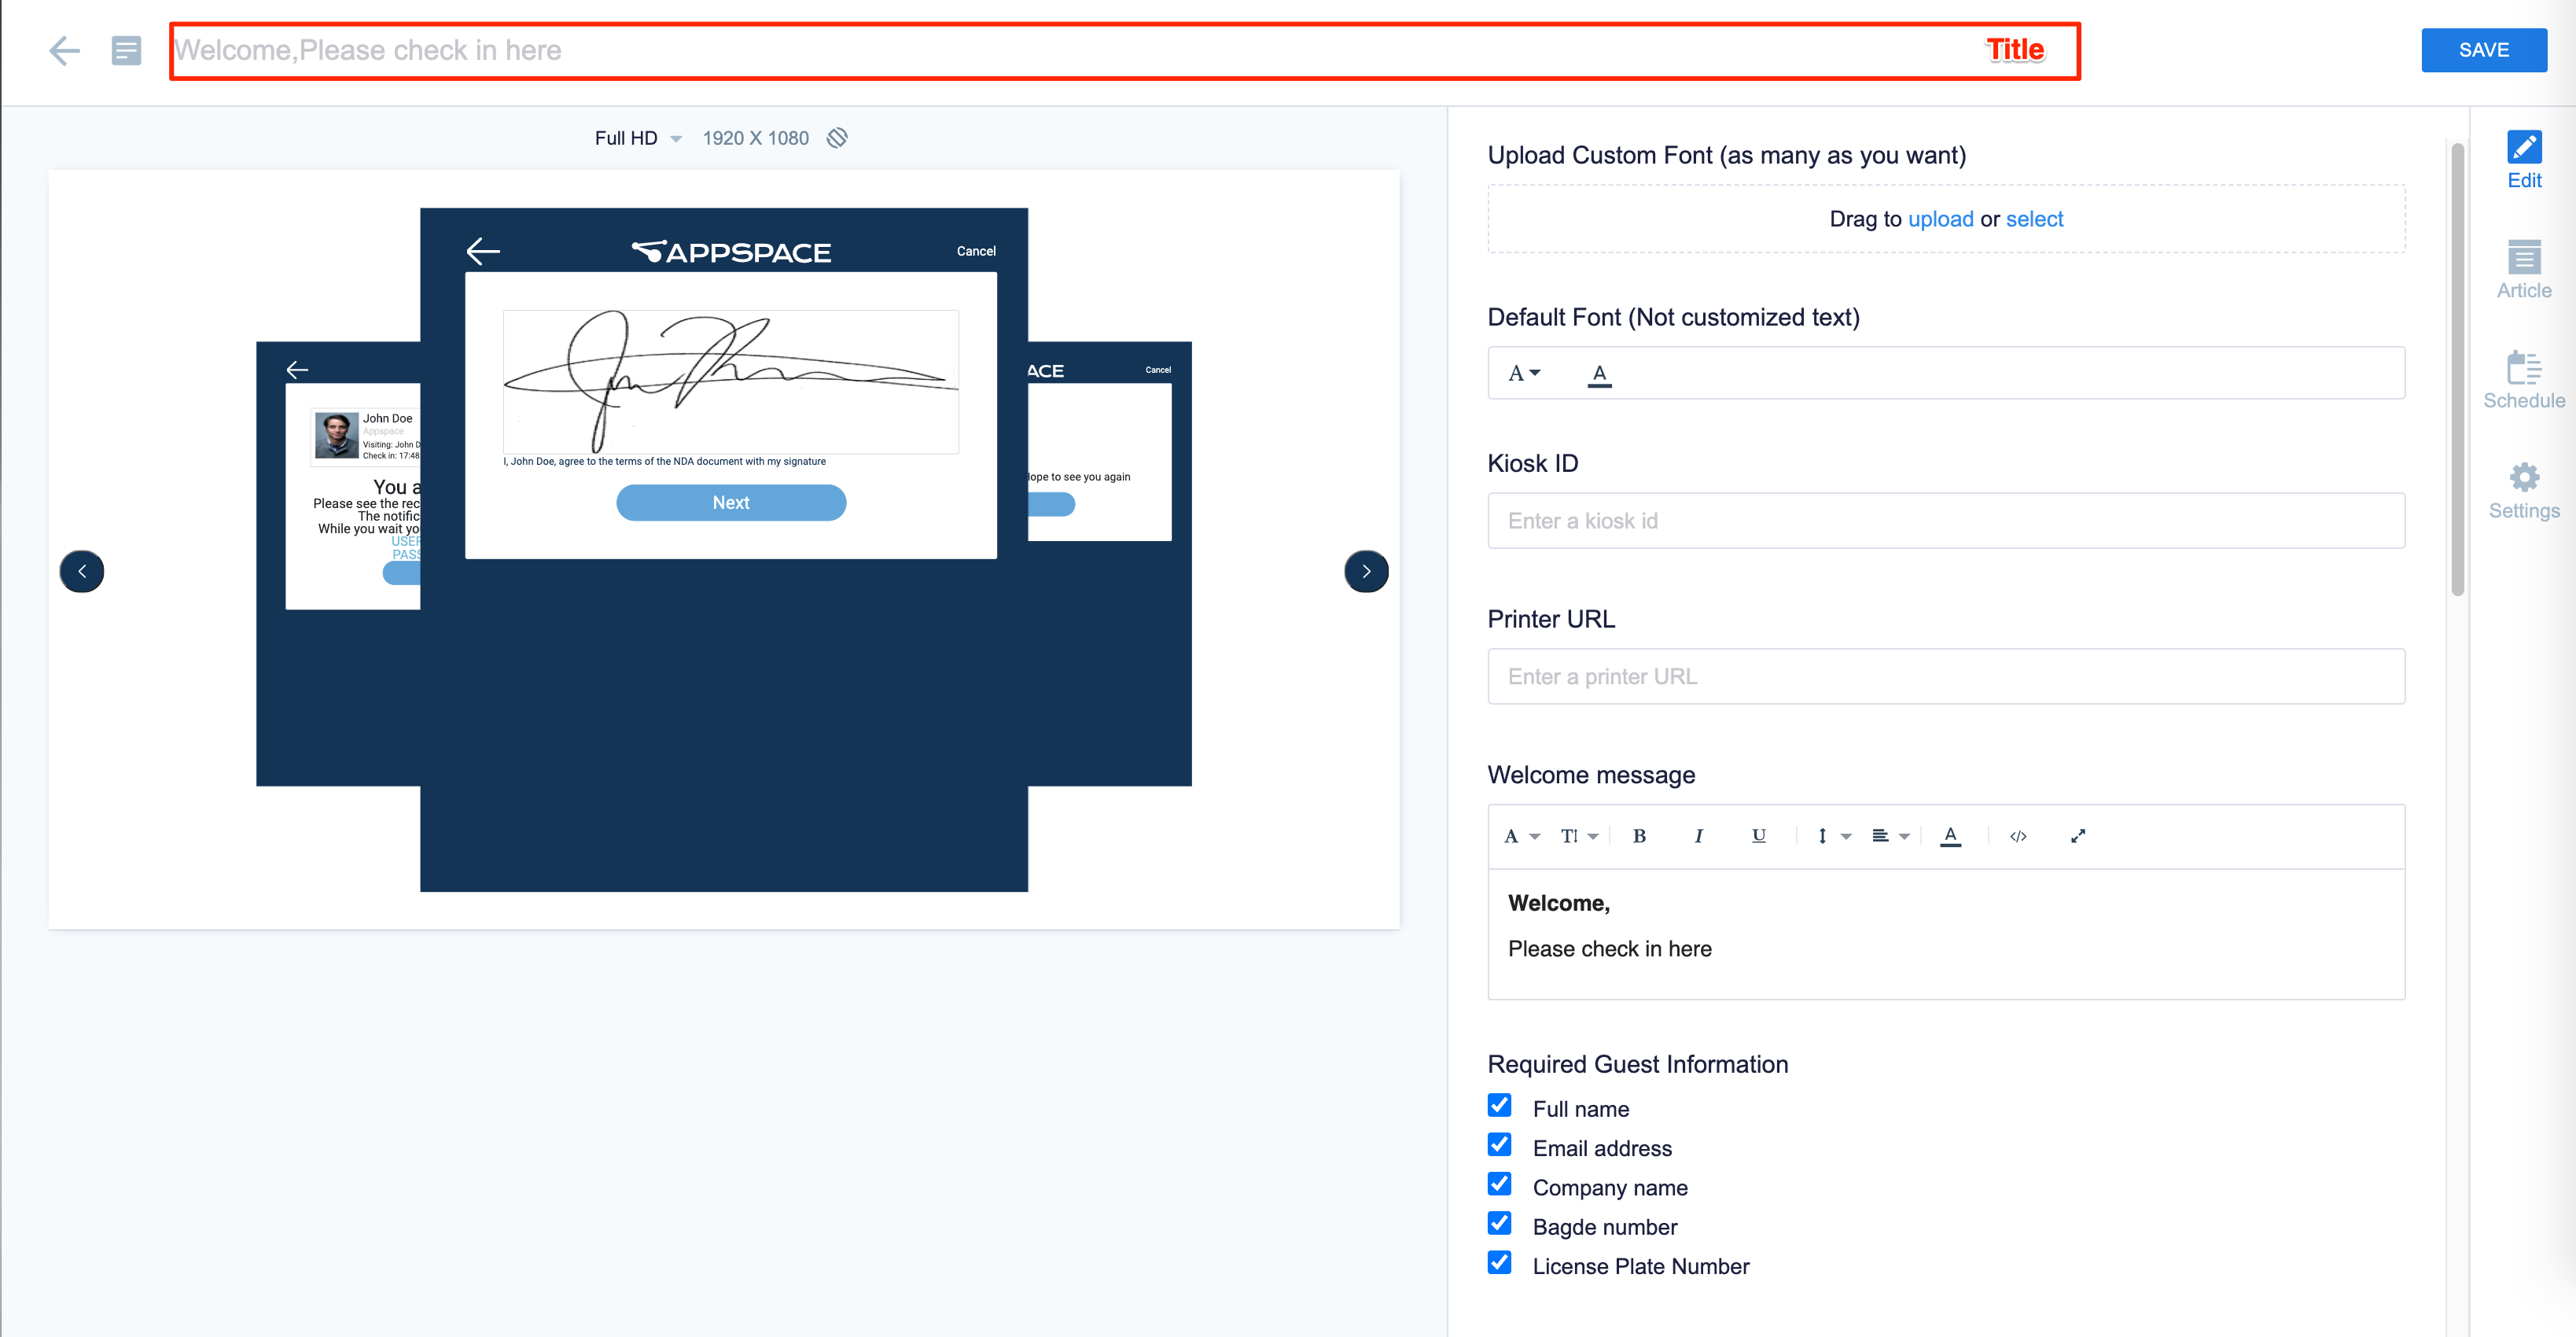
- In the Edit tab:
- You may Upload Custom Fonts, or select a font from the Default Font drop-down for text in the card.
- Enter the Kiosk ID.
NoteThis Kiosk ID can be found in the Visitor Registration module, and is meant to tie the physical device running the Visitor Registration card, and the entry in the Visitor Registration module.
- Enter the Printer URL of the printer to print visitor badges. This is optional. NoteThis is an additional feature that must be customized. If you would like to use this feature, please contact Appspace Professional Services.
- Enter the Welcome message with the preferred messaging, as this will be the first screen that is displayed to the visitors. Use the Text Editor to customize the text font and style.
NoteIf the Welcome message is deleted, the first screen displayed will be the Visitor Registration form requesting for personal information.
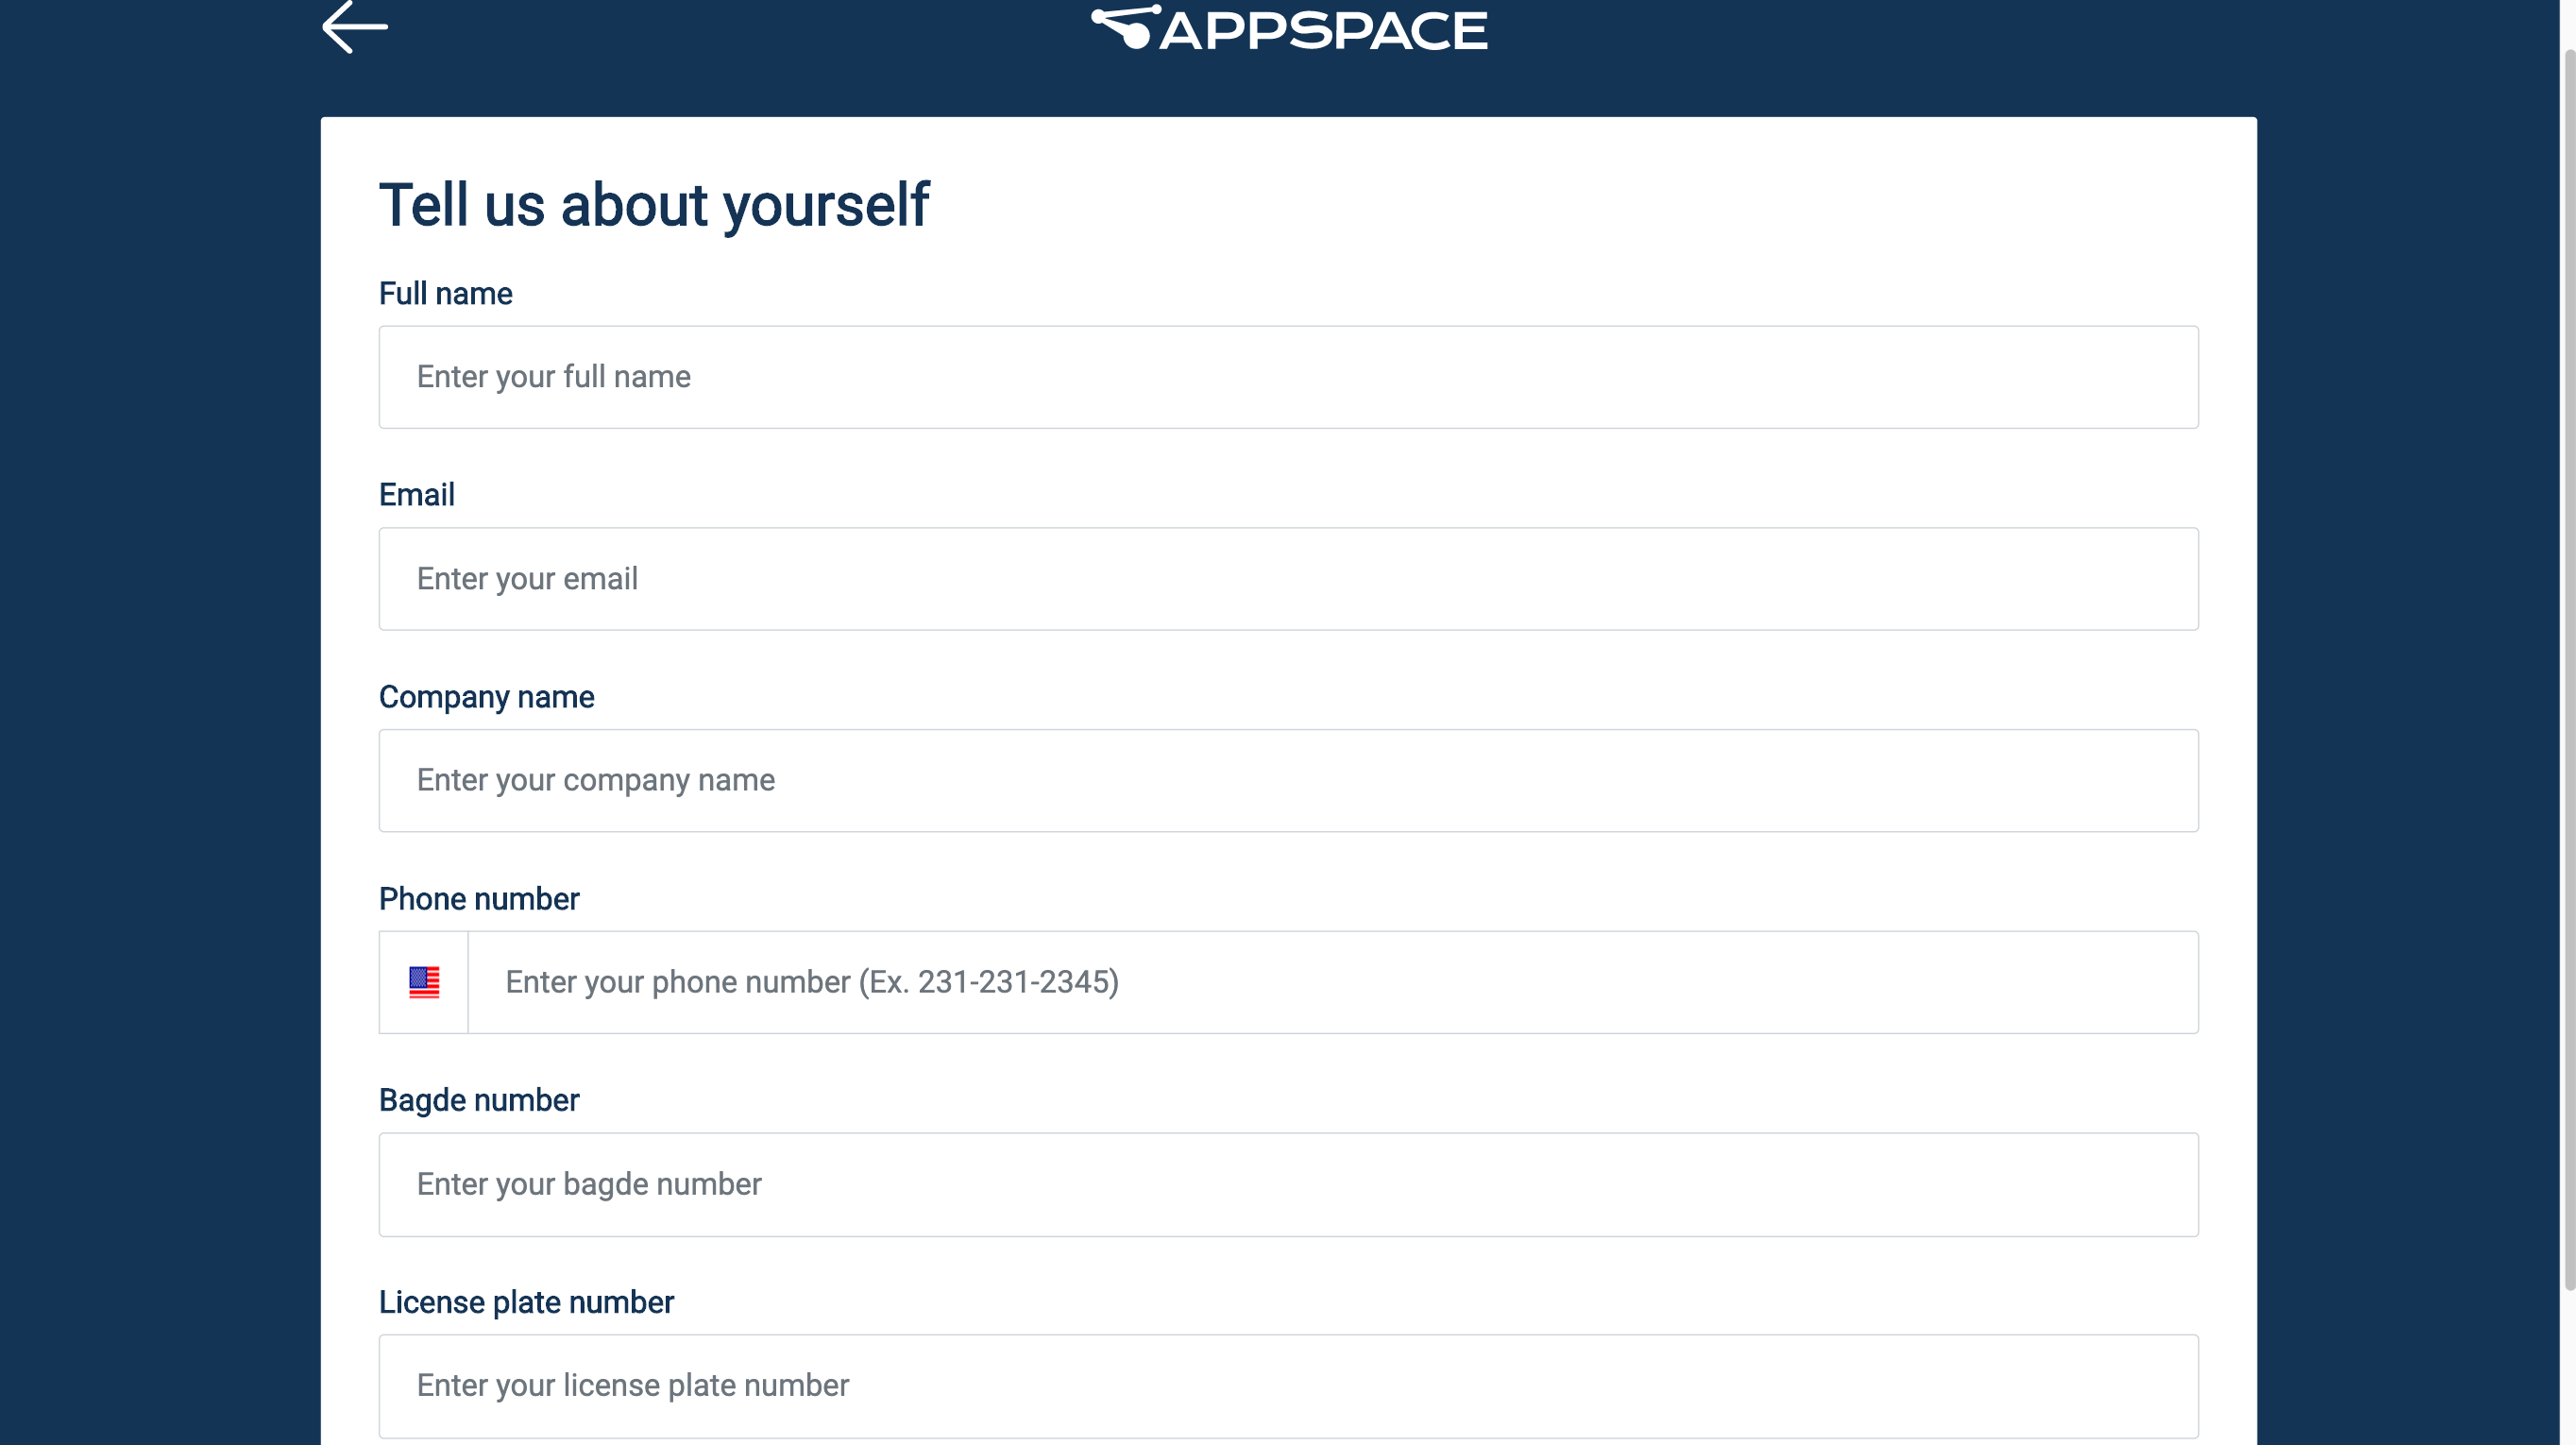
- Select the following Required Guest Information: (you may select more than one)
- Full Name
- Email address
- Company name
- Badge number
- License Plate Number
- Configure the Phone Number and Default Country Dial or Country Code (if applicable).
- Select the following Required Visit Information: (you may select more than one)
- Host Name
- Type of Meeting
- Select the following Configuration Options: (you may select more than one)
- Enable Guest Photo
- Enable Document
- Enable Guest Check Out
- Enable Language Transition
- You may upload a non-disclosure agreement in the Document Upload section, if you require your visitors to acknowledge during the registration process.
- Once uploaded, select if the visitor is required to provide a Signature or just click an Accept Button by selecting the appropriate radio button
- Enter the Check In Confirmation Message with the preferred messaging, as this will be the message once the visitor is registered. Use the Text Editor to customize the text font and style.
- Enter the Check out Confirmation Message with the preferred messaging, as this will be the message once the visitor checks out before leaving the building. Use the Text Editor to customize the text font and style.
- Customize the Buttons Font Color and Accent Color.
- Upload a Logo.
- In the Article tab:
- Include an Article or Caption to accompany the content item when being displayed on mobile apps, tablets, and other social collaboration apps.
- Enter a Referral Link to link more information to the content.
- In the Schedule tab:
- You may add the content to a channel by selecting the channel from the Add to channel drop-down menu, or leave it unassigned to be added later.
- When the content is assigned to a channel, the SCHEDULING and DISPLAY PROPERTIES options are displayed. Refer to the Configure Content Playback Properties: Dayparting, Frequency, Scheduling, in a Playlist Channel article for detailed configuration instructions.
- In the Settings tab:
- The Name field will be auto-populated to match the Title of the content which will also act as the filename for the content. This is a mandatory field.
- Enter any relevant Tags for the content. (Optional)
- Select a folder for the content in the Library Location drop-down menu to change the default folder location.
- Select an expiry date for the content from the Auto Delete Content from Library drop-down menu. (Optional)
- Upload an image to be used as the Thumbnail for the content.
- Once done, click SAVE.
Appspace Visitor Registration Experience
Once the Visitor Registration module and the Guest Registration card have been configured and deployed to the kiosks within the buildings, the visitor registration experience is ready. The examples below use the default Guest Registration card configuration:
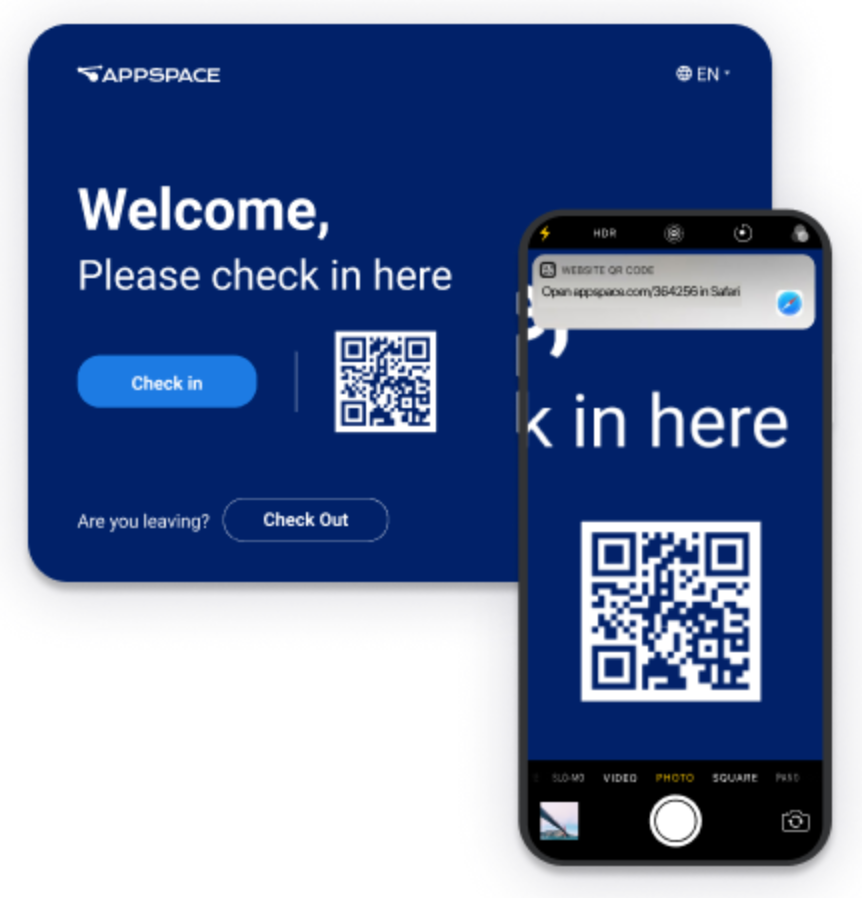
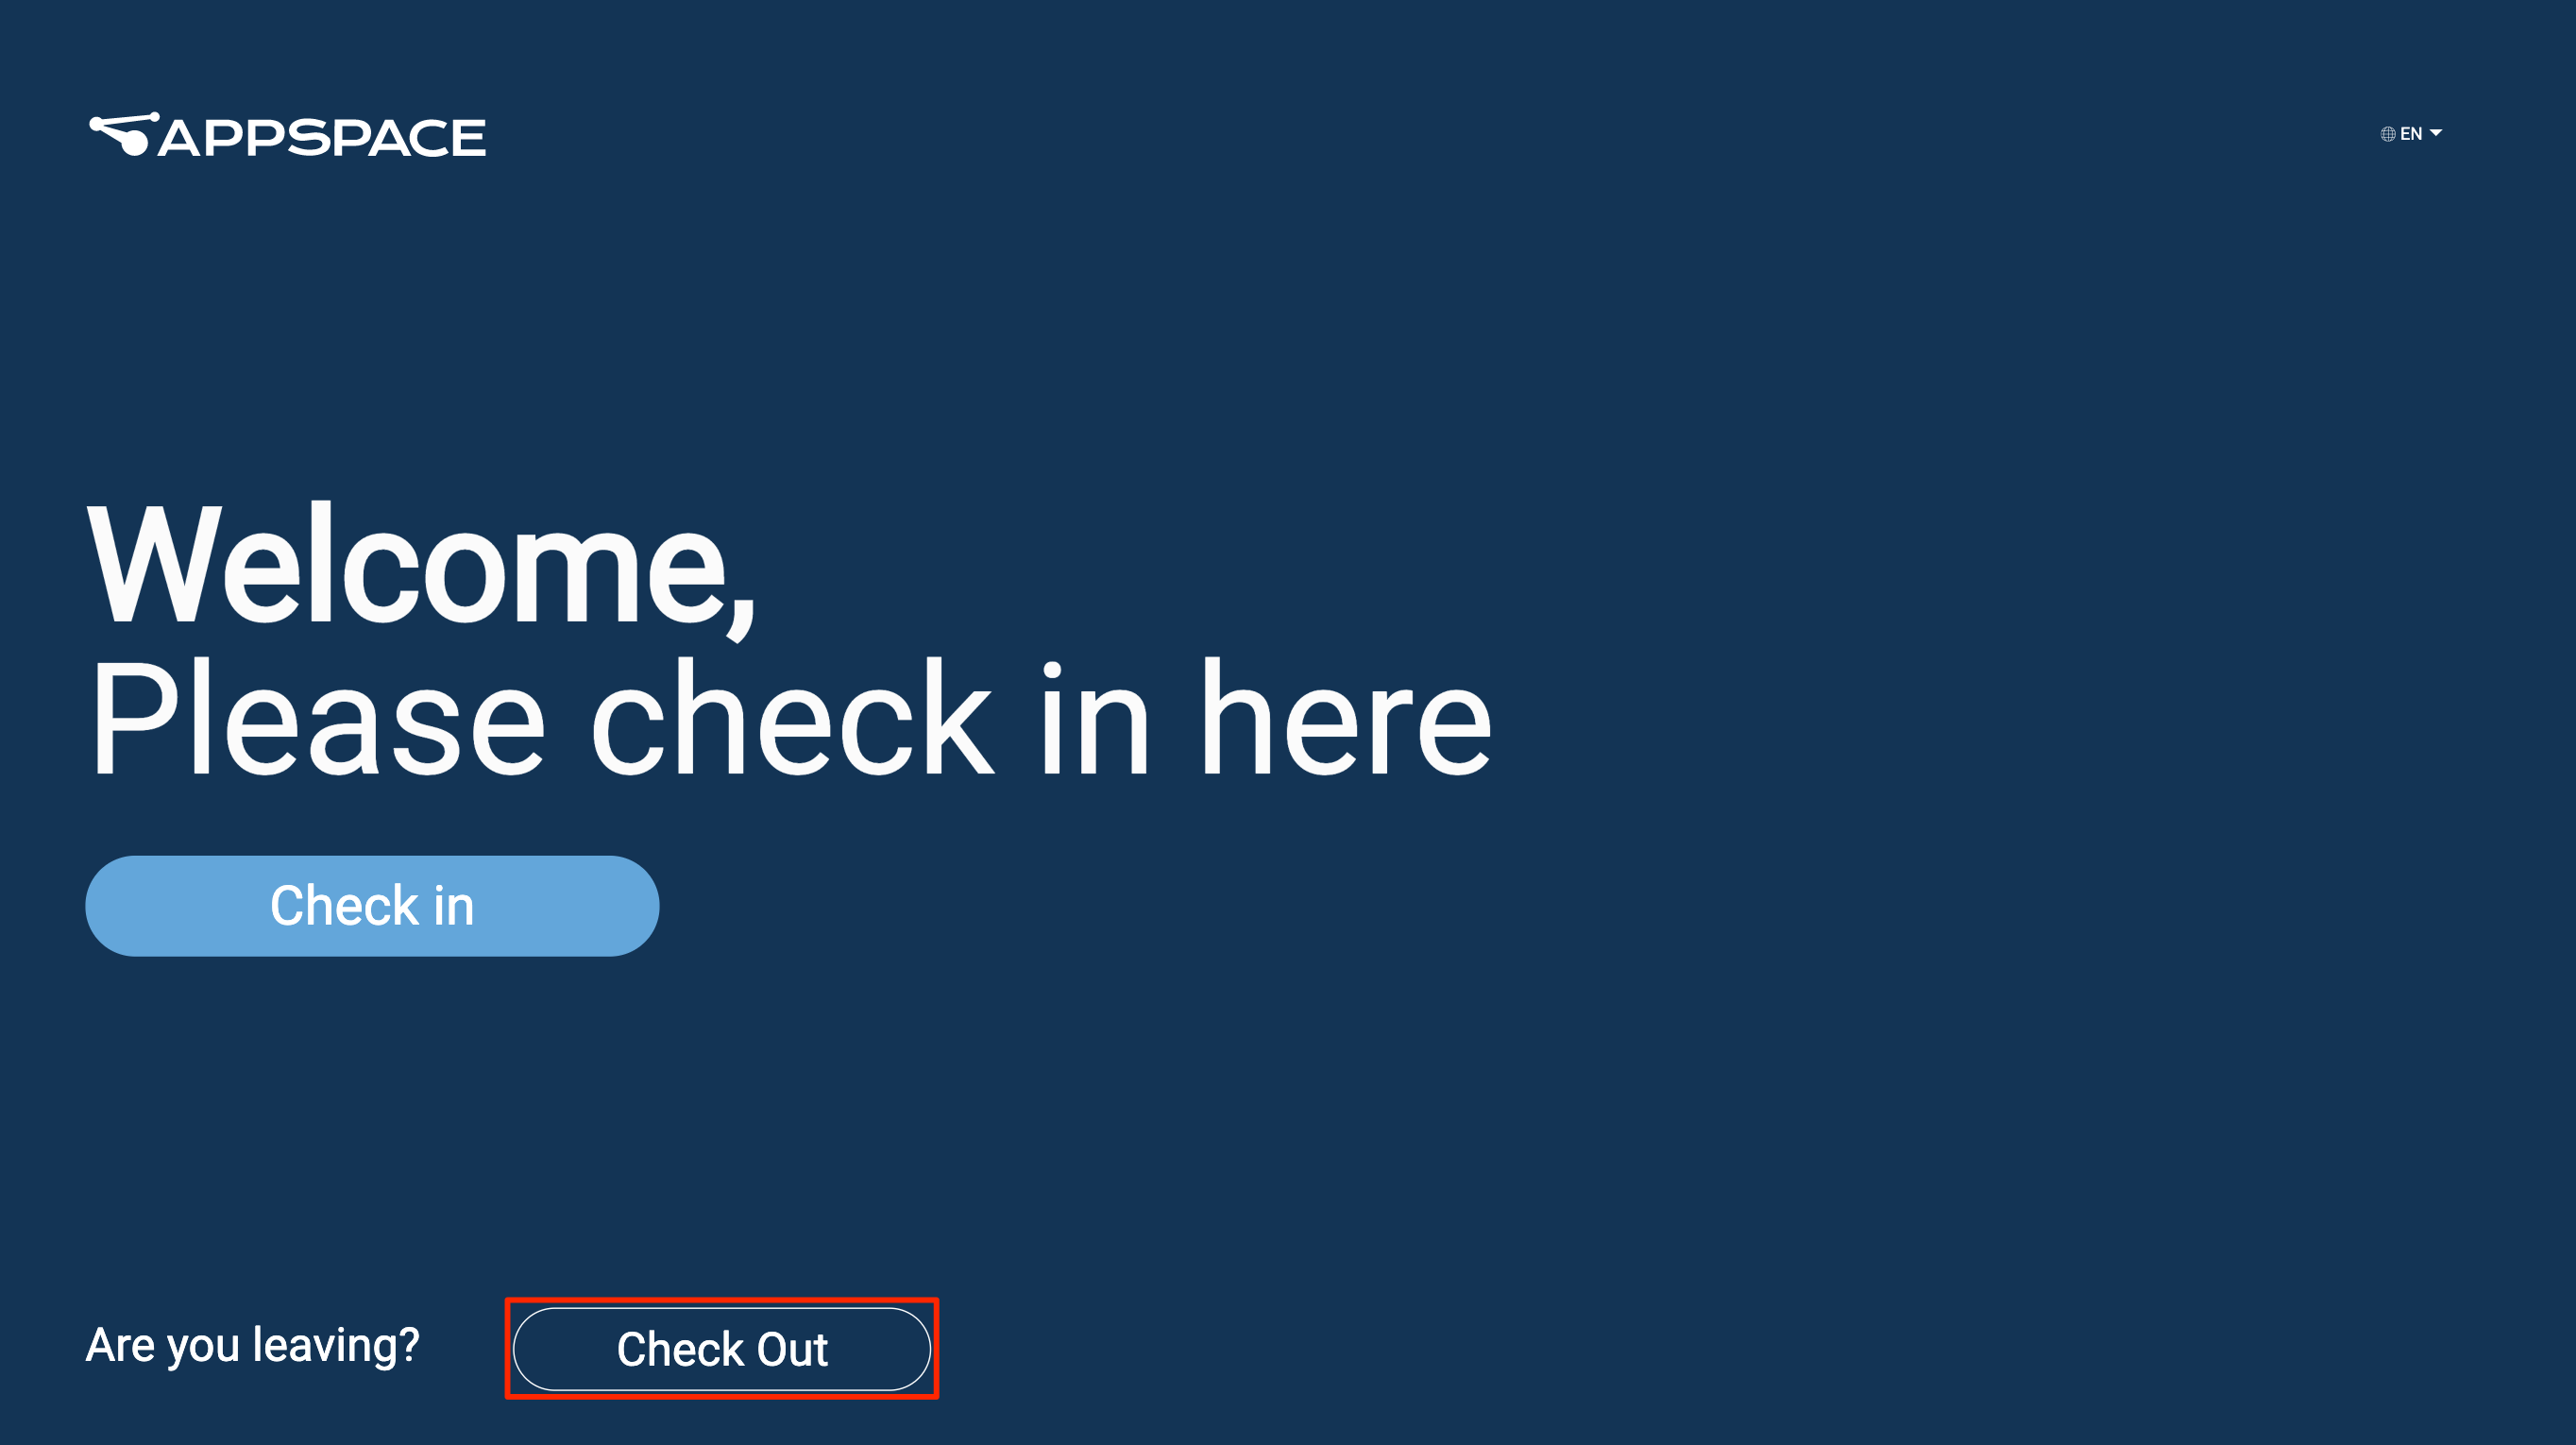
Check In
- On the visitor registration display, click the Check in button.
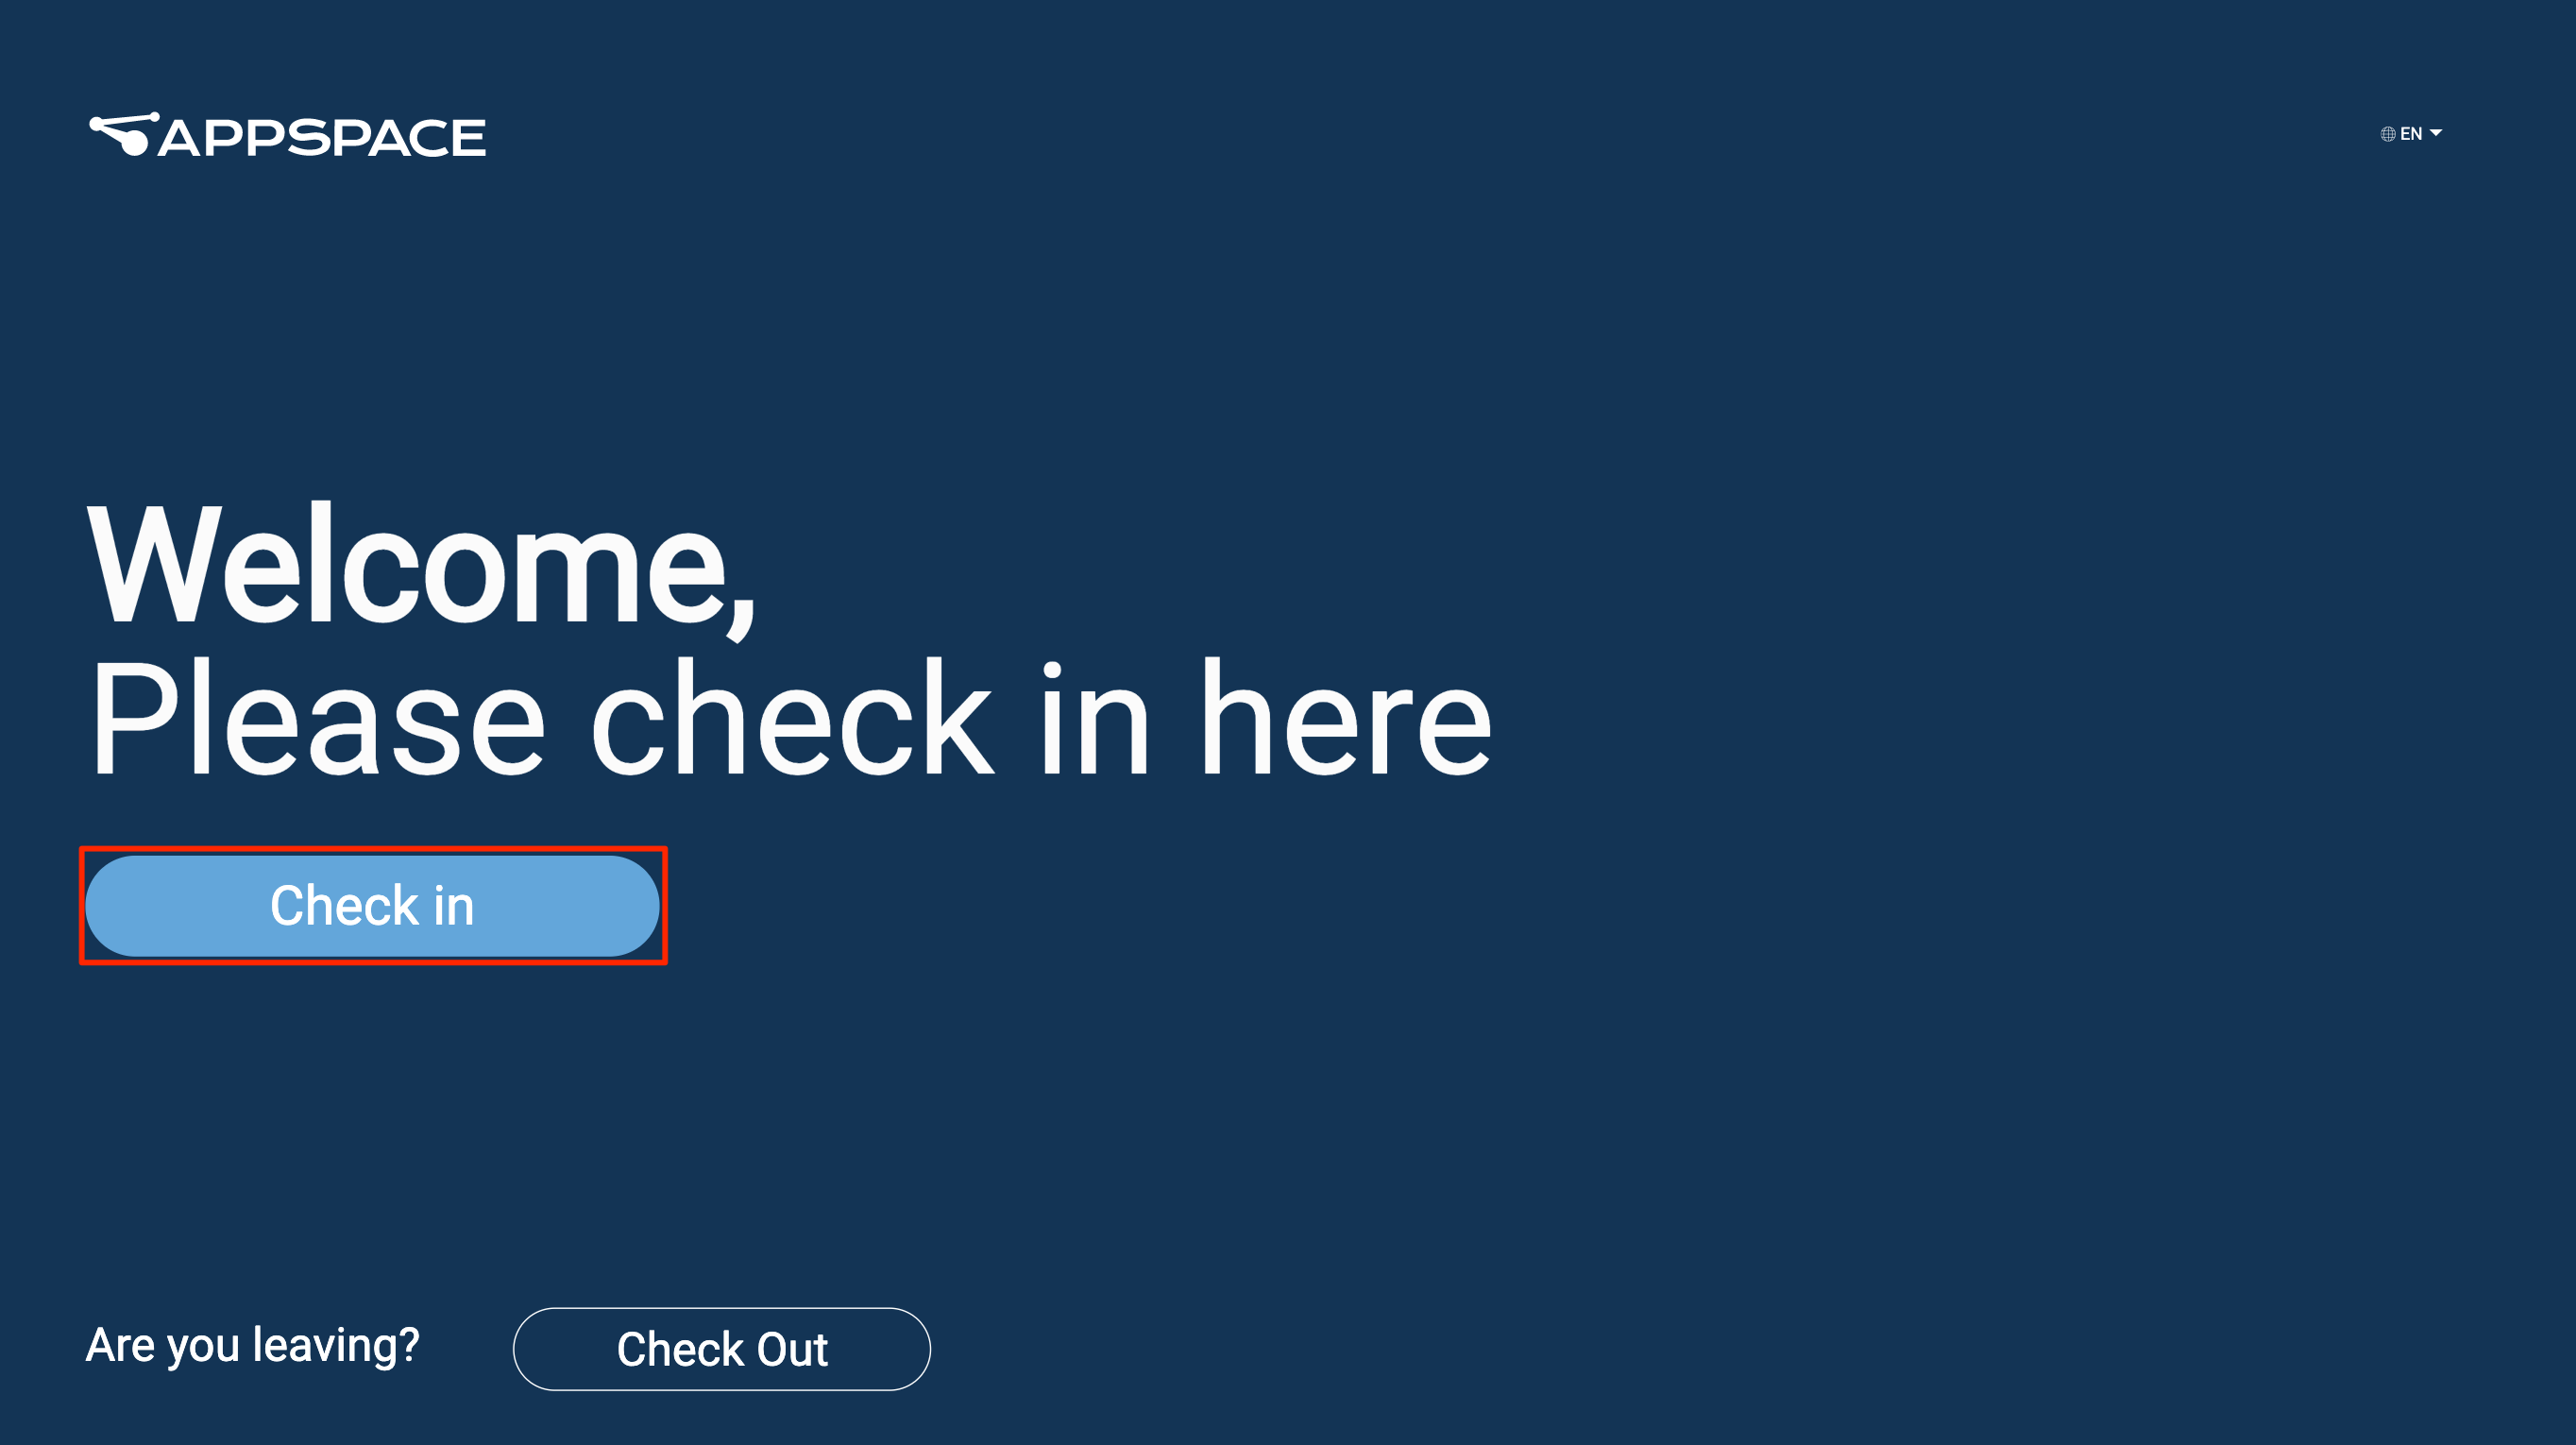
- Enter the visitor details, take a photo, and acknowledge the NDA document.
- Click Done.

- A notification with the photo and signed NDA document will be sent via email to the host.
Check Out
- On the visitor registration display, click the Check Out button.
- Select the method of identification that you’ll be checking out with.
- Enter the keyword of the selected method and click Find.
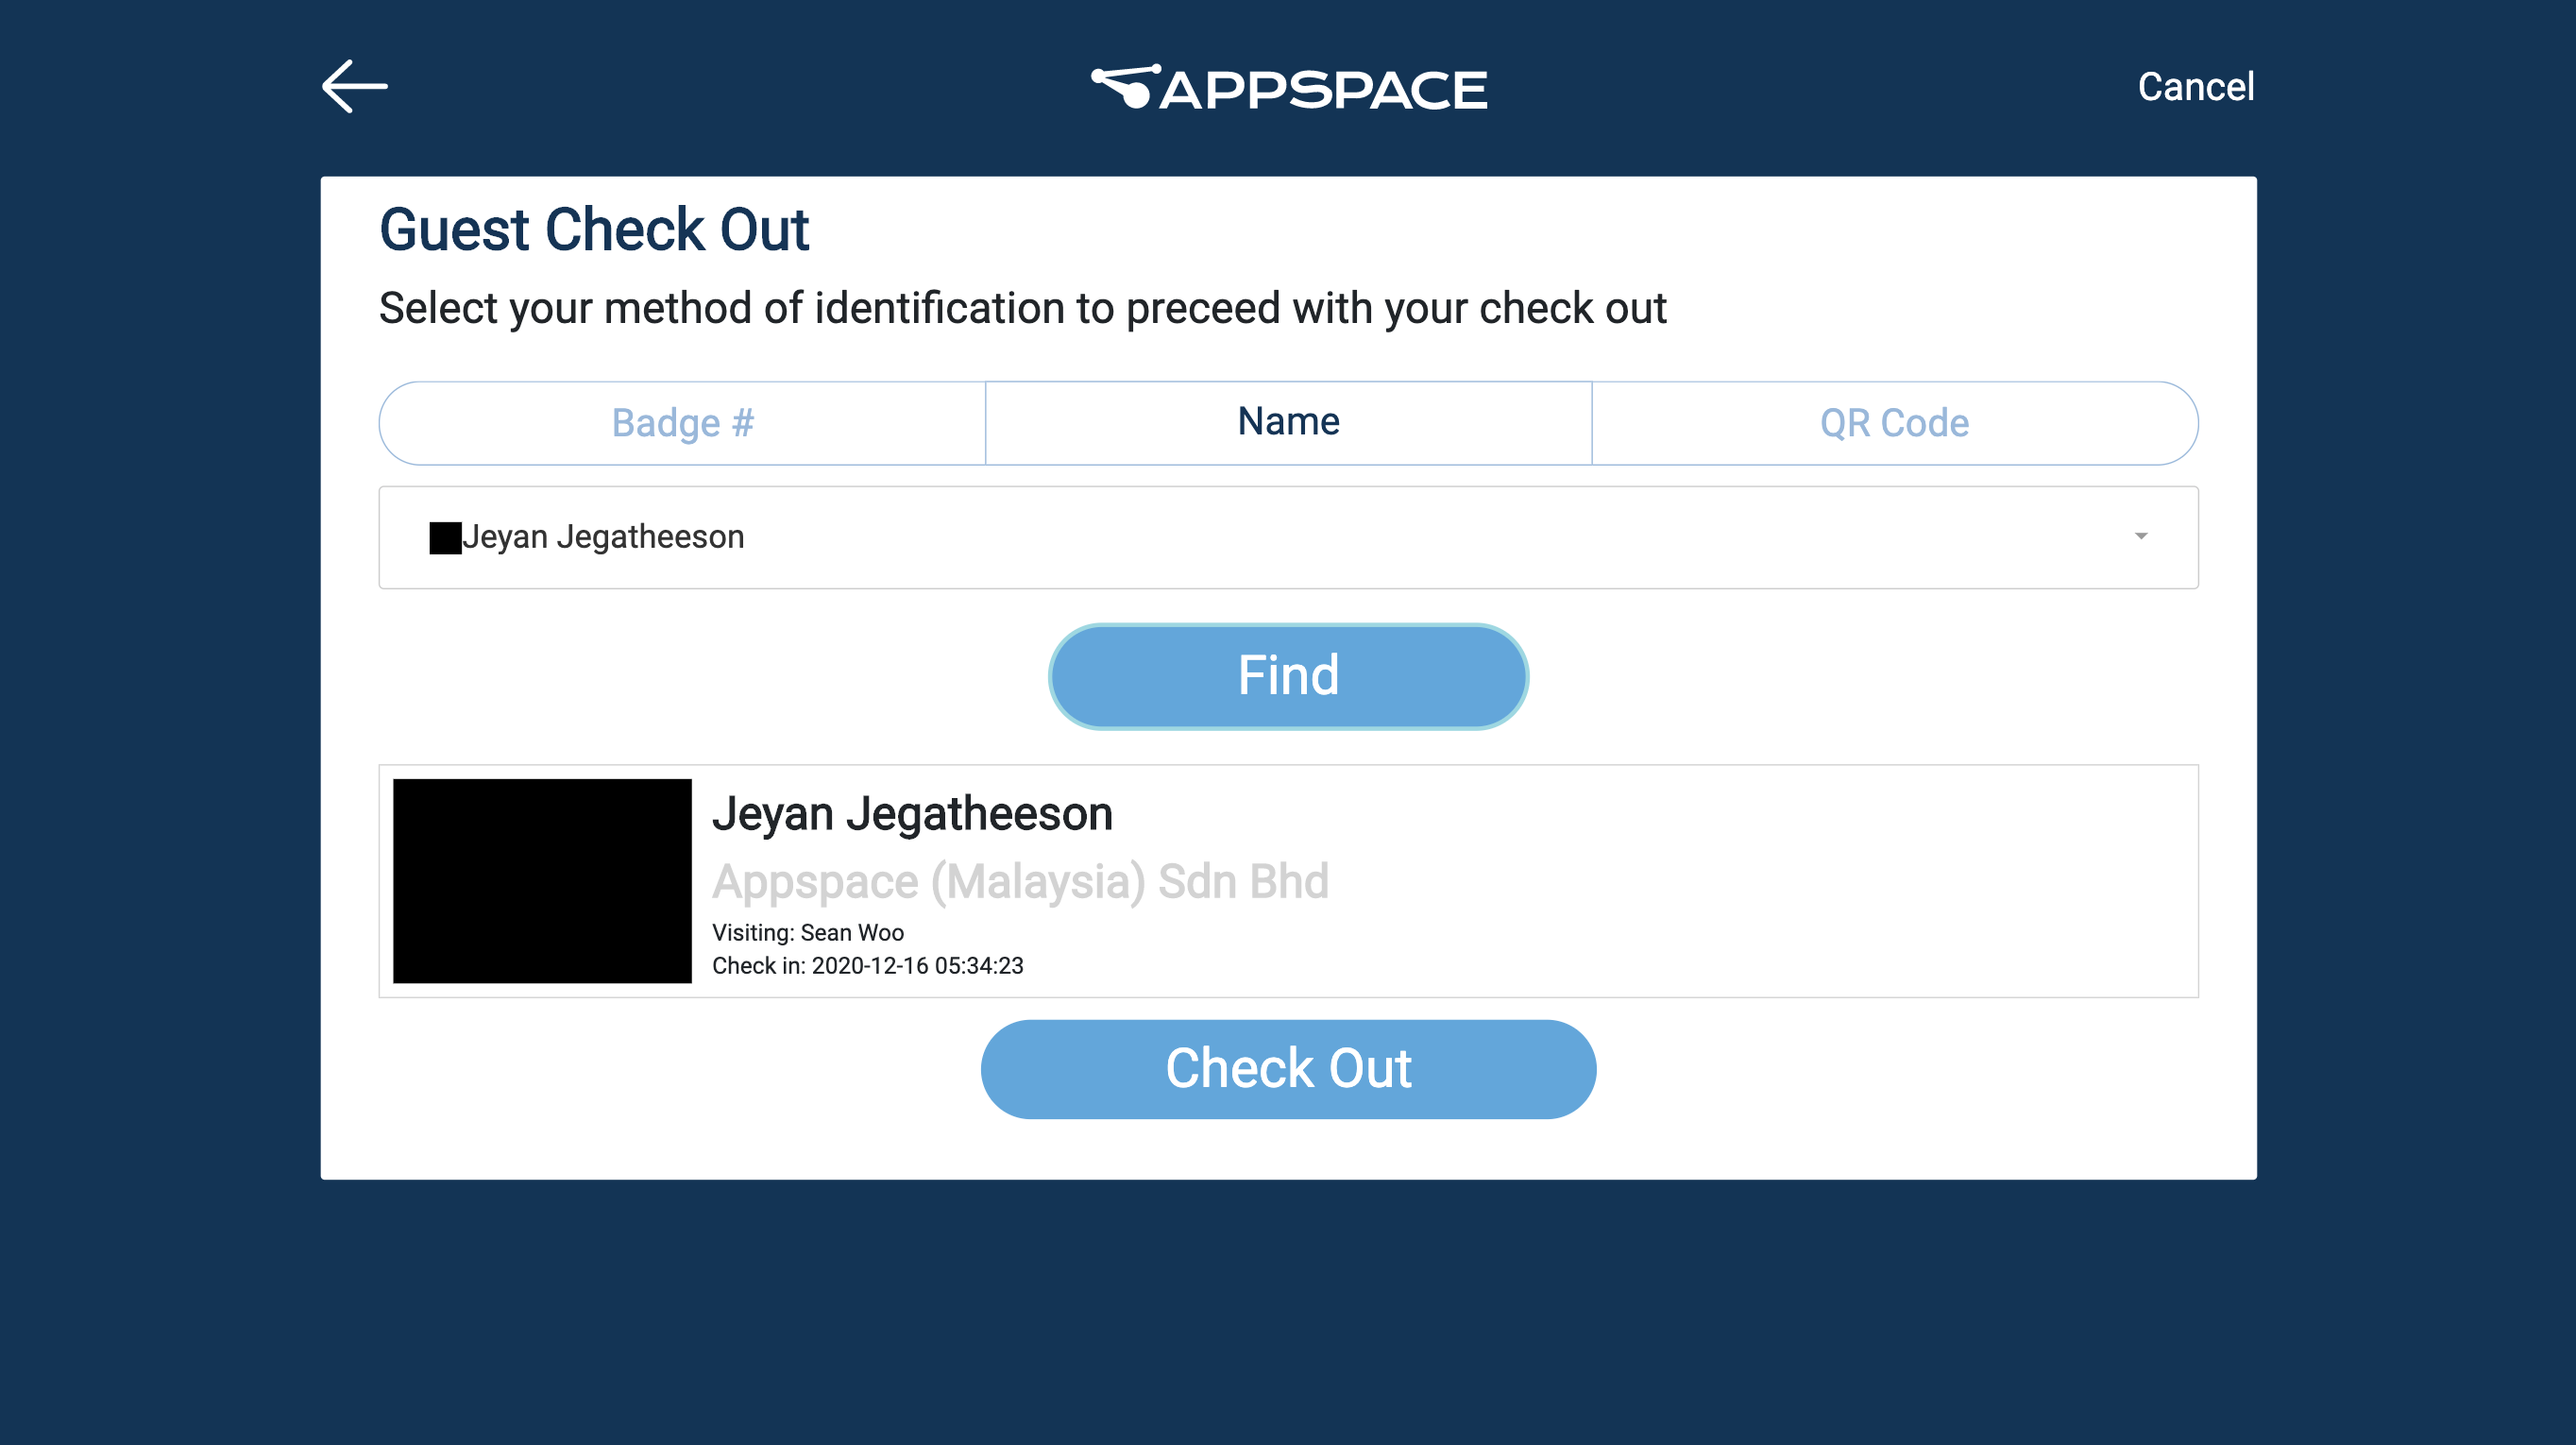
- Select your listing, and click Check Out.
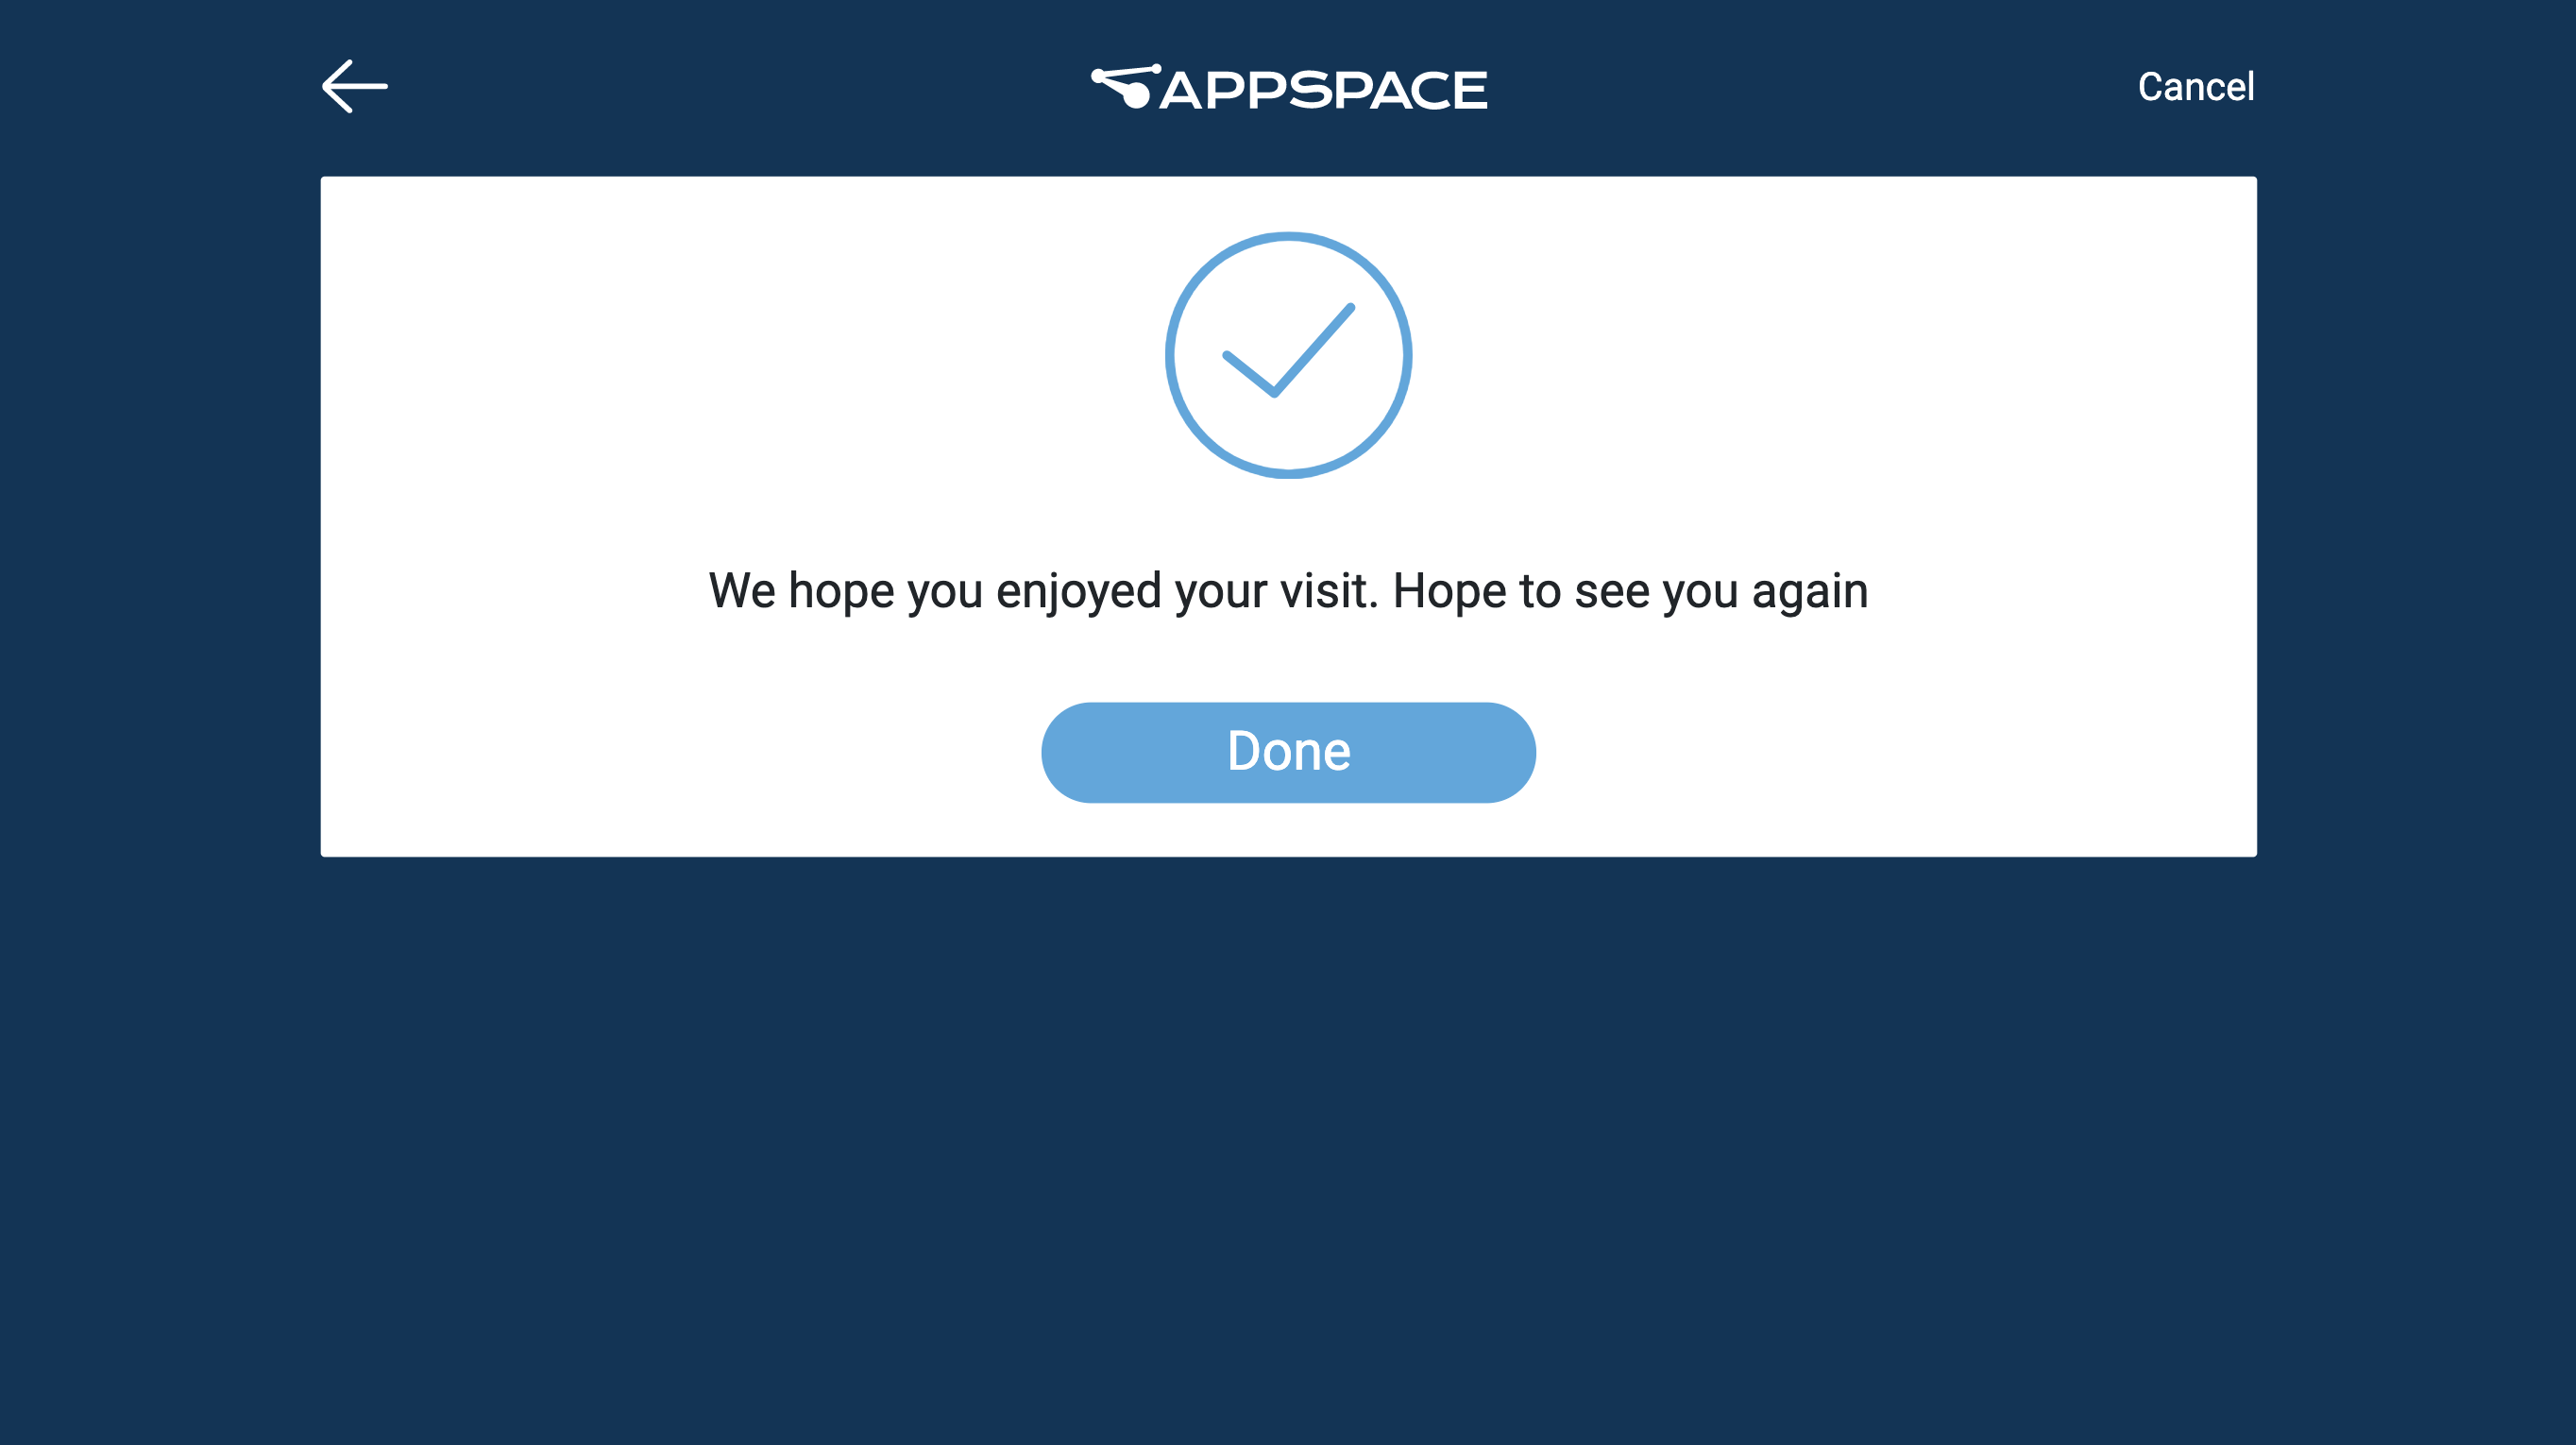
- Click Done.
Filter & Download Reports
Filter
The collected visitor information data can be filtered using three groups of filters to display specific information. These filters are:
- Search by: This filter allows search by specific column name.
- Choose a date: This filter allows search by a range of dates.
- Group by: This filter allows to group by specific column name.
Search By
Follow the instructions below to filter data using the Search by option:
- Click Reports from the ☰ Appspace menu.
- Click the Filter By icon, and select the desired column from the drop-down menu.
- Enter the keyword in the Search by field to search for data matching the keyword within the selected column.
- The report will display information based on the matching keyword in the selected column.
Choose A Date
Follow the instructions below to filter data using the Choose a date option:
- Click Reports from the ☰ Appspace menu.
- Click the Choose a date field, and select the desired data range from the calendar drop-down.
- The report will display information based on the date range selected.
Group By
Follow the instructions below to filter data using the Group by option:
- Click Reports from the ☰ Appspace menu.
- Click the Group by drop-down menu, and select the desired column.
- The report will display information based on the grouped column selected.
Download NDA Document
Follow the instructions below to download that NDA document that had been acknowledged by the visitor:
- Click Reports from the ☰ Appspace menu.
- Select the desired visitor report listing, and click the Download NDA icon. Each visitor listing contains the respective NDA document of that visitor.
- A new tab is launched with the NDA document ready to be downloaded.
Download CSV Report
Follow the instructions below to download the visitor information CSV report:
- Click Reports from the ☰ Appspace menu.
- Click the Download CSV button to download the .csv file format document containing visitor information.
Was this article helpful?