Appspace is a content publishing platform for workplace devices and digital signage, enabling companies to share information with their team using various means from wherever they are located, either in the office, at an industrial facility, at home, or on the go.
The Webex Control Hub is a centralized platform with a web interface for Webex administrators to manage users, services, and devices via a browser.
To make it easier for Webex device administrators to access Appspace content, Appspace and Webex are offering an integration, which will enable Webex users to access the Appspace content management system directly via the Webex Control Hub, to display engaging digital signage and/or interactive content when the device is not in use as a videoconferencing tool.
There are two experiences users may enable for their Webex devices via this integration:
- Appspace Lite – a free version, users may display signage on any supported device currently available in their Webex Control Hub account. However, this account will have a limited number of playlist channels and storage space. Video is also not supported. Appspace Lite devices are not supported on Private Cloud.
- Existing Appspace Account – this account is tied to a pre-existing, paid Appspace Express or Omni subscription plan(s). Users on this account will be able to use all Appspace features available with their subscription plan.
Below is a summary of the differences between the two account types, when configured in the Webex Control Hub:
| Feature | Appspace Lite (Free) | Appspace Omni (Paid) |
|---|---|---|
| Admin Roles (platform user license) | 3 | 25+ |
| Storage | 5 GB | 25-3000 GB |
| Devices | - Webex Board series - Webex Desk series - Webex Room series | - Webex Board series - Webex Desk series - Webex Room series |
| Playlist Channel | 3 | Unlimited |
| Maximum Number of Content in Playlist | 10 | Unlimited |
| Alerts | No | Yes |
| Video | No | Yes |
| Images | Yes | Yes |
| Appspace Cards | - Announcement card - Weather card - Web View card | All cards based on device type |
| Appspace Cards Theming | No | Yes, fully customizable |
| Reservations | No | Yes, paid subscription |
| Support | Documentation only | Phone, Email, Web |
This article provides the instructions to link the Appspace platform with a Webex organization directly from within the Webex Control Hub interface.
Prerequisites
- Appspace Private Cloud customers would be required to contact their CSM to enable support for Webex Control Hub on their private cloud.
- An active Webex Control Hub admin account.
- Any of the following supported Webex device, that meets the minimum hardware and software specifications required by Appspace:
- Webex Desk series
- Webex Board series
- Webex Room series
NotePlease refer to our Supported Devices & Operating Systems article for specifications. Appspace Lite devices however are not supported on Private Cloud.
- For existing Appspace customers that will be registering via the Existing Appspace Account option, the following prerequisites are also required:
- An active Appspace account.
- Account Owner or Location Admin role in Appspace.
- This feature is currently only supported on Appspace public cloud accounts.
- Only Appspace playlist channels are supported.
- Supported content type for Appspace Lite mode:
- Images
- Announcement card
- Weather card
- Web View card
Enable Appspace in Webex Control Hub
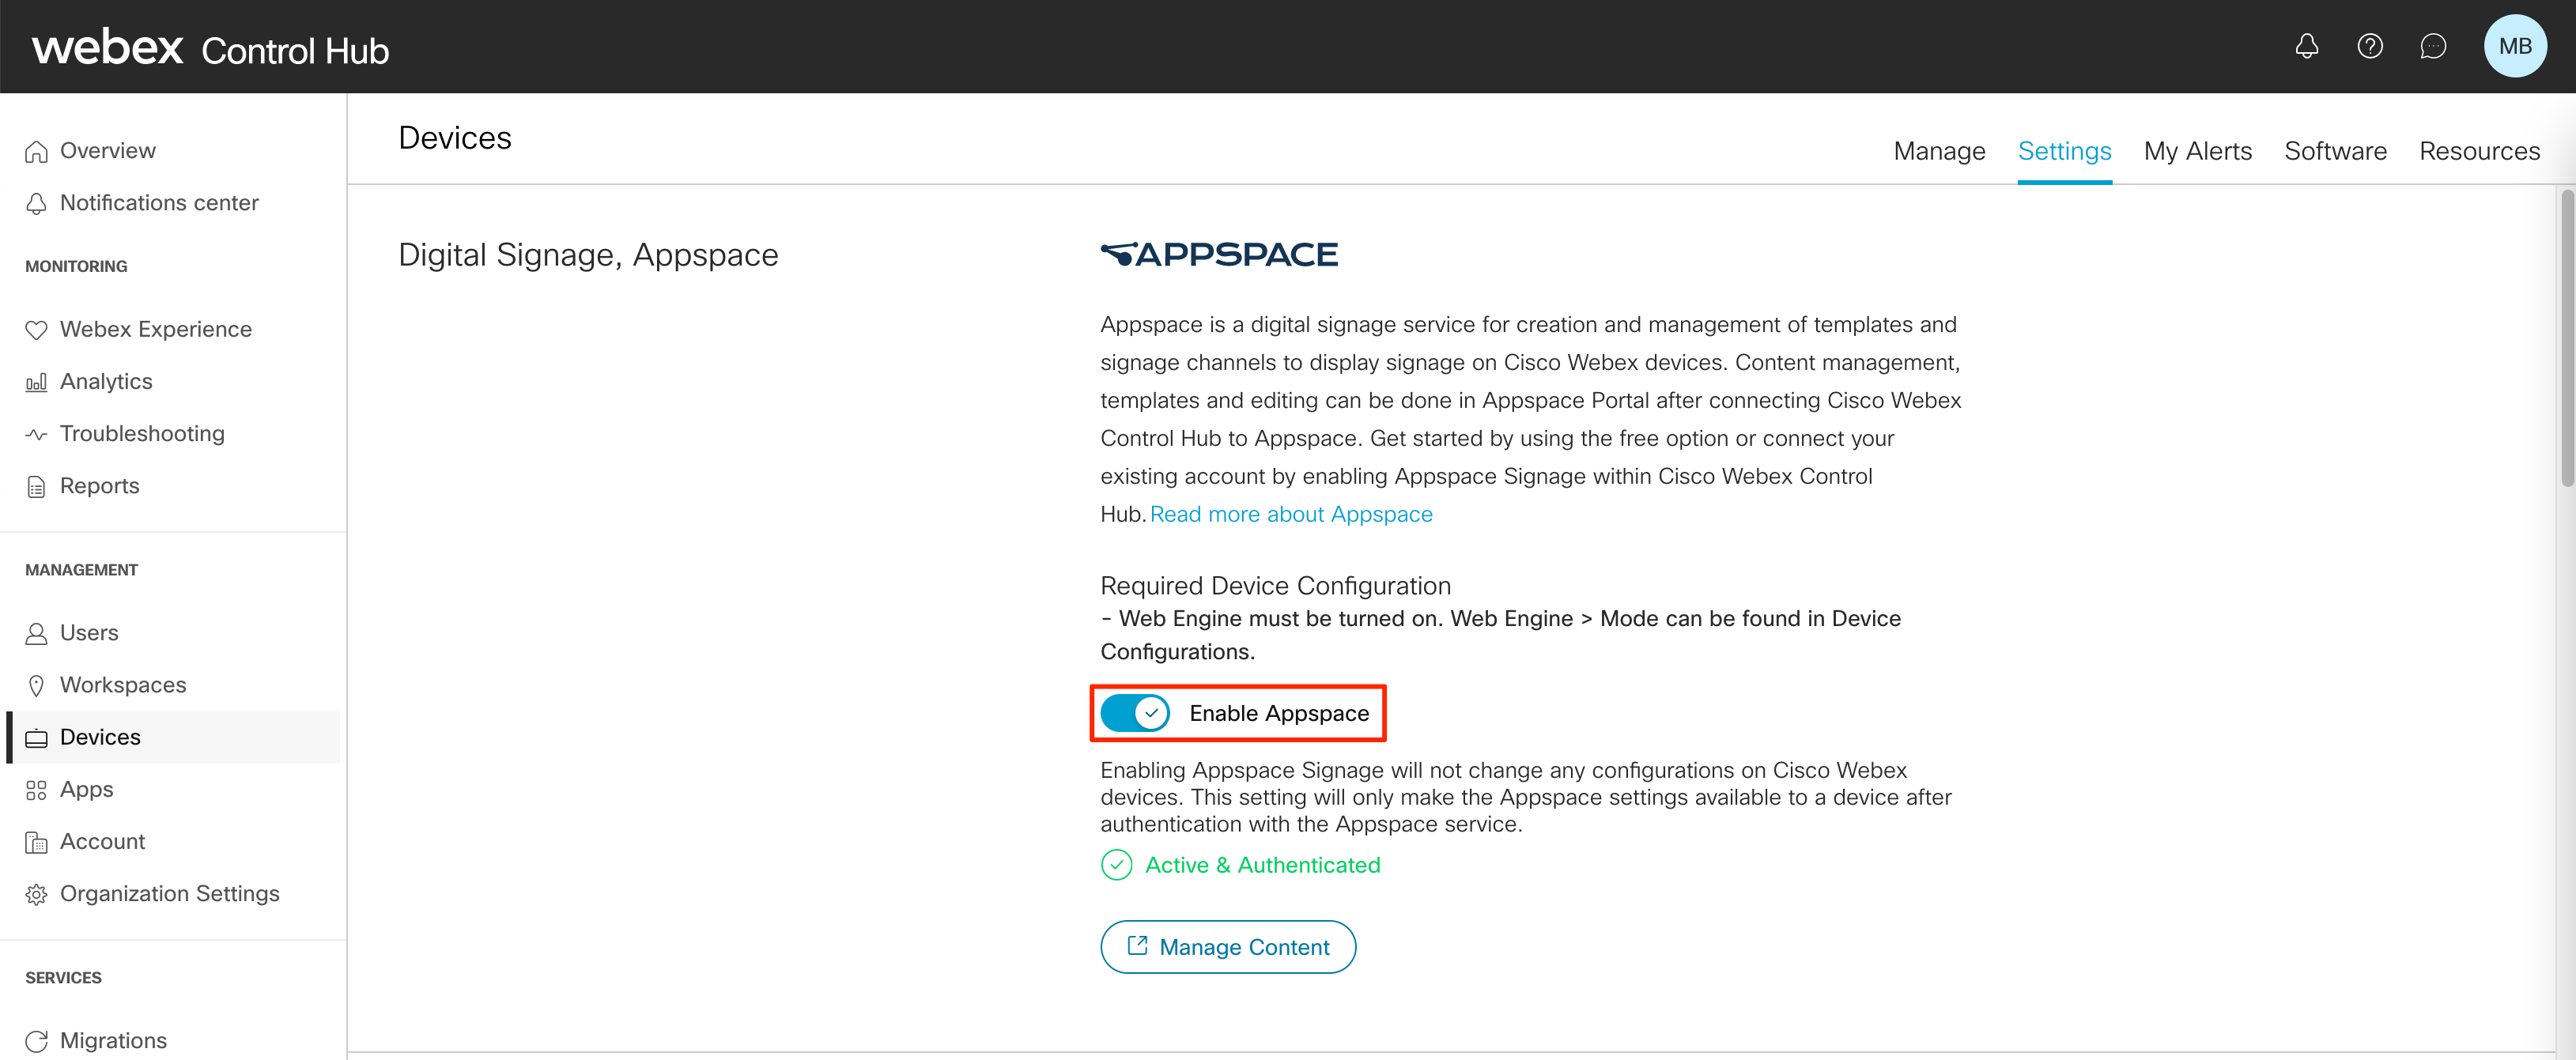
The Appspace content platform is accessible from the Devices menu in the Webex Control Hub. Follow the instructions below to enable Appspace:
- Log in to the Webex Control Hub portal at http://admin.webex.com
- Click Devices from the side panel menu, and click the Settings tab.
- Slide the Enable Appspace option to Enable.
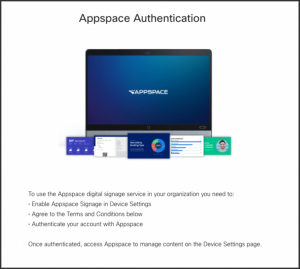
- In the Appspace Authentication window, please read and understand the terms required for the Appspace integration. Once agreed and understood, check the required checkbox, and click Authenticate Appspace.

- The Appspace Signage for Webex Control Hub window will display the following options:

Select one of the following options depending on your subscription type:- Enable Appspace Lite – For new customers to register an Appspace Lite (free) plan.
- Enable Existing Appspace Account – For existing Appspace customers that are on an Express or Omni subscription plan.
- Proceed to the relevant section below based on your selection above.


Enable Appspace Lite
- Appspace Lite devices will be listed in Devices with the IP address of 127.0.0.1, due to limited device management controls, as devices are managed by the Webex Control Hub. For more information, please refer to the table at the top of the page.
- Video will not be supported on the Webex devices when used via Appspace Lite, and will be automatically placed on Low Bandwidth Mode within the Appspace platform to minimize bandwidth overages for users.
If you are a new user and do not have an existing Appspace Omni subscription plan, you may use Appspace Lite. Follow the instructions below:
- Once you’ve selected the Enable Appspace Lite option in the section above, click ENABLE.
- In the Welcome to Appspace Lite window, enter the required information to provision the account, and confirm you’ve read the End User Agreement.
- Click ACCEPT.
- The Appspace Lite account will be auto-generated on the Appspace cloud based on your Webex organization information.
- Appspace will auto-provision a playlist channel as an example containing digital signage best practices.

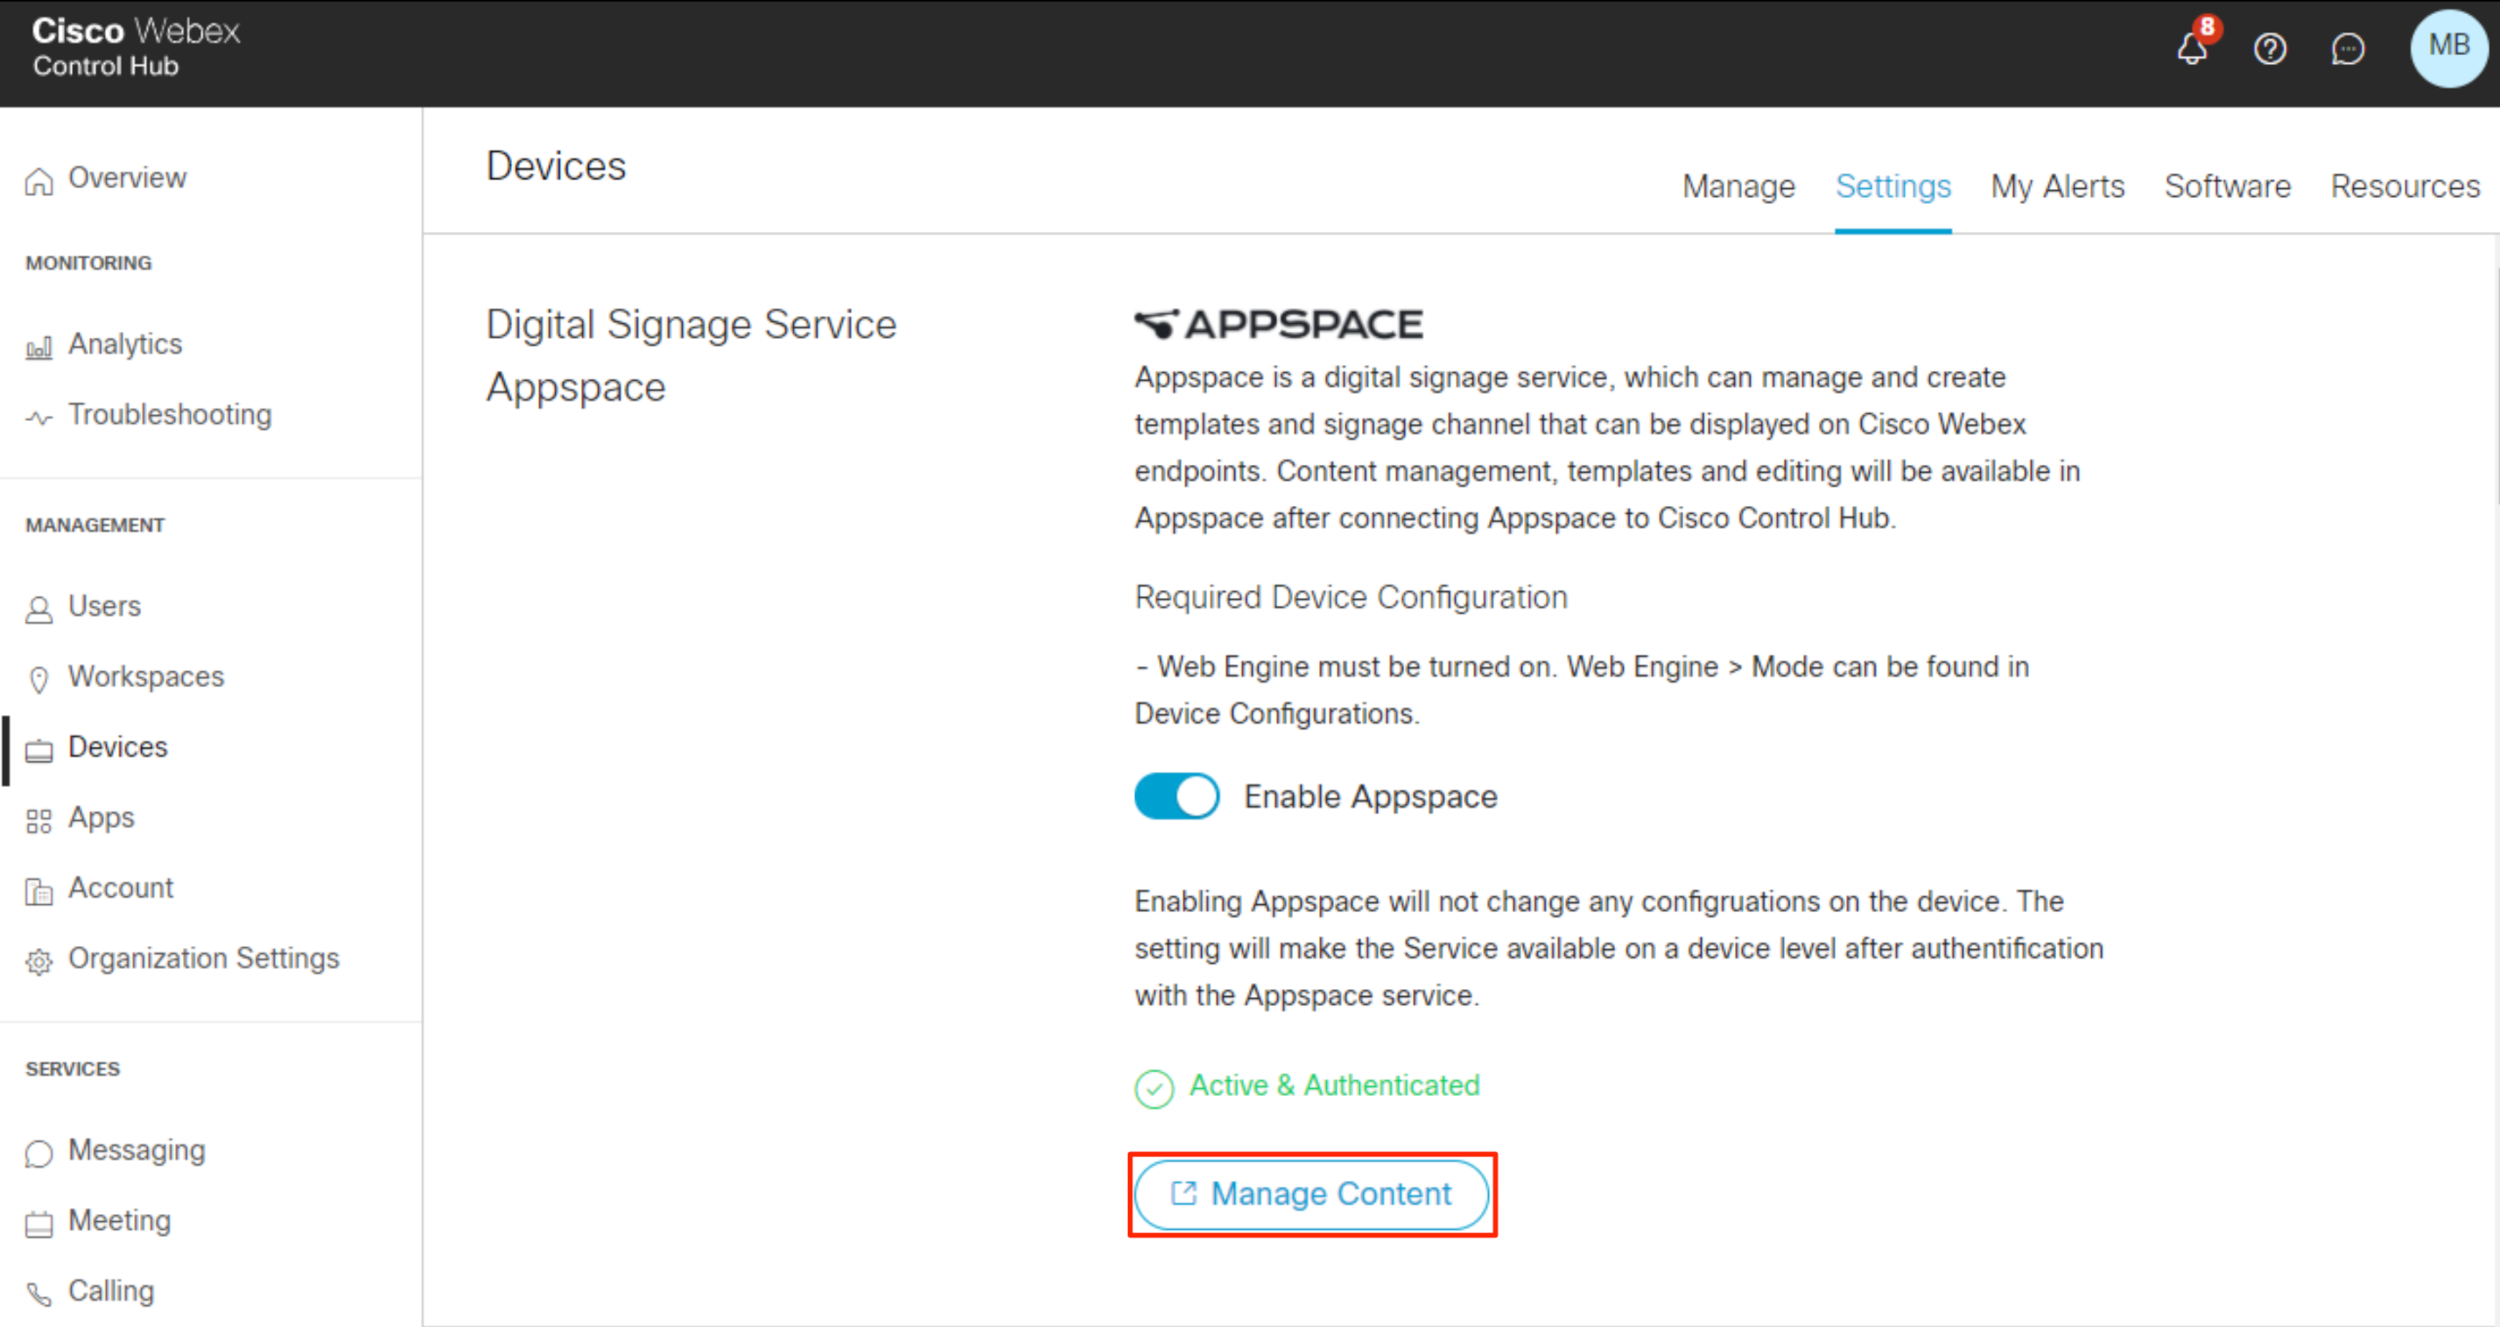
- Back on the Webex Control Hub, once the Appspace integration indicates Active and Authenticated, you have successfully linked your Webex Control Hub with your Appspace Lite instance.
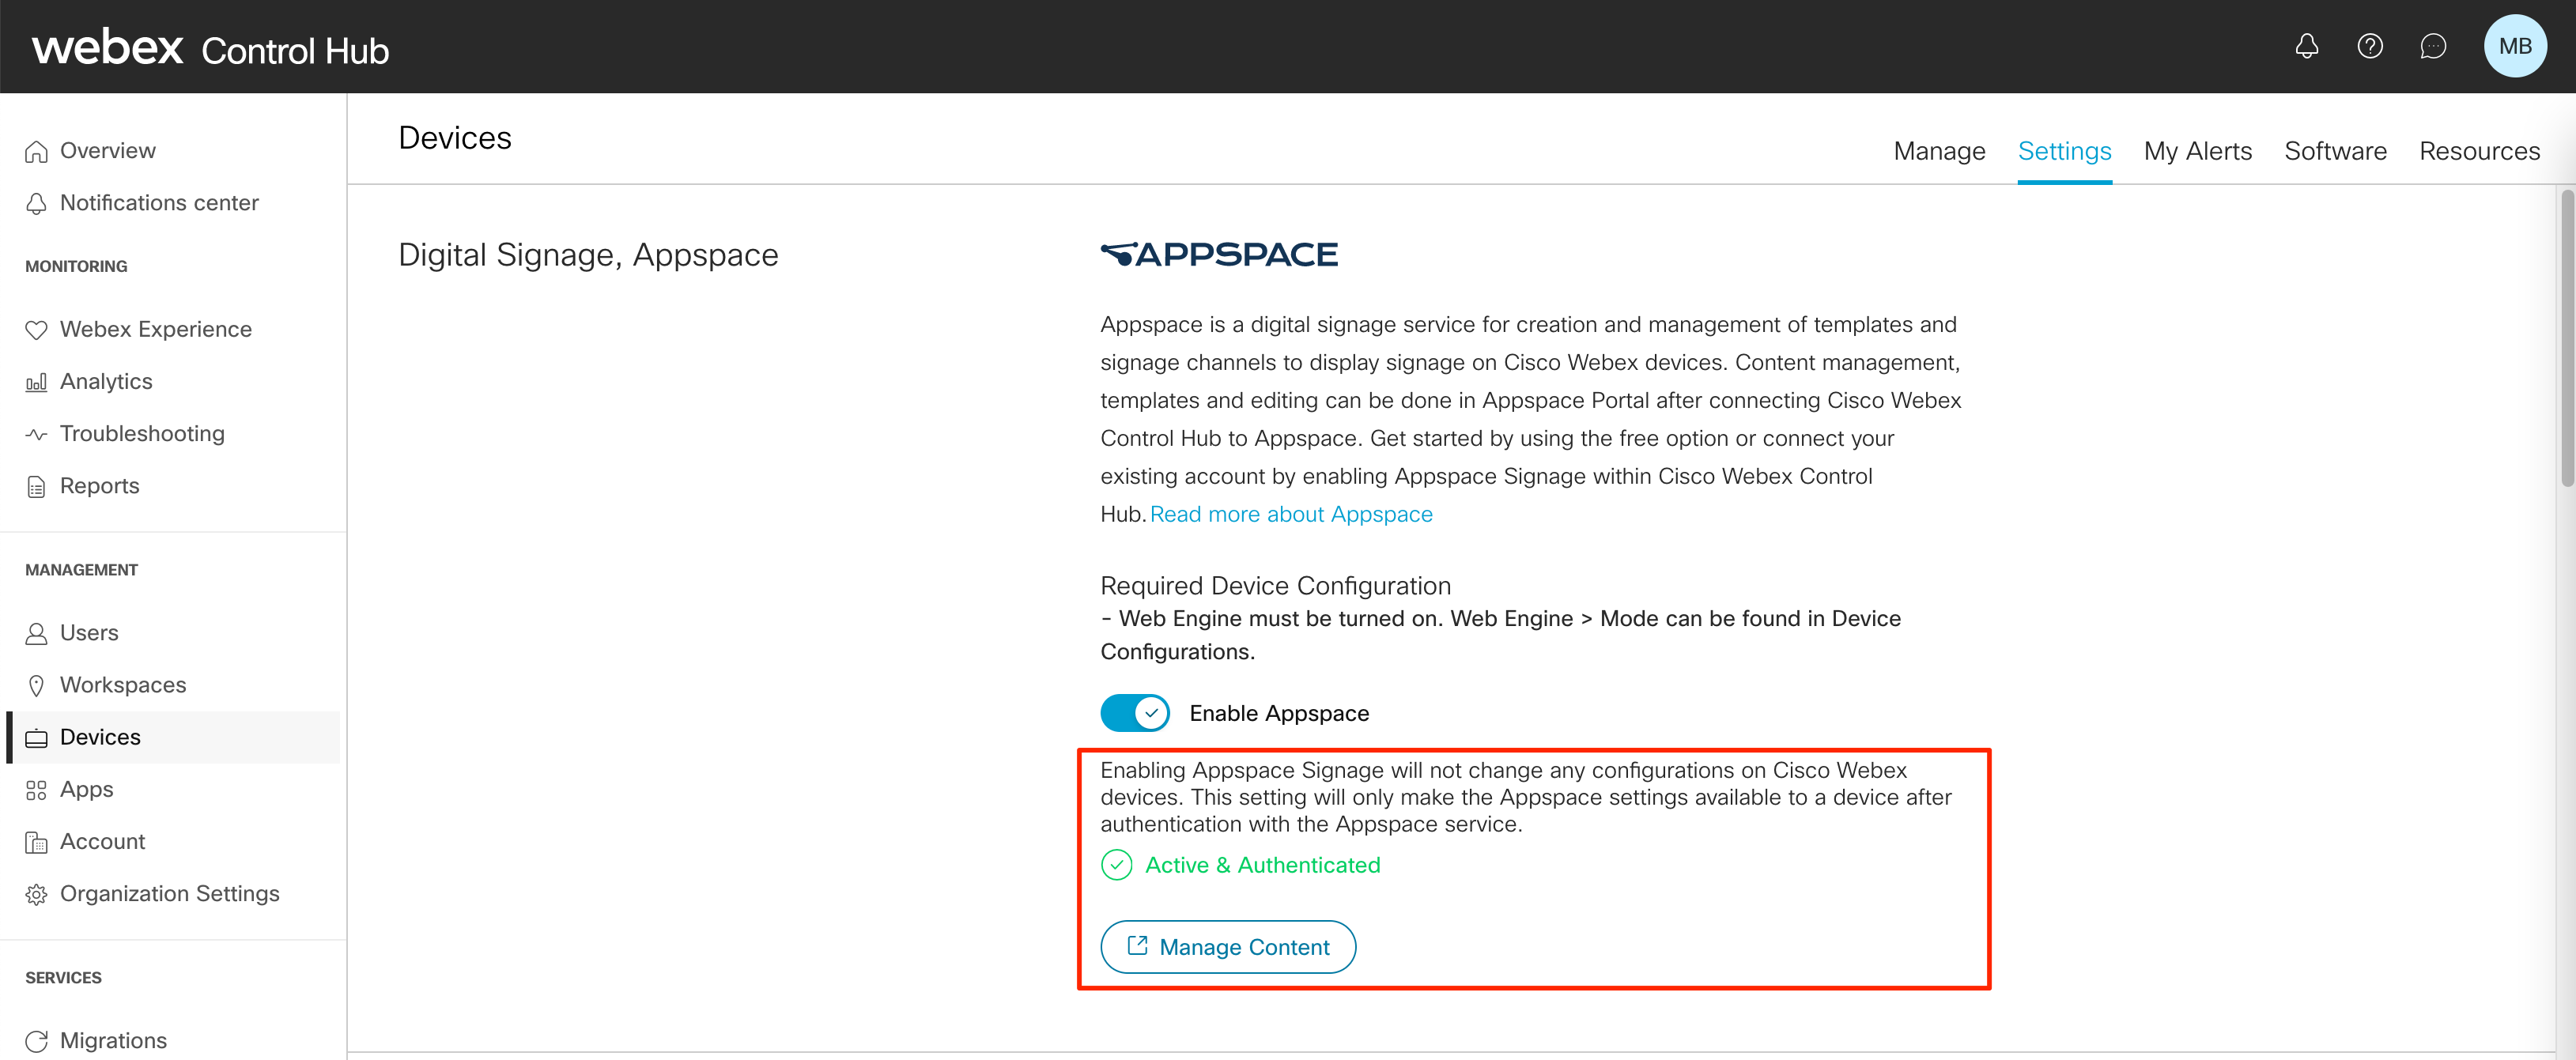
- Click Manage Content and proceed to set up Appspace playlist channels, which can be deployed to your supported Webex devices.
- The Appspace Lite mode offers a limited number of resources in the Appspace console compared to an Appspace subscription, nevertheless, you can create playlist channels and load the content to display on your Webex devices.
- Proceed to the Enable Digital Signage on Supported Devices section below.
Enable Existing Appspace Account
If you already have an Appspace Omni subscription, you may link it to your Webex Control Hub account.
Follow the instructions below to enable and connect an existing Appspace account to your Webex Control Hub:
- Once you’ve selected the Use Existing Appspace Account option, click the PUBLIC CLOUD LOGIN button.

- In the Appspace Log in screen, enter your Appspace credentials, and click LOG IN. The Appspace account will be validated and linked automatically.
- Back on the Webex Control Hub, once the Appspace integration indicates Active and Authenticated, you have successfully linked your Webex Control Hub with your Appspace cloud instance.
- Click Manage Content, and proceed to set up Appspace playlist channels that can be deployed to your supported Webex devices, which you can choose to either provision existing playlist channels available, or create new channels in the Appspace console.
- Proceed to the Enable Digital Signage on Supported Devices section below.
Enable Digital Signage on Supported Devices
Once you have established the integration into an Appspace account, you may proceed to navigate to the Devices list in Webex Control Hub and assign content to the supported devices you have registered.
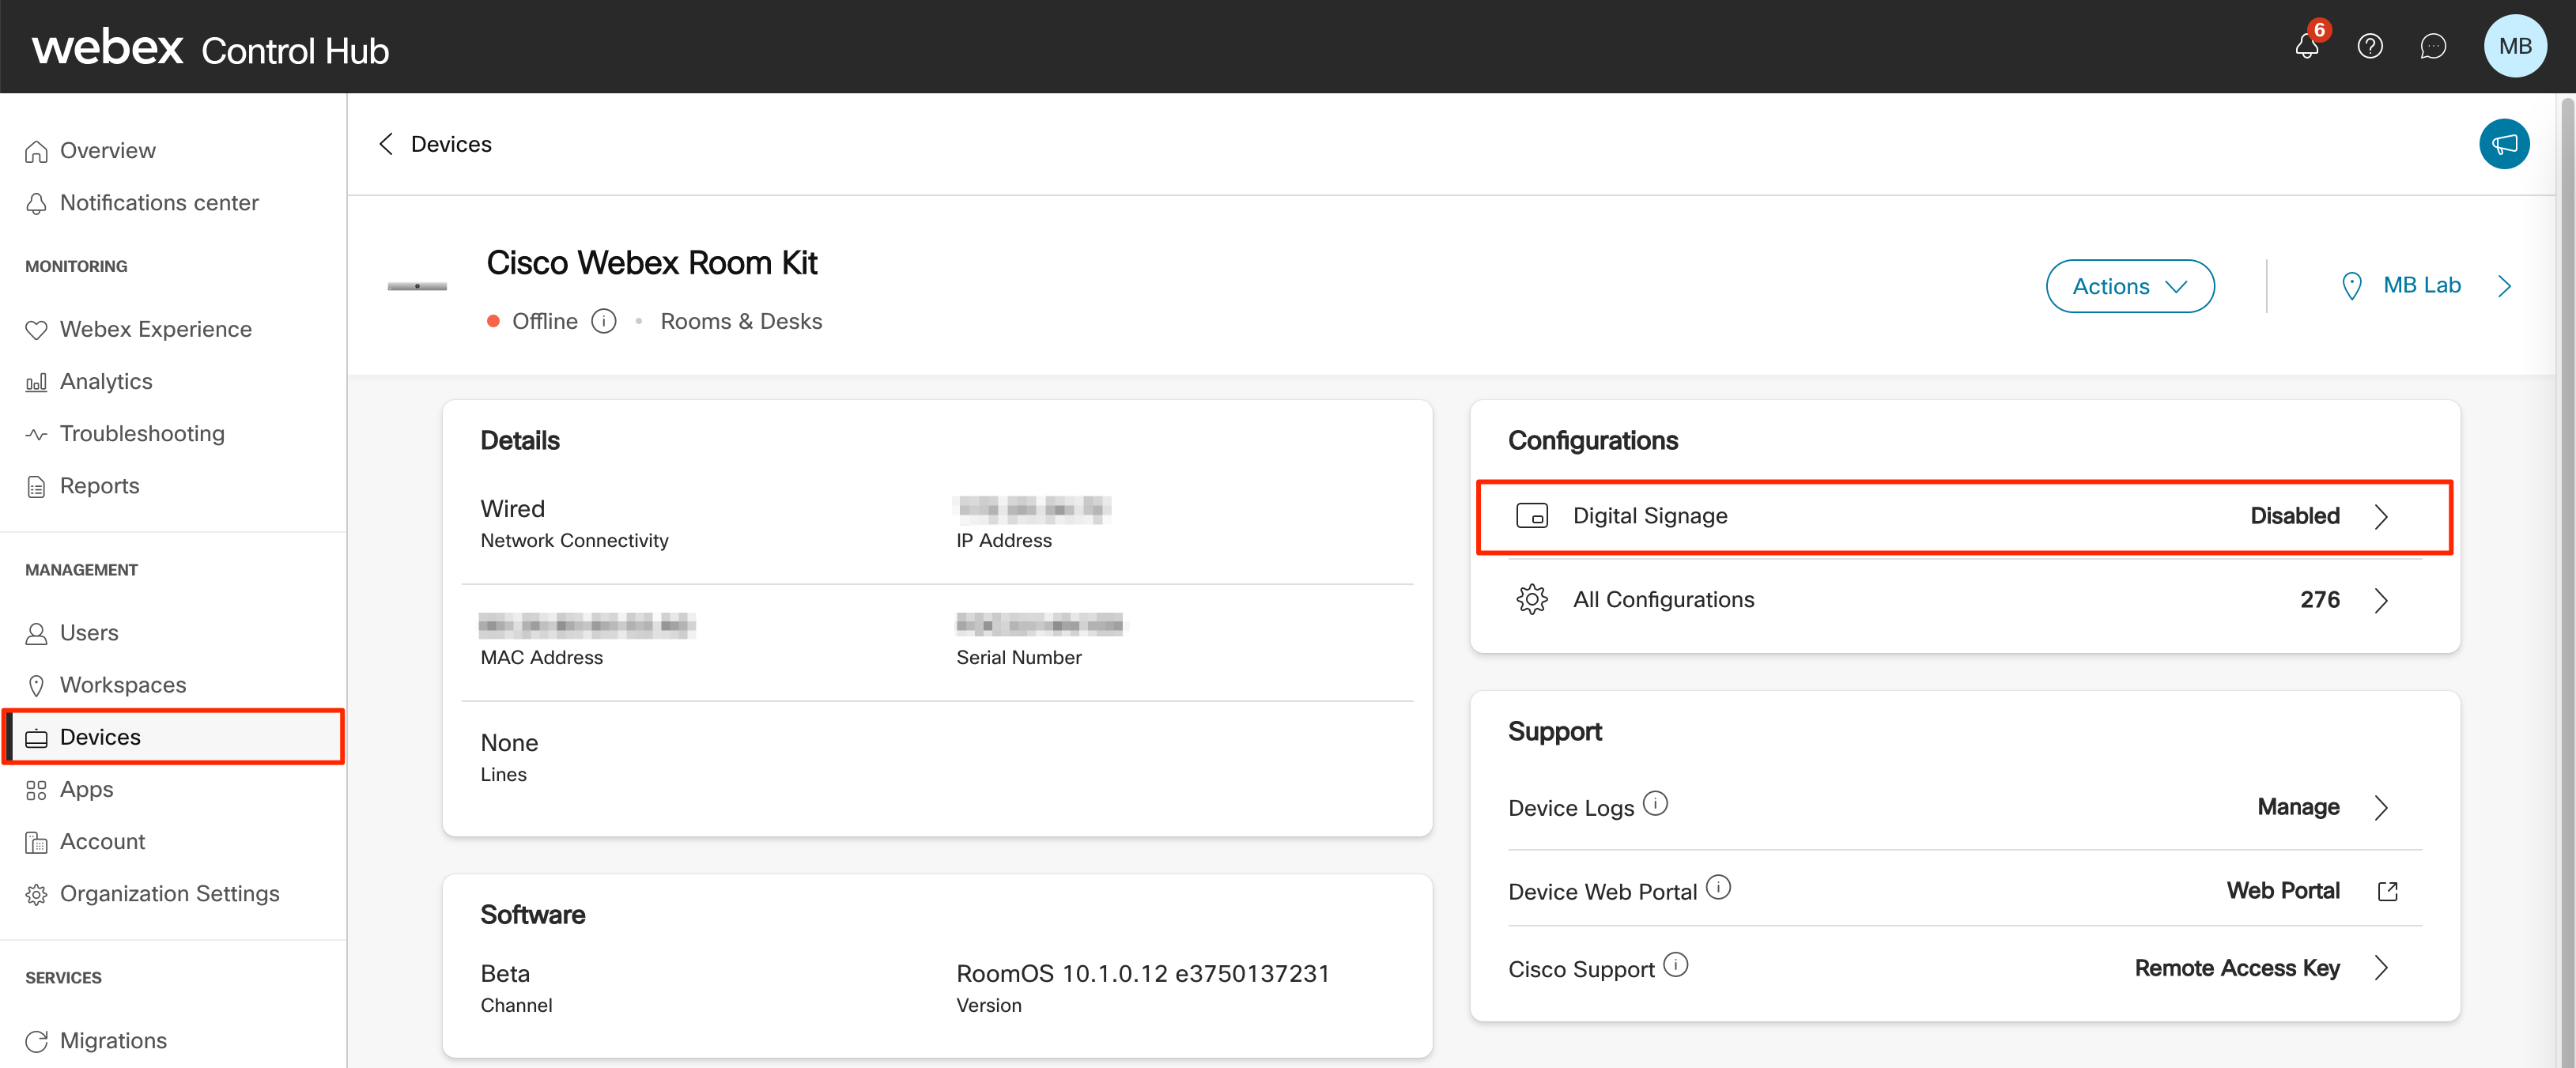
- On the Webex Control Hub, click Devices from the side panel menu, and select the desired supported Webex device from the device list.
- Click the device name to view additional configuration options, and click Digital Signage.
- Slide the Enable Digital Signage toggle option to enable, and proceed to select Appspace as the digital signage service.
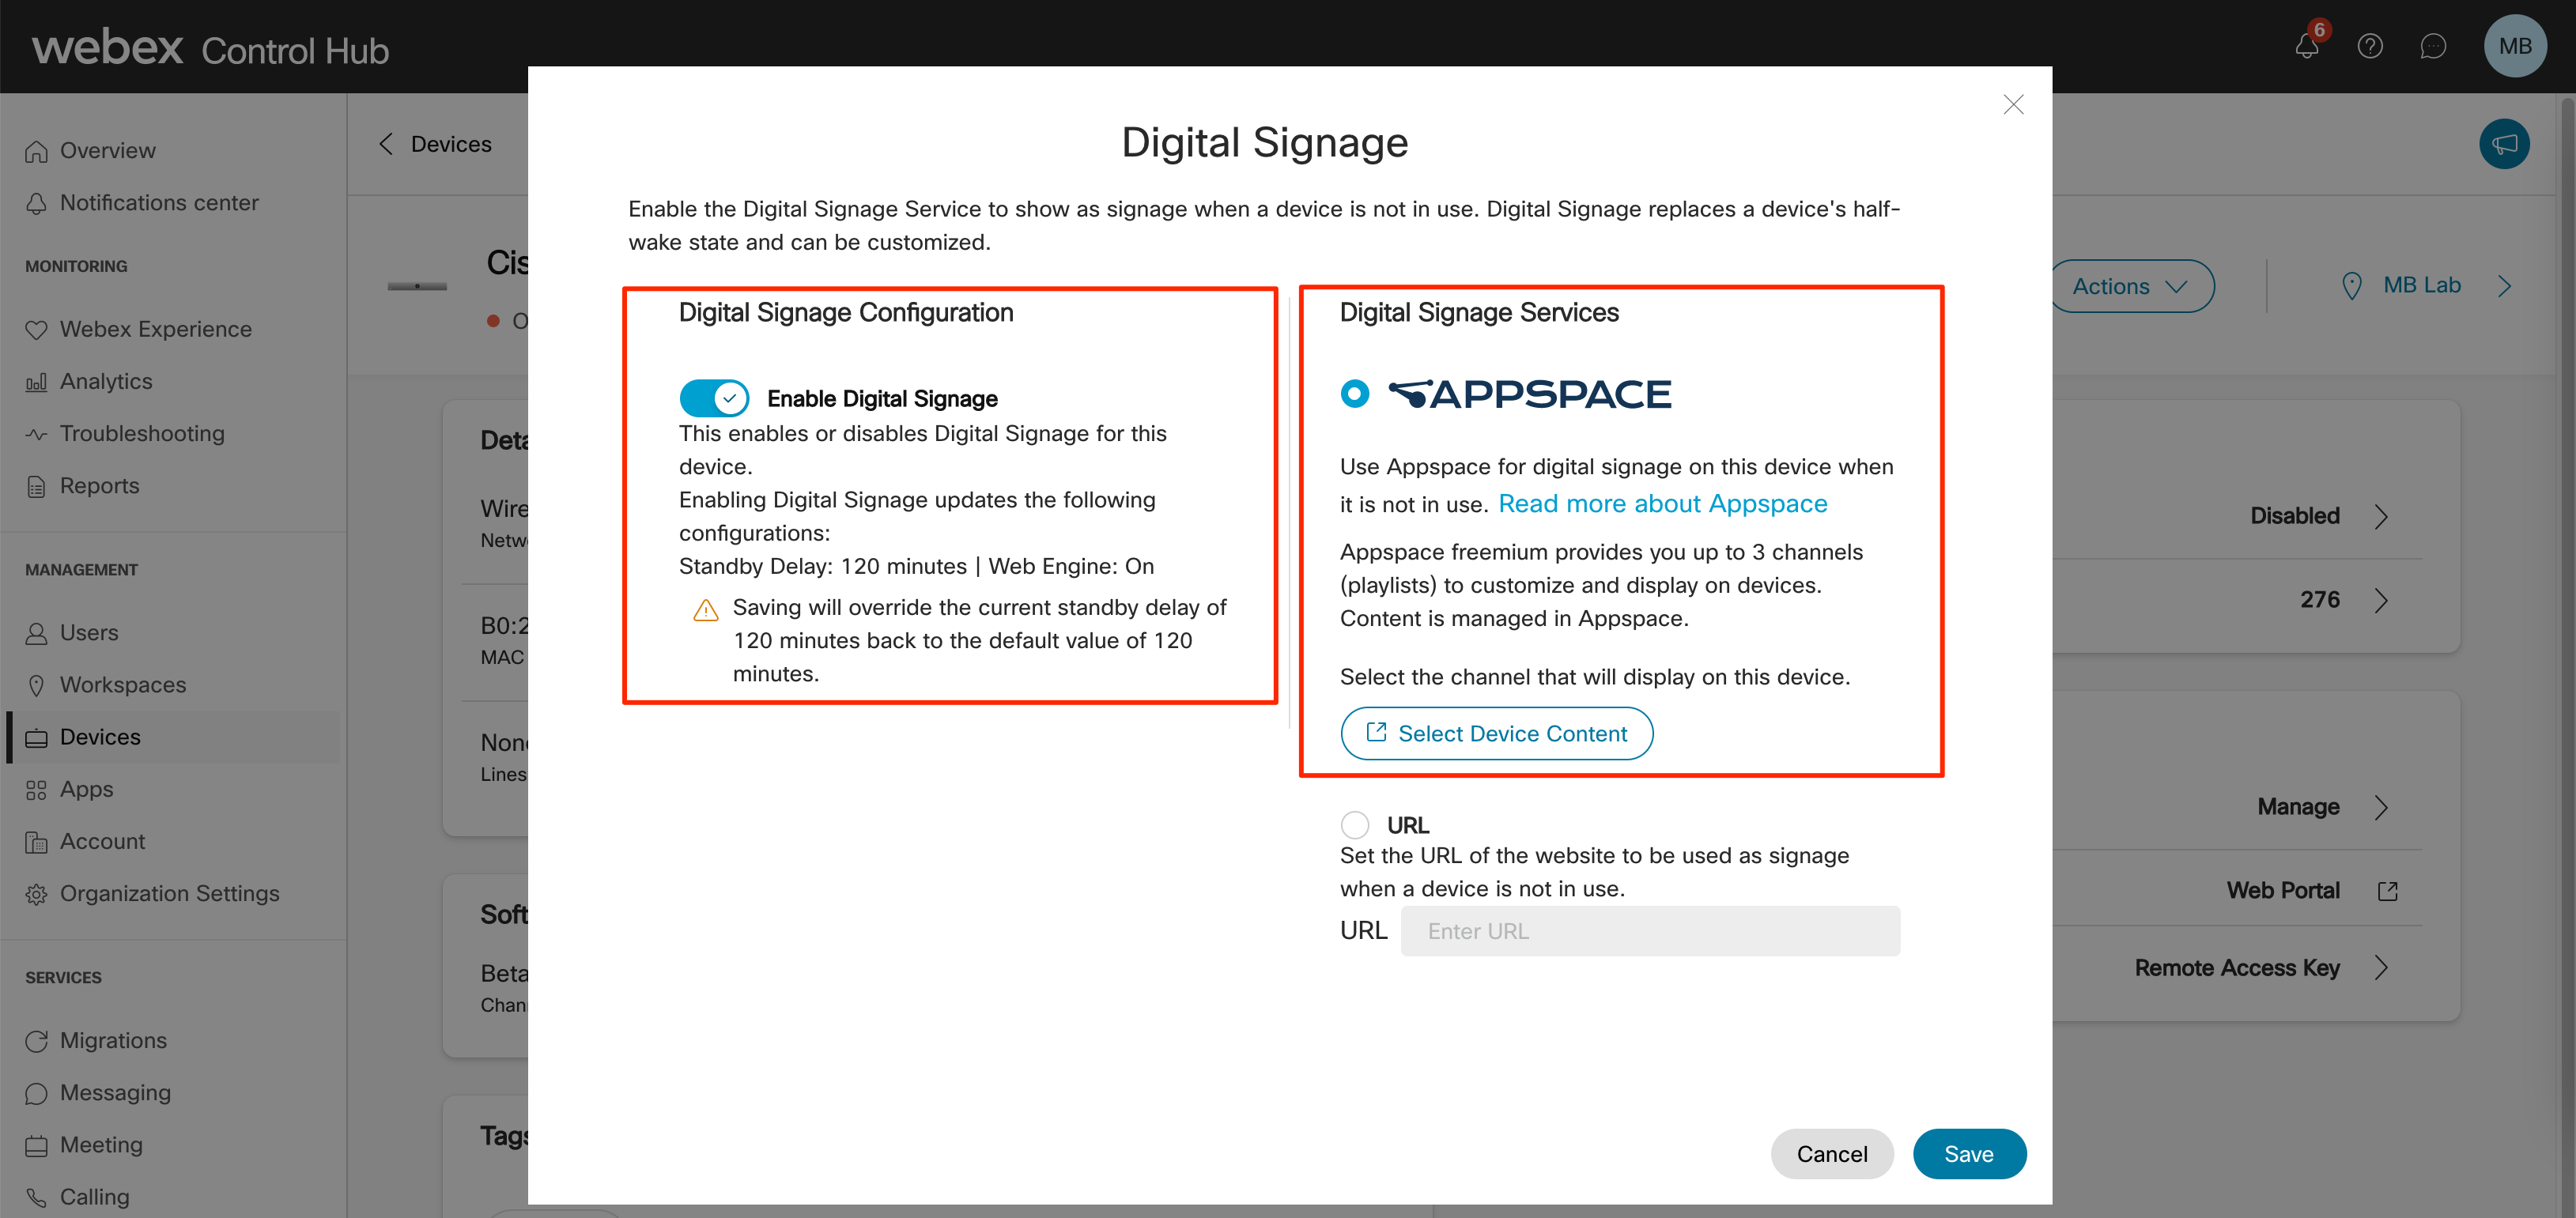
- Click Select Device Content to access the channel selection window, where you may choose the content to deploy to the device from a list of playlist channels you’ve already created.

ImportantYou may assign only one playlist channel at a time. - The assigned content will now be displayed when the device enters a half-wake state.
Disable Link with Appspace
- Log in to the Webex Control Hub portal: http://admin.webex.com
- Click Devices from the side panel menu, and click the Settings tab.
- Slide the Enable Appspace toggle option to Disable.
- In the Appspace Authentication window, please read and understand the Appspace integration disclaimer, disclaimer that informs you that Disconnecting Appspace will remove signage from all devices configured via Webex Control Hub integration. Check the required checkbox, and click Disconnect Appspace.
ImportantIf you are using an Appspace Lite account, you will be informed that your content will be kept for 30 days, after which the account tied to your Webex Control Hub organization and any content will be deleted. This is not the case if you use an Existing Appspace Account.
Was this article helpful?