In Appspace 8.0, we are launching Appspace integrations with calendar services that leverage standard technologies to create long-lived, authenticated, and secure connections. An initial connection must be established between Appspace and the calendar service, which is then stored in a virtual passport in Appspace and can be used until the calendar service revokes or cancels the integration.
As such, combining this new integration with the new Locations module that supports maps and floor plans for room scheduling experiences, the Schedule Board card has been updated to leverage these new features.
The card offers several layout options such as the following:
- Schedule
- Map and Listing
- Map
- Current events
In this article, we will focus on configuring the Map and Listing and Map views only.
The following new features have been added to the Map layout:
- On the upper left of the screen, there is a filter button.
- On the left side of the screen, there is a zoom in/out button.
- The reset button is aligned with the zoom in and zoom out buttons.
- The availability and location of the room are indicated by a legend on the right side of the screen.
You can now use the Schedule Board card to create a room booking experience that allows users to view the room location on the displayed floor plan, view its availability, and book it instantly.
This article provides instructions to configure the Schedule Board card with maps.
Prerequisites
- Appspace 8.1 and later.
- Schedule Board Card v 1.8 and later for Maps & Listing layout option.
- Schedule Board Card v 1.20 and later for Maps layout option.
- Appspace App 2.15 and later. (Preferably running on touch screen (interactive) devices).
NotePlease refer to our Appspace Supported Devices and Operating Systems article, and Compatible Appspace Cards article. - Ensure your device is compatible. Refer to the Supported Appspace Cards article.
- Account Owner or Location Admin role required to configure passport authentication and create maps/locations.
- Account Owner, Publisher, or Author role to create Schedule Board card.
- Ensure Calendar Provider booking account has been preconfigured with resources (rooms, buildings). Refer to either one of these articles for instructions, based on your calendar provider type:
- Administrator permissions to the calendar provider booking account, to authenticate the account with Appspace.
- Floor plans images should be in the following formats: jpg, svg, bmp, png, and gif.
Authenticate Calendar Provider Account
Follow the instructions to authenticate a calendar provider account with Appspace.
- Log in to the Appspace console.
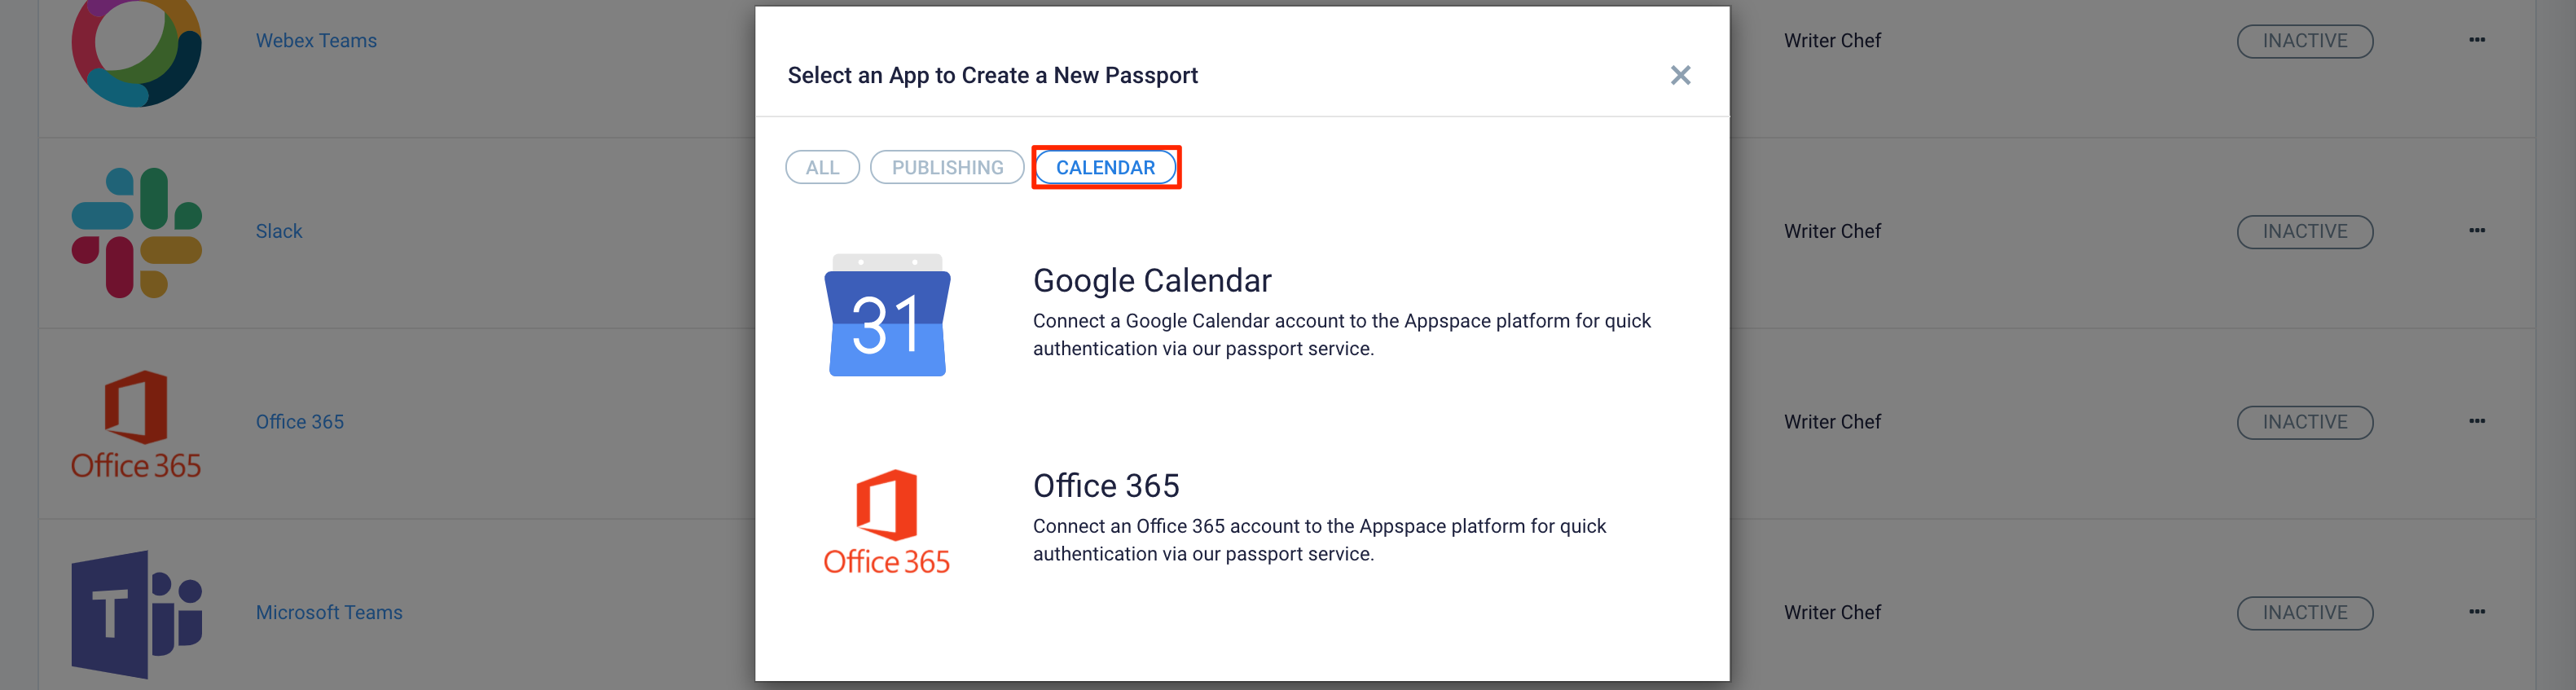
- Click the ☰ Appspace menu, and then click Integration, and click the Passports tab.
- Click +ADD, and select the desired calendar provider integration.
- In the Account Settings tab, click CONNECT ACCOUNT and grant the passport permissions to access the calendar provider. You may need to sign in with your calendar provider credentials if you’re currently not signed in.
NoteIf you encounter authentication issues while setting up the Office 365 passport with User privileges on Azure, please ensure the Azure Admin Consent Requests has been configured by following the steps in the Configure the admin consent workflow (preview) article: https://docs.microsoft.com/en-us/azure/active-directory/manage-apps/configure-admin-consent-workflow
- Once complete, continue to configure the Account Settings tab.
- In the Account Settings tab, you can perform the following actions;
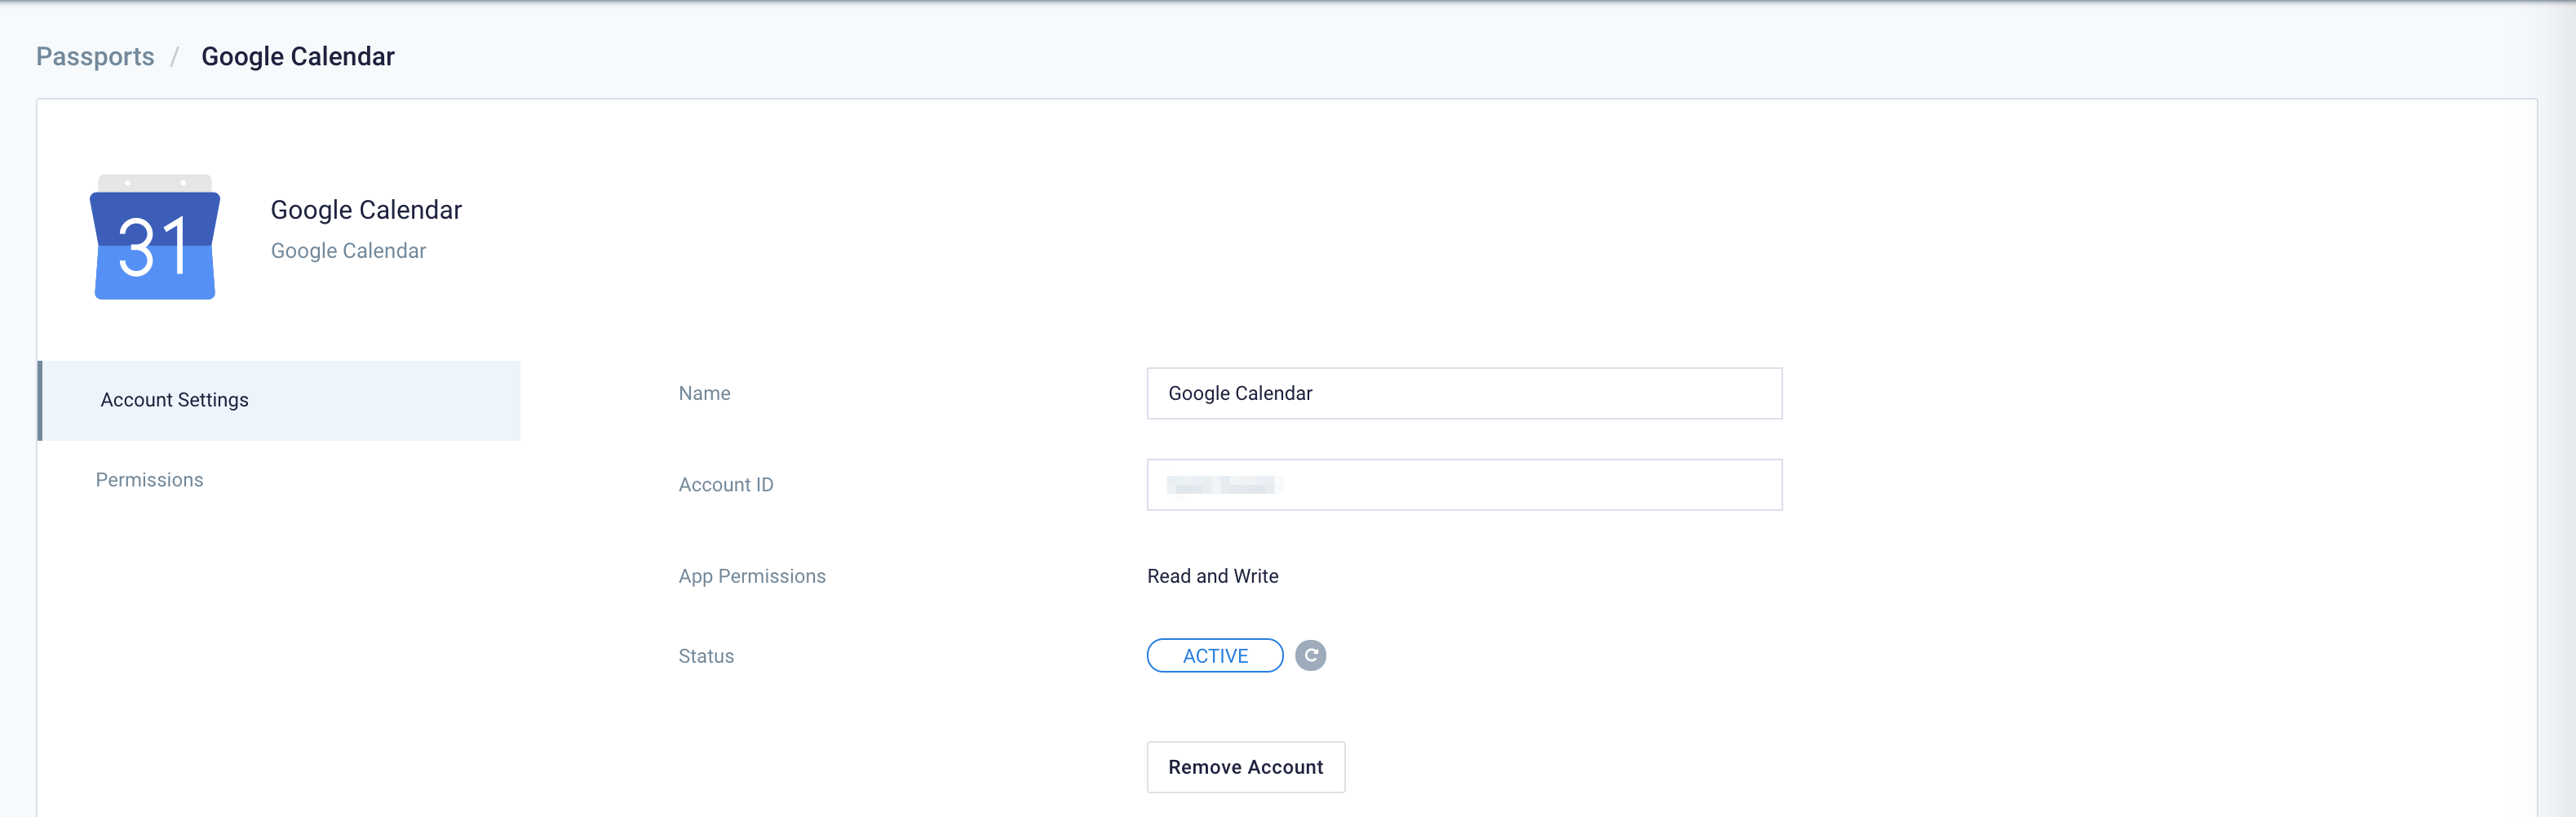
- Change the name of the calendar provider integration, by entering a different name in the Name field.
- View the Account ID of the calendar provider integration.
- View the App Permissions granted to the calendar provider integration.
- View and refresh the Status of the calendar provider integration.
- Remove the calendar provider integration, by clicking the Remove Account button.
- In the Permissions tab, you may grant the following users or user groups permissions to view or edit the passport.
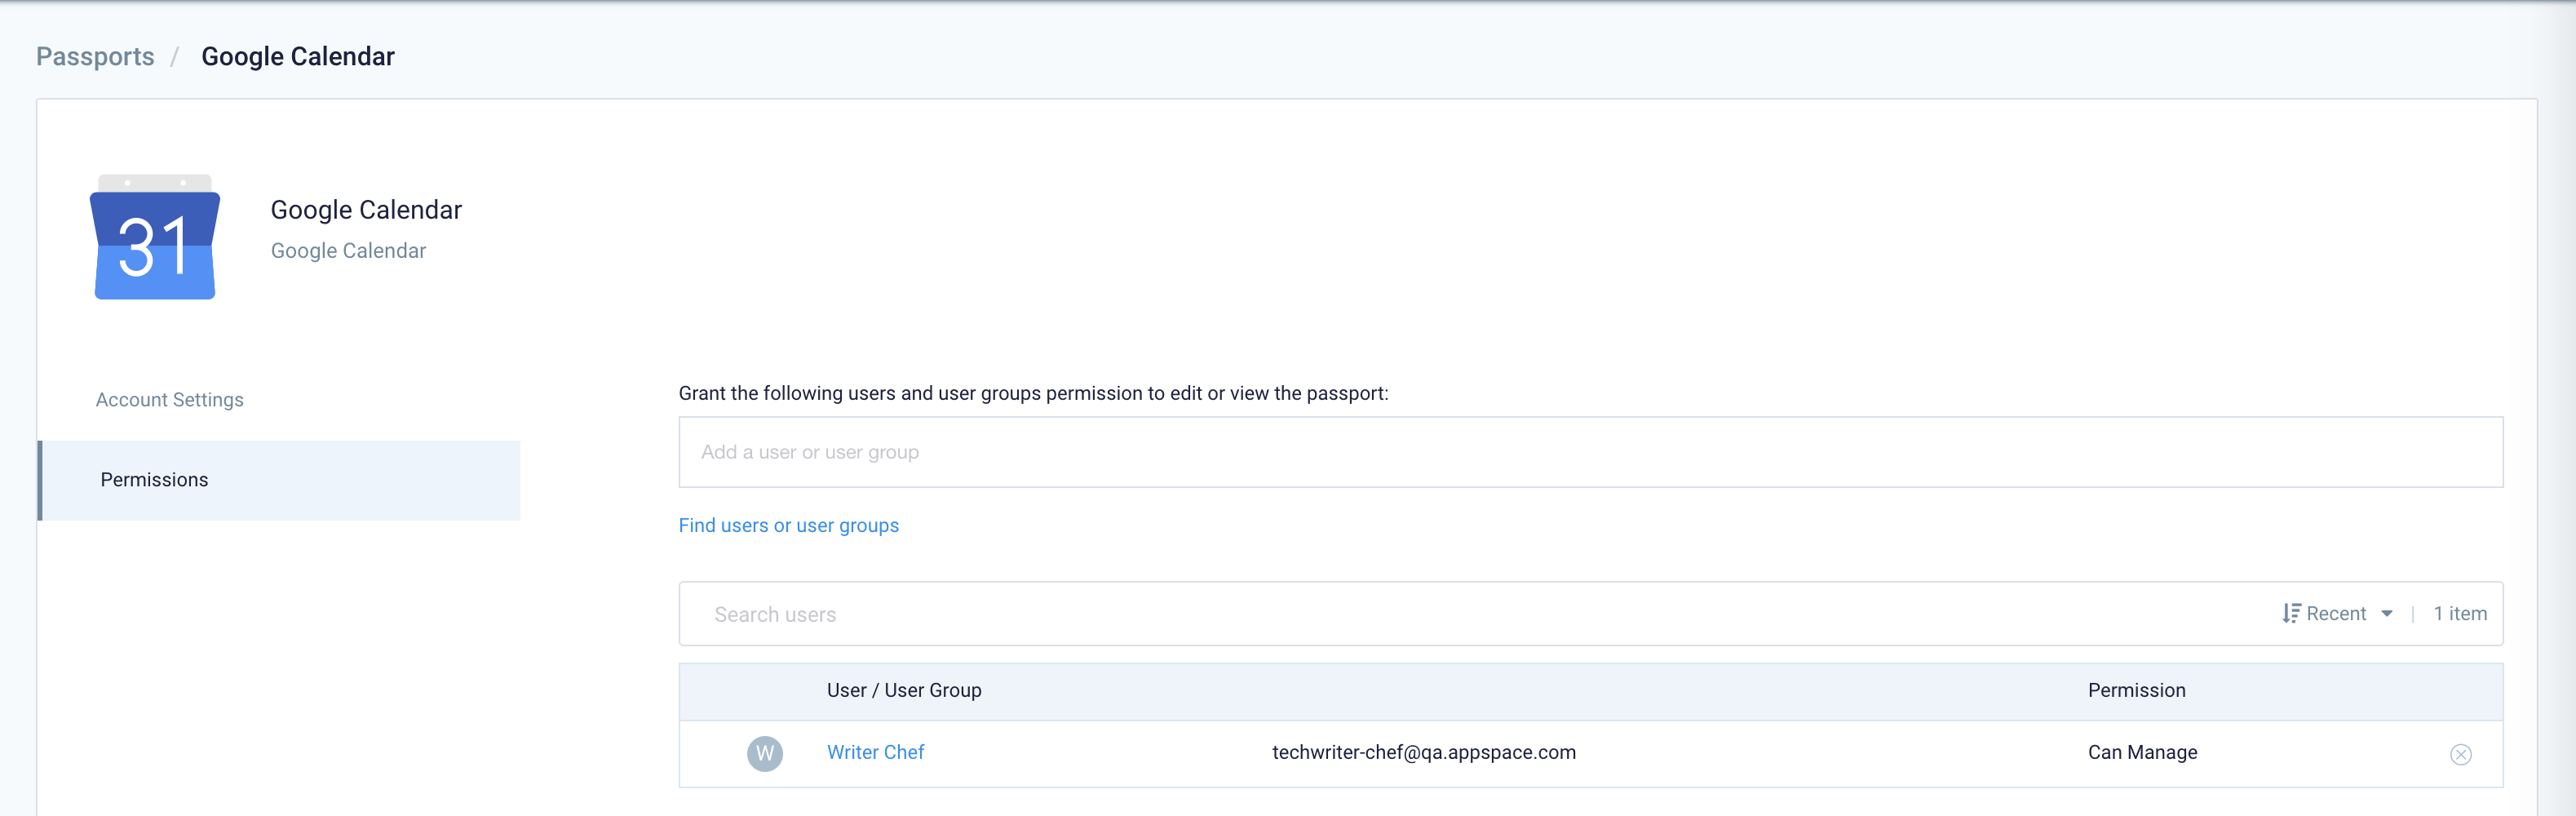
- Enter and select the users or user groups from the drop-down list, and select the permissions to grant from the Select permissions drop-down menu.
- You may also view and remove the users or user groups that have already been granted permissions.
- You may proceed to the Create Locations section below.
Create Maps and Locations
The instructions below show you how to create a floor plan for a location that will be used in your Schedule Board card.
- Log in to the Appspace console.
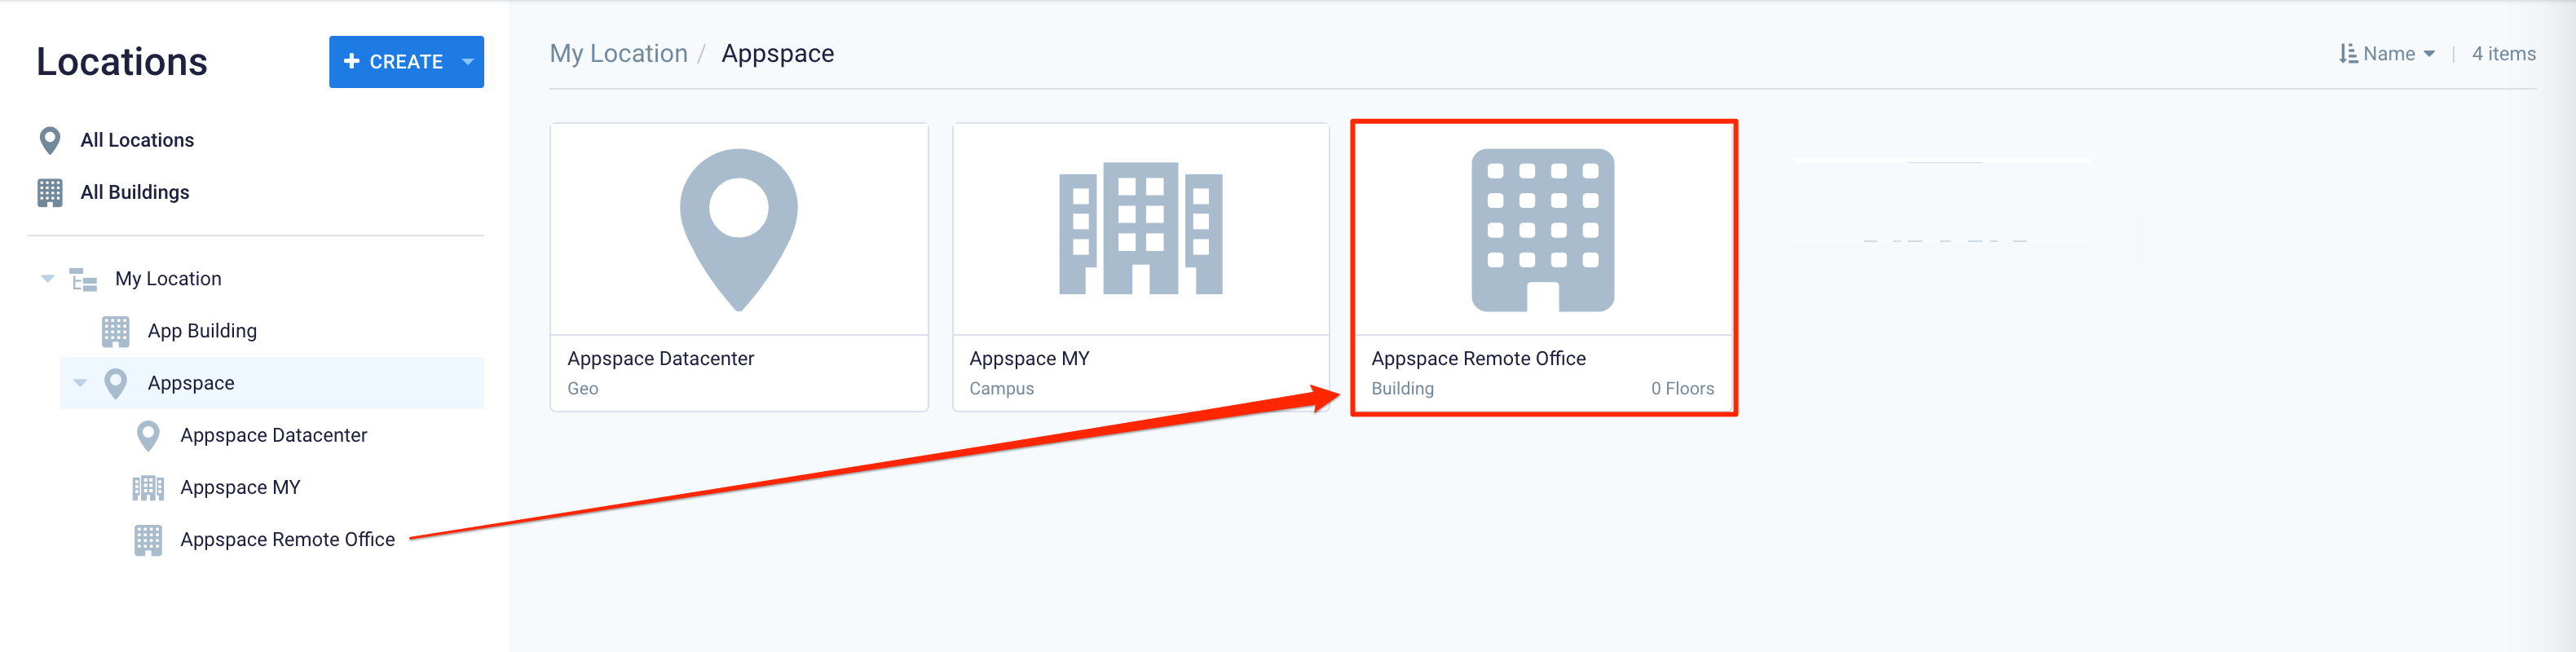
- Click Locations from the ☰ Appspace menu.
NoteSelect the geo location or campus location you wish to create the building plan in before clicking the Create button. For more detailed instructions refer to the Configure Locations with Maps & Floor Plans article. - Click the CREATE drop-down arrow, and select Create Building Location.

- Enter the name of the campus location, and click SAVE.
- Proceed to Upload a Floor Plan from here.
NoteLocations supports floor plan images in the following formats: jpg, svg, bmp, png, and gif. - Select the floor plan you wish to configure.
- In the Edit section, click ADD, and select one of the map tracing options:
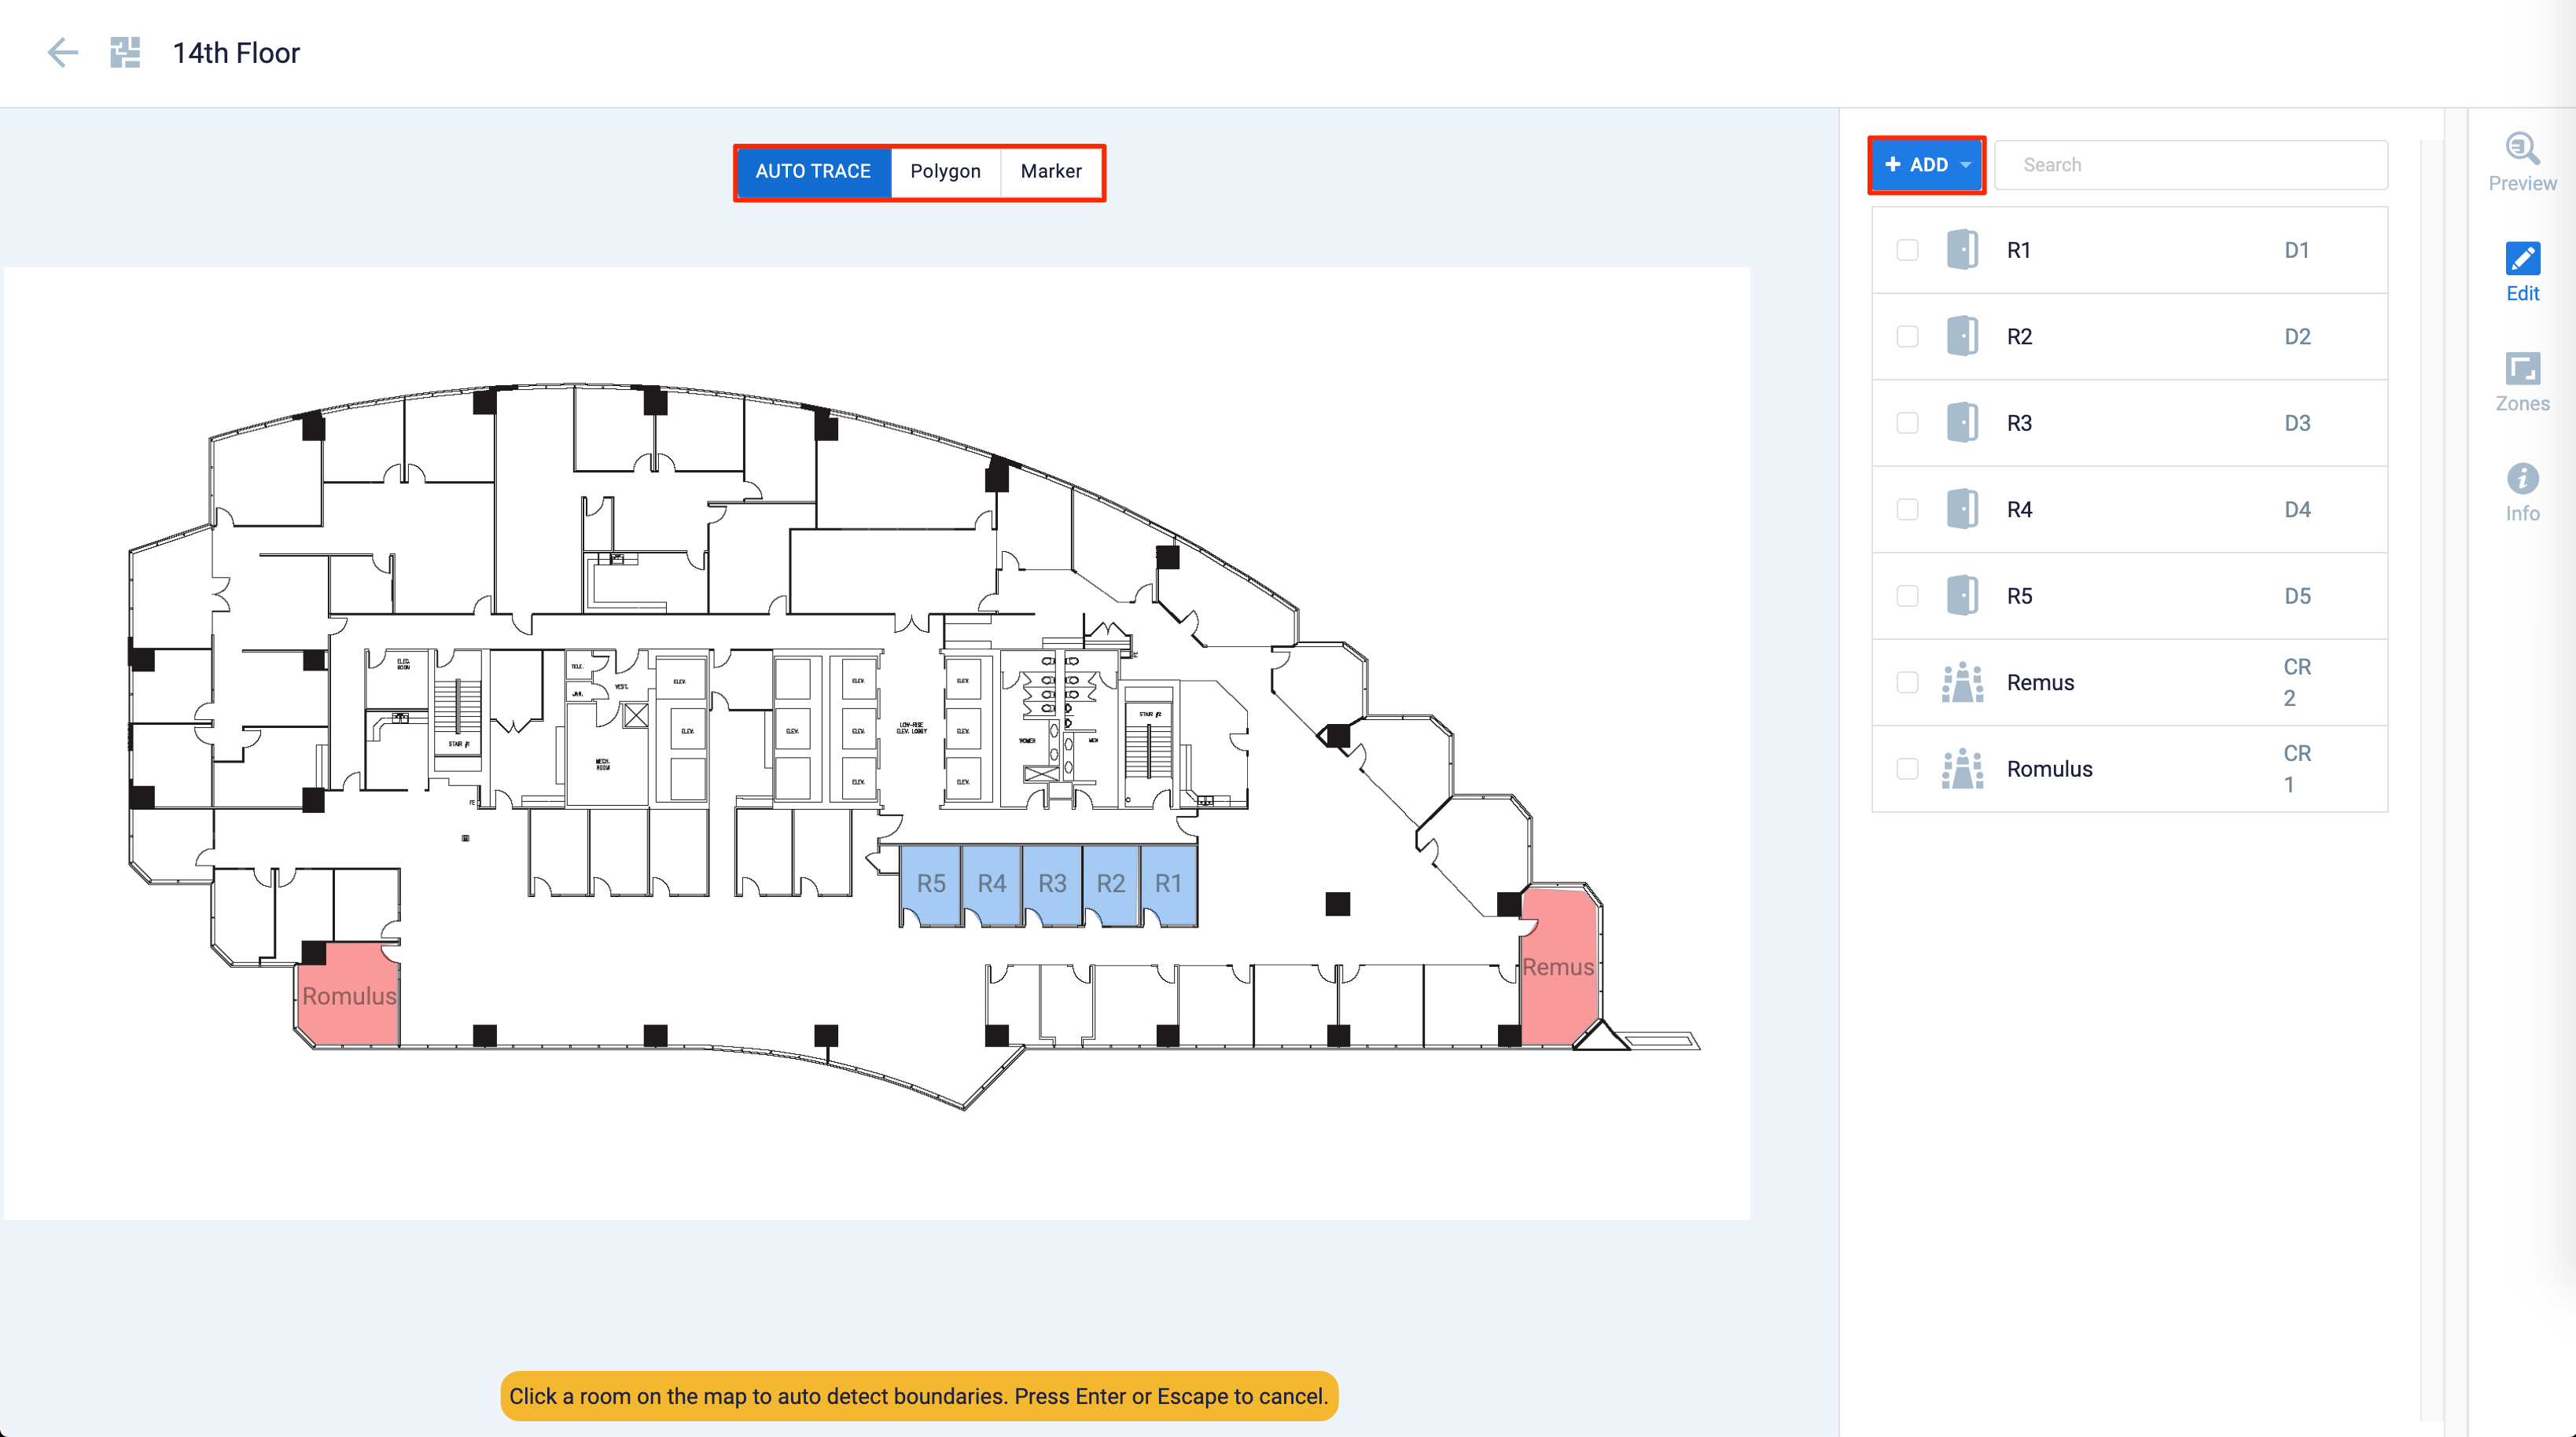
- AUTO TRACE – Automatically traced the borders of the room.
- Polygon – Manually trace the borders of the room.
- Marker – Manually hotspot a location.
- Map the room or point of interest on the floor plan.
- Click the mapped room or point of interest, and configure the following fields:
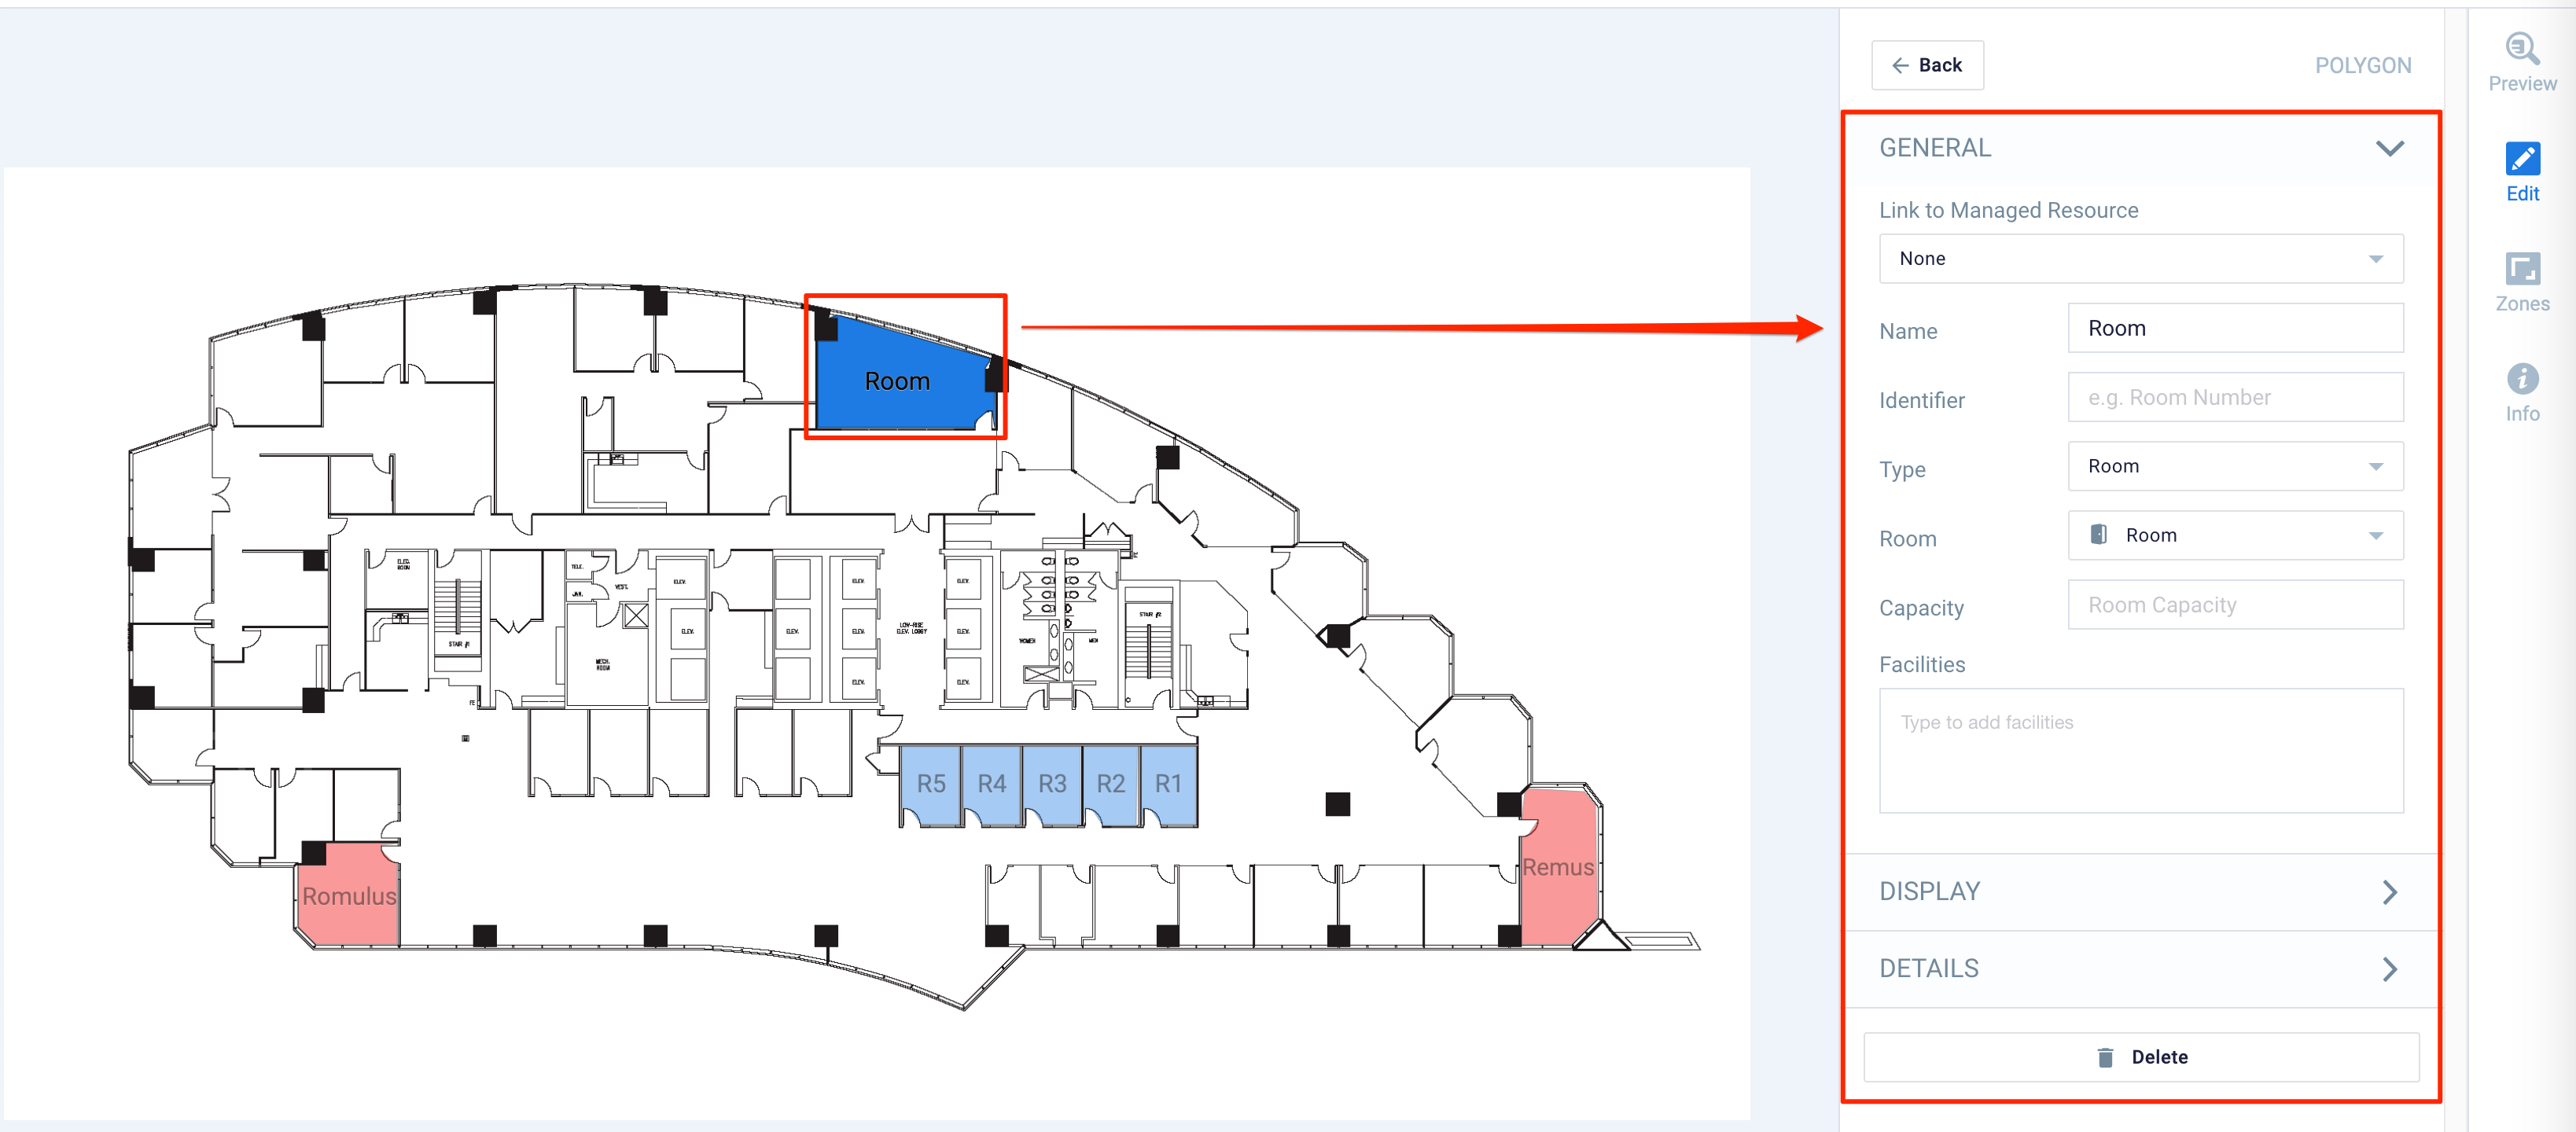
- Link to Managed Resource – Select the following options from the drop-down menu:
- External Calendar Passport
- Select the calendar provider from the drop-down menu.
- Enter or select the resource from the drop-down menu for the room.
- None
- External Calendar Passport
- Name – Enter the name of the room or point of interest, if not auto-filled by the calendar resource.
- Identifier – Enter the room number or specific location of the area.
- Type – Select the type of mapping.
- Room – Select the type of room.
- Capacity – Enter the capacity of the room.
- Coordinates – Enter the coordinates of the room to the floor plan.
- Facilities – Add the facilities available in the room.
- Photo – Add a photo of the room.
- Delete – Delete the room or point of interest.
- Link to Managed Resource – Select the following options from the drop-down menu:
- Click the Zones icon to organize your floor plan into zones.

- Click ADD, and select one of the map tracing options:
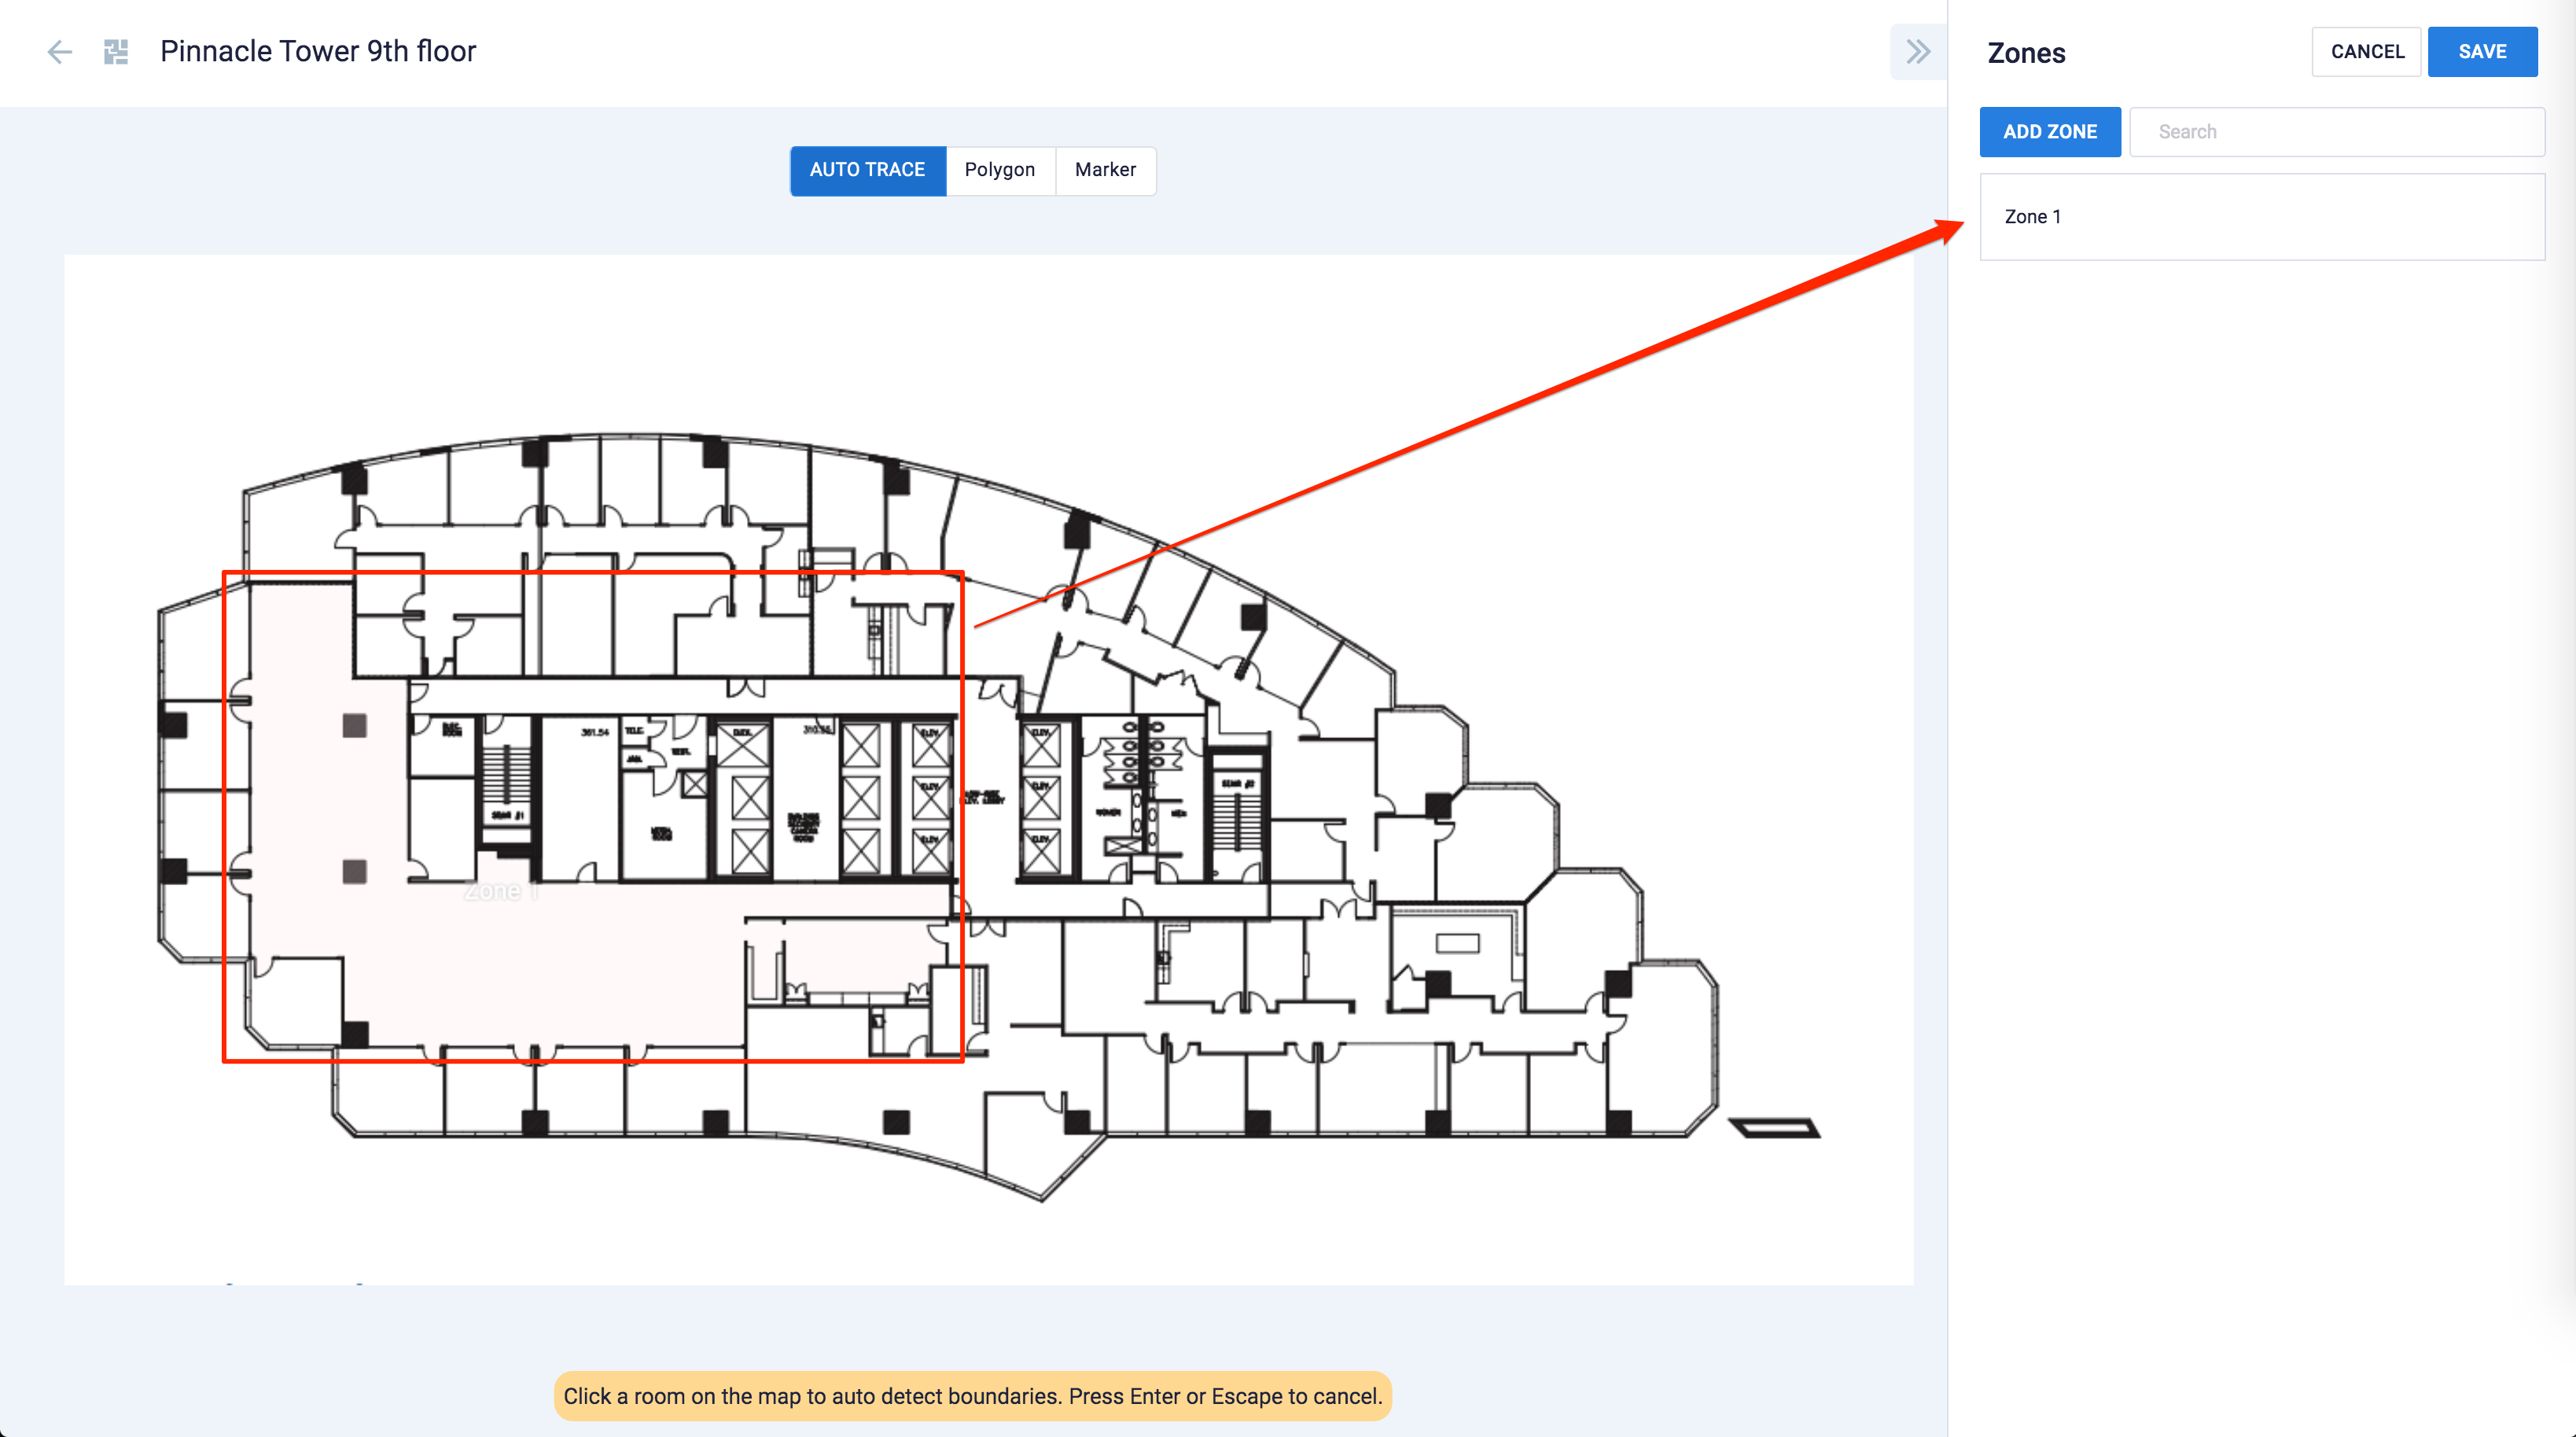
- AUTO TRACE – Automatically traced the borders of the room.
- Polygon – Manually trace the borders of the room.
- Marker – Manually hotspot a location.
- Click the Info icon to manage your floor plan.

- You may configure the following floor plan settings:
-
- Upload an image of the Floor Plan.
- Configure the floor plan level or floor number.
- Configure the floor plan scale ( pixels vs units ).
- Export the floor plan.
- Delete the floor plan.You may configure the following floor plan settings:
-
- Once done, click SAVE.
Configure Schedule Board Card with Maps
The instructions below show you how to configure your Schedule Board with maps.
- Log in to your Appspace console.
- To create this card, select one of the following options:
- Click +Quick Action from the Appspace menu bar on the top right, and select Create Card.
- Click Library from the ☰ Appspace menu, and select a library or folder you wish to create the content in. Click +CREATE, and select Card.
- To create and add the card directly to an existing channel, refer to Add Content to Playlist Channels.
- Select Workplace from the All Templates side panel, and click Schedule Board.
ImportantIf you are unable to locate the content, try using either the Search bar, the Order by, or Filter icon to narrow down the content that you are looking for.
- In the Edit tab;
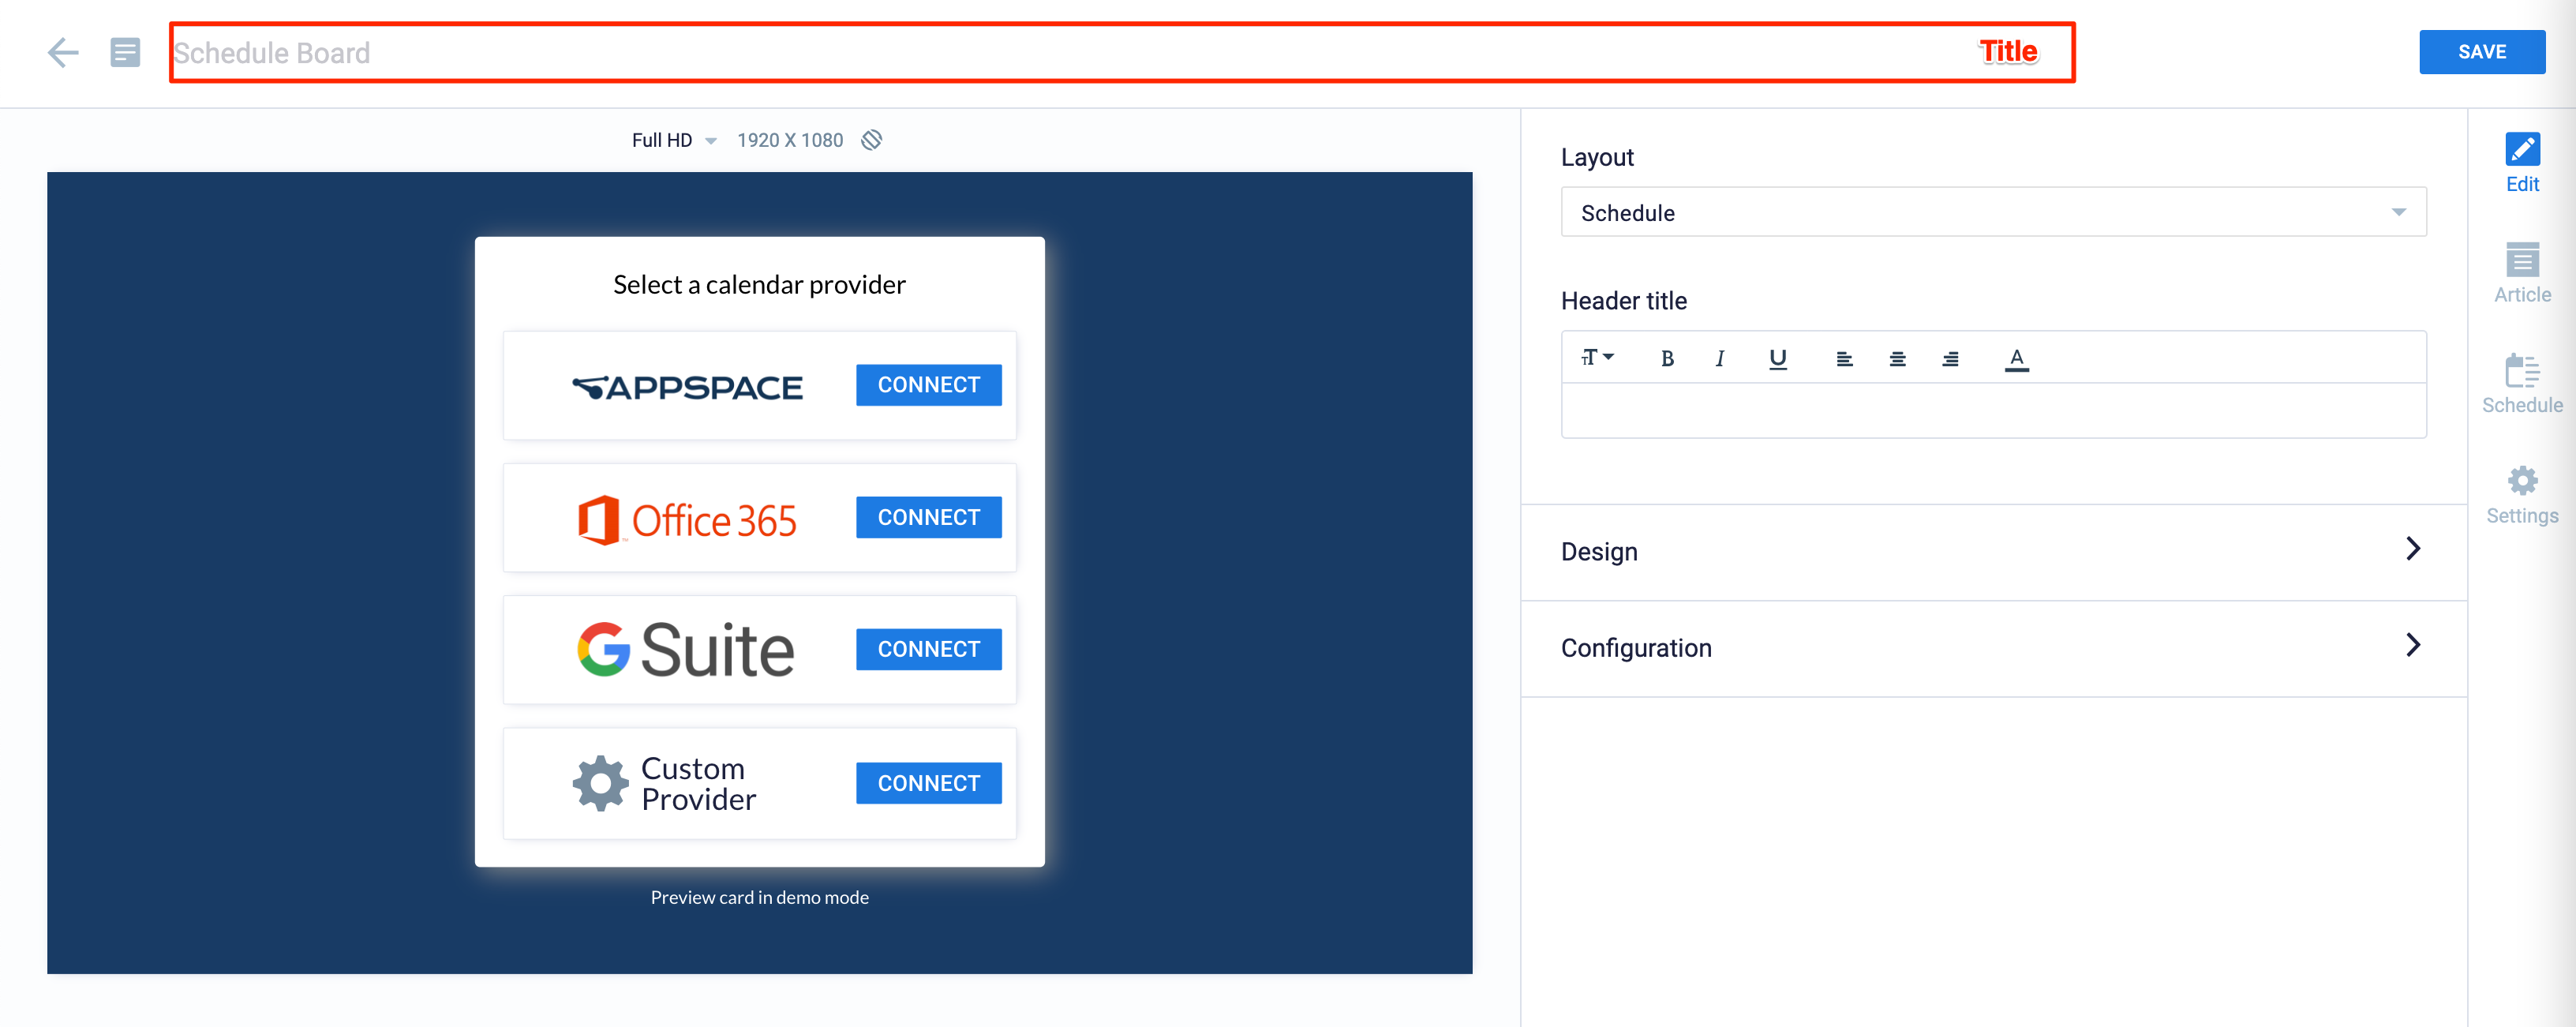
- In the Card section, select and authenticate your preferred Calendar Provider:
- Appspace
- Click CONNECT, and proceed to Step 6 below.
- Office 365
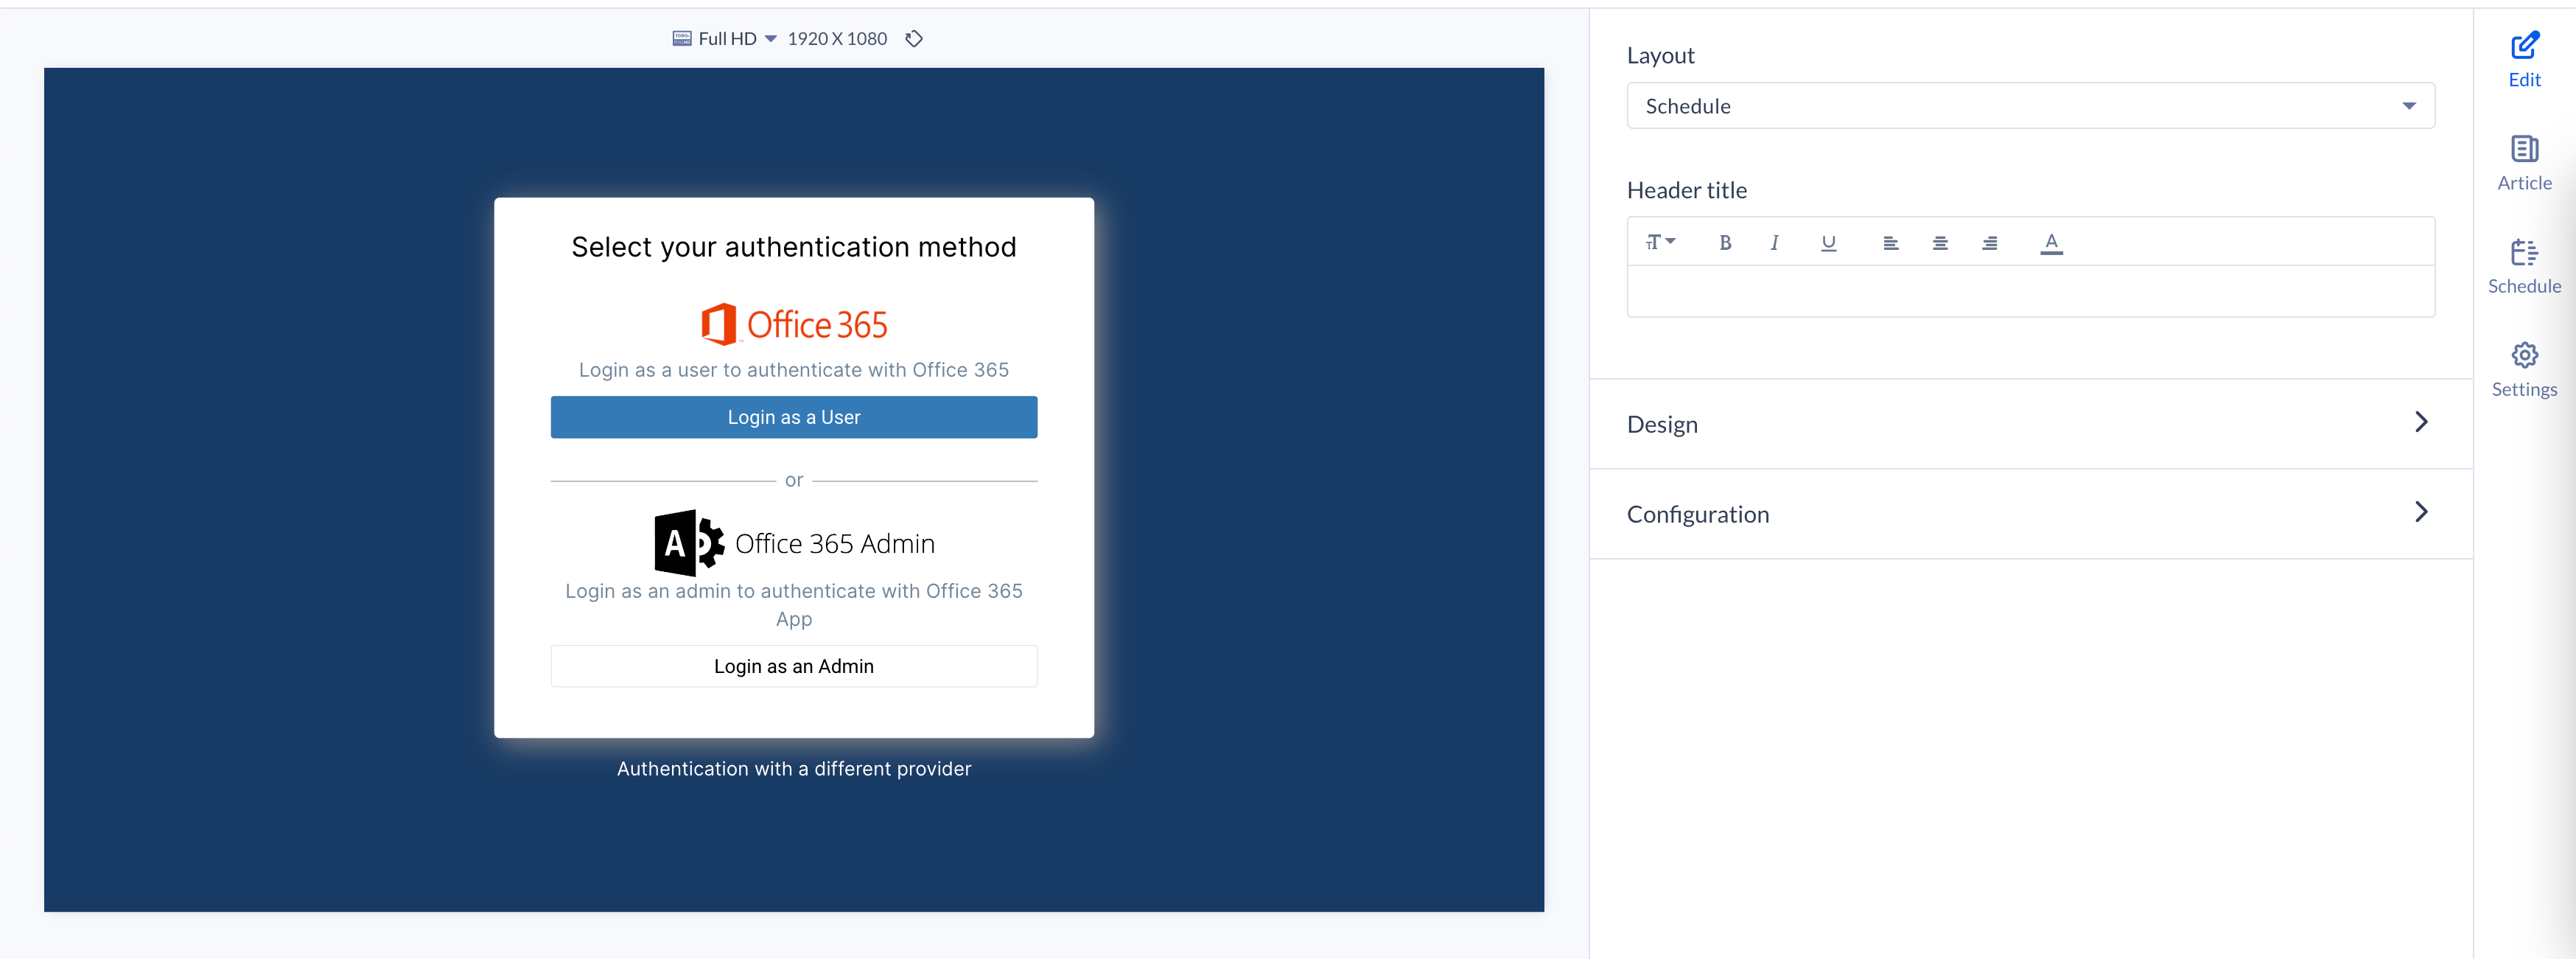
- Click CONNECT, and select the authentication method of your Booking Account.
- Login as a User – O365 Room Booking Service with User Privileges
- Login as an Admin – O365 Room Booking Service with Global Administrator Privileges
- In the Authentication window, enter the Booking Account credentials to authenticate the Schedule Board card.
NotePlease contact your Microsoft O365 Administrator for credentials. Some large organizations may have one account for each room. If you encounter authentication issues while setting up the Office 365 integration with user privileges on Azure, please ensure the Azure Admin Consent Requests have been configured by following the steps in the Configure the admin consent workflow (preview) article: https://docs.microsoft.com/en-us/azure/active-directory/manage-apps/configure-admin-consent-workflow
- Once the authentication is successful, proceed to Step 6 below.
- Click CONNECT, and select the authentication method of your Booking Account.
- GSuite
- Click CONNECT.
- In the Authentication window, enter the Booking Account credentials to authenticate the Schedule Board card.
NotePlease contact your GSuite Administrator for credentials. Some large organizations may have one account for each room.
- Once the authentication is successful, proceed to Step 6 below.
- Custom Provider

- Click CONNECT.
- Enter the Provider URL and API Key of the custom calendar provider, and click Configure.
- Optionally, click the HTTP(S) headers to add the custom provider’s header and value, such as the authorization credentials.
- Once the authentication is successful, proceed to Step 6 below.
NoteThe demo mode on cards, allows users to experience the design and functionality of the card, prior to configuring the calendar provider. This includes displaying various booking statuses, and performing bookings on the card itself.
- Appspace
- Enter in your booking account credentials (created earlier) to authenticate the Schedule Board card. NotePlease contact your Administrator for credentials. Some large organizations may have one account for each room.
- Once authentication is successful, select the rooms to be displayed on the board, and click Verify.

- Once the rooms have been verified, click Finish.
- Select a layout option. There are four different layout options, as follows: NoteThe header title, design, and display options are the same for all four layout options. You can refer to steps 10,11, and 12 for these editing and setting.
- Map – displays floor map in the map view in full screen mode.
- In the Configuration section, click the Add Data button for Room mapping. You may populate the table using one of the following methods:
- Drop or upload an .xlsx file
- Manually enter the data.
- Copy and paste data from an external table.
- Enable the “You Are Here” pin to show the Schedule Board card at the device’s current location. To set the device property below, refer to Add Device Property article.
NoteIn order to get the Point of Interest ID or Point of Interest Coordinates, please visit the Configure “You Are Here” Indicator section.
- Using the Point of Interest ID:
- Property: card.schedule.map.locationid = <POI ID>
- Example: card.schedule.map.locationid = 6c1df113-88dc-4934-ac0b-c20d8444c41f
- Setting the device using the Point of Interest Coordinates:
- Property: card.schedule.map.location = {“coordinates”:[###,###],”floorNumber”:#}
- Example: card.schedule.map.location = {“coordinates”:[1144.847376923731,484.71643567723817],”floorNumber”:14}
- Using the Point of Interest ID:
- You can turn on and off the Show POIs feature to display resources on the Schedule Board card in a certain building and floor.
- In the Configuration section, click the Add Data button for Room mapping. You may populate the table using one of the following methods:
- Map and Listing – displays floor map and listed room on map view.
- In the Configuration section, click the Add Data button for Room mapping. You may populate the table using one of the following methods:
- Drop or upload an .xlsx file
- Manually enter the data.
- Copy and paste data from an external table.
- Enable the “You Are Here” pin to show the Schedule Board card at the device’s current location. To set the device property, refer to Add Device Property article.
- Pagination can be set to a minimum of 10 and a maximum of 50.
- In the Configuration section, click the Add Data button for Room mapping. You may populate the table using one of the following methods:
- Schedule – show current and upcoming meetings in advance.
- In the Configuration section, click the Add Data button for Room mapping. You may populate the table using one of the following methods:
-
- Drop or upload an .xlsx file
- Manually enter the data.
- Copy and paste data from an external table.
-
- Pagination can be set to a minimum of 10 and a maximum of 50.
- In the Configuration section, click the Add Data button for Room mapping. You may populate the table using one of the following methods:
-
Current events – displays only the current and next meeting, for multiple rooms.
-
In the Configuration section, click the Add Data button for Room mapping. You may populate the table using one of the following methods:
-
- Drop or upload an .xlsx file
- Manually enter the data.
- Copy and paste data from an external table.
-
- Enable the “You Are Here” pin to show the Schedule Board card at the device’s current location. To set the device property, refer to Add Device Property article.
-
- Map – displays floor map in the map view in full screen mode.
-
Enter the Header title with the preferred messaging text. Use the Text Editor to customize the text font and style.
-
In the Design section; click the arrow to expand. Customize the Schedule Board card with the following options:
- Logo
- Logo position
- Header background color or image
- Header mask color
- Available color
- Occupied color
- Check in color
- Table text color
- Table color
- Table border color
- Level button color
- Level button text color
- Background color or media
- Background mask color
- In the Configuration section; click the arrow to expand. Select the Display options for the schedule board.
- Map enabled
- Interactivity enabled
- Logo enabled
- Header enabled
- 24-hour clock
- Show meeting name
- Show organizer’s name
- Show clock
- Show in 15 minutes time block ImportantIf the Schedule Board card detects that the service provider has restricted viewing access to a meeting room/resource, it will automatically disable the interactivity and booking functions for that room on the board (Appspace App). However, meeting information will still be displayed.
Navigating Schedule Board with Map
The instructions below show you how to navigate the Schedule Board with map.
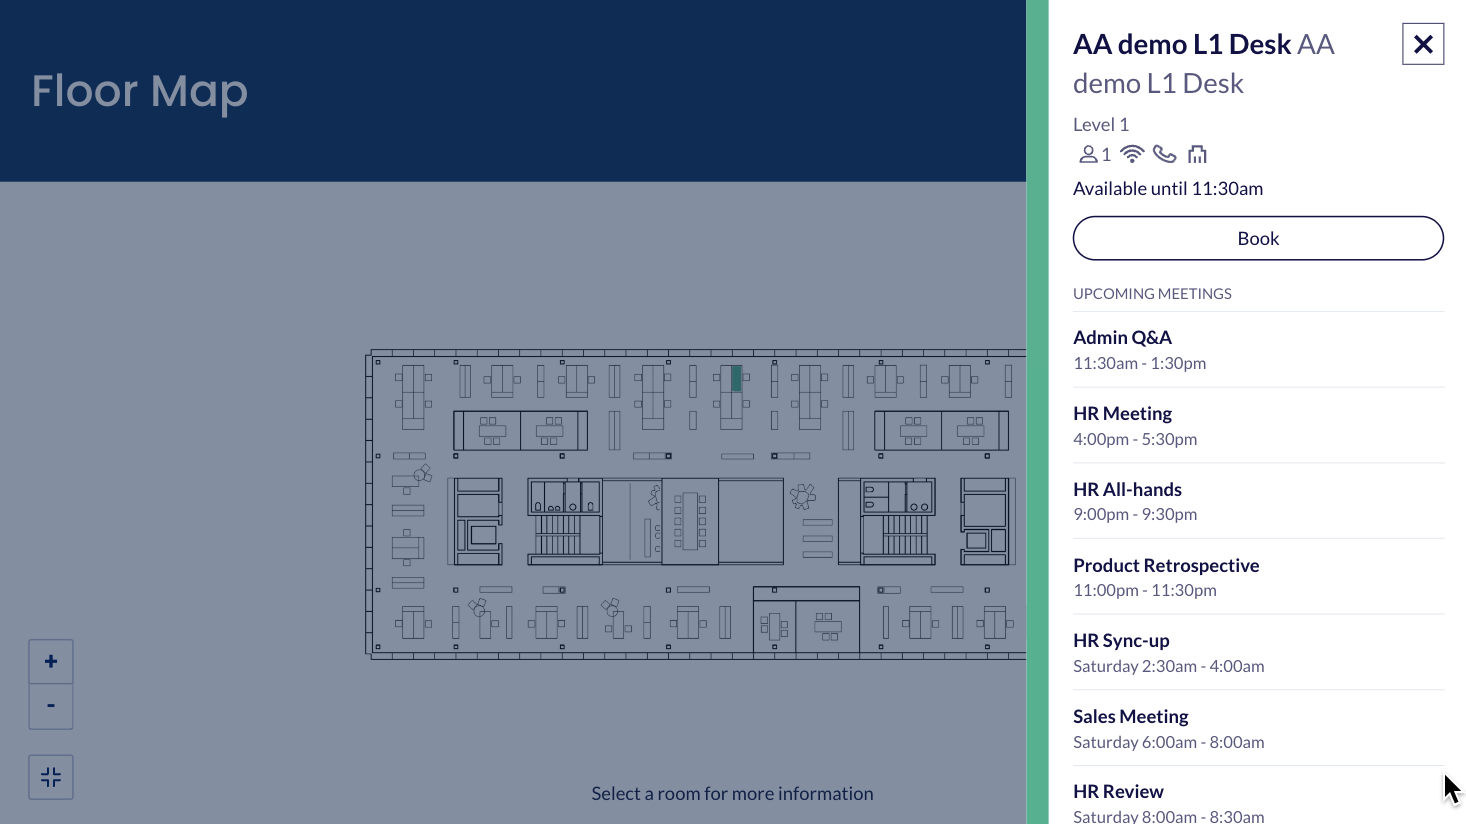
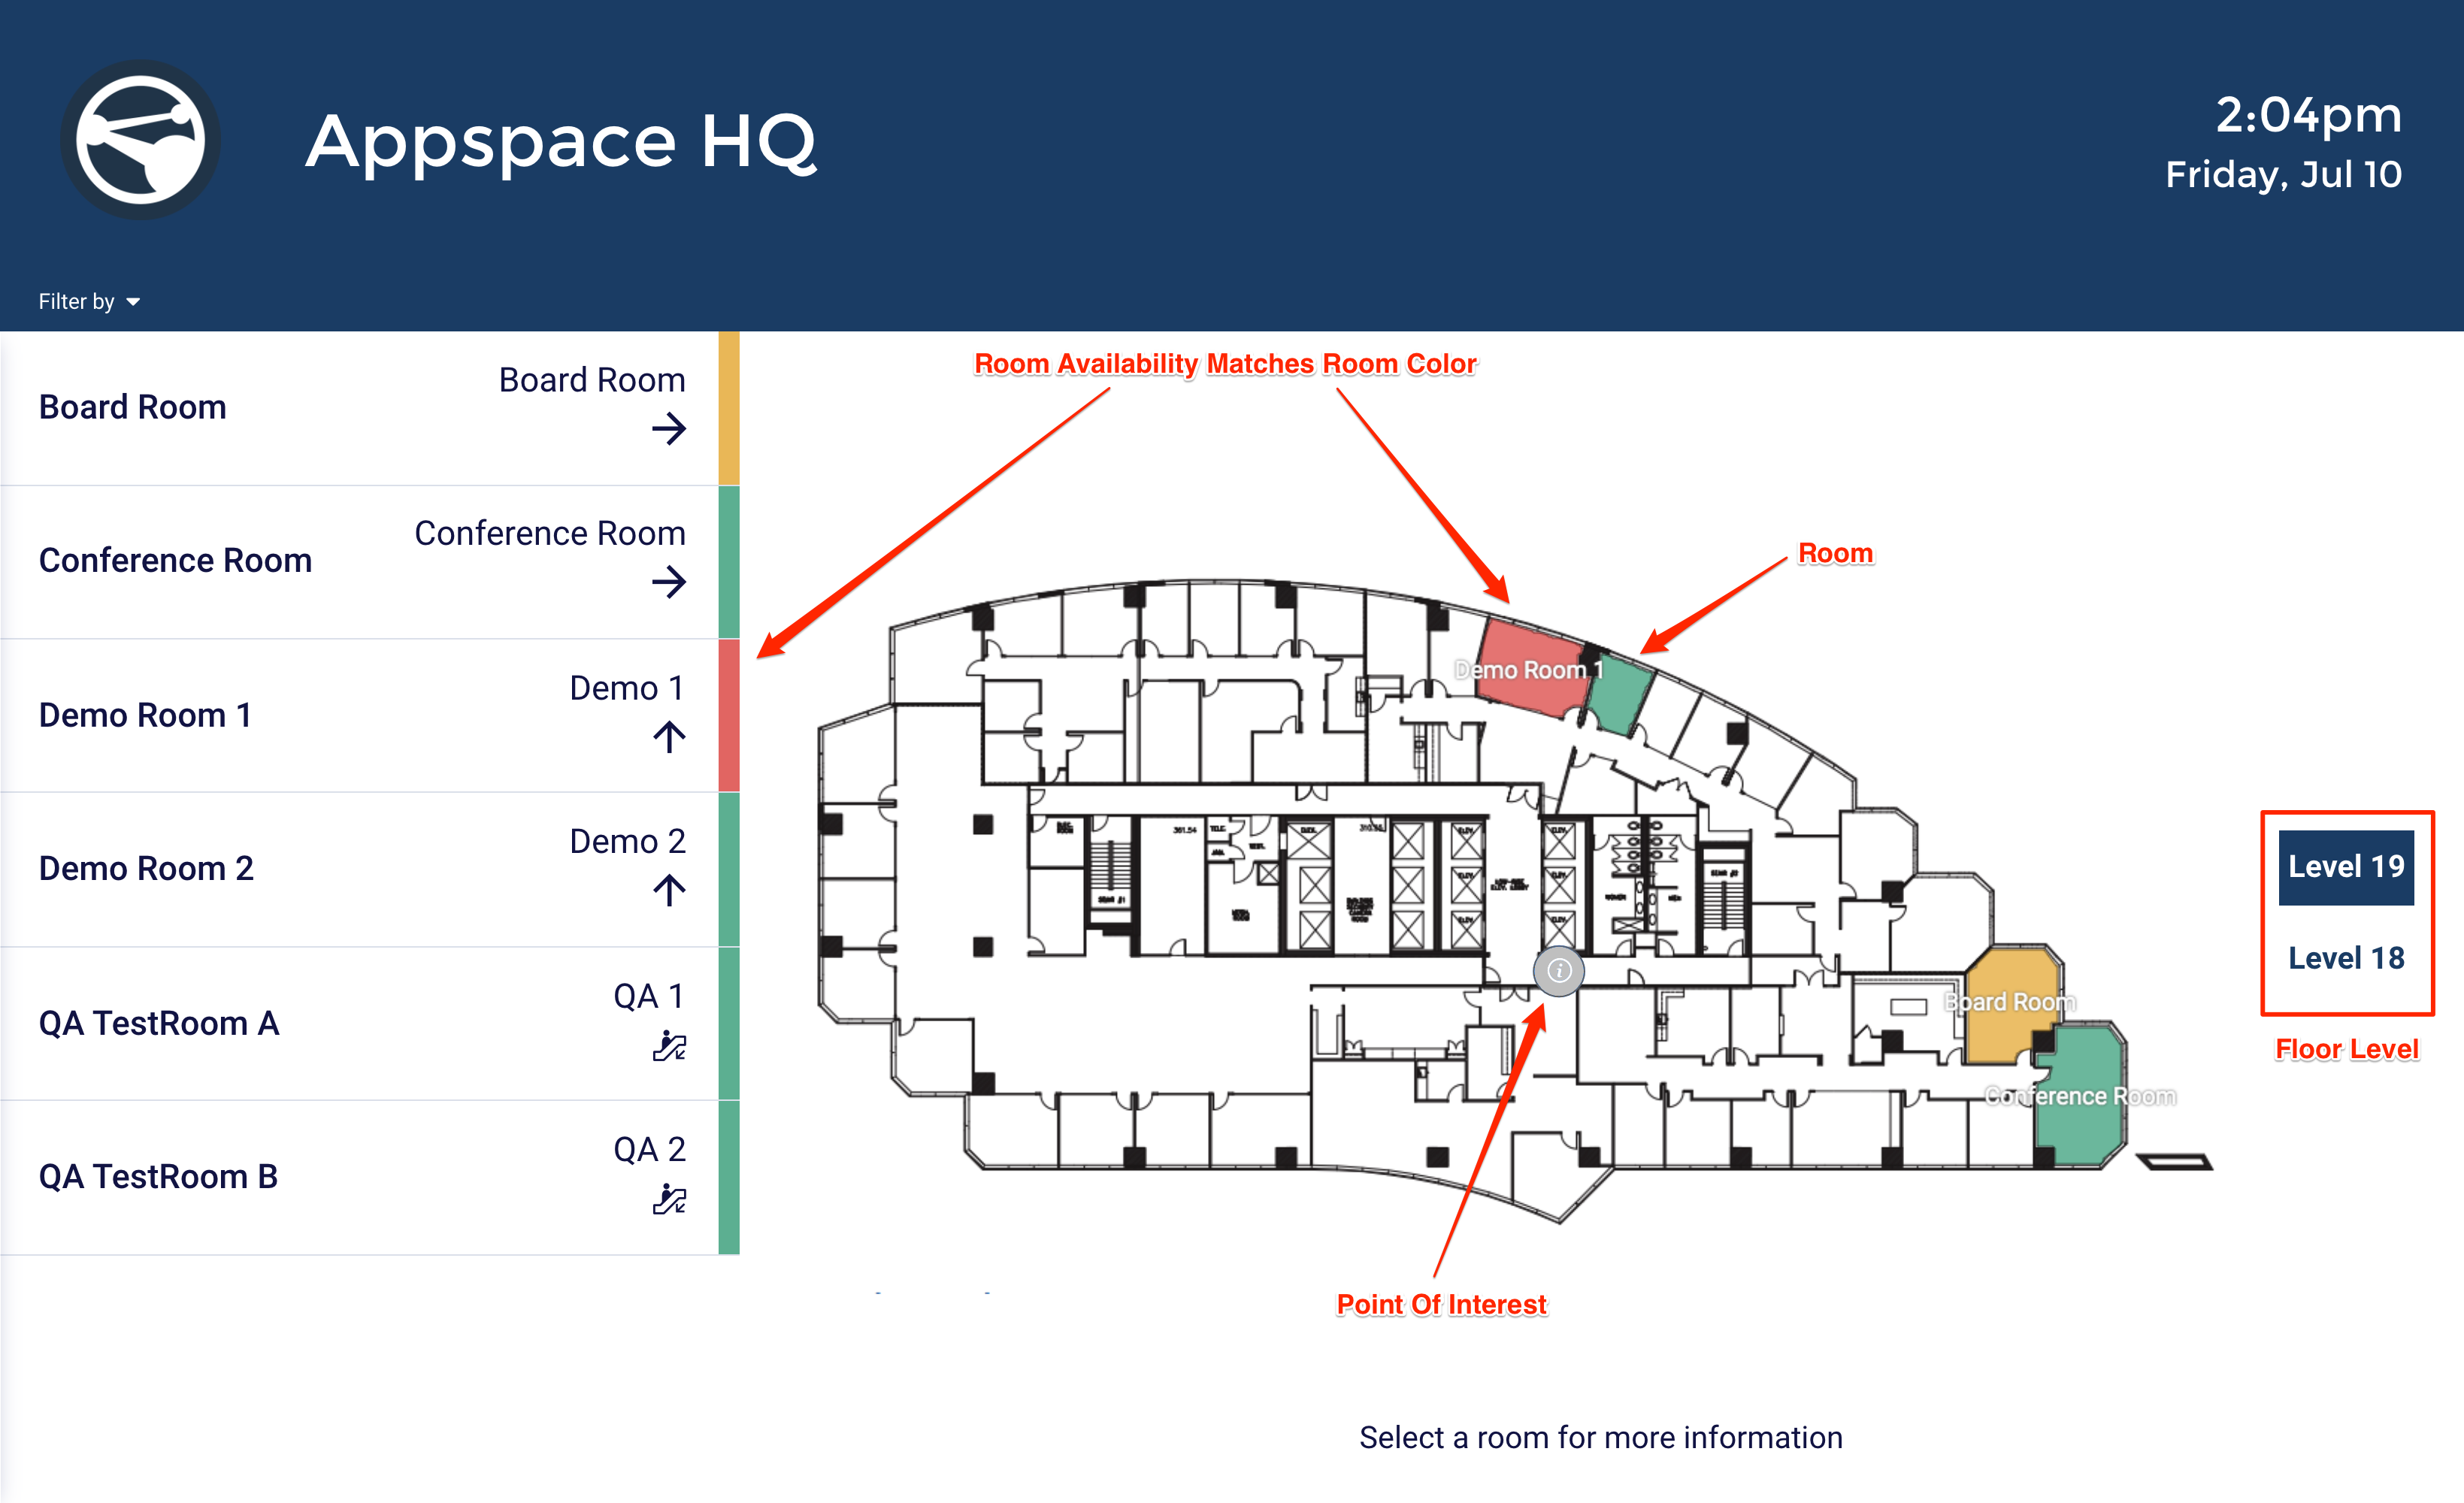
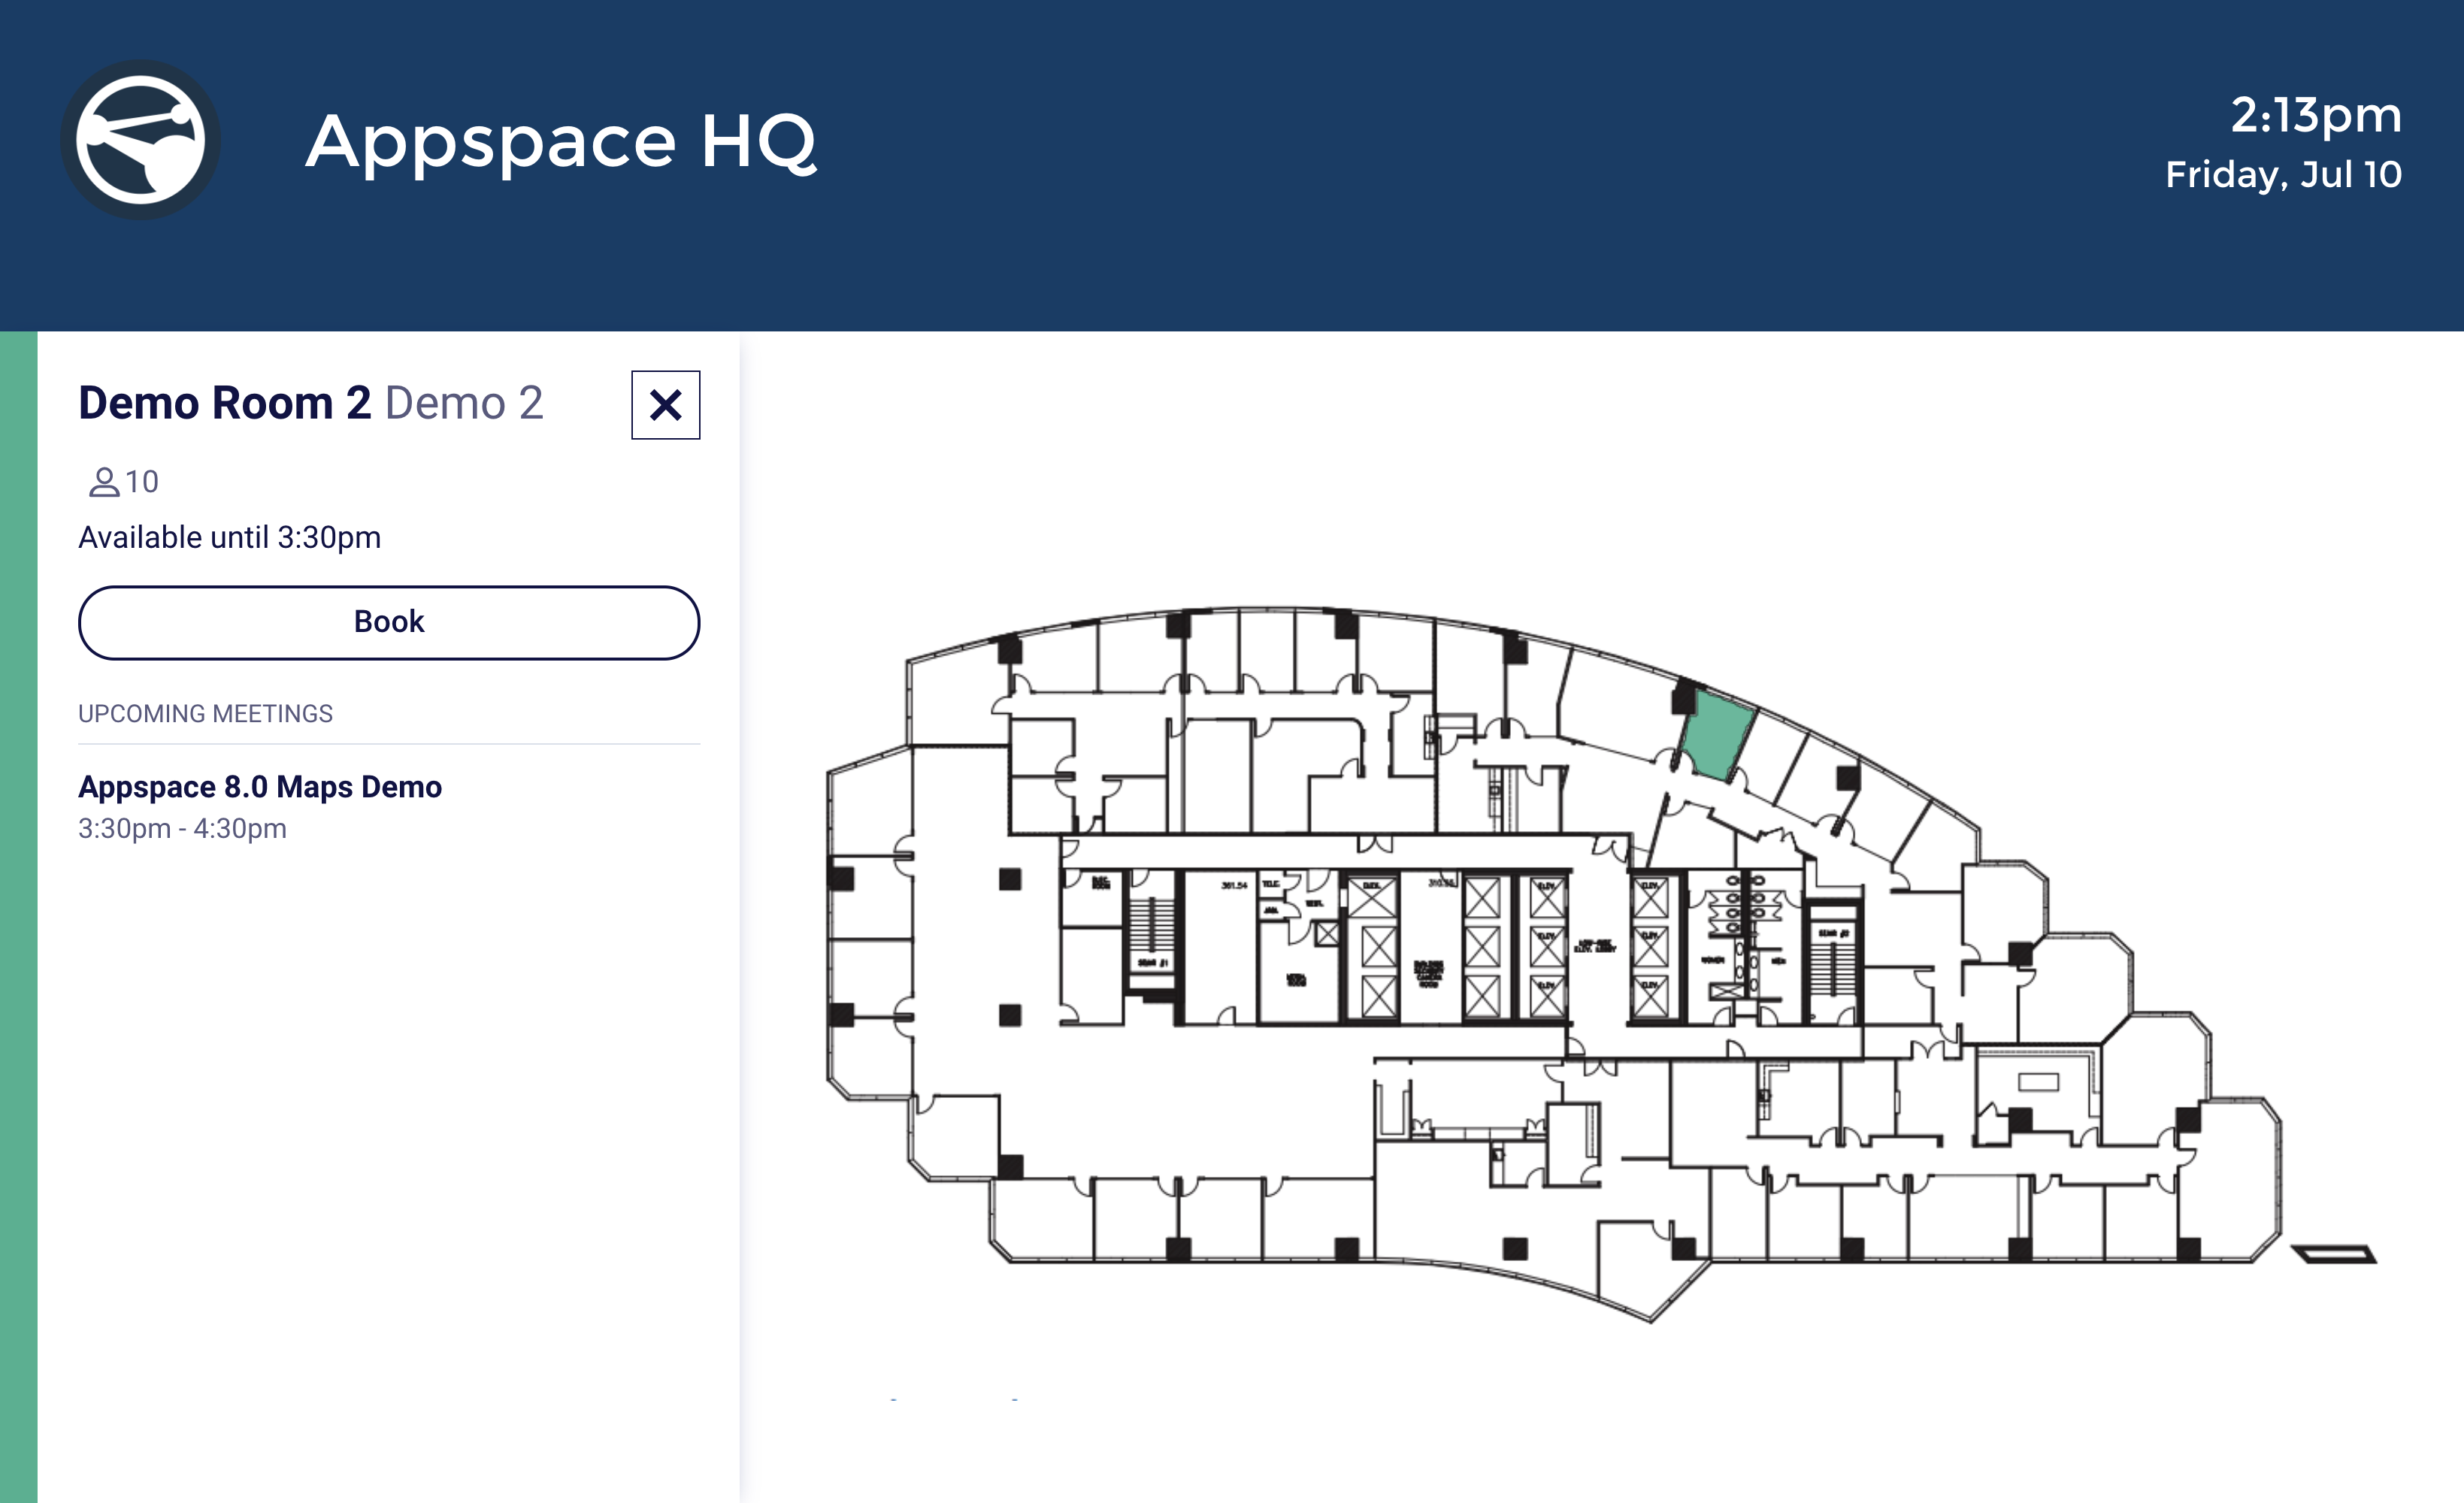
The Schedule Board card, which is displayed in a map style, allows users to quickly select a desired room and book it while also providing a graphical view of where the rooms are situated and their availability.
The booking functions are the same as the regular schedule board, for more information, please refer to the Book Multiple Meeting Rooms Instantly on Schedule Board article.

-
- Users are able to quickly identify the room’s availability and location instantly, as the room color on the floor plan reflects the current room status:
- Green – Room available for booking.
- Red – Room is occupied.
- Yellow – Room is waiting to be checked in.
- Grey – Unmapped resources, rooms, or POI (Point of Interest) that can’t be booked.
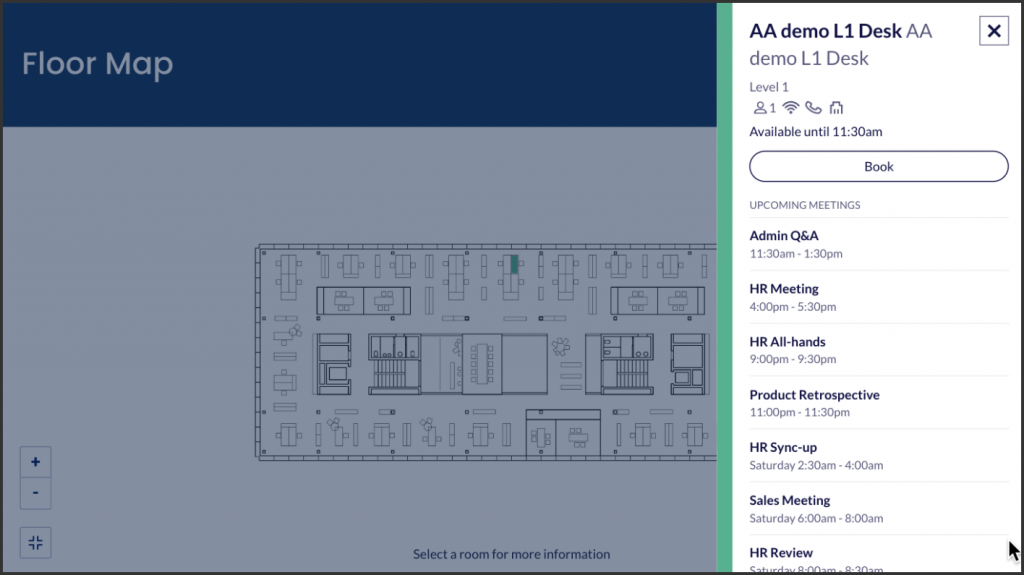
- Users can click on the room name, or the location of the room in the floor plan to view information, or to make a booking.
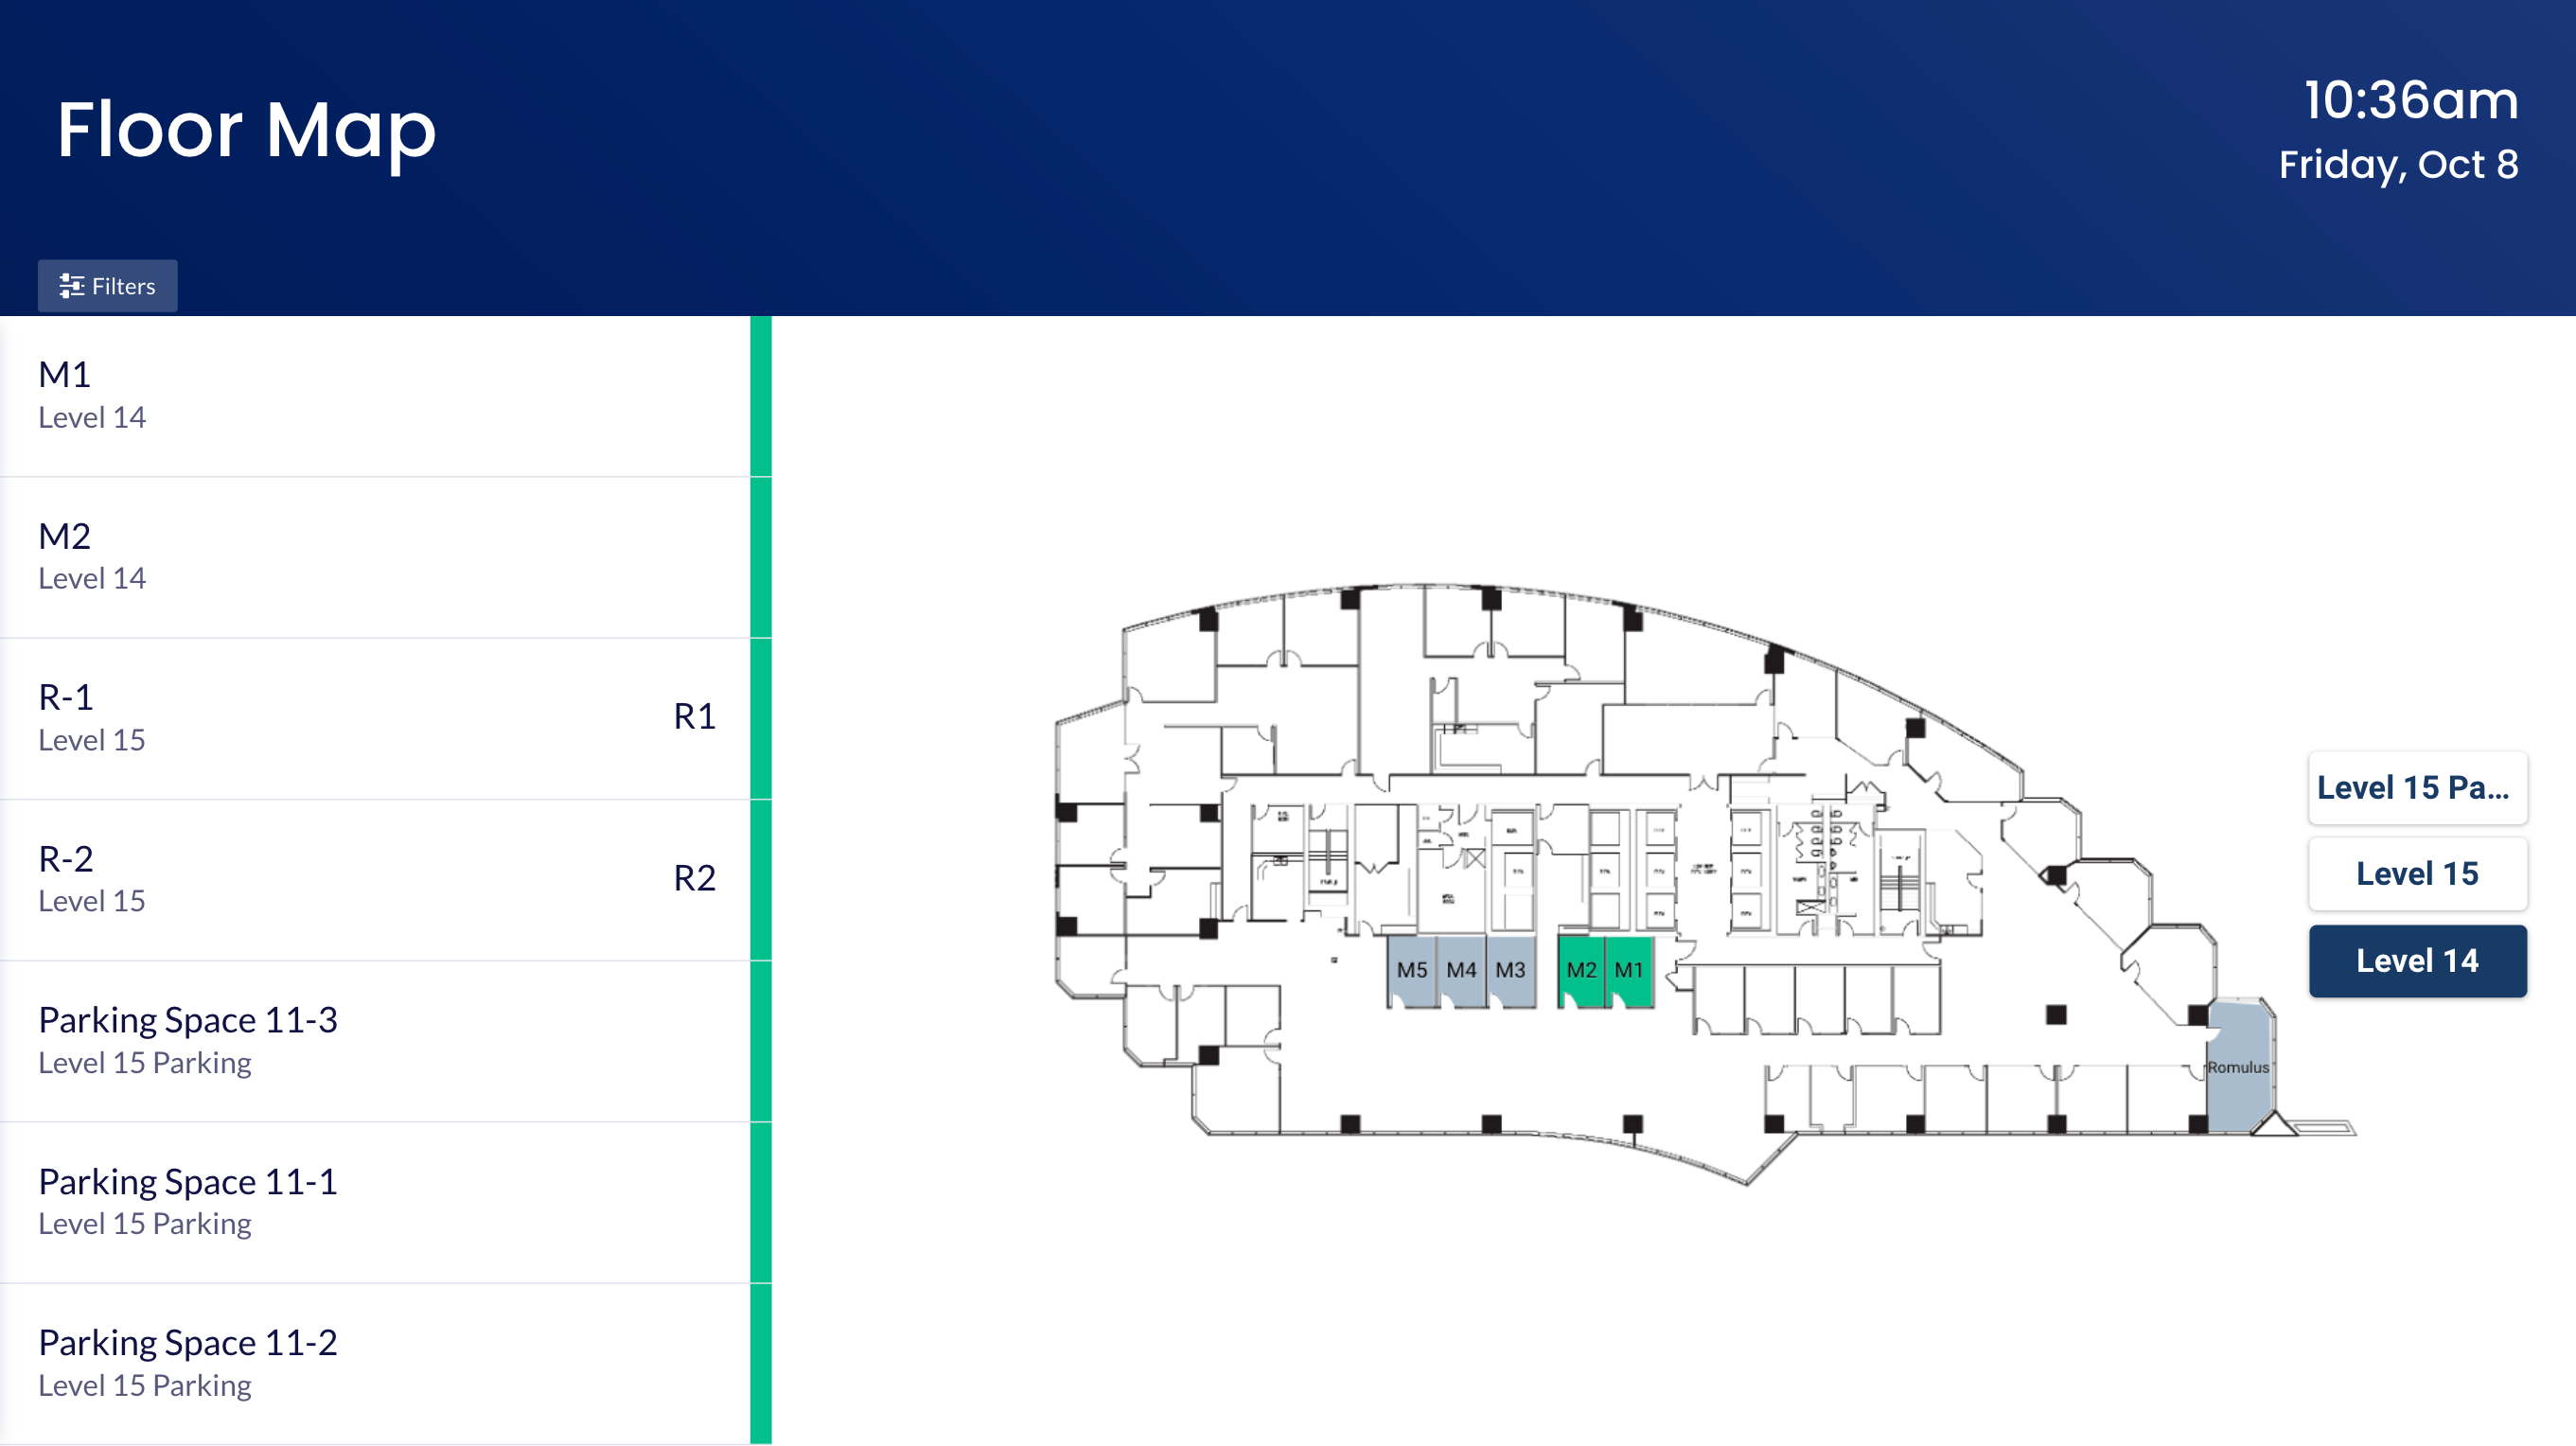
- If a building contains many floors, users can select the floor to identify the available rooms or resources located on that floor.
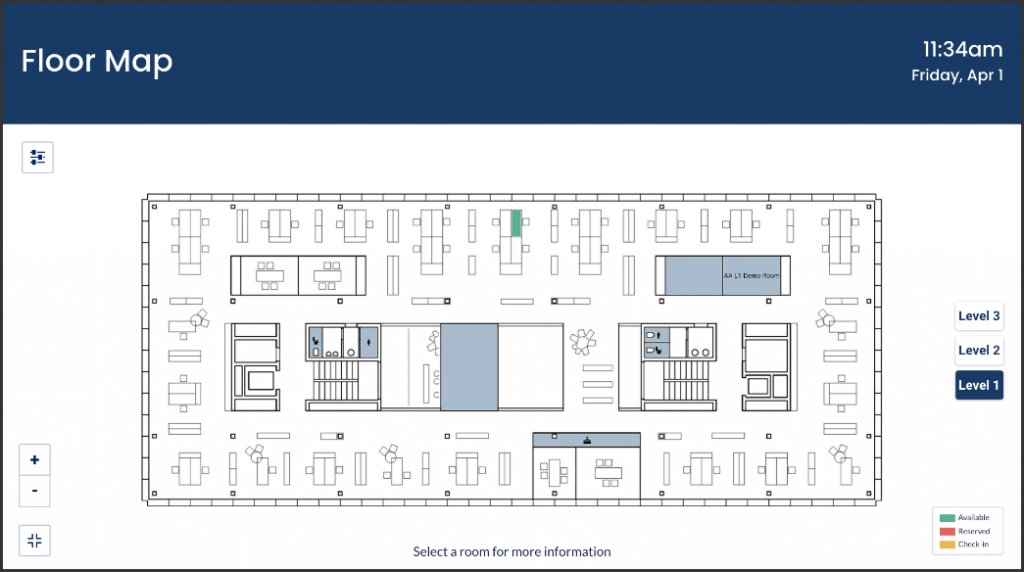
- By default, the map will display the First/Ground floor as the default floor of the building, unless the “You are Here” indicator is configured, then that floor will be displayed on the map when a user first accesses the Schedule Board card.
- First/Ground floor can be configured as Floor Level 0 in the location setting for the floor plan.
- If the Floor Level is not set, the First/Ground floor will be sorted (descending) accordingly based on the floor description.
- The map will display all resources within the floor first in alphabetical order, and then followed by the rest of the resources in other rooms.
- If there are more than 2 maps with the same Floor Level configured, for instance if the “Level 15” office area, and “Level 15 Parking” space area are on the same Floor Level, then these floors will be sorted and displayed based on their floor names.
- By default, the map will display the First/Ground floor as the default floor of the building, unless the “You are Here” indicator is configured, then that floor will be displayed on the map when a user first accesses the Schedule Board card.
- When a booking is made or canceled, the room color on the floor plan reflects the current room status.
- Users are able to utilize the Filter by option in order to filter rooms based on Status and Floors. (Filtering support for Facilities and Zones would be coming soon)
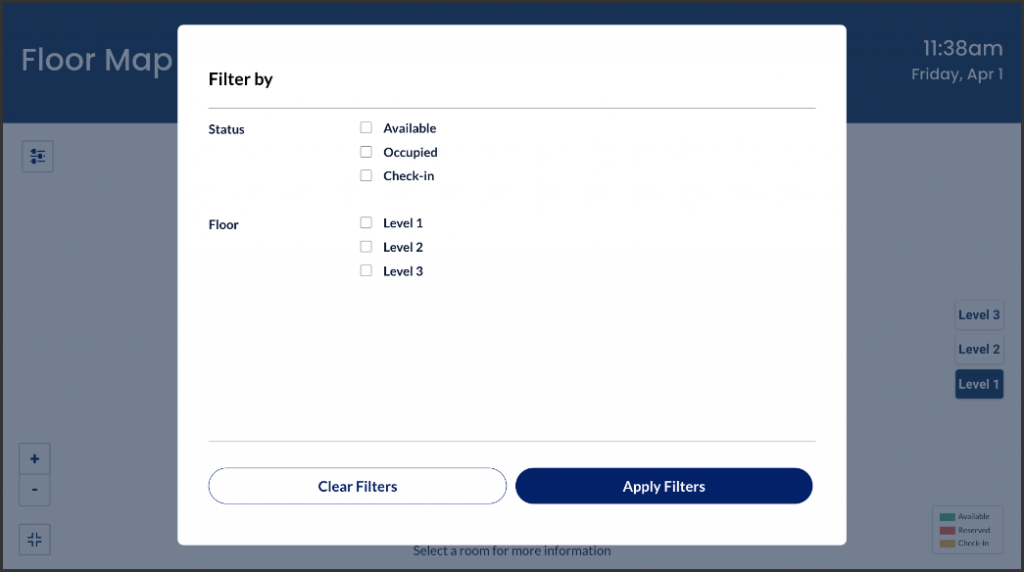
- Once a user selects a floor(s) to be filtered, the resource list on the left panel will automatically display all resources within the floor(s) in alphabetical order.
- Users are able to quickly identify the room’s availability and location instantly, as the room color on the floor plan reflects the current room status:


Navigating Schedule Board with Map and Listing
The instructions below show you how to navigate the Schedule Board with map and listing.
The Schedule Board card is displayed in the map layout, allows users to make room bookings instantly while providing them a graphical view of where the rooms are located and its availability.
The booking functions are the same as the regular schedule board, for more information, please refer to the Book Multiple Meeting Rooms Instantly on Schedule Board article.
-
- Users are able to quickly identify the room’s availability and location instantly, as the room color on the floor plan reflects the current room status:
- Green – Room available for booking.
- Red – Room is occupied.
- Yellow – Room is waiting to be checked in.
- Grey – Unmapped resources, rooms, or POI (Point of Interest) that can’t be booked.
- Users can click on the room name, or the location of the room in the floor plan to view information, or to make a booking.
- If a building contains many floors, users can select the floor to identify the available rooms or resources located on that floor.
- By default, the map will display the First/Ground floor as the default floor of the building, unless the “You are Here” indicator is configured, then that floor will be displayed on the map when a user first accesses the Schedule Board card.
- First/Ground floor can be configured as Floor Level 0 in the location setting for the floor plan.
- If the Floor Level is not set, the First/Ground floor will be sorted (descending) accordingly based on the floor description.
- The map will display all resources within the floor first in alphabetical order, and then followed by the rest of the resources in other rooms.
- If there are more than 2 maps with the same Floor Level configured, for instance if the “Level 15” office area, and “Level 15 Parking” space area are on the same Floor Level, then these floors will be sorted and displayed based on their floor names.
- By default, the map will display the First/Ground floor as the default floor of the building, unless the “You are Here” indicator is configured, then that floor will be displayed on the map when a user first accesses the Schedule Board card.
- When a booking is made or canceled, the room color on the floor plan reflects the current room status.
- Users are able to utilize the Filter by option in order to filter rooms based on Status and Floors. (Filtering support for Facilities and Zones would be coming soon)

- Once a user selects a floor(s) to be filtered, the resource list on the left panel will automatically display all resources within the floor(s) in alphabetical order.
- Users are able to quickly identify the room’s availability and location instantly, as the room color on the floor plan reflects the current room status:
Edit Schedule Board Card with Maps
The instructions below show you how to edit a Schedule Board card with maps.
- Log in to the Appspace console.
- Click Library from the ☰ Appspace menu, and select a library or folder containing the content you wish to edit.
- Select and click the Schedule Board card to edit, and select the desired tab to edit or view.
- In the Edit, Article, and Settings tabs:
- You may edit the content the same way as it was configured. For detailed instructions on how to do this, please refer to the Create Schedule Board Card with Maps section above.
- In the Preview tab:
- Preview how the content is displayed on your device.
- In the Channels tab:
- You may add the content to a channel by selecting the channel from the Add to channel drop-down menu, or leave it unassigned to be added later.
- When the content is assigned to a channel, the SCHEDULING and DISPLAY PROPERTIES options are displayed. Refer to the Configure Content Playback Properties: Dayparting, Frequency, Scheduling, in a Playlist Channel article for detailed configuration instructions.
- In the Analytics tab:
- View the individual content analytics in this tab. For more information, please refer to the Individual Content Analytics section of the Analytics article.
- In the Edit, Article, and Settings tabs:
- Once done, click SAVE.
Was this article helpful?