The Alert card can be used to display important or critical messages quickly using our pre-built custom templates, via a playlist channel and displayed instantly or at scheduled times. Users can also build the card and use it with the Appspace Alerts broadcasting system, allowing businesses to quickly broadcast critical information such as evacuation notices, fire alerts, weather warnings, and a whole assortment of other messaging to alert users instantly over their network.
As an example, retail stores can even re-purpose and customize the Alert card to notify and redirect customers to sections of their store where there’s going to be an extra 5% off in that hour.
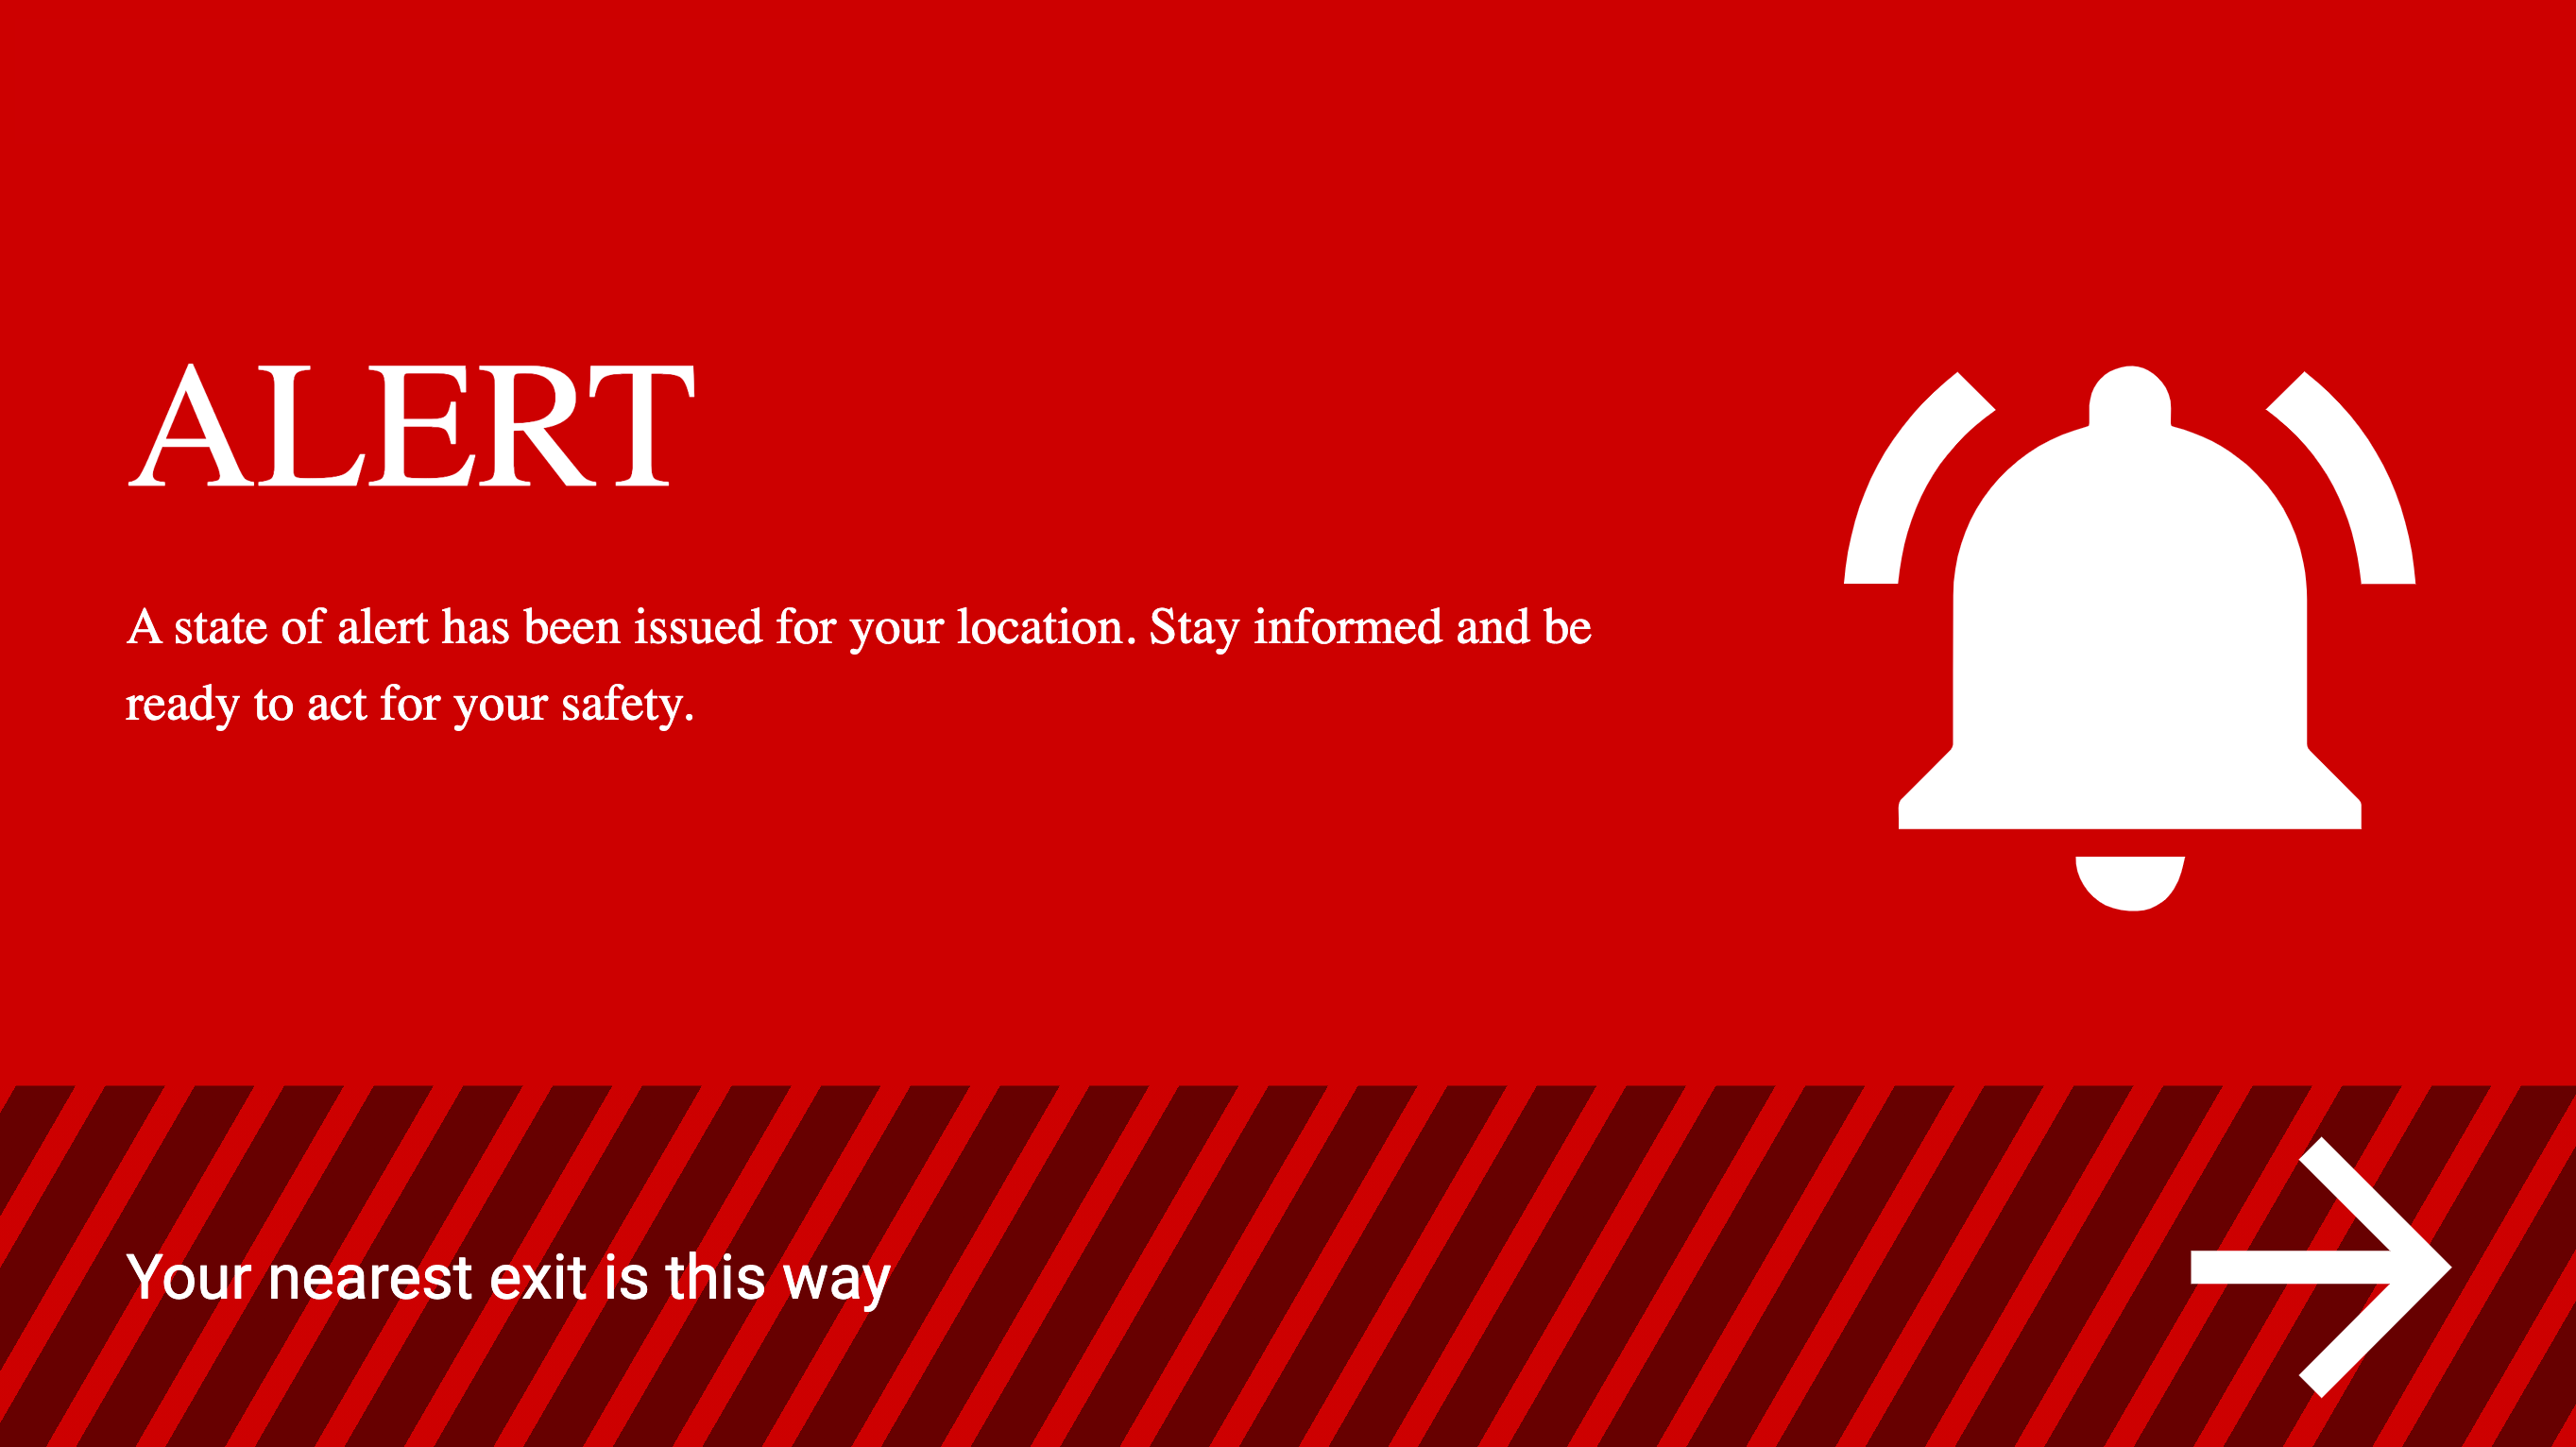
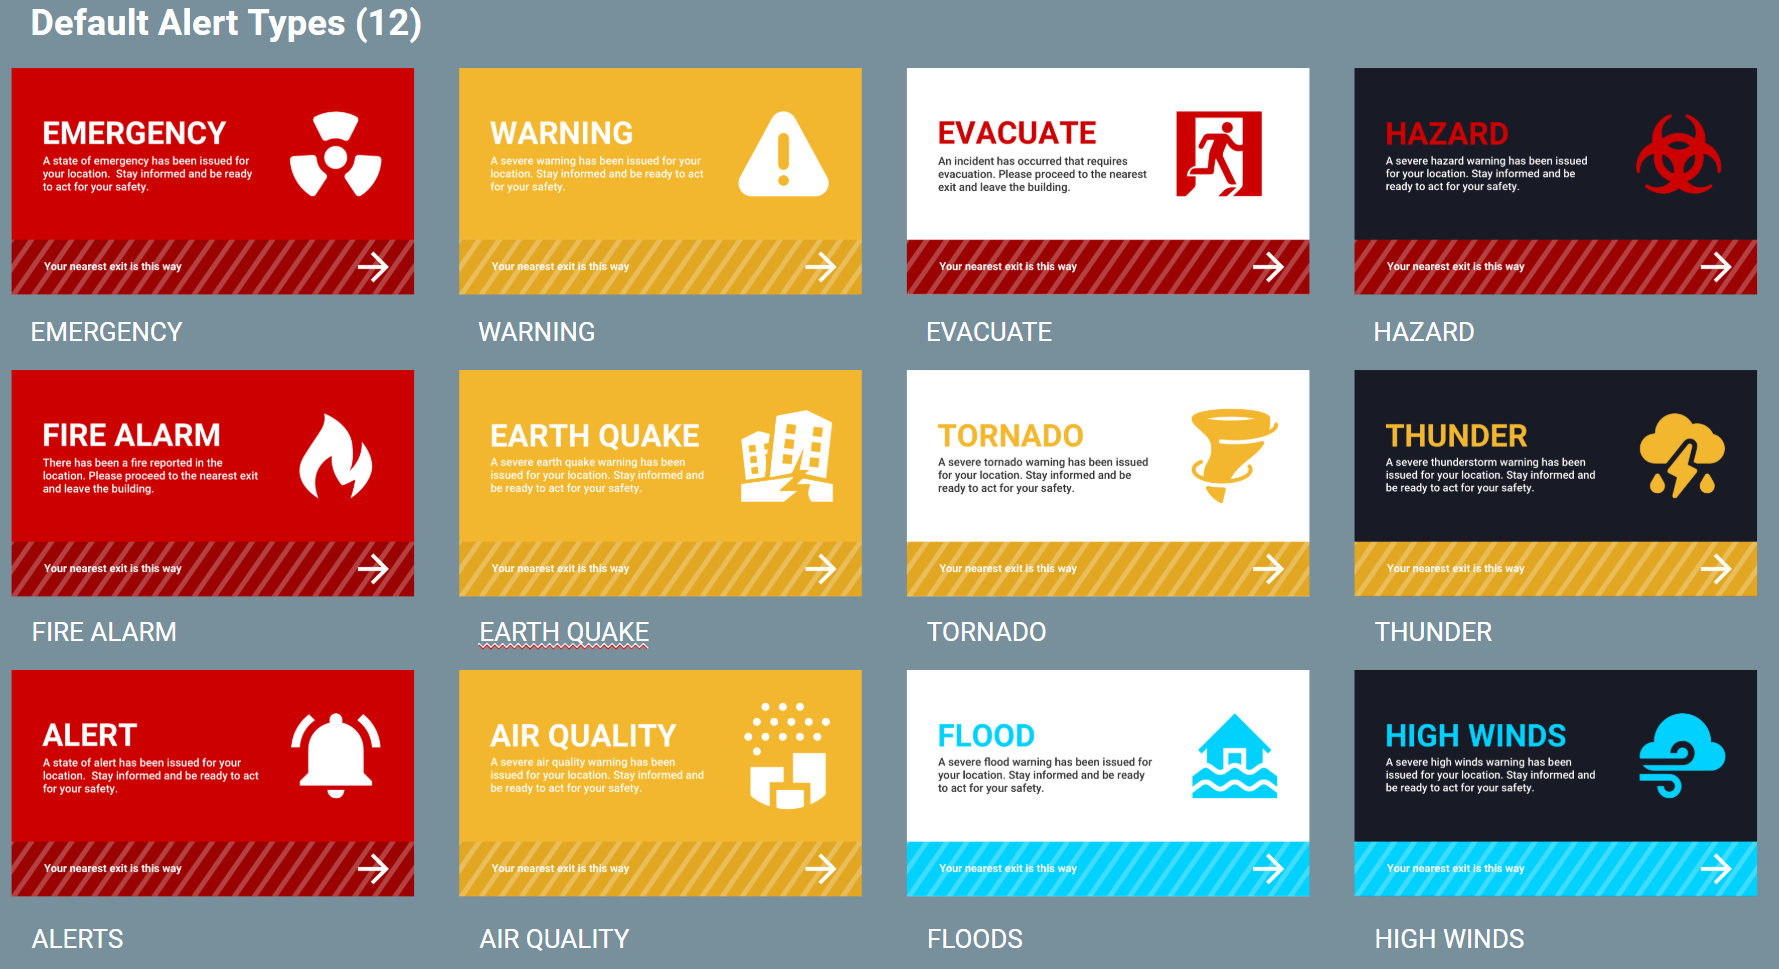
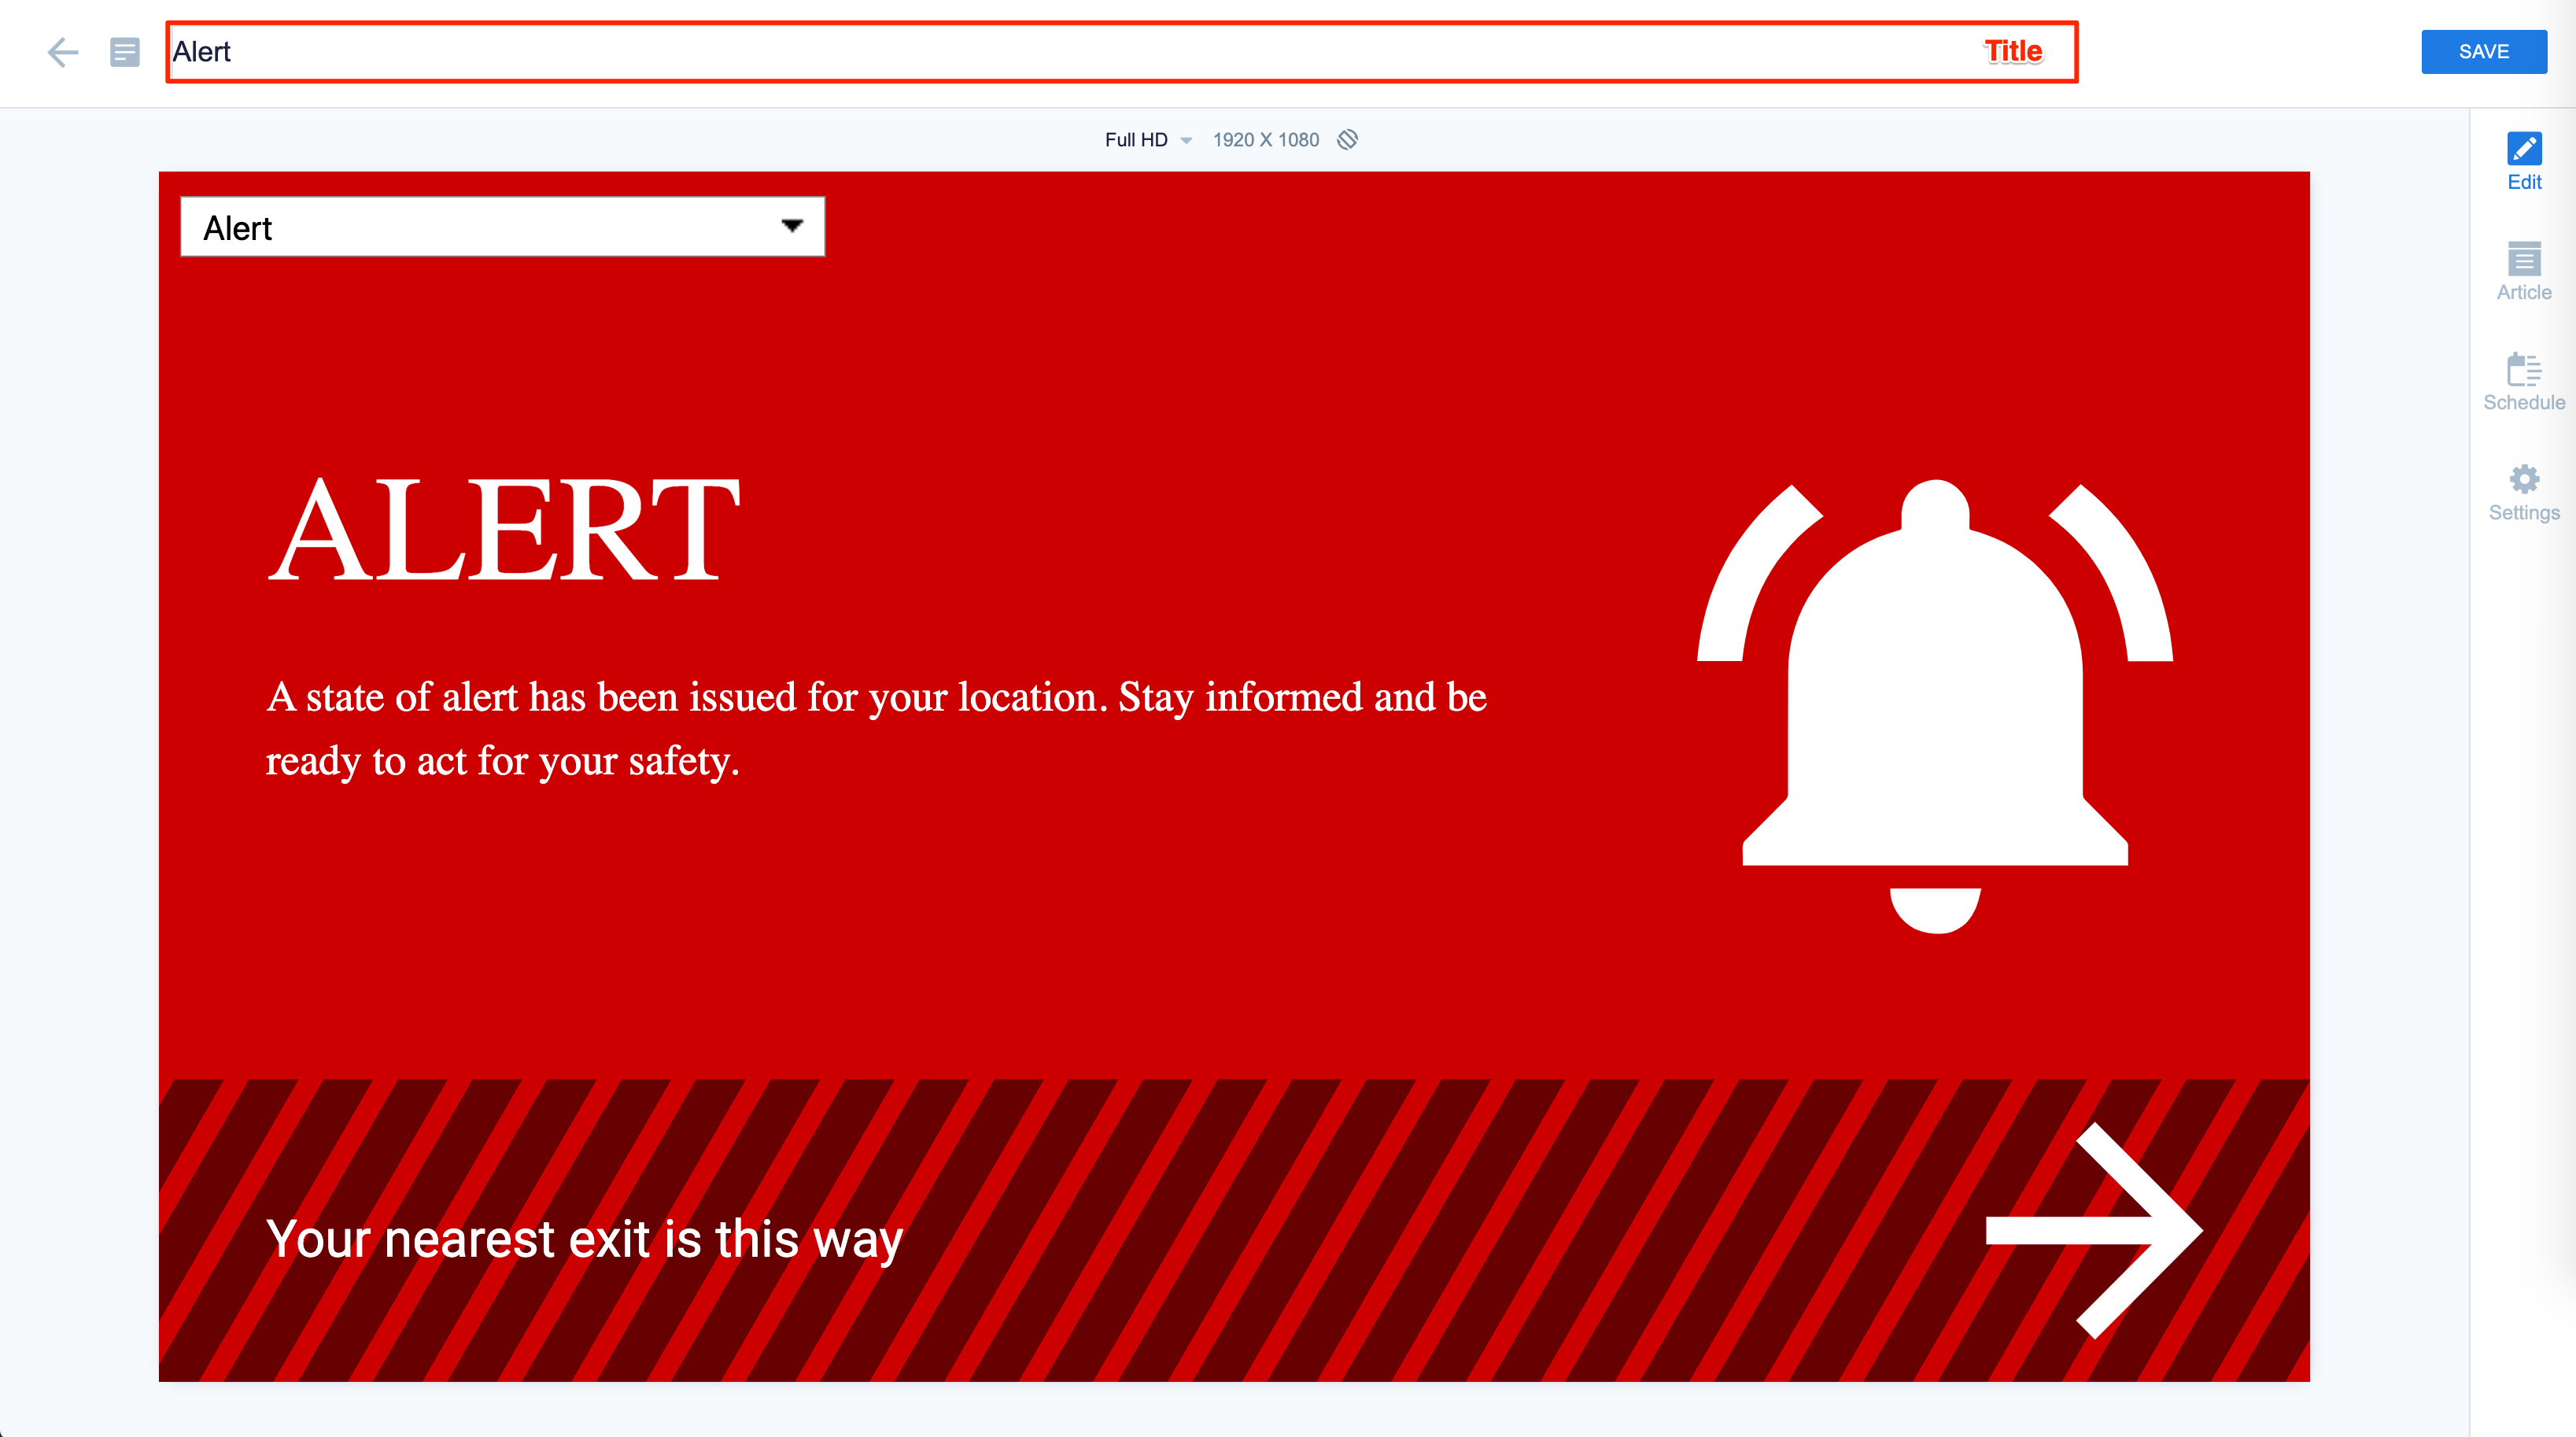
The base Alert card provides users with 12 available templates consisting of three different alert levels, which are Critical (Red), Warning (Yellow), and Information (Blue), that they can create and configure to display important or critical messages. Users can also add this card to an Alert broadcast, where it can be displayed immediately through a trigger URL, or at a scheduled time.
Apart from the basic card customizations, the following customizations and features are available for the Alert card:
- With the introduction of Content Categories in Appspace 8.0 ac.22, the Alert card is assigned with the Safety & Compliance content category.
- The three default Alert level colors (red, yellow, blue) can be customized to any color, apart from the three color themes (regular, light, dark).
- Custom alert messages can be added manually, or by uploading a .xlsx file, with the following header rows:
- Title
- Summary
- Graphic
- Theme Style
- Exit Building
- Custom graphics can be uploaded. Supported image formats: JPEG, PNG, SVG (recommended).
- Exit building directions can be defined on the device, allowing one card to be displayed while still pointing to the correct exit point during an emergency.
The Alert card is an Appspace supported card, which is officially created and periodically updated by Appspace with new templates and features.
Visit our Appspace Card Gallery to find the perfect card to deliver your message.
This article provides instructions on how to create, configure, and customize the Alert card, and finally add it to Alerts.
What’s in this article:
Prerequisite
- Ensure your device is compatible. Refer to the Supported Appspace Cards article.
- Account Owner, Portal Admin, or Location Admin roles to create and customize the Alert card, and for wayfinding.
- Account Owner, Portal Admin, Publisher (Editor), or Author roles to add or edit content in Library.
Customize Alert Theme
Follow the instructions below to customize the card:
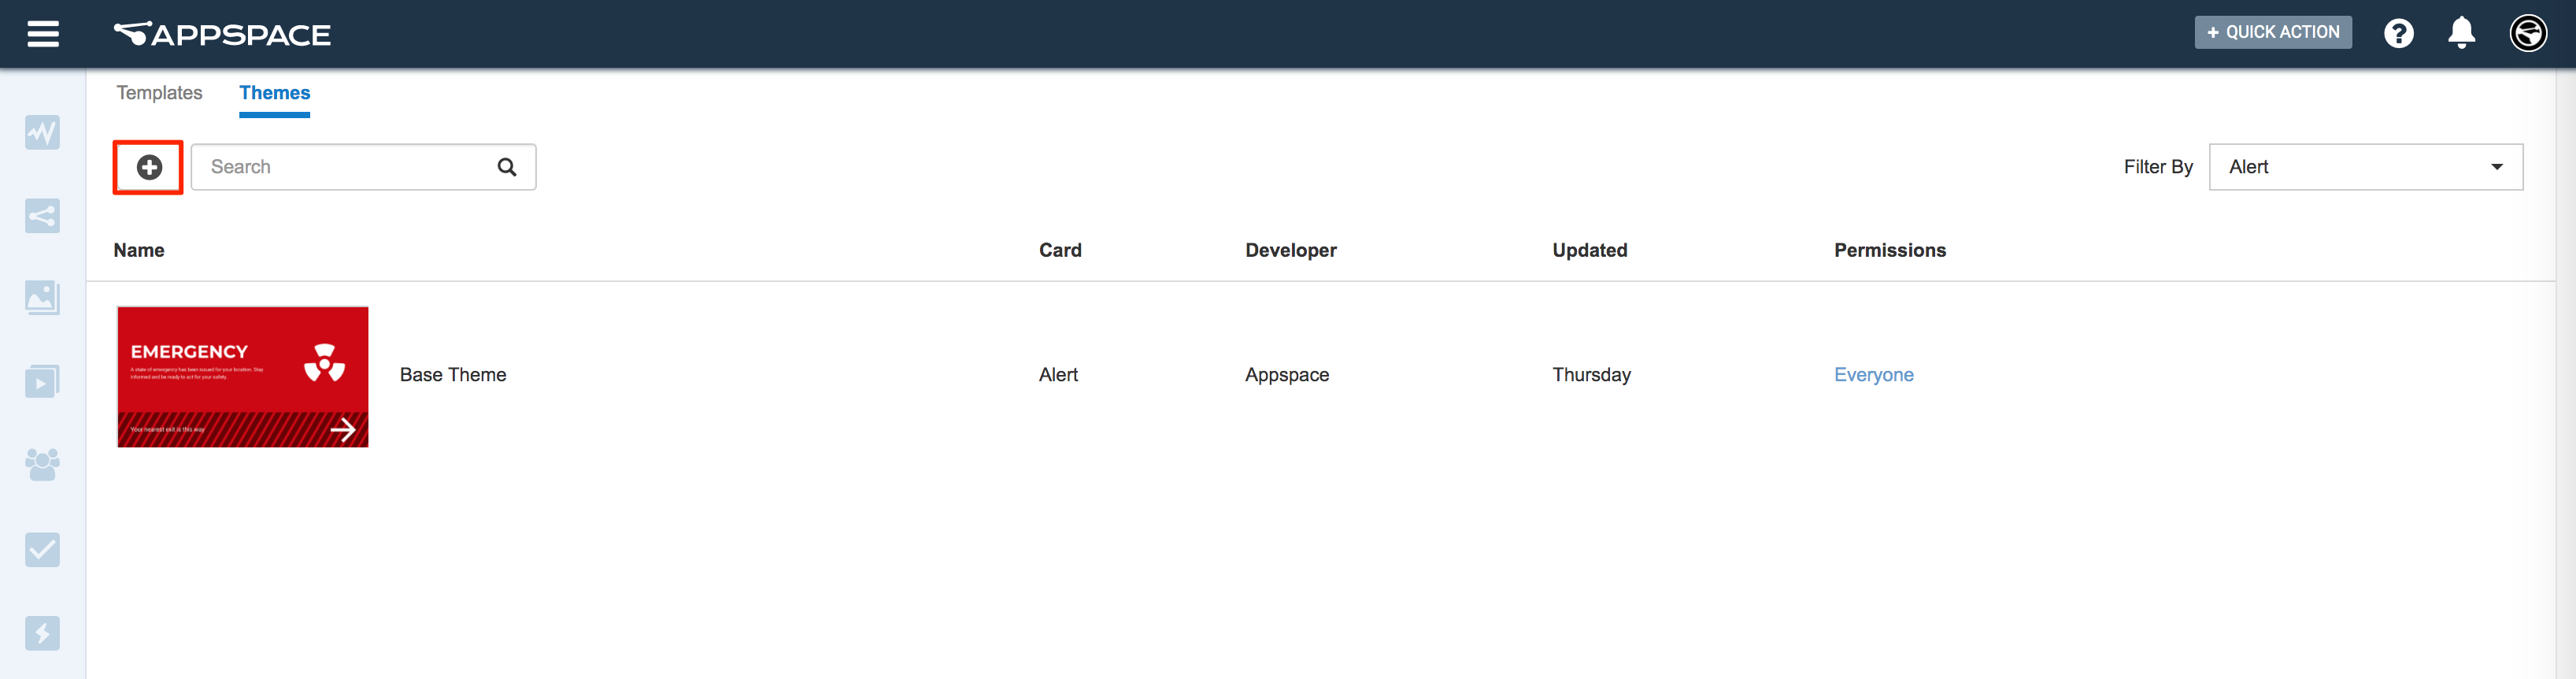
- Log in to your Appspace console.
- Click Library > Cards from the ☰ Appspace menu, and click the Themes tab.
- Click the Add icon, and select Create Theme.
- Select the Alert card template from the drop-down menu, and click Next.
- Enter in the Theme title of the card theme.
- Proceed to make the following customizations:
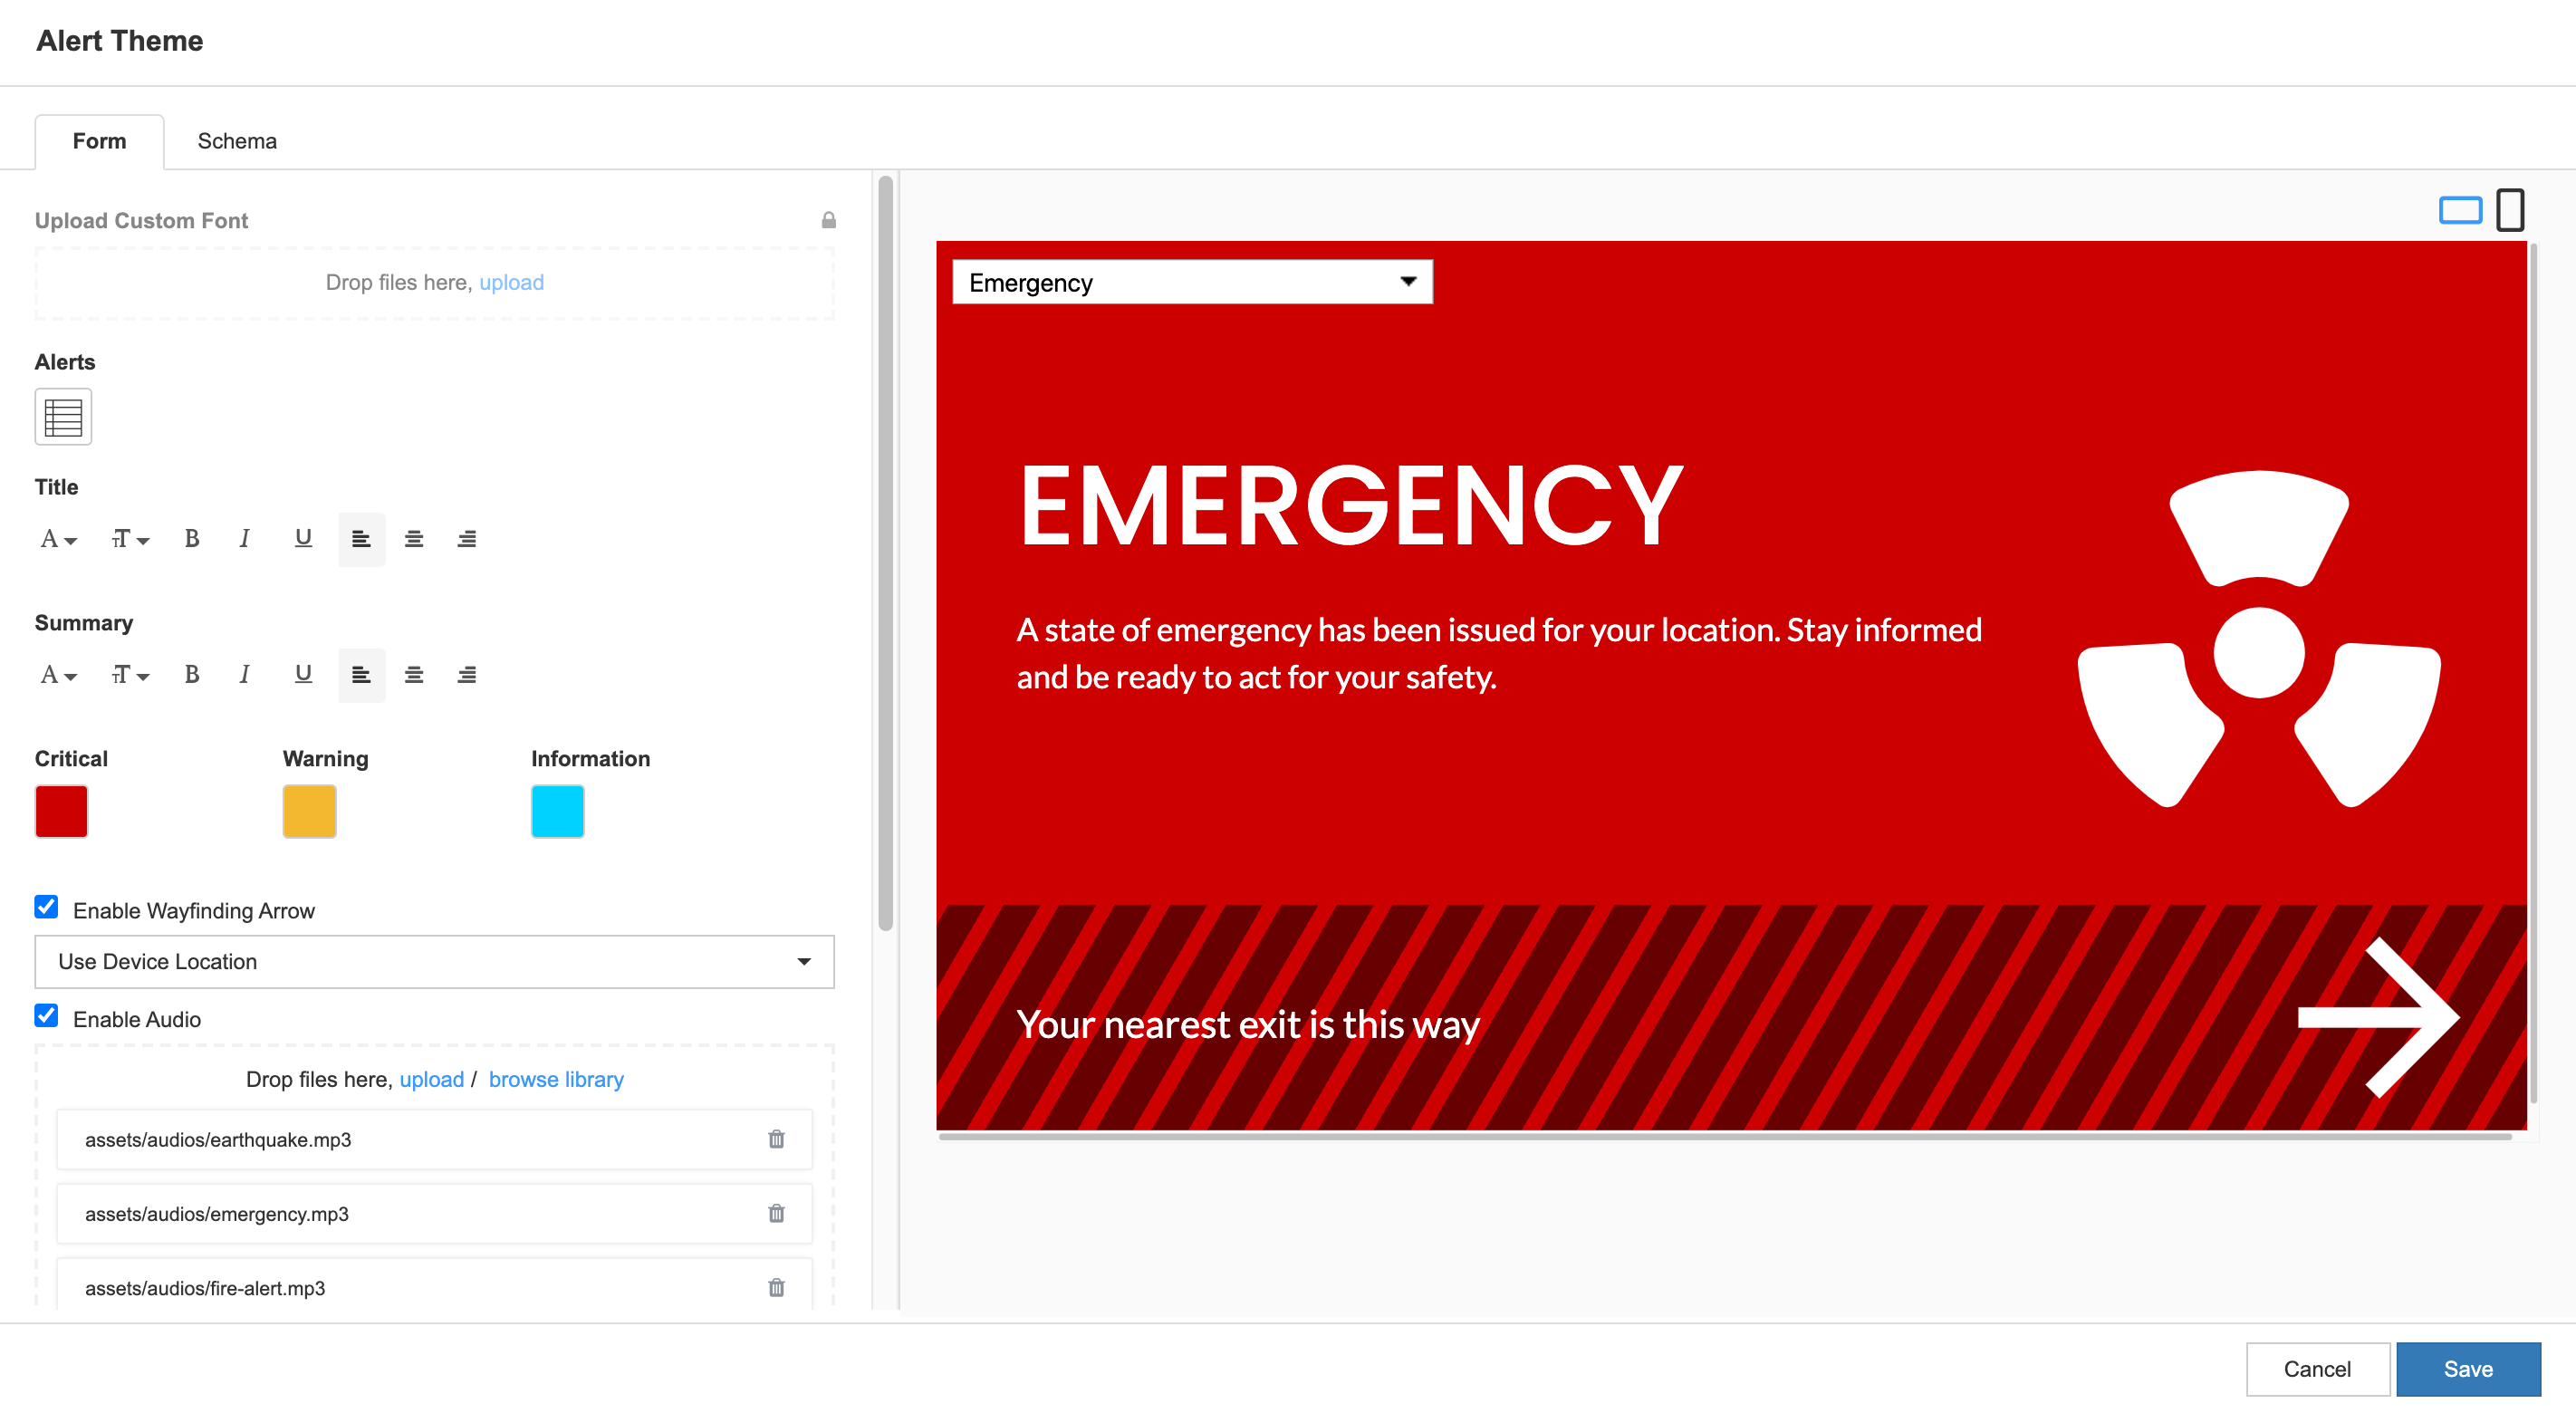
- Upload a Custom Font.
- Customize the Title and Summary text style.
- Customize the respective Alert level colors.
- The Enable Wayfinding Arrow checkbox is enabled by default. Optionally, you may configure the wayfinding (exit building direction) arrows by selecting one of the following options:
- Use Device Location – If this option is selected, please follow the instructions in the Customize Wayfinding (Exit Building Direction) Arrows section below to configure the Appspace devices that will be displaying this Alert card.
- Right – Displays a right arrow.
- Left – Displays a left arrow.
- Up – Displays an up arrow.
- Down – Displays a down arrow.
- The Enable Audio checkbox is enabled by default. Optionally, you may use the existing audio alert sounds, or upload up to 20 mp3 audio files to be used as custom alert alarms for each alert type.
- To add or edit the alert messages, click the Alerts Table Data icon.

- You may edit the existing alert message.
- Optionally, you may upload an .xlsx file that has the following header columns:
- Title
- Summary
- Graphic
- Theme Style
- Exit Building
NoteThe cells for Graphic and Exit Building must be left blank.
- Once done, click Save.
Create and Configure Alert Card
The instructions below allow you to create alerts.
- Log in to your Appspace console.
- To create this card, select one of the following options:
- Click +Quick Action from the Appspace menu bar on the top right, and select Create Card.
- Click Library from the ☰ Appspace menu, and select a library or folder you wish to create the content in. Click +CREATE, and select Card.
- To create and add the card directly to an existing channel, refer to Add Content to Playlist Channels.
- Select Communication from the All Templates panel, and click the Alert card. ImportantIf you are unable to locate the content, try using either the Search bar, the Order by, or Filter icon to narrow down the content that you are looking for.
- Enter the Title of the content as this will also act as the filename for the content. This is a mandatory field.
- In the Edit tab:
- Select the desired alert messaging from the drop-down menu on the card.
NoteThe Alert alarm sounds can be heard, if the Alert alarm sounds have been enabled for the selected alert messaging by the Account Owner or Portal Admin. This can be enabled or disabled when Customizing the Alert Theme.
- Select the desired alert messaging from the drop-down menu on the card.
- In the Article tab:
- Include an Article or Caption to accompany the content item when being displayed on mobile apps, tablets, and other social collaboration apps.
- Enter a Referral Link to link more information to the content.
- In the Schedule tab:
- You may add the content to a channel by selecting the channel from the Add to channel drop-down menu, or leave it unassigned to be added later.
- When the content is assigned to a channel, the SCHEDULING and DISPLAY PROPERTIES options are displayed. Refer to the Configure Content Playback Properties: Dayparting, Frequency, Scheduling, in a Playlist Channel article for detailed configuration instructions.
- In the Settings tab:
- The Name field will be auto-populated to match the Title of the content which will also act as the filename for the content. This is a mandatory field.
- Select the Content Category from the drop-down menu to match the focus of the message, or leave it at the default content category.
- Enter any relevant Tags for the content. (Optional)
- Select a folder for the content in the Library Location drop-down menu to change the default folder location.
- Select an expiry date for the content from the Auto Delete Content from Library drop-down menu. (Optional)
- Upload an image to be used as the Thumbnail for the content.
- Once done, click SAVE.
- You may now add the card to a playlist channel or choose to configure alerts broadcast settings.
Customize Wayfinding (Exit Building Direction) Arrows
Follow the instructions in the Add Device Properties article, to add the following device property and value to configure the device displaying the Alert card.
- To define the Exit Building directions of the card, the following device property and value has to be added to the device:
- Device Property: card.alert.exitdirection
- Device Property Value: right / left / down / up / upright / downright / upleft / downleft / elevatorup / elevatordown / escalatorup / escalatordown / stairsup / stairsdown
- This is required to be done on every device that displays the Alert card.
- If the Wayfinding arrow is configured on the theme cards, then it takes precedence over the device property configuration.
- Only one device property value can be supported at one time on a single device.
- If there is no device property, the bottom banner with the direction on the card will be disabled.
Edit Alert Card
The instructions below show you how to edit an Alert card.
- Log in to your Appspace console.
- Click Library from the ☰ Appspace menu, and select a library or folder containing the content you wish to edit.
- Select and click the Alert card to edit, and select the desired tab to edit or view.
- In the Edit, Article, and Settings tabs:
- You may edit the content the same way as it was configured. For detailed instructions on how to do this, please refer to the Create and Configure Alert Card section above.
- In the Preview tab:
- Preview how the content is displayed on your device.
- In the Channels tab:
- You may add the content to a channel by selecting the channel from the Add to channel drop-down menu, or leave it unassigned to be added later.
- When the content is assigned to a channel, the SCHEDULING and DISPLAY PROPERTIES options are displayed. Refer to the Configure Content Playback Properties: Dayparting, Frequency, Scheduling, in a Playlist Channel article for detailed configuration instructions.
- In the Analytics tab:
- View the individual content analytics in this tab. For more information, please refer to the Individual Content Analytics section of the Analytics article.
- In the Edit, Article, and Settings tabs:
- Once done, click SAVE.
Was this article helpful?