This article provides the instructions to download, install, and configure the operating system, prerequisite software, and Appspace software for a fresh installation of an Appspace 8.0 on-prem deployment.
Please follow the instructions in this order:
Note
To upgrade your existing Appspace on-prem server, please refer to our Upgrade to Appspace 8.0 On-Prem article.
Prerequisites
- Windows Server Administrator permissions.
- Ensure all hardware and software requirements listed in the Appspace 8.0 On-Prem System Requirements article are met.
- Ensure the DNS (Domain Name Server) has been configured with an FQDN (Fully Qualified Domain Name) to be used to identify the Appspace on-prem server.
- Disable any anti-virus software prior to the Appspace server installation, as it may prevent or block certain Appspace installation processes from running, and increase the overall installation time. ImportantIf you are unable to disable the anti-virus software due to company security policies, please configure the anti-virus software to exclude all Appspace folders and databases.
- Disable FIPS on Windows Server 2019 prior to licensing the Appspace server installation, as it may prevent the licensing service from running.
Install and Configure the Operating System
Install Microsoft Windows Server 2019
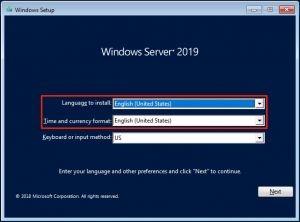
- Install Windows Server 2019 with Desktop Experience (GUI) on your server, as outlined on the Microsoft website: https://docs.microsoft.com/en-us/windows-server/get-started-19/install-upgrade-migrate-19 ImportantEnsure the Time and currency format is set to English (United States), which is also the default setting. This is to prevent a licensing issue between the on-prem server being unable to add the pending license receipt from the cloud server. This may occur due to a date formatting mismatch, where the cloud server is set with the M/d/yyyy date format, while the on-prem server contains a different date format when configured with another locale during the Windows Server 2019 installation.
- Once installation is complete, install all the necessary Windows Server 2019 updates. Important
- Ensure that all Windows Server update installations have been completed before proceeding with the Appspace installation. This is to prevent Windows Server Update background processes to conflict with the Appspace installation process.
- DO NOT disable the Windows Server update service, as this may cause the Appspace installer to encounter errors.
- Once done, proceed to the Configure Microsoft Windows Server 2019 below.

Configure Microsoft Windows Server 2019
- Log in to Windows Server 2019, and launch the Server Manager.
- Click Configure this local server, and disable Internet Explorer Enhanced Security Configurations (IE ESC). This option is enabled by default, and blocks Internet Explorer (IE) from downloading files.
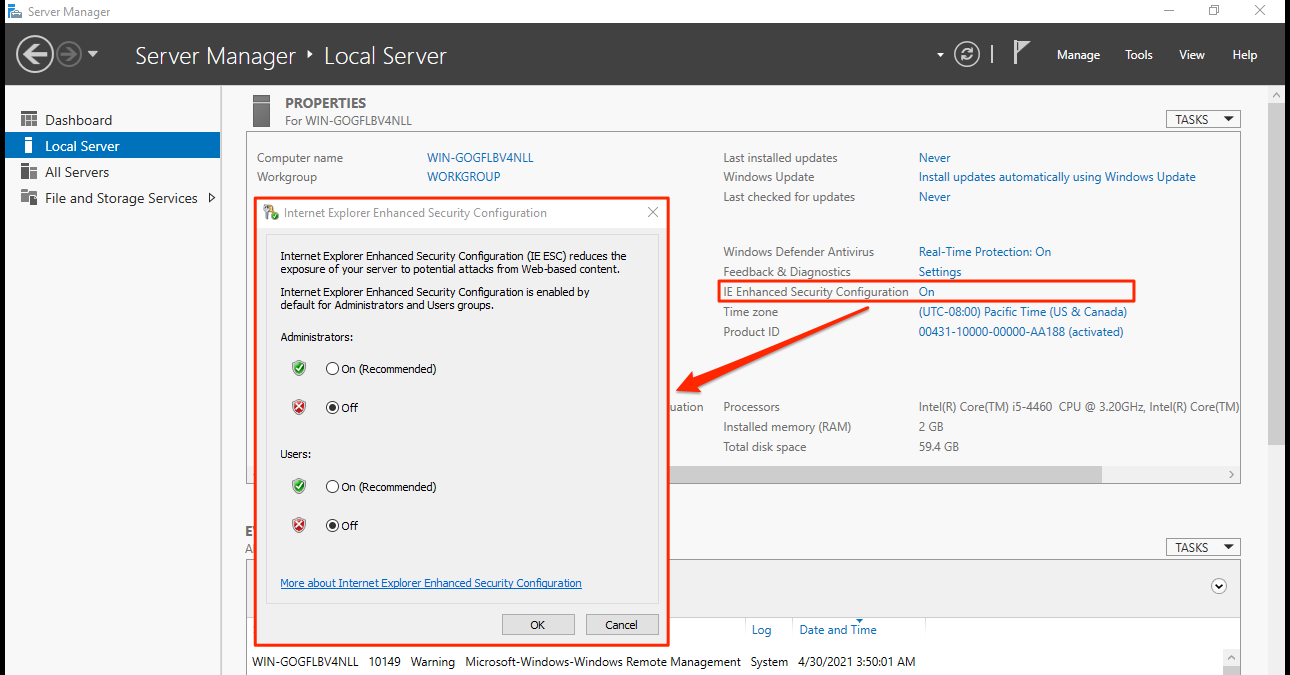
- To disable, click the On link for the IE Enhanced Security Configurations option, and select Off for both Administrators and Users in the window. Once done, Click OK.
- Click Dashboard from the side pane, and click Add roles and features to add the following features:
- For Installation Type, select Role-based or feature-based installation.
- For Server Roles, select Web Server (IIS).
- For Features, select and ensure the following are checked:
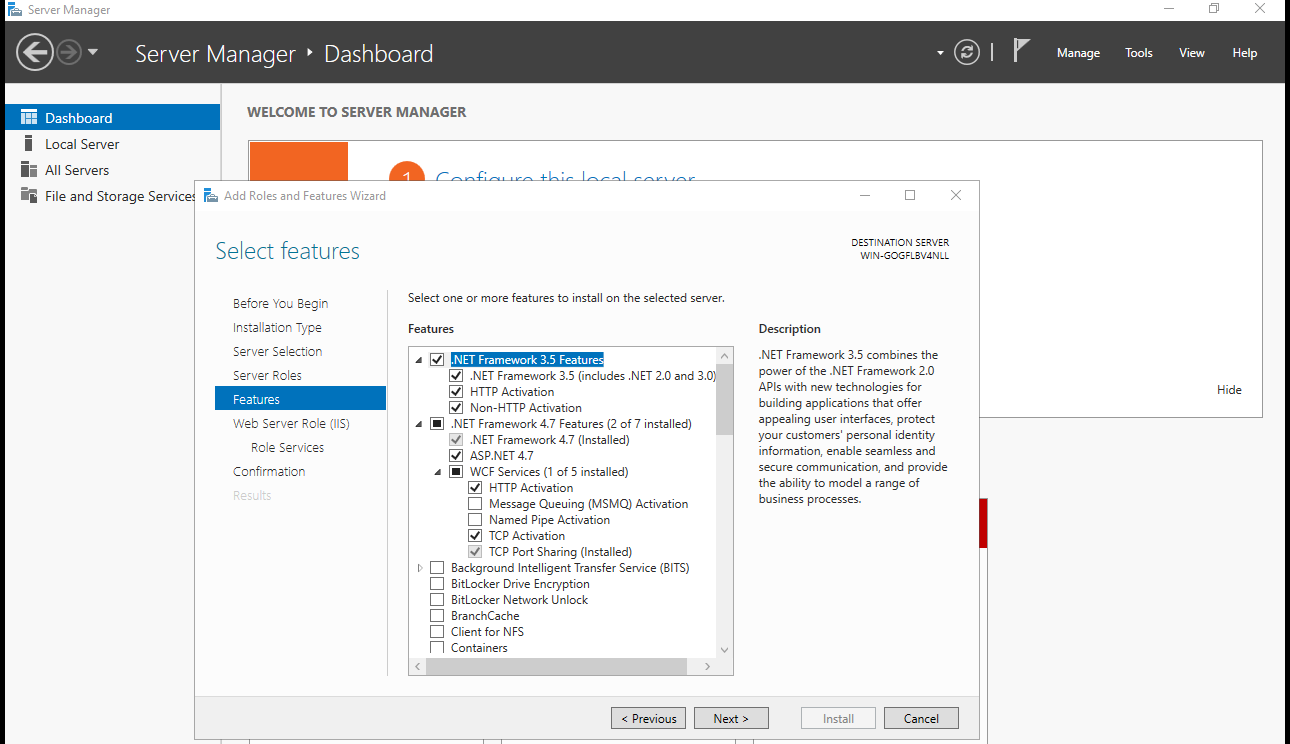
- .NET Framework 3.5 Features
- .NET Framework 3.5 (includes 2.0 and 3.0)
- HTTP Activation
- Non-HTTP Activation
- .NET Framework 4.7 Features
- .NET Framework 4.7 Features
- ASP.NET 4.7
- WCF Services
- HTTP Activation
- TCP Activation
- TCP Port Sharing
- .NET Framework 3.5 Features
- For Web Server Role (IIS) Role Services, select and ensure the following are checked:
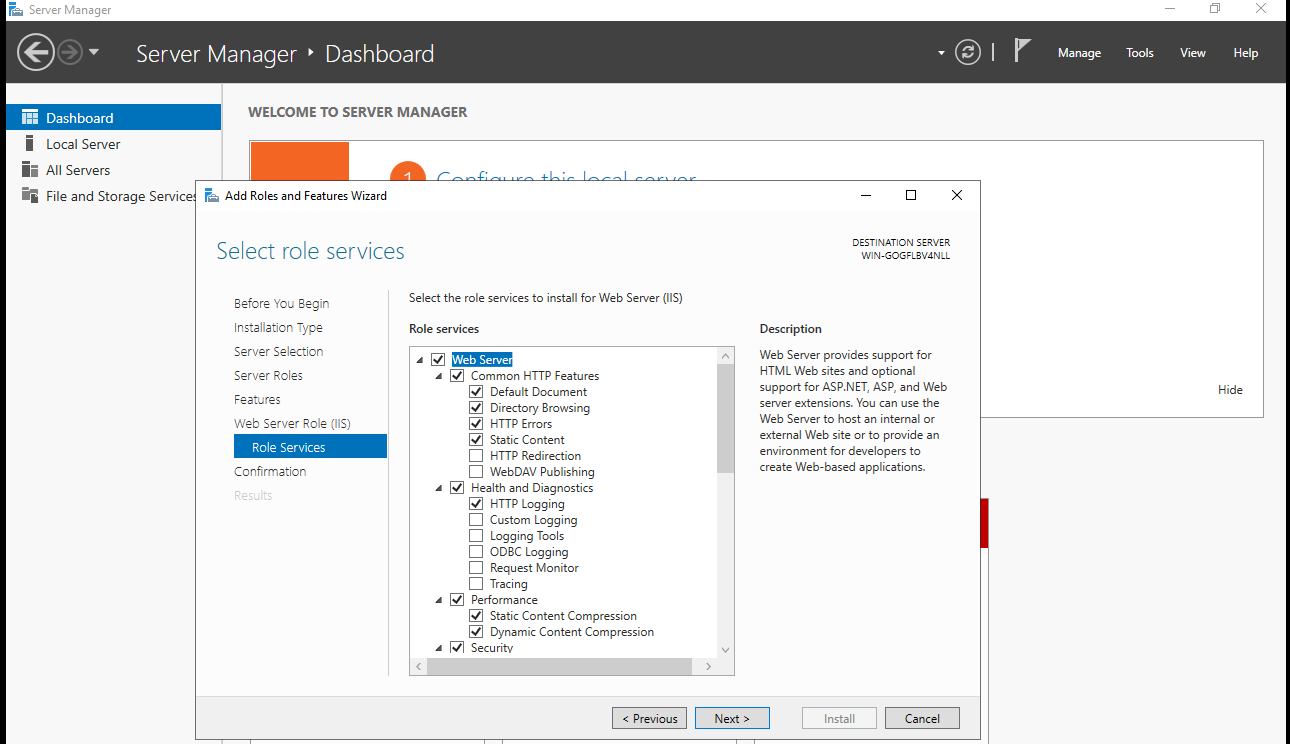
- Web Server
- Common HTTP Features
- Default Document
- Directory Browsing
- HTTP Errors
- Static Content
- Health and Diagnostics
- HTTP Logging
- Performance
- Static Content Compression
- Dynamic Content Compression
- Security
- Request Filtering
- Application Development
- .NET Extensibility 3.5
- .NET Extensibility 4.7
- ASP
- ASP.NET 3.5
- ASP.NET 4.7
- ISAPI Extensions
- ISAPI Filters
- Common HTTP Features
- Management tools
- IIS Management Console
- Web Server
- Once all the server roles and features have been installed, restart Windows Server 2019.
- Log in to Windows Server 2019, and proceed to configure Secure Sockets Layer (SSL) in IIS Manager for the server, by following the instructions here: https://docs.microsoft.com/en-us/iis/manage/configuring-security/configuring-ssl-in-iis-manager
- Once done, proceed to the Configure Folder Permissions section below.
Configure Folder Permissions
Warning
Failure to configure and grant permissions may result in a failed Appspace installation, due to restricted access to the folders on the server.
- C:/Windows/Temp
- C:/Temp
- C:/Appspace
Note
In this example, we will be using the C:/ drive as the default Appspace installation drive. If the Appspace installation is done other than the defaulted C:/ drive, ensure the folders above are created in the respective Appspace installation drive.
- On the Windows Server 2019 server, navigate to one of the folders listed above. If the folder is not available, create the folder in the installation drive (C:/ drive) in the same file structure above.
- Right-click on the folder, and select Properties.
- Click the Security tab, and search for the IIS_IUSRS group in the Group or user names section:
- If it is listed, proceed to Step 6.
- If it is not listed, click Edit.
- In the Edit window, click Add to add the group name.
- In the Enter the object names to select field, enter IIS_IUSRS, and click OK.
- In the Permissions window, select IIS_IUSRS, and check the Allow checkbox for Full Control.

- Once done, click OK, and repeat Steps 1 to 6 on the remaining folders listed above.
- Once done, proceed to the Install and Configure the Database section.
Install and Configure the SQL Database
Download and install your preferred database:- MySQL 8.0 Server – https://dev.mysql.com/downloads/mysql/
- Microsoft Server SQL (MS2019 – https://www.microsoft.com/en-us/sql-server/sql-server-downloads
Warning
- SQL passwords CANNOT contain shell metacharacters such as ! # ’ ” ` & ; or spaces.
- Database credentials CANNOT be changed once Appspace has been installed.
- Database user account CANNOT be deleted once Appspace has been installed.
MySQL 8.0 Server
Install and Configure MySQL Server
Follow the instructions below to install and configure the MySQL Server with MySQL Workbench:
- Install MySQL 8.x on your server, as outlined in the Installing MySQL on Microsoft Windows guide here: https://dev.mysql.com/doc/refman/8.0/en/windows-installation.html
- Ensure the following configuration settings are made:
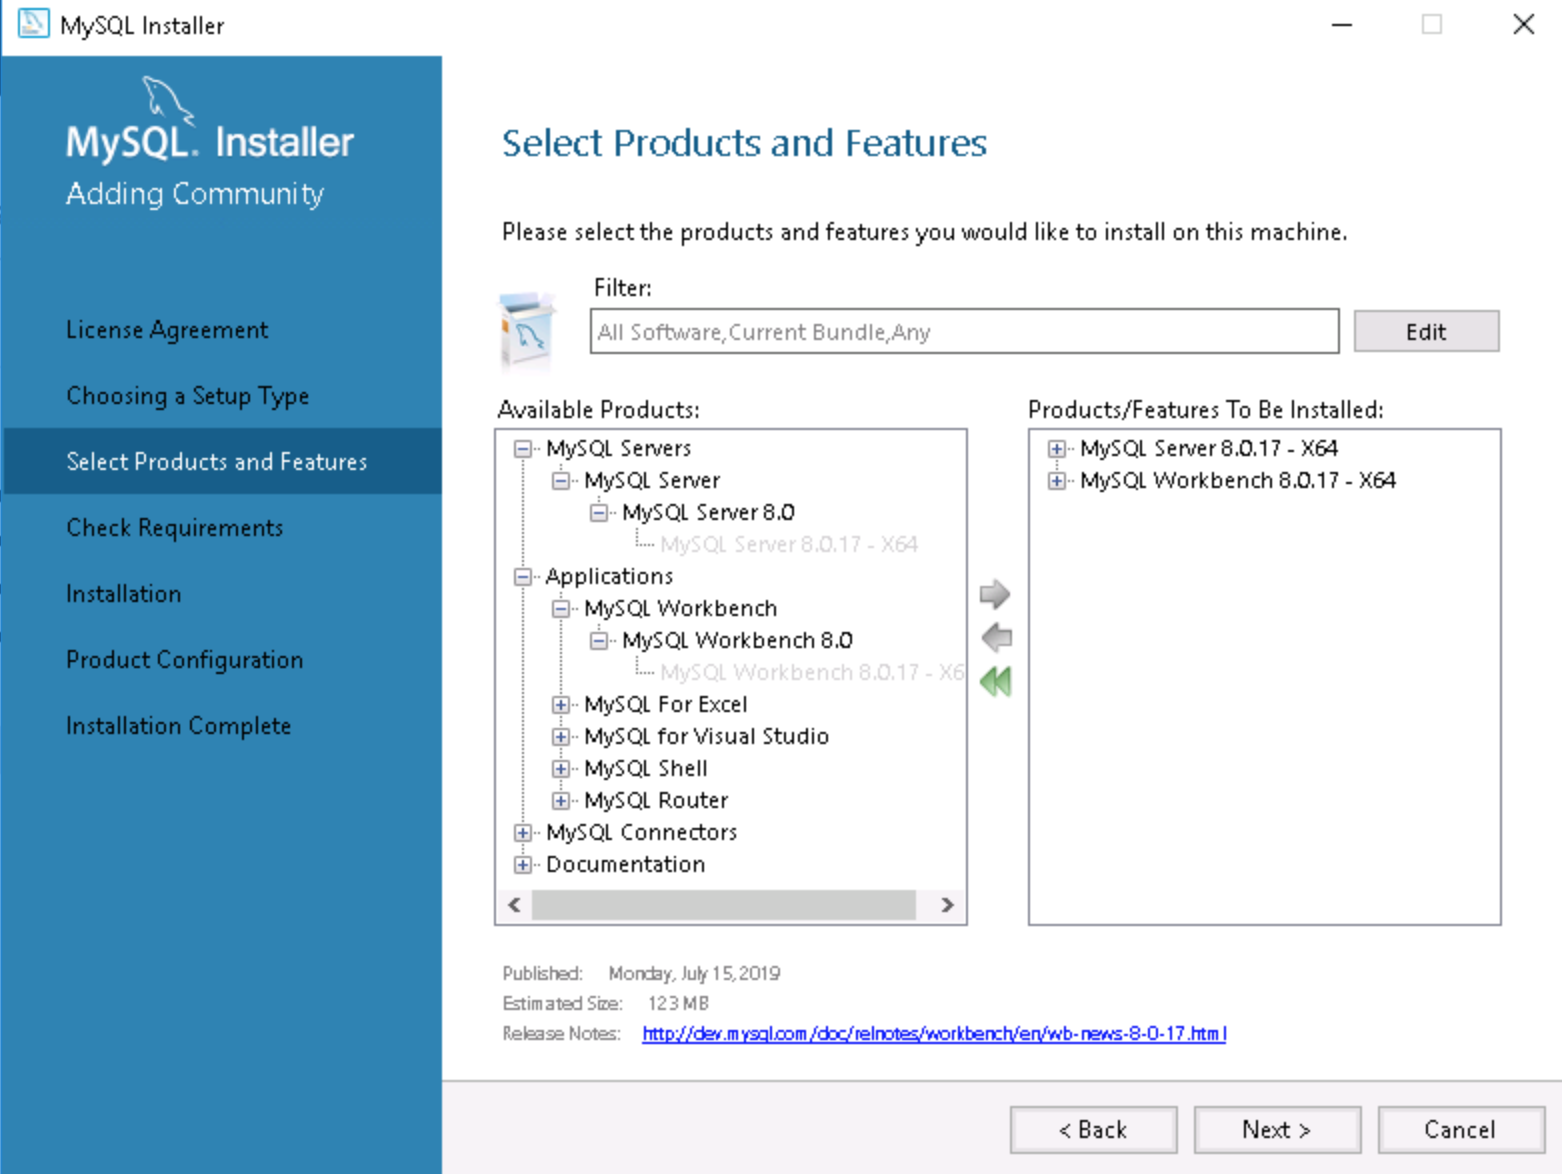
- Select the Custom option on the Choosing a Setup Type window, and click Next to continue.
- On the Select Products and Features window, ensure the following options are selected, and moved under the Products/Features To Be Installed section.

- MySQL Server 8.x (x64 version)
- MySQL Workbench CE 8.0.x (x64 version) WarningOnly select these 2 options. Leave all the other options unchecked. It is important to make sure that the other options (such as MySQL Connectors) are NOT selected during the MySQL installation.
- In the Group Replication window, select the Standalone MySQL Server/Classic MySQL Replication option.
- In the Type and Networking window, do the following:
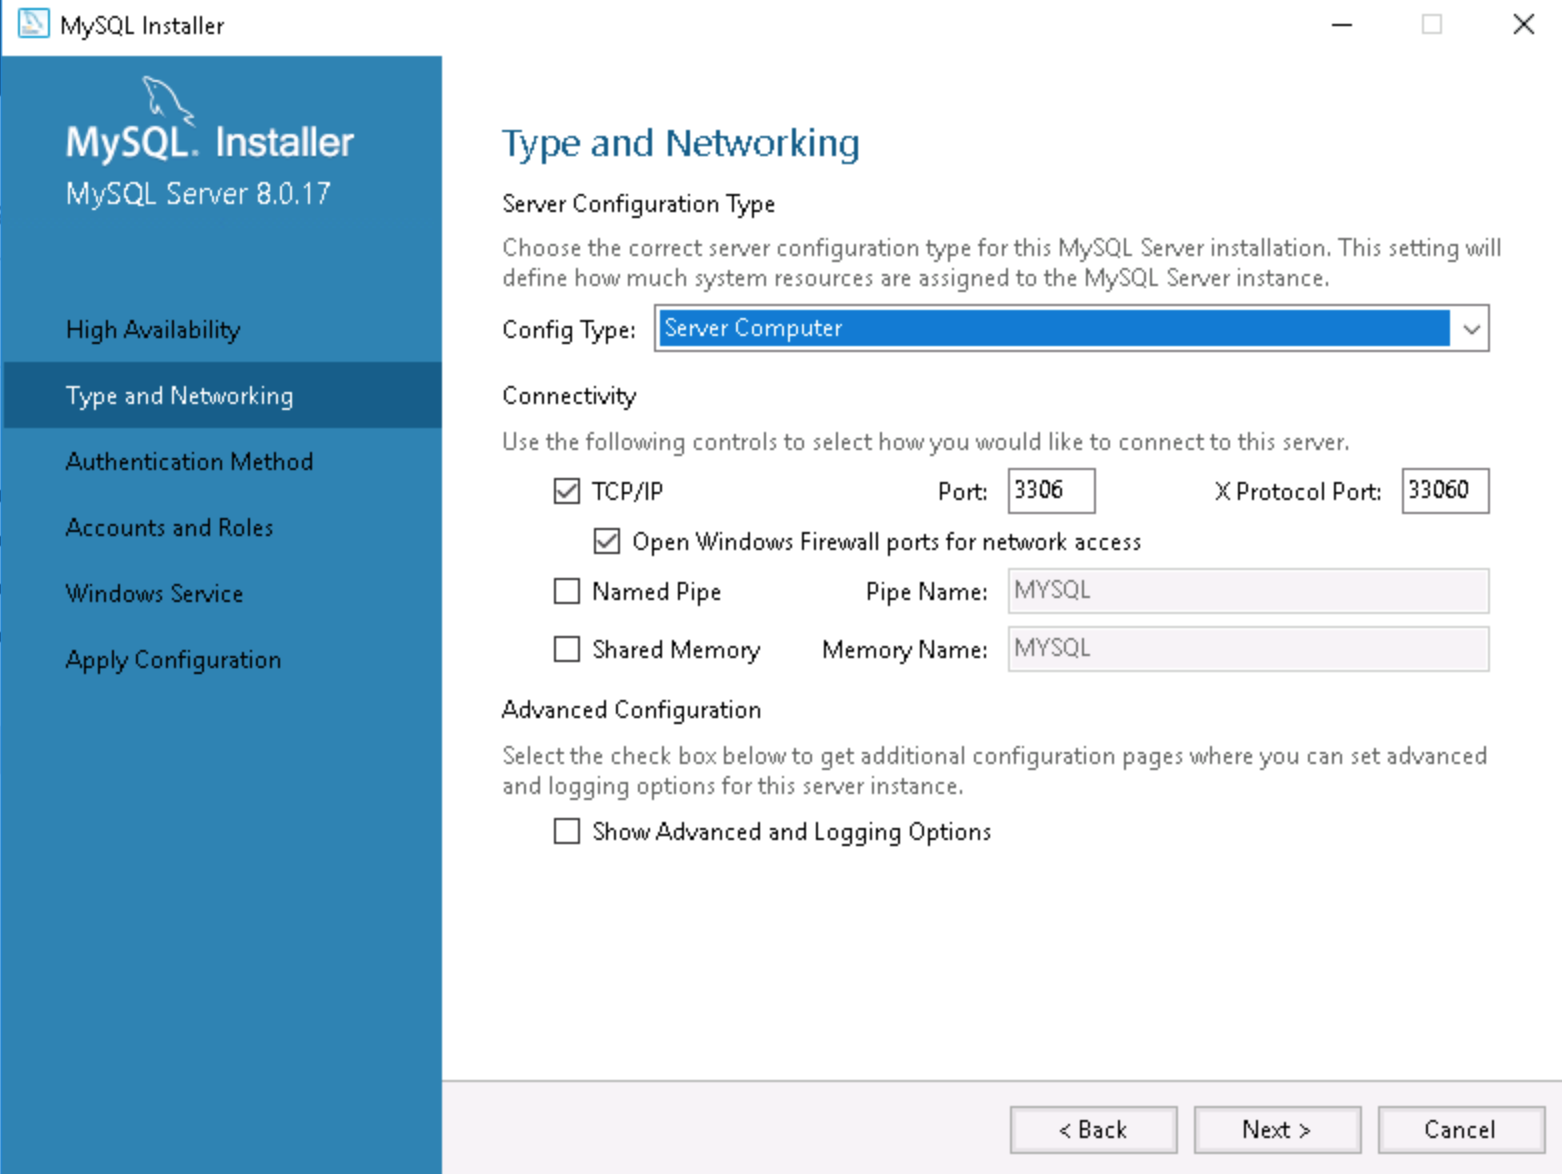
- Select Server Machine from the Config Type drop-down menu.
- Under Connectivity, check the TCP/IP checkbox, and set the Port Number to 3306.
- Check Open Firewall port for network access.
- Check Show Advanced and Logging Options.
- In the Authentication Method window, select the Use Legacy Authentication Method (Retain MySQL 5.x Compatibility) option.
- In the Accounts and Roles window, enter in the MySQL Root Password. WarningSQL passwords should NOT contain shell metacharacters such as ! # ’ ” ` & ; or spaces.
- Proceed to configure the MySQL Workbench by following the instruction in the next section below.
Configure MySQL Workbench
Warning
Ensure the SQL root password created during installation has been granted System Administrator privileges in Windows before proceeding.
- Launch the MySQL Workbench from the desktop.
- Click the Local instance MySQL80 button, and click Connect to begin the configuration process.
- When prompted, enter in the MySQL server root password which was created during the MySQL installation process. Optionally, you may check the Save password in vault check box. Click OK to continue.
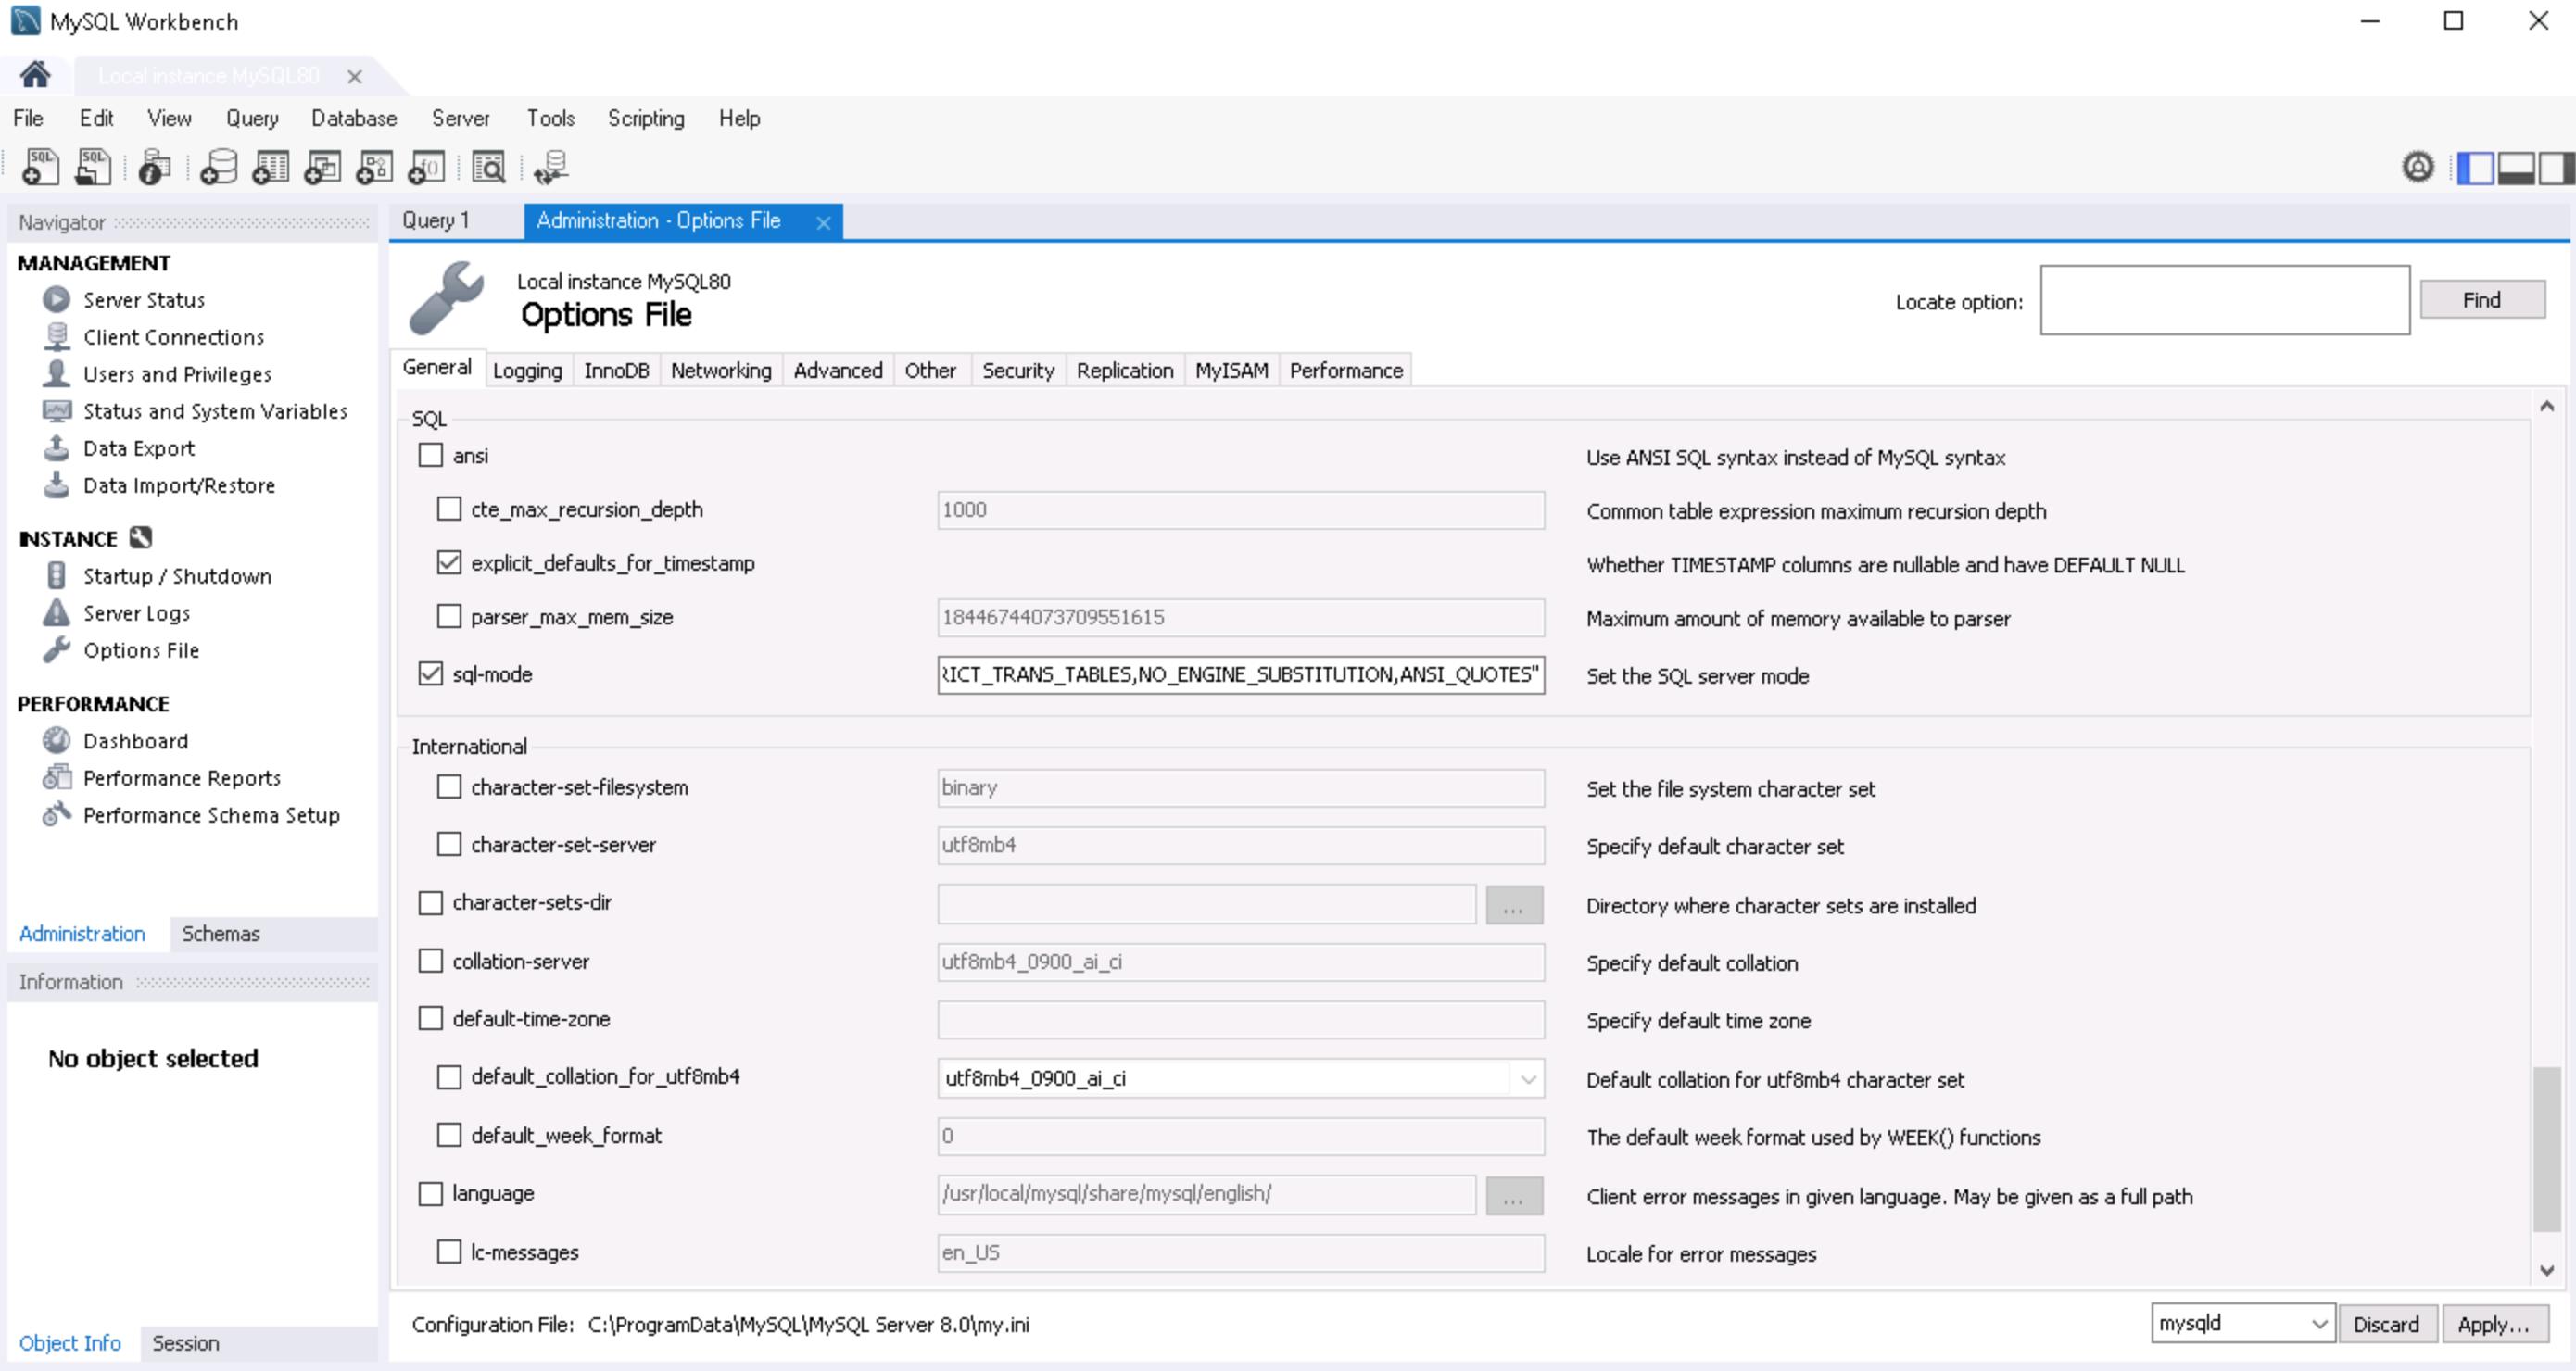
- In the Navigator pane, click Options File under the INSTANCE section to access the Administration – Options File tab.
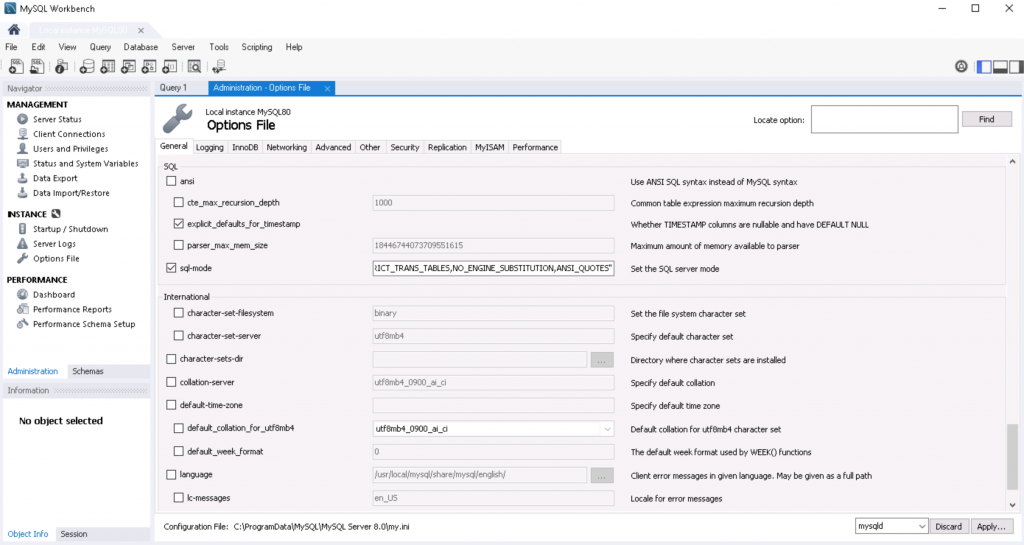
- Click the General tab, and scroll down to the SQL section.
- Edit the sql-mode text field by adding the following to the existing string (before the closing quotation marks): ,ANSI_QUOTES
 WarningEnsure the comma is added, and do NOT leave any blank spaces.
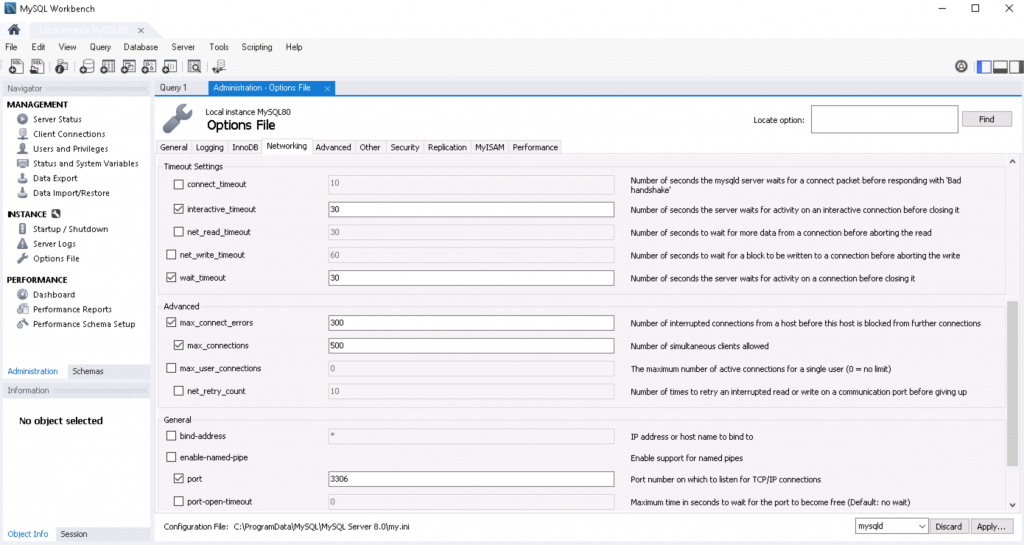
 - Click the Networking tab, and scroll down to the Timeout Settings and Advanced sections. Check the following check boxes, and set its values as stated:
- interactive_timeout, set the value at 30.
- wait_timeout, set the value at 30.
- max_connect_errors, set the value at 300.
- max_connections, set the value at 500.
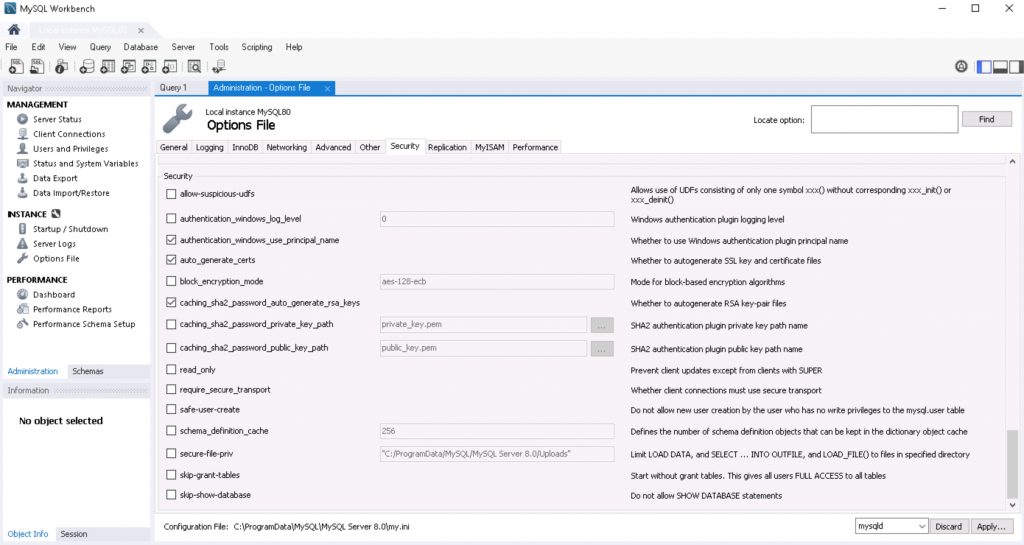
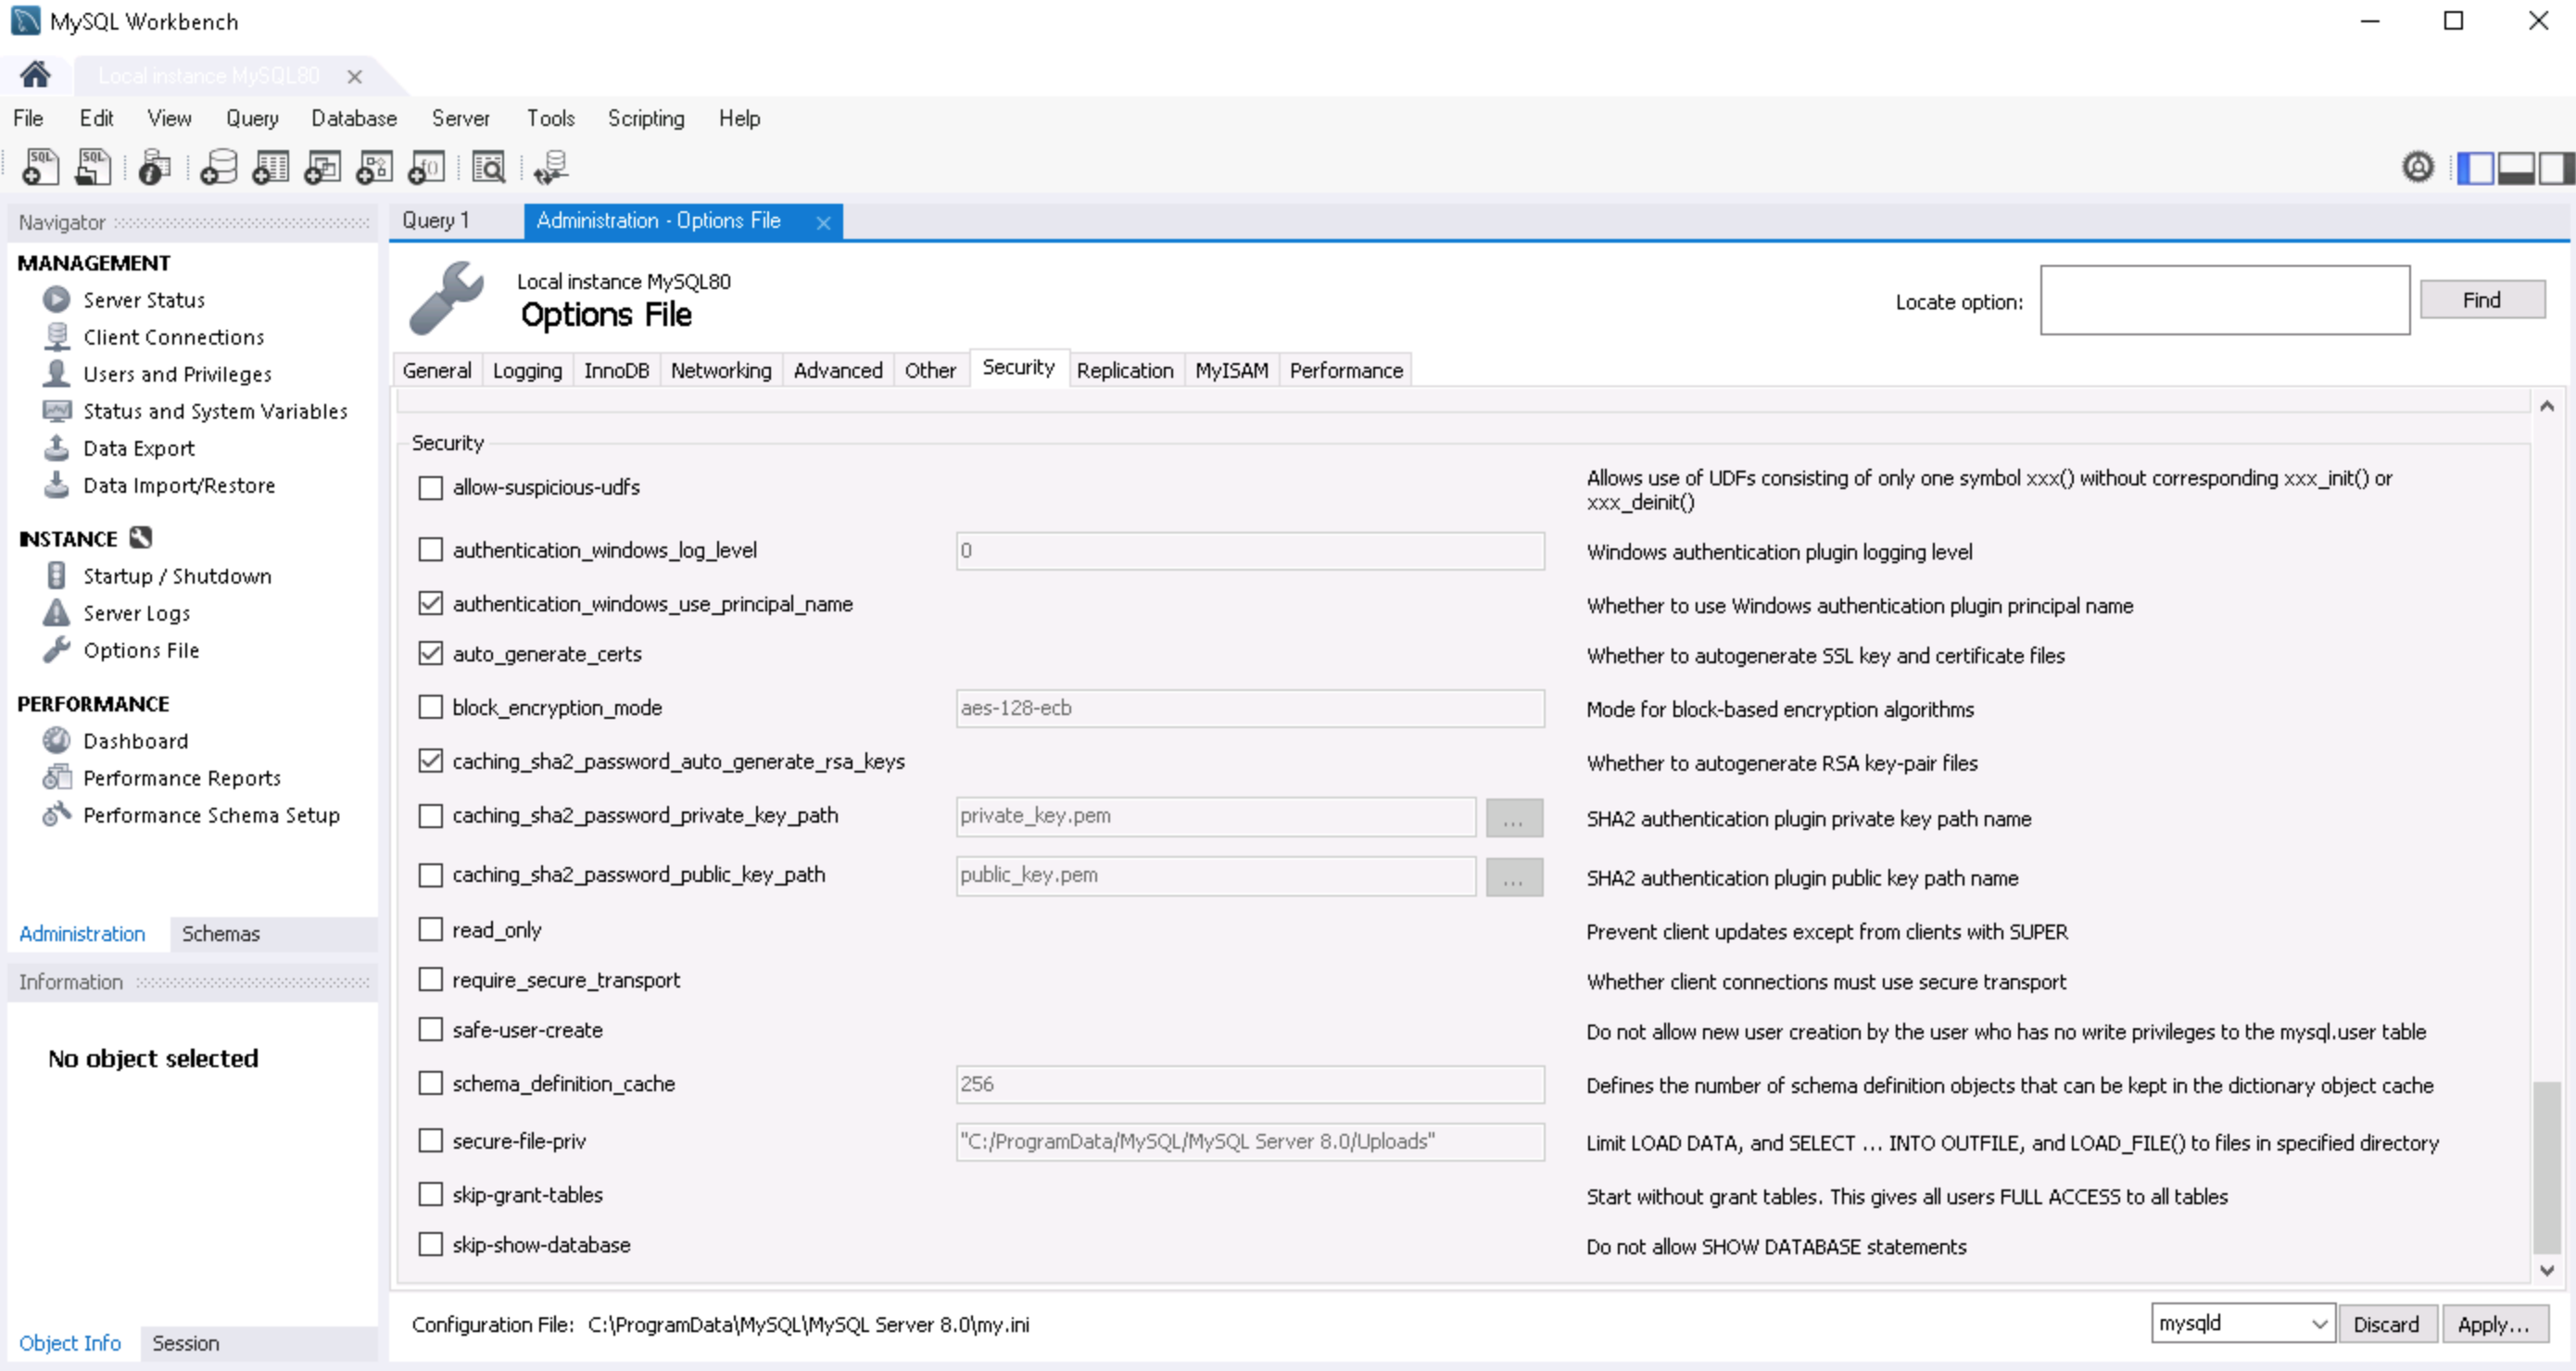
- Click the Security tab, and uncheck the secure-file-priv option in the Security section.
- Click Apply once all configurations have been done.
- The Apply Changes to MySQL Configuration File window is displayed, and lists all the configurations that were just made. Click Apply to confirm the changes.
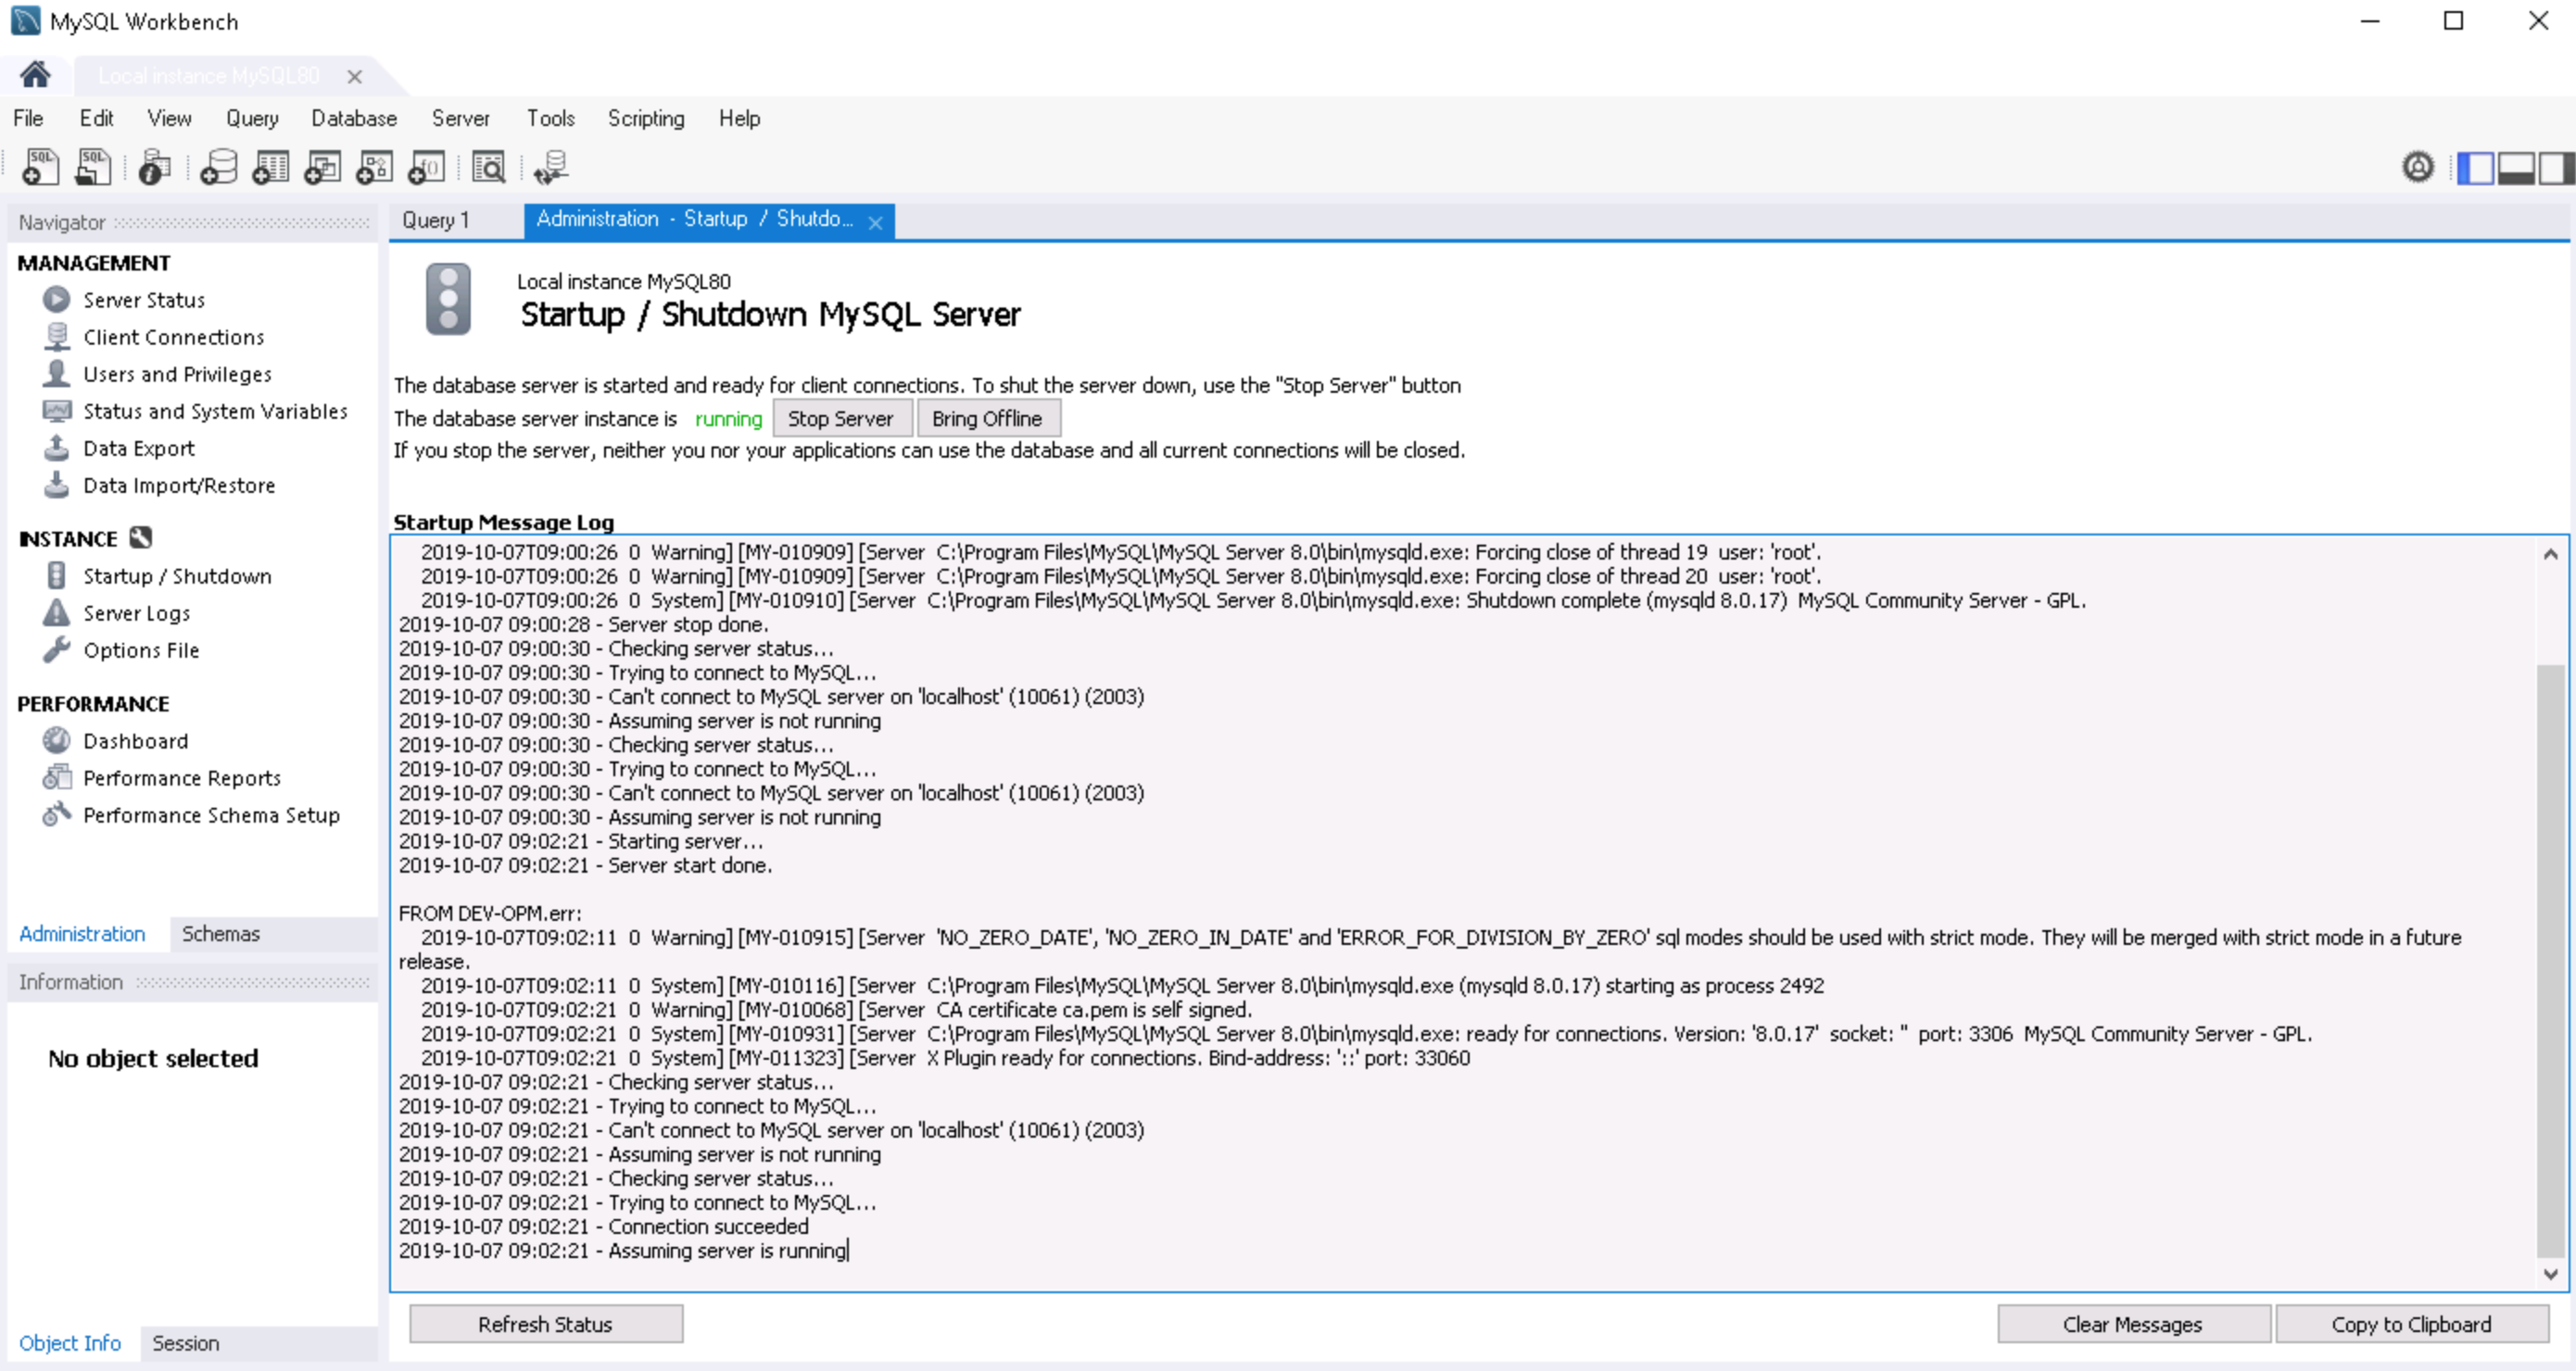
- In the Navigator pane, click Startup / Shutdown under the INSTANCE section to access the Administration – Startup / Shutdown tab. The database server instance is status should display running. Click Stop Server to stop the MySQL server.
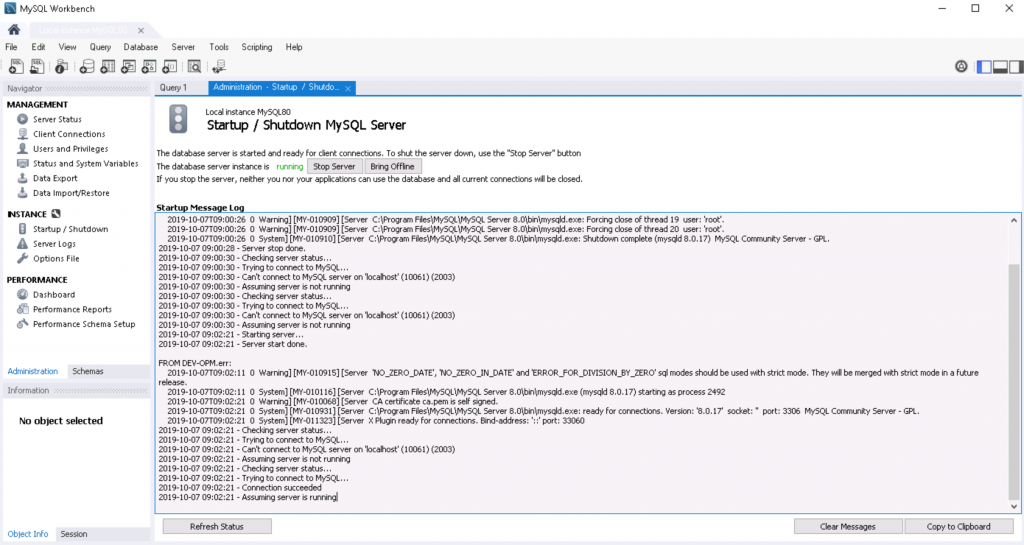
- Once The database server instance is status displays stopped, it can be confirmed that the MySQL server has shutdown.
- Click Start Server to restart the MySQL server.

Microsoft SQL Server 2019
Install and Configure Microsoft SQL Server
- Install Microsoft SQL Server 2019 on your server, as outlined in the Install SQL Server from the Installation Wizard (Setup) guide here: https://docs.microsoft.com/en-us/sql/database-engine/install-windows/install-sql-server-from-the-installation-wizard-setup?view=sql-server-ver15
- Ensure the following configuration settings are made:
- In the Setup Role window, select the All Features With Defaults option.
- In the Feature Selection window, keep all features that are selected by default.
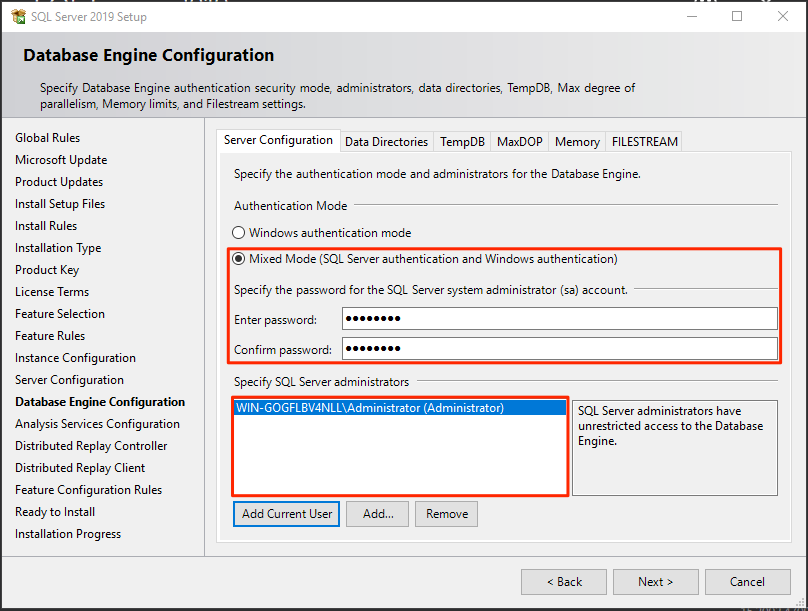
- In the Database Configuration window, select the Mixed Mode option. Ensure that at least one user has been assigned administrative permissions for Analysis Services.
- Proceed to configure the SQL Management Studio by following the instruction in the next section below.
Configure SQL Management Studio
Warning
Ensure the SQL root password created during installation has been granted System Administrator privileges in Windows before proceeding.
Follow the instructions below to configure SQL Server Management Studio:
- Launch the SQL Server Management Studio from the desktop.
- In the Connect to Server window, select Database Engine from the Server type drop-down menu, and Windows Authentication from the Authentication drop-down menu. NoteTake note of the server name value, as it shall be used at a later point.
- Click Connect to connect to the MS SQL server.
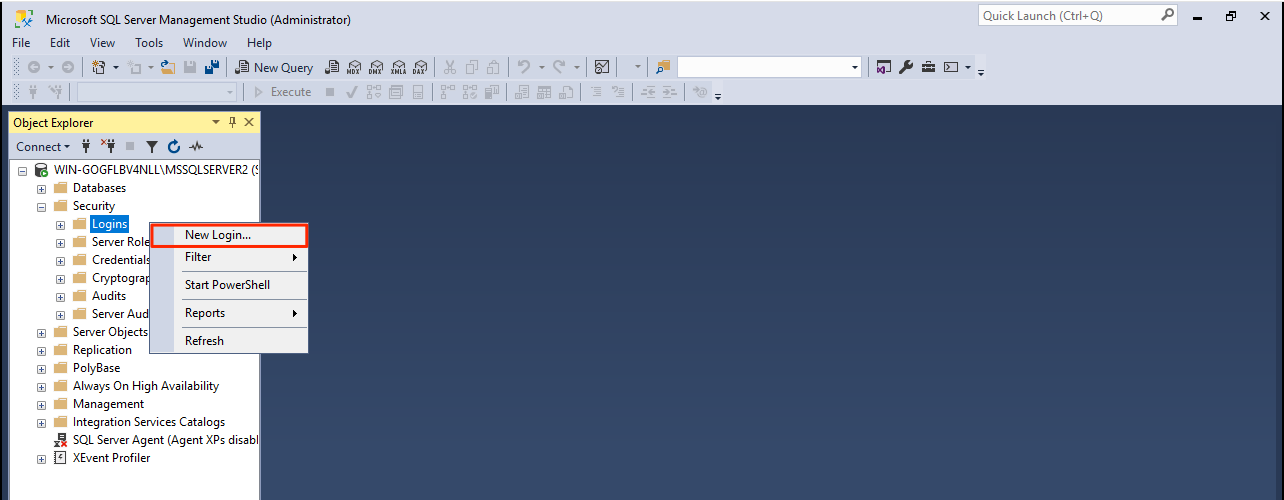
- Once connected, in the Object Explorer pane, right-click the Security > Logins folder, and select New Login.
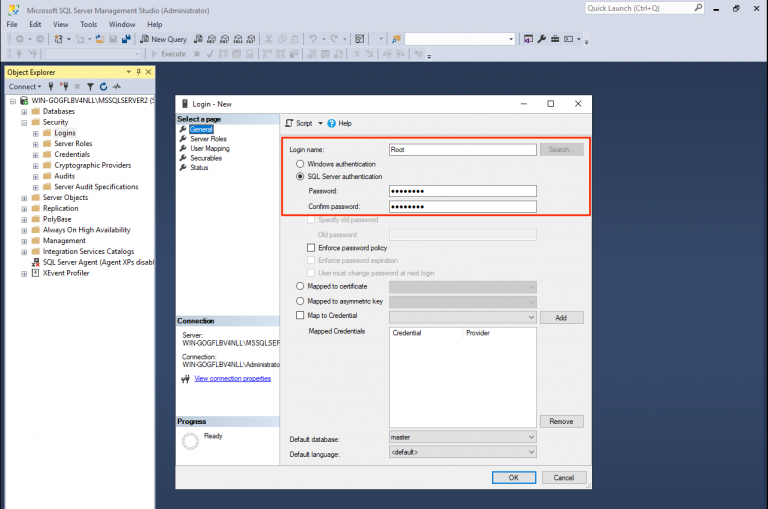
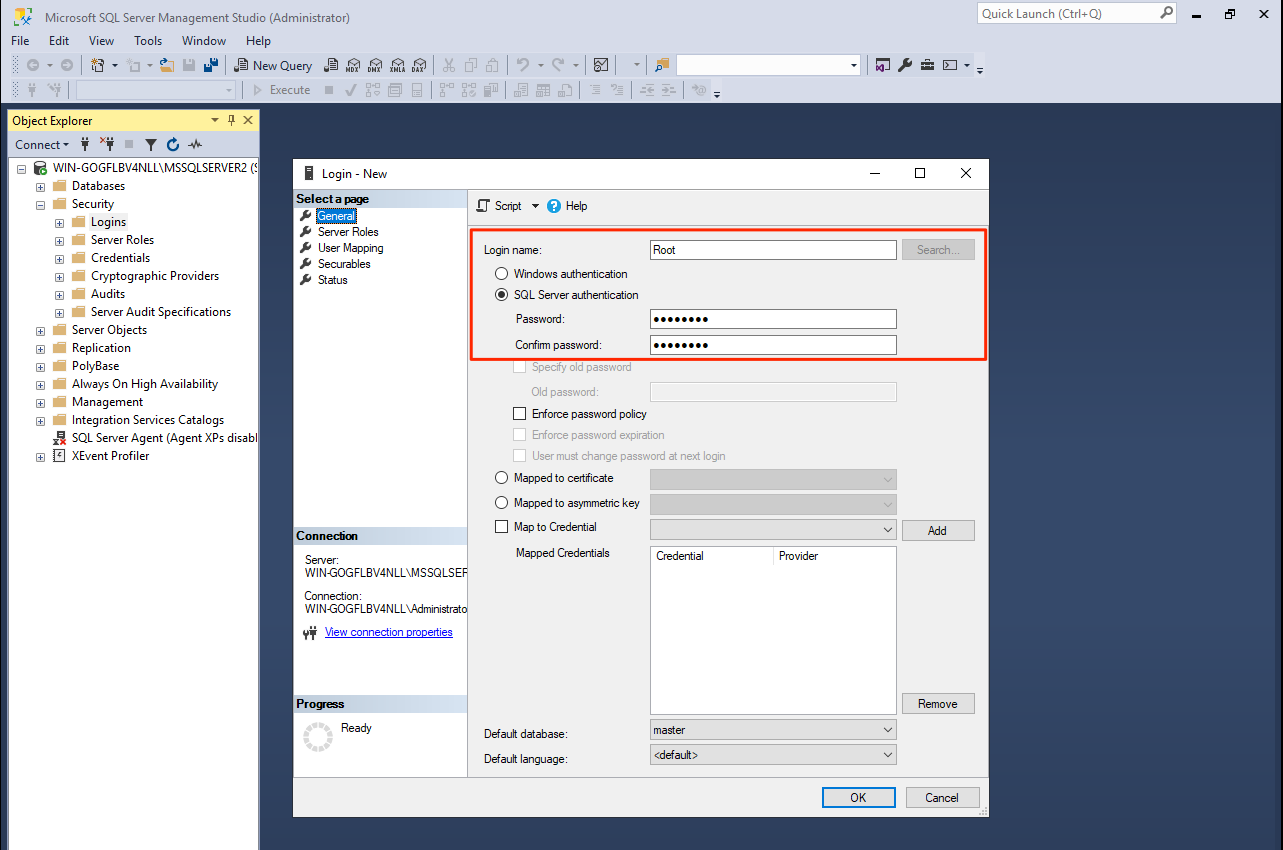
- In the Login Properties window, click General in the Select a page pane, and enter in root as the Login name.
- Select the SQL Server authentication option, and enter in a new password.
 WarningSQL passwords should NOT contain shell metacharacters such as ! # ’ ” ` & ; or spaces.
 - Ensure the Enforce password policy, and Enforce password expiration options are unchecked, and click OK once done.
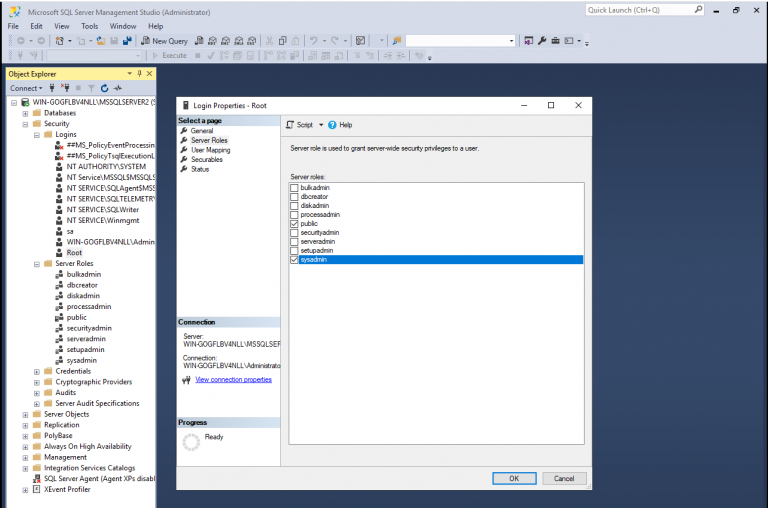
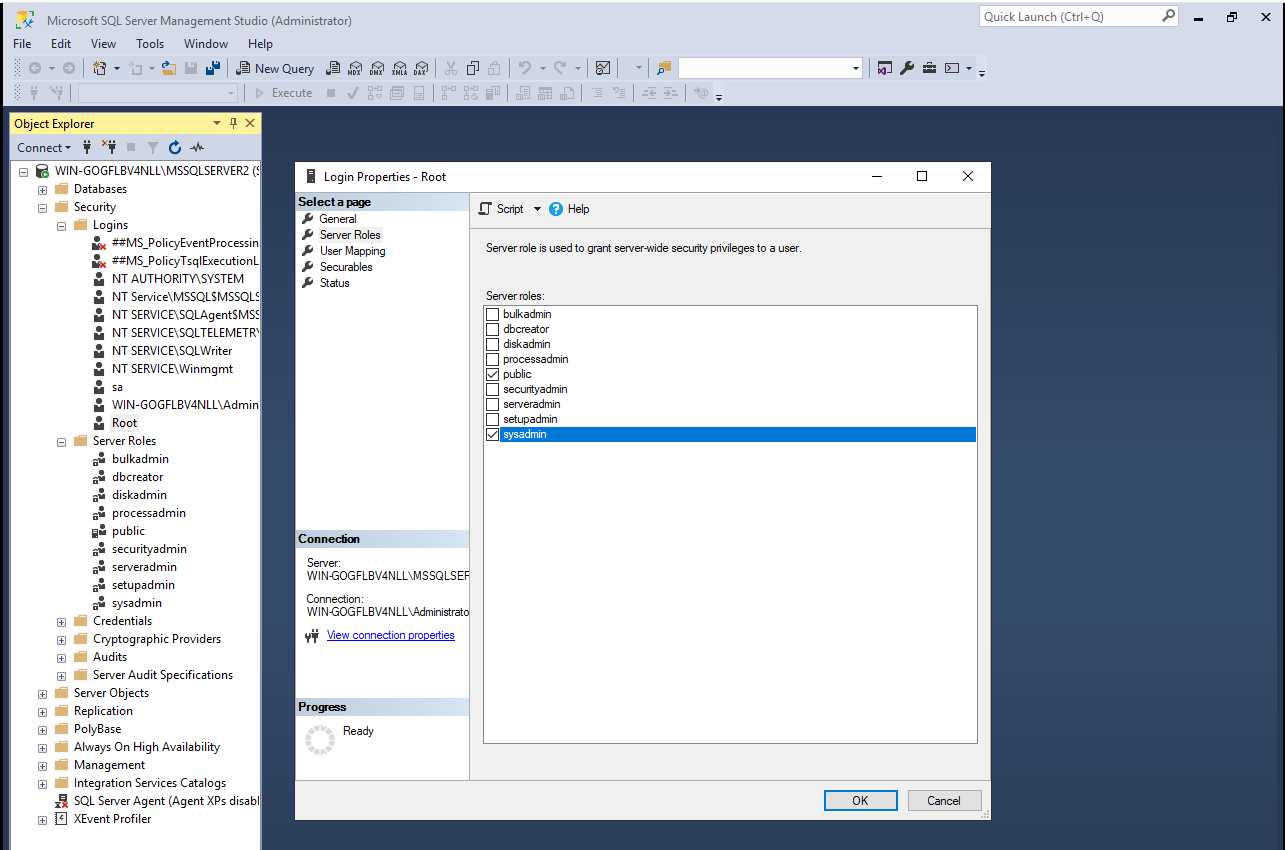
- Proceed to click Server Roles in the Select a page pane, and check the sysadmin checkbox to give the root user System Administrator privileges. Click Ok once done.
- Back in the Object Explorer pane, right-click the MS SQL server instance, and select Properties.

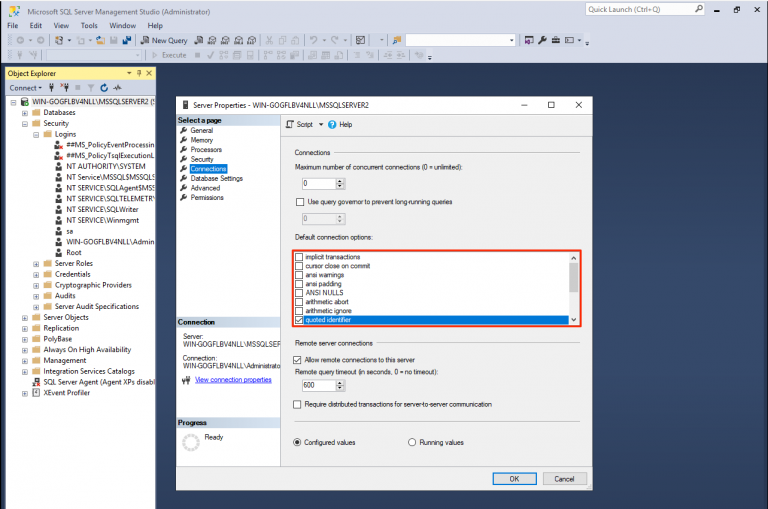
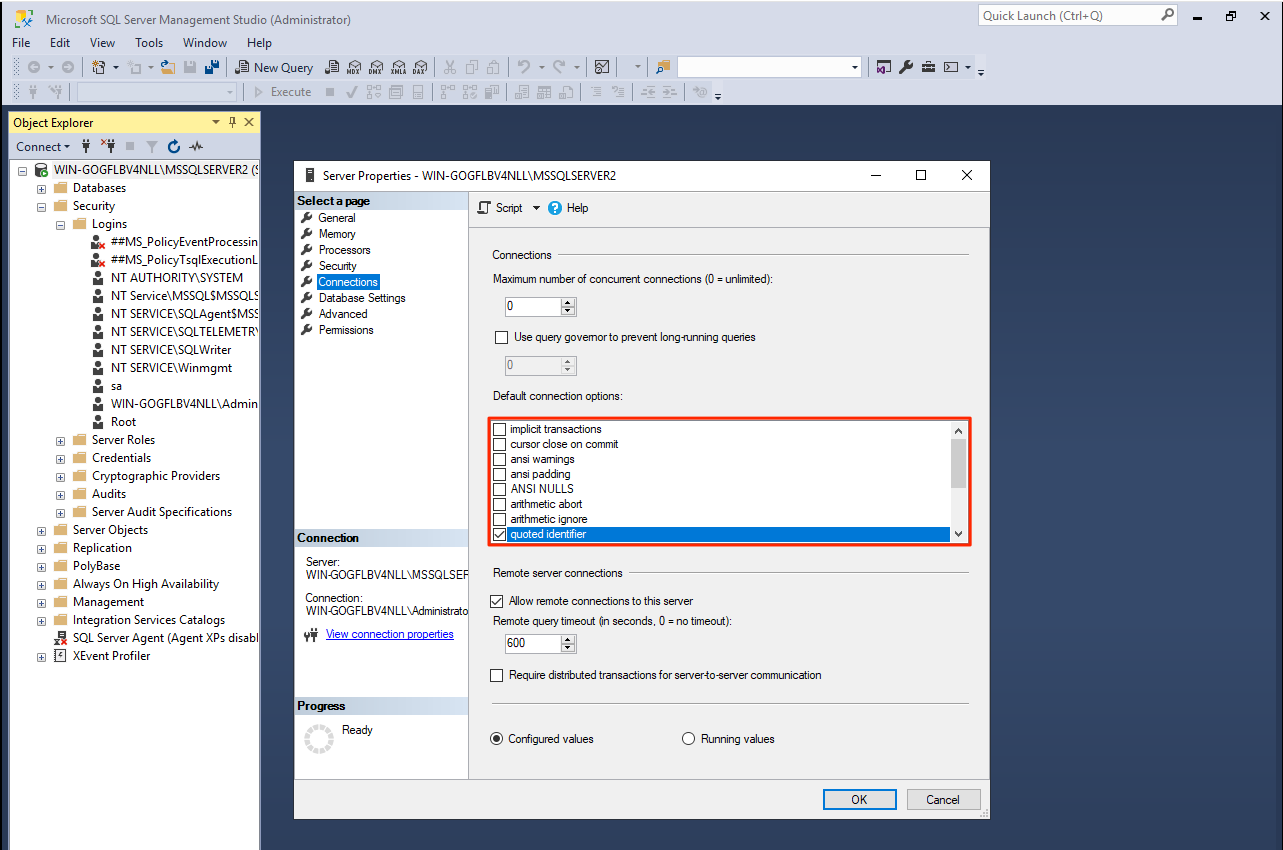
- In the Server Properties window, select Connections in the Select a page pane, and check the quoted identifier checkbox in the Default connection options section. Click Ok once done.
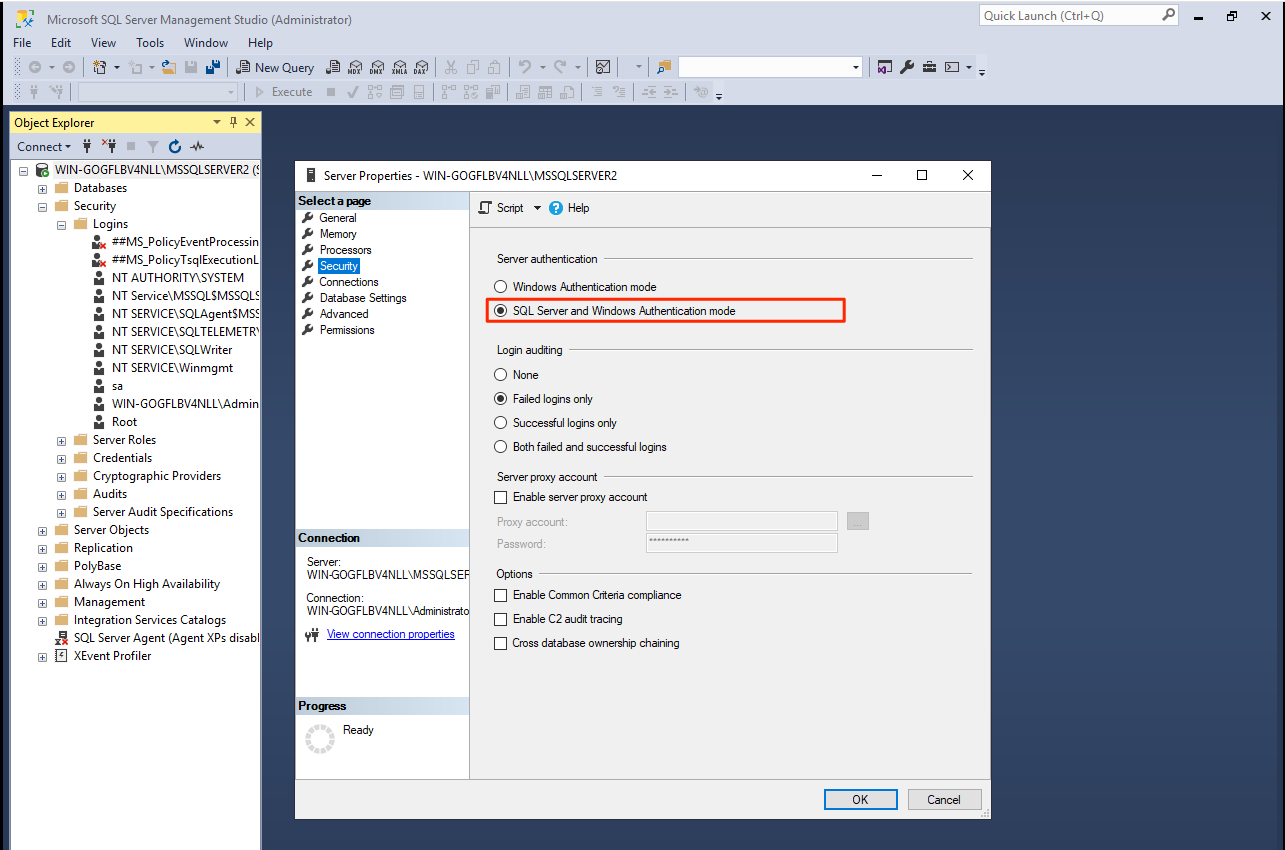
- Proceed to click Security in the Select a page pane, and select the SQL Server and Windows Authentication mode option in the Server authentication section. Click Ok once done.
Install Appspace 8.0 On-Prem
Important
Please disable the FIPS-compliant algorithms on your Windows Server, prior to licensing your Appspace 8.x On-prem deployment, in order to prevent licensing issues.
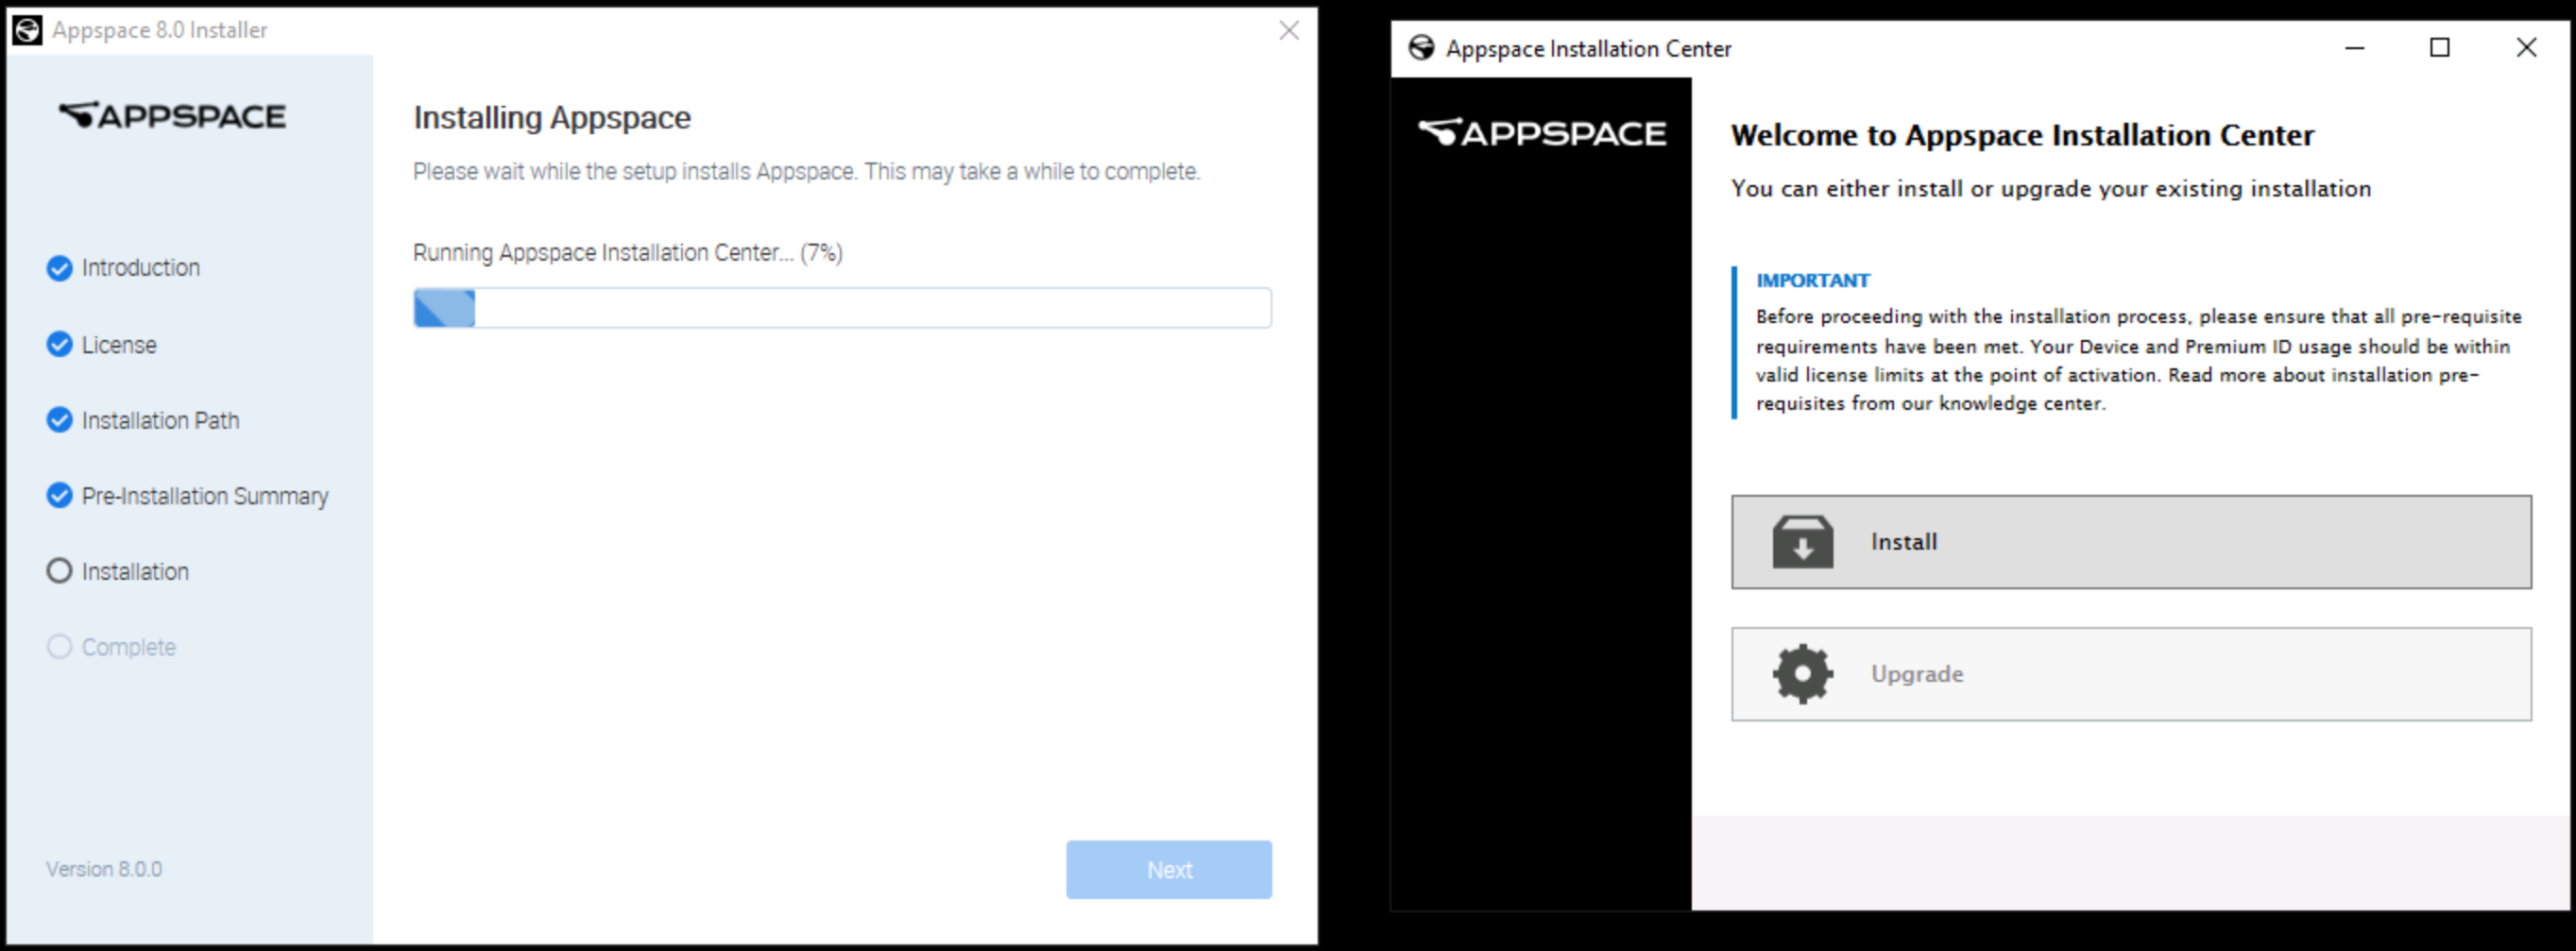
The Appspace 8.0 on-prem installation involves two Appspace installers. The Appspace Installation Center Setup is included as part of the Appspace 8.0 Installer.
- On the Windows Server 2019 server, launch the Appspace 8.0 Installer, and click Begin Installation.

- In the License section, check the I have read and agree to the terms of Appspace’s Software License Agreement checkbox once you have read and agreed to the terms, and click Agree.
- In the Installation Path section, ensure the installation paths for the Application path, Content path, and Data path are correct.

- Enter the FQDN of the server in the Host Name field, as this will be used to identify, and access the Appspace console once the installation is complete. Example: https://<server.domain.com> Company server: server Company domain / hostname name: domain.com
- In the Pre-Installation Summary section, review the list of applications and services that will be installed, and click Install. The Appspace 8.0 Installer will begin installing the required applications, services, and the Appspace Installation Center Setup file. ImportantThe installation duration varies and may require the server to be restarted multiple times during the installation process. You must click the restart button on the installer as displayed. Do NOT manually restart the machine.
- Once the Appspace Installation Center Setup is launched during the installation process, click Install.
- Ensure the Installation, and Content folder paths are correct, and click Next.
- Select the server Database type from the drop-down menu, and enter in the database Host and root credentials. You may leave localhost as the Host. ImportantWe officially do not support or recommend the use of a remote database engine, as it may impact performance. However, if a remote database engine must be used, please contact our Support Team to further advise on configuration settings based on your deployment.
- Click Validate to continue the installation process. ImportantIf a Proxy Server is used, please follow the instructions below before restarting the server.
- Navigate to C:\Appspace\Content\MediaNetConfig\appspace.config
- Edit the appspace.config file, and replace the following key values of the code below:
<add key="enableproxy" value="True" />
<add key="proxy.bypassonlocal" value="" />
<add key="proxy.bypasslist" value="" />
<add key="proxyserver" value="http://{proxy server ip}" />
<add key="proxydomain" value="" />
<add key="proxyusername" value="username" />
<add key="proxypassword" value="password" /> - Save once done, and proceed to Restart the server in Step 10.
- Restart the server once the Appspace Installation Center Setup has completed as indicated. ImportantYou must click the Restart button on the installer as displayed. Do NOT manually restart the machine.NoteIf the installation fails, close the Appspace Installation Center Setup window. DO NOT click on the Restart button on the Appspace installer. Manually re-run the Appspace Installation Center Setup.
- Once restarted, the Appspace 8.0 Installer would continue the installation process.
- Click Next once the installation process is complete, and Next again at The installation was successful screen.
- Click Close at the You have completed the installation! screen, and OK at the confirmation dialog box.
- Launch your web browser and connect to your Appspace console via the following URL: https://<hostname> (replace <hostname> with the Host Name entered in Step 3 above)
- When you access the Appspace console for the first time, you will be redirected to the License Activation page. Please refer to Activate Appspace On-Prem Server for more information.
Note
If there was an issue during the data migration or card installation phase, or if you wish to uninstall Appspace 8.0 on-prem, relaunch the Appspace 8.0 Installer setup file, and select one of the following options:
- Data Migration – Select this option if Data Migration previously was not completed during the installation phase.
- Card Installer – Select this option to install Cards (Update existing templates, and themes).
- Uninstall – Select this option to uninstall Appspace 8.0.
Was this article helpful?