This article provides instructions to configure and register BrightSign devices with the Appspace App, and other BrightSign specific configurations such as enable closed captioning, enable text overlay over video, configure BrightSign for 4k Displays etc.
We also provide instructions to manually update the Appspace App and BrightSign firmware, as the BrightSign devices do not auto-update.
- If you wish to upgrade existing BrightSign devices running the Appspace App to OS version 8.5, the Appspace App must be updated to version 2.54.2 first, before the device firmware is updated to version 8.5. This is crucial to prevent the local storage from being wiped off due to the architectural changes in the location of the local storage for BrightSign OS 8.
- BrightSign devices running firmware v 8.3.46, requires Appspace App to be updated to version 2.36 or higher.
- BrightSign devices are unable to update the Appspace App versions automatically. Please refer to the Update Appspace App on BrightSign section below for workarounds.
- DHCP Option 43 is supported on Appspace App 1.36 and above.
Prerequisites
- The device must meet the manufacturer’s minimum hardware and technical specifications. Please refer to Supported Devices & Operating Systems. ImportantAppspace Support for BrightSign Series 5 Devices (XC5, XT5, XD5, HD5, LS5) While we support the entire Series 5 lineup, our comprehensive testing efforts have been primarily focused on the XC4055 model which we have supported along with BrightSignOS 9.0 since December of 2022. Appspace remains committed to ensuring the compatibility and functionality of our software across the entire BrightSign Series 5 range, encompassing the XC5, XT5, XD5, HD5, and LS5 models. Customers can confidently choose from any of the Series 5 models, knowing that Appspace support is available, even if we have not yet specifically certified every model.NoteThe BrightSign RC-1001 remote control is only supported via the 3.5mm IR jack on BrightSign devices, and not via the USB IR receivers.
- Ensure the device has been installed with the latest BrightSign firmware. Download here: https://www.BrightSign.biz/downloads/overview.
- A BrightSign compatible SD card/USB drive/SSD storage device. ImportantBrightSign devices with SSD storage are only compatible with Appspace App 1.33 and above, and BrightSign firmware 7.0.60 and above is required.
- A USB keyboard for activation.
- An active Appspace account, with sufficient device licenses to register the device.
- Account Owner or Location Admin user roles with sufficient platform licenses.
- An active Internet connection. Note
-
To connect to a wireless network, ensure your BrightSign device is fitted with the WS103 wireless module. More info can be found on the BrightSign website: https://www.BrightSign.biz/digital-signage-products/accessories/wifi-modules
-
To configure BrightSign to connect to a wireless network, follow the instructions here: http://docs.BrightSign.biz/display/DOC/Device+Setup#DeviceSetup-WirelessSetup
-
To configure security certificates on to the BrightSign device, follow the instructions here: http://docs.BrightSign.biz/display/DOC/BrightSign+Network+Setup#BrightSignNetworkSetup-Wired/Wireless
-
- It is recommended that the device clock is set to automatically retrieve time from a Network Time Protocol (NTP) server, with the correct time zone, in order for it to sync correctly with the Appspace server.Note
- Appspace cloud servers by default retrieve time from a NTP server. If an Appspace on-premises server is used, ensure the server time is automatically retrieved by a NTP server.
-
Appspace has updated the timezone configurations, which now includes timezones other than GMT. This enables users with daylight savings to adjust the time accordingly.
For more information, please refer to the Appspace 7.1-ac.8 Release Notes
- Please ensure your network is configured to allow Appspace Approved URLs and the relevant network ports.On your proxy server, ensure our approved URLs are listed in the ‘How to set up networks with SSL content filters’ section in the following article: https://support.google.com/chrome/a/answer/3504942#sslinspection.
Configure BrightSign with Appspace App
Follow the instructions below to setup the BrightSign device:
- Log in to the Appspace console.
- Select the ☰ Appspace menu, and click Devices > Settings > App Downloads tab.
- Download the Appspace App for BrightSign client file (autorun.zip). ImportantDo NOT extract the autorun.zip file.
- Copy the autorun.zip file to an SSD storage, an SD card, or a USB drive according to your preference. If using an SD card or a USB drive, plug in the devices into the BrightSign device. WarningBrightSign devices with SSD storage are only compatible with Appspace App 1.33 and above, with BrightSign firmware 7.0.60 and above.
- The Appspace App installation package will be automatically extracted to the storage device. NoteThe autorun.zip file is automatically deleted from the storage device after the extraction.
- Connect the BrightSign device to a display screen.
- Ensure network connectivity is active, and switch on the BrightSign device.
- Wait for the device to boot-up and display the Device registration page. NoteThe BrightSign device may need to be restarted a couple of times if the device registration page does not show up.
- Launch the Appspace App.
- Register your device.
-
If using an SSD, once the initial installation and registration process is complete, you may remove the SD card or USB drive, as the Appspace App will operate solely from the SSD storage hereafter.
Enable Closed Captioning on BrightSign
To enable Closed Captioning or subtitles manually, follow the instructions below.
- Log in to the Appspace console.
- Select the ☰ Appspace menu, and select Channels.
- Select the desired advanced channel, and select the Edit tab.
- Click the edit button for the layout containing the Media Zone widget.
- In the editing window, select the Media Zone widget, and click the Properties button.
- Select the Properties tab, and click the Edit button.
- Enter in the following widget property:
Description Widget Property Value Closed Captioning / Subtitles custom.media.video.cc Boolean (True or False) - Once done, click Finish.
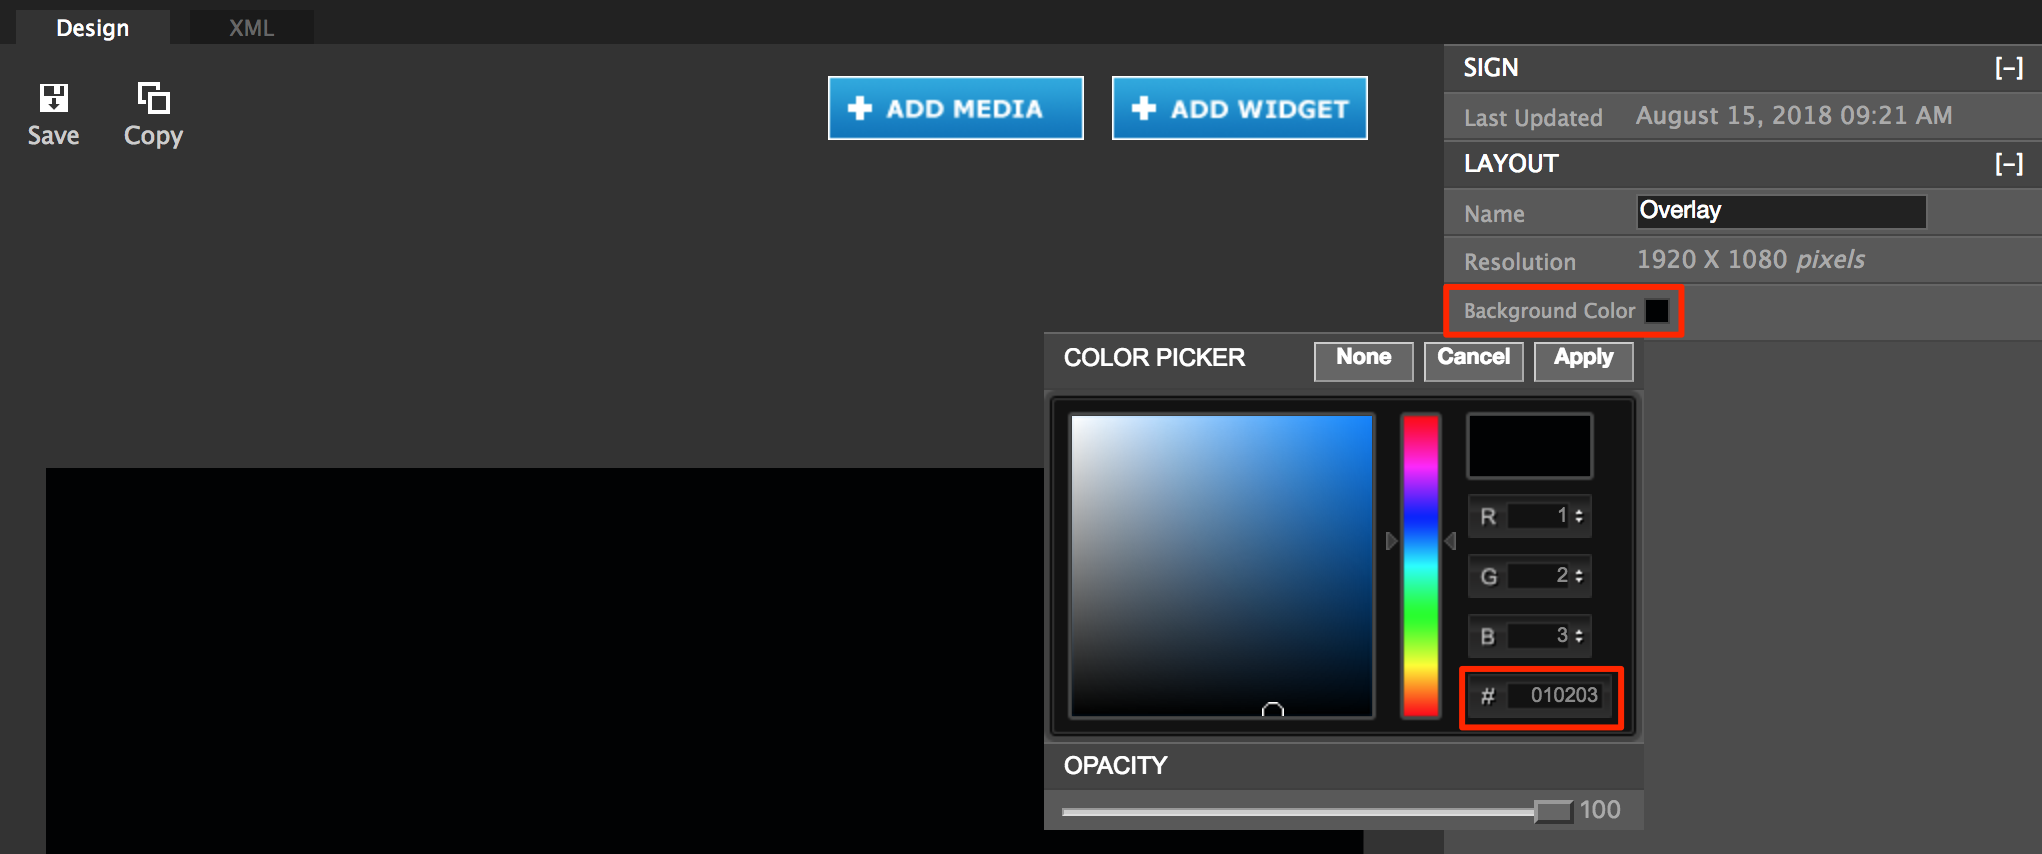
- Select the Appearance tab, and ensure that Background Color is set to the default value of #000000 with the OPACITY of 0. You may also click the None button to return to the default value.
- Click Apply, and close the window once changes have been made.
- Back on the editing window, change the layout Background Color to #010203 with the OPACITY of 100, or edit the following widget property:
Description Widget Property Value Change the background color to black standard.bgcolor #ff010203 
- Click Apply, and Save once done.
Enable Text Overlay over Video
To enable text overlay over video for viewing in interactive mode/channel browsing mode (user mode on a web browser or mobile device), add a device property, while to enable it on a sign channel, add a widget property to the Media Zone widget instead.
Enable Text Overlay over Video in Interactive Mode (Channel Browsing)
To enable text overlay over video in interactive mode on BrightSign devices during channel browsing, add the following device property:
| Description | Device Property | Value |
|---|---|---|
| Enable text overlay over video | Custom.media.video.layerindex | -1: Places the video behind all graphics |
| 0: Disables “hwz” mode completely | ||
| 1: Places the video in front of all graphics (the default setting) | ||
| 2: Places the video in front of all graphics, as well as a second video element |
Enable Text Overlay over Video in Advanced Channel (sign)
Follow the instructions below to enable text overlay over video in an advanced channel (sign):
- Add the following property to your Media Zone widget: For instruction to add a widget property, please refer to Adding Widget Property.
Description Widget Property Value Enable text overlay over video Custom.media.video.layerindex -1: Places the video behind all graphics 0: Disables “hwz” mode completely 1: Places the video in front of all graphics (the default setting) 2: Places the video in front of all graphics, as well as a second video element NoteWhen “hwz” is enabled, the video is rendered as a video element, ensuring the highest possible frame rate and video quality. When “hwz” is disabled, the video is rendered as a graphics element. - Change the advanced channel’s layout Background Color to #010203, and set the Opacity slider value between 1 and 100 (non-zero value).
Description Widget Property Value Change the background color to black standard.bgcolor #ff010203
Configure Device Rotation Settings
Devices with Playlist Channels
In Appspace 7.0 and later, a single playlist channel automatically rotates based on the natural orientation of the device. However, BrightSign by default, does not have a device orientation setting to support this feature, and instead follows the current, or the last orientation setting of a device.
To play a single playlist channel in the desired orientation, set the device orientation in the BrightSign device settings, as per the following instructions:
- Log in to the Appspace console.
- Select the ☰ Appspace menu, and select Devices .
- Select the desired BrightSign device, and click the Settings tab.
- Select the desired Display orientation option.
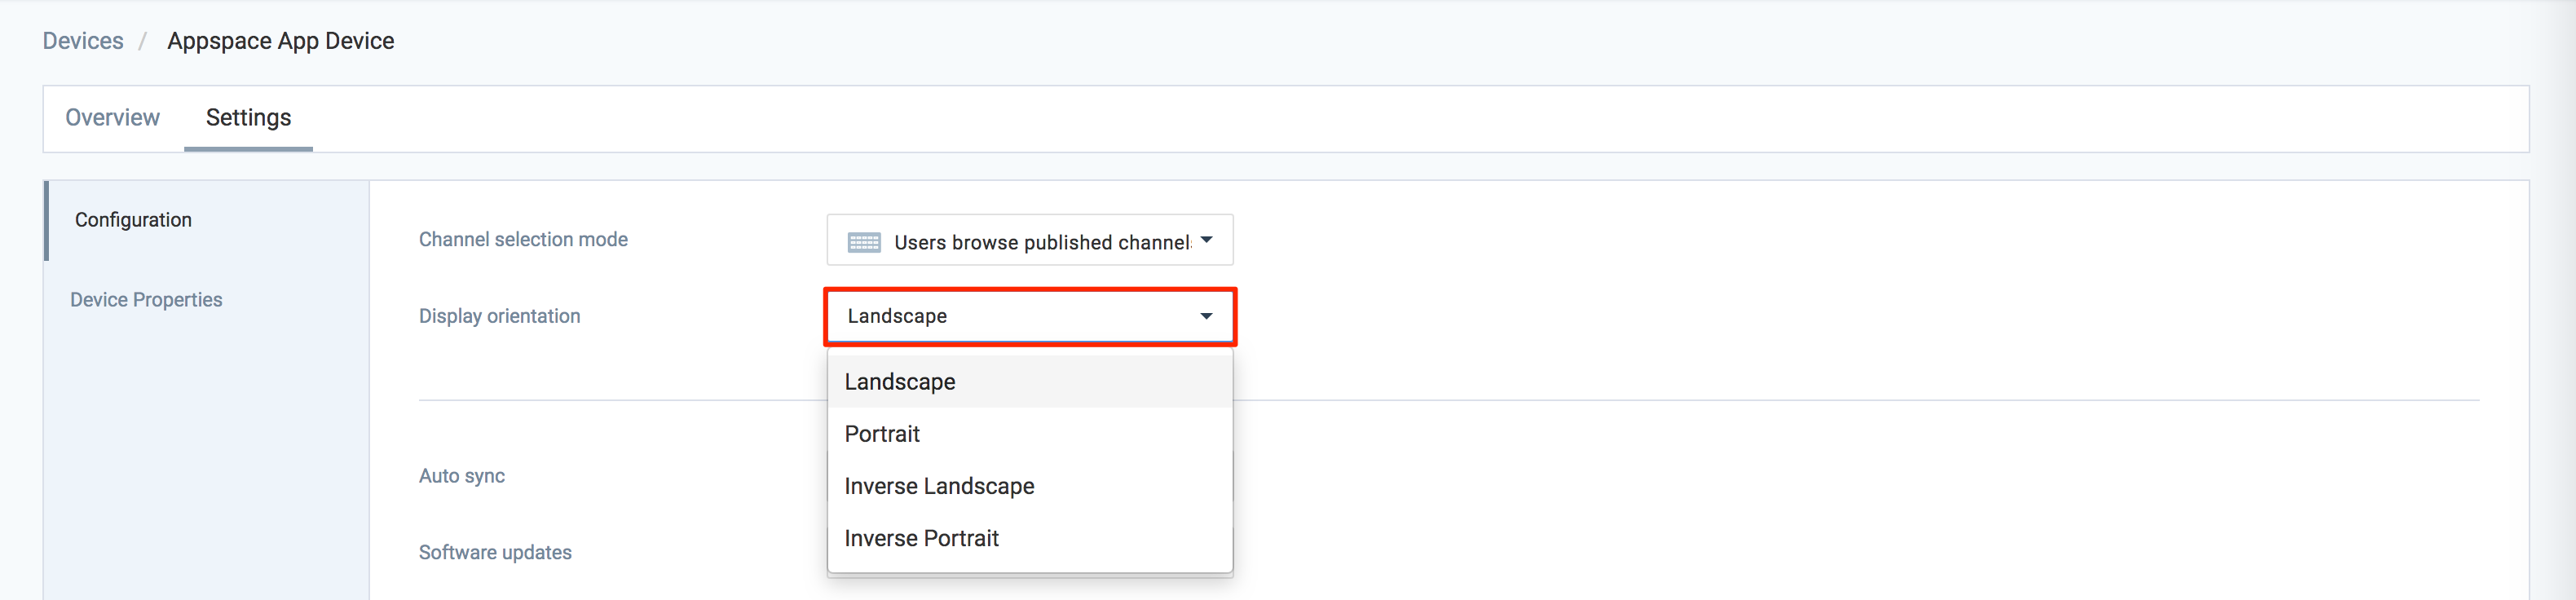
- Click Save.
Configure BrightSign for 4K Display
To display 4K content on BrightSign devices, you will need to modify the main.brs file before installing Appspace App onto the BrightSign device.
- Log in to the Appspace console.
- Select the ☰ Appspace menu, and click Devices > Settings > App Downloads tab.
- Download the Appspace App for BrightSign (autorun.zip) to your computer, and extract the autorun.zip file.
- Navigate and open the main.brs file located in the appspace folder.
- Locate the “vmCreate Object (“roVideoMode”) line of code, and enter the vm.SetMode(“4096x2160x30p:fullres:gfxmemlarge”) line of code below it.
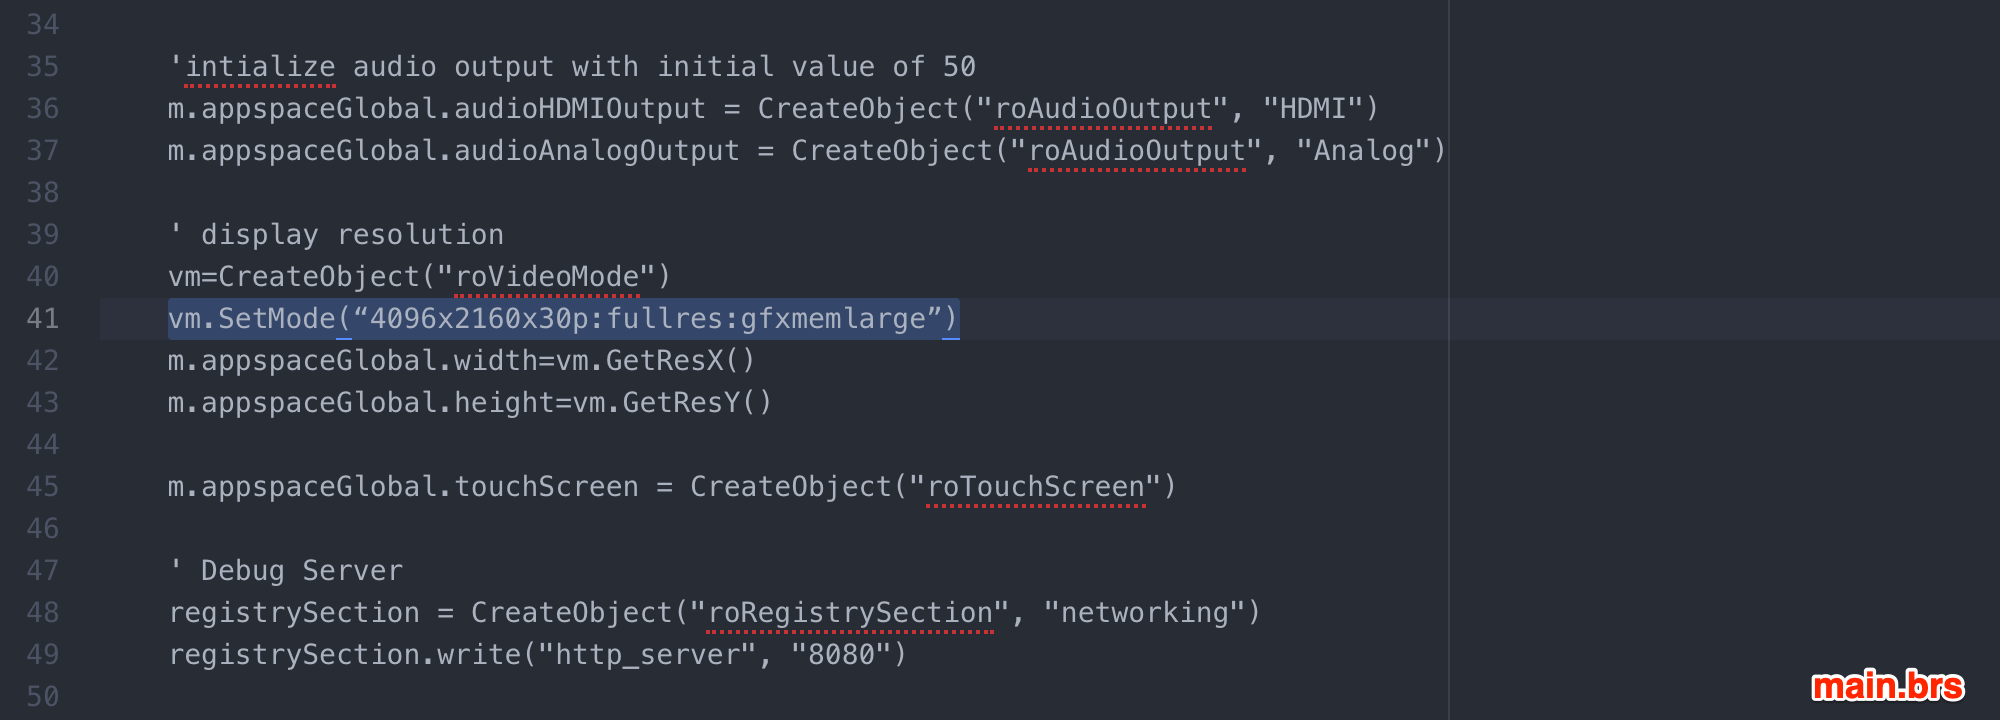 Codevm=CreateObject(“roVideoMode”)
vm.SetMode(“4096x2160x30p:fullres:gfxmemlarge”)
m.width=vm.GetResX()
m.height=vm.GetResY() - Once done, save the main.brs file and repackage it back to the autorun.zip file.
- Proceed to configure your BrightSign device with the modified autorun.zip file.
Configure BrightSign to Utilize Multiple HDMI Outputs (Video Wall)
To utilize the multiple HDMI outputs on BrightSign XC Series devices in a video wall configuration, you will need to modify the main.brs file before installing Appspace App onto the BrightSign device.
- Videomodeconfiguration: https://BrightSign.atlassian.net/wiki/spaces/DOC/pages/370678463/videomodeconfiguration#videomodeconfiguration-getScreenModes(
- Supported Video Modes: https://BrightSign.atlassian.net/wiki/spaces/DOC/pages/370676833/Supported+Video+Modes
- Note that at this time the XC series isn’t listed in the supported video modes so it may be the case that some modes are not possible, you’ll have to verify with BrightSign support if a mode is supported.
- Log in to the Appspace console.
- Select the ☰ Appspace menu, and click Devices > Settings > App Downloads tab.
- Download the Appspace App for BrightSign (autorun.zip) to your computer, and extract the autorun.zip file.
- Navigate and open the main.brs file located in the appspace folder.
- Locate the “vmCreate Object (“roVideoMode”) line of code (default in line 40), and enter the following block of code based on the video wall configuration and number of HDMI outputs that are utilized:Each Screen (HDMI Output) requires its own block of code to be added to the main.brs file. Example of the code block below:
sm.[x].video_mode - Resolution Setting
sm.[x].transform - Rotation Setting
sm.[x].display_x - Position of content on x axis (screen width)
sm.[x].display_y - Position of content on y axis (screen height)
sm.[x].enabled/disabled - Flag to power on/off this HDMI output.-
Screens: To enable or disable a screen is merely a matter of setting sm[x].enabled or sm[x].disabled where ‘x‘ is the number of the HDMI output/screen.
-
Orientations: As you can see, its merely a matter of changing the sm[x].display_x or sm[x].display_y values depending on whether the wall is vertical or horizontal. You may need to take into account a bezel offset if perhaps the client screens are physically offset and they wish this effect to translate to the content.
- Resolutions: The resolution values can be changed according to the supported resolutions guide from BrightSign. Review the Supported Video Modes article.
- Rotations: To denote the proper screen rotation change the sm[x].transform value to either = { “normal”, “90”, “180”, “270” }.
-
- Once done, save the main.brs file and repackage it back to the autorun.zip file.
- Proceed to configure your BrightSign device with the modified autorun.zip file.
Example 1:
This code block example assumes a 2 x 1 video wall (1080p – “Horizontal Row” or a “standard wall”)
vm=CreateObject("roVideoMode")
sm = vm.GetScreenModes()

sm[0].video_mode="1920x1080x60p"
sm[0].transform = "normal"
sm[0].display_x=0
sm[0].display_y=0
sm[0].enabled=true

sm[1].video_mode="1920x1080x60p"
sm[1].transform = "normal"
sm[1].display_x=1920 'Not adding an offet for bezels, might need to increase this value if screen 2 is cutoff.
sm[1].display_y=0
sm[1].enabled=true

sm[2].enabled=false 'Disabling the other two screens just for testing
sm[3].enabled=false 'Disabling the other two screens just for testing

vm.SetScreenModes(sm)
Example 2:
This code block example assumes a 1 x 2 video wall (1080p – “Landscape Stack”)
vm=CreateObject("roVideoMode")
sm = vm.GetScreenModes()

sm[0].video_mode="1920x1080x60p"
sm[0].transform = "normal"
sm[0].display_x=0
sm[0].display_y=0
sm[0].enabled=true

sm[1].video_mode="1920x1080x60p"
sm[1].transform = "normal"
sm[1].display_x=0
sm[1].display_y=1100 ' Bezel compensation of 20 pixels
sm[1].enabled=true

sm[2].enabled=false
sm[3].enabled=false

vm.SetScreenModes(sm)
Update Appspace App on BrightSign
To ensure the Appspace App is updated on all supported BrightSign devices in the network, follow the instructions below:
Prerequisites
- Ensure the network allows devices to be updated.How To
- Navigate to Devices in the ☰ Appspace menu, and select the Locations > Properties tab.
- Ensure the Software.SoftwareUpdates device property value is set to TRUE.
- Ensure the BrightSign device is configured to receive updates automatically.How To
- Navigate to Devices in the ☰ Appspace menu.
- Select the desired BrightSign device, and click the Settings tab.
- Ensure the Software updates option is set to Automatic Update.
Update Appspace App
Follow the instructions below to manually update the Appspace App:
- Log in to the Appspace console.
- Download the task templates package.
- Click the ☰ Appspace menu, and then click Devices > Device Tasks.
- Import task templates.
- Click the Advanced Tasks tab, and click the +ADD button.
- Select the Appspace App : BrightSign App Updater task.
- Configure parameters, deploy to target, and schedule.
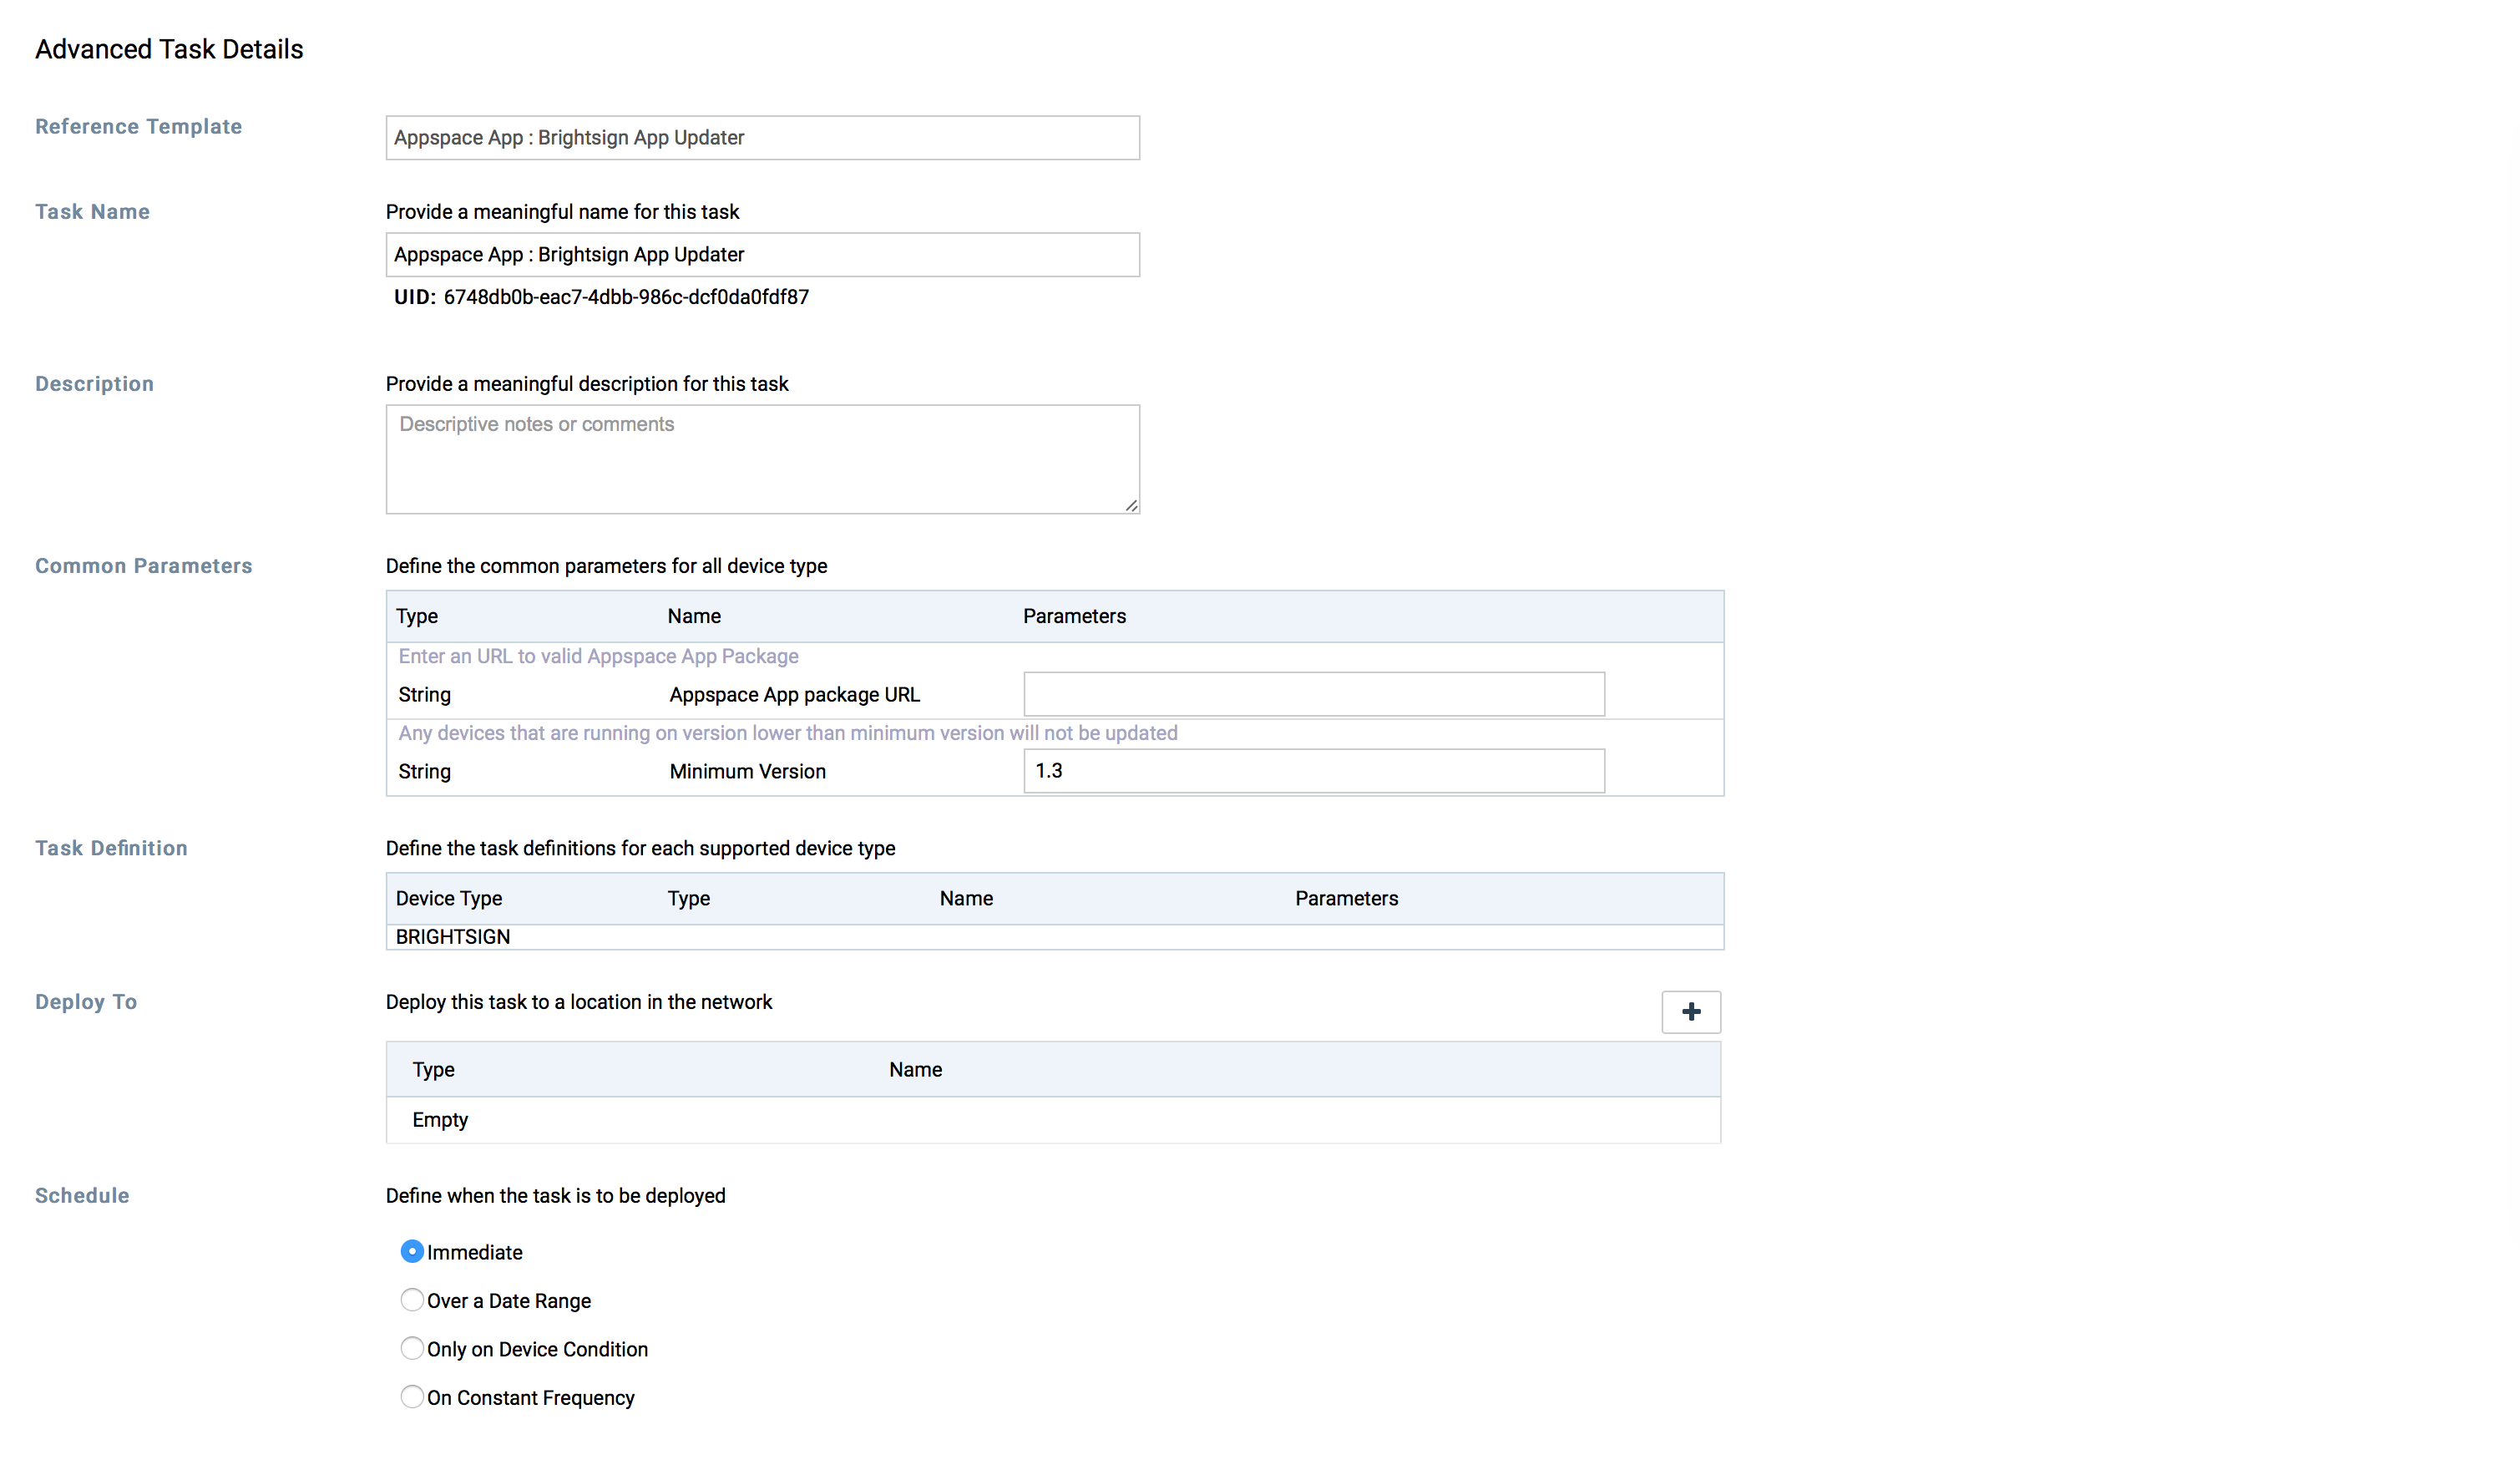
- In the Common Parameters section, insert the following URL for the Appspace App Package URL field to get the latest Appspace Device App.
https://downloads.appspace.com/devices/brightsign/packages/bsn/latest/autorun.zip
- In the Common Parameters section, insert the following URL for the Appspace App Package URL field to get the latest Appspace Device App.
-
Click Save.
Update BrightSign Firmware
- If you wish to upgrade existing BrightSign devices running the Appspace App to OS version 8.5, the Appspace App must be updated to version 2.54.2 first, before the device firmware is updated to version 8.5. This is crucial to prevent the local storage from being wiped off due to the architectural changes in the location of the local storage for BrightSign OS 8.
- BrightSign devices running firmware v 8.3.46, requires Appspace App to be updated to version 2.36 or higher.
- BrightSign devices are unable to update the Appspace App versions automatically. Please refer to the Update Appspace App on BrightSign section below for workarounds.
- DHCP Option 43 is supported on Appspace App 1.36 and above.
- Device registration information should persist when upgrading your BrightSign device firmware to BSFW 8.3.46. However, this behavior is not expected when downgrading to BSFW 8.2.55.5, where device registration information is lost and users are required to re-register their BrightSign devices on Appspace.
Follow the instructions below to manually update the BrightSign firmware:
- Download the BrightSign firmware of your device from the BrightSign Downloads site at: https://www.BrightSign.biz/downloads/overview
- Extract the BrightSign firmware .zip file.
- Copy only the .bsfw file and paste it in a folder on the local web server.
- Right-click and compress the .bsfw file.
- Log in to the Appspace console.
- Select the ☰ Appspace menu, and navigate to Devices > Device Tasks.
- Select the Advanced Tasks tab.
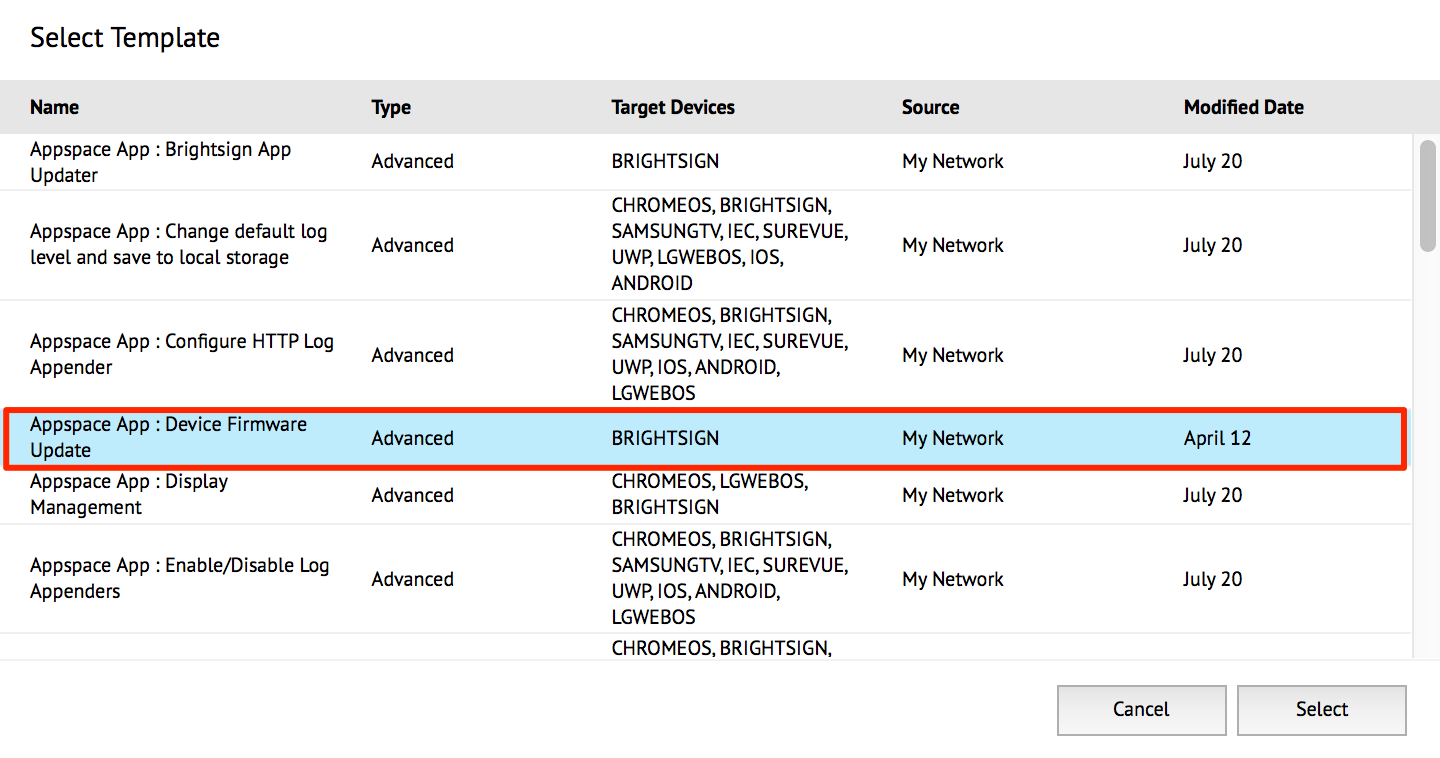
- Click the Add button, and select the Appspace App : Device Firmware Update task.
- In the Common Parameters section, enter in the URL to the BrightSign firmware package on your local web server (from Step 3 above).

- In the Deploy To section, select the desired network to deploy the task to.
- In the Schedule section, select the desired deployment option.
-
Click Save.
Enable Chromium Web Inspector Engine
With the release of BrightSign OS 8.5, the Chromium Web Inspector engine is disabled by default, and to ensure that users do not unintentionally enable the remote web inspector on production software, as this may cause an increase in memory usage and is unsecured, an extra registry value has been added to the HTML registry section to enable the web inspector.
Follow the instruction below to manually enable the Chromium Web Inspector engine on BrightSign OS 8.5 devices.
- Log in to the Appspace console.
- Select the ☰ Appspace menu, and click Devices > Settings > App Downloads tab.
- Download the Appspace App for BrightSign (autorun.zip) to your computer, and extract the autorun.zip file.
- Navigate and open the main.brs file located in the appspace folder.
-
Proceed to enter the following script to enable the Chromium Web Inspector engine.
registryHtmlSection = CreateObject("roRegistrySection", "html")
registryHtmlSection.write("enable-inspector-server", "1")
- Once done, save the main.brs file and repackage it back to the autorun.zip file.
- Proceed to configure your BrightSign device with the modified autorun.zip file.
- Launch a web browser, and enter the BrightSign device IP address to navigate to the BrightSign device dashboard.
- Click the DIAGNOSTICS tab, and check the Allow Javascript console checkbox in the Chromium Debugging section.
- Click SET to confirm changes, and reboot the device.
- Once the device has been rebooted, the Chromium Web Inspector engine is enabled and should be accessible by navigating via the device’s IP Address and port <192.268.0.1:2999>
Technical Limitations & Workaround
- The RSS Ticker animation stutters when displayed on BrightSign devices due to technical limitations, caused by iframe loading issues.
BrightSign 9.0
- Videos that have been configured to be displayed in Portrait on BrightSign 9.0 devices are being displayed in Landscape due to a bug. Appspace has already begun working on this, and a fix will be available in a future release.
Was this article helpful?