With Broadcasts, you can quickly configure and publish important messages to several channels at the same time, including Digital Signage, the Appspace Employee App, and integrated enterprise messaging platforms, reaching teams and individual employees across different locations. Plus, Broadcasts utilize Appspace’s Channels model natively, so you can integrate with IPTV providers and emergency alert systems to automatically trigger critical notifications.
Broadcasts give you more than just emergency alerts and warnings. You can publish any content that’s important to your organization like upcoming live town halls and events, or noteworthy company news.
With Broadcasts, you can reach employees wherever they are. Whether you want to publish updates in messaging apps like Slack and Teams or reach frontline workers via the Employee App through notifications and pinned content, you can be sure your message won’t get missed.
With the release of Broadcasts the existing Alerts functionality should no longer be used. If you have any configured Alerts in your account, they are still available, but they should be migrated to Broadcasts in order to take advantage of the additional features and reach that Broadcasts offer, as well as ensure that the messaging is able to be distributed to your audience in the event. Alerts are no longer being supported moving forward and will be phased out completely by the end of 2023. For more information regarding Alert’s end-of-life, please visit our FAQ page here:

Broadcasts are used to effectively push urgent and critical messages out to devices and users either using specific targeting rules or to everyone, by means of the screen take over, user notifications and highlighted messages within the employee app.
- Administrators looking to migrate their existing Alerts broadcasts to the new Broadcasts solution, please refer to the Migrate Alerts to Broadcasts article.
- Administrators looking for answers on frequently asked questions regarding Alerts to Broadcasts, please refer to the FAQ: Customer Information for Alerts to Broadcasts article.
- List item
This article provides administrators with the instructions to create, trigger, and manage broadcasts in the Broadcasts module.
Prerequisites
- An Appspace Account Owner or Publisher that has been assigned a Platform User license.
- Account Owner permissions to authenticate the enterprise messaging app.
- Supports Broadcasts devices running Appspace App for Devices 2.54.0 or later.
- Supports Appspace only Playlist Channels and Live Channels.
- Supports Appspace cards, such as from Communications & Messaging, Content Feeds, Premium Content Feeds, or etc.
Device Support
The broadcast feature is only supported on the following target devices and operating systems:
Target Devices
Appspace App for Devices 2.54.0 or later
- BrightSign
- Linux
- MacOS
- PWA
- Windows
- Windows UWP
Appspace App for Devices 2.54.1 or later
- Cisco RoomOS
Appspace App for Devices 2.55.0 or later
- ChromeOS
Appspace App for Devices 2.55.2 or later
- MediaVue
Appspace App for Devices 2.68 or later
- Android
- Cisco RoomOS Devices
- Crestron
- Google Meet
- iOS
- LG webOS
- Logitech Tap Scheduler
- Mersive
- Poly
- Samsung Tizen
Target Users
Appspace App for Mobile 1.3.43 or later
For more device information or technical limitations, please visit our Browse and Navigate Broadcasts in Appspace article.
- Broadcasts now support publishing to Audiences, allowing for targeted broadcasts that are tailored to specific job positions, departments, or locations.
Create and Configure Broadcasts
Follow the instructions below to create and configure broadcasts.
- Log in to your Admin console.
- Click Broadcasts from the ☰ Appspace menu, and click the + Create button.
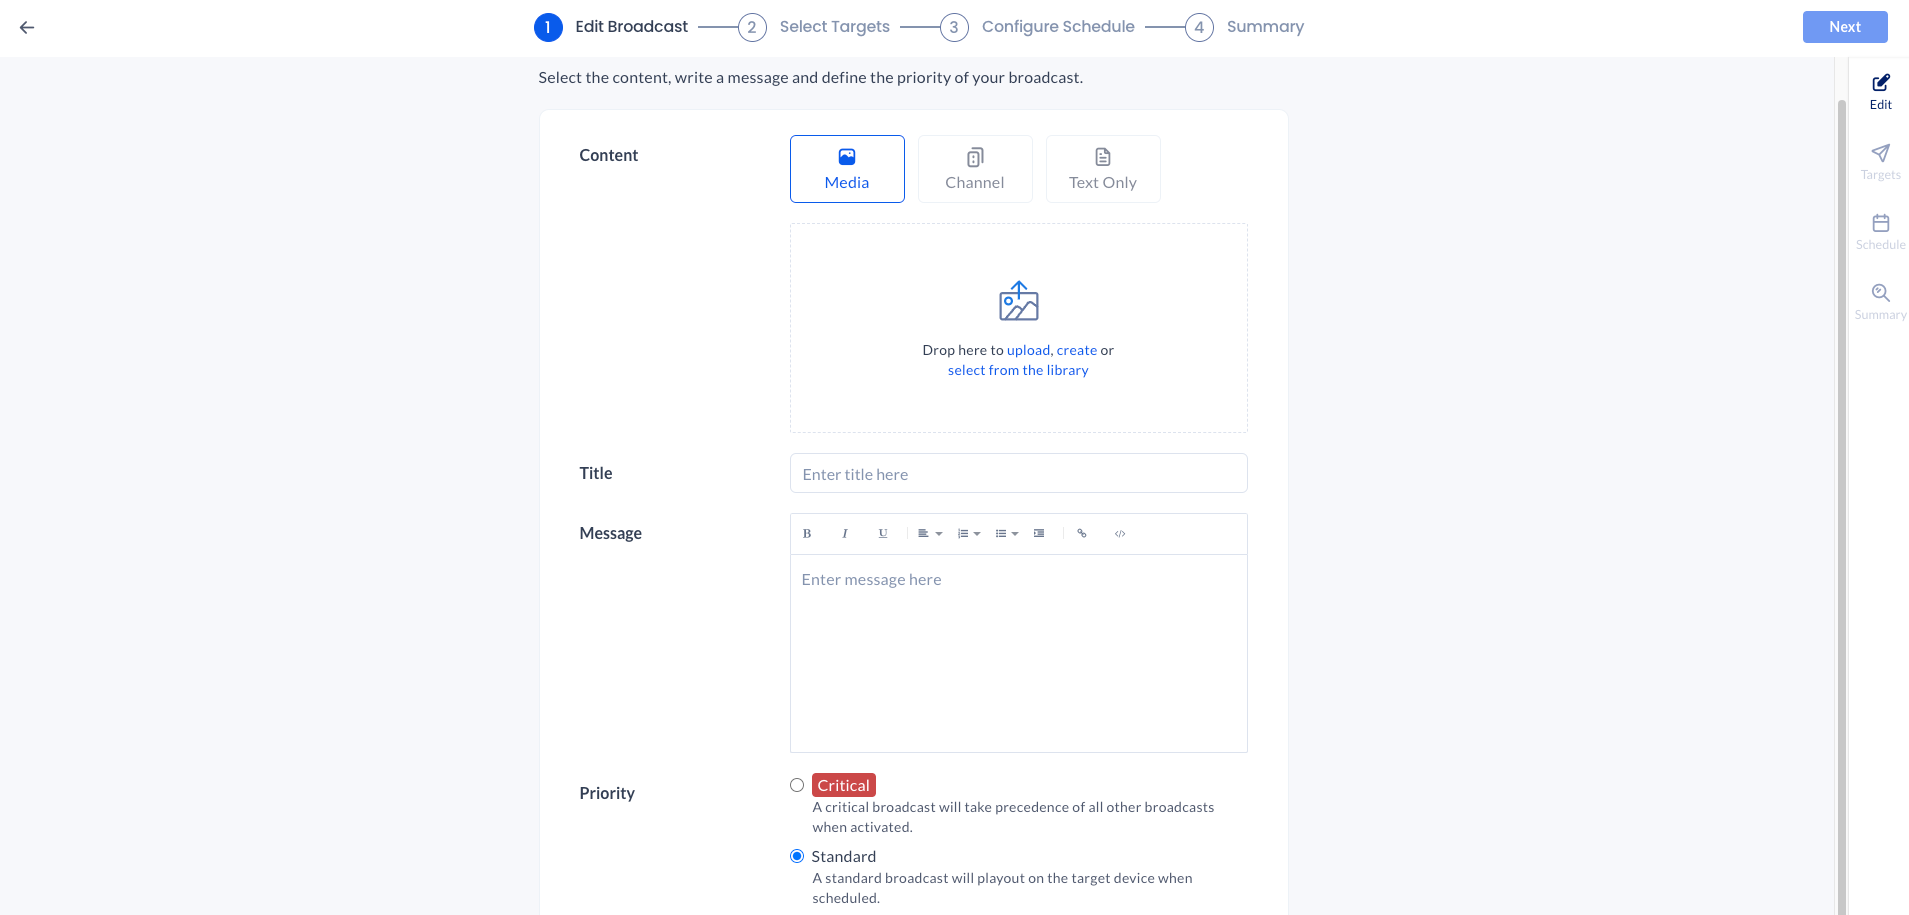
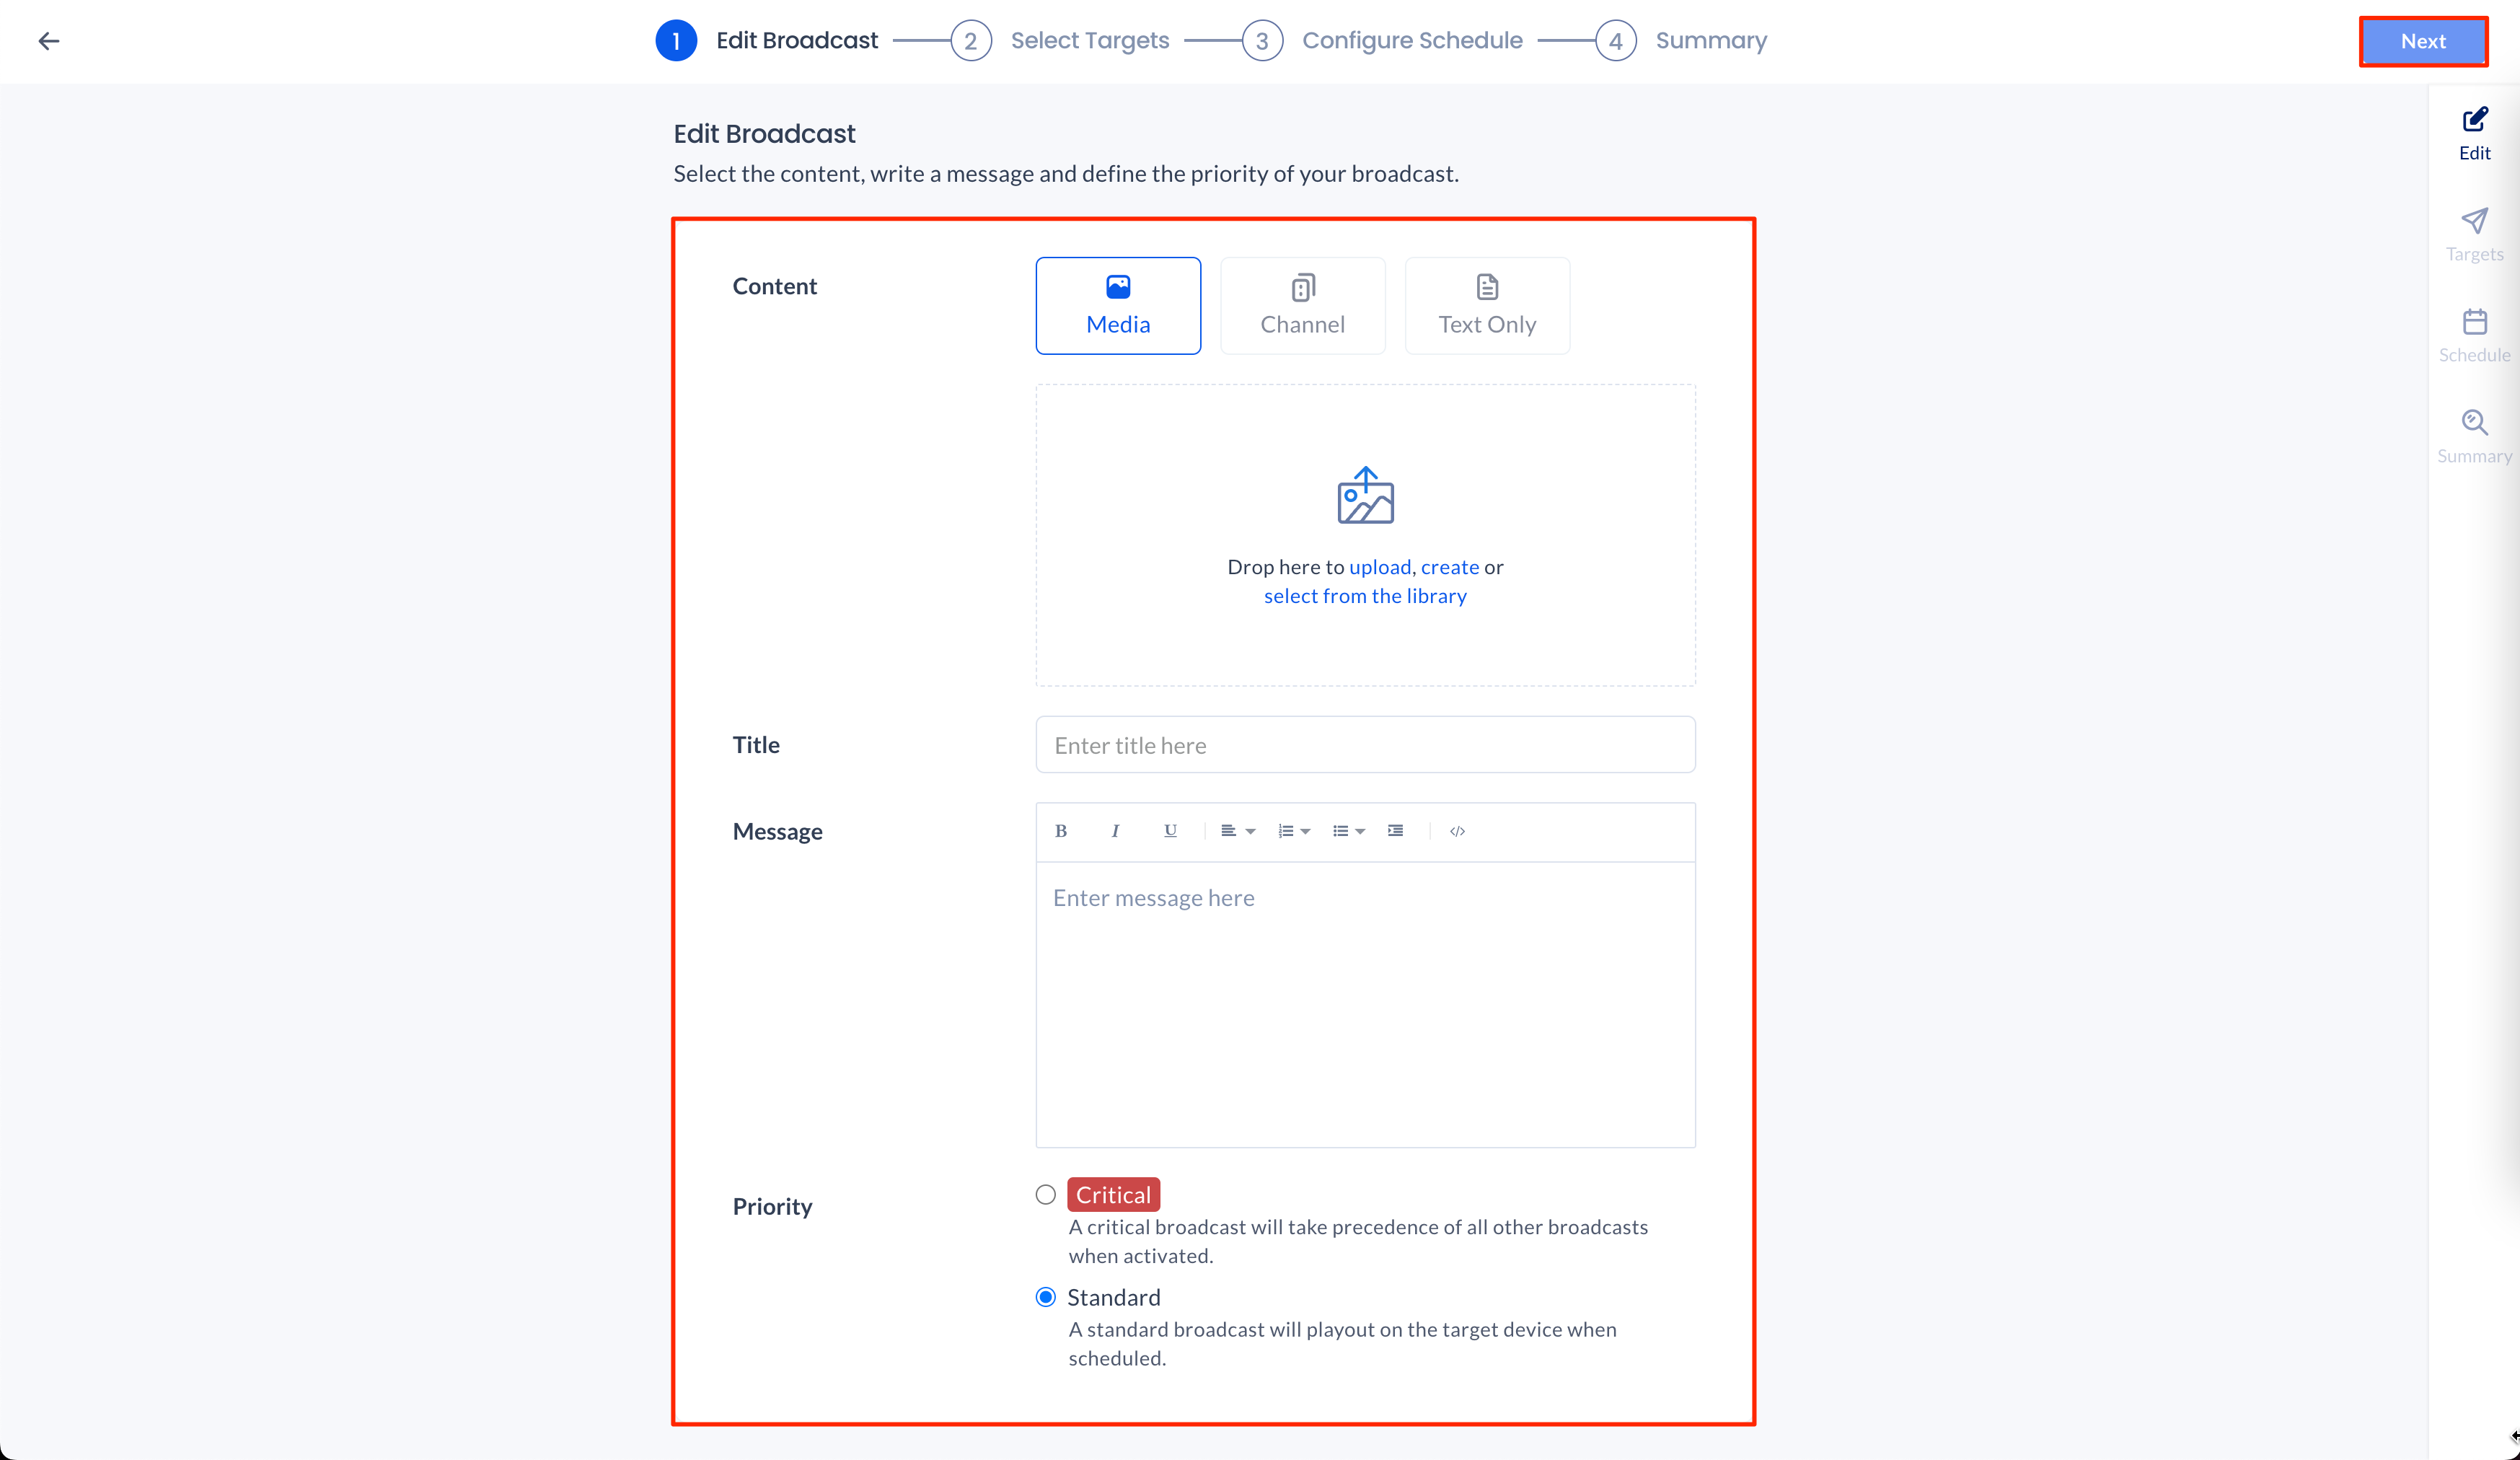
- In the Edit Broadcast section, configure the broadcasts message:
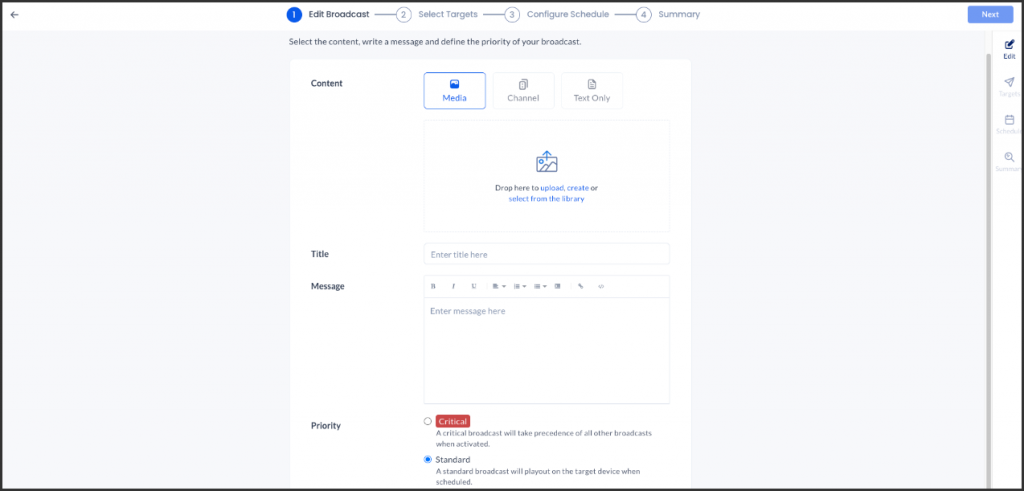
- Content – Select your broadcast type:
- Media – Upload, create, or select your desired content from the Library. We recommend using the Alerts Card.
- Channel – Select a Live channel or Playlist channel.
- Text Only
- Title – Enter the desired broadcast title.
- Message – Enter the desired broadcast message. Messages can include a hyperlink to the desired text. – New Improvement
- Priority – Select the broadcast priority.
- Critical – A critical broadcast will take precedence over all other broadcasts when activated.
- Standard – A standard broadcast will play out on the target device when scheduled.
- Content – Select your broadcast type:
- Click Next.
- In the Select Targets section, configure the broadcasts target, audience, and type of broadcast below: NoteSelect Users if you wish to use Broadcast push notifications on the Employee App for Mobile on iOS and Android. See the Broadcasts section in the Browse and Navigate Appspace Employee App for Mobile article.
- Devices
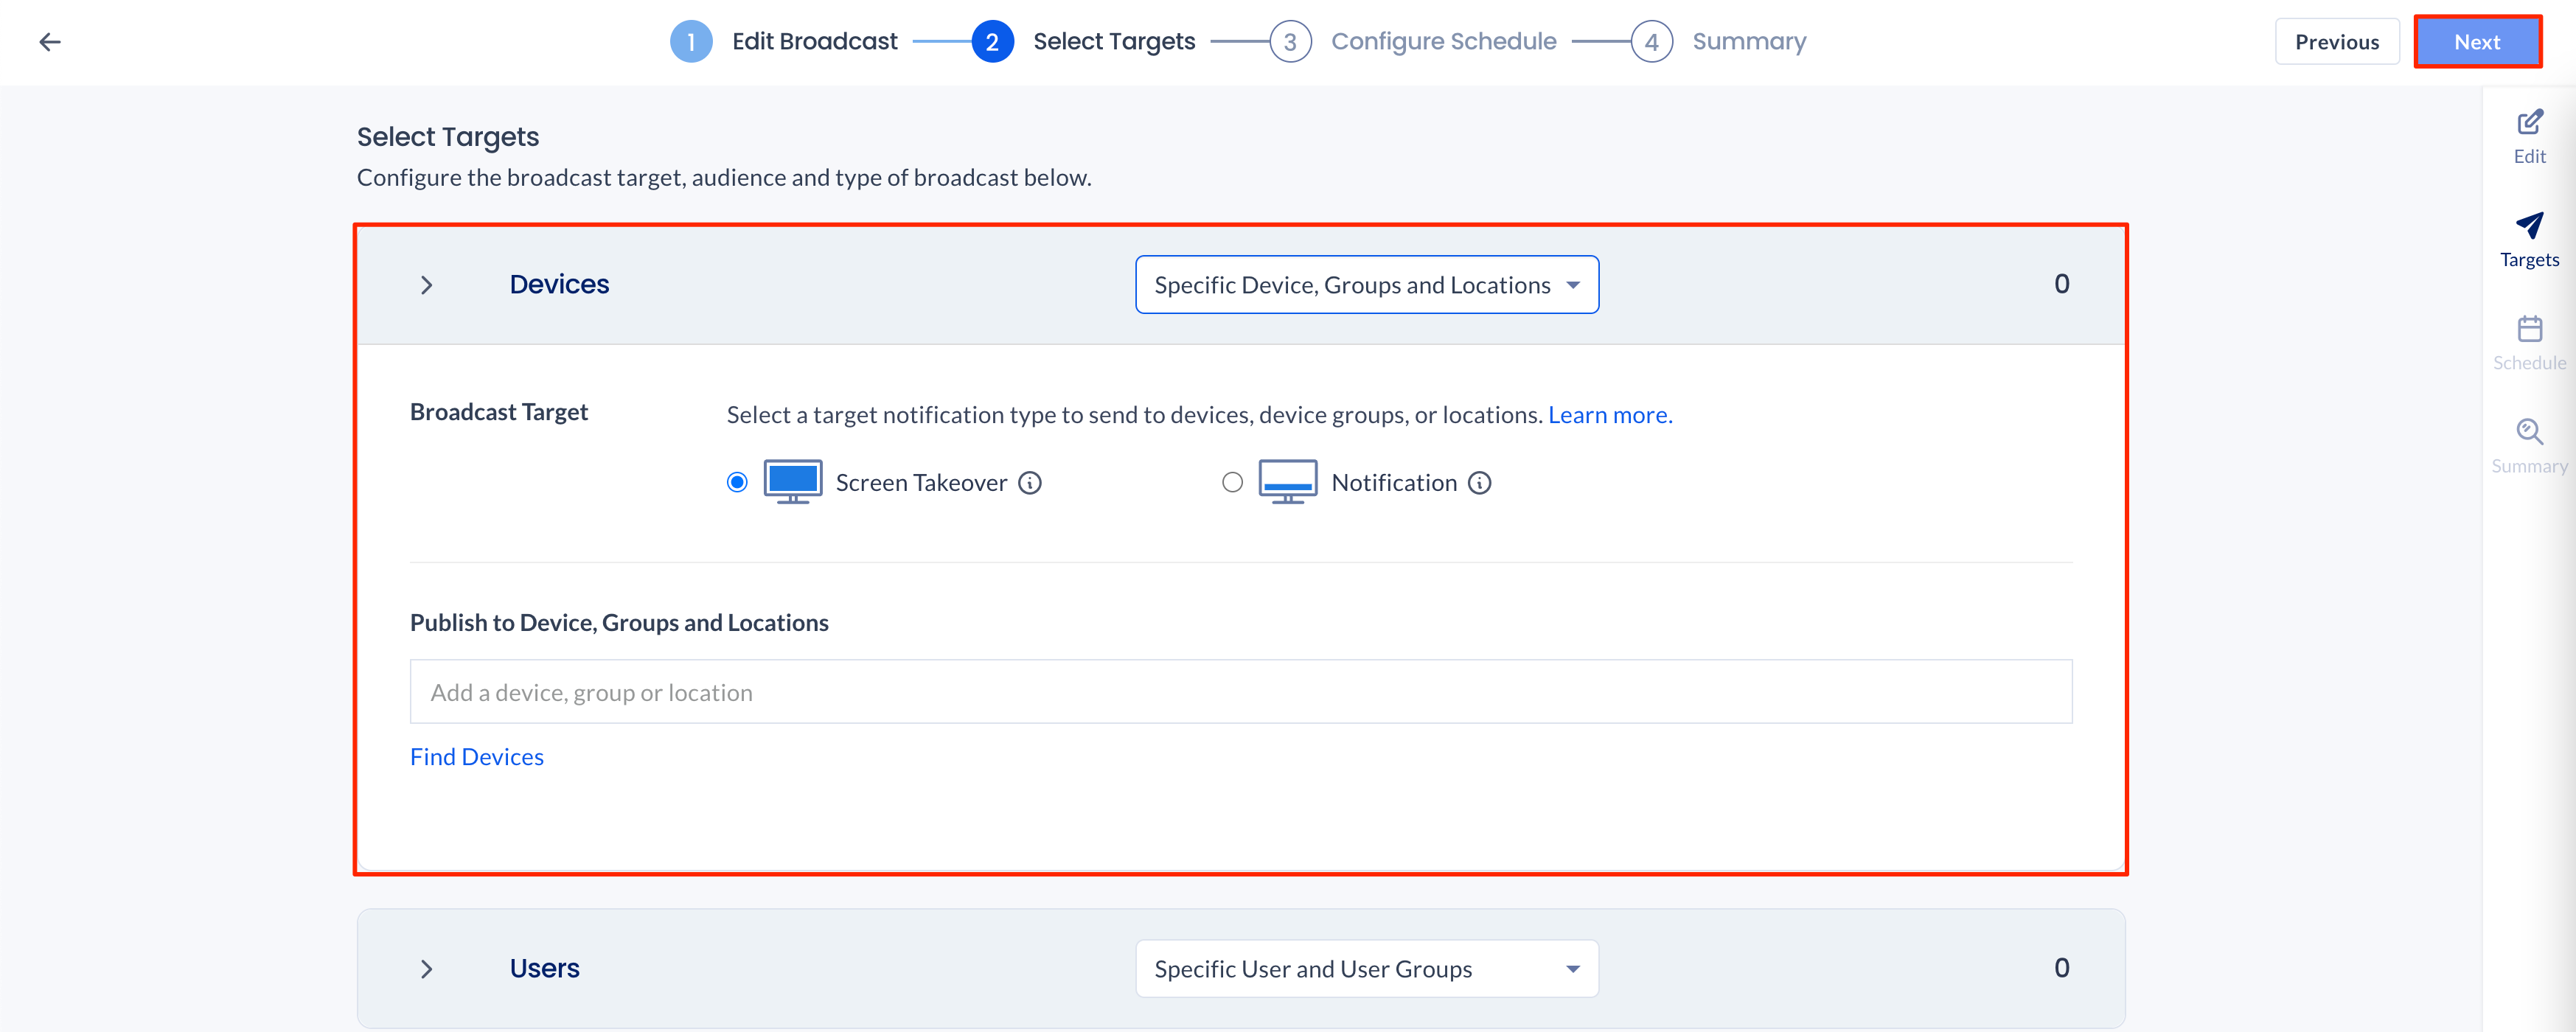
- Select the target devices:
- None
- All Devices
- Specific Device, Groups, and Locations – Proceed to select and add the specific target device, device groups, or device locations.
- Custom Rules – Create custom rules to filter down target devices.
- Click CREATE RULE.
- Select either to Include or Exclude devices from the Rule drop-down menu.
- In the Devices field, enter in the desired devices or device groups to the rule.
- Click the > Expand arrow to configure the following:
- Broadcast Target
- Screen Takeover – Broadcasts will takeover the entire screen of the device. Critical broadcasts will take priority over all other content playing, while Standard broadcasts will playout as additional to the scheduled content.
- Notification – Broadcasts will be displayed and pinned to the bottom 1/3 of the screen.
- Broadcast Target
- Select the target devices:
- Users
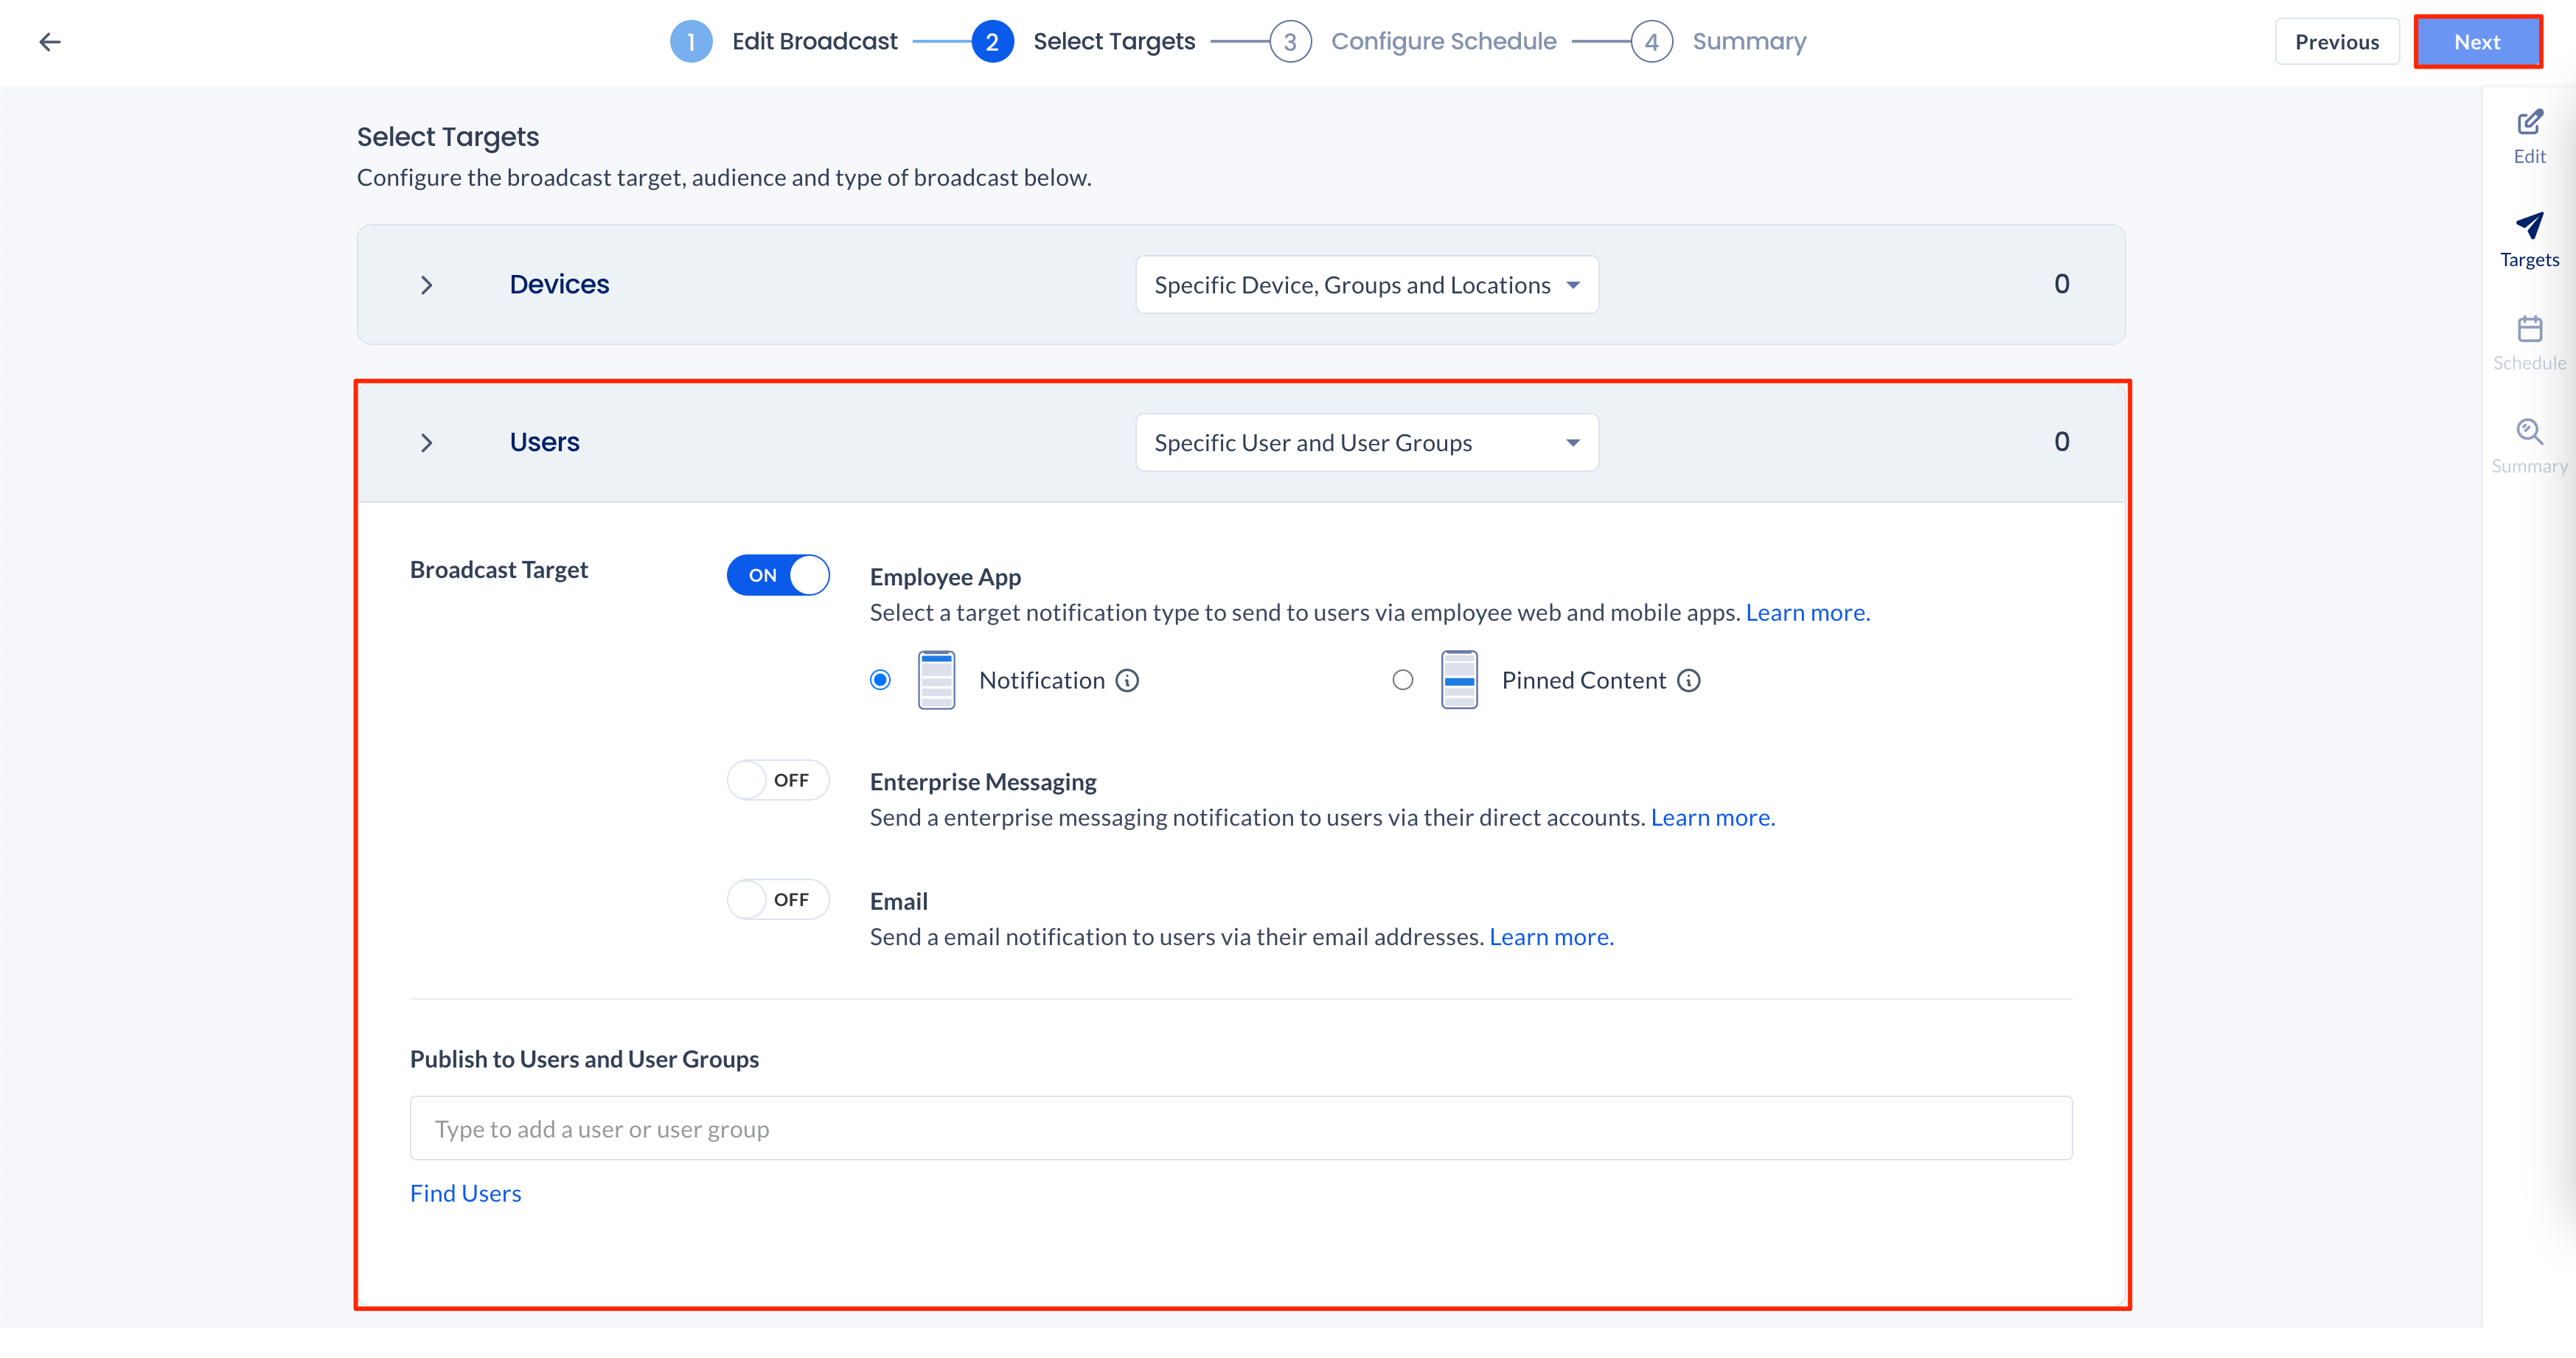
- Select the target users:
- None
- All Users
- Specific User – Proceed to select and add the specific users, user groups and audiences.
- Custom Rules – Create custom rules to filter down target users.
- Click CREATE RULE.
- Select either Include or Exclude devices from the Rule drop-down menu.
- In the Devices field, enter the desired devices or device groups to the rule.
- Click the > Expand arrow to configure the following:
- Broadcast Target
- Appspace – Toggle the switch to ON to send Employee App notifications to users.
- Notification – Broadcasts will be displayed at the top of the Employee App homepage.
- Pinned Content – Broadcasts will be displayed as pinned content on top of the newsfeed on the Employee App homepage.
- Enterprise Messaging – Toggle the switch to ON to send enterprise messaging notifications to users.
- Email – Toggle the switch to ON to send email notifications to users.
- Appspace – Toggle the switch to ON to send Employee App notifications to users.
- Broadcast Target
- Select the target users:
- Devices
- Click Next.
- In the Configure Schedule section, configure how the broadcast is activated or deactivated (triggered):
- Schedule tab:
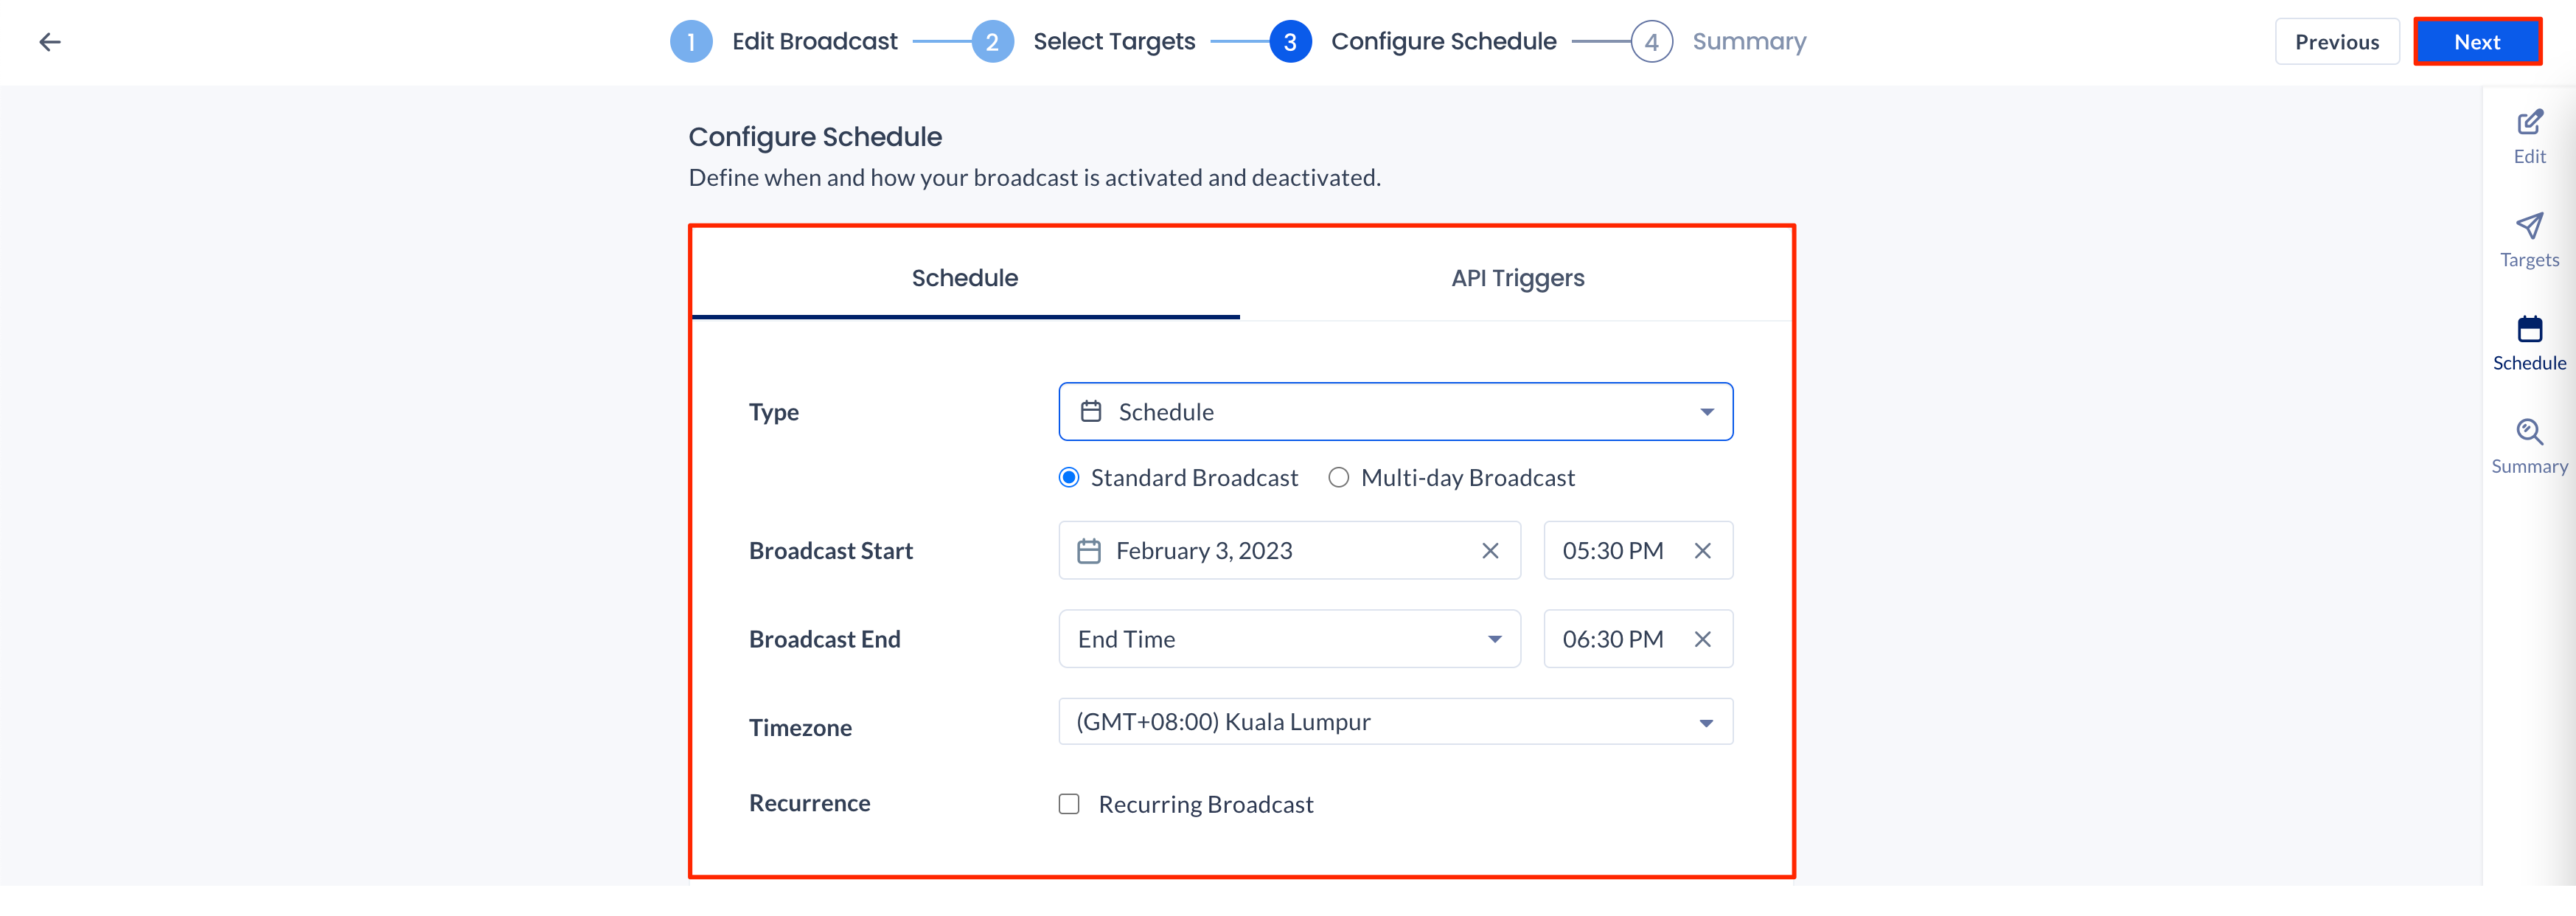
- Type
- Schedule
- Standard Broadcast
- Multi-day Broadcast
- Broadcast Start
- Broadcast End
- Timezone
- Recurrence – Check the Recurrence Broadcast checkbox, and configure the recurrence fields below:
- Repeats Every – Enter the number of times the broadcast is repeated per (Day, Week, Month, Year)
- Ends
- Never
- After – Enter the number of occurrences until the broadcast ends.
- On – Enter the date when the broadcast ends.
- Now
- Broadcast End
- End Time
- Duration
- Manual Deactivation – Broadcast deactivation can be performed from the console, or via an API trigger.
- Timezone
- Broadcast End
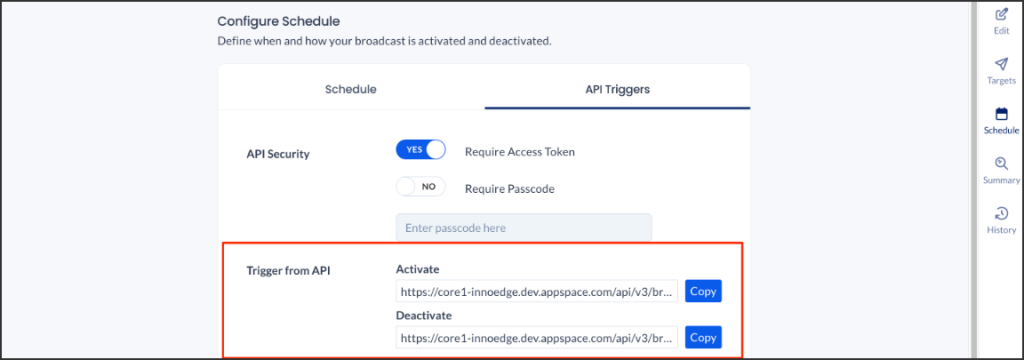
- Manual – Click the API Triggers tab, and configure the API trigger.
- Schedule
- Type
- API Triggers tab:
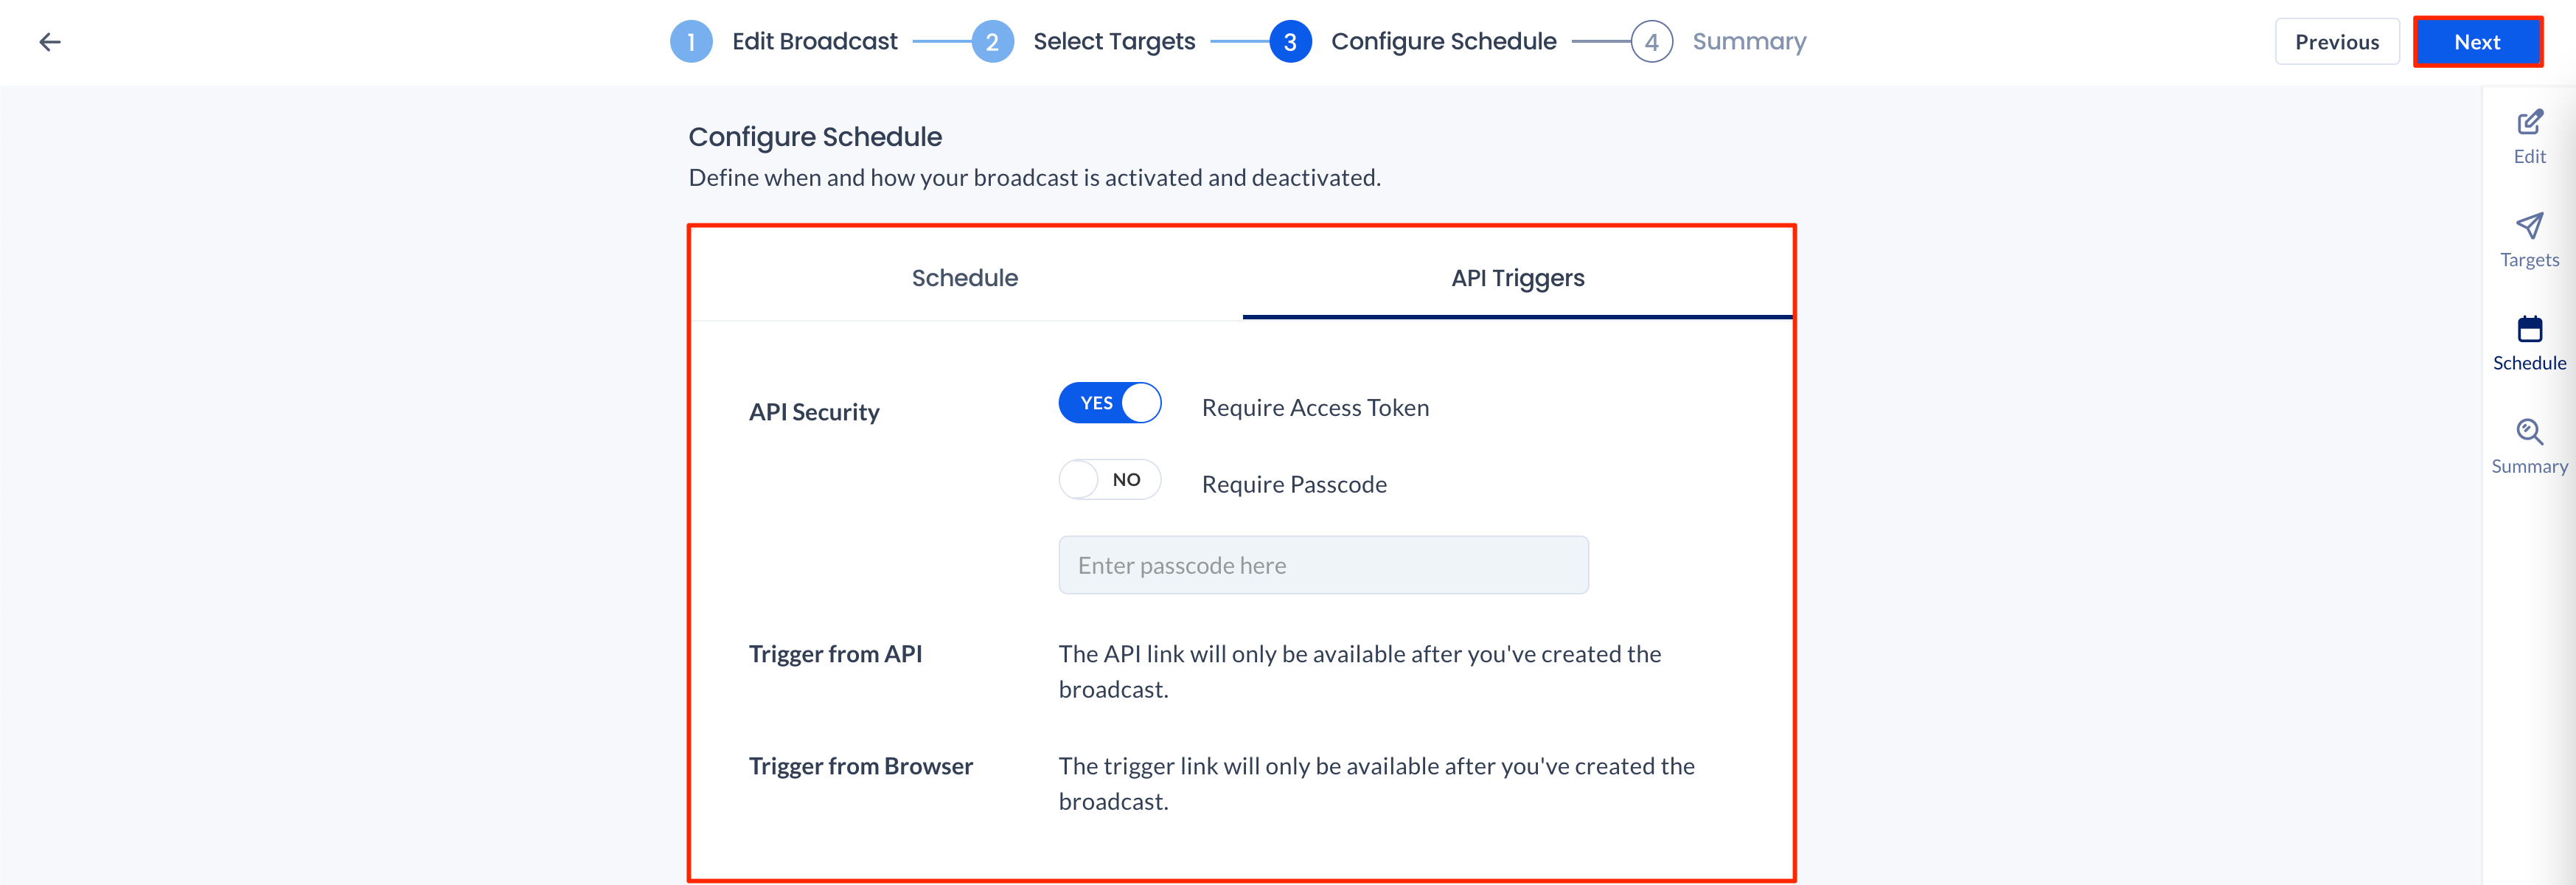
- API Security
- Require Access Token – Toggle the switch to YES if the API trigger requires an access token.
- Require Passcode – Toggle the switch to YES if the API trigger requires a passcode, then proceed to enter the passcode in the field below.
- Trigger from API – Only displayed once the broadcast is saved.
- Activate – Copy the API Activation URL to be used externally.
- Deactivate – Copy the API Deactivation URL to be used externally.
- Trigger from Browser – Scan the QR code, or copy the URL to trigger the broadcast from a web browser.
- API Security
- Schedule tab:
- Click Next.
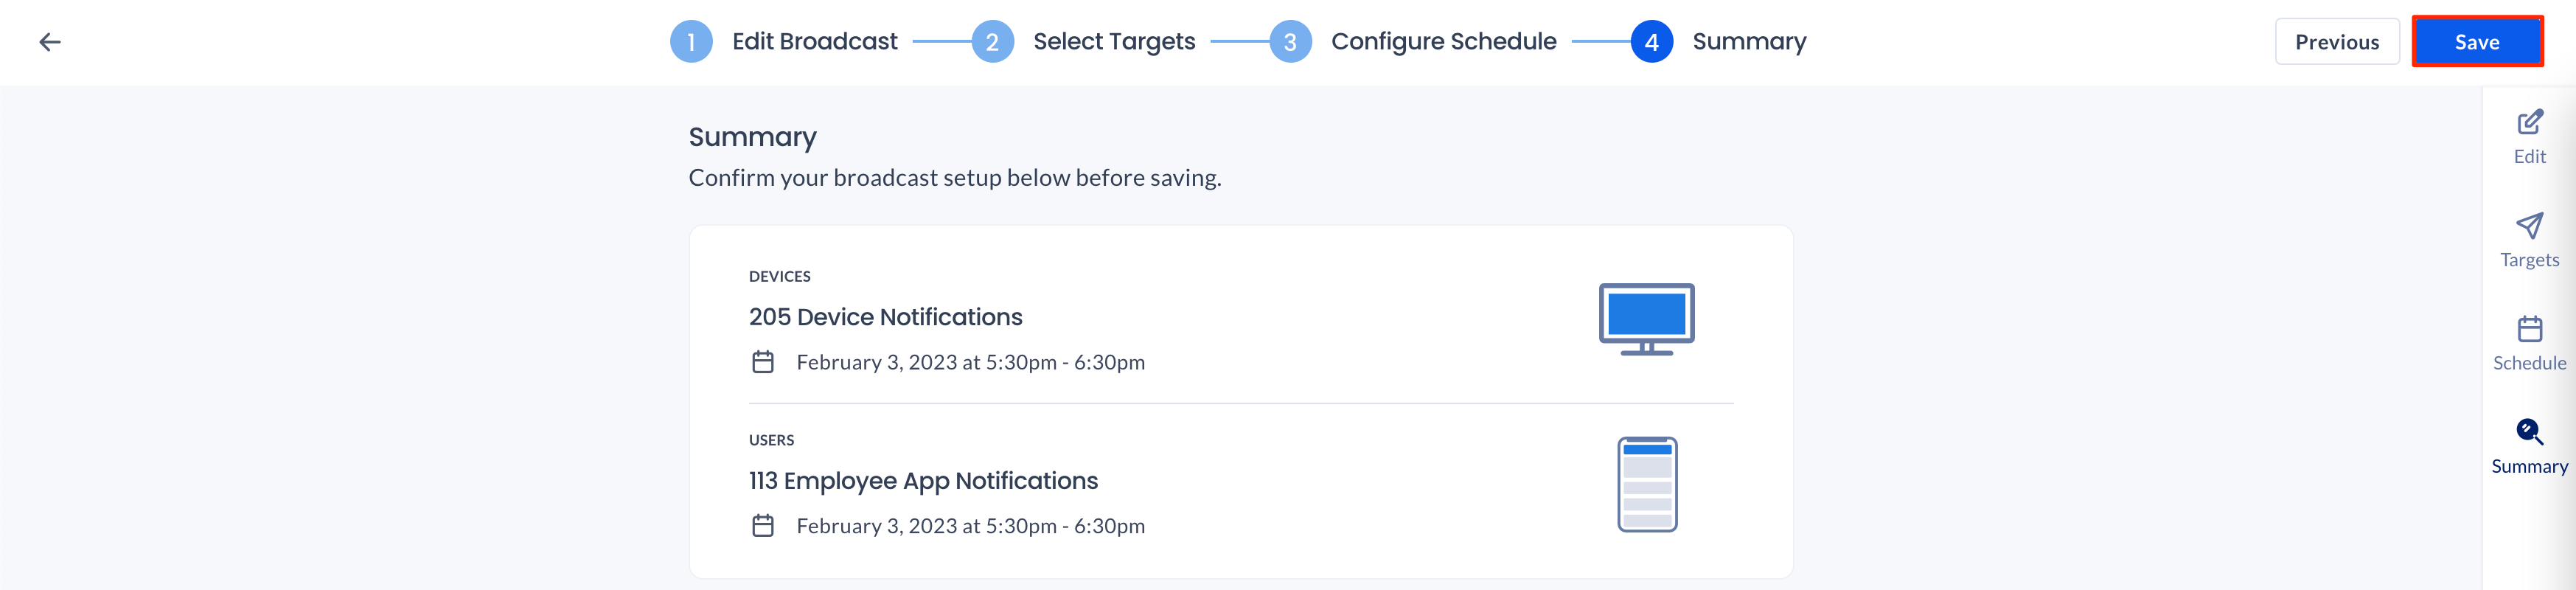
- In the Summary section, confirm your broadcast setup before saving. Once done, click Save.
- Once saved, you may activate the broadcast via the following options:
Activate and Deactivate Broadcasts
Thus, based on the below broadcast configuration, if the broadcast was activated at 9:45 am, the broadcast will be displayed for the duration of 30 mins, and end at 10:15 am.
- Broadcast Start Time = 10:00 am
- Broadcast End Time = 10:30 am
- Duration = End Time – Start Time = 30 mins
Activate and Deactivate Broadcasts via Appspace Console
Follow the instructions below to manually activate or deactivate broadcasts via the Appspace console.
- Log in to your Admin console.
- Click Broadcasts from the ☰ Appspace menu.
- Select the desired broadcast from the dashboard, and click Activate or Deactivate.
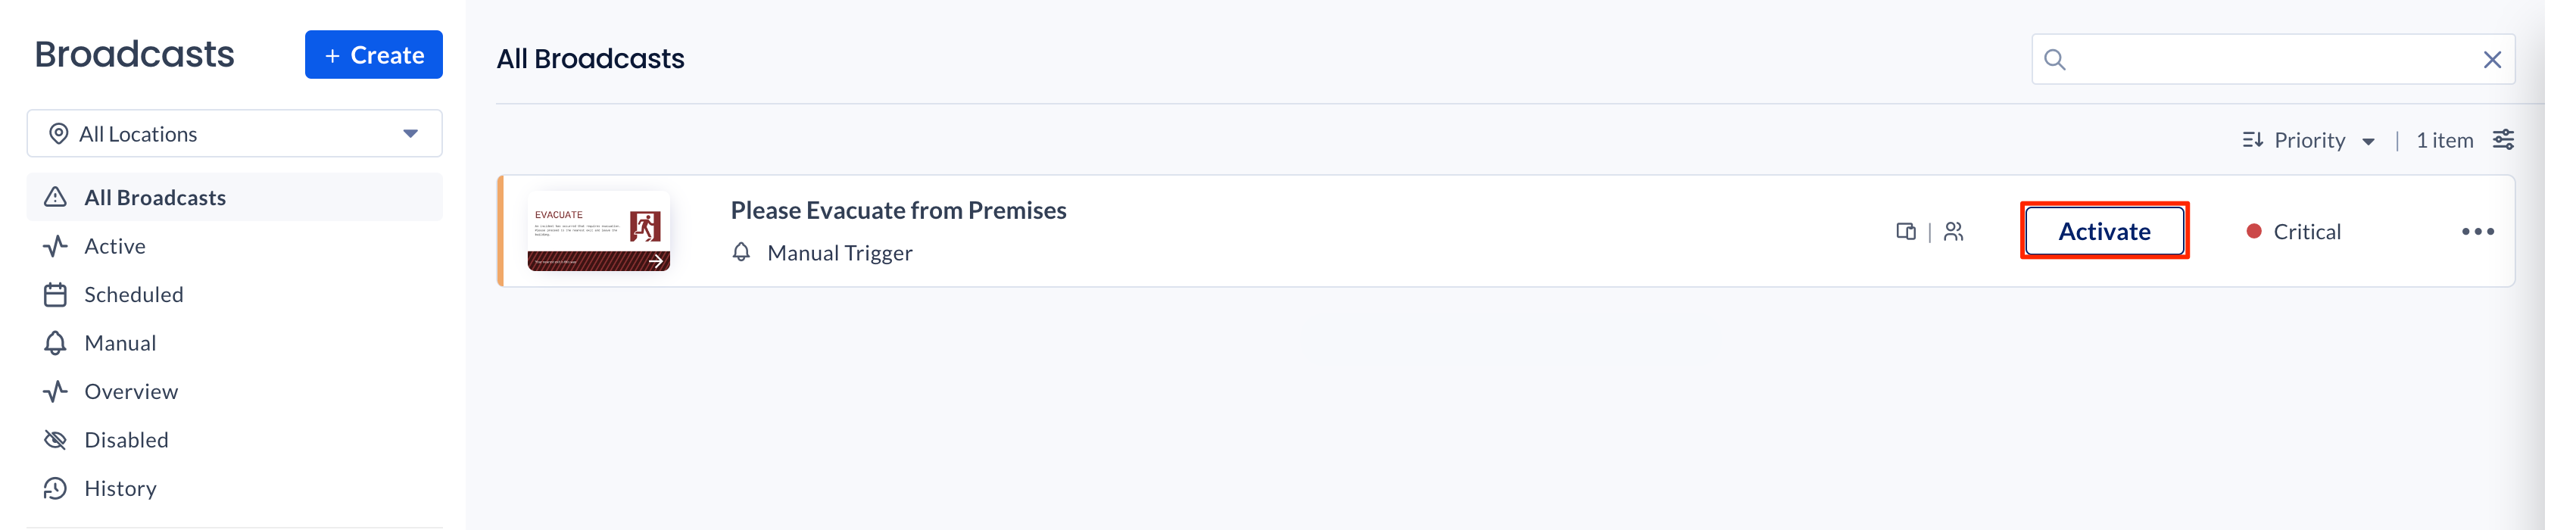
- Click OK to confirm the activation or deactivation of the broadcast.
Activate and Deactivate Broadcasts via API URL Triggers
Follow the instructions below to manually activate or deactivate broadcasts via API URL triggers.
- Log in to your Admin console.
- Click Broadcasts from the ☰ Appspace menu.
- Select and click the desired broadcast from the dashboard, and click the Schedule tab.
- Click the API Triggers tab, and copy both the Activate and Deactivate API URL triggers, which can be used by an external system to activate or deactivate broadcasts. (Request Method: POST)
Activate and Deactivate Broadcasts via Web Browser
Follow the instructions below to manually activate or deactivate broadcasts via web browsers.
- Log in to your Admin console.
- Click Broadcasts from the ☰ Appspace menu.
- Select and click the desired broadcast from the dashboard, and click the Schedule tab.
- Click the API Triggers tab, and copy and paste the Trigger from Browser URL onto a web browser, or scan the QR code to launch a web browser. (Request Method: POST)

- In the web browser, you may Activate or Deactivate the broadcast.
Manage Broadcasts
Follow the instructions below to manage a Broadcast.
- Log in to the Admin console.
- Click the ☰ Appspace menu, and select Broadcast.
- In the Broadcast dashboard, you can see all the broadcasts.
- Click the ellipsis next to the Activate button.
- The options are as follows:
- Activate Now: Only applicable for Scheduled and Manual broadcasts.
- Edit Broadcast: To make changes to the broadcast content that has been chosen.
NoteBroadcasts must be deactivated in order to edit and make changes.
- Configure Schedule: To set aside time for the broadcast content that has been chosen.
- Enable or Disable: To turn on or off the selected broadcast.
NoteThe options will display Enable if the broadcast is currently Deactivated.
- Copy: Copy to save time and prevent having to create the same broadcast repeatedly. You’ll need to rename the new broadcast when you click Copy.
- Delete: Delete the broadcast.
Configure the Common Alerting Protocol (CAP) for Broadcasts
Prerequisites
- Customers will need to register with their preferred authority organization in order to receive their Common Alerting Protocol (CAP) URL link.
Follow the instructions below to configure the Common Alerting Protocol for Broadcasts.
- Log in to the Admin console.
- Click the ☰ Appspace menu, and select Broadcasts.
- Click Settings from the side panel, and select Broadcasts Connectors.
- Click + ADD to configure your CAP (Common Alerting Protocol) connector.
- In the Connector tab, configure the CAP connector:
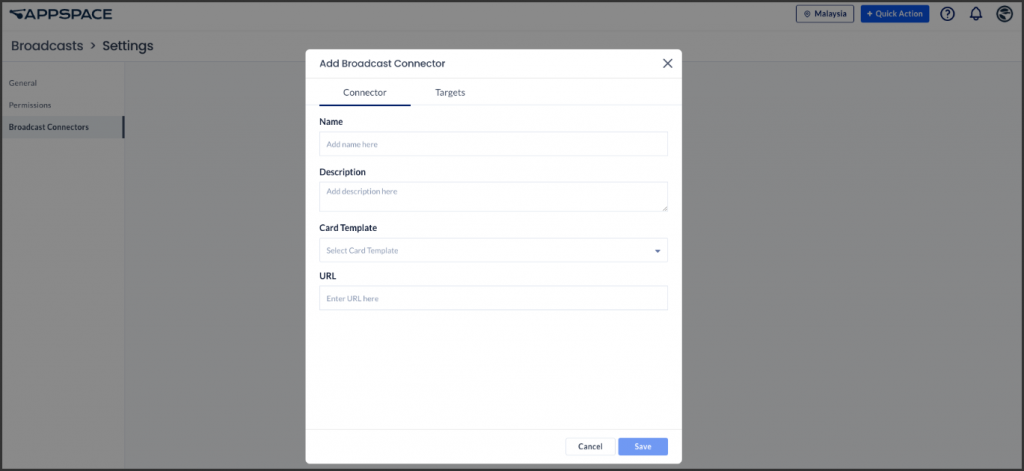
- Name – Enter the name of the CAP connector.
- Description – Provide a description for the CAP connector.
- Card Template – Select the Card template that displays the CAP information.
- URL – Enter the CAP URL link (.xml format).
- In the Targets tab, configure the CAP target:
- Click +ADD THE TARGET and enter the CAP address and click Apply.
NoteIn order to get the CAP Address, follow the instructions below:- Copy and paste your CAP URL link to your web browser.
- Locate the <url> tag, and copy and paste that link to your web browser.

- Locate the <addresses> tag, and copy and paste the address to the CAP address field.

- Do note that the CAP address may differ between CAP URL links from different authority organizations.
- Proceed to map the users or devices to the CAP address and click Apply.
- In the Select Targets section, complete the following:
- Devices:
- None
- All Devices
- Specific Device, Groups, and Locations – Proceed to select and add the specific target device, device groups, or device locations.
- Custom Rules – Create custom rules to filter down target devices.
- Click CREATE RULE.
- Select either to Include or Exclude devices from the Rule drop-down menu.
- In the Devices field, enter in the desired devices or device groups to the rule.
- Click the > Expand arrow to configure the following:
- Broadcast Target
- Screen Takeover – Broadcasts will takeover the entire screen of the device. Critical broadcasts will take priority over all other content playing, while Standard broadcasts will playout as additional to the scheduled content.
- Notification – Broadcasts will be displayed and pinned to the bottom 1/3 of the screen.
- Broadcast Target
- Users:
- None
- All Users
- Specific User – Proceed to select and add the specific users, user groups and audiences.
- Custom Rules – Create custom rules to filter down target users.
- Click CREATE RULE.
- Select either Include or Exclude devices from the Rule drop-down menu.
- In the Devices field, enter the desired devices or device groups to the rule.
- Click the > Expand arrow to configure the following:
- Broadcast Target
- Employee App – Toggle the switch to ON to send Employee App notifications to users.
- Notification – Broadcasts will be displayed at the top of the Employee App homepage.
- Pinned Content – Broadcasts will be displayed as pinned content on top of the newsfeed on the Employee App homepage.
- Enterprise Messaging – Toggle the switch to ON to send enterprise messaging notifications to users.
- Email – Toggle the switch to ON to send email notifications to users.
- Employee App – Toggle the switch to ON to send Employee App notifications to users.
- Broadcast Target
- Devices:
- In the Select Targets section, complete the following:
- Click +ADD THE TARGET and enter the CAP address and click Apply.
- Once done, click Apply.
Manage Common Alerting Protocol (CAP) for Broadcast
Follow the instructions below to manage a Broadcast.
- Log in to the Admin console.
- Click the ☰ Appspace menu, and select Broadcast.
- In the Broadcast Connectors dashboard, you can see all the broadcasts.
- Click the ellipsis next to the API type.
- The options are as follows:
- Edit: To edit the broadcast connector.
- Delete: To remove the broadcast connector.
Was this article helpful?