This article provides instructions to enable the Single Sign-On (SSO) feature for Appspace On-Prem.
With SSO, Appspace On-Prem accounts can now be configured to integrate with Security Assertion Markup Language (SAML) 2.0 compliant identity providers, allowing for seamless and secure connections using a single set of credentials, simplifying username and password management. When you login to Appspace, your credentials are authenticated by the identity provider, and a SAML assertion is sent to Appspace via the web browser to allow the login access to Appspace.
Appspace provides the following two additional seamless SSO configuration options for users on an external IdP:
- Just-in-Time (JIT) provisioning
- Pass-through authentication
Note
See Introduction to Configuring SSO with Appspace for more information.
What’s in this article:
Prerequisites
JIT Provisioning
- An Identity Provider that is SAML 2.0 compliant.
- IdP metadata, or the SSO URL and x.509 certificate.
- Appspace account with Account Owner credentials to configure SSO settings.
- An Appspace User Group to act as the default user group for newly created JIT-provisioned users.
- Configure a SAML identification attribute flag to identify an IdP user as one that should be created in Appspace. This attribute can be selected by the IdP administrator and should be configured in both the IdP and in Appspace.
- Configure the IdP to pass the correct JIT-related attributes to Appspace such as attribute mappings for the First Name and Last Name fields.
- Configure JIT as per the specific access management tool (i.e. Okta/OneLogin) and ensure that any Appspace-specific attributes are created and passed with each assertion.
- Make Appspace available in the IdP-specific App Store catalog.
Pass-through Authentication
- An Identity Provider that is SAML 2.0 compliant.
- IdP metadata, or the SSO URL and x.509 certificate.
- Appspace account with Account Owner credentials to configure SSO settings.
Enable Single Sign-On (SSO)
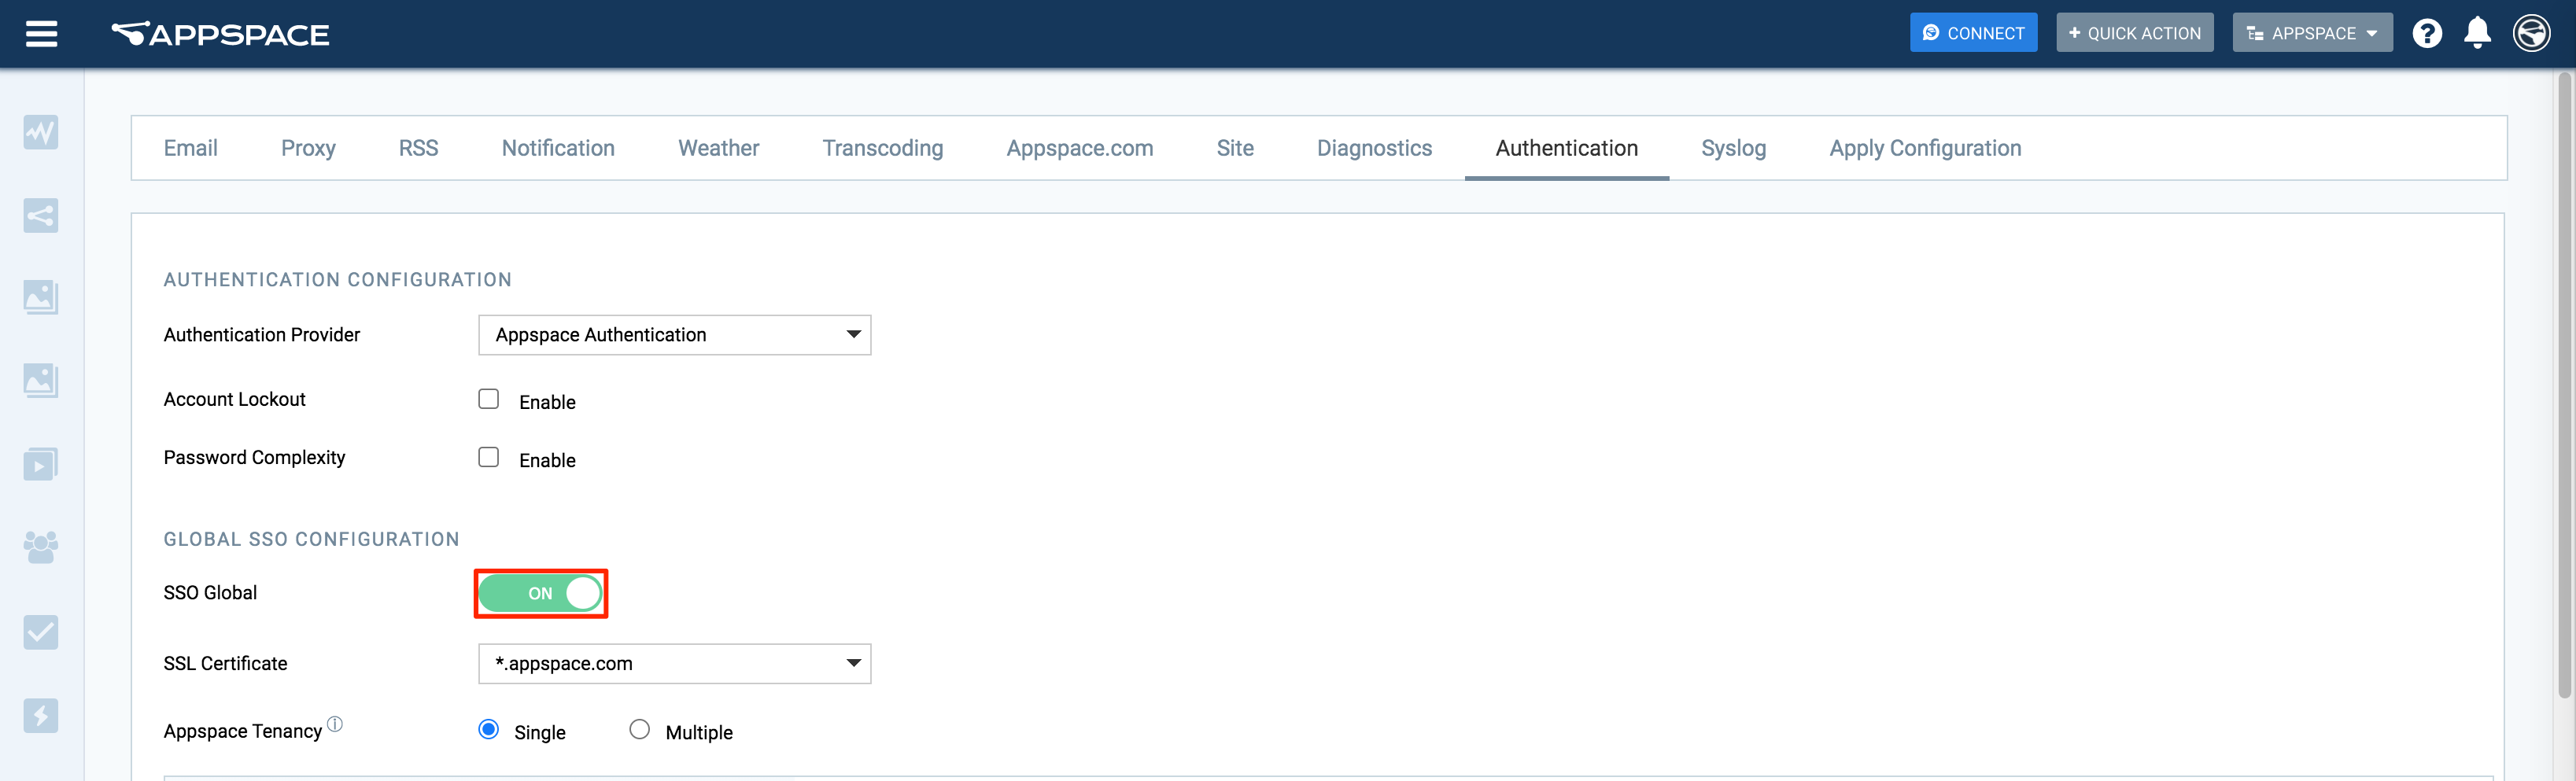
- Navigate to System > Configuration from the Appspace menu, and click the Authentication tab.
- In the GLOBAL SSO CONFIGURATION section, slide the SSO Global slider to ON to view additional SSO configurations.
- In the SINGLE SIGN-ON (SSO) SETTINGS section, select the desired Login Method:
- SSO only – Users must log in with Single Sign-On credentials.
- SSO or Appspace Credentials – Users can login with their Single Sign-On credentials and their Appspace credentials.
- In the IDENTITY PROVIDER (IDP) INFORMATION section, drop or upload the IdP metadata XML file, or manually enter the SSO URL and X.509 Certificate details in the relevant fields.
 ImportantPlease ensure the NameID in the SAML assertion is the email address of the user.
Appspace uses the following NameID format: urn:oasis:names:tc:SAML:1.1:nameid-format:emailAddress - In the GENERATING SERVICE PROVIDER (SP) METADATA section, select the desired Data binding (IdP to SP) option:
- Redirect – Users are redirected to the Identity Provider. SSO details will be passed in a query string with “?SAMLRequest=……” as part of the URL.
- Post – SSO details are passed using the POST method. Ensure the Identity Provider has direct access to the Appspace Server for this method to work.
- Optionally, you may enable the following features:
- Just-In-Time Provisioning (JIT) – follow the instructions in the Configure Just-In-Time Provisioning section below.
- Pass-through Authentication – this feature is ideal for on-prem deployments, and is disabled by default.
- Once all SSO configurations have been made, click Save.
Configure Just-In-Time Provisioning (JIT)
Just-In-Time Provisioning allows you to enable the automatic creation of users on the Appspace account if they do not exist.
- In the JUST-IN-TIME PROVISIONING (JIT) section, slide the Enable JIT? slider to ON.

- Enter in the User Group in which the new users will be assigned to. NoteBy default, the SAML attributes are mapped to first name and last name of the IdP configuration.
- Optionally, click the Show advanced configuration link, if you would like to map the SAML attributes to a value that matches your IdP implementation

- Enter in the JIT condition Attribute Name and Attribute Value Regex. NoteThe SAML identification attribute flag, Attribute=”appspace-role” and Value=”^platform-user$”
This value is a regular expression. If the attribute value matches this regular expression then the user is provisioned via JIT. Regular expressions allow very flexible matching for the wide array of IdP configurations.
This allows you to only provision platform users for some employees, while allowing for pass-through access. By default, this looks for an attribute called “appspace-role” with a value of “platform-user$”, however this is designed to be flexible and has a regex match. You could also make it match all users by setting it to something like attribute = ‘mail’ value = ‘.*’ (regex wildcard that will match any email value) - Enter in the SAML attributes mapping for the First name and Last name.
Disable Single Sign-On (SSO)
- Navigate to System > Configuration from the Appspace menu, and click the Authentication tab.
- In the GLOBAL SSO CONFIGURATION section, slide the SSO Global slider to OFF.
- Click Save and confirm settings.
- Click the Click Here link in the notification message displayed at the top of the page.
- You’ll be re-directed to the Apply Configuration tab, where you’ll be required to enter in your Windows Server credentials, and click Apply to finish applying the settings to the system.
- Click Yes to confirm, and restart your Appspace server.
Was this article helpful?