This article provides the instructions to download, install, and configure the operating system, prerequisite software, and Appspace software, for a first-time install of an Appspace 7.x on-prem deployment.
Please follow the instructions in this order:
Prerequisites
- Please ensure you meet all the requirements listed in the On-Prem System Requirements article.
- HTTPS is required for communications. Download and install a valid publicly trust SSL (Secure Sockets Layer) signed certificate for the Appspace on-prem server. Refer to the How to Set Up SSL on IIS 7 instructions here: https://docs.microsoft.com/en-us/iis/manage/configuring-security/how-to-set-up-ssl-on-iis
- Configure the DNS (Domain Name Server) with a FQDN (Fully Qualified Domain Name).
- Turn off anti-virus software prior to installation. If unable to turn off anti-virus software due to company policies, configure the anti-virus software to exclude all Appspace folders and databases.
Install and Configure Operating System
- Links to the installation instructions on the provider’s website are provided.
- Please ensure you take note of and complete the specific configuration required for each application, described in each step below.
- Select and install the Windows Server 2016 operating system (OS). Please note the specific configuration required for Appspace, as listed below:
- Install Windows Server 2016 as per instructions on the Microsoft website: https://social.technet.microsoft.com/wiki/contents/articles/37890.windows-server-2016-installation.aspx Important
When installing the Windows Server 2016, ensure that the Time and currency format is set to English (United States). This is the default setting.
This is to prevent a licensing issue, where the on-prem server is unable to add the pending license receipt. This is due to a date format mismatch between the Appspace cloud server, which is set with the M/d/yyyy date format, and the on-prem server, which may contain a different date format, if another locale is selected during the Windows server installation.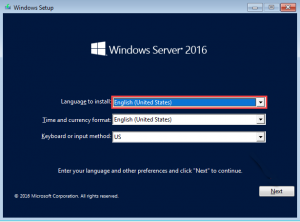
- Install all the necessary updates for Windows Server 2016. Important
- Please install all the latest Windows Updates before the Appspace installation, to prevent installation conflicts between both the Appspace installation process and windows server updates in the background.
- Do not disable the Windows Update service. If the Windows Update service is disabled, the Appspace installer will encounter an error.
- Install Windows Server 2016 as per instructions on the Microsoft website: https://social.technet.microsoft.com/wiki/contents/articles/37890.windows-server-2016-installation.aspx
- Install the Universal C Runtime update as per instructions on the Microsoft website: https://support.microsoft.com/en-us/help/2999226/update-for-universal-c-runtime-in-windows
- Ensure the following options are checked:
- Role-based or feature-based installation.
- Select Appspace server from the server pool.
- Web Server (IIS).
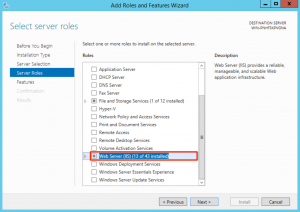 Ensure the following Web Server IIS services are selected:
- Web Server (IIS)
- Web Server
- Default Document
- Static Content
- Performance
- Static Content Compression
- Dynamic Content Compression
- Application Development
- .NET Extensibility 3.5
- .NET Extensibility 4.6
- ASP
- ASP.NET 3.5
- ASP.NET 4.6
- ISAPI Extensions
- ISAPI Filters
- Web Server
- Management Tools
- IIS Management Console
- Web Server (IIS)
- .NET Framework 3.5 Features and .NET Framework 4.6 Features.
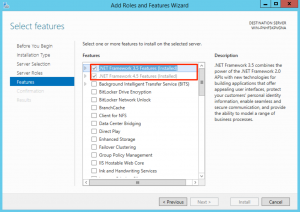 Ensure the following .NET Framework features are selected:
- .NET Framework 3.5 Features
- HTTP Activation
- Non-HTTP Activation
- .NET Framework 4.6 Features
- WCF Services
- HTTP Activation
- TCP Activation
- WCF Services
- .NET Framework 3.5 Features
- Restart the Windows 2016 server.
- Proceed to configure the Secure Sockets Layer (SSL) for the server, by following the How to Set Up SSL on IIS 7 instructions here: https://docs.microsoft.com/en-us/iis/manage/configuring-security/how-to-set-up-ssl-on-iis
-
Once installed, restart the Windows 2016 server and proceed to the next section.
Download Prerequisite Software
- Disable the Internet Explorer Enhanced Security Configurations (IE ESC), which is enabled by default, as this blocks IE from downloading all files.
In Windows Server Manager, click On and in the IE Enhanced Security Configuration option, select the Off options for both Administrators and Users.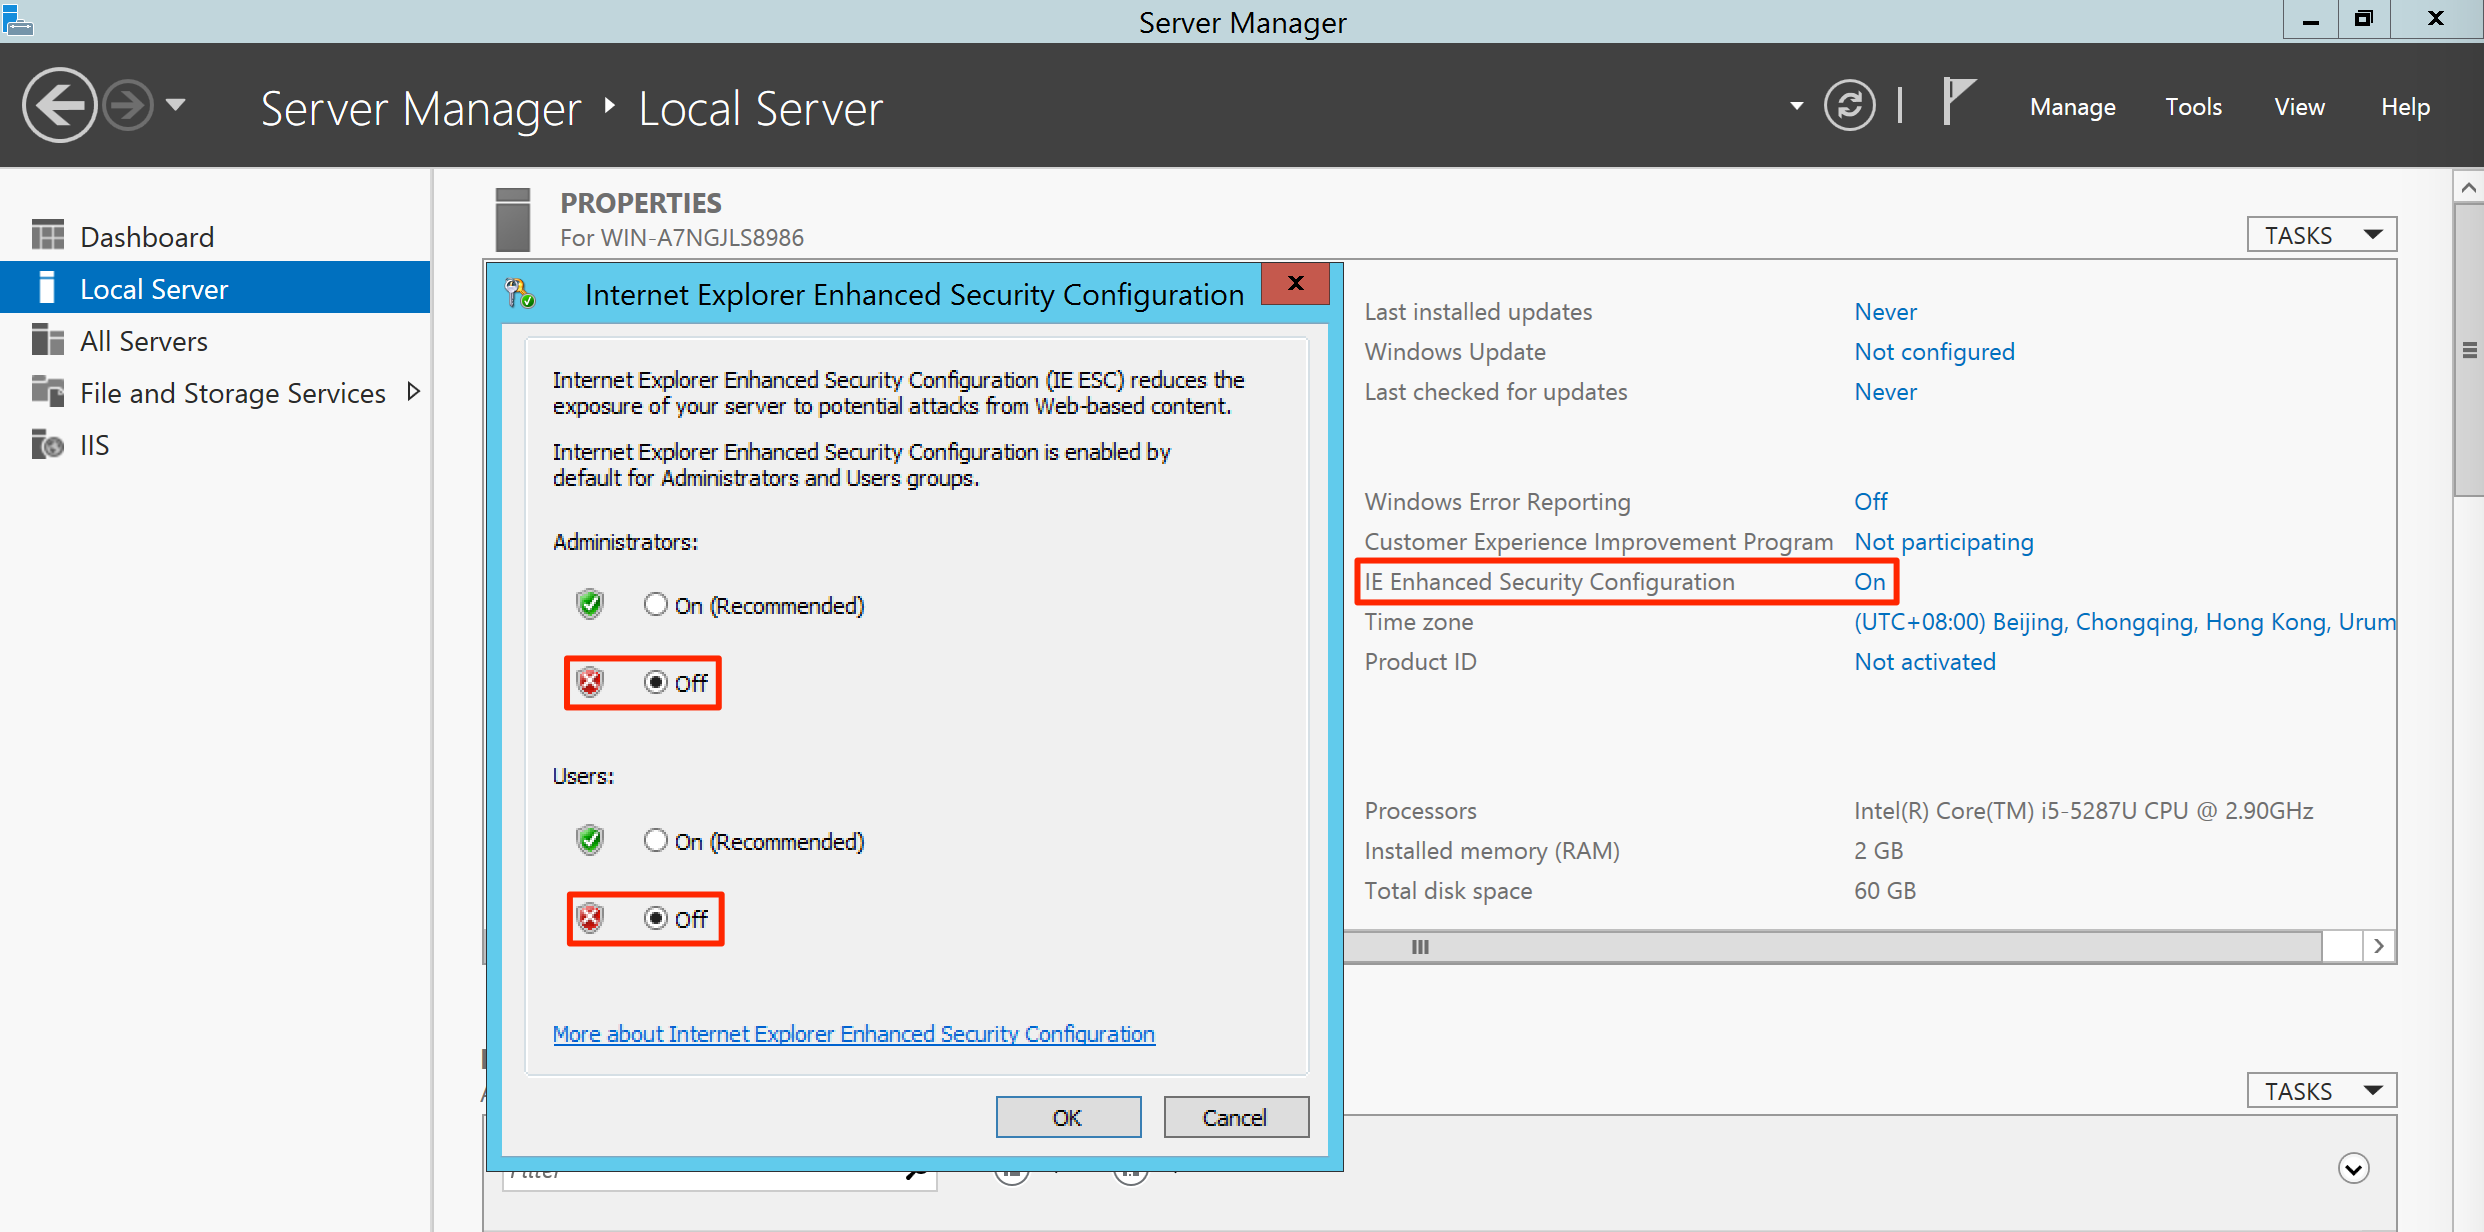
- Download Microsoft .NET Framework 4.6.2: https://support.microsoft.com/en-us/topic/the-net-framework-4-6-2-web-installer-for-windows-6ec55fa1-50e9-0395-2a37-ff612779027c
- Download only one of the following database:
- MySQL 8.x: https://dev.mysql.com/downloads/mysql/
- MS SQL: Microsoft SQL Server 2016: https://www.microsoft.com/en-us/evalcenter/evaluate-sql-server-2016
- Please contact Appspace Support to get the latest Appspace Installer.
- Proceed to install the applications as per the instructions in the next section below.
Install Prerequisite Software
- Links to the installation instructions on the provider’s website are provided.
- Please ensure you take note of and complete the specific configuration required for each application, described in each step below.
- Please right-click each installer file and select ‘Run as Administrator’ to install.
Please install the prerequisite software downloaded earlier, in the following order:
- Install .NET Framework 4.6.2. Follow the instructions here: https://docs.microsoft.com/en-us/dotnet/framework/install/guide-for-developers?redirectedfrom=MSDN
- Install and configure your preferred database: Warning
- SQL passwords should NOT contain shell metacharacters such as !#’”`&; or spaces.
- The database credentials CANNOT be changed once Appspace has been installed.
- The database user account must not be deleted once Appspace has been installed.
- MySQL:
- Install MySQL 8.x. Follow the instructions here: https://dev.mysql.com/doc/refman/8.0/en/windows-installation.html
- Select the Custom option on the Choosing a Setup Type window, and click Next to continue.
- On the Select Products and Features window, ensure the following options are selected, and moved under the Products/Features To Be Installed section.
- MySQL Server 8.x (x64 version)
- MySQL Workbench CE 8.0.x (x64 version)
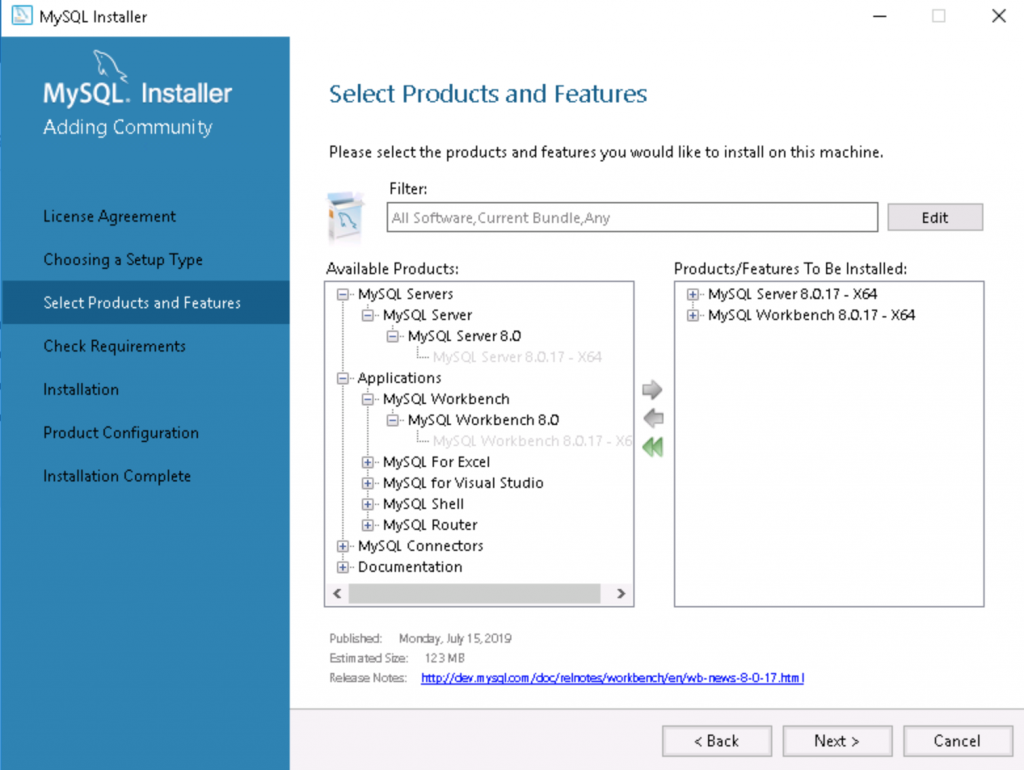 WarningOnly select these 2 options. Leave all the other options unchecked. It is important to make sure that the other options (such as MySQL Connectors) are NOT selected during the MySQL installation.
- In the Group Replication window, select the Standalone MySQL Server/Classic MySQL Replication option.
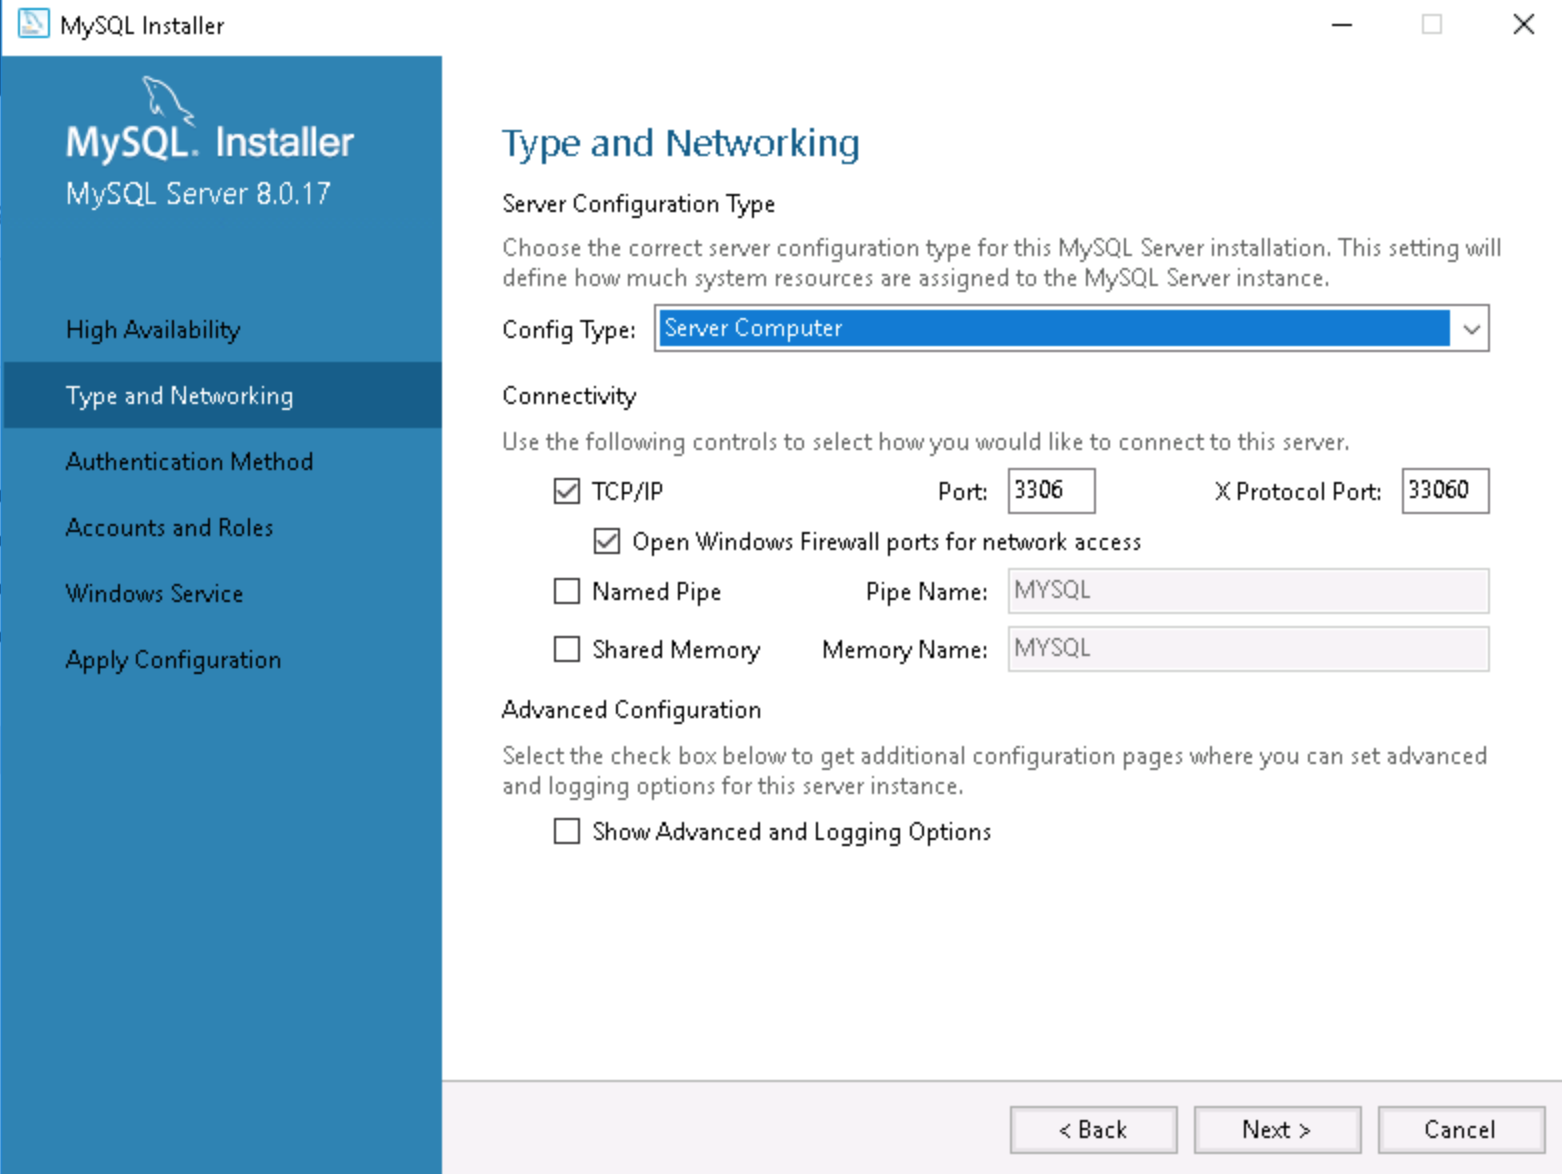
- In the Type and Networking window, do the following:
- Select Server Machine from the Config Type drop-down menu.
- Under Connectivity, check the TCP/IP checkbox, and set the Port Number to 3306.
- Check Open Firewall port for network access.
- Check Show Advanced and Logging Options.
- In the Authentication Method window, select the Use Legacy Authentication Method (Retain MySQL 5.x Compatibility) option.
- In the Accounts and Roles window, enter in the MySQL Root Password. WarningSQL passwords should NOT contain shell metacharacters such as !#’”`&; or spaces.
- Configure MySQL Workbench. Follow the instructions in the Setup MySQL with MySQL Workbench article.
- Install MySQL 8.x. Follow the instructions here: https://dev.mysql.com/doc/refman/8.0/en/windows-installation.html
- MS SQL
- Install Microsoft SQL Server 2016. Follow the instructions here: https://docs.microsoft.com/en-us/sql/database-engine/install-windows/install-sql-server-from-the-installation-wizard-setup?view=sql-server-2017
- In the Setup Role window, select the All Features With Defaults option.
- In the Feature Selection window, keep all features that are selected by default.
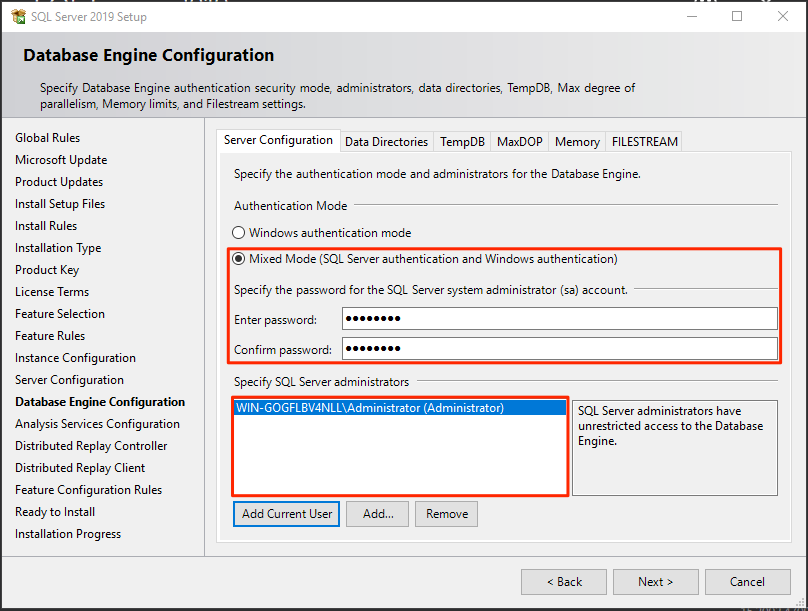
- In the Database Configuration window, select the Mixed Mode option. Ensure that at least one user has been assigned administrative permissions for Analysis Services.
- Configure MS SQL Management Studio. Follow the instructions in the Setup MS SQL with SQL Server Management Studio article.
- Install Microsoft SQL Server 2016. Follow the instructions here: https://docs.microsoft.com/en-us/sql/database-engine/install-windows/install-sql-server-from-the-installation-wizard-setup?view=sql-server-2017
- Proceed to the next section below.
Configure Folder Permissions
Grant read and write permissions to IIS_IUSRS for the following folders on the Windows and Appspace installation drive of your server:
- C:/Windows/Temp
- C:/temp
- C:/Appspace
Repeat the instructions below for each folder listed above:
- Navigate to the temp folder on your Windows server. If you do not see the folder, create the folder in the C drive (installation drive).
- Right-click on the folder and select Properties.
- Select the Security tab, and look for IIS_IUSRS in the Group or user names section.
- If it is listed, proceed to Step 6.
- If you do not see it, select Edit to continue.
- On the next window, select the Add button to create the group name.
- Enter the value, IIS_IUSRS, in the Enter the object names to select field. Click OK to continue.
- Select IIS_IUSRS, and check the Allow check box for Full control. Click OK.

- Repeat Step 1 to Step 6 for the other two folders listed above.
- Proceed to the next section below.
Install Appspace 7.x
The installation of Appspace 7.x on-prem involves the installation of two Appspace installers. The Appspace Installation Center Setup file is included as part of the Appspace 7.x Installer.
- Right-click the Appspace 7.x Installer setup file on your on-prem server, and select Run as administrator to launch the installer. Click Begin Installation.
- Read the Appspace’s Software License Agreement. If you agree to the terms, check the checkbox, and click Agree.
- Click Next once you have ensured the installation paths for the Application, Content, and Data paths are correct. Enter in the FQDN Host Name of the server, as it will be used to identify and access the Appspace console once the installation is complete. Example: https://<server.hostname.com>
Company Server: server
Company Hostname: hostname.com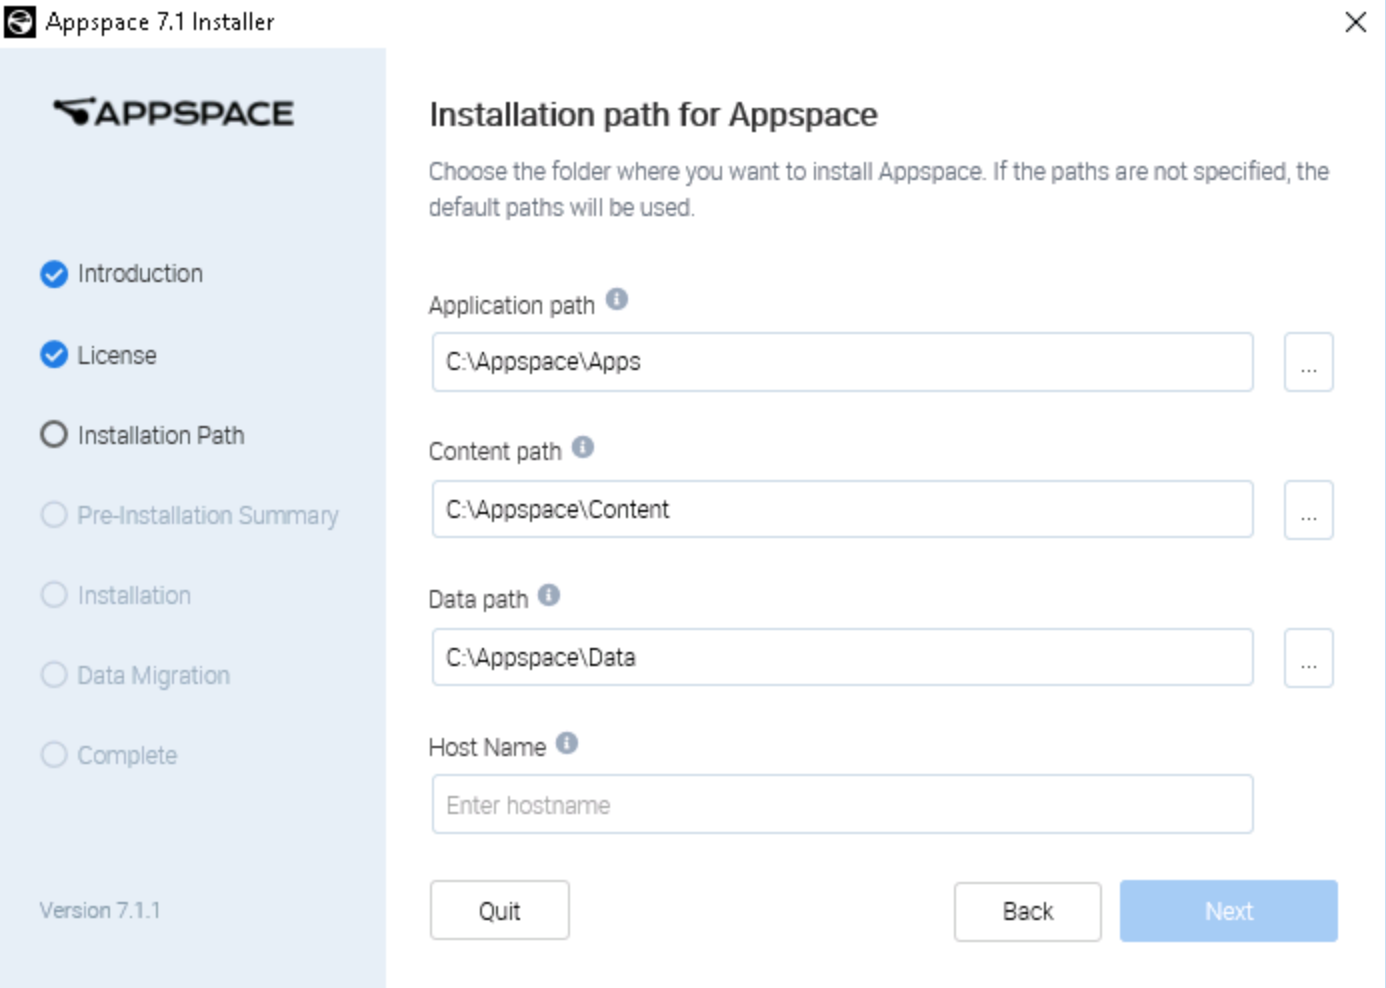 WarningEnsure the FQDN hostname is used when asked for a hostname. We do not recommend changing this Host Name once the installation is complete. If a need arises, please contact Appspace Support first.
 - Review the list of applications and services that will be installed, and click Install. The Appspace 7.x Installer will begin installing the required applications, services, and the Appspace Installation Center Setup file. ImportantThe installation duration varies and may require the server to be restarted multiple times during the installation process. You must click the restart button on the installer as displayed. Do NOT manually restart the machine.
- Once the Appspace Installation Center Setup is launched during the installation process, click Install.
- Ensure the Installation, and Content folder paths are correct, and click Next.
- Select the server Database type from the drop-down menu, and enter in the database Host and root credentials. You may leave localhost as the Host. ImportantWe officially do not support or recommend the use of a remote database engine, as it may impact performance. However, if a remote database engine must be used, please contact our Support Team to further advise on configuration settings based on your deployment.
- Click Validate to continue the installation process.
- Restart the server once the Appspace Installation Center Setup has completed as indicated.ImportantYou must click the Restart button on the installer as displayed. Do NOT manually restart the machine.NoteIf the installation fails, close the Appspace Installation Center Setup window. DO NOT click on the Restart button on the Appspace installer. Manually re-run the Appspace Installation Center Setup.
- Once restarted, the Appspace 7.x Installer would continue the installation process.
- Click Next once the installation process is complete, and Next again at The installation was successful screen.
- Click Close at the You have completed the installation! screen, and OK at the confirmation dialog box.
- Launch your web browser and connect to your Appspace console via the following URL: https://<hostname> (replace <hostname> with the Host Name entered in Step 3 above)
- When you access the Appspace console for the first time, you will be redirected to the License Activation page. Please refer to Activate Appspace On-Prem Server for more information.
- Data Migration – Select this option if Data Migration previously was not completed during the installation phase.
- Card Installer – Select this option to install Cards (Update existing templates, and themes).
- Uninstall – Select this option to uninstall Appspace 7.x.
Was this article helpful?