This article provides the instructions to configure an Appspace playlist channel as a wallpaper with customized messaging, to be displayed in the background, when a Webex Share device or the Webex Room Phone is in an idle state.
The Webex Share is a palm-sized, affordable device that allows you to quickly and easily share content to any display without using cables or dongles. Wirelessly share an entire screen or a specific app with one click from Webex Meetings or the Webex Teams app.
The Webex Room Phone is a conference phone designed for collaborative meetings. From high-quality audio to a simple, familiar share and meeting experience using the power of the Webex platform, you can enjoy your collaboration experience. The Room Phone has a brilliant 6-inch full-HD touchscreen with instant access to meetings, calling, directories, and content sharing.
Appspace leverages Webex’s API on these devices in order to manage content while the device is in idle mode. From the Appspace console, you can generate a registration URL that is used in the Webex Control Hub to configure the device and have it register itself.
Appspace can also be configured to display alerts and emergency messages over the wallpaper when triggered. Both the wallpaper and the alerts are only displayed when the devices are not in use.
The wallpaper content will change periodically based on the playlist channel’s predefined schedule and playout duration (e.g. every 30s, hourly,).
Prerequisites
- Appspace 7.1 or higher.
- An active Appspace account, with sufficient device licenses to register the device.
- Account Owner or Location Admin user roles with sufficient platform licenses.
- An Appspace playlist channel, with content only consisting of images set to a minimum of 60 secs duration per item. Click here for instructions to create a playlist channel. Important
- We only support images and videos in the playlist channel. However, the Webex Room Phone does not support videos currently.
- Support for Appspace cards is limited to simple messaging templates. Cards with animations, interactivity, or live data/feeds will be presented as a high-resolution thumbnail that is generated when the card is created.
- Duration for each content item (image/static screenshot) in the playlist must be set to a minimum of 60s or more. We recommend changing content only once or twice in an hour or once at the top of every hour. It will be ideal to display the wallpaper content between meetings. Changing content too frequently is not ideal for device scalability and performance.
- Advanced channels, live stream channels, and playout metrics, are not supported for this solution.
- Supported Webex Share or the Webex Room Phone running the latest firmware (novum 1.1.0 and later).
- A Webex Control Hub account with the Digital Signage features enabled by the Webex team.
- An active Internet connection.
- It is recommended that the device clock is set to automatically retrieve time from a Network Time Protocol (NTP) server, with the correct time zone, in order for it to sync correctly with the Appspace server. Note
- Appspace cloud servers by default retrieve time from an NTP server. If an Appspace on-premises server is used, ensure the server time is automatically retrieved by an NTP server.
-
Appspace has updated the timezone configurations, which now include timezones other than GMT. This enables users with daylight savings to adjust the time accordingly.
For more information, please refer to the Appspace 7.1-ac.8 Release Notes
- Please ensure your network is configured to allow Appspace Approved URLs and the relevant network ports.On your proxy server, ensure our approved URLs are listed in the ‘How to set up networks with SSL content filters’ section in the following article: https://support.google.com/chrome/a/answer/3504942#sslinspection.
Configure Webex Share or Webex Room Phone
Follow the instructions below to configure and register a Webex Share device on the Appspace console.
-
- Log in to the Appspace console.
- Launch the device registration page via one of the following methods:
- Click the Quick Actions menu and select Register a Device.
- Go to the Device Registration widget on the Dashboard.
- Click the ☰ Appspace menu, select Devices, and click the Add button in the Devices tab.
- In the Register a New Device window, click the advanced device registration link.
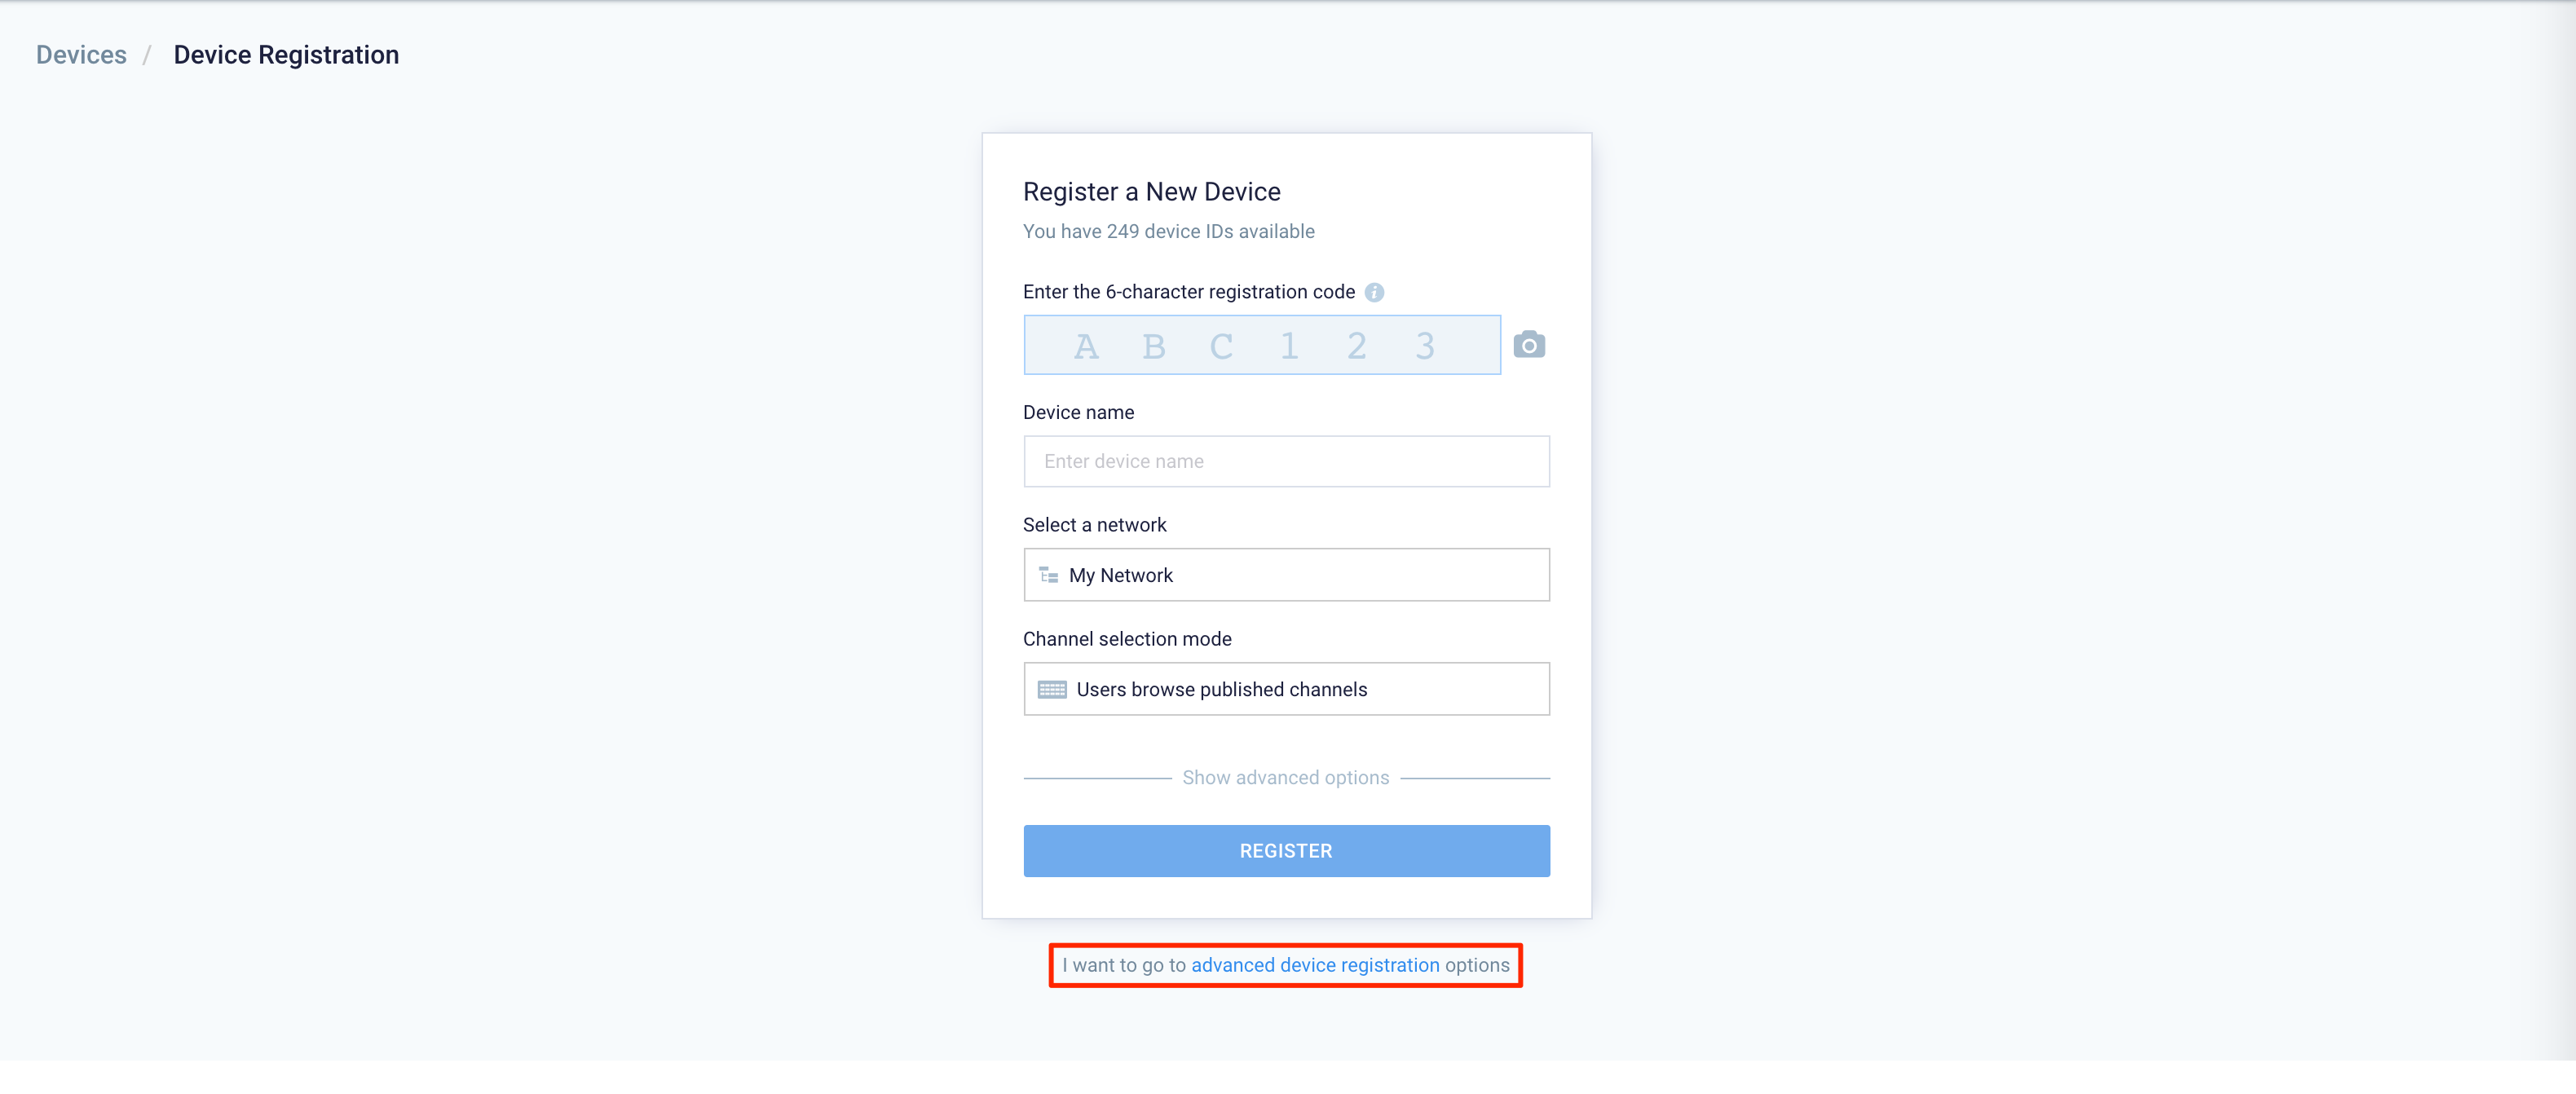
- In the Configure Advanced Registration window, select either Webex Share / Room Phone as the Deployment method, and select the desired network.

- In the Channel selection mode field, select one of these playback options and assign a channel (if already created):
- Channels will autoplay sequentially – this option is currently available only for playlist channels. Channels with autoplay based on the playlist sequence or any scheduling or dayparting settings configured.
- Administrators can select a single channel – ideal for signage, you may select either a playlist channel, an advanced channel or a live channel. However, to select a channel here, the channel must already be created prior to this registration. If the channel has not been created, you may skip this step and assign a channel later.
- Click the Generate Registration URL button.
- Copy the Webex Registration URL link.

- Log in to the device, and navigate to the Configurations section in the Webex Control Hub, and click Access x Configurations (number may vary depending on your Webex Control Hub setup).

- Select the DigitalSignageServer option from the available configurations.
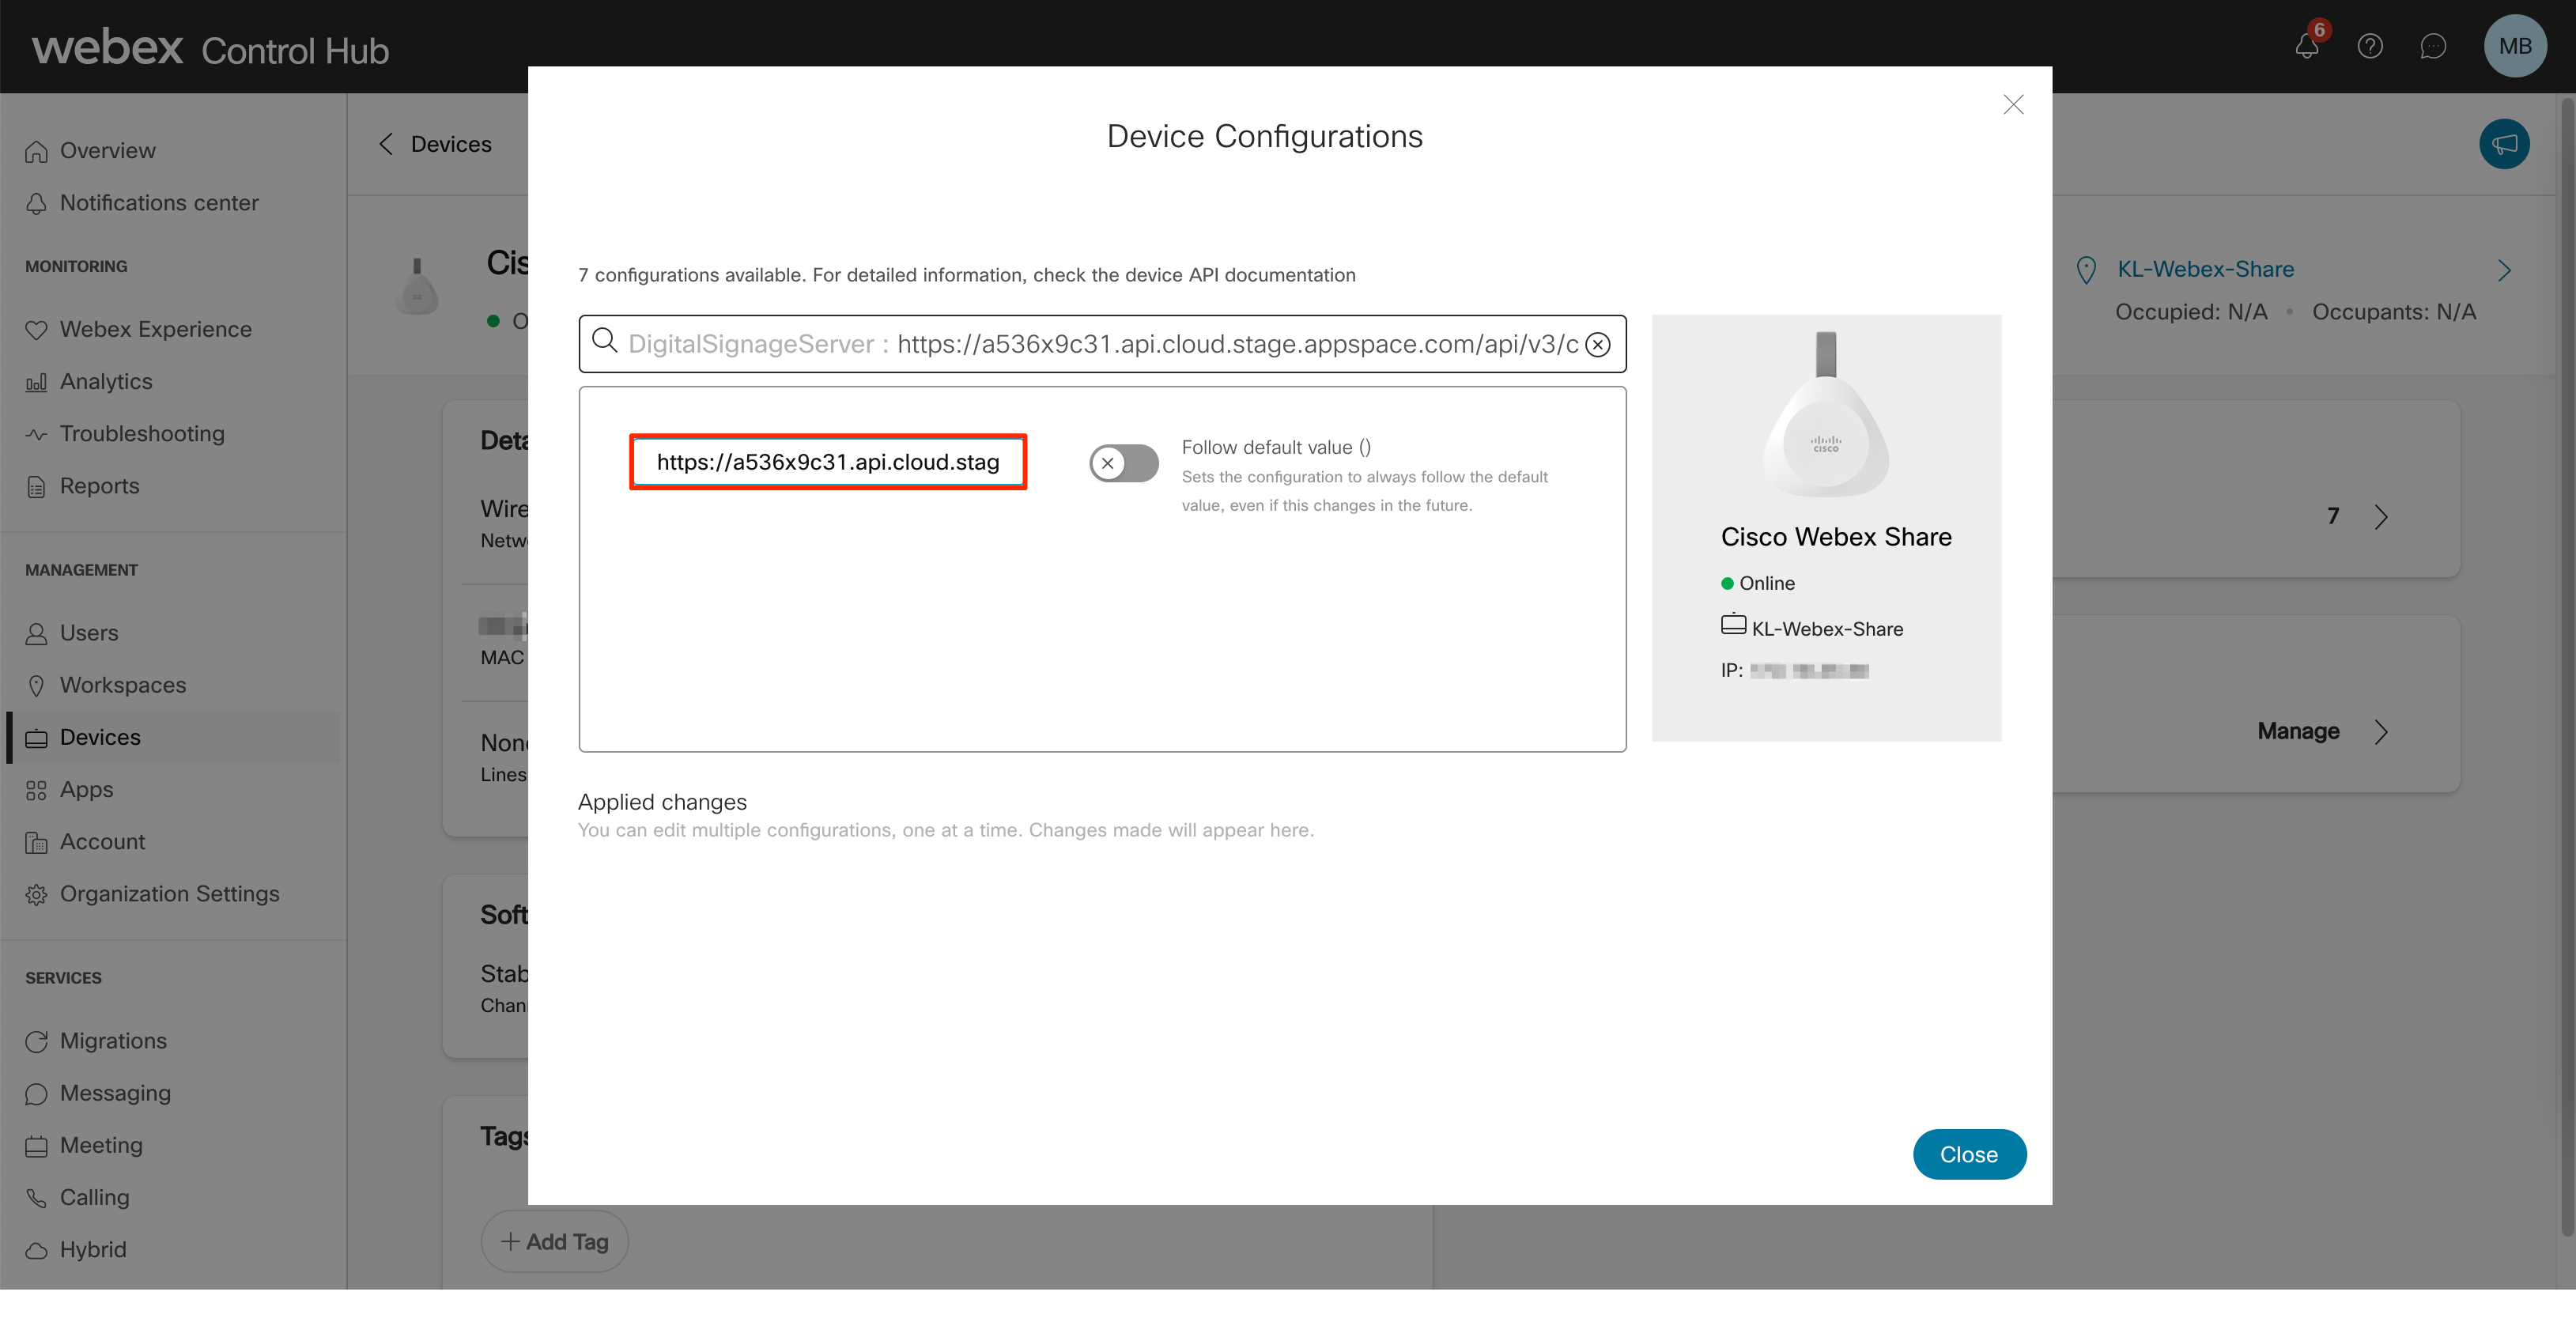
- Paste the copied Webex Registration URL link into the empty URL field and click Apply.
- The Webex device will be registered and listed in the device list in Devices, in the Appspace console.
- Once done, you may proceed to assign a playlist channel to the device from the Appspace console (if not done in Step 5 above), by following the instructions in the Assign Channel to Device article.
Was this article helpful?