The Users module in the Appspace console is the primary user account management center that allows administrators to send user invitations, manage users and user groups, and also assign user roles and permissions for navigating features in the console. Appspace 8.0 introduces a brand new user interface with a streamlined design, improved functionality, and updated workflows for a better user experience.
The new user interface also allows administrators to easily identify the status of the users, permissions granted, and user groups assigned to the user all in a glance. Another improvement administrators will welcome is that all user roles can now be assigned directly within the user profile or during the user invitation process. Refer to Browse and Navigate Users Module in Appspace 8.0 for more information.
This article provides the instructions to invite users, and create user groups, user group library, and a common library for users in your account:
- User Group Library Visibility for Account Owners, without the need to be added to the user group
Prerequisites
- Portal Administrator, Account Owner, or Location Admin role in an on-prem or private cloud deployment.
- Account Owner or Location Admin role in a public cloud deployment.
Users
Invite Users
User accounts in the Appspace console are created by sending out an invitation to the user’s email address. Once the user accepts the invitation email, they can click the invitation link and follow the on-screen instructions to activate their user account.
Follow the instructions below to invite users:
- Log in to the Appspace console.
- To invite users, use one of the following options:
- Click Users from the ☰ Appspace menu. On the Users dashboard, click the +ADD button, and select Invite User.
- Click the +QUICK ACTION button on the console toolbar, and select Invite Users.
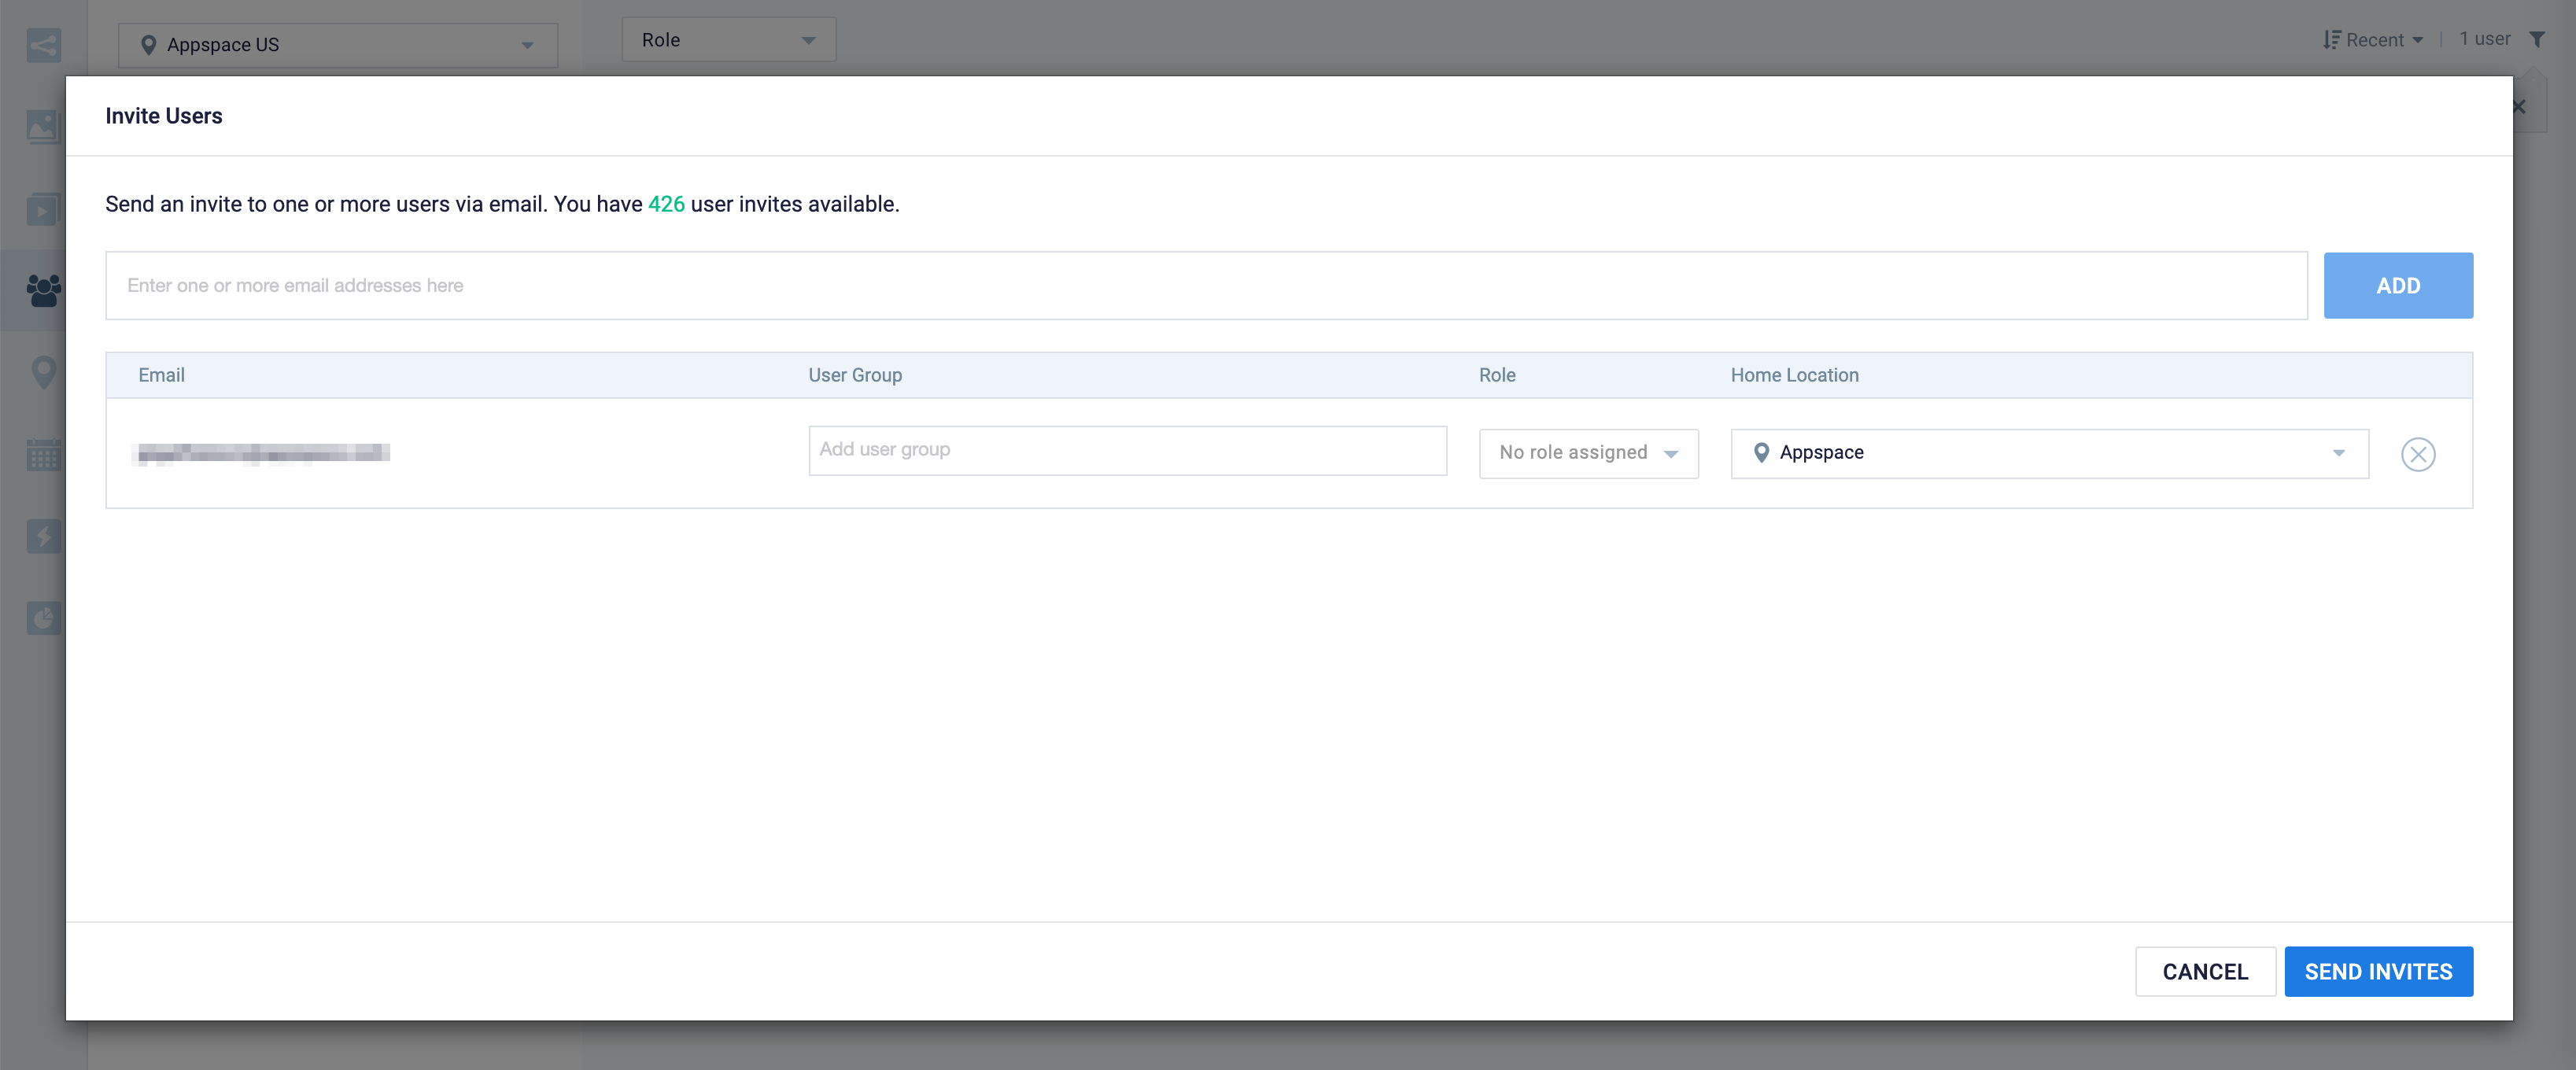
- In the Invite Users window, enter the user’s email address, and click ADD. You may enter multiple email addresses to the field at once.

Optionally, you may import an .xlsx spreadsheet to batch invite multiple users.- Ensure the .xlsx spreadsheet is imported using the following format:
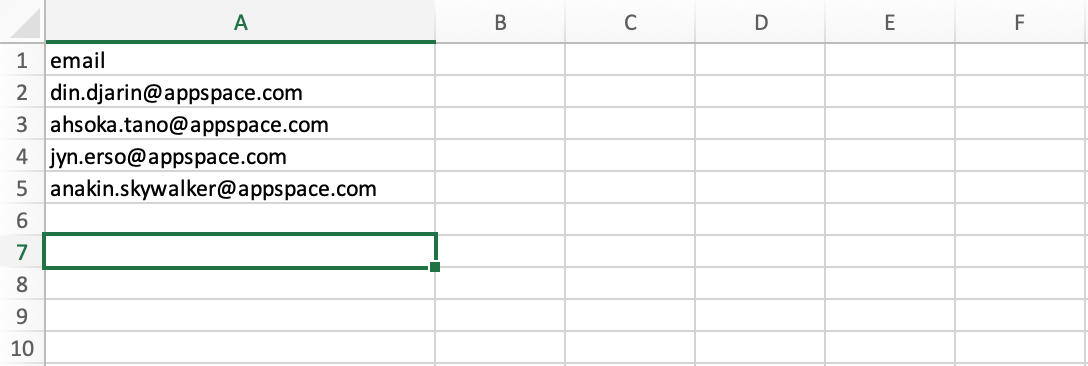
- The “email” header must be in the first row of the first column.
- Subsequent rows of the first column contain the users’ email addresses, with each row containing one email address.
- Ensure the .xlsx spreadsheet is imported using the following format:
- The users that can be invited are listed below. Optionally, you may pre-assign the following for each user:
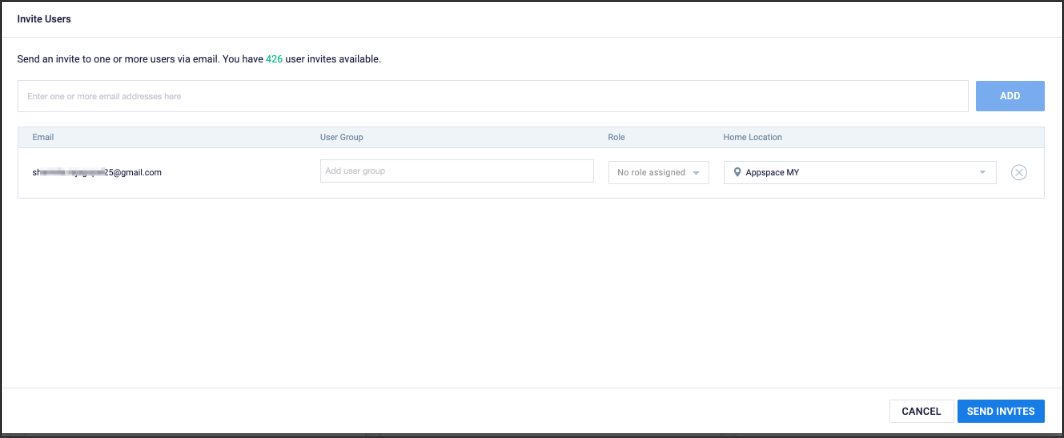
- Enter the user’s Phone Number.
- Assign a User Group.
- Assign a user License.
- Premium – ideal for users who are employees, for access to the Appspace Employee App to view employee content and make workspace reservations within the organization, either through their mobile devices, or from a web browser.
- Platform – assigned to users who will be administrators or content creators in the Appspace console, such as team leads, department heads, or IT administrators who require access to administer devices, or create, manage, and publish content. Users with this license type must additionally be assigned an Appspspace administrator user role (see below).
NoteIf you would like an administrator to also receive employee updates and make reservations via the Employee App, then the administrator must be assigned both the Platform and the Premium user license. However, during this user invitation, you can only assign either one license type. Proceed to the Manage User Profile section below to add the other license type after the user has accepted the invitation.
- Assign a user Role. (only available if Platform license is selected)
- Account Owner
- Location Admin
- Publisher
- Author NoteFor information on user licenses and roles, please visit the Introduction to User Licenses and Roles in Appspace 8.0 article.
- Assign the default Home Location.
- Once done, click SEND INVITES, and a list of all invited users that have, or have not accepted their user invitations will be listed on the Users dashboard.
- Proceed to the Manage User Profile section below to update licenses, roles, permissions, and user details, after they have accepted the user invitation.
Manage User Profile
Once a user has accepted the user invite, Account Owners or Location Admins are able to edit the user details, assign user groups, assign user roles, and grant specific permissions in the Edit User Profile page.
If you have an Appspace account with any administrator role, you may edit and update your own user profile.
Follow the instructions below to update a user profile:
- Log in to the Appspace console.
- Click Users from the ☰ Appspace menu.
- On the Users dashboard, select and click the name of the desired user profile to be managed.
- In the Edit User Profile window, you may perform the following:
- Click the General tab, to edit or view user information:
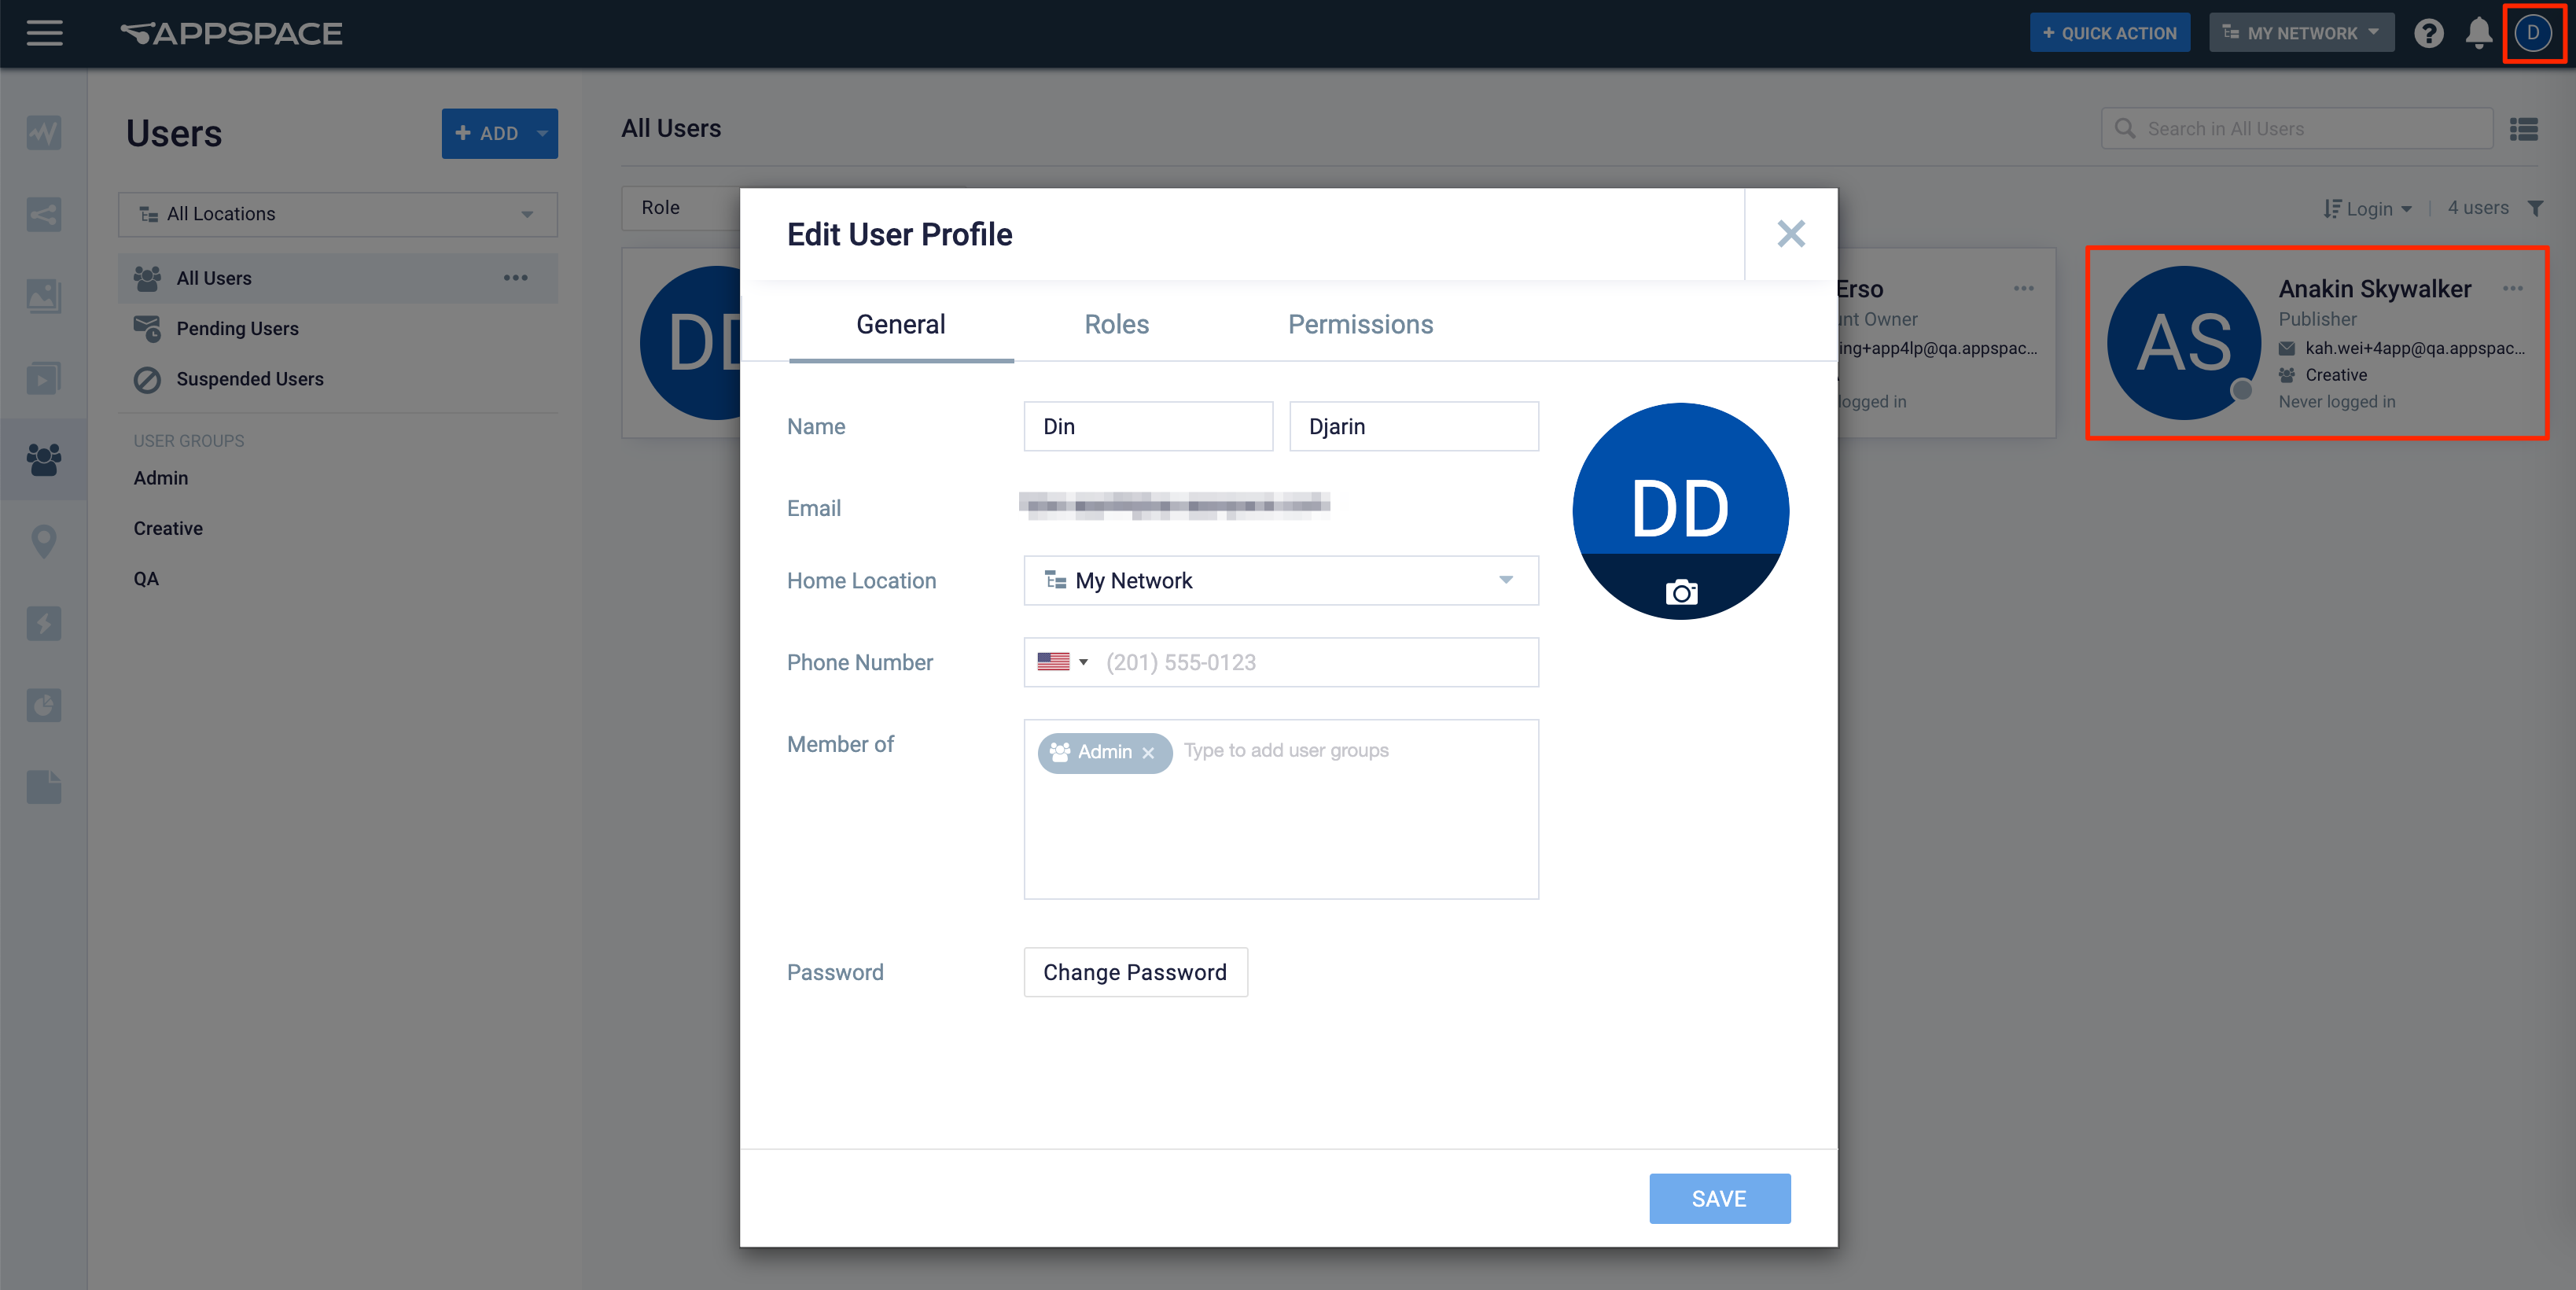
- Add a profile image.
- Edit the user’s Name (first, last).
- Assign or change the user’s Home Location.
Important
In addition to geo, campus, or building locations, you may also set a floor or zone as the Home Location for a user.
When a user logs in to the Appspace console or the Appspace Employee App, they will only see content and/or resources available in their default Home Location. Users may switch their Home Location from their profile page in the Employee App or the Appspace console.
- Enter the user’s Phone Number.
- Assign the user’s Manager.
ImportantThis feature is currently behind a feature flag, and is not available in our General Available release.
- For the Member of field, you can assign the user to one or more User Groups.
- Select one or both User Licenses.
- Set the User Directory toggle option to either Public or Private. This will set the user’s profile to be either displayed or hidden from the People module on the Employee App.
- Change the user Password.
- Click the Roles tab, to assign, or view user roles the user has been assigned with or inherited:
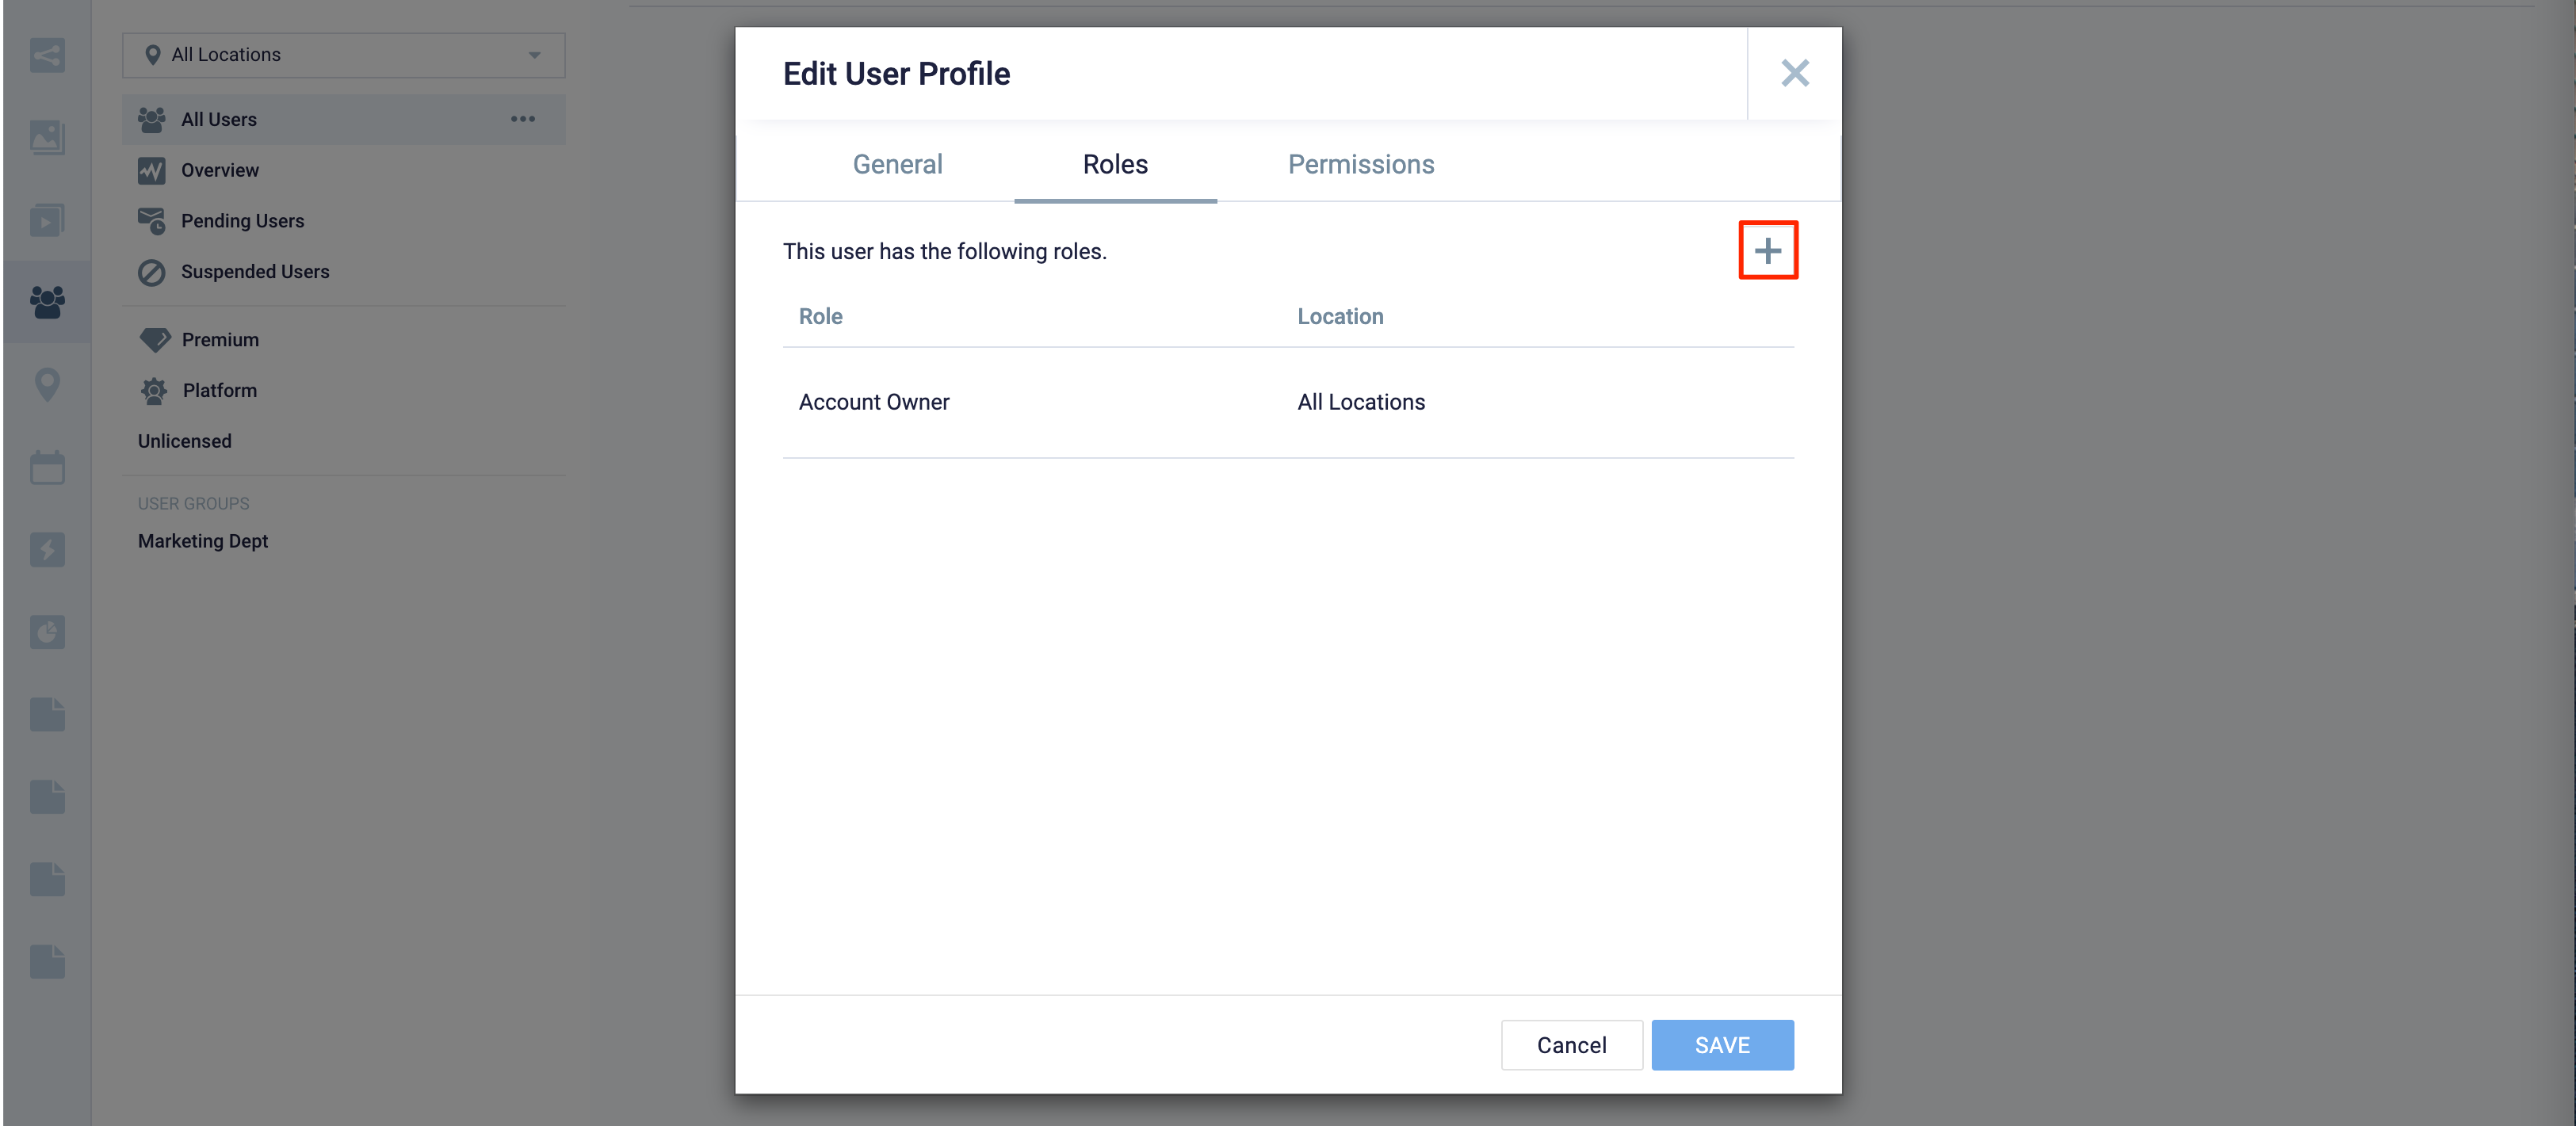
- Click the + button, and select a user Role and Location for the user.
- Click the Permissions tab, to view channels and channel group permissions the user has been assigned with:
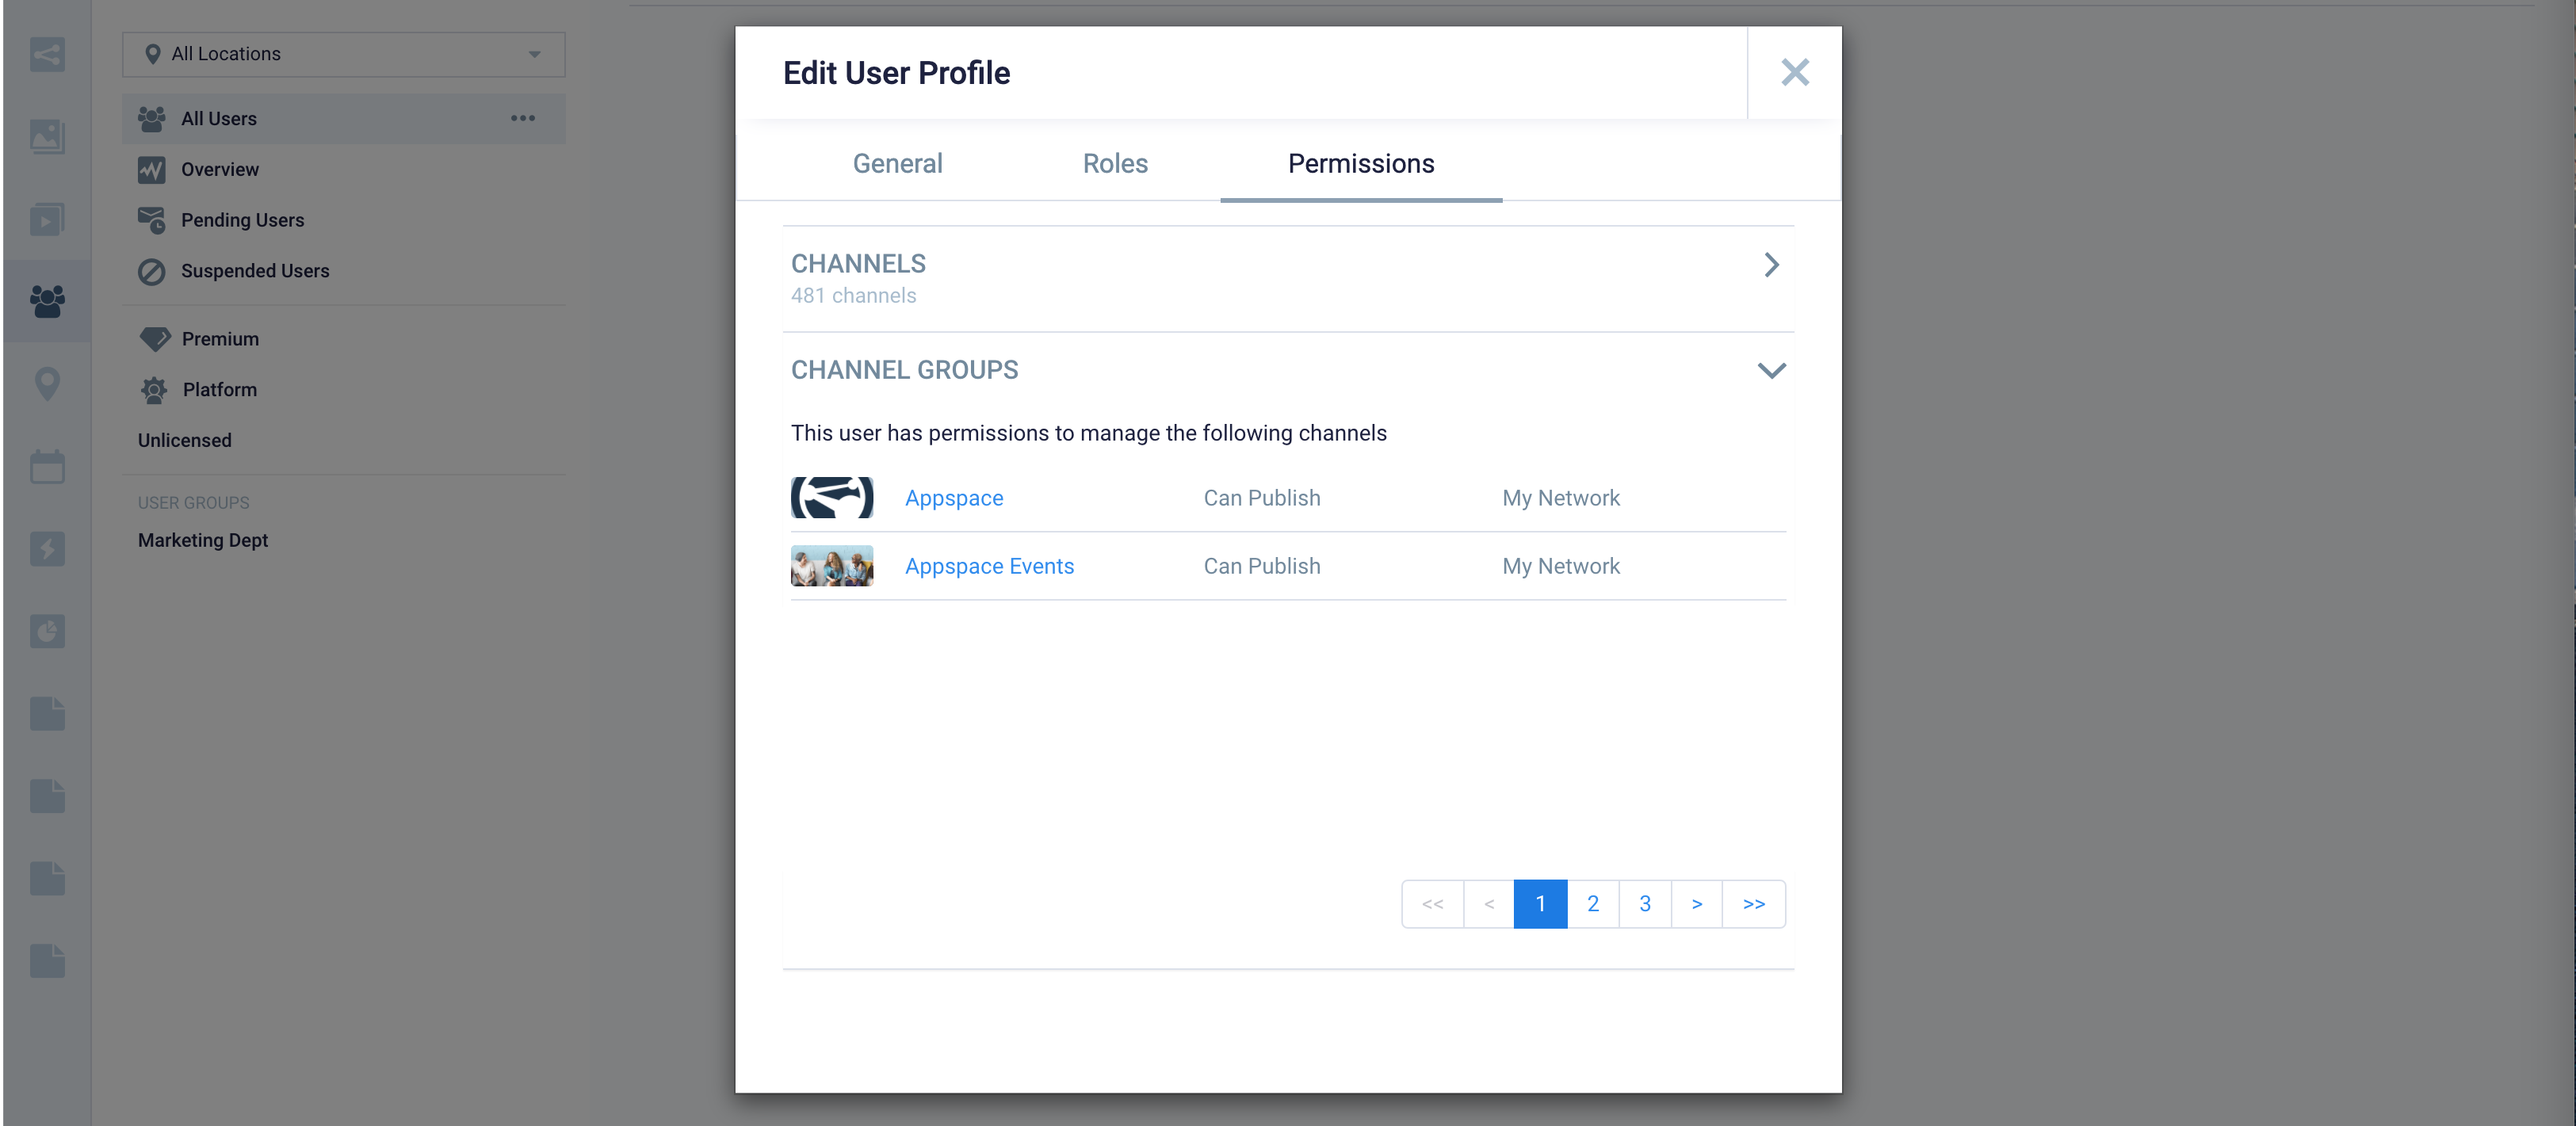
- A Publisher must separately assign/publish a channel or channel group to any user.
- Click the General tab, to edit or view user information:
- Once done, click SAVE.
Manage Multiple User Profiles
Follow the instructions below to make updates on multiple user profiles:
- Log in to the Appspace console.
- Click Users from the ☰ Appspace menu.
- On the Users dashboard, select and click the name of the desired user profiles to be managed.
- In the batch actions bar, you may perform the following:

- Manage Home Location – Assign the Home Location to multiple users:
- Select the Home Location from the drop-down menu, and click SAVE.
NoteIf multiple users with different home locations are selected, the Location selection drop-down menu will be empty. Only when multiple users with the same home location are selected, that the Location selection drop-down menu will display the corresponding home location.
- Select the Home Location from the drop-down menu, and click SAVE.
- Manage Membership – Assign the User Group Memberships to multiple users:
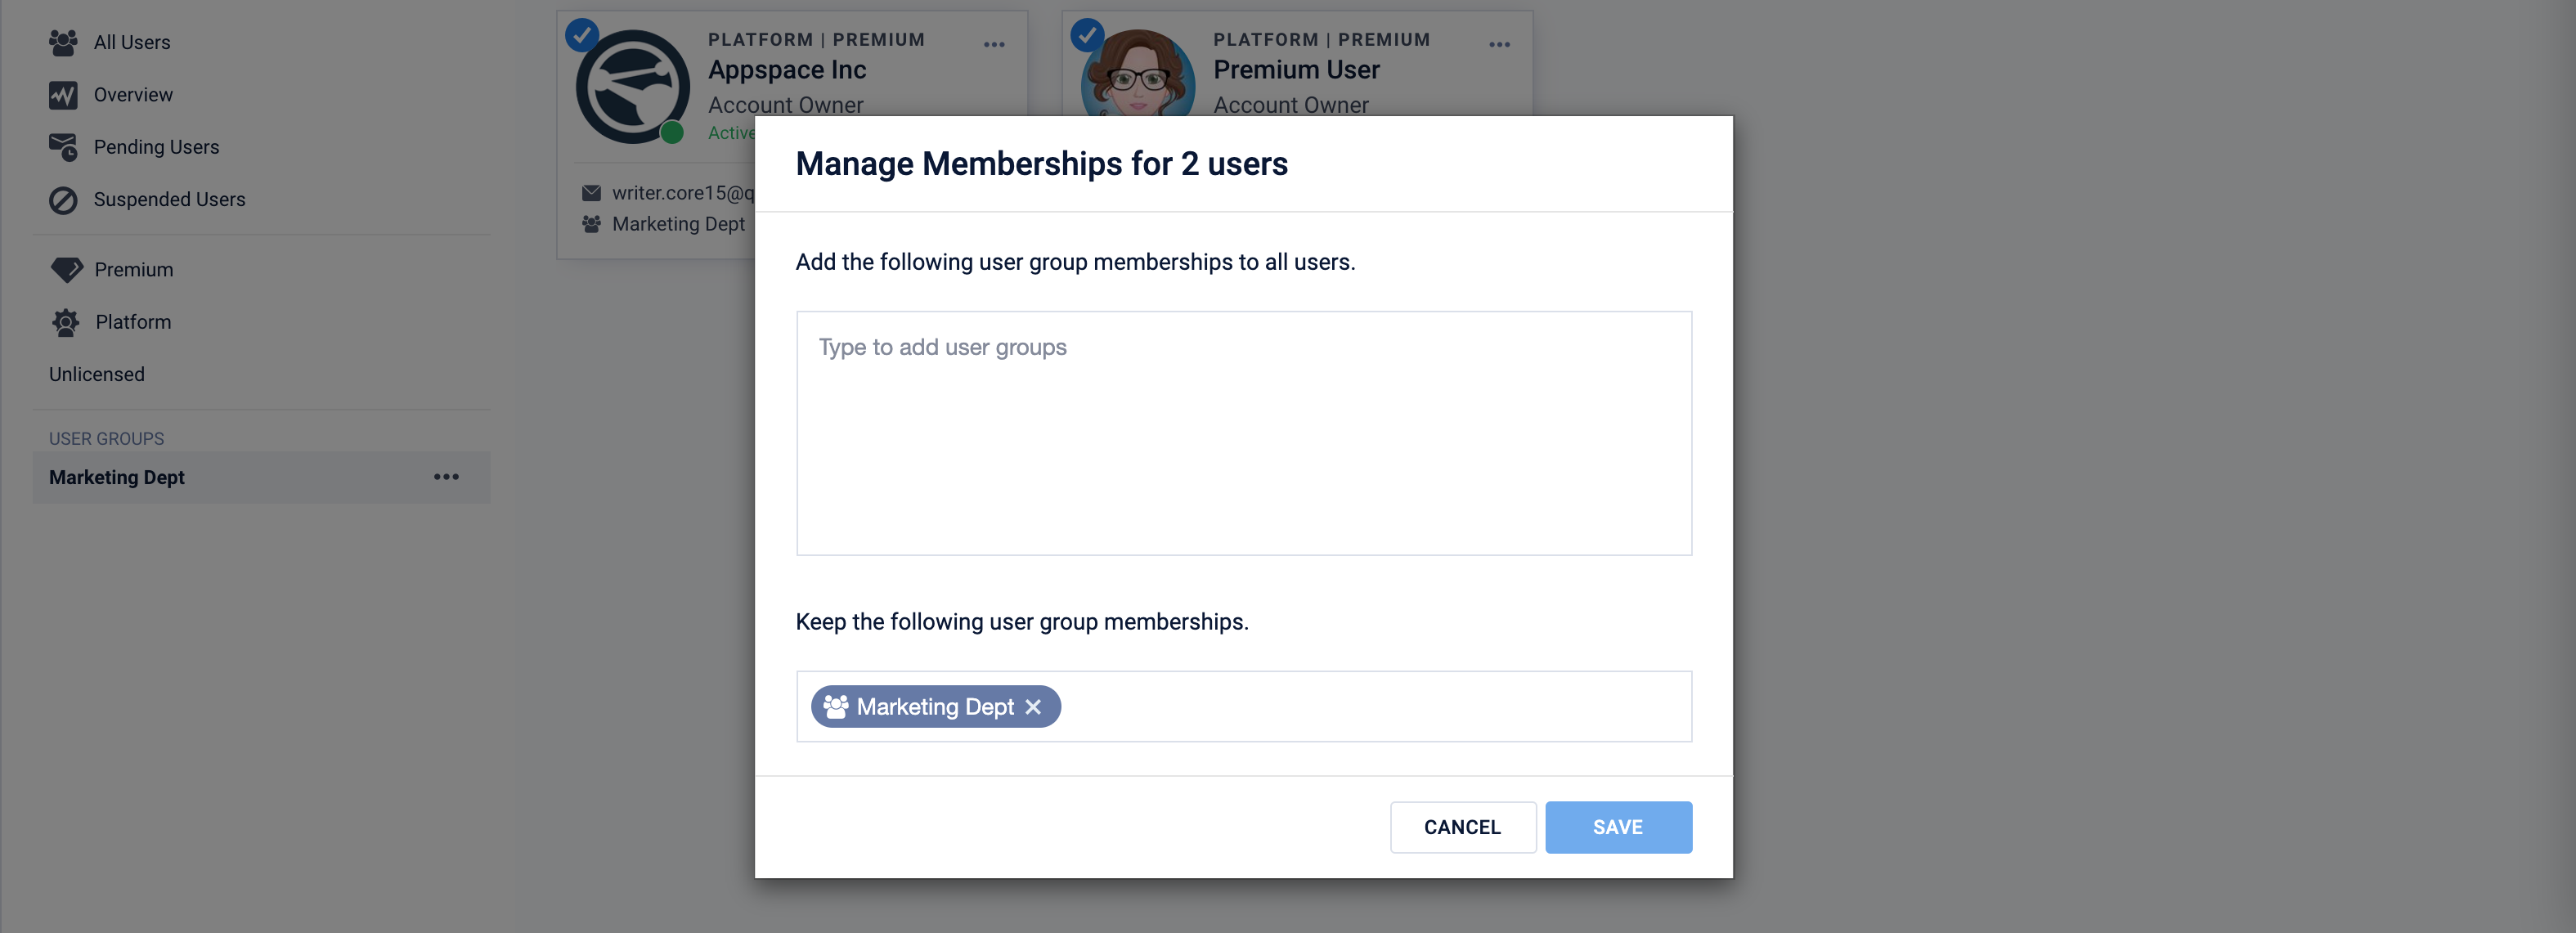
- Search and add the User Groups you wish to assign the users to be members of.
- Alternatively, you may remove the membership for the selected users by deleting the User Group listed.
- Click SAVE.
- Manage Licenses – Assign User Licenses to multiple users:
- Check or uncheck the desired user license checkbox, and click SAVE.
- Manage Home Location – Assign the Home Location to multiple users:
Export User List
Follow the instructions below to export the Appspace user list:
- Log in to the Appspace console.
- Click Users from the ☰ Appspace menu.
- Click the ADD drop-down arrow, and select Export Users.
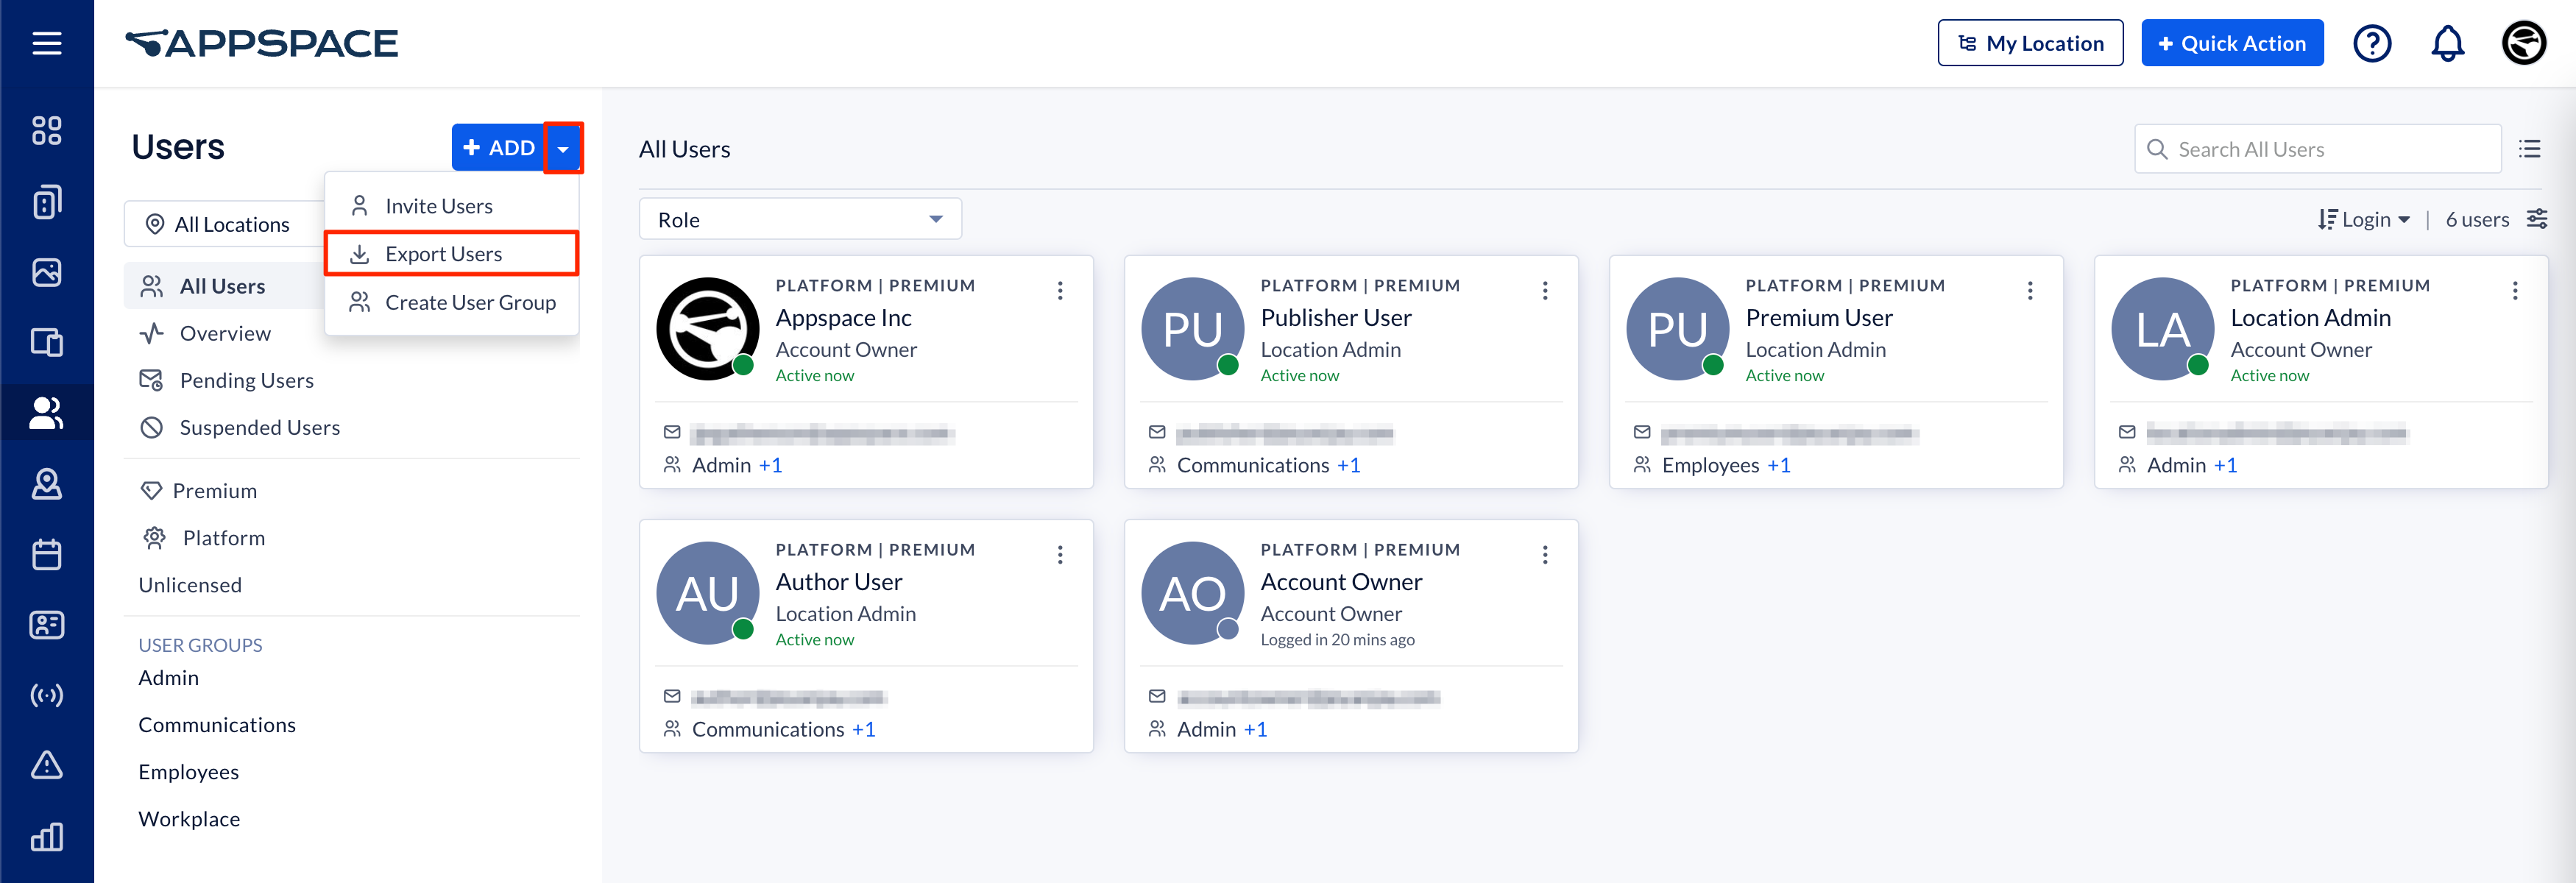
- The Appspace user list .xlsx file will be automatically downloaded to your default download folder.
User Groups
User groups are created to easily manage users in terms of assigning locations, roles, or channel permissions. Each user group may enable a library, allowing only users assigned to the user group to access, upload, and manage content in that library. However, all Account Owners will still have access to the library regardless if they have been assigned to the user group or not.
Create User Group
Follow the instructions below to create a user group:
- Log in to the Appspace console.
- Click Users from the ☰ Appspace menu.
- On the Users dashboard, click the +ADD button, and select Create User Group.
- In the Create User Group window, you may perform the following:
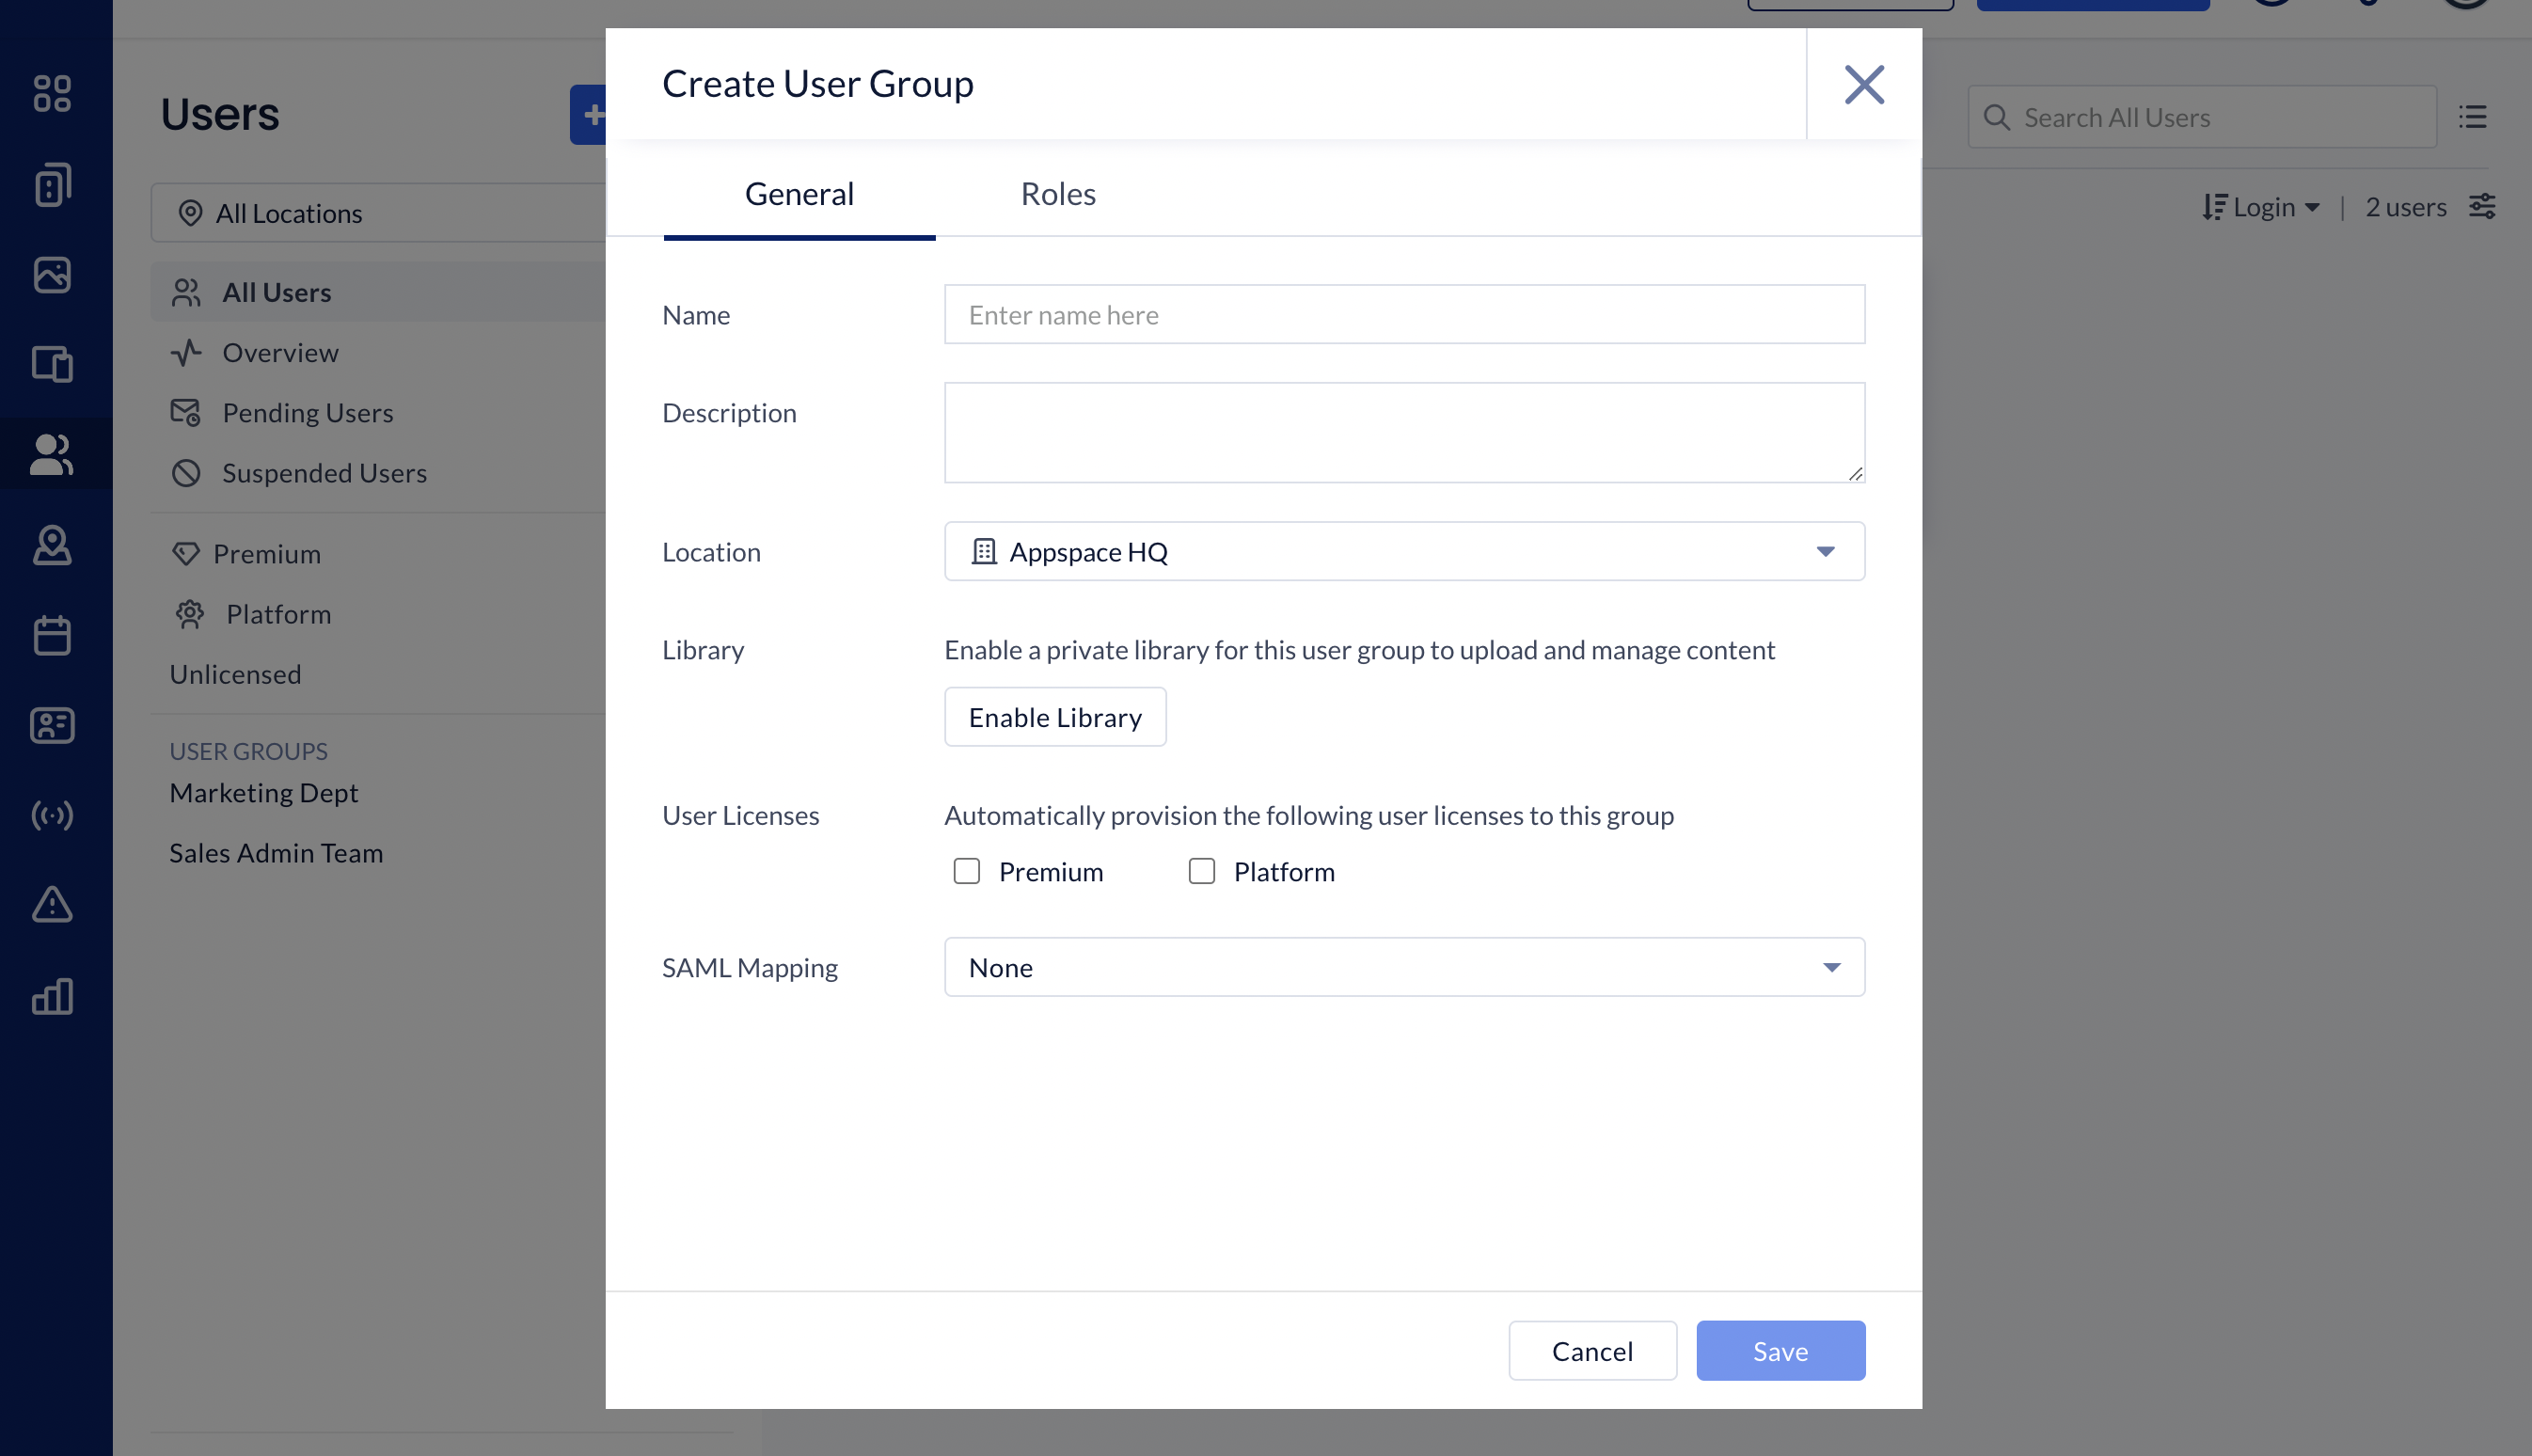
- In the General tab:

-
- Enter the Name and Description of the user group.
- Select the Location of the user group.
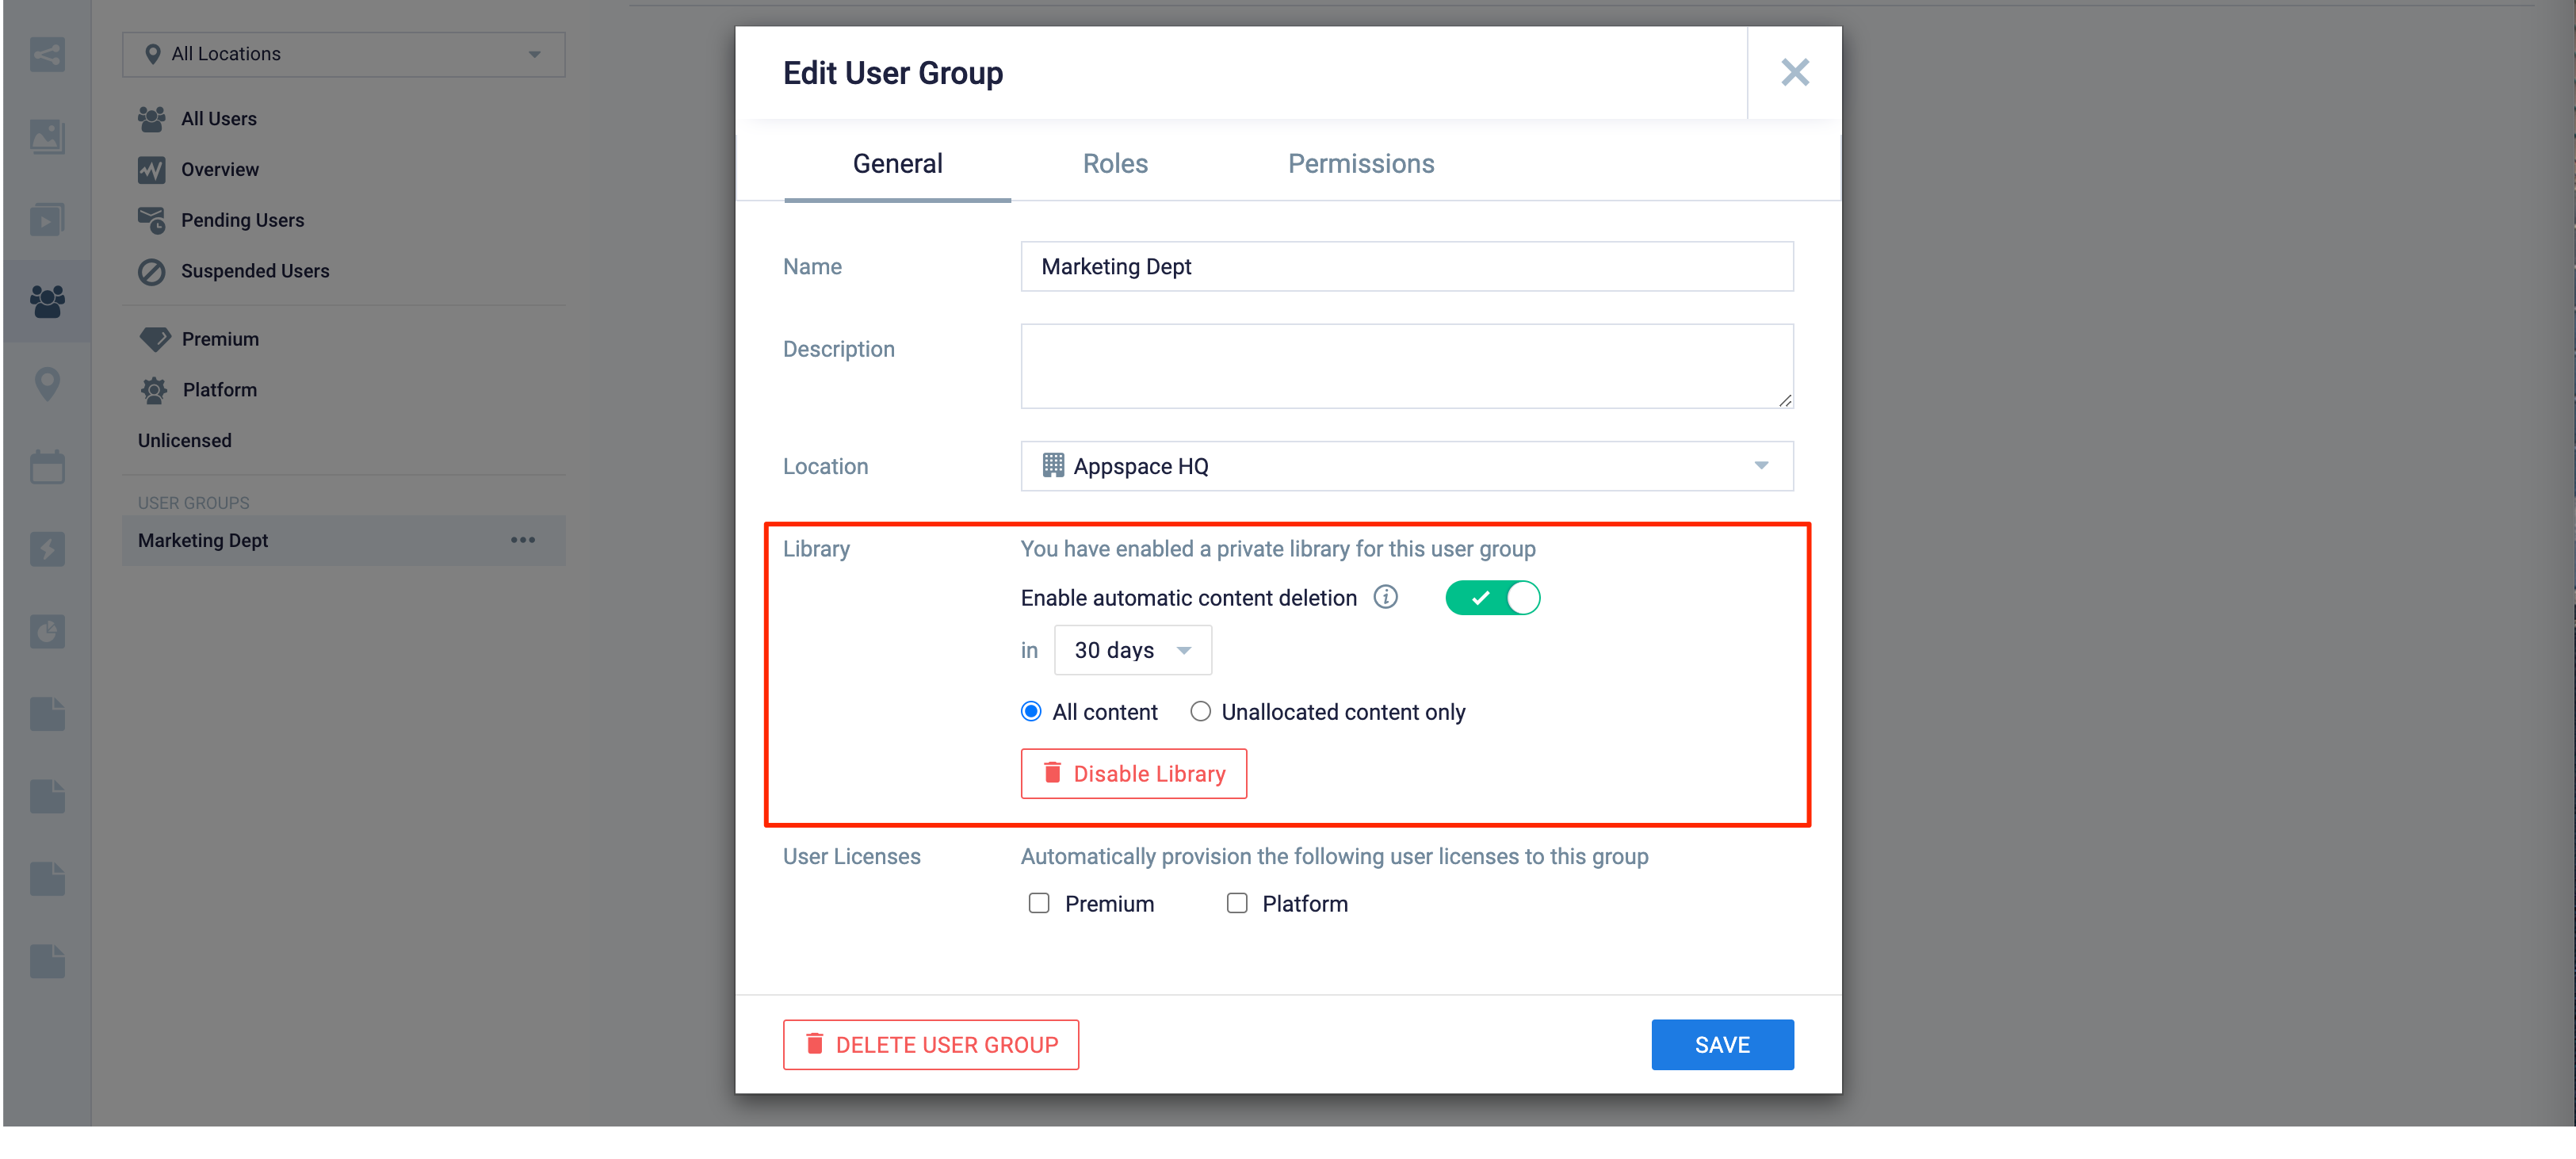
- Optionally, you may enable the user group library by clicking the Enable Library button. Once enabled, you may also Enable automatic content deletion:
- Configure the duration of the content deletion, by selecting the duration in days from the drop-down menu.
- Configure the type of content to be deleted, whether it would be All content or Unallocated content only.
- Optionally, you may assign the user licenses that will be inherited by the users of this user group.
- Premium – ideal for users who are employees, for access to the Appspace Employee App either via the portal or mobile app.
- Platform – this license is for administrators; Account Owners, Location Admins, Publishers, and content Creators, for access to the Appspace console.
NoteWhen a new user is added to this user group, the user will inherit and be automatically assigned with the license assigned to this user group, in addition to his own user license. For example, if the user is assigned with a Platform license, but the user group is assigned with the Premium license, then the user will have both the Platform and Premium user licenses.
- You may configure SAML mapping with a custom rule for user the group. Refer to Step 4 in the Configure User Groups with SAML Mapping and Rules article.
-
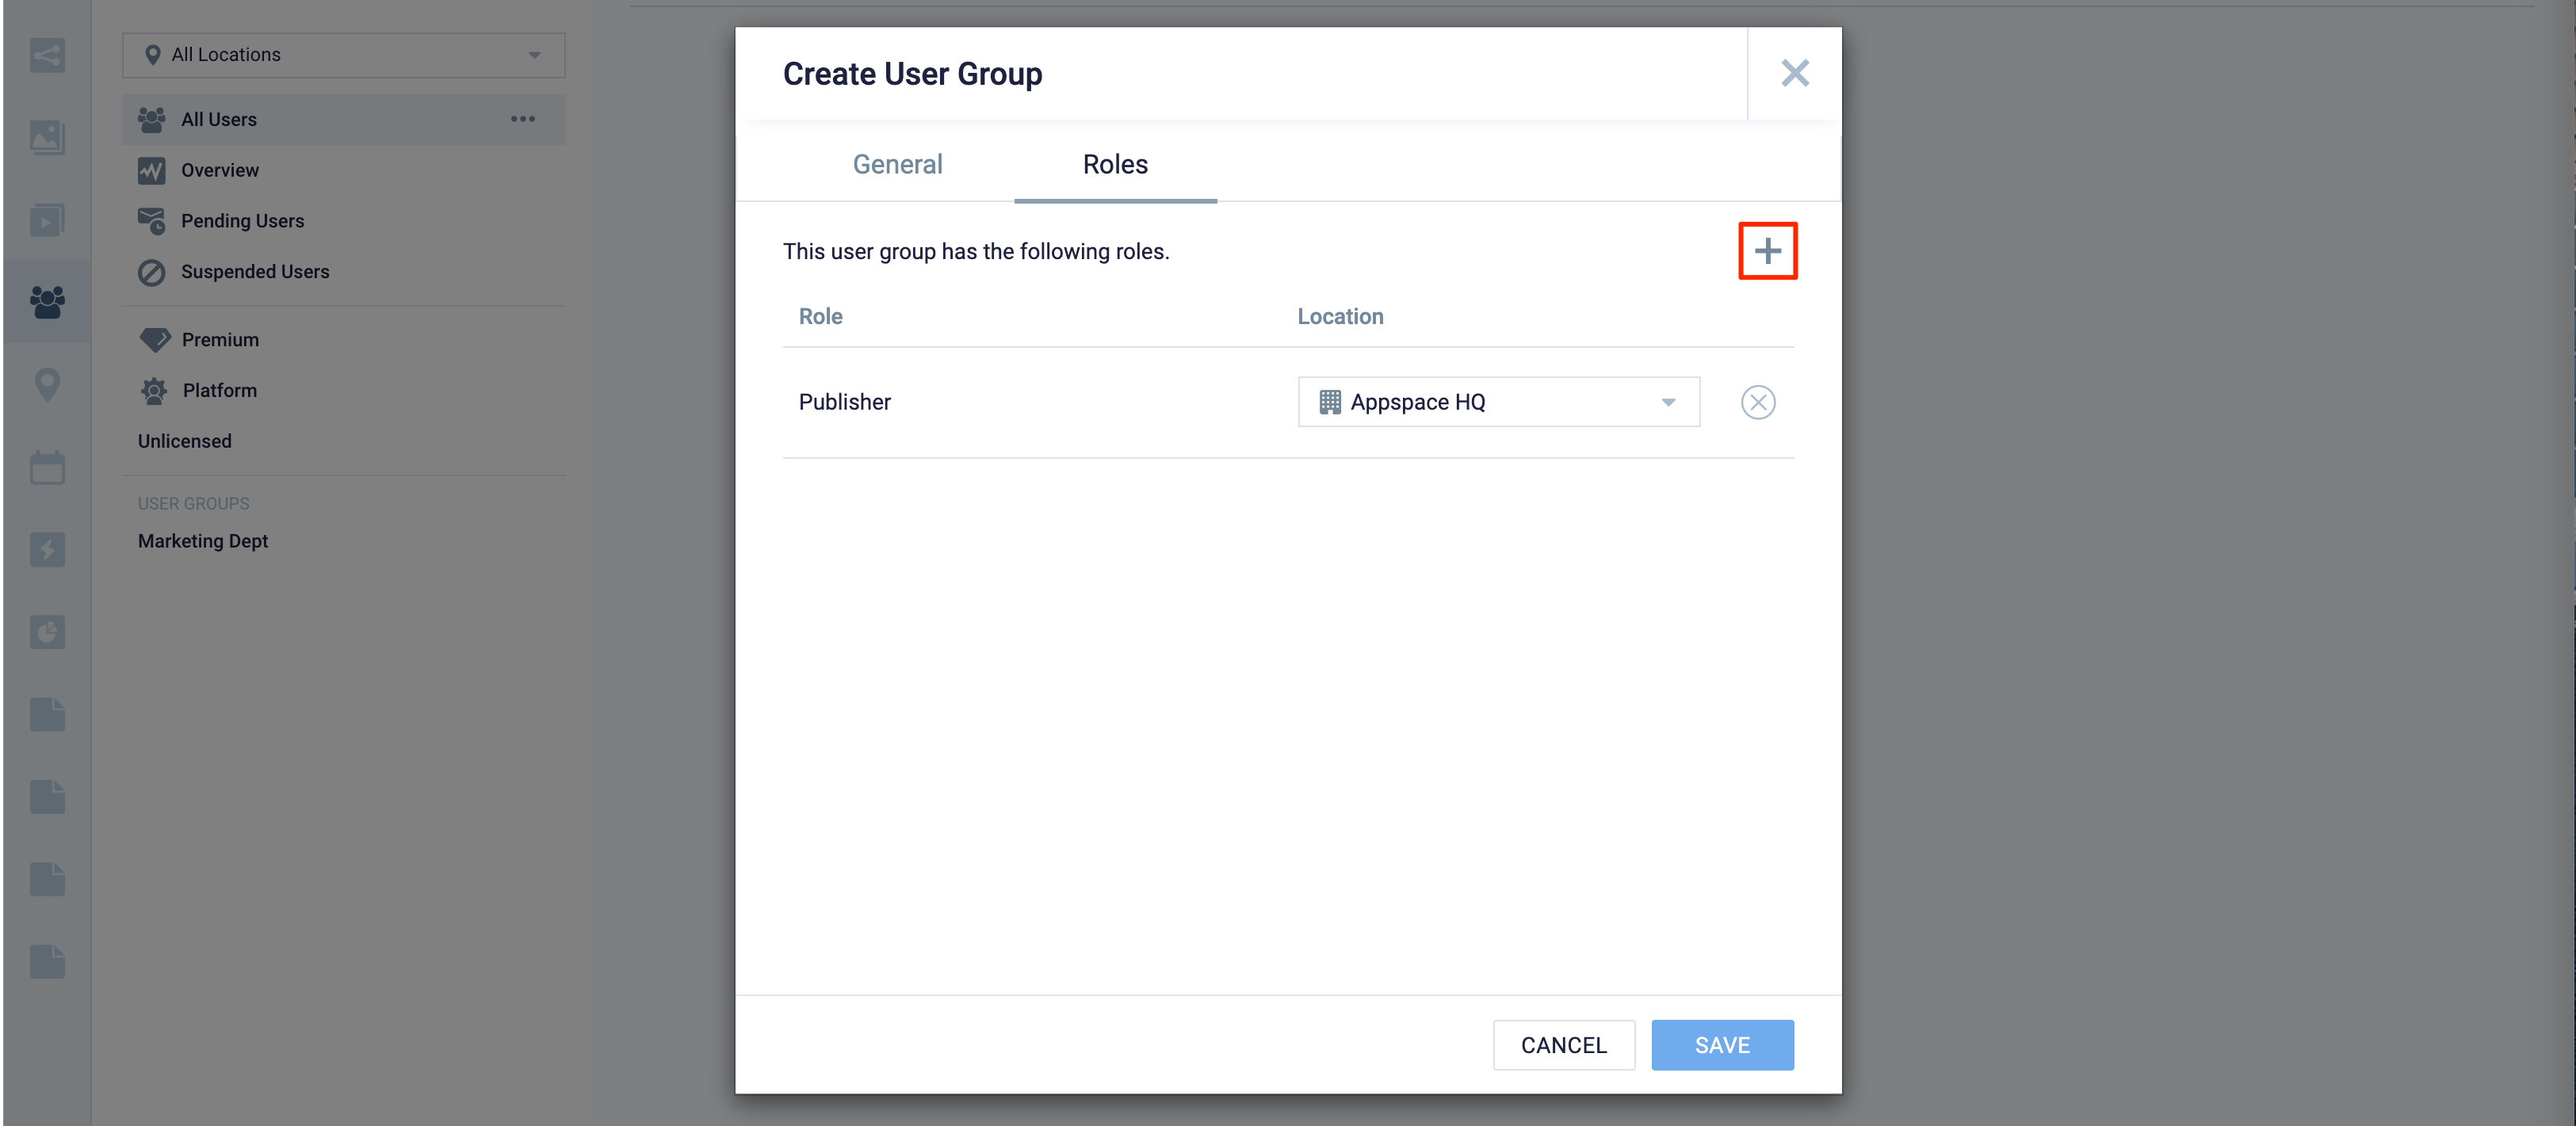
- In the Roles tab:
- In the General tab:
- Click SAVE.
Edit User Group
Follow the instructions below to edit a user group:
- Log in to the Appspace console.
- Click Users from the ☰ Appspace menu.
- On the Users dashboard, select and click the desired user group ellipsis, and select Edit User Group.
- In the Edit User Group window, select the desired tab to edit:
- In the General and Roles tab:
- You may edit the user group details the same way as it was configured. For detailed instructions on how to do this, please refer to the Create User Group section above.
- In the Permissions tab:
- You can view the channels and channel groups the user group has permission to.
- A Publisher must separately assign/publish a channel or channel group to any user.
- In the General and Roles tab:
- Once done, click SAVE.
Libraries
Configure Common Library
An Account Owner may create one common library for all users under their account, by clicking the All Users ellipsis on the Users dashboard, and selecting Configure Common Library. The Account Owner may configure read, write, or custom permissions providing users or user groups with access to view or manage content together within the common library.
Follow the instructions below to create a common library on your account:
- Log in to the Appspace console.
- Click Users from the ☰ Appspace menu.
- On the Users dashboard, click the All Users ellipsis, and select Configure Common Library.
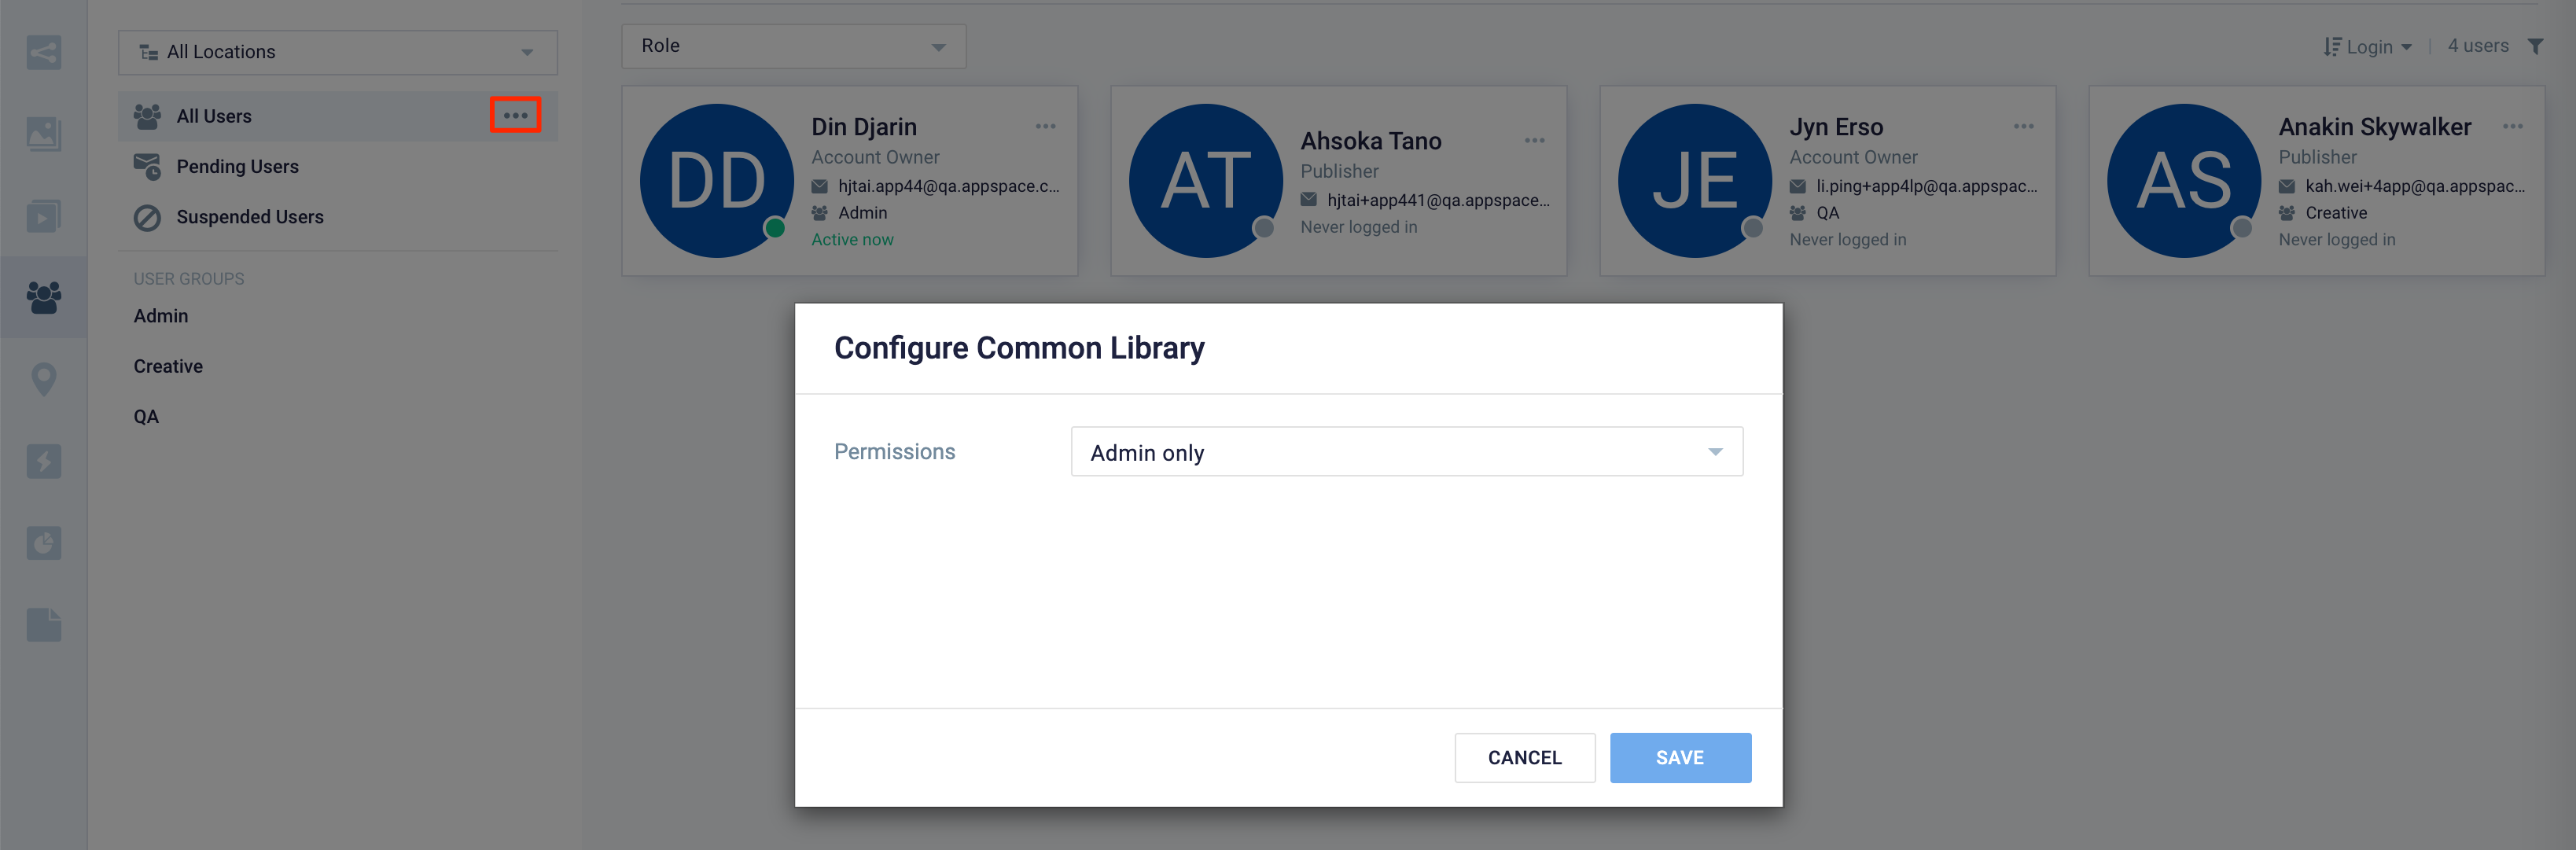
- Select the Permissions for the library:
- Admin only
- Everyone can read & write
- Everyone can read only
- Custom access – Assign permissions to specific user or user groups.
- Once done, click SAVE.
Configure User Group Library
Administrators can enable a single shared library for each user group, and configure read, write, or custom permissions allowing users assigned to the user group to view and manage content together.
Follow the instructions below to create a user group library:
- Log in to the Appspace console.
- Click Users in the ☰ Appspace menu.
- On the Users dashboard, select and click the desired user group ellipsis, and select Edit User Group.
- In the Edit User Group window, click the General tab.
- Click Enable Library, and you have the option to Enable automatic content deletion by sliding the slider to On.
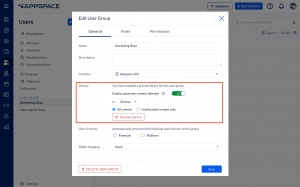
- Configure the duration of the content deletion, by selecting the duration in days from the drop-down menu.
- Configure the type of content to be deleted, whether it would be All content or Unallocated content only.
- Once done, click SAVE.

Was this article helpful?