The Reservations module is ideal for configuring space reservations in a flexible, hybrid workplace. You can configure our system for reserving rooms, workspaces, desks, and even building passes for limiting access to offices on certain days. You may choose to import room and other resource details from supported external calendar providers such as Google or Microsoft 365, or simply add new resources using Appspace’s built-in calendar provider services introduced with this reservations system.
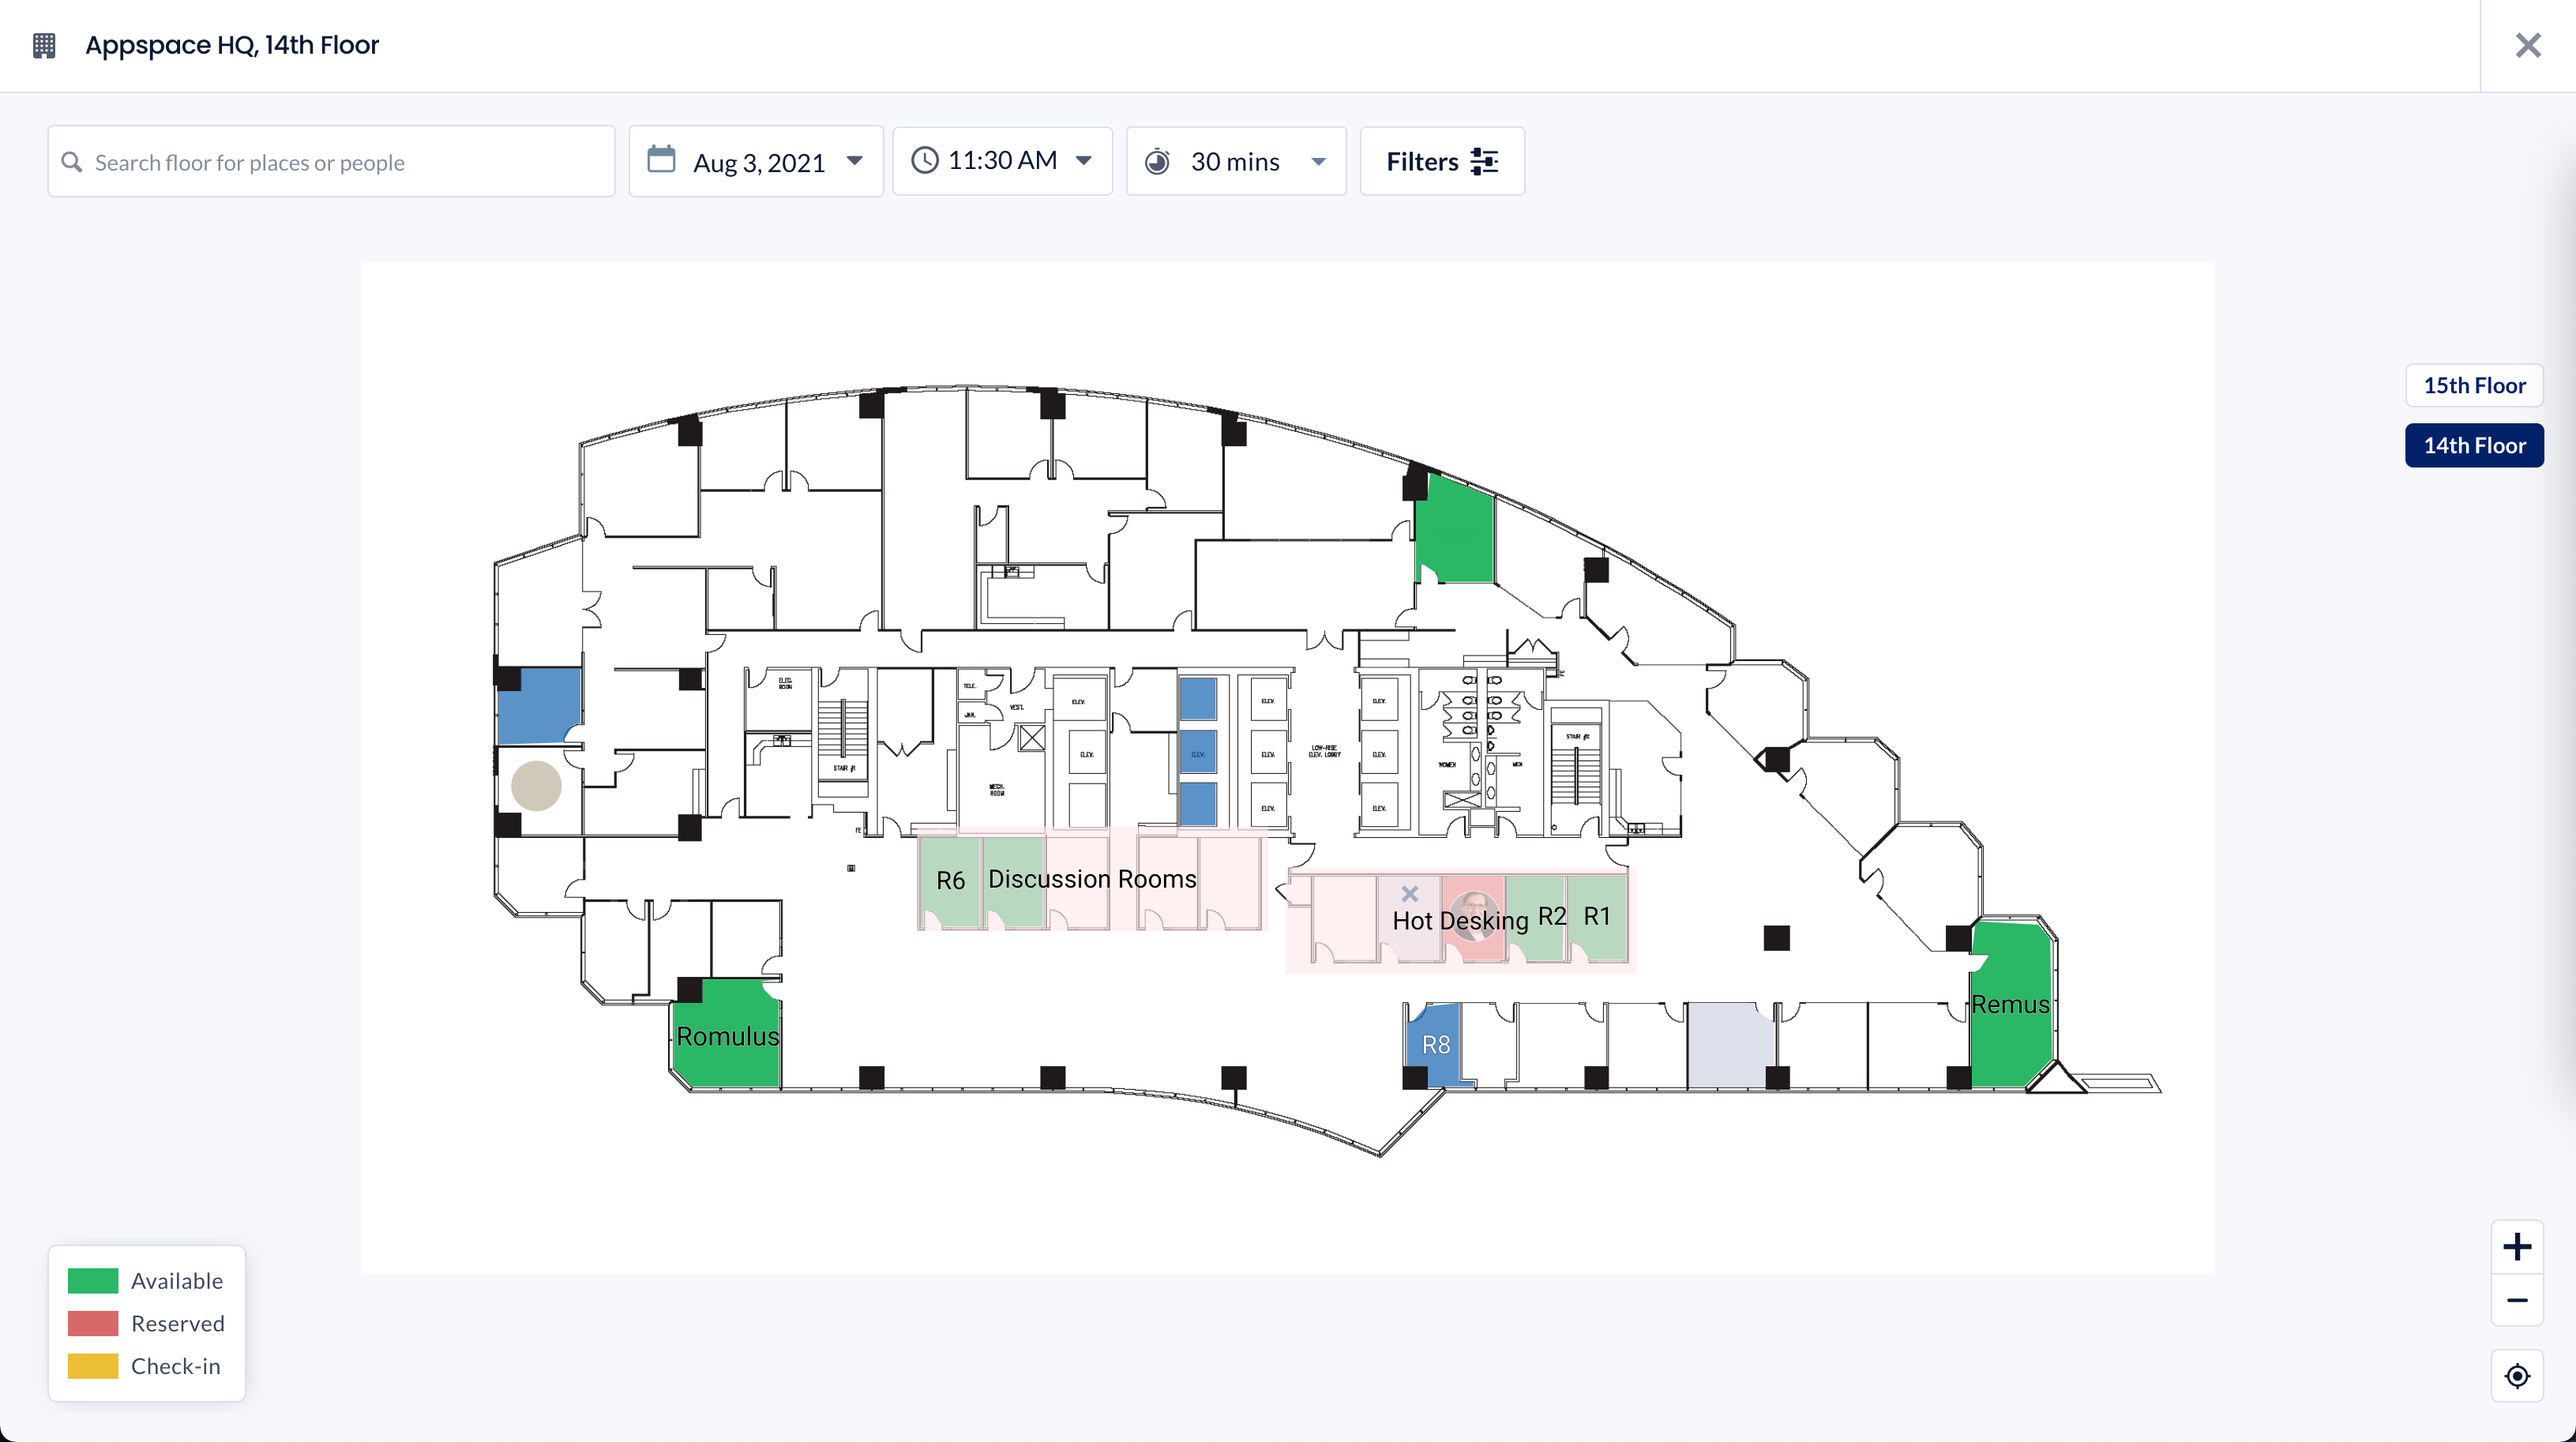
Administrators can use our Locations module to upload floor plans to a building, campus, or individual floors, and map resources and points of interest to these floor plans and link them to the Appspace Reservations system. They can also choose to upload the floor plans in the Locations module, and thereafter do the resource mapping directly in the Reservations module. providing a clear visual guide and experience for employees and visitors when making reservations later on.
Once the system is set up, reservations can be made via the web using our Employee App portal, or via the Appspace Employee App on a mobile device (Android or iOS).
Administrators:
All administrative tasks are performed in the Reservations module in the Appspace console, as follows:
- Create reservable resources – Import room resources from a calendar provider, or create them directly in Appspace.
- Manage workspaces & resources – Implement reservation rules, set employee permissions, manage reservations.
- Upload floor plans and link resources – Upload floor plans and map workspaces to resources to provide a better visual guide and experience to employees and visitors.
- Analytics & reports – Measure your workplace utilization, and monitor and track users’ access.
Employees:
All space and building pass reservations are made via the Employee App portal via a desktop browser, the Appspace Employee App on mobile devices, or on touch-screen devices using the Room Schedule card or the Schedule Board card, as follows:
- Check-in from anywhere – Check-in, end, or extend a reservation from your mobile or workplace devices.
- Reserve workspace – Reserve a desk, room, or any available workspace on a map, from the Employee App via a browser or personal devices.
- Reserve building pass – Reserve a building pass via the Employee App for access to a restricted building or campus network, and then scan the QR code to check-in.
Reservations module in the Appspace console for configuring resources and rules.
This article provides administrators with an introduction to the user interface and the configuration features available within the Reservations module in the Appspace console.
- Administrators looking for instructions to configure the Appspace Reservations system, refer to Configure and Manage Workspace & Desk Reservations – Administrators.
- Administrators who would like to reserve a space directly in the Reservations module in the console for themselves or on behalf of someone else, refer to Reserve Workspace & Building Pass in Console – Administrators.
- Employees looking for guidance on making a reservation, refer to Reserve a Workspace, Desk, or Room – Employees.
- Administrators looking for instructions to configure a building pass, refer to Configure and Manage Building Passes.
- Employees looking for guidance for reserving building passes, refer to Reserve A Building Pass – Employees.
- Administrators looking for instructions to configure the Schedule Board card with Appspace built-in provider settings to enable space, room, or desk reservations, on the card, refer to Cards: Schedule Board (Multi-Rooms) with Appspace Reservations.
User Interface & Navigation
Sign-in to the Appspace console to access the Reservations module via the ☰ Appspace menu on the console sidebar. This module is only visible to Appspace Account Owners or Location Admins.
The Reservations module has three tabs: Reservations, Resources, Analytics.
Reservations
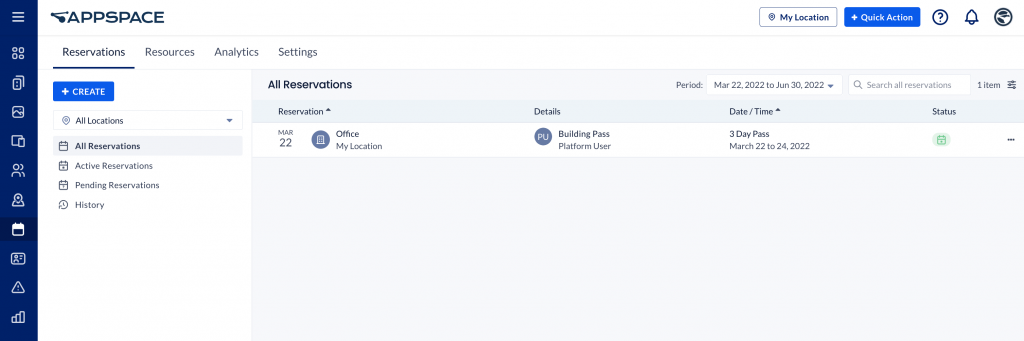
In the Reservations tab, you’ll be able to view and manage all building, floor, and workspace reservations that have been made on the Appspace platform. This tab will initially be empty.
Make Reservations
The Create button allows you to make reservations directly from the Appspace console.
Edit Reservations
- Clicking the ellipsis of a reservation allows you to view the reservation details. If you have the necessary permissions, you may also edit the reservation details, or cancel reservations made by users. To edit a reservation, refer to the steps after a reservation is selected in the Manage Workspace Reservations article.
- Selecting multiple reservations allows you to cancel all selected reservations quickly.
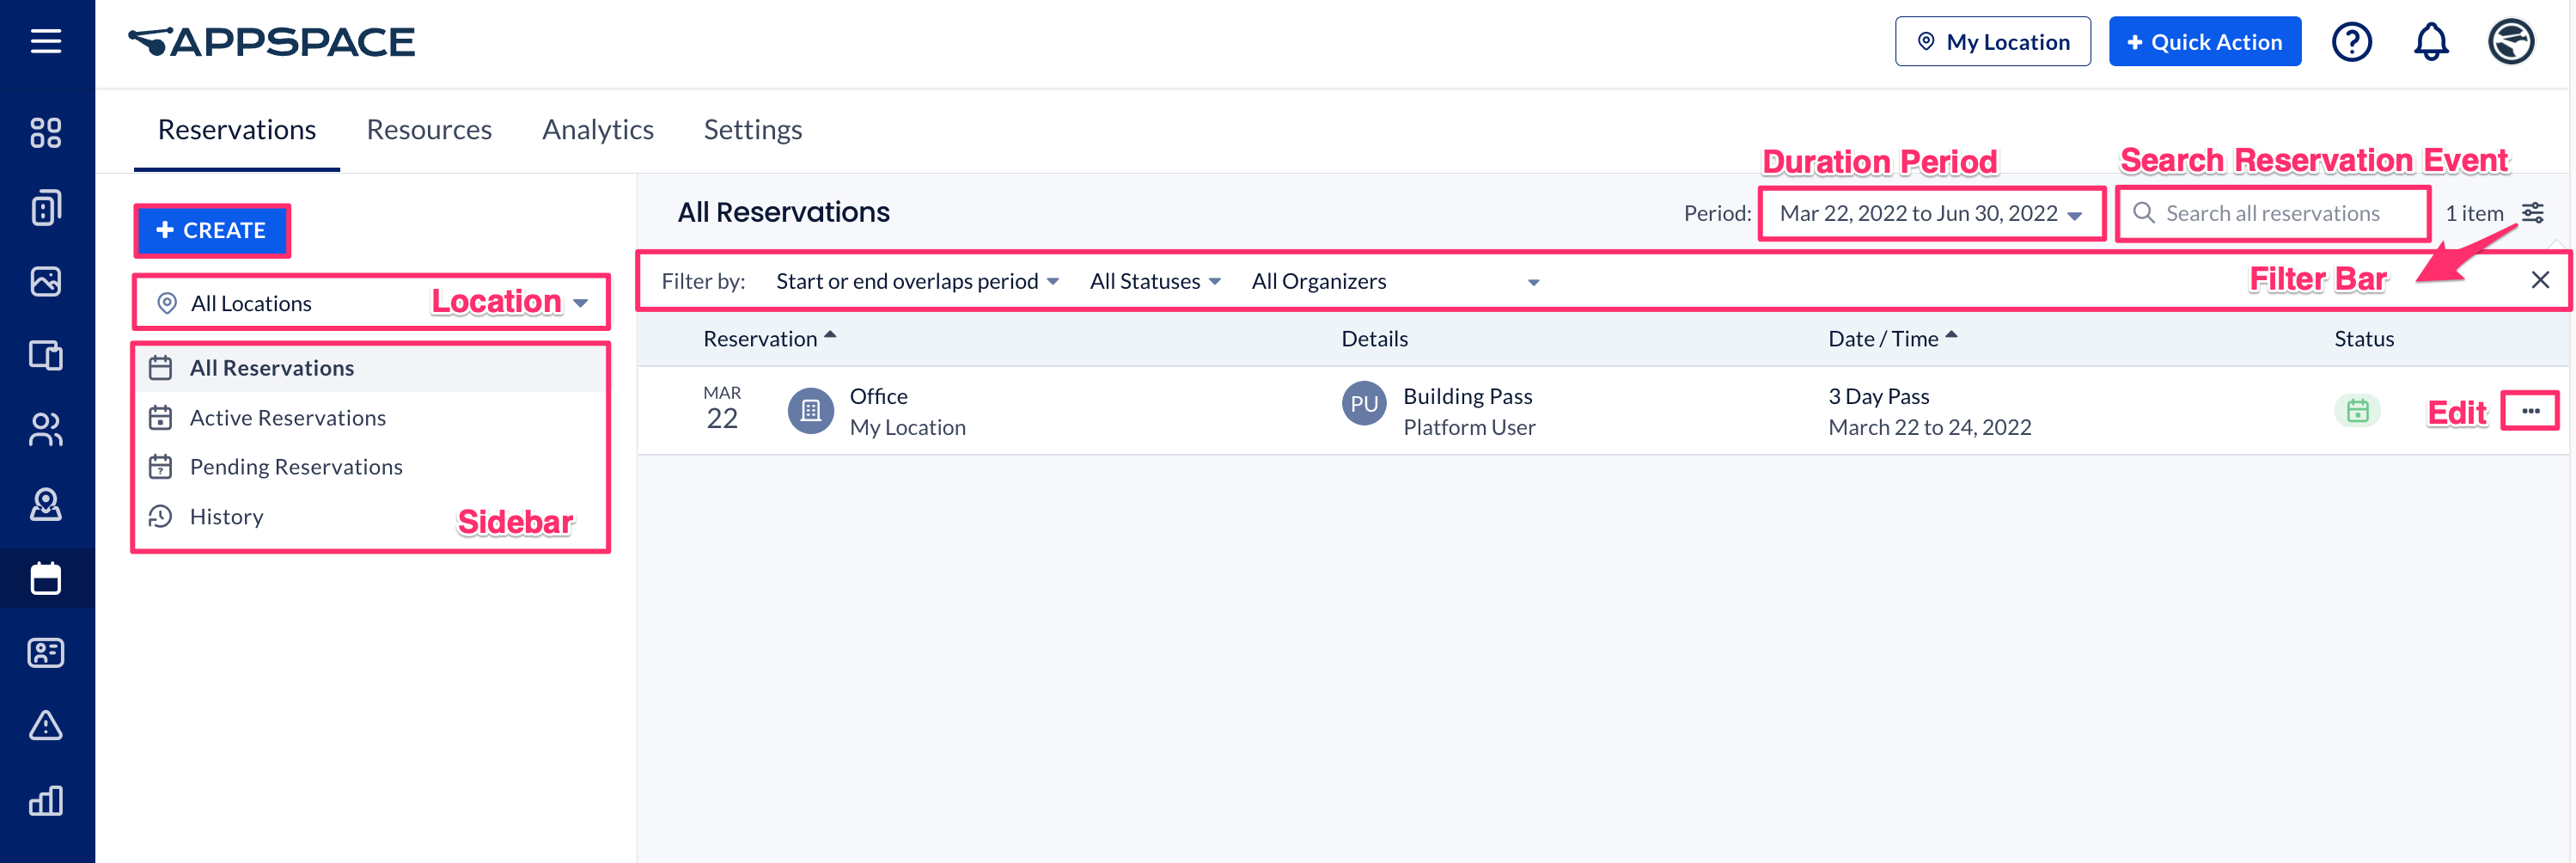
Search and Filters
To search for a specific reservation, you may select one of the following filters which narrows down the search, presenting you with a list of reservations based on the filter aspect:
- Sidebar
- By Location
- All Reservations
- Active Reservations – Display reservations that are currently ongoing.
- Pending Reservations – Display reservations that have not occurred, due to incomplete checkpoints that are part of the workflow.
- History – Display reservations that have ended.
- Duration Period – Display reservations within a date range
- Search Field – Search reservation by keyword
- Filter By Icon
- Start or Ends overlap period
- All Statuses
- All Organizers
Sort
Sort the listed resources by Reservation, Details, Date / Time, or Status in ascending or descending order by clicking the header arrows.
Export Reservations
Reservations can now be exported based on the current selection or filters, by selecting all or multiple reservations, and clicking the Export icon in the batch menu. The exported reservations list will be downloaded in an .xls file format, and contain the following columns:
- Meeting Name
- Resource Name
- Resource Type
- Resource SubType
- Organizer
- Organizer Type (user, external)
- Organizer Email
- Start Time
- End Time
- IsAllDay
- Recurrence (use the recurrence label)
- Location
- Floor
- Status
- Sensitivity
- Origin (Provider or Appspace)
- Attendees (comma delimitated email string)
- Attendees Count
- Check-in Status (not-required, user-checkin, auto-checkin, expired, pending)
- Facilities (comma delimitated string)
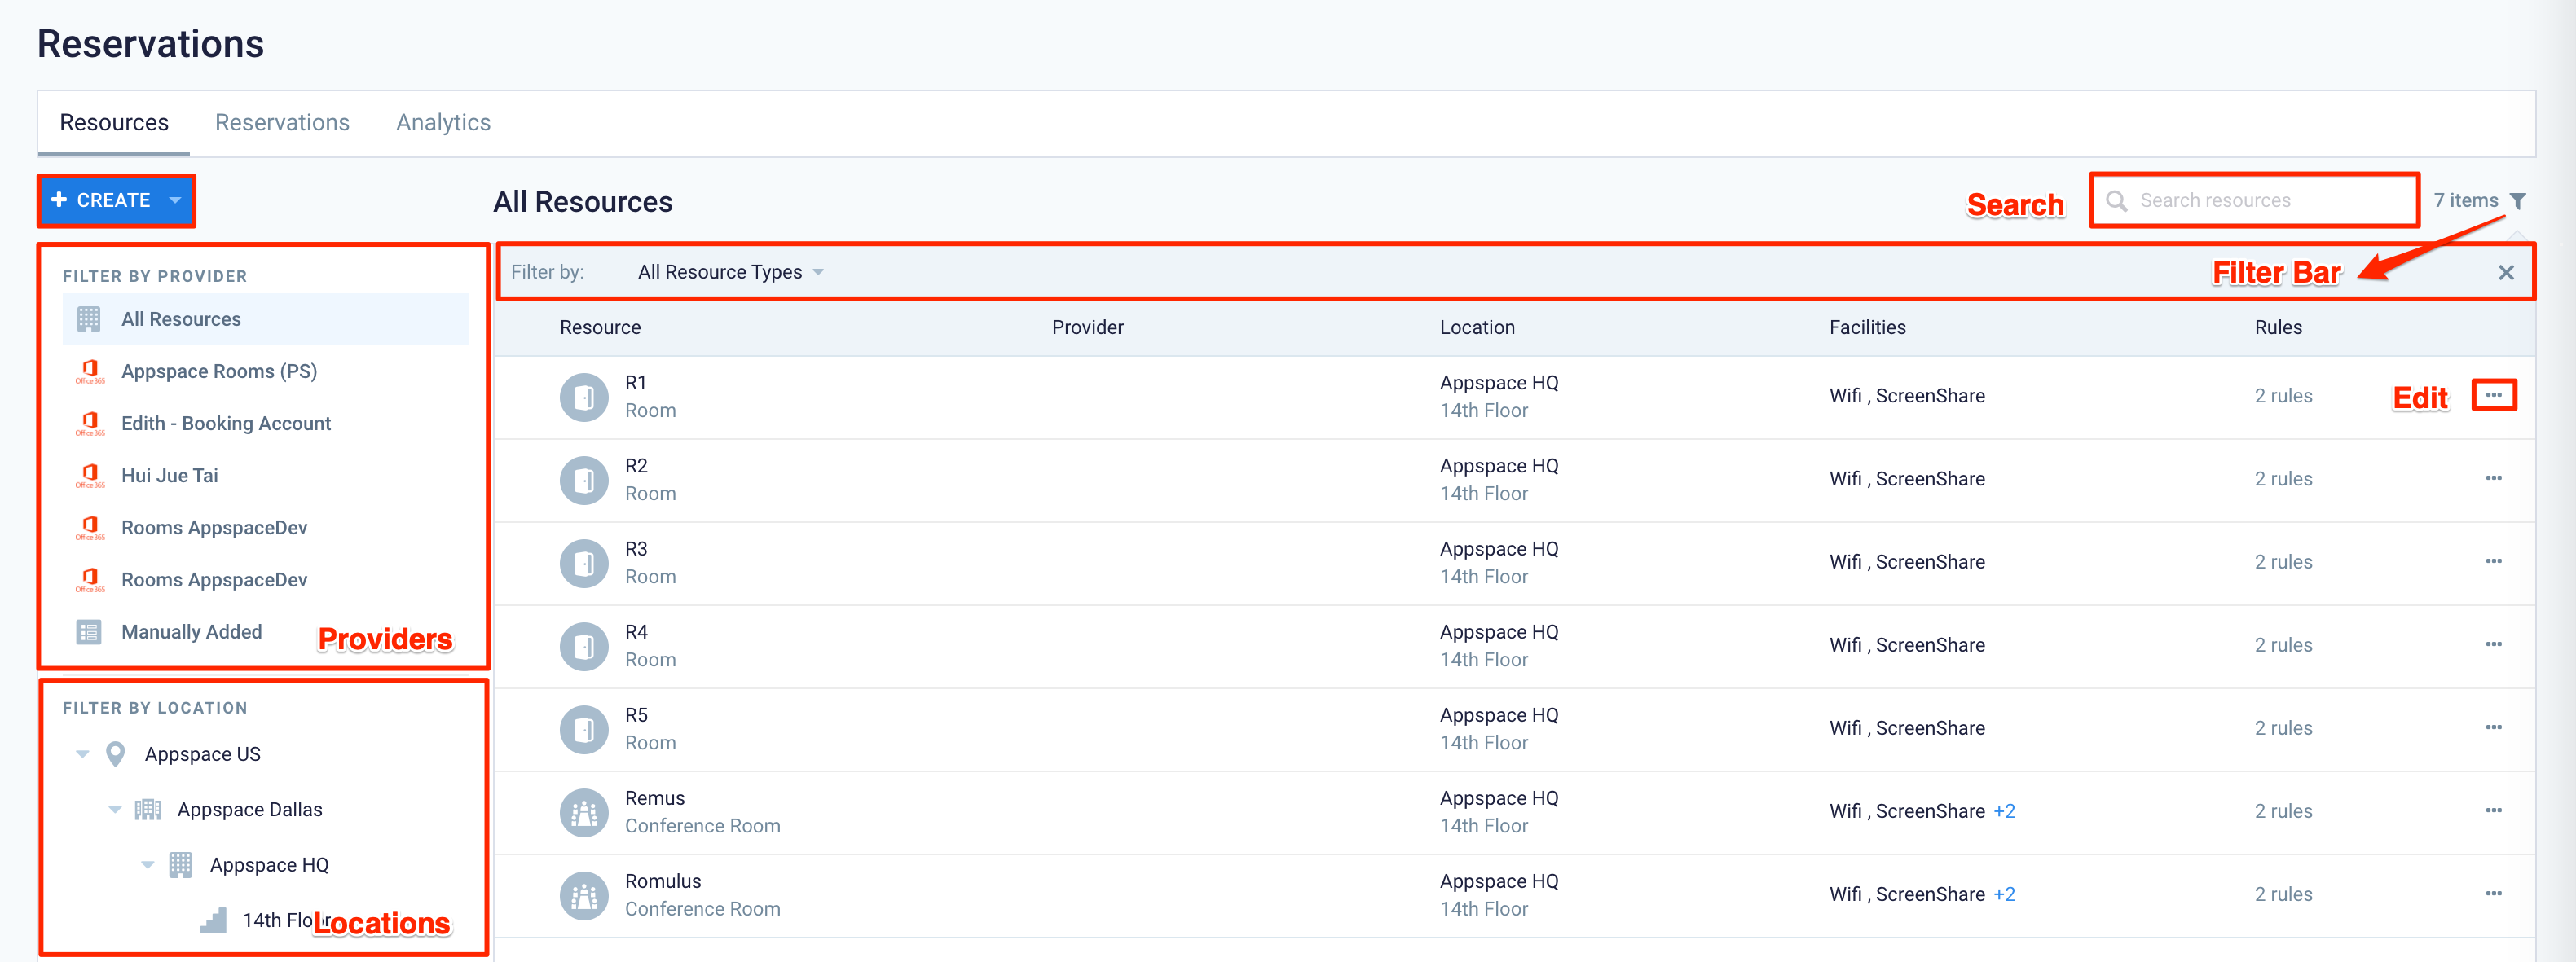
Resources
In the Resources tab, you’ll be able to view and manage the building, floor, and workspace resources, such as building passes, meeting rooms, huddle spaces, and hot-desking spaces within your organization.
Each reservation created and listed on the dashboard displays these details:
-
- Reservation date
- Resource information
- User or organizer details
- Reservation date and time
- Resource’s reservation status
Create Resources
The Create button allows you to manually create a resource. Clicking the arrow next to the button allows you to perform the following additional functions:
- Create Resource – Create resources such as rooms, desks, or points of interest (POI).
- Add Provider – Import your calendar provider resources. A passport must be created and a connection established with the calendar provider.
- Import Resources – Import multiple resources using a .xlxs file.
- Export Resources – Export existing resource details into a .xlsx file for quicker bulk edits.
Edit Resources
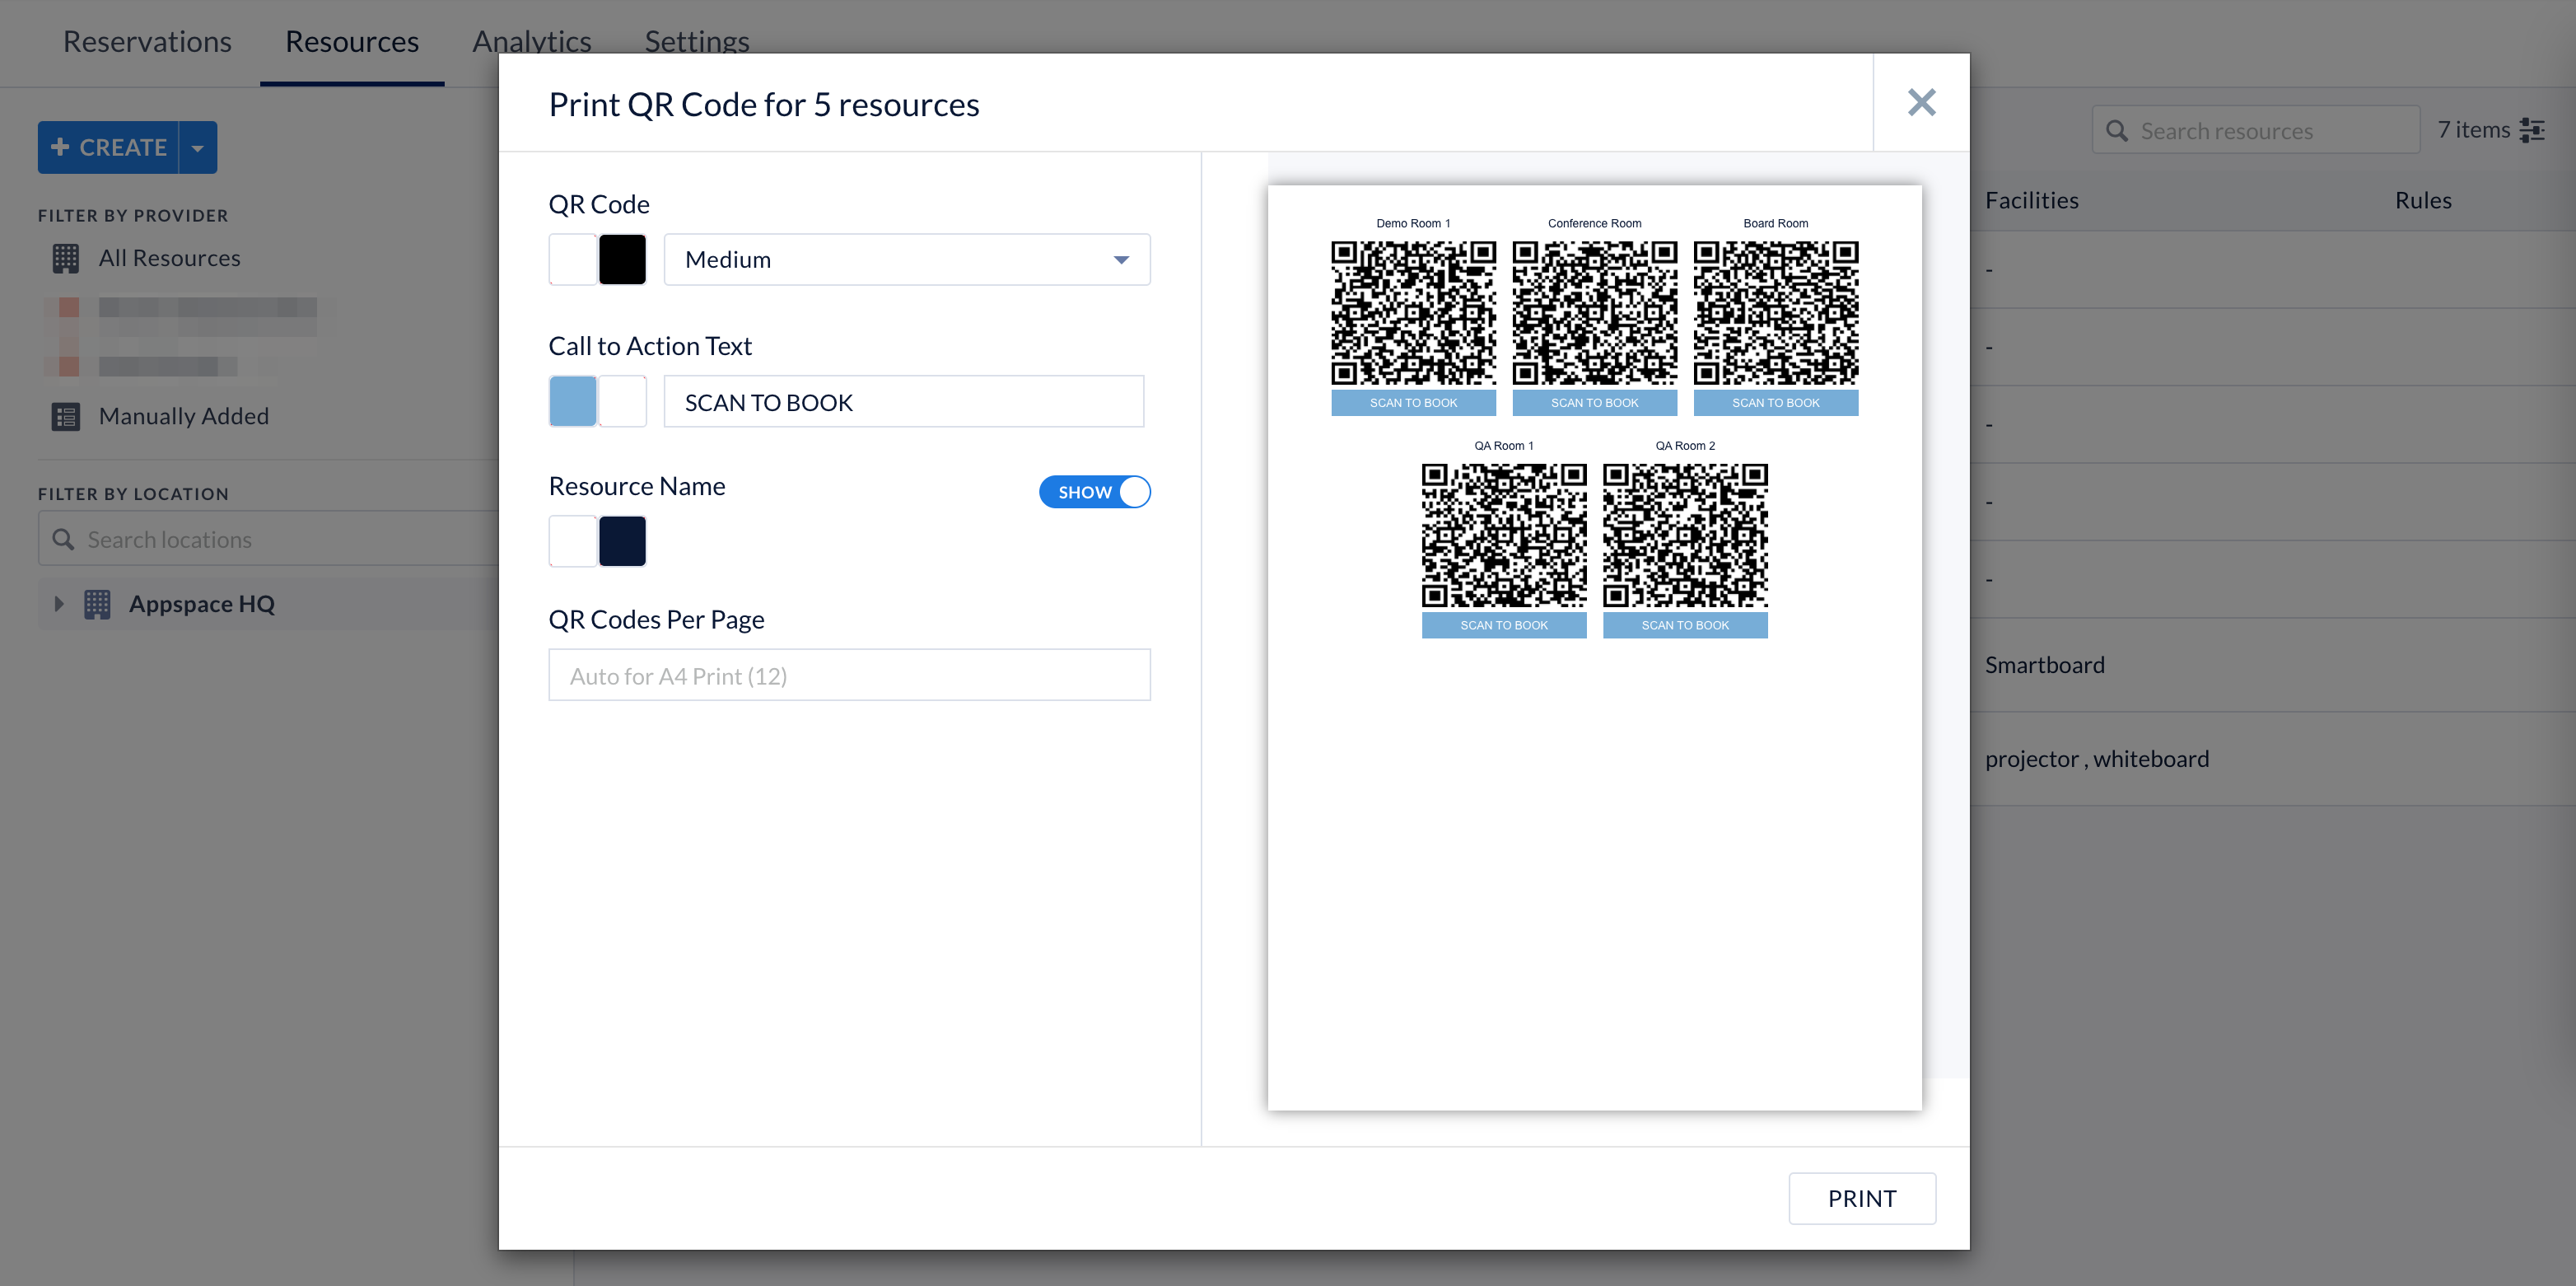
Clicking the ellipsis of a resource allows you to edit the resource details, print a QR code for that resource, or delete the resource, provided you have the necessary permissions to do so.
Edit Multiple Resources
Selecting multiple resources allows you to perform bulk edits, or manage permissions of the selected resources quickly.

- Manage Permissions – Manage the Access Control Permissions for the selected resources.
- Print QR Code – Print the QR Codes for the selected resources. The following customizations can be made:
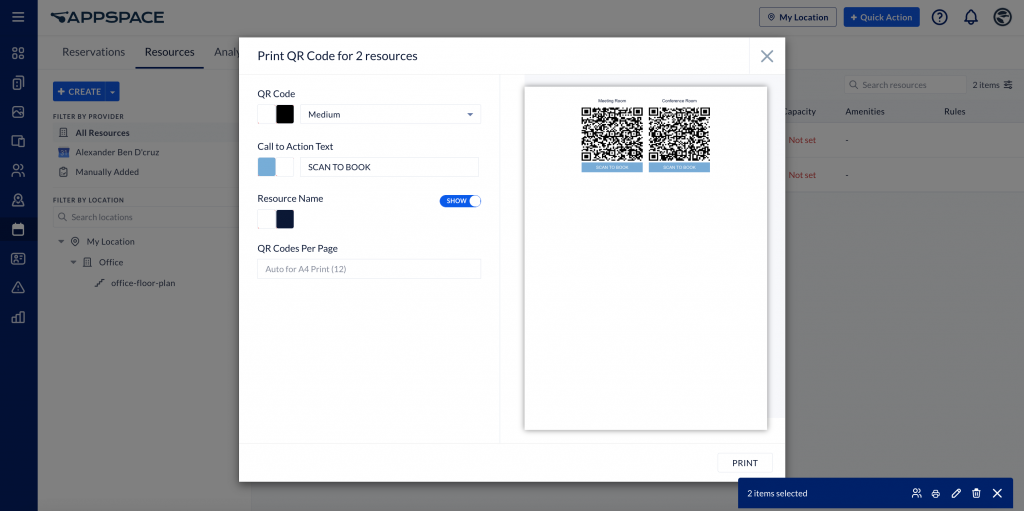
- Customize QR code color and background color.
- Customize QR Code size (small, medium, or large).
- Customize Call to Action text, color, and background color.
- Display Resource Name.
- Customize Resource Name text and background color.
- Customize the number of QR codes per page (dependant on print page size) to be printed.
- Edit – Edit the selected resources.
- Delete – Delete the selected resources.
- Close – Close the bulk edit toolbar.

Sidebar
Filter By Provider
The Filter By Provider sidebar displays a list of calendar providers that have been configured with resources used in Reservations.
Selecting the provider displays all resources within the provider, while clicking the ellipsis of the provider allows you to manage, or delete the provider.
Filter By Location
The Filter By Location sidebar displays the location tree that has been configured in Locations, and the resources used in Reservations.
Selecting the location displays all resources within the location, while clicking the ellipsis of the location, depending on the location type, allows you to manage the following:
- Network, Geo, and Campus locations – Manage rules and permissions to the resource, which will then be inherited by child resources.
- Building and Floors locations – Manage the general information, rules, and permissions of the resource. View the reservations and analytics of the resource.
Search and Filters
To search for a specific resource, you may select one of the following filters which narrows down the search, presenting you with a list of resources based on the filter aspect:
- Sidebar
- Filter By Provider
- Filter By Location
- Duration Period – Display resources within a date range
- Search Field – Search resources by keyword
- Filter Bar Icon
- Filter By Start or end overlaps period
- Filter By All statuses – The status of the reservation.
- Filter By All Organizers – The organizer of the reservation.
Sort
Sort the listed resources by Resource, Provider, or Location in ascending or descending order by clicking the header arrows.
Analytics
In the Analytics tab, you’ll be able to view statistical data of all the reservations that have been made either via the Appspace Employee App or the Employee App portal. This tab will initially be empty.

Filters
To filter data, you may select one of the following:
- Activity Period – Displays reservation analytics for a date range.
- Filter By Location – Displays reservation analytics by location.
Trend Widgets
- Total Building Reservations: Tracks the number of building reservations over the specified time period. It displays the total number with an up/down trend percentage.
- Total Workspace Reservations: Tracks the number of workspace reservations over the specified time period. It displays the total number with an up/down trend percentage.
- Total Users: Tracks the number of users over the specified time period. It displays the total number with an up/down trend percentage.
- Total Workspaces Created: Tracks the number of workspaces over the specified time period. It displays the total number with an up/down trend percentage.
Widgets
- Reservations by Resource Type: Tracks the number of resource reservations made over the specified time period. It displays the total number with a breakdown by type. It will show individual totals on mouseover.
- Workspace Reservations: Tracks the number of workspace reservations created over the specified time period. It displays the number of workspace reservations broken down in smaller time slices to show a trend.
- Building Pass Reservations: Tracks the number of building pass reservations created over the specified time period. It displays the number of building pass reservations broken down in smaller time slices to show a trend.
- Most Reserved Workspaces: Tracks the number of reservations made to that workspace. It displays the top 5 most reserved workspaces and the total number of reservations made.
- Most Reserved Floors: Tracks the number of workspace reservations made in that floor. It displays the top 5 most reserved floors and the total number of reservations made in that floor.
- Most Reserved Buildings: Tracks the number of workspace reservations made in that building. It displays the top 5 most reserved buildings and the total number of reservations made in that building.
- Most Active Users: Tracks the number of user logins over the specified time period. It displays the top 5 most active users and their login count.
Individual Building, Floor, or Workspace Resource Analytics
You may also view detailed analytics for an individual building, floor, or workspace resource by clicking the Analytics tab when editing the resource from the Resources tab.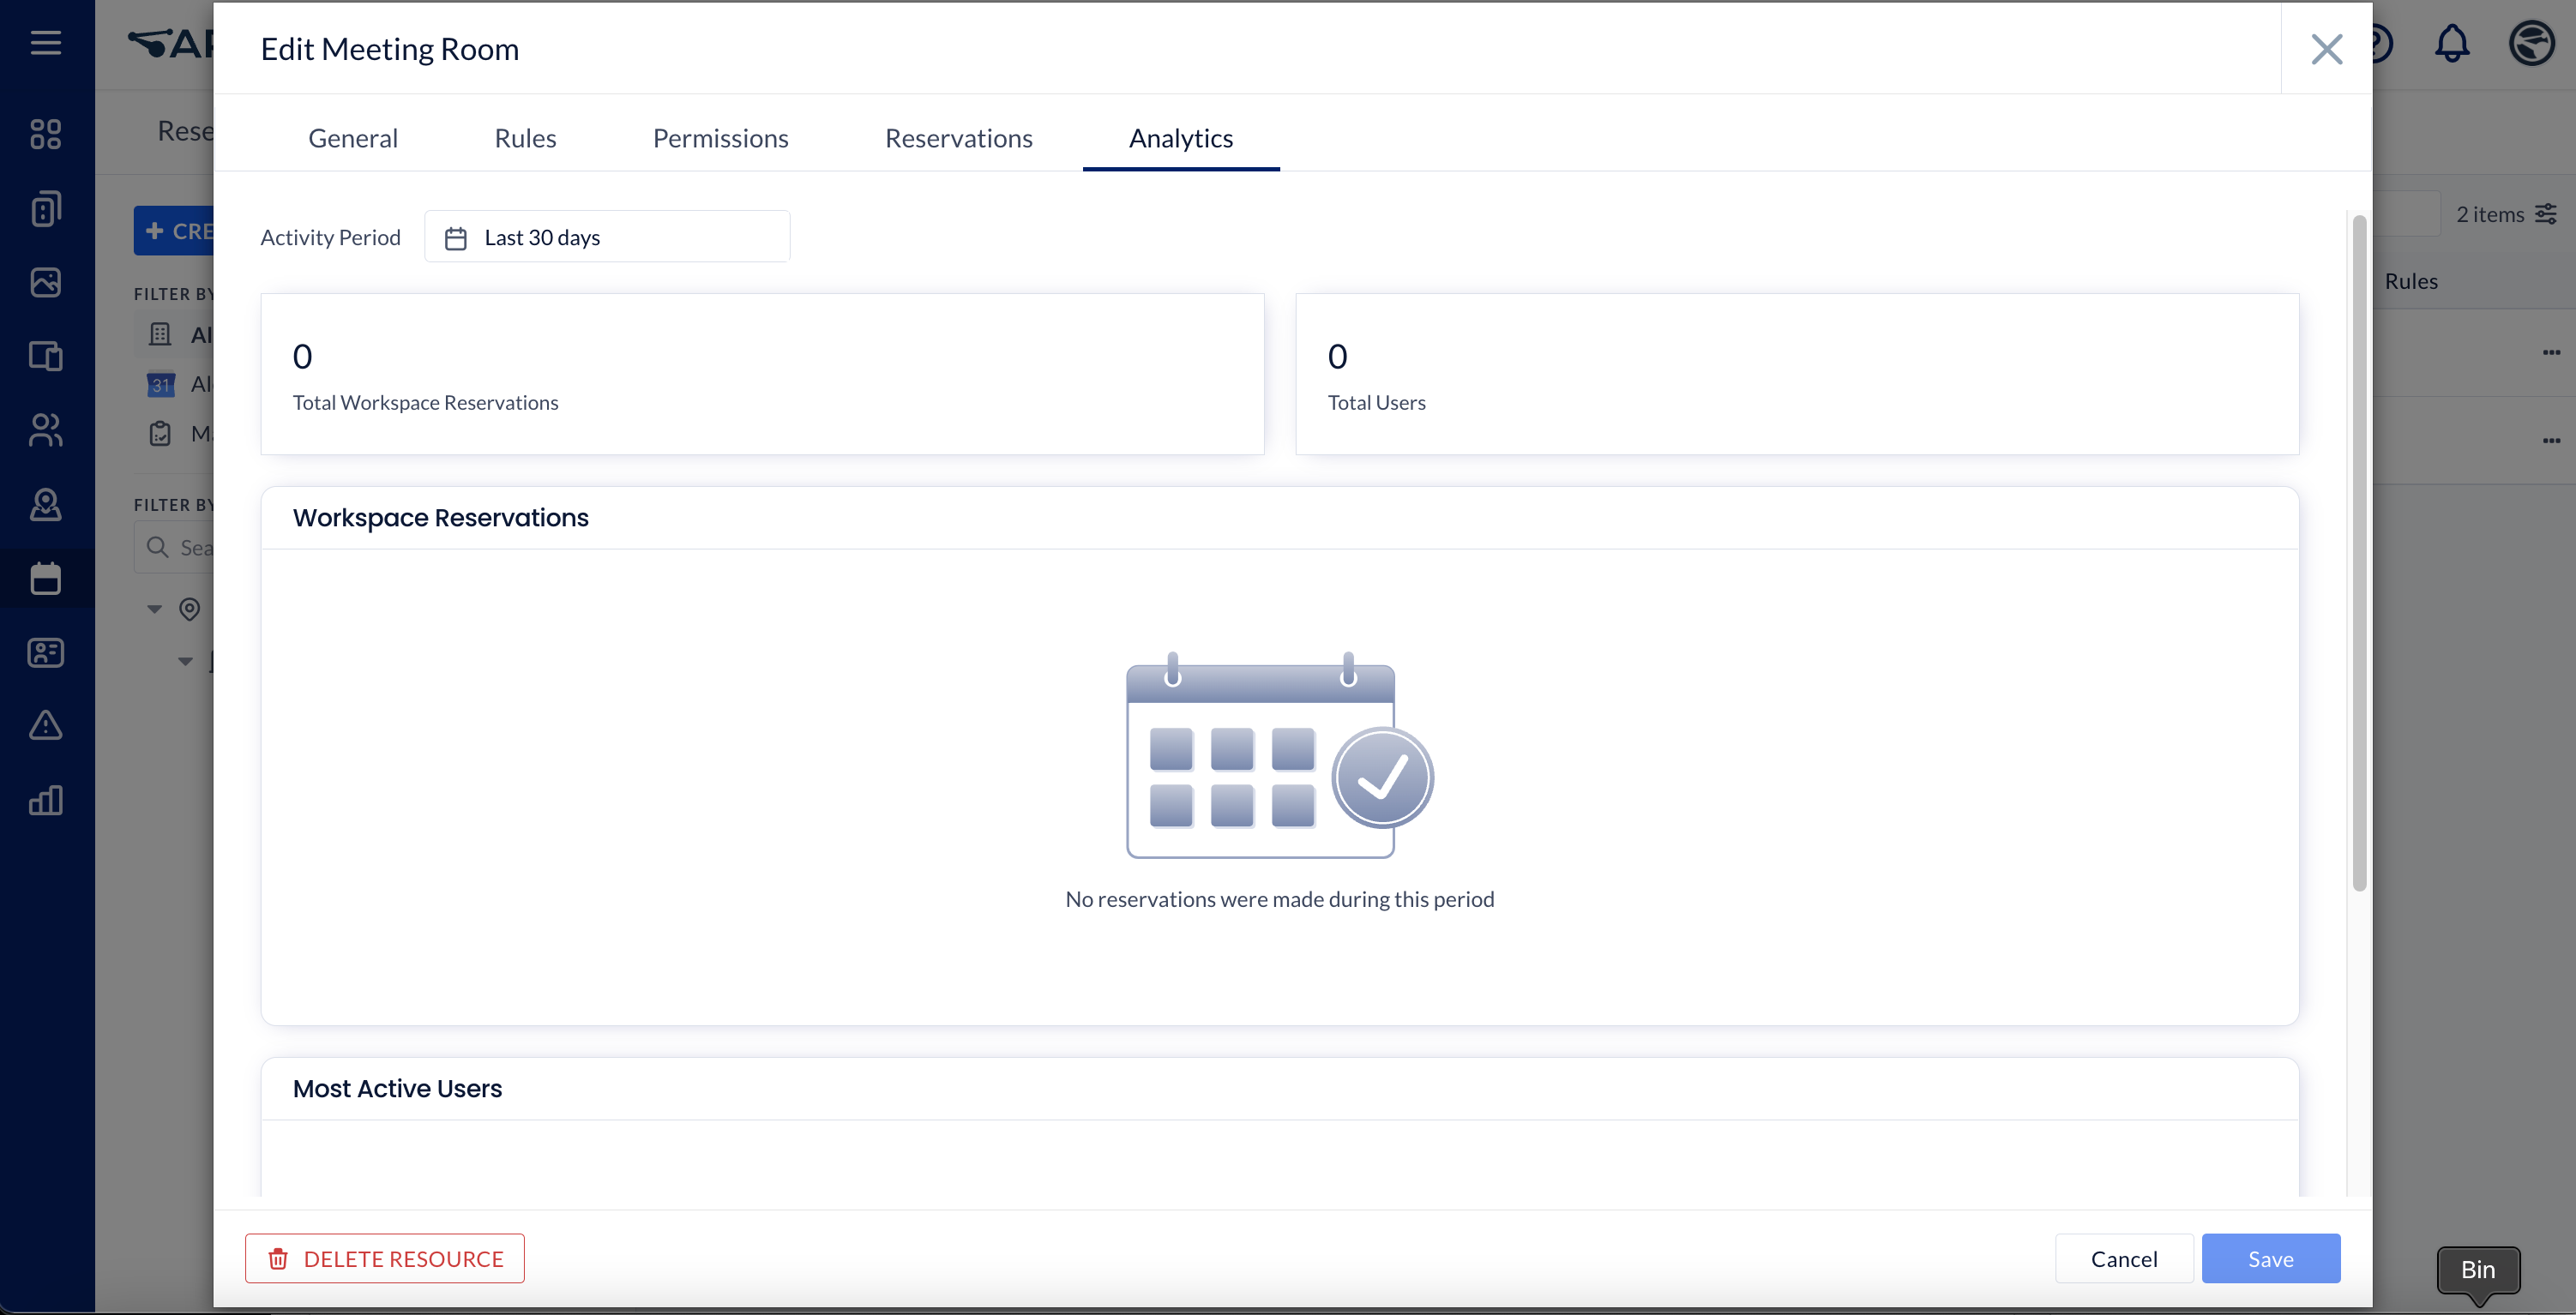
Depending on the resource selected, the following analytical widgets will be displayed:
Building
Trend widgets:
- Total Building Reservations
- Total Reservations
- Total Users
Widgets:
- Workspace Reservations
- Building Pass Reservations
- Reservations by Resource Type
- Most Reserved Workspaces
- Most Reserved Floors
- Most Active Users
Floor
Trend widgets:
- Total Reservations
- Total Users
Widgets:
- Workspace Reservations
- Reservations by Resource Type
- Most Reserved Workspaces
- Most Active Users
Workspace Resource
Trend widgets:
- Total Reservations
- Total Users
Widgets:
- Workspace Reservations
- Most Active Users
Settings
The Settings tab allows administrators to configure global reservation settings for the following:

- Enable Recurring Reservation
- Default Reservation Sensitivity
- Default Building Reservation Name
- Default Workspace Reservation Name
- Default Reservation Duration
- Configure Notifications for Enterprise Messaging Apps
- Configure a Concierge Service to Manage Workspace Reservations ImportantThe Concierge service is an Appspace Limited Release feature. Contact your Appspace Customer Success Manager to be a part of the Limited Release program and enable this feature.
- Configure Visitors in Reservations (new)
Was this article helpful?