How to Create a Blog Space (User Instructions)

Share on print
Share on facebook
Share on linkedin
Share on whatsapp
Share on email
Note that the information provided in this article is up-to-date with the latest releases of the software.

Feature Description

The Modern Intranet includes native functionality called blogs, which has been available and supported since version 3.0.

With blogs, users can create their own individual spaces to share informal information with others in a continuous format, such as daily, weekly, monthly, etc. These spaces are perfect for CEOs or other users who want to share longer text with richer formatting.

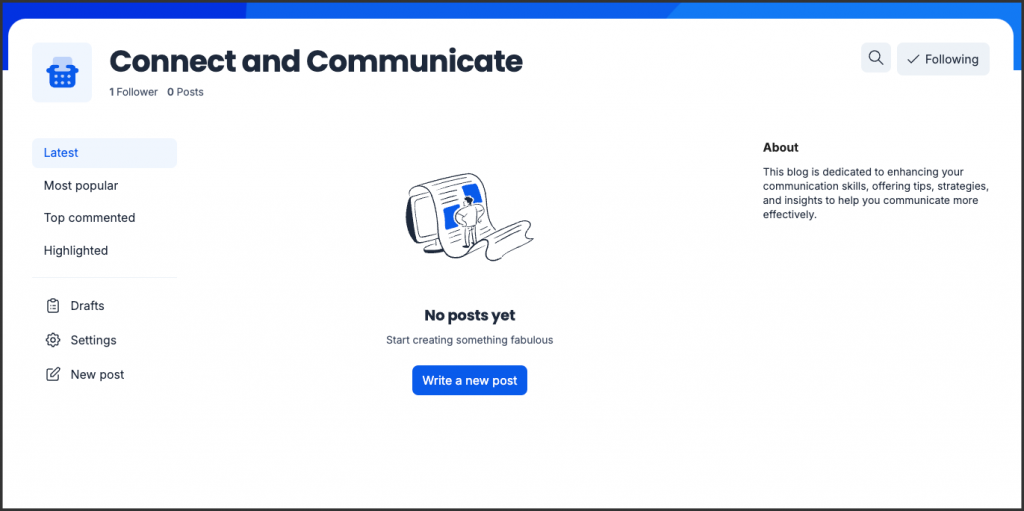
Blogs in Appspace can also be used to promote informal discussions between the owner and other users through informative content that can be enriched with visual content like in-text images or videos. By using this feature, users can share their ideas, thoughts, and experiences in a creative and engaging way. In the figure below, you can see an example of a user’s blog in the Appspace environment.

Why is “blogs” a useful feature?

  • Blogs provide a cross-community, or organization-wide platform for internal communications (vs. team-based collaboration).
  • allow communication to a broad audience on a consistent basis (e.g. by having a team’s blog).
  • Communities can choose to have private Blogs exclusively accessible to members, whereas a standalone blog post could be made available for all employees to read, but not modify.

User instructions

To create a blog, you just need to follow the steps indicated below:

1. Select “Create a New Space”, as highlighted in red. Note that for any user to create a standalone blog, permissions have to be granted by the administration roles. You can learn more about basic configuration here.

2. Select Create a Blog and then click Create, as highlighted in red.

3. Create a New Blog. To create a new blog, you can start by editing the main categories of the blog, namely:

    1. Title: in this field, you must include the title of your blog (e.g., The CEO’s Blog).
    2. Description: in this field, you must include the description or goal of this space (e.g., this is my blog, where I’ll post the 5 highlights for each week).
    3. Tags: here you can add the tags related to your blog content.
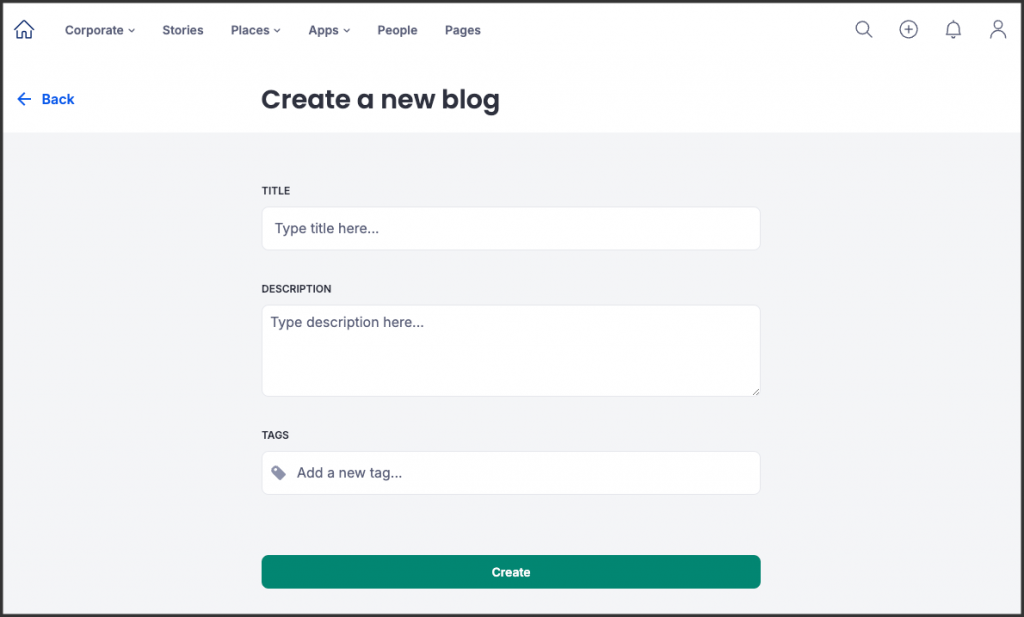
4. Click on the Create button to launch the blog space. This procedure could take up to five minutes. While you wait, you can change the blog settings (such as the title, description, and tags) by clicking “Start configuring” or “Exit and get notified” (you will then be notified in your notifications space). You’ll get a notification in either of the options so that you know your blog space was properly created.

After the process is complete you can either view the Blog space or Edit the blog settings.

By clicking the View Blog button, you’ll get to the blog environment where you will be able to manage all your blog posts. Now it is time to write a new blog post by clicking on the highlighted button “Write a new post”.

5. Write a new blog post. The blog post space allows you to do some activities (e.g., embed an image or video, attach a file, etc.) (see figure below).

By clicking on the X icon, you have access to the functionalities you can use when writing a blog post, namely:

  • Upload an image.
  • Upload a video.
  • Upload a file.
  • Embed a link
  • Create a bullet list.
  • Create a numbered list.
  • Create headings (H1) and subheadings (H2)

You can also access the editing toolbox by selecting the text with the cursor (see figure below). This toolbox allows you to edit the text (e.g., bold and italic options) and create quotes.

Within this post-creating environment, you can also use other functionalities, such as adding more authors and tags (see figure below) to the blog post and Save as a draft. If the post you are creating includes content that must be shown with higher relevance in your blog space, you can highlight it by turning on the option “Highlight” (see figure below).

On the “3 dots” icon, you also have the option to delete the content you have created.

6. Save or publish my post. If you click on save, you will add your post to the draft section to work on later on.

If, for any reason, you click on the “going back” option, you’ll be notified before proceeding with the action.

If your post is ready to publish, then you just need to click “Publish” (see picture below). Note that the “Publish” button will only be available if you have at least one title and some text in the blog’s body.

7. Manage the blog’s workspace. There are a few functionalities available in the left menu (see image below) for you to manage your blog’s space, including:

  • Latest Blog Posts: You can quickly access the last published posts ordered by publishing date.
  • Most popular: you can quickly access your blog posts with more “Likes.”
  • Top Commented: You can quickly access the blog posts that generated more comments among the readers.
  • Highlighted: you can quickly access the most relevant blog posts that can be either highlighted by authors or owners in the editor (top right three-dot menu -> highlight option).
  • Drafts: you can access your drafts, i.e., all of your work in progress, in the blog workspace within the My drafts tab, while the All drafts tab contain all drafts that have been created by other writers and yourself. This enhancement speeds up the process of accessing blogs users are actively working on.
  • Settings: you can quickly access the edit settings (BASIC, USERS, and DESIGN) for the blog workspace.
  • Basic: In this section, you can edit the title and description of your blog space. You can also include the relevant tags for your blog. This is the same setting menu as you see when you create a blog (see point 3).

    • Users: in this section, you can manage the authors and owners of your blog space.
  • The authors can write, create, delete, and/or edit a blog post.
  • The owners can write, create, delete, and/or edit blog posts and manage the blog space settings.

    • Design: In this section, you can customize your blog space by adding a banner image and a blog (thumbnail) image.

    • New Post: You can quickly create a new post in your blog workspace and follow point 5. Write a New Blog Post

________________________________________________________________________________________________________________

FAQs

  • Do I have a text editor available for blog editing?
    • Yes. You can either use the toolbox when dropping down the “+” button that appears in the text body, or you can select the text and use the editing toolbox. You can see the functionalities available for text editing in point 5. Write a new blog post.
  • Do all the authors have the same permissions as the blog’s owner (in the blog workspace)?
    • No. Blog authors (invited by the blog owners) can add new blog posts to the blog’s space. On the other hand, the blog owner can create, write, and edit a blog post and manage all the blog settings. See Information 7. Manage the blog’s workspace.
  • How can I become an author?
    • You can become an author if the blog’s owner invites you to be part of the blog’s space as an author. The owner of the blog must do this by going to Blog Settings -> Users and adding the person’s name in the authors section (see information in 7. Manage the blog’s workspace.).
  • How can I customize the blog’s workspace (e.g., include a banner and a thumbnail photo)?
    • You can customize the blog’s workspace in the blog’s Settings -> Design section and then upload a banner or blog (thumbnail) photo.