Introduction
In this introductory path, you will learn the basics about how Appspace can be used to create interactive kiosk experiences. Ready-to-use templates and services are available to create kiosk experiences for visitor registration, employee directories, and room wayfinding. Kiosk experiences can use touch-enabled devices, or be presented through a touch-less interface using QR codes and mobile devices.
Prerequisites
Before you begin, ensure that you meet the following prerequisites:
- For visitor registration and employee directory, you need an Appspace account that is enabled with the Visitor Registration module.
- You will need permissions to register and manage devices.
- Get these permissions with the Location Admin role.
- You will need permissions to create and publish channels.
- Get these permissions with the Location Admin role or Publisher role.
- A compatible device that will be used as the interactive kiosk endpoint.
Kiosk Building Tools
Appspace has a collection of tools that lets you build interactive kiosk experiences that can welcome both employees and visitors, and direct them to the person and location for meetings. In a corporate or industrial setting, this type of kiosk can serve as the check-in zone. The use of wayfinding and maps will then provide visual directions of how to get there.
Setup the Visitor Registration module
The Visitor Registration module will first need to be enabled in order to build a kiosk to welcome and register visitors. Once enabled, you will first need to configure it. Follow the steps outlined in this how-to article to configure the Visitor Registration module.
The Visitor Registration module lets you configure and manage the following:
- Buildings. Buildings represent the topmost structure in which kiosks and employees are placed under.
- Kiosks. Kiosks represent the actual kiosk endpoints which run the Guest Registration card to collect data.
- Employees. Each employee that belongs to a building can be entered into the database and will be visible in the employee directory.
To see more details on navigating the Visitor Registration module, please take a look at this how-to article.
1
Setup the Visitor Registration card
The Visitor Registration card is an interactive template that is published to a compatible device. This template is essentially the user interface that visitors see when they arrive at the check-in desk and use the kiosk.
The Visitor Registration card has the following items that need to be configured:
- Kiosk ID. This Kiosk ID can be found in the Visitor Registration module, and is meant to tie the physical device running the Visitor Registration card, and the entry in the Visitor Registration module.
- Welcome message. The welcome message is displayed first to visitors when they use the kiosk. If no welcome message is used, visitors will immediately see the registration form.
- Required guest information. Data collection attributes such as full name, email address, company name, phone number, badge number, and license plate number can be set as required or optional.
- Required visit information. Information for the host name or type of meeting can be set.
- Visitor document. You can also upload a document such as a non-disclosure agreement that requires the visitor to acknowledge.
- Confirmation message for check in/out. You can also enter text to display for the confirmation process when a visitor checks in or checks out.
To see the entire list of configurable settings, please take a look at this how-to article on configuring the Visitor Registration card.
After configuring the Visitor Registration card, it needs to be added to a channel and published to a device. You can find more details about publishing content to a device in this guided path about publishing to workplace devices.
2
Room schedule boards and wayfinding
In addition to visitor registration experiences, you can also create kiosks that let employees and visitors view meeting room schedules, locations, and perform room booking reservations. The Schedule Board card is a highly configurable template that shows information for multiple rooms, and allows you to search for an available room and perform instant booking reservations. It integrates with Google Calendar or Microsoft Office 365 to retrieve room calendar data for display and booking.
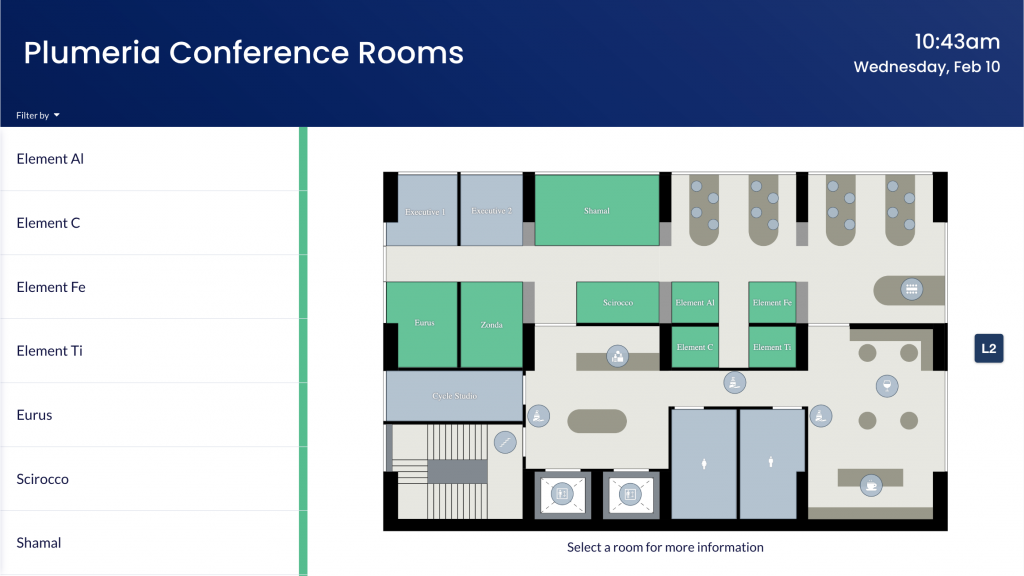
- Room locations. You can upload floor plans and configure all of the room definitions using the Locations module. Rooms can be linked to a calendar provider to pull room availability data for booking reservations. For more details, please read this how-to article on configuring the Schedule Board card with maps and floor plans.
- Simple wayfinding. The rooms that are displayed on the Schedule Board can also show directional wayfinding icons that indicate their general locations. For more details, please read this how-to article on configuring the Schedule Board card with simple wayfinding.
3
Congratulations!
You now know how to create kiosk experiences for visitor registration and room booking.
You can configure and integrate the right templates and components to work with your existing data providers for a seamless workplace experience.
Explore All Articles
Browse a list of all our how-to articles, guides, paths, and troubleshooting articles, available for Appspace cloud.
Was this article helpful?