The Schedule Board card is designed for viewing the schedule of multiple meeting spaces on larger displays placed in common areas. When the Schedule Board card is configured and displayed on a TV at a huddle space or lobby area, the following features will be available to you:
- Multiple Room information: room name and status indicating if the room is available, offline, or occupied is displayed.
- Meeting information: details of current meeting and upcoming meetings for the day.
- Booking functions:
- Book now – ability to book 30 minutes, 1 hour, or 1.5 hours from the current time, based on room availability.
- Book in advance – book future time slots (on the same day only) or up to 3 days in advance, based on room availability.
- Check in – option to check in to a meeting from 10 minutes before until 10 minutes after the start of the meeting.
- Extend meeting – extend current meeting by 30 minutes, 1 hour, or 1.5 hours.
- End meeting – end current meeting, and make the room available.
Note
If you are an end-user looking for information on booking a scheduled meeting via our App or your calendar, please refer to Booking Multiple Meeting Rooms.
- Configure Resources with Appspace Reservations.
- Create Schedule Board card in the Appspace console.
- Create a playlist channel and add the Schedule Board card.
- Assign the playlist channel to a registered device installed with the Appspace App.
- Book a room directly on the Appspace App.
Important
- Administrators looking for instructions to configure the Appspace Reservations system, refer to Configure and Manage Workspace & Desk Reservations – Administrators.
- Administrators looking for information on navigating the Reservations module in the console, refer to Browse and Navigate Reservations Module in Appspace 8.0.
- Administrators who would like to reserve a space directly in the Reservations module in the console for themselves or on behalf of someone else, refer to Reserve Workspace & Building Pass in Console – Administrators.
- Employees looking for guidance on making a reservation, refer to Reserve a Workspace, Desk, or Room – Employees.
- Administrators looking for instructions to configure a building pass, refer to Configure and Manage Building Passes – Administrators.
- Employees looking for guidance for reserving building passes, refer to Reserve A Building Pass – Employees.
Note
This article provides administrators with the instructions to configure the Schedule Board card within the Appspace console.
Prerequisites
- Ensure your device is compatible. Refer to the Supported Appspace Cards article.
- An Appspace Platform user license.
- An active Appspace public/private cloud user account.
- Account Owner, Publisher, or Author role to create and configure the Schedule Board card.
- Ensure that you have already configured the resources that will be available for booking, by following the instructions in the Configure and Manage Workspace & Desk Reservations article.
- It is recommended that the device clock is set to automatically retrieve time from a Network Time Protocol (NTP) server with the correct time zone, in order for it to sync correctly with the calendar provider. Appspace Cloud servers retrieve time from an NTP server by default. If an Appspace on-prem server is used, configure the on-prem server to retrieve time from an NTP server with the correct time zone.
Create Schedule Board Card
Follow the instructions below to create and configure the Schedule Board card:
- Log in to your Appspace console.
- Click Library from the ☰ Appspace menu, and click + CREATE. Alternative
- Click +Quick Action from the Appspace menu bar on the top right, and select Create Card.
- To create and add the card directly to an existing channel, refer to Add Content to Playlist Channels.
- Click Workplace from the side panel, and click the Schedule Board card. NoteIf you are unable to locate the card content, you may use the Search bar, Filter By Content Category or Tags, to further narrow down the card content that you are looking for.
- Enter the Title for the card content, as this also acts as a filename when displayed in the Library. This is a mandatory field.
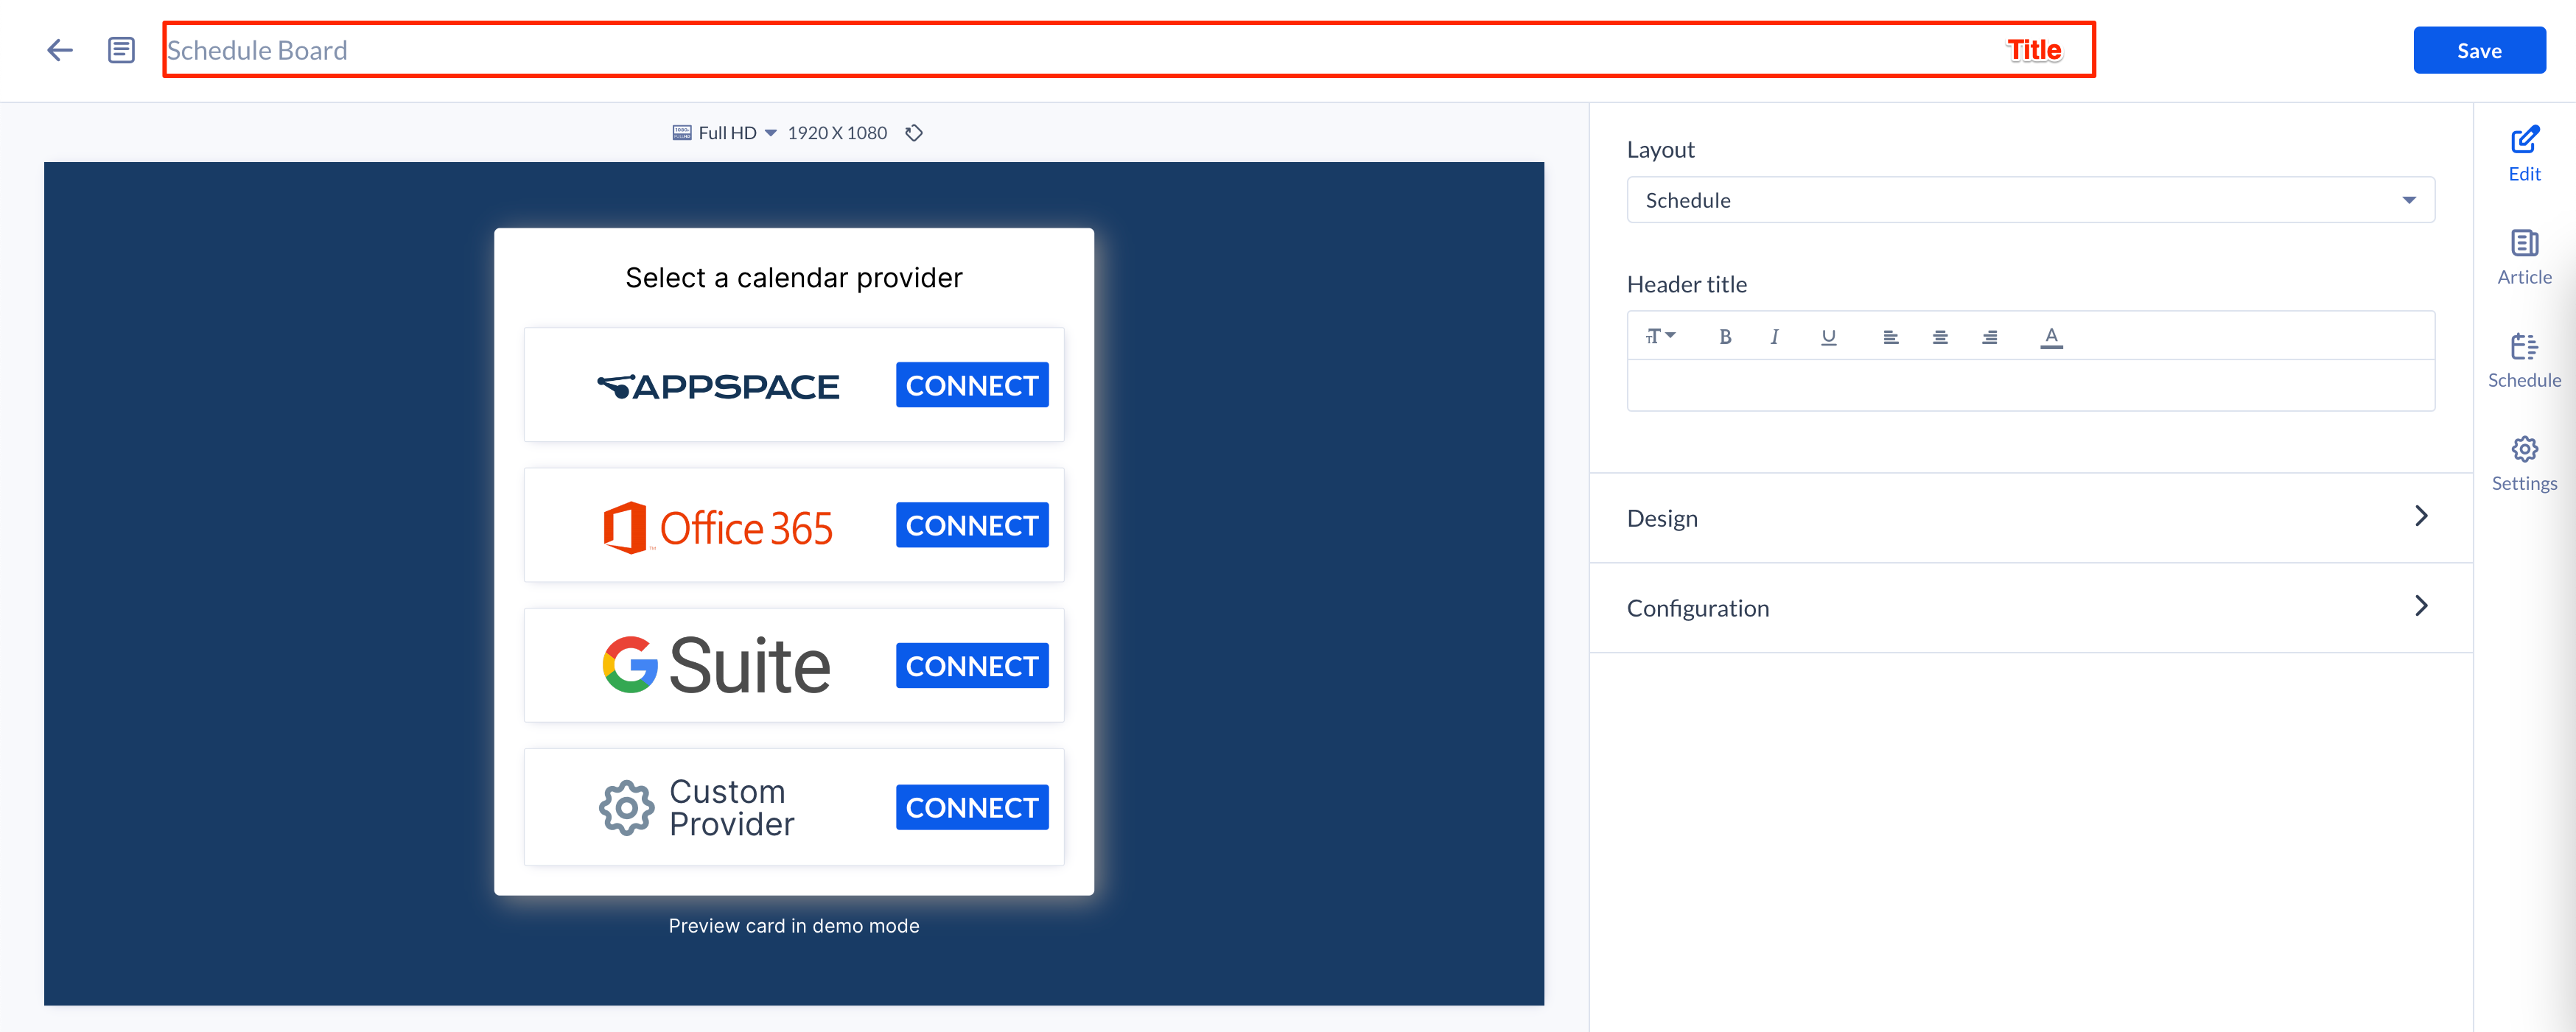
- In the Card section, select and authenticate your preferred Calendar Provider:
- Appspace
- Click CONNECT, and proceed to Step 6 below.
- Office 365
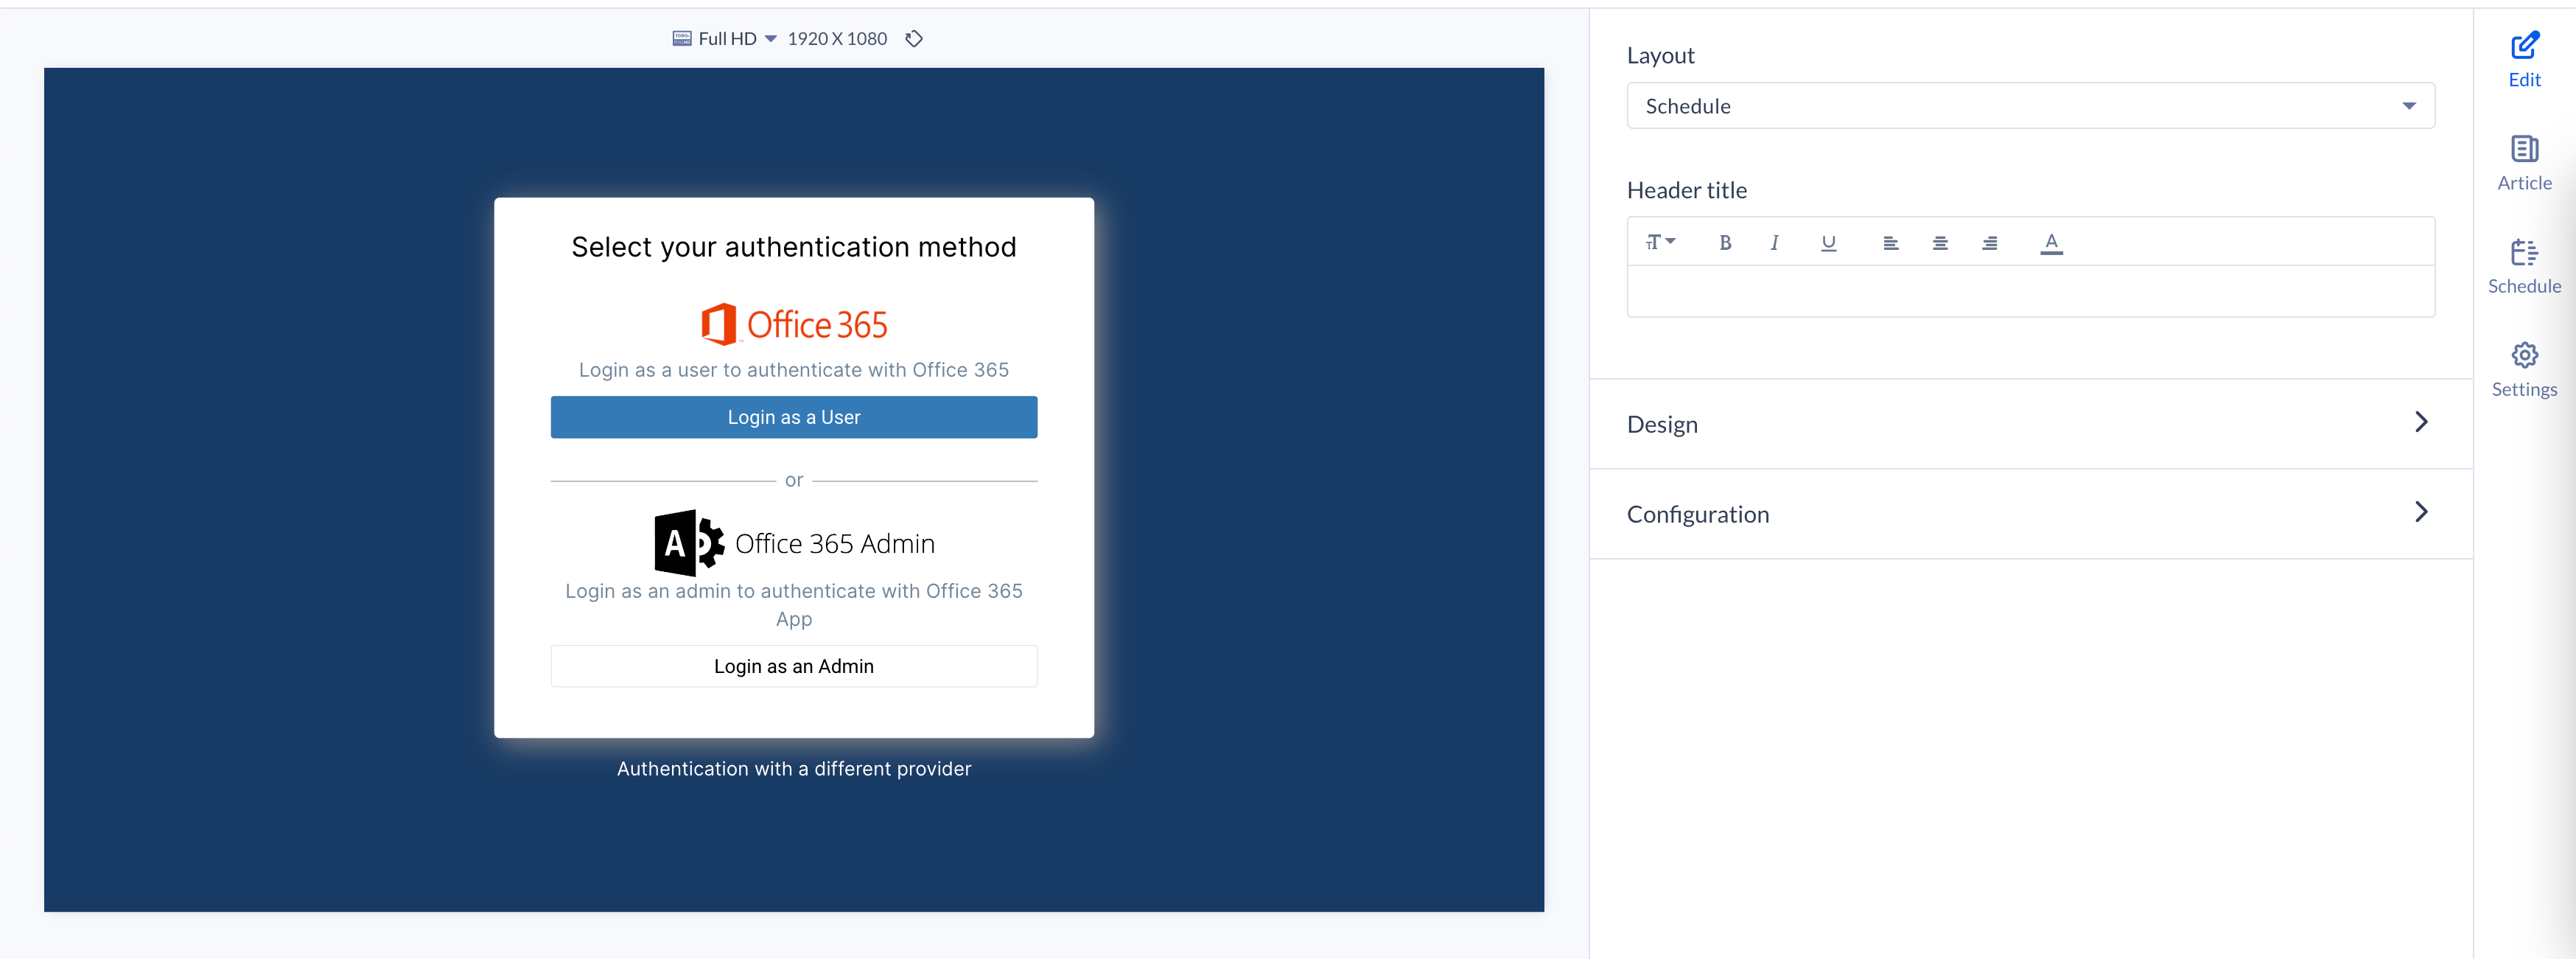
- Click CONNECT, and select the authentication method of your Booking Account.
- Login as a User – O365 Room Booking Service with User Privileges
- Login as an Admin – O365 Room Booking Service with Global Administrator Privileges
- In the Authentication window, enter the Booking Account credentials to authenticate the Schedule Board card. NotePlease contact your Microsoft O365 Administrator for credentials. Some large organizations may have one account for each room. If you encounter authentication issues while setting up the Office 365 integration with user privileges on Azure, please ensure the Azure Admin Consent Requests have been configured by following the steps in the Configure the admin consent workflow (preview) article: https://docs.microsoft.com/en-us/azure/active-directory/manage-apps/configure-admin-consent-workflow
- Once the authentication is successful, proceed to Step 6 below.
- Click CONNECT, and select the authentication method of your Booking Account.
- GSuite
- Click CONNECT.
- In the Authentication window, enter the Booking Account credentials to authenticate the Schedule Board card. NotePlease contact your GSuite Administrator for credentials. Some large organizations may have one account for each room.
- Once the authentication is successful, proceed to Step 6 below.
- Custom Provider

- Click CONNECT.
- Enter the Provider URL and API Key of the custom calendar provider, and click Configure.
- Optionally, click the HTTP(S) headers to add the custom provider’s header and value, such as the authorization credentials.
- Once the authentication is successful, proceed to Step 6 below.
- Preview
- Click the Preview card in demo mode link if you would like to authenticate later. NoteThe demo mode on cards, allows users to experience the design and functionality of the card prior to configuring it to a calendar provider. This includes displaying various booking statuses and performing bookings on the card itself.
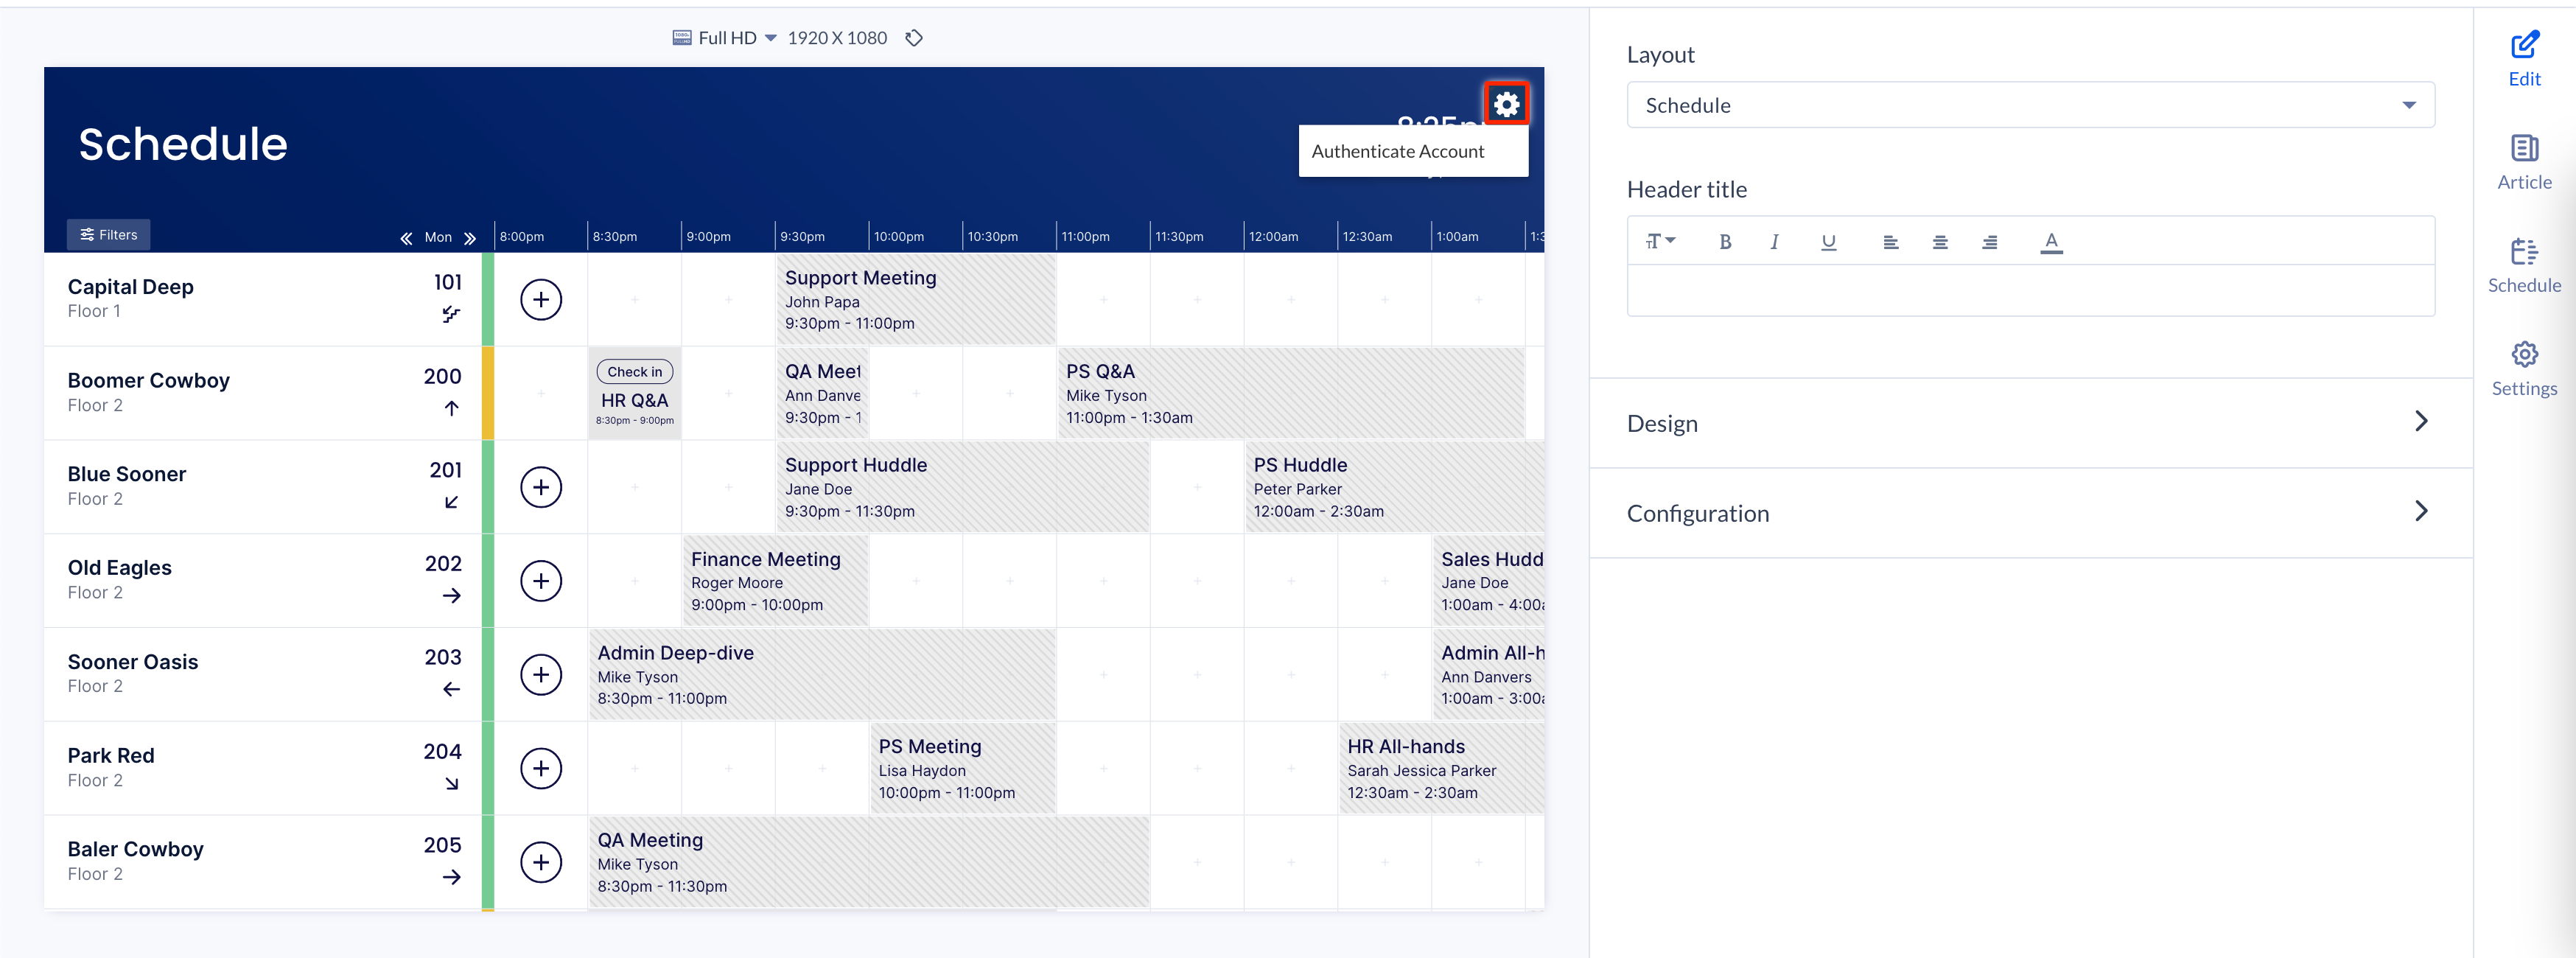
- The preview pane displays the card. Click the Gear icon to change the displayed rooms, or to log out from the card. NoteThe booking status of the meeting room is only a preview, and is not indicative of the real status in this preview. If the card is in demo mode, clicking the Gear icon will display the Authenticate Account option, which will allow you to authenticate the card with your desired calendar provider.
- Click the Preview card in demo mode link if you would like to authenticate later.
- Appspace
- In the Manage Rooms window, find and select the resources (meeting rooms) you wish displayed on the Schedule Board card.
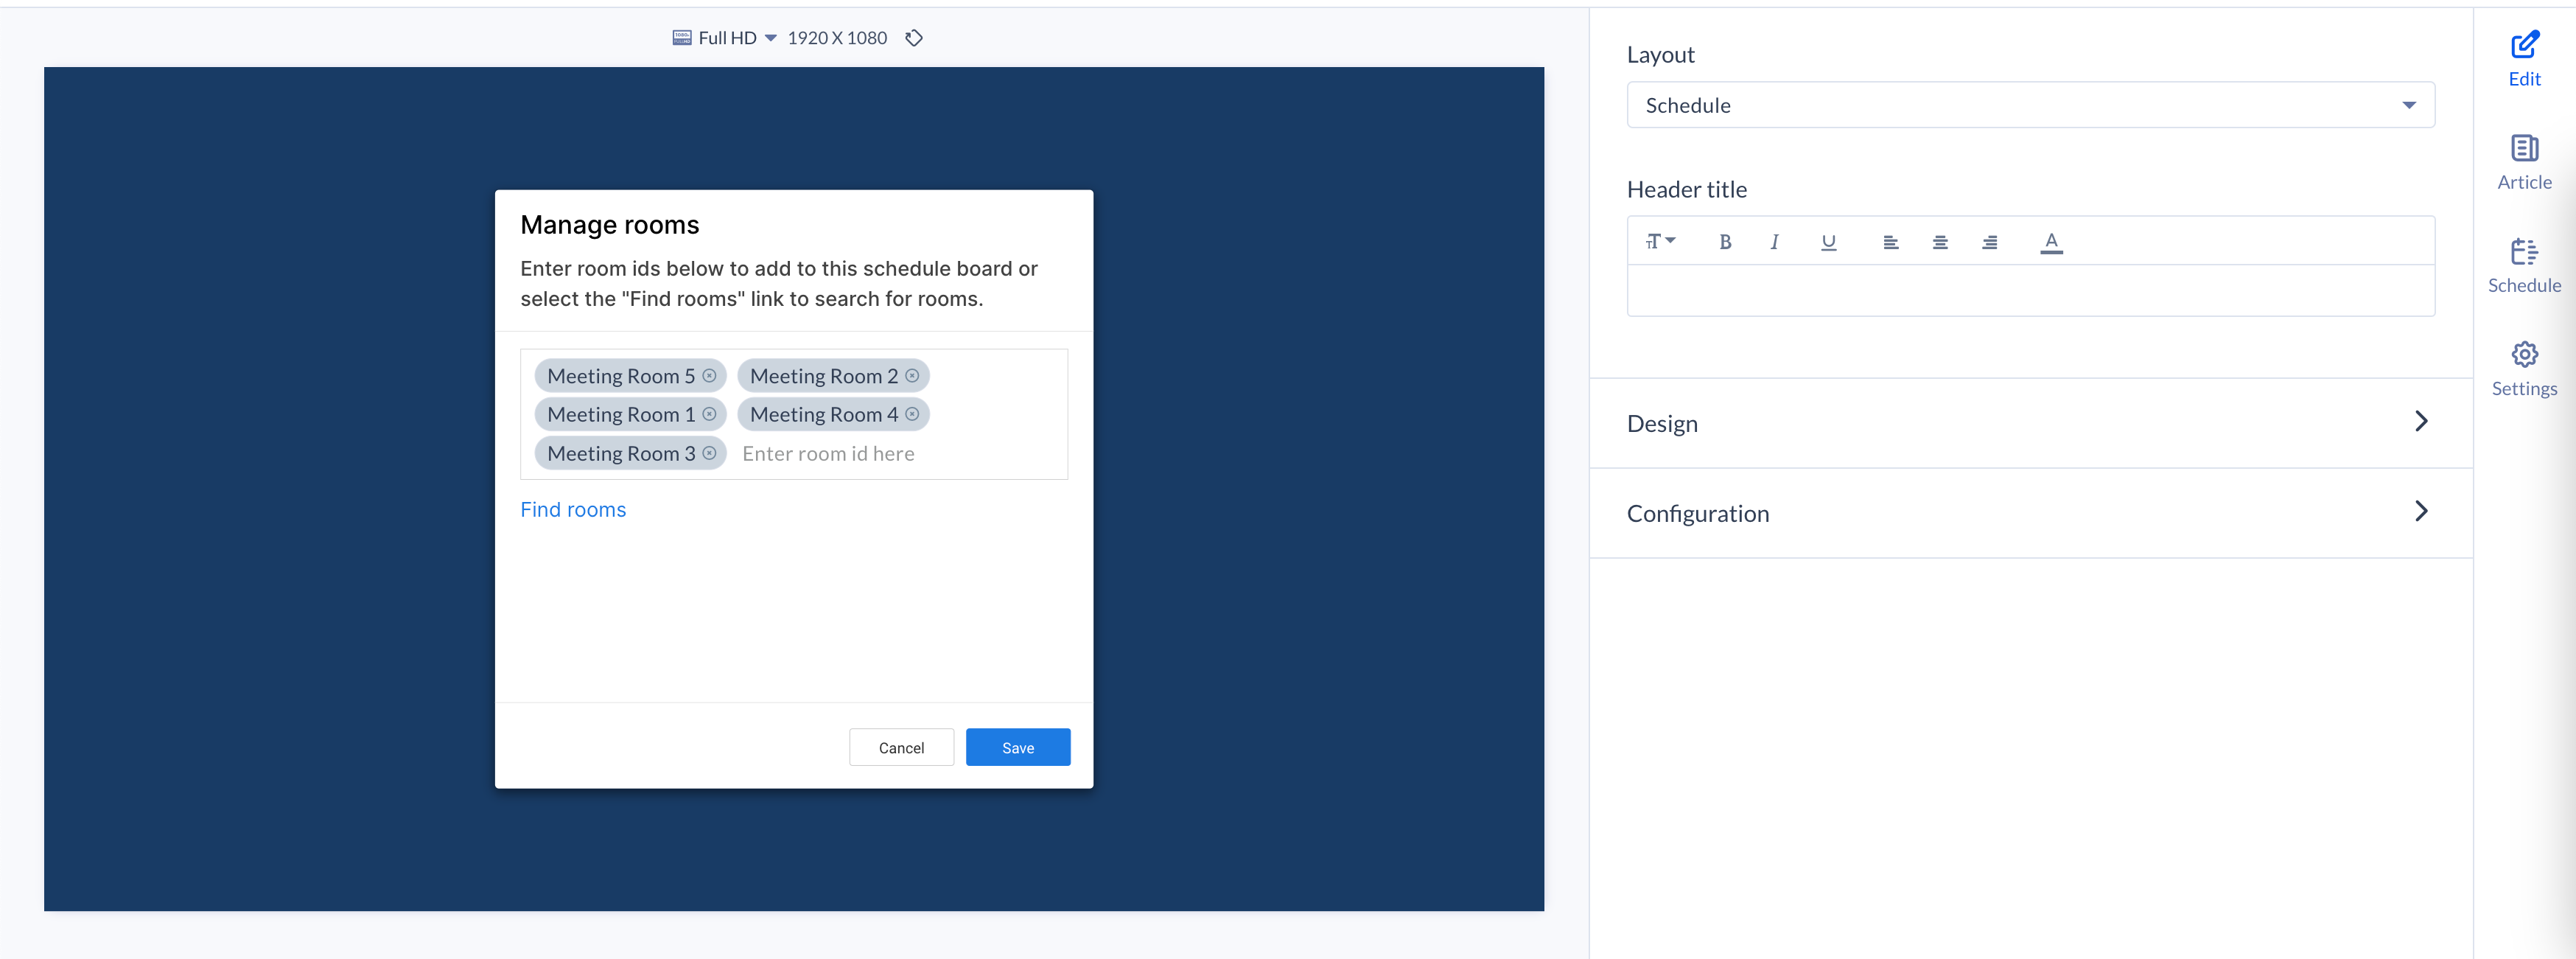
- Once done, click Save.
- In the Edit tab:
- Layout – Select the preferred layout option for the Schedule Board card, to display resource information and events available to users from the drop-down menu. NoteIf Map is selected, please refer to the Configure Schedule Board with Maps article on how to configure Maps to be used with the Schedule Board card.
- Map
- Map & Listing
- Schedule (default)
- Current events
- Header title – Enter the preferred title for the Schedule Board card. Use the Text Editor to customize the text font and style.
- In the Design section: click the arrow to expand.
- Customize the Schedule Board card with the following design options:
- Logo
- Logo position
- Header background color or image
- Header mask color
- Use theme colors (default ON) – When toggled OFF, allows you to customize the following colors.
- Available color
- Occupied color
- Check in color
- Table text color
- Table color
- Table border color
- Level button color
- Level button text color
- Background color or media
- Background mask color
- Customize the Schedule Board card with the following design options:
- In the Configuration section: click the arrow to expand.
- Display options – Select the preferred display options for the Schedule Board card from the drop-down menu. ImportantIf the Schedule Board card detects that the service provider has restricted viewing access to a resource (meeting room), it will automatically disable the interactivity and booking functions for that room on the schedule board. However, meeting information will still be displayed.
- Map enabled
- Interactivity enabled (default)
- Logo enabled (default)
- Header enabled (default)
- 24-hour clock
- Show meeting name (default)
- Show organizer’s name (default)
- Show clock (default)
- Schedule interval:
- 15 mins
- 30 mins (default)
- 1 hr
- Block size:
- 1x (default)
- 2x
- Status Refresh Interval – Define how often the card syncs with Appspace (Configure events polling interval).
- 15 seconds
- 30 seconds
- 45 seconds
- 60 seconds
- Enable meeting check-in
- Enable auto scrolling NoteIf Interactivity is disabled, auto scrolling will be enabled by default.
- Room mapping – Configure resources (meeting rooms) for Simple Wayfinding. Please refer to the Configure Simple Wayfinding section below
- Pagination – Displays the number (min 10 – max 50) of resources per page.
- Display options – Select the preferred display options for the Schedule Board card from the drop-down menu.
- Layout – Select the preferred layout option for the Schedule Board card, to display resource information and events available to users from the drop-down menu.
- In the Article tab:
- Article – Include an article to accompany the content when it’s being displayed on the Employee App portal, and mobile devices, or other social apps.
- Caption – Include a short summary about the content, or leave blank to have one auto-generated from the article.
- Referral Link – Include a link to more information on the content.
- In the Schedule tab:
- Add to channel – Add the card to a playlist channel from the drop-down menu, or leave it unassigned. NoteIf a card is assigned to a playlist channel, the SCHEDULING and DISPLAY PROPERTIES options are displayed. Please refer to the Configure Content Playback Properties: Dayparting, Frequency, Scheduling, in a Playlist Channel article for detailed configuration instructions.
- SCHEDULING
- DISPLAY PROPERTIES
- Add to channel – Add the card to a playlist channel from the drop-down menu, or leave it unassigned.
- In the Settings tab:
- Name – (Title) Filename when displayed in the Library. This is a mandatory field.
- Content Category
- Tags
- Library Location
- Auto Delete Content from Library – DO NOT SET an expiry date for the Schedule Board card.
- Thumbnail
- Once done, click SAVE.
Edit Schedule Board Card
The instructions below show you how to edit a Schedule Board card.- Log in to the Appspace console.
- Click Library from the ☰ Appspace menu, and select a library or folder containing the content you wish to edit.
- Select and click the Schedule Board card to edit, and select the desired tab to edit or view.
- In the Edit, Article, and Settings tabs:
- You may edit the content the same way as it was configured. For detailed instructions on how to do this, please refer to the Create and Configure section above.
- In the Preview tab:
- Preview how the content is displayed on your device.
- In the Channels tab:
- You may add the content to a channel by selecting the channel from the Add to channel drop-down menu or leave it unassigned for later.
- When the content is assigned to a channel, the SCHEDULING and DISPLAY PROPERTIES options are displayed. Refer to the Configure Content Playback Properties: Dayparting, Frequency, Scheduling, in a Playlist Channel article for detailed configuration instructions.
- In the Analytics tab:
- View the individual content analytics in this tab. For more information, please refer to the Individual Content Analytics section of the Analytics article.
- In the Edit, Article, and Settings tabs:
- Click SAVE.
Configure Simple Wayfinding
- In the Schedule Board card, click the Edit tab.
- In the Configuration section, click the Add Data button for Room mapping.
- The table will be auto-populated with the Room IDs and Room Names of the selected resources (meeting room in Microsoft Office 365) displayed on the schedule board, in the first and second columns respectively, starting from the second row onwards. NoteThe Room ID (Resource ID) is the Resource ID of your Appspace Reservation resource; refer to the Edit Resource section above.
- You may populate the table using one of the following methods:
- Manually enter the data.
- Copy and paste data from an external table.
- Import data from an Excel spreadsheet (.xlsx). NoteIf you’re pasting data from an external table, or importing data from a spreadsheet, please ensure that the Room IDs, Room Names, and Headers are exactly as displayed in the Room mapping table. We recommend copying the data from the Room mapping table to your external table or spreadsheet first, before pasting or importing it back.

- Enter the schedule board device(s) locations in the first row, starting from the third column onwards of the table.
- Finally, enter the directions of the schedule board device in relative to the resource (meeting rooms) in the third column (and onwards). The following directions are supported:
- left
- right
- forward
- forward-left
- forward-right
- backward
- backward-left
- backward-right
- escalator-up
- escalator-down
- stairs-up
- stairs-down
- Once complete, click SAVE.
- On the device displaying the Schedule Board card, ensure the following device property is added: Example: card.schedule.location : lobby Click here for instructions to Add a device property. You will need Location Admin or Account Owner privileges to add a property.
Device Property Value card.schedule.location device location
Create Playlist Channel and Add Schedule Board Card
Important
You will need Account Owner, or Publisher privileges to perform the steps below.
- Click the Quick Actions menu, and select Create Channel to create a playlist channel. Enter in the Playlist channel name.
- Click ADD CONTENT, and select the Schedule Board card from the Library. Click Add once done.
- Click the Apply button to save the settings.
Assign Playlist Channel to a Registered Device
Important
You will need Location Admin or Account Owner privileges to perform the steps below.
- Register your device (tablet) as per the Register a device article.
- Go to the Appspace menu, and select Devices.
- Select the name link of the device that will be used for the meeting room.
- In the Device Information page, click the Settings tab, and select Admin assigns a single channel option from the Channel selection mode drop-down menu.
- Navigate back to the Overview tab, and click the Select channel button, and select the playlist channel with the Schedule Board card, created earlier.
- Click Save. The meeting room booking service can now be viewed on the app.
Book Meeting Room via Appspace App
For booking instructions, please see Booking Multiple Meeting Rooms.
Was this article helpful?