- Article purpose: This guide describes all of the Space Reservation components and outlines the general setup workflow that is needed to set it up in a company.
- Business problem: Companies have traditionally used different solutions to piece together an end-to-end reservation and location mapping experience using several different products that may not integrate well with each other, if at all. When introduced to Appspace for the first time, companies discover that they can build all of their space reservation and mapping needs under one platform, but may not know the best way of starting and doing the initial configuration.
- Solution: Appspace provides the necessary tools for companies to create an inventory of resources for reservation, create functional floor plans, and integrate with calendar providers to make a seamless workspace reservation solution that can be accessed by all employees with their very own devices.
- Conclusion: Building and facilities administrators can easily start configuring Space Reservation for their company, and expand the rules and functionality of reservable workspaces to suit a wide variety of use cases.
WHAT’S IN THIS ARTICLE:
Features released in Appspace 8.6 Aquarius:
- The Resource-level admins feature allows location admins to be assigned at a more granular level to a specific resource or floor, and this customization will cascade down to all sub-resources. By configuring resource and location permissions, you can configure specific locations (campus, buildings, or floors), or resources (rooms, workspaces) to be managed only by certain sub-location administrators or user groups. See the introduction to the feature here.
Introduction
Appspace is a versatile platform that includes features and functions to reserve and manage workspace resources such as desks, offices, meeting rooms, and much more. Appspace provides the necessary tools for you to create the inventory of all workspace resources for reservation, and also provides the tools to manage maps and upload floor plans for buildings and campuses. By configuring all of these workspaces for space reservation, employees can then search for available workspaces and start making reservations.
To create the full space reservation experience, Appspace has the following modules and components:
- Reservations. This is the administrative module in the console that allows you to to create the inventory of all reservable workspace resources, along with all of the reservation and checkpoint rules that are needed. The Reservations module works in conjunction with the Locations module by linking reservable resources to actual locations.
- Locations. This is the administrative module in the console that allows you to define all the locations you have in your organization that you’d like to track. These locations can be buildings and campuses, and can all be grouped together geographically. The majority of user interactions are focused on buildings, where buildings contain floor plans that show where everything is.
- Employee App. This is the app that everyone in your company will use to search for available workspaces to make reservations for. Employees can search for available locations in specific buildings and floors, along with additional preferences to filter their selection of available workspaces.
This article will provide the necessary information to guide you as an administrator, on how best to configure all of the Appspace space reservation components to work for your company.
The Setup Workflow
In order to successfully set up a good end-to-end space reservation experience, it is important to ensure that you have all of the relevant floor plans and resource details ready to enter. The process of setting up Space Reservation for your company can be described through the following general workflow steps:
- Define locations and upload maps
- Create workspace resources
- Map resources to workspaces
- Define reservation rules
The following sections go into more detail about how each step of the process works.
Define Locations and Upload Maps
The first part of setting up Space Reservation is to get started with the Locations module. This module is where you will define where all of your workspaces are located across floor plans. Depending on the size of your company, there will either be a single building with one or more floor plans, or there will be multiple buildings across different geographical locations.
In order for Locations to work for Space Reservation, you will need to upload all of the relevant floor plans for the appropriate buildings.
The visual format of floor plans should be very simple to read, with clear outlines for desks, rooms, and other workspaces which can be easily interpreted by the average employee. The following example is what a good floor plan should look like.
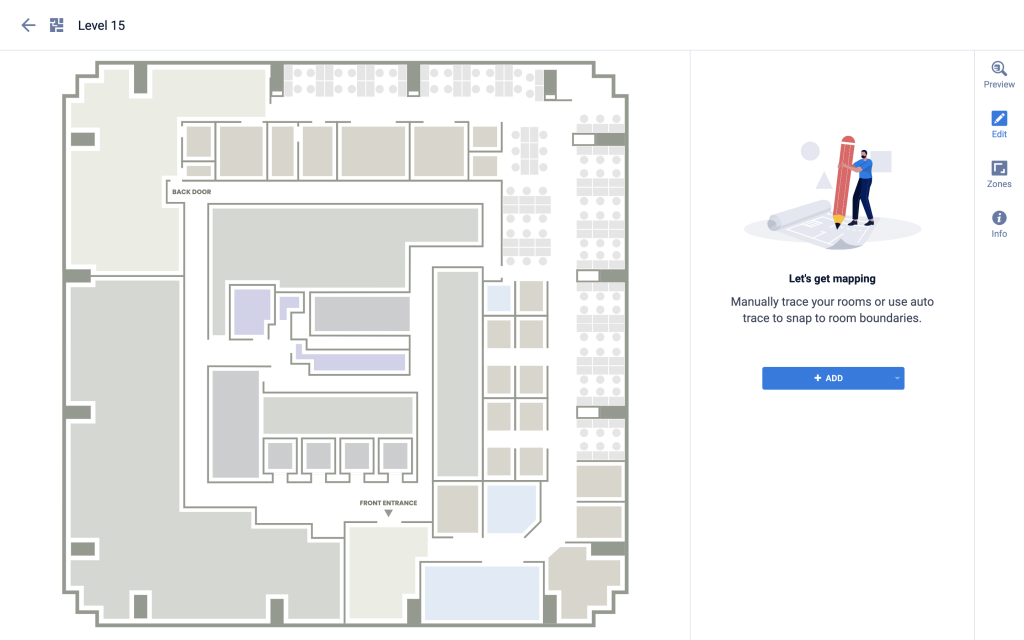
Once you have uploaded all of the required floor plans to the appropriate buildings, you can start creating all of the workspace resources which will be made available for booking reservations.
Create Workspace Resources
The next part of setting up Space Reservation is to create or import the inventory of workspace resources. Workspace resources can include individual desks, open seating spaces, office rooms, conference rooms, classrooms, and much more. The creation of resources is done through the Reservations module under the Resources section.
Appspace allows you to create two types of workspace resources:
- Rooms. Rooms will be the most common type of workspace resource that gets listed in the inventory, and usually represents an actual physical room. Rooms are also typically listed in a company’s calendar provider, especially conference rooms.
- Spaces. Spaces refer to anything else that isn’t a room, and therefore can have a very wide variety of use cases. When it comes to reservable resources, spaces can be individual desks, open seating areas, huddle spaces, and anything else that can be booked as a resource.
Creating Rooms
To start the process of creating workspace resources, it is best to check if there is already an existing calendar provider that has an inventory of all rooms. If your company uses Google Calendar or Microsoft Office 365 to track all room calendars, you will be able to import those rooms as workspace resources.
If your company isn’t using an external calendar provider to manage the inventory of rooms, you can simply create those rooms within Appspace.
Creating Spaces
For everything else other than rooms, you will need to create spaces. Creating workspaces that are desks will be the most common use case. Since desks are not the type of workspaces that are available from a calendar provider, these will need to be created within Appspace.
Although you can create spaces individually, it will be much easier for you to list your entire inventory of spaces in a spreadsheet and import them all at once. By entering your resources into a spreadsheet, you can add hundreds or thousands of resources in bulk.
When creating a spreadsheet, the following fields will be needed:
- Name
- Type
- Subtype
- Facilities
The Name, Type and Subtype fields are mandatory and each field contains a single value. The Facilities field is optional and can contain multiple comma separated values. If you do not have any keyword items that can be used for Facilities, you can leave it blank.
When importing resources in bulk, you will be asked to select the building or floor to import the resources into. This makes it easier when it comes to mapping, as the imported resources will already be placed in the correct location.
Map Resources to Workspaces
Once the inventory of resources has been created, all of the room and space resources will need to be mapped to the relevant floor plans. The most efficient way to map all the resources during the initial setup phase is to do it through the Locations module. From within the Locations module, you will need to locate the specific building and the floor plan where the mapping exercise will take place.
When you load a floor plan that contains unmapped resources, you will see the list of resources appear with a label beside each resource indicating that it has not yet been mapped.
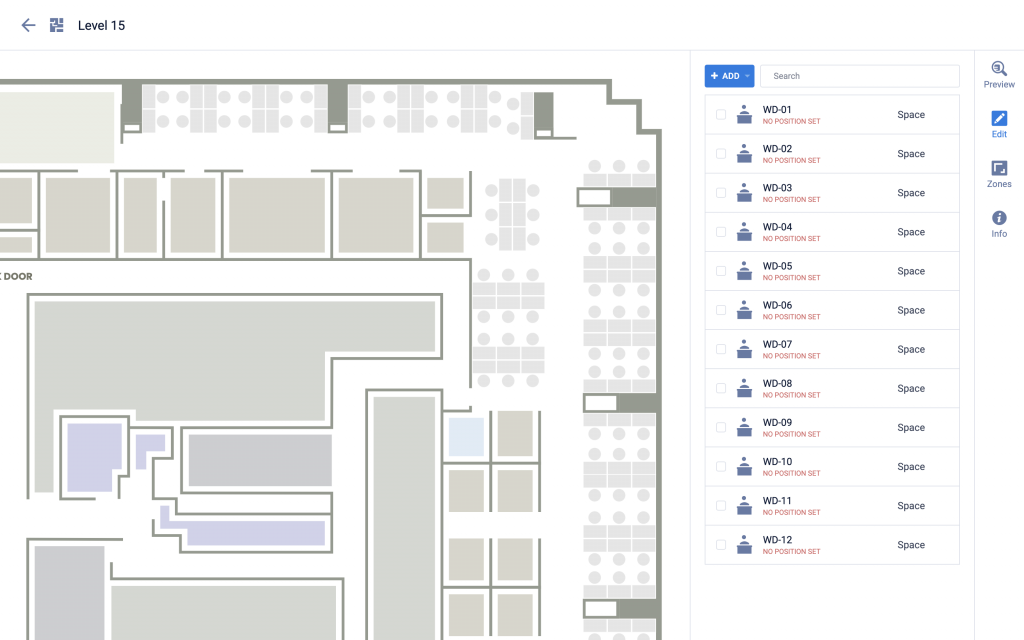
Newly created resources that are not mapped will have an indicative label that tells you that it has not yet been mapped. If you have a large list of resources that need to be mapped, it is easier to do the mapping from within the Locations module once all resource data has either been created or imported.
To begin the mapping process, the following lists the general steps:
- From within the Locations module, simply select a floor in a building that you wish to begin mapping, and you will see the list of all unmapped resources.
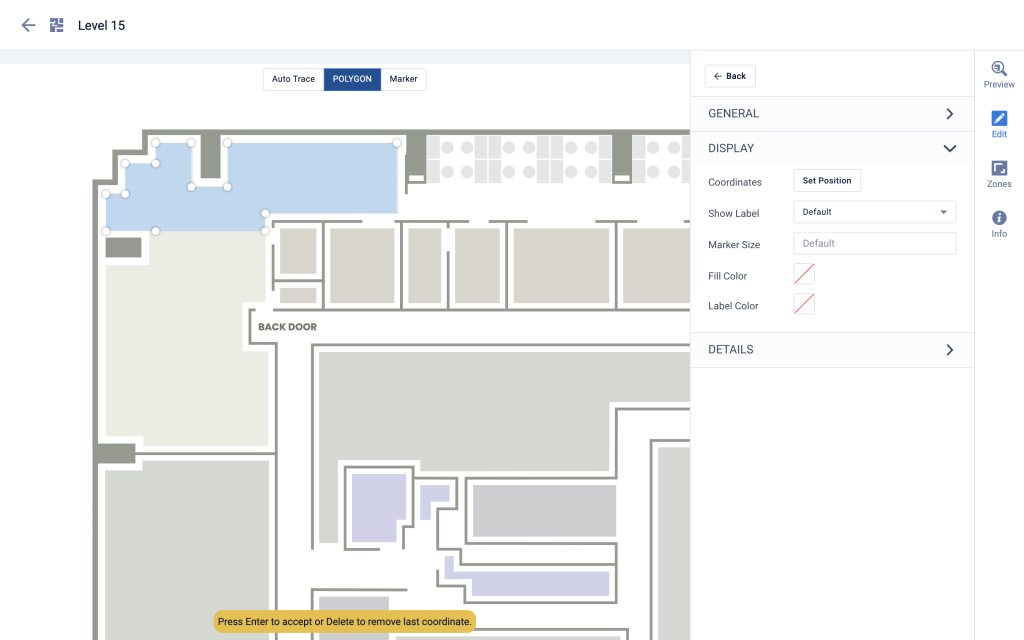
- Select one of the unmapped resources, and then go to the Display properties.
- Click on the option to Set Location, and you will be presented with choices to Auto Trace, create a Polygon, or place a Marker.
Using the Auto Trace, Polygon, and Marker tools
The choice of which mapping tool to use depends on how you want the resource to be presented on the map.
- Auto Trace. This tool works best if your resource is a solid shape on the map that represents a room or area that you want to map. If the rooms on your floor plan appear as solid blocks of color, this is where the Auto Trace function works best.
- Polygon. For irregularly shaped spaces that may have lines or blocks of colors overlapping other areas in the floor plan, using the polygon tool lets you manually define the space. Simply click to place the polygon segments, and close the polygon segment by clicking on the first point.
- Marker. This tool is best used to represent open areas or spaces without enclosed borders. Examples of these types of spaces can be open desks, huddle areas, break areas, cafeterias, and so on. A marker appears as an icon that represents what type of space it is on the map.
Updating floor plans and reassigning spaces and locations
In the event that your company has major renovations and completely changes floor plans, you can always re-upload a new floor plan to replace the old one. Whenever these kind of changes happen, there are a few important things to note:
- When uploading a new floor plan, ensure that the dimensions of the newer floor plan matches those from the previous one. This is to ensure that any existing workspace coordinates do not get affected if the floor plan changes affect only a partial area.
- You will need to reset the coordinates for workspaces and POIs that have been affected by the floor plan update. To do this, you will need to select the affected workspaces, and for each workspace, go under Display and then clear the current position by clicking on the ‘X’ next to the coordinates.
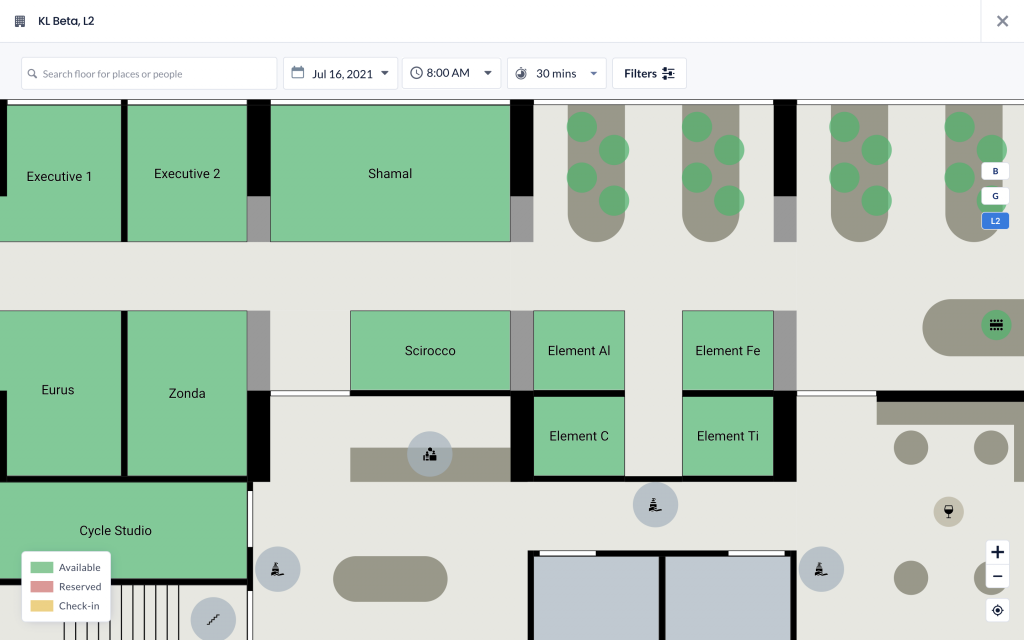
Viewing workspace locations with the Employee App
With all of the floor plans uploaded, and workspaces and all other areas properly mapped, company employees will be able to view them all using the Employee App. By navigating to the Places section of the Employee App, you will be able to view the location of all workspace resources through the Map View.
Define Reservation Rules
Once the majority of your resource inventory has been entered and mapped, it is time to set some practical rules about how these resources are booked. Most companies will often have rules about when and how rooms and other resources can be booked. In Appspace, this is done using reservation rules.
Reservation rules allow you to set constraints and checkpoints for when employees book a workspace. Once resources have been mapped to the appropriate locations, you can start defining reservation rules for workspaces that need them. Reservation rules allow you to configure constraints and checkpoints.
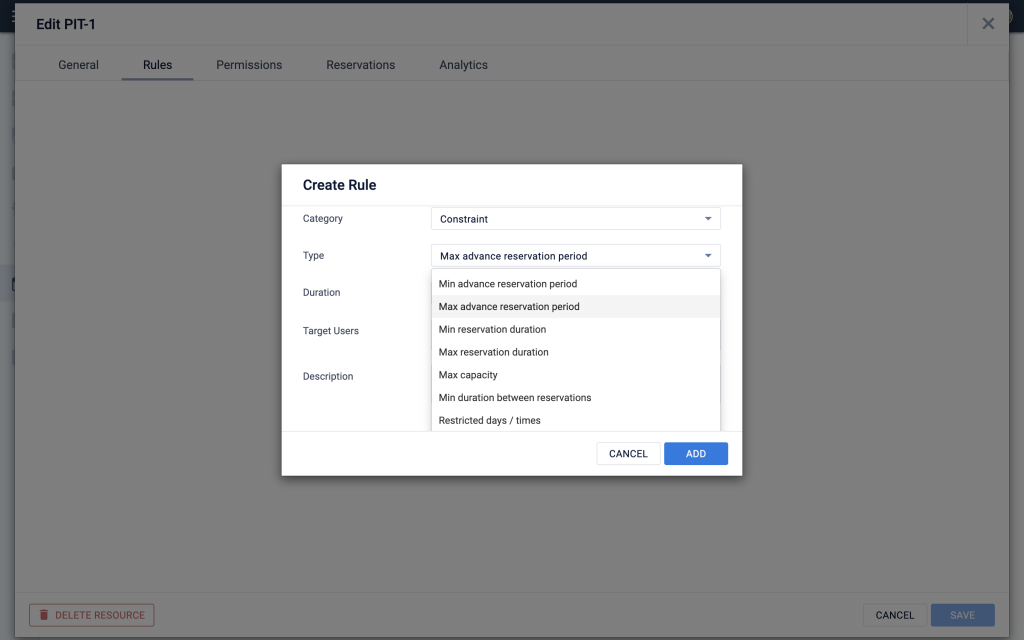
Examples of constraints
Constraints give you the ability to set control limits to how a reservation is booked. Examples of constraints that you can configure include:
- Set how far in advance people can make a reservation
- Set the minimum or maximum time duration for a reservation
- Set a maximum capacity for the number of people who can attend a reservation
- Set restricted days and times to control when reservations can be made
- Set check-in requirements to ensure reservations are properly utilized
Examples of checkpoints
Checkpoints give you the ability to force an interaction when a user is making a reservation. Examples of checkpoints that you can configure include:
- Set a checkpoint at the time of reservation for users to agree to a consent form
- Set a checkpoint at the time of reservation to show a general notice
- Set a checkpoint at the time of reservation for users to fill in a custom form
These rules can all be set for individual workspaces or an entire group of workspaces from within the Reservations module.
Set Permissions for Resources
Permissions for Resource and Location Reservations
With all resources mapped and configured with rules, the next part is to configure who in your company has the ability to make reservations. By default, reservations are open to every employee in the company. Essentially, anyone who is a premium user will be able to make reservations.
However, there may be general requirements in a company as to which group of people are able to make reservations for certain places. More often than not, there could be geographic requirements where only employees for a specific location are allowed to reserve rooms and desks in a particular building.
By configuring resource and workspace permissions, the following examples illustrate the various uses cases that are possible:
- Configure specific spaces to be reservable only by specific individuals, such as a designated office room for an executive.
- Configure specific spaces to be reservable only by specific user groups, such as meeting rooms that can only be reserved by sales and customer service team members who need to conduct customer meetings.
- Allow only employees for a specific location to have access to a specific building.
- Restrict reservations to only a specific time period for a specific group of employees, such as different teams that transition between early morning or evening shifts.
If the company has requirements about who is able to book reservations, Appspace has the ability for you to set permissions for users and user groups.
Permissions for Resource and Location Administration
(New) The next step is defining location administrator permissions for resources and locations. By default, location administrators are assigned at the building level. However, this can be further customized to a more granular level for more complex organizational structures. For example, it can be set for a specific resource or floor, and this customization will cascade down to all sub-resources.
By configuring resource and location permissions, you can configure specific locations (campus, buildings, or floors), or resources (rooms, workspaces) to be managed only by certain sub-location administrators or user groups. Sub-location administrators will only see resources (and corresponding reservations) within their management scope. Floors outside their jurisdiction will appear greyed out, and any restricted resources will not be displayed.
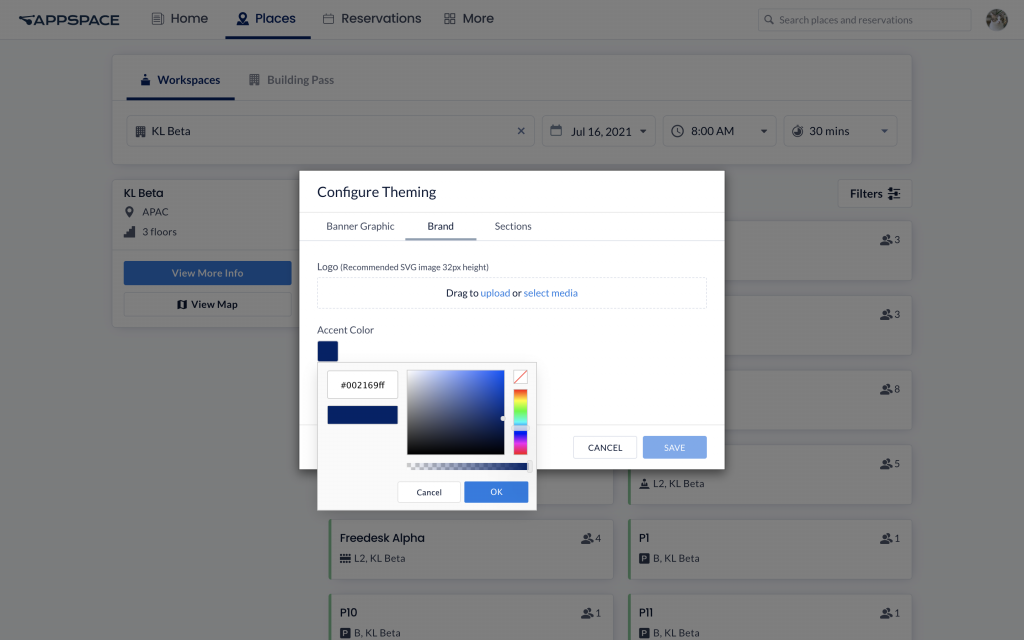
Customize the Brand and Theme
Companies also have the option to apply their own branding for the Employee App experience. By uploading a company logo, and setting an accent color, the look and feel of the Employee App can be made to match your company’s brand guidelines.
Using QR Codes
Every single workspace resource that is created and managed in Appspace will have a unique QR code generated. In practice, what does having QR codes for workspaces do for people in a company?
Quick and Touchless Interaction for Reservations
QR codes are primarily used for touchless interactions, where people can use their own devices to scan QR codes that can automatically launch details about a workplace.
In order for this experience to happen, QR codes must first be printed out and then physically attached to the corresponding workspaces. This makes it possible for anyone in a company to approach a bookable workspace, and scan the QR code of that workspace to check-in or make a reservation.
Scanning the QR code for a resource will launch the detailed information view for that particular workspace in the Employee App. From there, you can do the following:
- Make a reservation. If the workspace is available, you can make a reservation by entering your reservation details and preferences.
- Check-in to a meeting. If the workspace is scheduled for a meeting and you are either the organizer or one of the attendees, you can check-in to the meeting when scanning.
Share Workspace Details with Colleagues
Additionally, you can also share a workspace location with your colleagues by sharing the image of the QR code of the workspace. When they scan the QR code, they will be able to access the details of that workspace in the Employee App on their devices.
Conclusion
As an administrator, you should now have the knowledge of configuring all of the various components of space reservation to make it work for your company. Starting from defining locations of buildings and floor plans, to configuring rules and permissions for workspaces, the general setup workflow presented in this article will help you to get space reservation up and running. Once everything is configured and running, employees in your company will be able to use the Employee App to browse for available workspaces and start making reservations.
Was this article helpful?