Important
This article is applicable to customers who would like to upgrade to Appspace from the Marlin platform.
This article provides the instructions to repurposing an existing CMS device, Marlin’s Electronic Communication Station (ECS), for use with Appspace software.
Important
These steps assume that you are ready to stop using ECS on the device and you are ready to build Appspace content on a device.
Prerequisites
- Please ensure you have met the conditions outlined in the Check ECS Device Compatibility Before Upgrade to Appspace article.
- An Appspace account.
- Account Owner, or Location Admin role to download Appspace software from the console.
- Account Owner, Publisher, or Author role to create content in the Library.
- Connect the wireless keyboard to your device.
- If you have multiple devices to repurpose, a USB drive is recommended.
Shut Down ECS Application
Follow the instructions below to shut down ECS applications:
- On your keyboard, hold CTRL and press Delete to shutdown all ECS applications at once. (If ECS is still open, proceed to step 2 below.)
- Press the CTRL + Shift + Esc keys on the keyboard to bring up the Task Manager.
- Click the Processes tab.
- Select an ECS application and click the End Task button in the lower right.

- Repeat step 4 for all ECS applications, until they are all closed.
- Proceed to the next section below.
Download Appspace Software
Follow the instructions below to download Appspace software files:
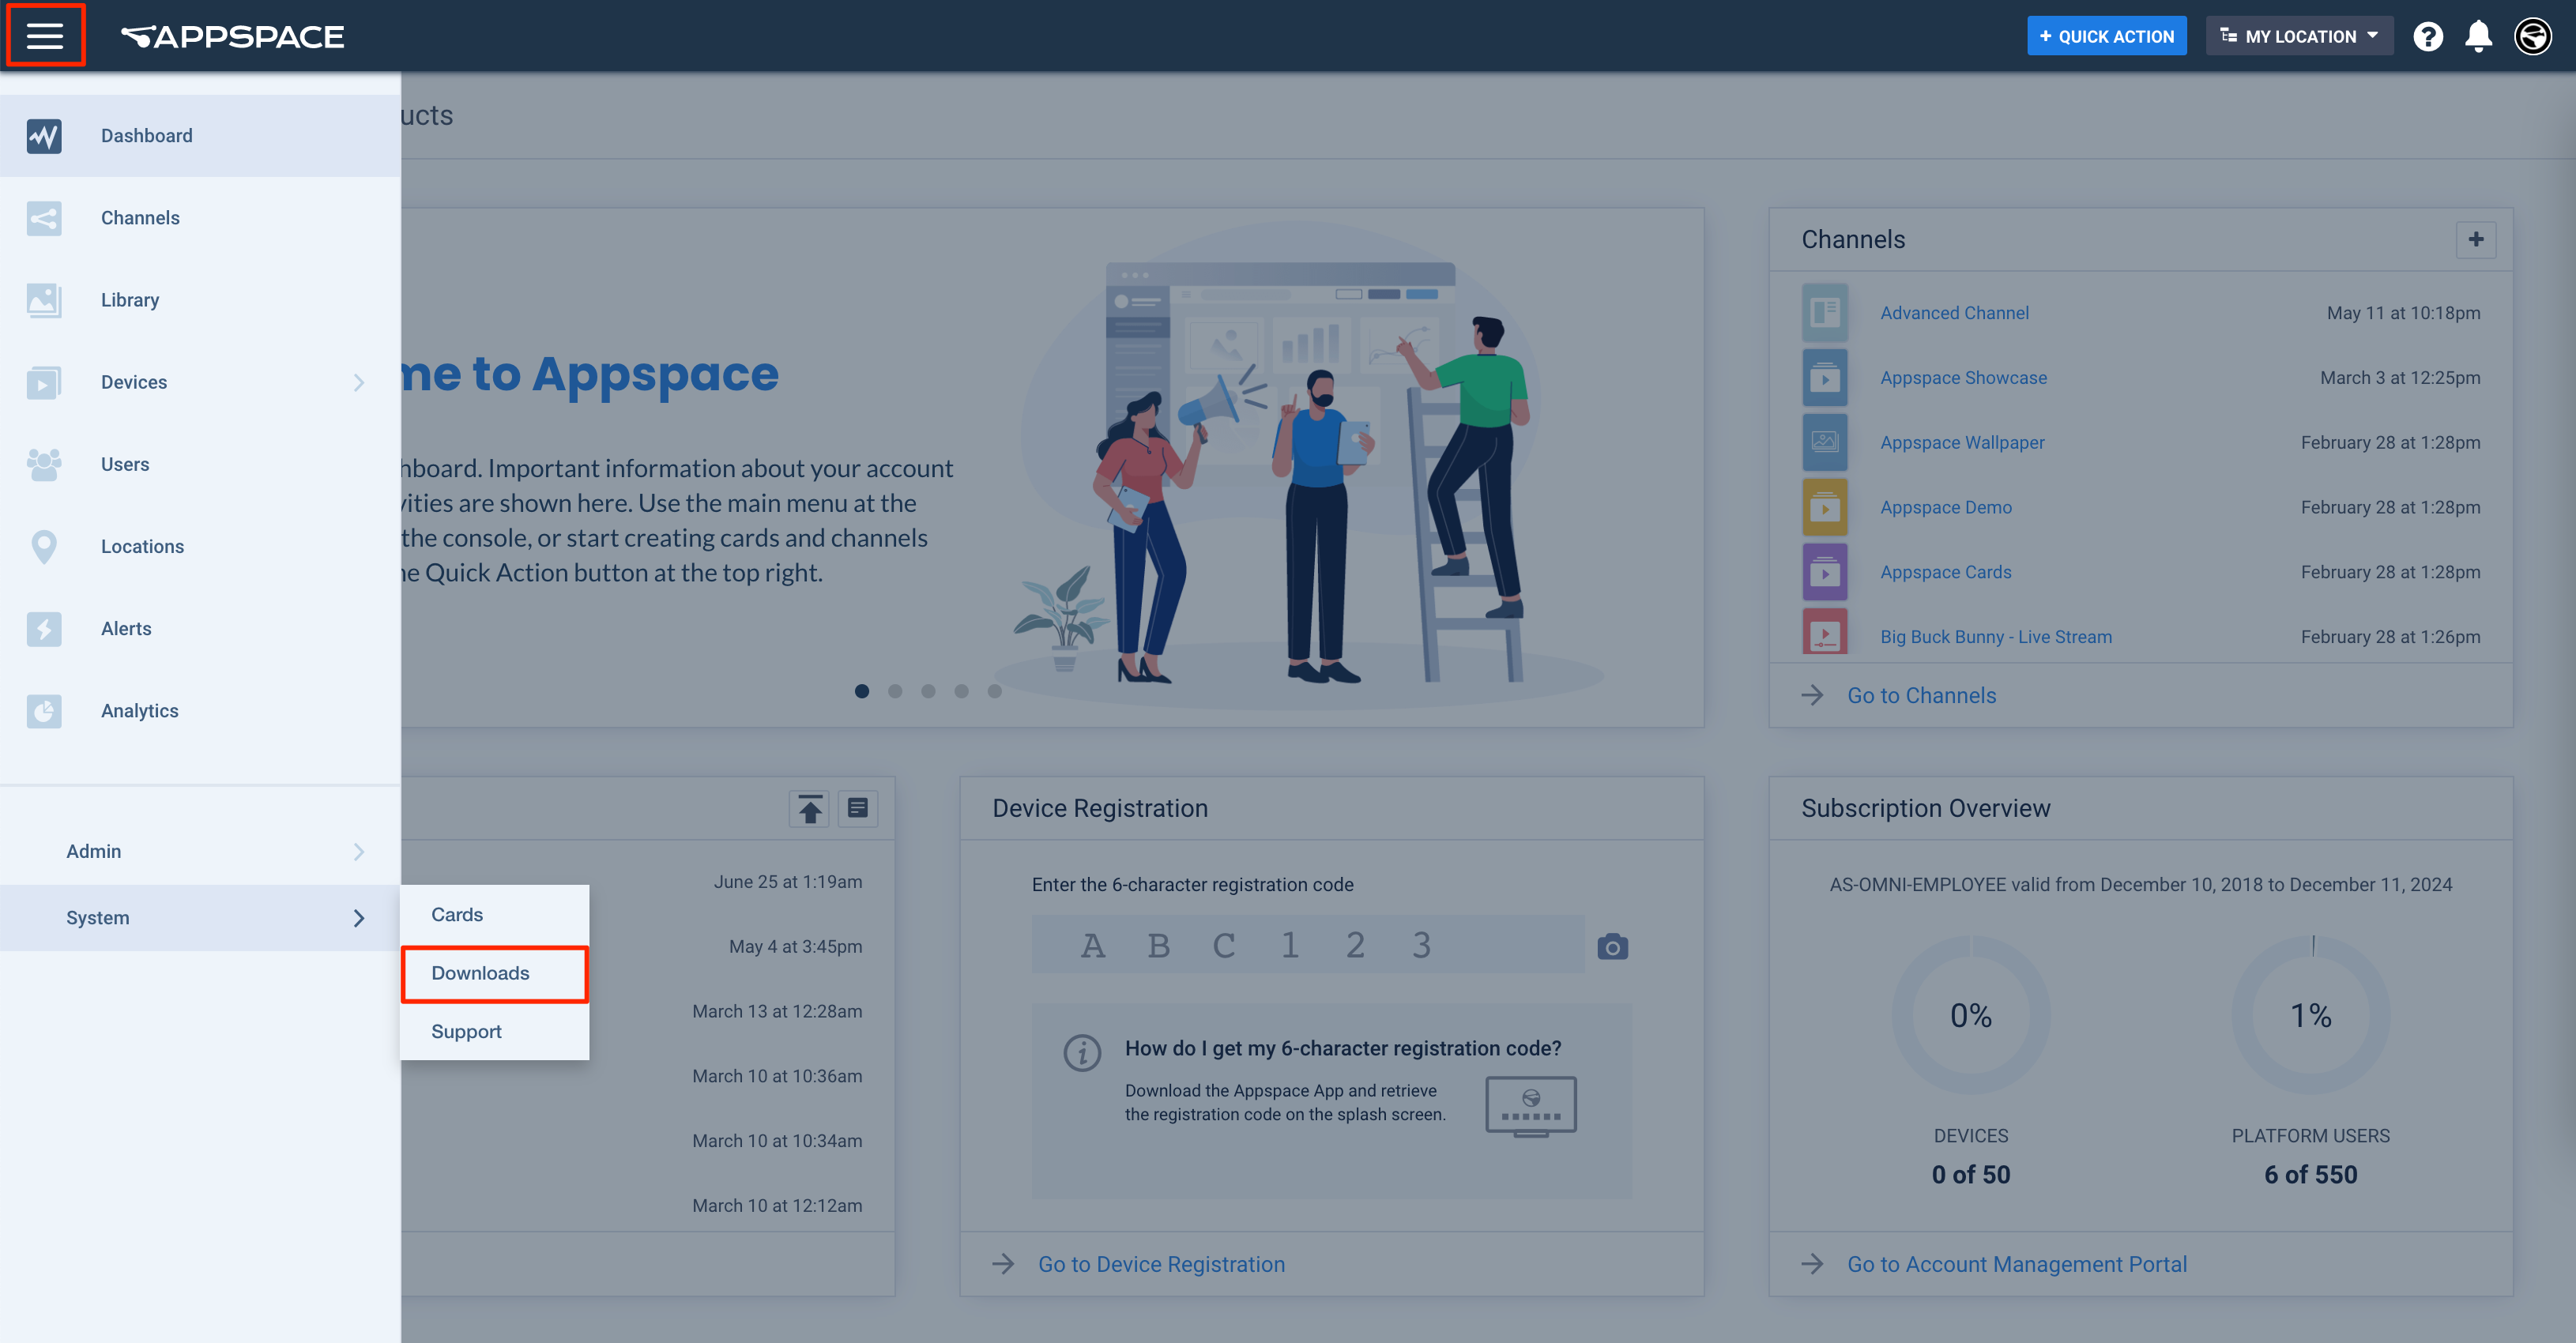
- Open a web browser and navigate to https://cloud.appspace.com/#!/login and enter your Appspace account information.
- Once logged in, click the ☰ Appspace menu in the upper left corner of the console, and click Devices > Settings > App Downloads tab.
- Locate the Appspace app for Windows option and click on Download. Be sure to locate this specific file name.
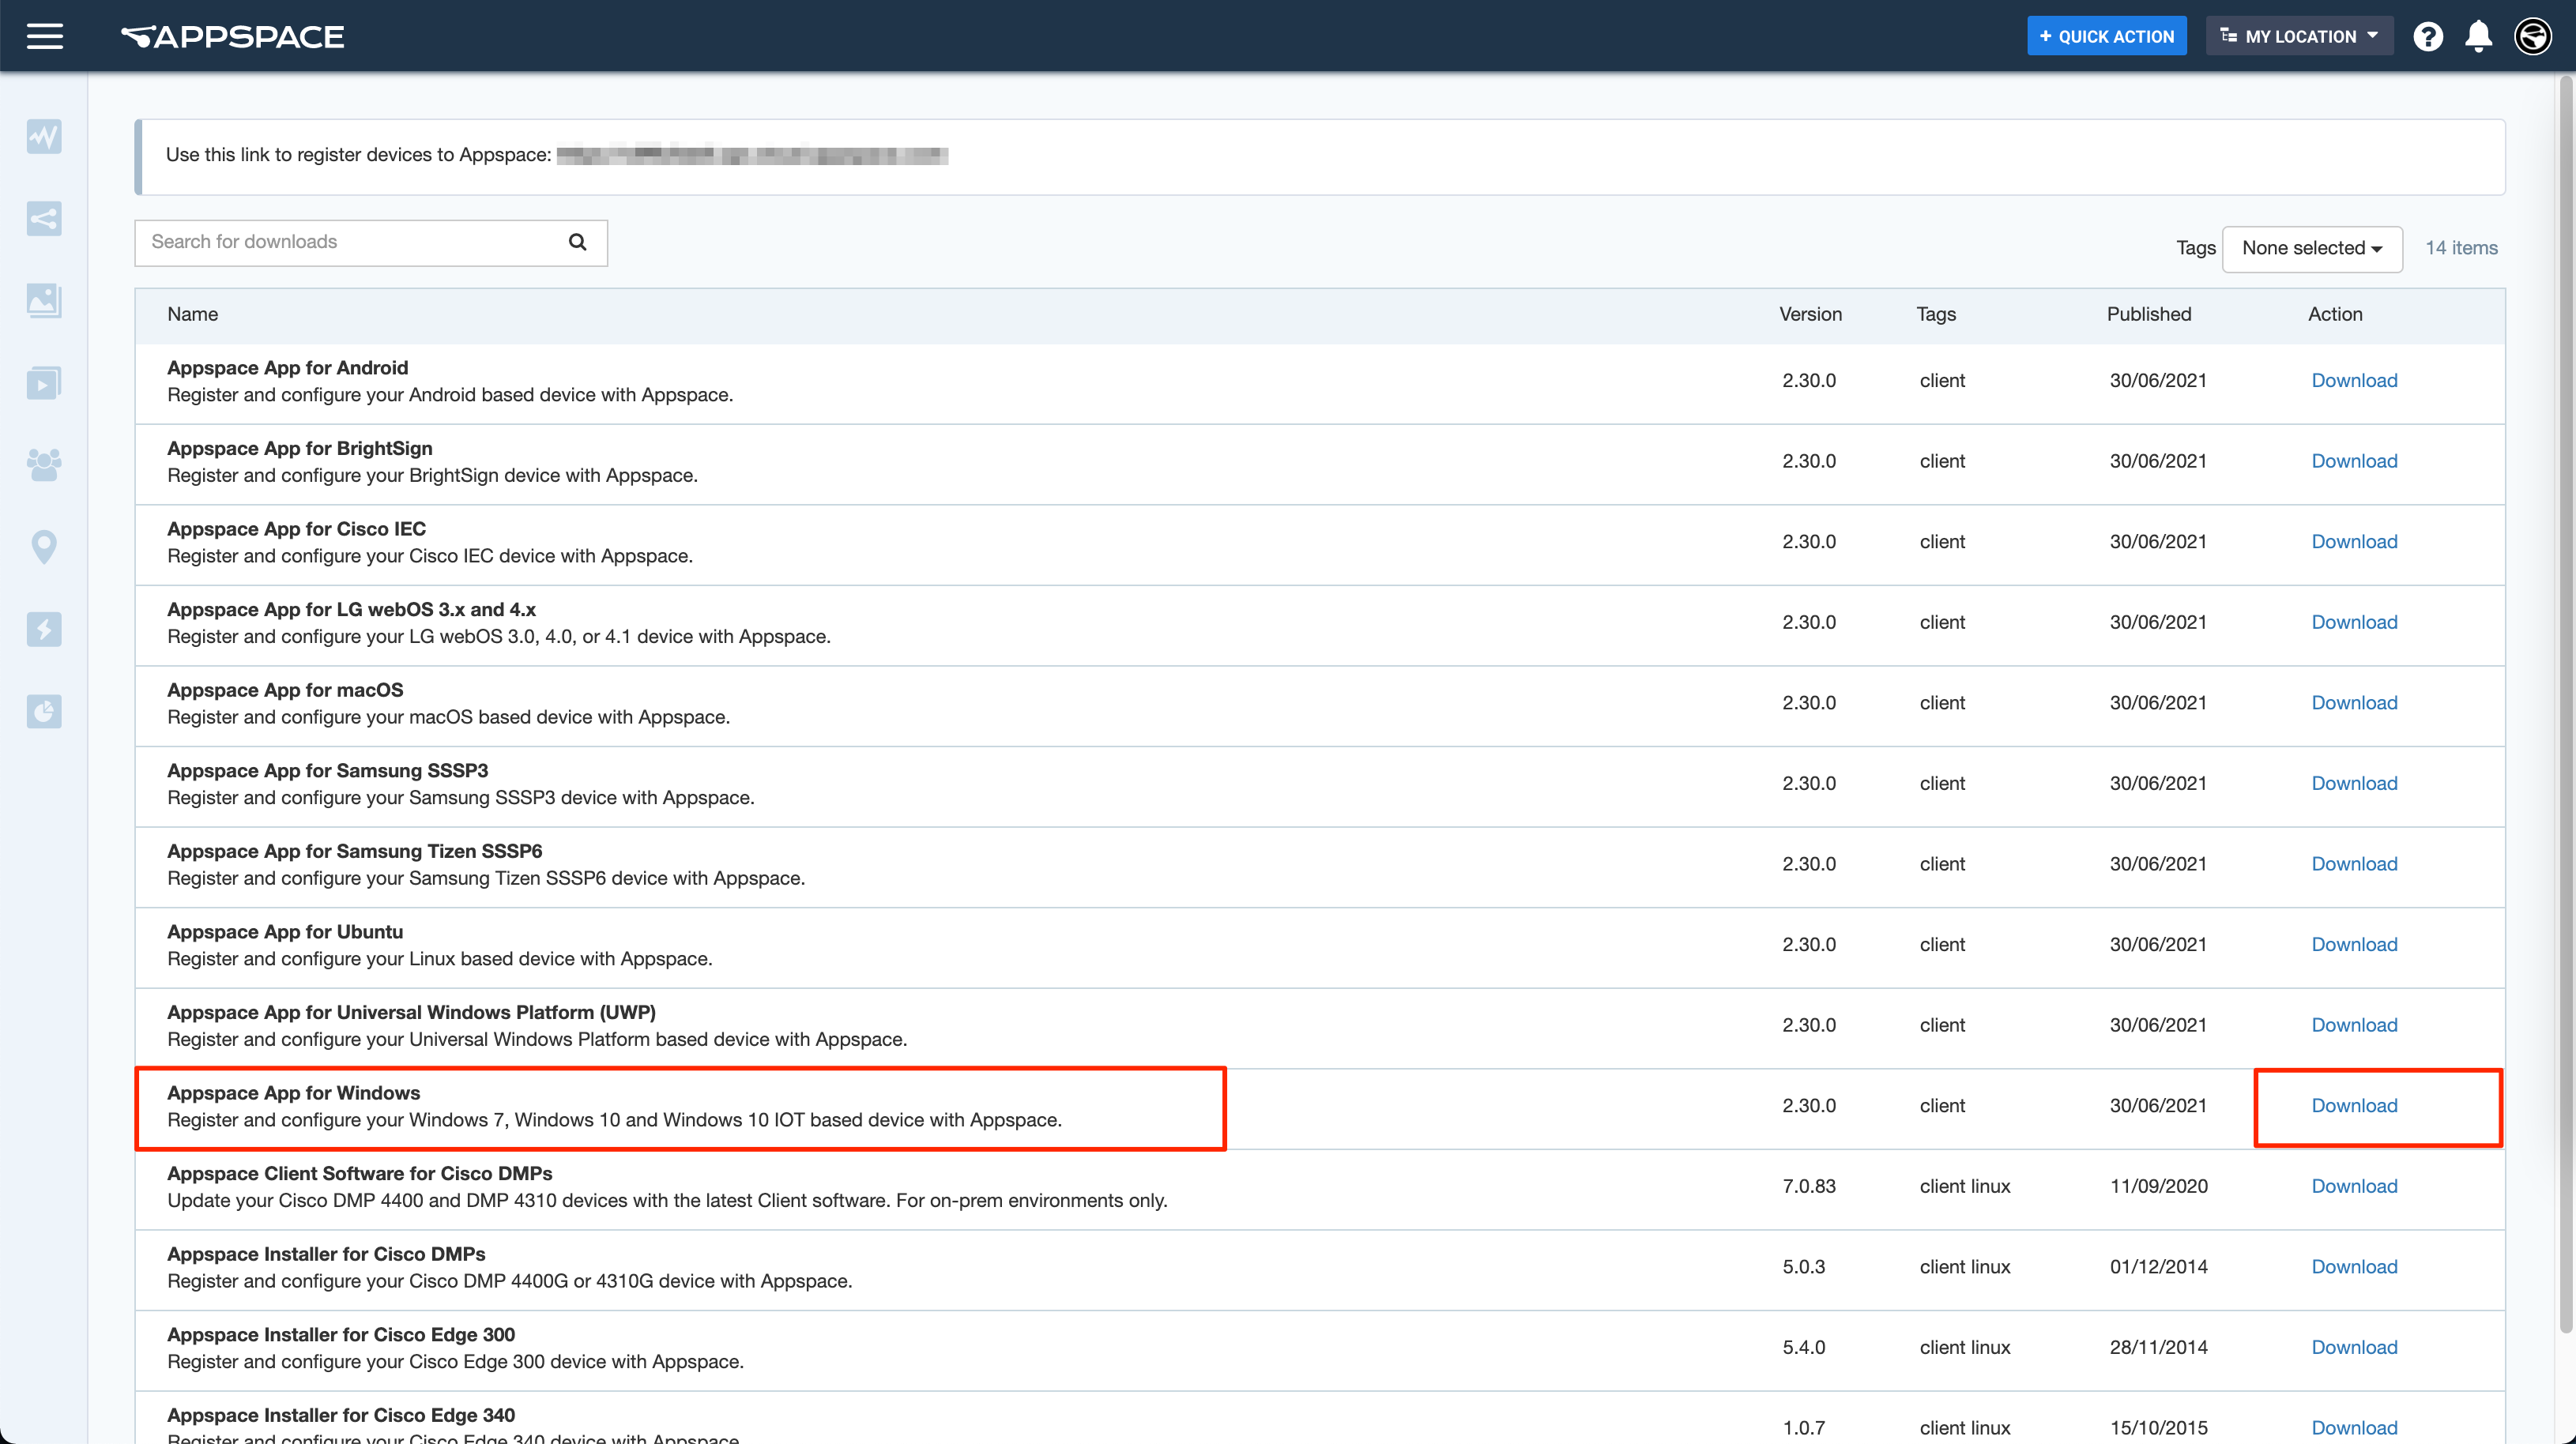
- Read the terms in the Download Confirmation & Agreement pop-up window, and check the box.
- Click the Download button and save the Appspace App Setup.exe file to a folder on your desktop.
- Locate the file that was downloaded and copy it to each device that will be used with Appspace.
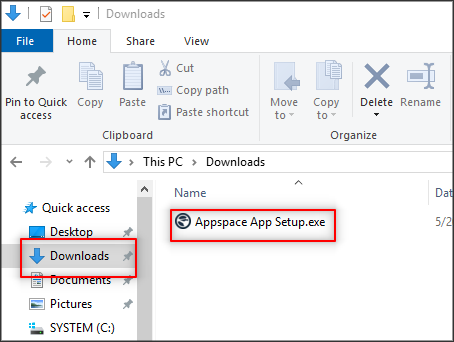 NoteThe downloaded application should have been placed in the Downloads folder. To access your download folder, hold down the Windows key (left of space bar) and press R to bring up the Run window. Type C: in the Run window and press Enter or OK.
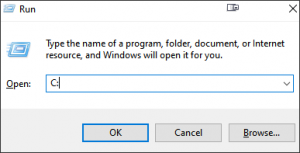
- If you have multiple devices to install Appspace on, copy the downloaded Appspace App Setup.exe file to a removable drive (USB) to bring it to any other devices that need it.
- Proceed to the next section below.
Install Appspace Software
Follow the instructions below to install Appspace software:
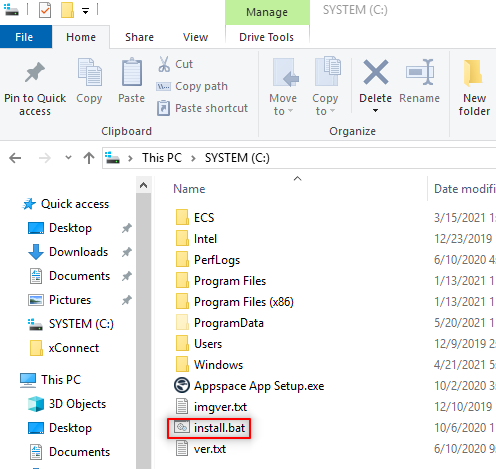
- Copy and paste the following text into a Notepad document.
@echo off del /s C:\Users\ECSUser\Desktop\*ECS*.lnk rmdir /s /q c:\ECS reg delete HKLM\SOFTWARE\Wow6432Node\Microsoft\Windows\CurrentVersion\Uninstall\{49901955-D2DD-4384-8A4D-AB4977F8B942} /f reg delete HKEY_CURRENT_USER\Software\Microsoft\Installer\Products\55910994DD2D4834A8D4BA94778F9B24 /f del /s C:\Windows\options\startup\*ECS*.lnk del /s "C:\Users\ECSUser\AppData\Roaming\Microsoft\Windows\Start Menu\Programs\Startup\*ECS*.lnk" call "Appspace App Setup.exe" /s - Save the notepad file as install.bat.

- Copy the newly created install.bat file to the C: drive on the desired device. Note
- To access the C: drive, hold down the Windows key and press R to bring up the Run window. Then type C: in the Run window and press Enter.
- To copy the file to the C: drive, you can left-click on the file, hold, and drag it into the C: drive window, and let go of the mouse button. It should join the other files.
WarningThe next step below will wipe out all existing content from the ECS player. - Double-click the install.bat file to remove all ECS references and install the Appspace App, readying it for registration.
- Proceed to the next section below.
Register Device
Follow the instructions below to register your device with Appspace:
- Launch the Appspace App on your device and wait for the device splash screen.
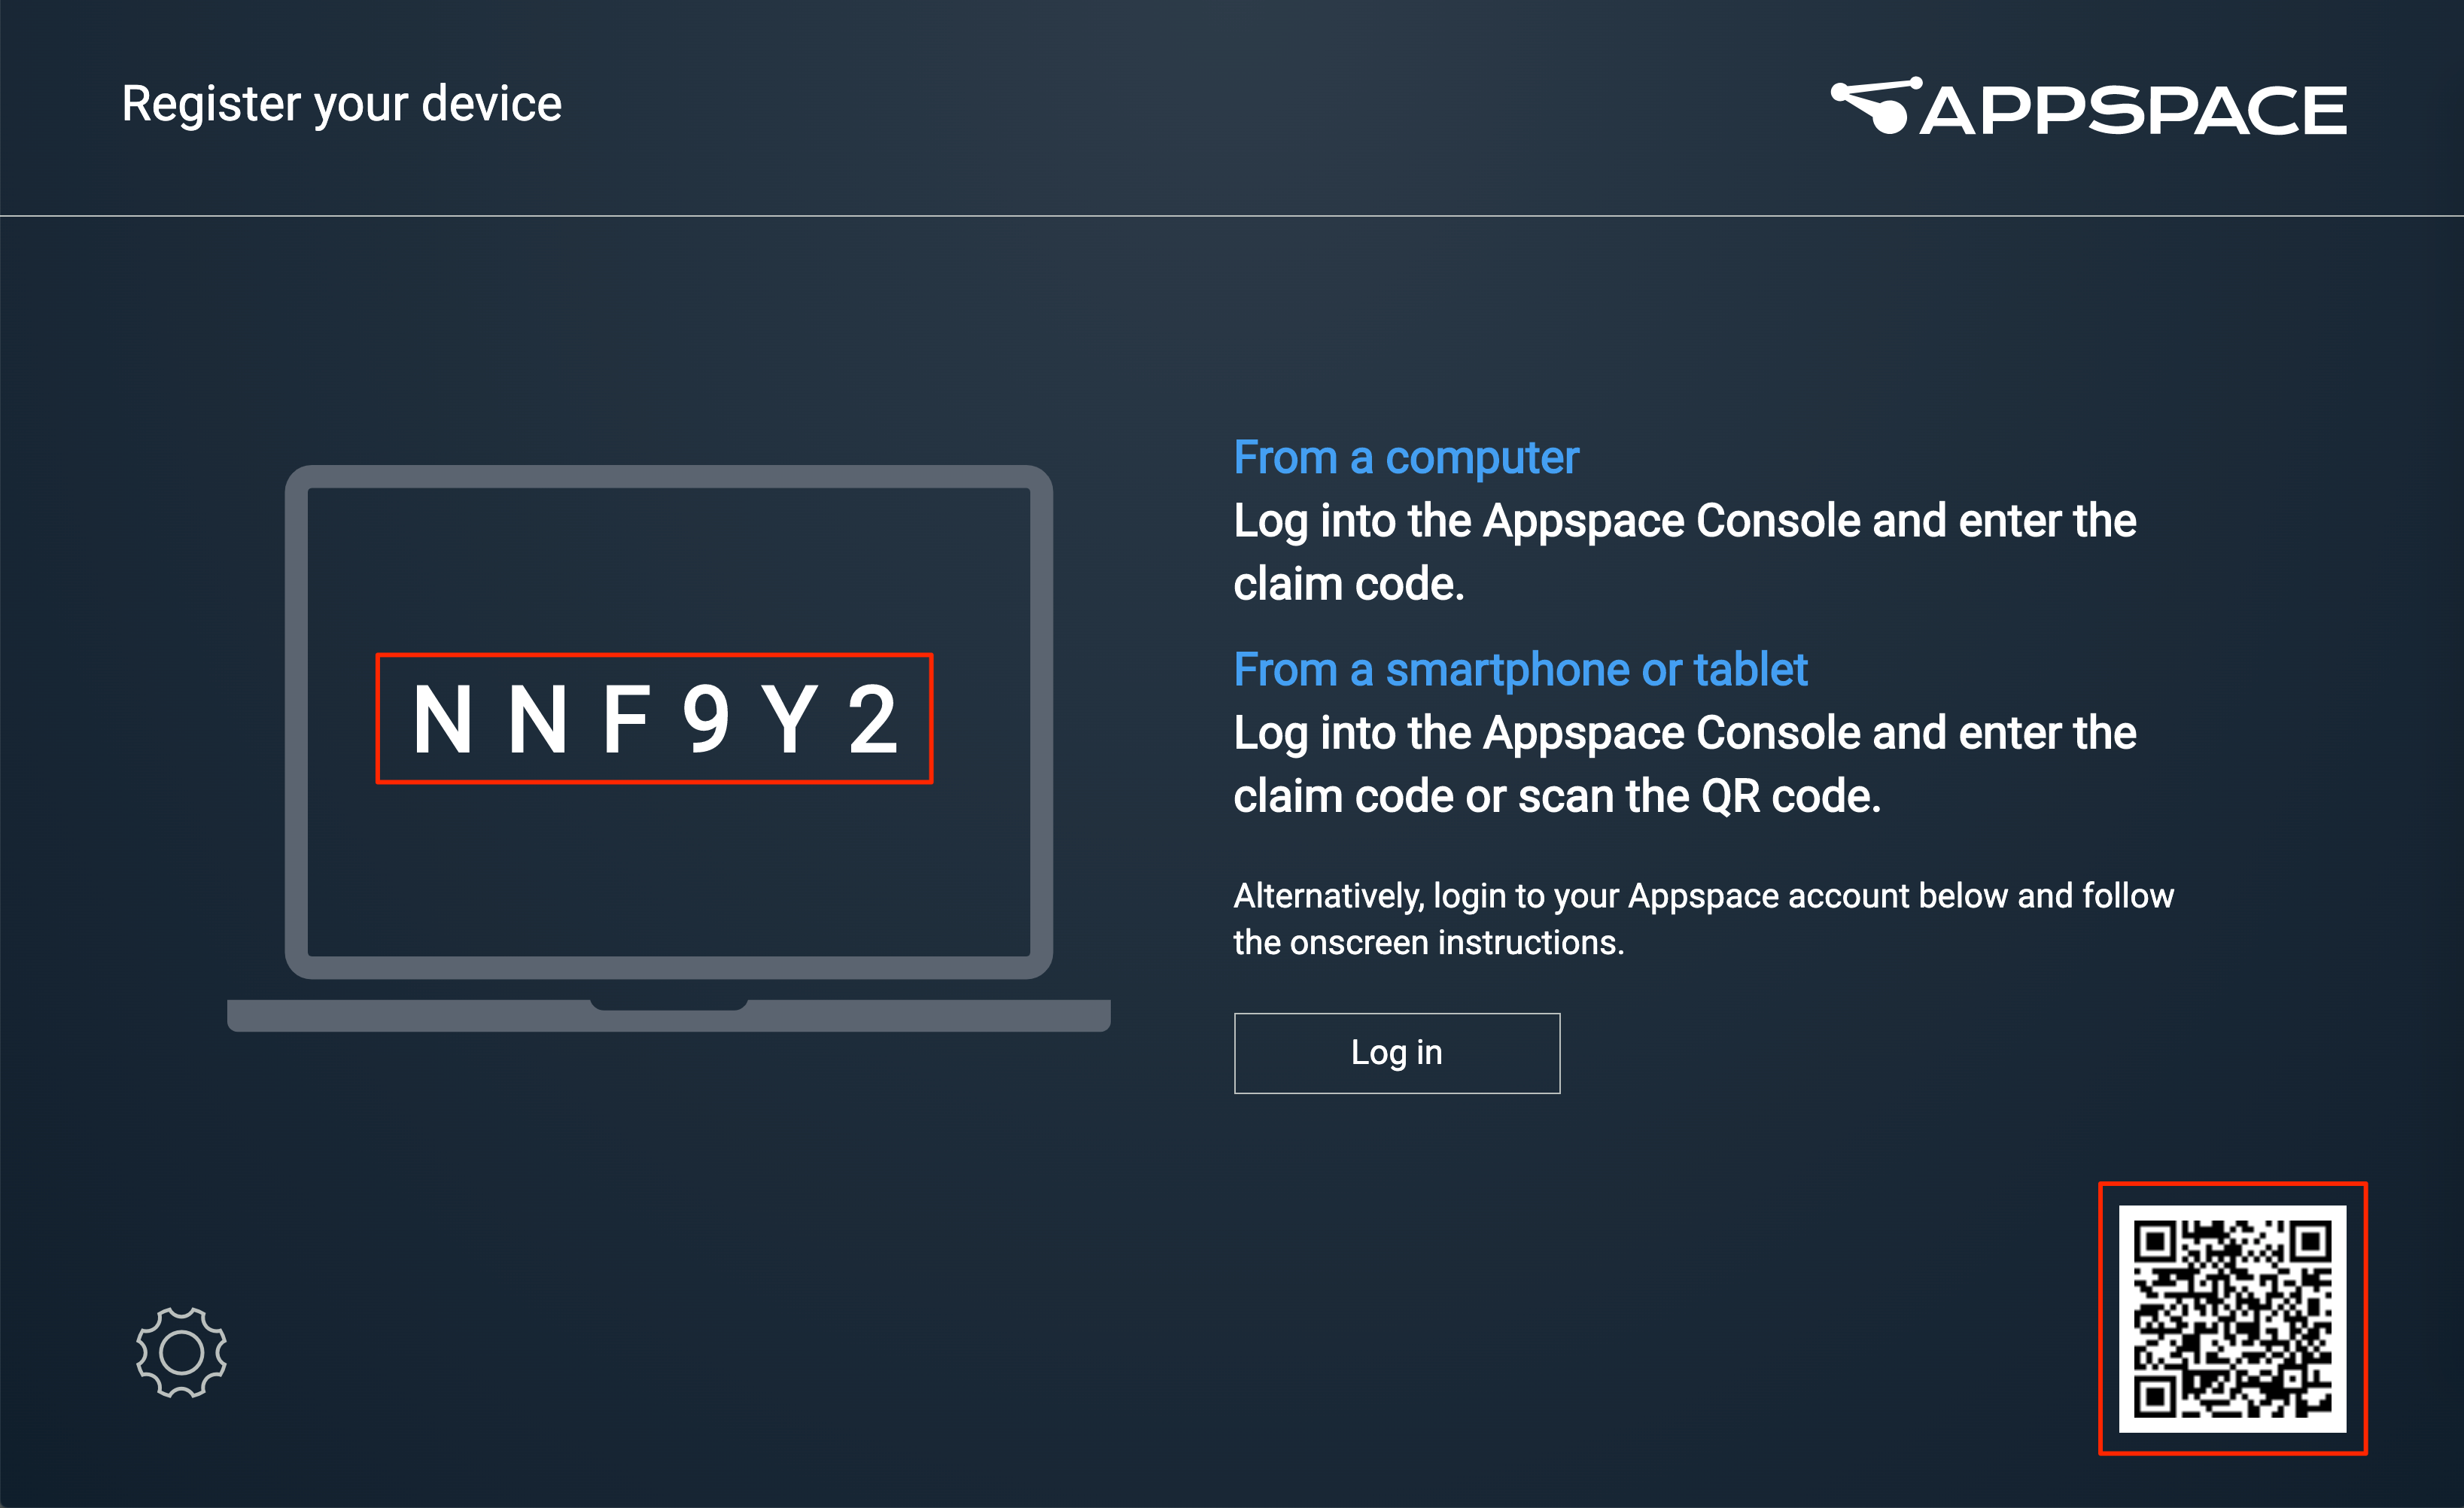
- Copy the 6-character code.
- Log in to the Appspace console and launch the device registration page via one of the following methods:

- Click the Quick Actions menu and select Register a Device.
- Go to the Device Registration widget on the Dashboard.
- In the Register a New Device window, enter the 6-character registration code copied earlier in Step 2 above.:
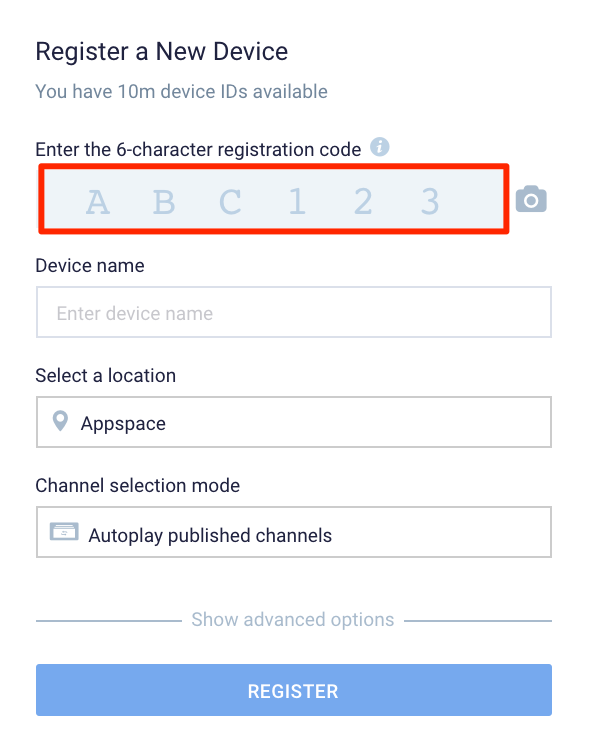
- Enter the Device name and select a location. If a location has not been created, you may skip this step and assign a location later.
- In the Channel selection mode field, select the Autoplay published channels playback option:
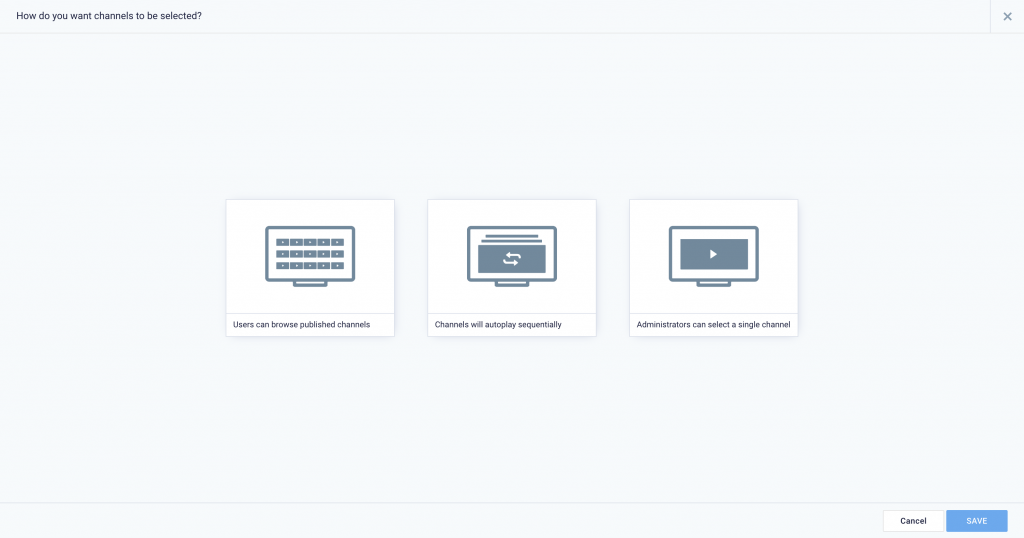
- Autoplay published channels – when this option is selected, one or more channels will autoplay on the device. This option is ideal for digital signage, video walls, interactive billboards, and any other workplace or public space signage needs. No user interaction is needed. Content is displayed according to scheduling or dayparting settings. For more information about the other display options, refer to Assign Channel to Device.
- Click the Save button.
- Back in the Register a New Device window, click Show advanced options and enter the following:
- Device description – type a brief description for the device such as its location or its function.
- Device group – select an existing device group. Skip this step if there is no device groups created. You may assign a device group later.
- Device tag – select from exiting tags or type in new tags.
- Click the REGISTER button.
- Once registration is complete, the device will sync with the Appspace platform to retrieve content. Once content sync is complete, you can view your published channel(s) on your TV.
Need Help?
Contact our Customer Support Technicians either by phone at (866) 877-7895 or by email at customercare@appspace.com.
Was this article helpful?