This article provides the instructions to register your device with Appspace using one of the following options:
- a 6-character code – ideal for standard media player devices/smart TVs, or mobile devices running on Android or iOS.
- the QR code – ideal for mobile devices running on Android or iOS, or supported tablets.
Prior to registration, your device must be configured with the Appspace App for devices, ideal for displaying digital signage, touch-screen kiosks, enterprise TV live streams, and room scheduling systems.
Device configuration depends on the desired device type or solution; configuration for devices that support the standard Appspace App for devices on operating systems such as Chrome OS, BrightSign, Samsung SSP, etc., differs from devices with Appspace built-in, such as Crestron TSS and Cisco Collaboration Endpoints.
To install the App, there are four scenarios:
- For most devices, you are required to download and install the Appspace App from an OS-bound app store.
- For some devices such as BrightSign, the App can be downloaded from the Appspace console.
- For some devices such as the MediaVue, the App comes preinstalled with the device.
- For most collaboration devices such as the Cisco Collaboration Endpoints with wallpaper displays, or the Crestron Touch Panels for room scheduling, the Progressive Web App (PWA) version of the Appspace App is used.
For information on supported devices, device requirements, Appspace App download information, and links to installation articles for your device, refer to the Supported Devices & Operating Systems article.
Prerequisites
- An Appspace supported device installed with the Appspace App for devices. Find the device requirements and installation instructions for your device in the Supported Devices & Operating Systems article.
- An active Appspace account, with sufficient device licenses to register the device.
- Account Owner or Location Admin user roles with sufficient platform licenses.
Register Device
Follow the instructions below to register your device using the 6-character code or QR code:
- Configure your device with the Appspace App based on your device’s operating system (Android, iOS, Chrome OS, etc.).
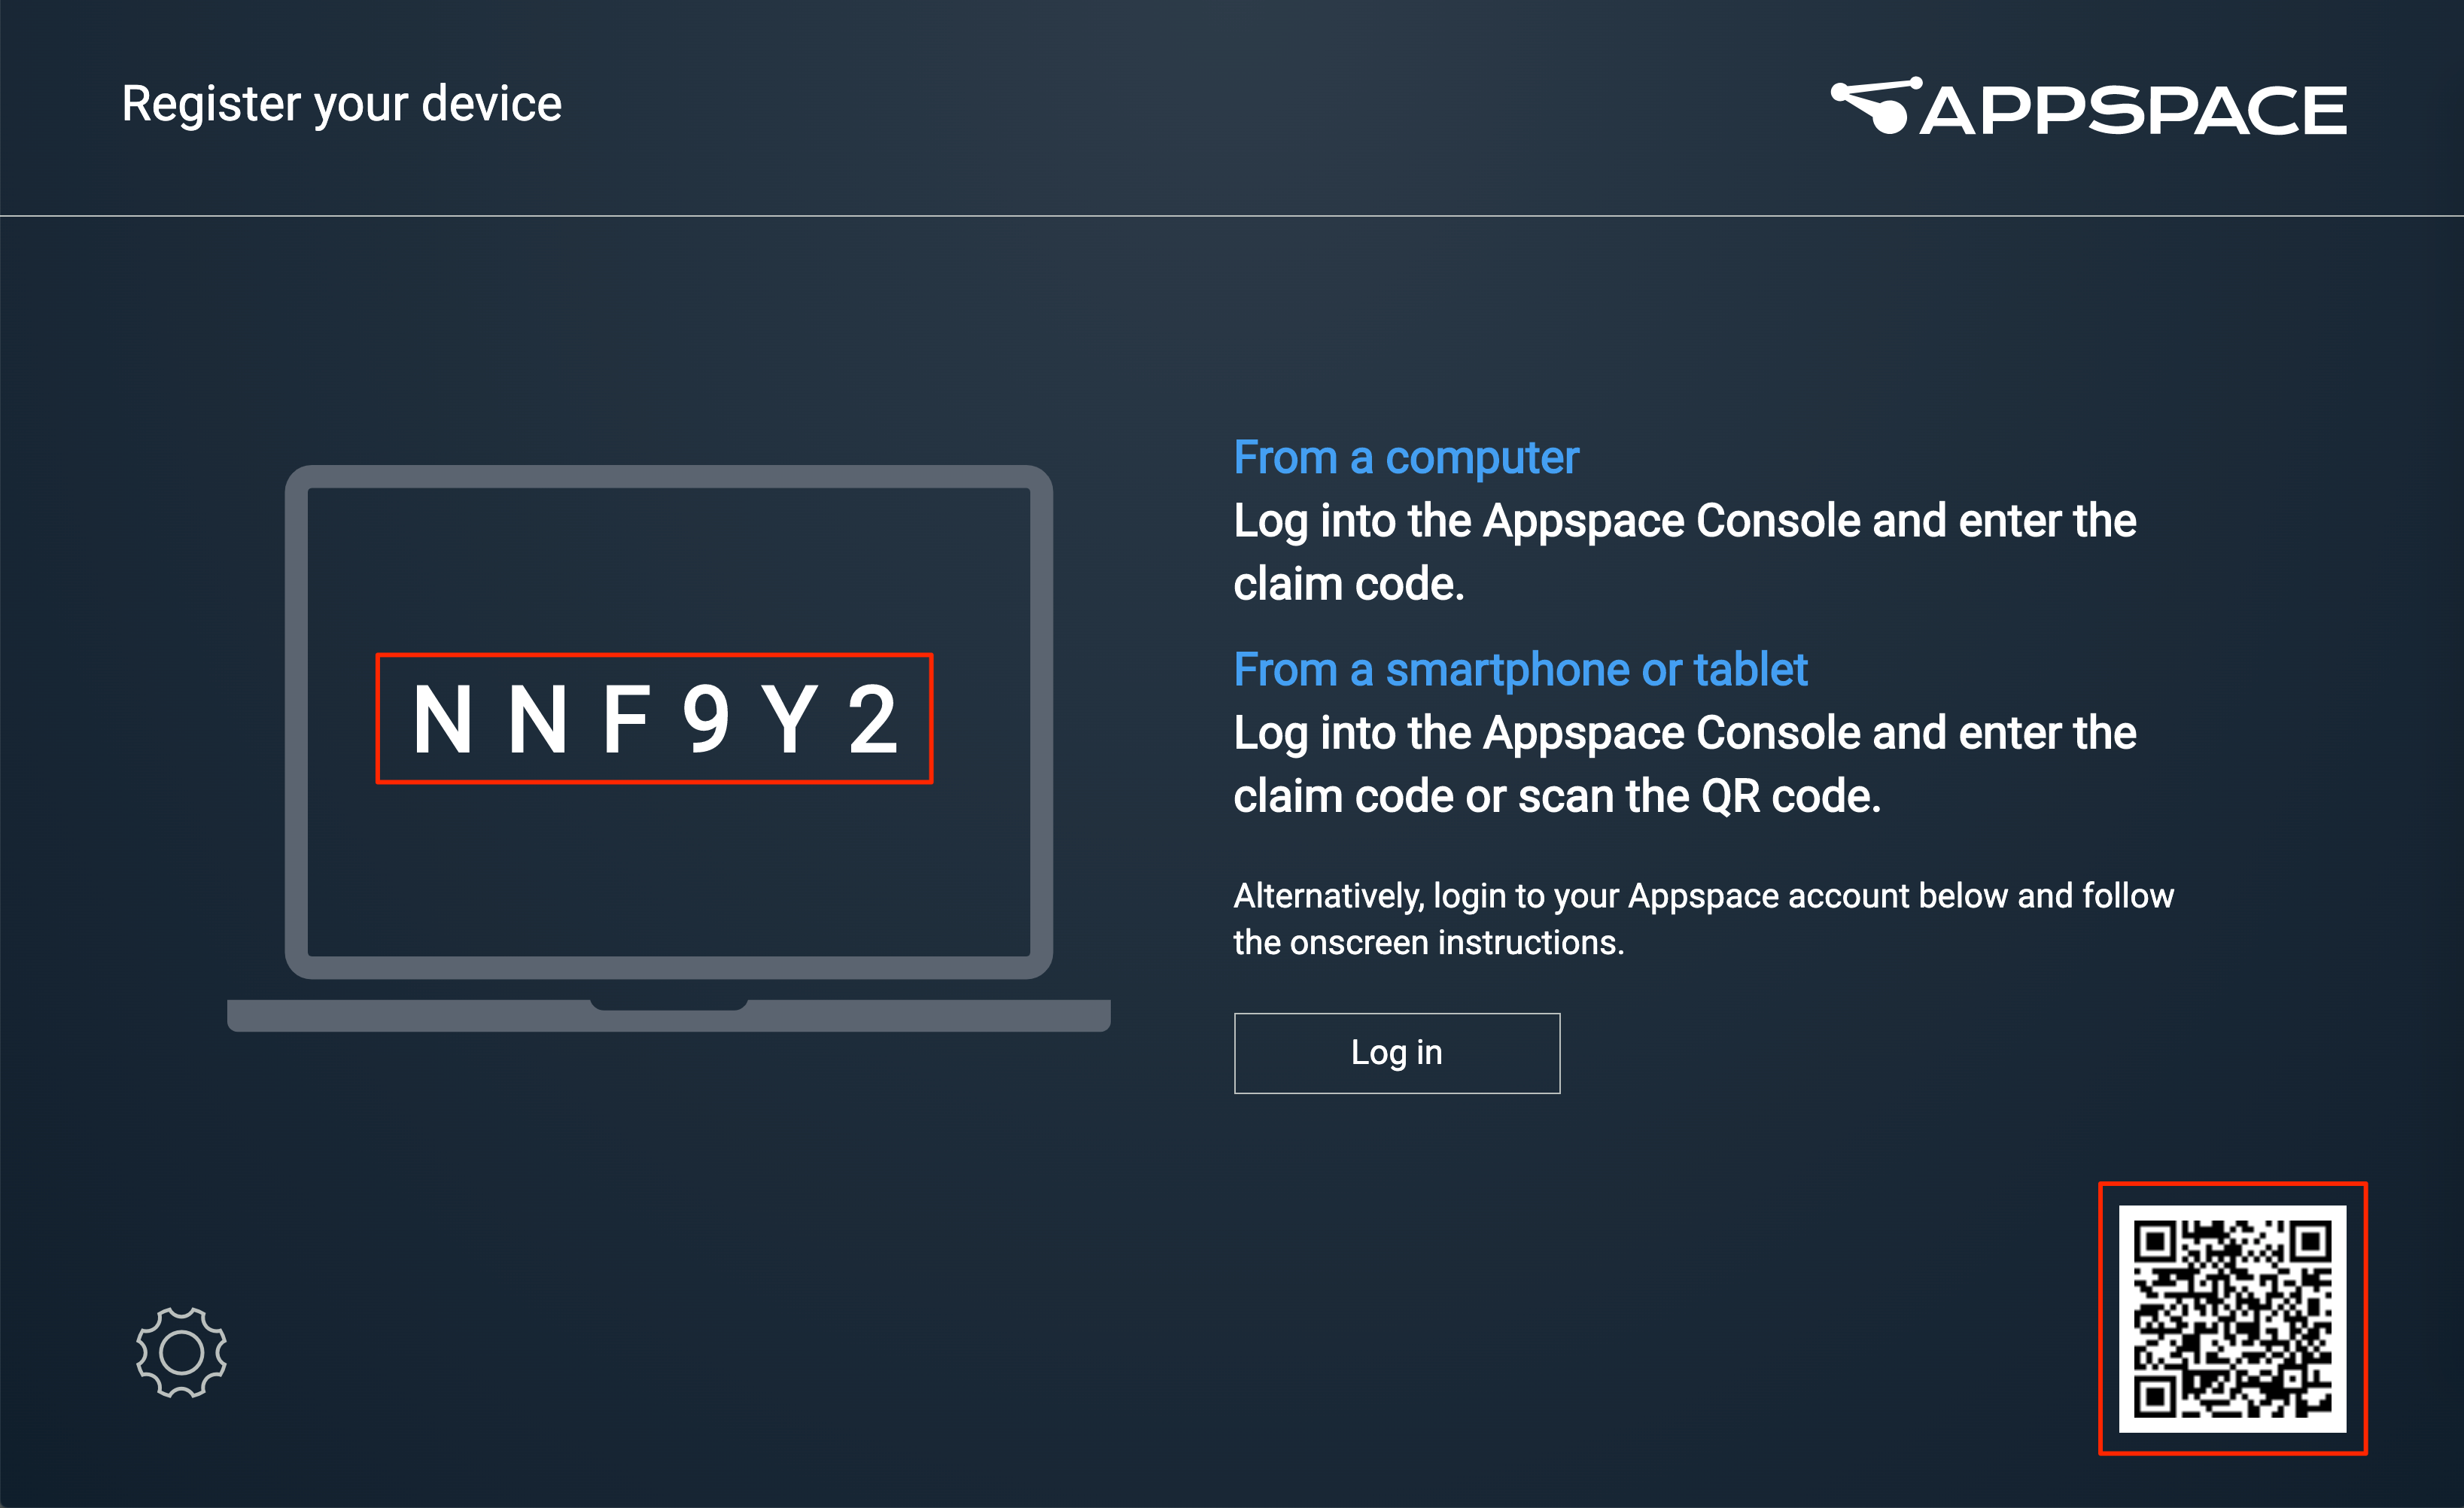
- Launch the Appspace App. The device registration page will be displayed.
- Log in to the Appspace console and launch the device registration page via one of the following methods:
- Click the QUICK ACTION menu and select Register a Device.
- Go to the Device Registration widget on the Dashboard.
- Click the ☰ Appspace menu, select Devices, and click the Add button in the Devices tab.

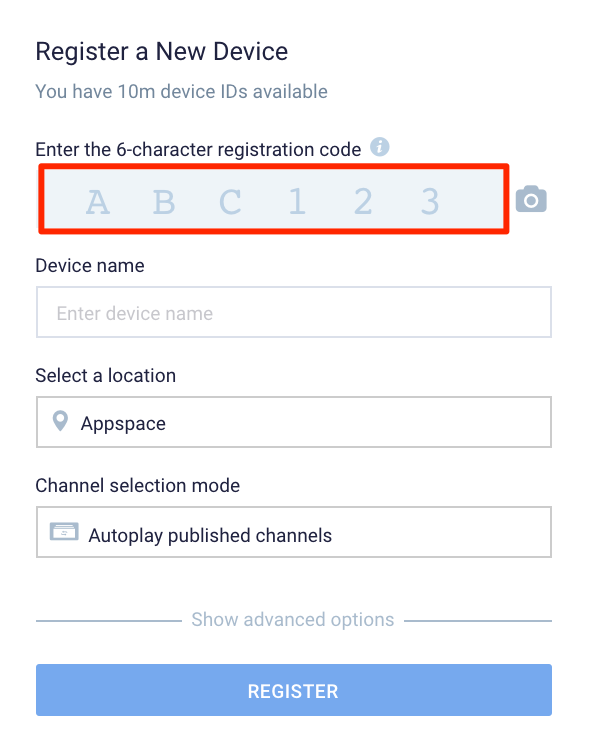
- In the Register a New Device window, choose one of the following methods:
- Using the 6-character registration code:
- Enter-in the 6-character registration code displayed on the Appspace App device registration screen.
- Go to Step 5 below.
- Enter-in the 6-character registration code displayed on the Appspace App device registration screen.
- Using the QR code:
- Click the camera icon to launch the QR code scanner.
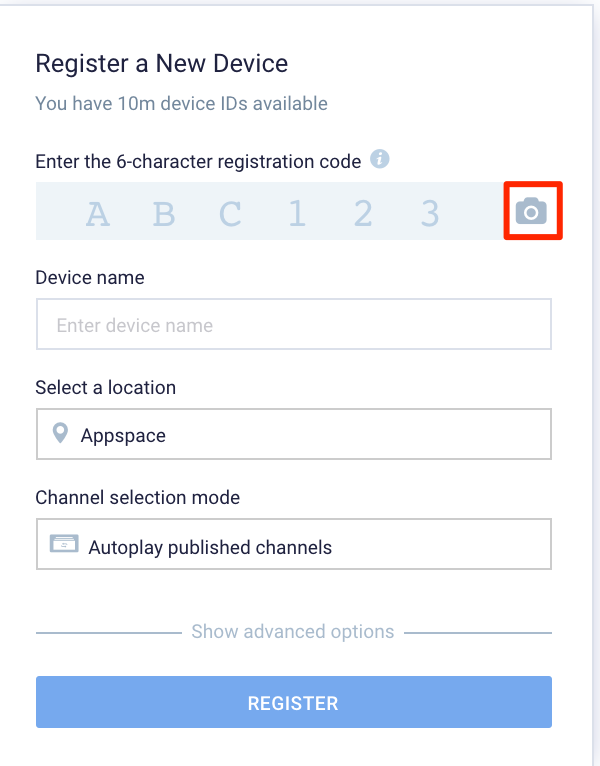 NoteOn first use, you need to allow the QR code scanner to access the camera, by clicking the Allow button in the request window.
 - Point the QR code scanner to the QR code on the Appspace App device splash screen. Once the QR code is in view, and scan is successful, you are returned to the Register a New Device window once again.

- Proceed to Step 5 below.
- Click the camera icon to launch the QR code scanner.
- Using the 6-character registration code:
- Back in the Register a New Device window, enter the Device name and select a location. If a location has not been created, you may skip this step and assign a location later.
- In the Channel selection mode field, select one of these playback options and assign a channel (if already created):
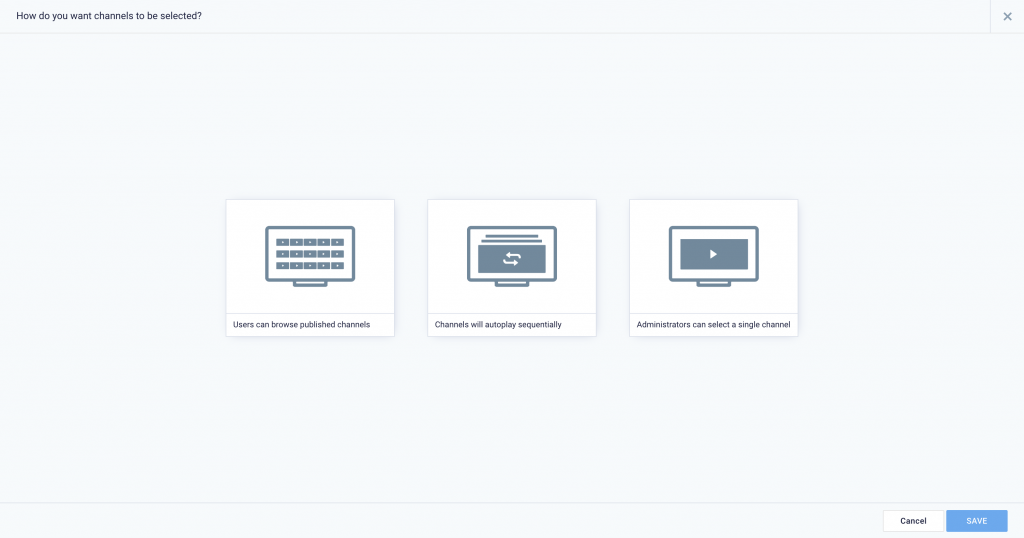
- Users browse published channels – this is the interactive mode or channel browsing mode, ideal for touch screen TVs or TVs with remote control, to display corporate content and enterprise tv, in any common space. When displaying the channel browsing mode, anyone can browse and play any content published to this device. While a Location Admin configures this setting, a Publisher must publish channels to the device and may assign any type of content, and channel type.
- Autoplay published channels – when this option is selected, one or more channels will autoplay on the device. This option is ideal for wallpaper displays in collaboration devices, video walls, interactive billboards, and any other workplace or public space signage needs. No user interaction is needed. Content is displayed according to scheduling or dayparting settings. While a Location Admin configures this setting, a Publisher must publish channels to the device and configure the scheduling settings. This option is currently available only for playlist channels.
- Administrators can select a single channel – this option displays only one channel, with any type of content, and channel type (playlist channel, an advanced channel, or a live channel). It is ideal for information kiosks, POS systems, bulletin boards, room scheduling, and simple signage. The Location Admin who registers the device is able to assign one single channel directly during this configuration. However, to select a channel here, the channel must already be created prior to this registration. If the channel has not been created, you may skip this step, and you (Location Admin) or a Publisher may assign a channel later.
- Click the Save button.
- Back in the Register a New Device window, click Show advanced options and enter:
- Device description – type a brief description for the device such as its location or its function.
- Device group – select an existing device group. Skip this step if there is no device group created. You may assign a device group later.
- Device tag – select from exiting tags or type in new tags.
- Click the REGISTER button.
- Once registration is complete, the device will sync with the Appspace console to retrieve content. Once content syncing is complete, you can view your published channel(s) on the TV, tablet, or on a kiosk.
- However, if no channels have been assigned to the device or user, you will see a blank screen. Proceed with one of the following, based on the channel Channel selection mode selected in step 6 above.
- Users browse published channels – for channels to appear in interactive mode or channel browsing mode, a Publisher must publish multiple channels or channel groups to this device.
- Autoplay published channels – for one or more playlist channels to autoplay based on the playlist sequence, a Publisher must publish multiple channels or channel groups to this device and configure the channel’s scheduling or dayparting settings. Only a playlist channel is supported.
- Administrators can select a single channel – assign one channel; a Location Admin or a Publisher must assign either a playlist channel, an advanced channel, or a live channel.
- You may now proceed to configure device settings, or find out how to browse and view content displayed by the Appspace App.
Was this article helpful?