Add and manage registered devices, create tags and organize these devices into device groups or locations, or simply assign channels to one or more devices, all in the Devices module in the Apppace console.

The Devices module consists of the following four tabs:
- Devices – the dashboard where you can add new devices and start the device registration process, or configure the different settings such as changing the channel selection mode, setting a location, changing the sync schedule, etc. for all registered devices.
- SmartHub ASE – this tab is to manage the legacy SmartHub ASE solution that is still being used by some on-prem customers.
- Locations – add locations to manage your device locations.
- Advanced – here you can import/export device information for all devices listed here, and there is also a quick access link to advanced and legacy device registration options.
This article illustrates the features available in this module and provides the introduction as well as the instructions to configure the different settings, as follows:
Devices Dashboard
The Devices dashboard is accessed via the ☰ Appspace menu on the console sidebar. Here, you’ll be able to register, view, and manage a list of devices registered with the Appspace App.
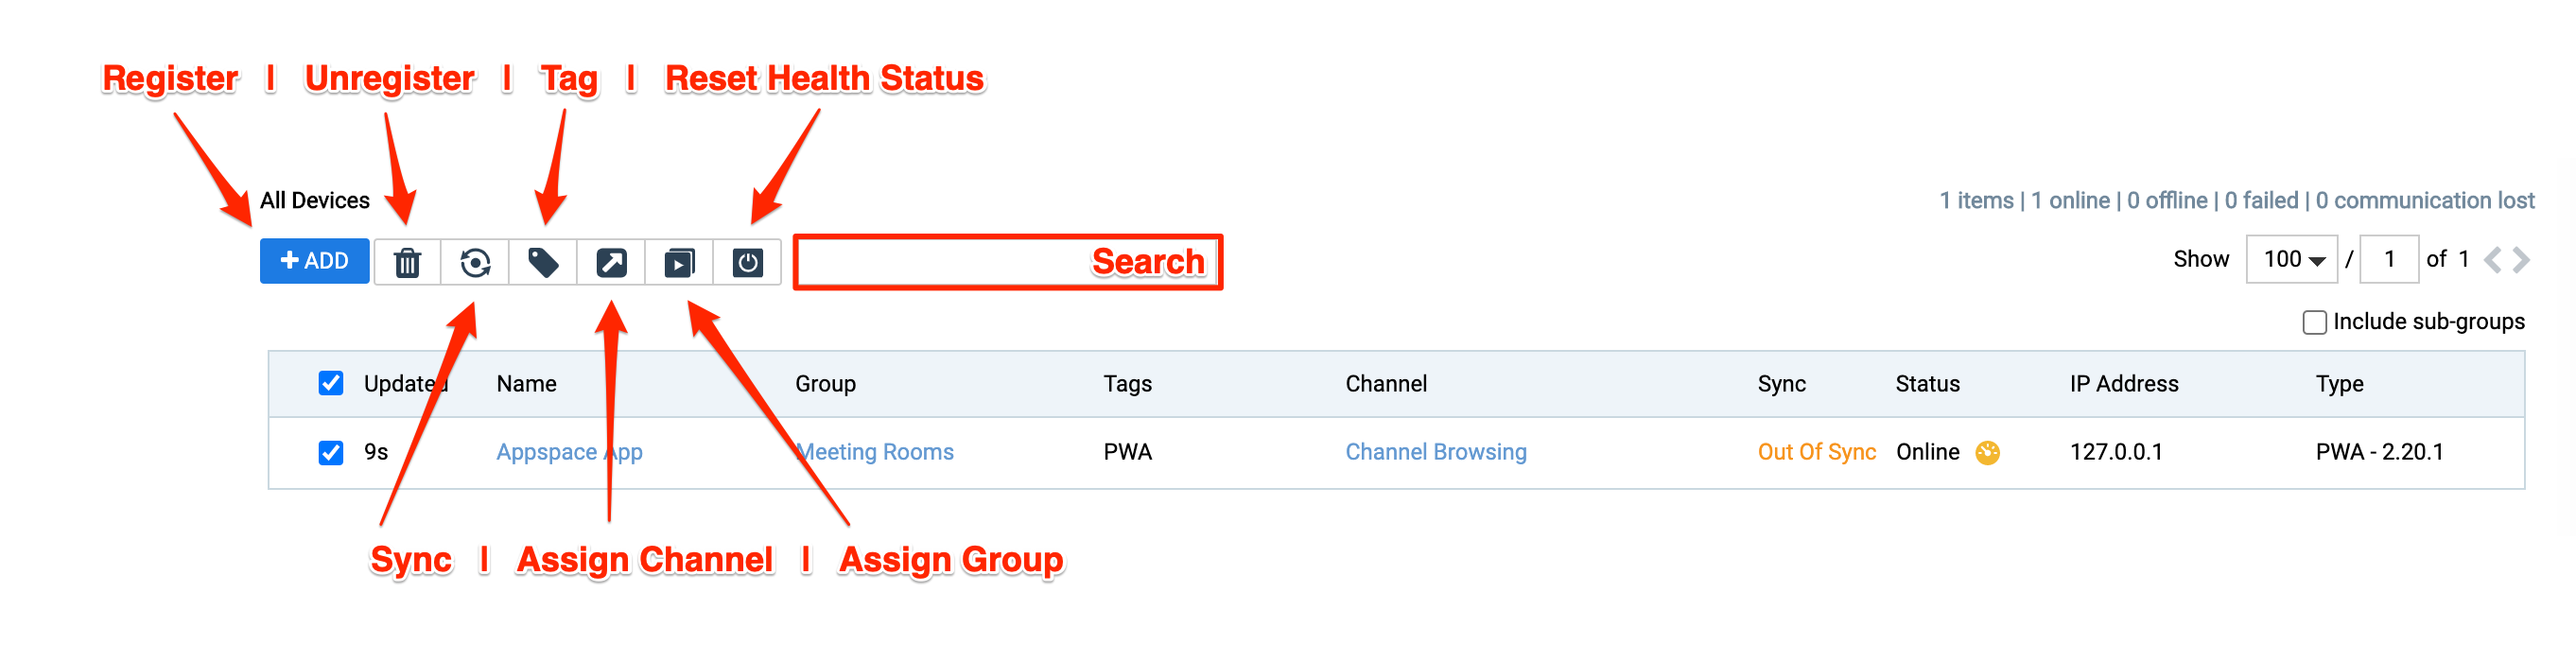
Search
The Search field is used to search devices based on the name of the devices.
- On the Devices dashboard, enter the keyword of the device name you wish to display.
- Click the Enter or Return button on your keyboard, and the list of devices matching the keyword will be listed on the device listing page.
Sync Device
Devices sync with the Appspace server every minute by default, to determine device status and update content. However, users are given the option to manually configure the device to sync at a specific time(s) of the day in order to either conserve bandwidth or limit network bandwidth usage to off-peak hours.
The Sync icon is enabled only if automatic sync is turned off and the sync setting is configured in Scheduled Sync mode. To sync content now for any device with scheduled sync enabled, do the following:
- On the Devices dashboard, select the desired device(s) by checking the device checkbox.
- Click the Sync icon to sync the device(s) with the Appspace server.
Reset Health Status
The Reset Health Status icon is used to determine the current network connection between the Appspace server and devices. The health status of a device indicates whether or not Appspace can communicate with the device, based on the 60-second heartbeat.
- On the Devices dashboard, select the desired device(s) by checking the device checkbox.
- Click the Reset Health Status icon to refresh the connection between the Appspace server and device(s).
- The Status column of the device listing page is then refreshed with one of the following statuses:
-
- Online – The device is connected to the Appspace server. The device has successfully reached out to Appspace via its heartbeat, and the app is running and syncing content.
- Offline – The device is unable to connect to the Appspace server. When a device has been in Communication Lost status for 2 weeks, it is changed to Offline status. This indicates that the device has been on the Communication Lost status (i.e. Appspace is not hearing from the device via the aforementioned heartbeat mechanism) for a longer period of time.
- Communication Lost – The device has failed to report back to the Appspace server. When a device has missed 15 consecutive heartbeats (i.e. hasn’t reached out to Appspace for 15 minutes) it gets flagged as Communication Lost. This indicates that a device stopped communicating with Appspace. This could mean the following actions have occurred:
- The device is powered off.
- The device has lost network connection.
- The device has been blocked on the firewall.
- Any other thing that has prevented communication to Appspace cloud servers.
Content may still play on the screen if the app is running, but the device cannot reach out to Appspace. The last check-in time given when a user moves the mouse over the red exclamation point is in UTC time.
- Failed – An error was detected during playback.
-
Assign Channel/Change Channel Selection Mode (Playback)
The channel selection mode or the channel playback option for a device is assigned during device registration. However, once the device is registered you may change the selection mode here in the Devices dashboard.
- Users can browse published channels – this is the interactive mode or channel browsing mode, ideal for touch screen TVs or TVs with remote control, to display corporate content and enterprise tv, in any common space. While a Location Administrator can choose this setting during registration or in the Devices dashboard, a Publisher must separately publish channels to the device from the Channels dashboard. The publisher can assign any channel type.
- Channels will autoplay sequentially – when this option is selected, one or more channels will autoplay on the device. This option is ideal for wallpaper displays in collaboration devices, video walls, interactive billboards, and any other workplace or public space signage needs. No user interaction is needed. Content is displayed according to scheduling or dayparting settings. While a Location Administrator configures this setting during registration or in the Devices dashboard, a Publisher must publish channels to the device and configure the scheduling settings. This option is currently available only for playlist channels.
- Administrators can select a single channel – this option displays only one channel, with any type of content, and channel type (playlist channel, an advanced channel, or a live channel). It is ideal for information kiosks, POS systems, bulletin boards, room scheduling, and simple signage. The Location Administrator who registers the device is able to assign one single channel directly during this configuration. However, to select a channel here, the channel must already be created prior to this registration. If the channel has not been created, you may skip this step, and you (Location Administrator) or a Publisher may assign a channel later.
Users may change channel selection mode for one device at a time or in bulk. Refer to the Assign Channel to Devices article for instructions.
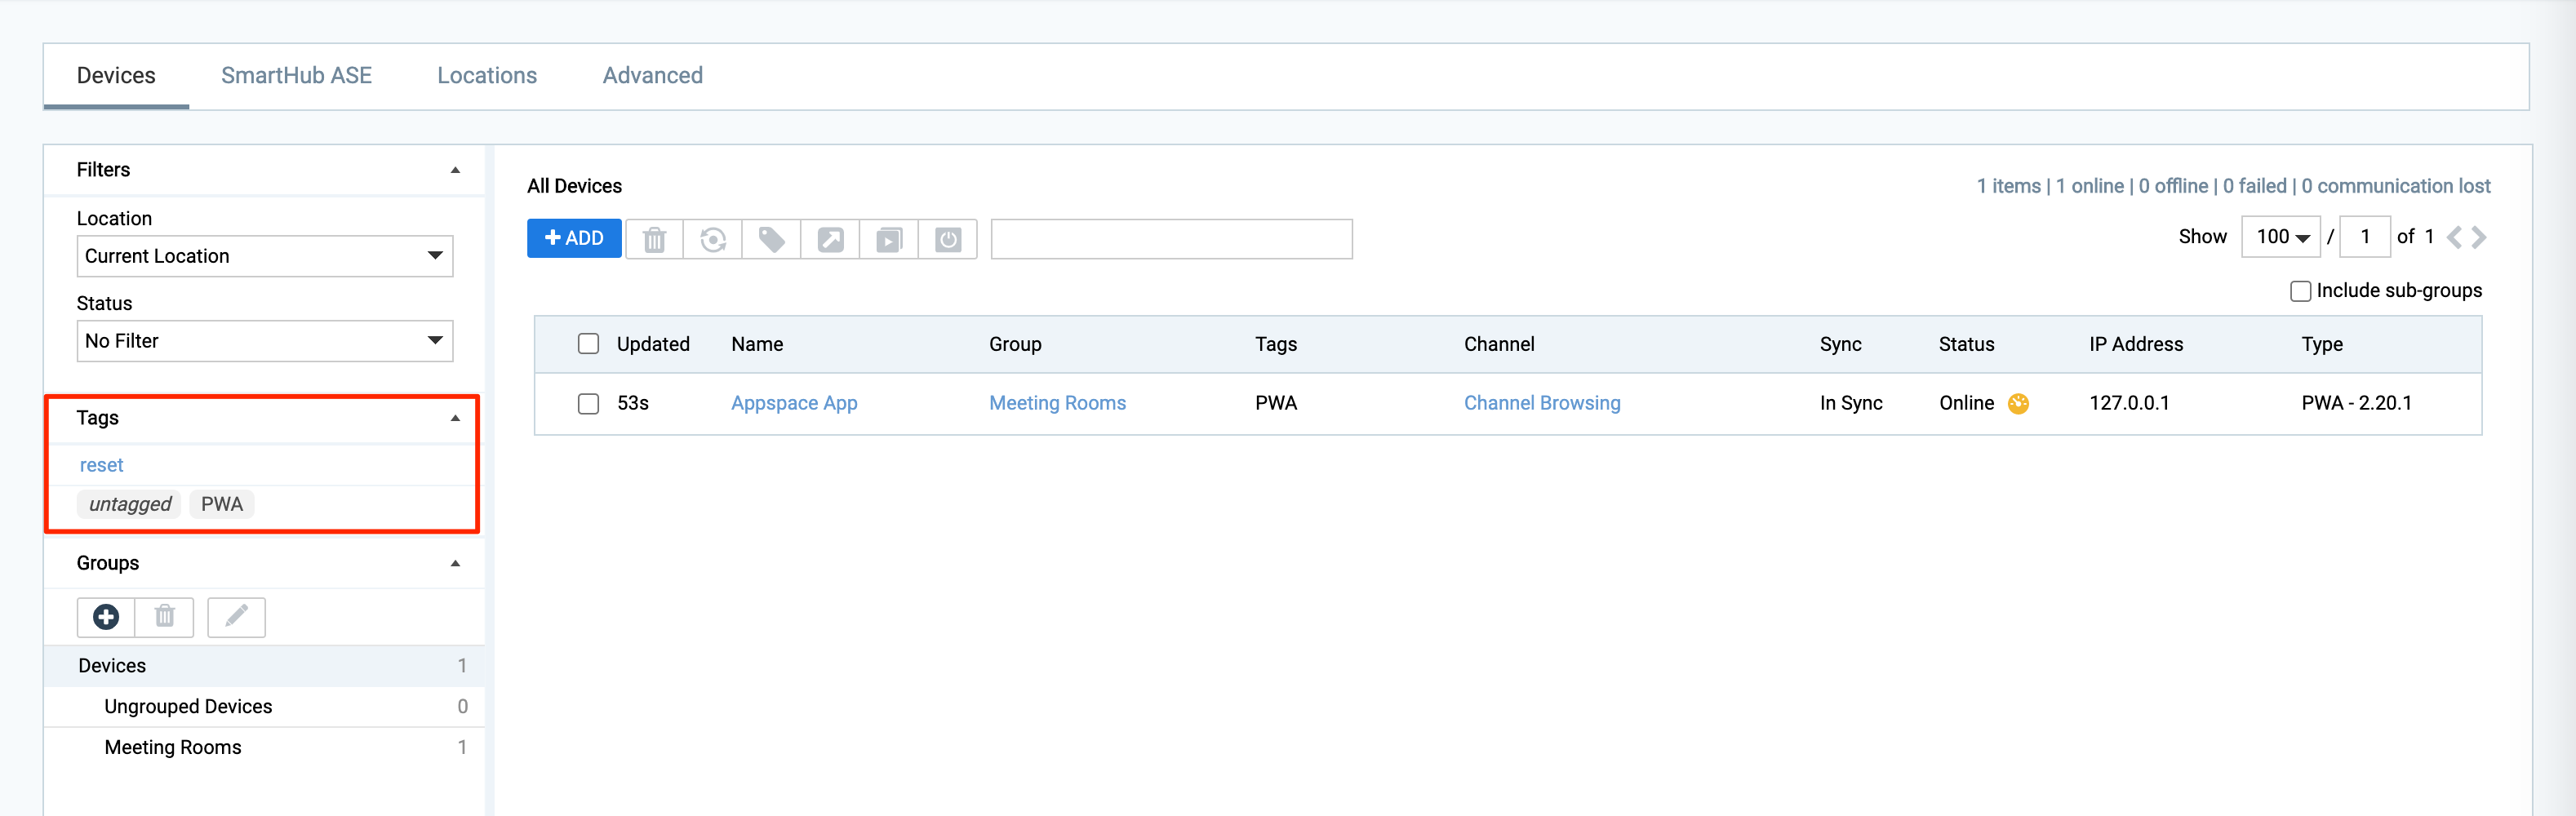
Filters
The Device Filters section allows users to determine and narrow down devices that are displayed on the device listing page based on the Location and Status.
When a user selects a desired Location or Status filter from the drop-down menu, the device listing page is automatically refreshed and displays devices depending on the filters selected.

The Device Tags section displays the available device tags, which users can use to display devices in the device listing page based on the device tag(s) selected. Users can click the reset link to clear and return to displaying all devices.
Device Tags
Create New Tags
A device tag is typically created during device registration – when you add a device in the console. To create new tags for a device after the device is registered and is listed here in the console, do the following.
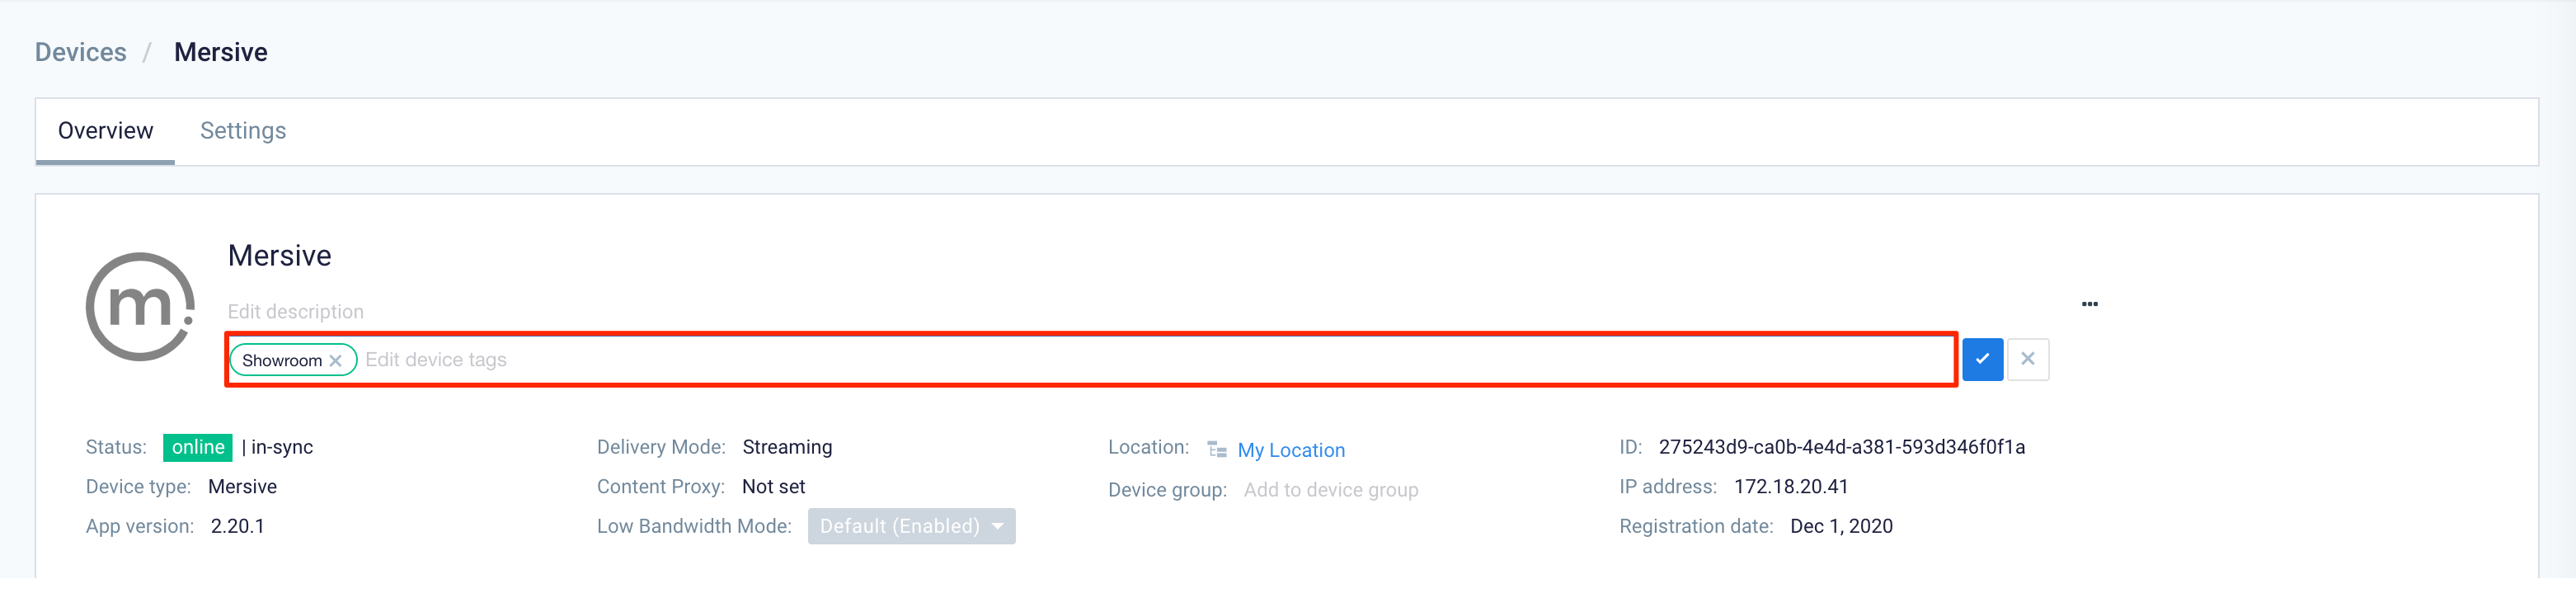
- Select the device name link on the Devices dashboard.
- In the Overview tab, type in a tag name and hit enter in the Edit device tags field. You may add more than one tag. You will also be able to select any pre-existing tags which will appear in the field as you type.

- Click the checkmark to save.
Add Existing Tags
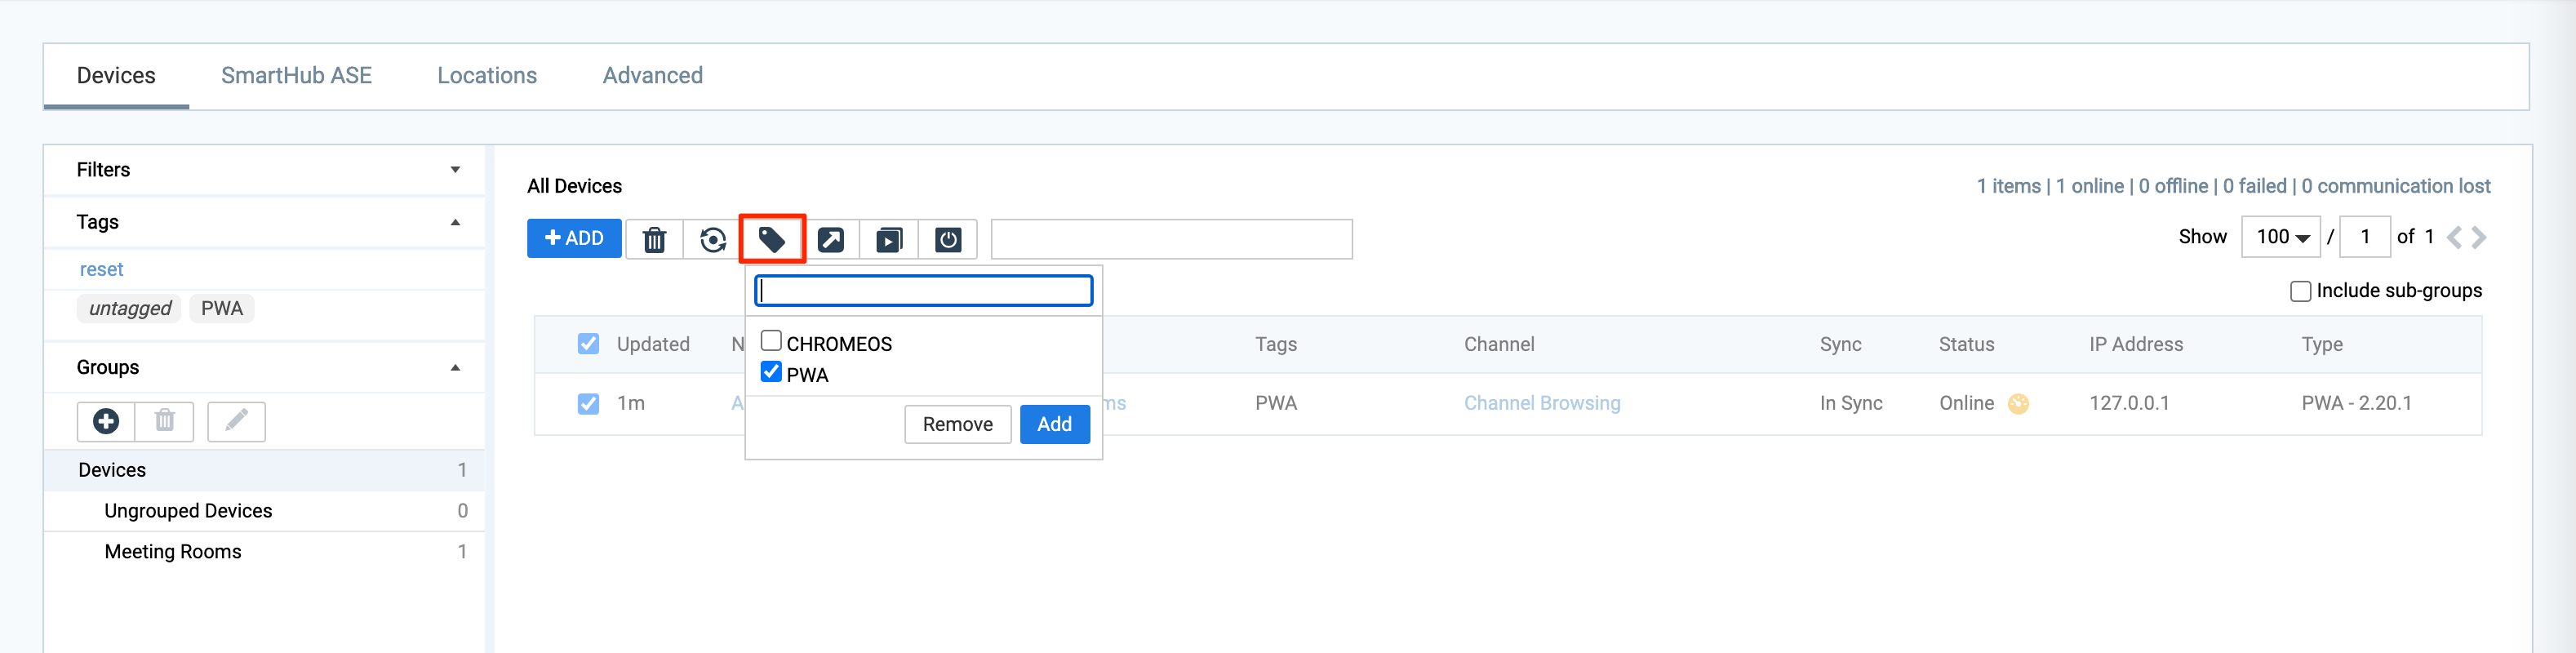
You can also use the Tag Devices icon on the dashboard to assign or remove existing tags to devices.
- On the Devices dashboard, select one or multiple devices by selecting the checkbox(es).
- Click the Tag icon, check all the necessary tags, and click Add.
Remove Tags
To remove tags, do the following:
- On the Devices dashboard, select one or multiple devices by selecting the checkbox(es).
- Click the Tag icon, uncheck the tags, and click Remove.
Add/Manage Device Groups
The Device Groups section displays the device groups within the location, which are used to organize and manage devices on Appspace. You may create, rename, or delete a device group here.
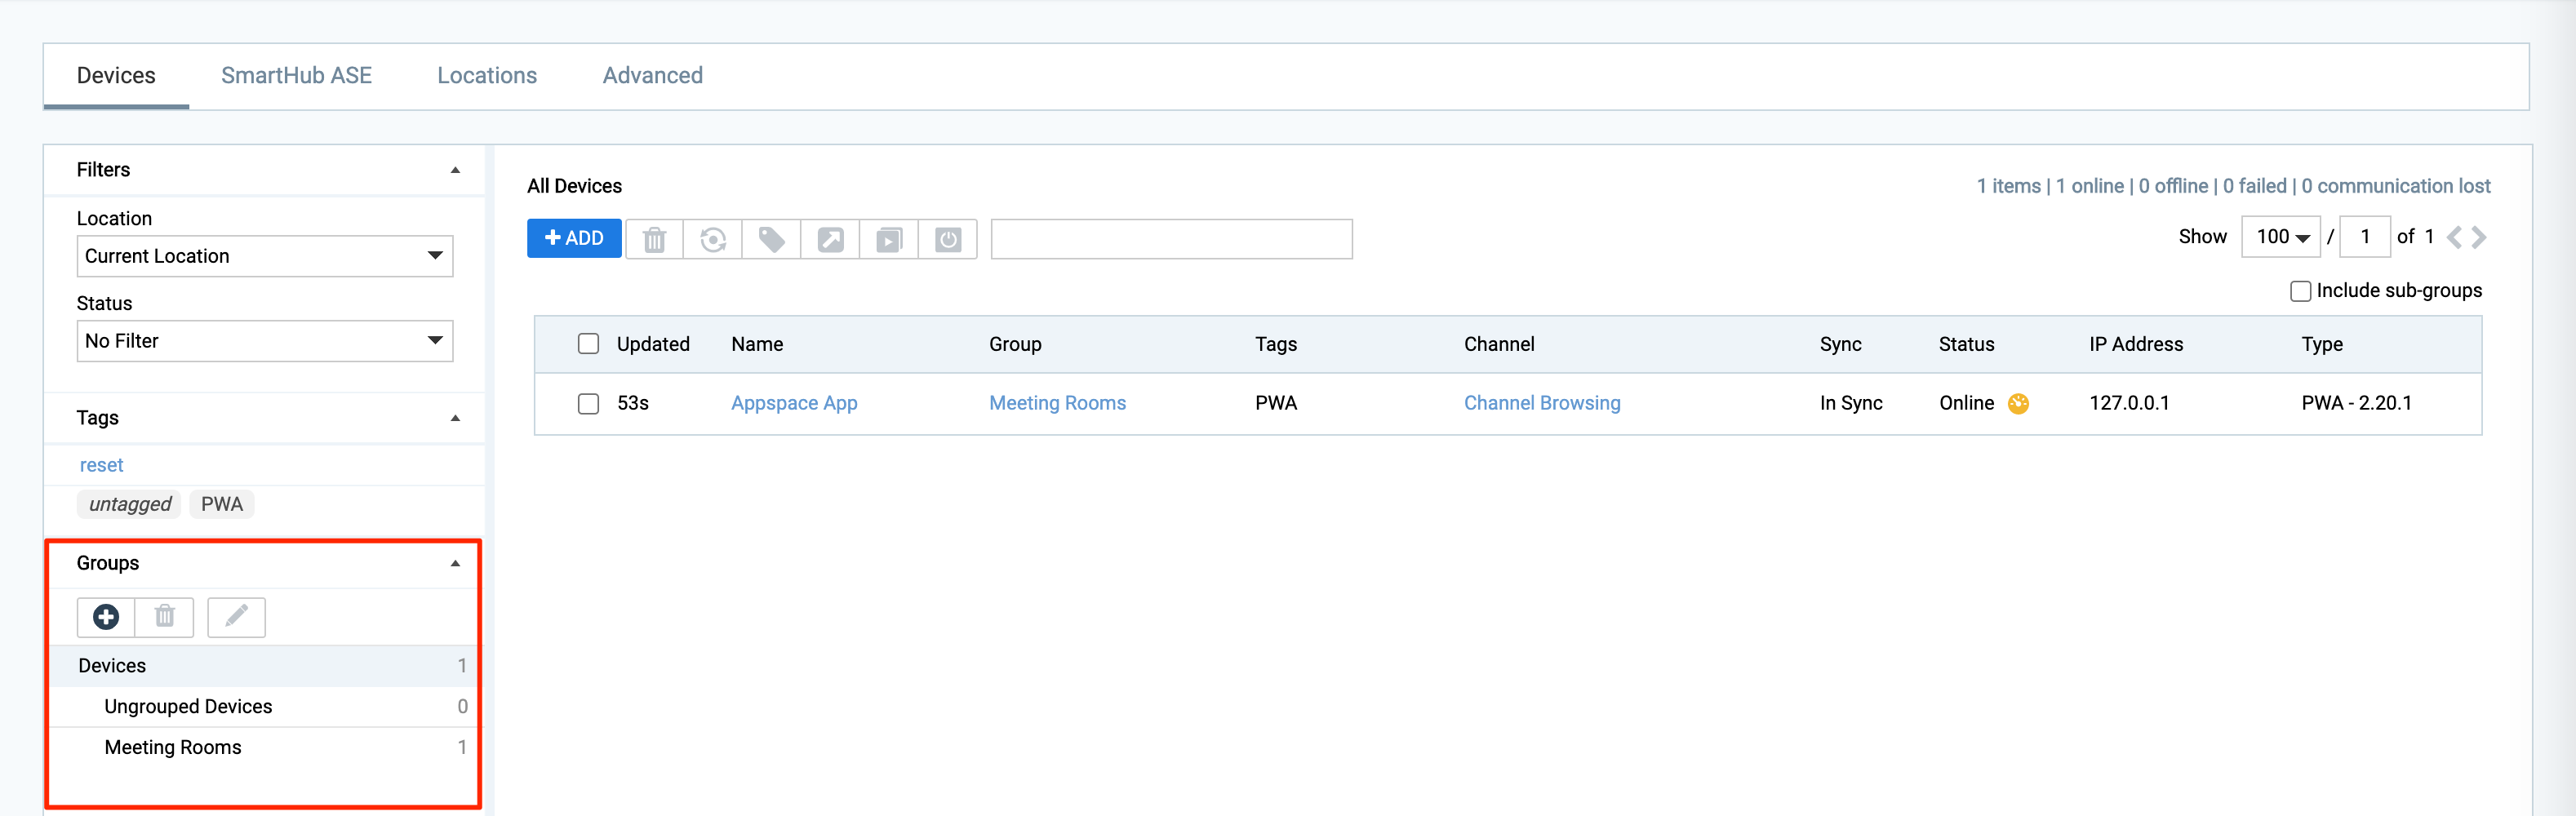
Assign Device Group
The Assign Group icon is used to assign a device group to devices
- On the Devices dashboard, select the desired device(s) by checking the device checkbox.
- Click the Assign Group icon, and select a device group for the device(s).
WarningDevices that are already in a device group, will be re-assigned to the new device group selected.
- Click Proceed to move the devices to the selected device group.
Display Devices in Sub-Groups
The Display Devices in Sub-Groups checkbox enables devices within the device sub-groups to be displayed together with the devices in the main device group.
List Number of Devices per Page
The List Number of Devices per Page drop-down menu allows users to load the selected number of devices on a single page.
Unregister Device
The Unregister icon is used to unregister devices from the Appspace console.
- On the Devices dashboard, select the desired device(s) by checking the device checkbox.
- Click the Unregister icon and follow the on-screen instructions to unregister the device(s) from the Appspace server.
- You may also go to the device and directly remove the Appspace App from the App store or device storage if the app was downloaded from the Appspace console previously.
Add/Register Device
The +ADD button is used to register devices with Appspace App via a 6-character code or QR Code from the Devices dashboard. Follow the instructions below to register your Appspace App device.
- Launch the Appspace App on your device, and wait for the device registration splash screen.
- On the Devices dashboard, click the +ADD button to display the device registration window.
- Proceed to register the device via the 6-character code, or the QR code (from a mobile device), and follow steps 4 through 10 of the Register a Device with Appspace article.
- Once registered, the device will now appear on the Devices dashboard, which users can later on manage.
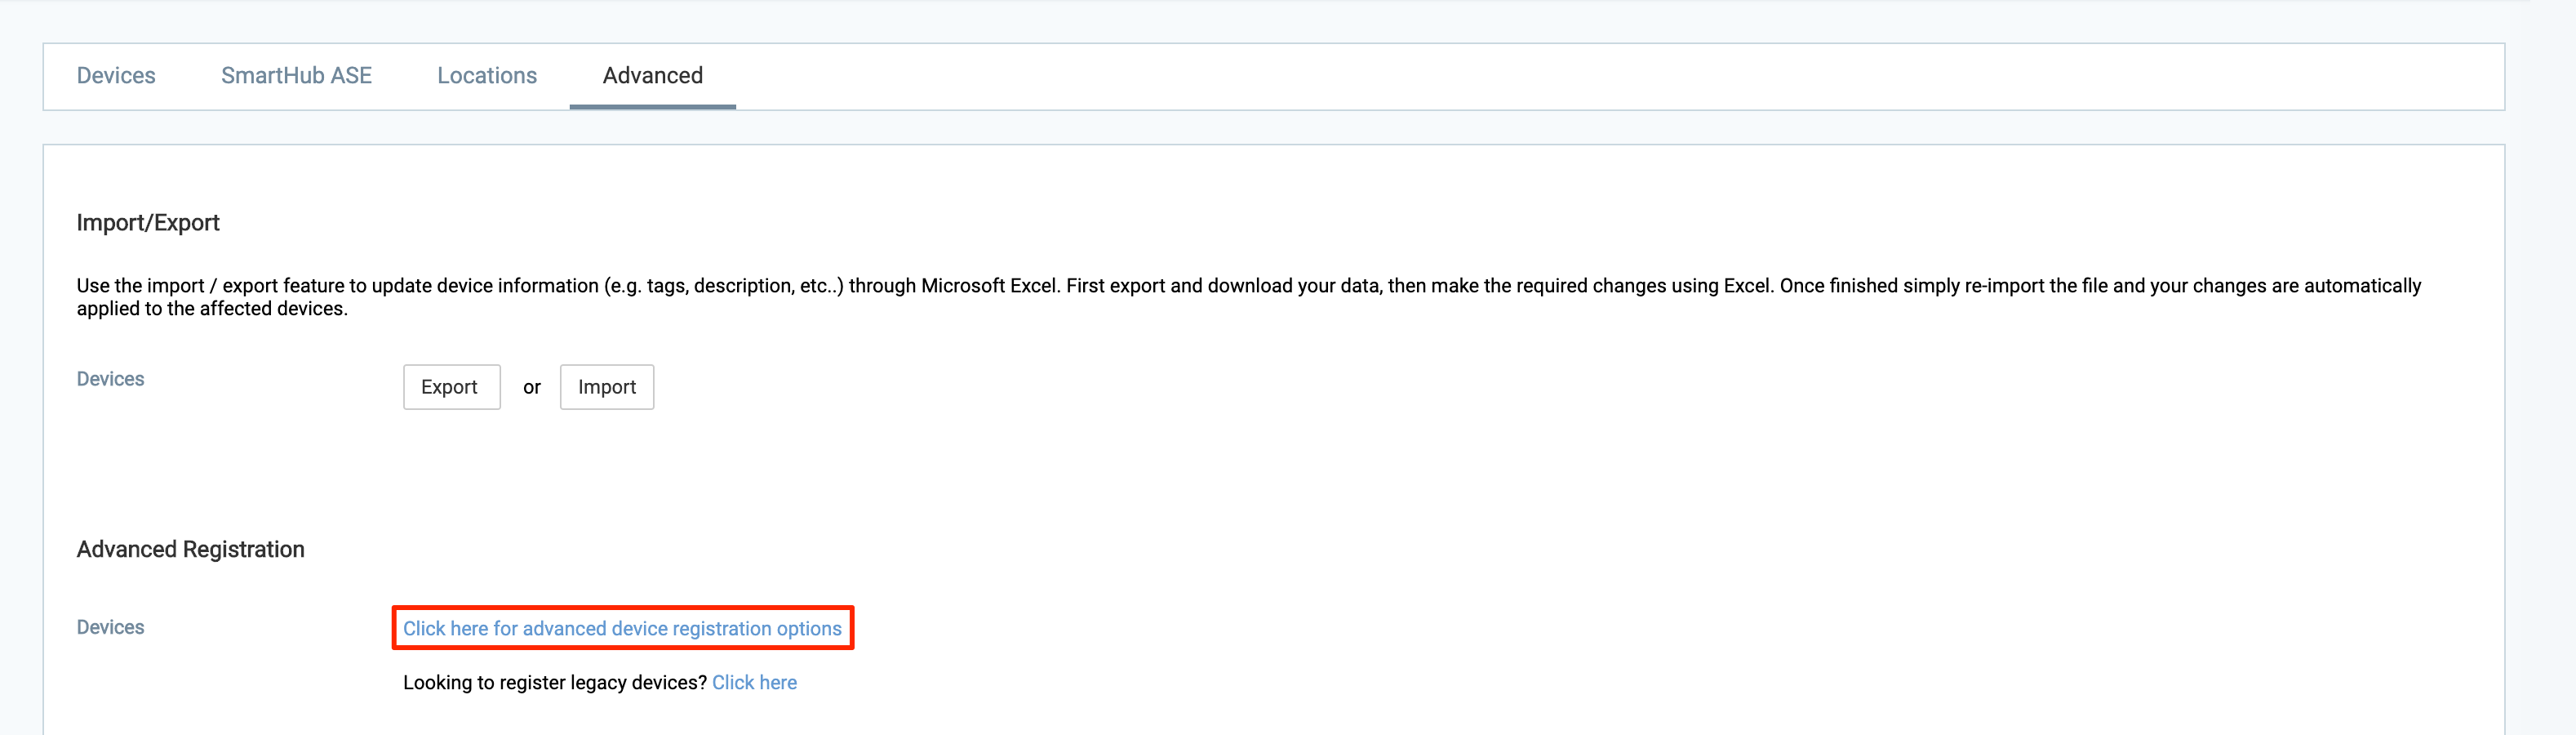
Advanced Registration
The Advanced Registration section provides users the option to register their devices in bulk or that are currently offline depending on the device.
Please refer to the Advanced Device Registration Options article for more information.
- On the Devices dashboard, click the Advanced tab.
- Click the Click here for advanced device registration options link.
- Proceed to follow the instructions in the articles below based on the Deployment method selected from the drop-down menu:
Configure Registered Devices
Device Overview
The Device Overview provides users with the relevant device details, device preview, and also the channel, channel groups, or content that has been assigned to the device.
To access the Device Overview, click the device name link of the selected device in the Devices dashboard.
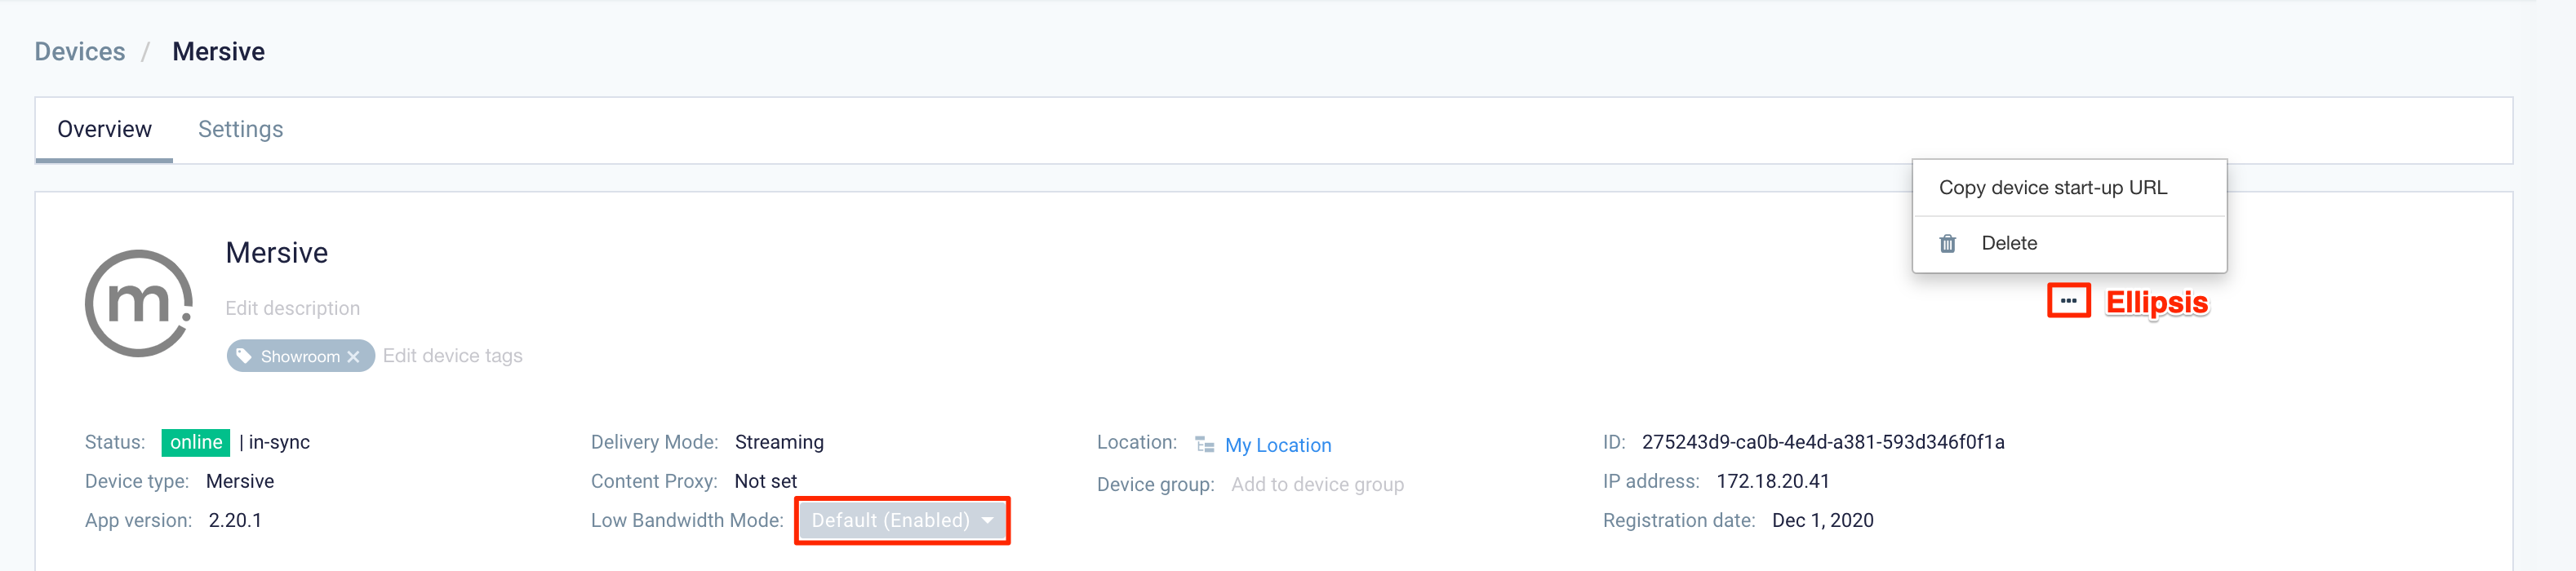
The first section of the Device Overview provides users with device details, and clicking the ellipsis allows you to obtain the device start-up URL that is used to assign pre-registered devices to physical devices. The following device details are displayed:
- Device Name
- Description
- Tags
- Status
- Device Type
- App Version
- Delivery Mode
- Content Proxy
- Low Bandwidth Mode
- Location
- Device Group
- ID
- Registration Date
Edit Device Name, Description, and Tags
The device name, description, and device tags can be easily added or edited by clicking the respective fields, and making the necessary edits.
Configure Low Bandwidth Mode
To help customers optimize bandwidth usage, Appspace automatically enables Low Bandwidth Mode on streaming devices that support video. For more information, please refer to our Low Bandwidth Mode Content Delivery article.
The Low Bandwidth Mode is enabled by default, however, you may choose to disable it:
- On the Devices dashboard, click the desired device name link.
- Select Disable from the Low Bandwidth mode drop-down menu.
Change Device Location
A device is typically added to a location during the device registration process. However, you may choose to change the location as follows:
- On the Devices dashboard, click the desired device name link.
- Click the Location name link, and select the desired location.
Change Device Group
- On the Devices dashboard, click the desired device name link.
- Click the Device group name link, and select the desired device group the device will be assigned to.
Start-up URL for Pre-registering Devices
The device start-up URL allows users to assign pre-registered devices to physical devices running Appspace PWA app on web browsers. It can also be used to view how channels are displayed via your web browser on existing devices.
To pre-register a device, follow the instructions in the Advanced Registration: Preregister Devices with Appspace article.
To obtain the device start-up URL, follow the instructions below:
- On the Devices dashboard, click the pre-registered device name link.
- Click the Ellipses, and select Copy device start-up URL.
- Once done, paste the link on a web browser of the physical device, which will then launch and register the Appspace PWA app.
- The device will start displaying the channels previously assigned to it. If no channels are displayed, proceed to publish channels to the device by following the Publish Content to Devices instructions.
Content Preview
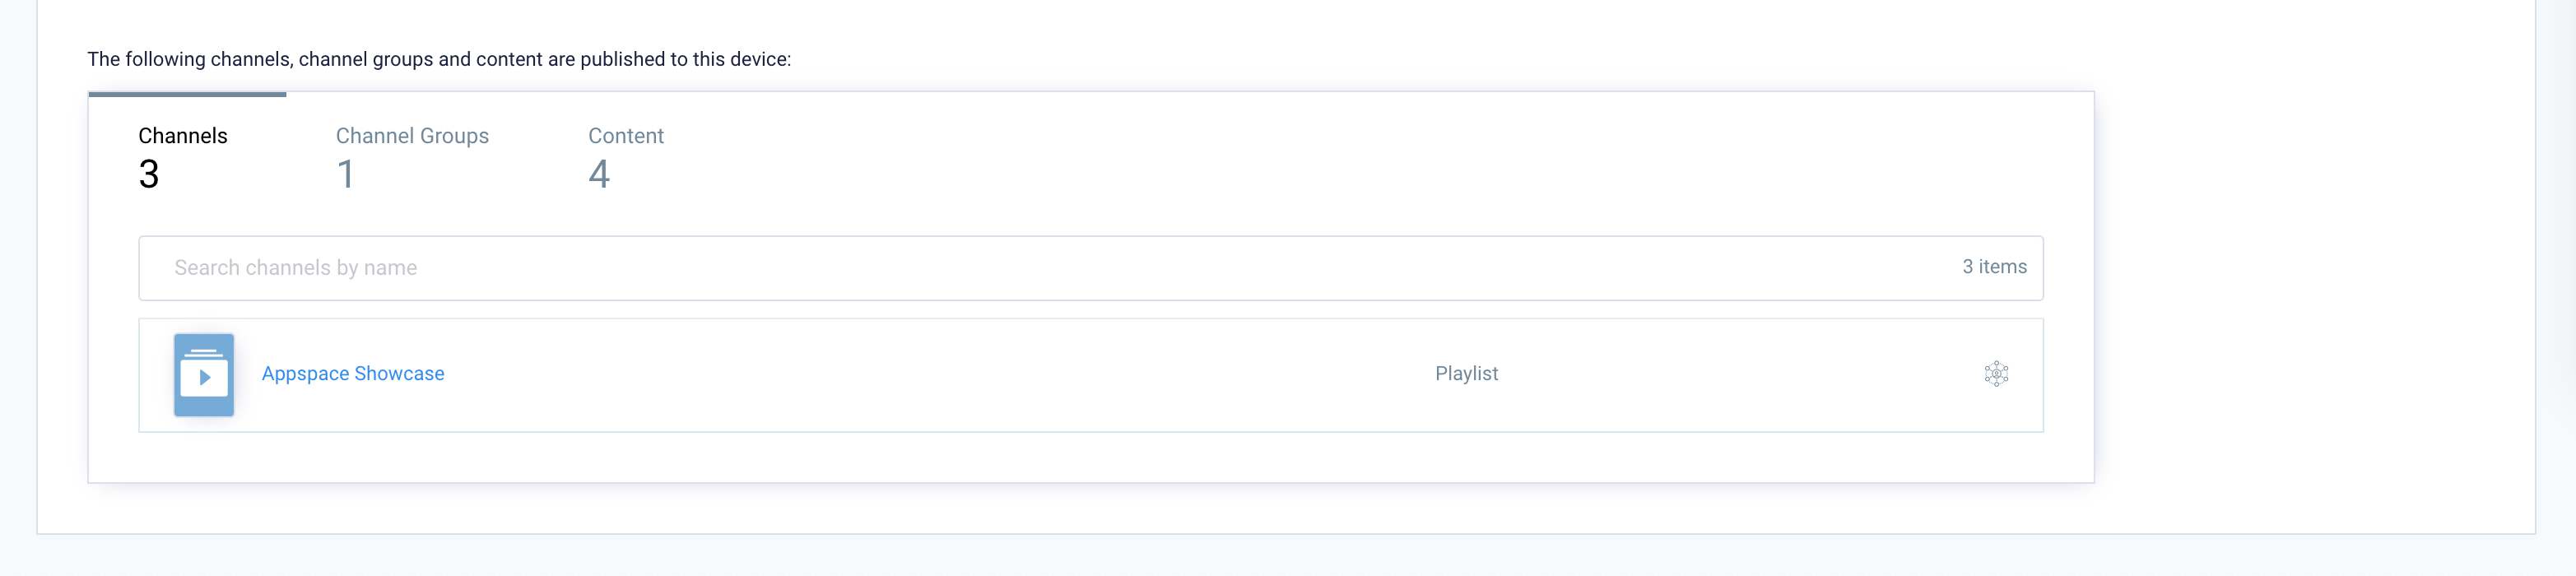
The second section of the Device Overview page displays the device preview, where you can browse and view channels that have been assigned to the device.
You may click the Launch Preview icon to launch the channel on a browser.
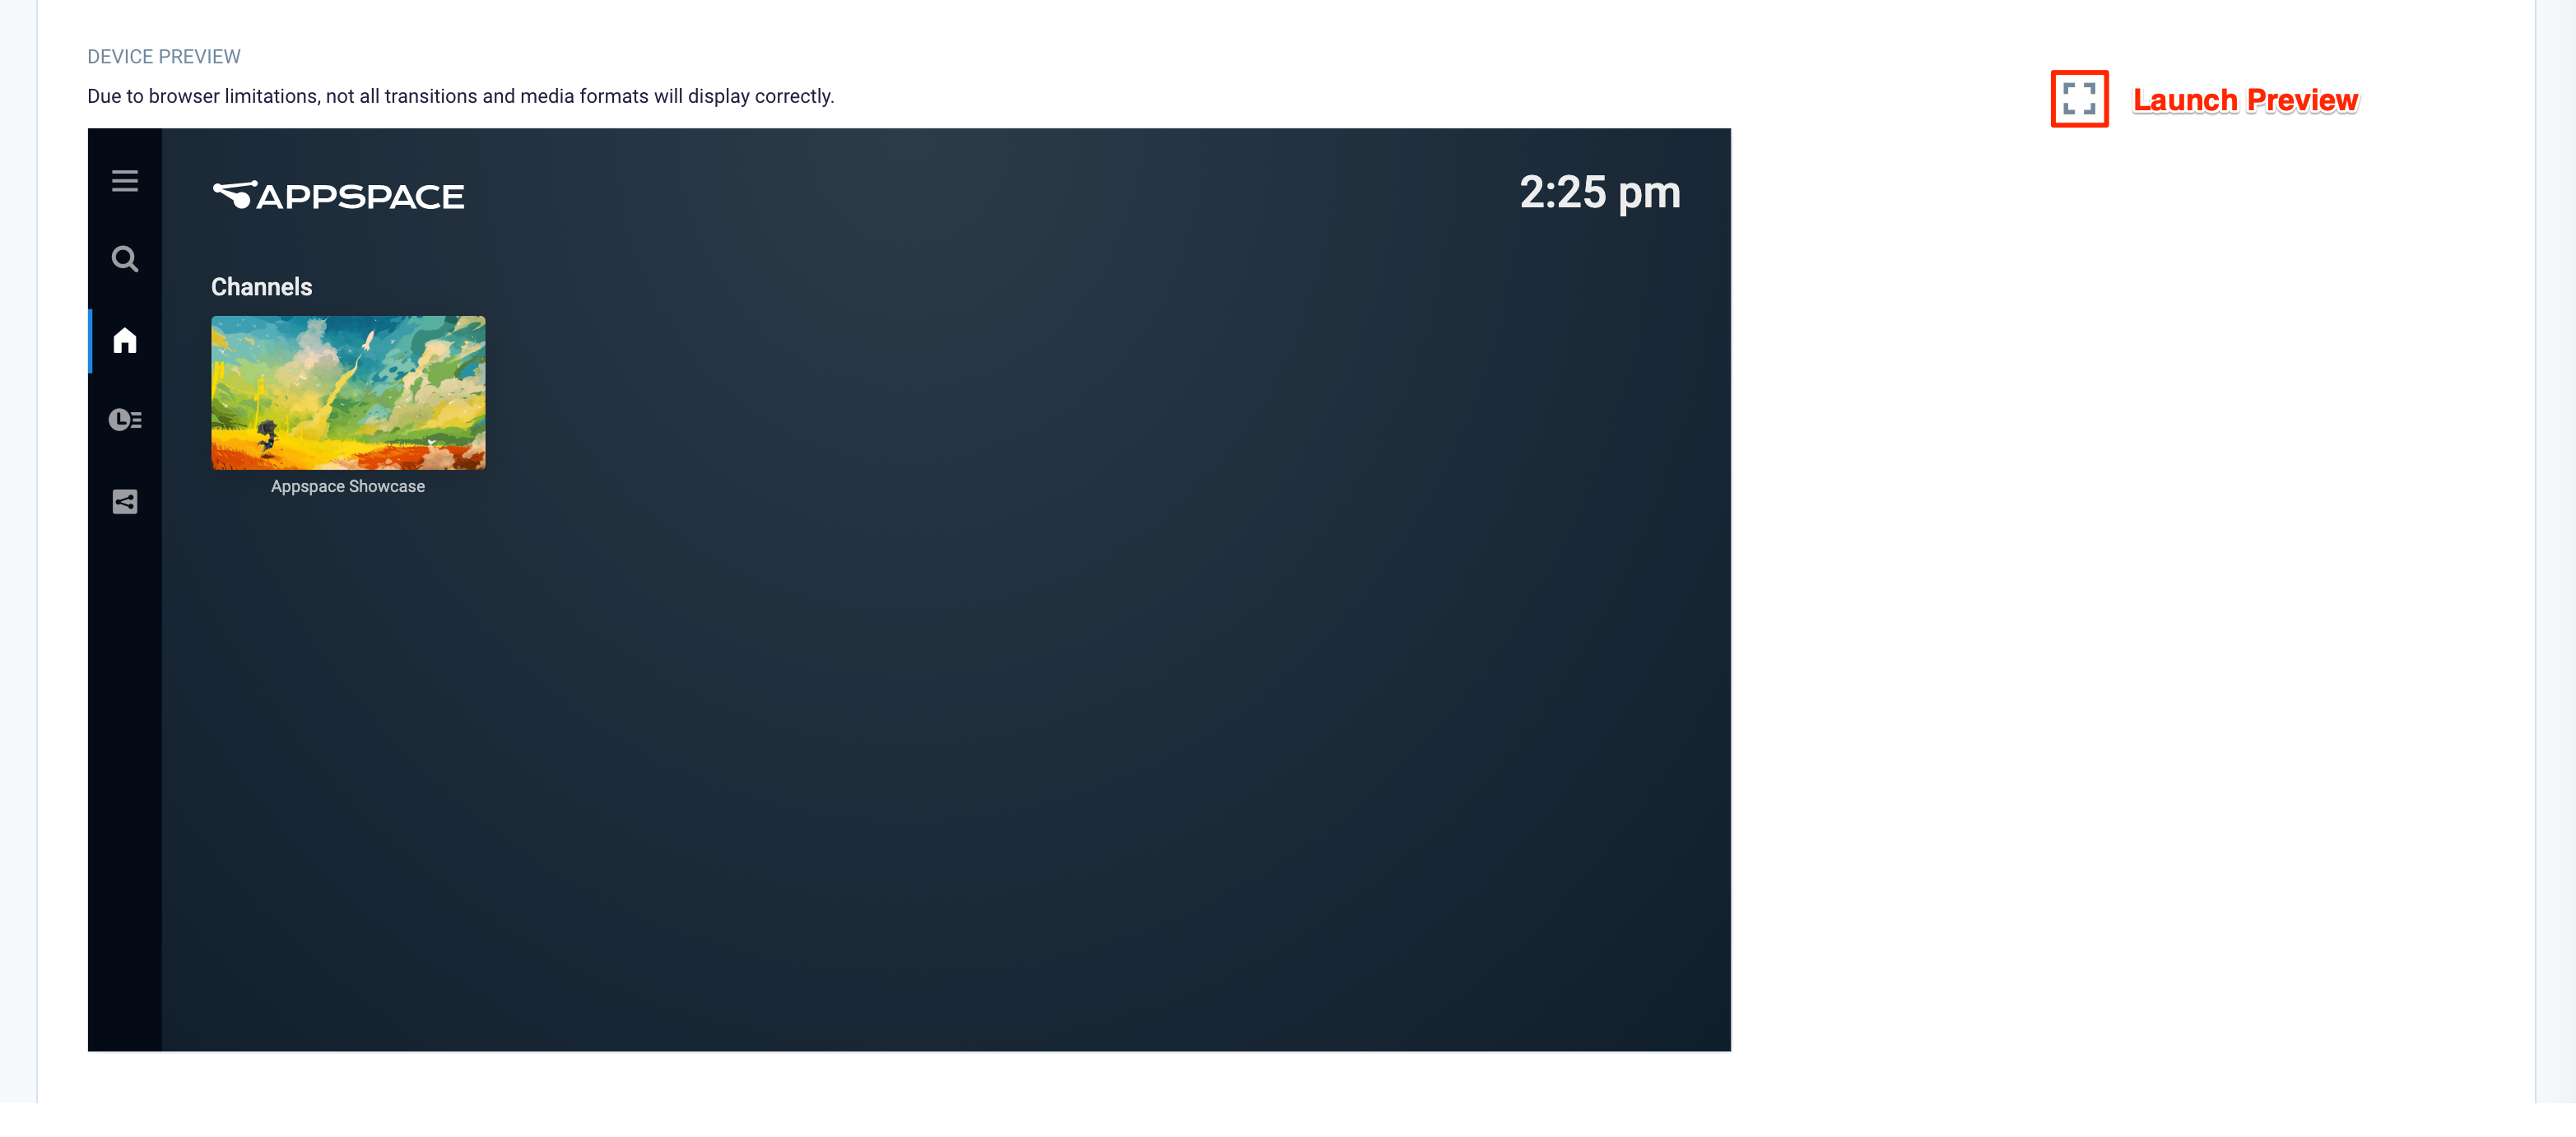
Below the preview section, there is a list of channels, channel groups, and content assigned to the device. Publishers may click on each channel to view the channel details.
Device Settings
The Device Settings tab contains the Configuration and Device Properties sub-tabs, allowing users to perform various device configurations and manage the device properties of the device.
To access the Device Settings Configuration and Device Properties sub-tabs, click the device name link of the selected device in the Devices dashboard, and click the Device Settings tab
Change Channel Selection Mode
The Channel selection mode or the channel playback option for a device can be changed even after it has been set during the device registration process, via the Device Settings tab.
Refer to the Assign Channel to Devices article for instructions.
Change Display Orientation
Follow the instructions below to configure the display orientation of a device:
- On the Devices dashboard, click the desired device name link.
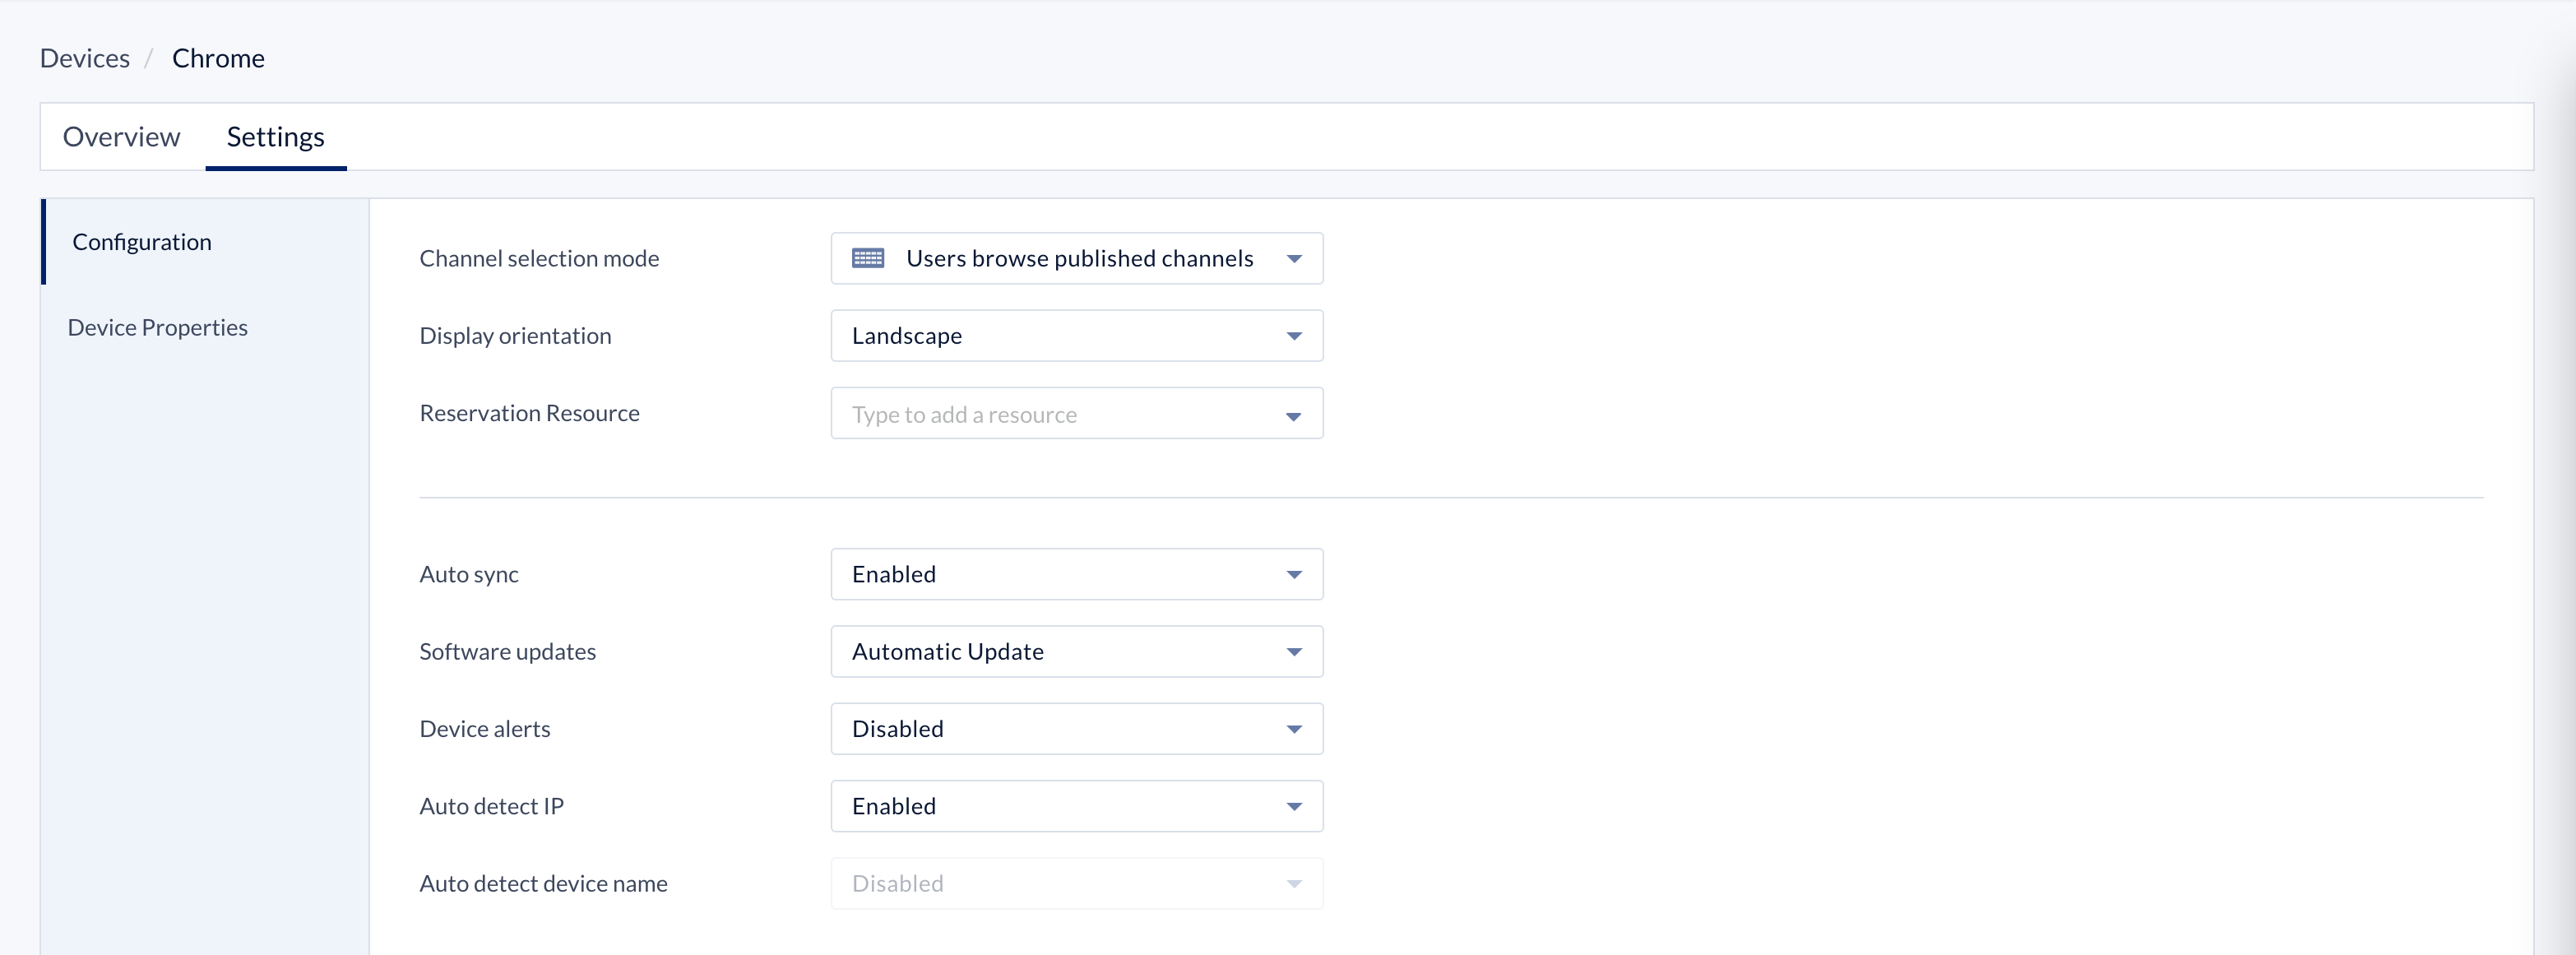
- Click the Settings > Configuration tabs, and select the device Display orientation from the drop-down menu:
- Landscape (default)
- Portrait
- Inverse Landscape
- Inverse Portrait
- Once done, click SAVE.
Assign a Reservation Resource to a Device
Follow the instructions below to assign a reservation resource to a device for the Room Schedule card:
- On the Devices dashboard, click the desired device name link.
- Click the Settings > Configuration tabs, and enter or select the desired resource from the Reservation Resource drop-down menu.
NoteThis feature is only supported on resources configured with the Appspace Calendar Provider, and takes precedence over the card.room.roomid device property that is configured on the device.
- Once done, click SAVE.
Change Auto Sync Settings
Devices are periodically synced with the Appspace server every minute by default, to determine device status, application, and content updates. However, users are given the option to manually configure the device to sync at a specific time(s) of the day in order to conserve bandwidth or limit network bandwidth to off-peak hours. Follow the instructions below to configure the Device Sync Schedule.
- On the Devices dashboard, click the desired device name link.
- Click the Settings > Configuration tabs, and select Disabled from the Auto Sync drop-down menu.
- Proceed to select the Frequency of the device syncs from the drop-down menu, which can be Everyday, Weekends, Weekdays, or Specific day of the week.
- Once selected, determine the start and end time of when the device should sync with the Appspace server.
Configure Software Updates Mode
Follow the instructions below to configure if the device automatically or manually updates the Appspace App software on the device.
- On the Devices dashboard, click the desired device name link.
- Click the Settings > Configuration tabs, and select the Software Updates option from the drop-down menu:
- Automatic Update (default)
- Manual Update
- Once done, click SAVE.
Configure Device Alerts/Notifications
Follow the instructions below to configure alerts on the device.
- On the Devices dashboard, click the desired device name link.
- Click the Settings > Configuration tabs, and select the Device alerts option from the drop-down menu:
- Disabled (default)
- Enable
- Once done, click SAVE.
Configure Device IP/Auto Detect IP
Follow the instructions below to manually configure the IP address of the device.
- On the Devices dashboard, click the desired device name link.
- Click the Settings > Configuration tabs, and select Disabled from the Auto detect IP drop-down menu.
- Proceed to enter the IP Address of the device.
- Once done, click SAVE.
Configure Device Operating Hours
- On the Devices dashboard, click the desired device name link.
- Click the Settings > Configuration tabs, and click Setup Operating House Schedule.
- Please follow the instructions in the Configure Dayparting section to configure the Operating Hours Schedule.
- Once done, click Apply.
Configure Device Properties
The Device Properties allows non-visual settings to be configured for a device. These properties could include numerous device configurations and settings such as screen burn time, or software player versions. Users can also define custom device properties to be used with Event Actions in advanced channels.
The Device Properties list contains the following columns:
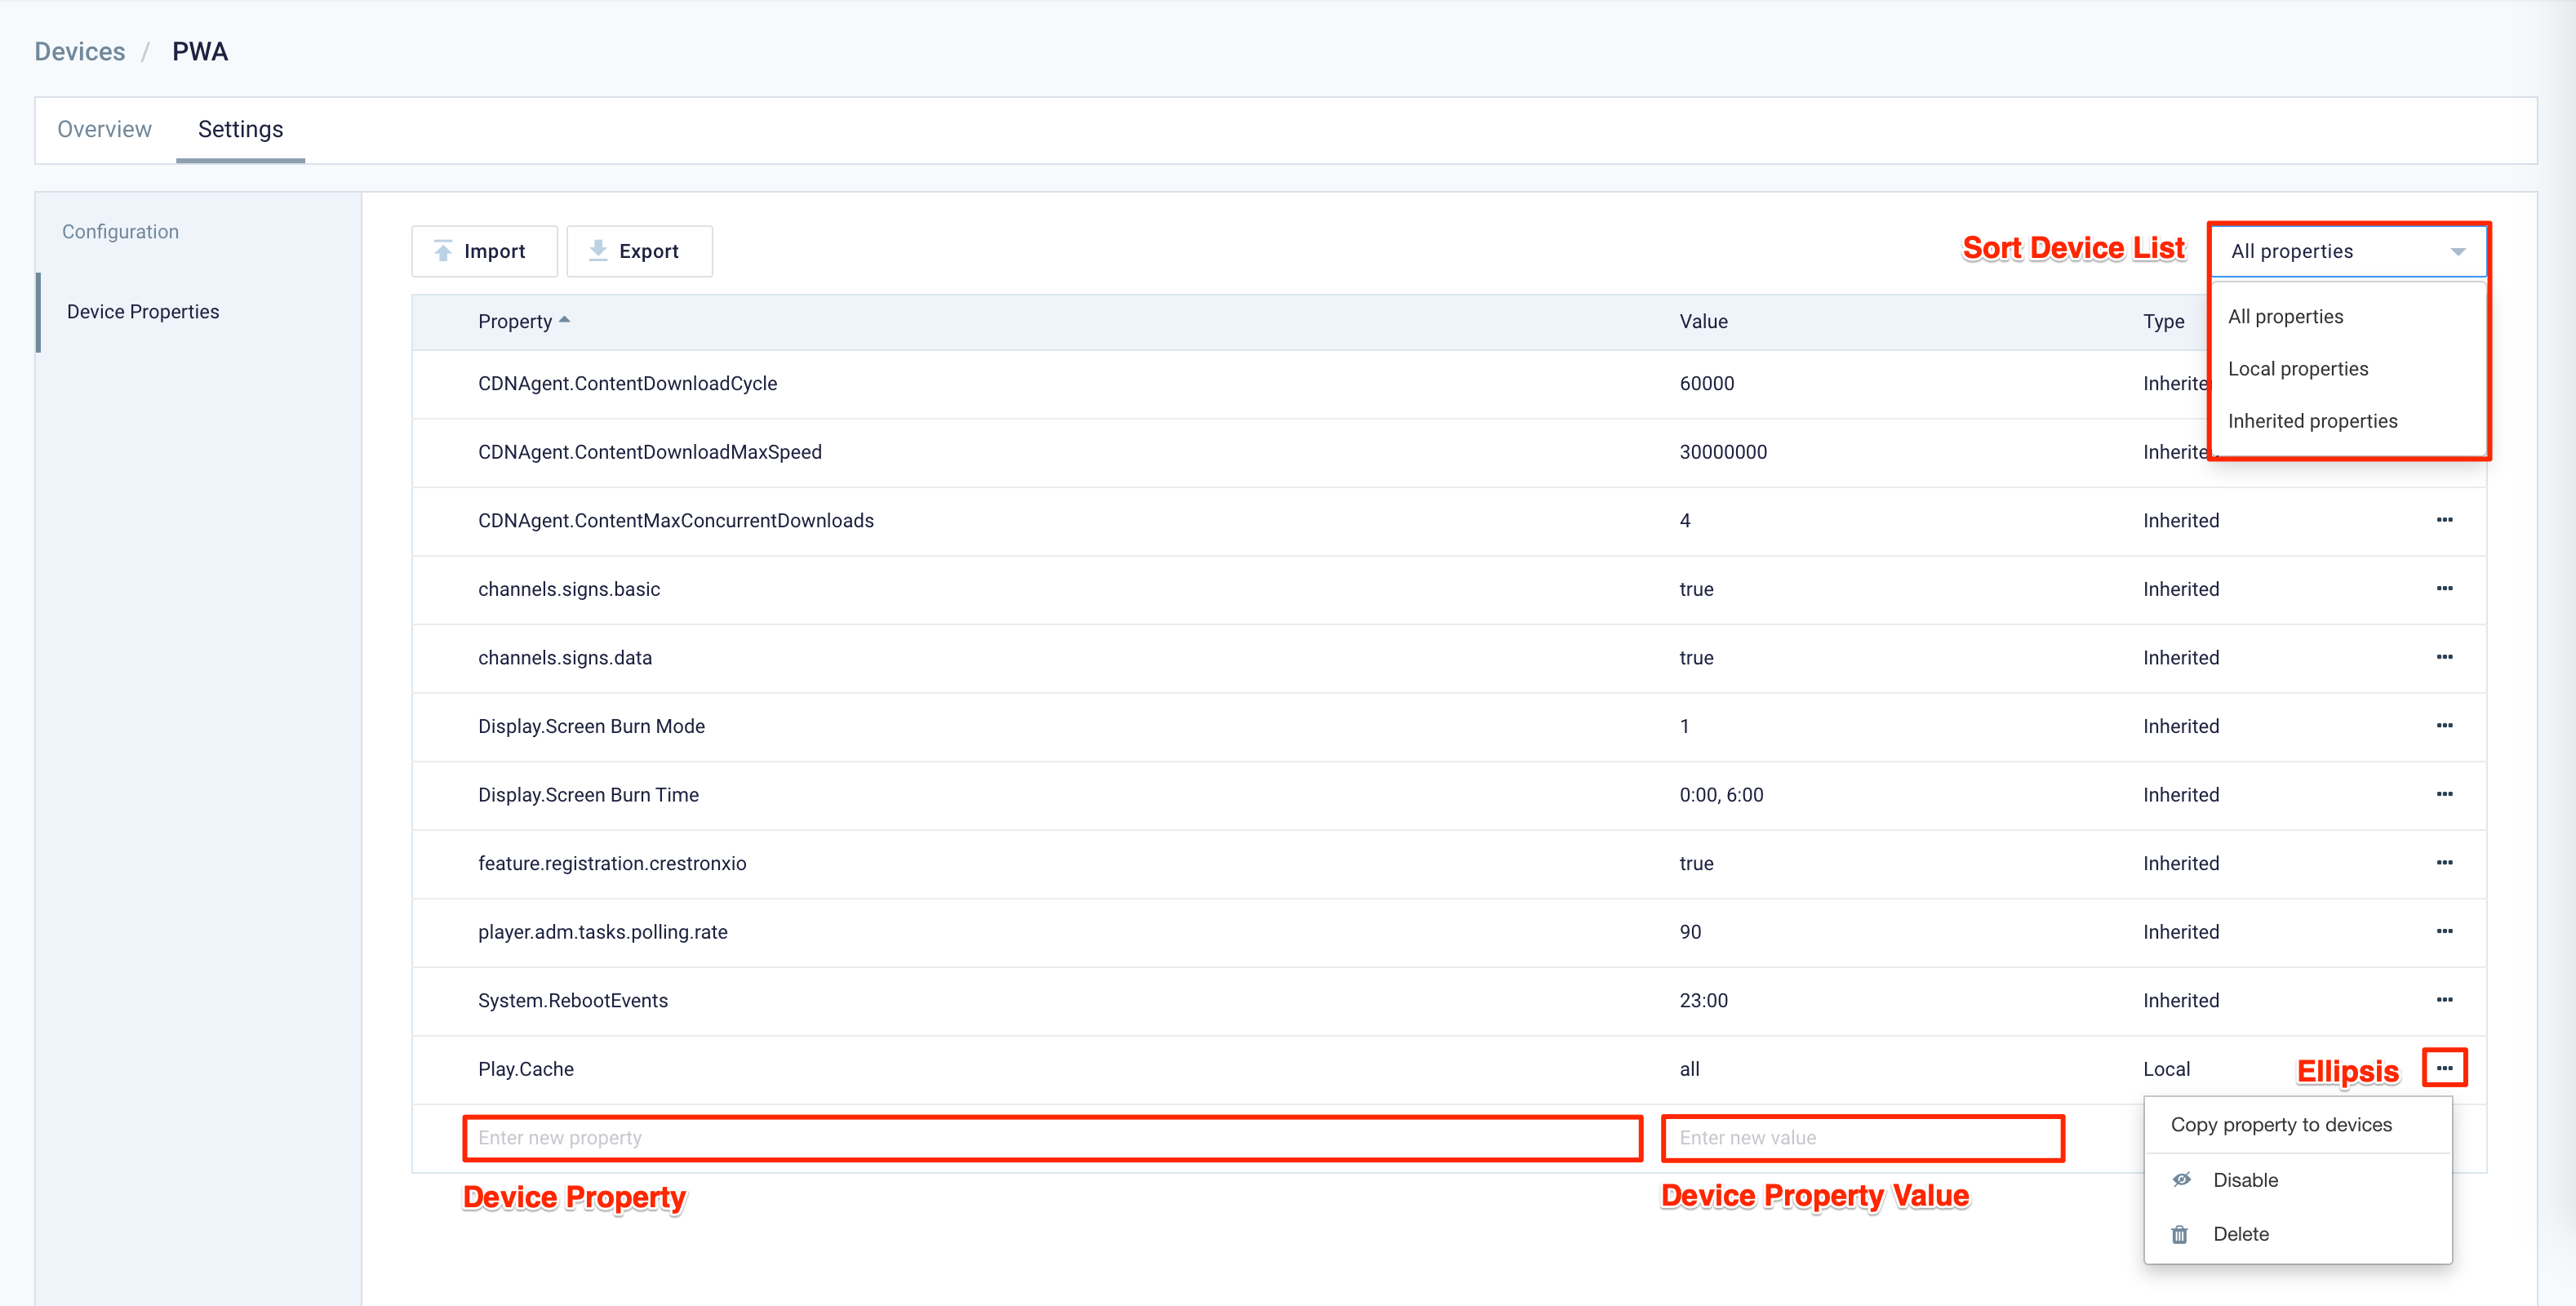
- Property – Displays the device property.
- Value – Displays the device property value.
- Type –
- Inherited – This device property is inherited by the system or location, and is applied to all devices. Inherited device properties can’t be disabled or deleted from the device. However, if the device property is inherited from a location, it can be disabled or deleted directly from the location.
- Local – Any device property that been added to only affect the selected device. Local device properties can be disabled or deleted from this page.
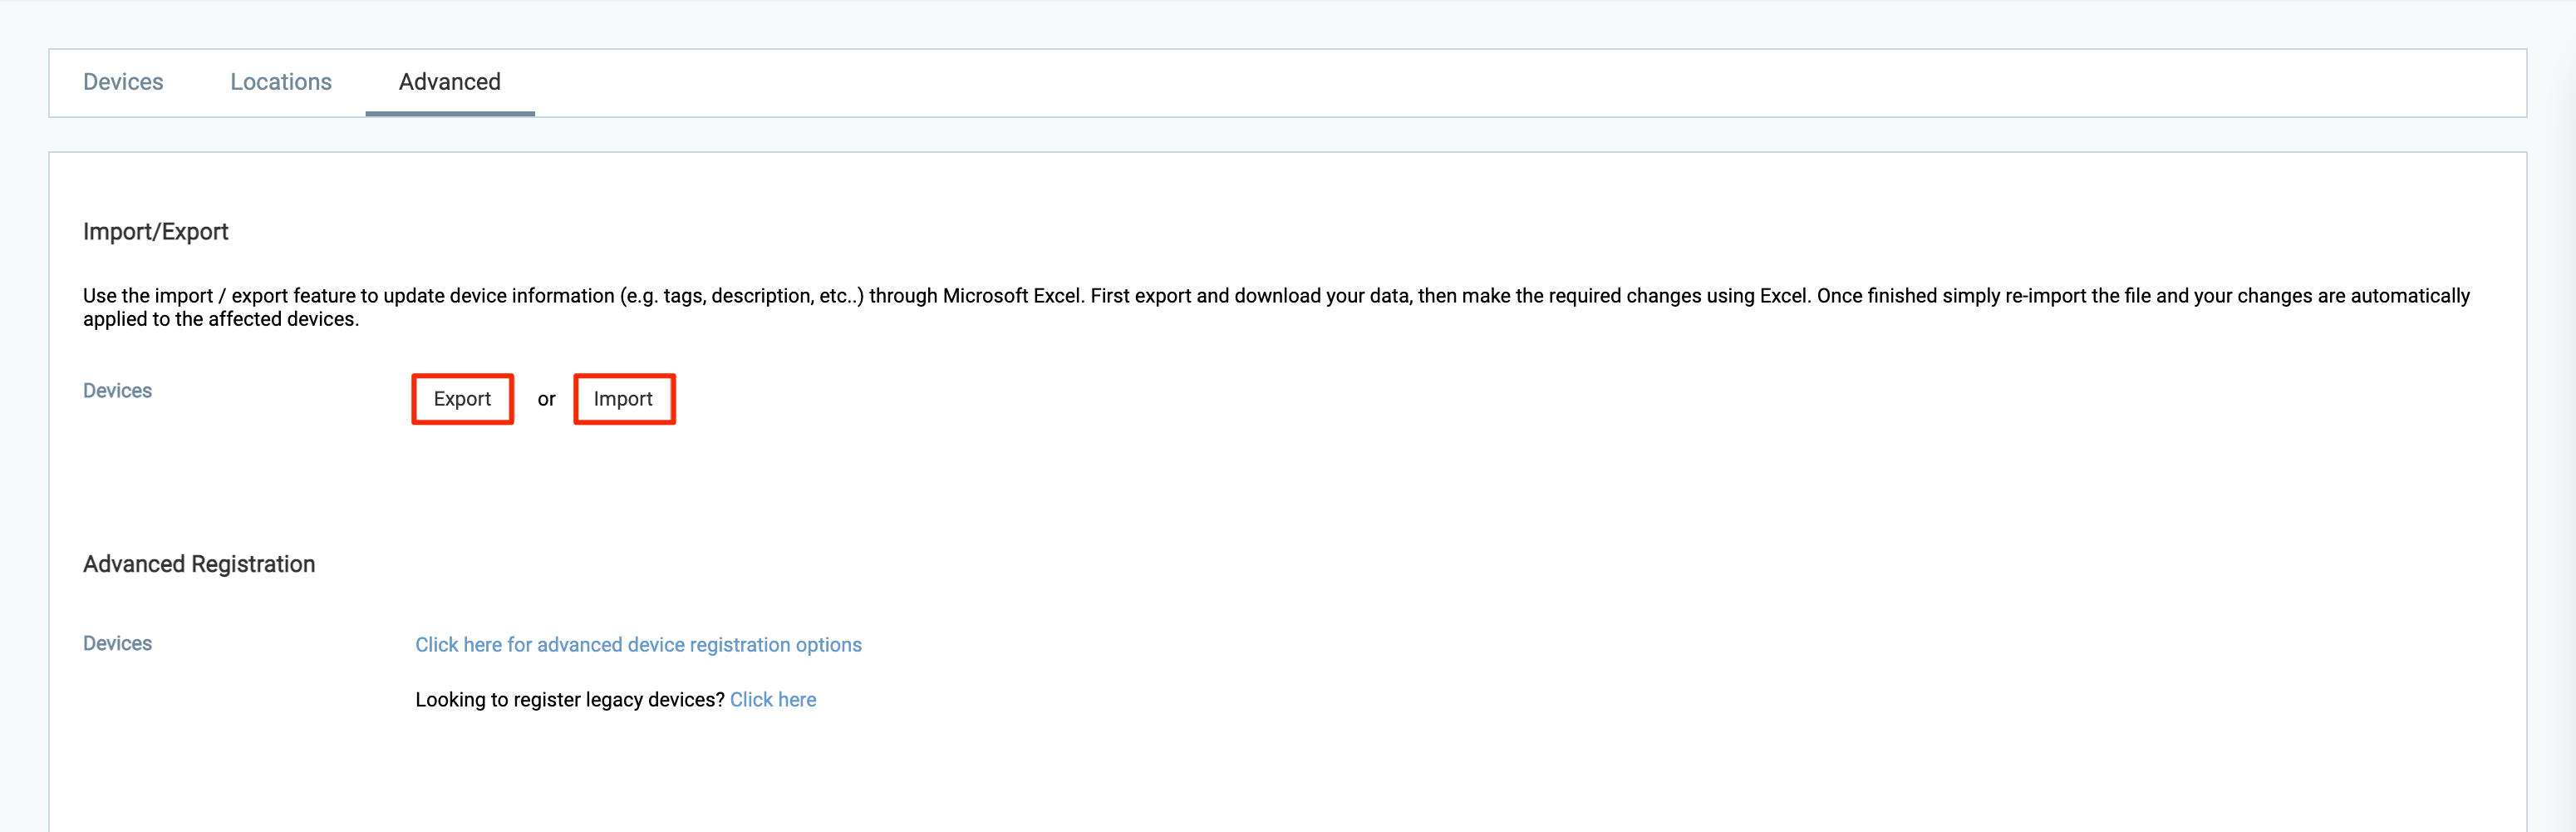
Import/Export Device Information
The devices import and export feature allows users to update device information, such as device names, descriptions, or tags via a spreadsheet in .CSV file format. To be able to do this, the user would be required to export the file, make the required changes before re-importing the file to be applied to the devices.
- On the Devices dashboard, click the Advanced tab.
- Click the Export button to download the Export Devices spreadsheet file in .CSV format. The file will be downloaded to your default download folder.
- Open the Export Devices spreadsheet, and make the changes ONLY in the following column fields.
- Name
- Description
- Group Name
- Tags
- Once done, click the Import button, and select the Export Devices spreadsheet by clicking the choose file button.
- Click Upload to upload and apply the changes to the devices.
Legacy Device Registration
While Appspace does not recommend organizations using legacy devices due to the lack of support, security updates, and the ability to fully utilize most of Appspace 8.0 features, we understand that some organizations may not be able to quickly discard or replace their old devices with newer ones based on our supported device list. Thus, we do still allow the following legacy devices to be registered and used to display signage.
- On the Devices dashboard, click the Advanced tab.
- Click the Looking to register legacy devices? Click here link.

- Select the legacy device you wish to register from the Select Device drop-down menu, and click OK.
- Proceed to follow the instructions in the article below based on the legacy device selected:
Device Licensing
Device Licensing is part of the Devices module that manages the content licenses of an Appspace registered device, necessary for displaying Appspace premium content, which requires additional paid subscriptions, such as the Industry Feeds, Industry Content Collection, and the News cards.
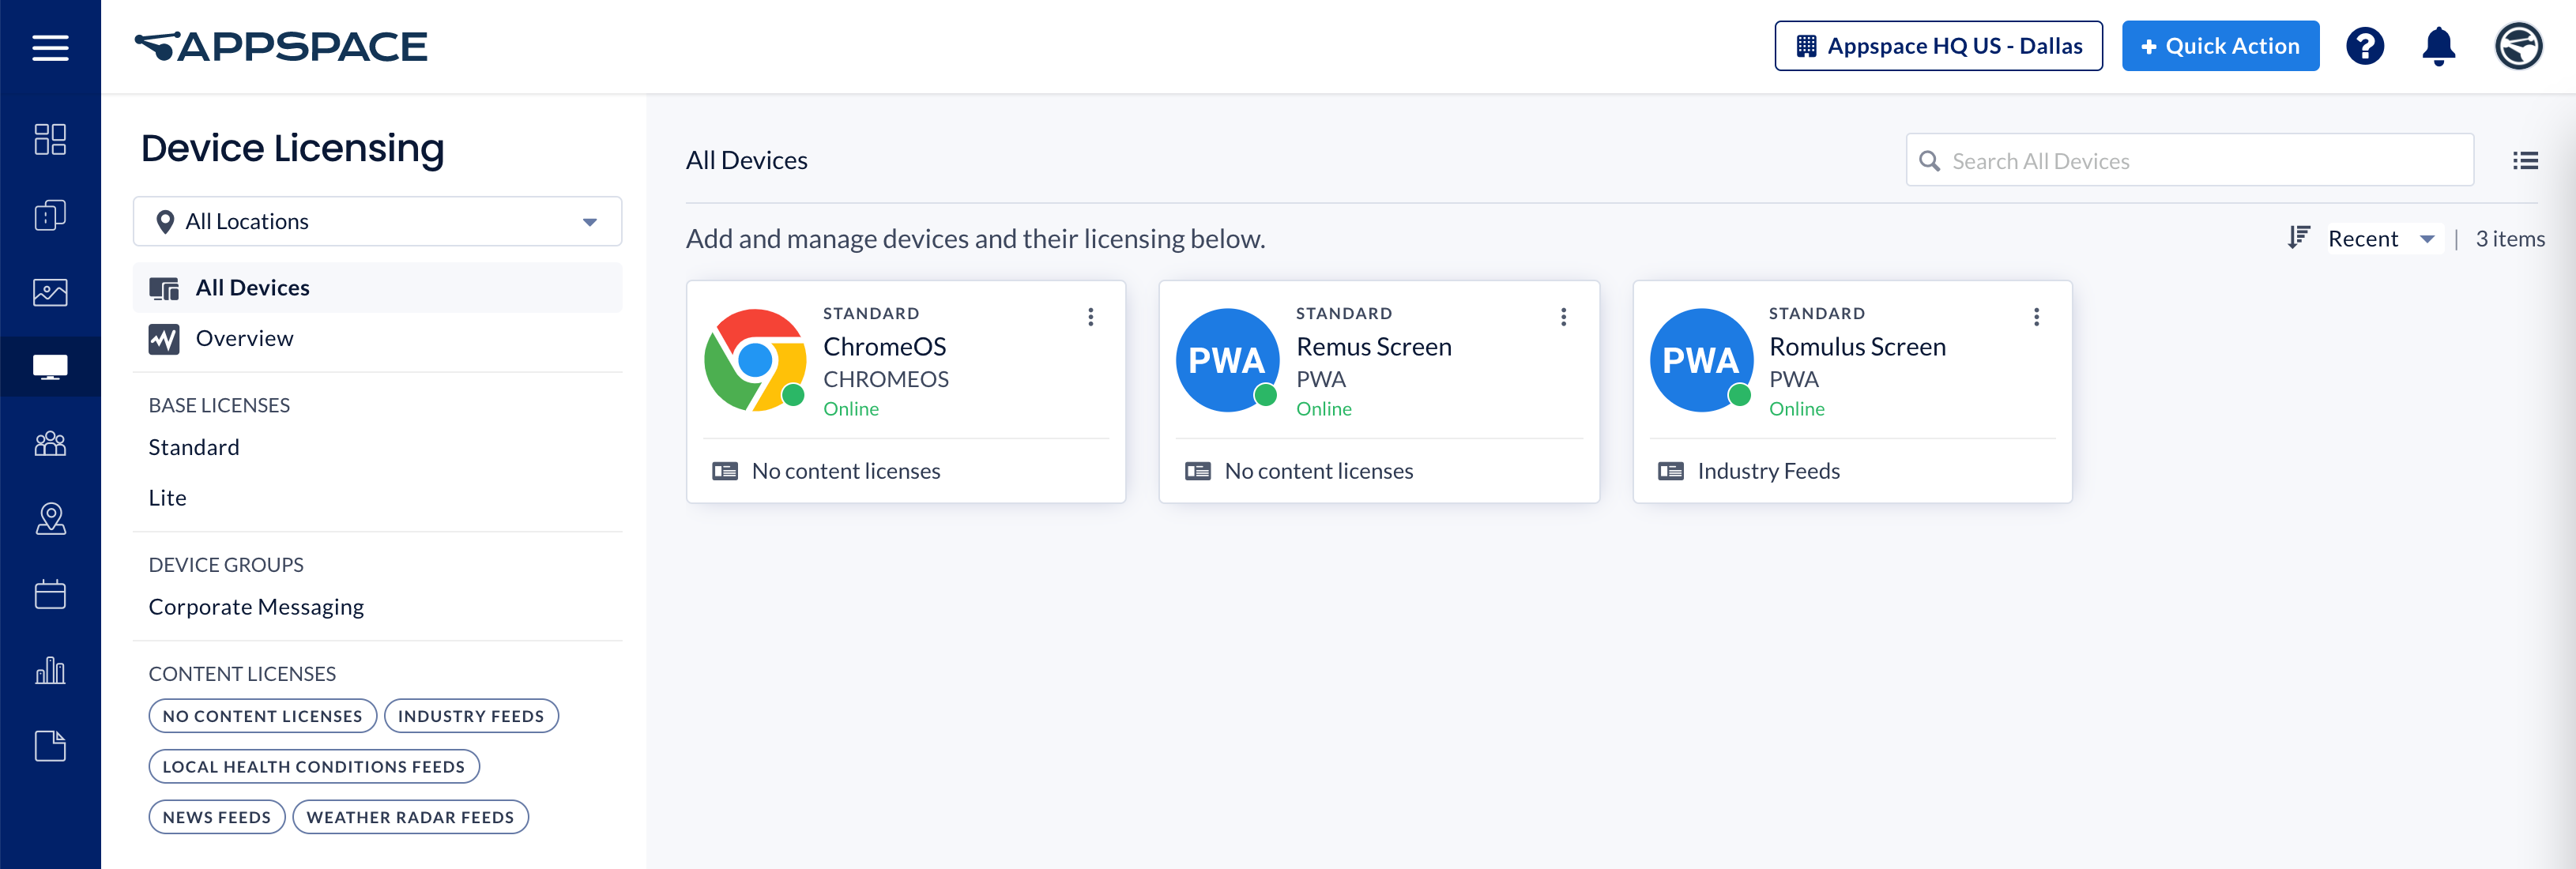
Access the Device Licensing by clicking Devices > Device Licensing from the ☰ Appspace menu.
In the Device Licensing dashboard, you can view all Appspace registered devices in All Devices, or view the following analytics widgets in Overview:
- Standard Device Licenses – Displays the percentage and number of standard device licenses used.
- Industry Feeds – Displays the percentage and number of Industry Feed licenses used.
- News Feeds – Displays the percentage and number of News Feed licenses used.
- Local Health Conditions Feeds – Displays the percentage and number of Local Health Conditions Feed licenses used.
- Weather Radar Feeds – Displays the percentage and number of Weather Radar Feed licenses used.
You may also filter device listing based on device groups or the following license types:
- BASE LICENSES
- Standard
- Lite
- DEVICE GROUPS
- CONTENT LICENSES
- Industry Feeds
- News Feeds
- Local Health Conditions Feeds
- Weather Radar Feeds
- No Content Licenses
You must manually assign content licenses to any device that needs to display premium content. Refer to the Add Premium Content Licenses for Devices article.
Was this article helpful?