The Appspace Employee App portal is a web-based system for employees to view published corporate content, make workspace reservations, and reserve building passes.
Focused on employee communications and space reservations, the portal improves the traditional information sharing workflow across an organization, making it easy for employees to access information or make reservations from their computers, tablets, or mobile devices, regardless of where they are. We’ve also made it really easy for publishers to add content to any channel they have access to, directly from the portal, without the need to navigate back to the console.
Administrators may also brand the portal for their own organization by changing the theme color, logo, and home banner, with a myriad of options.
This article provides illustrations on navigating the Appspace Employee App portal, allowing employees to make reservations, and access corporate content that has been published to them either via the Appspace console, or directly from an enterprise messaging app, such as Slack, Webex Teams, and Microsoft Teams.
- We also have an Employee App for users on mobile devices, making it easy for employees to access information or make reservations from anywhere.
- Translations of posts (including event posts), stories, pages, comments, and praises in the Employee App are only available if the AI Translation setting is enabled in the Administrative Console.
Features released in Appspace 8.8 Lynx:
- If a Post (Including Event Posts), Comment, or Praise is written in a different language than set in the Employee App, users can select See translation to view a translation of the text.
Features released in Appspace 8.7 Cygnus:
- Users can view translations of Pages and Stories published to the Employee App, including the voice language in AI narrations.
- Multiple Authors are supported in Pages and Stories, allowing content to be co-authored.
Portal Access
Employees with premium user licenses, can access the Appspace Employee App portal via the Appspace domain, or directly from content posted in an enterprise messaging app channel or chat room that has been configured with the Appspace publishing bot. In both instances, the employee must have an Appspace public/private cloud user account to login, and can only view content published to them or their user groups.
Administrators meanwhile, who have both the premium user licenses and platform user licenses, in addition to the above methods, will be able to access the portal from the Appspace console.
- Employees: Log in to the Appspace domain with your Appspace credentials, and you’ll be redirected to the Employee App portal.
- Administrators: Log in to the Appspace console with your Appspace credentials, click your User Profile icon on the top right, and click the Switch to Employee View button.

To return to the Appspace console, click the Switch to Admin Console button from the ☰ Employee App menu.
- Enterprise Messaging App Channel/Chat: You may also access the Employee App portal from an enterprise messaging app, if the Appspace App publishing bot has been configured for this purpose. Click the title or thumbnail of the content posted to the enterprise messaging app’s chat window to launch the portal, and sign in with your Appspace credentials (on public/private cloud only).
For specific instructions, refer to Slack, Webex Teams, or Microsoft Teams.
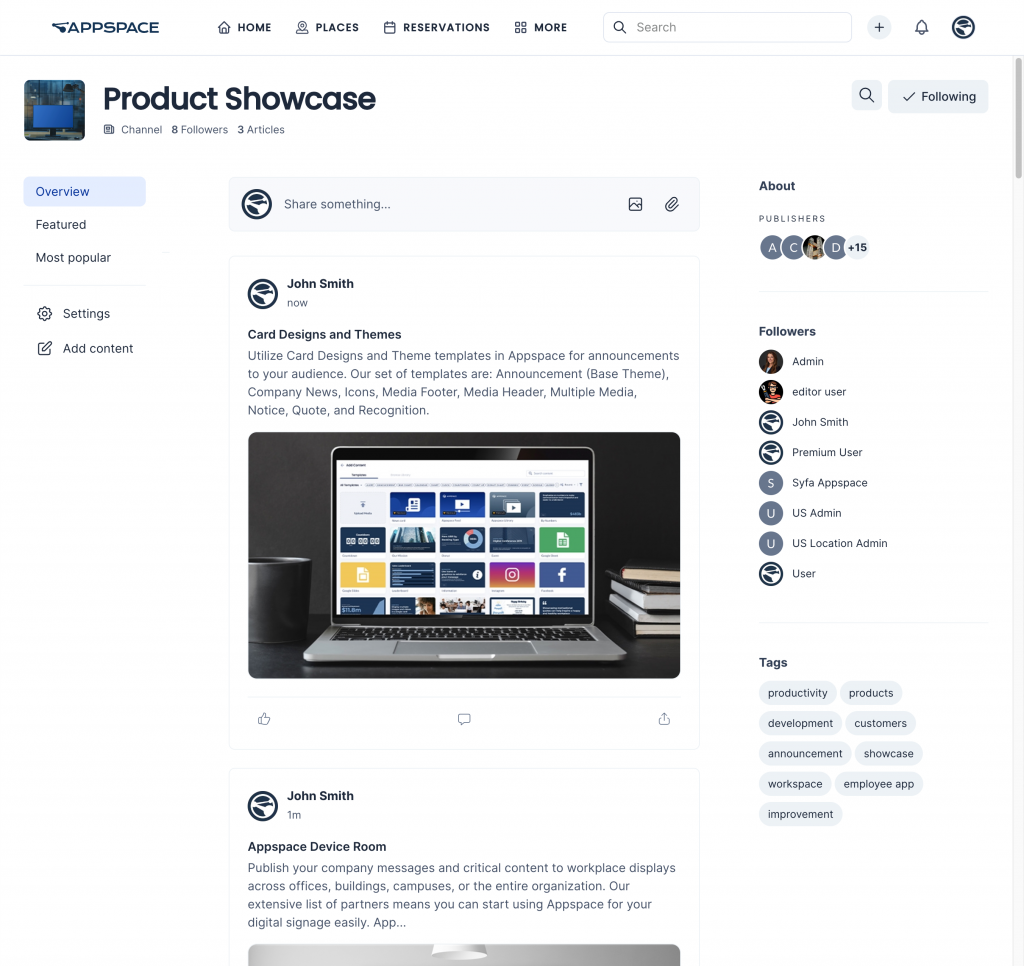
Layout & Navigation
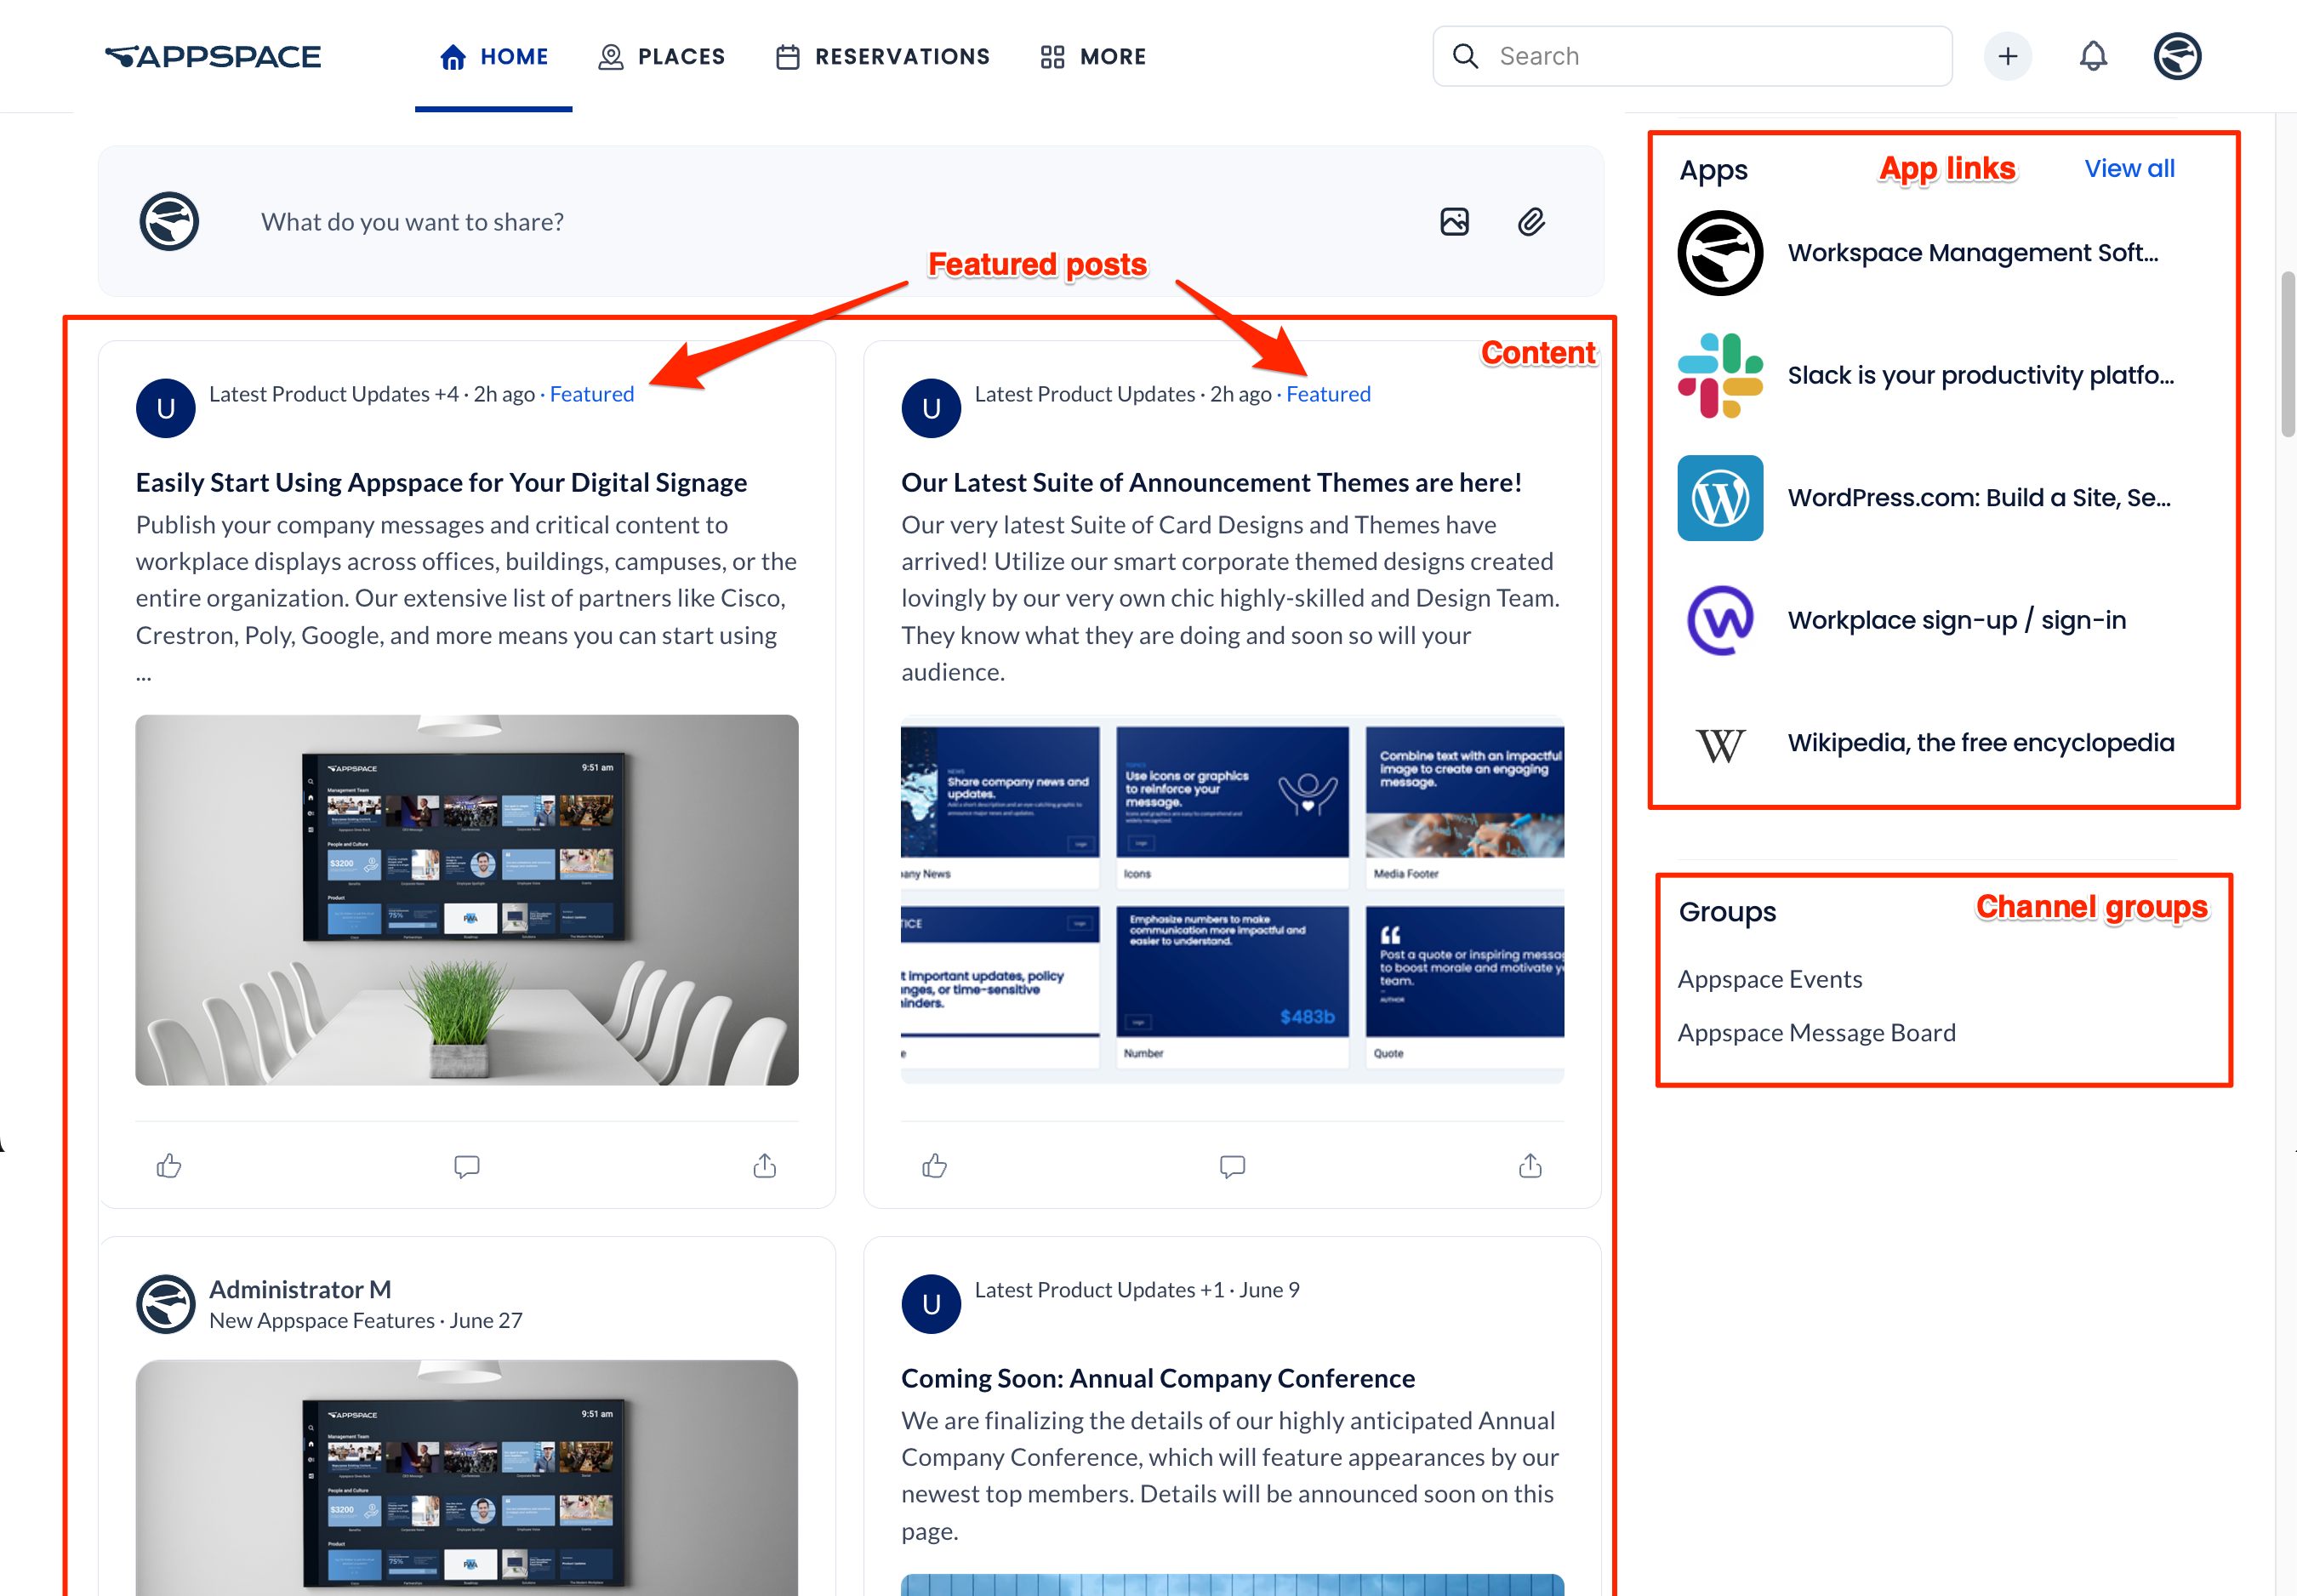
The below illustrates the default dashboard display of the Appspace Employee App portal when viewed from a web browser.
Search
The Global Search bar on the Home page of the Employee App is comprehensive and completely displays results of all types, ranging from topics, pages, channels, stories, and channel groups, to people, places, and reservations.
Additionally, under each tab and sub-tab, such as Places, Reservations, People, and Explore, you will have another localized search bar that will allow you to search for a resource specific to that section, such as a reservation or building pass under Reservations, or topics, channels, pages, and stories under Explore. See the individual sections below for more information.
The Employee App utilizes predictive search across all searches and displays results as soon as characters or numbers of the keyword are entered in the search field.
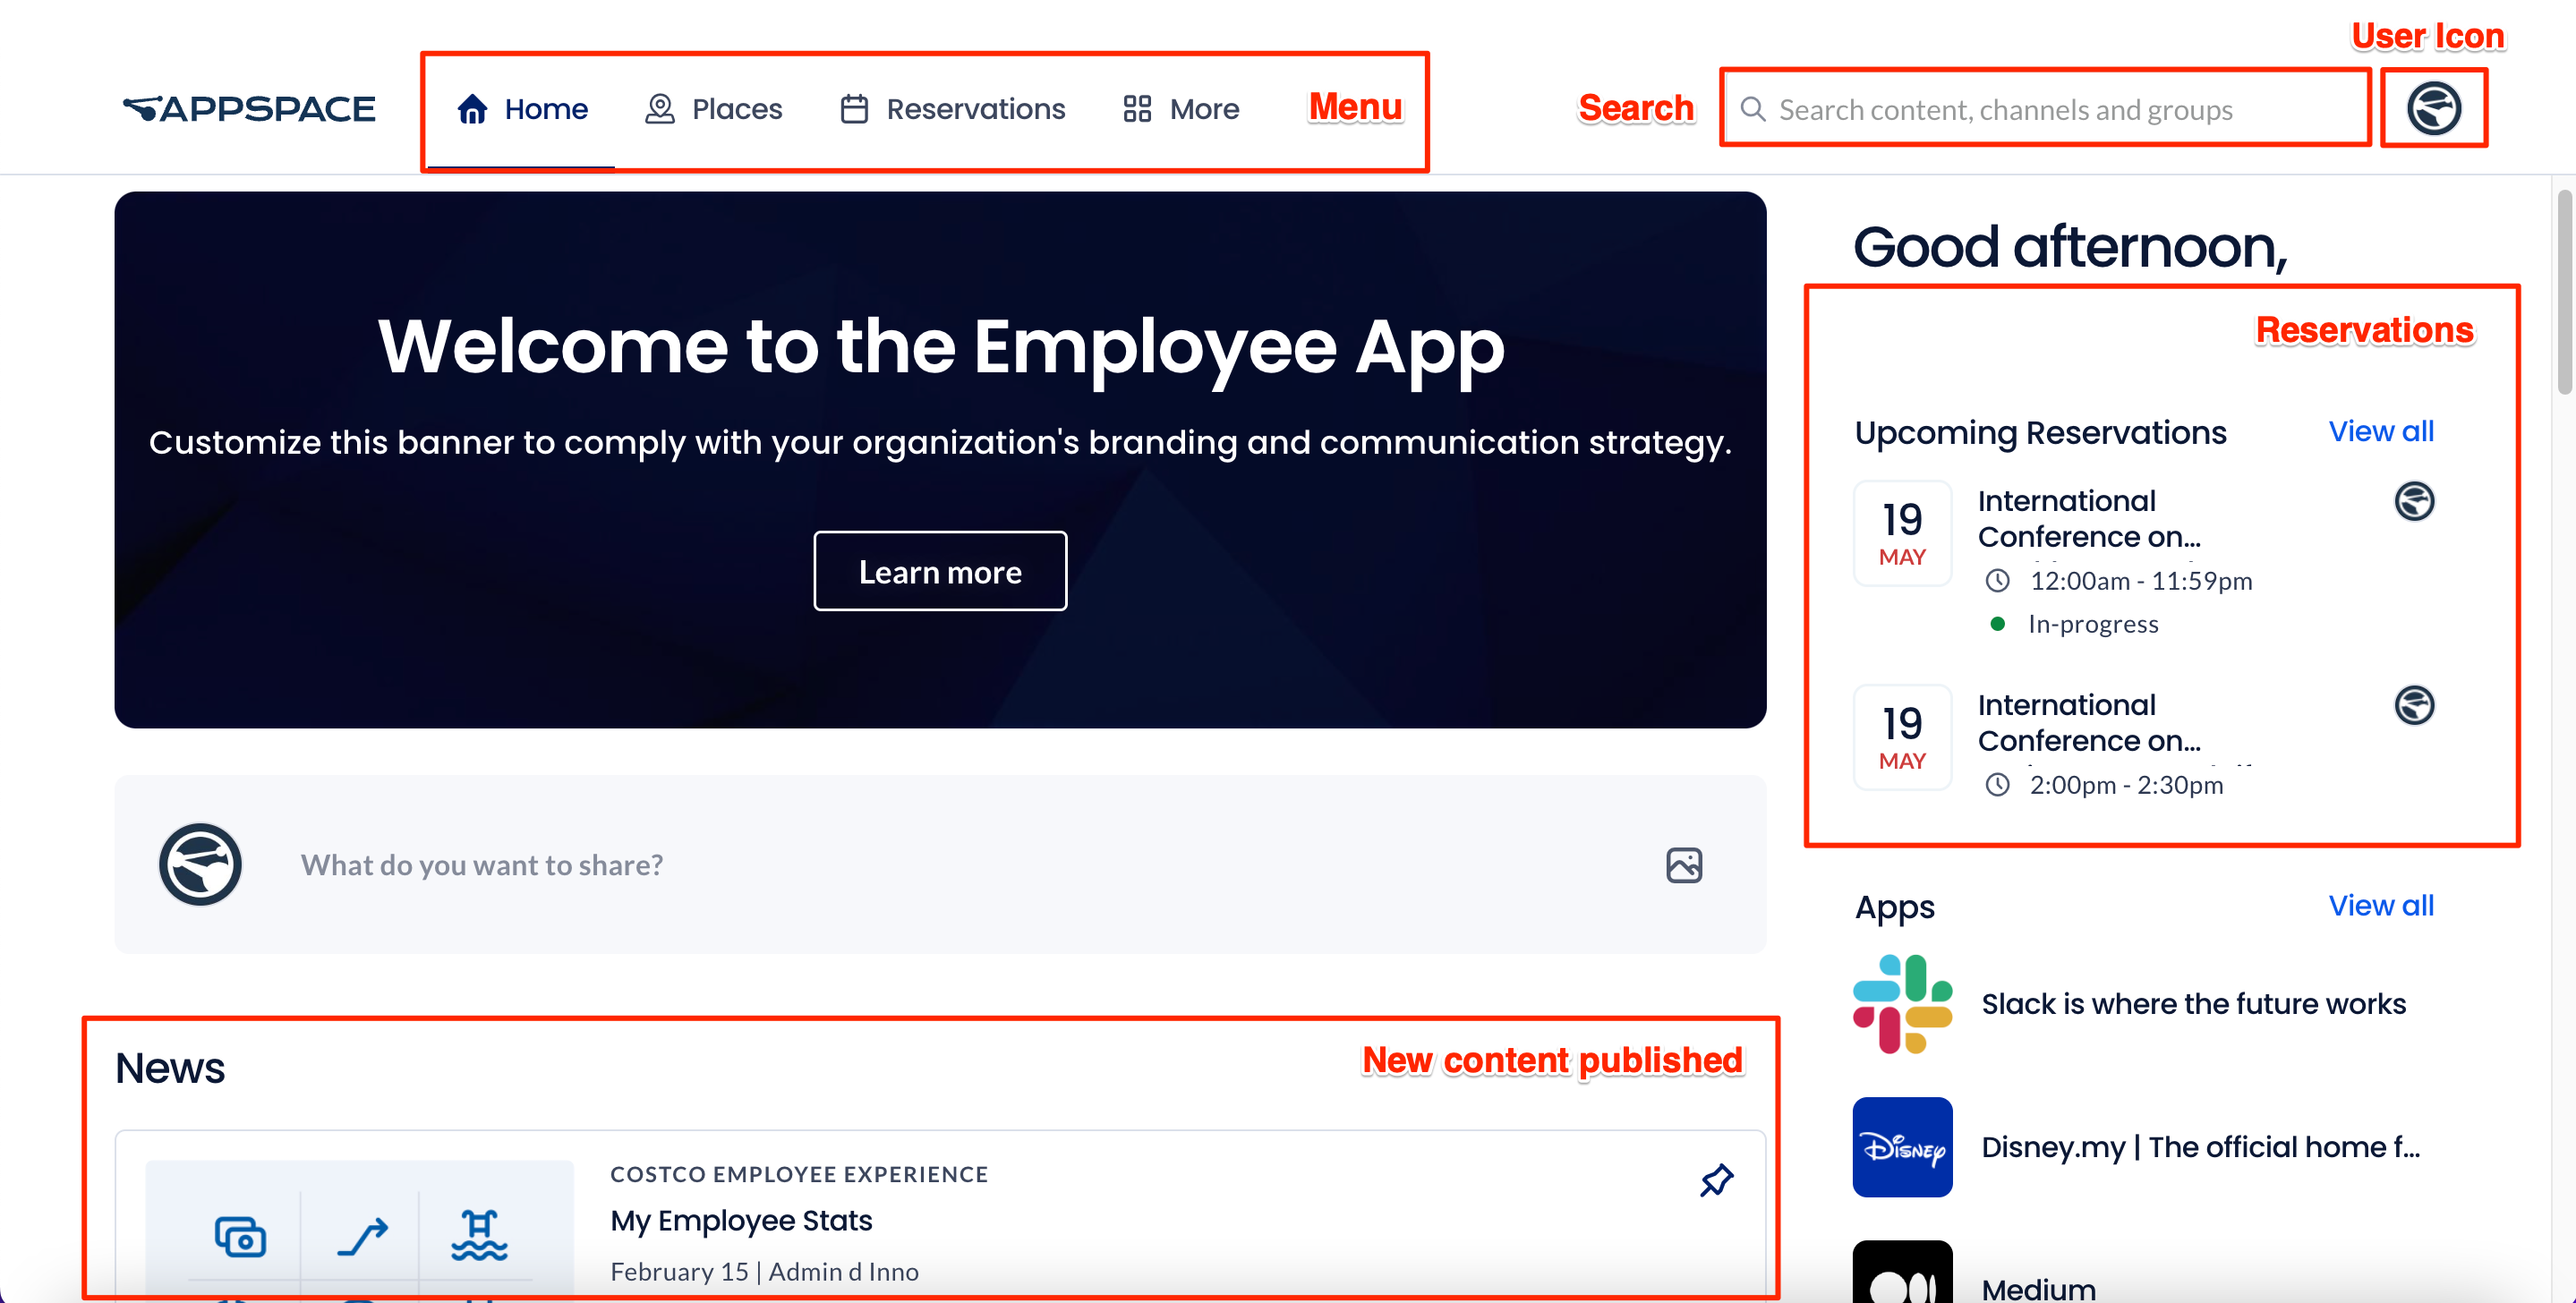
Menu
- The menu is displayed at the top of the page in the portal. The menu items displayed are dependent on the features required by your organization. These sections can be toggled on and off by an administrator (refer to Note above).
- The default menu contains all the following items:
- Home – lists all the latest content posted to you or your user group.
- Places – find buildings, and reserve a workspace or building pass.
- Reservations – view and manage workspace reservations in a list view.
- More
- Visitors – displays the Visitor Management system to invite visitors to a meeting or event held at your company.
- Explore – displays all topics, channels, channel groups, pages, and stories posted to you or your user group.
- Videos – displays all videos posted to you or your user group.
- Concierge – provides employees concierge permissions to view a calendar of all reservations under their purview. (requires concierge permissions).
- Apps – displays third-party application links that are applicable to the employee’s needs.
- People – displays users and their profiles within the organization.
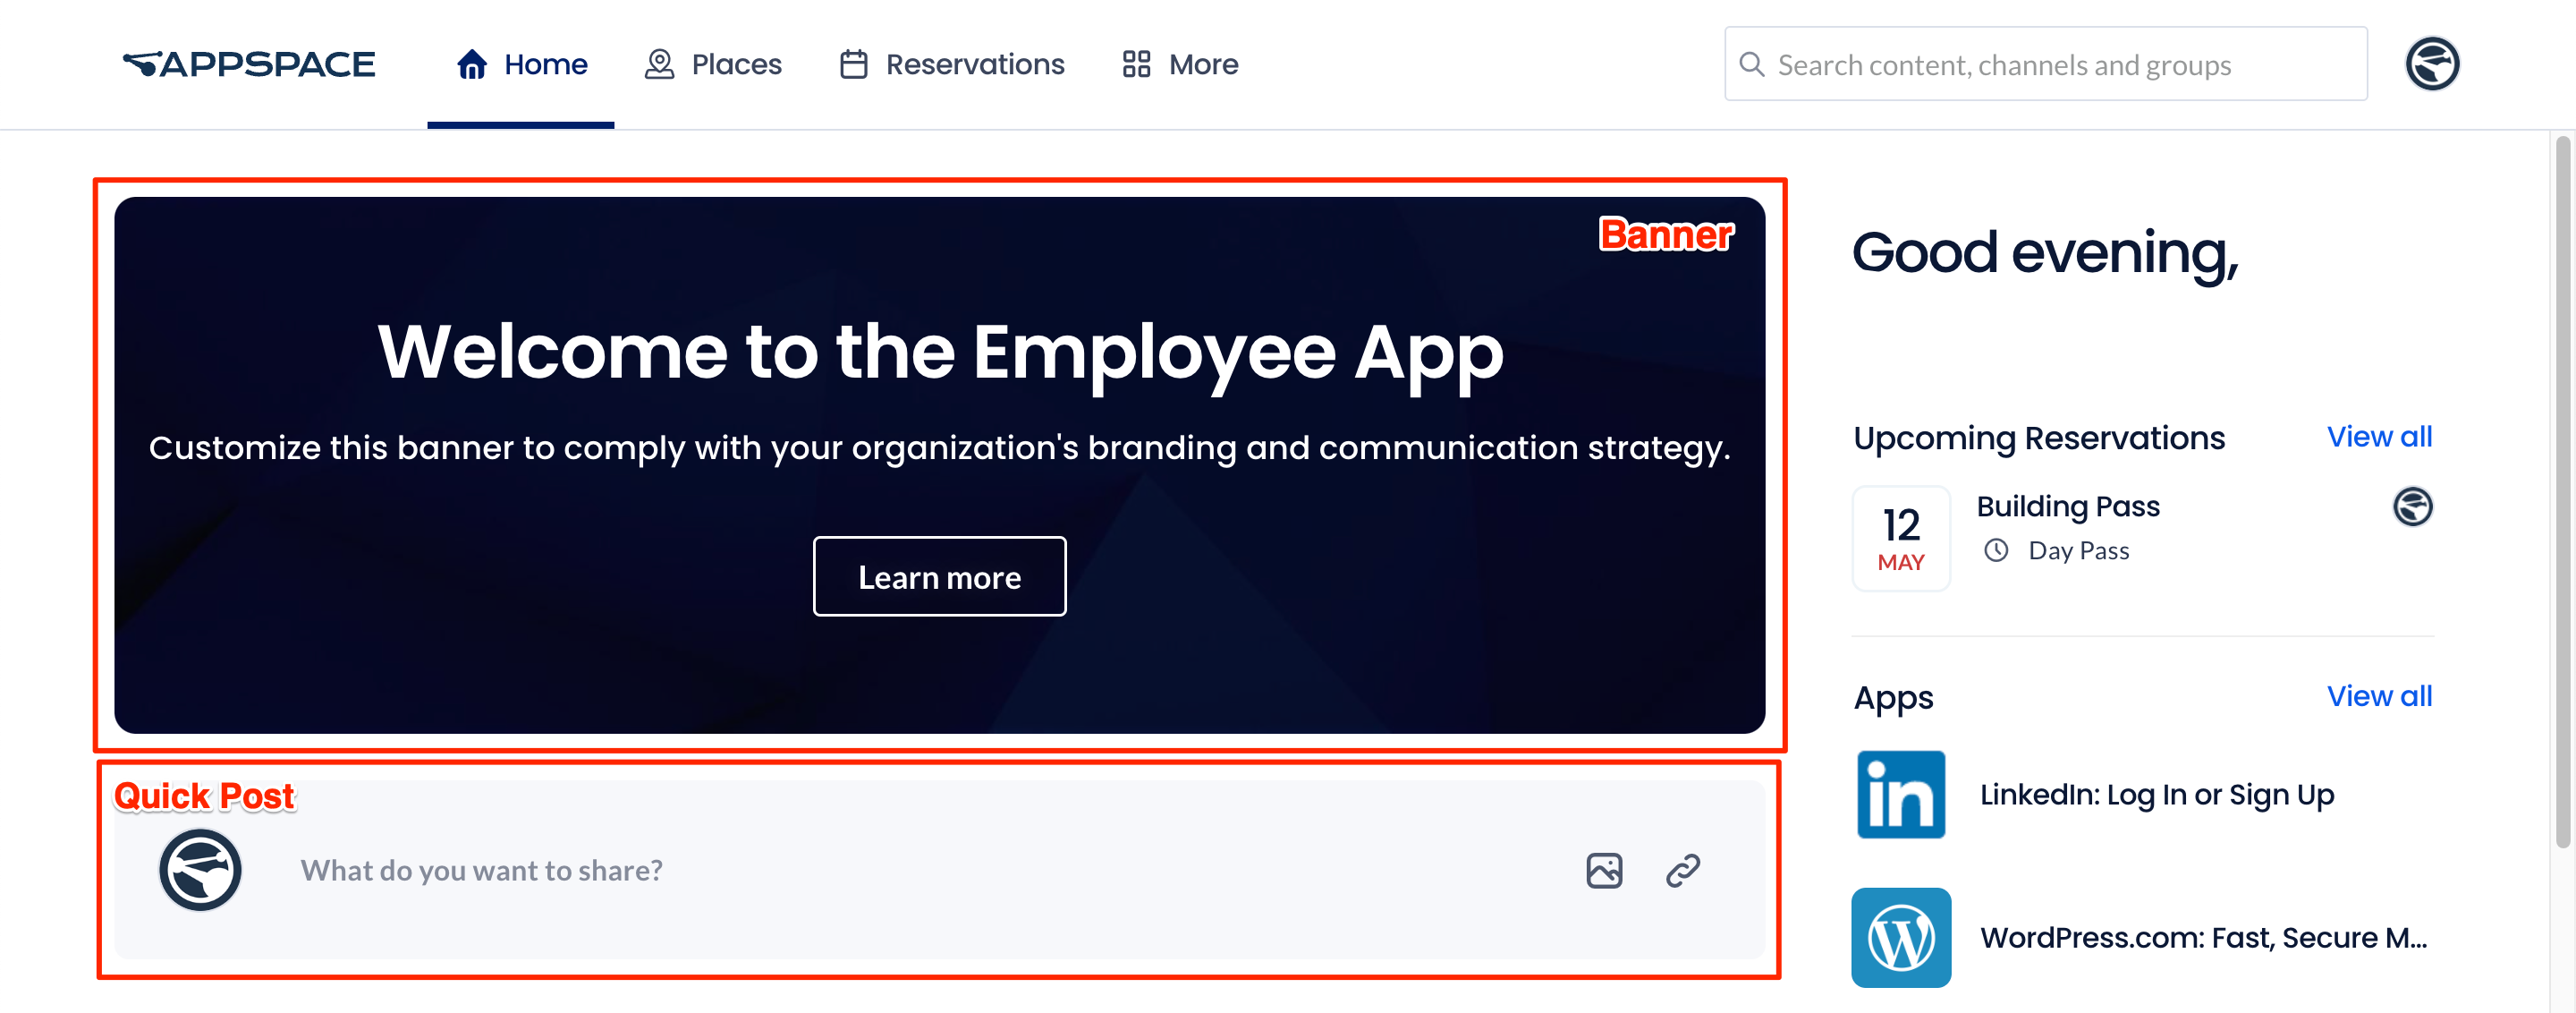
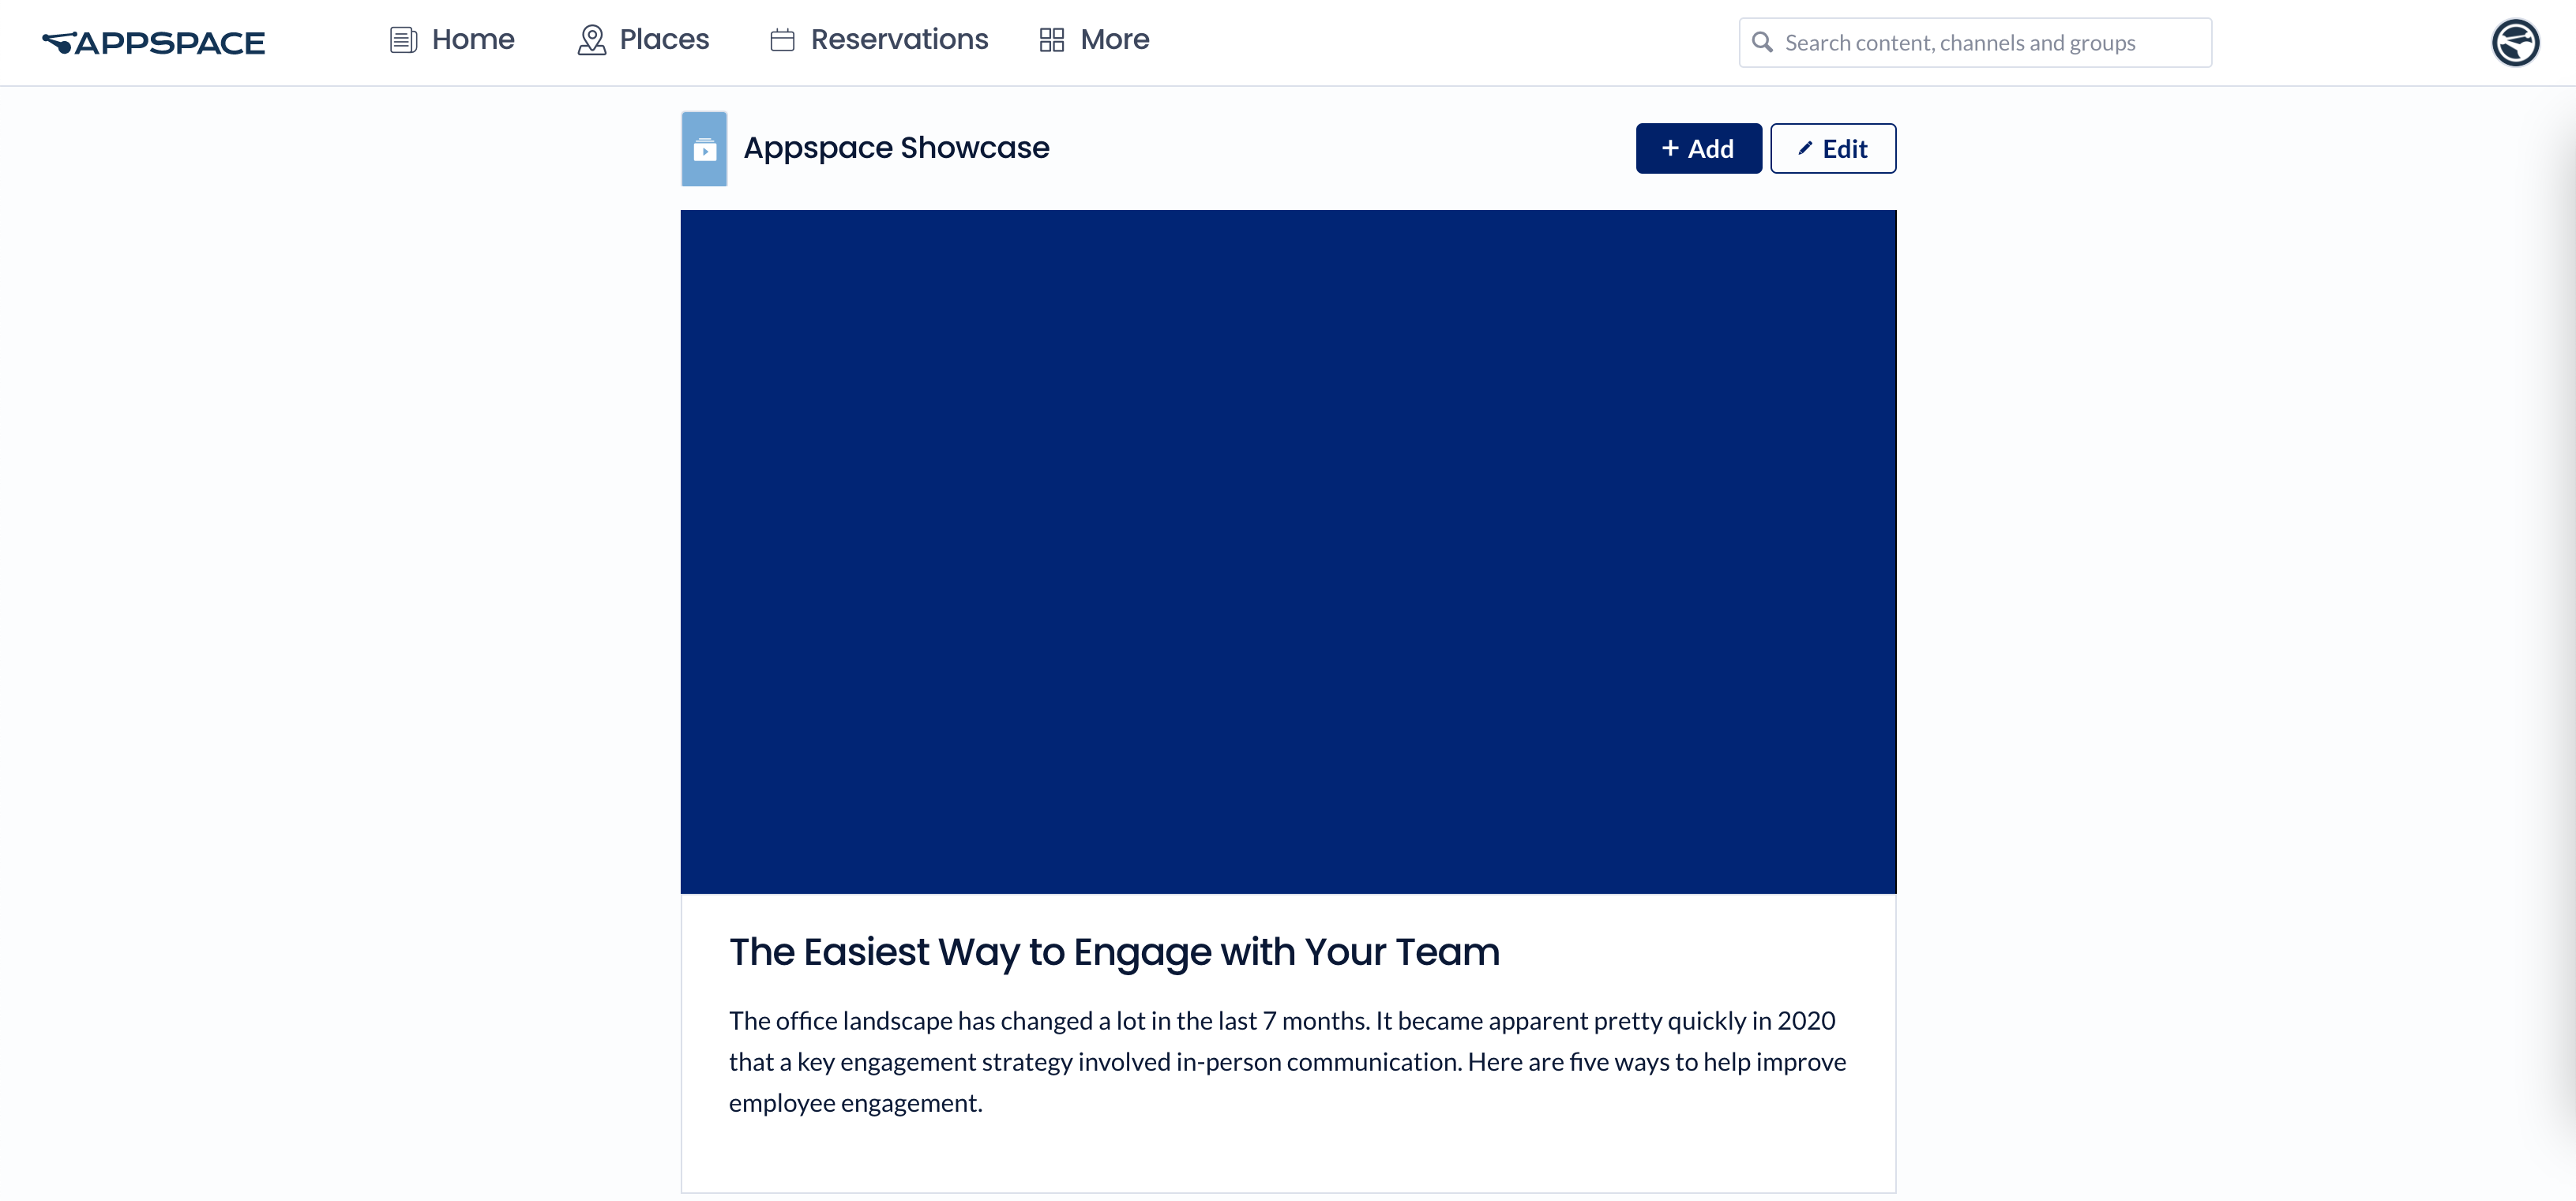
Banner
The banner shows media content, a webpage, or even recently posted content.
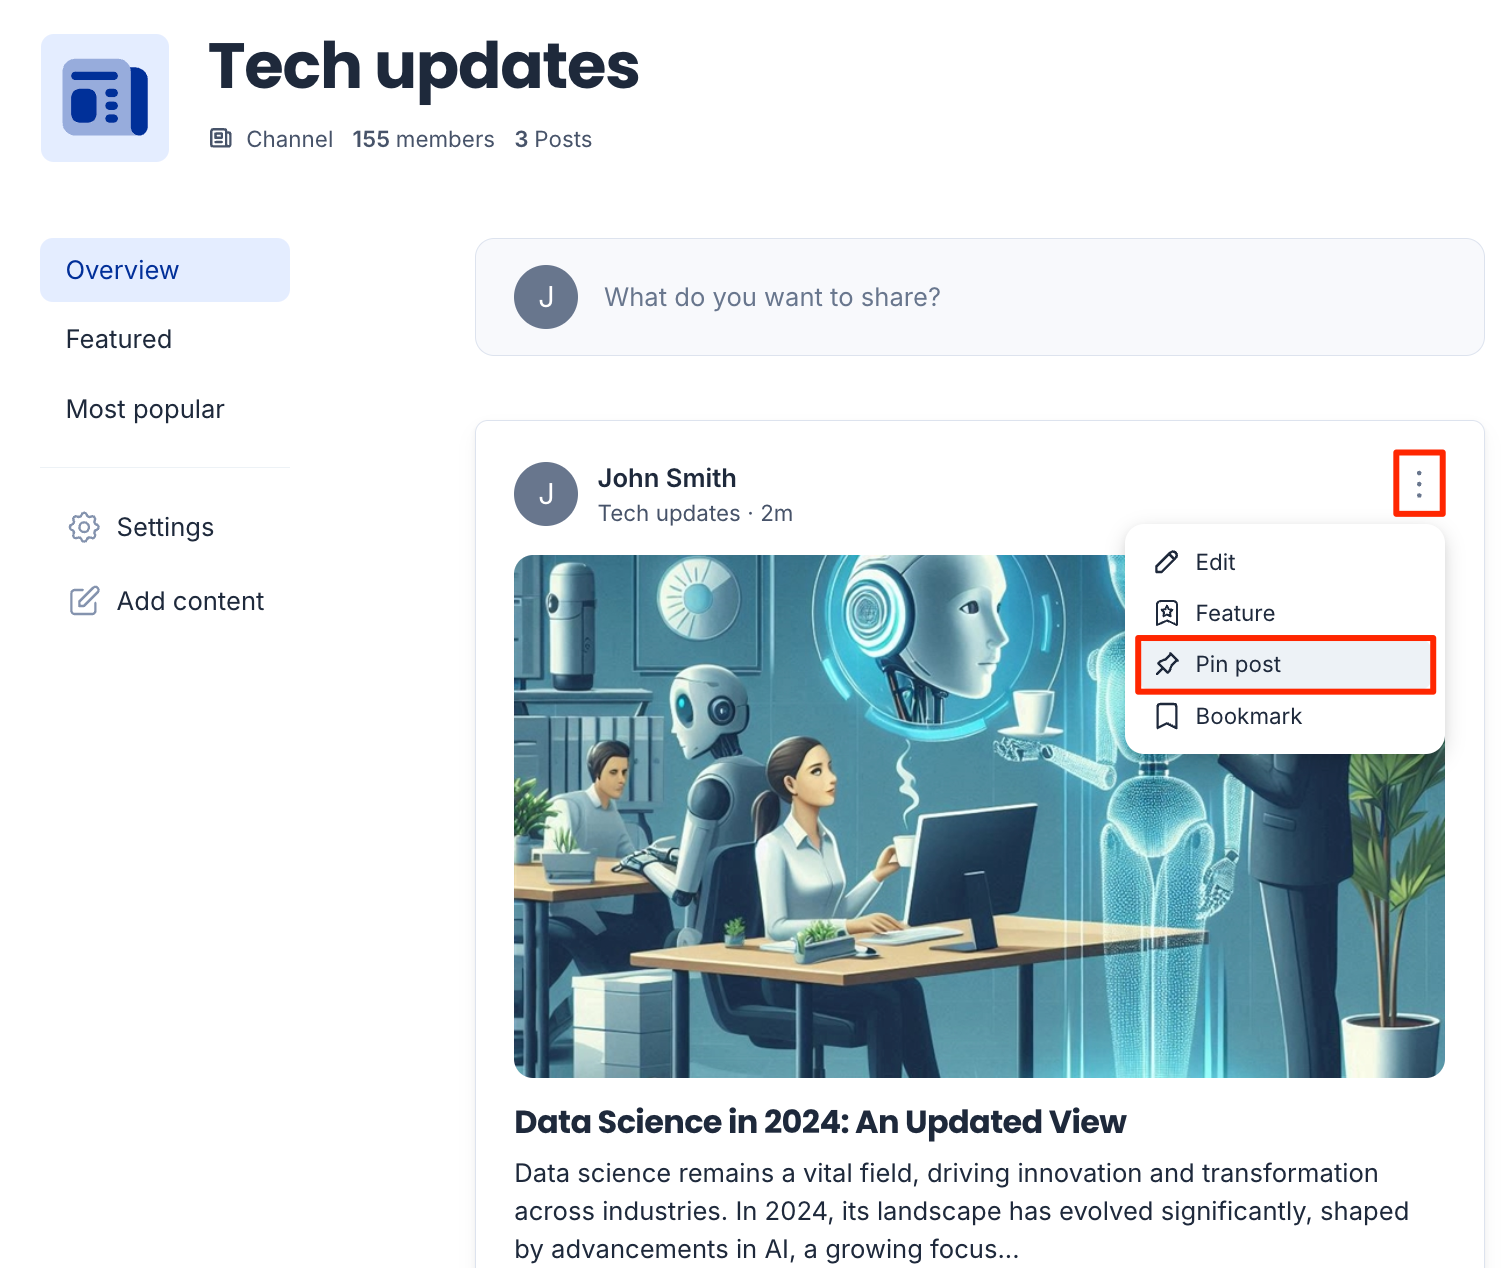
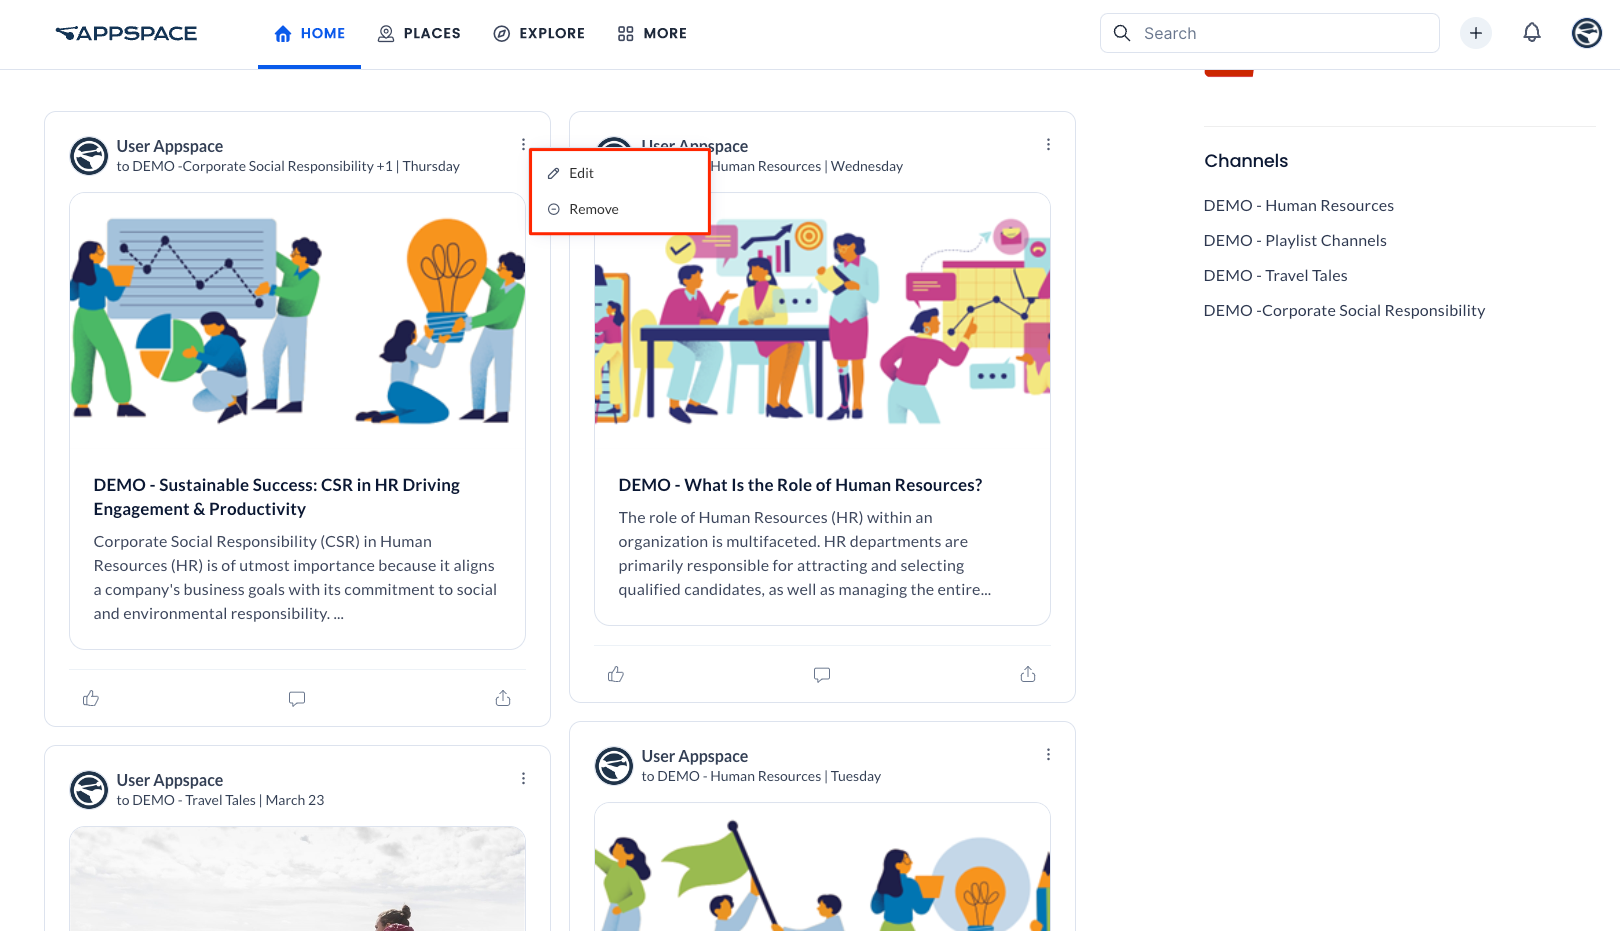
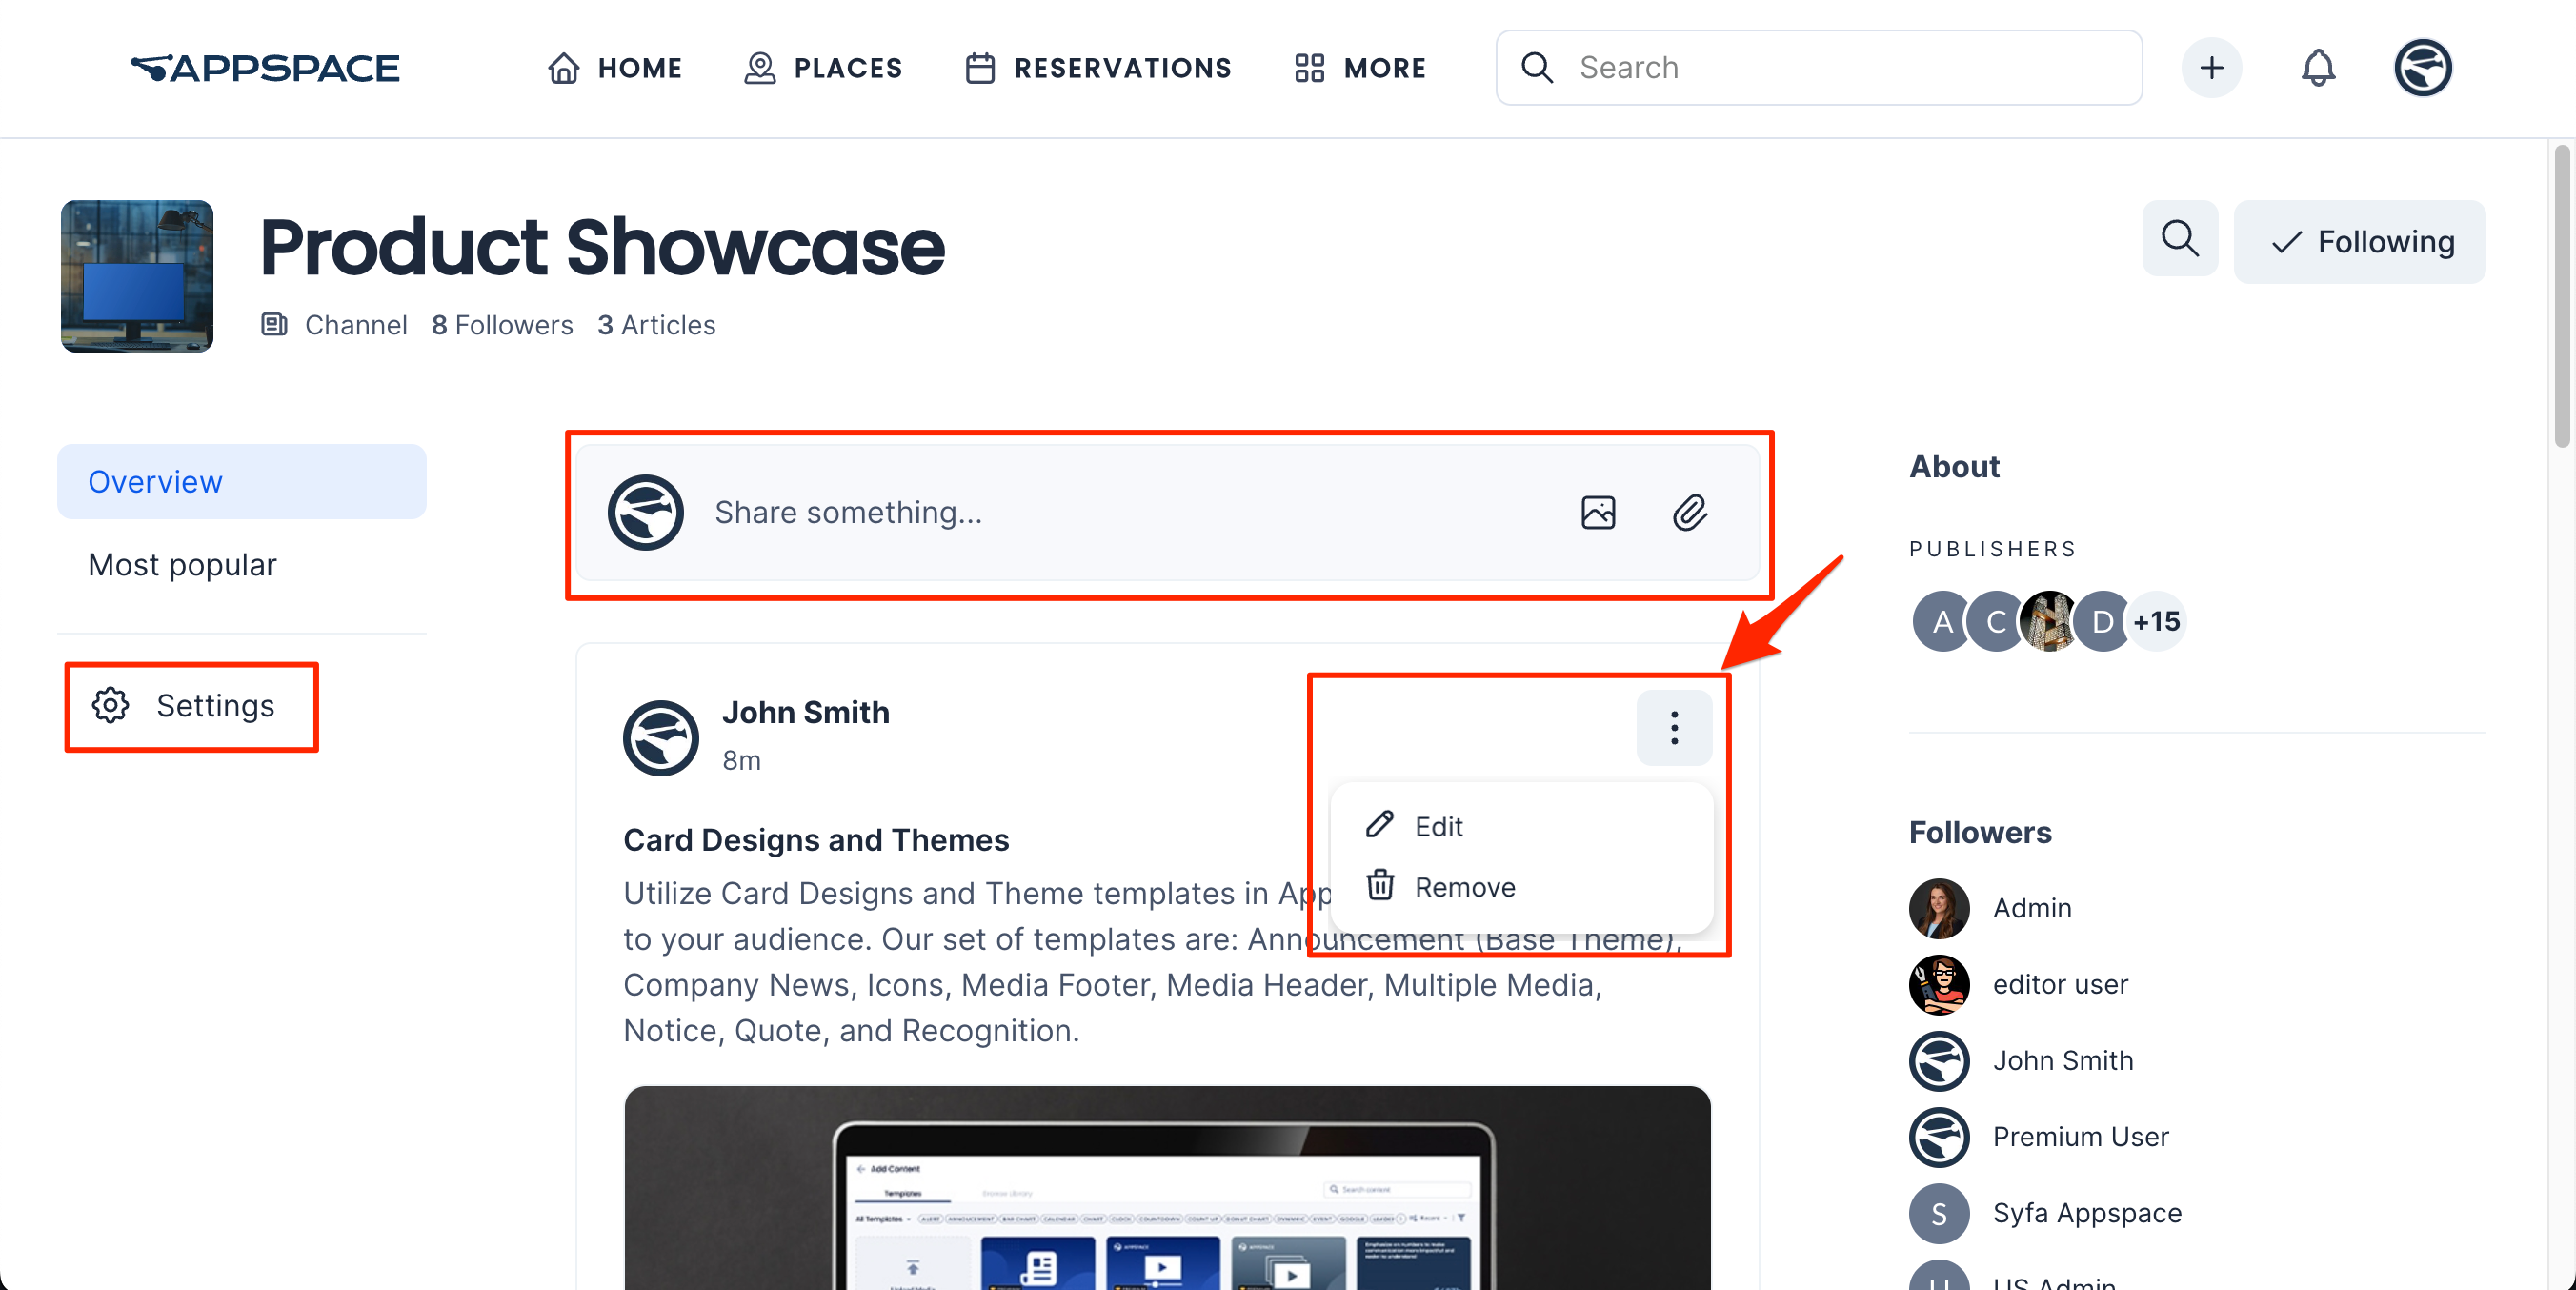
Pin and Unpin Posts or Stories in a Channel
Account Admins, Publishers (including users with inherited roles from user groups), and Editors may pin or unpin posts (including event posts, questions, polls, and praises) and stories published in a channel. Pinned posts or stories are positioned at the top of the channel Overview page in the Employee App.
To pin a post or story to the top of a channel, perform the following steps:
- Log in to the Appspace Employee App.
- Go to the More > Explore section, and select the Channels tab. Select a channel.
- The channel Overview page displays its posts and stories.
- Click the ellipsis (…) of a post or story and select Pin post. For the Expires after field, select one of the following options:

- Never – the article is pinned indefinitely until it is manually unpinned.
- 7 days – the article is pinned for 7 days.
- 30 days – the article is pinned for 30 days.
- Custom date – the article is pinned until the selected date. Select the year, month, and date from the calendar.
- After selecting an option, the article is pinned at the top of the channel Overview page. If several articles are pinned, they are sorted by published date.
To unpin a post or story in a channel, perform the following steps:
- Log in to the Appspace Employee App.
- Go to the More > Explore section, and select the Channels tab. Select a community.
- The channel Overview page displays its posts and stories.
- Click the ellipsis (…) of a pinned post or story and select Unpin.
- In the Unpin post window, select Unpin.
- The article is removed from the pinned section and placed in its regular position within the channel, sorted by published date.
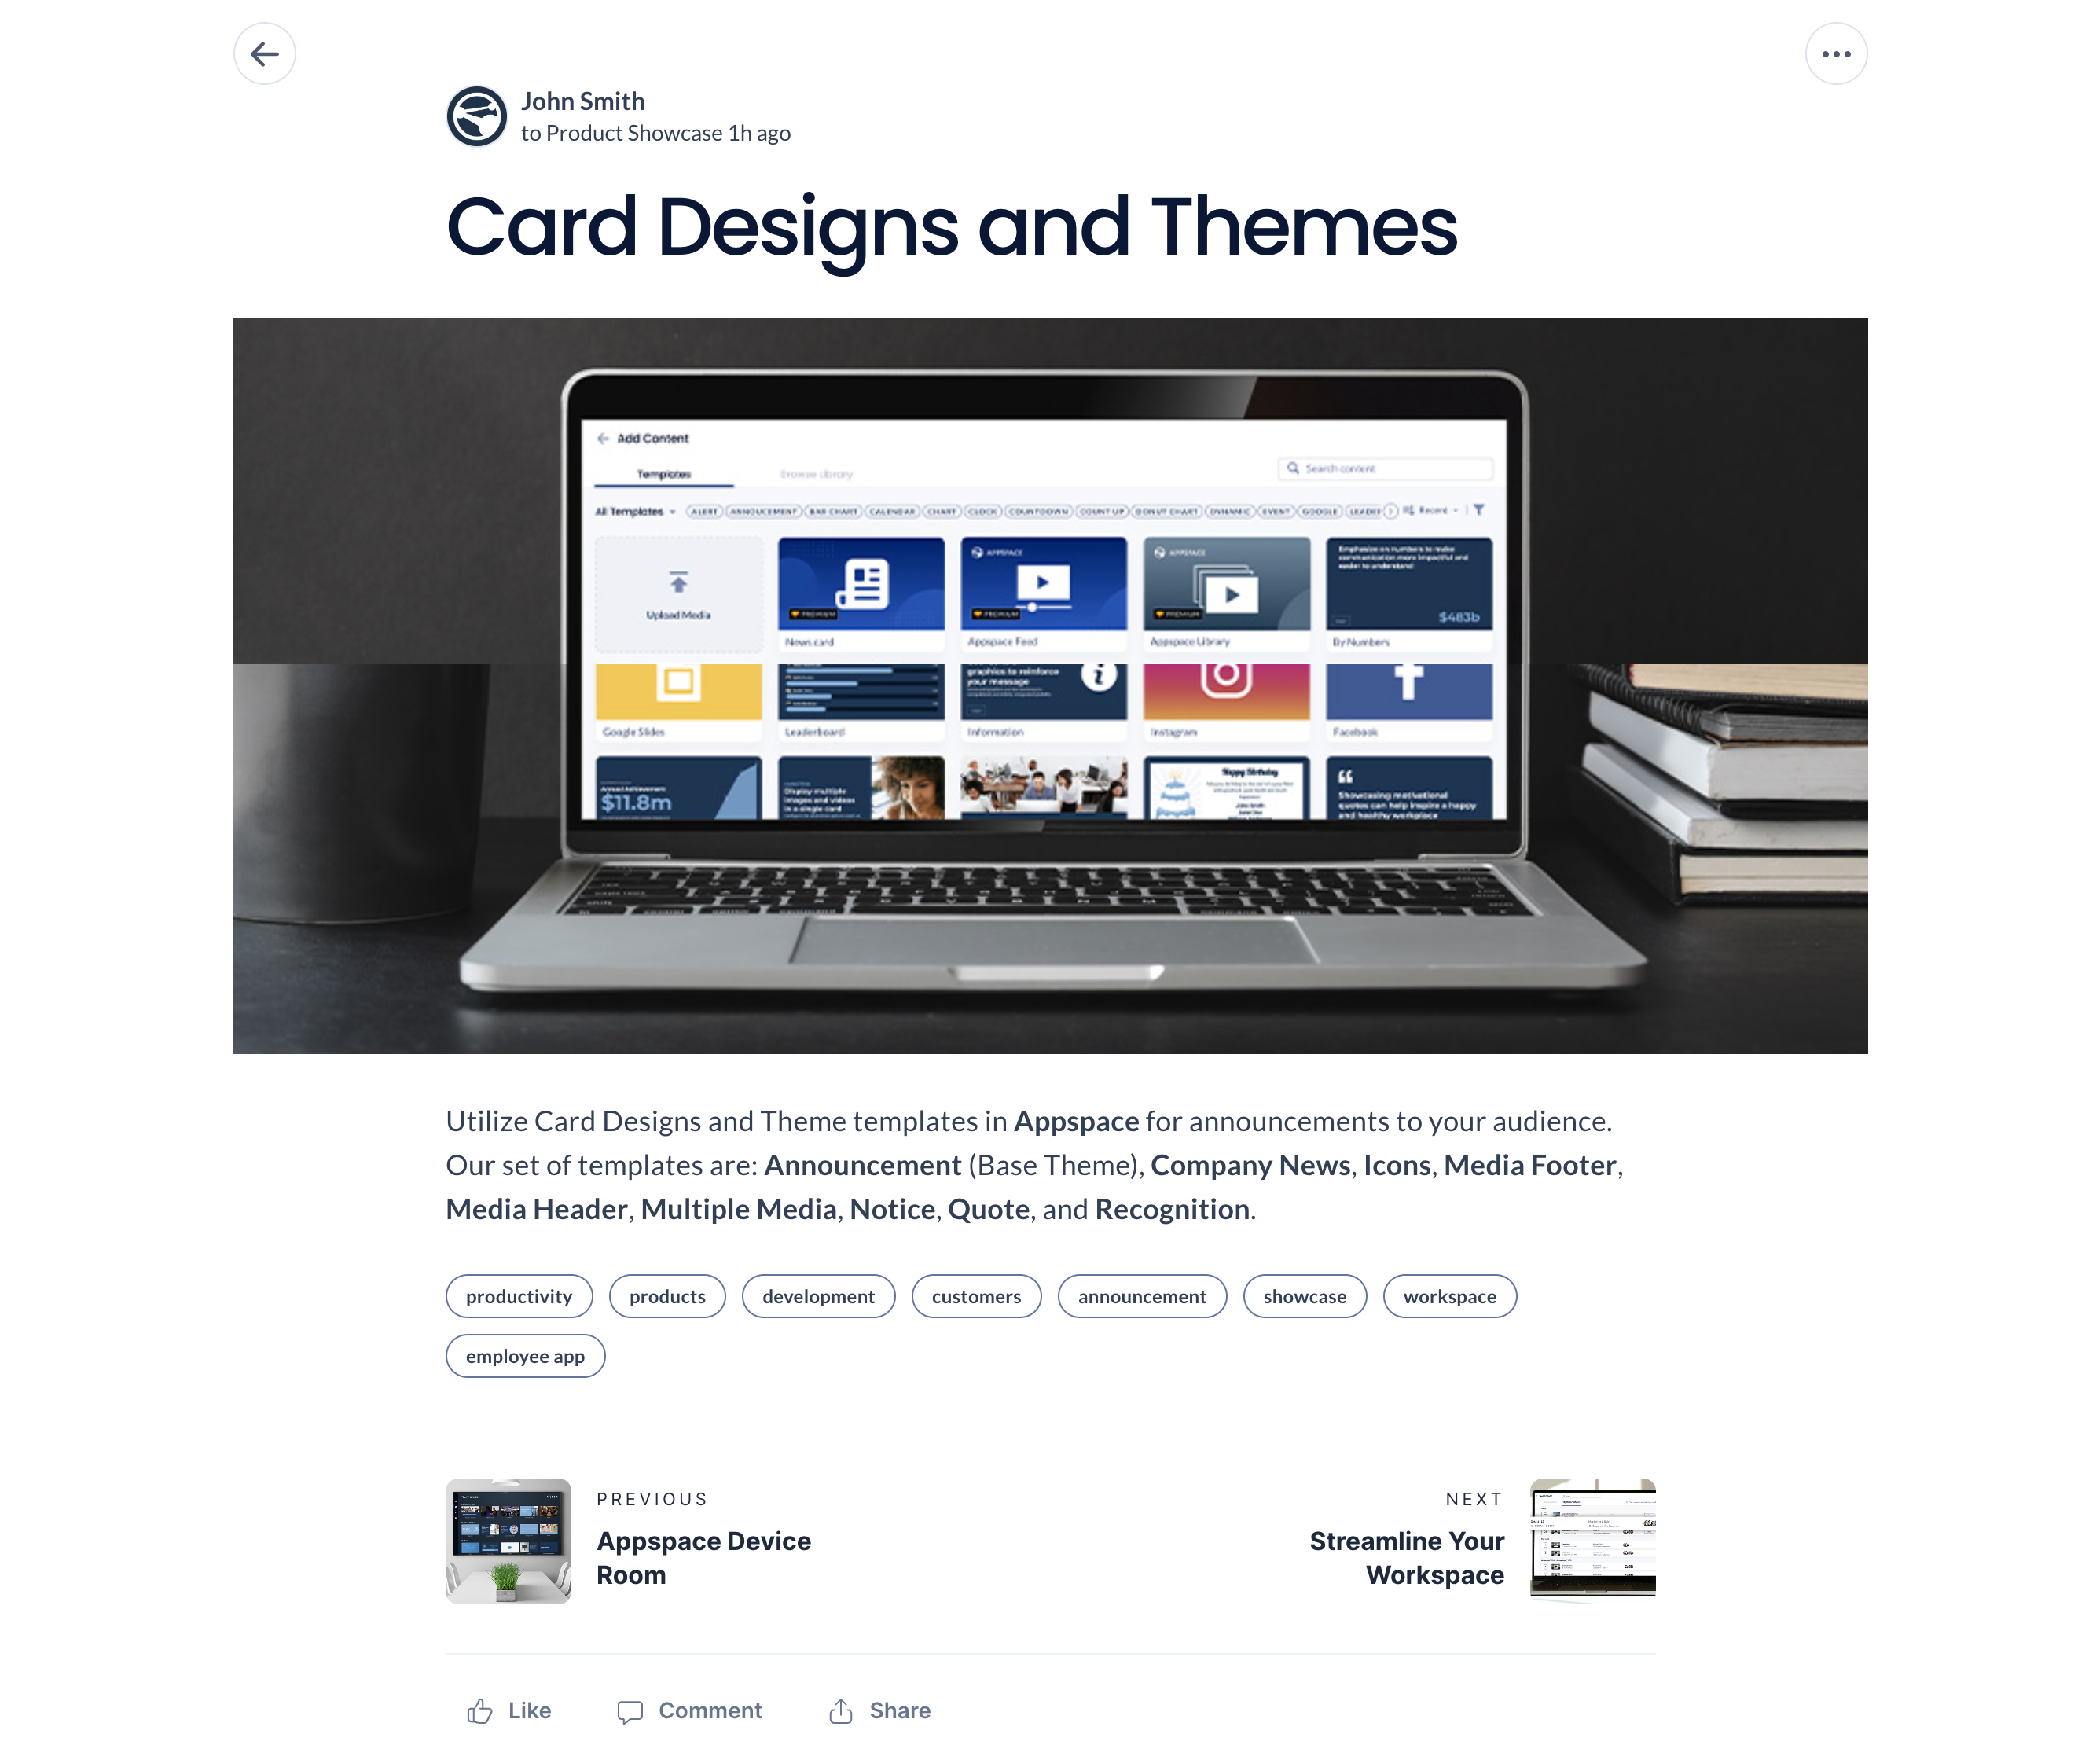
Quick Post
Authors, Publishers, and Account Owners can quickly create posts (including events, questions, polls, and praises), stories, and pages within the Appspace Employee App, resulting in an improved content creation workflow experience that allows authors to quickly post articles with text and media without leaving the Employee App (and go to the Appspace console). They can create a post or story, upload media, and publish it to a community or channel from the Home dashboard or any community or channel in the Employee App. The content of the post will be automatically translated to digital signage and enterprise messaging formats by the Appspace platform.
Similarly, Authors, Publishers, and Account Owners can also create a page directly from the Home dashboard, to be published to users subscribed to that topic in the employee app.
Additionally, you have the option to create an event within your Employee App. Events and updates can be announced via posts on your Employee App in the News or Events sections, and Employee App users can indicate their attendance for events that require RSVP. You can also edit any of the posts that you are the author of.
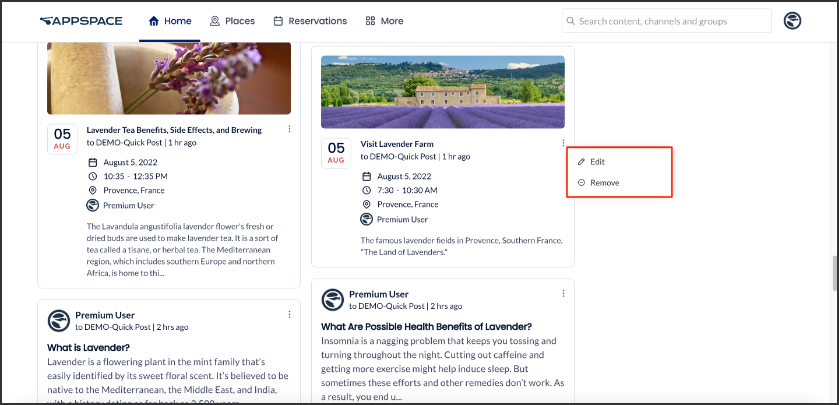
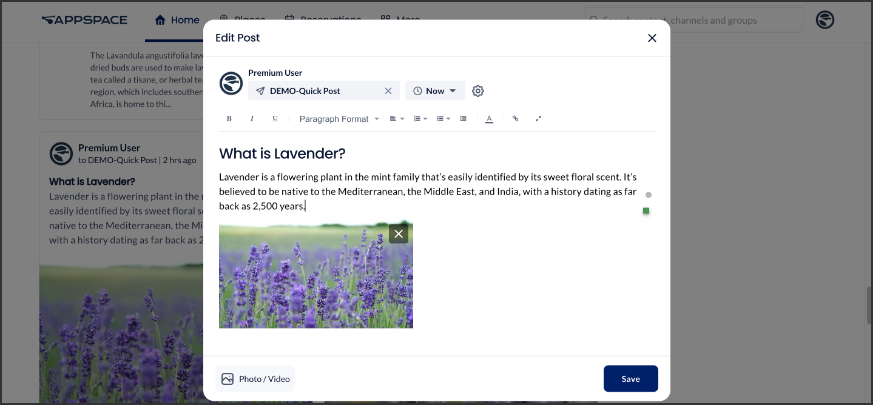
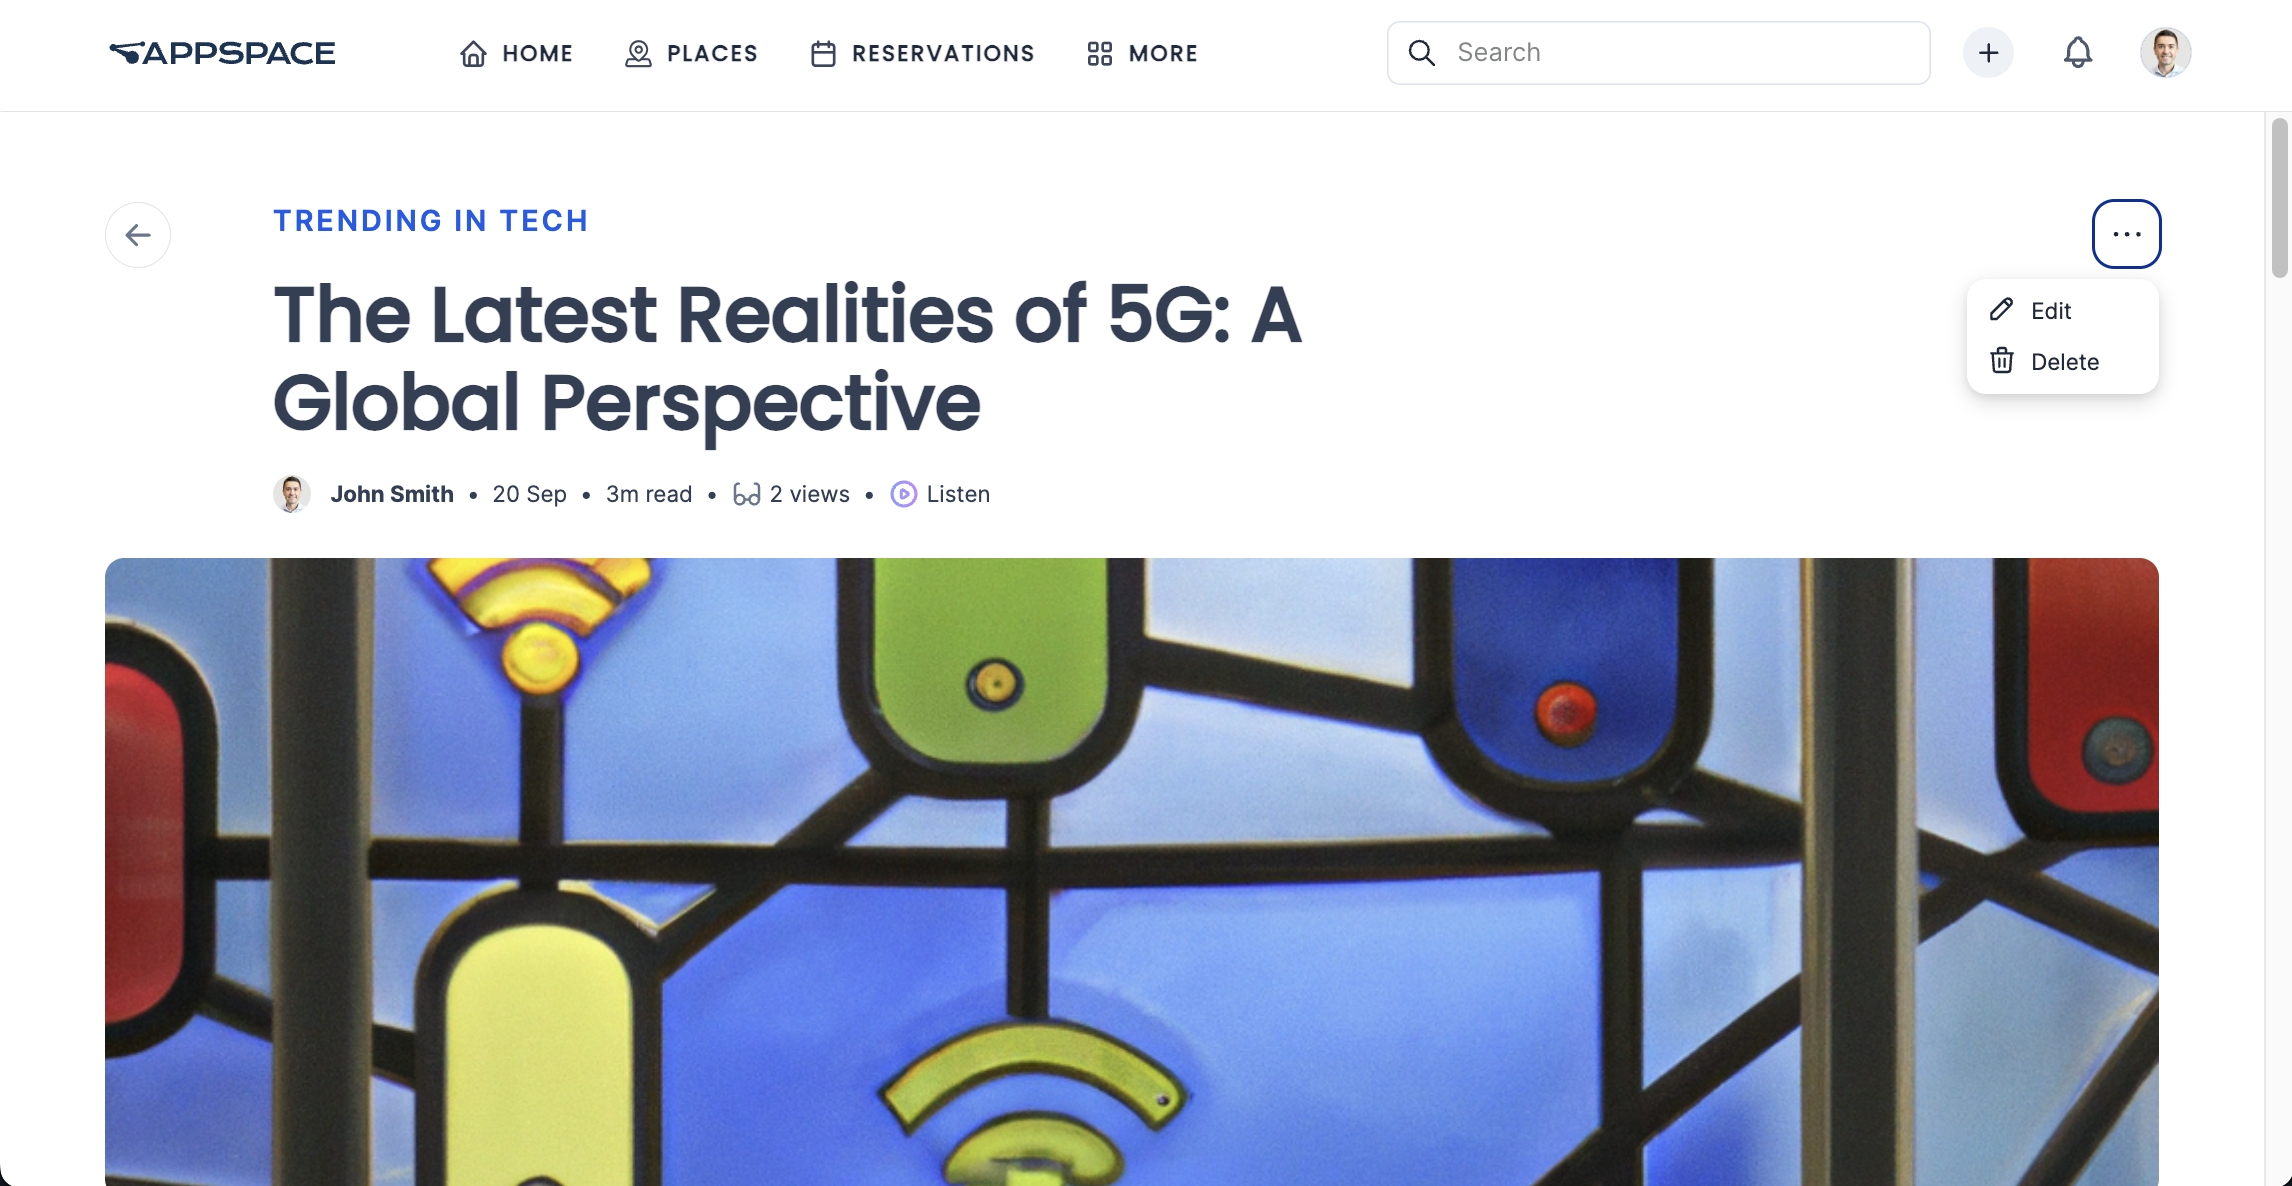
Edit Post
To update a post, navigate to the News or Channels section of your Employee App. From there, you can edit any post you find there.
Edit Post in News
Follow the instructions below to edit any post in your Employee App:
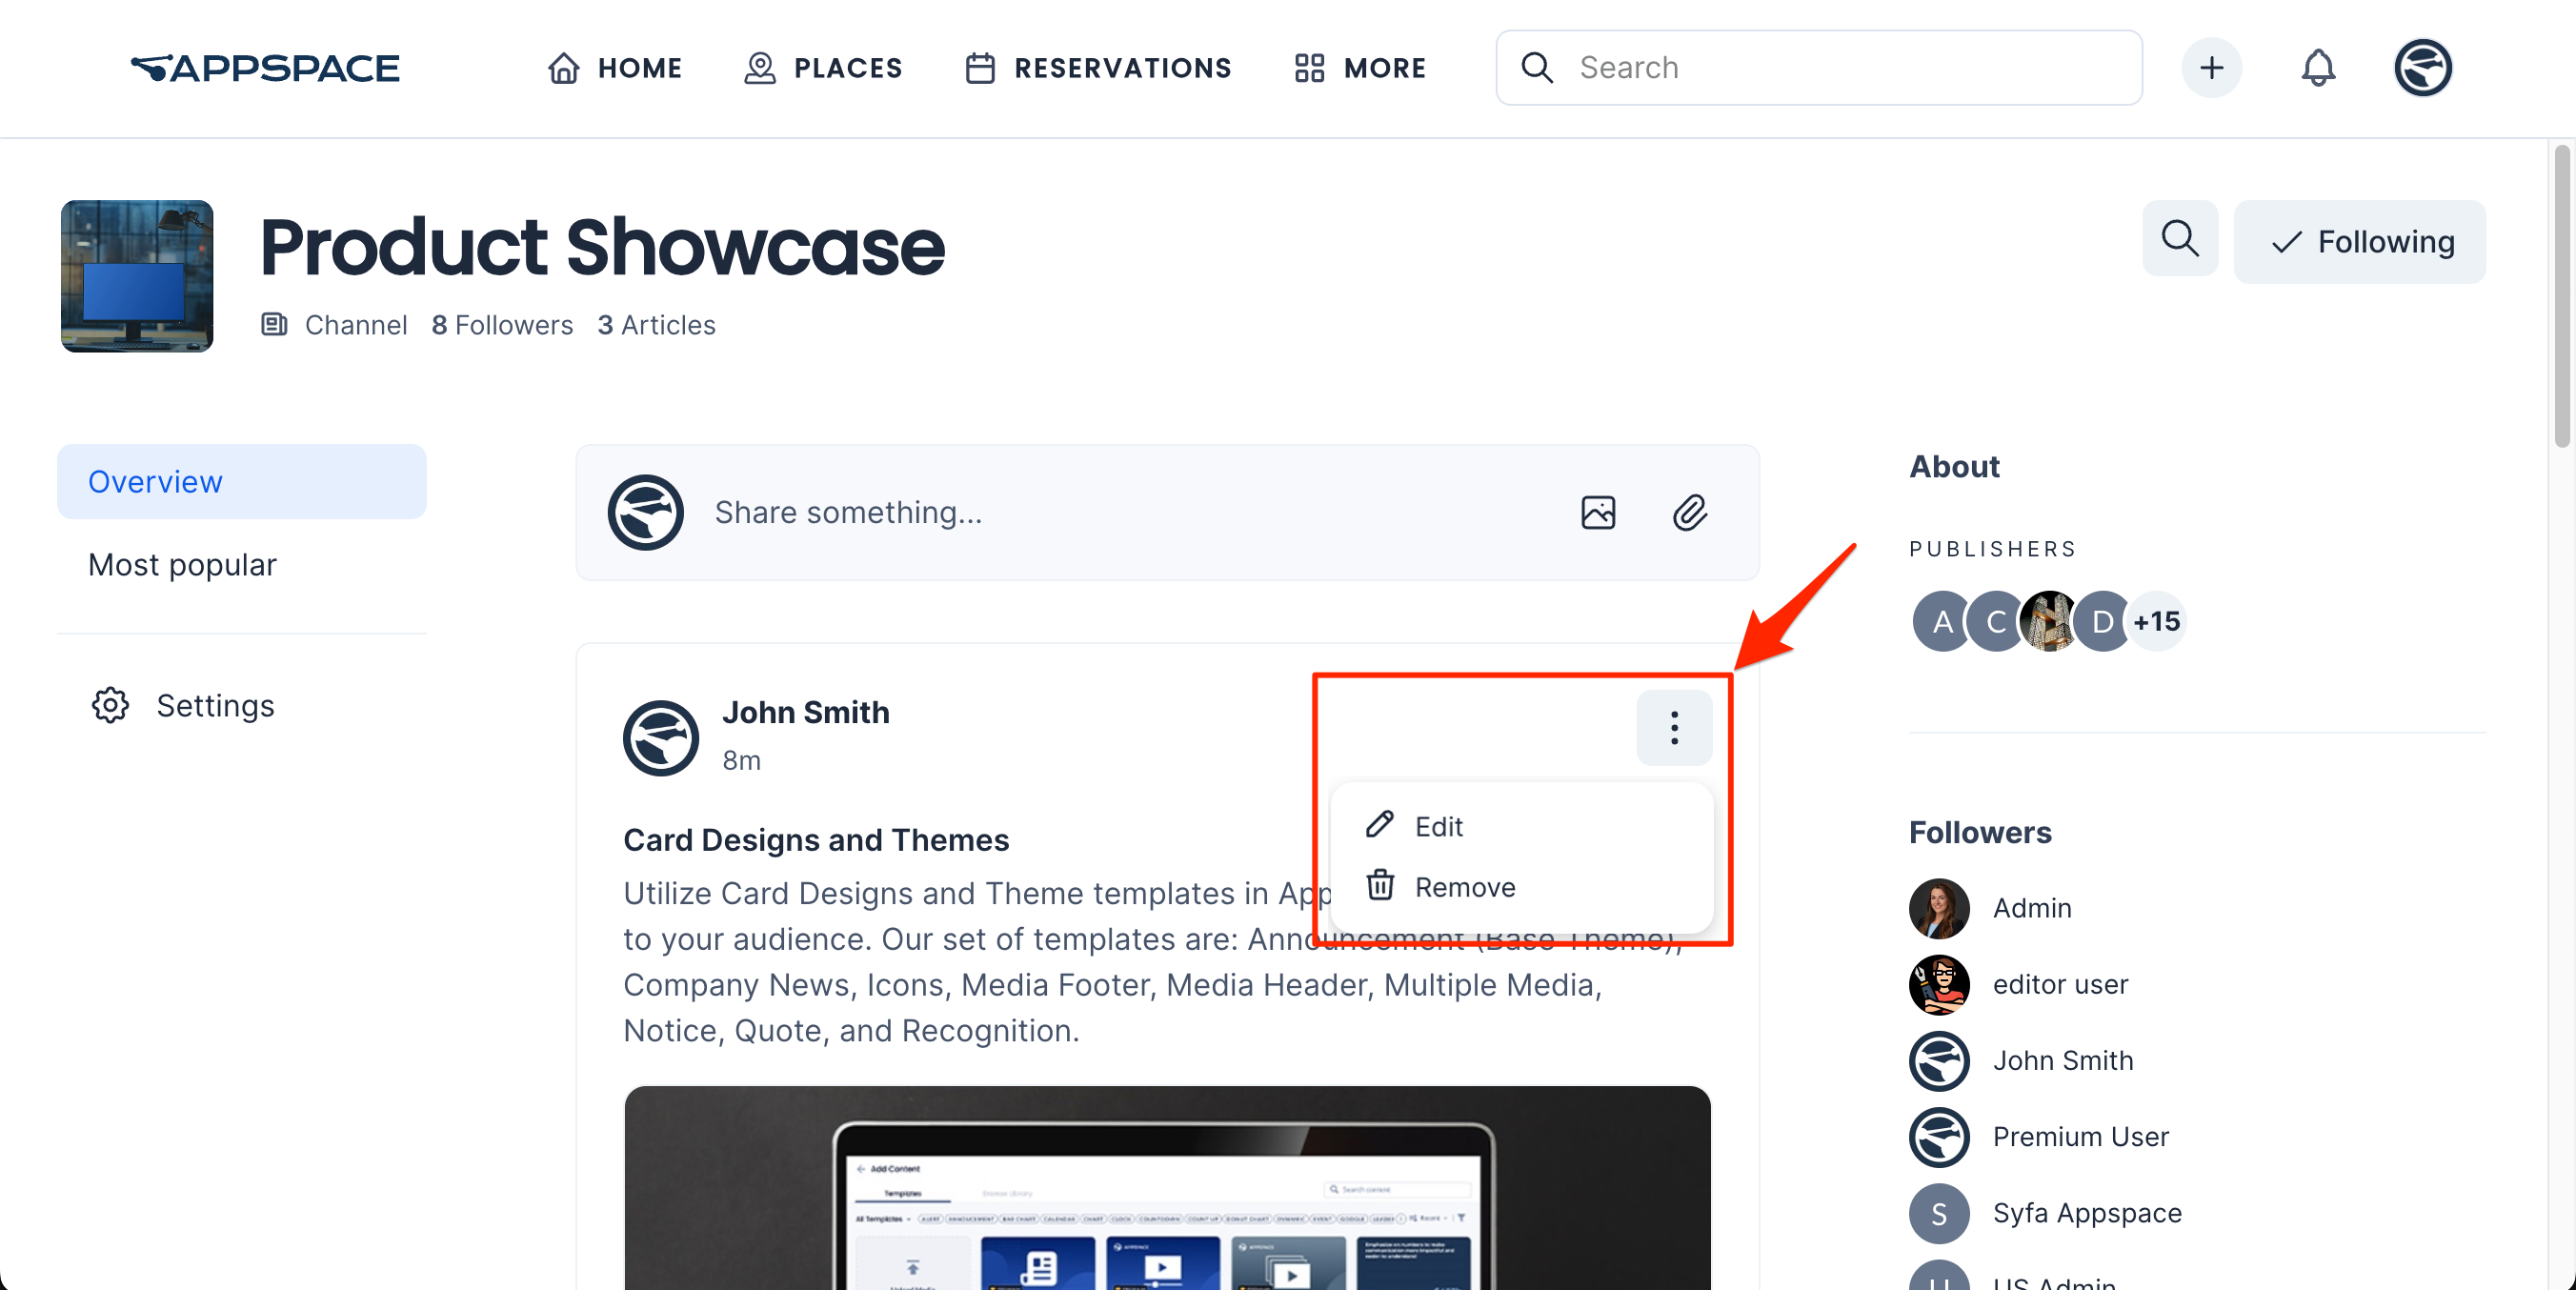
- To edit, navigate to your desired post in the Home > News section.
- Click on the ellipsis next to a post and select Edit. You can also delete your post by clicking the Remove button.
- Proceed to edit the content and click Save.
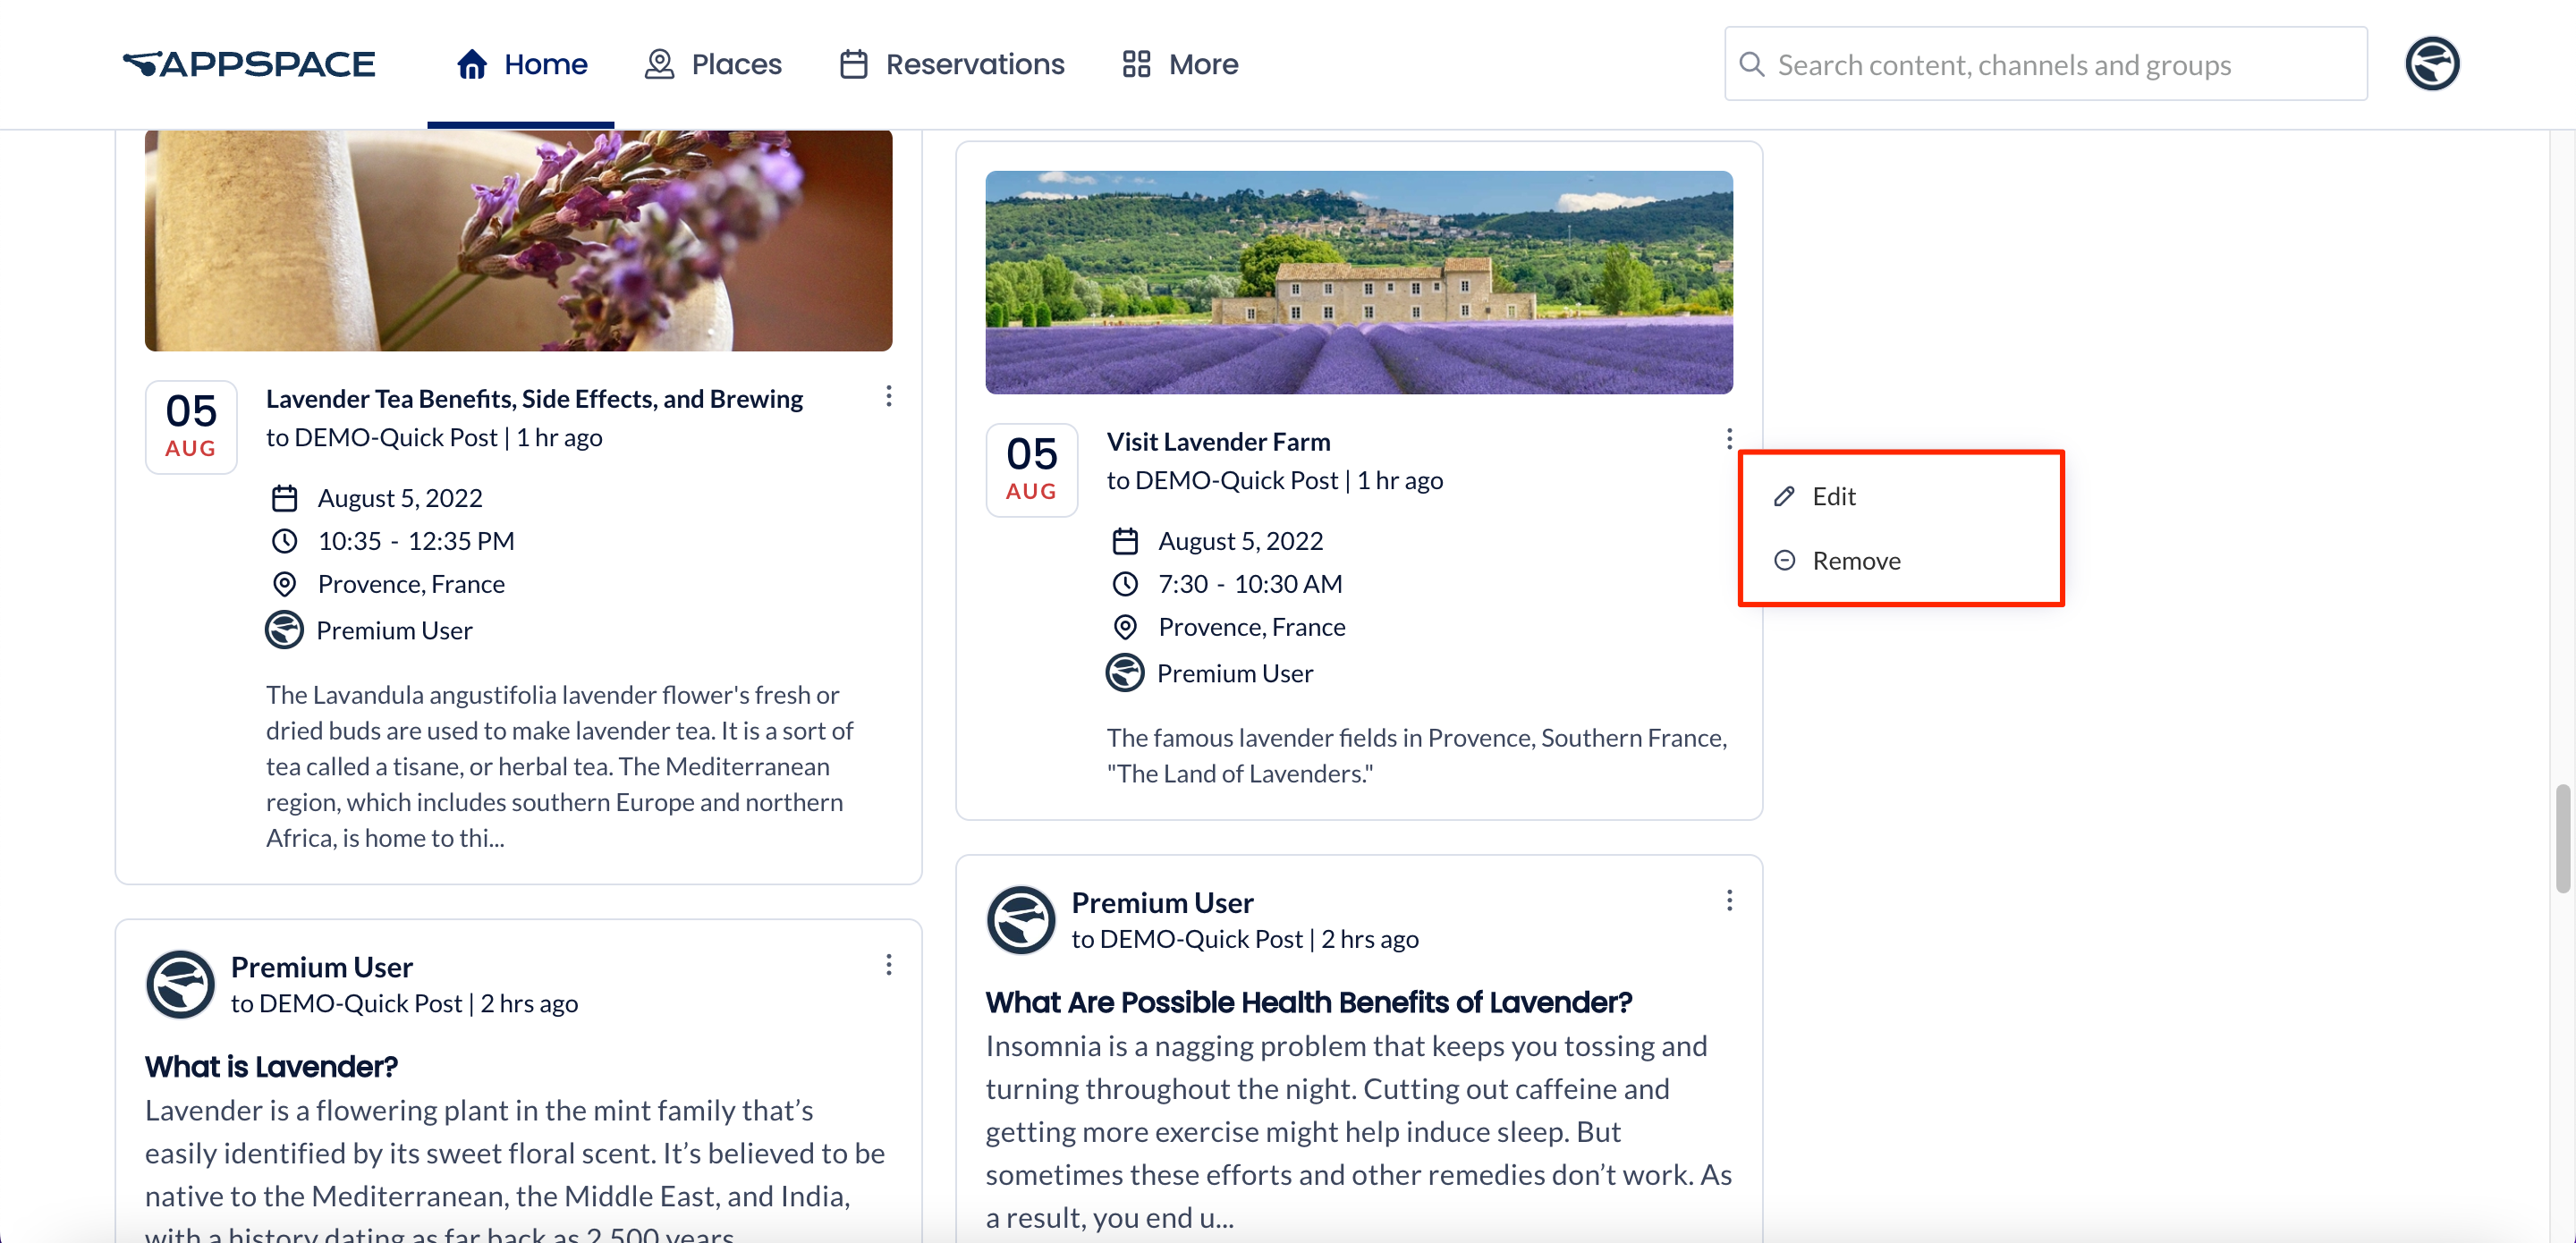

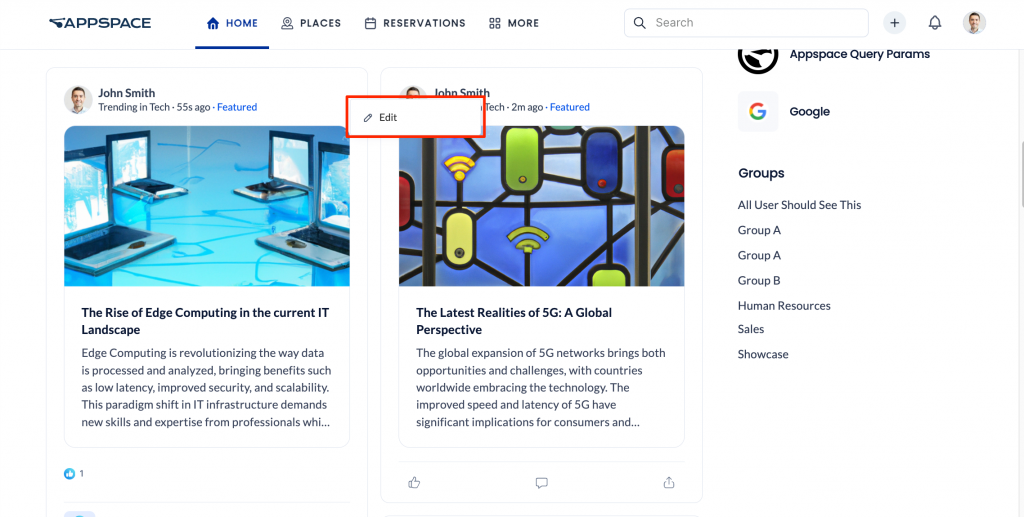
Edit Post in Channels
Follow the instructions below to edit any post in your Employee App:
- Go to the More > Explore section.
- Select the Channels tab.
- Select the Group or Channel that you want to edit the post in.
- In the group or channel, click on the ellipsis next to a post and select Edit. You can also delete your post by clicking the Remove button.
- Proceed to edit the content and click Save.
Edit Page
To update a page, navigate to the News or Explore section of your Employee App. From there, you can edit any page you find there.
Edit Page in News
Follow the instructions below to edit any post in your Employee App:
- To edit, navigate to your desired post in the Home > News section.
- Click on the ellipsis next to a post and select Edit. You can also delete your post by clicking the Remove button.
- Proceed to edit the content.
- Once done, click Publish Updates.

Edit Page in Explore
Follow the instructions below to edit any page in your Employee App:
- To edit, navigate to your desired post in Explore > Pages.
- Select the page you desire to edit.
- Click on the page and select Edit.
- Proceed to edit the content.
- Once done, click Publish Updates.

Edit Story
To update a story, navigate to the News or Explore section of your Employee App. From there, you can edit the stories you find there.
Edit Story in News
Follow the instructions below to edit a story in the Employee App:
- To edit, navigate to the desired story in the Home > News section.
- Click on the ellipsis next to a story and select Edit.
- Proceed to edit the content.
- You can also edit the story settings by clicking the Settings icon. refer to the settings panel in the Create Story section above.
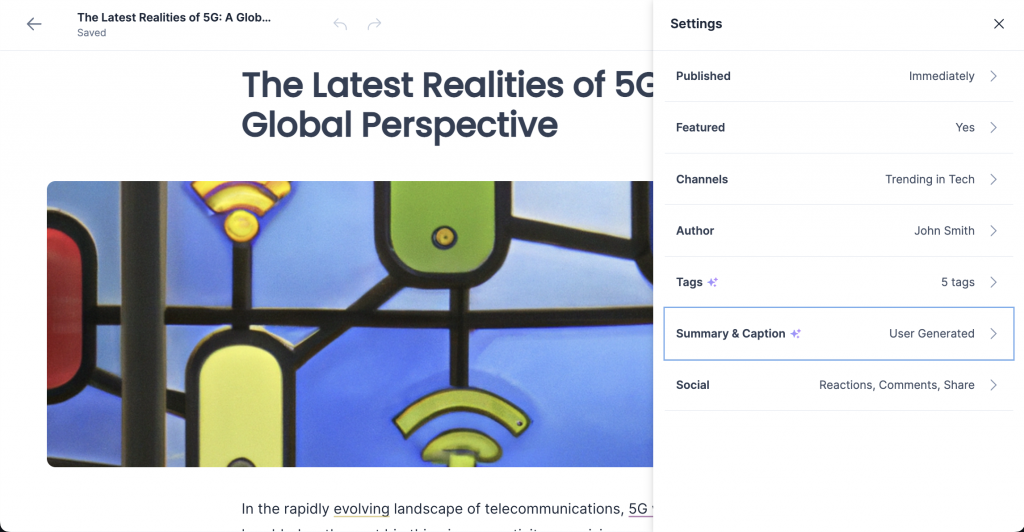
- Once done, click Publish Updates.


Edit Story in Explore
Follow the instructions below to edit a story in the Employee App:
- To edit, navigate to the desired post in Explore > Stories.

- Click the story that you wish to edit.
- On the story page, click the ellipsis icon and select Edit.
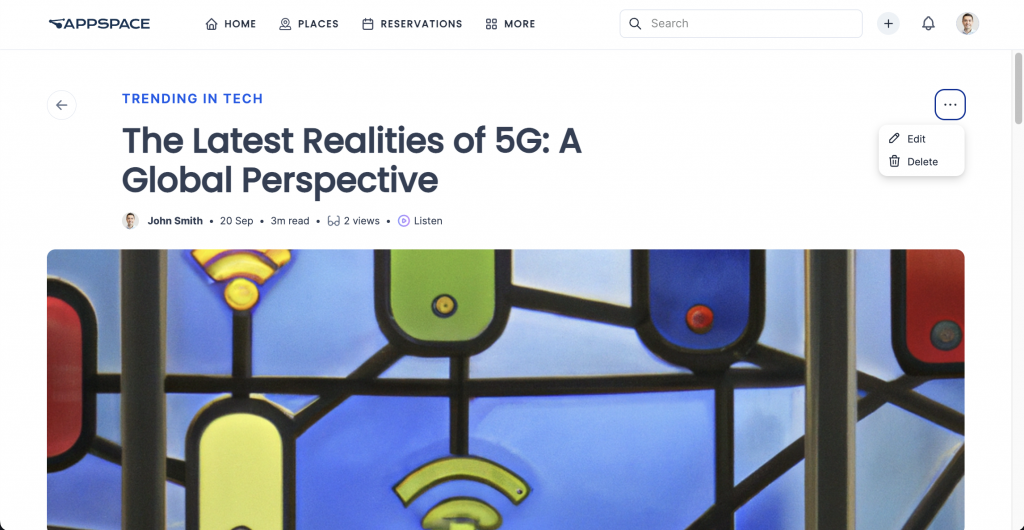
- Proceed to edit the content.
- Once done, click Publish Updates.
Edit Story in Channels
Follow the instructions below to edit a story within a channel in the Employee App:
- Go to the More > Explore section.
- Select the Channels tab.
- Select the Group or Channel that you want to edit the post in.
- In the group or channel, click on the ellipsis next to a story and select Edit.

- Proceed to edit the content and click Save.

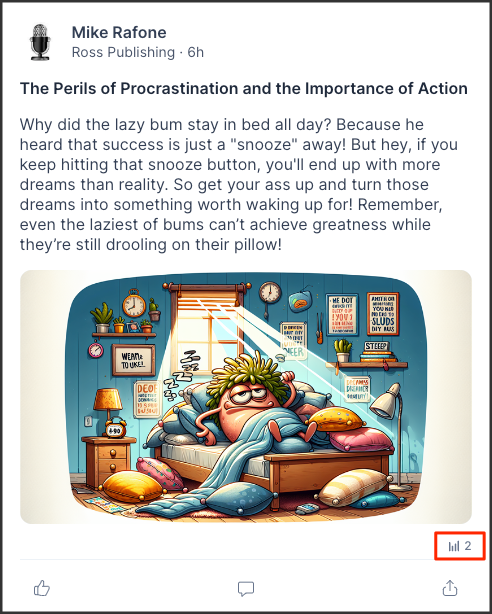
View Quick Post Insight
Quick Post Insights transforms how employees connect and share within your organization. This powerful feature in Employee Apps makes posting updates a breeze, allowing employees to quickly share text, images, and videos, all while providing valuable analytics to measure post performance. By understanding what resonates with their audience, both authors and admins can refine their communication strategies, leading to greater transparency, stronger connections, and a more engaged workforce.
Broadcasts
Broadcasts are important messages published to the Appspace Employee App of teams and employees, such as emergency alerts and warnings, upcoming organizational events (for example, conferences or live town halls), or noteworthy company news. Publishers and Account Owners can create Broadcasts from the Appspace console, and send broadcast messages to the Appspace Employee App homepage of targeted users. Broadcasts will appear in one of two locations, depending on how the broadcast is configured:
- Notification – The broadcast will be displayed as a message above the banner of the Employee App homepage.
- Pinned Content – The broadcast will be displayed as pinned content below the quick post field on the Employee App homepage.
Broadcasts set as Critical will be prioritized before other broadcasts in their respective location.
Click the broadcast to view the entire message.
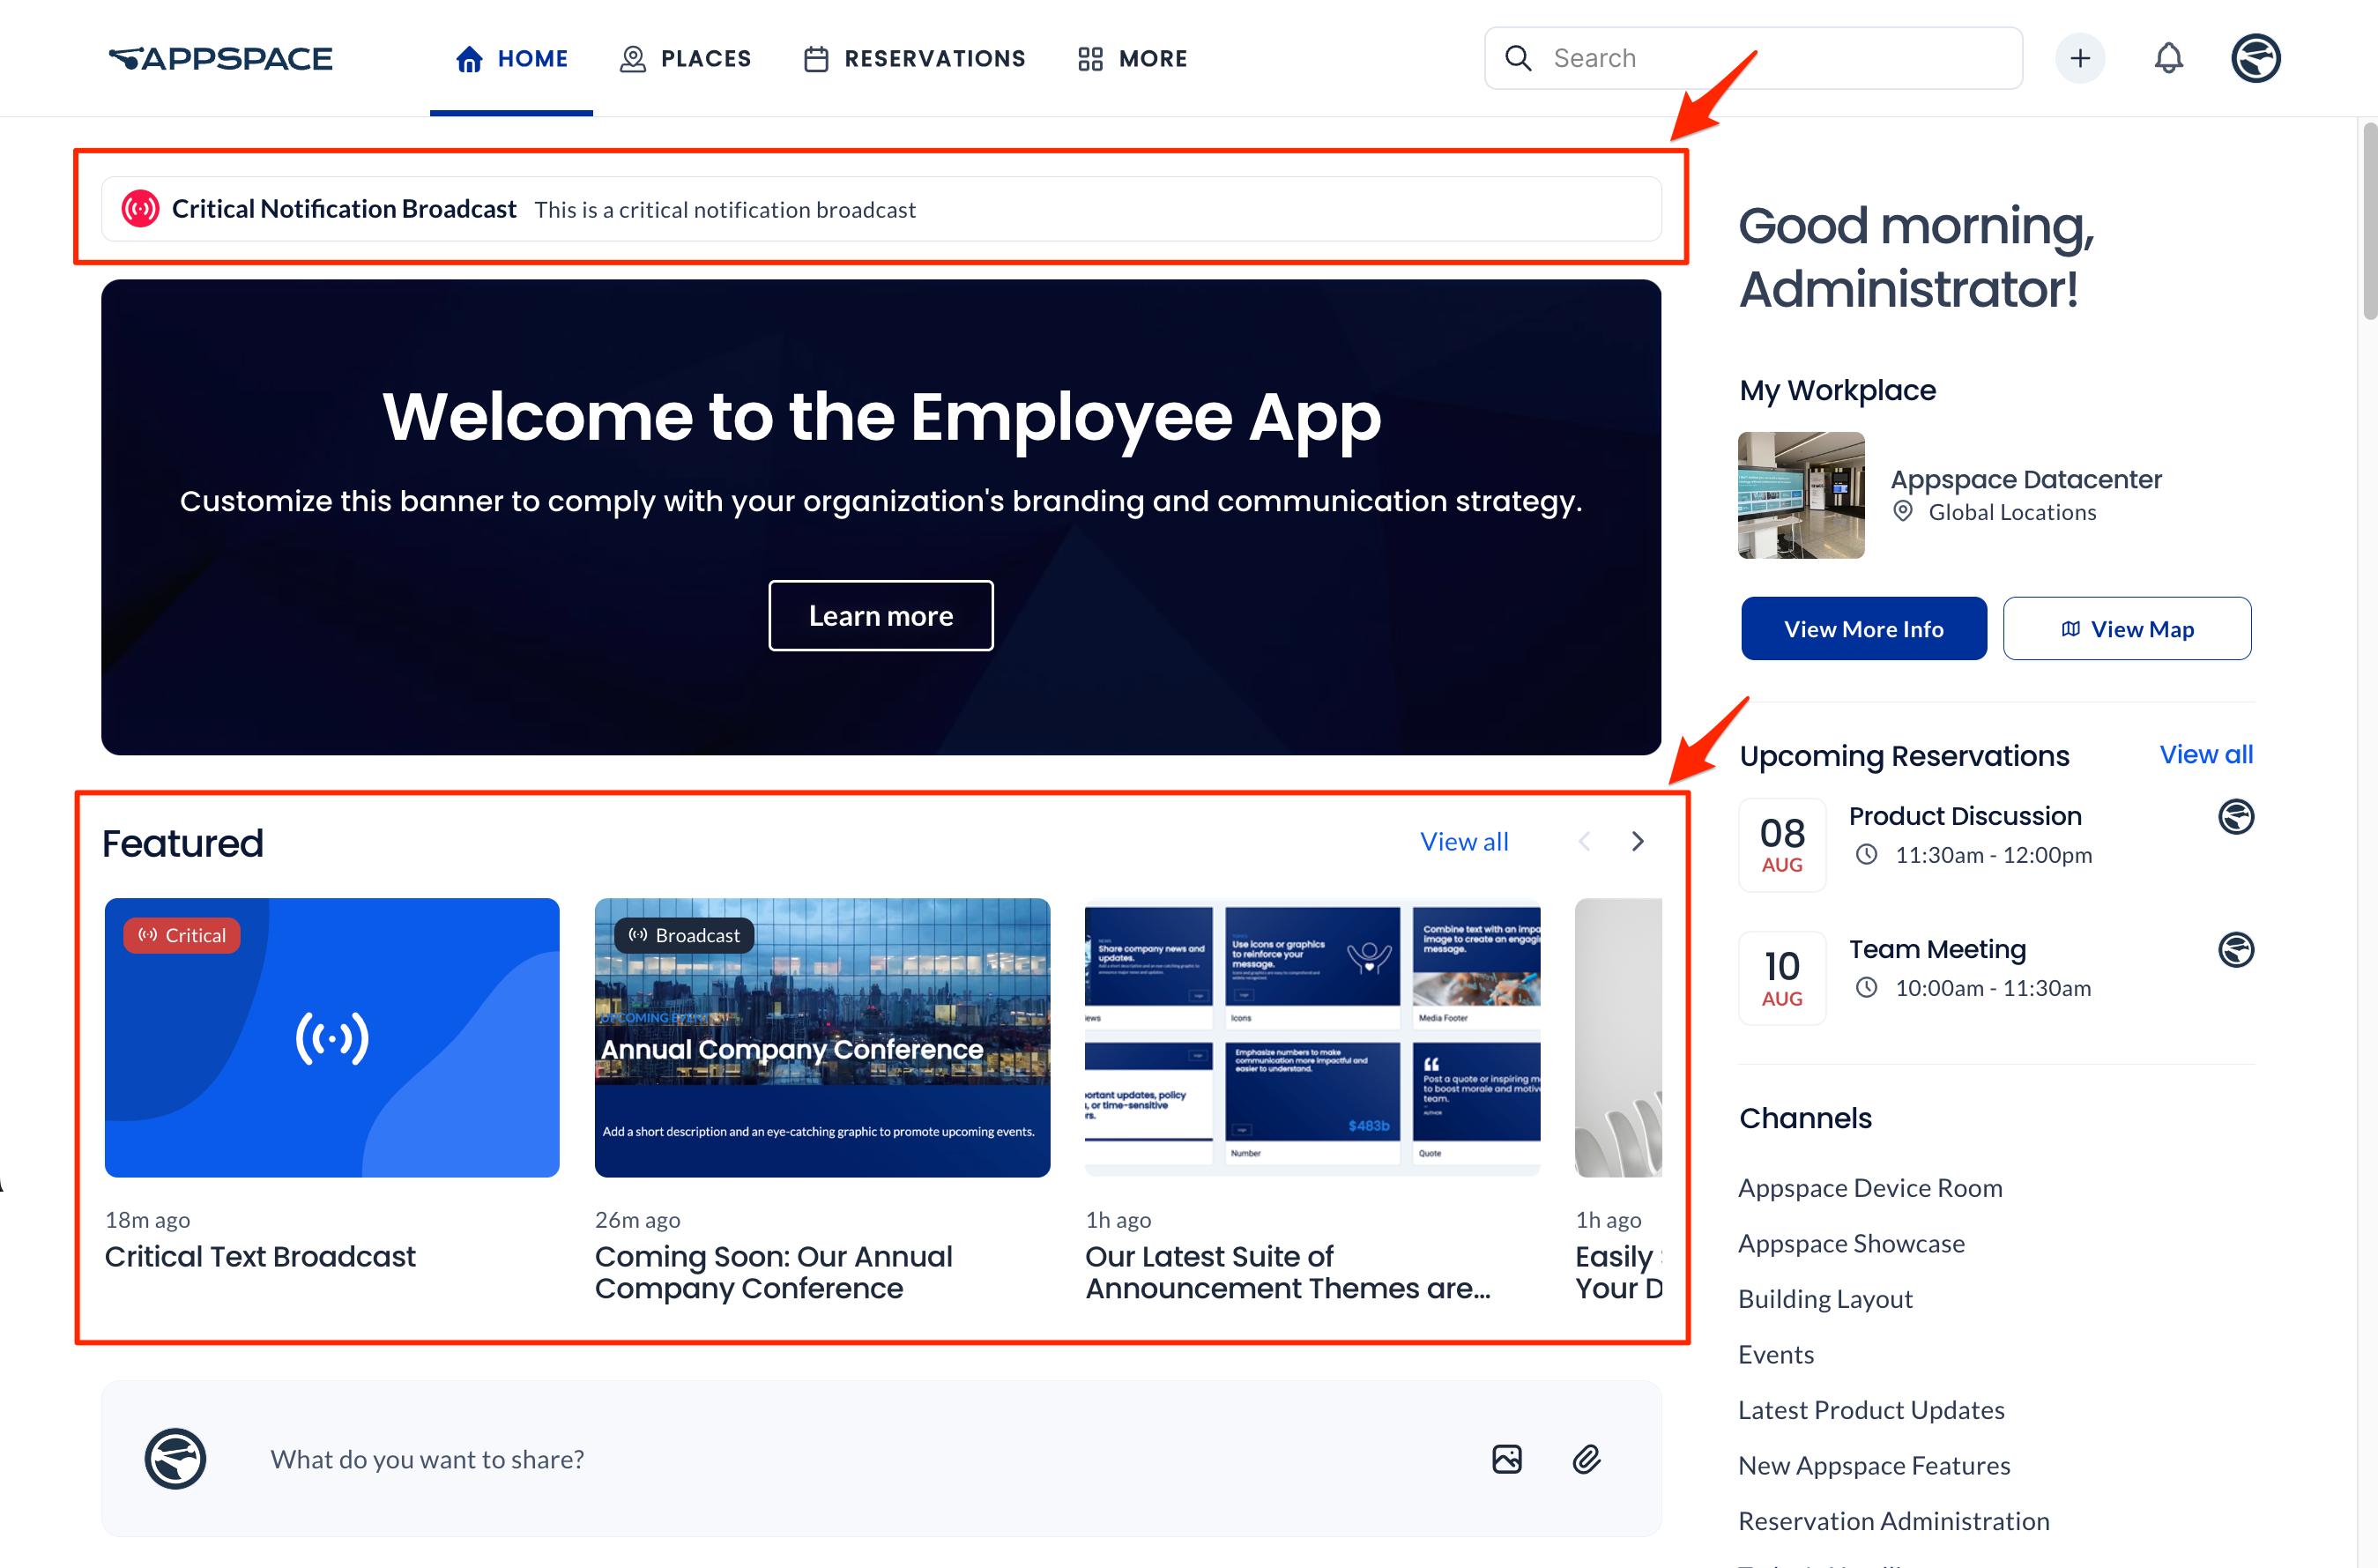
Featured Posts
Featured posts are content that is created in quick posts, event posts, stories, or pages that are set to be featured and published in the Appspace Employee App. Authors, Publishers, and Account Owners who create posts, stories, or pages within the Appspace Employee App can set their content as featured on the Appspace Employee App homepage. Featured posts are displayed in two locations:
- Featured section – Featured posts (including event posts, questions, polls, and praises), pages, and stories are displayed in the Featured section above the quick post field on the Employee App homepage.NoteIn this section, featured content is displayed after critical and regular broadcasts.
 Click on View all to go to the Featured view, which lists all featured posts, stories, and pages in chronological order. This view allows you to perform the following options:
- Select one of the sort options on the left bar to sort content by the latest (All) or Most popular.
- Search the titles of featured content by clicking the search icon on the right, then entering a letter or keyword.
- View tags related to featured content under the Tags section. Select a tag to view posts under the tag.
- Click on a post, story, or page to view it in full.
- Home content section – The post, story, or page is marked as Featured on the home content section on the Employee App homepage.
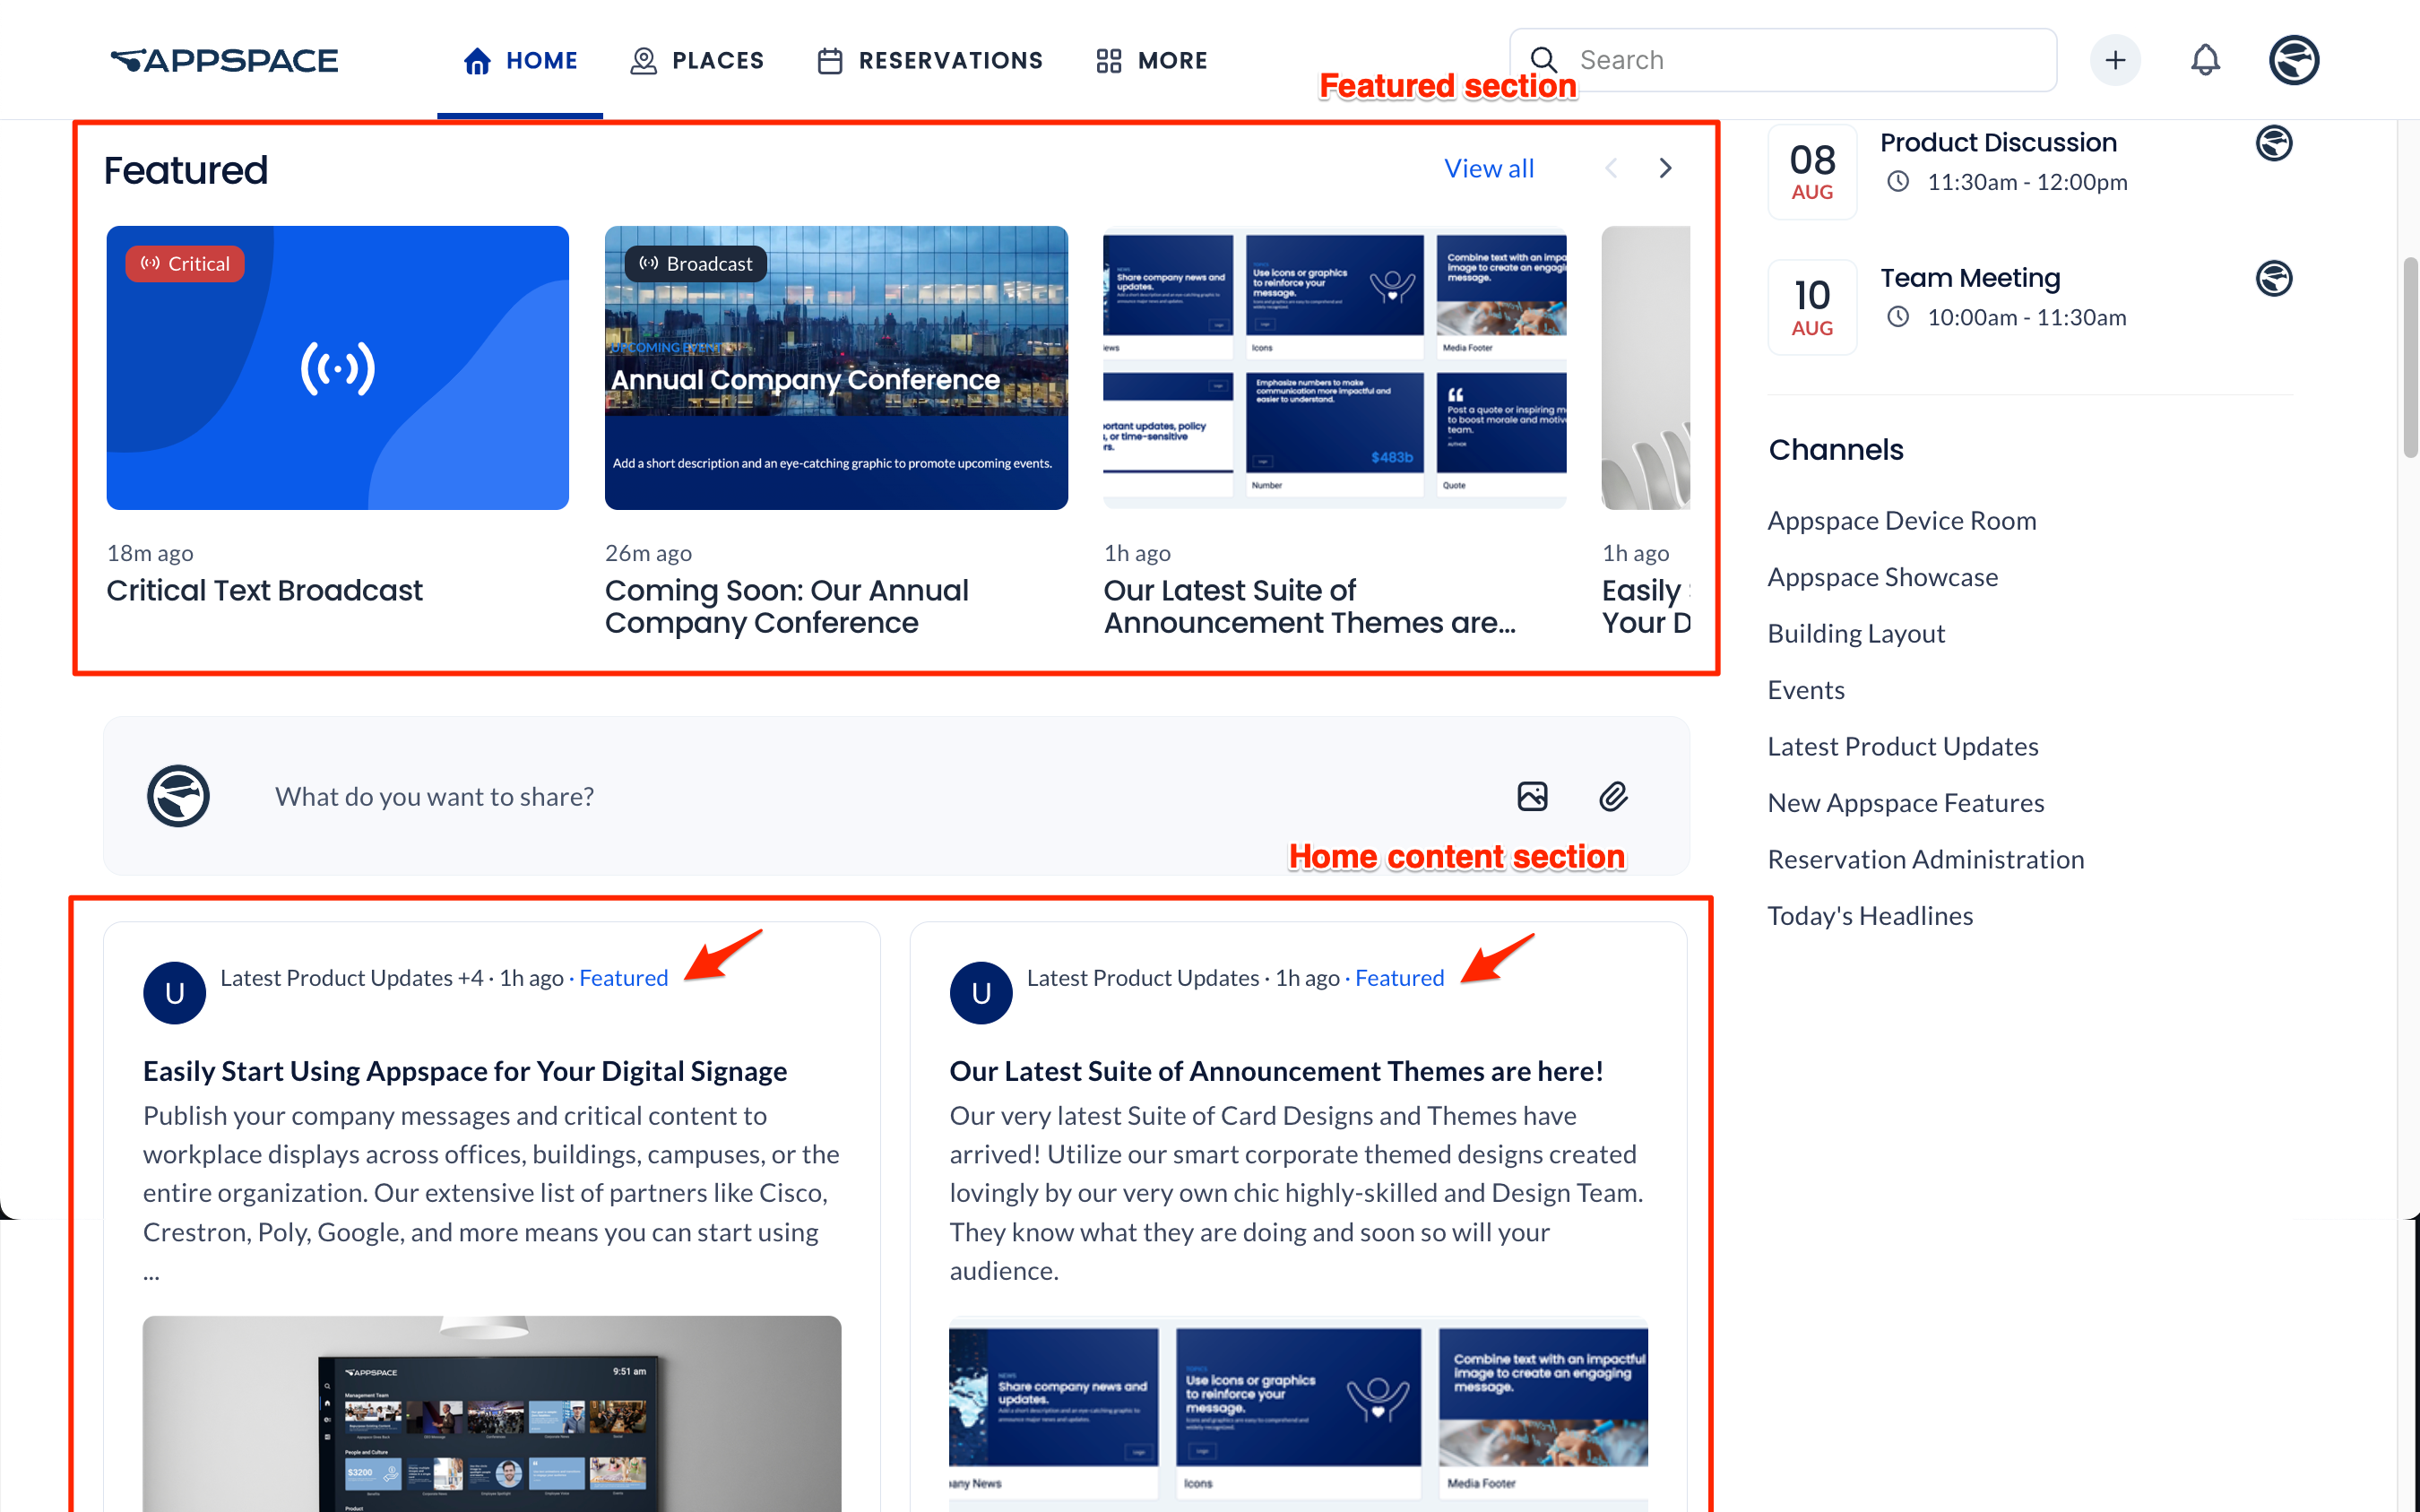
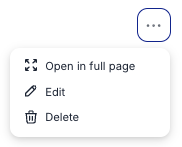
Click the content to view the post, story, or page in a window. When in window view, you can click on the ellipsis in the upper right corner of the window of an event post, story, or page and select Open in full page to view it as a full page.
My Workspace
The My Workspace section displays the building that is set as the home location of the employee, allowing employees to quickly create a building pass or a workspace reservation the same way they would at Places at the building they are most frequently working at.
Clicking the View All link redirects employees to the Building Pass, or Workspaces (if building pass is not enabled) sections on the Places tab.
This section is only available if Places is enabled by your organization.
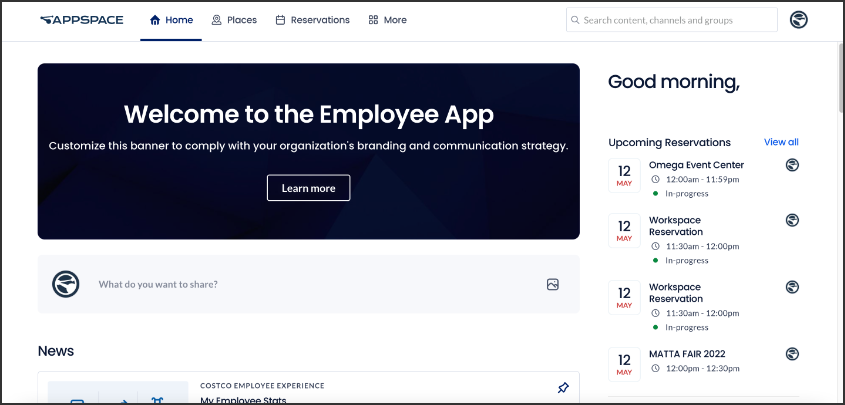
Upcoming Reservations
Employees would be able to quickly view four of their current and upcoming building passes, or workspace reservations in this section. For current workspace reservations, they would be able to extend or end the reservation, while clicking the View All link redirects the employee to the Reservations tab.
This section is only available if Places is enabled by your organization.
Home
The Home tab displays the latest posts (including events, questions, polls, and praises), stories, and pages published to you or your user group. The items in this section allow you to perform the following options:
- (New) You may bookmark a post (including event posts, questions, polls, and praises), story, or page by moving your mouse over the item, clicking the ellipsis icon (…), and selecting Bookmark. Bookmarked articles are saved to the Bookmarks widget (which must be enabled in App Theme Settings) and to your People profile (under the Bookmarks tab).
- You may indicate your attendance for events that require RSVP, click content to view in detail, or select one of the listed channel groups on the right to view all content posted to that channel group.
- You can identify Featured posts, stories, and pages in this section with the Featured mark. Click the Featured mark link to go to the Featured page which lists all featured content in chronological order.
- (New) If a post, event post, question, poll, praise, or comment is in a different language, a See translation option will appear below the text. Click the option to auto-translate the text.
- Apart from viewing the latest content, you’ll also be able to make reservations and view your upcoming reservations for workplace resources that have been configured within your organization.
To view all other available or older content, such as more posts, stories, and pages, go to the Explore or Video tabs (in the More section).
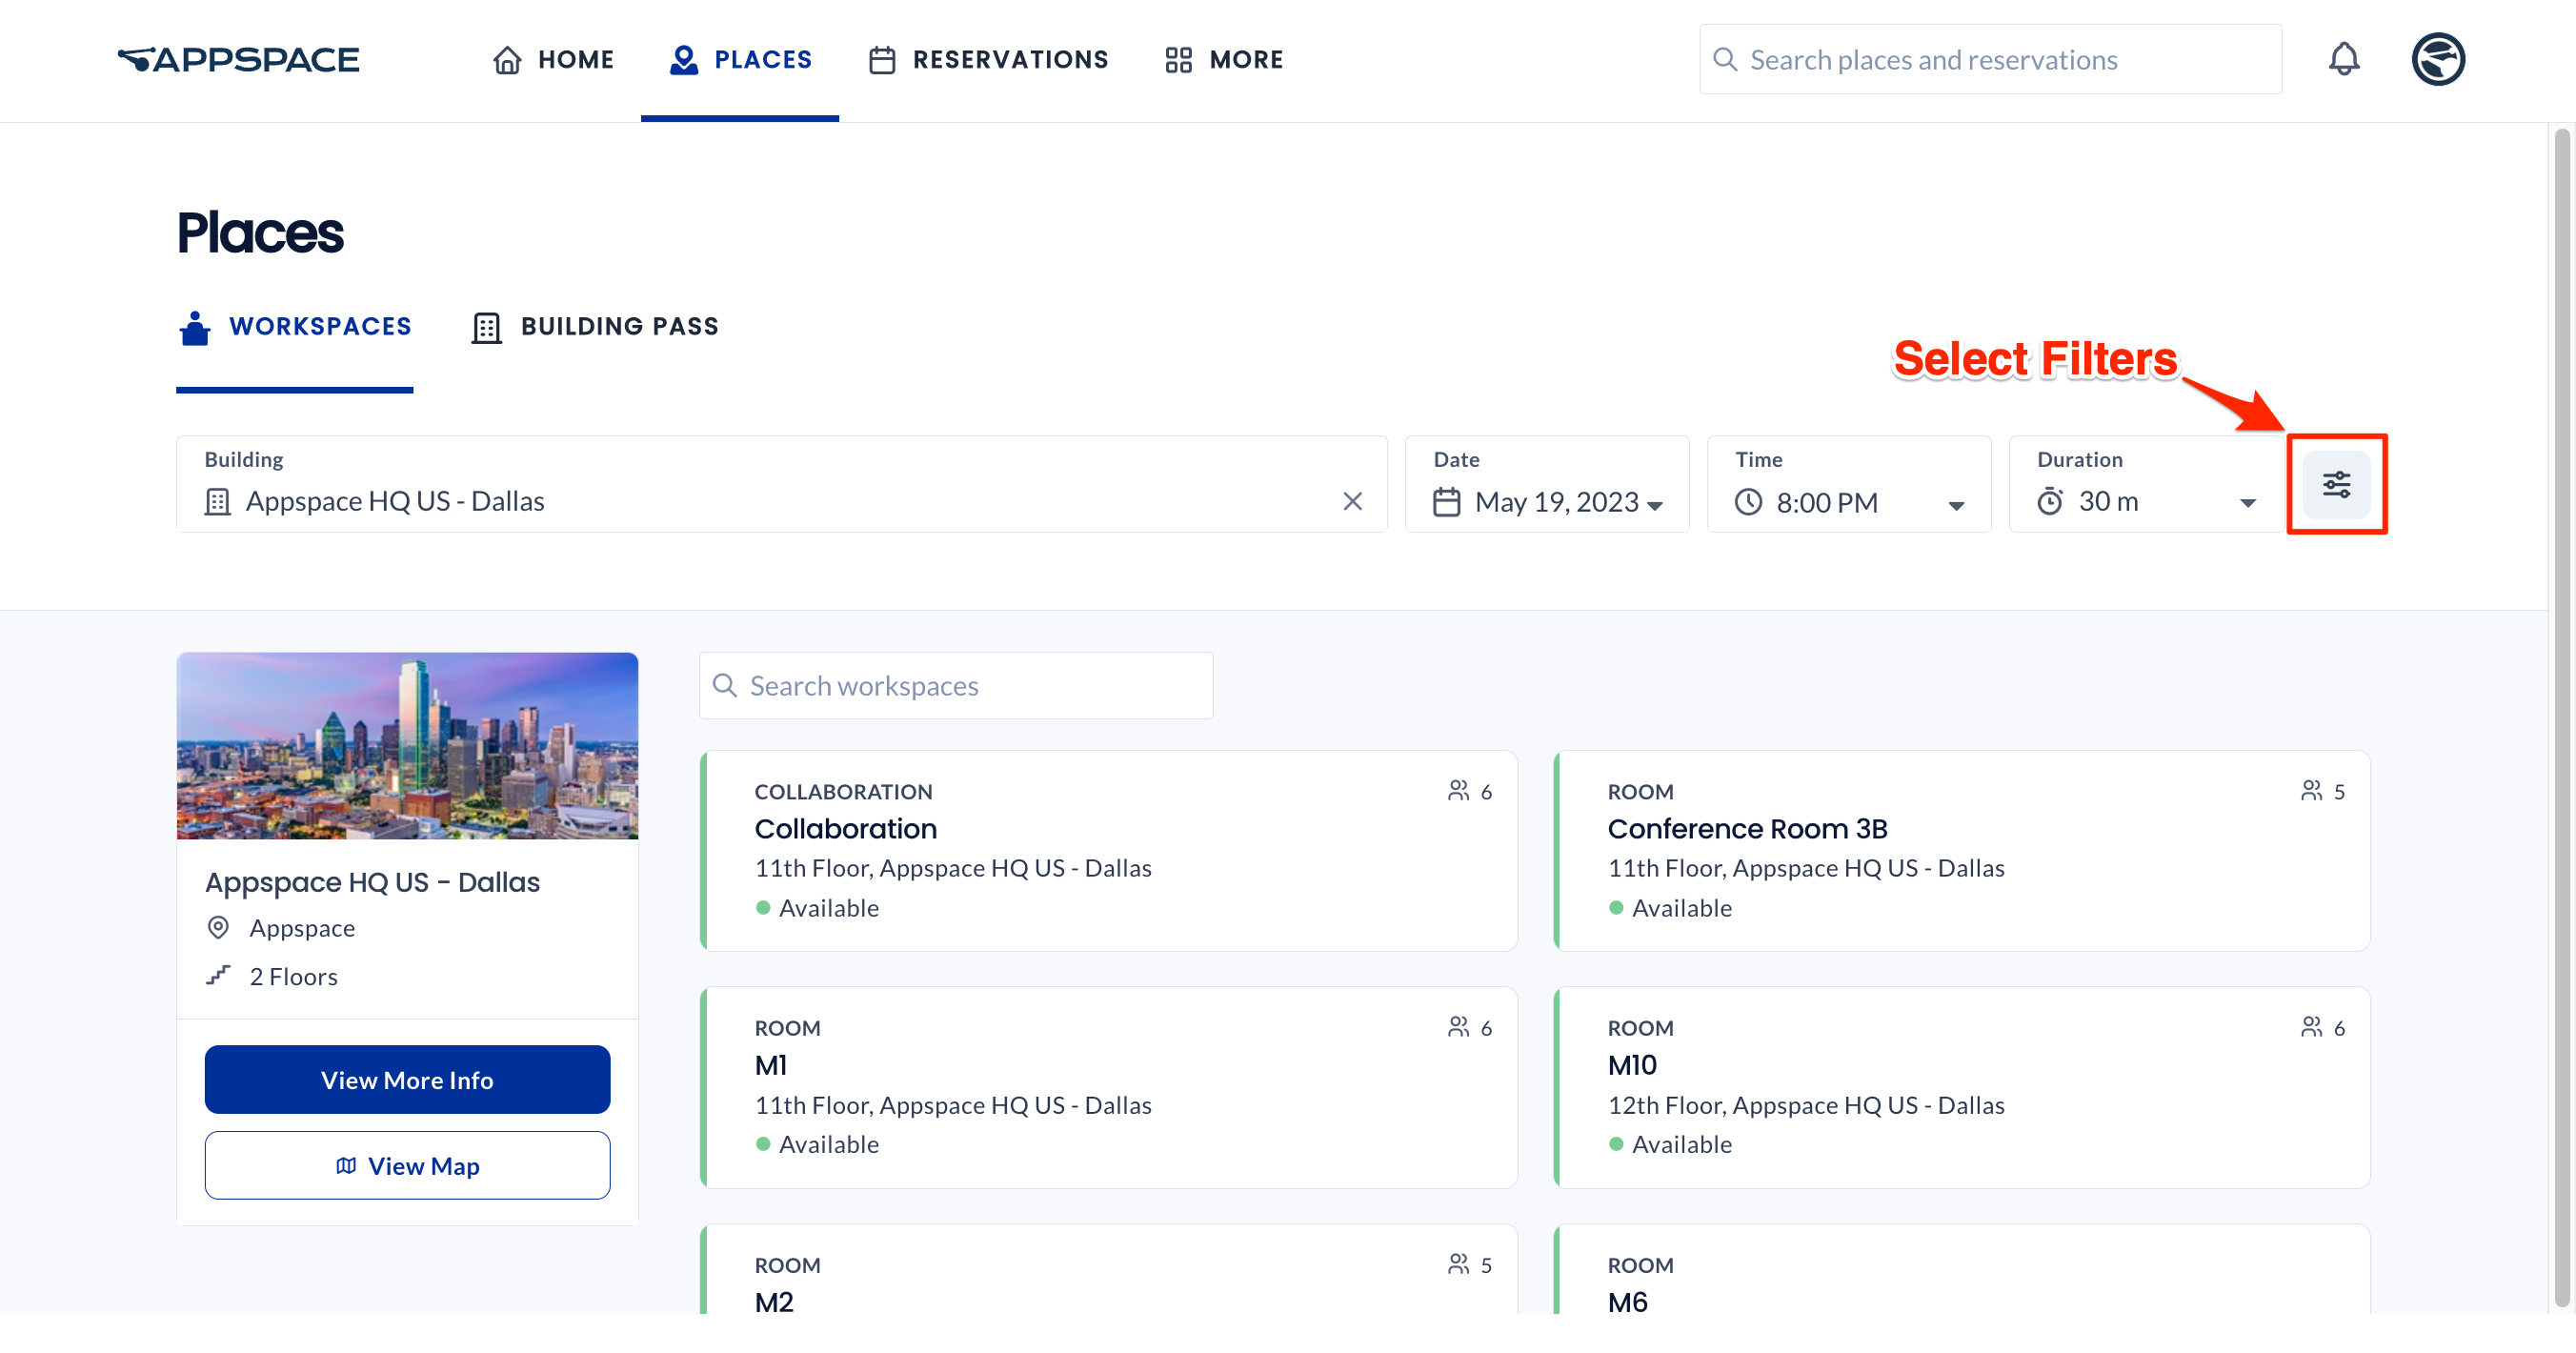
Places
The Places tab includes three sub-tabs: Workspaces (default selected), Building Pass, and At The Office.

Workspaces
The Workspaces tab will list your most recent building and workspace reservations/bookings, for easy access and quick reservations.
This section may be empty on first use if no reservations have been made thus far. However, if your home location has buildings with bookable resources, these buildings will always be listed at the top, regardless of reservation history.

- Search – The search bar on the top menu bar is now localized to this Workspaces tab. Type in a letter or keyword to search for available buildings or resources. The search results will display all reservable and non-reservable resources, such as Rooms, Spaces, and even Points of Interest.
- Building – Type in a letter or keyword, and select a building from the drop-down menu. Use the Date, Time, and Duration filters to narrow down your search for buildings. If your home location has buildings with bookable resources, these buildings will always be listed at the top.
Once you select a building, the building is displayed on the left, and all workspaces in that building are displayed on the right.
-
-
- Filters – Narrow down the resources in your selected building based on the floor, zone, workspace type, resource status (Available/Unavailable), capacity, and facilities available in the resource.

- Show Colleagues – Turn on this option to see colleagues that are booked with a resource. However, colleagues will remain hidden if their workspace reservation is set to private, unless you are the host or an attendee of the meeting.
- Recurring Reservation – Turn on this option if the reservation would occur periodically. Enter the number of times the reservation occurs in the Repeats every field and drop-down menu:
- Day – The reservation occurs every set number of days.
- Week – The reservation occurs every set number of weeks.
- In the Repeats on drop-down menu, you may select if the reservation is repeated on the day of each week. For example:
-
- Reservation is repeated every Monday, Wednesday, and Friday of each week.
-
- In the Repeats on drop-down menu, you may select if the reservation is repeated on the day of each week. For example:
- Month – The reservation occurs every set number of months.
- In the Repeats on drop-down menu, you may select if the reservation is repeated on the date, or day of each month. For example:
- Day 6 – 6th of each month.
- The first Sunday of each month.
- In the Repeats on drop-down menu, you may select if the reservation is repeated on the date, or day of each month. For example:
- Year – The reservation occurs every set number of years.
- In the Repeats on drop-down menu, you may select if the reservation is repeated on the date, or day of each year. For example:
- 6 June – 6th of June each year.
- The first Sunday of June each year.
- In the Repeats on drop-down menu, you may select if the reservation is repeated on the date, or day of each year. For example:
- Select when the reservation Ends:
- Never – The recurring reservation never ends.
NoteWhen set to Never Ends, the maximum recurring reservations will be determined by the reservations provider:
- Appspace Provider: Maximum of 730 meeting instances, or meeting instances until the year 2100, whichever comes first.
- After – The recurring reservation ends after the set number of occurrences.
- On – the recurring reservation ends after the set date.
- Never – The recurring reservation never ends.
- Filters – Narrow down the resources in your selected building based on the floor, zone, workspace type, resource status (Available/Unavailable), capacity, and facilities available in the resource.
- View More Info – Click this button to display more information about the building, such as capacity, number of floors, and any applied restrictions. You may also directly reserve a building pass to this building.
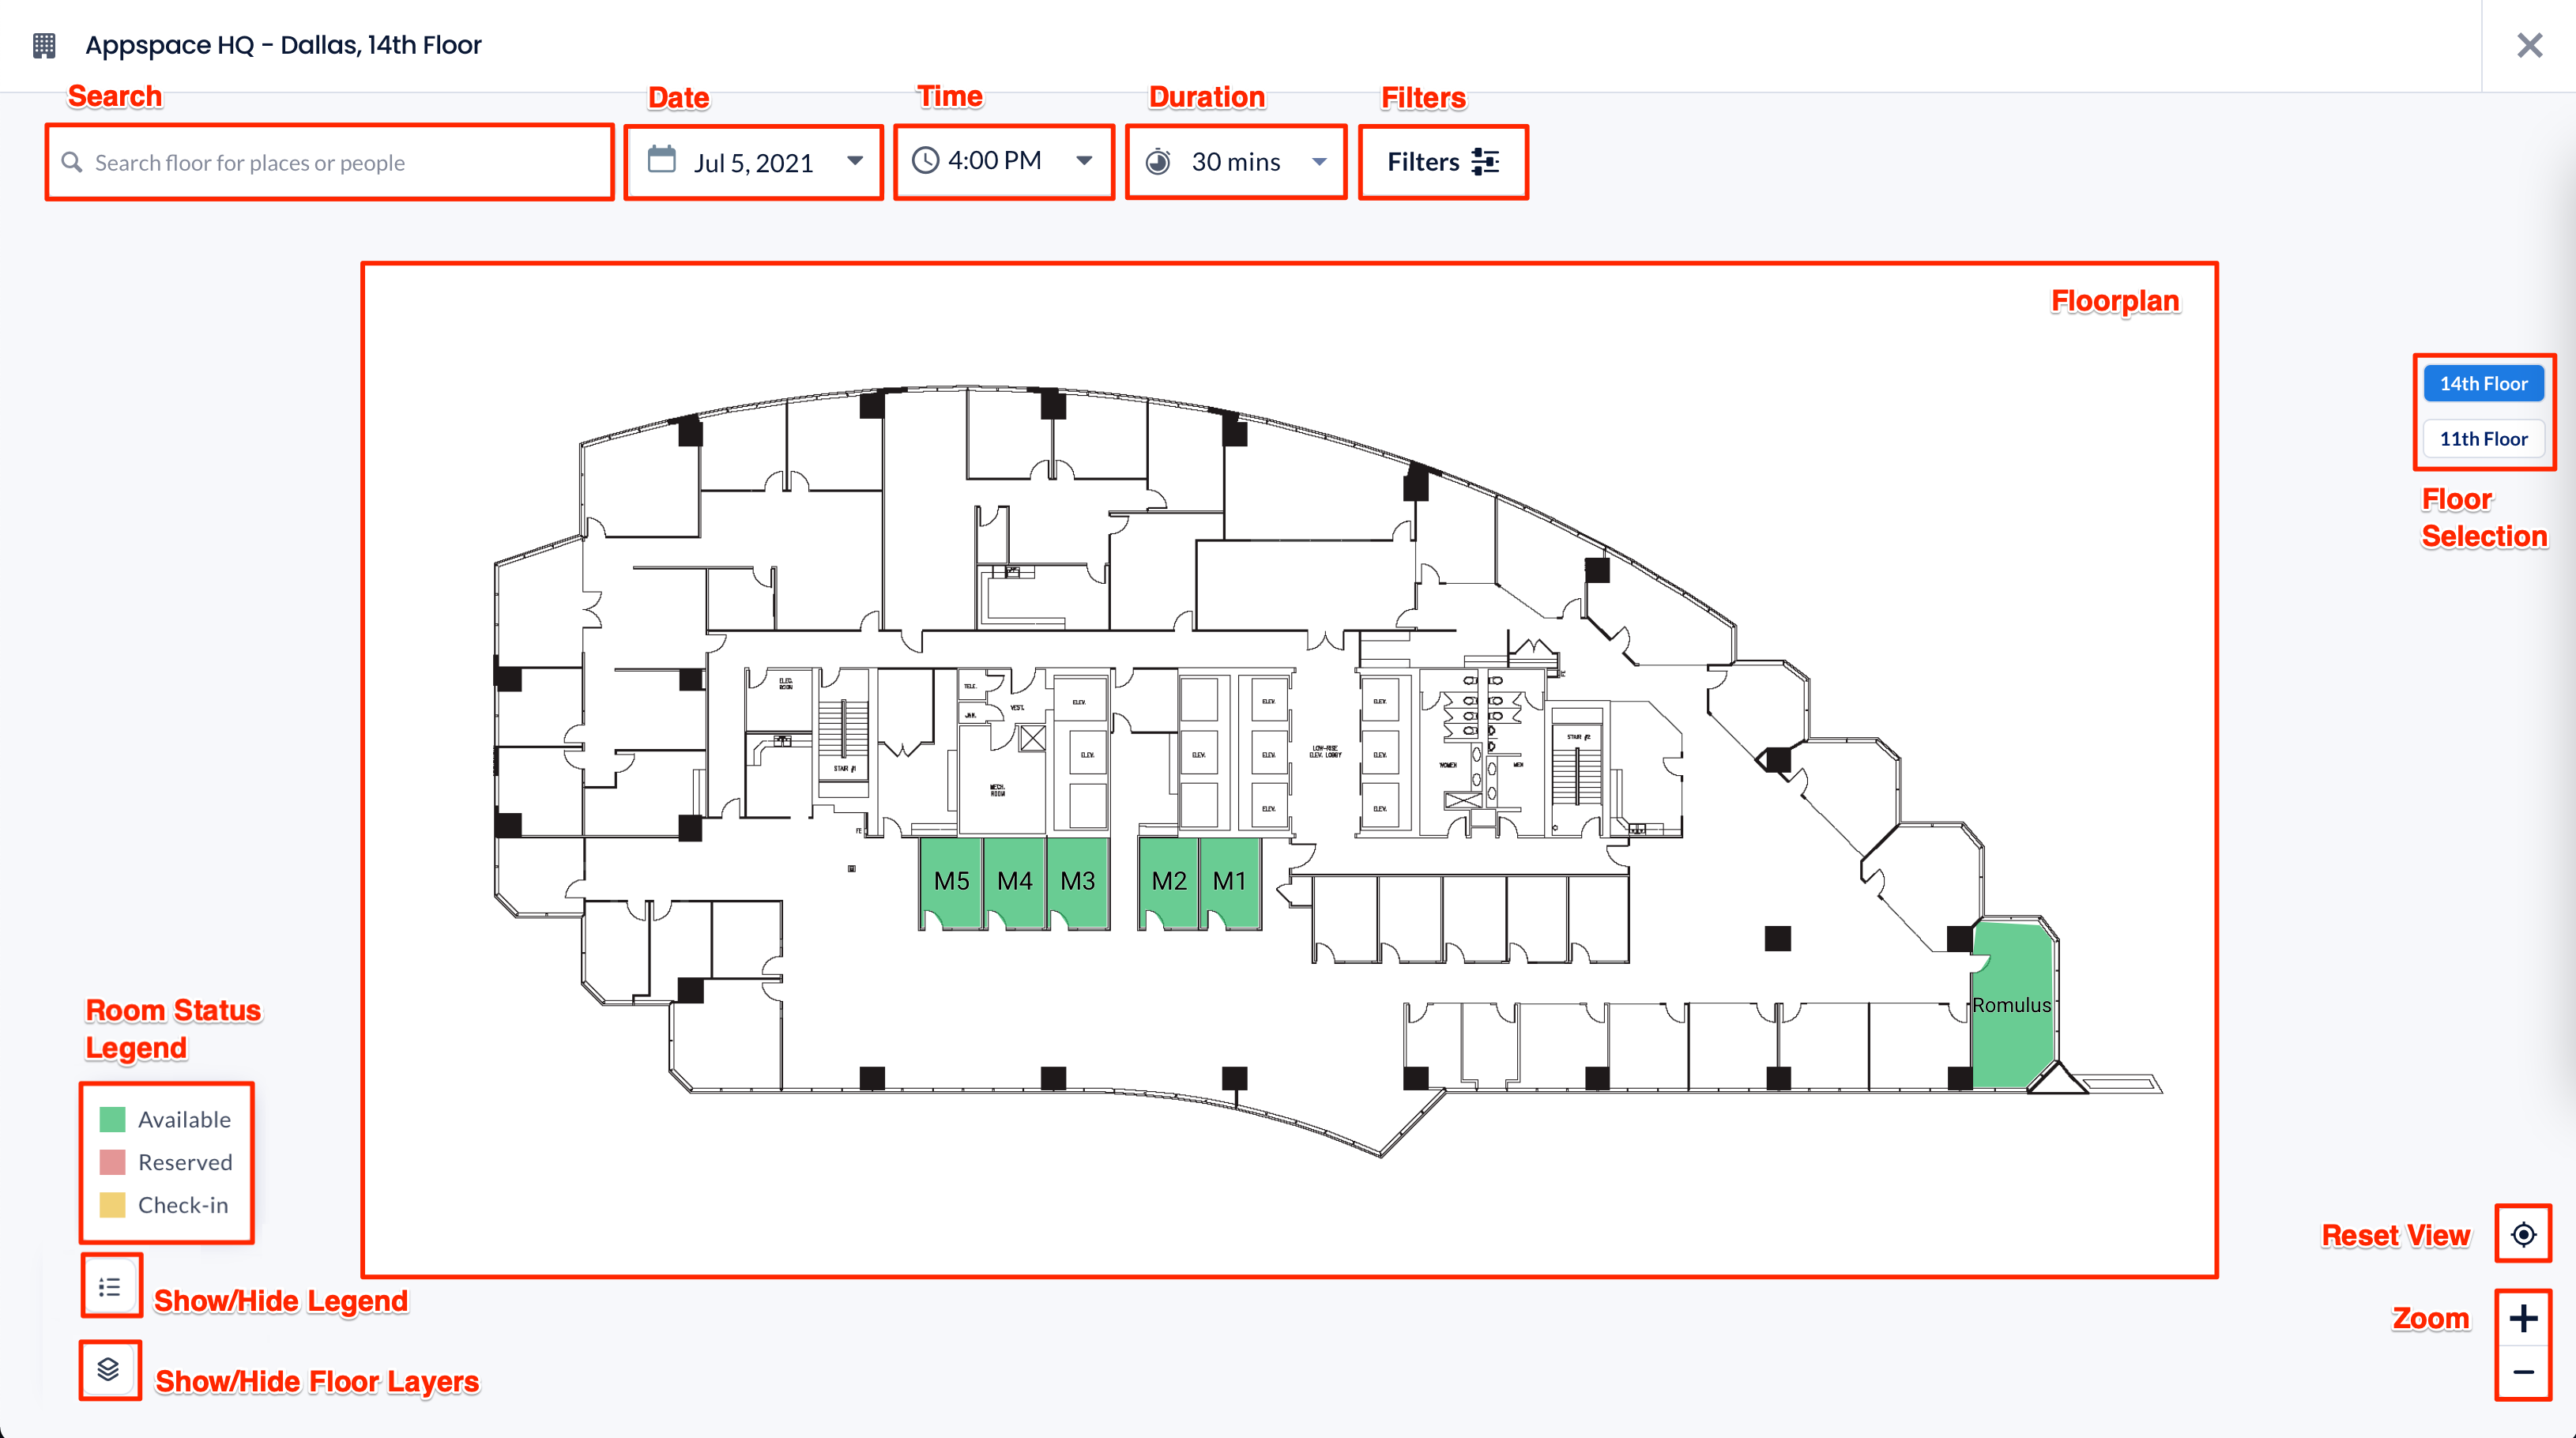
- View Map – Click this button to display the floorplan in map view. The floorplan will display all available workspaces and resources on the selected floor (if applicable).
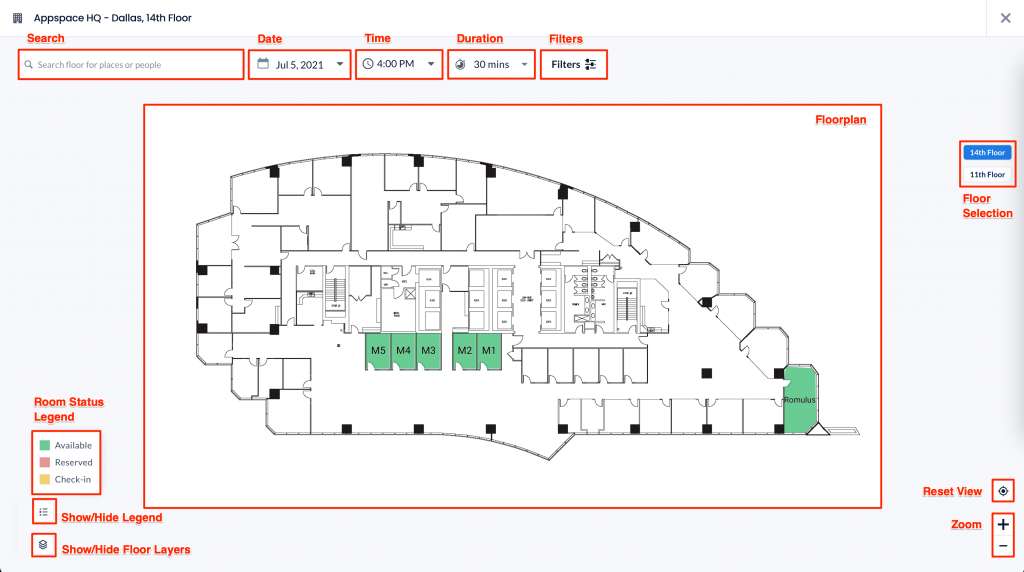
On this floorplan view, you may do the following:- Search – Type in a letter or keyword to search for and display floors, workspaces, or people (colleagues) in this building. Use the Date, Time, and Duration filters to narrow down your search. Workspaces and people (colleagues) who are on a different floor from the one currently shown will also be displayed in the search result. However, people in workspace reservations that are set to private will not appear in the results.
- Filters – Use the Filters button to narrow down the search based on the floor, zone, workspace type, resource status (Available/Unavailable), capacity, and facilities available in this building.
- Floor Selection – Select an available floor to view the floor plan and all its available resources. If there are no floors in this building, this option will not be available.
- Zoom – Use the + or – buttons to zoom in or out.
- Reset View – Reset to the default floorplan view.
- Room Status Legend – indicates the colors for room status. These colors may be customized by an administrator to follow your organization’s preferences. The legend will only display colors and room statuses that are being used and hide those that are not being used.

- Select Layer – Select a floor layer to display on the floor plan. -new

-

Making a Reservation
Once you’ve found the desired resource either in normal view or the map view, you may reserve the resource. Refer to the Reserve a Workspace, Desk, or Room – Employees article for detailed instructions.Pathfinding
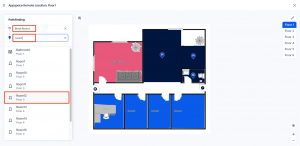
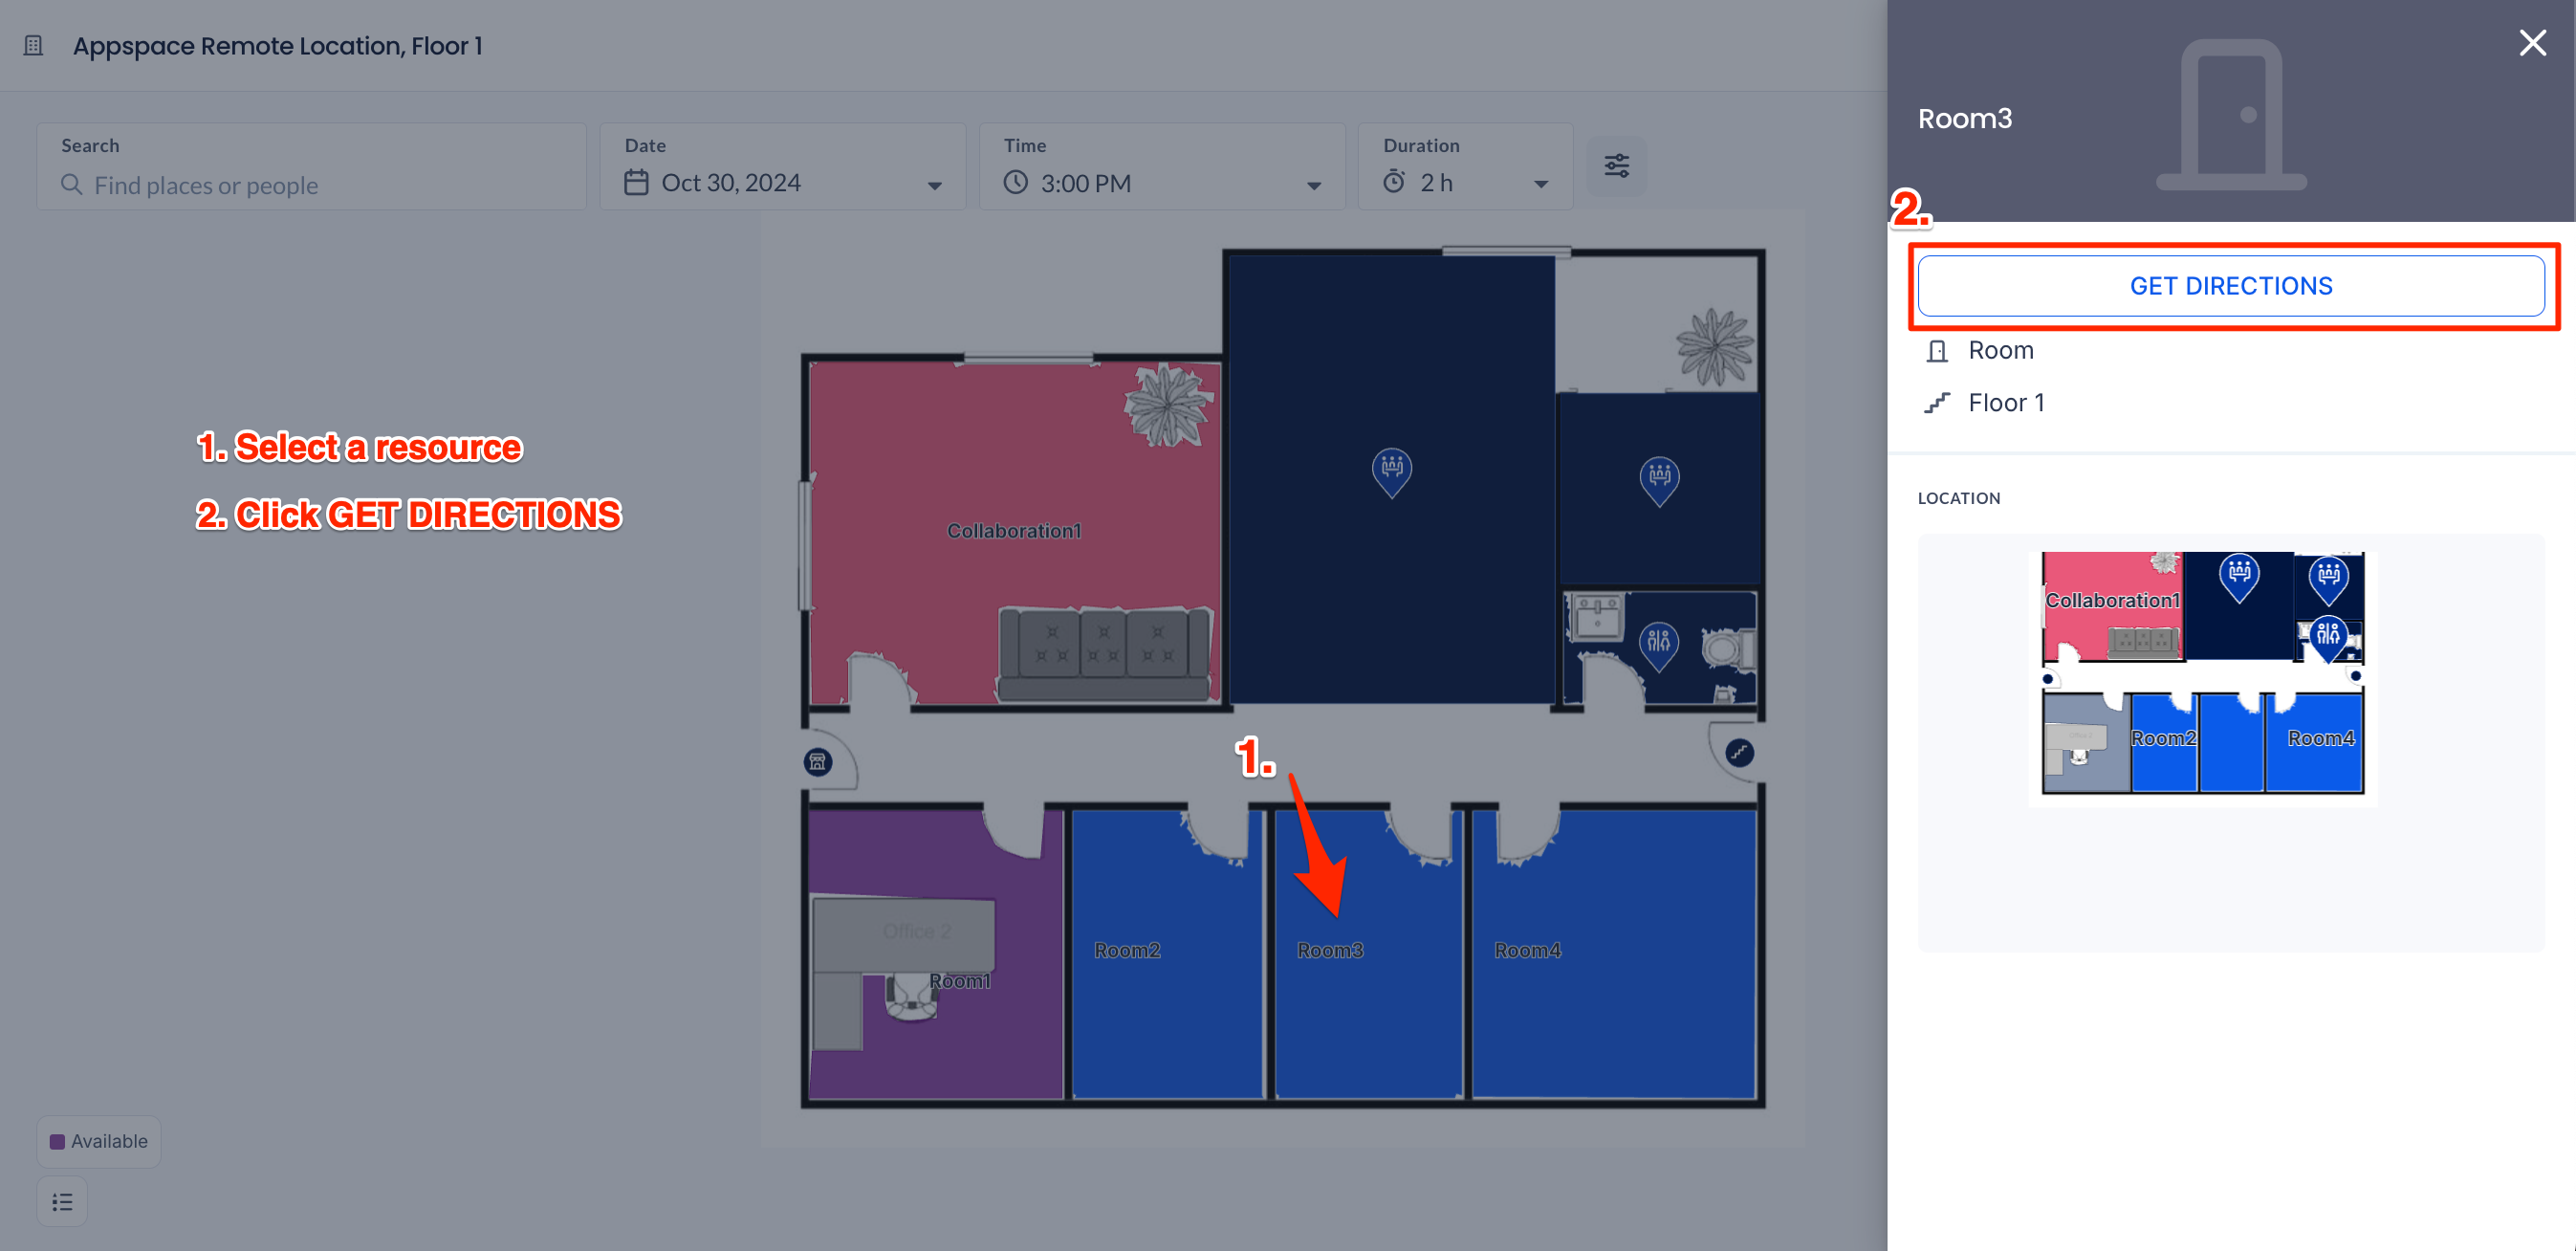
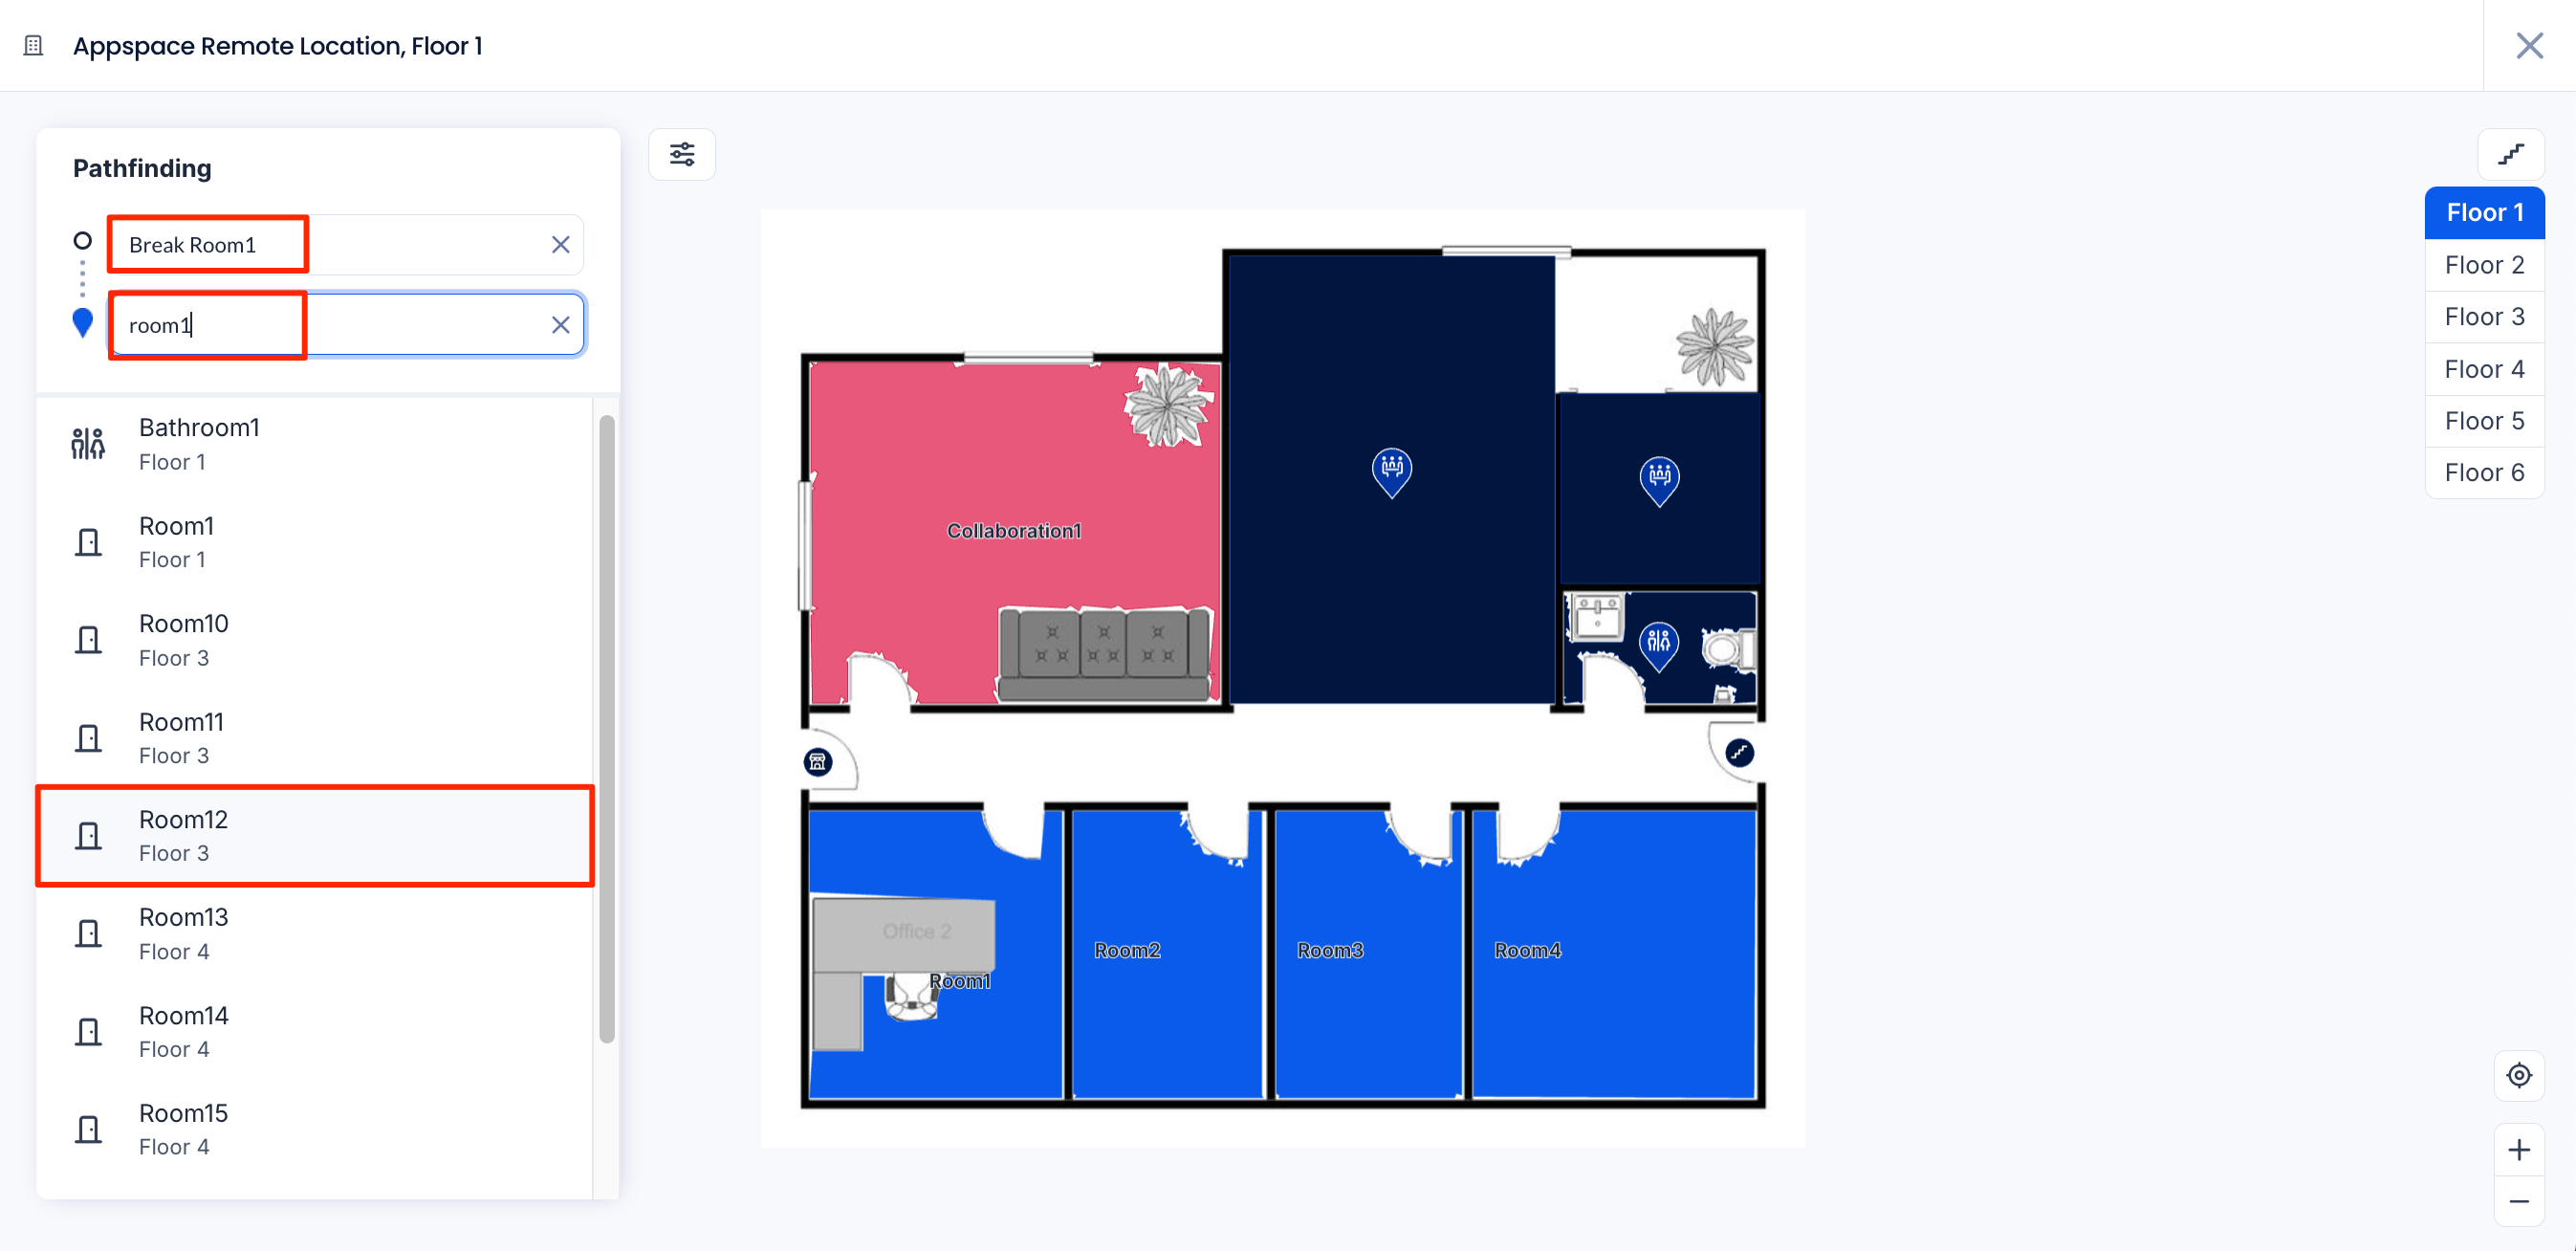
(New) Pathfinding allows users to quickly find directions between resource locations, such as rooms, workspaces, and points of interest (POIs), by defining a start and end location in the system. The system displays the route on the map, offering straightforward point-to-point directions without needing to capture the user’s position, providing a seamless navigation experience for employees and visitors. It also includes accessibility features that help users find routes that bypass obstacles, such as stairs.
Perform the following steps to use the pathfinding feature to display directions to a resource, such as rooms, workspaces, and points of interest (POI), on the floor map of a building.
- Log in to your Employee App with your Appspace Premium User credentials.
- Click Places from the menu, and click the Workspaces tab.
- Select a building or type a building name in the Building drop-down menu.
- After you have selected the building, click View Map.
- The map layout view of the default floor is displayed. Select a different floor from the right column if required.
- Use one of the following methods to select available resources, such as rooms, workspaces, and points of interest (POIs).
- Method 1 – To get directions starting from the Building Starting Point:

- On the map layout, click on the desired resource (room, workspace, or POI) and click Get Directions.
- Under the Pathfinding section, click the first field to set the starting point.
- The directions from the Building Starting Point to the selected resource will be displayed.
- Method 2 – To get directions from a starting point other than the Building Starting Point:
- On the map layout, click on the desired resource (room, workspace, or POI) and click Get Directions.
- Under the Pathfinding section, click the first field to set the starting point.
- With the field selected, type in the name of the resource (room, workspace, or POI), or click on the desired resource on the map layout.
- Click on the second field to set your destination. You can either type the name of the destination resource and select it from the drop-down list or, if it’s on the same floor as the starting point, select it from the map layout.
- The directions from the starting resource to the destination resource will be displayed.
- Method 1 – To get directions starting from the Building Starting Point:
- If the pathfinding involves multiple floors, use the left and right arrows to switch between the starting and destination floors.
- The starting floor will display directions from the starting point to the nearest available staircase, escalator, or elevator.
- The destination floor will display directions from the staircase, escalator, or elevator to the destination resource.
- Handicapped users who wish to use an elevator or wheelchair access can click the Options icon and select Avoid stairs.
Building Pass
The Building Pass tab will list all the buildings available in your location. Each building block indicates the building name, location, and its status (Available, Unavailable, Restrictions).
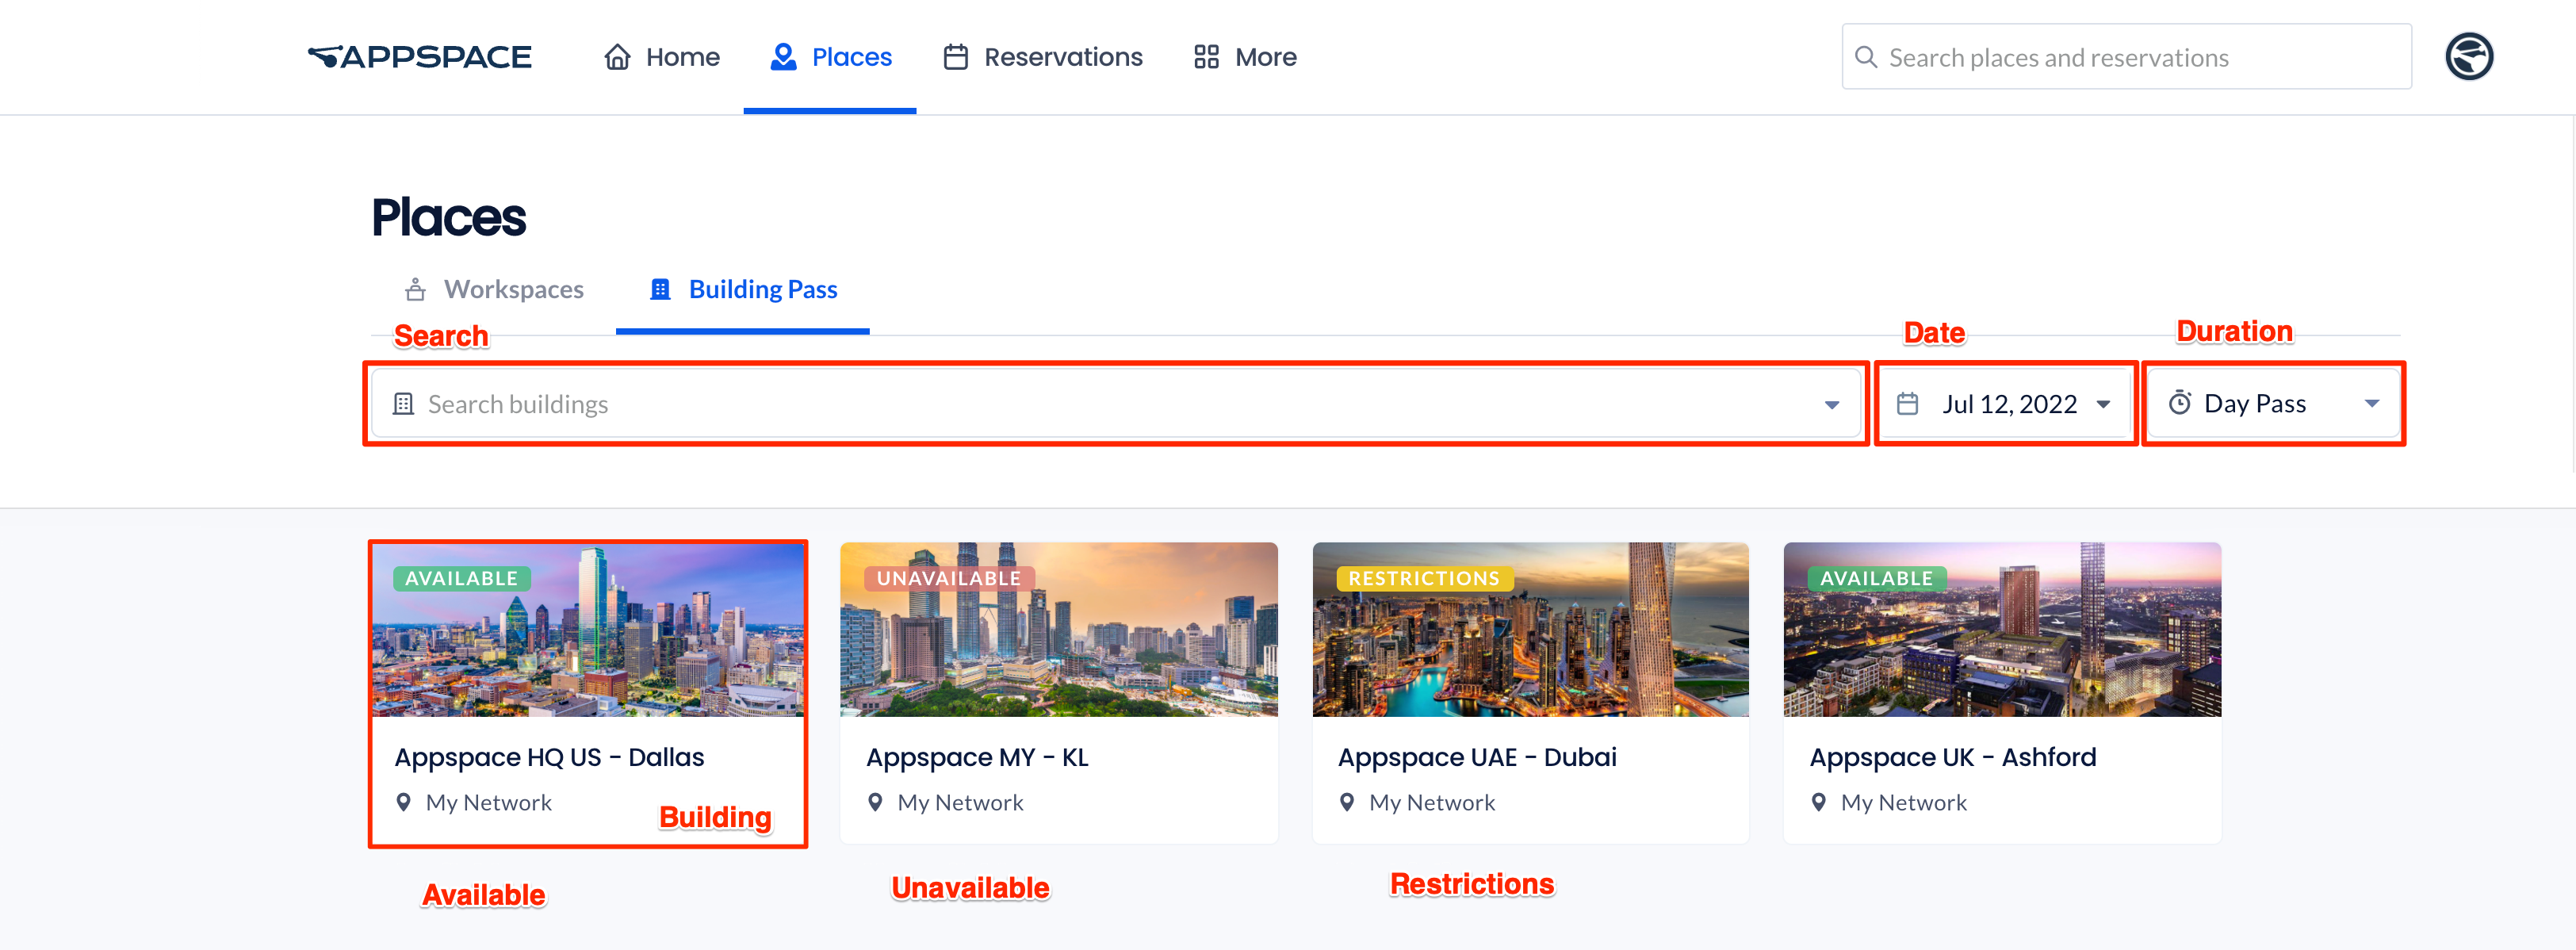
You may search for a building with a letter or keyword, and select a building from the drop-down menu. Use the Date and Duration (Pass type) filters to narrow down your search for buildings. If your home location has a building with bookable resources, the building will always be listed at the top, regardless of reservation history.
Select any building to view more information and booking restrictions (if any), and directly book a building pass. Refer to the Reserve A Building Pass – Employees article for more information.
At The Office
The At The Office tab displays a weekly view of people (including yourself) who are attending workplace reservations or building passes in the current building. This allows you to quickly check when you and your colleagues will be in the office on the days of any given week.
You can also view information on your reservations within the building for the week and book a building pass.
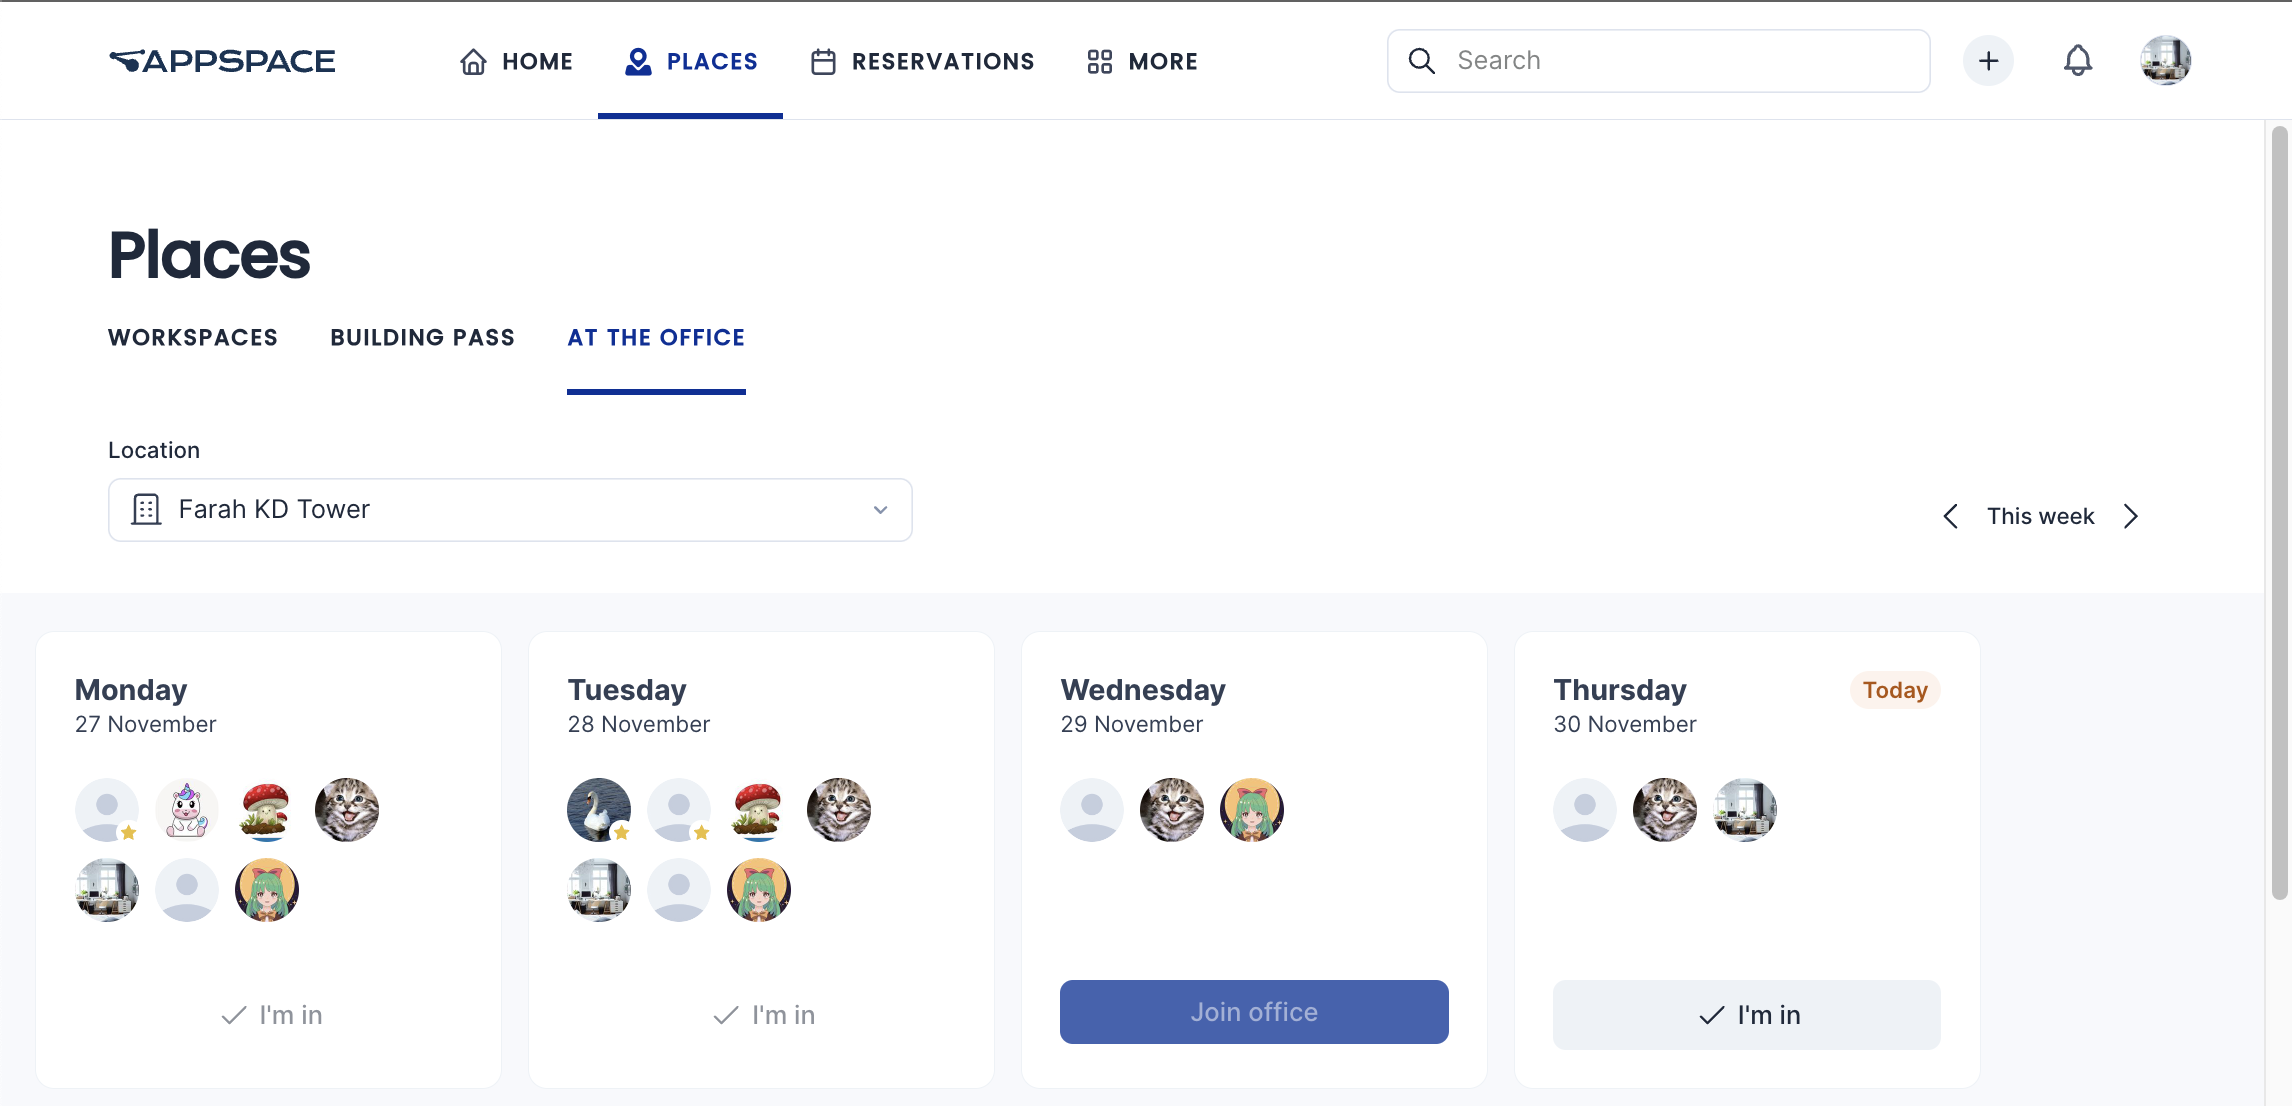
Reservations at your current location and the current week are displayed by default. You may select a different building from the drop-down list, and change to the next or previous week.
The I’m in option will be available on the days that have a reservation that you are attending for that week, while the Join Office option is displayed on the days you do not have a reservation.
- Click I’m in to view information on the reservations that you will be attending for that day. If you have more than one reservation, select the reservation or building pass that you wish to manage. Refer to the Manage Workplace Reservations and Manage Building Pass Reservation articles for more information.
- Click Join Office to directly book a building pass for the current building. Refer to the Reserve A Building Pass – Employees article for more information.
Click on the day card to view information about the building, such as the number of resources, capacity, number of floors, and any applied restrictions. You may select one of the following options: 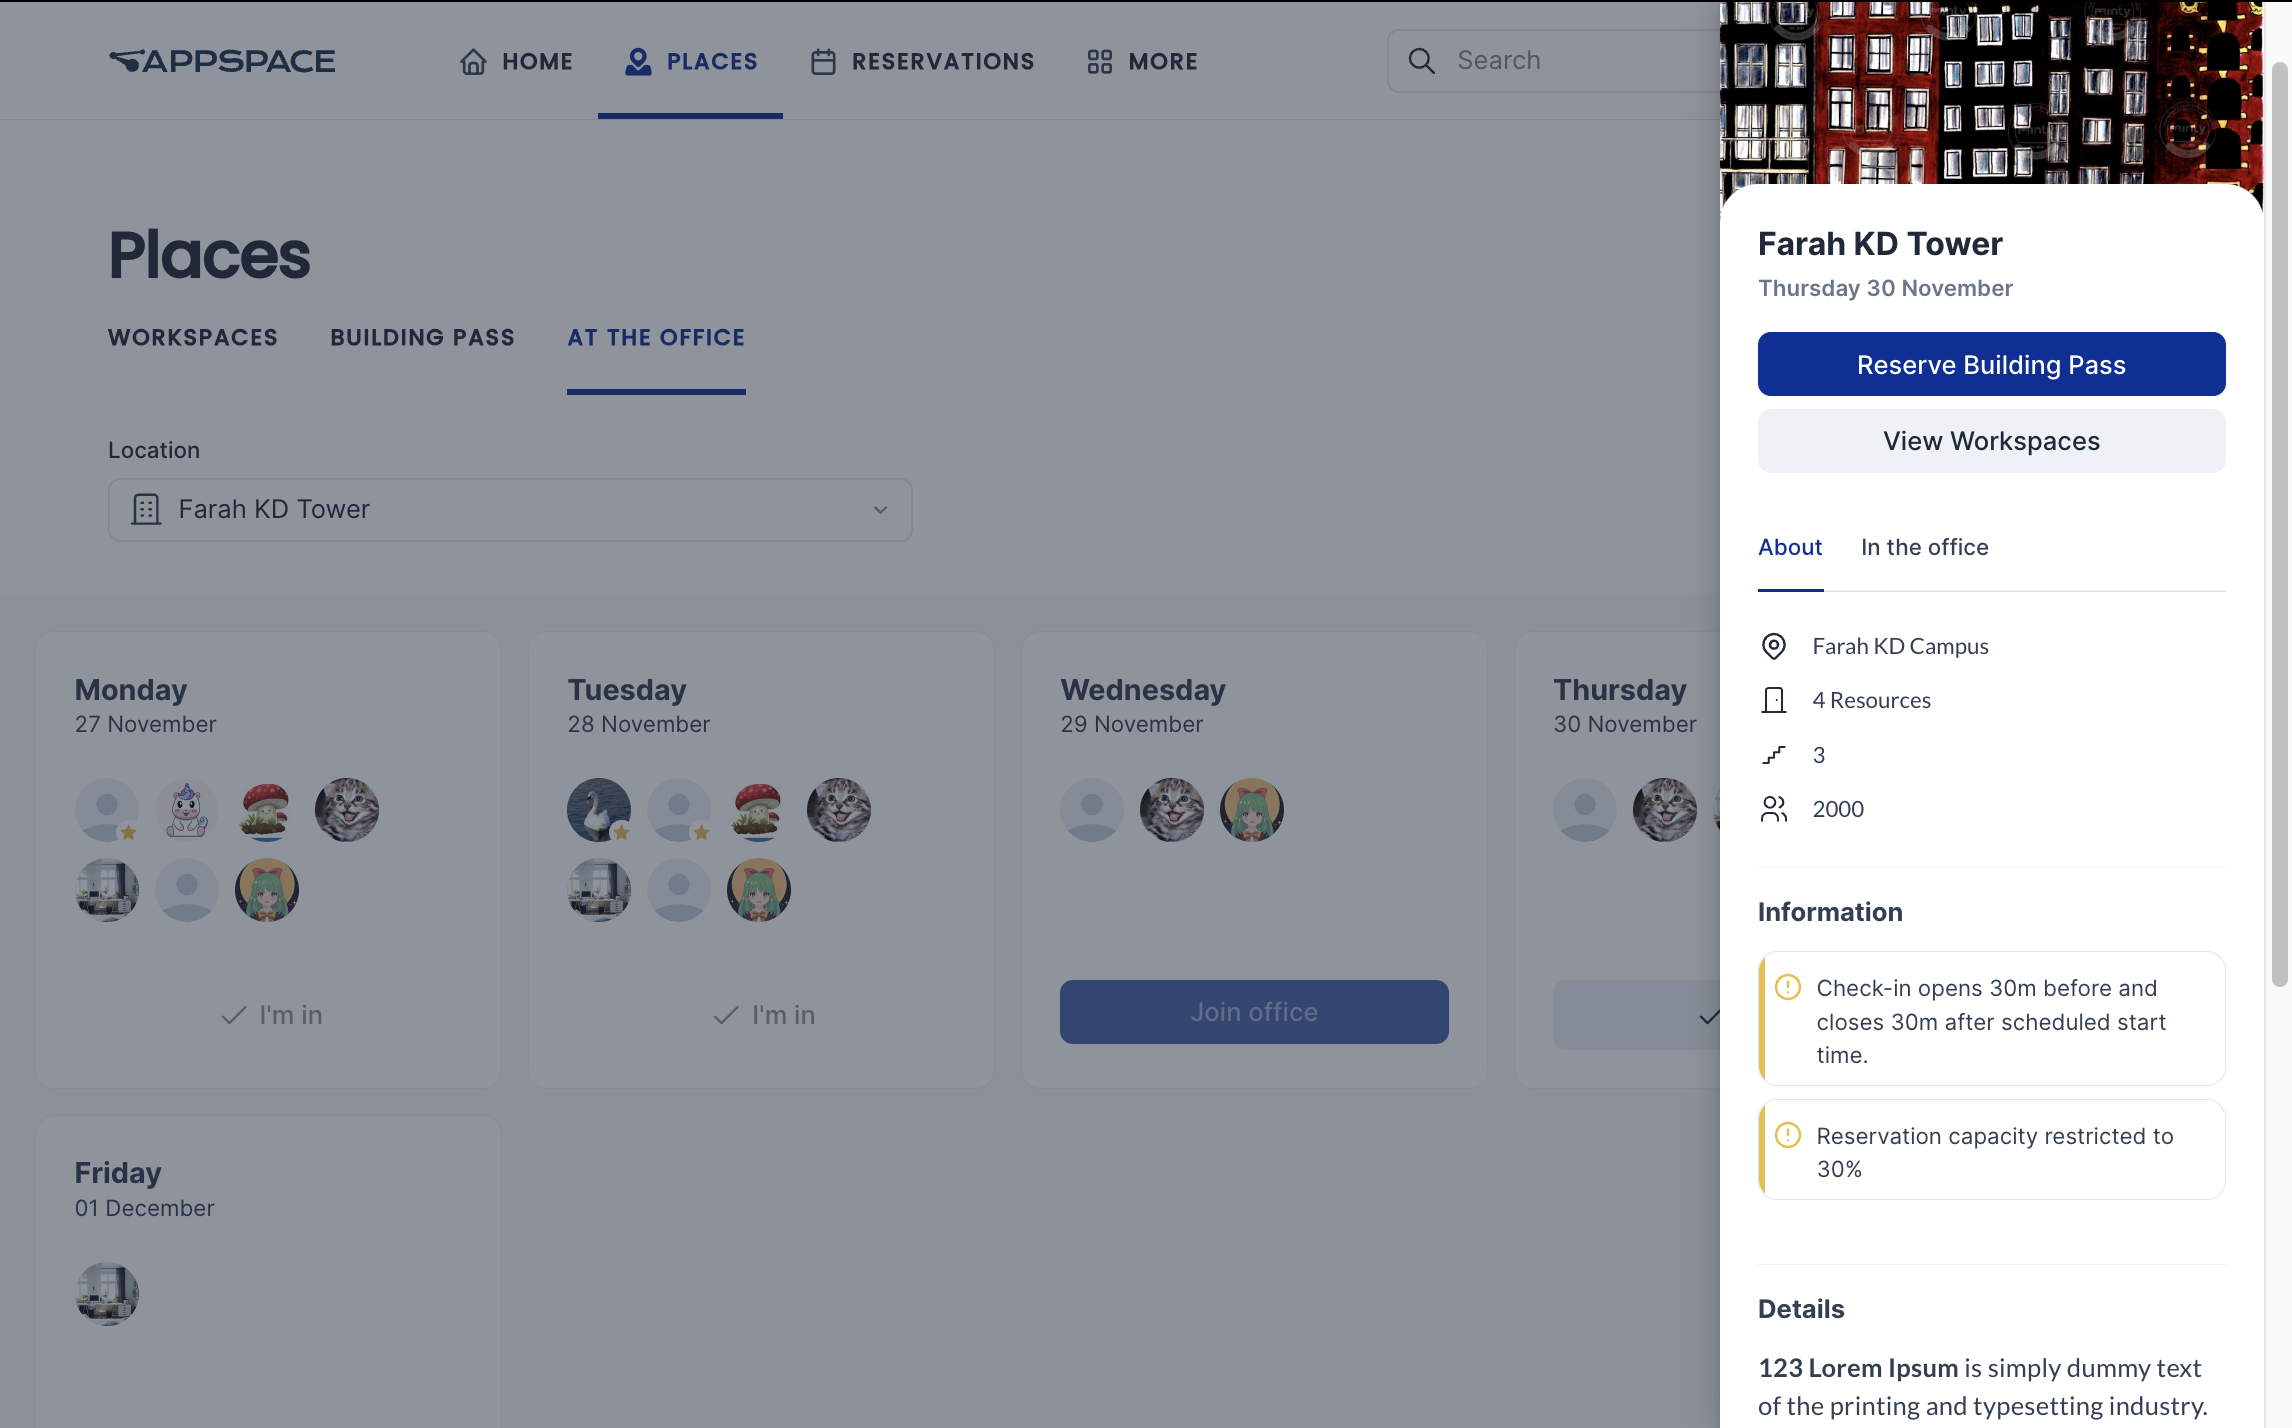
- Click Reserve Building Pass to directly reserve a building pass to this building. Refer to the Reserve A Building Pass – Employees article for more information.
- Click View Workspaces to search and view available workspaces inside the building and create a workspace reservation. Refer to the Reserve Workspace article for more information.
- Click the In the Office tab to list the people who will be attending workplace reservations or building passes in the building on that day. People who you have set as favorites will be listed first. However, people in workspace reservations set to private will not be shown. You may click on a person to view the person’s profile.
Reservations
On the top menu, click More and select Reservations.
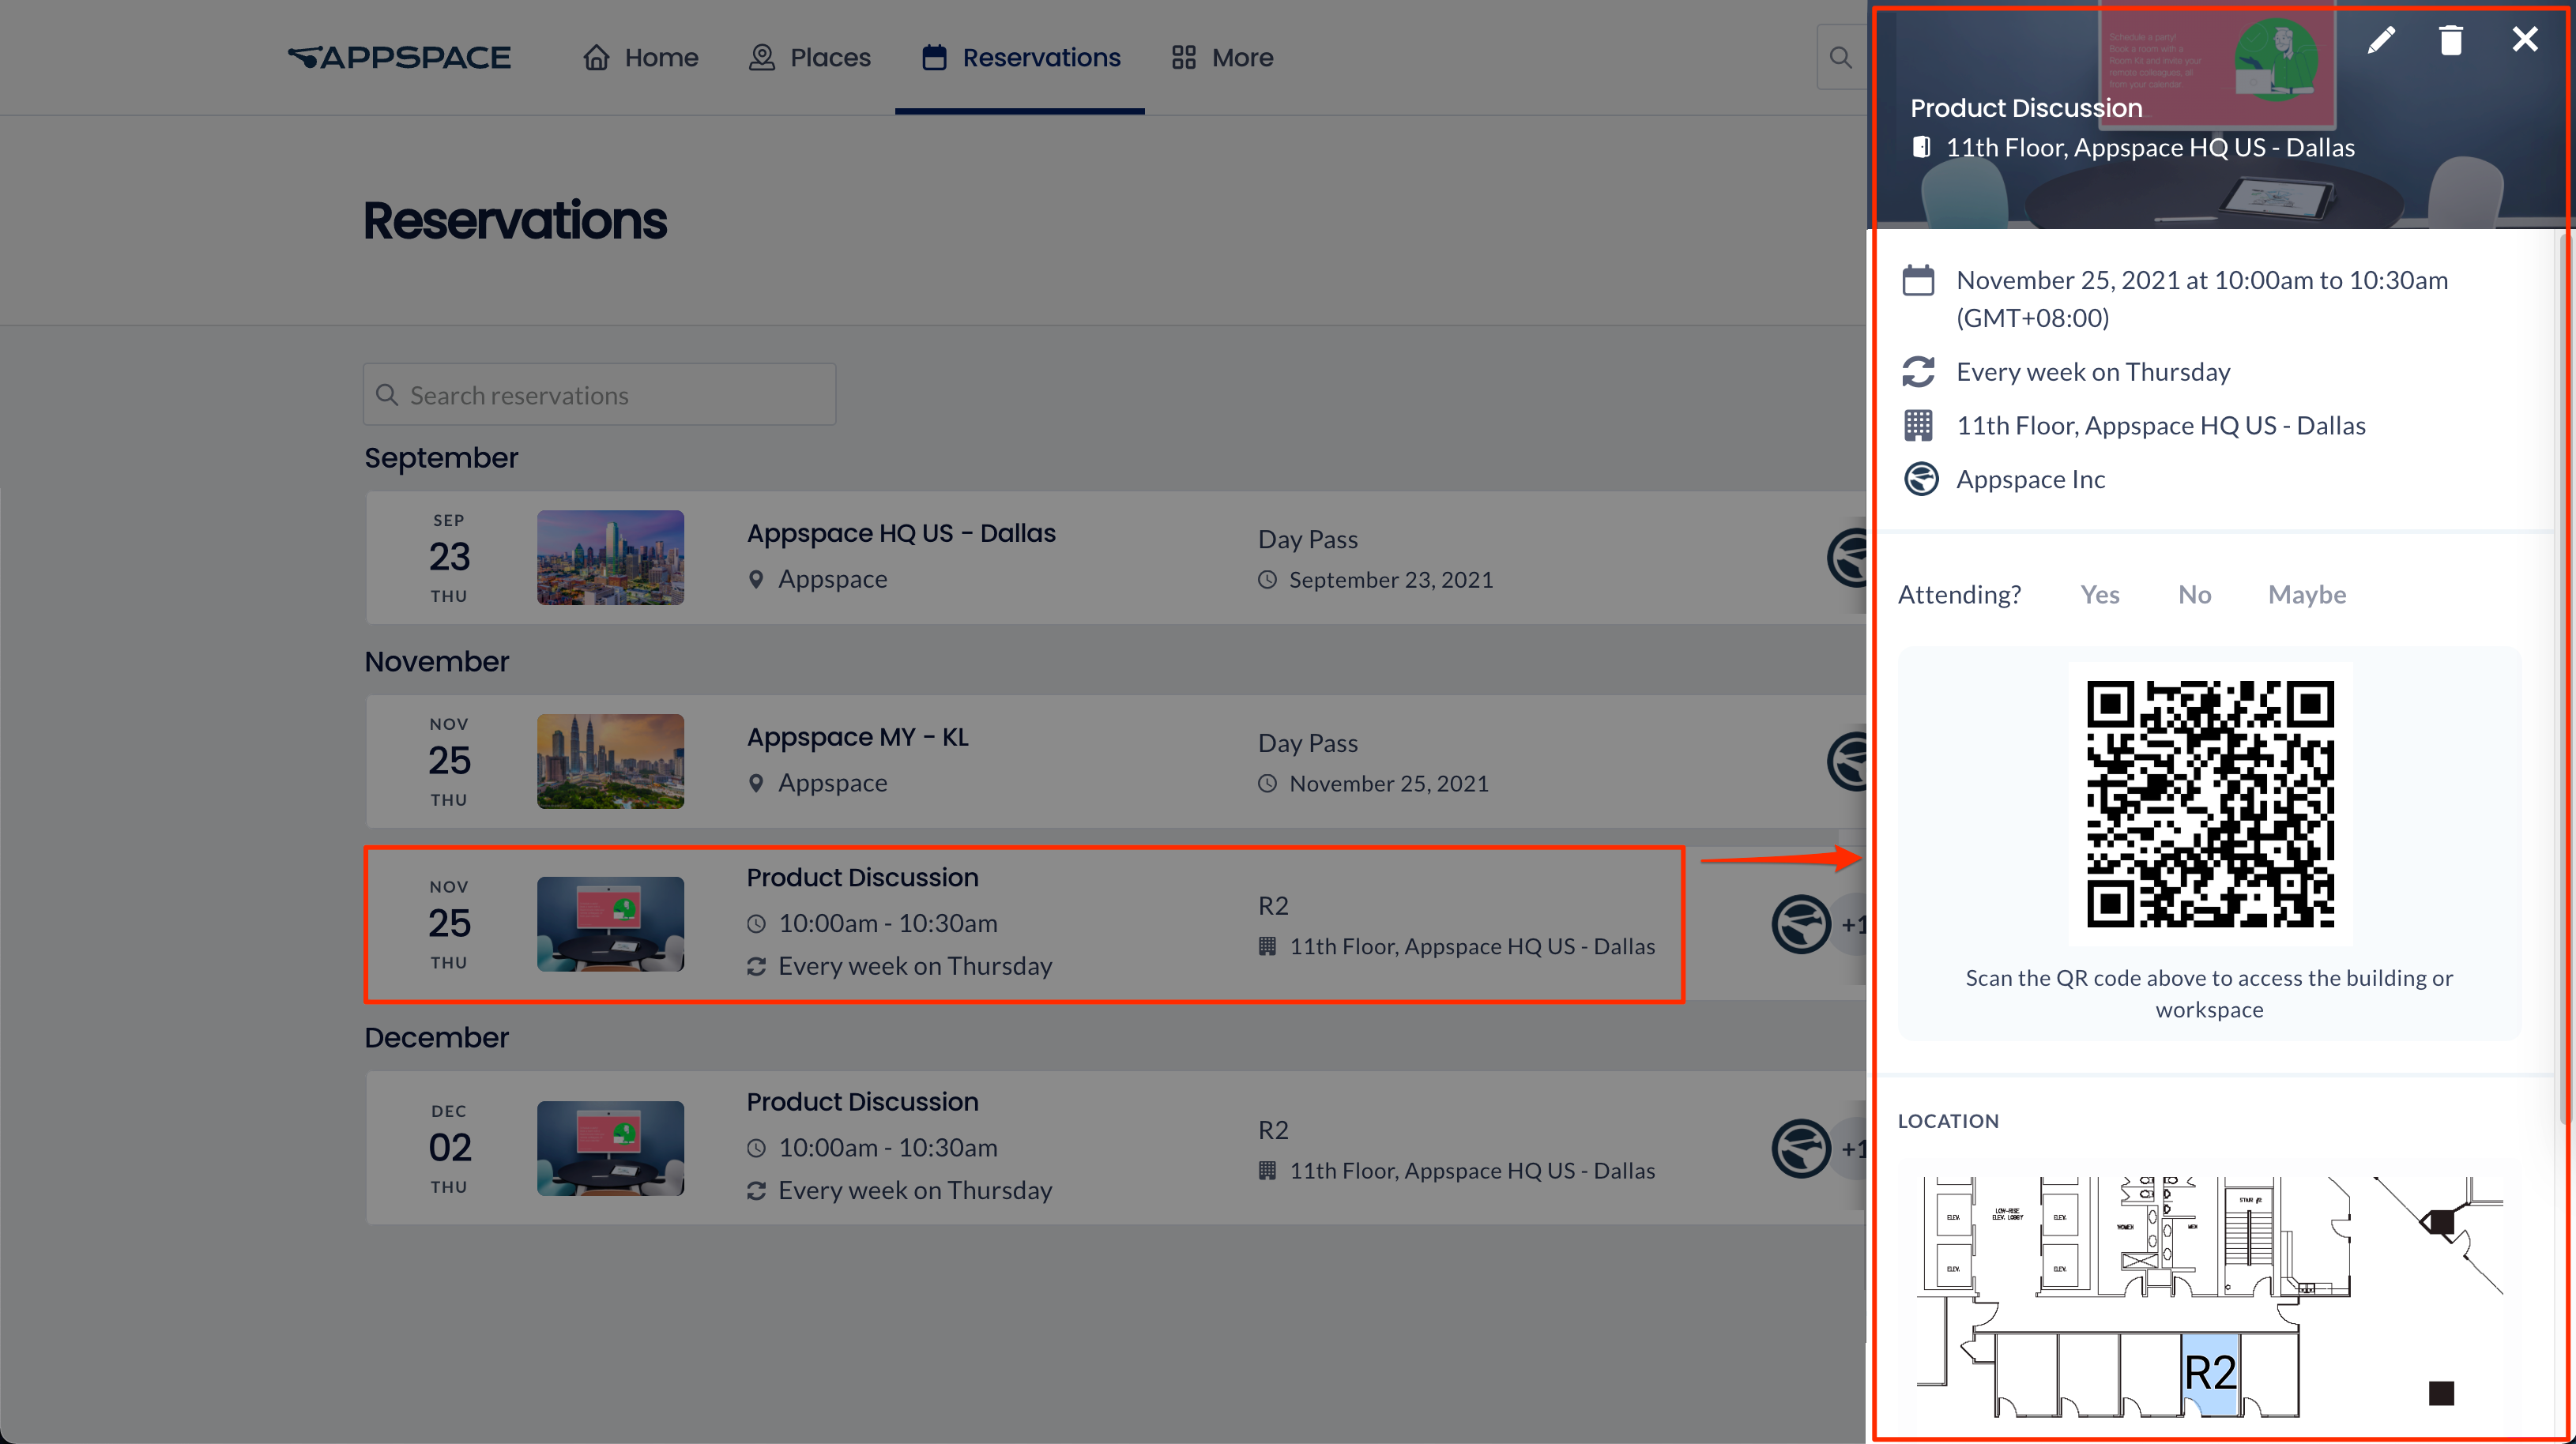
The Reservations tab lists all the reservations and building passes you have personally booked, or meetings that you have been invited to.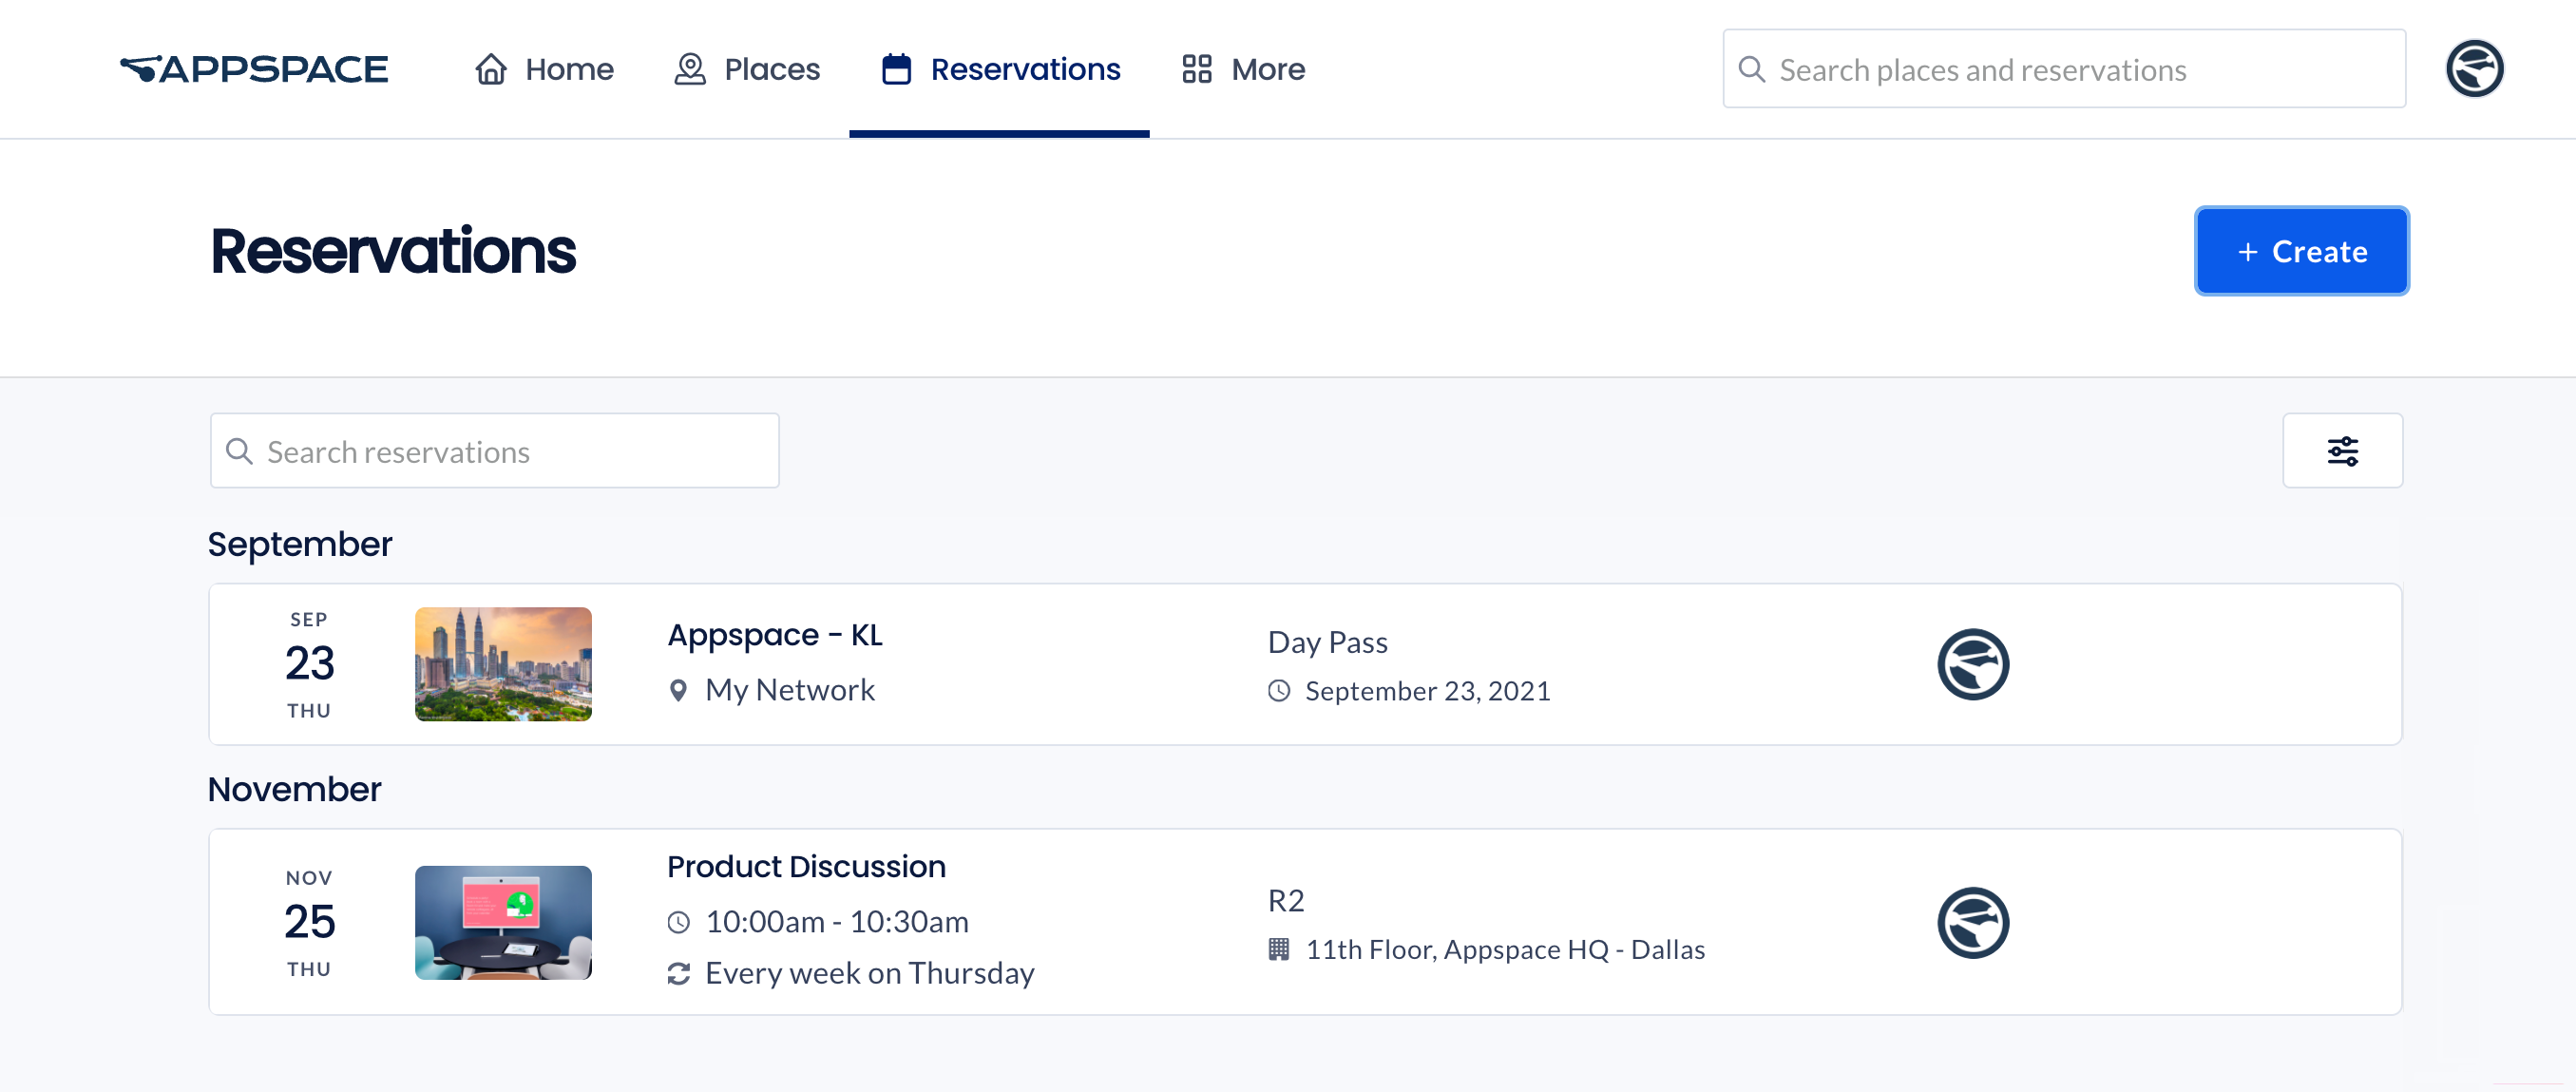
You can check, extend, or even cancel your reservations. Administrators are also able to make and manage reservations on behalf of someone else.
When you select a building pass or workspace reservation, you may view the resource details, booking details, and the resource’s location on a map (if available). If you are assigned as an approver for a resource (such as location, building, workplace, or room) you are also able to view pending reservations and approve or decline them.
You may also confirm the reservation by clicking Yes or scanning the QR code to check in. You may also extend or cancel the booking.
For more information, refer to either one of these articles:
- Reserve a Workspace, Desk, or Room – Employees
- Reserve A Building Pass – Employees
- Approve a Reservation – Approvers
Concierge
On the top menu, click More and select Concierge.
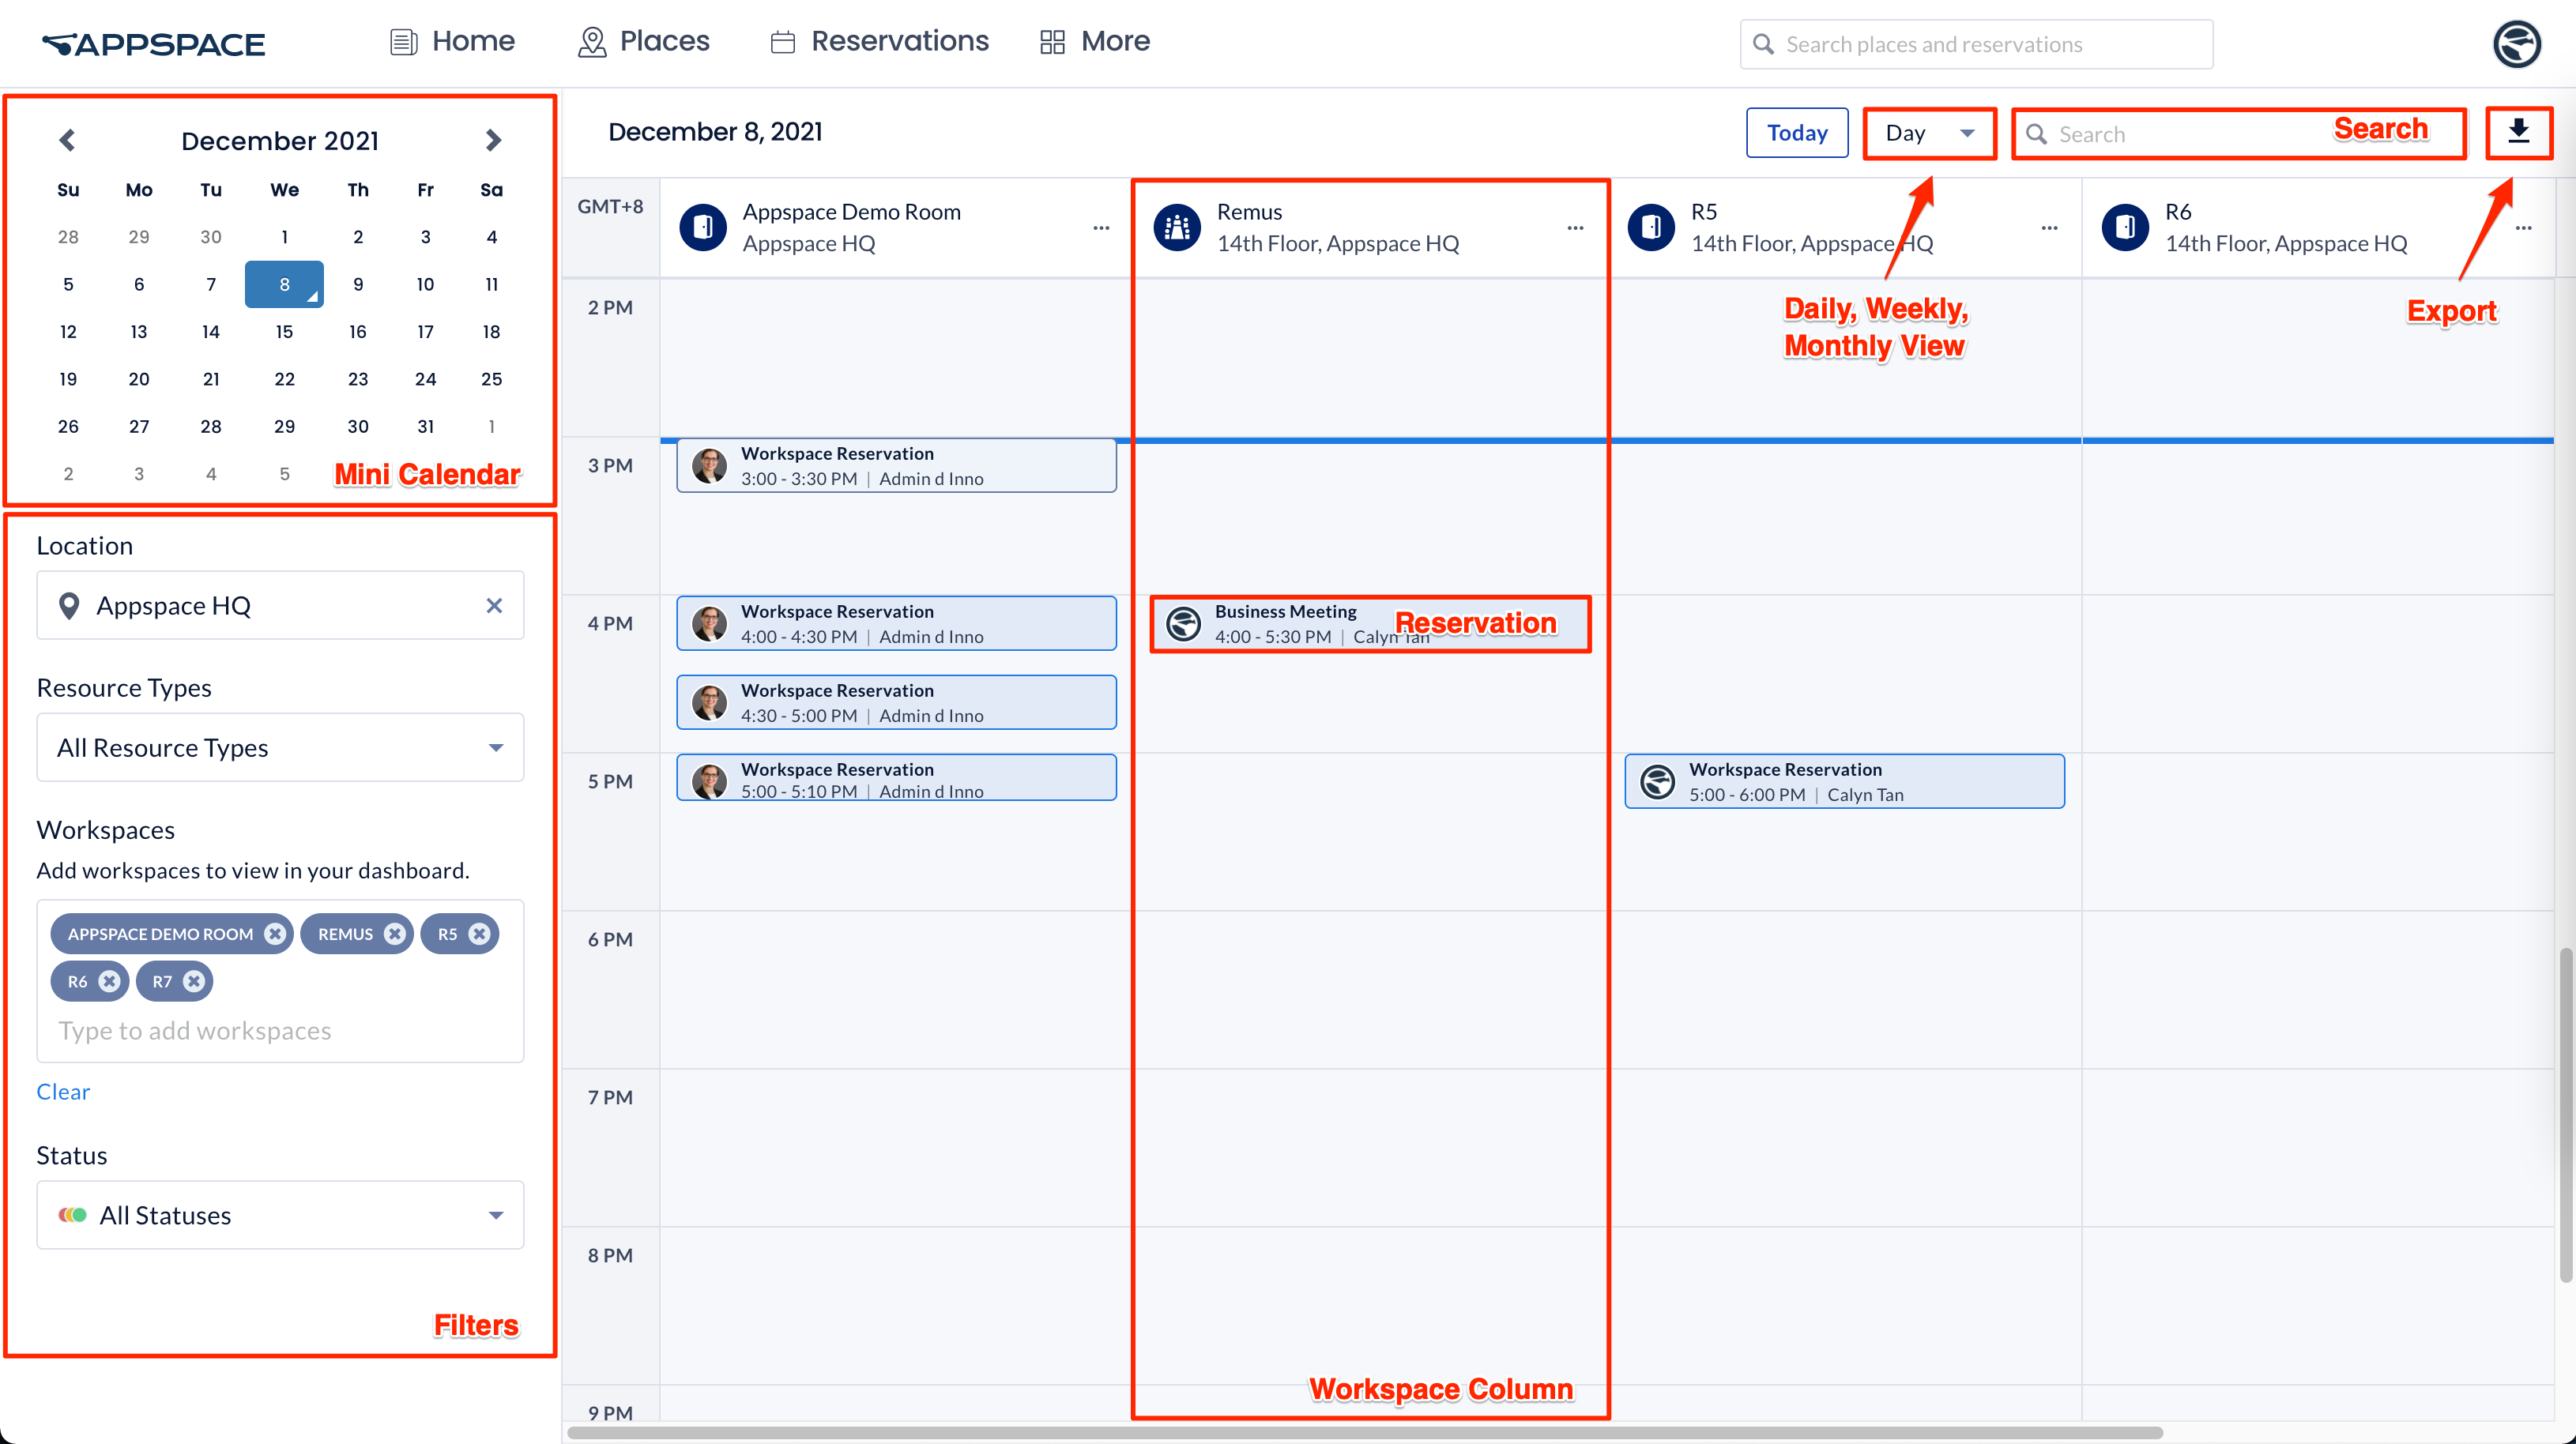
The Concierge dashboard provides employees assigned with concierge permissions a calendar view of all reservations under their purview. Employees with concierge permissions are also able to view and manage reservations of workspaces in locations they have been assigned to.
- Today – Click this button to bring back the calendar focus to the current time and date.
- Day / Week / List – Select one of the following options from the drop-down menu to display the calendar in the daily, weekly, or list view format.
- Search – Type in a letter or keyword to search for a workspace or reservation.
- If a workspace is selected, it will be added automatically to the calendar view if it wasn’t already.
- If a reservation is selected, the reservation edit window will be displayed for viewing or editing.
- Export – Click the Export icon to export reservation records into an .xlsx format.
- Reservation – Click a selected reservation to view additional reservation details, such as the organizer, attendees, and other additional information.
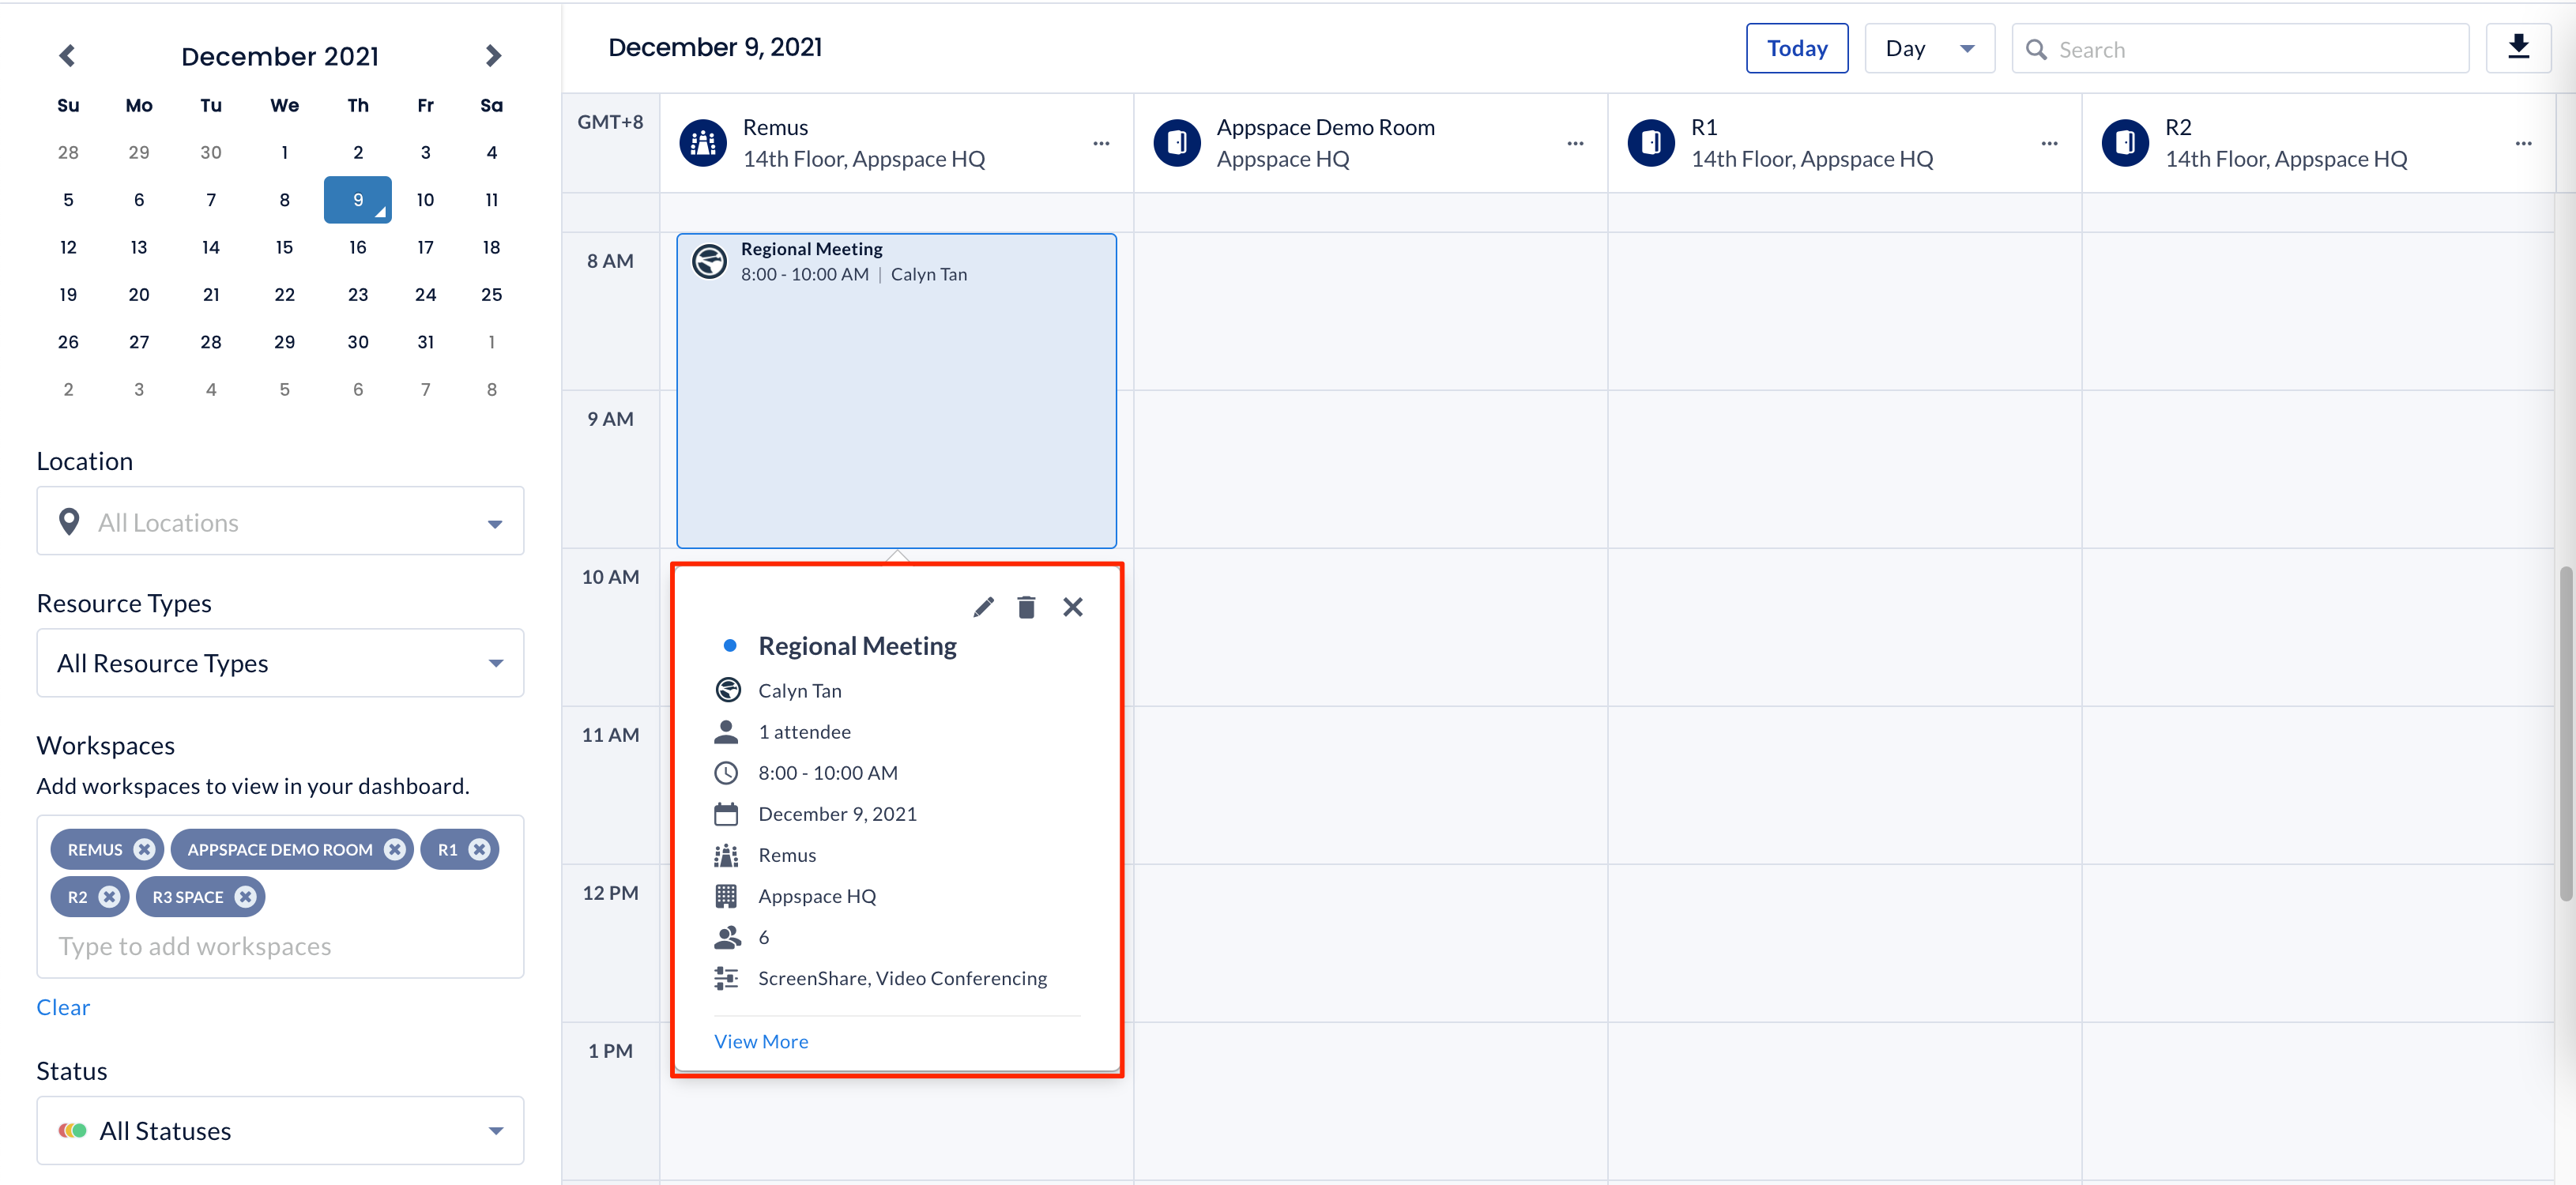
When viewing the reservation details, you may do the following:- Edit icon or View More link – Edits the workspace reservation.
- Delete icon – Deletes the workspace reservation.
For more information, refer to the articles below:
- Manage Workspace, Desk, or Room Reservations – Concierge
- Configure Concierge Permissions in Reservations
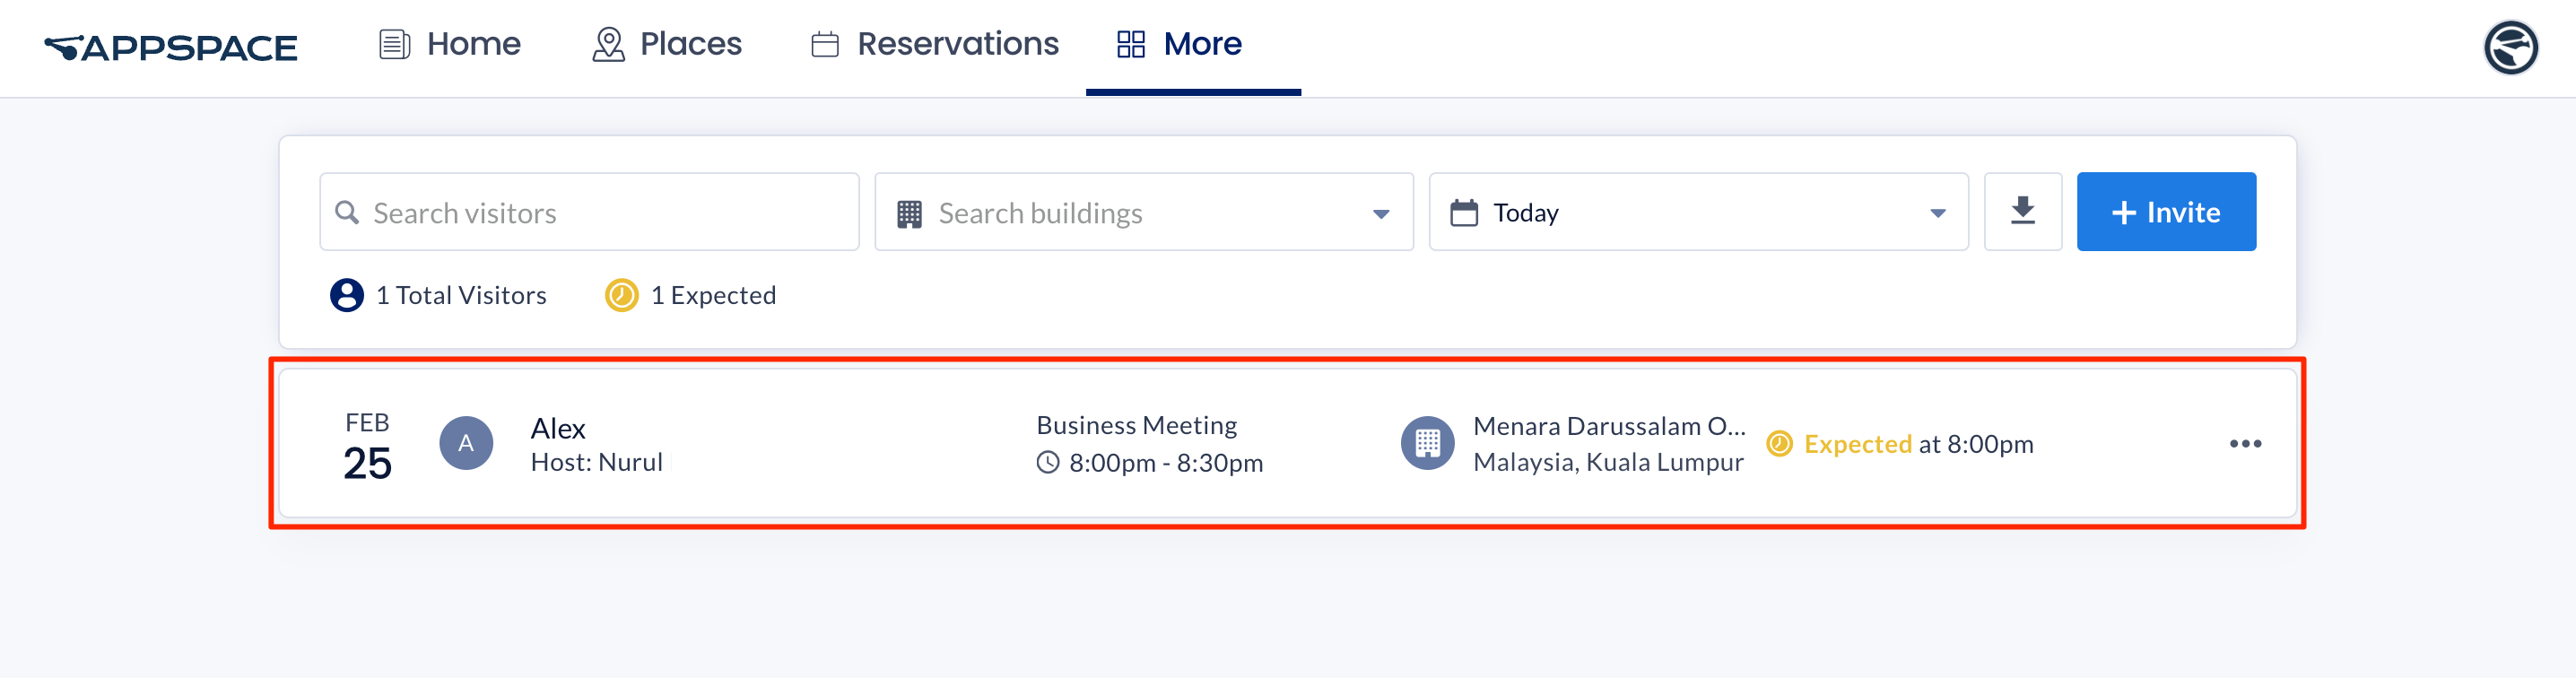
Visitor
On the top menu, click More and select Visitor.
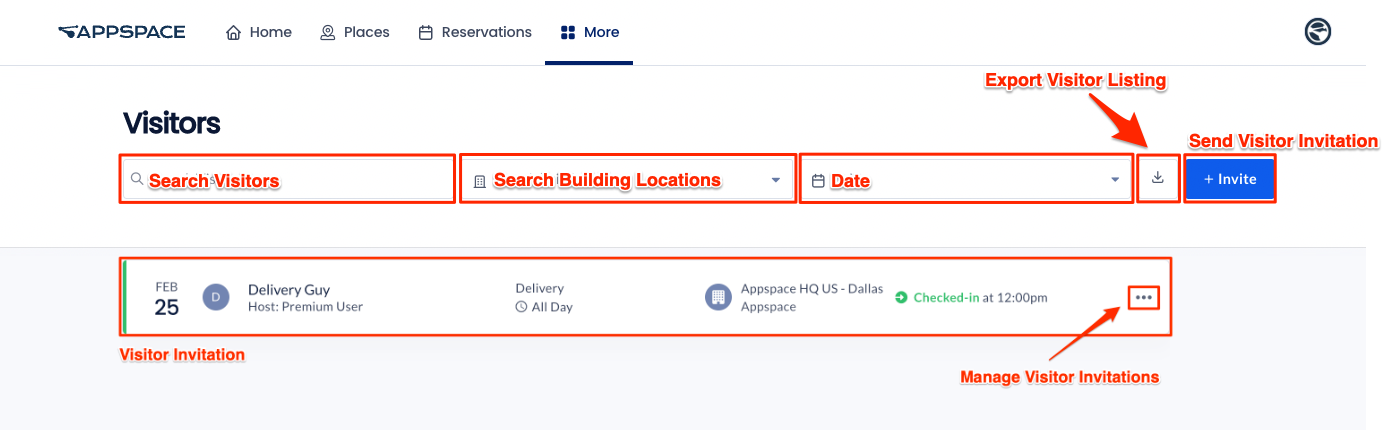
The Visitor dashboard displays the Visitor Management system used to invite external users (visitors) to a meeting or event held at your company. These visitors could be an employee from another facility, division, or subsidiary within your company or other corporate entities from outside the company. Event Hosts and Facilitators may do the following:
- send an invitation to a prospective visitor.
- check-in to a desired visitor invitation.
Refer to the following articles for more information:
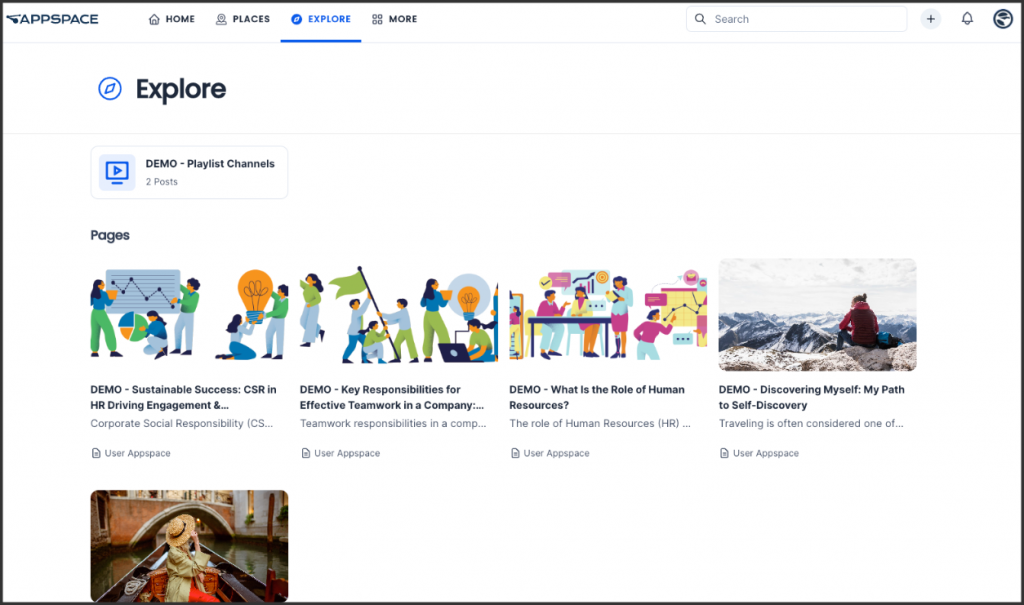
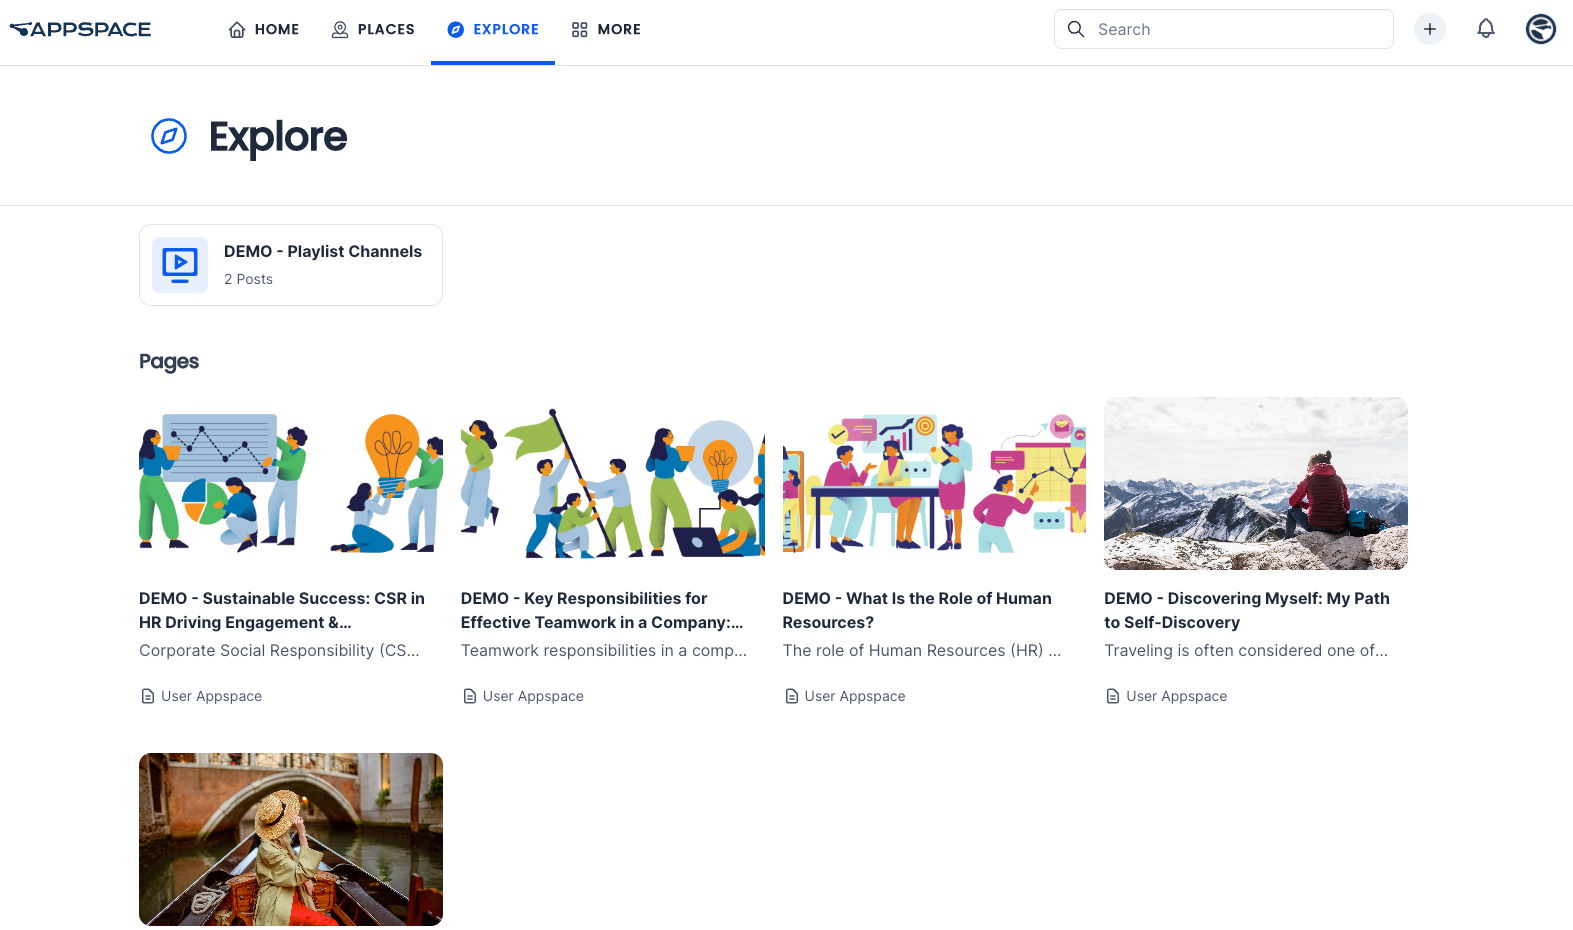
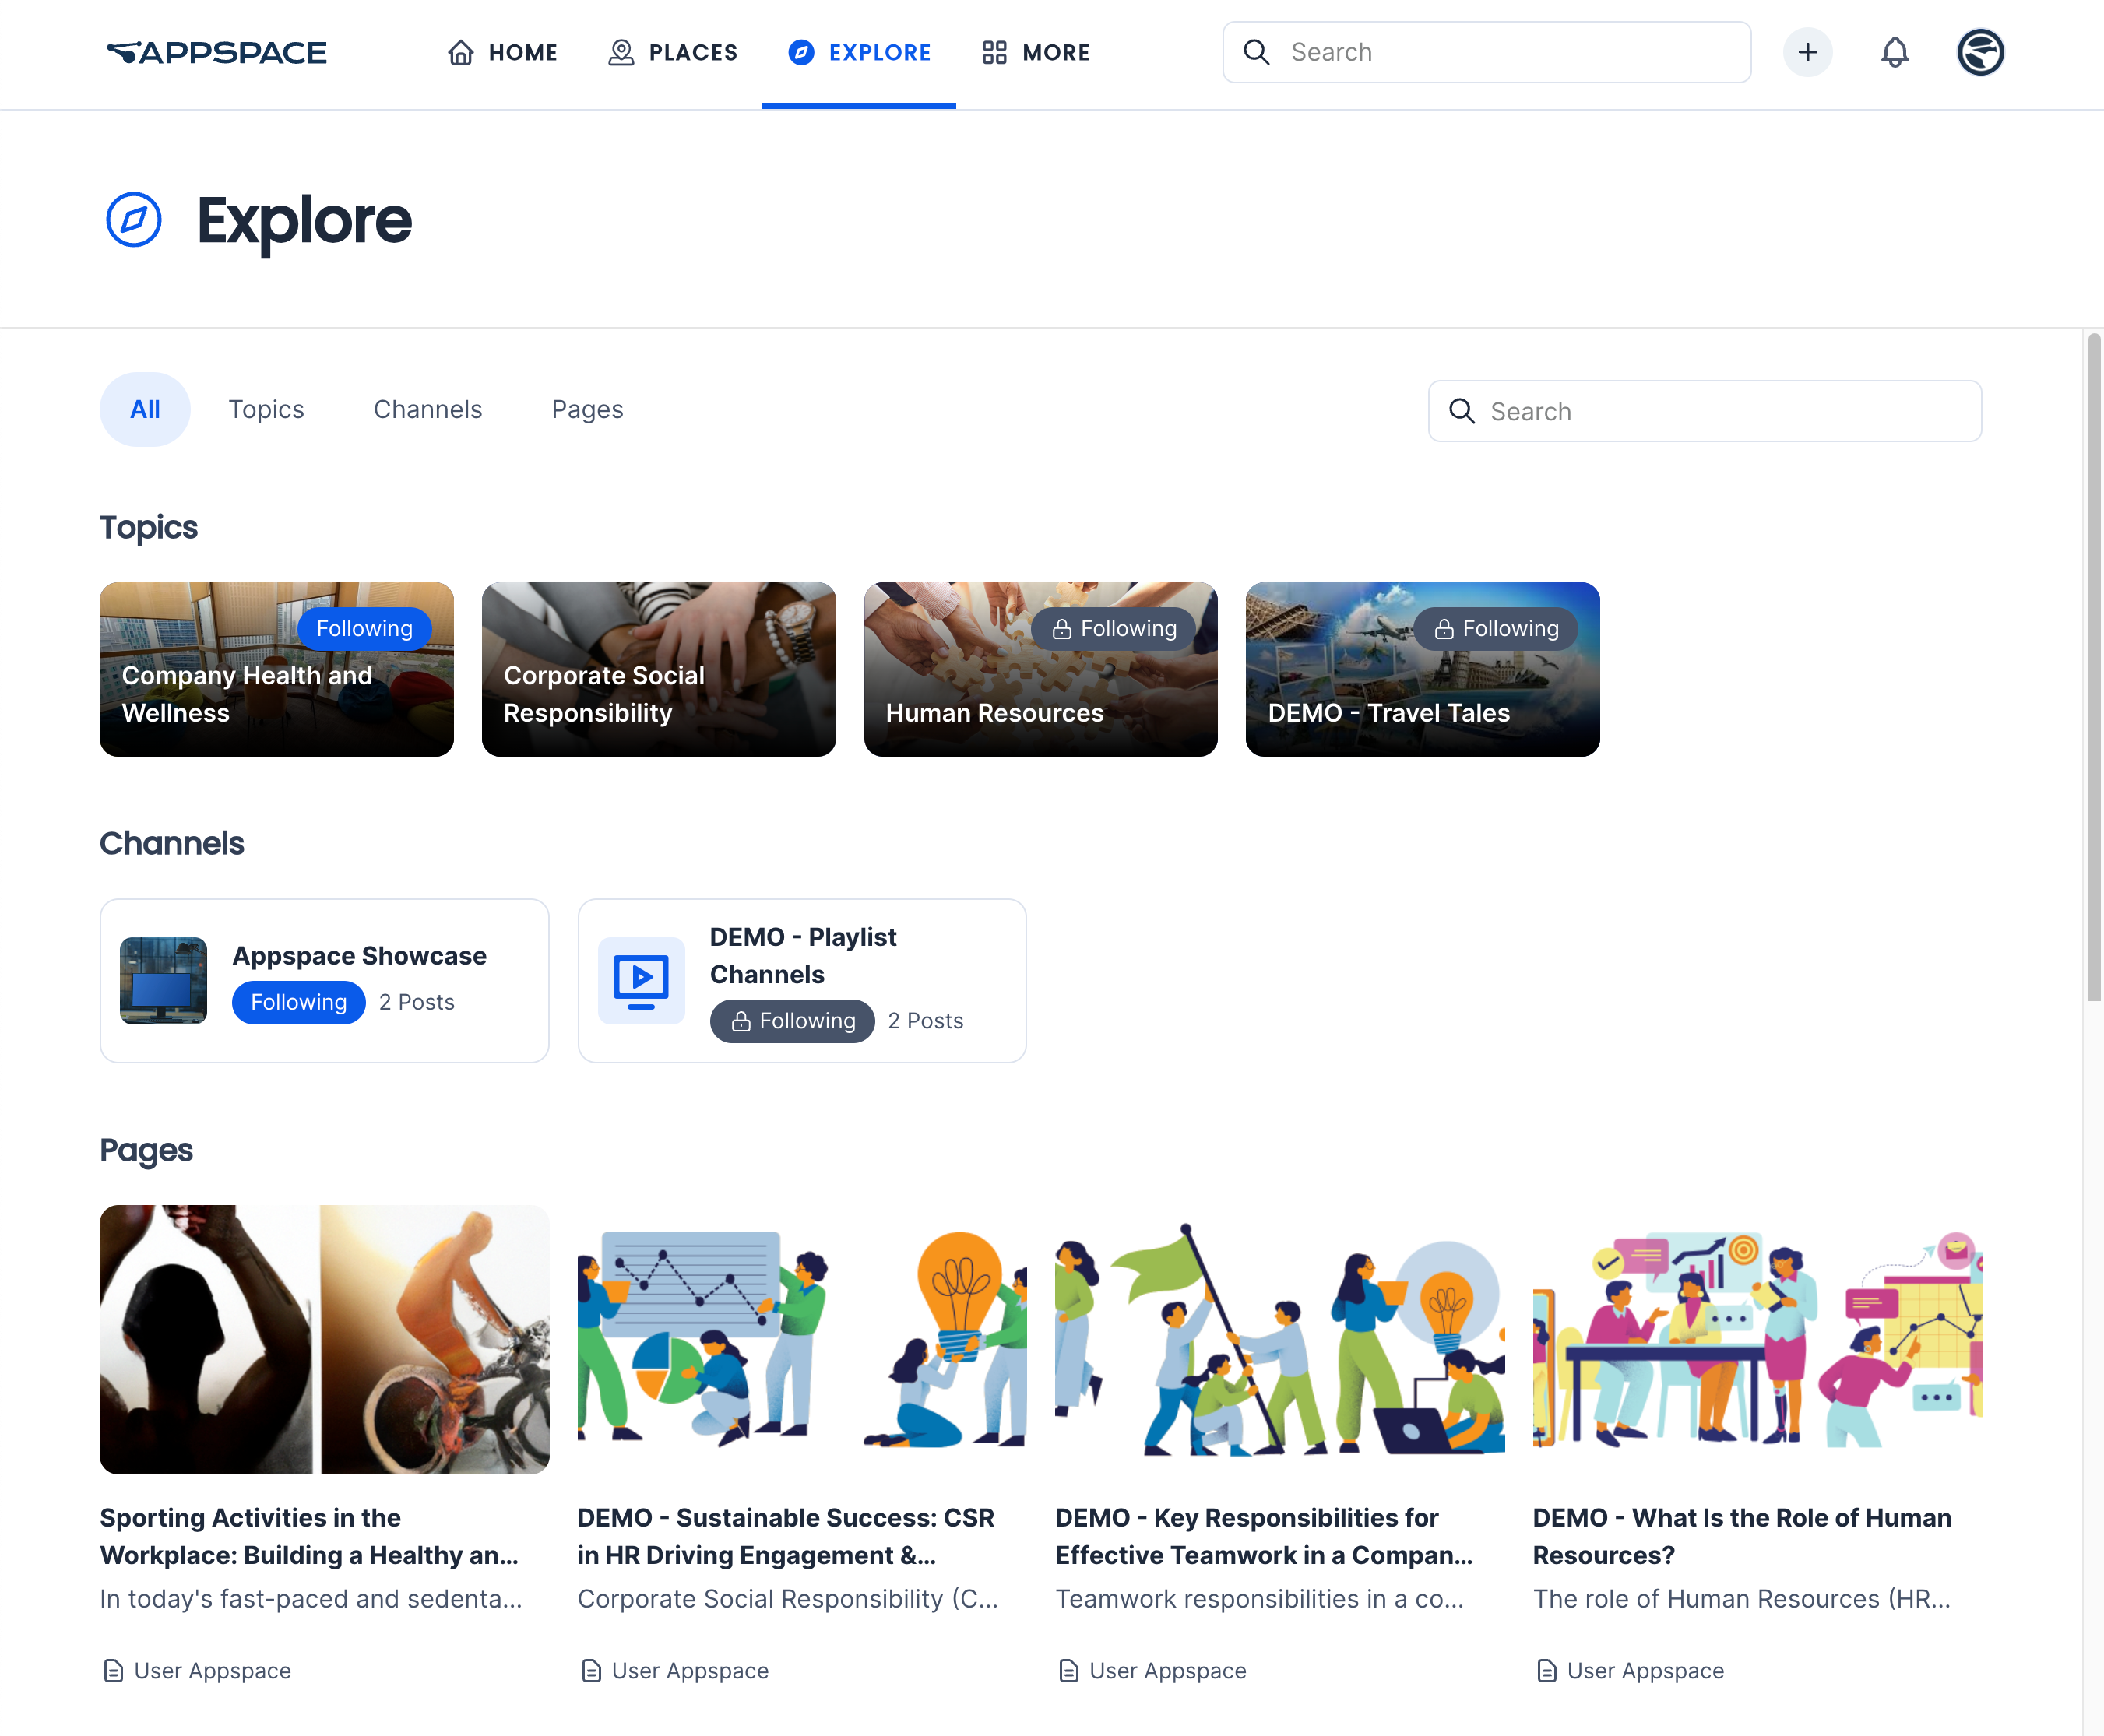
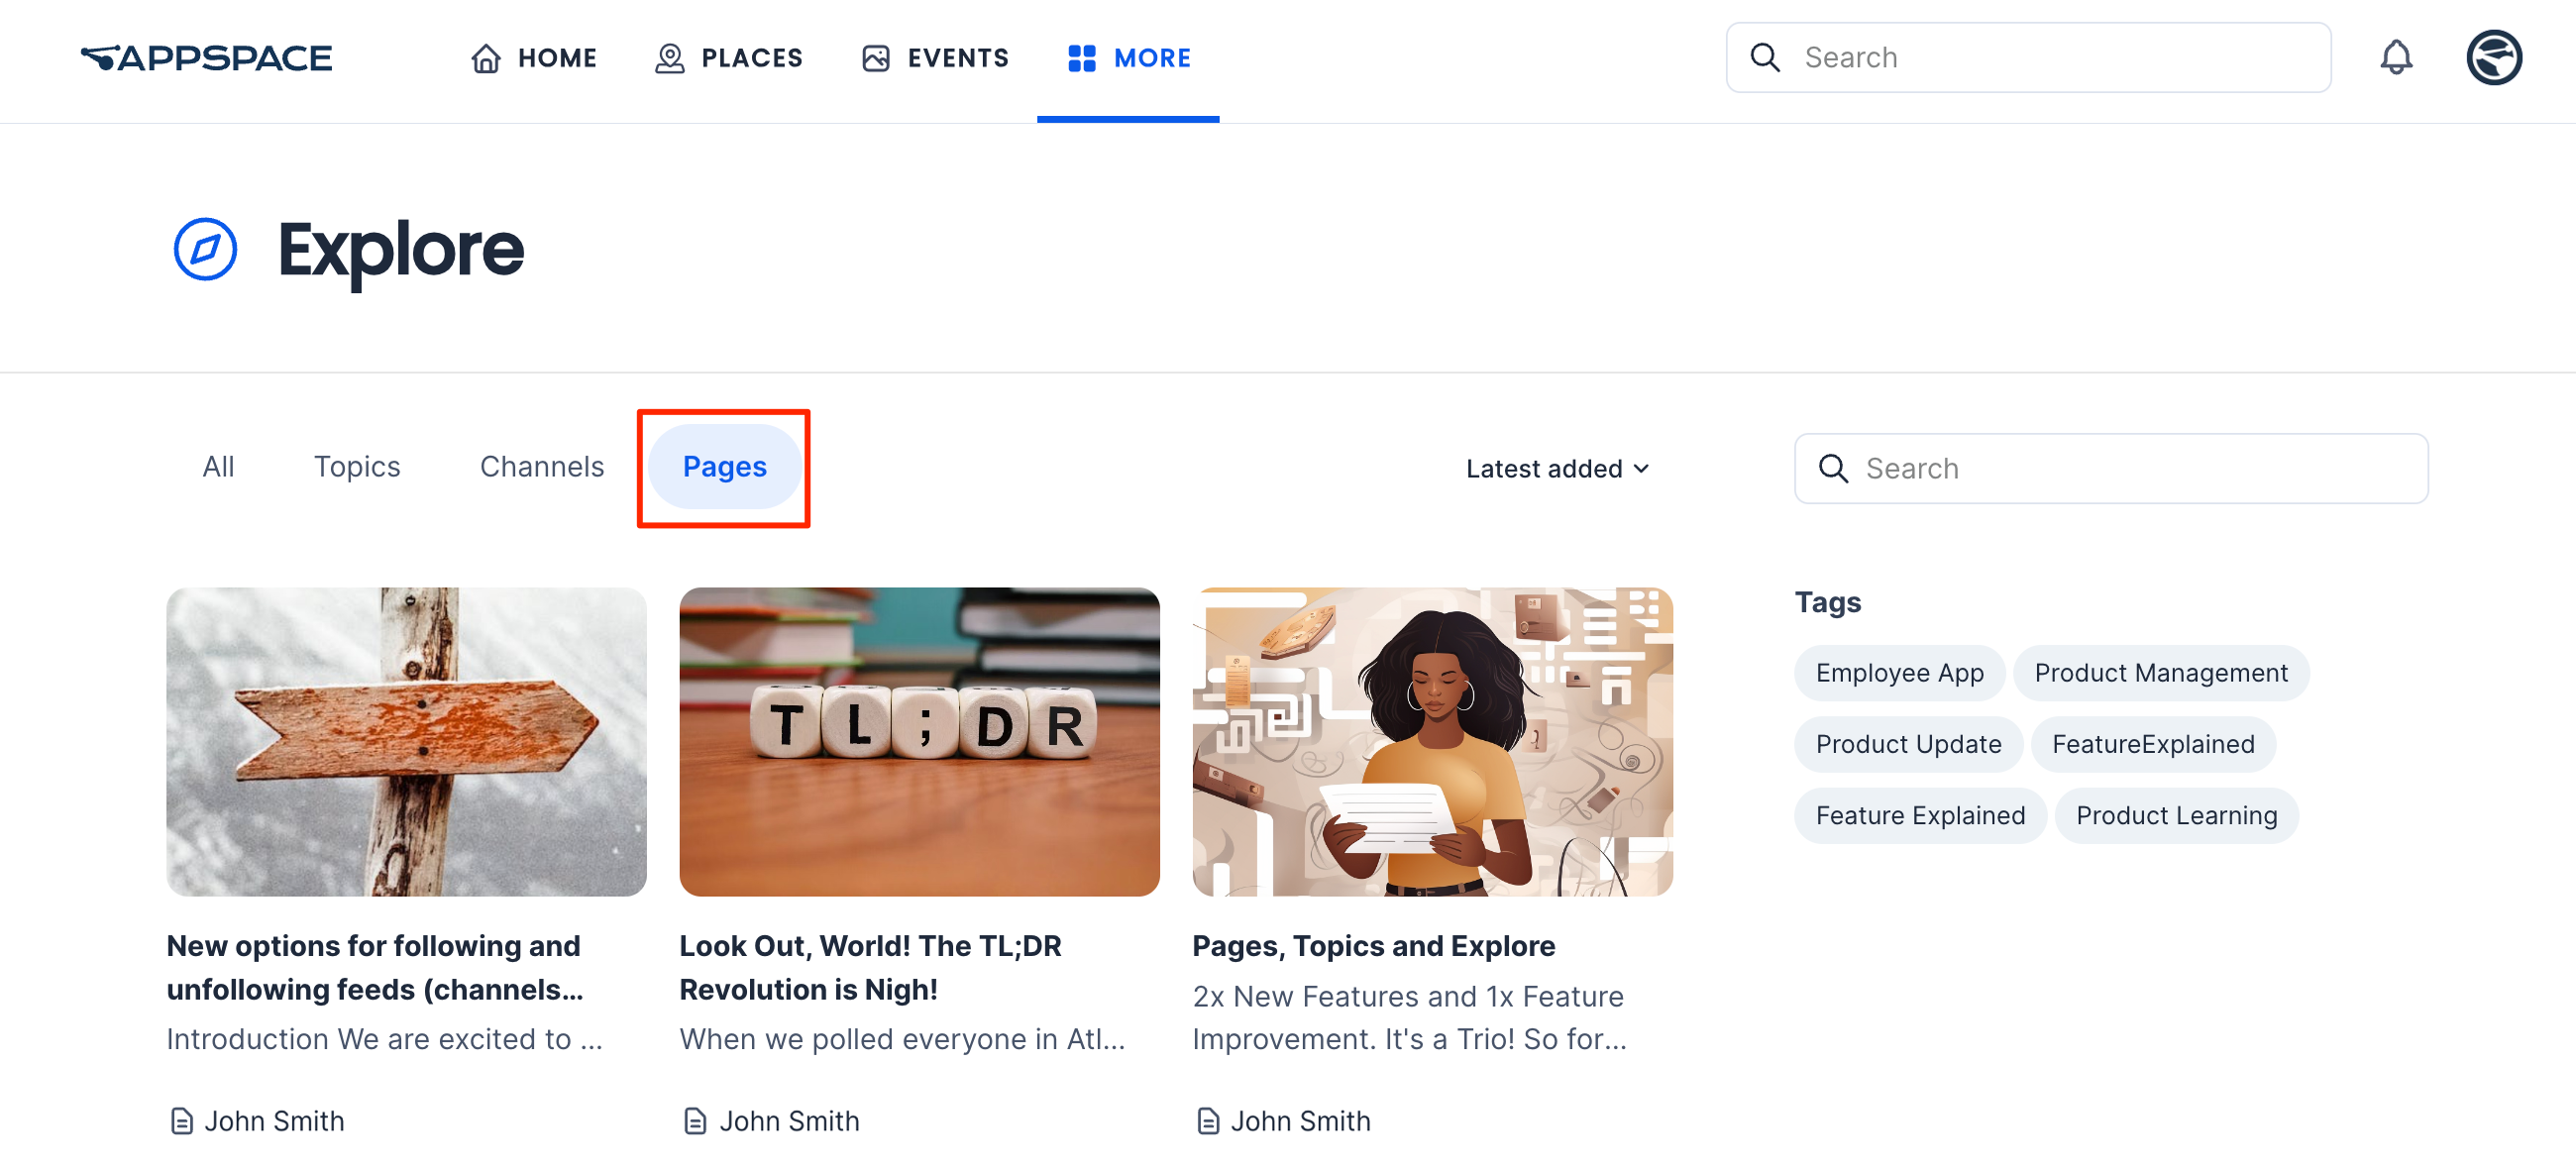
Explore
On the top menu, click More and select Explore.
The Explore tab displays the latest topics, channels, channel groups, stories, and pages that have been published to you or your user group. To filter the content type, select the Topic, Channel, Pages, or Stories sub-tab.
Follow and Unfollow Topics and Channels
In the Explore section, you can choose to follow or unfollow topics and channels under the All, Topics, and Channels tabs. Posts that are under followed channels and Pages that are under followed topics will be displayed on the Home section of the Employee App.Topics or channels that are mandatory to follow will display a lock icon. Unfollowing the topic or channel is not allowed.
You can follow or unfollow a topic or channel that has not had its follow setting locked:
- To follow a topic or channel, move the mouse over it and click the Follow button.
- To unfollow a topic or channel that you have previously followed, click the Following icon in the topic or channel and select Unfollow in the message box.
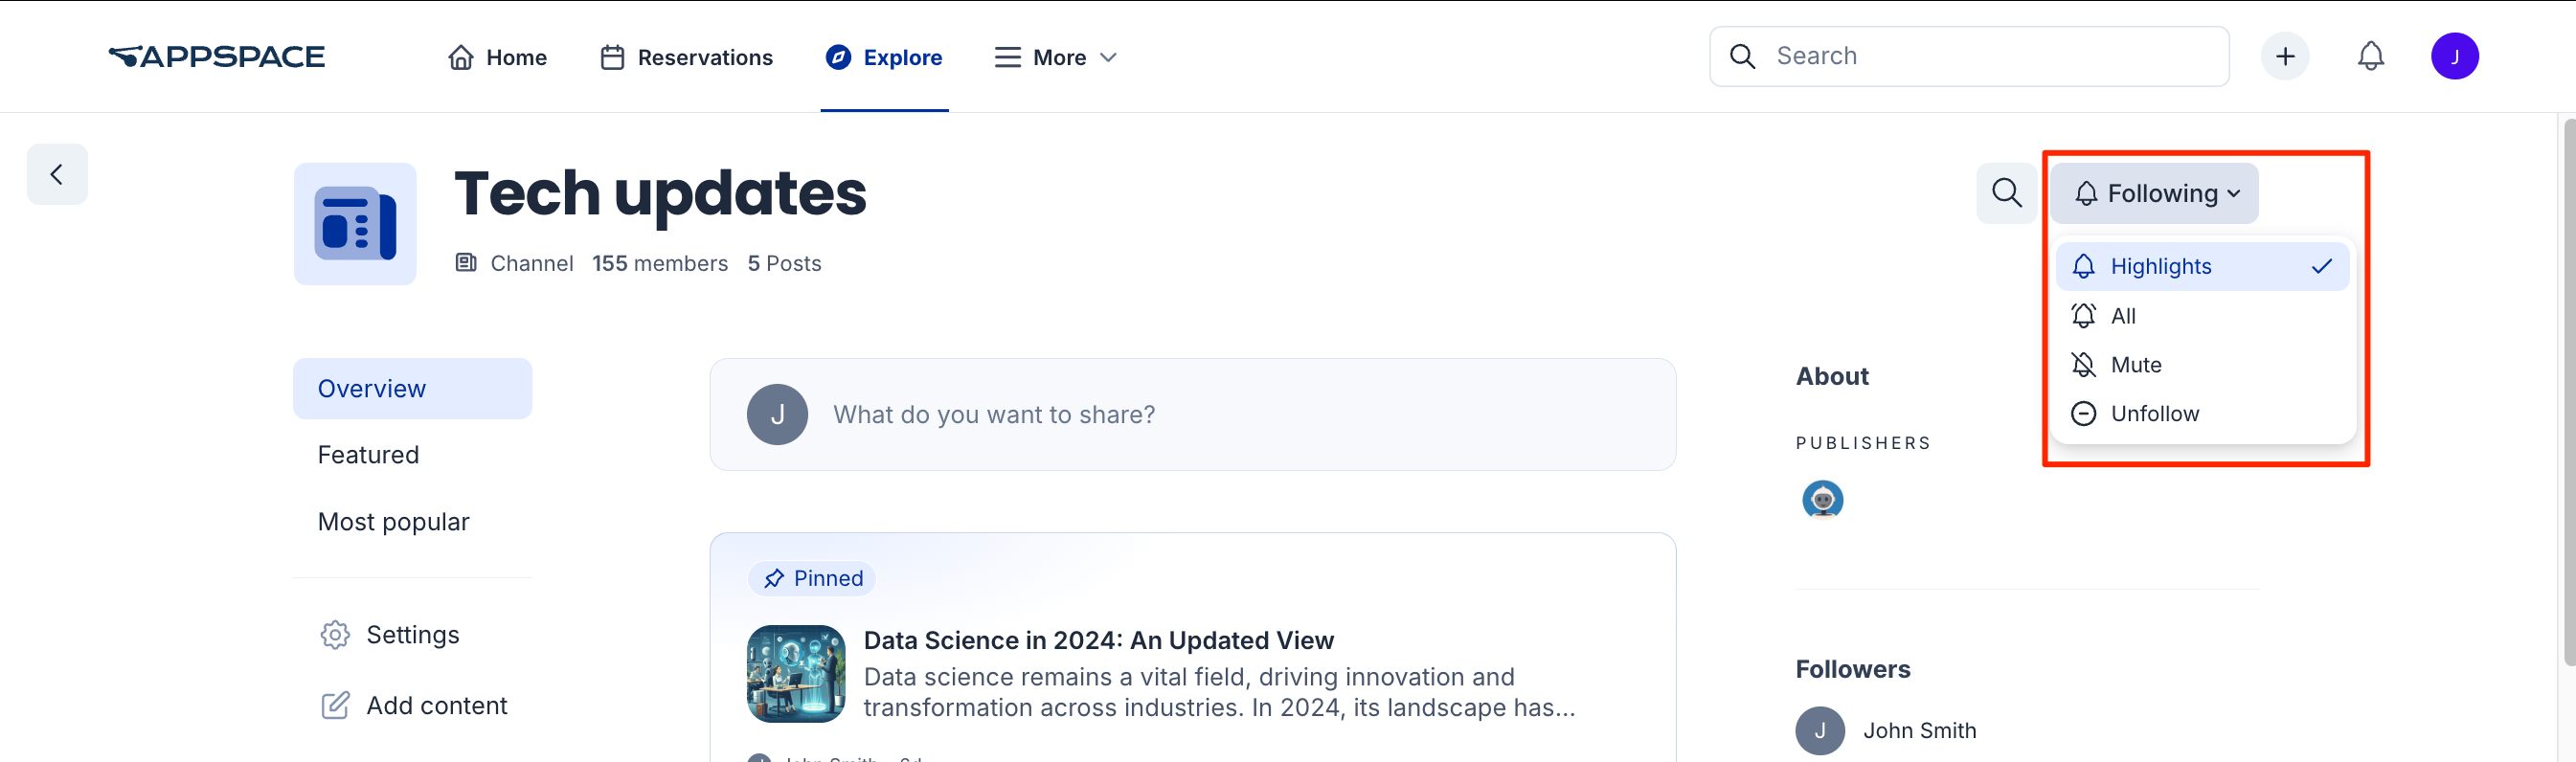
Set Notifications for Followed Topics, Channels, and Communities
After you have followed a topic or channel or joined a community, you can set the level of notifications you receive from the topic, channel, or community by performing the following step:-
- To change notification settings for a followed topic or channel, go to the channel and click the Following button.
- To change notification settings for a community that you have joined, go to the community page and click the Joined button.
Select one of the following notification options:
-
- Highlights – Receive push notifications in the Employee App for Mobile for new featured posts, stories, or pages published in the topic, channel, or community (default setting).
- All – Receive push notifications in the Employee App for Mobile for new posts, stories, or pages and new featured posts, stories, or pages published in the topic, channel, or community.
- Mute – Receive no notifications for new and featured posts, stories, or pages from the topic, channel, or community. Additionally, the posts, stories, or pages will be hidden from the Home section of the Employee App. However, new featured posts will still appear in the Featured section.
No matter what notification setting you choose, you will always receive notifications for the following events from a followed topic or channel or joined community:
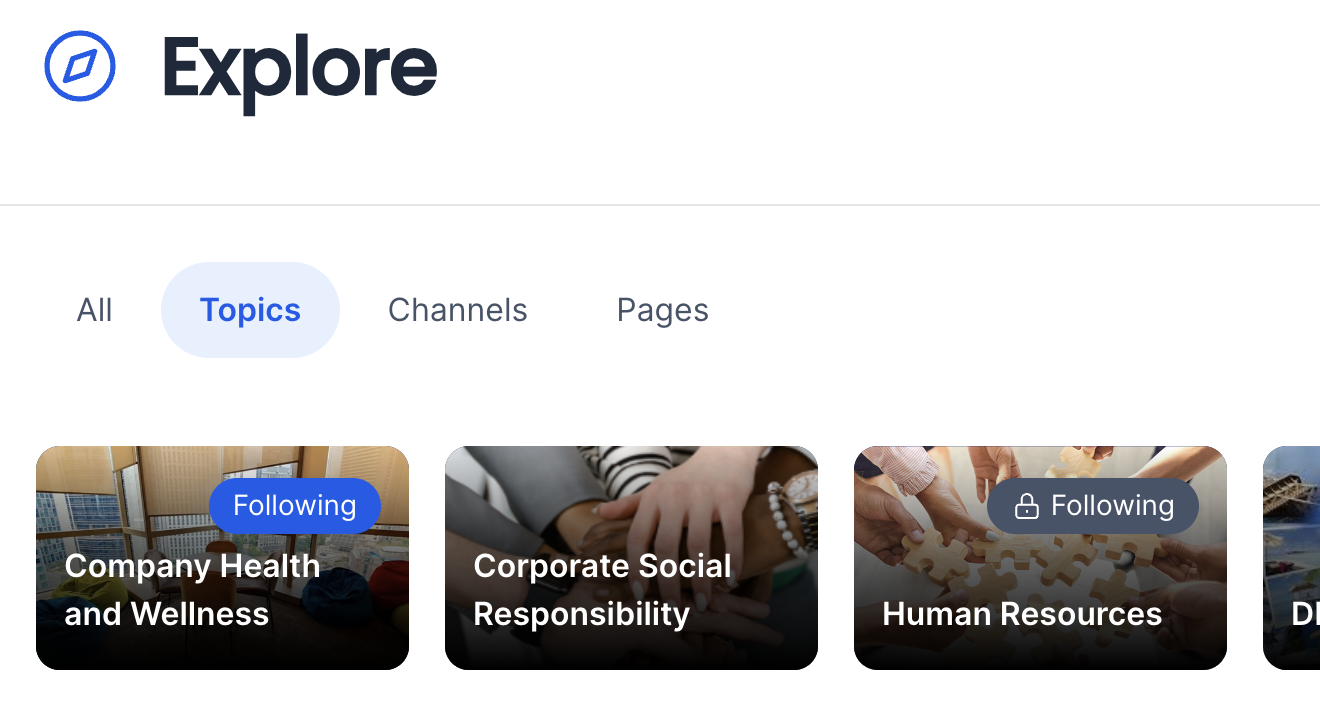
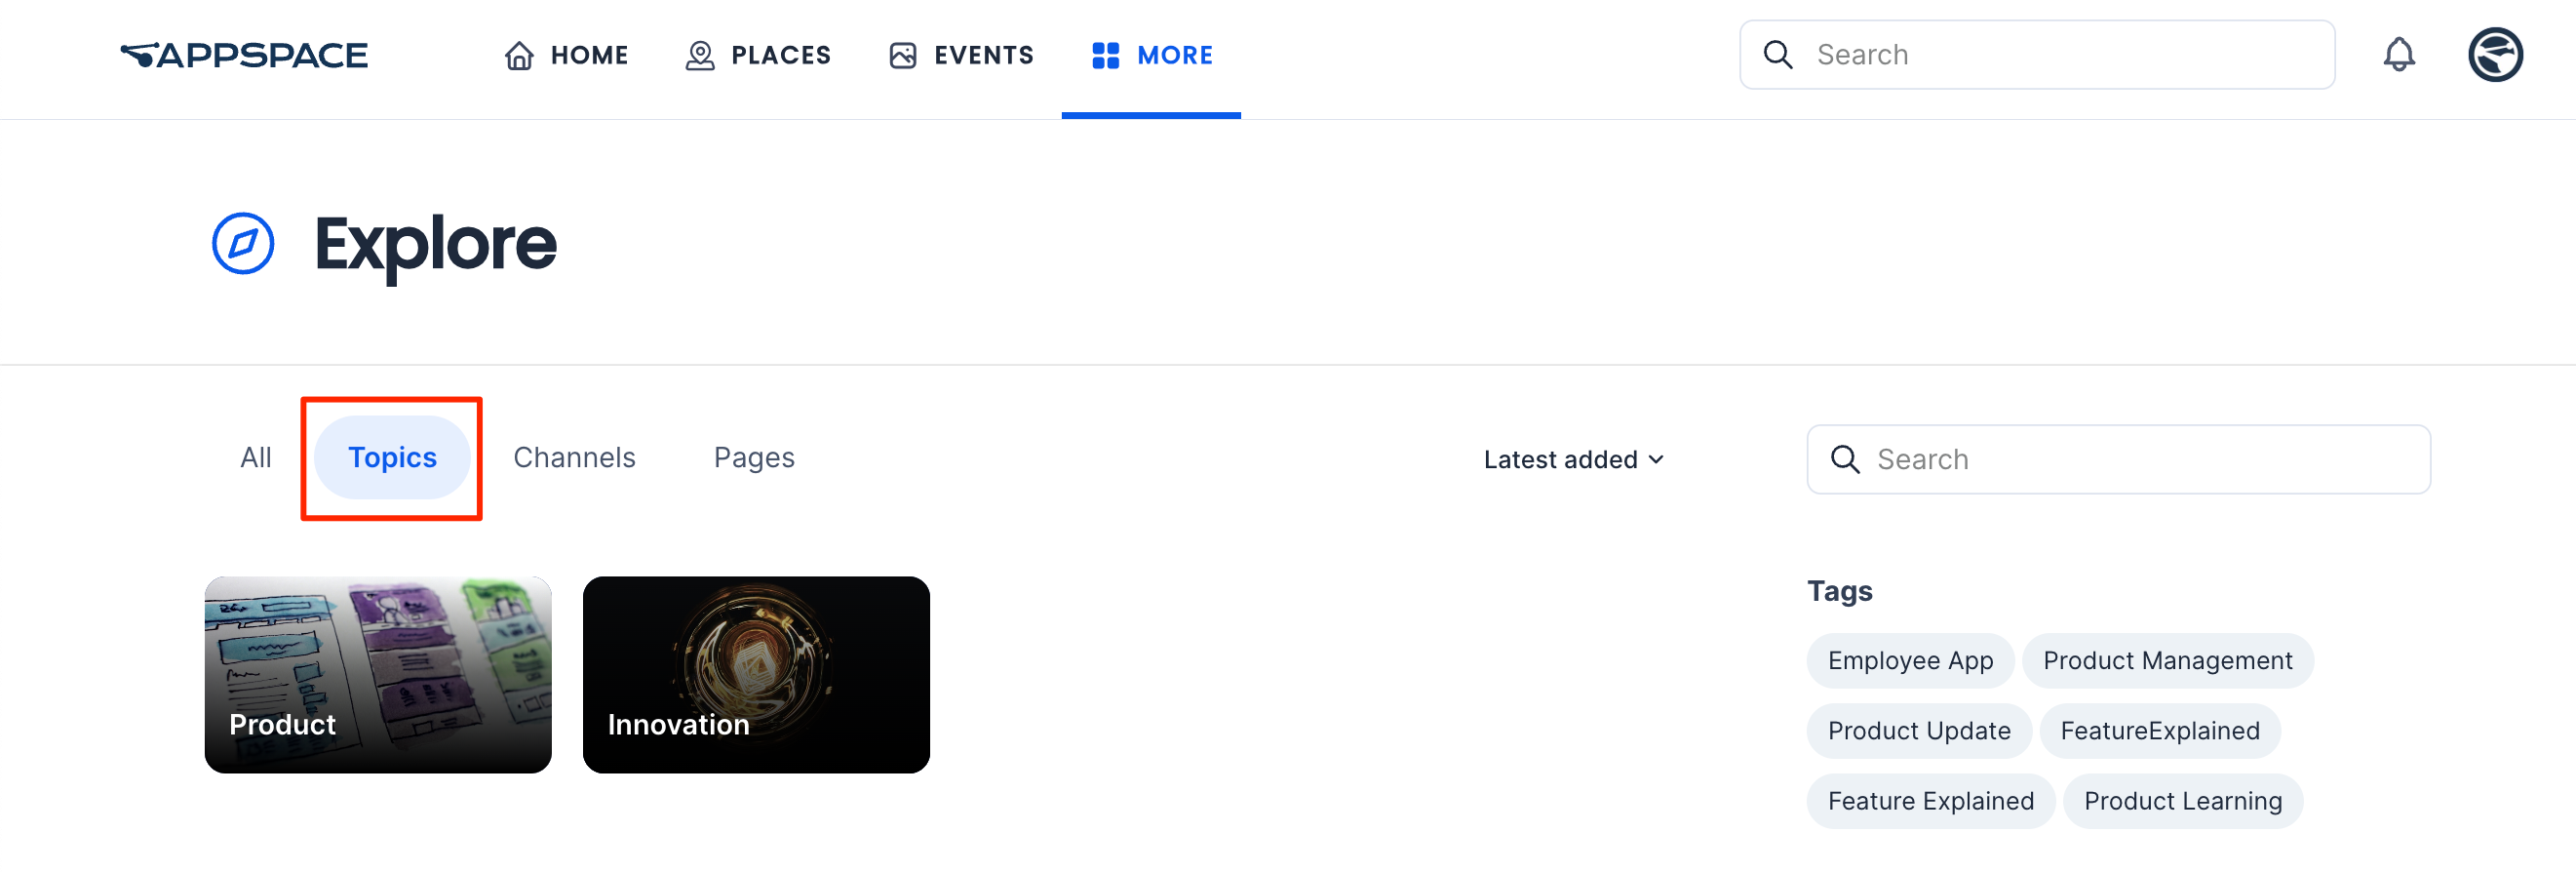
Topics
Click the Topics sub-tab to view all topics. You may click on the sort option on the upper-right to sort topics by the latest added, latest updated, ascending, or descending. On the right section, you can search for available topics by typing in a letter or keyword into the search bar, or filter topics by selecting the available tags under the Tags section.
You can follow and unfollow topics that are not set to mandatory. Refer to the previous section above.
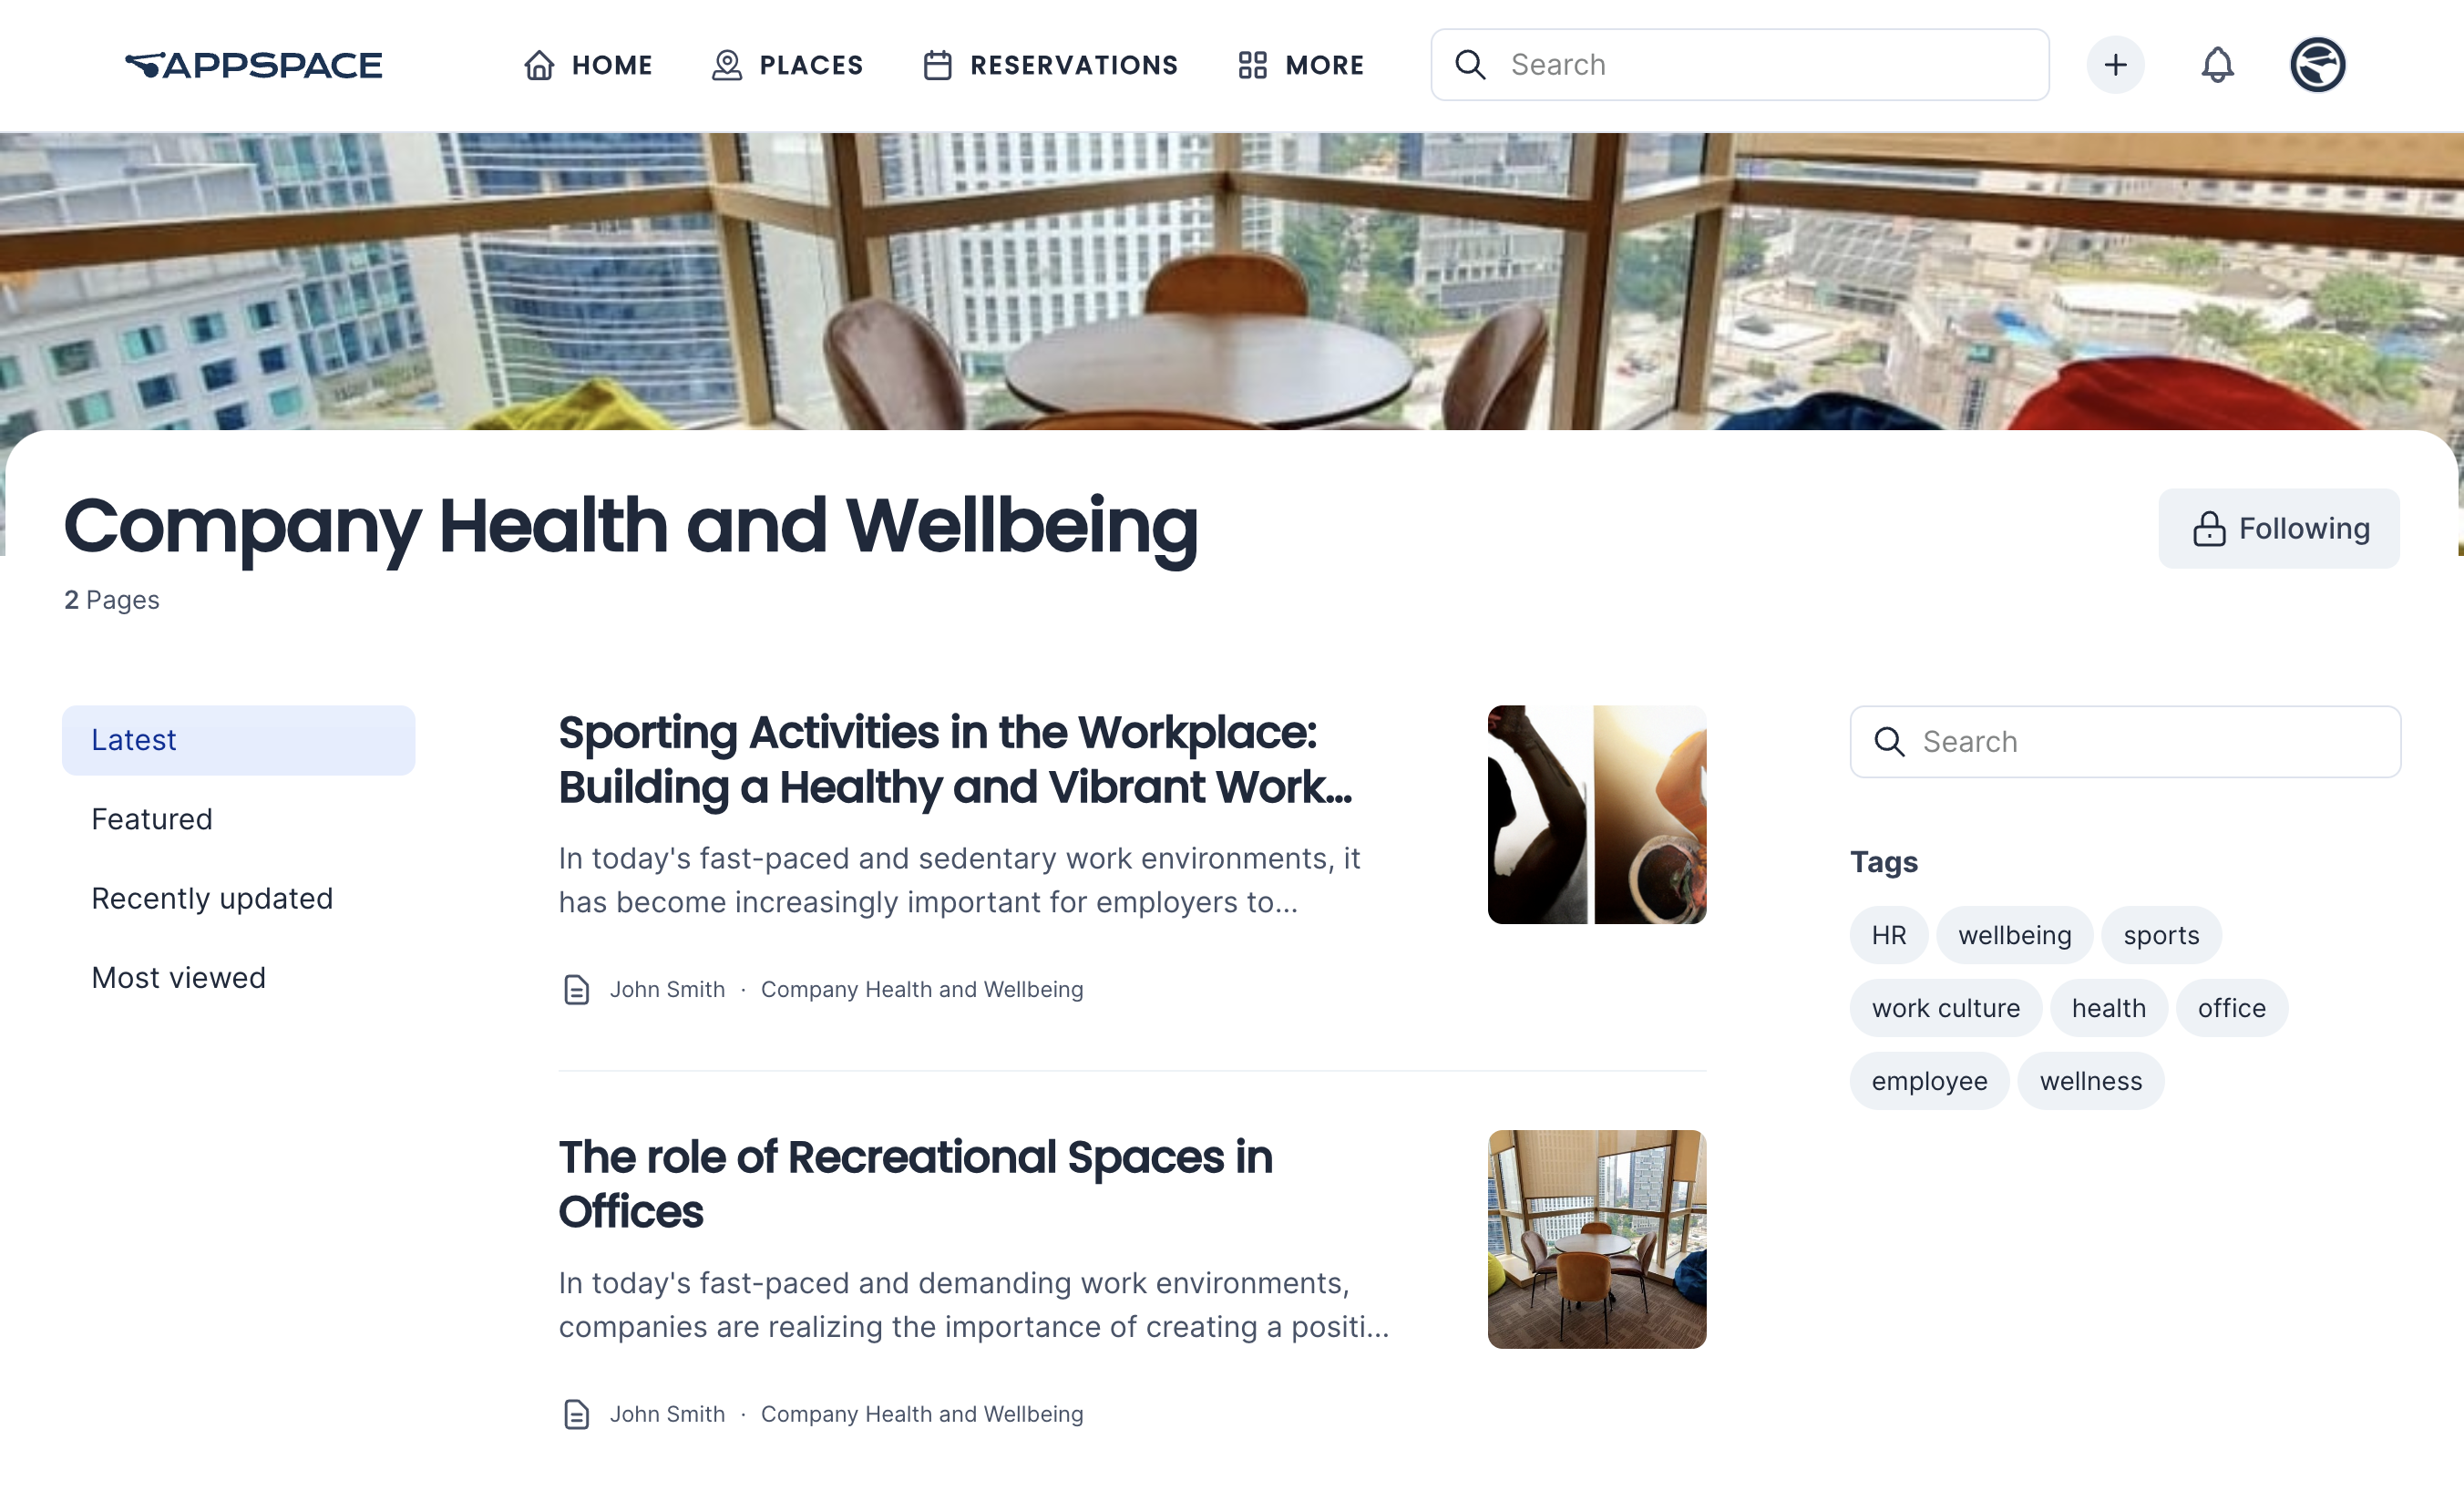
Select a topic to view and navigate the pages under it. The topic view allows you to perform one of the following options:
-
- Select one of the sort options on the left bar to sort pages by the latest, featured, most recently updated, or most viewed.
- Follow or unfollow the topic by clicking the Follow option on the upper left of the screen.
- Search for pages under the topic by typing a letter or keyword into the search bar on the right.
- Select a tag under the Tags section to view pages that have the tag in the Pages tab.
- Click on a page to view it in full.
View Topics Insight
Topics Insights provides analytics on the performance and engagement of specific topics or categories within a community. It helps admins and managers identify which topics resonate most with users by tracking metrics such as post frequency, views, likes, comments, and shares. This feature also highlights trending topics, engagement patterns, and user sentiment, enabling the creation of targeted content and strategies to boost interaction. By analyzing which topics drive the most engagement, organizations can align their efforts with audience interests and improve overall community relevance and participation.
In Topics, after selecting the desired topic, navigate to the Insights section. From there, you can perform the following actions:
Channels
Click the Channels sub-tab to view channel groups and channels. You may click on the sort option on the upper-right to sort the channels and channel groups by the latest added, latest updated, ascending, or descending. On the right section, you can search for available channels and channel groups by typing in a letter or keyword into the search bar, or filter them by selecting the available tags under the Tags section.
You can follow and unfollow channels that are not set to mandatory. Refer to the previous section above.
Select a channel group from the Group section (top), or select a channel from the Channels section to view content.
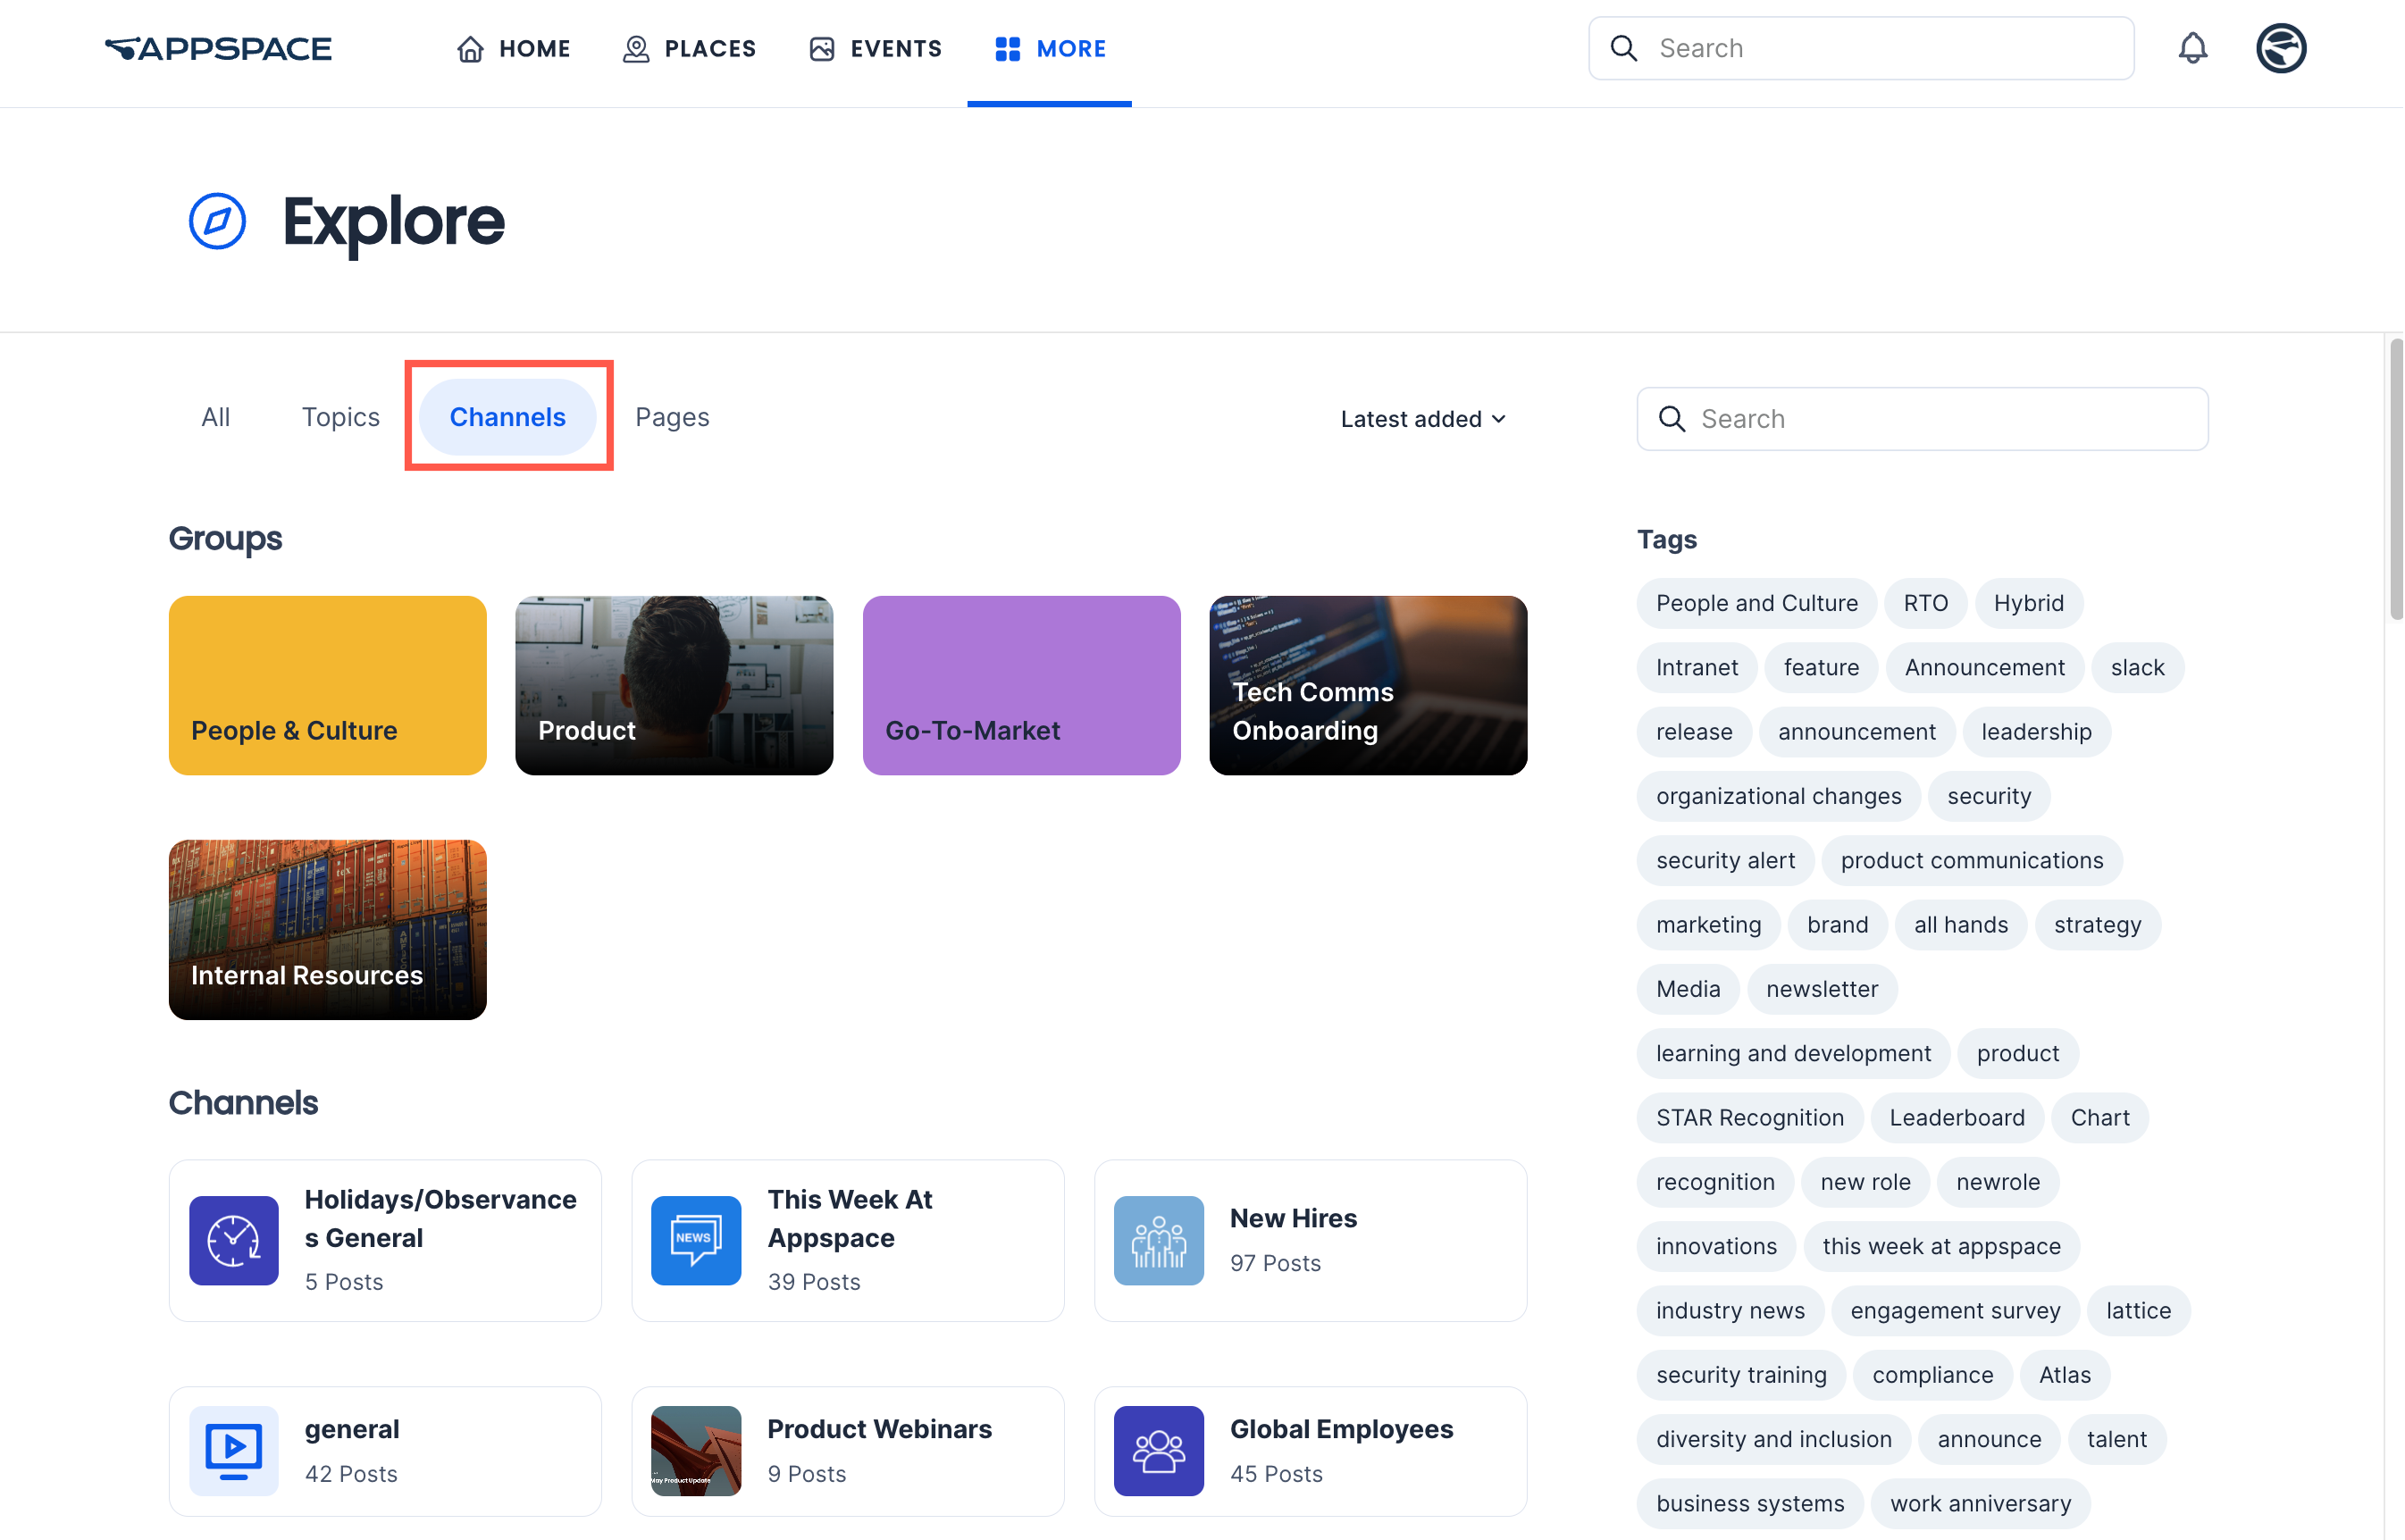
Channel Group
When a channel group is selected, the channels within the selected channel group will be listed on the right sidebar, while the channel content (such as quick posts and events) will be listed in the left section.
Channel
When a channel is selected, the channel will be displayed either in Feed view or Carousel view. These views are configured by an administrator in the Employee Mode settings when creating a channel.
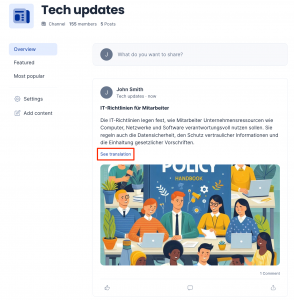
- Feed – All content within the channel will be listed, allowing users to select specific content for viewing. This view allows you to perform the following options:Note(New) If a post, event post, praise, or comment is in a different language, a See translation option will appear below the text. Click the option to auto-translate the text.
- Search for posts within the channel by clicking the Search icon on the upper right and entering a letter or keyword.
- Follow or unfollow the topic by clicking the Follow option on the upper right of the screen.
- Select a sort option on the left bar to sort pages by latest (overview), featured, or most popular.
- (New) Bookmark a post (including event posts), story, or page by clicking the ellipsis and clicking Bookmark. Bookmarked items are saved to the Bookmarks widget on the Employee App (which must be enabled in App Theme Settings) and to your People profile (under the Bookmarks tab).
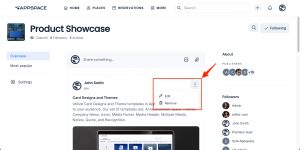
- Users with Publisher or Editor permissions can edit a post using one of the editing options.
- Select the icons under Publishers to list all the publishers of the channel in a window.
- View the followers of the channel.
- Select a tag under the Tags section to view posts that have the tag within the channel.
- (New) View pinned posts, stories, and pages at the top of the community Overview page.
- Like, comment, and share a post.
- Click on a post to view it in a window.
 When in the window view of an event post, you can click on the ellipsis in the upper right corner of the window and select Open in full page to view it as a full page.
 - When you click any content, the content together with details such as title, article (description), and publishing details are displayed.

- Users with Publisher or Editor permissions can edit the content by clicking the ellipsis icon and selecting Edit.
- Carousel – In this format, all content within the channel will be displayed similar to how it will be viewed during device playback. This feature is only applicable and available for playlist channels.
- You may click the thumbnail below this content to view the next content.

Add Content & Edit Channel
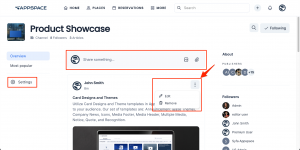
Account Owners, Publishers, or Channel Editors may edit content directly from the Employee App portal, without having to navigate back to Channels or Library in the Appspace console.
- To add a quick post to the channel, click the quick post field.
- Alternatively, you may choose to edit the channel in the console. Select the Settings button instead.
- You may also edit a post directly in the channel itself.
- (New) Account Admins, Publishers, and Editors may Pin or unpin posts (including event posts) and stories to the top of the channel Overview page to be viewed by Employee App users. See this article on how to pin or unpin articles in a channel.
View Channels Insight
Channels Insights offers analytics to evaluate the performance and engagement within specific channels of a community. It provides detailed metrics such as member activity, post frequency, views, comments, and likes, helping admins and managers understand how effectively each channel is being utilized. The insights highlight top-performing channels, trends in user participation, and peak activity times, allowing for better content planning and resource allocation. With Channels Insights, organizations can identify engagement gaps, foster more meaningful interactions, and ensure channels align with the community’s needs and goals.
In Channels, after selecting the desired channel, navigate to the Insights section. From there, you can perform the following actions:
Pages
Click the Pages sub-tab to view all pages. You may click on the sort option on the upper-right to sort the pages by the latest added, latest updated, ascending, or descending. On the right section, you can search for available pages by typing in a letter or keyword into the search bar, or filter pages by selecting the available tags under the Tags section.
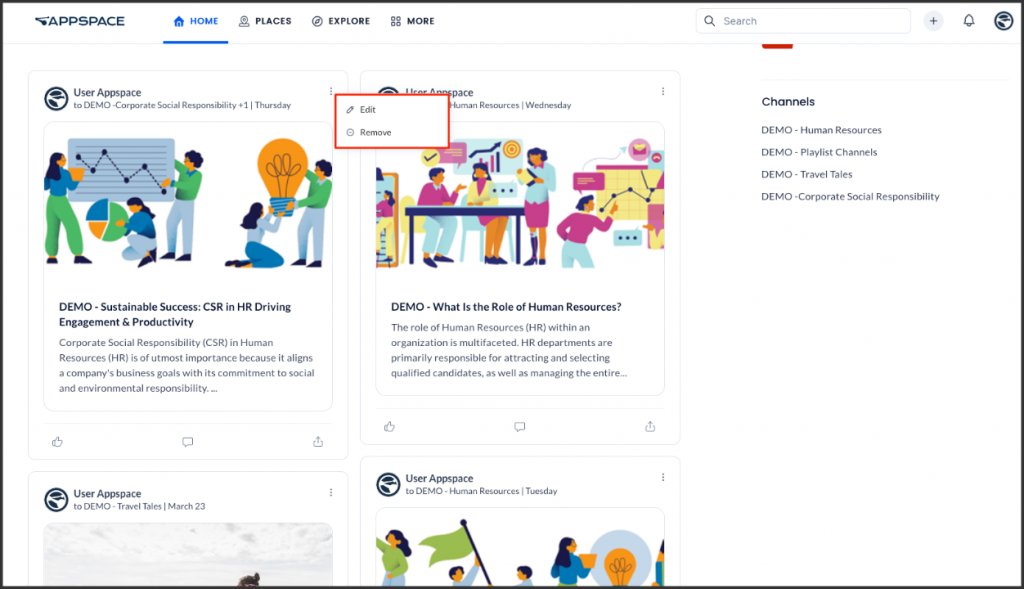
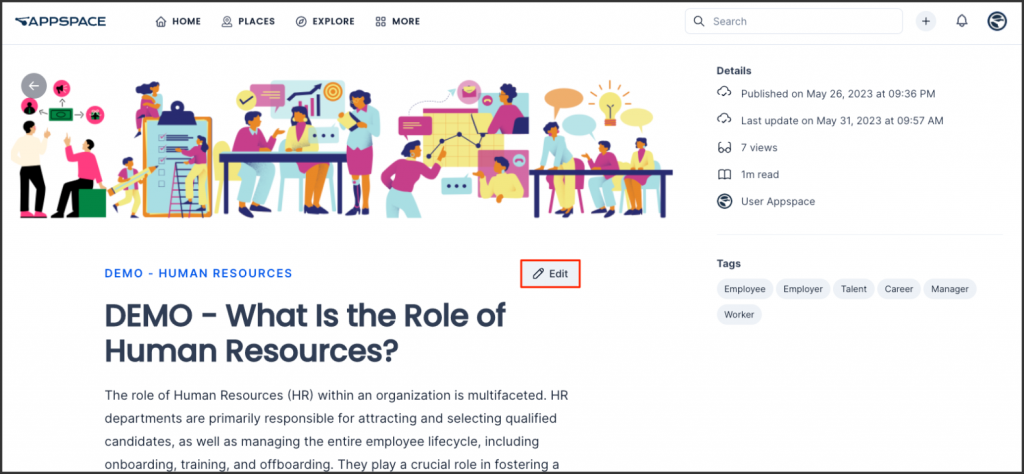
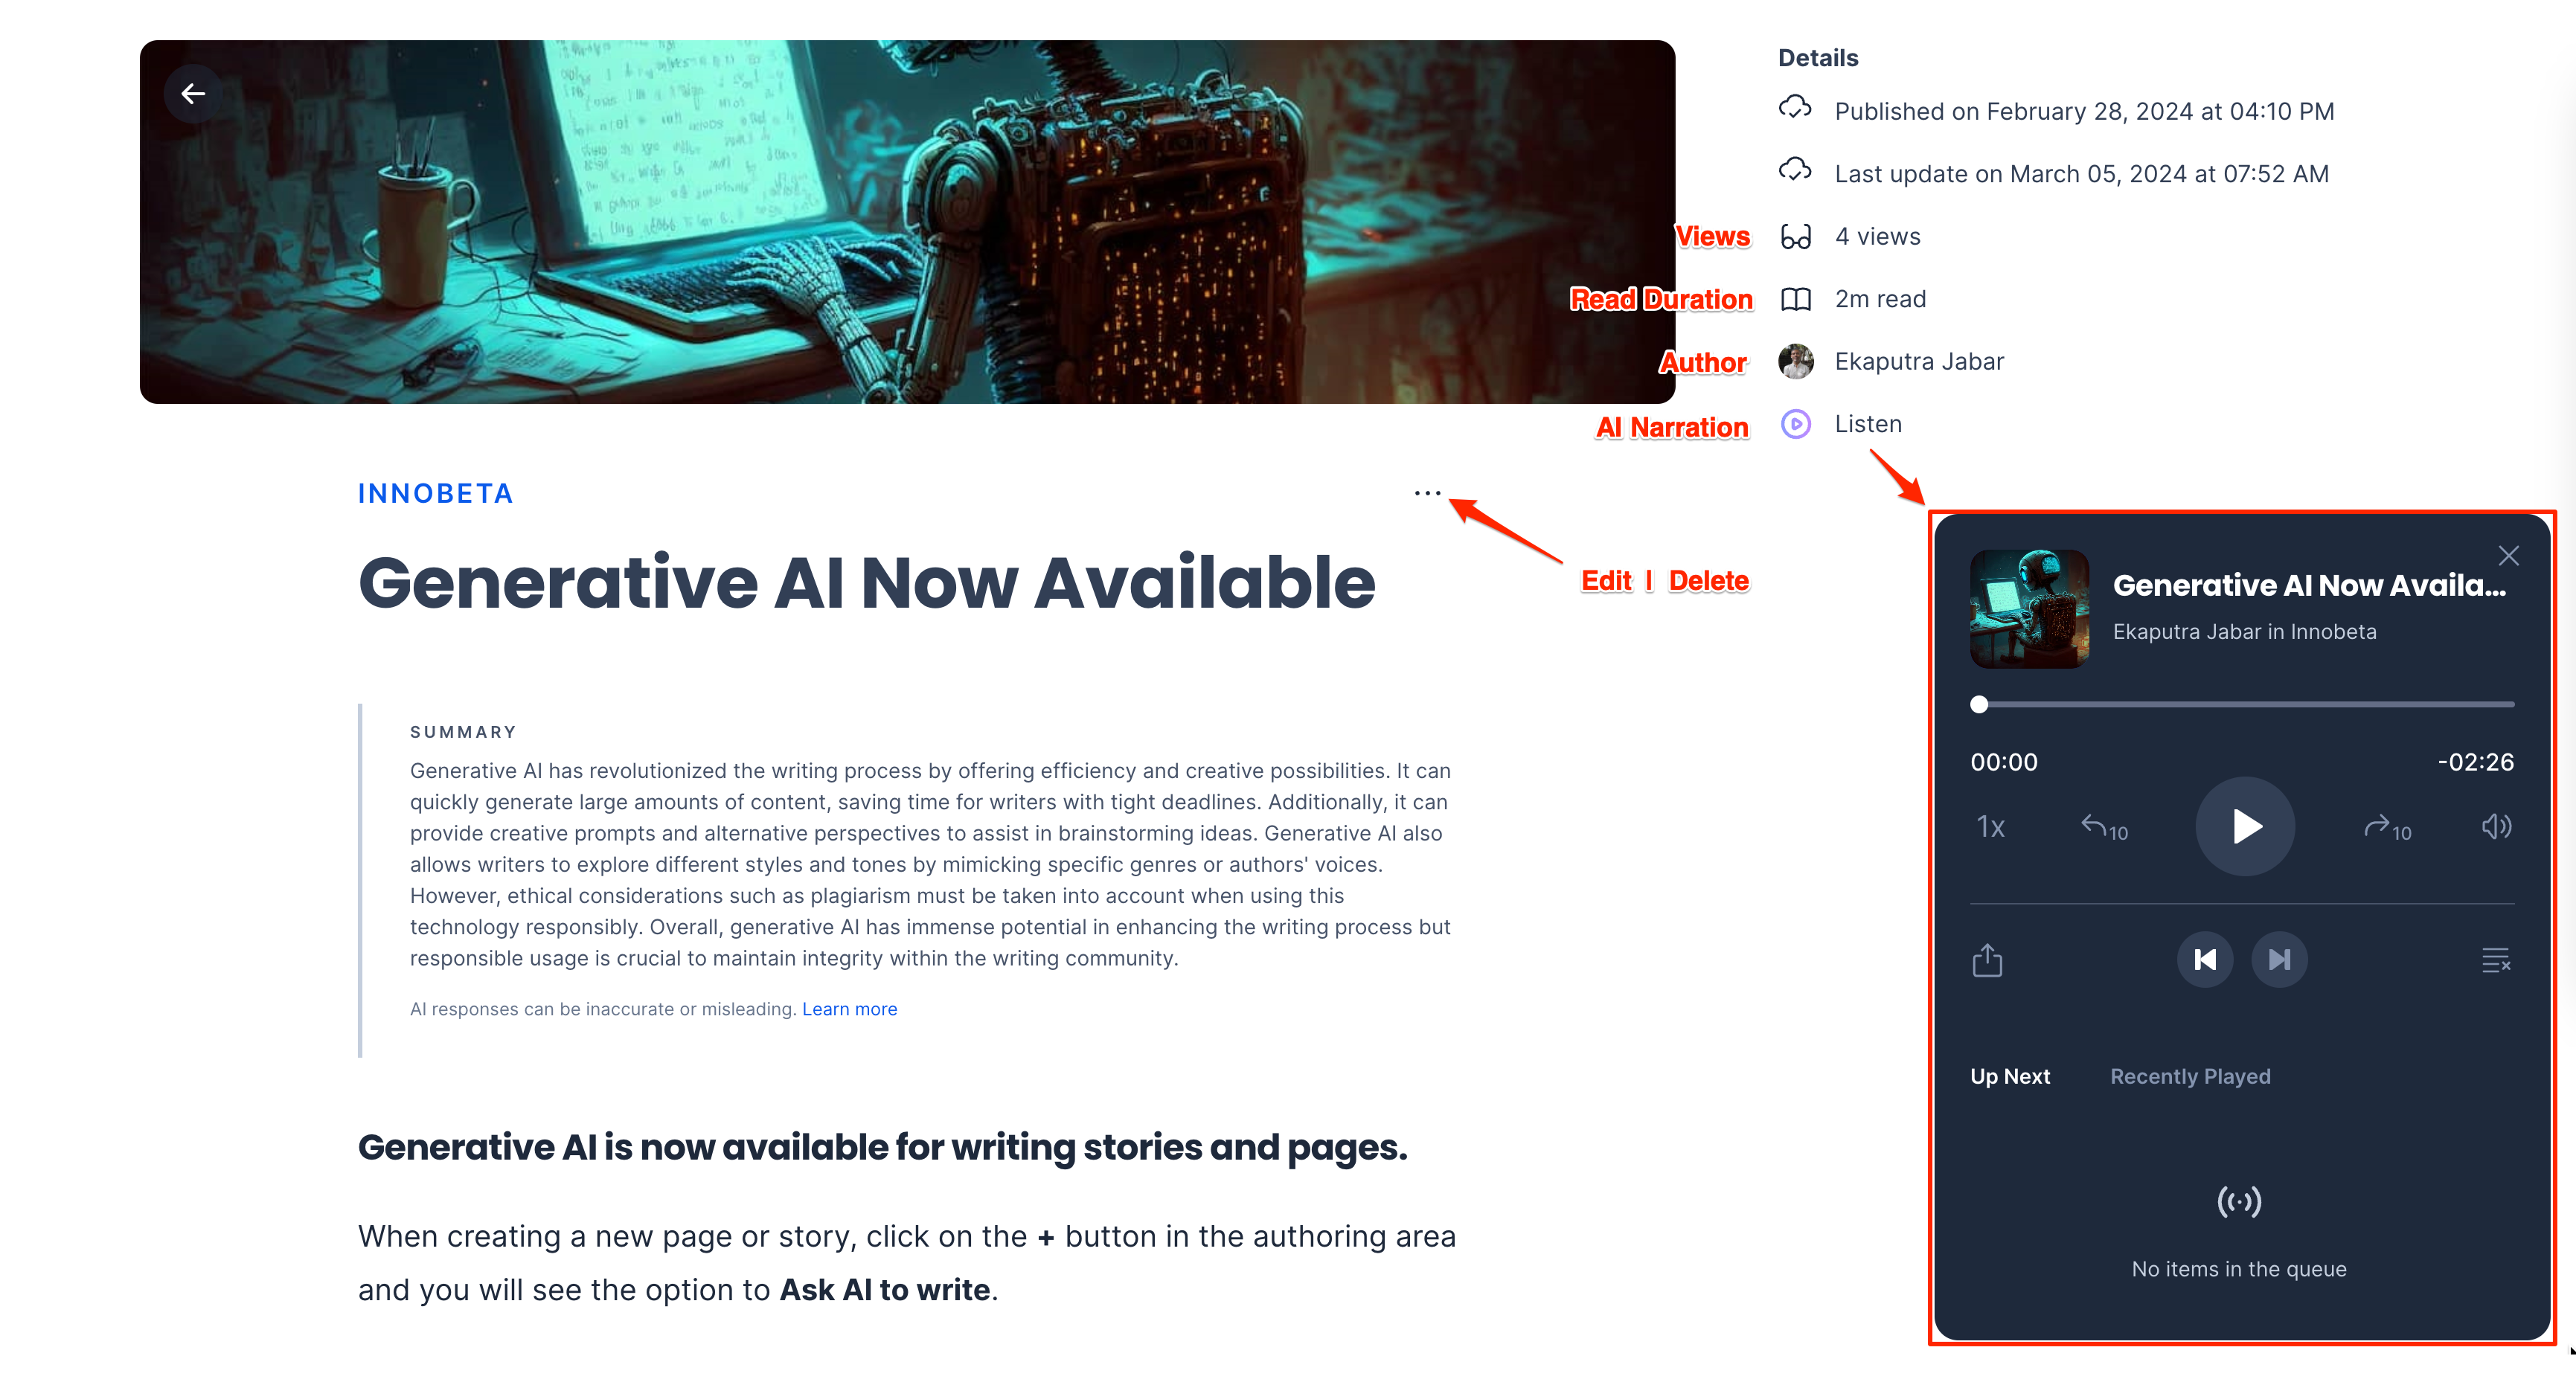
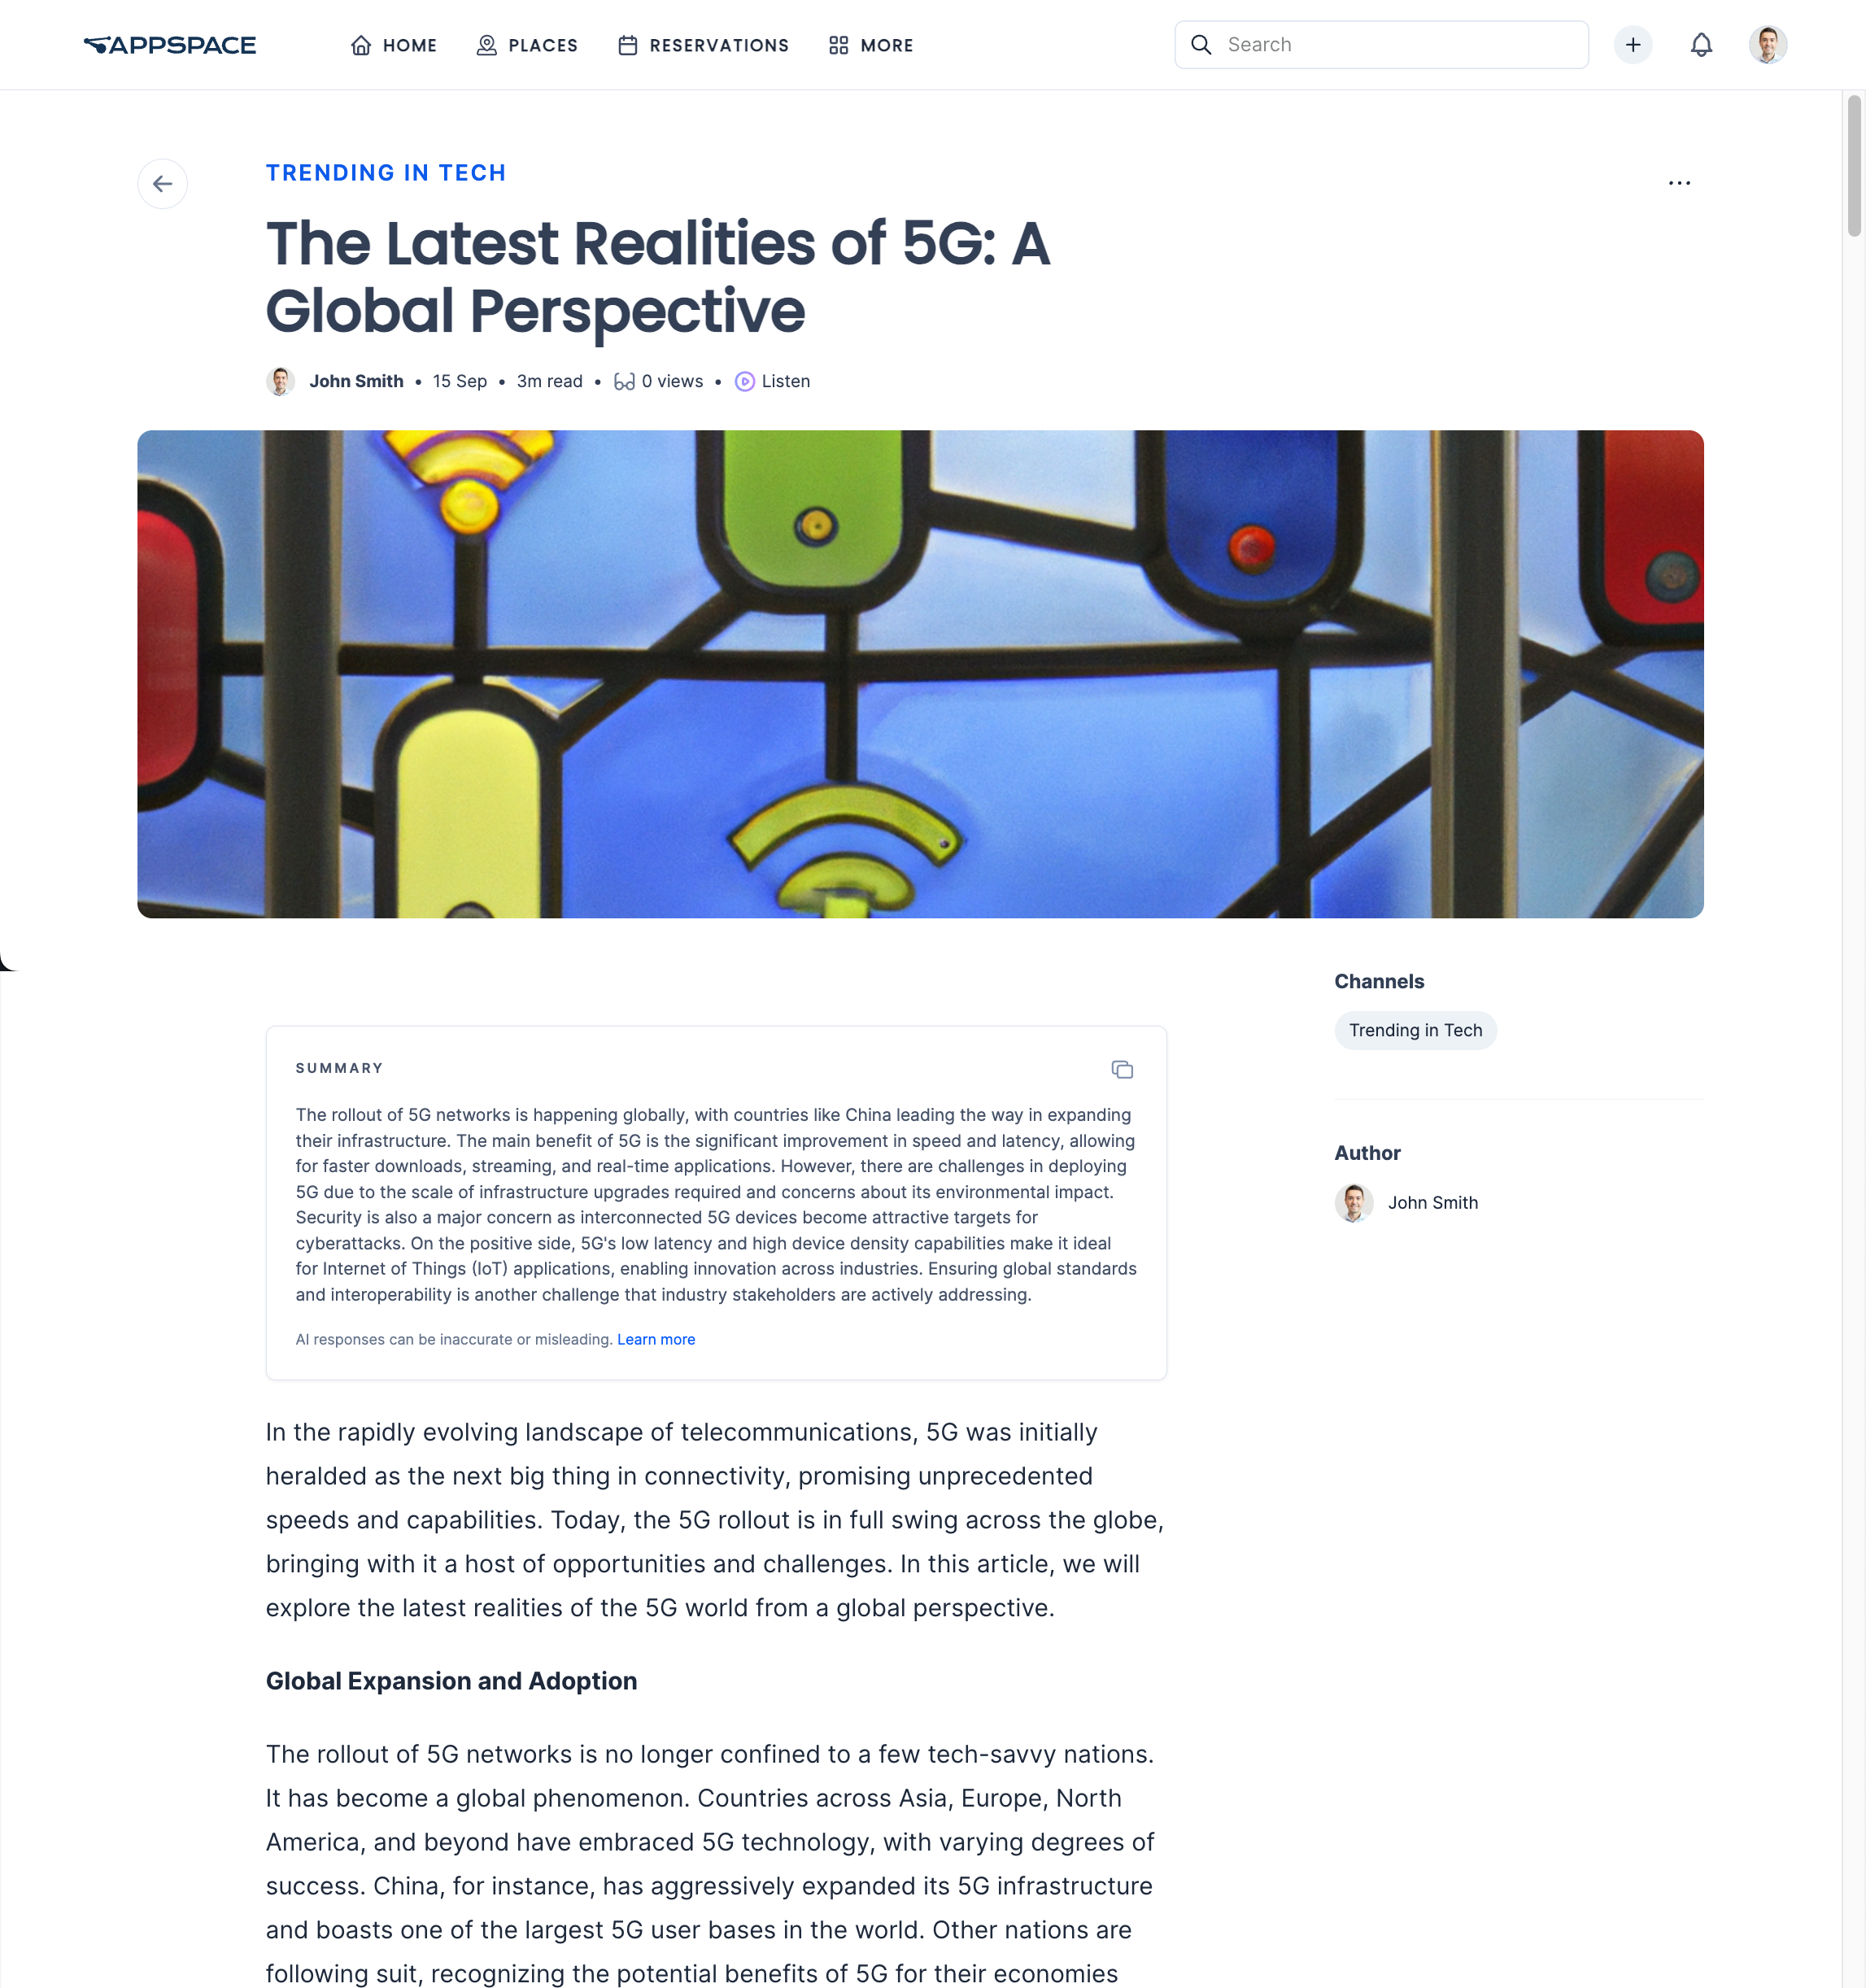
Click on a page to view it in a window. The right section displays Details of the page (published date and time, number of views, the amount of time to read the article, and author /authors), as well as its Tags.
The page view allows you to perform the following actions:
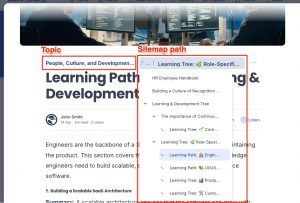
- (New) The navigation path at the top of the page displays the Topic, followed by the Sitemap path. Note
- The Sitemap for the topic needs to be configured for both the Sitemap path and the Move location in sitemap option to be displayed.
- If the page belongs to more than one topic, the sitemap path will not be displayed.
- Click the Topic to go to the topic feed page, which lists all pages under the topic.
- Click the Sitemap path to view other pages in the tree structure of the topic. Navigate to another page by clicking the path within the tree.
- You can move the page to another location within the sitemap tree structure by clicking the ellipsis (…) next to the path and selecting Move location in sitemap. Select a page within the sitemap tree to move the current page under it.
- When in window view, you can click on the ellipsis (…) in the upper right corner of the window and select Open in full page to view the content on a full page.
- Bookmark the page by clicking the ellipsis and clicking Bookmark. Bookmarked pages are saved to the Bookmarks widget on the Employee App (which must be enabled in App Theme Settings) and to your People profile (under the Bookmarks tab).
- Click the ellipsis to Edit or Delete the Page, if you have authoring or publishing permissions.
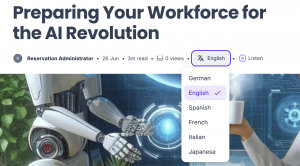
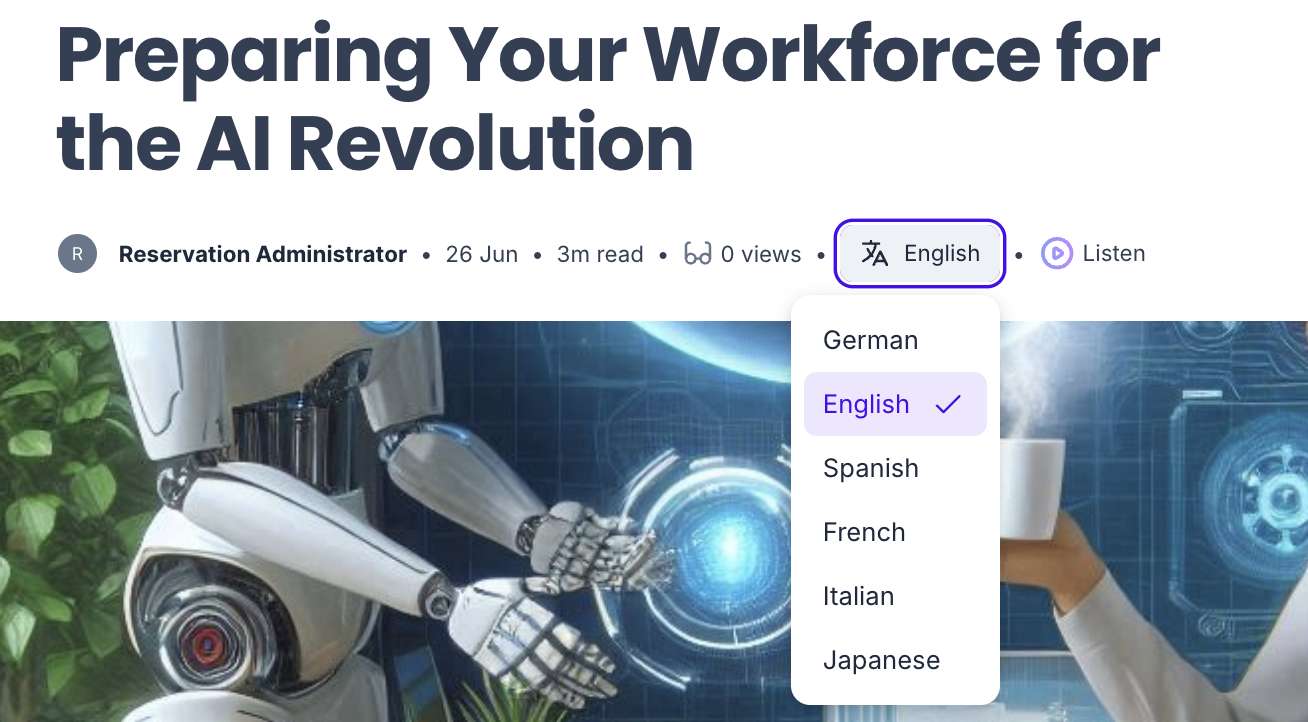
- View the different translations of the page (if available), by clicking the language icon under the Title and selecting the language from the drop-down list.
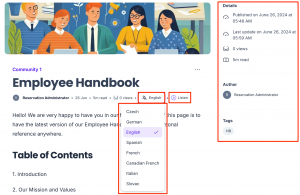
- Listen to the contents of the page, by clicking Listen to have AI narrate the contents of the page through its player. The voice language will match the language translation selected above.
- In Details:
- View the published and last updated date of the page.
- View the number of times the page has been viewed.
- View the estimated duration it takes to read the page.
- View the Author (s) of the page, by clicking the name of the Author to view their profile in People.
- Select Tags within the Tags section to view similar pages available in Pages.
- The Like, Comment, and Share social features are available and located at the end of the page.


Communities (New)
Communities are dynamic, user-driven collaboration spaces that provide a platform for users to easily create and participate in groups centered around various subjects, interests, and projects.
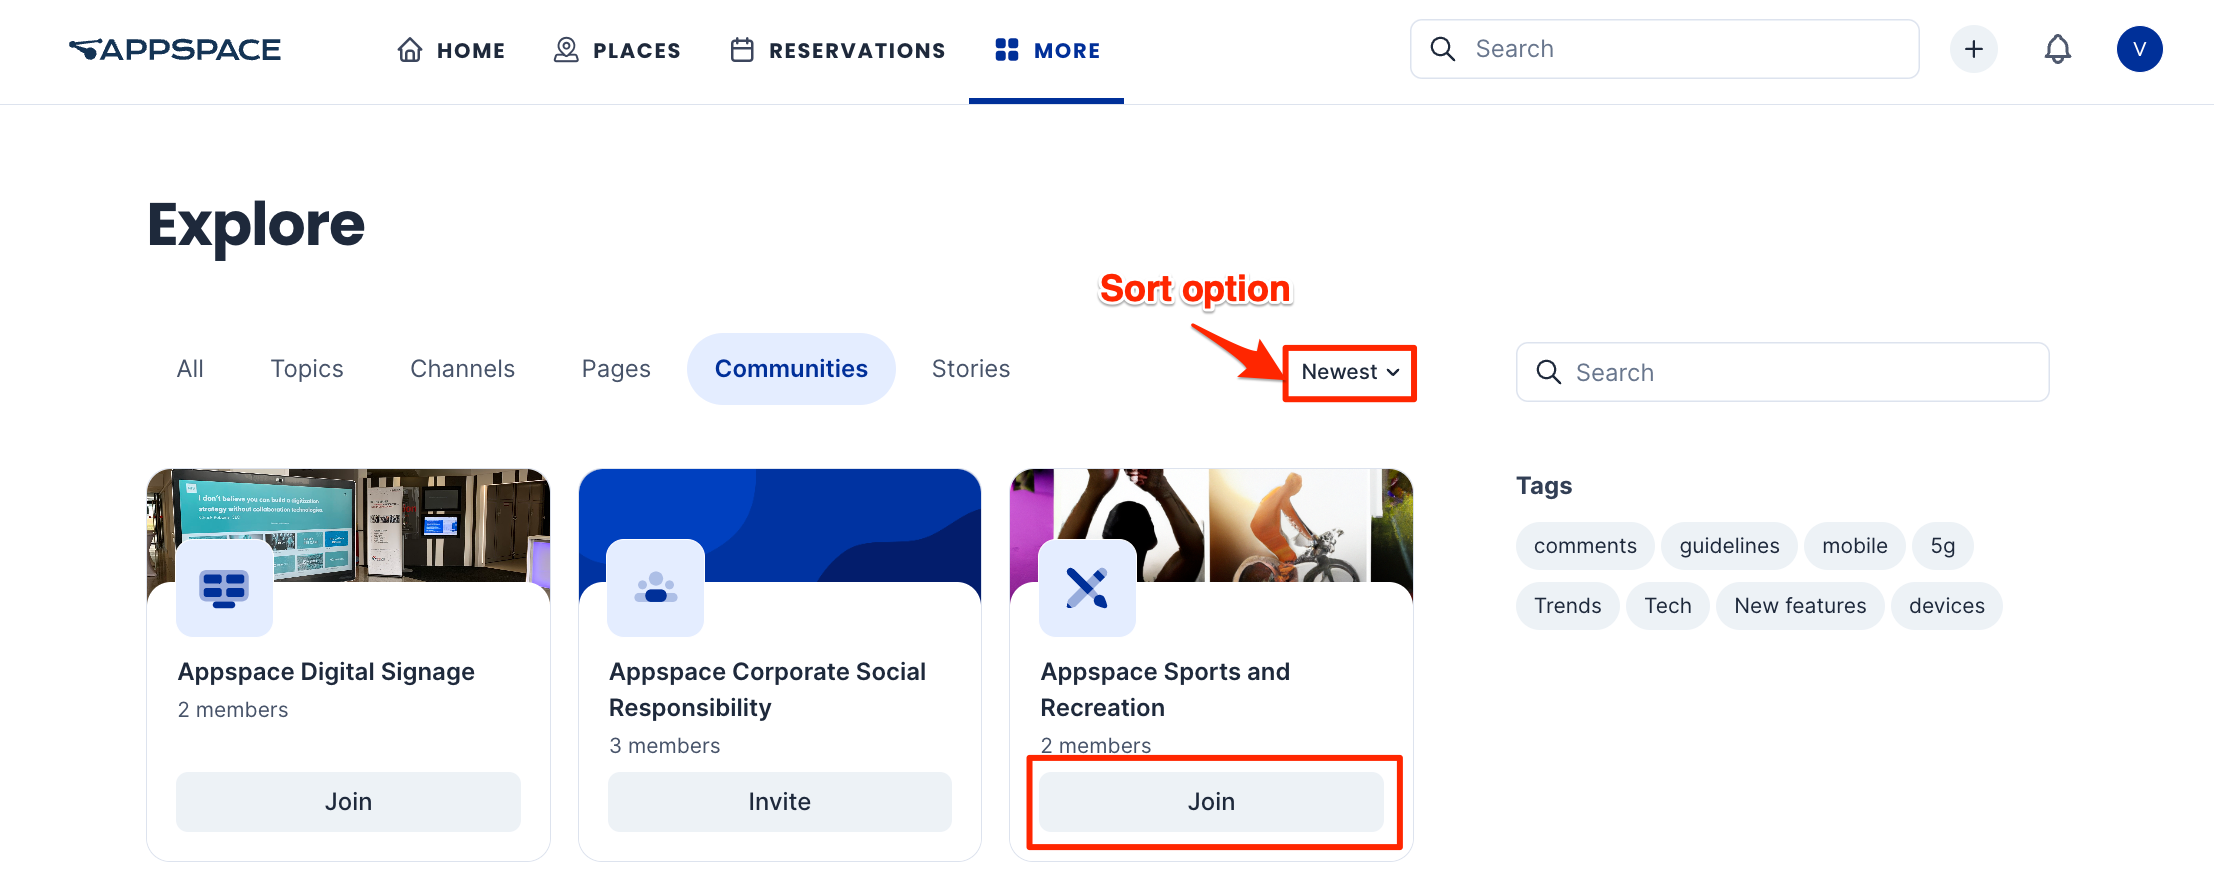
Click the Communities sub-tab to view public communities with posts, stories, and pages published to employees of the organization. You may click the sort option on the upper-right to sort communities by the newest, latest updated, or name (ascending or descending). On the right section, you can search communities by typing a letter or keyword into the search bar.
The Tags section contains the tags assigned to communities and also to posts, stories, or pages within the communities. Select tags to display tagged communities and communities that contain tagged articles.
Click Join to become a member of a community, or Leave to leave the community. Click Invite to invite users to join communities that you are an administrator, owner, or moderator of.
Select a community to view the Community and its contents. The following options are available on the community page:
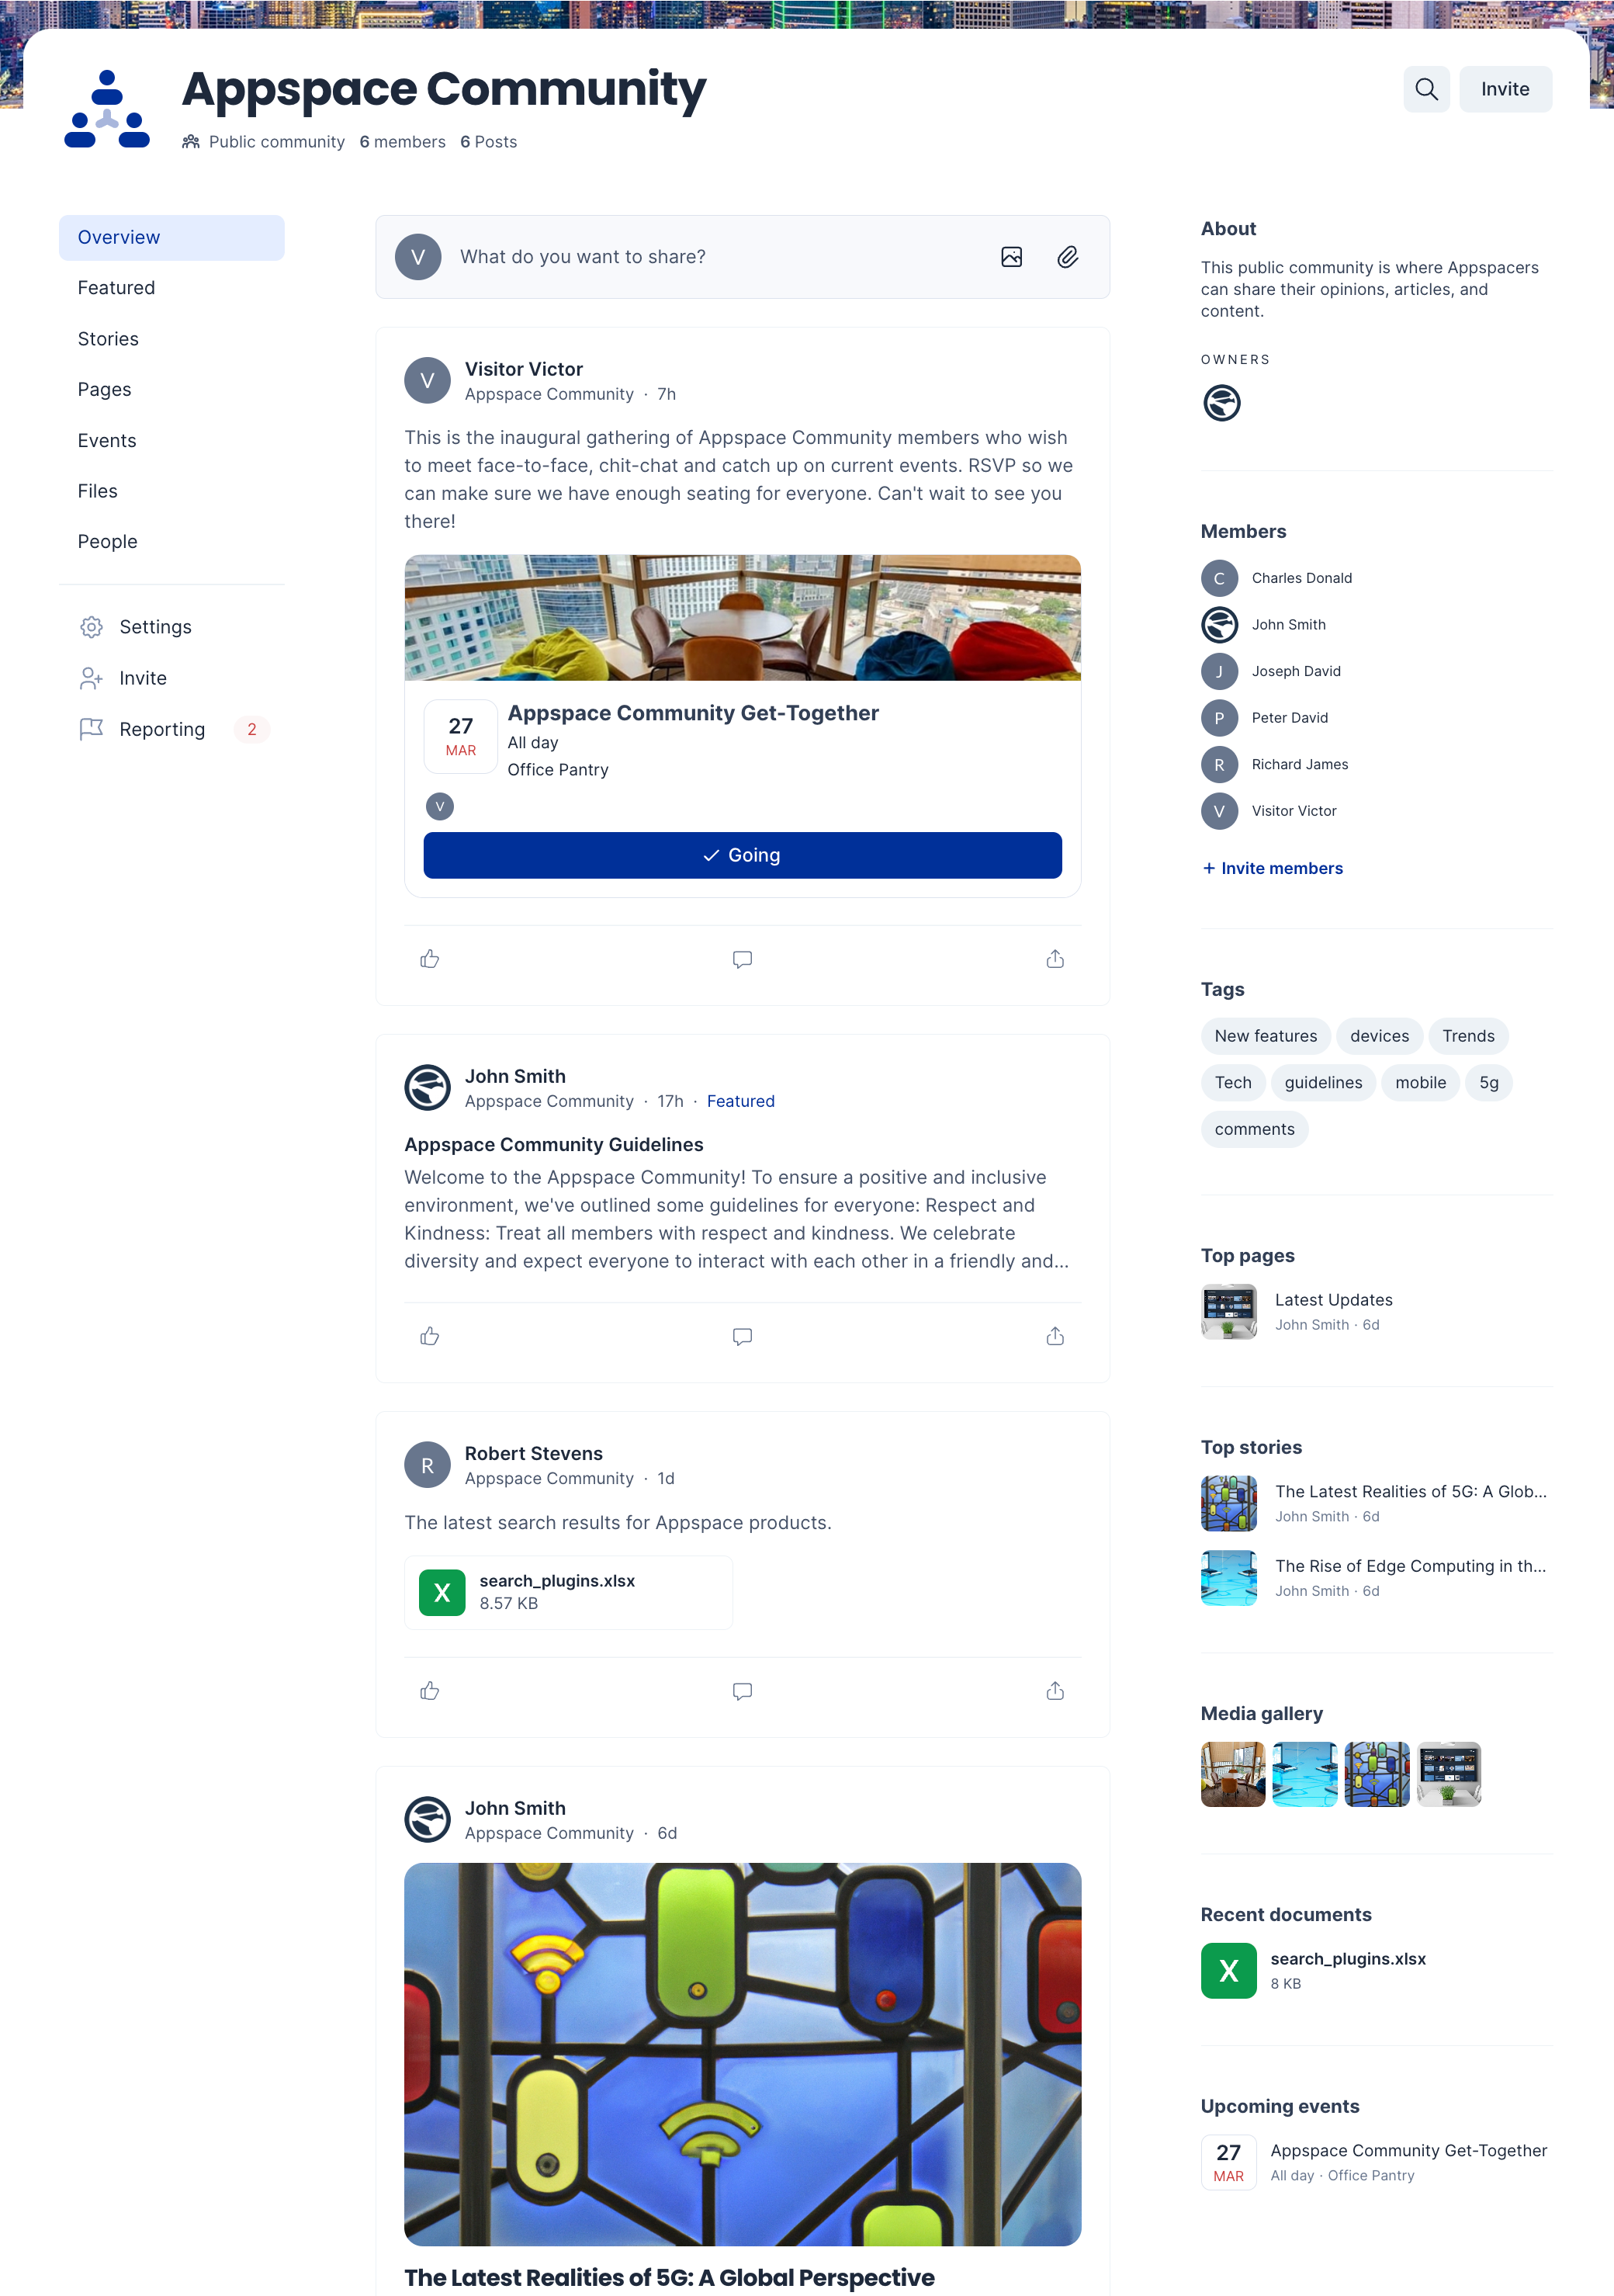
- Search for posts, stories, or pages within the community by clicking the Search icon on the upper right and entering a letter or keyword.
- Click Join to become a member of a community, or Leave to leave the community.
- To add a quick post to the community, click the quick post field.
- Select the icons under Owners to list all the community owners in a window.
- View the Members of the channel. Click each member to go to the person’s profile page.
- Select a tag under the Tags section to view posts, stories, or pages that have the tag within the community.
- View the Top pages, Top stories, Media gallery, and Recent documents.
- (New) View pinned posts, stories, and pages at the top of the community Overview page.
- React, comment, and share a post, story, or page.
- Click on a post, story, or page to view it in a window. When in window view, you can click on the ellipsis in the upper right corner of the window of an event post, story, or page and select Open in full page to view it as a full page.
- Click Invite to send invites to users to join communities that you are a member of. See this article for steps on inviting users.
The Overview page displays posts, stories, pages, files, and members of the community. On the left bar, click the appropriate section to view the relevant content:
- Overview – displays community posts, stories, and pages, with pinned articles at the top. This is the community default page.
- Featured – displays posts published as featured in the community.
- Stories – displays stories published in the community.
- Pages – displays pages published in the community.
- Events – displays event posts published in the community.
- Files – displays files published in posts, stories, or pages within a community. Click the file to view or download it.
- People – view and message the members, owners, and moderators of the community. Click on the person to view the People profile.
Users can perform the following actions within each section:
- To publish, edit, or report posts, stories, pages, or files in a community, see this article.
- You can like, comment on, and share posts, stories, and pages in the community. See this article for steps on how to do so.
The following options are available to account admins, location admins, publishers, community owners, and moderators:
- (New) Account Admins, Community Owners, and Moderators may Pin or unpin posts (including event posts), stories, and pages to the top of the community Overview page to be viewed by community members. See this article on how to pin or unpin articles in a community.
- Settings – Click the option to configure and administrate the community. See this article for steps on configuring settings for the community.
- Reporting – Click the option to view and moderate reported posts, stories, or pages. See this article on how to moderate reported articles within the community.
View Communities Insight
Communities Insights provides valuable data to track user engagement, content performance, and overall community activity. It enables admins and managers to monitor metrics like active users, post views, interaction rates, and content popularity. With demographic segmentation, sentiment analysis, and trend detection, it helps tailor strategies to user behavior and interests. Real-time dashboards and detailed reports offer visual insights, making it easier to optimize engagement, improve content strategies, and address inactivity. By leveraging these analytics, organizations can make data-driven decisions to foster a thriving and engaged community.
In Communities, after selecting the desired community you joined, navigate to the Insights section. From there, you can perform the following actions:
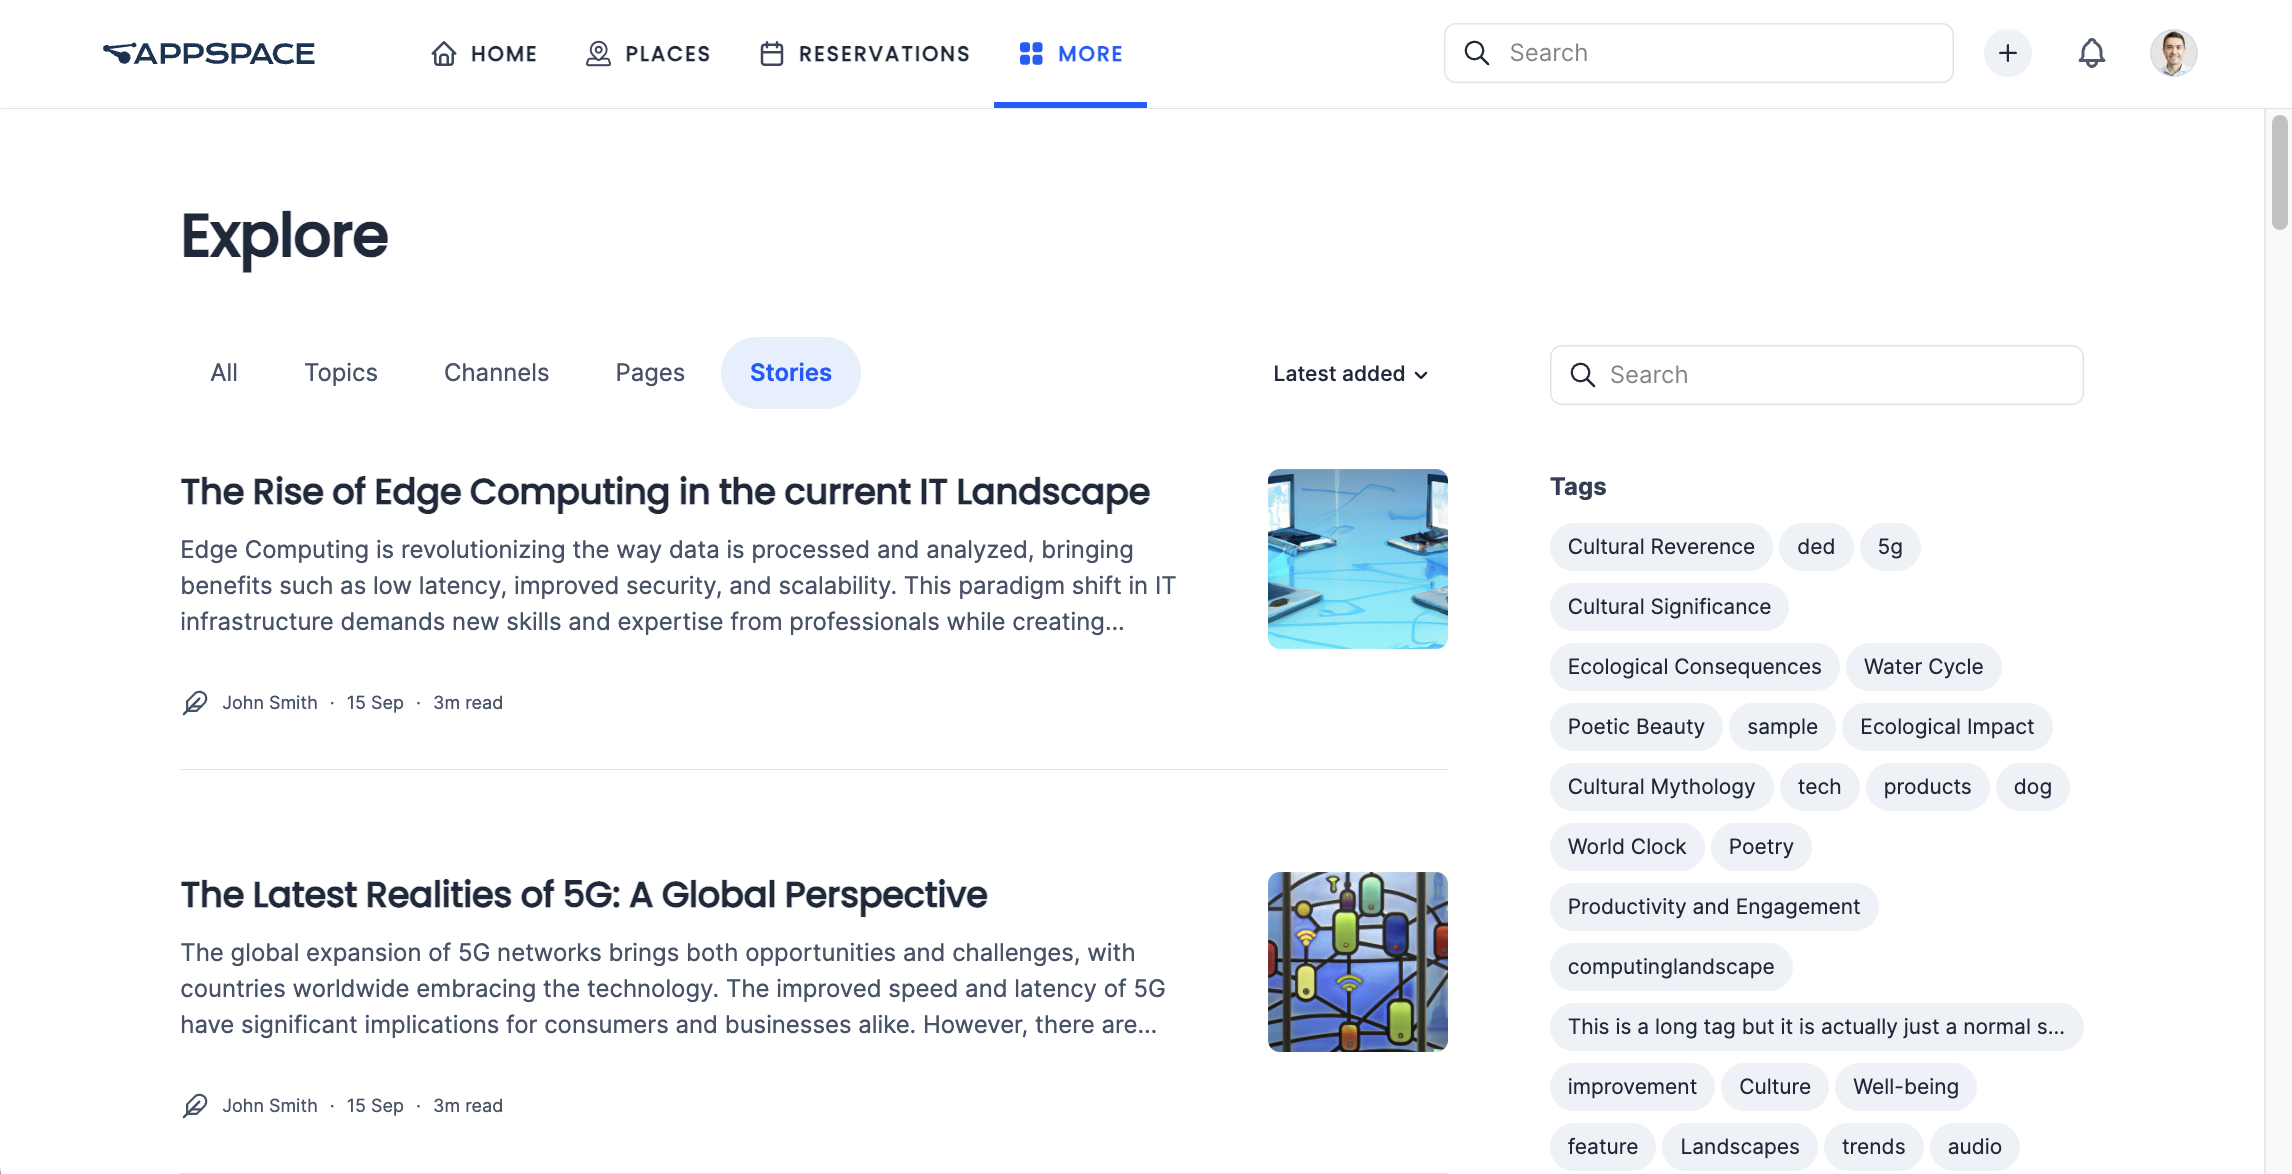
Stories
Stories provide a richer medium for compelling and thoughtful articles that include elements such as text, photos, and videos to create content that drives employee engagement within the company. For more information on stories, refer to this article.
Click the Stories sub-tab to view all stories. You may click on the sort option on the upper-right to sort the stories by the latest added, latest updated, ascending, or descending. On the right section, you can search for available stories by typing in a letter or keyword into the search bar, or filter stories by selecting the available tags under the Tags section.
Click on a story to view it in a window. The line below the header displays the author (s), published date and time, the amount of time to read the article, number of views, language translation (New), and the audio narration option (New). The right section displays channels that the story is part of and the author (s). The story view allows you to perform the following actions:- When in window view, you can click on the ellipsis in the upper right corner of the window and select Open in full page to view the story on a full page.
- (New) Bookmark the story by clicking the ellipsis and clicking Bookmark. Bookmarked stories are saved to the Bookmarks widget on the Employee App (which must be enabled in App Theme Settings) and to your People profile (under the Bookmarks tab).
- Click the ellipsis to Edit or Delete the Story, if you have authoring or publishing permissions.
- In Details:
- View the Author (s) of the story, by clicking the name of the Author to view their profile in People.
- View the published and last updated date of the story.
- View the estimated duration it takes to read the story.
- View the number of times the story has been viewed.
- (New) View the different translations of the story (if available), by clicking the language icon and selecting the language from the drop-down list.
- (New) Listen to the contents of the story, by clicking Listen to have AI narrate the contents of the story through its player. The voice language will match the language translation selected above.
- Select Tags within the Tags section to view similar stories available in Stories.
- In Channels: View the Channels the story is published to.
- In Author: View the Author (s) of the story.
- The Like, Comment, and Share social features are available and located at the end of the story.
Videos
On the top menu, click More and select Videos.
The Videos tab simply displays a collection of all videos available in your app, from all the channels and channel groups assigned to you or your user group.
Each video block will include details such as channel name, video title, duration, publish date, and author name.
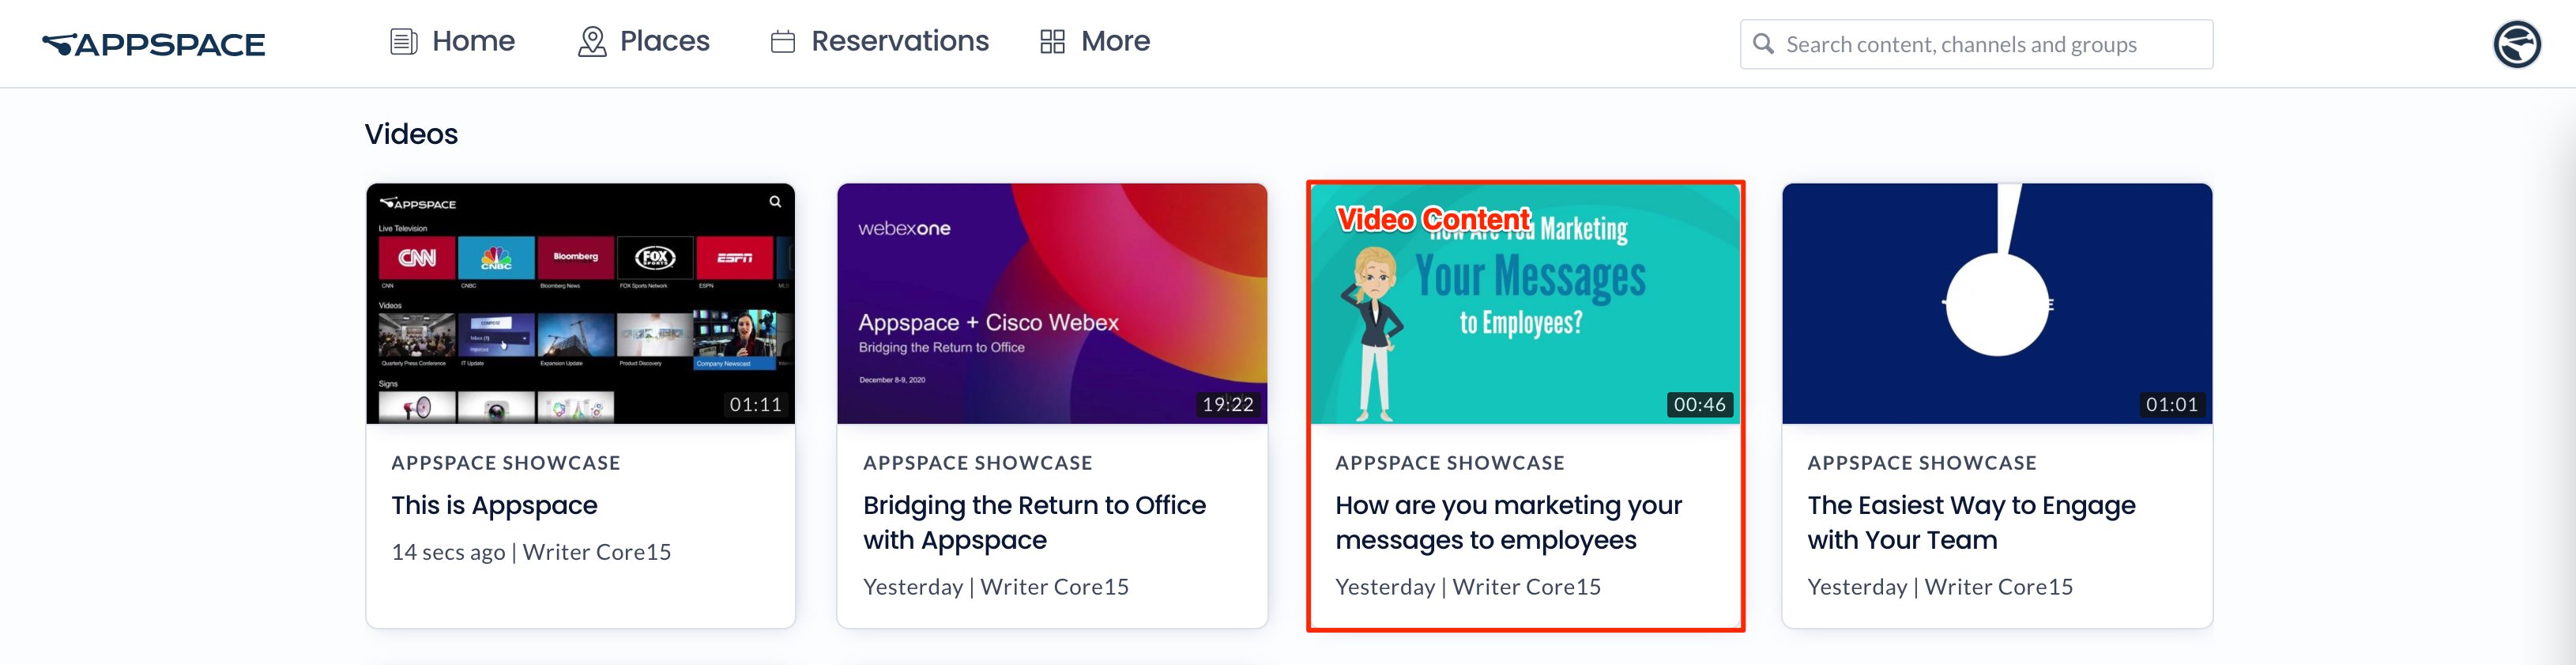
Simply click on any video block to view.
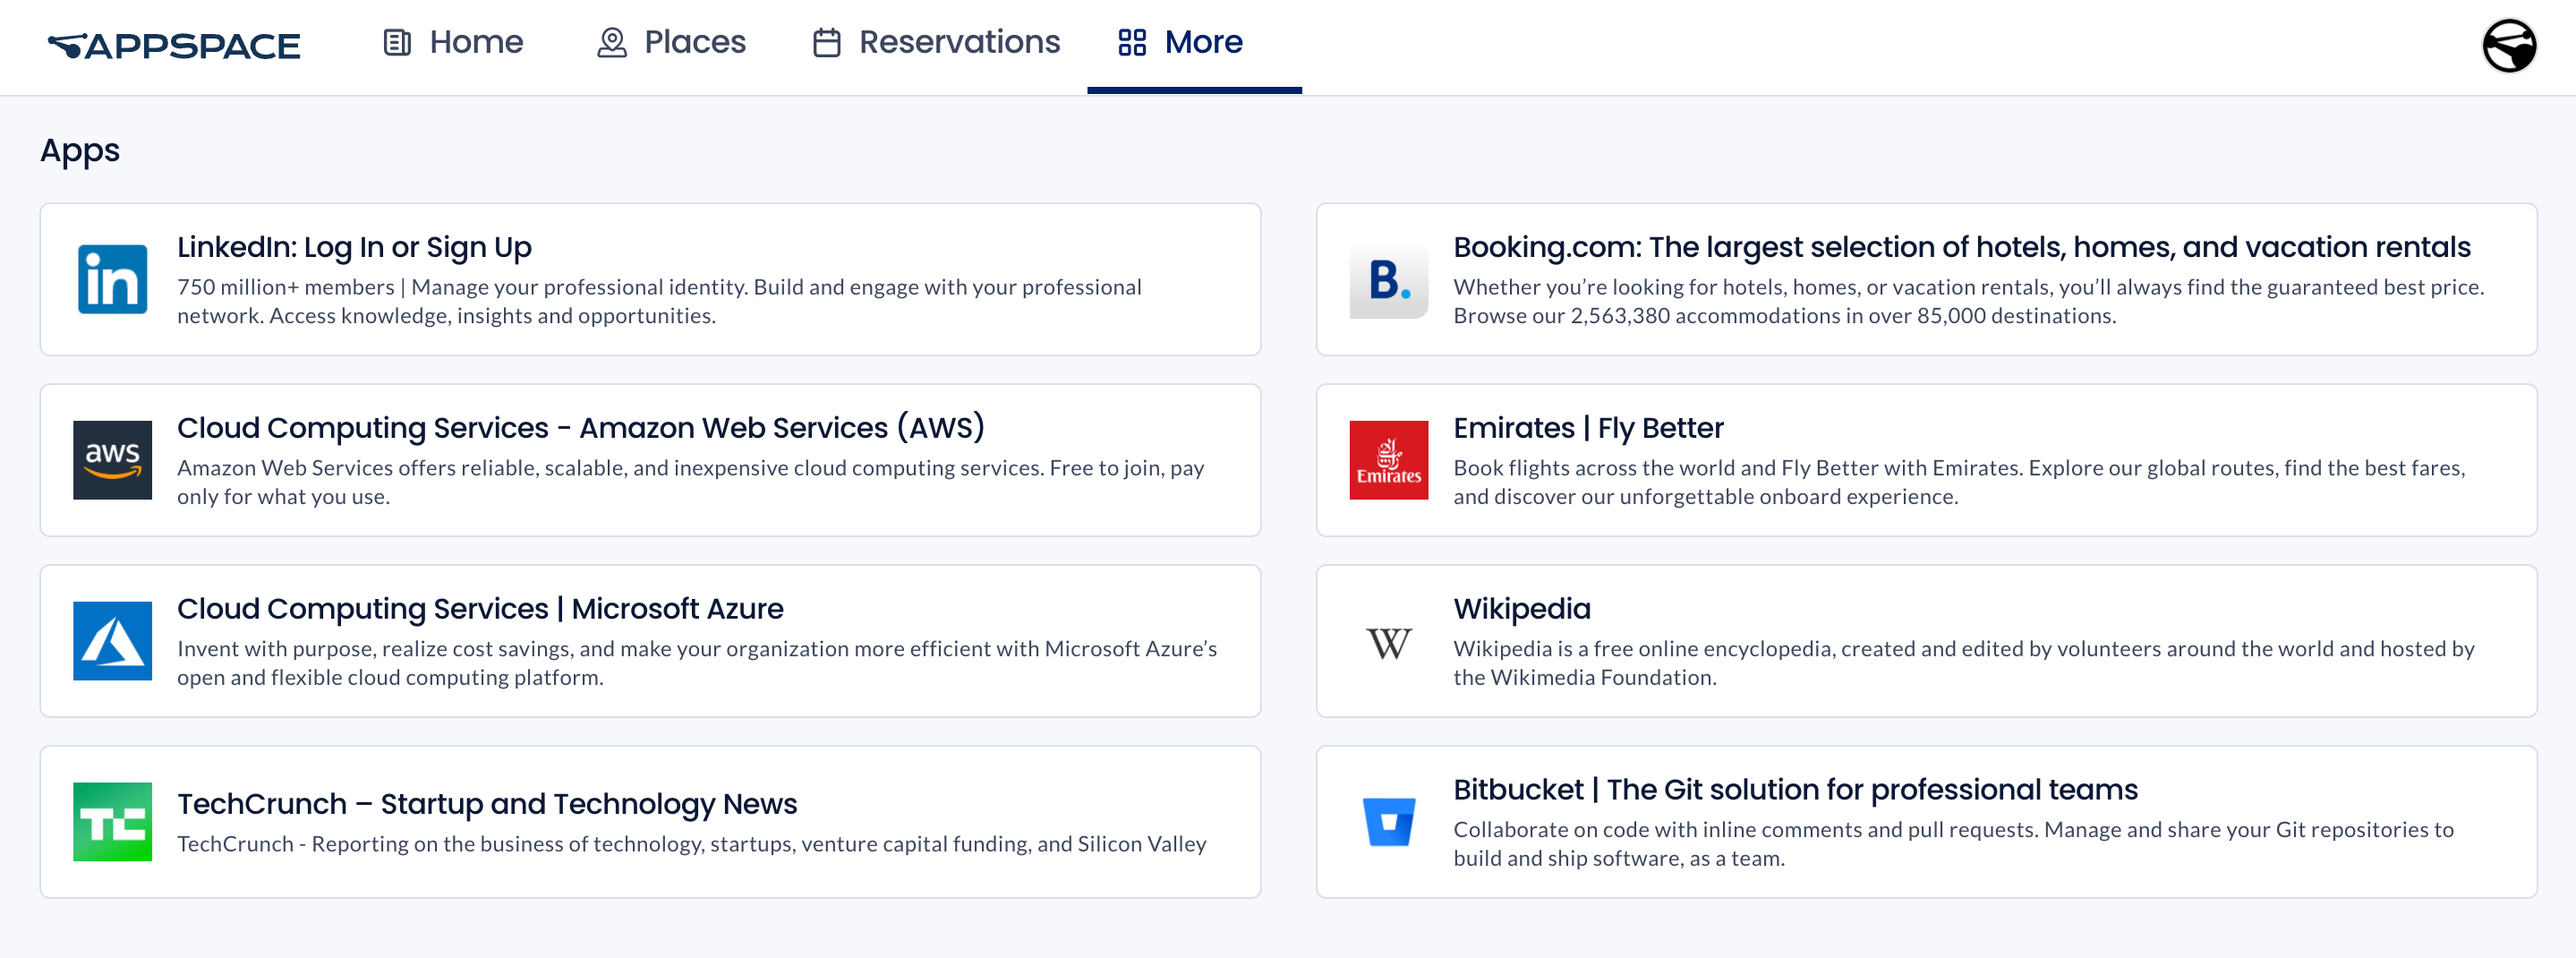
Apps
On the top menu, click More and select Apps.
The Apps dashboard displays links to third-party applications within the Employee App that are applicable to the employee’s needs. The Location Admin administer these links, which can target the entire organization or specific user groups, regions, or locations.
People
Go to the People section by clicking on the More tab and selecting People. On the People page, the All tab displays the users within the current organization. Click on the Favorites tab to view only people you have marked as favorites.
You may perform a search for specific users by typing in a letter or keyword into the search bar. In the upper-right, click on the sort option to sort people by the latest updated, most recently joined, or ascending, or click Filter to filter the people displayed based on job title and department.
The bar on the right displays the total number of people visible to the current user within the current organization. Below it, the people who are around you At Your Location (e.g. building or campus) are listed. Click Show all to view the entire list.

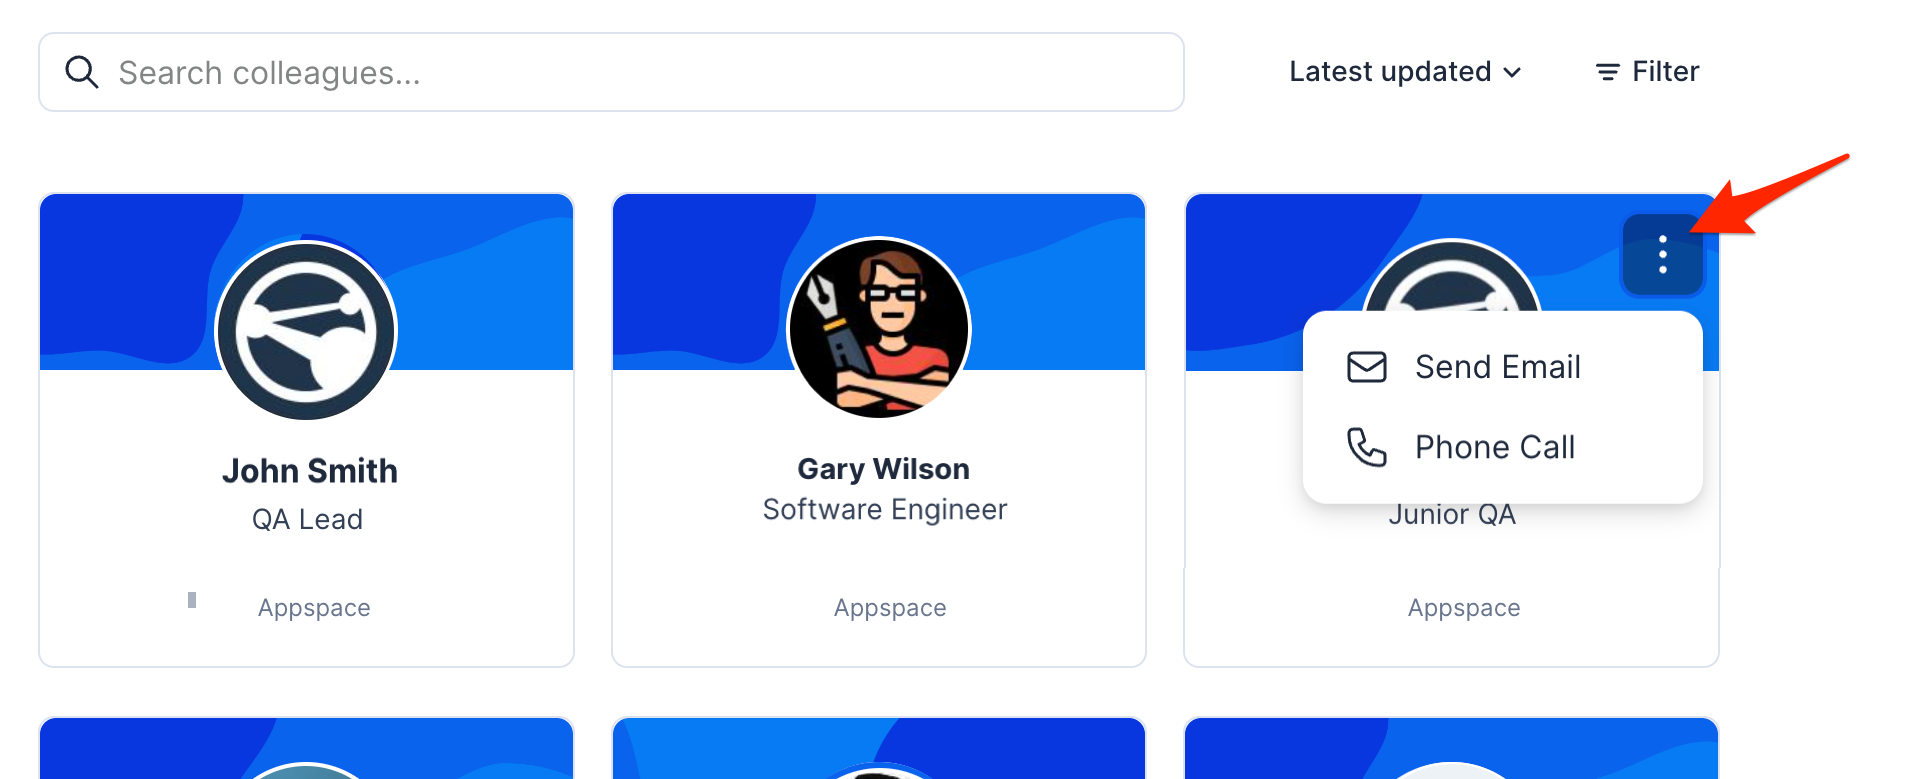
Contact a person
Move the mouse over the person’s profile and click the ellipsis to view the person’s contact options. You can select the option to send an email to the person, or to make a phone call if the person’s profile has phone contact information. Each option will use the default email application or phone conferencing application of the device being used.
Add a person to Favorites
Move the mouse over the person’s profile and click the star icon to set the person as a favorite. People you have set as favorites are marked with a star on their profile image and can be viewed in the Favorites tab. Refer to the Add People to Favourites article for more detailed instructions.
View a person’s profile or edit your profile information
Click on the person to open the user’s Profile page. You may also click on your own profile to view and edit your own information, user icon, and background image (only your own profile is editable). Refer to the View People Profile and Edit Your Profile articles for more detailed instructions.
User Profile
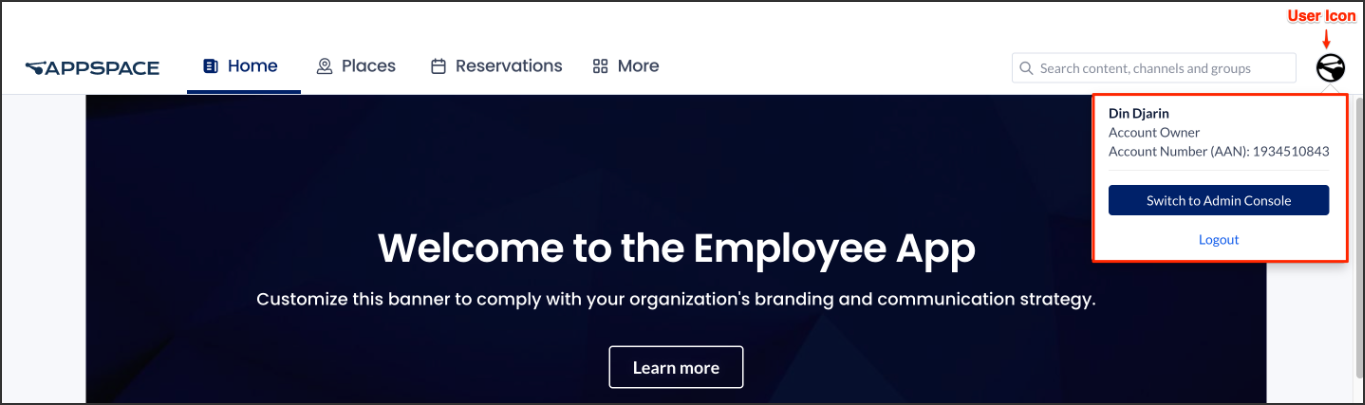
The User profile window allows you to view your user information and do the following:
- View the current user name and role.
- View the Appspace account number
- Switch to Admin Console – Only available to administrators.
- Log out from the Employee App.
Was this article helpful?