This article provides instructions for employees to reserve and manage workspace reservations, such as office spaces, meeting rooms, and hot desks via the Appspace Employee App portal on web browsers, or from the Appspace Employee App on mobile devices.
Features released in Appspace 8.7 Cygnus
Appspace introduces the Smart Space Suggestions feature to for workplace reservations. This advanced functionality provides intelligent recommendations for scheduling meetings, allocation of workspaces, organizing collaborative sessions, and planning events.
With adaptive algorithms and insightful suggestions, Smart Space Suggestions anticipates employee preferences and provides:
- Time suggestions for reservations.
- Suggestions of available alternate workspace resources.
- Quick Reserve Now option for previously booked workspace resources.
- Notifications when a favorite colleague is in the office.
- Administrators looking for instructions to configure the Appspace Reservations system, refer to Configure and Manage Workspace & Desk Reservations – Administrators.
- Administrators looking for information on navigating the Reservations module in the console, refer to Browse and Navigate Reservations Module in Appspace 8.0.
- Administrators who would like to reserve a building pass or workspace directly in the Reservations module in the console for themselves or on behalf of someone else, refer to Reserve Workspace & Building Pass in Console – Administrators.
- Administrators looking for instructions to configure a building pass, refer to Configure and Manage Building Passes-Administrators.
- Employees looking for guidance for reserving building passes, refer to Reserve A Building Pass – Employees.
- Administrators looking for instructions to configure the Schedule Board card with Appspace built-in provider settings to enable space, room, or desk reservations, on the card, refer to Cards: Schedule Board (Multi-Rooms) with Appspace Reservations.
Prerequisites
- An Appspace Premium user license.
- An active Appspace public/private cloud user account.
- Supported web browsers if using the Employee App portal.
- Supported mobile device if using the Appspace Employee App.
Employee App
Reserve Workspace
-
-
-
- Log in to your Employee App with your Appspace Premium User credentials.
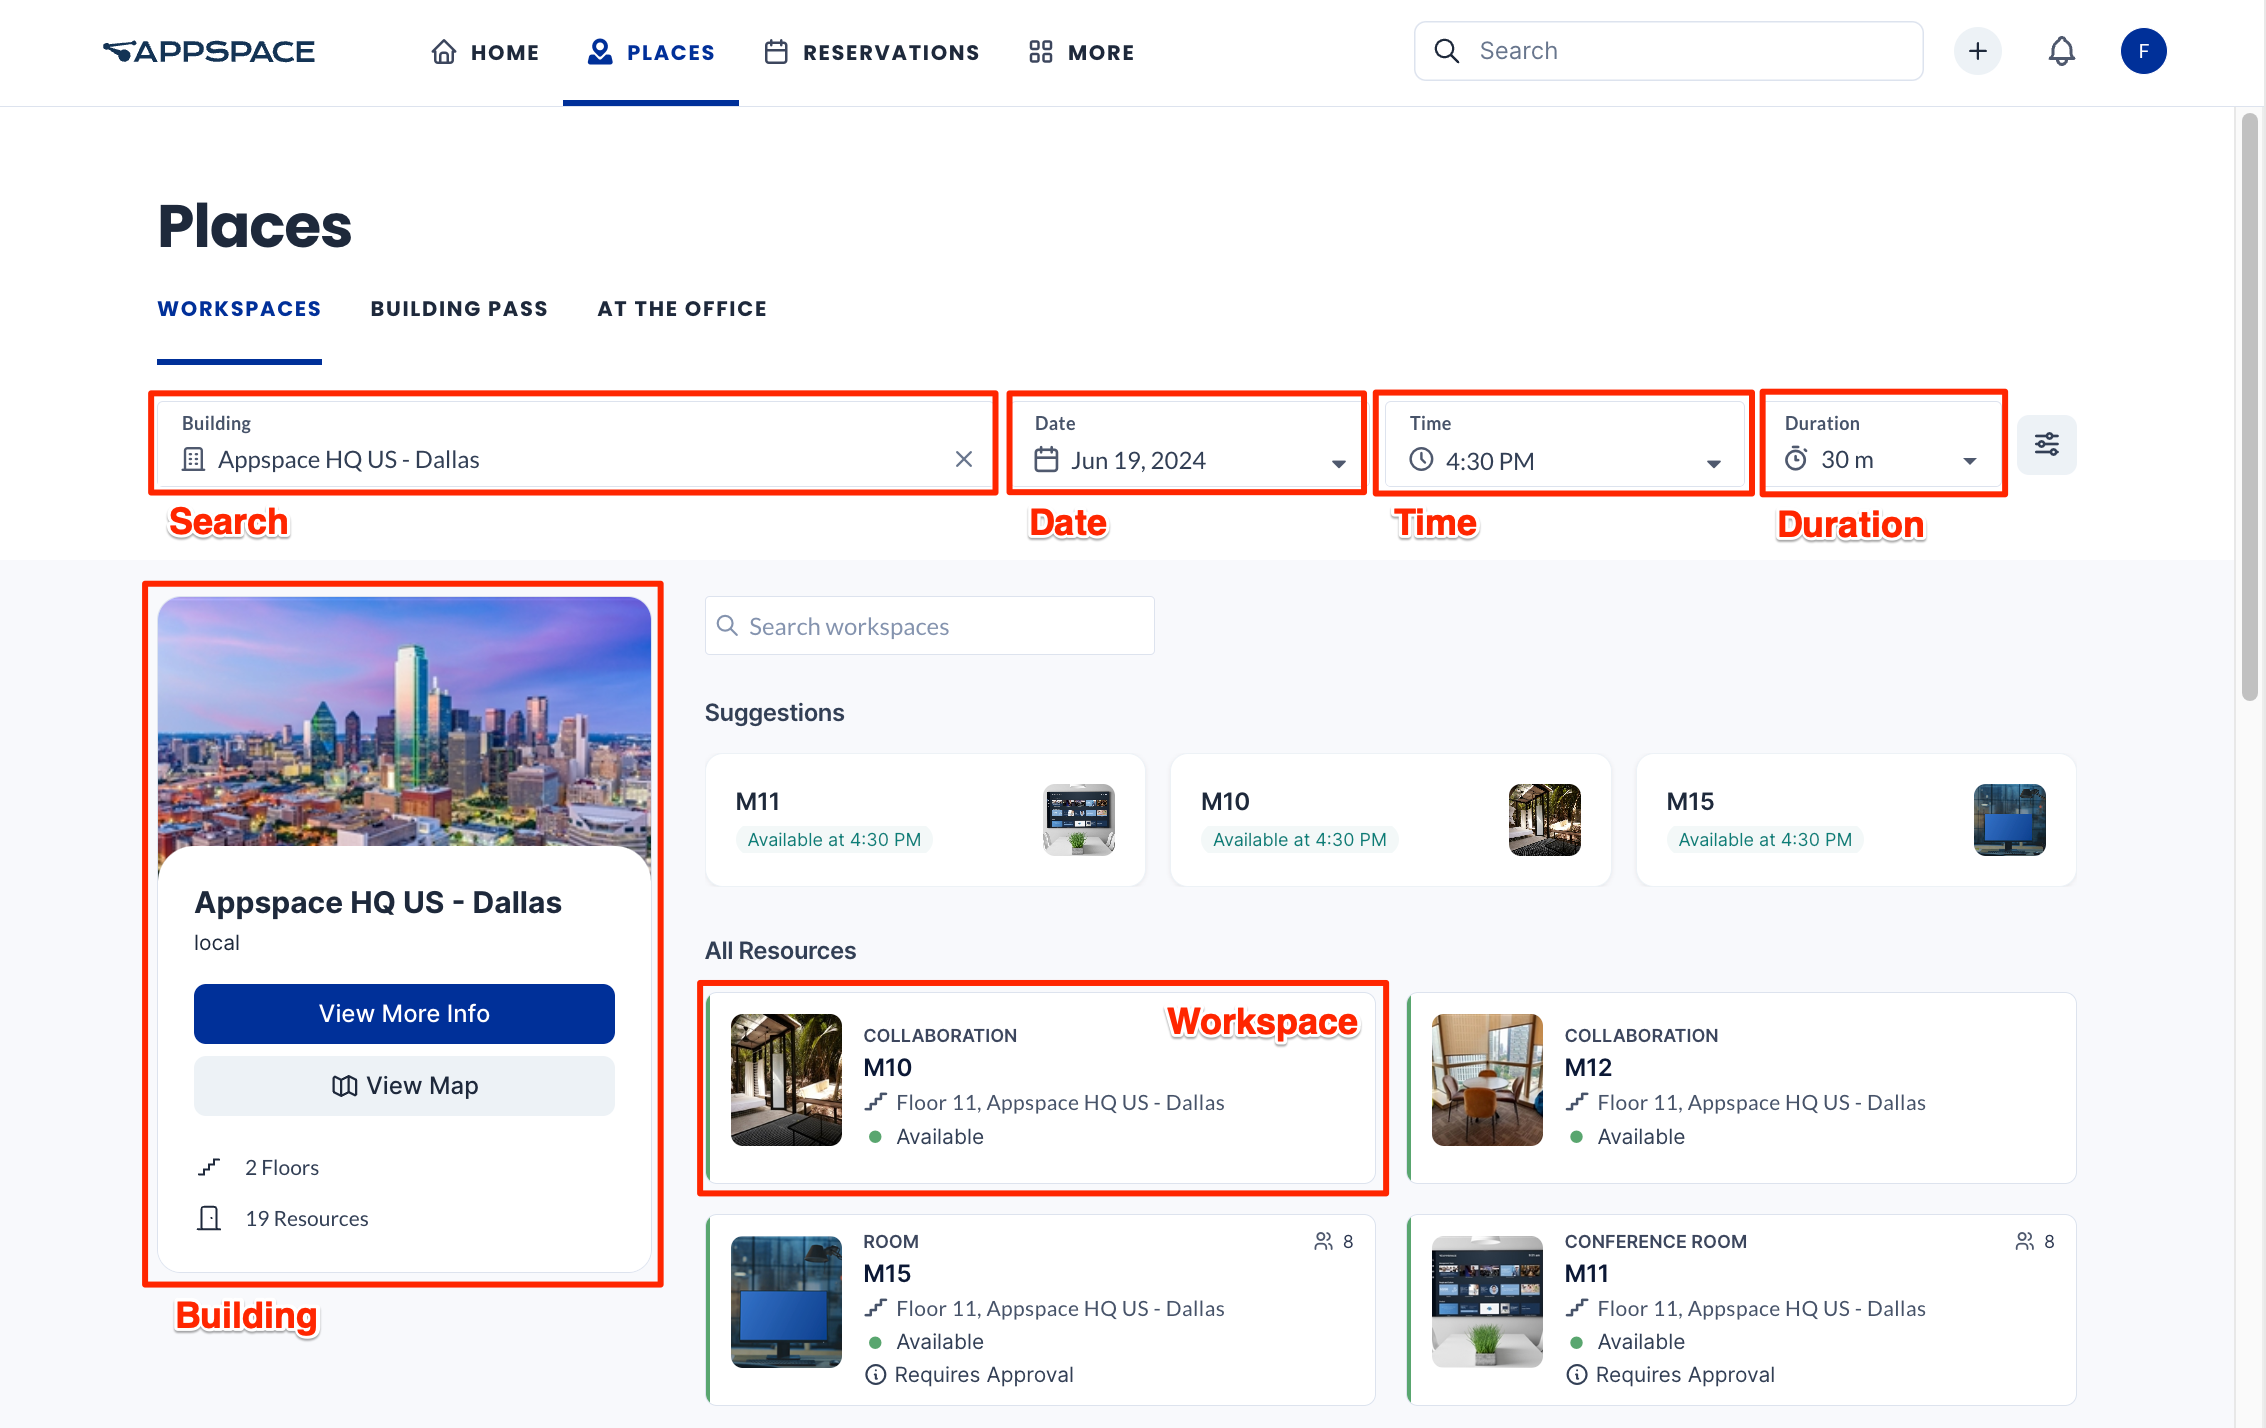
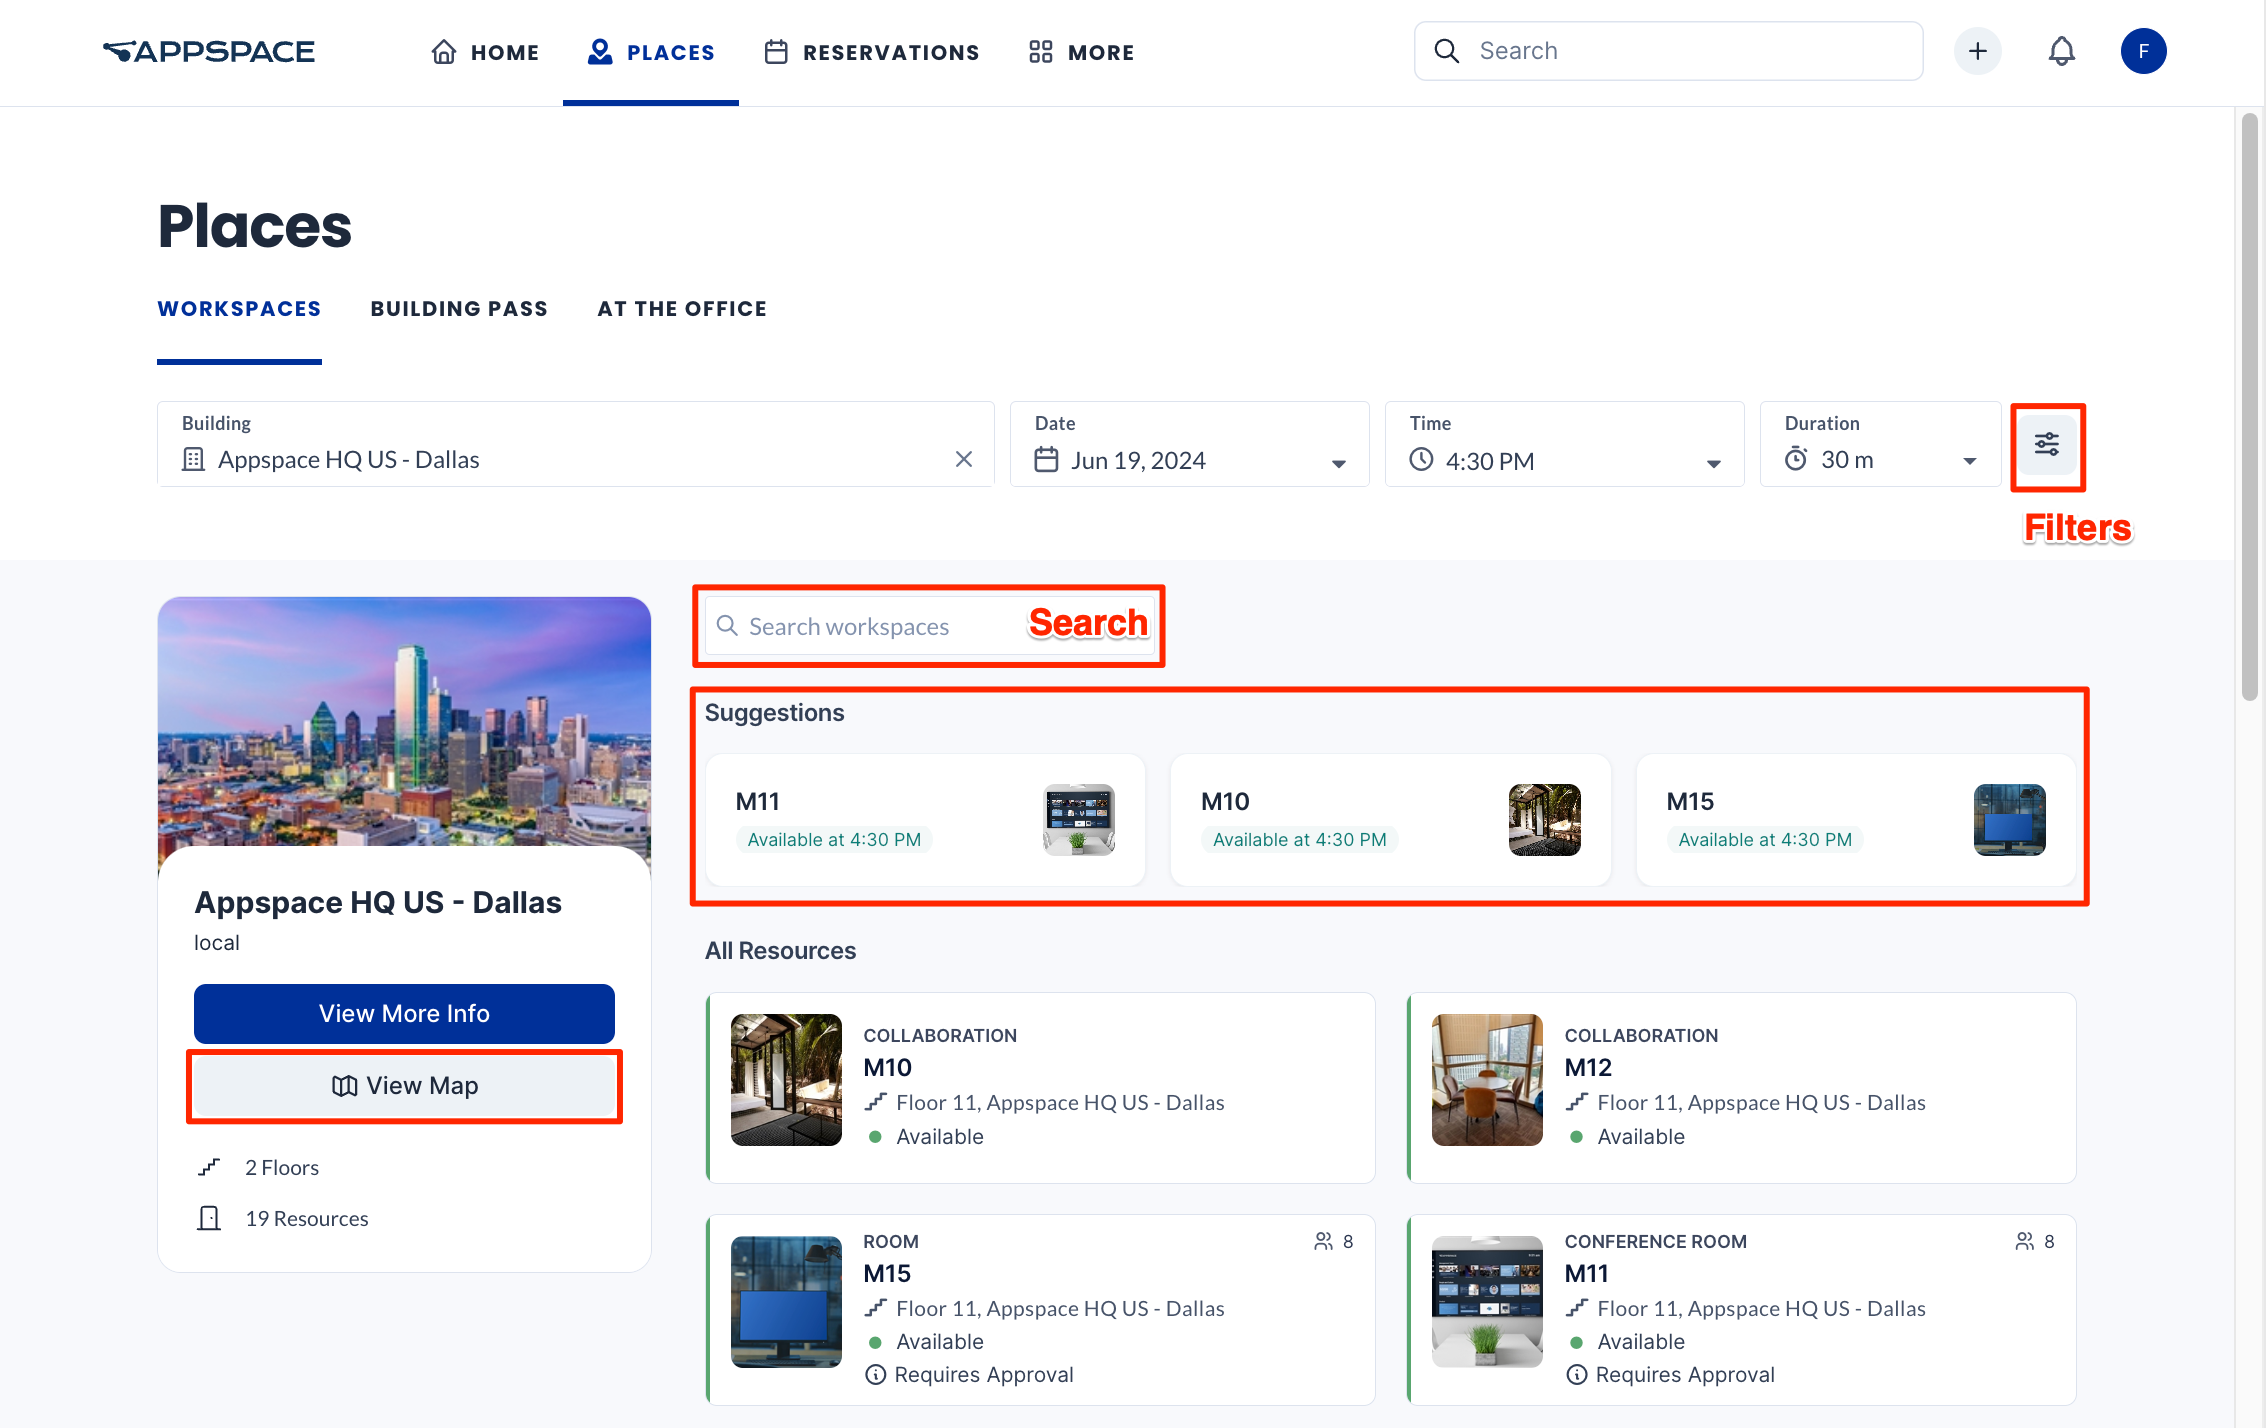
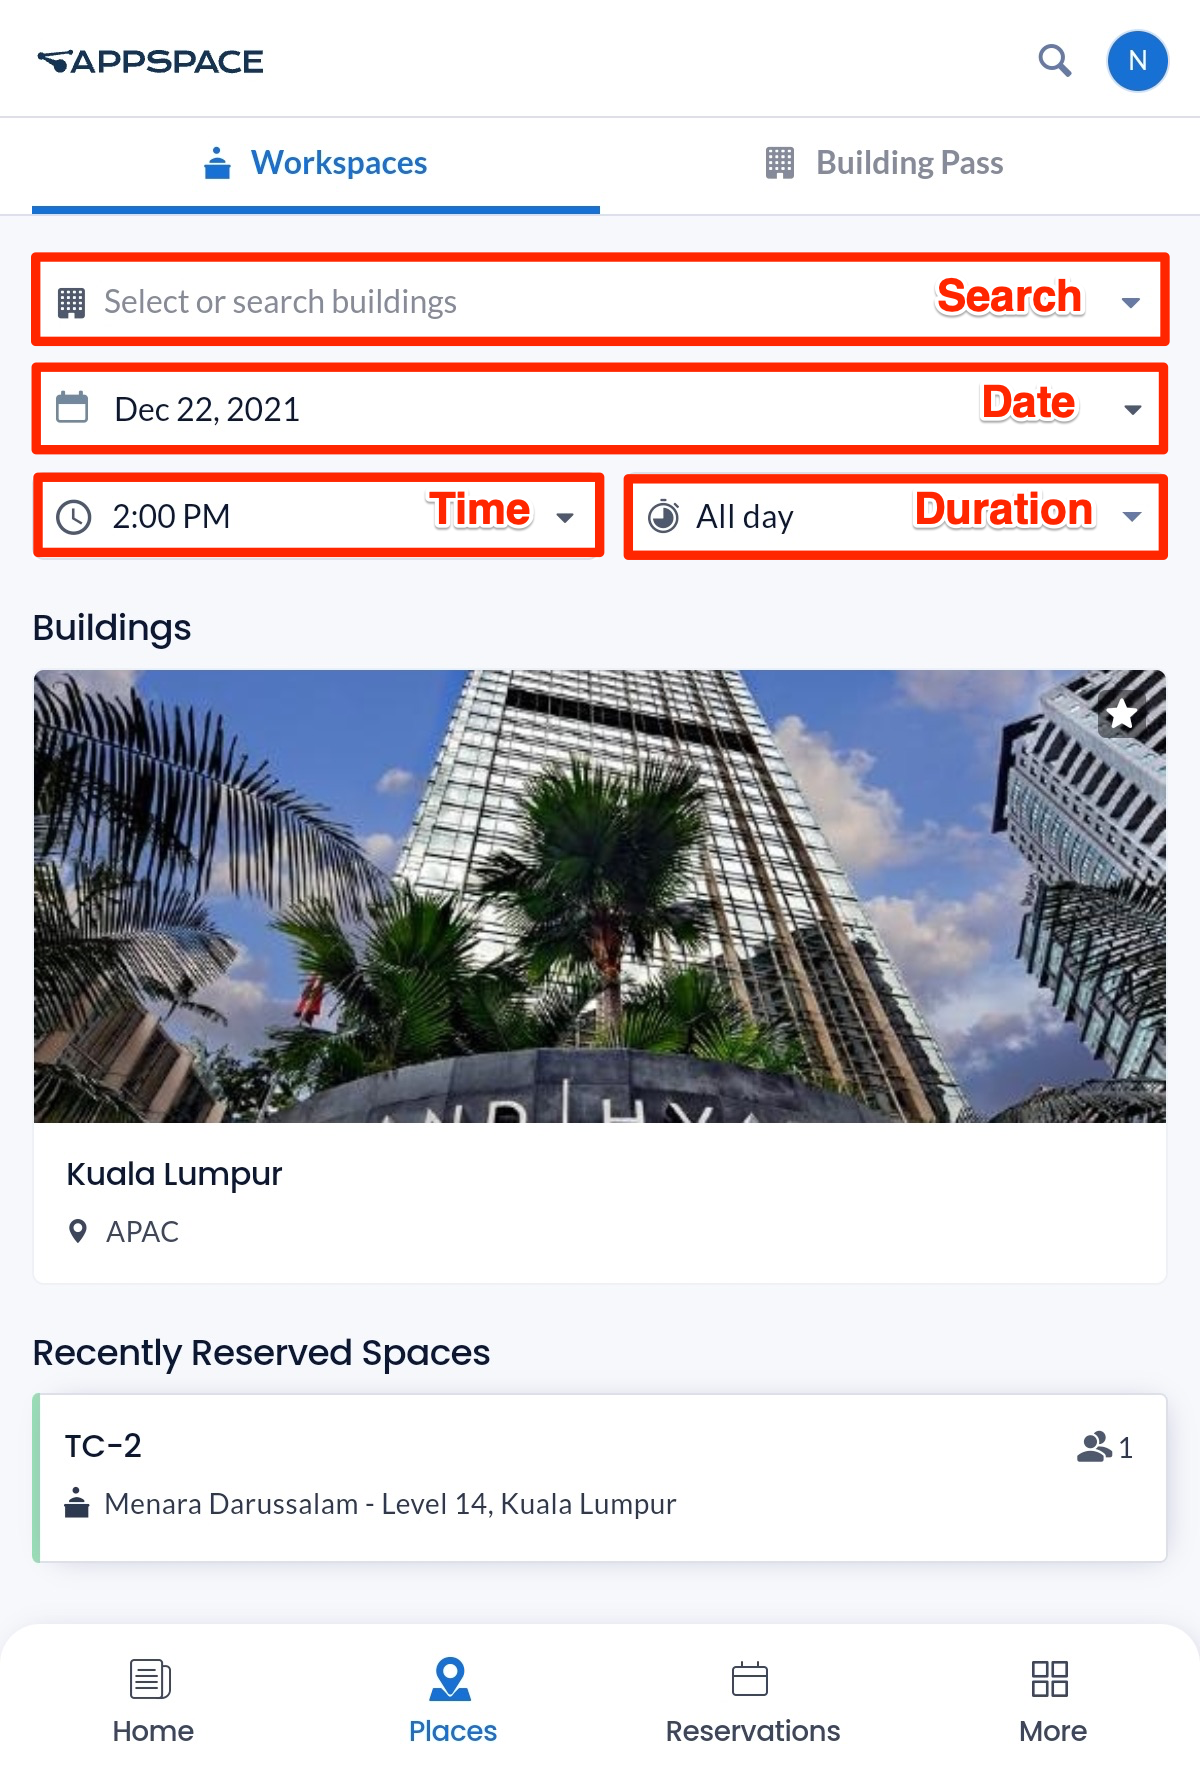
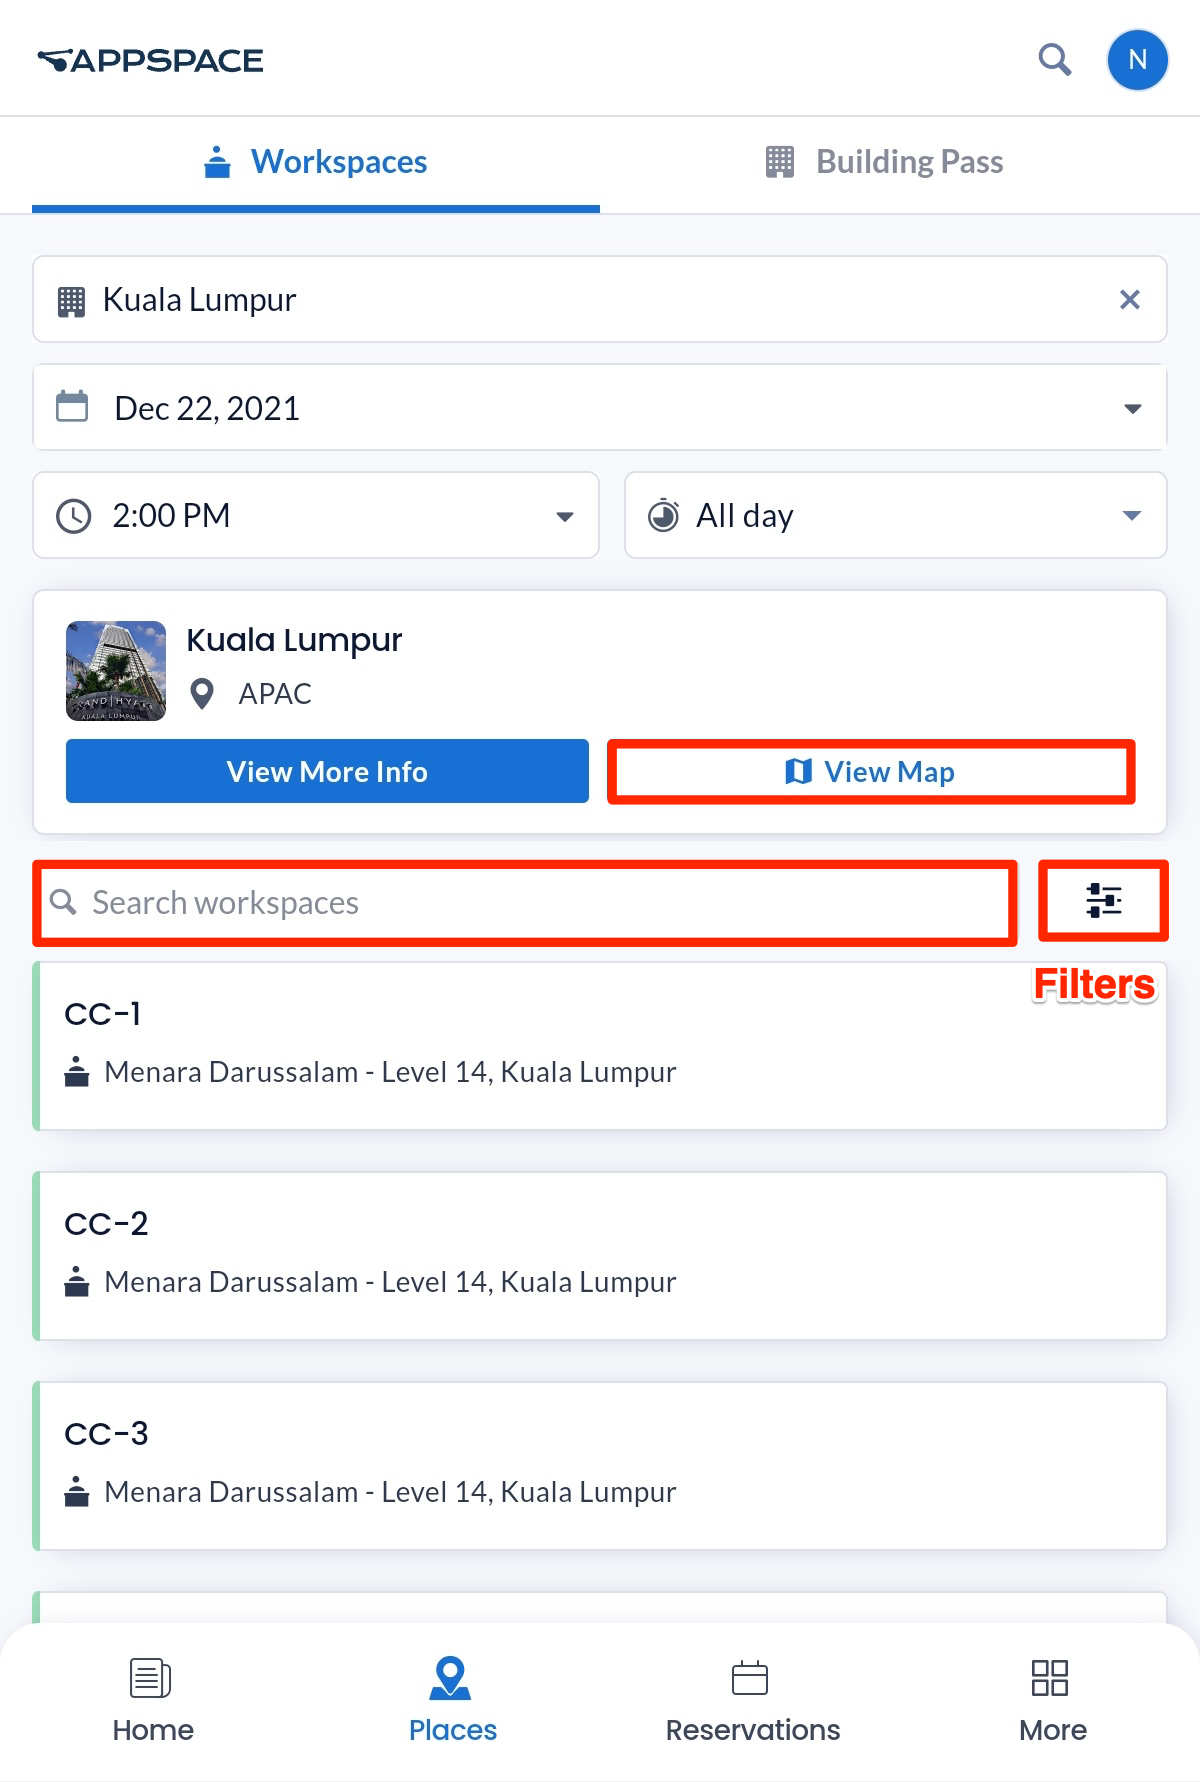
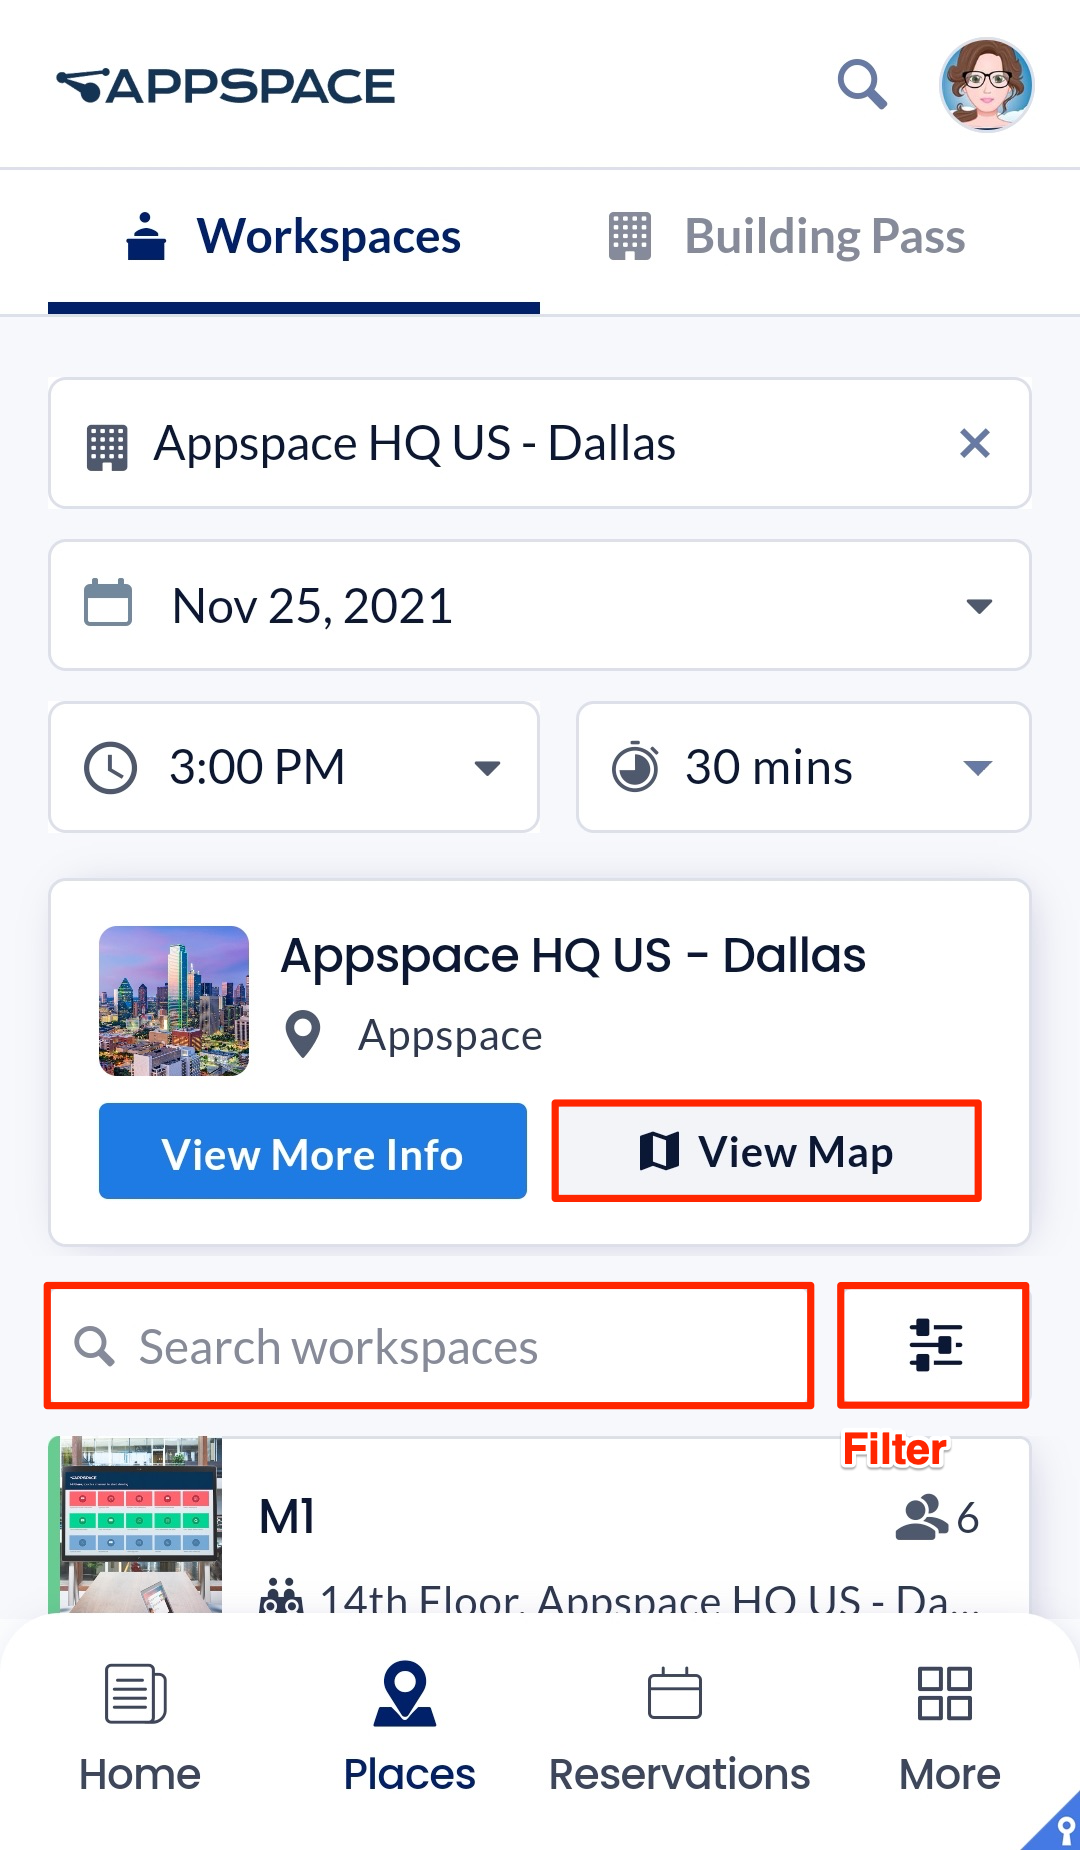
- Click Places from the menu, and click the Workspaces tab.
- Select the Date, Time, and Duration of the workspace you wish to reserve from the respective drop-down menus.
- Select a building or type a building name in the Building drop-down menu. If the building is not listed, enter the Geo or Campus location (ex: APAC or London), and based upon what has been entered, display a list of building names in the drop-down that is associated with that Geo or Campus location. Alternatively, you may also select from a list of recently reserved buildings, or select a workspace or room from the Recently Reserved Spaces or Recently Reserved Rooms sections below the building list. These lists will not exist if this is your first time in the Employee App.
- After you have selected the building, you may choose a workplace using one of the following options. Only resources that you have permissions to are displayed. (New) Alternatively you may select a zone for the reservation. Zones are specific areas within a building or floor that contain a group of resources (such as rooms and workplaces). Selecting a zone when making a reservation will automatically allocate a resource within that zone to employees, based on availability and the number of attendees. This removes the need to manually select a specific resource.Important
- You can only select one zone for a reservation.
- Currently, multi-resource reservations are not supported when a zone is selected.
- (New) Select a workplace under Suggestions. Suggestions displays up to three suggested workspaces based on the selected reservation date, time, and duration, and availability within the resource’s rules and office hours. This option is not shown if Duration is set to All Day or Office Hours.
- Select a workplace or zone under All Resources.
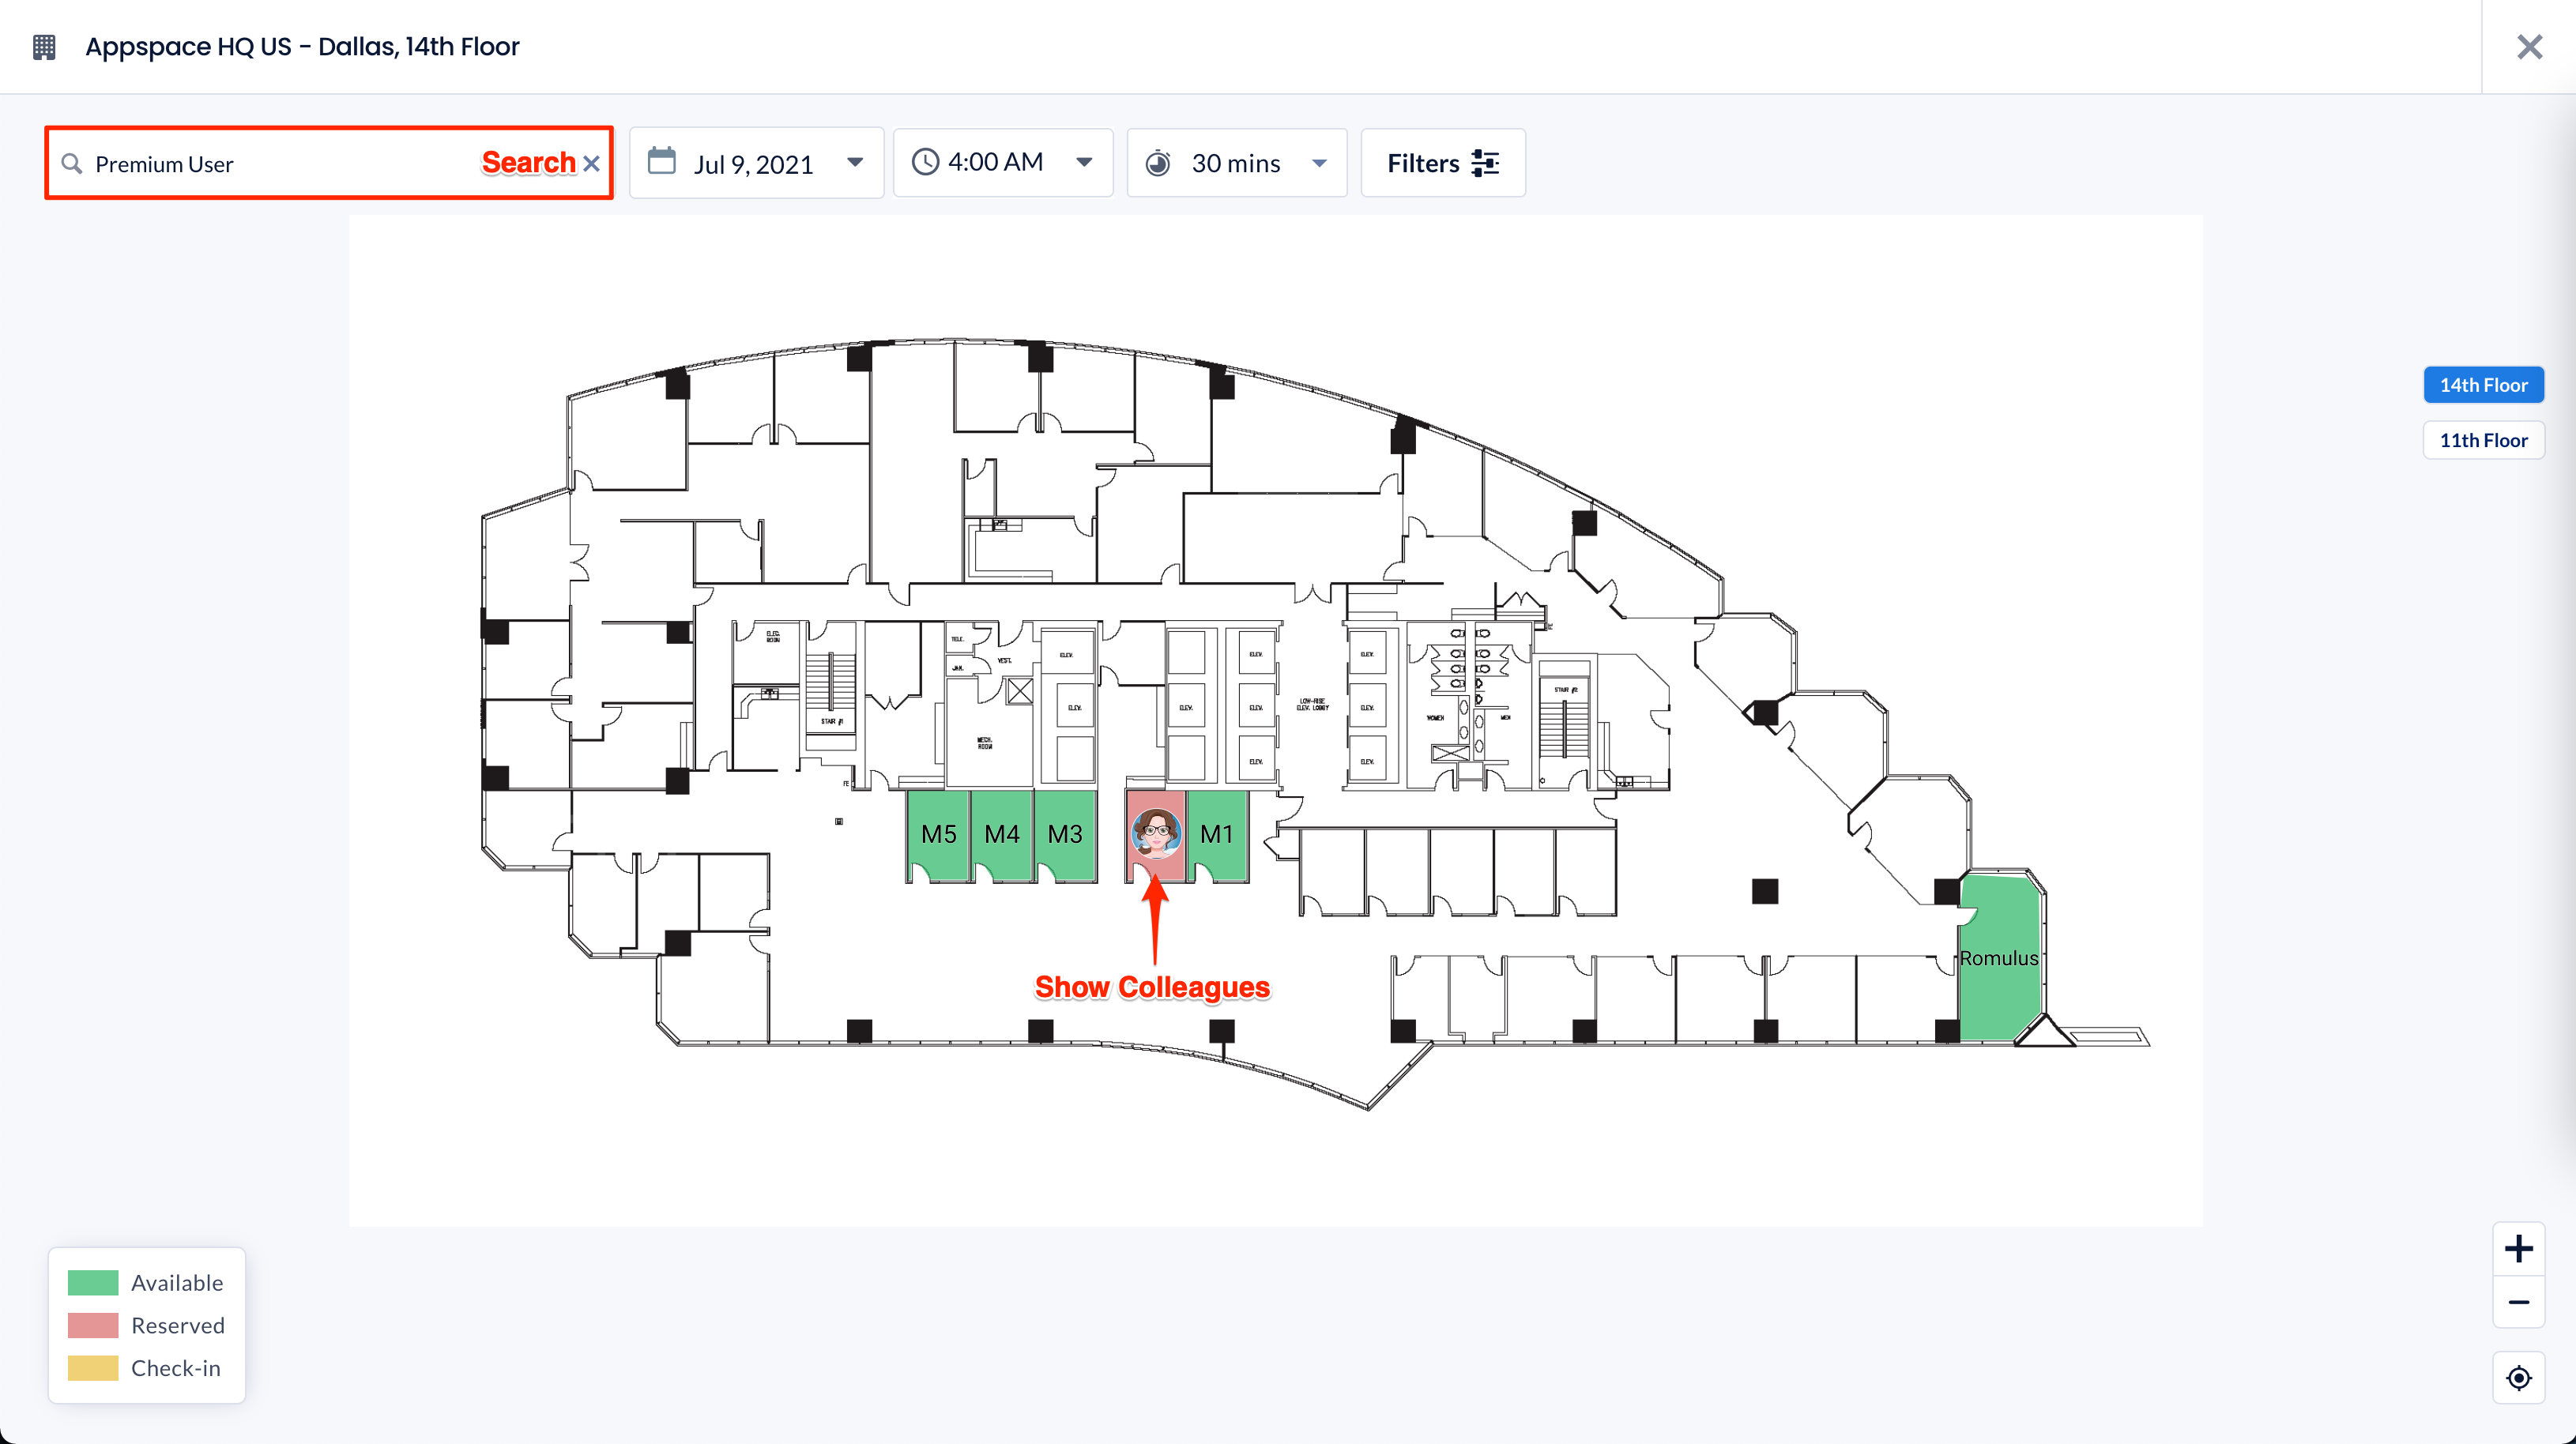
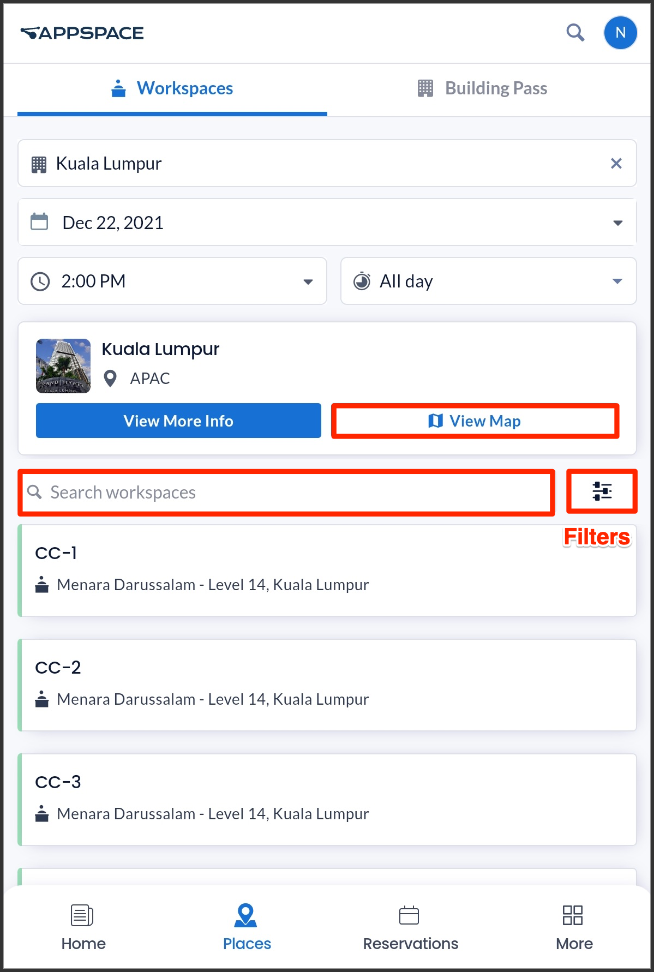
- Click View Map for a map layout to view and select available workspaces and zones. To explore a specific zone, click on it to zoom in for a detailed view of its resources. If the zone is reservable, the Reserve option will appear in the right-hand sidebar.
- Search for the desired workspace or zone.

- Click Filters to refine your search for your desired workspace or zone, based on the following:
-
- Floor
NoteAll inactive floors and corresponding inactive resources are hidden from being displayed and listed in the Map view on the Employee App, if the Administrator has set the floor resource Status to Inactive.
- Zone
NoteThere are a few limitations when filtering zones in map view:
- When a zone from a different floor is selected from the drop-down menu, the map does not automatically switch to the respective floor, and must be done manually.
- When a floor is selected, only the zones from that floor are listed in the drop-down menu to be selected. Users will not be able to search for zones within other floors.
- Workspace Type and Sub-type
- Reservation Status
- Workspace Capacity
- Amenities
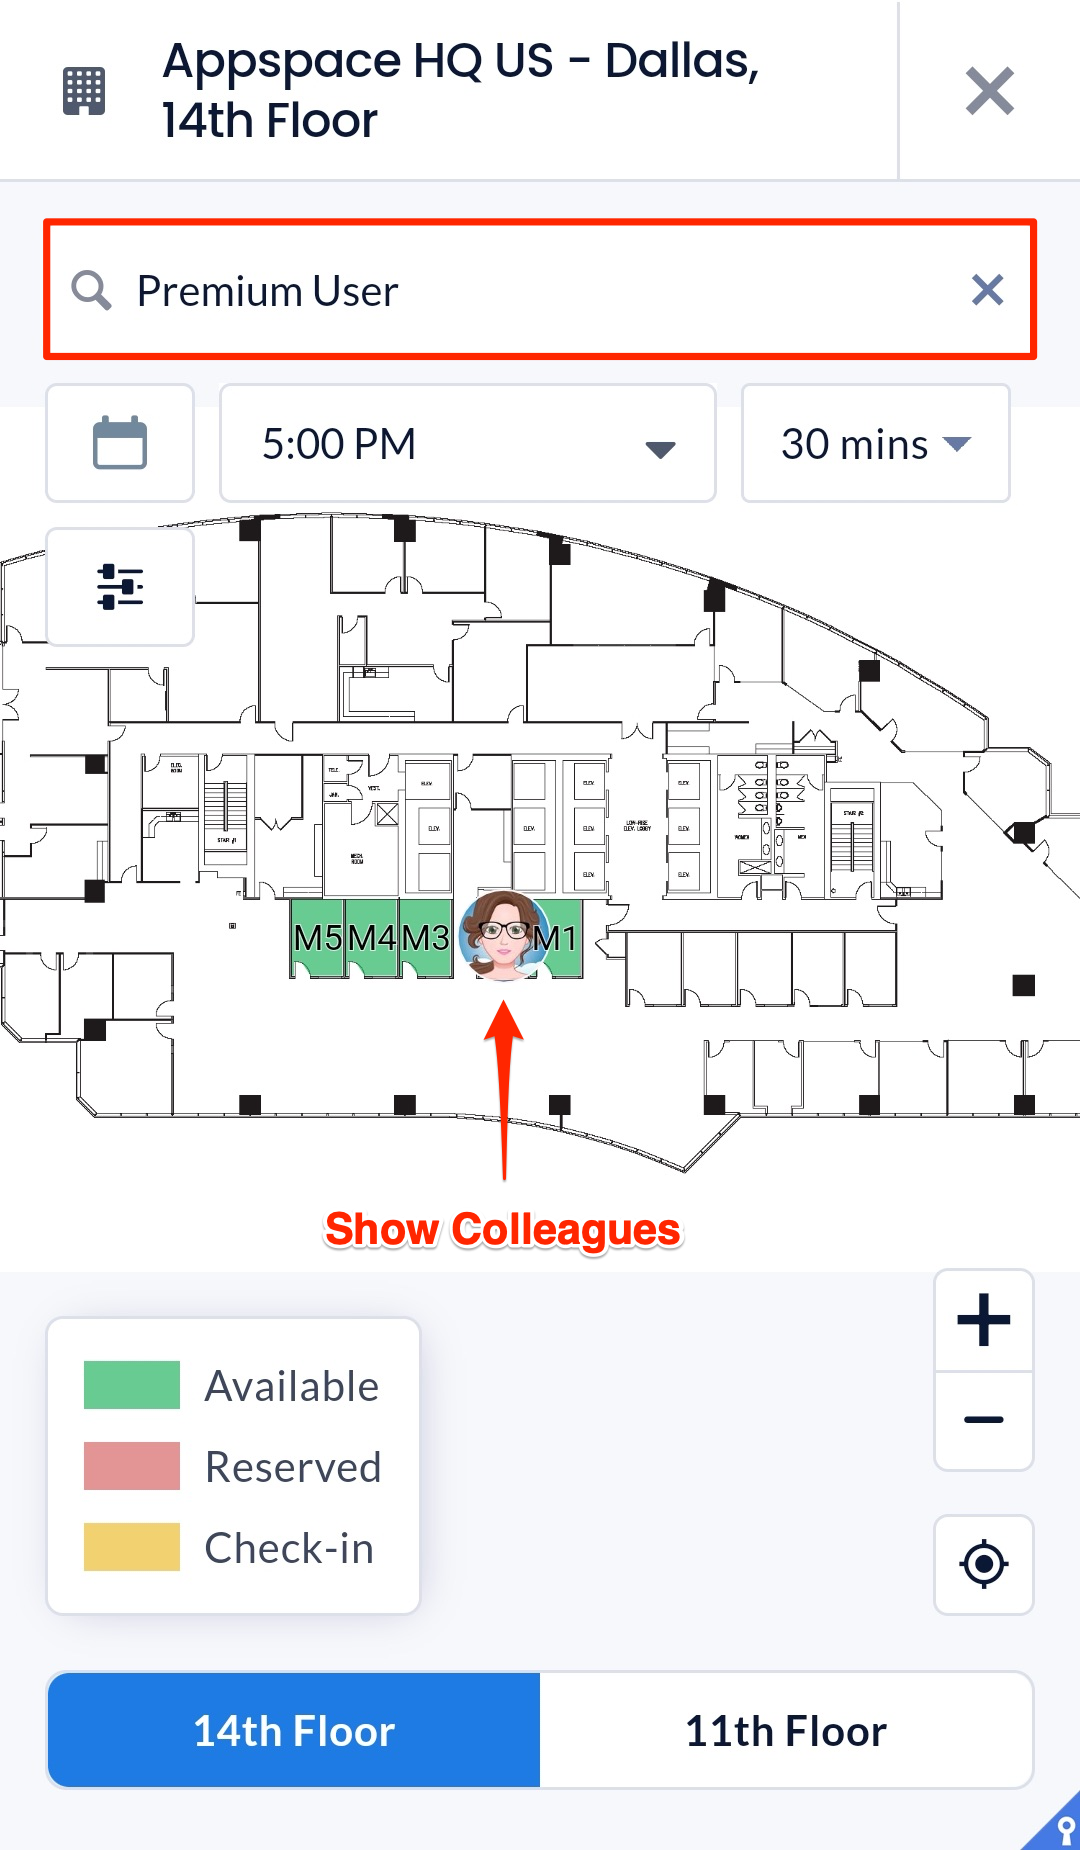
- Show Colleagues NoteThe Show Colleagues field allows you to identify your fellow colleagues and their reserved workspaces, in both list and map views. This feature is OFF by default and can be toggled to ON. However, colleagues will remain hidden if their workspace reservation is set to private, unless you are the host or an attendee of the meeting. In Map View, you may also search and locate workspaces reserved by your colleagues by entering their user name in the search field, the Date for the reservation, and Time (for Duration, select All Day to search the entire day). The search feature has been enhanced to display colleagues who have reserved workspaces on different floors within the same building.
- Recurring Reservations Enable this option if the reservation would occur periodically. The following settings can be configured:
- Enter the number of times the reservation occurs in the Repeats every field and drop-down menu:
- Day – The reservation occurs every set number of days.
- Week – The reservation occurs every set number of weeks.
- In the Repeats on drop-down menu, you may select if the reservation is repeated on the day of each week. For example:
- Reservation is repeated every Monday, Wednesday, and Friday of each week.
- In the Repeats on drop-down menu, you may select if the reservation is repeated on the day of each week. For example:
- Month – The reservation occurs every set number of months.
- In the Repeats on drop-down menu, you may select if the reservation is repeated on the date, or day of each month. For example:
- Day 6 – 6th of each month.
- The first Sunday of each month.
- In the Repeats on drop-down menu, you may select if the reservation is repeated on the date, or day of each month. For example:
- Year – The reservation occurs every set number of years.
- In the Repeats on drop-down menu, you may select if the reservation is repeated on the date, or day of each year. For example:
- 6 June – 6th of June each year.
- The first Sunday of June each year.
- In the Repeats on drop-down menu, you may select if the reservation is repeated on the date, or day of each year. For example:
- Select when the reservation Ends:
- Never – The recurring reservation never ends.
NoteWhen set to Never Ends, the maximum recurring reservations will be determined by the reservations provider:
- Appspace Provider: Maximum of 730 meeting instances, or meeting instances until the year 2100, whichever comes first.
- After – The recurring reservation ends after the set number of occurrences.
- On – the recurring reservation ends after the set date.
- Never – The recurring reservation never ends.
- Enter the number of times the reservation occurs in the Repeats every field and drop-down menu:
- Floor
-
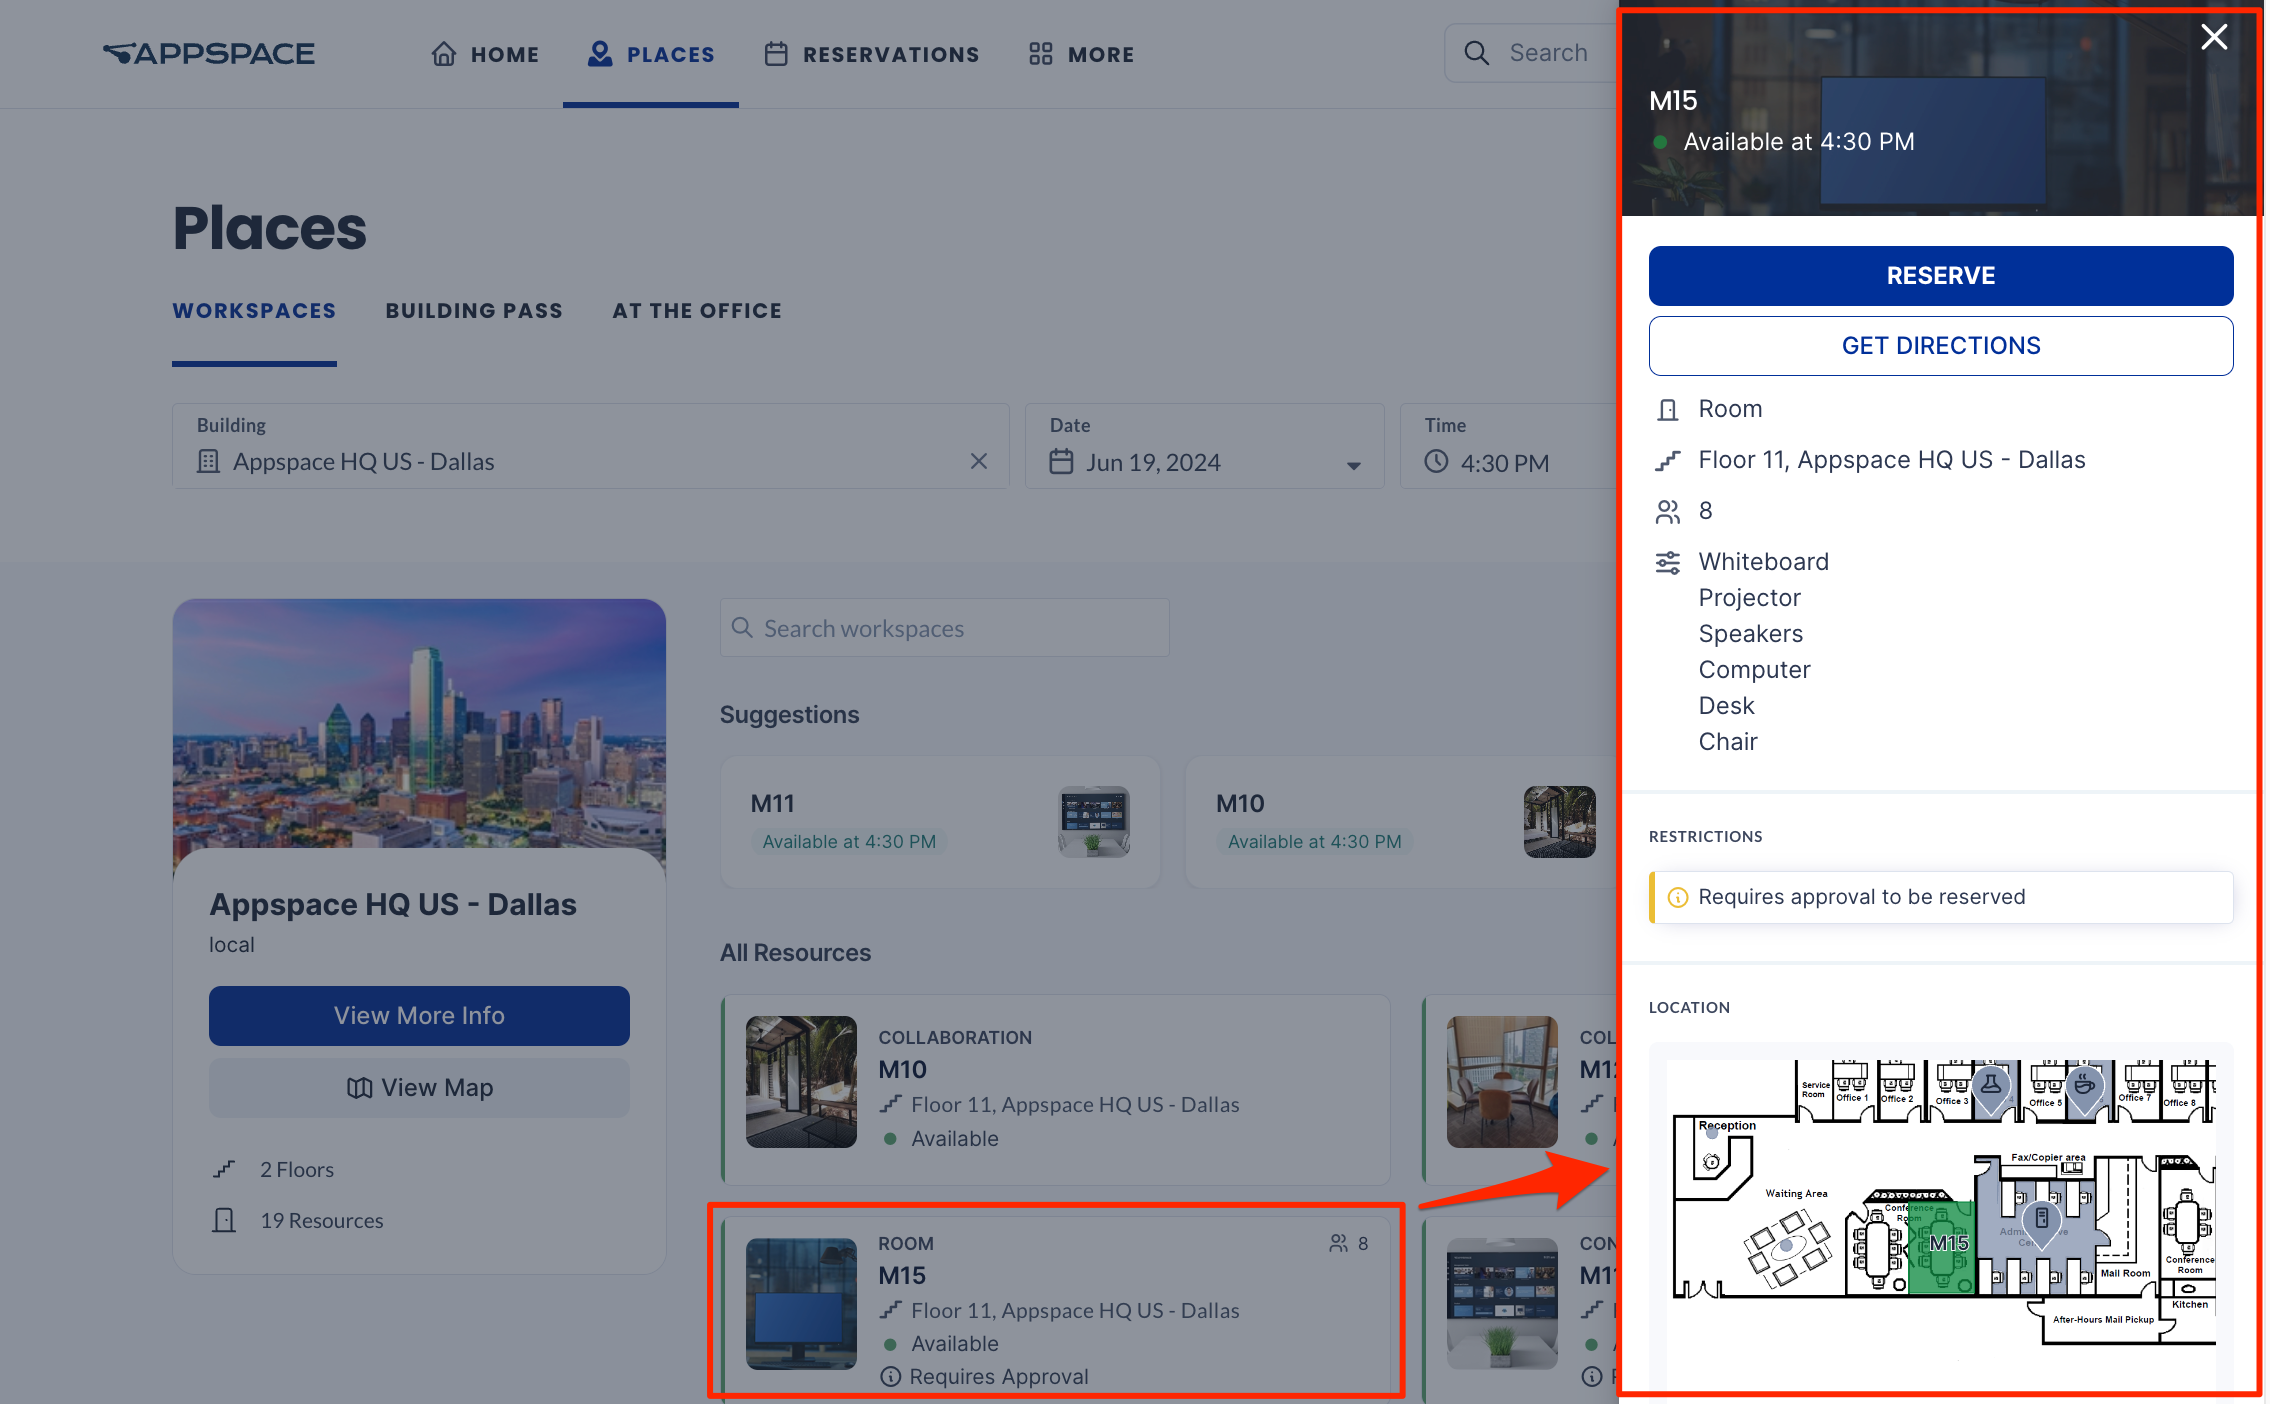
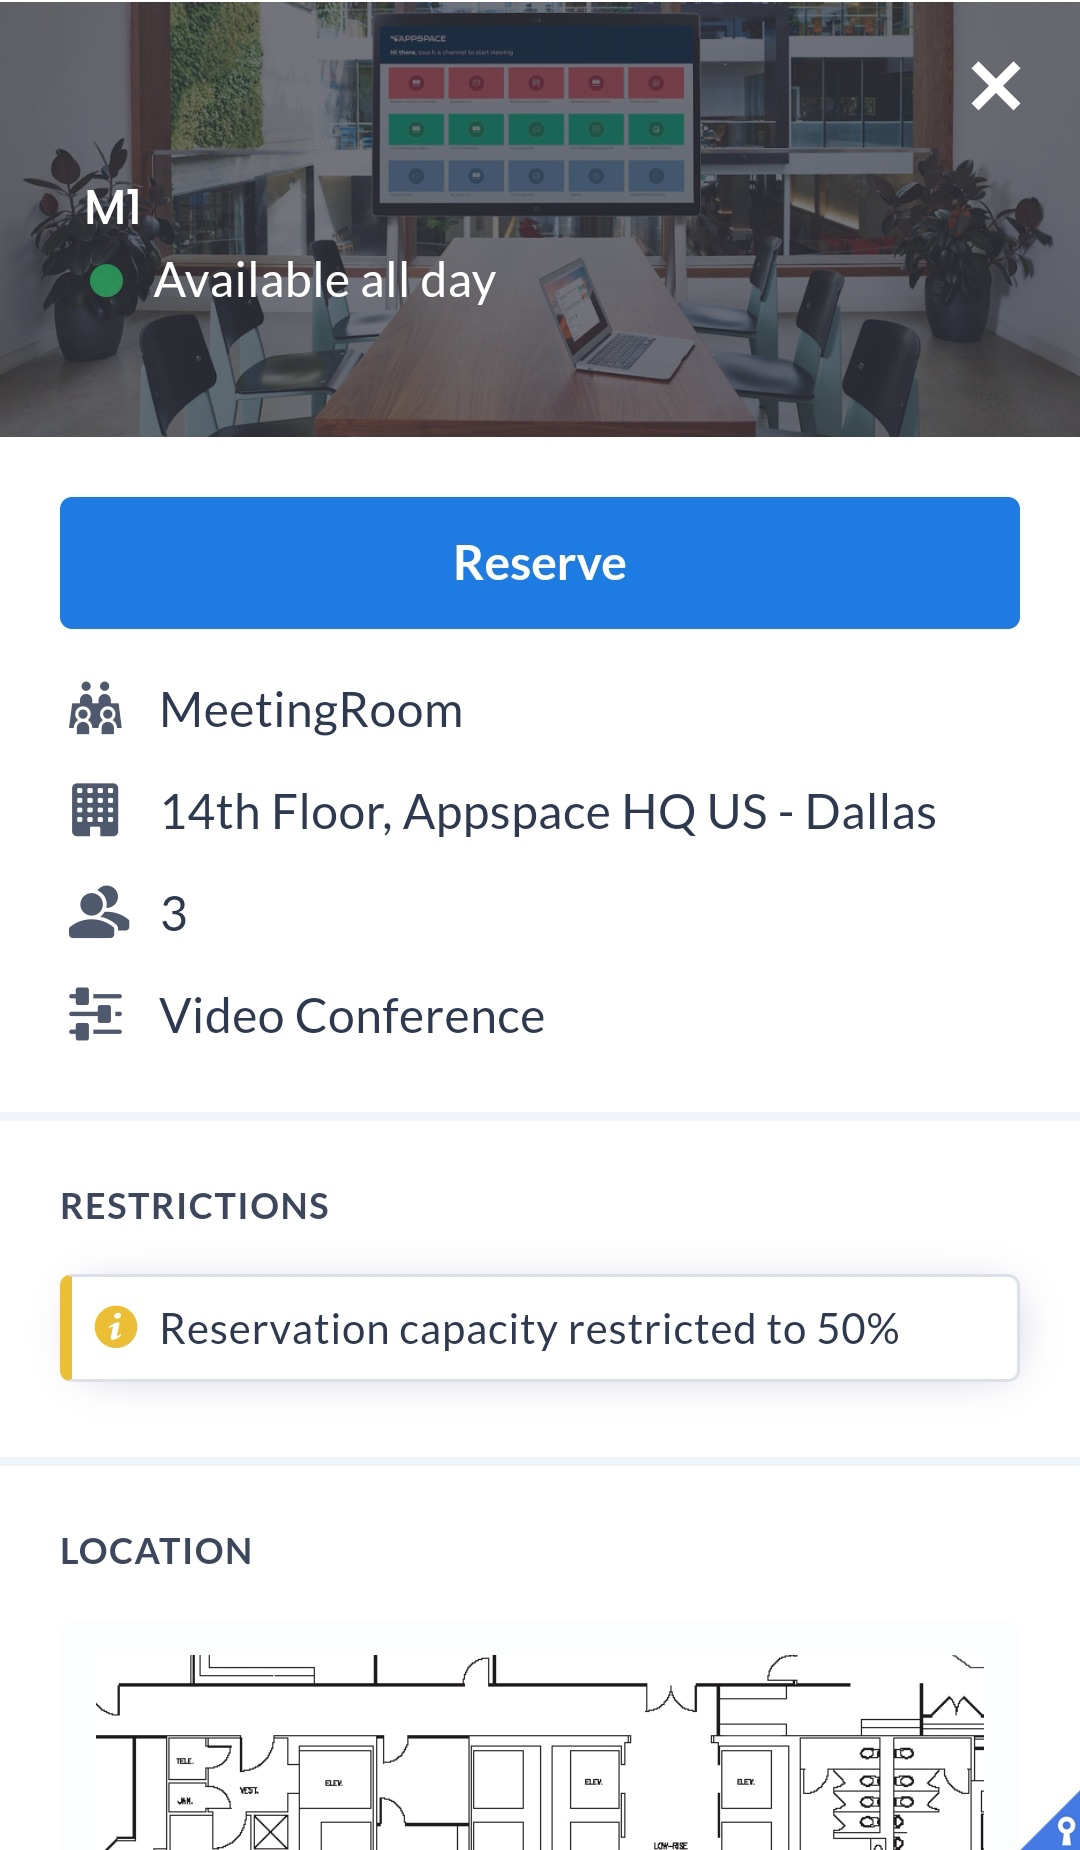
- Click on the desired workspace or zone and click the Reserve button. If you choose a workspace, you can also view any restrictions that apply to it here.NoteIf the selected resource requires approval during the reservation process, a note will display that the resource requires approval to be reserved.

-
- If you are adding more than one resource workspace for the reservation (known as a multi-resource reservation), perform the following steps:
Important
- Recurring multi-resource reservations can only support resources from one calendar provider. Multiple providers are not supported.
- (New) Mixed-resource reservations are now supported, where a reservation contains resources from Appspace and resources from one external calendar provider (such as Office 365 or Google Calendar). However these only support non-recurring (single) reservations. Reservations with resources from different external providers are not supported.
- Once a mixed-resource reservation is created, you cannot transition from a reservation with resources from multiple providers (Appspace resources and resources from one external calendar provider) to a reservation with just Appspace resources. A minimum of one resource from the external calendar provider needs to remain in the reservation. You can add other resources from the same external calendar, but the last resource of the original batch cannot be removed.
- Currently, the following edits to multi-resource reservations can be performed:
- Modify a mixed-resource reservation to only have resources from a single external calendar provider.
- Add resources from an external provider to a reservation with only Appspace resources.
- Add Appspace resources to a reservation with resources from a single external provider resource (Google or Microsoft).
- Once a multi-resource reservation is created with resources from an external calendar provider (such as Office 365 or Google Calendar), the first resource (known as the organizer room) cannot be removed when editing the reservation.
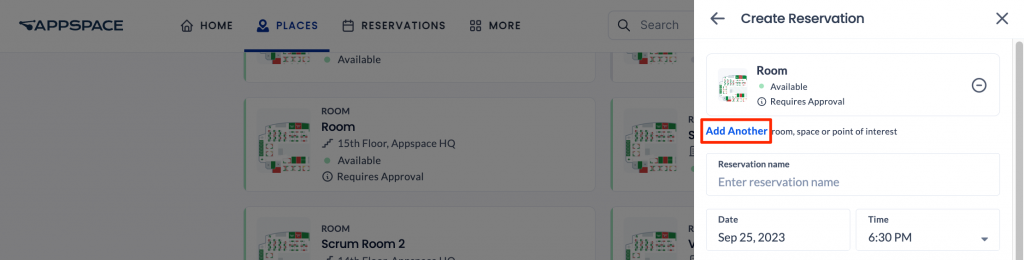
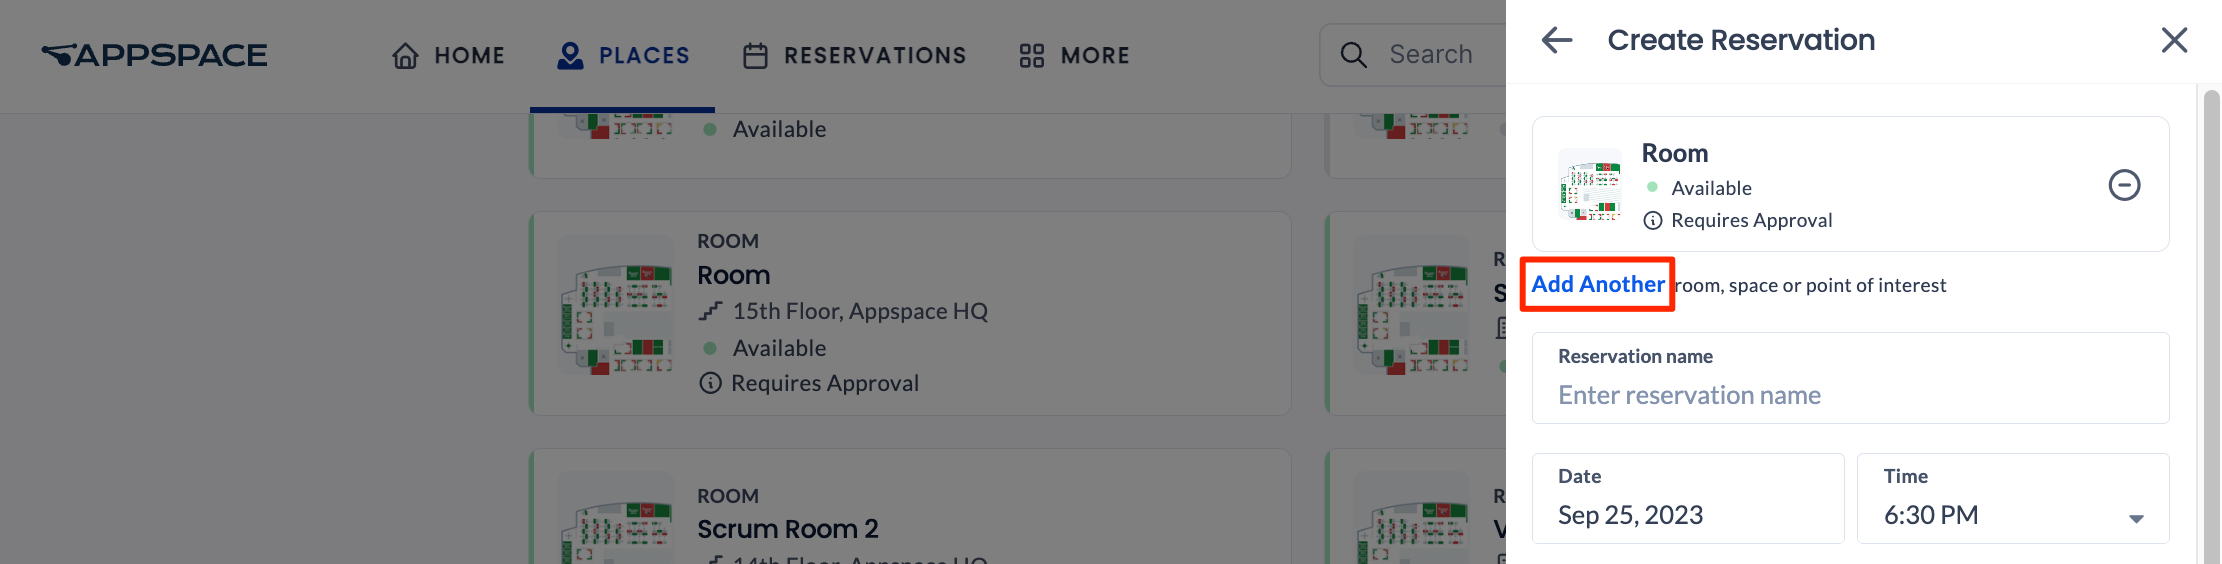
- Click Add Another.
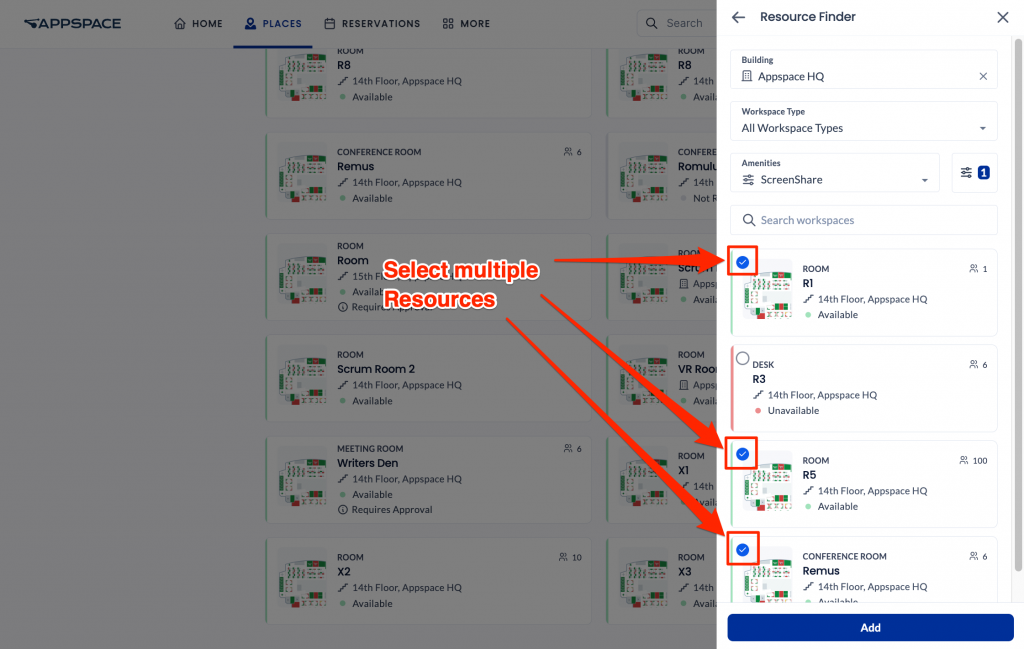
- You can select or search the Building, Workspace Type, or Amenities from the drop-down menus to filter the desired results.
- You can also search for the desired resource workspace by entering the resource name in the Search workspaces field.
- Click the Settings icon to select additional filters such as the Status (Available or Unavailable) and Capacity (the number of attendees that the resource can accommodate) of the workspace resource.
- After you have found the desired workspace resource, select it. You may select more than one workspace from the list. Click Add.
- If you wish to add more resource workspaces that are not listed (e.g. because your resource does not meet the current search or filter criteria or is in a different building), click Add Another again, then repeat the steps from the beginning of this list. You may add up to 50 resources per reservation.
- Click Add.
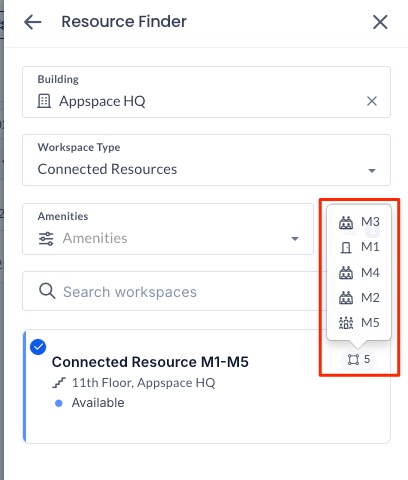
- You may also select a connected resource for a reservation. Connected resources are a grouping of two or more resources (such as rooms, spaces, or POIs) that allow users to reserve multiple resources as a single, unified area. This functionality is used for accommodating larger numbers of attendees, such as by merging two or more rooms or spaces. To view and select connected resources if they are available in the location, perform the following steps:Note
- Connected resources first need to be created and configured by an administrator. Please refer to this article.
- Connected resources are indicated by a symbol. Move your mouse over the symbol to view the resources linked to the connected resource.

-
- Click Find resource or Add Another if you have not already done so.
- In the Resource Finder, click Workspace type and select Connected Resources.
- Select a Connected resource from the result. Click Add.
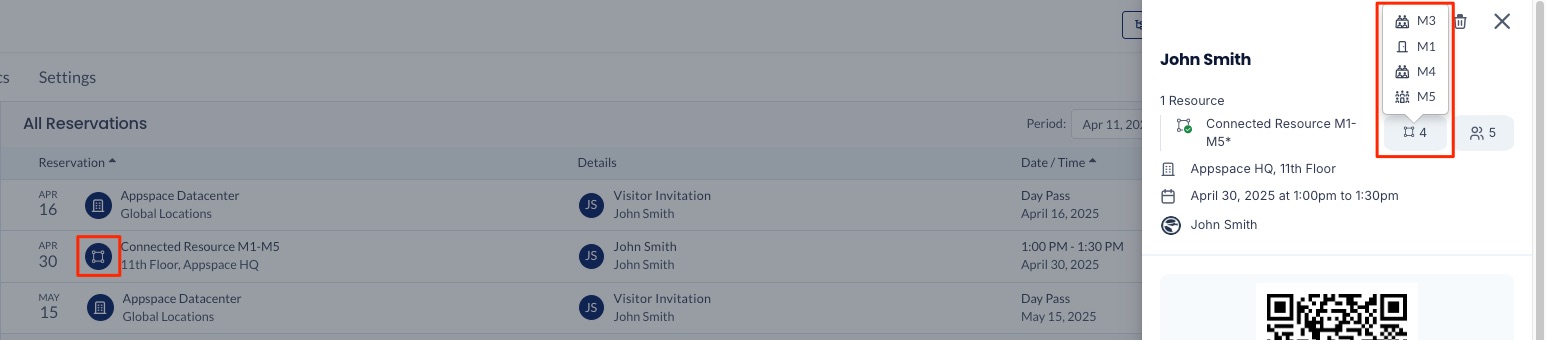
- When viewing the reservation list or details, a symbol will indicate that your reservation is for a connected resource. Move your mouse over the symbol to view the resources linked to it.
- If you are adding more than one resource workspace for the reservation (known as a multi-resource reservation), perform the following steps:
- Alternatively, you can select a zone for the reservation. Zones are specific areas within a building or floor that contain a group of resources (such as rooms and workplaces). Selecting a zone when making a reservation will automatically allocate a resource within that zone to employees, based on availability and the number of attendees. This removes the need to manually select a specific resource.Important
- You can only select one zone for a reservation.
- Currently, multi-resource reservations are not supported when a zone is selected.
- Click Add.
-
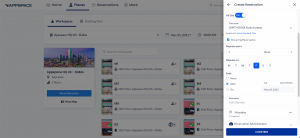
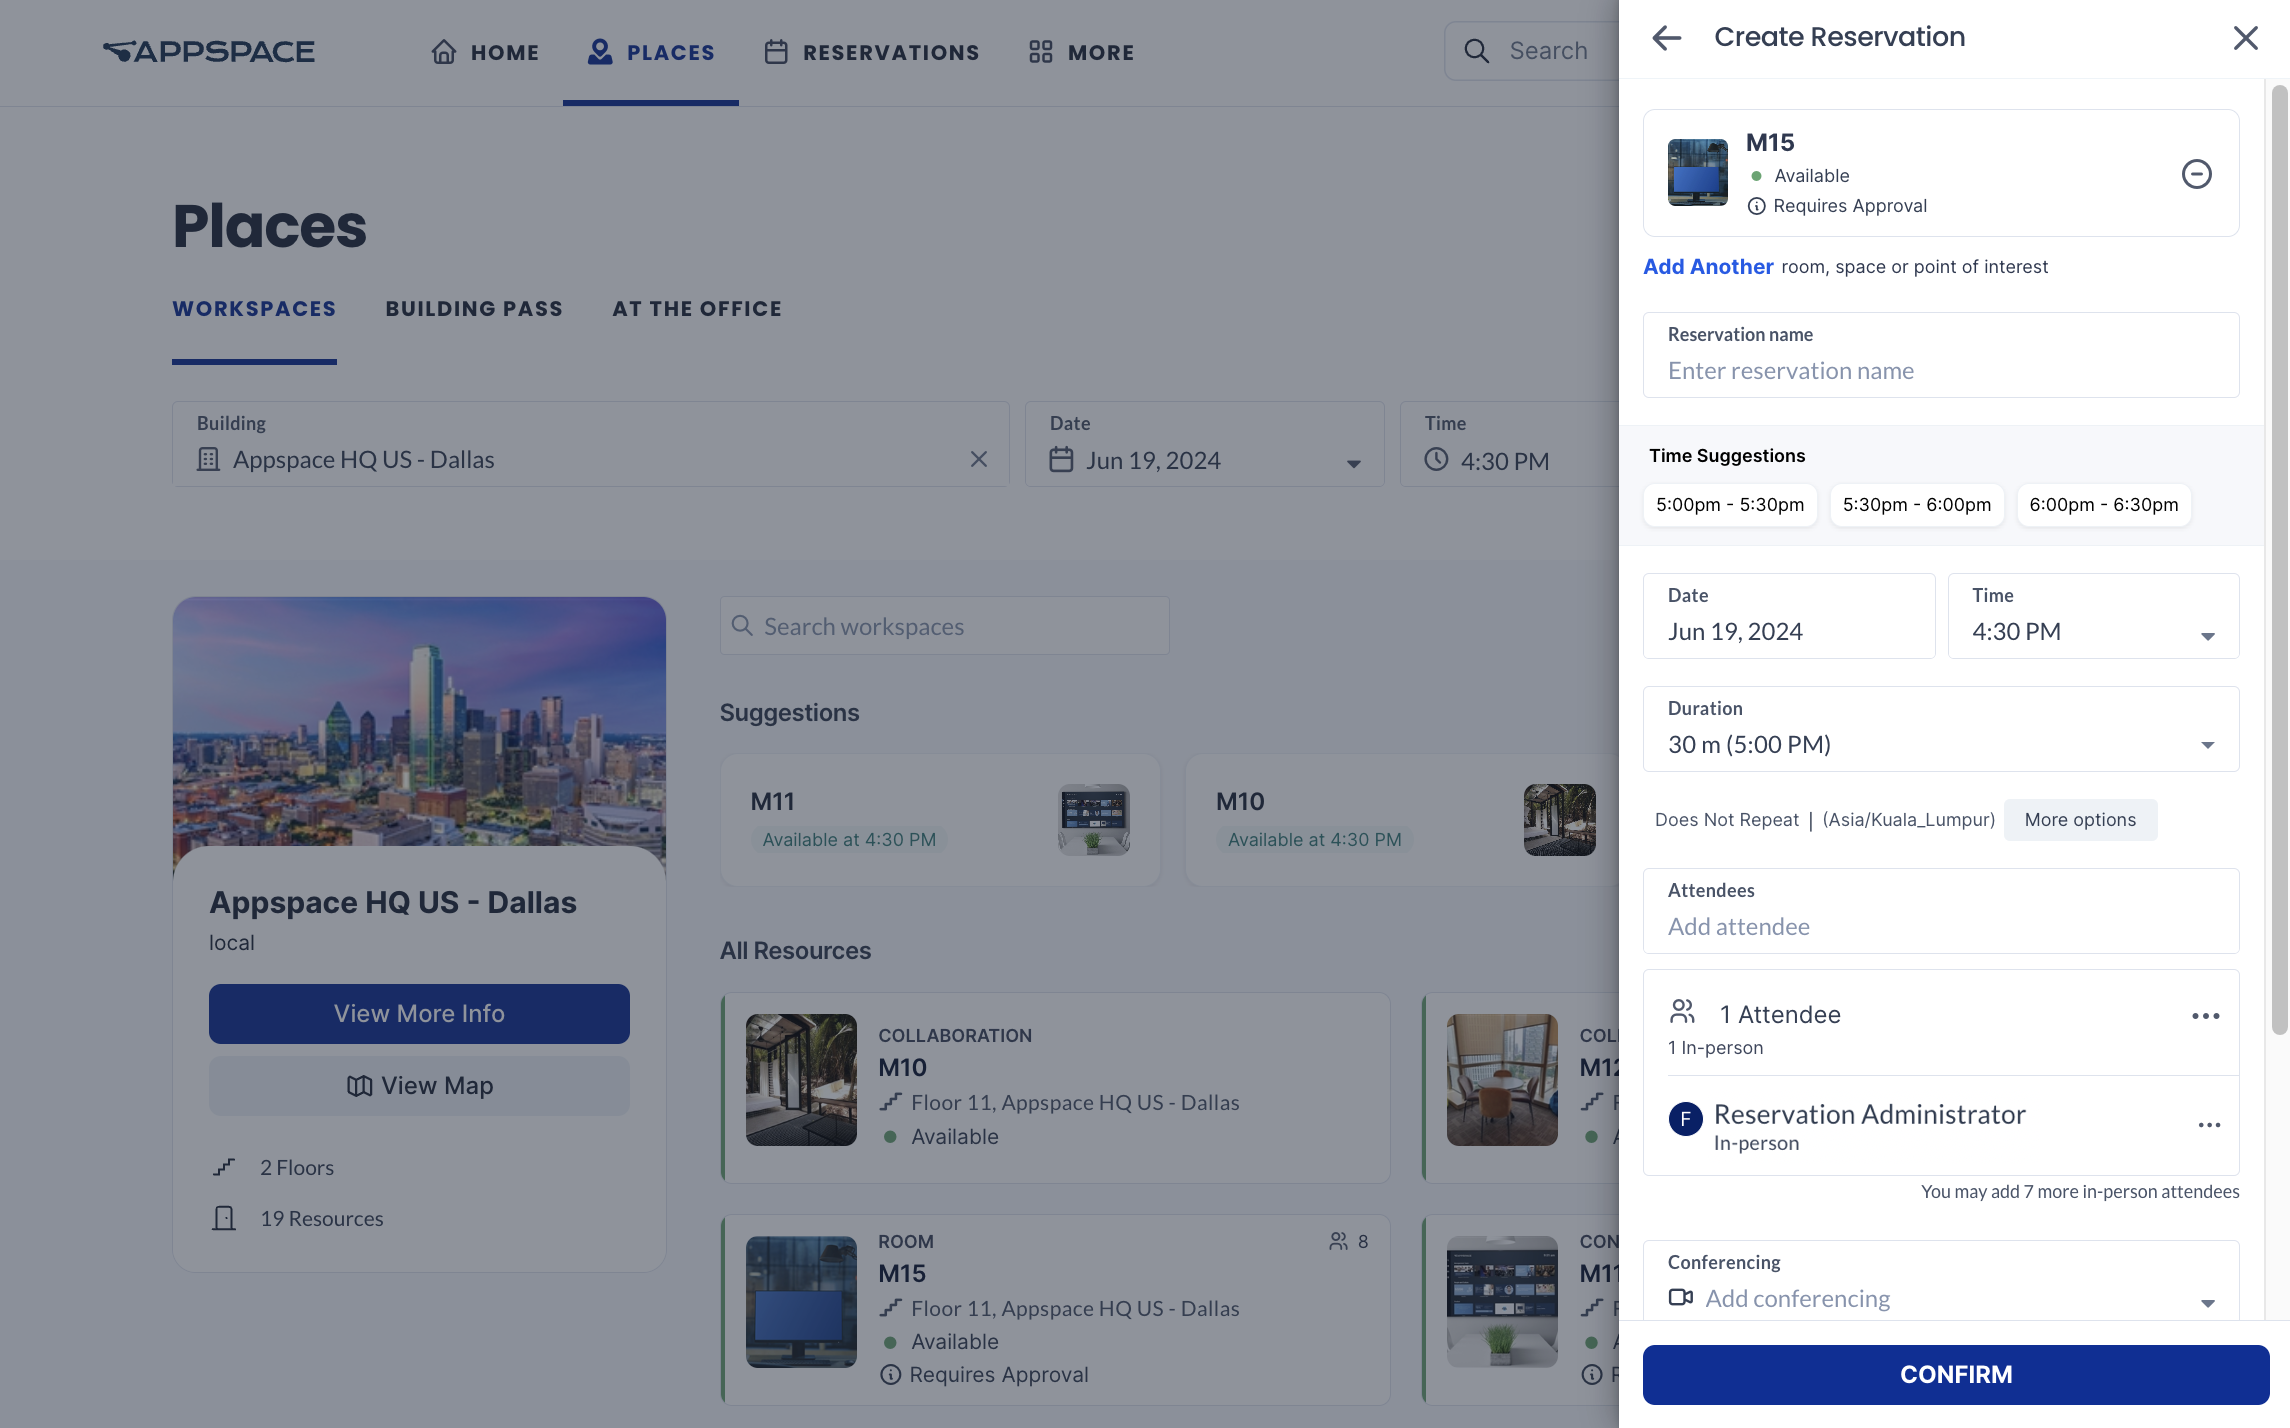
- In the Create Reservation side panel, configure the following fields:

-
-
-
-
- Enter the Reservation Name in the text field. The organizer’s name is used by default if the field is left empty.
- (New) Time Suggestions displays up to four suggested time slots, based on the currently selected reservation date, time, and duration, and resource availability. You may select a time slot, or manually set the reservation date and time in the next step.
- Select the Date of the reservation from the drop-down calendar, and the Time from the drop-down menu.
Select the Duration from the drop-down menu (from 30 minutes to 1 – 12 hours). - Select More Options to view and set the All Day, Time Zone, and Recurring Reservation options:
- Select the All Day option to set the reservation for the entire day.
- You can switch to a different Time Zone from the drop-down menu, in case the reservation is for someone else.
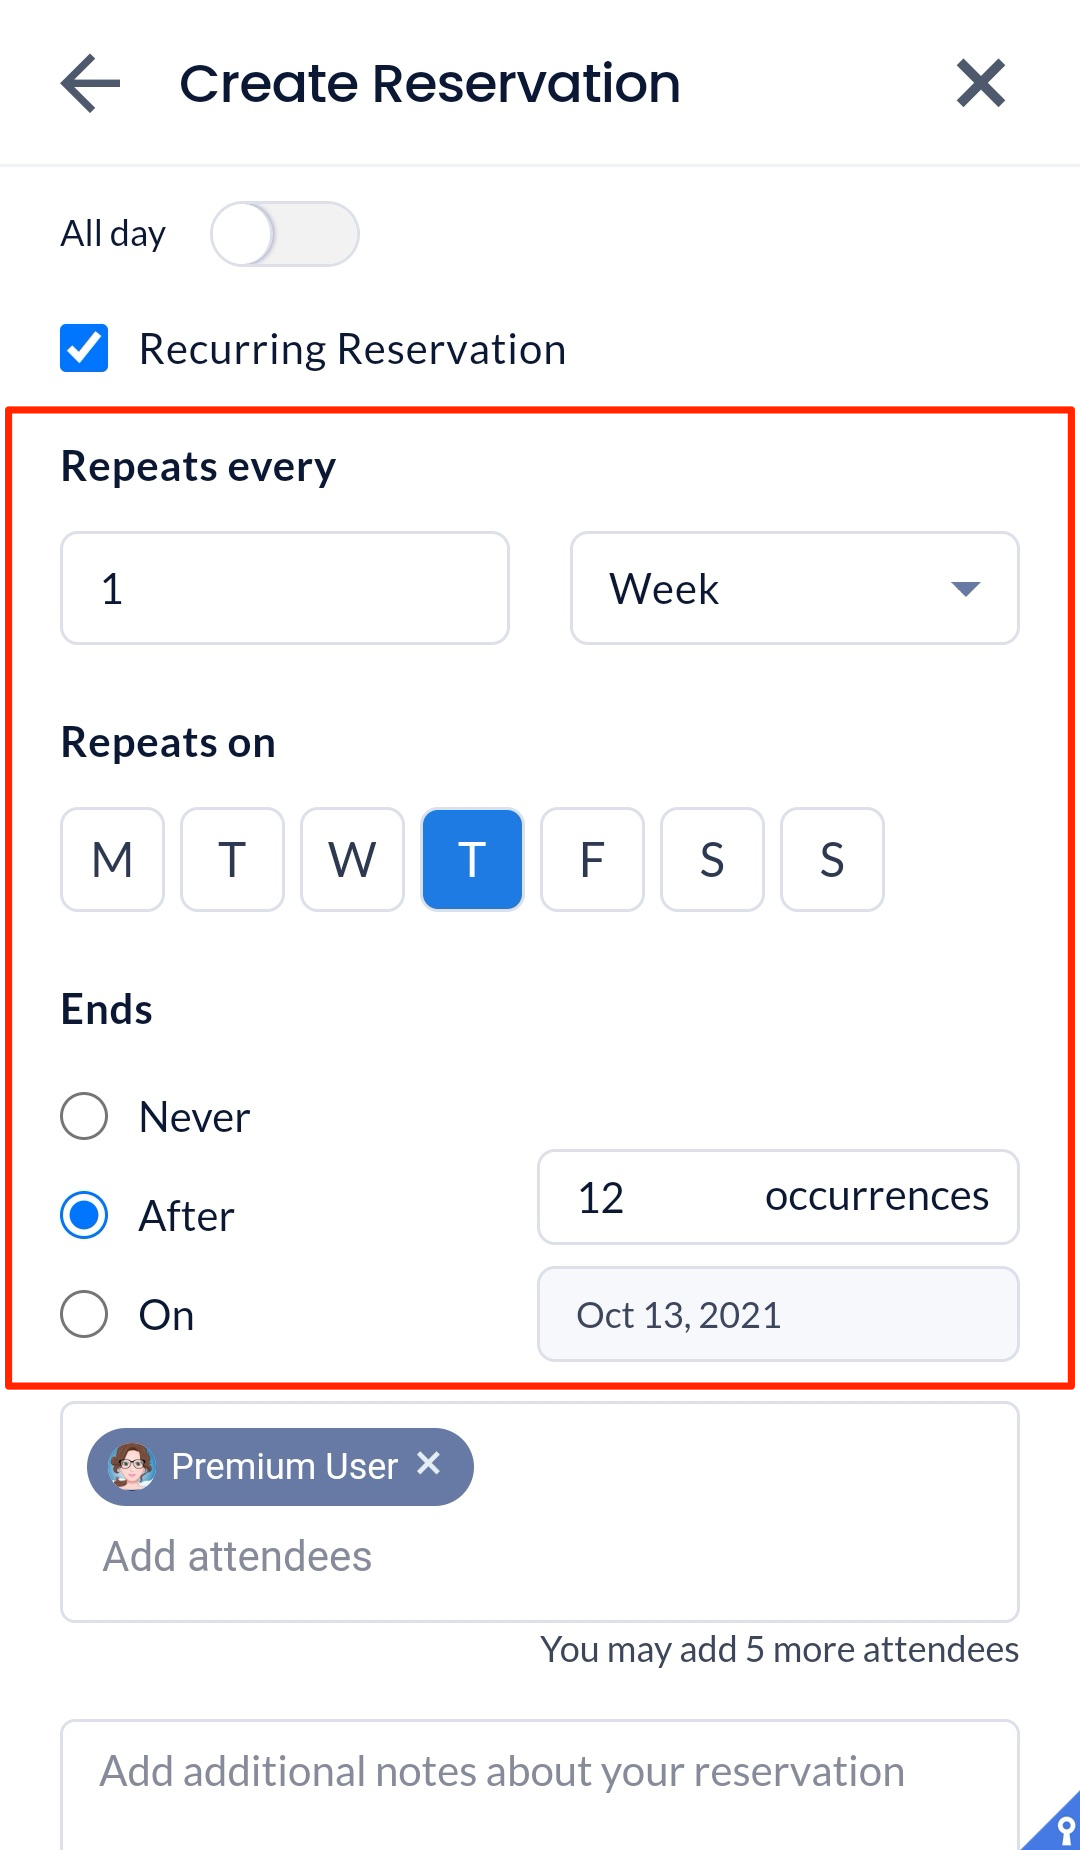
- Enable the Recurring Reservation option if the reservation would occur periodically. The following settings can be configured:
- Enter the number of times the reservation occurs in the Repeats every field and drop-down menu:
- Day – The reservation occurs every set number of days.
- Week – The reservation occurs every set number of weeks.
- In the Repeats on drop-down menu, you may select if the reservation is repeated on the day of each week. For example:
- Reservation is repeated every Monday, Wednesday, and Friday of each week.
- In the Repeats on drop-down menu, you may select if the reservation is repeated on the day of each week. For example:
- Month – The reservation occurs every set number of months.
- In the Repeats on drop-down menu, you may select if the reservation is repeated on the date, or day of each month. For example:
- Day 6 – 6th of each month.
- The first Sunday of each month.
- In the Repeats on drop-down menu, you may select if the reservation is repeated on the date, or day of each month. For example:
- Year – The reservation occurs every set number of years.
- In the Repeats on drop-down menu, you may select if the reservation is repeated on the date, or day of each year. For example:
- 6 June – 6th of June each year.
- The first Sunday of June each year.
- In the Repeats on drop-down menu, you may select if the reservation is repeated on the date, or day of each year. For example:
- Select when the reservation Ends:
- Never – The recurring reservation never ends.
NoteWhen set to Never Ends, the maximum recurring reservations will be determined by the reservations provider:
- Appspace Provider: Maximum of 730 meeting instances, or meeting instances until the year 2100, whichever comes first.
- After – The recurring reservation ends after the set number of occurrences.
- On – the recurring reservation ends after the set date.
NoteOrganizers will still receive a Confirmation email, even though there is a conflicting reservation. Conflicting reservations will be marked with the Conflict status on the Reservations dashboard, and would require the organizer to separately resolve these conflicting reservations manually.
-
-
-
-
-
-
- The Attendees field defaults to your user account, thus if the workspace resource is for someone else, select or enter their user name from the drop-down menu. If the user name is not listed, enter the user’s name in the field to search for it.
-
-
-
-
-
-
- Never – The recurring reservation never ends.
- Enter the number of times the reservation occurs in the Repeats every field and drop-down menu:
-
-
-
-
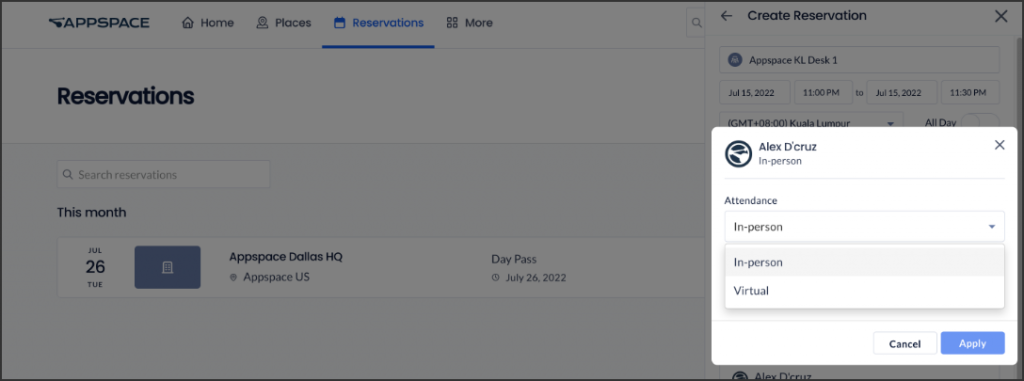
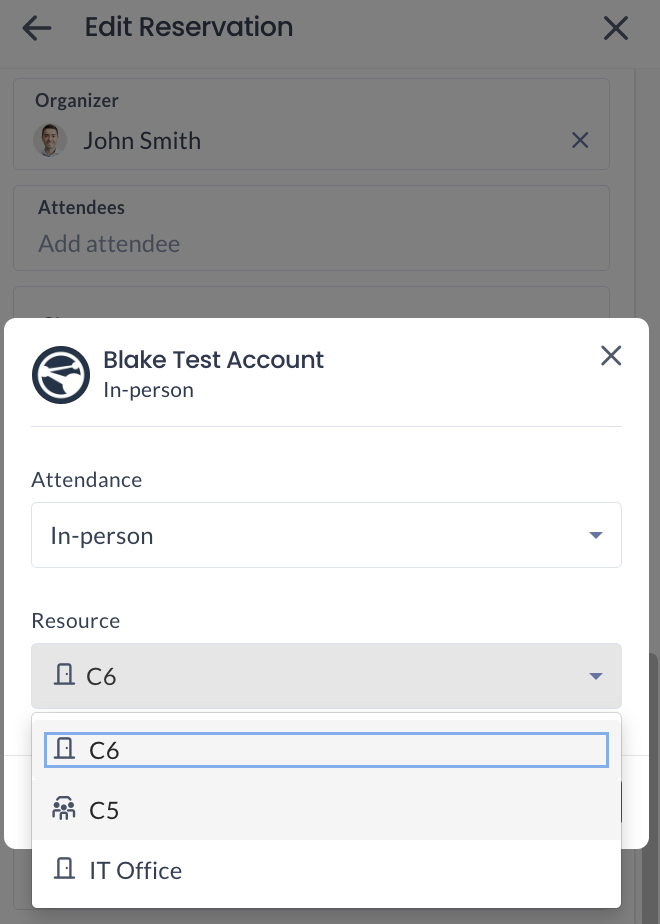
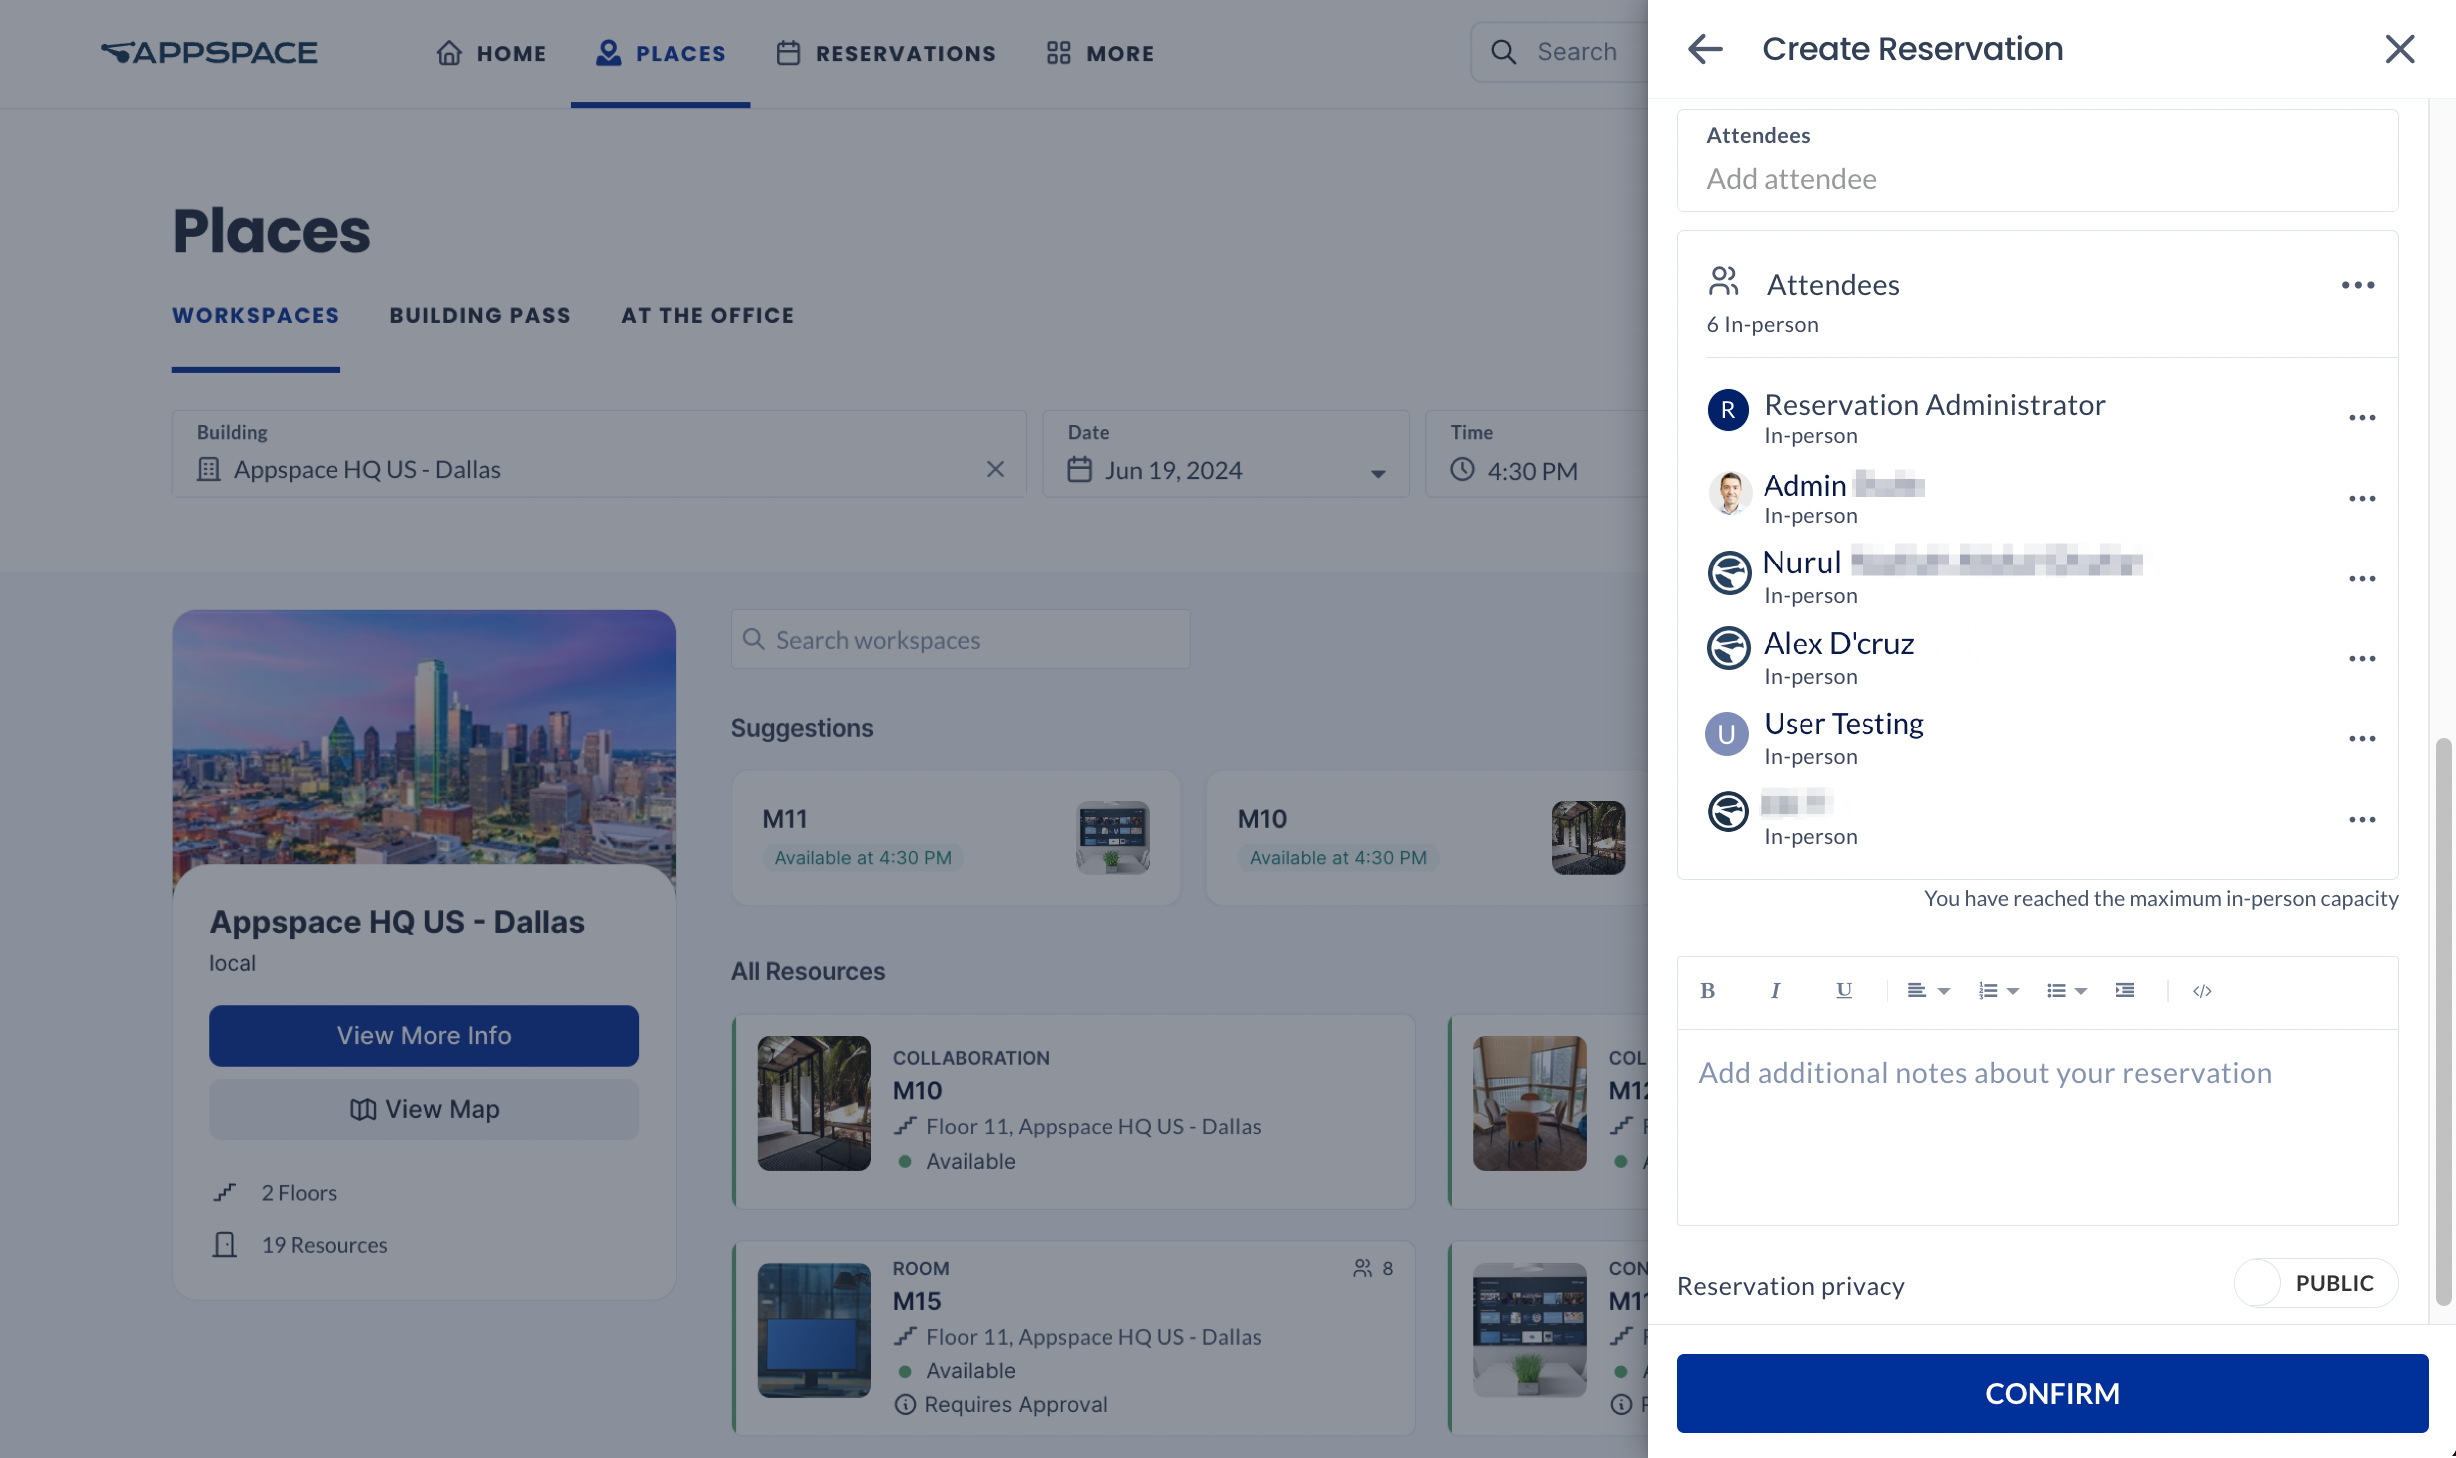
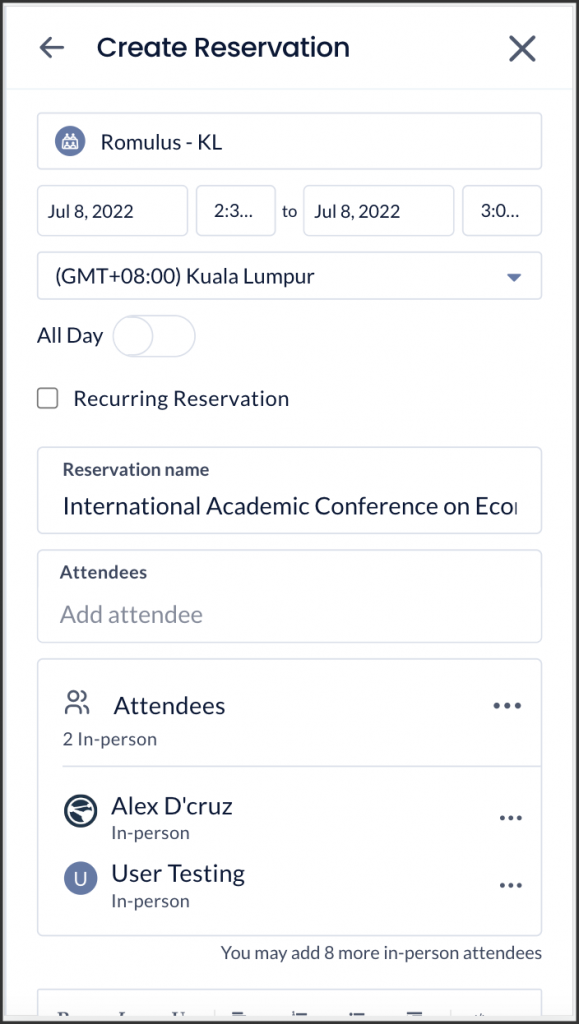
- Add Attendees of the reservation by entering their user names or email addresses in the field. For each invited attendee, you have the choice to edit and choose the attendance type (In-person, Virtual).
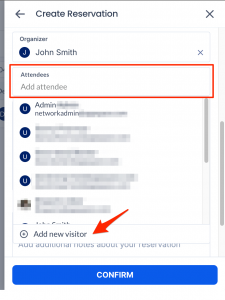
- You may also add additional attendees for the reservation by entering their user names or email addresses in the field.
NoteThe Add Attendees field will be hidden if the resource capacity has been configured to be equal or less than two (2). If unconfigured or left blank, it would default to zero (0)
- (New) You can also add Visitors to the reservation by entering their email address and selecting an existing visitor from the drop-down list or by clicking the Attendees field and selecting +Add new visitor.
- After selecting an existing visitor, a window opens, allowing you to choose the Attendance type (Visitor, Virtual), Visitor Type, and Visitor Purpose.
- If you select to Add new visitor, a window opens, allowing you to enter the Email, Attendance type (Visitor, Virtual), First Name, Last Name, Visitor Type, and Visitor Purpose.Note
- (New) For the inclusion of visitors in workplace reservations, The Allow visitors in reservations option must be enabled in Reservations > Settings.
- After the attendees and visitors are entered, the reservations panel will list attendees and visitors, as well as their attendance type.
- All reservations must have at least one in-person attendee.
- (New) When a reservation is created with visitors, a visitor invitation will be automatically created with the visitors, which can be viewed in the visitor management module.
- When an event has checkpoints, only the in-person attendee needs to complete the checkpoints.
- You may also add additional attendees for the reservation by entering their user names or email addresses in the field.
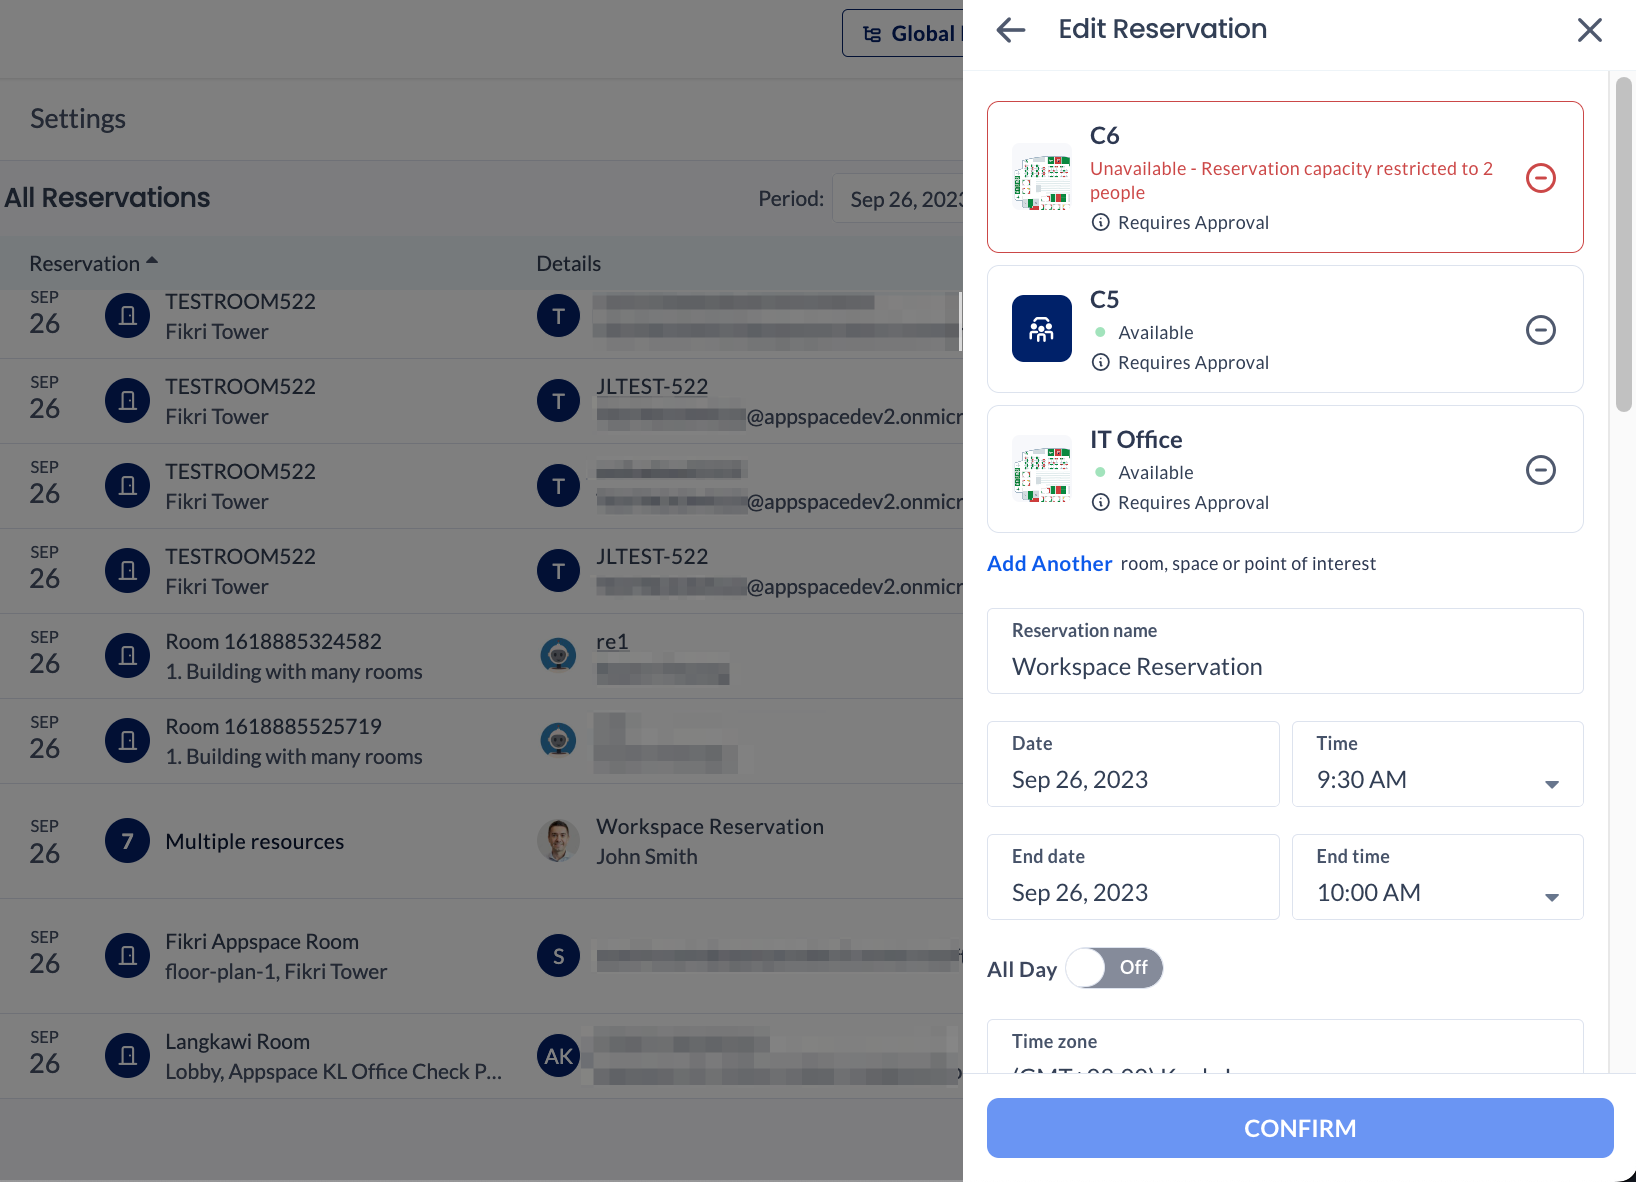
- If the amount of attendees exceeds the maximum capacity of the selected resource workspace(s), a note stating that the resource is unavailable is displayed and the reservation cannot be confirmed. In this case, you will need to manually rearrange the attendees from the overbooked resource into the other available resources:

- Click the ellipsis (…) icon of the attendee and click Edit.
- Select a different workplace resource for the attendee.
- If required, add more workplace resources and repeat the process.
-
- Select the services (checkpoint rules) that you wish to apply for the reservation. You can select multiple options. For multi-resource reservations, on-demand services from all resources will be shown. Keep in mind that once the reservation is created, selected checkpoint rules cannot be removed. The checkpoint rule is only applicable to the meeting organizer. Only the meeting organizer will be able to view the Services field and receive notifications from these checkpoints. Service checkpoints are configured when you create checkpoints set as On-demand (services) for the resource.
- Select a Conferencing software (e.g. Google Meet, Microsoft Teams, or Webex) for the reservation by clicking Add conferencing and selecting an option. A conferencing link will be available to all attendees in the Employee App and in email and messaging notifications.
NoteThis option cannot be changed after the reservation is created.
- You may add Additional notes or information for the reservation to be seen by attendees. You can also apply basic formatting to your text.
- (New) Enable the Show as Busy option to set your status as Busy during the reservation, or disable the option to set it as Free. Disabling this option keeps your calendar open for creating additional reservations during the period, even if you’ve already made an all-day reservation for a resource such as a desk or workplace, for example.
- Optionally, you may make your reservation private, preventing other employees from identifying your reservation via the Show Colleagues option, by toggling the Reservation privacy slider to PRIVATE (which is PUBLIC by default).
- Click CONFIRM. Important
- If the reservation requires approval, the reservation will be set to pending approval until it is approved by the approver of the resource. During this pending status, the resource will be shown as unavailable for the reserved time slot in the system. Invitees will not be able to see pending reservations or receive any notification of the reservation until the meeting is approved.
- Once a reservation is approved, it cannot be further edited or changed. The meeting organizer will receive an email confirmation of the approval.
-
- Optionally, you may be required to complete any checkpoints that may have been configured for the workspace, before being able to proceed with the reservation. For future reservations, you may be requested to return at a later date to complete the checkpoint, this however is all dependant on how the checkpoint has been configured. For Service checkpoints (which will display catering and menu options), refer to the section below.
- Once the workspace has been successfully reserved, it would be listed and available in the Reservations tab.


Complete Service Checkpoint in a Reservation
The Services module enables the configuration and management of food catering services, menu orders, and food order tracking within Appspace Reservations. After a Service and Menu are set up, an administrator can select and link to a Service checkpoint for a resource. These Service checkpoints are configured to display food catering options to attendees during a reservation check-in.
If a Service checkpoint has been configured for a resource, when a user checks in for a reservation, a form will appear asking if the attendee wants to order food from a catering service menu. This feature is only available for Appspace users.The attendee can select one of three options:
- Yes, but I’ll order later – the attendee chooses to perform the order later when completing the check-in process.
- Yes, I’ll order now – the attendee can select food options from a menu for the reservation / meeting / conference.
- No, I don’t want to order – The attendee does not perform an order from any menu. This option is available only if Attendee Compliance for the checkpoint is set to Optional.
If the attendee selects Yes I’ll order now or checks in after selecting I’ll order later, an order form will be displayed allowing the attendee to select from the menu.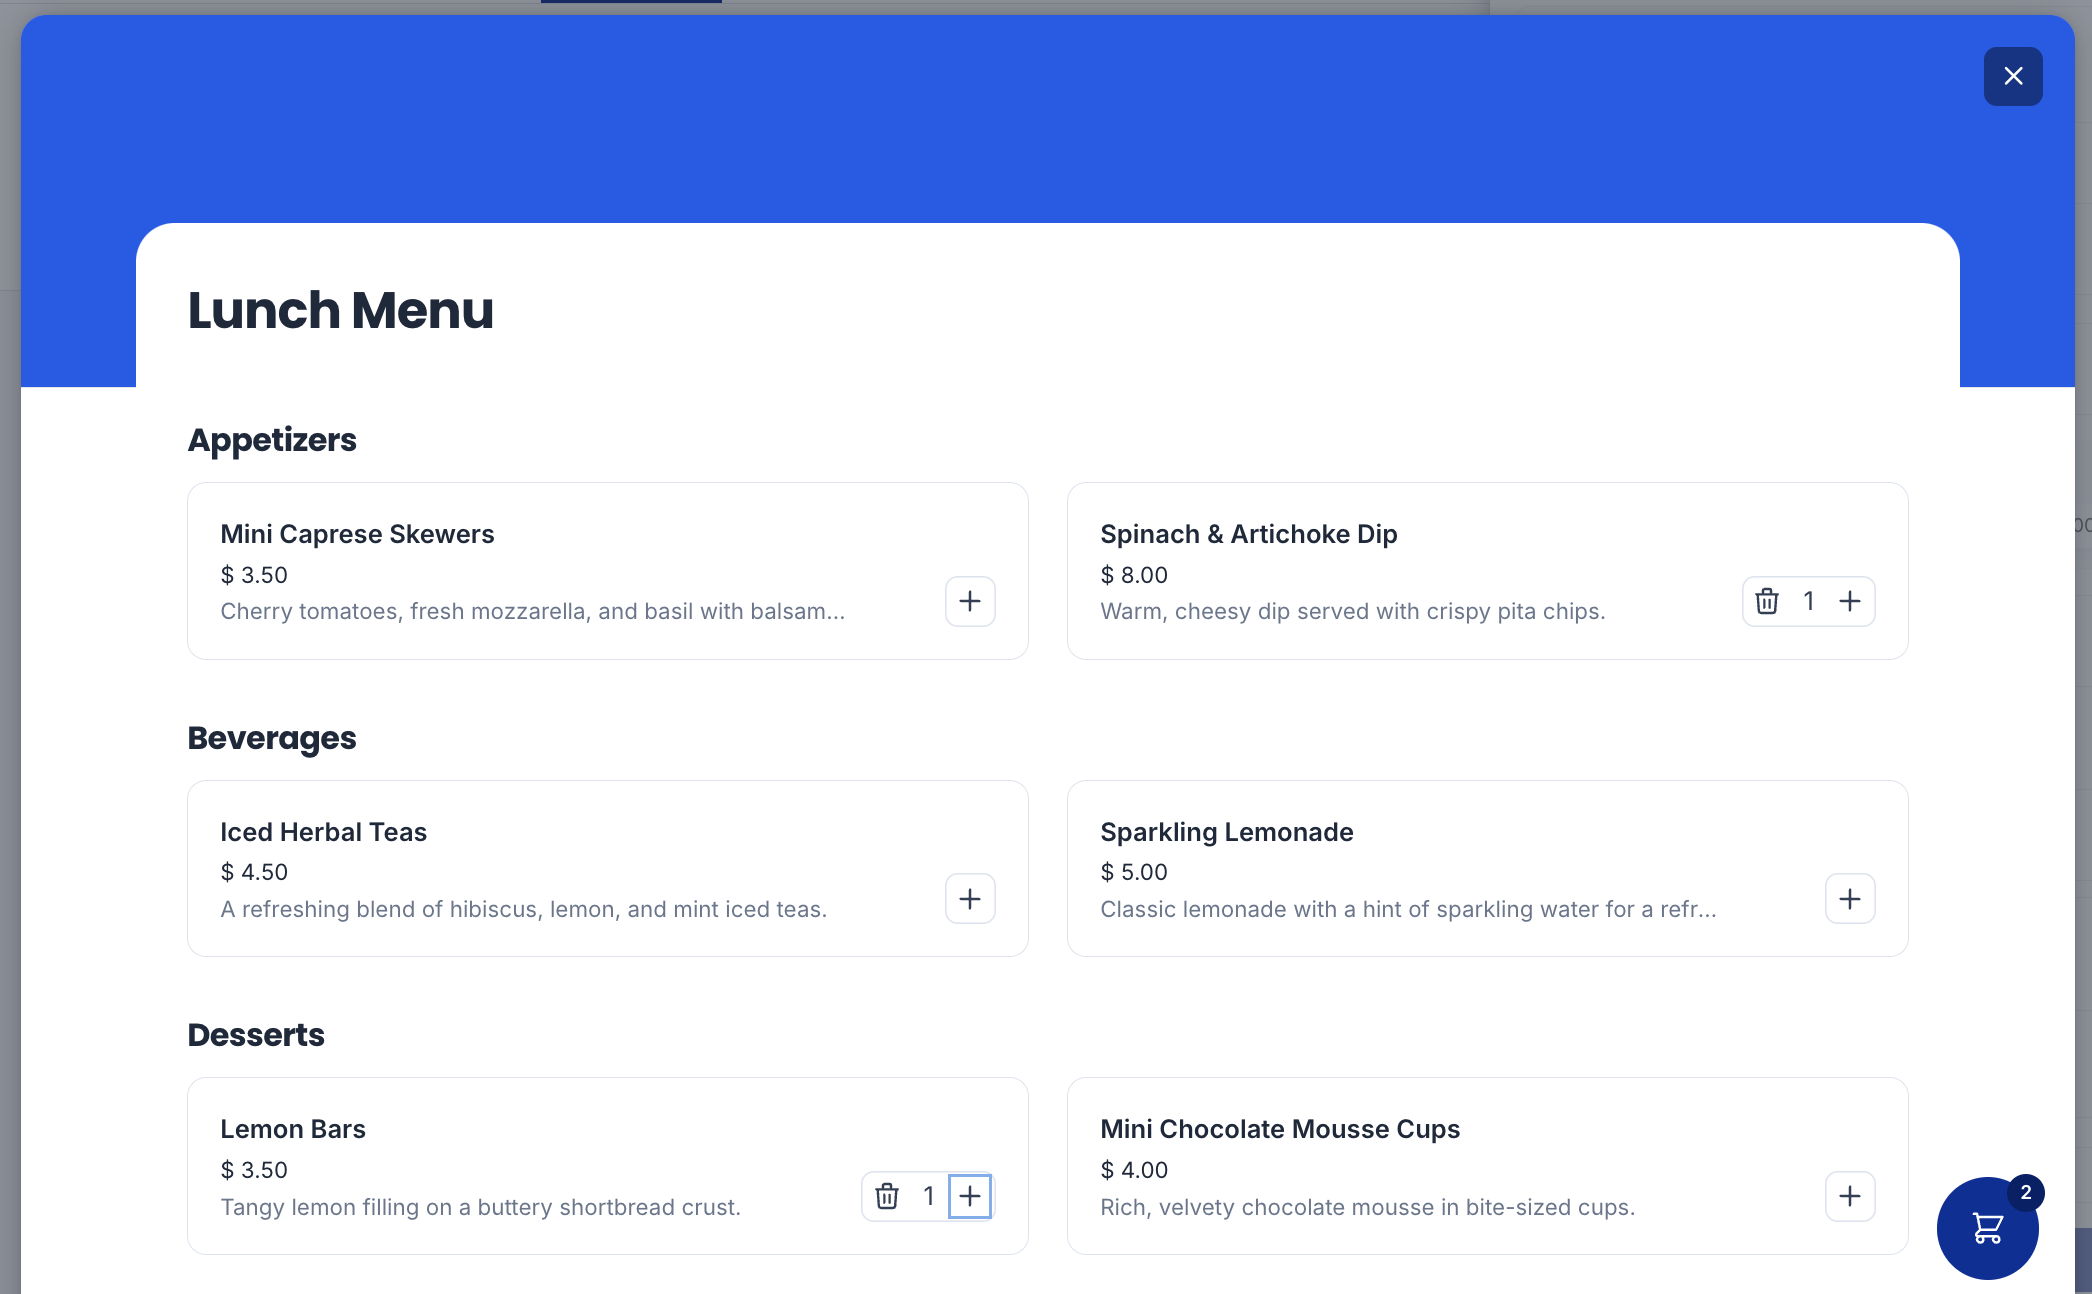
After the checkpoint is completed, attendees will be able to view their own food order.
Manage Workspace Reservations
- Log in to your Employee App with your Appspace Premium User credentials.
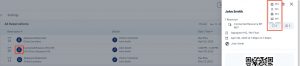
- Click the Reservations tab to view all your workspace reservations.Important
-
- Conflicting reservations will be marked with the Conflict status, and would require the organizer to separately resolve these conflicting reservations manually.
- Reservations set to private will appear as “Workplace Reservation” instead of showing the full name. However, the full name will be visible to the host and meeting attendees.
-
- Select a reservation to perform the following actions:
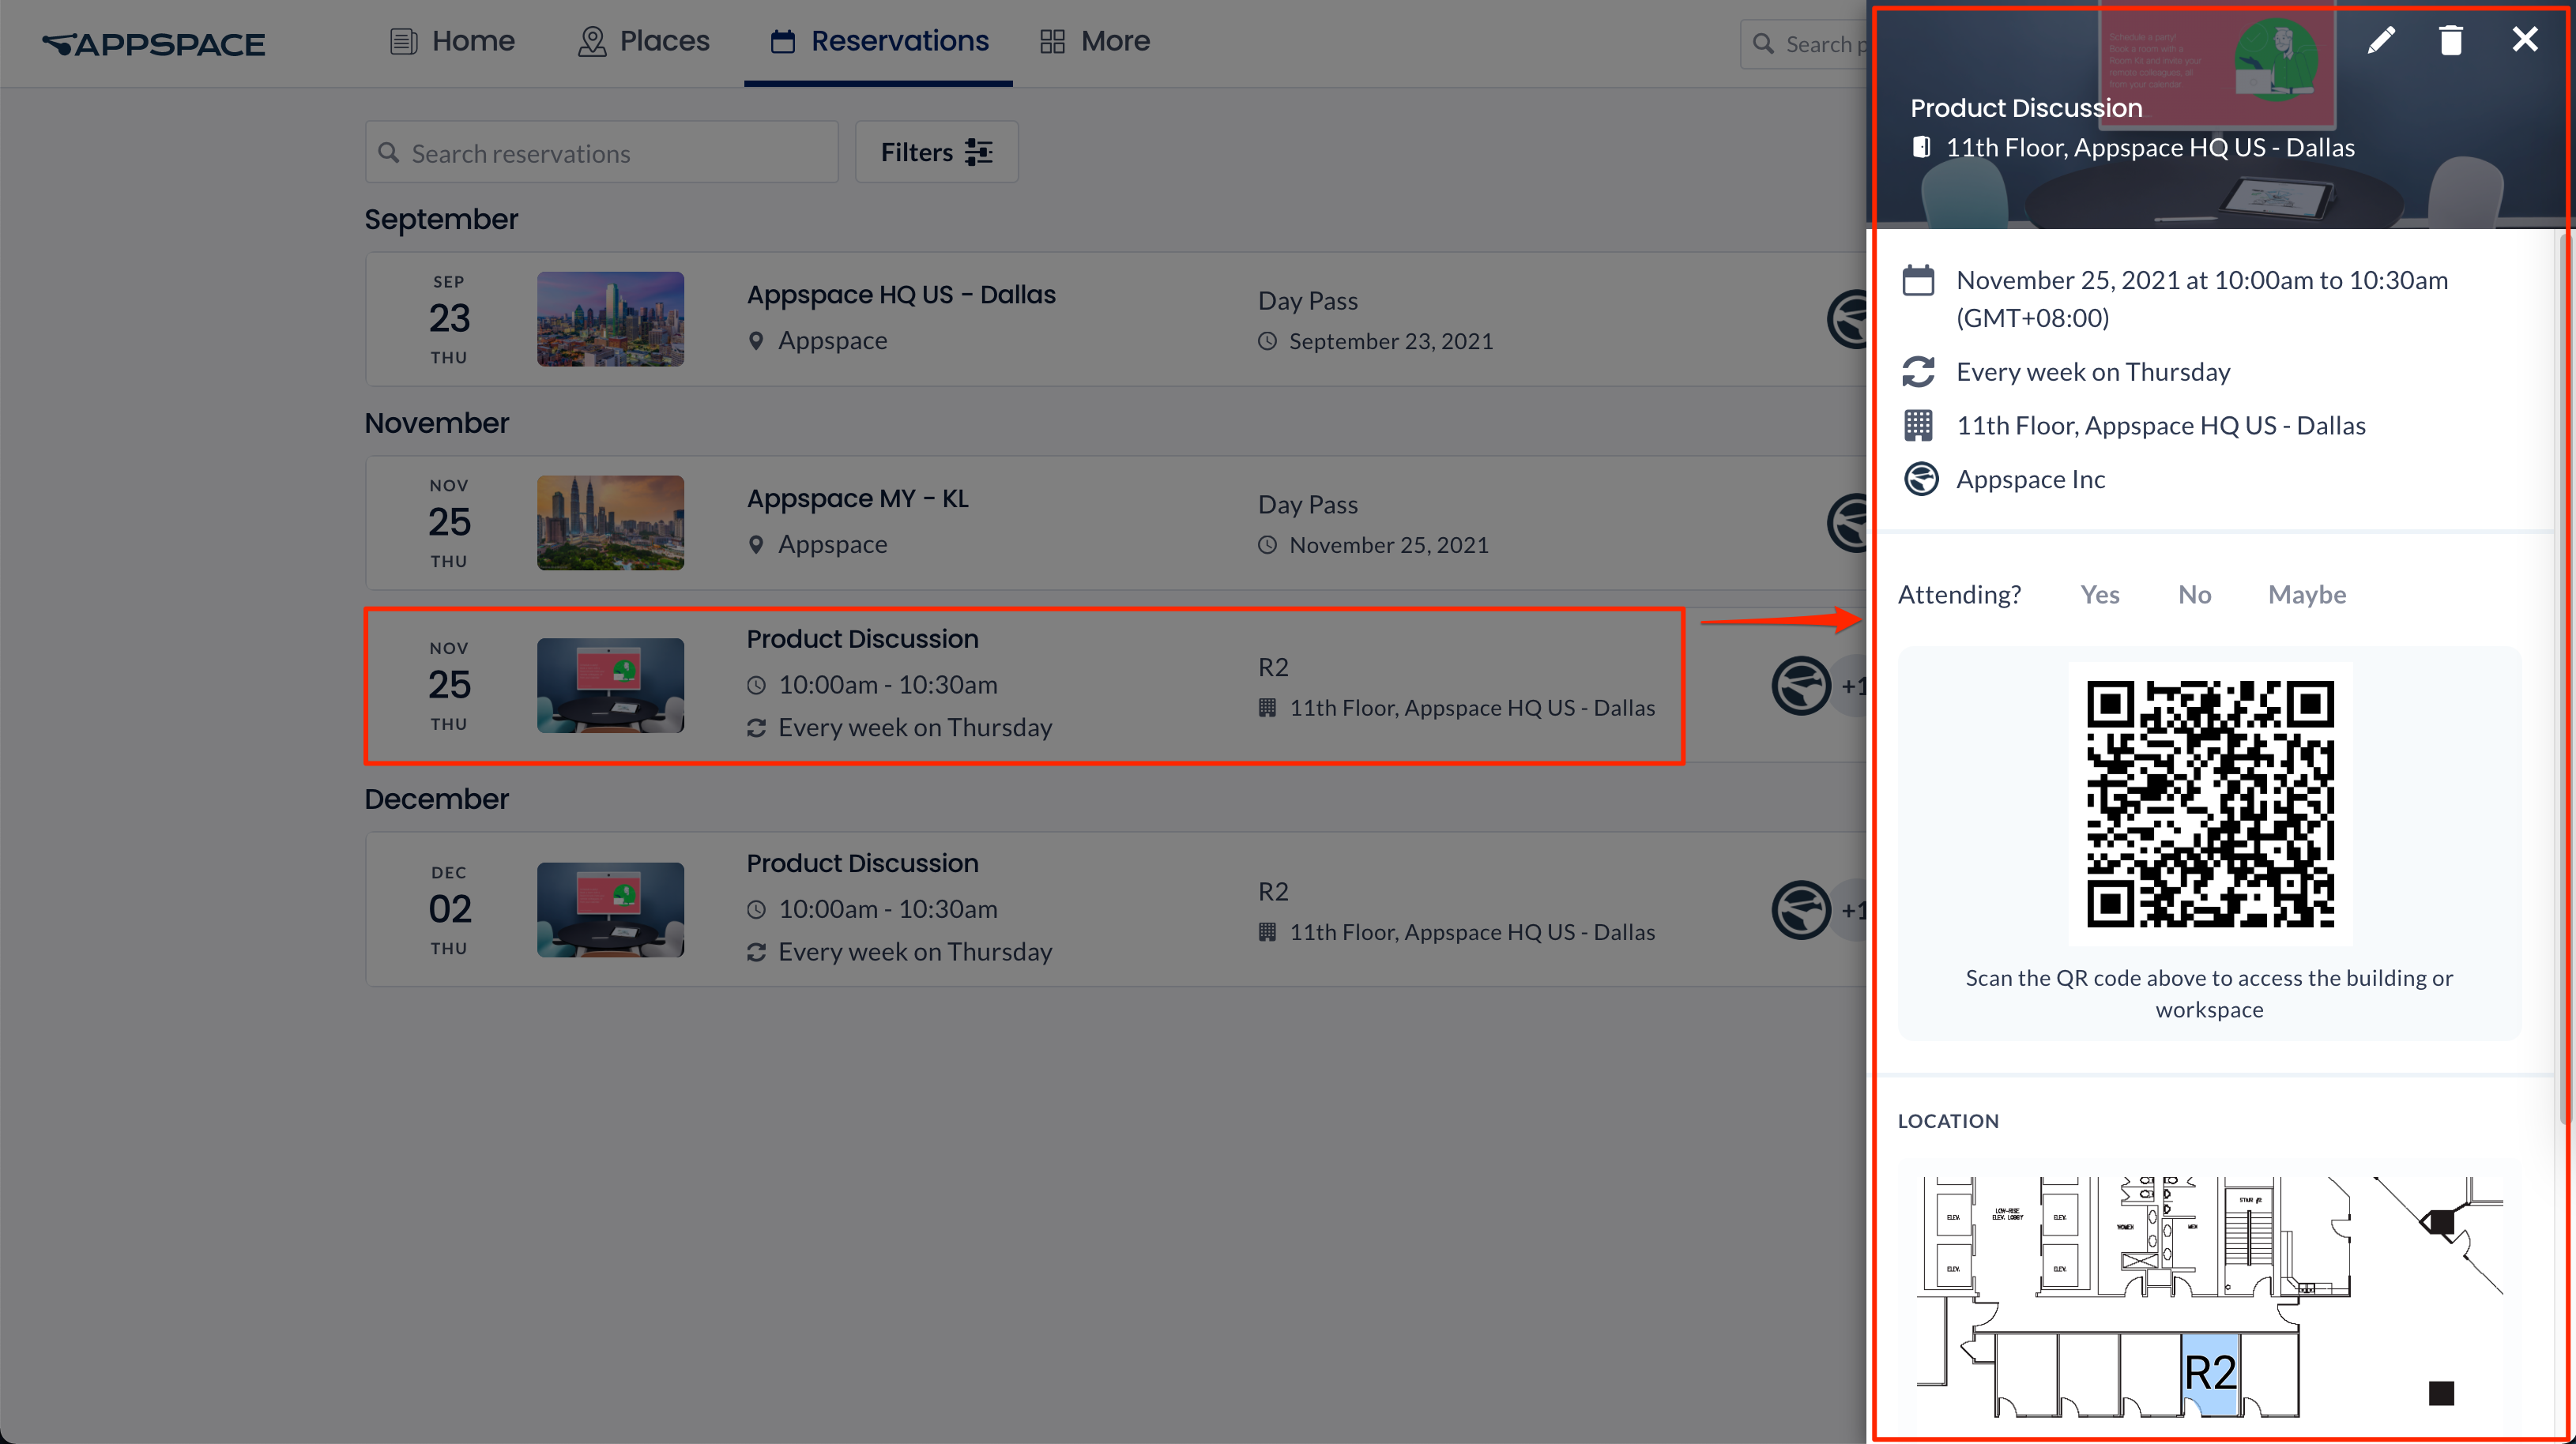
- Confirm attendance – Click Yes, No, or Maybe to confirm or decline your attendance.
- Complete Checkpoints – This option is displayed if you have incomplete checkpoints for the reservation. Click to view and complete your checkpoints.
- View or scan QR Code – View the QR code, or click to enlarge the QR code to scan if needed.
- View location – View the location of the resource on a map.
- View Attendees – View the list of attendees for the reservation.
- NoteReservations set to private will display the event’s host name but keep the attendee list hidden. However, the host and meeting attendees can still view the full list of attendees.
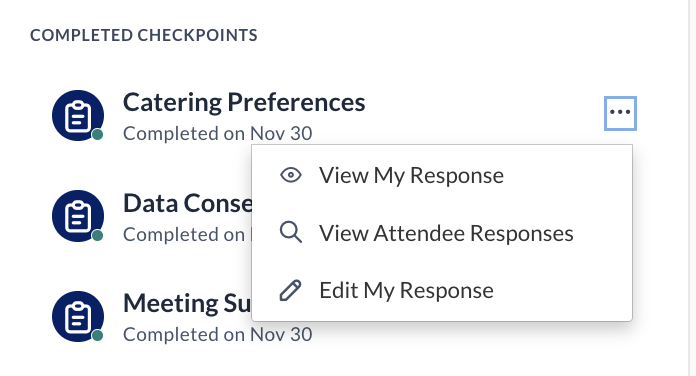
- View completed checkpoints – View your completed checkpoints for the reservation. Click the ellipsis next to the checkpoint names to perform the following options:
- View My Response – View your previous responses for the checkpoint.
- (New) View Attendee Responses – View attendee responses to the checkpoints for the reservation.
- (New) Edit response – Open the checkpoint and edit your responses for the checkpoint.
- Edit Workspace Reservation – Click the Modify Reservation icon to make the following edits to your reservation, and click CONFIRM once done.
- Change the Reservation Name.
- Change the Date, Time, or Duration of the workspace reservation.
- Enable or disable Recurring Reservations.
ImportantThe Recurring Reservations checkbox may be disabled due to a limitation where once an event is created, it cannot be changed to recurring. We are currently working on a fix for this.
- Add or remove Attendees. NoteReservations set to private will display the event’s host name but keep the attendee list hidden. However, the host and meeting attendees will still have access to the full list of attendees.
- Add (but not remove) Services (on-demand checkpoints).
- Edit the workspace reservation Notes.
- Enable or disable the Show as Busy option.
- Enable or disable the Reservation privacy of the workspace reservation.
- Delete Workspace Reservation – Click the Cancel Reservation icon to delete the workspace reservation, and click OK to confirm.
Appspace Employee App (Mobile)
Reserve Workspace
- Log in to your Appspace Employee App with your Appspace Premium User credentials.
- Click Places from the menu, and click the Workspaces tab.
- Select the Date, Time, and Duration of the workspace you wish to reserve from the respective drop-down menus.
- Select a building or type a building name in the Building drop-down menu. Alternatively, you may also select from a list of recently reserved buildings, workspaces, or rooms. These lists will not exist if this is your first time in the Employee App.
- If in a building, select from the listed workspaces, click View Map for a graphical layout of the available workspaces, or search for the desired workspace. Only resources that you have permission to are displayed.
Use the Filters button to refine your search for your desired workspace, based on the following:- floor
NoteAll inactive floors and corresponding inactive resources are hidden from being displayed and listed in the Map view on the Employee App, if the Administrator has set the floor resource Status to Inactive.
- zone
NoteThere are a few limitations when filtering zones in map view:
- When a zone from a different floor is selected from the drop-down menu, the map does not automatically switch to the respective floor, and must be done manually.
- When a floor is selected, only the zones from that floor are listed in the drop-down menu to be selected. Users will not be able to search for zones within other floors.
- workspace type and sub-type
- reservation status
- workspace capacity
- amenities
- show colleagues – enabled by default
NoteThe Show Colleagues field allows you to identify your fellow colleagues and their reserved workspaces, in both list and map views. This feature is OFF by default and can be toggled to ON. However, if the workspace reservation is set to private, then the user icon will not appear on their booked workspace reservation. In Map View, you may also search and locate workspaces reserved by your colleagues, by entering their username in the search field.
- floor
- Select the desired workspace and click the Reserve button.
You may also view any restrictions that may have been configured for the workspace here.
- In the Create Reservation window, configure the following fields:
- Confirm the Date and Time (start time and end time) of the reservation from the drop-down calendars.
- You also have the option of switching to a different Time Zone from the drop-down menu, in case the reservation is for someone else.
- Optionally, you may check the Recurring Reservations checkbox if the reservation would occur periodically. If the checkbox is checked, the following settings can be configured:
- Enter the number of times the reservation occurs in the Repeats every field and drop-down menu:
- Day – The reservation occurs every set number of days.
- Week – The reservation occurs every set number of weeks.
- In the Repeats on drop-down menu, you may select if the reservation is repeated on the day of each week. For example:
- Reservation is repeated every Monday, Wednesday, and Friday of each week.
- In the Repeats on drop-down menu, you may select if the reservation is repeated on the day of each week. For example:
- Month – The reservation occurs every set number of months.
- In the Repeats on drop-down menu, you may select if the reservation is repeated on the date, or day of each month. For example:
- Day 6 – 6th of each month.
- The first Sunday of each month.
- In the Repeats on drop-down menu, you may select if the reservation is repeated on the date, or day of each month. For example:
- Year – The reservation occurs every set number of years.
- In the Repeats on drop-down menu, you may select if the reservation is repeated on the date, or day of each year. For example:
- 6 June – 6th of June each year.
- The first Sunday of June each year.
- In the Repeats on drop-down menu, you may select if the reservation is repeated on the date, or day of each year. For example:
- Select when the reservation Ends:
- Never – The recurring reservation never ends.
- After – The recurring reservation ends after the set number of occurrences.
- On – the recurring reservation ends after the set date.
- Enter the number of times the reservation occurs in the Repeats every field and drop-down menu:

-
-
- Enter the Reservation Name in the text field.
- Add Attendees of the reservation by entering their user names or email addresses in the field. For each invited attendee, you have the choice to edit and choose the attendance type (In-person, Virtual).
Note
- The reservations panel will now list attendees as well as their attendance type.
- All reservations must have at least one in-person attendee.
- When an event has checkpoints, only the in-person attendee needs to complete the checkpoints.

NoteThe Add Attendees field will be hidden if the resource capacity has been configured to be equal or less than two (2). If unconfigured or left blank, it would default to zero (0)
- Optionally, you may enter Notes for the reservation.
- Optionally, you may make your reservation private, preventing other employees from identifying your reservation via the Show Colleagues option, by toggling the Reservation privacy slider to PRIVATE (which is PUBLIC by default).
-

-
- Once done, click CONFIRM.
- Optionally, you may be required to complete any checkpoints that may have been configured for the workspace, before being able to proceed with the reservation. For future reservations, you may be requested to return at a later date to complete the checkpoint, this however is all dependant on how the checkpoint has been configured.
- Once the workspace reservation has been successfully reserved, it would be listed and available in the Reservations section.
Smart Suggestion Notifications for Mobile
Depending on push notification settings, you may receive a push notification on the Employee App for Mobile if three or more of your favorite colleagues have reserved workspaces within the building set as your location in the Employee App. These notifications may be sent an hour before office hours if you have no reservations (in-person) within the office building for that day.

Manage Workspace Reservations
- Log in to your Appspace Employee App with your Appspace Premium User credentials.
- Click Reservations to view all your workspace reservations.
- Select the workspace reservation you wish to manage to perform the following actions:

- Confirm Attendance – You may confirm your attendance by clicking the relevant response.
- Complete Checkpoints – This option is displayed if you have incomplete checkpoints for the reservation. Click to view and complete your checkpoints.
- View or scan QR Code – You may view the QR code, or click to enlarge the QR code for scanning if needed.
- View location – View the location of the resource on a map.
- View Attendees – View the list of attendees for the reservation.
- View completed checkpoints – View your completed checkpoints for the reservation. Click the ellipsis next to the checkpoint names and select View My Response to view your previous responses for the checkpoint.
- Edit this reservation – Click the Modify Reservation button at the top (pencil icon) to make the following edits on the reservation, and click CONFIRM once done.
- Change the Reservation Name.
- Change the Date, Time, or Duration of the workspace reservation.
- Enable or disable Recurring Reservations.
ImportantThe Recurring Reservations checkbox may be disabled due to a limitation where once an event is created, it cannot be changed to recurring. We are currently working on a fix for this.
- Add or remove Attendees.
- Edit the workspace reservation Notes.
- Enable or disable the Reservation privacy of the workspace reservation.
- Delete Workspace Reservation – Click the Cancel Reservation button at the top (dustbin icon) to delete the workspace reservation, and click OK to confirm.
Access Workspace QR Code for Check-Ins or Attending Meetings
- Log in to your Appspace Employee App with your Appspace Premium User credentials.
- Click Reservations to view all your workspace reservations.
- Select the desired workspace reservation to display the QR code to be scanned.
Click to enlarge the QR code for scanning if needed.
ImportantIf a checkpoint has been configured for the workspace, users are then required to complete the checkpoint, before being able to scan the QR code to check-in, or attend the meeting. Failure to do so may result in the user being removed from the attendee’s list, depending on how the checkpoint is configured. - Once scanned, you may exit the app.
Reserve Workspace QR Codes on Qbic Devices
Employees can also scan QR codes that are displayed on Qbic Panel-PC devices or tablets that are running the Desk Booking card to reserve a desk or workspace, as follows:
- Scan the QR code displayed on the Qbic Panel-PC device or tablet with your QR code scanner on your mobile device.
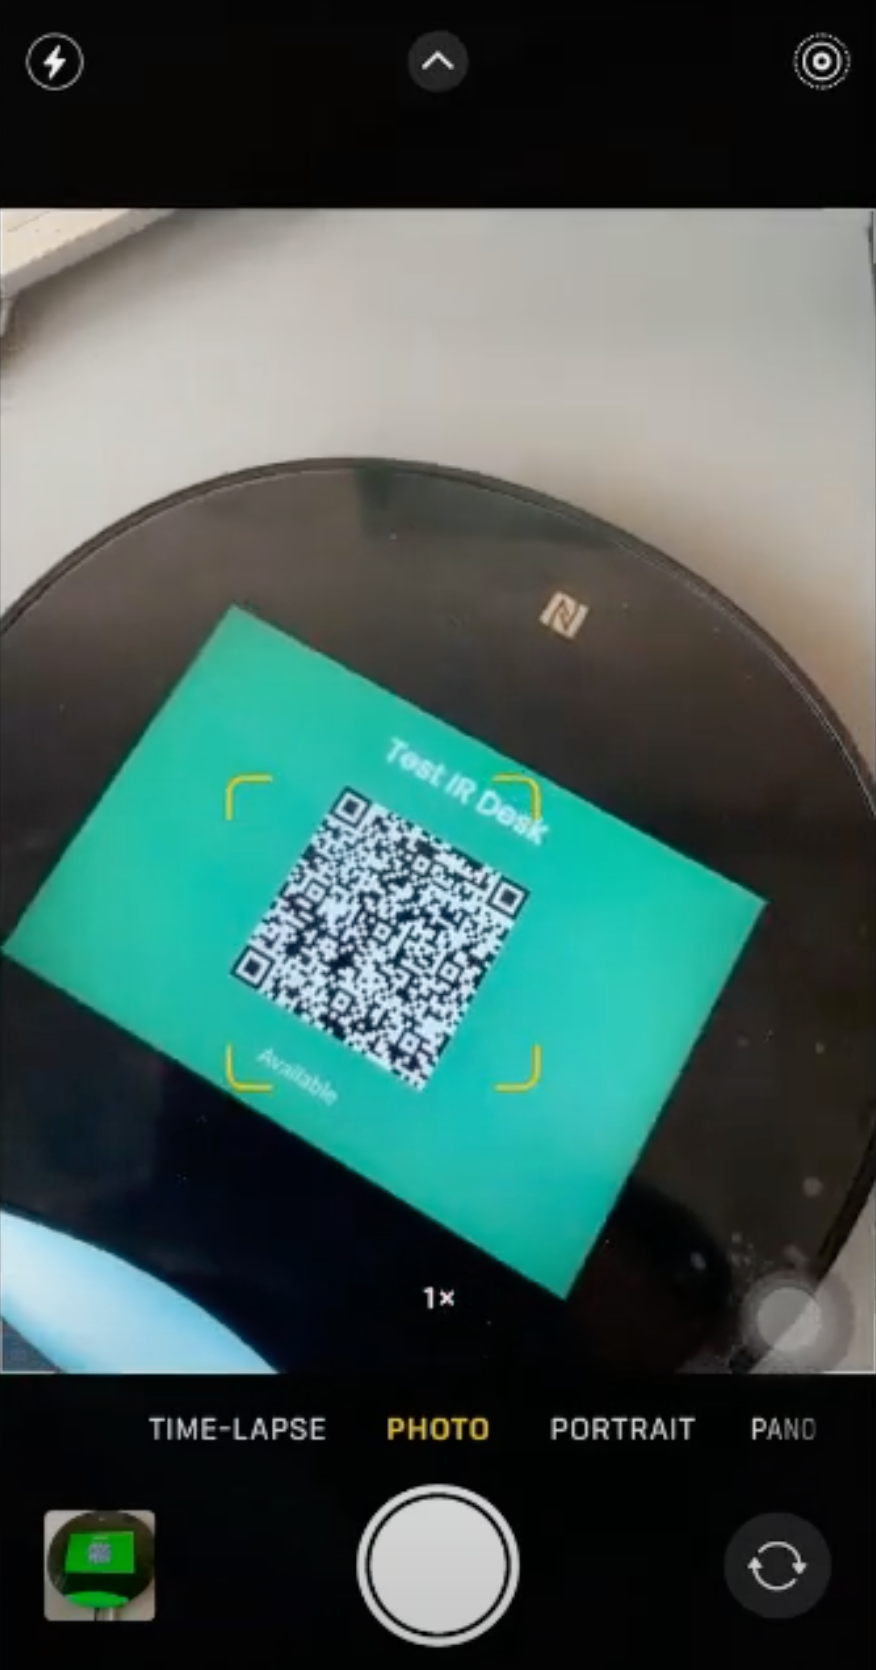
- Once scanned, this will redirect you to either launch the Employee App on your mobile device or launch the Employee App from a web browser.
- Log in to your Appspace Employee App with your Appspace Premium User credentials.
- Click Reserve, and perform the desk booking by following Step 7 onwards from the Reserve Workspace section above.
Was this article helpful?