Activate your on-prem server
This article provides instructions to activate your Appspace on-prem server for all subscription plans (i.e. OMNI C, OMNI D, OMNI E, OMNI F, or OMNI G, Pro, Pro+, or Enterprise); using the following methods:
- One-Step Licensing - Online Activation, when you have an active Internet connection.
- Advanced Licensing - Online Activation, when you have an active Internet connection, and wish to allocate Device and Premium User IDs.
- Advanced Licensing - Offline Activation, when you do not have an active Internet connection.
Note
Please read about our new licensing workflow and the new Account Management Portal, before you proceed.
We also have instructions to:
- View license and information
- View Perpetual IDs
- Manage ID allocation
- Renew Server License
- Switch Server License
- Deactivate Server License
Prerequisites
- An active Appspace subscription plan.
- You must be one of the following Appspace roles:
- Portal Administrator
- Account Owner
One-Step Licensing - Online Activation
Follow the instructions below to activate an Appspace on-prem server with an active Internet connection.
In the Appspace on-prem server license activation page, click LICENSE AUTOMATICALLY within the One-Step Licensing box.
Note
If the Appspace on-prem login screen is displayed, enter in the default Appspace on-prem credentials below, and check the End User Agreement checkbox.
User: admin Password: password123

Proceed to enter in the Server name, and select the Country the server is located in. Optionally, you may enter in the Server description.
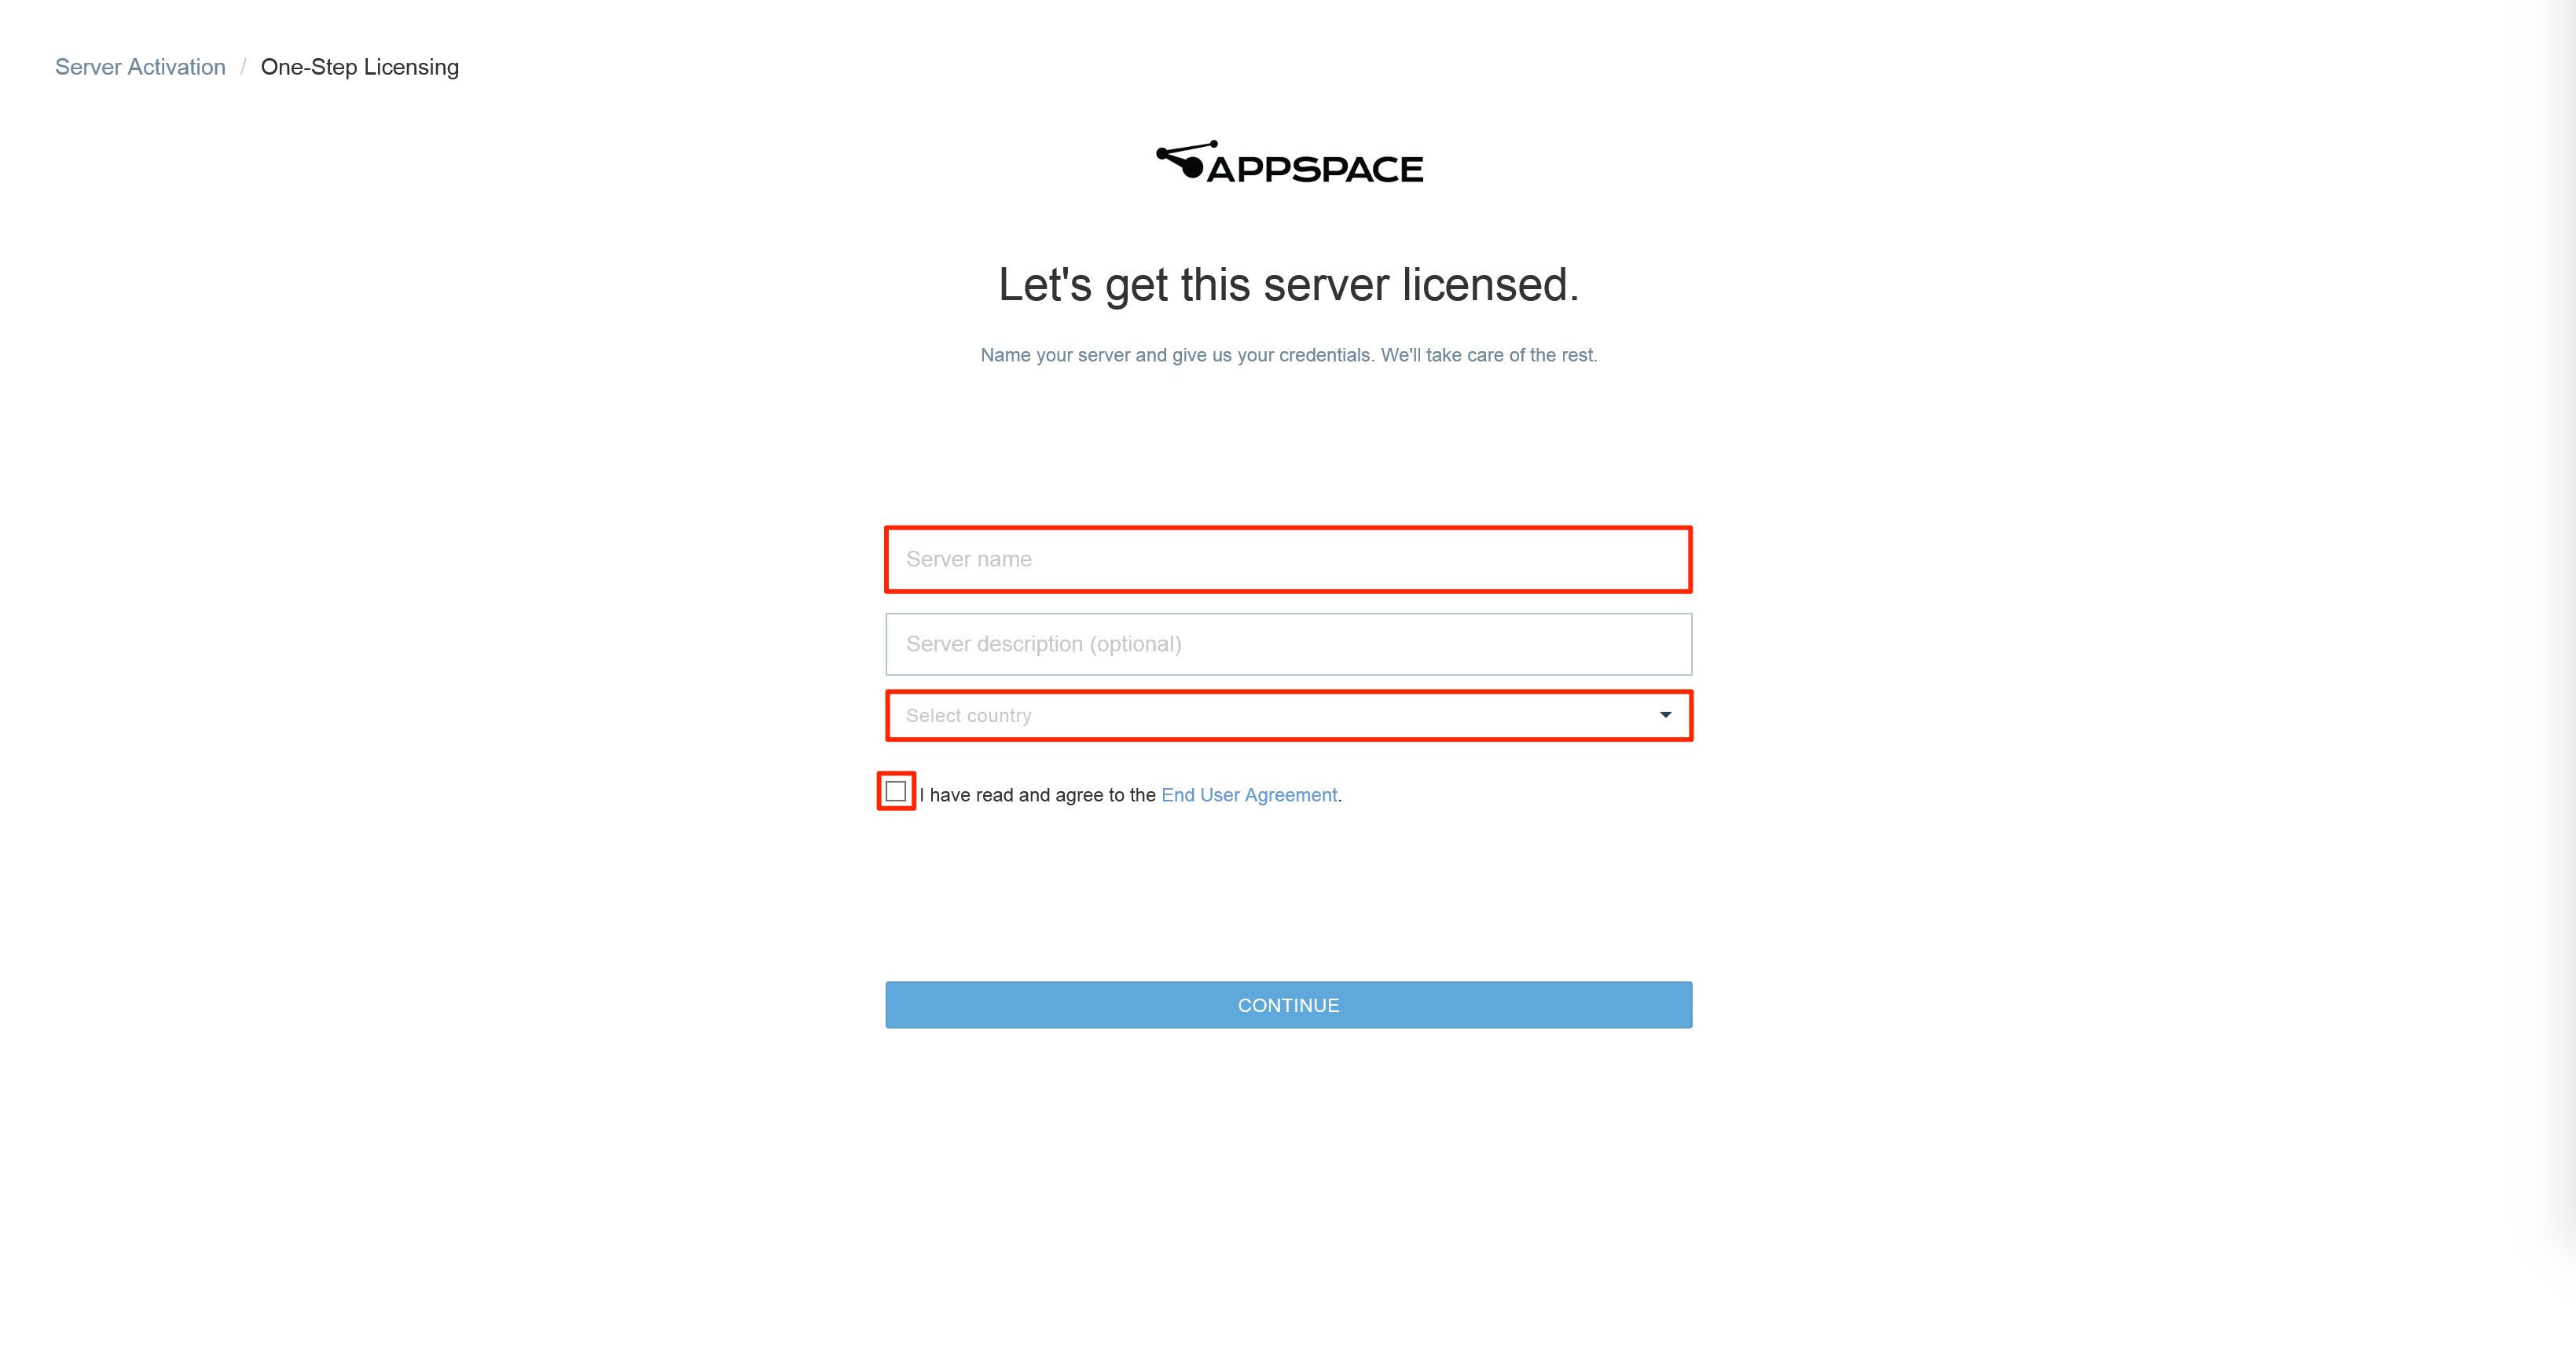
Check the End User Agreement checkbox, and click CONTINUE to be redirected to the Account Management Portal.
Log in to the Account Management Portal (https://account.appspace.com) with your Appspace credentials.
The Appspace on-prem server will begin to sync and apply the license from your cloud account.

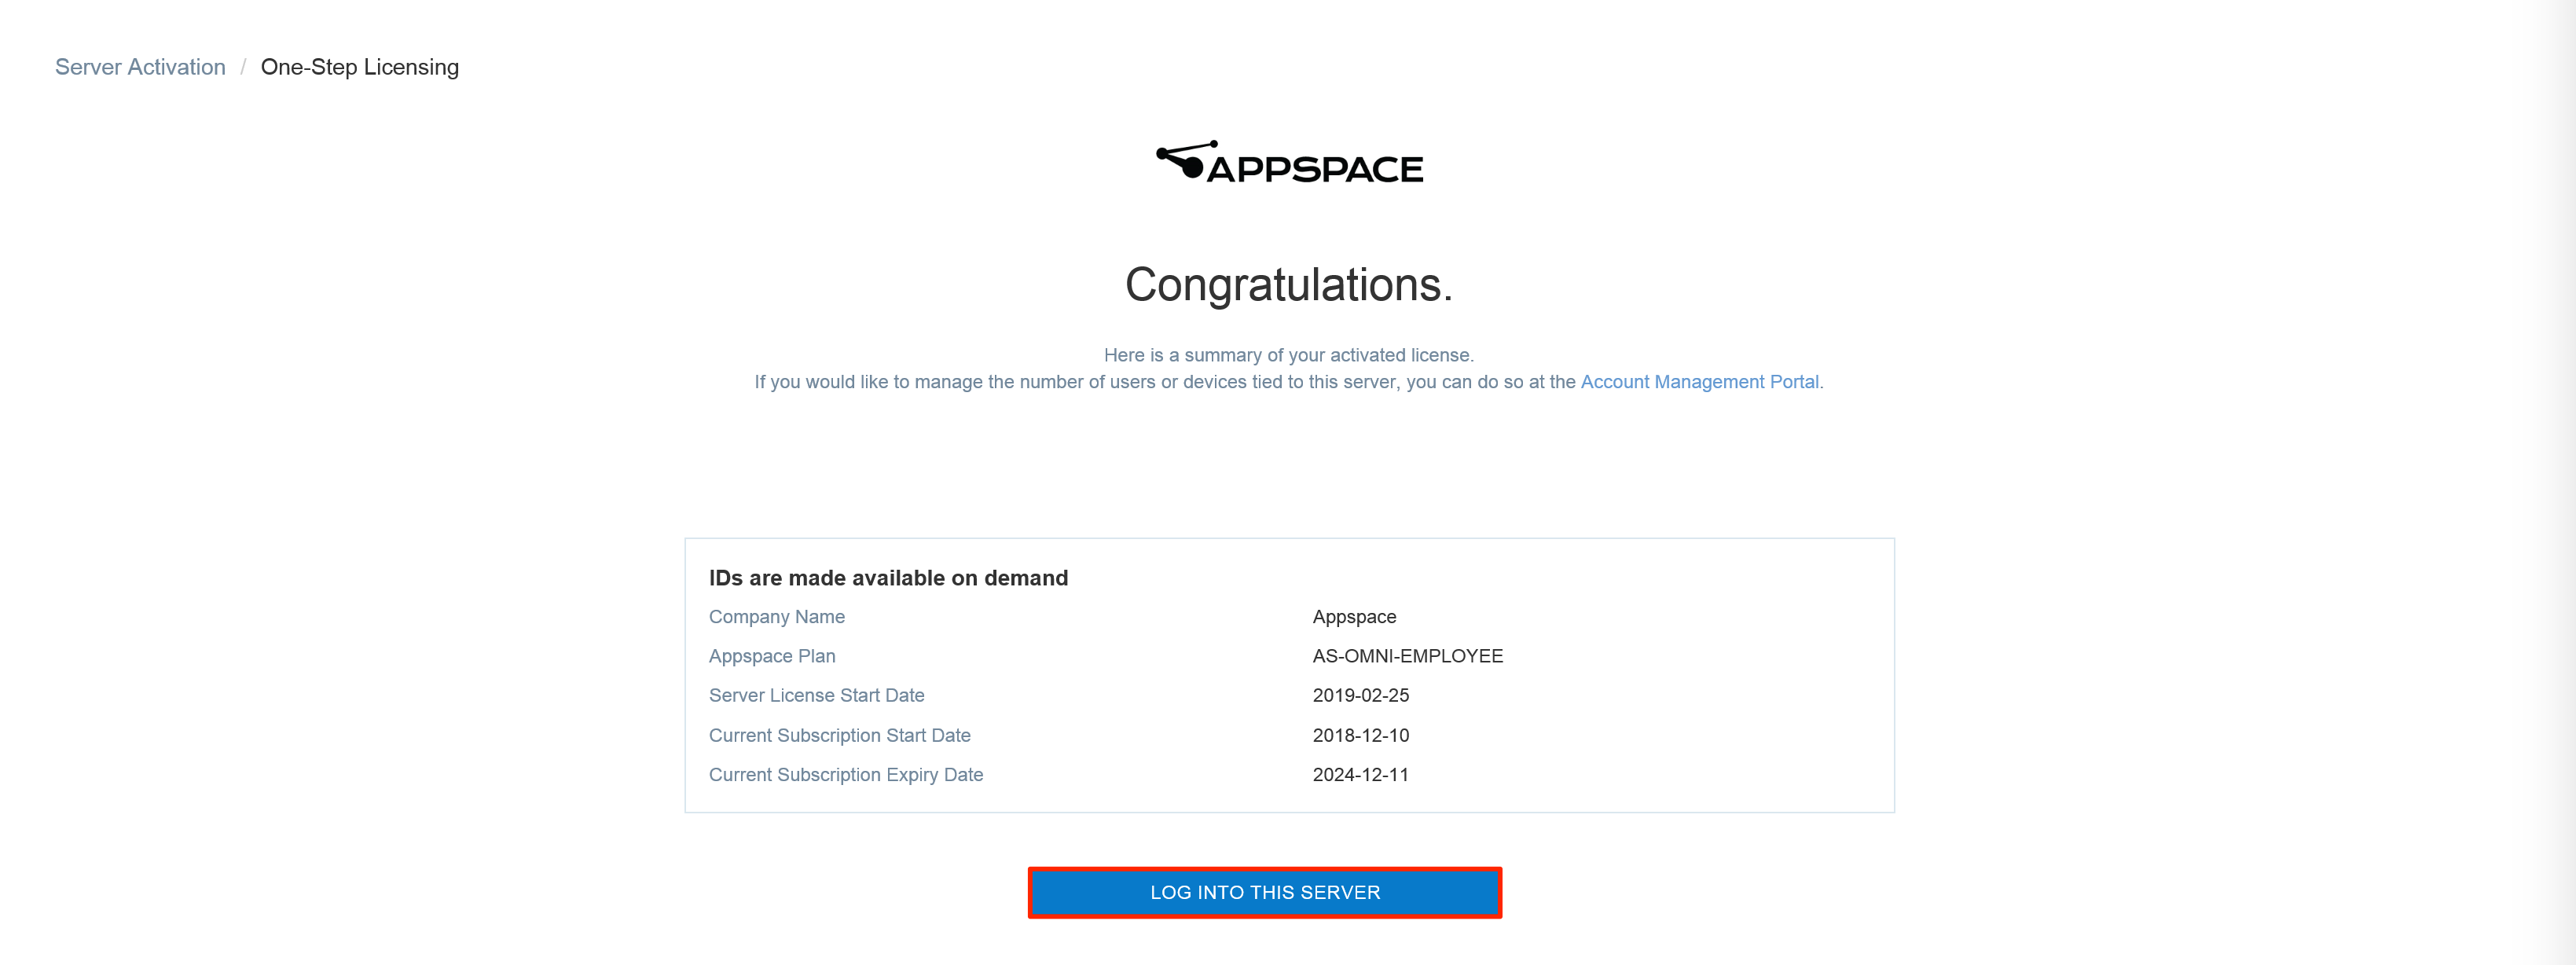
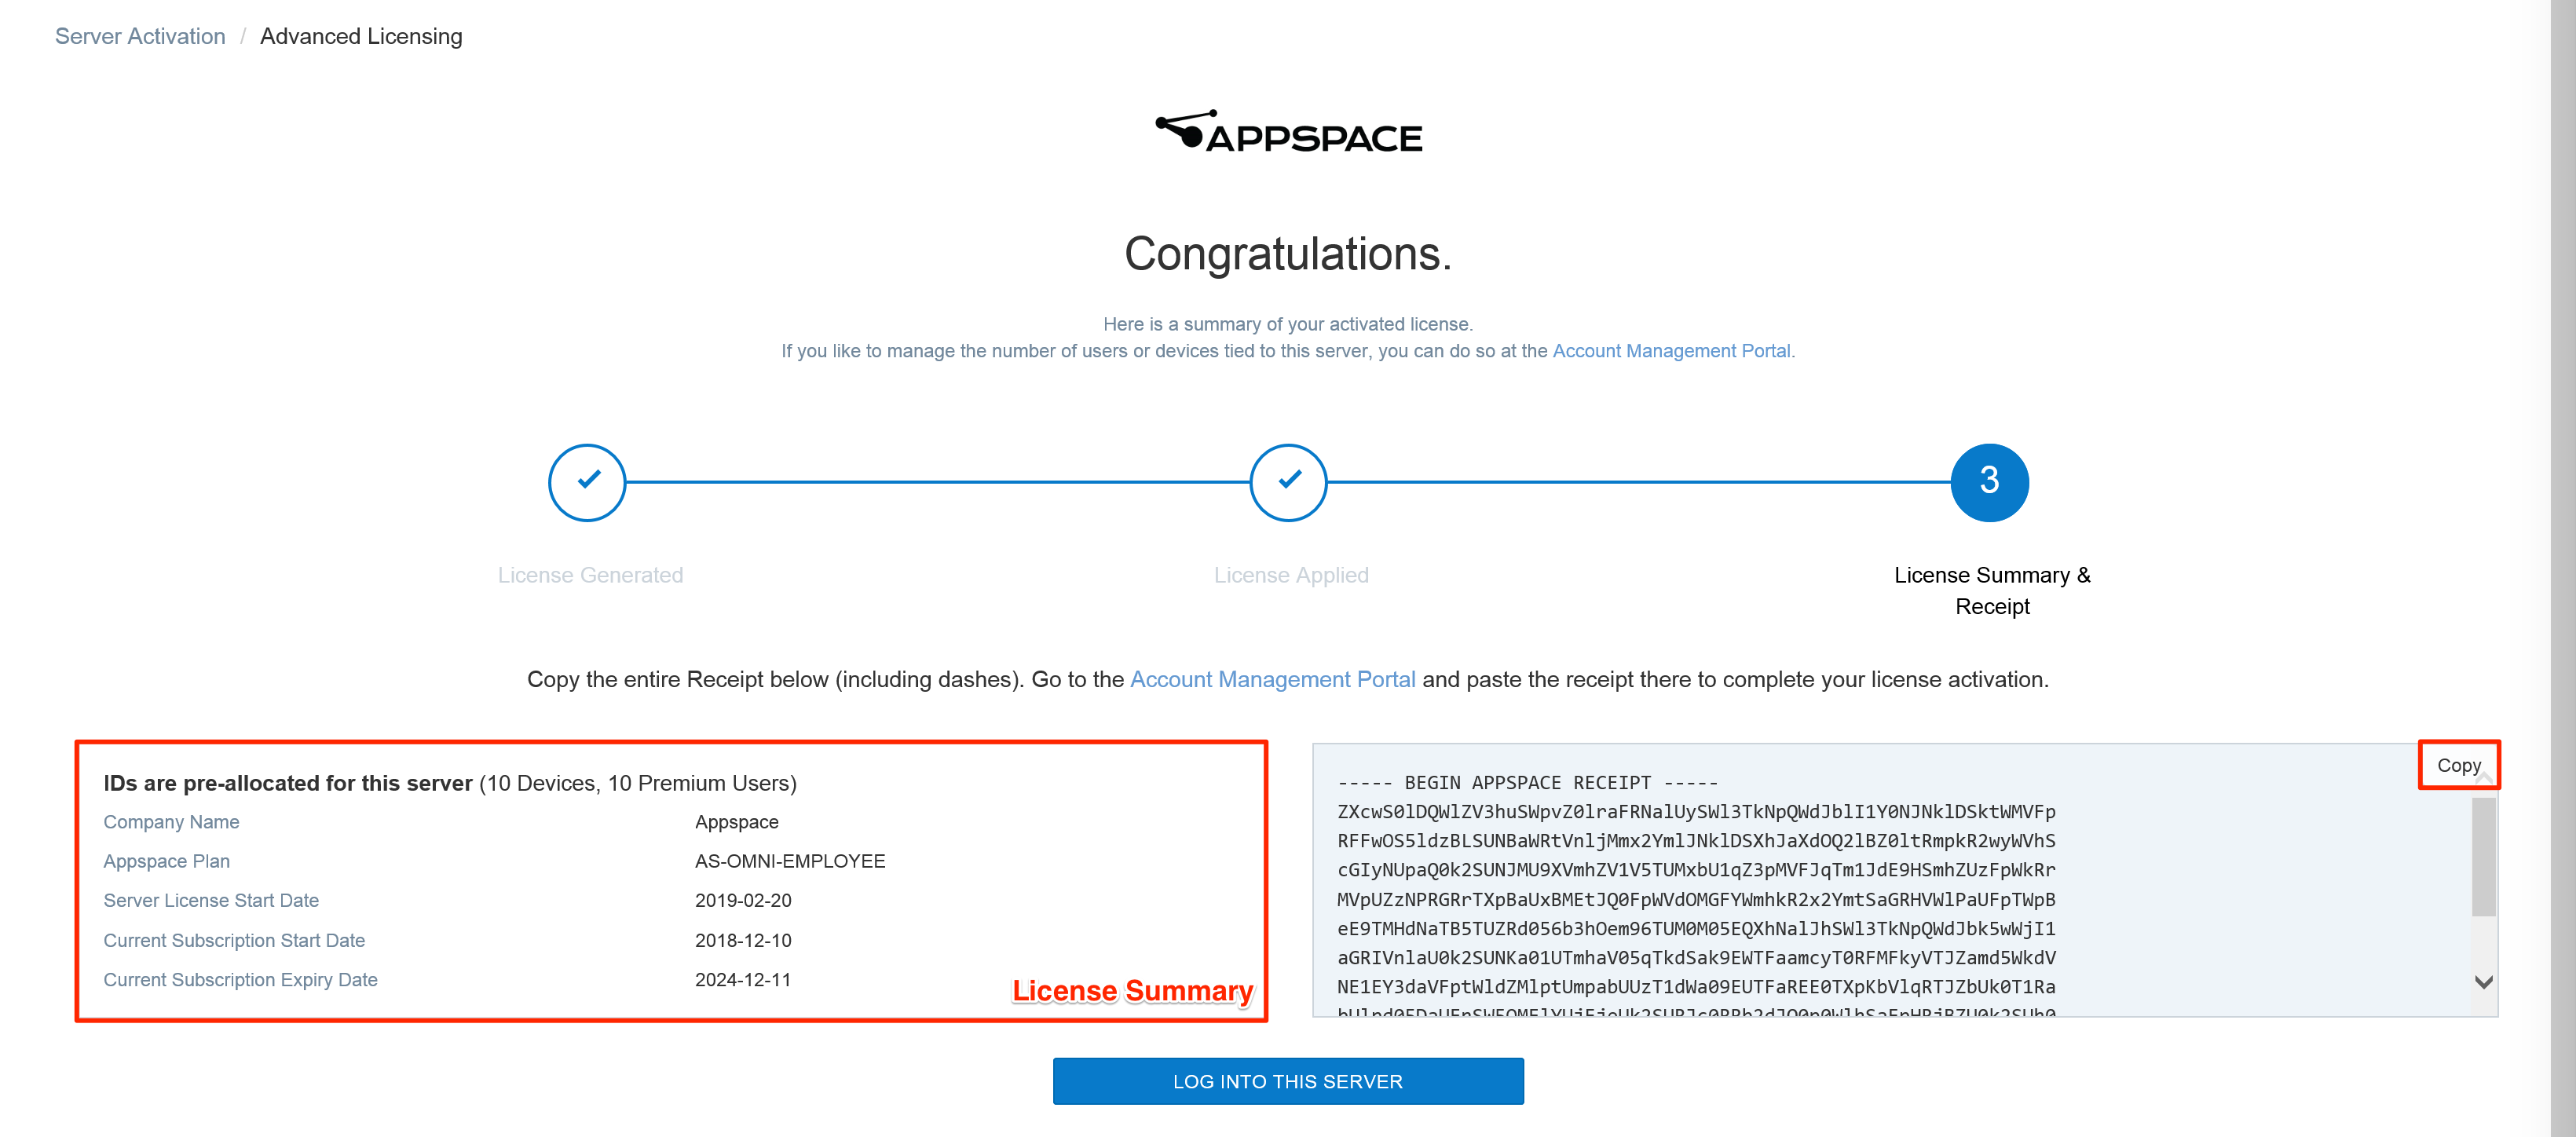
Once the Appspace on-prem server has been successfully licensed, the license summary is displayed.
Click LOG INTO THIS SERVER to login in to your Appspace on-prem server.
Advanced Licensing - Online Activation
Follow the instructions below to activate an Appspace on-prem server with an active Internet connection, where you will be able to input the Device and Premium User ID values for pre-allocation at the point of activation, without having to access the Account Management Portal, as licenses and receipts are automatically generated and synced to the cloud.
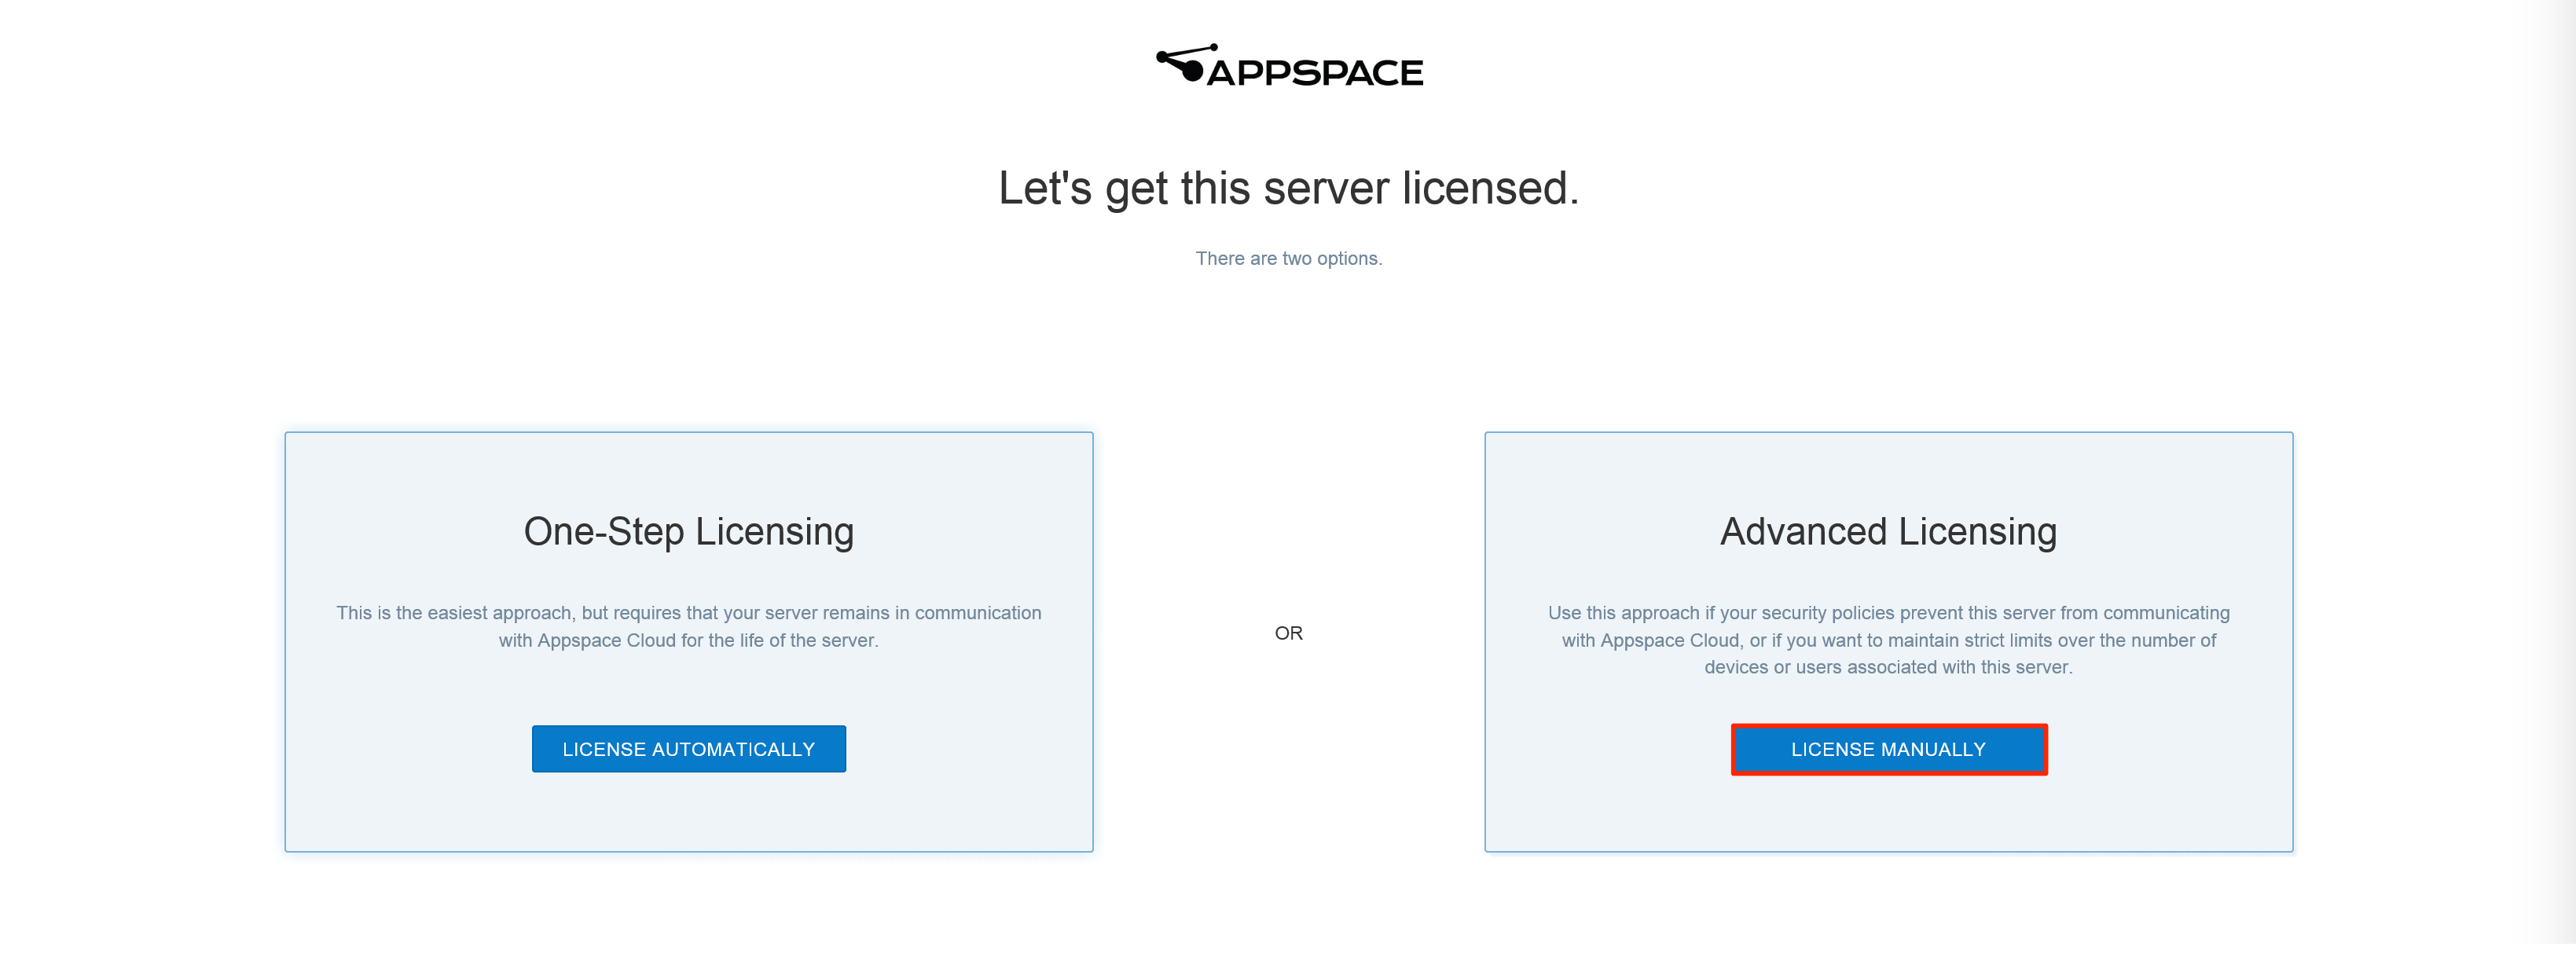
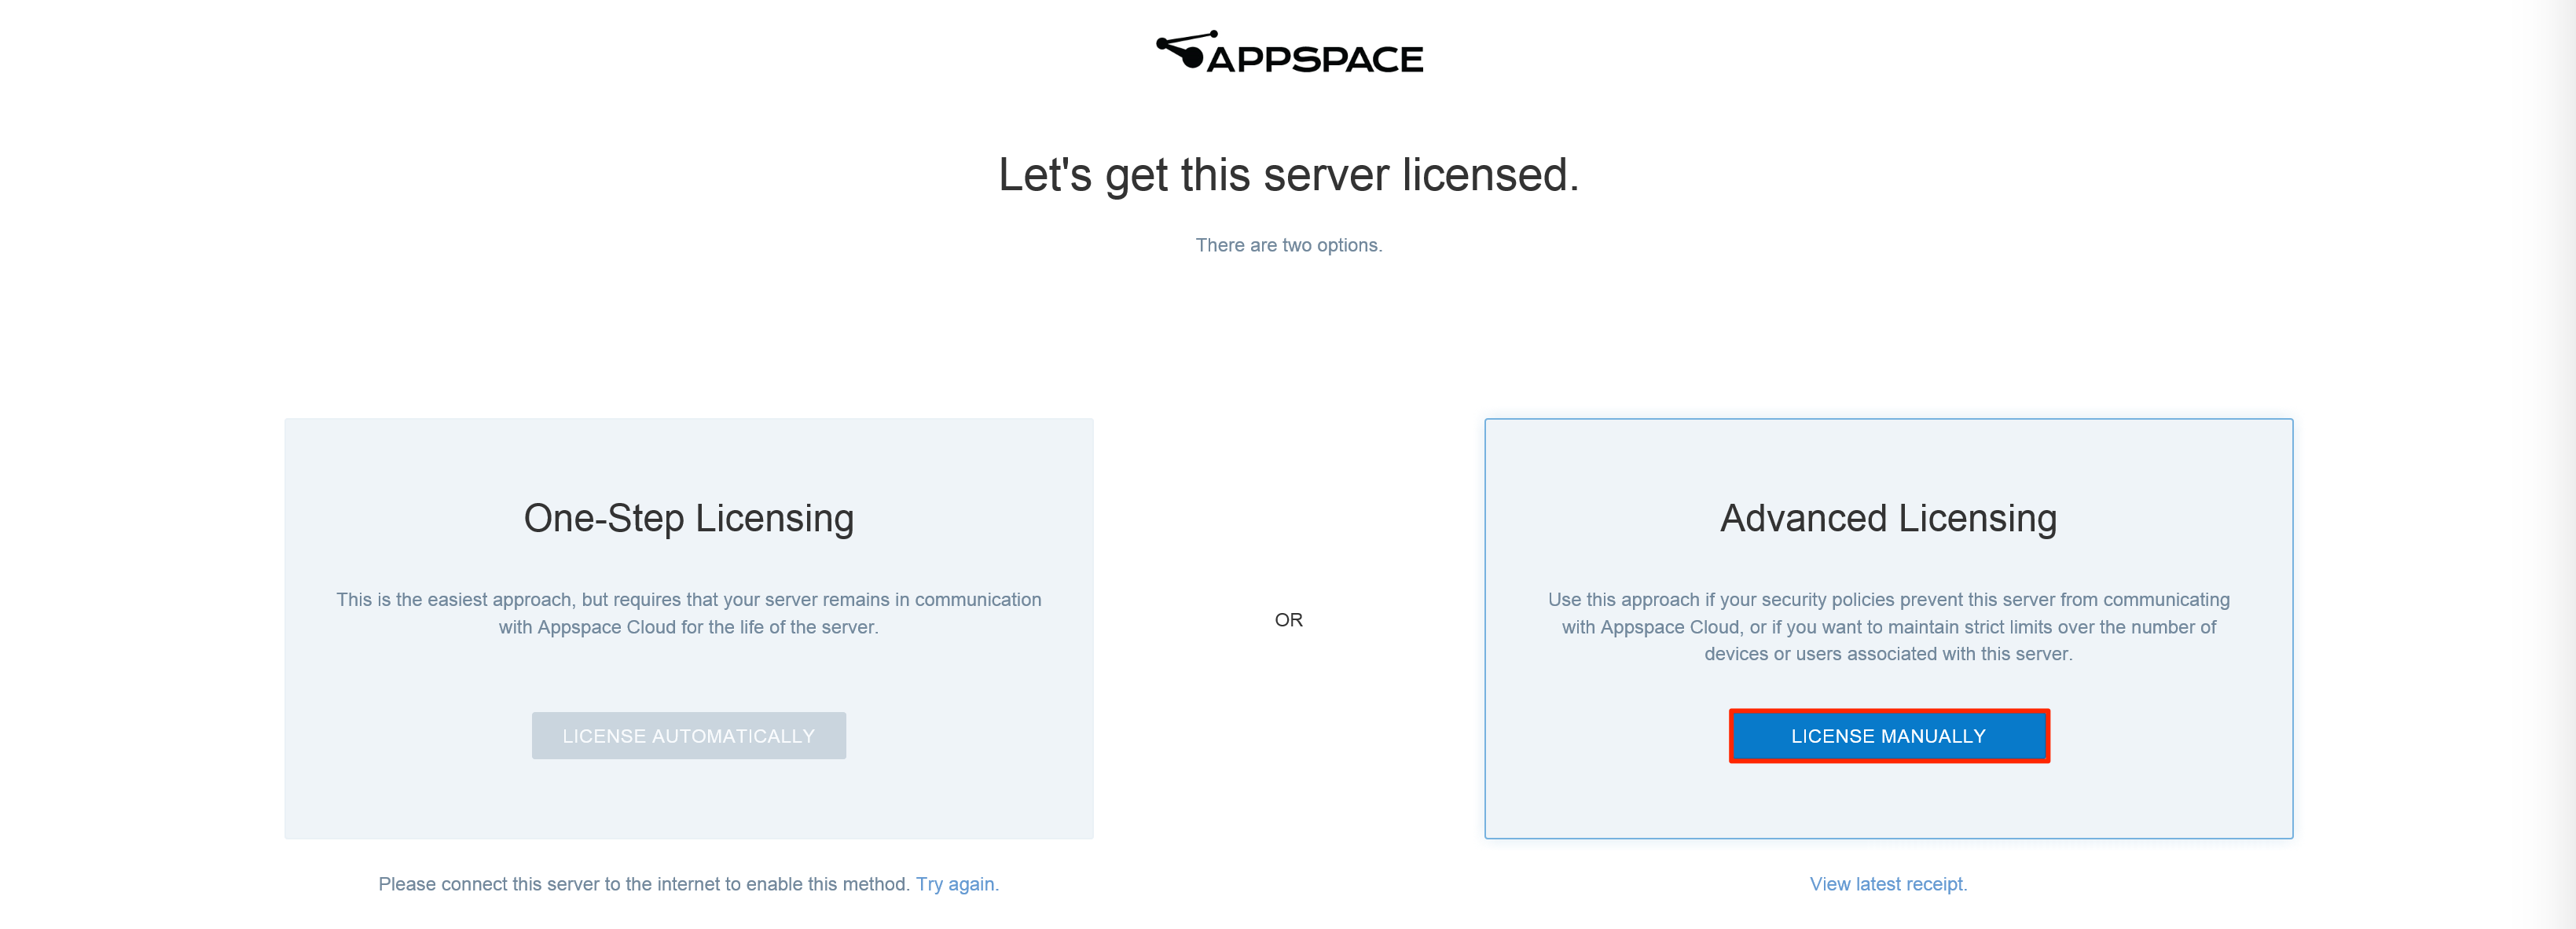
In the Appspace on-prem server license activation page, click LICENSE MANUALLY within the Advanced Licensing box.
Log in to the Account Management Portal (https://account.appspace.com) with your Appspace credentials.
Proceed to enter in the Server name, and select the Country the server is located in. Optionally, you may enter in the Server description.
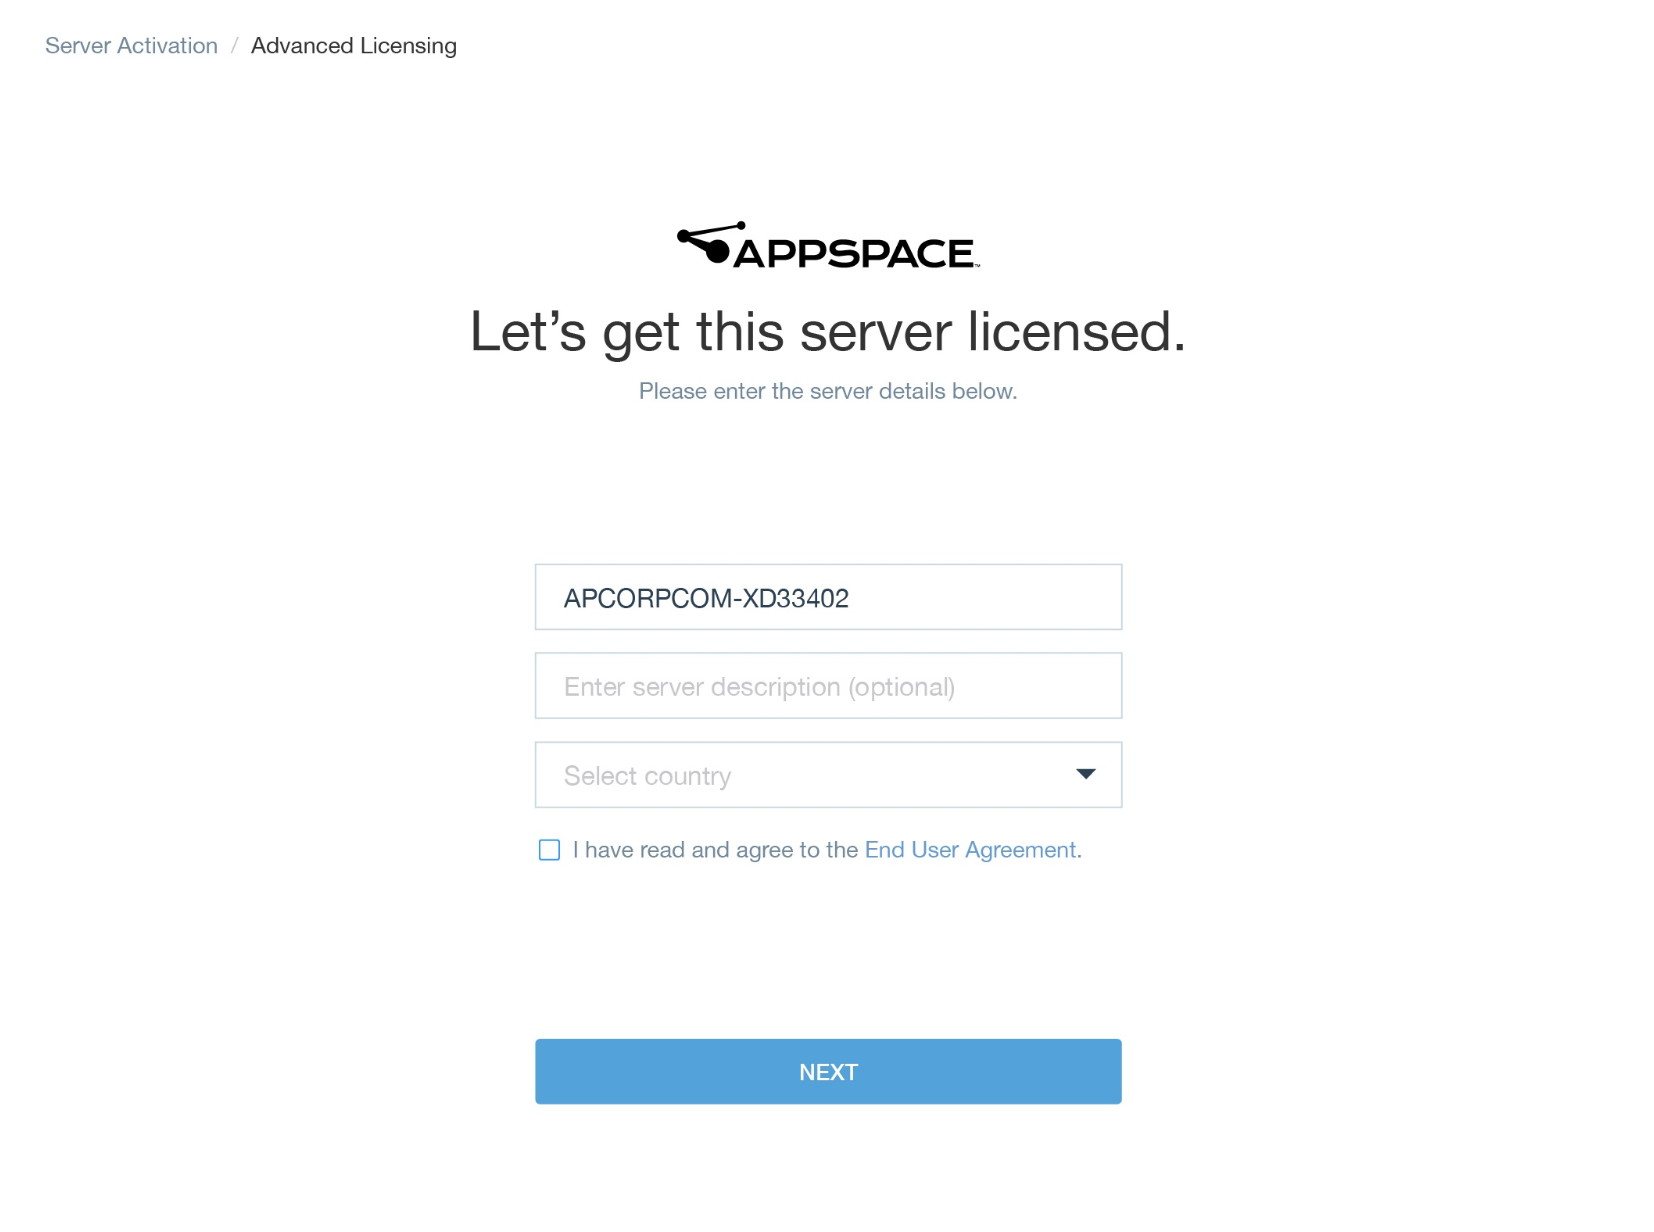
Check the End User Agreement checkbox, and click NEXT.
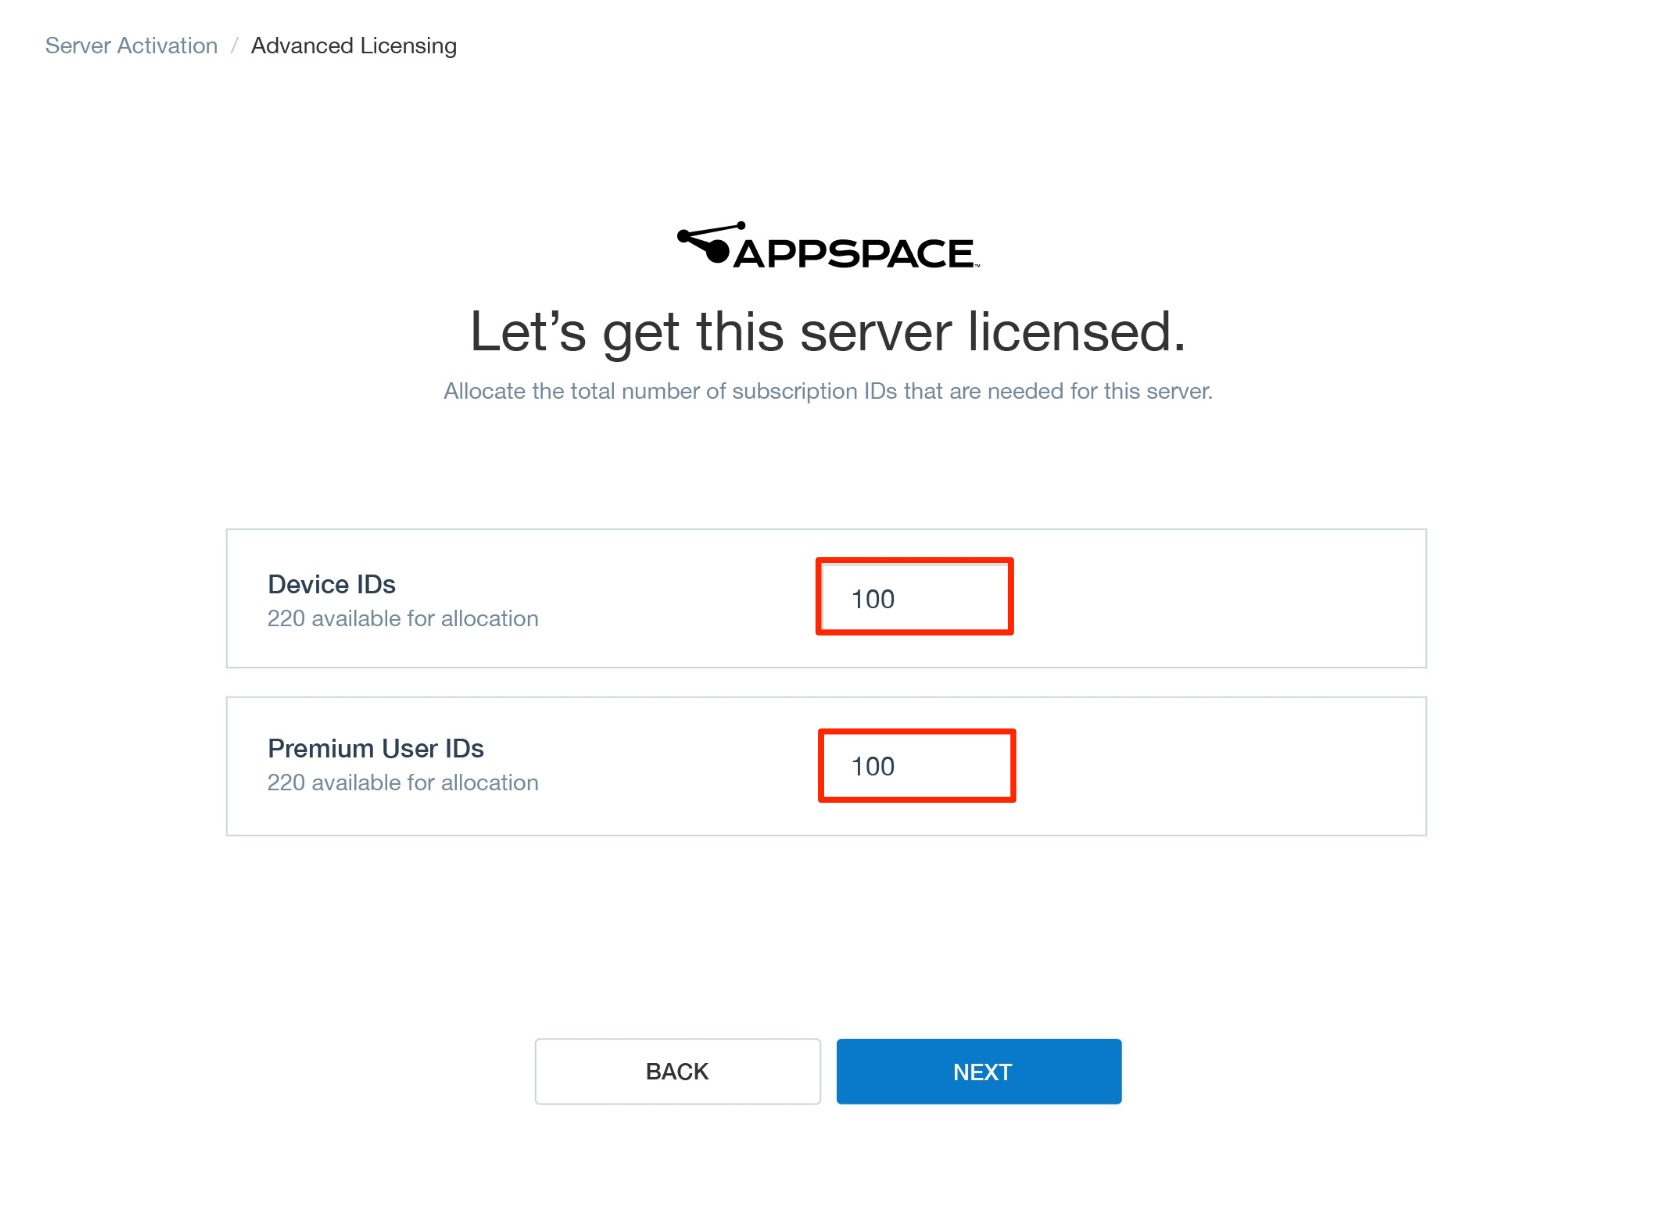
Enter in the number of Device IDs, and Premium User IDs you wish to allocate to the Appspace on-prem server. Click Next.
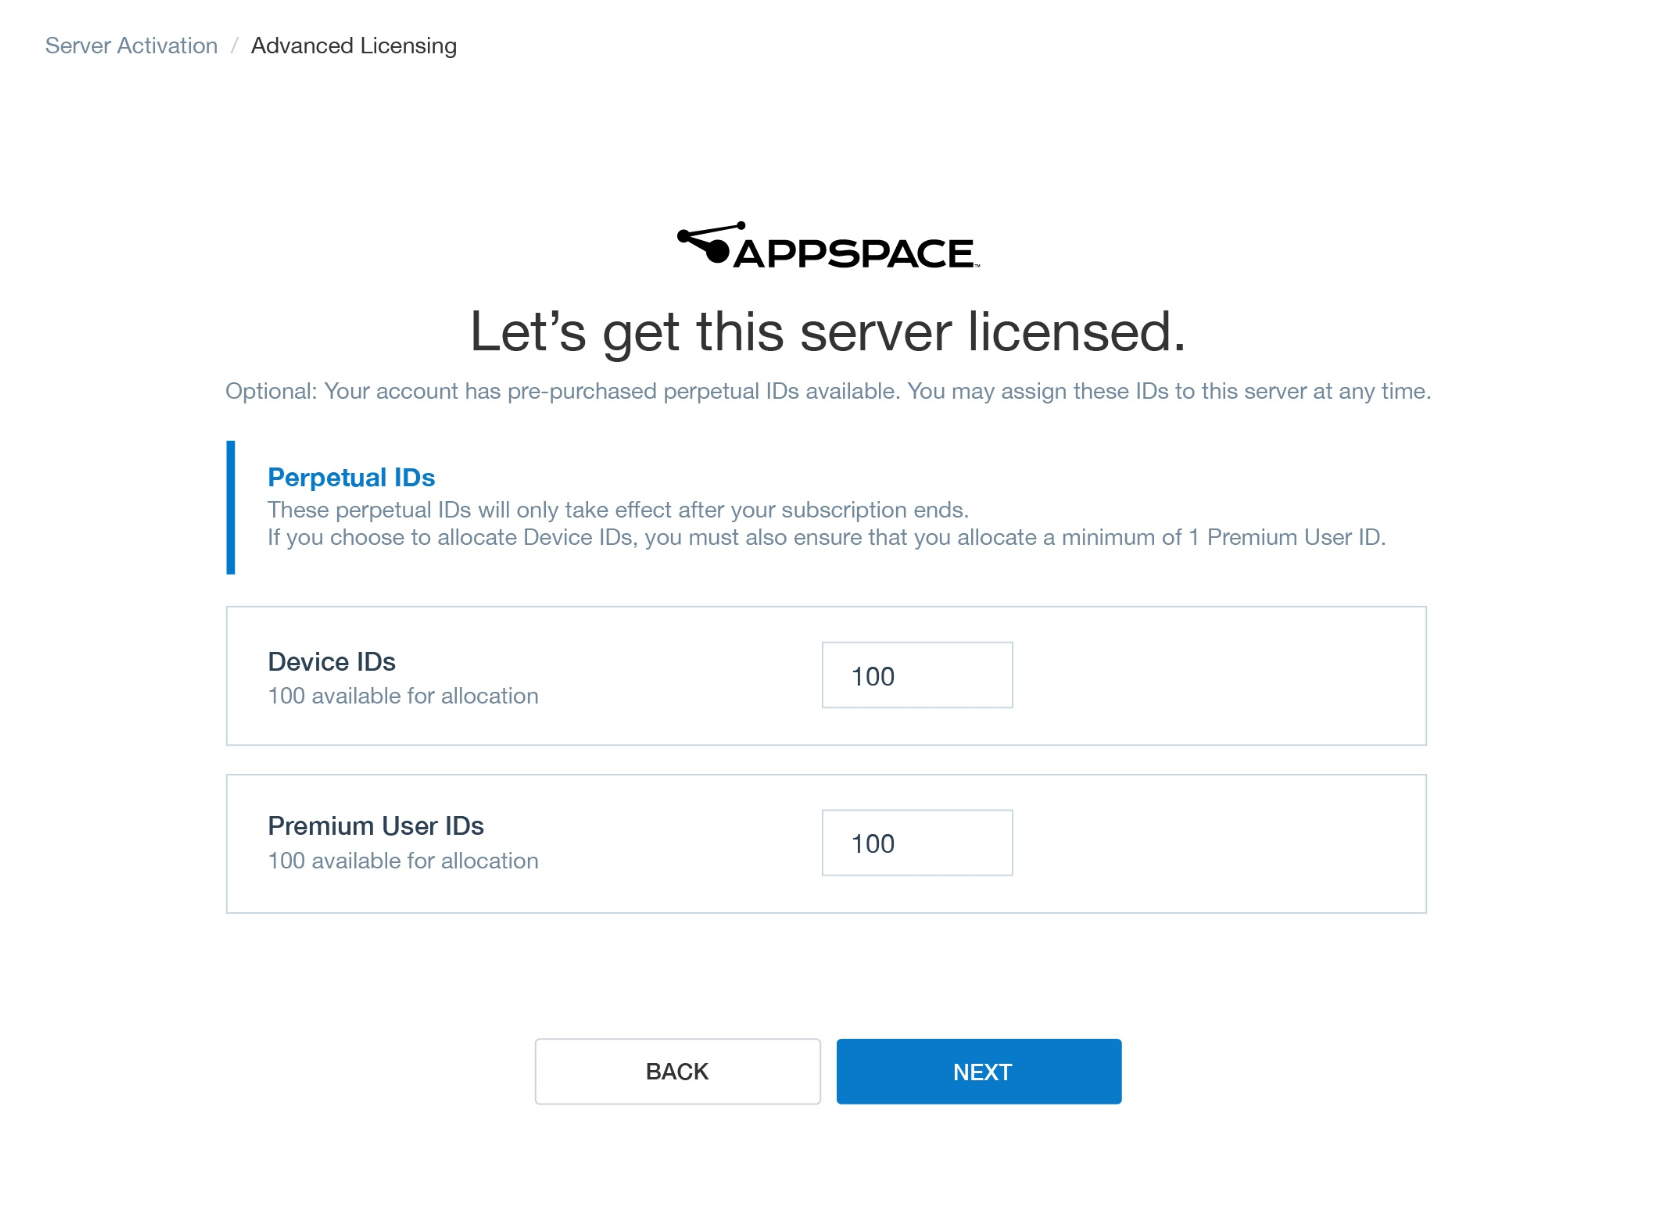
Optionally, if a Perpetual License has been purchased, enter in the number of Device IDs, and Premium User IDs you wish to allocate to the Appspace on-prem server. Click Next.
The Appspace on-prem server will begin to sync and apply the license from your cloud account.
Once the Appspace on-prem server has been successfully licensed, the license summary is displayed.
Click LOG INTO THIS SERVER to login in to your Appspace on-prem server.

Advanced Licensing - Offline Activation
Prerequisites
- Computer with internet access
- USB drive
Follow the instructions below to activate an Appspace on-prem server without an active Internet connection, or with security policies in place that limit internet access.
In the Appspace on-prem server license activation page, click LICENSE MANUALLY within the Advanced Licensing box.
Note
If the Appspace on-prem login screen is displayed, enter in the default credentials:
User: admin Password: password123
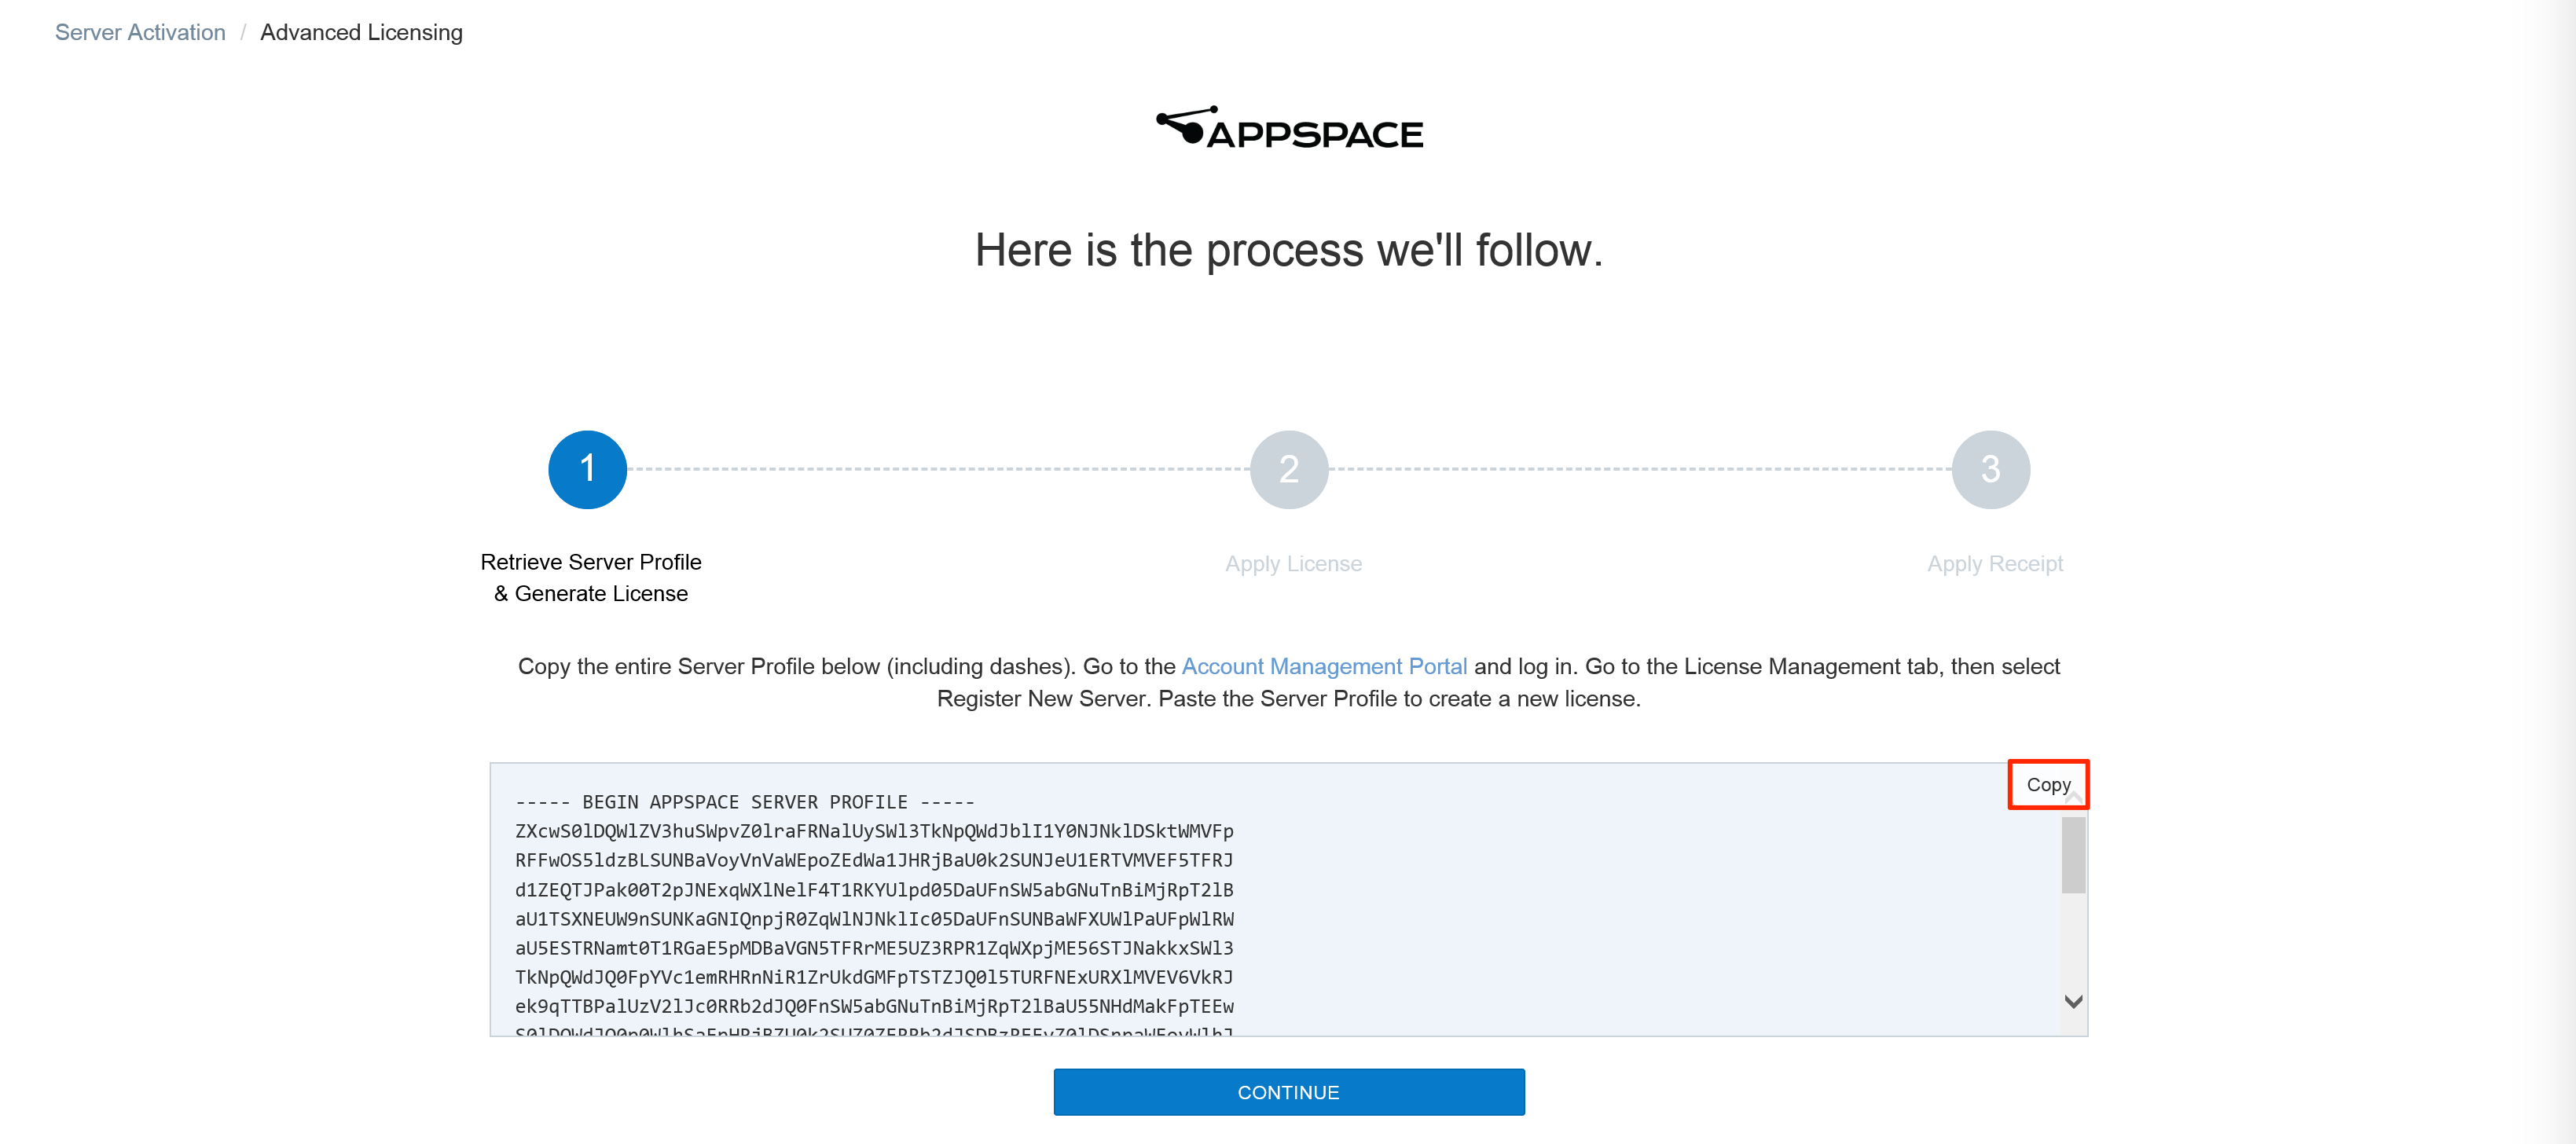
In the Retrieve Server Profile & Generate License section, click Copy and save the Appspace Server Profile text block into a USB drive.
Log in to the Account Management Portal (https://account.appspace.com) with your Appspace credentials from a computer with internet access.
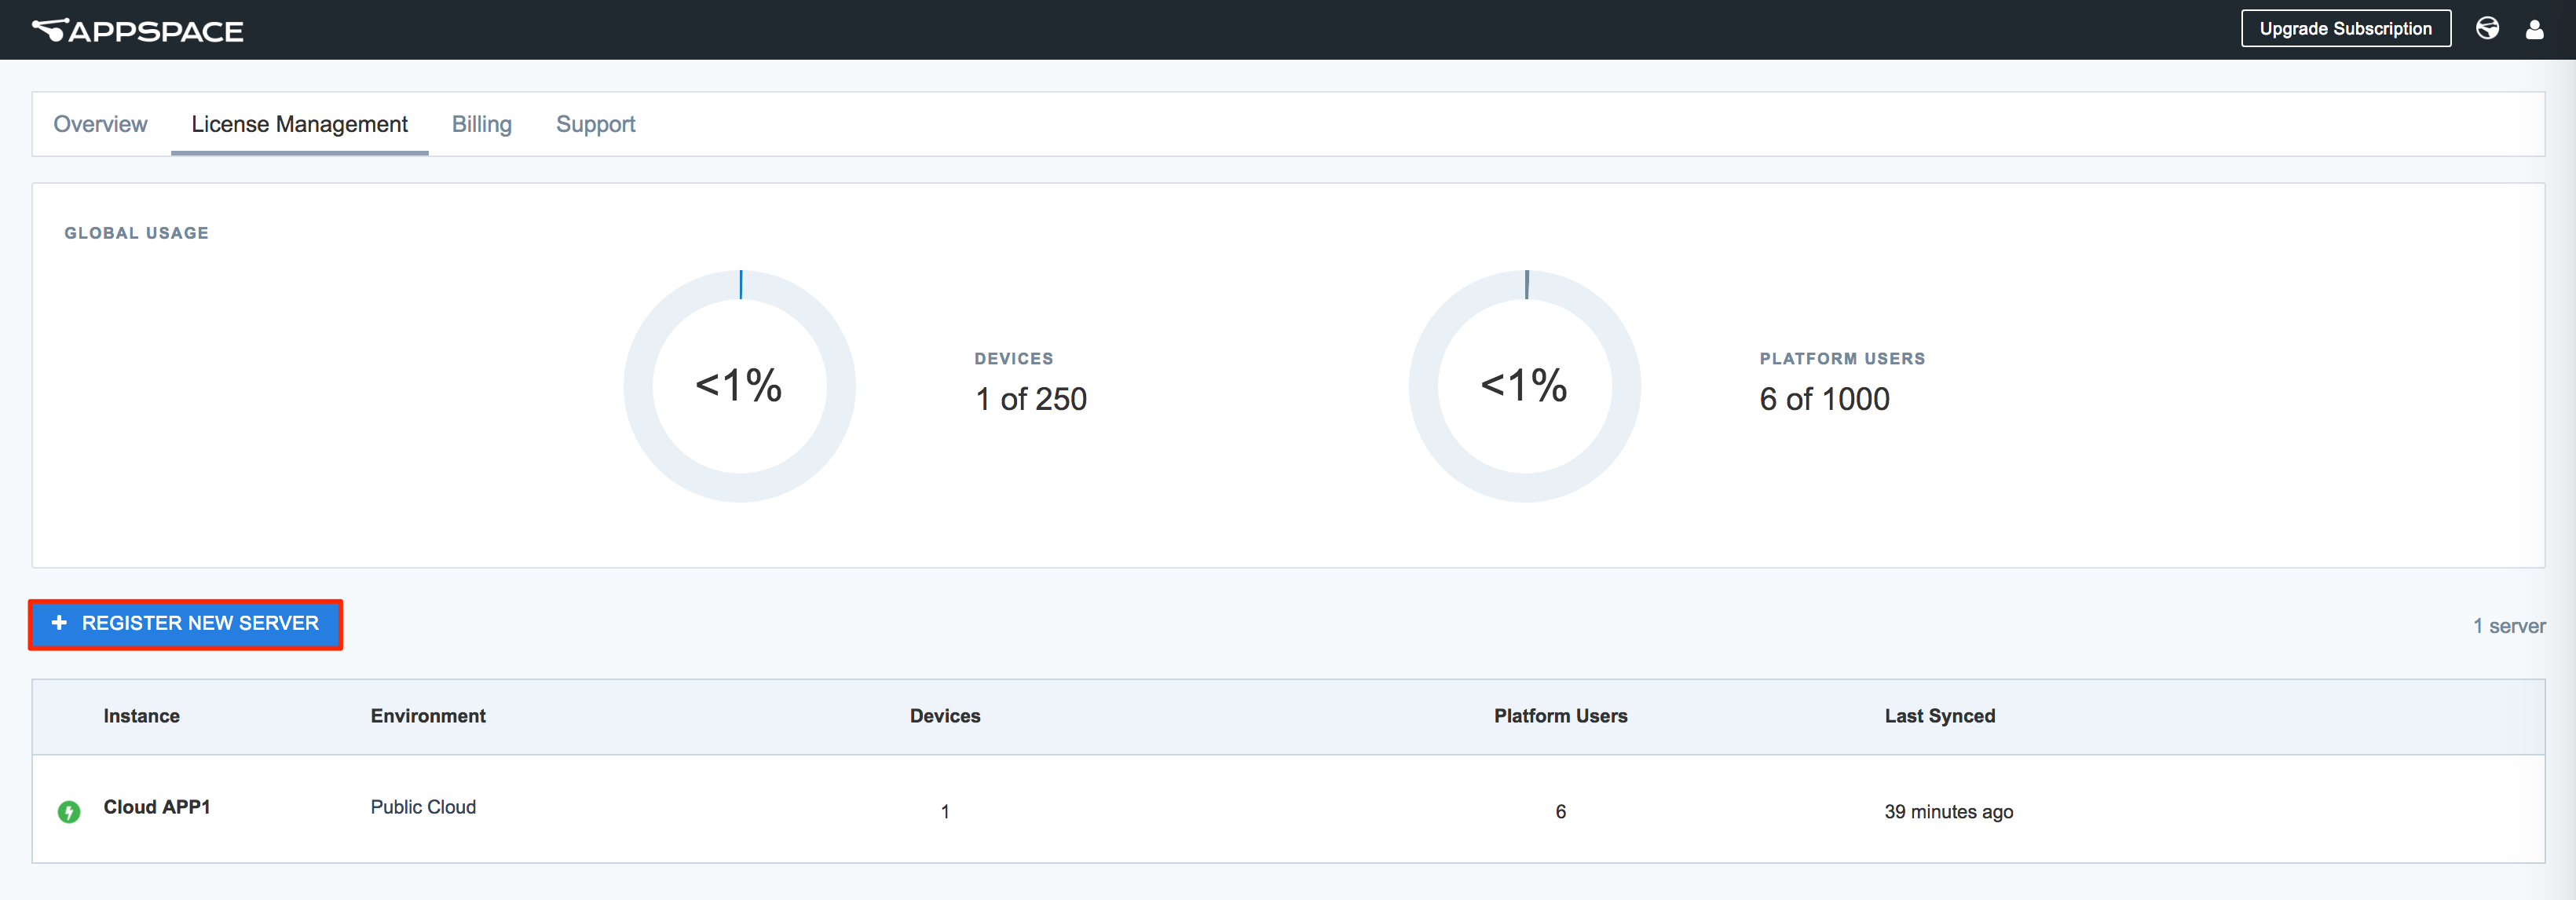
Click the License Management tab, and click REGISTER NEW SERVER.
Copy the Appspace Server Profile text block from the USB drive, and paste it into the Appspace Server Profile text box.
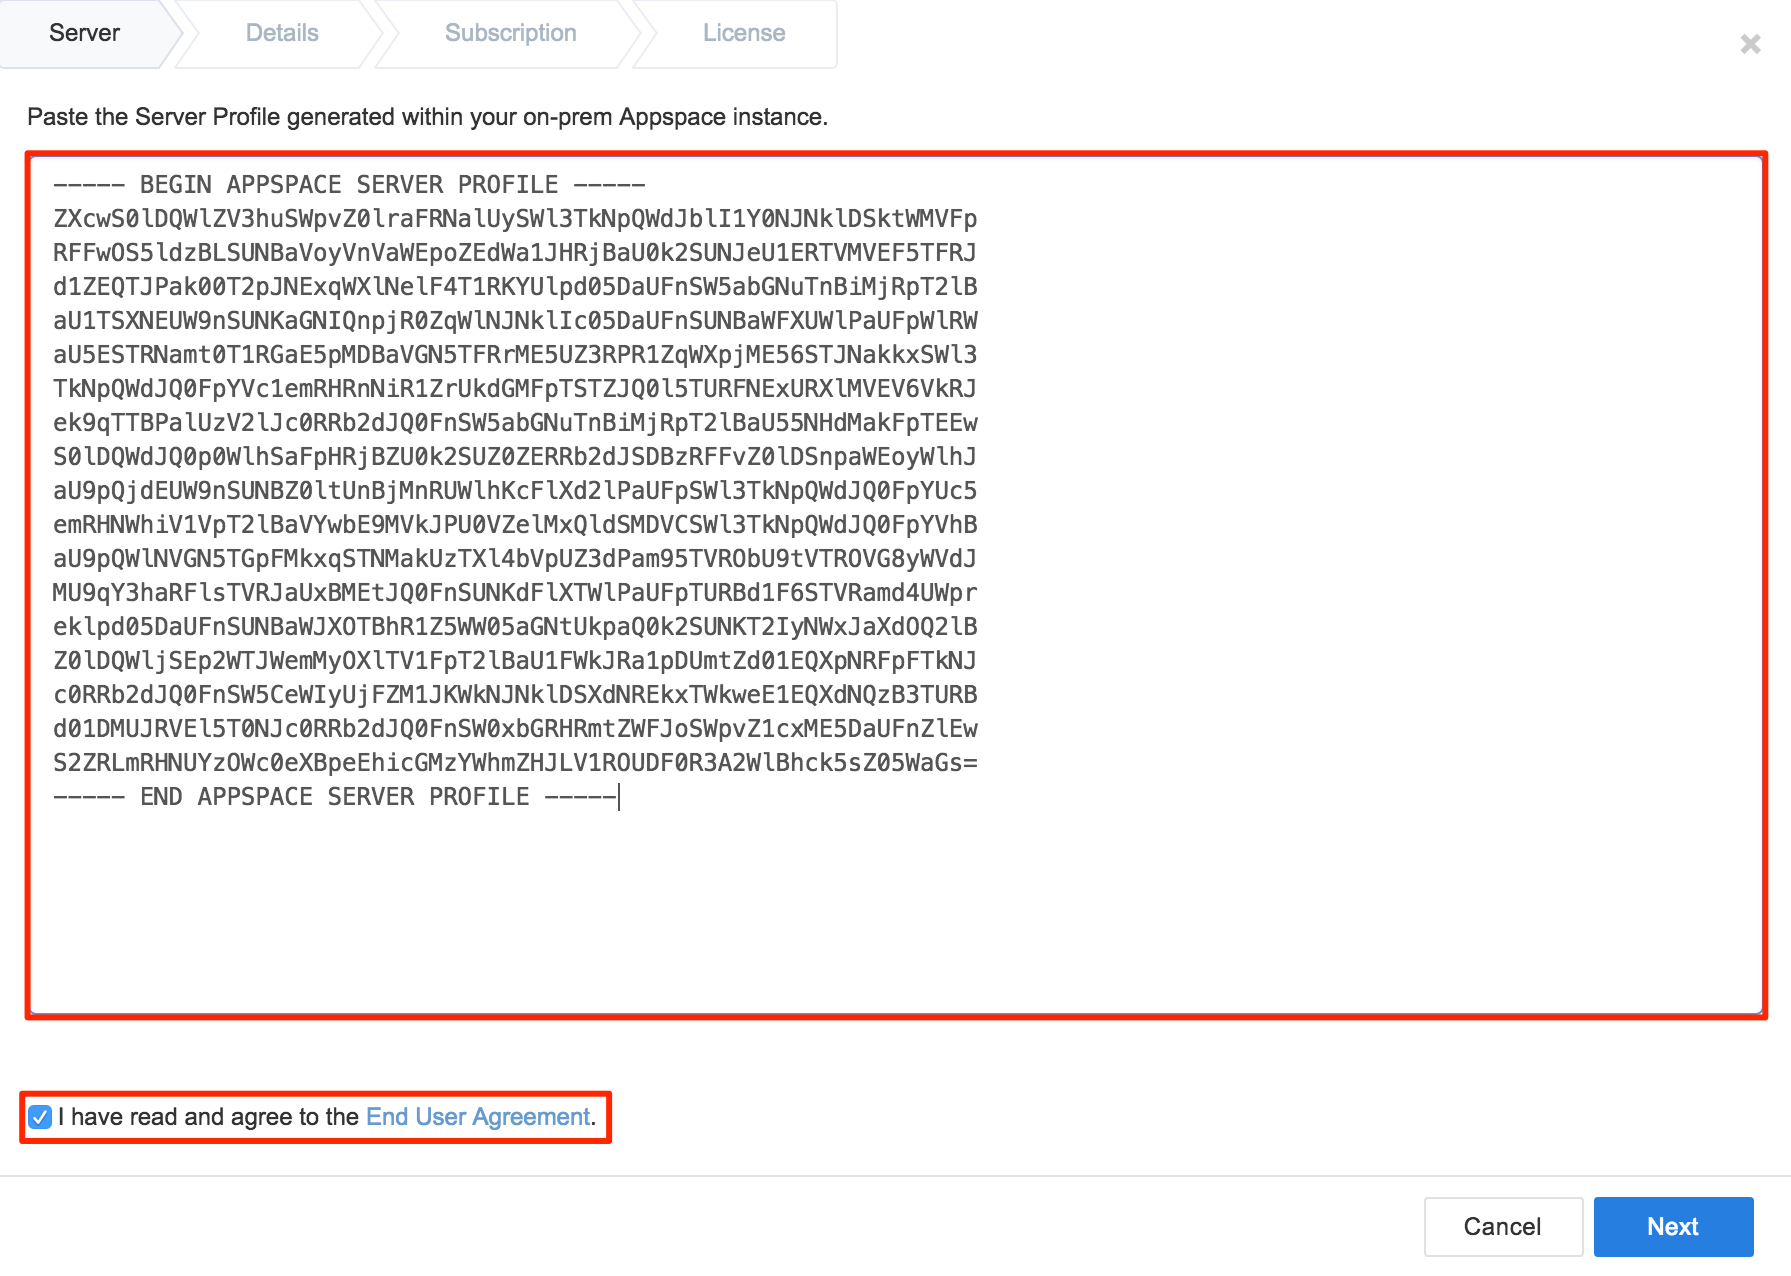
Check the End User Agreement checkbox, and click NEXT.
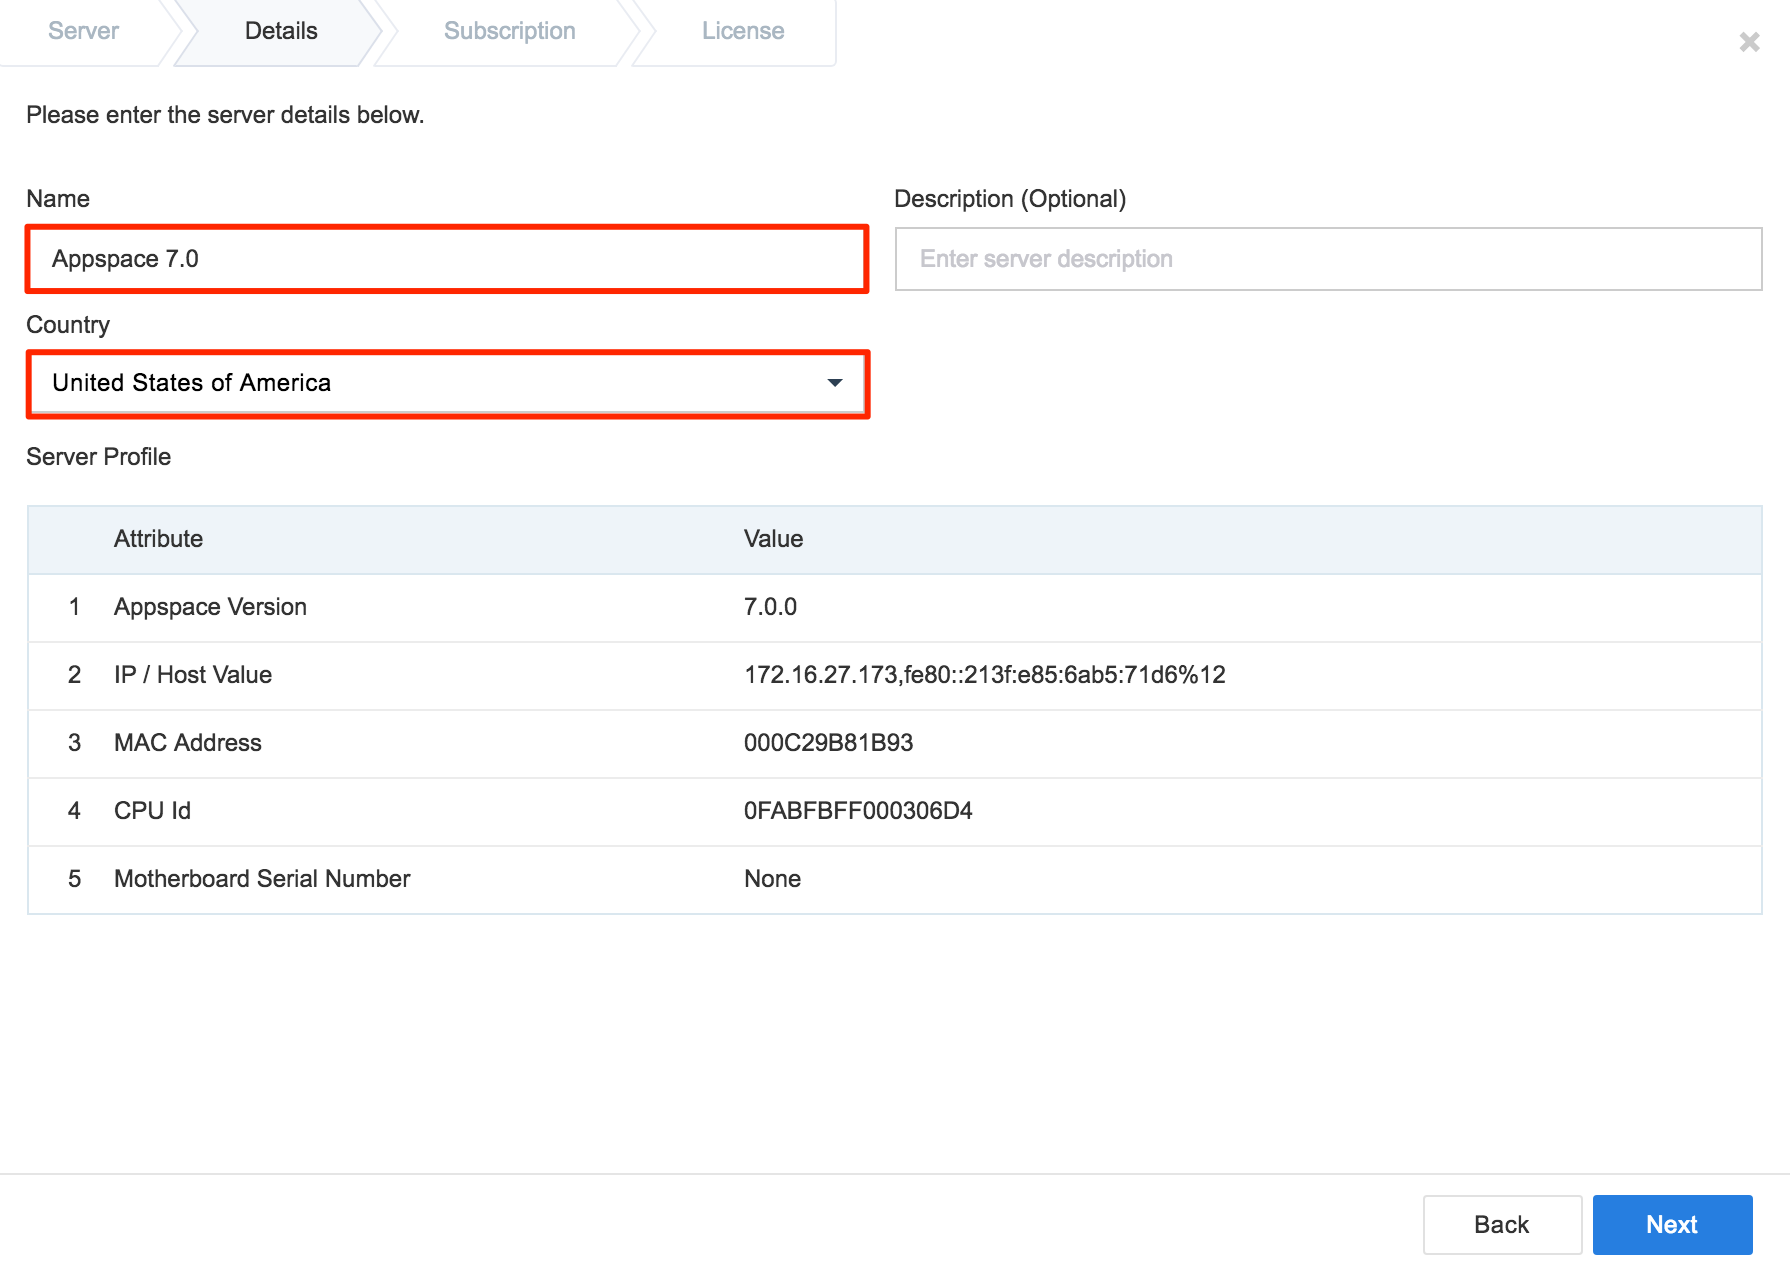
Proceed to enter in the Server name, and select the Country the server is located in. Optionally, you may enter in the Server description. Click **Next.
Enter in the number of Device IDs, and Premium User IDs you wish to allocate to the Appspace on-prem server. Click Next.

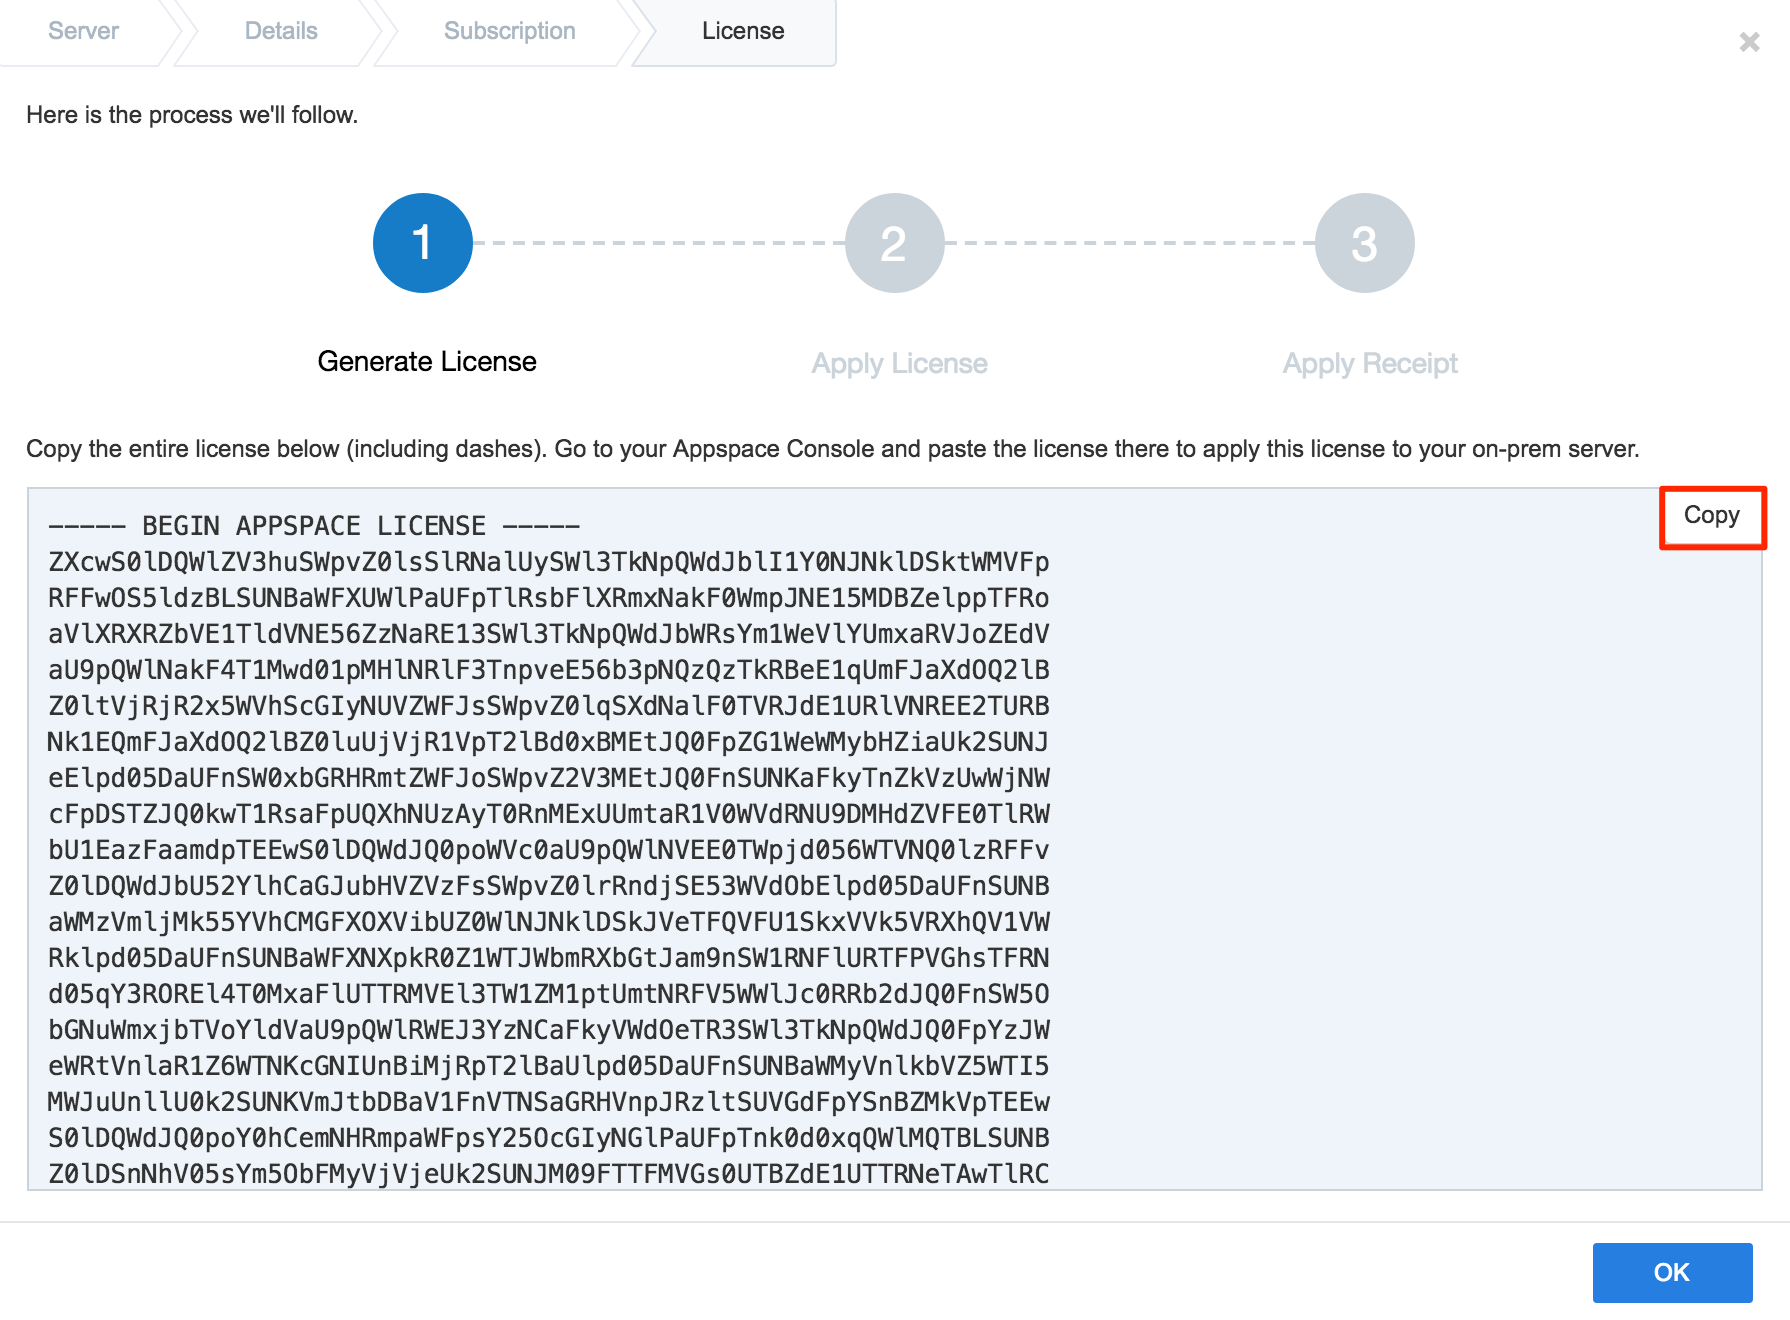
Once done, click Copy and save the generated license text block onto the USB drive. Click OK
Back on the Appspace on-prem server, paste the generated license text block from the USB drive, into the Apply License text box, and click APPLY.

Once the Appspace on-prem server has been successfully licensed, the license summary and receipt is displayed. Click Copy and save the license receipt text block into the USB drive.
Note
If the license fails to activate, copy the license cancellation receipt that is generated and proceed with the step below.
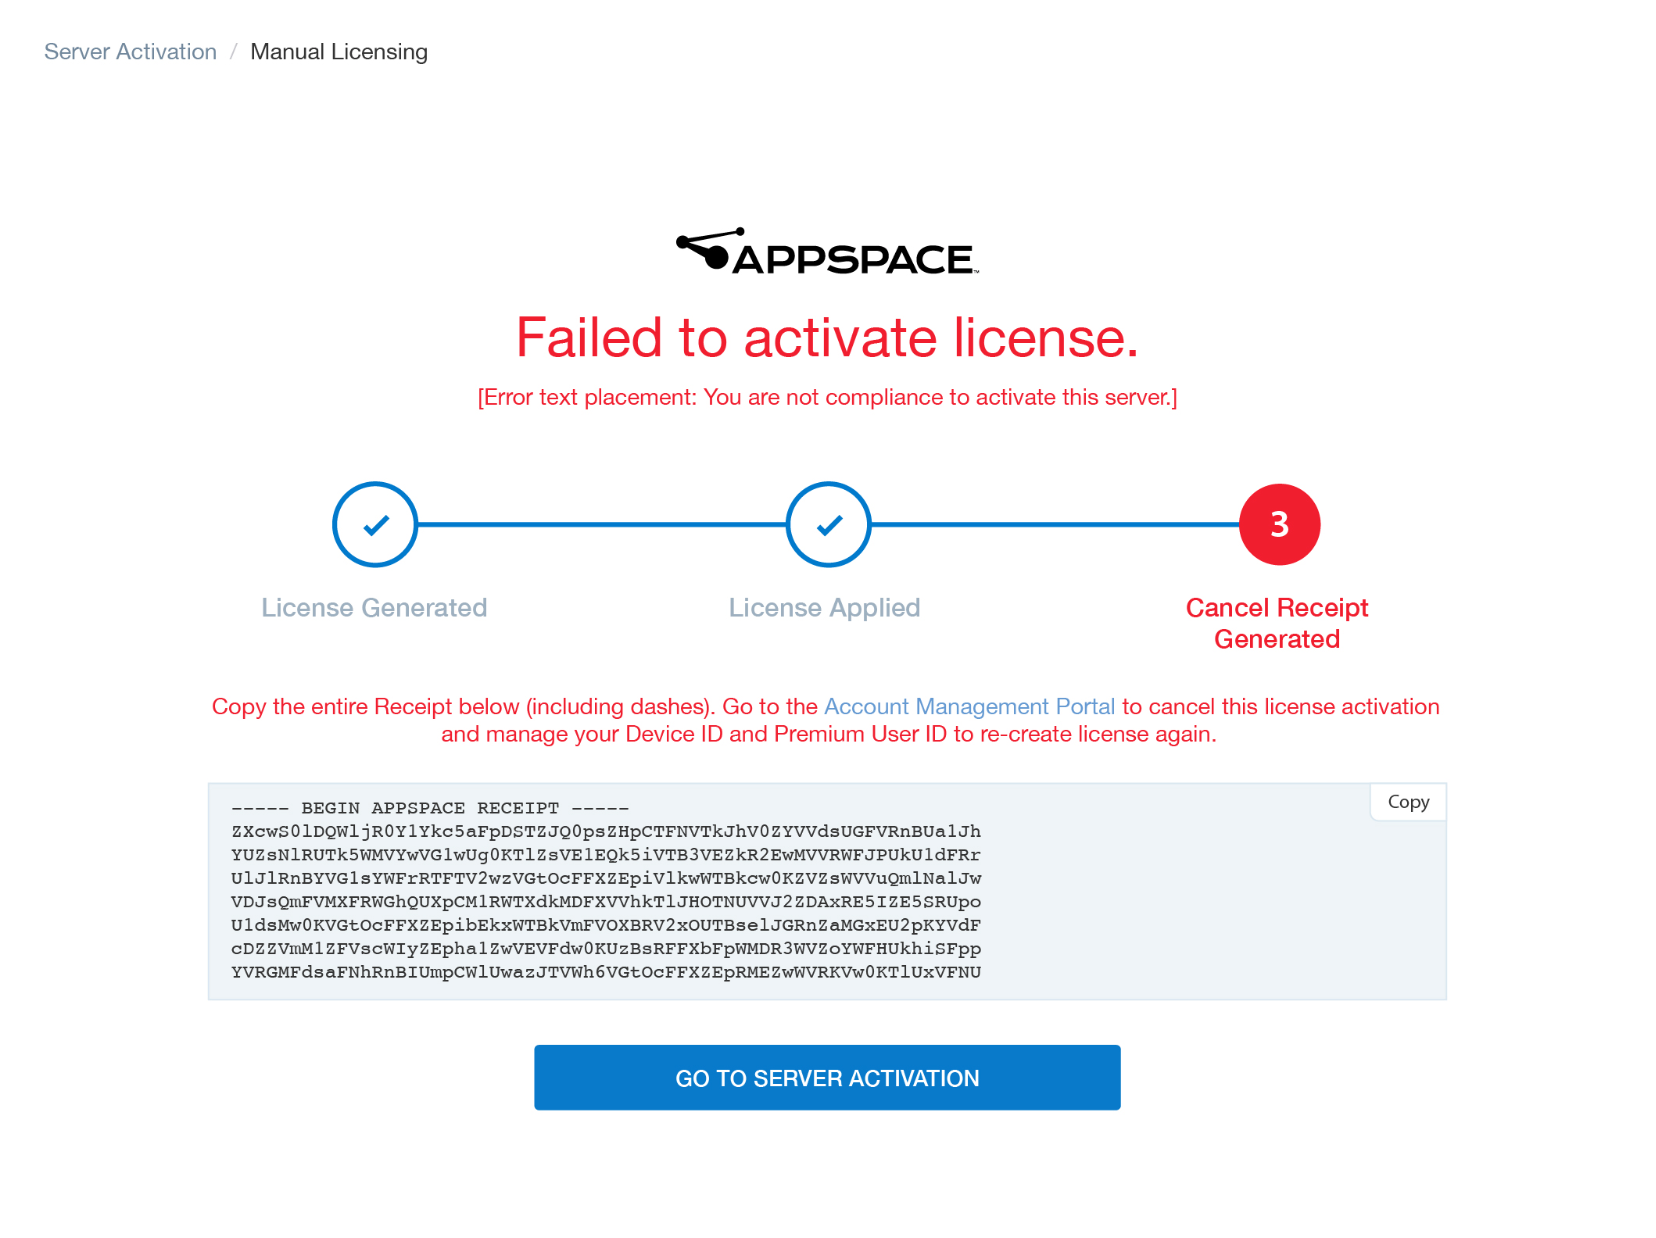
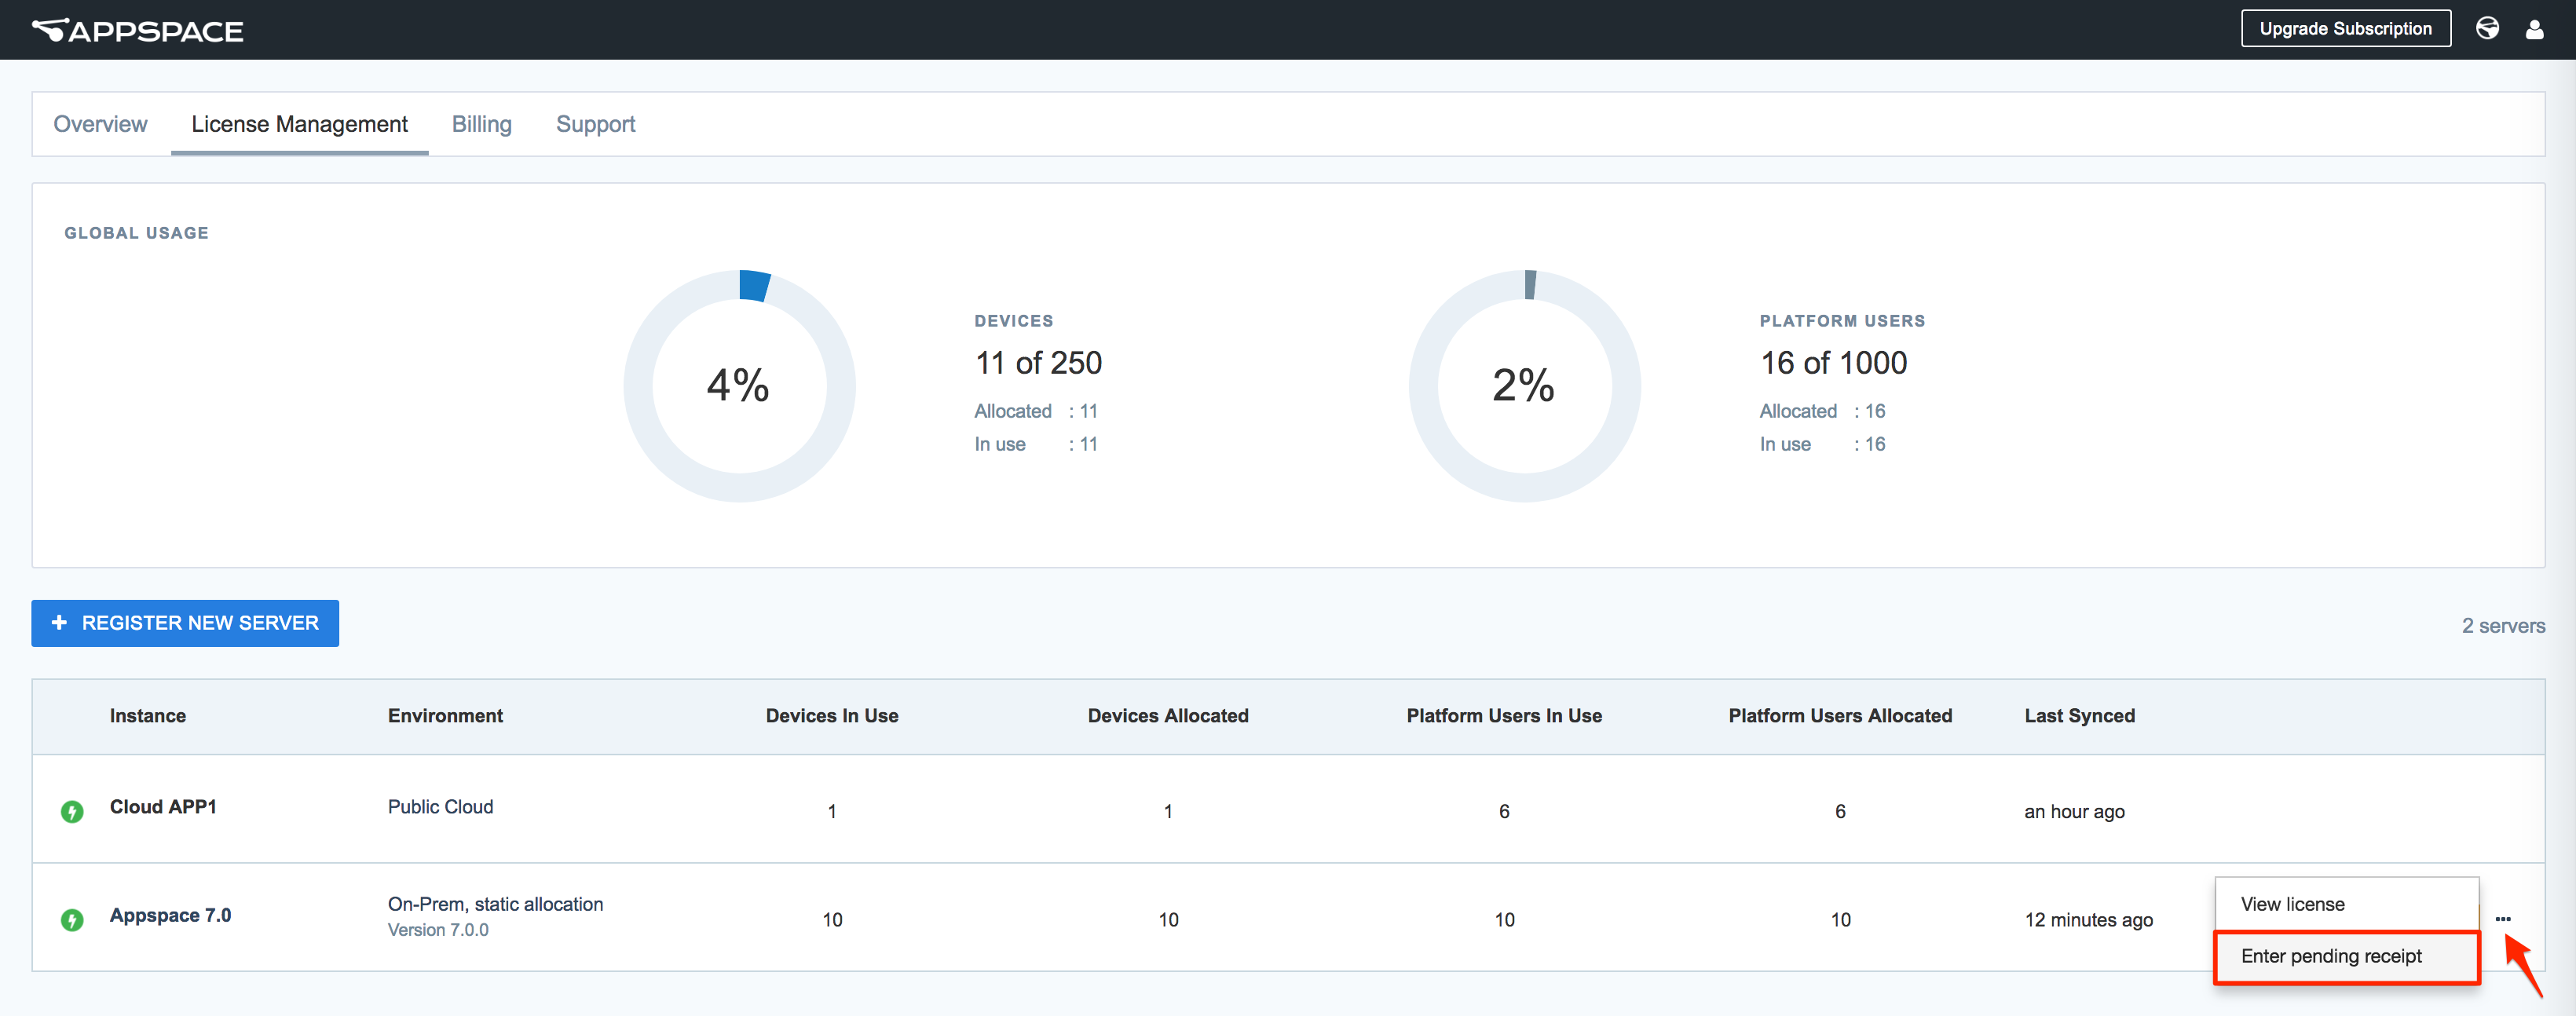
Back on the Account Management Portal, select the License Management tab.
Click the ellipsis on the newly licensed Appspace on-prem server, and select Enter pending receipt.
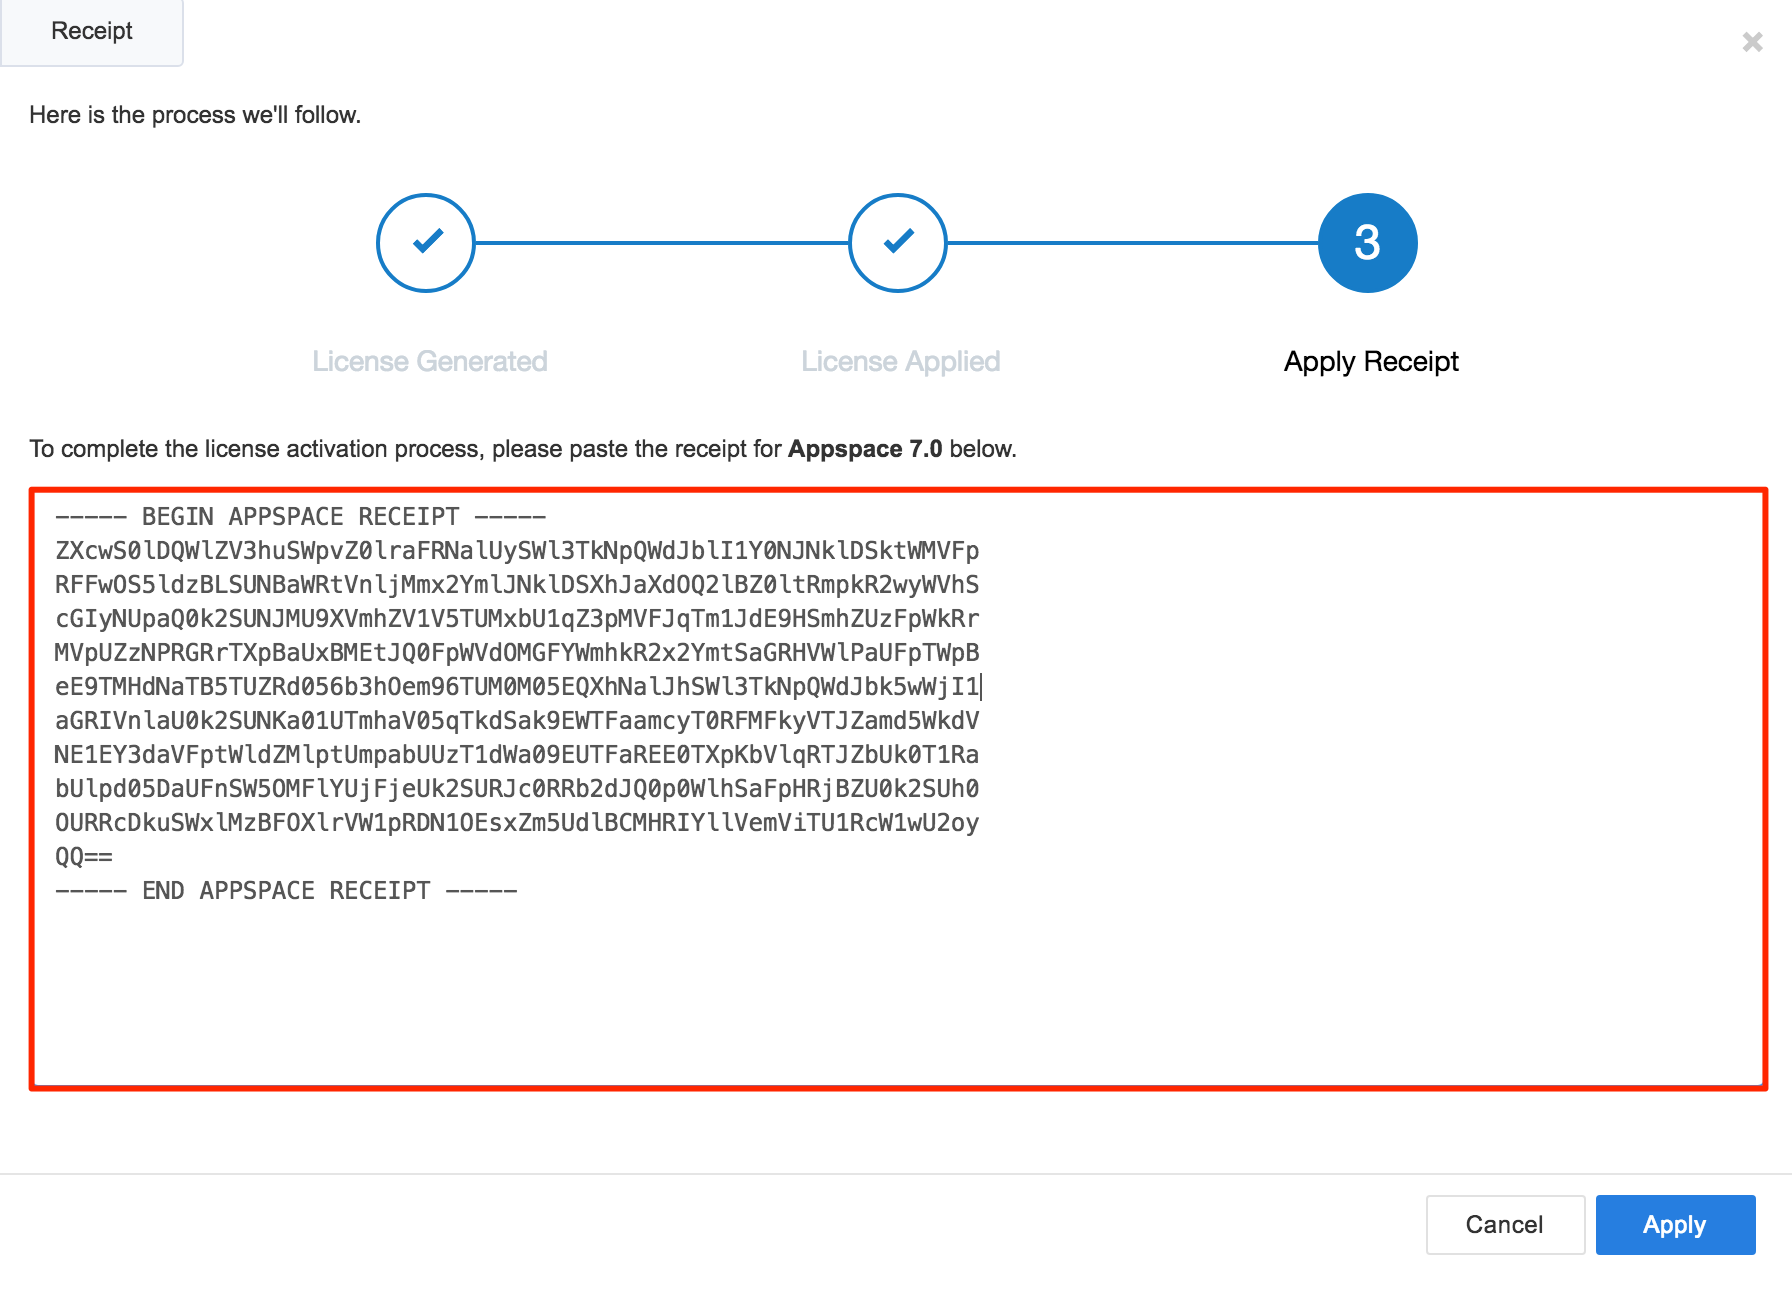
Paste the license receipt text block (or license cancellation receipt) into the Apply Receipt text box, and click APPLY to complete the license activation process.
View license and information
From the Account Management Portal
Log in to your Account Management Portal with your Appspace credentials, and click the License Management tab.
You’ll be able to view the Device and Premium User IDs each server is allocated with, and also other relevant server details on a global level.
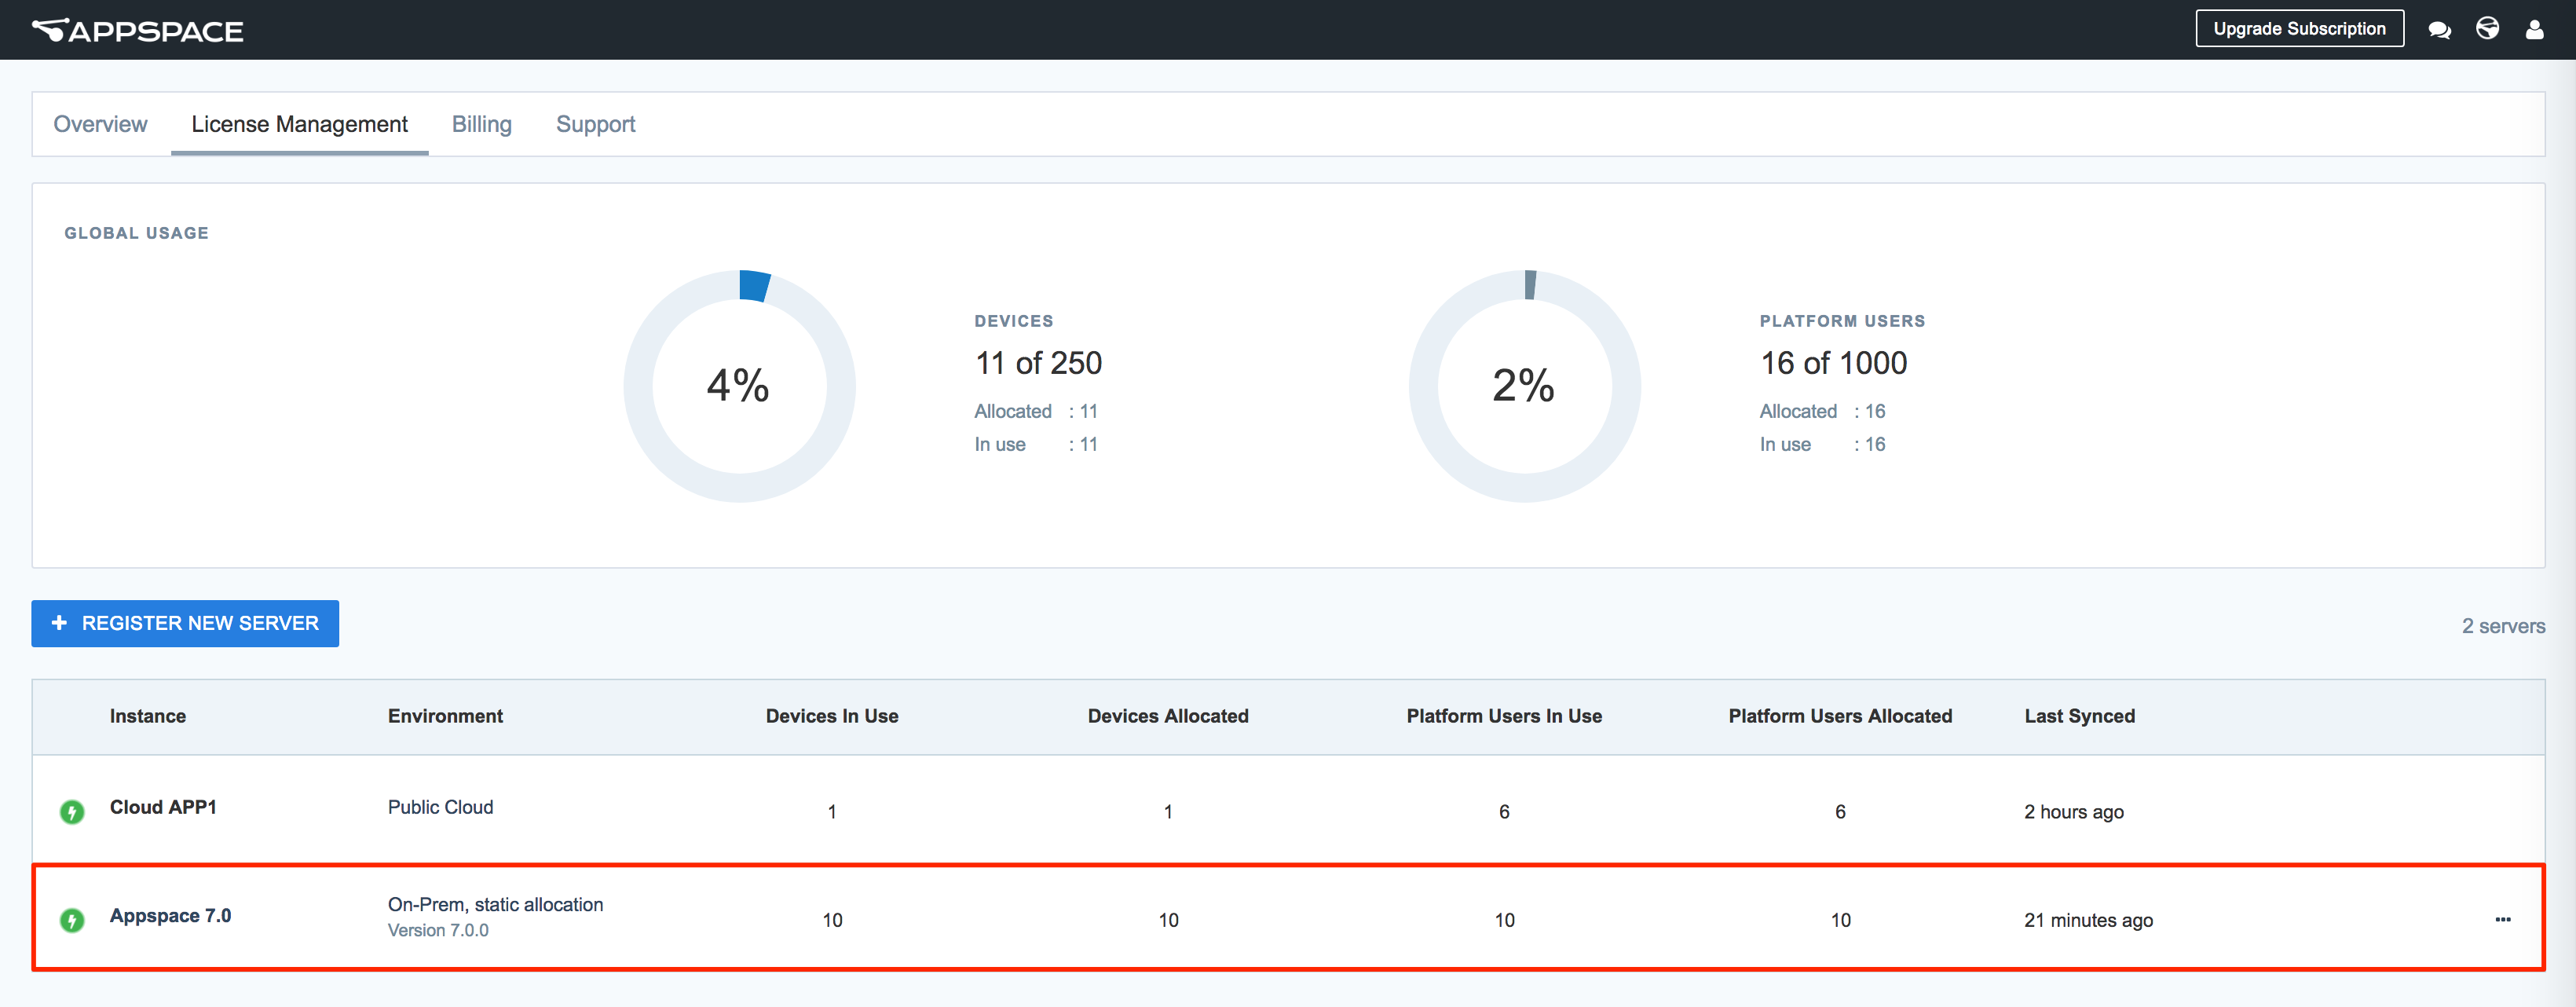
To view the latest server license text block, click the ellipsis of the server instance, and select View license.

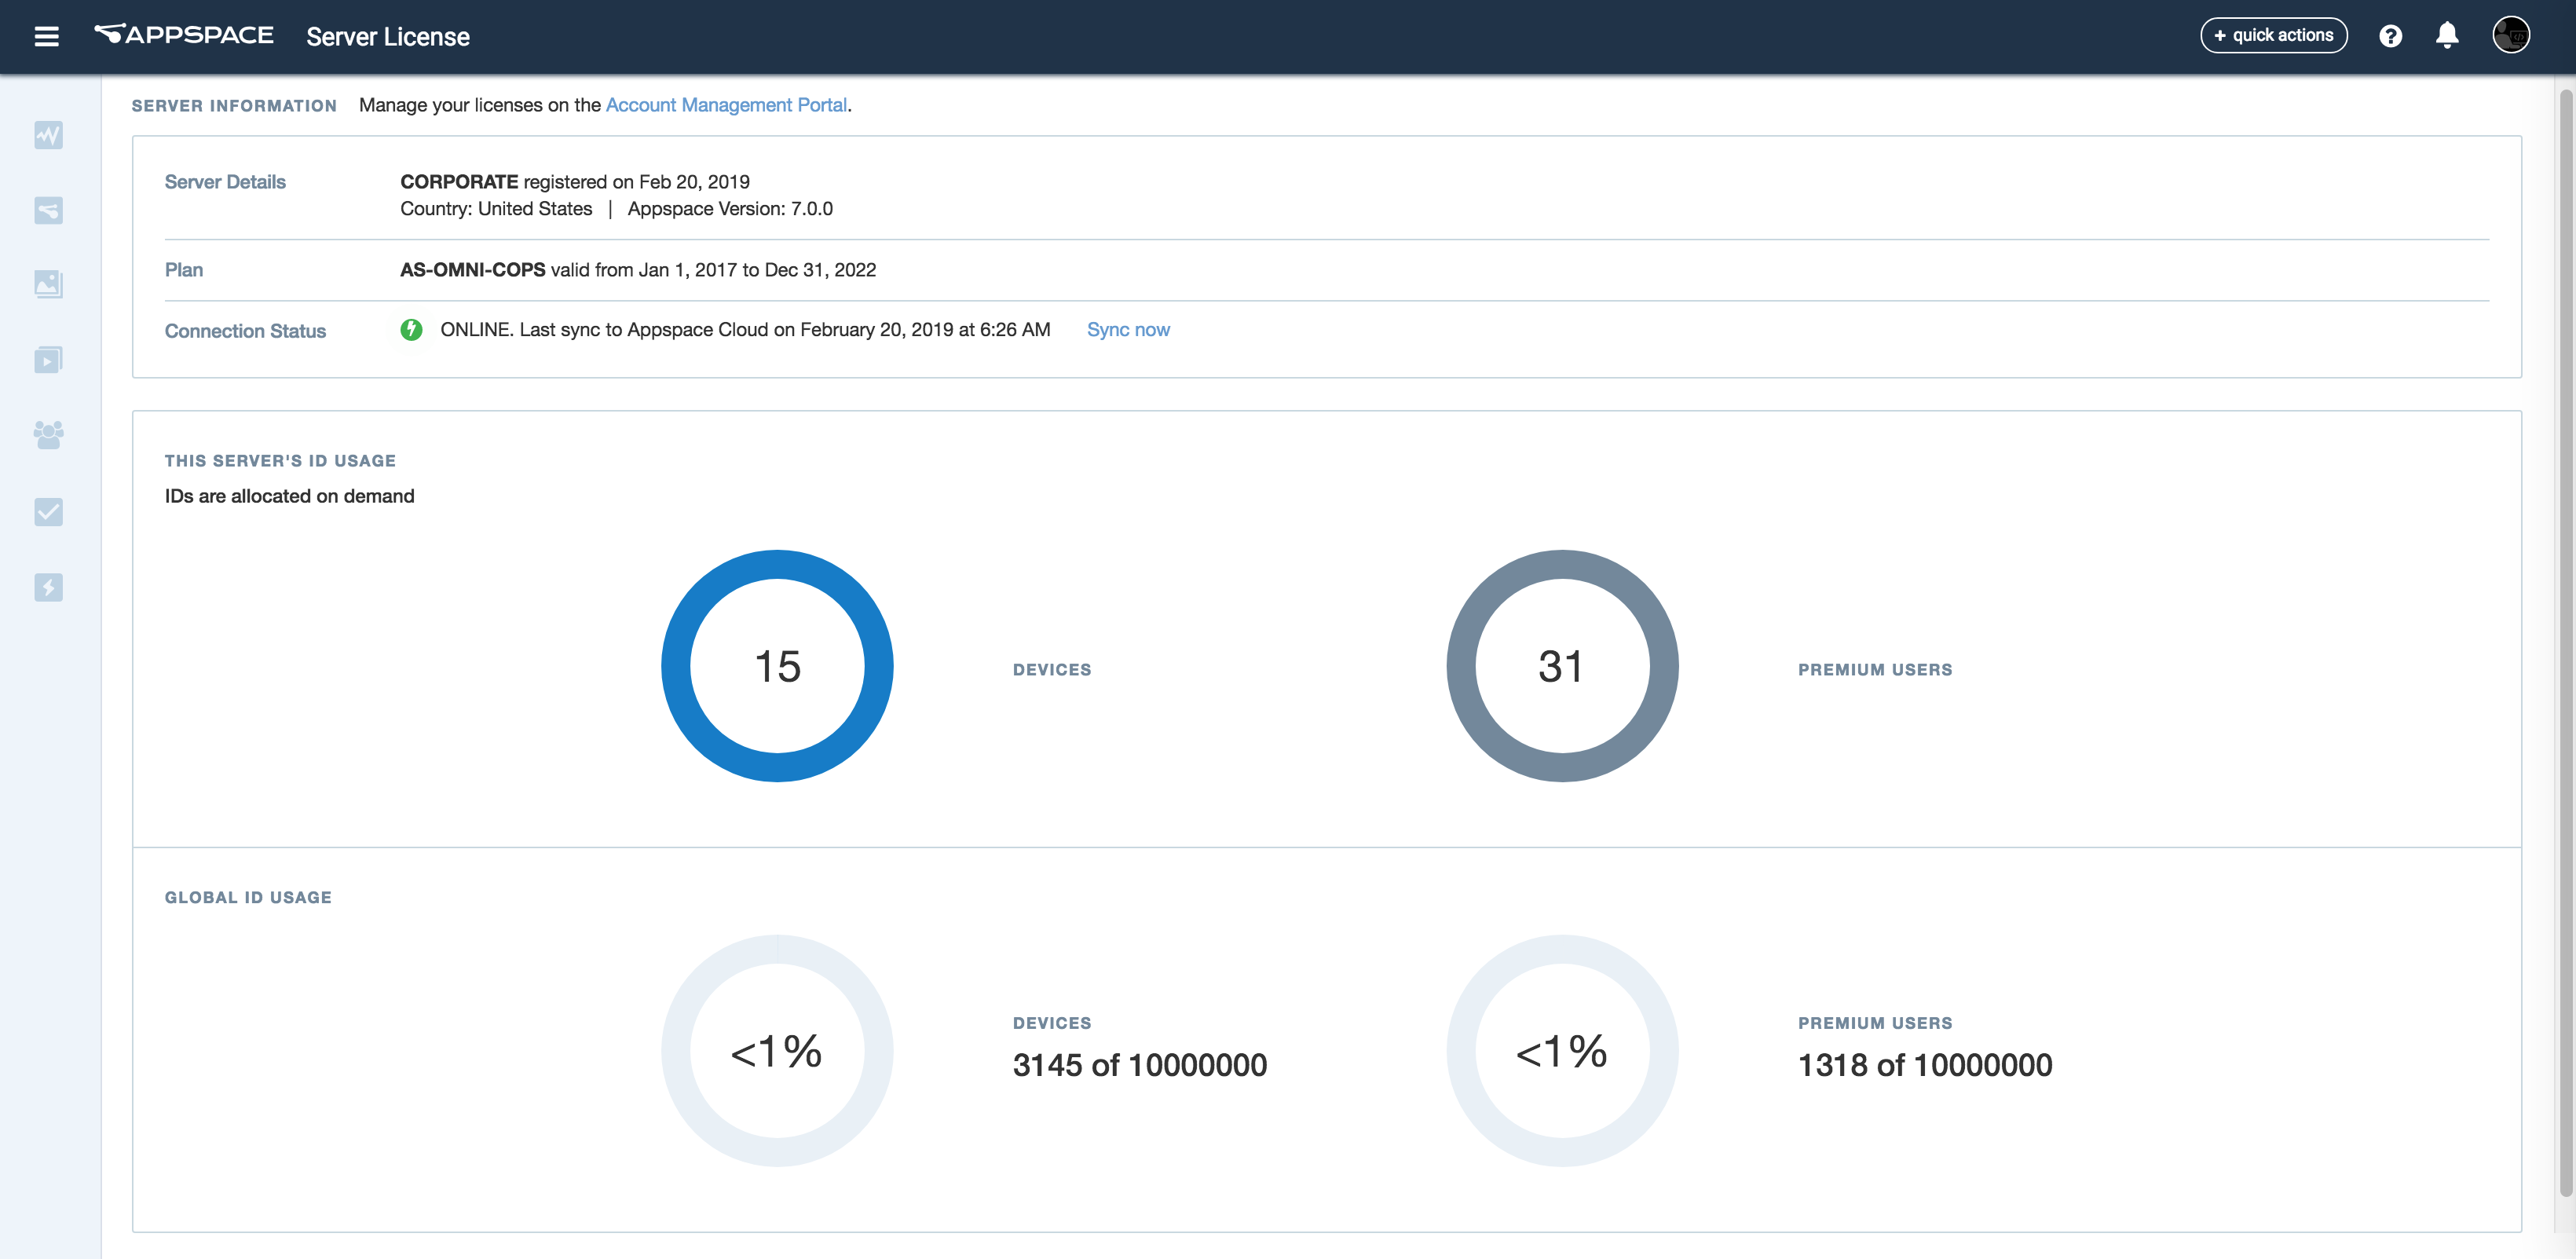
From the Appspace Console
Log in to your Appspace on-prem server with your Appspace credentials, and navigate to System > Server License from the Appspace menu.
You’ll be able to view the Device and Premium User IDs that is allocated to the server, and also other relevant server details.
View Perpetual IDs
Log in to your Account Management Portal, and click the License Management tab.
Click the ellipsis of the desired server, and click View Perpetual IDs.

The number of perpetual IDs are displayed. Click OK to close the window.
Note
This option only appears if you have a perpetual license included in your subscription plan.
Manage ID allocation
Follow the instructions below to manage ID allocation on an Appspace on-prem server.
Log in to the Account Management Portal with your Appspace credentials, and click the License Management tab.
Click the ellipsis of the desired server, and click Manage ID allocations.

Increase or decrease the allocated Device and Premium User IDs on the server, and check the End User Agreement checkbox.
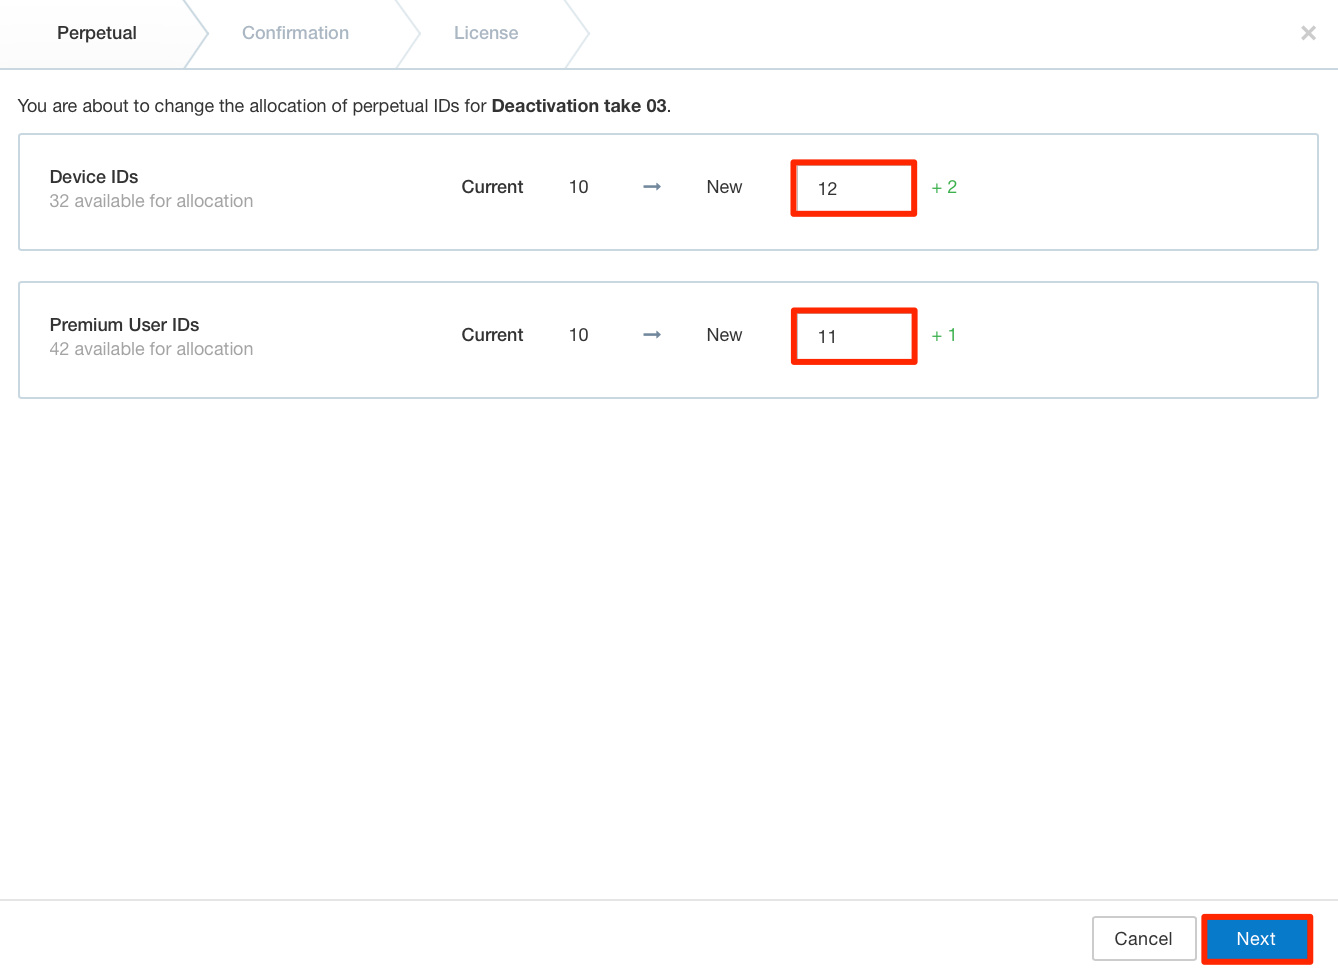
Important
You may only increase or decrease both IDs at any given time. You may not increase one ID type, while decreasing the other ID simultaneously.
Click Next, and Next once again to confirm changes.
Copy the generated license text block into a USB drive.
On the Appspace on-prem server, navigate to System > Server License from the Appspace menu.
In the Server License page, click UPDATE LICENSE and paste the generated license text block.
Once the on-prem server license has been updated, copy the generate receipt text block into the USB drive.
Back on the Account Management Portal, paste the receipt text block in the Apply Receipt text box, and click Apply.
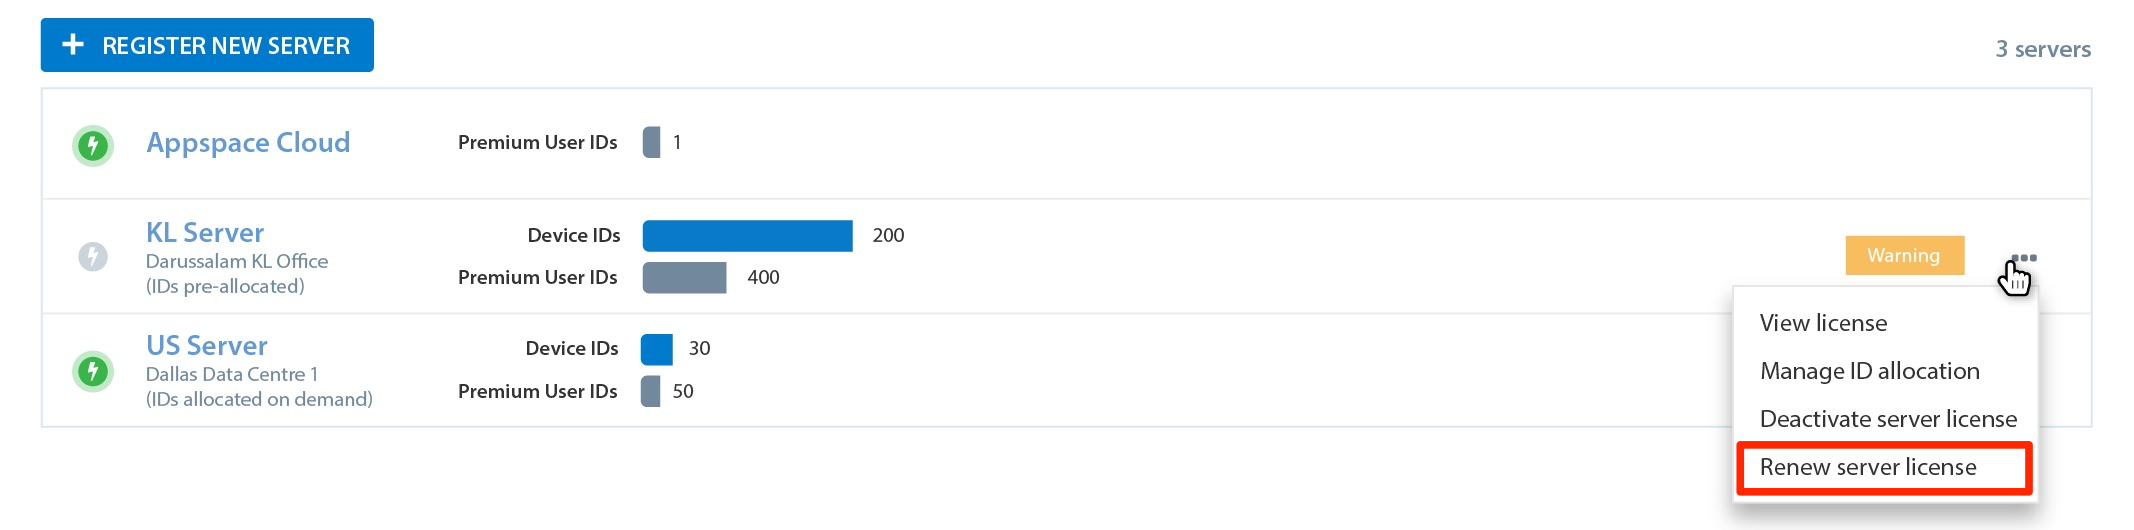
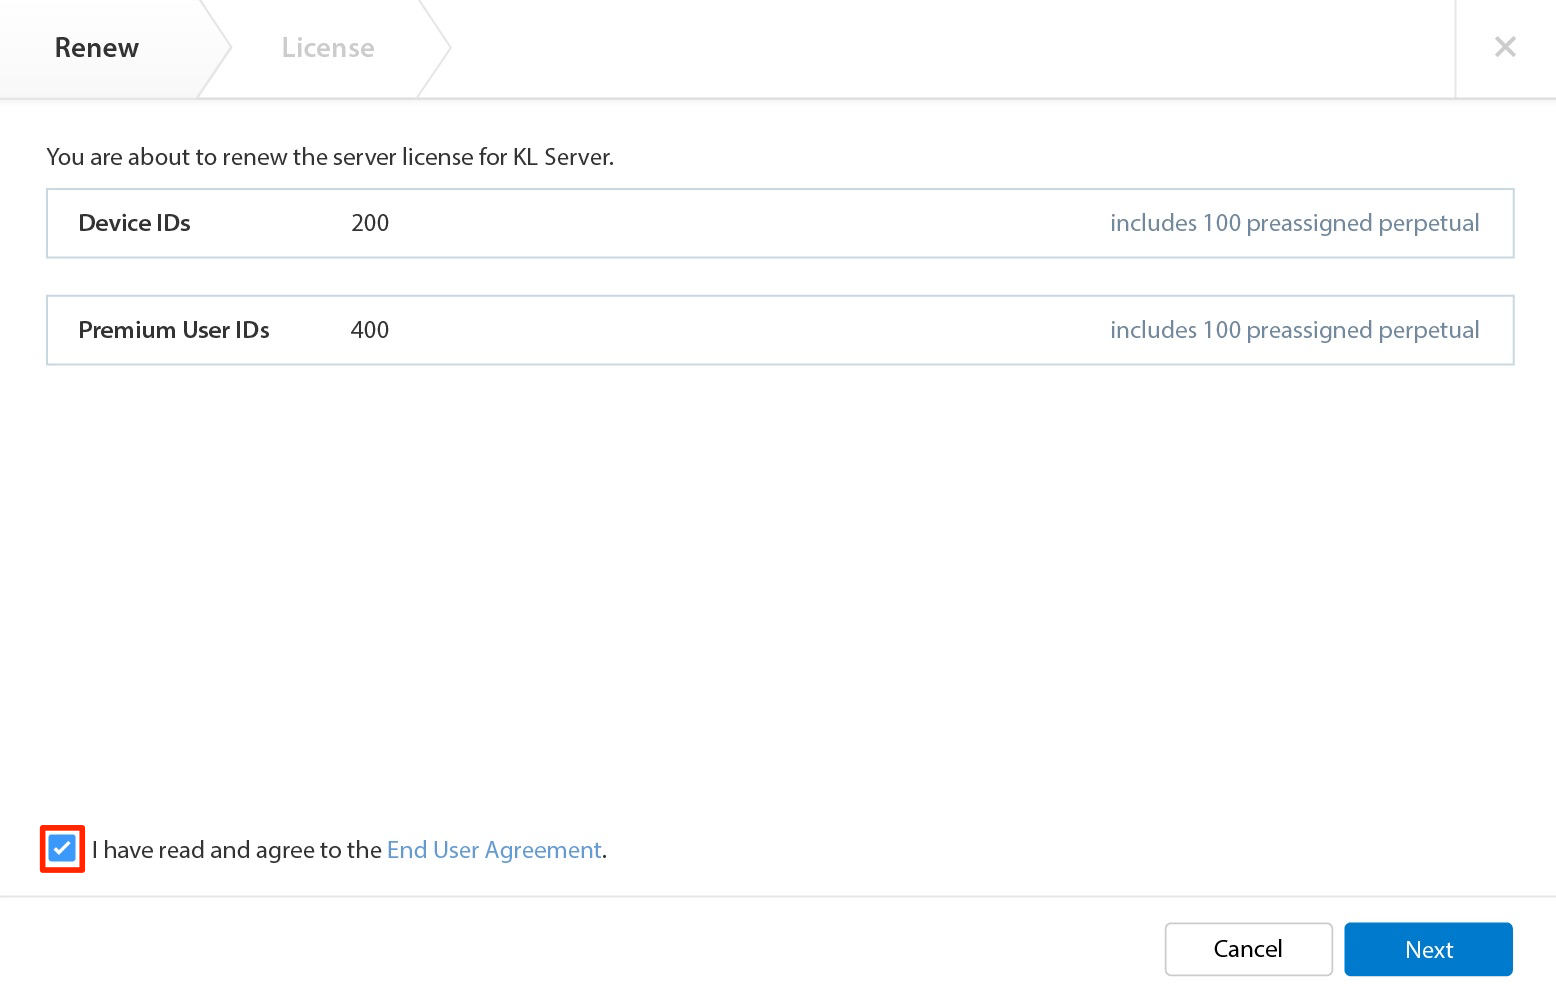
Renew Server License
Follow the instructions below to renew an Appspace on-prem server.
Log in to your Account Management Portal, and click the License Management tab.
Click the ellipsis of the desired server, and click Renew server license.
The number of Device IDs and Premium User IDs assigned to the server are displayed. Check the End User Agreement checkbox, and click Next to confirm renewal.
Click Copy and save the generated server license text block to a USB drive in txt format.
Log in to your Appspace on-prem server with your Appspace credentials, and navigate to System > Server License from the Appspace menu.
Click the Update License button, paste the license text block, and follow the on-screen instructions.
Once the server has been licensed, click Copy and save the generated receipt into a USB drive in txt format
Back onto the Account Management Portal, paste the generated receipt into the Apply License text box from the USB drive.
Switch Server License
Follow the instructions below to switch to another server licensing method; e.g.from One-Step Licensing to Advanced Licensing, and vice versa:
Log in to your Account Management Portal, and click the License Management tab.
Deactivate the server you wish to switch licensing methods, by following the instructions in the Deactivate Server License section below.
Important
When deactivating the server, it is important to copy and paste the deactivation receipt back to the Account Management Portal and the on-prem server. This is to ensure that any allocated IDs are returned, and Appspace servers are successfully deactivated.
Once the server has been deactivated, proceed to re-license the server with one of the following methods:
- One-Step Licensing - Online Activation, when you have an active Internet connection.
- Advanced Licensing - Online Activation, when you have an active Internet connection.
- Advanced Licensing - Offline Activation, when you do not have an active Internet connection.
Deactivate Server License
Follow the instructions below to deactivate an Appspace on-prem server.
Log in to your Account Management Portal, and click the License Management tab.
Click the ellipsis of the desired server, and click Deactivate server license.

Check the EULA checkbox, and click Deactivation to confirm server license deactivation.
Click Copy and save the deactivation license text block to a USB drive in txt format.
Log in to your Appspace on-prem server with your Appspace credentials, and navigate to System > Server License from the Appspace menu.
Click ellipsis, and select Enter Deactivation License.
Paste the deactivation license text block from the USB drive into the Apply License text box, and click Deactivate.
Once deactivated, copy the deactivation receipt text block to a USB drive in txt format.
Back onto the Account Management Portal, paste the deactivation receipt text block from the USB drive into the Apply Receipt text box, and click Apply.
The Appspace on-prem server will deactivate once it syncs with the Account Management Portal.