Create data visualization cards
This article provides the instructions to creating data visualization type cards. The Data Visualization card is an Appspace supported card, which is officially created and periodically updated with new templates and features by Appspace, and is available to all cloud users.
Data visualization type cards such as the Progress bar and Donut themes allow you to display customized progress charts, while the Line theme allows you to import data from external spreadsheets and display customized graphs.
Important
- Cards are only supported on devices with the Appspace App. To ensure your device is compatible, please refer to the Supported Card Types section in the Compare device media player capabilities article.
- Legacy devices are not supported.
- For more information on the basic functionality of creating a card and types of available cards, please refer to the Create a card article.
Create Card
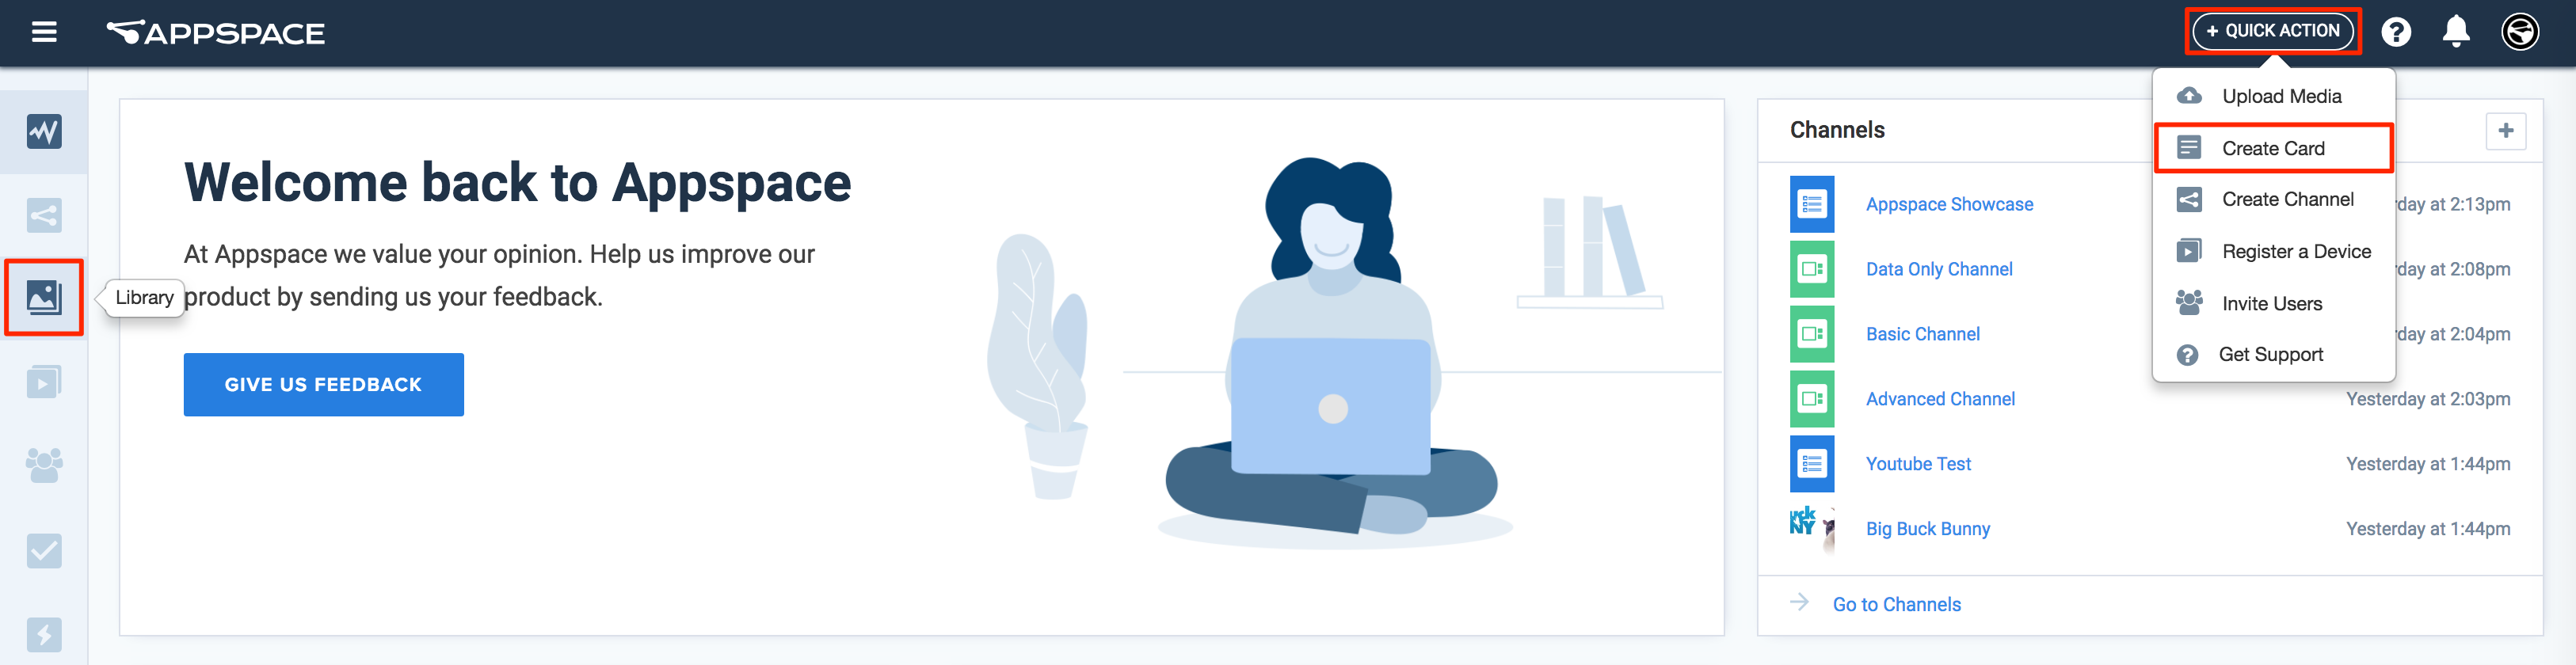
On the Appspace console, click the Quick Actions menu on the top right and select Create Card, and proceed to step 3 below.
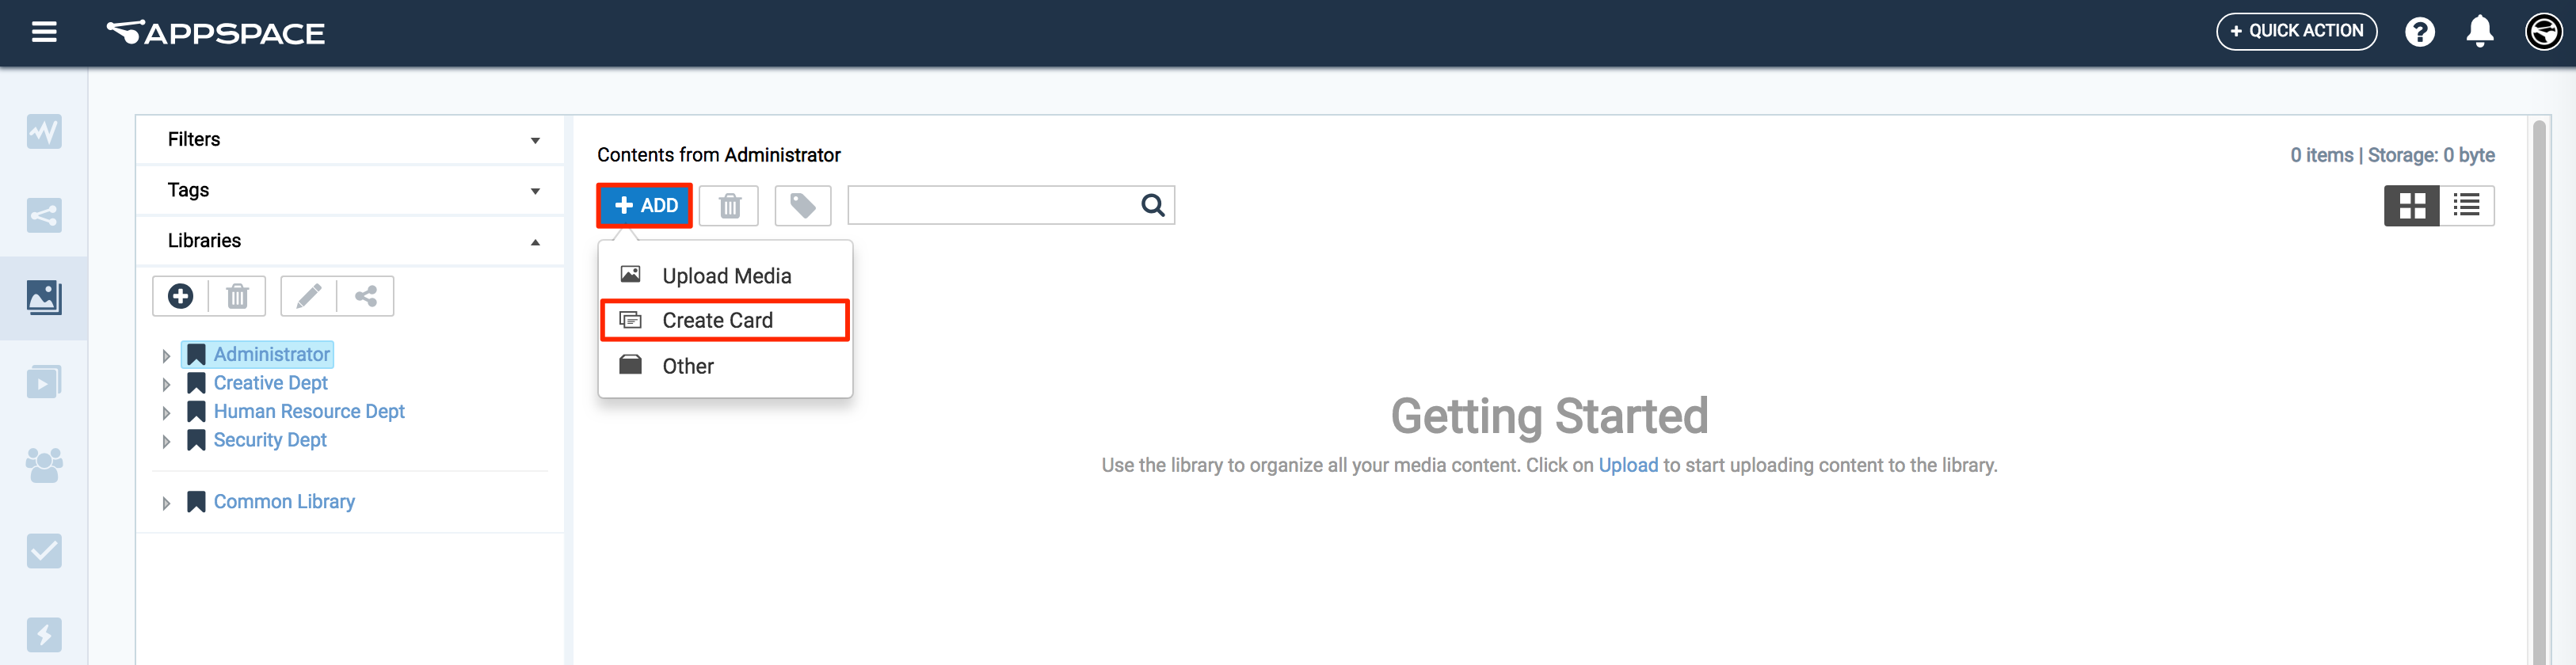
Or click Library from the Appspace Menu navigation bar on the left, and proceed to step 2 below.
Select the desired folder in the library, and click the ADD button, and select Create Card.
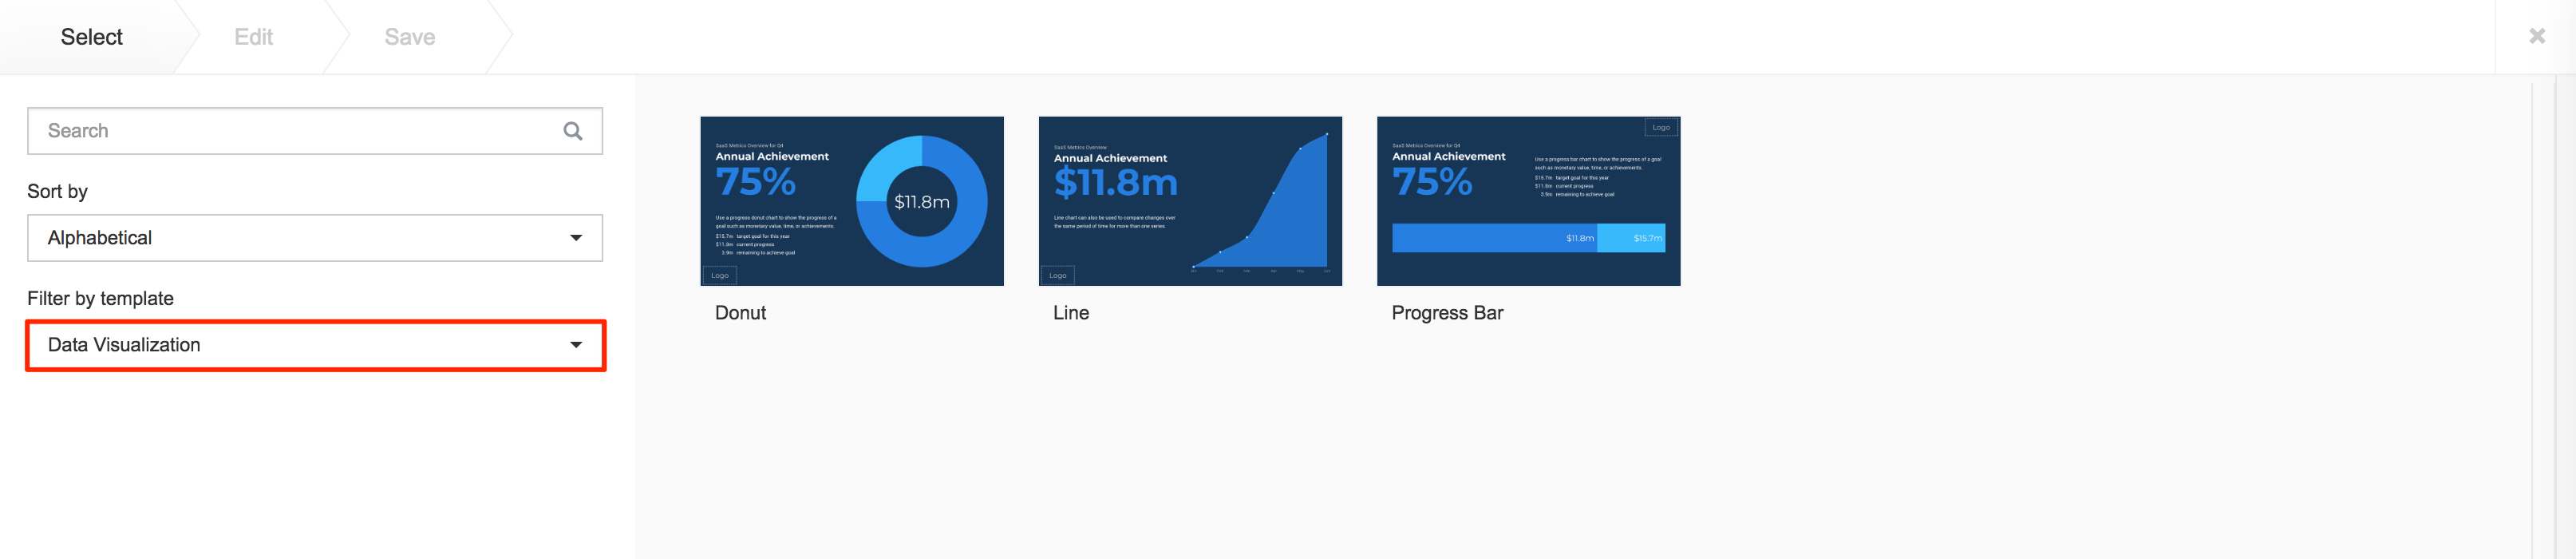
Select Data Visualization from the Filter by template menu, and continue to configure the card as per the on-screen instructions.
For detailed configuration information, click the links below.
- Progress Bar - Use a progress bar chart to show the progress of a goal such as monetary value, time, or achievements.
- Donut - Use a progress donut chart to show the progress of a goal such as monetary value, time, or achievements.
- Line - Line chart can also be used to compare changes over the same period of time for more than one series.
Progress Bar
The Progress Bar chart can be used to display the current progress of a target goal, where the goal may be of monetary, time, or the achievement percentage values.
Enter in the Header, Headline, Key Result, and Notes. The text editor can be used to customize the text styles.

The Key Result can be customized to display the following, by entering the respective codes below:
- Percentage = {model.progress.percent}
- Remaining = {model.progress.remaining}
- Goal = {model.progress.goal}
- Current = {model.progress.current}
Proceed to enter in the data for the progress bar:
- Goal Label - Enter in the label or title of the target goal.
- Current Label - Enter in the label or title of the current goal.
- Remaining Label - Enter in the label or title of the remaining goal.
- Current - Enter in the monetary, time, or percentage value of the current goal.
- Goal - Enter in the monetary, time, or percentage value of the target goal.
The following card customization can be done:
Select the Layout.
Select the Chart Options:
- Show percentage
- Show current
- Show goal
- Show animation
Customize Primary Color, Background color or image.
Upload a Logo.
Click Next.
Fill in the Title, as this is a mandatory field. Optionally, you may fill in the Article, Caption, Content Expiry, Content Tags and even upload a custom thumbnail for the content.
Click the Save button.
You may now create a playlist channel and add the card to it.
Donut
The Donut chart can be used to display the current progress of a target goal, where the goal may be of monetary, time, or the achievement percentage values.
Enter in the Header, Headline, Key Result, and Notes. The Text Editor can be used to customize the text styles.

The Key Result can be customized to display the following, by entering the respective codes below:
- Percentage = {model.progress.percent}
- Remaining = {model.progress.remaining}
- Goal = {model.progress.goal}
- Current = {model.progress.current}
Proceed to enter in the data for the progress bar:
- Goal Label - Enter in the label or title of the target goal.
- Current Label - Enter in the label or title of the current goal.
- Remaining Label - Enter in the label or title of the remaining goal.
- Current - Enter in the monetary, time, or percentage value of the current goal.
- Goal - Enter in the monetary, time, or percentage value of the target goal.
The following card customization options can be done:
Select the Layout.
Select the Chart Options:
- Show percentage
- Show current
- Show goal
- Show animation
Customize Primary Color, Background color or image.
Upload a Logo.
Click Next.
Fill in the Title, as this is a mandatory field. Optionally, you may fill in the Article, Caption, Content Expiry, Content Tags and even upload a custom thumbnail for the content.
Click the Save button.
You may now create a playlist channel and add the card to it.
Line
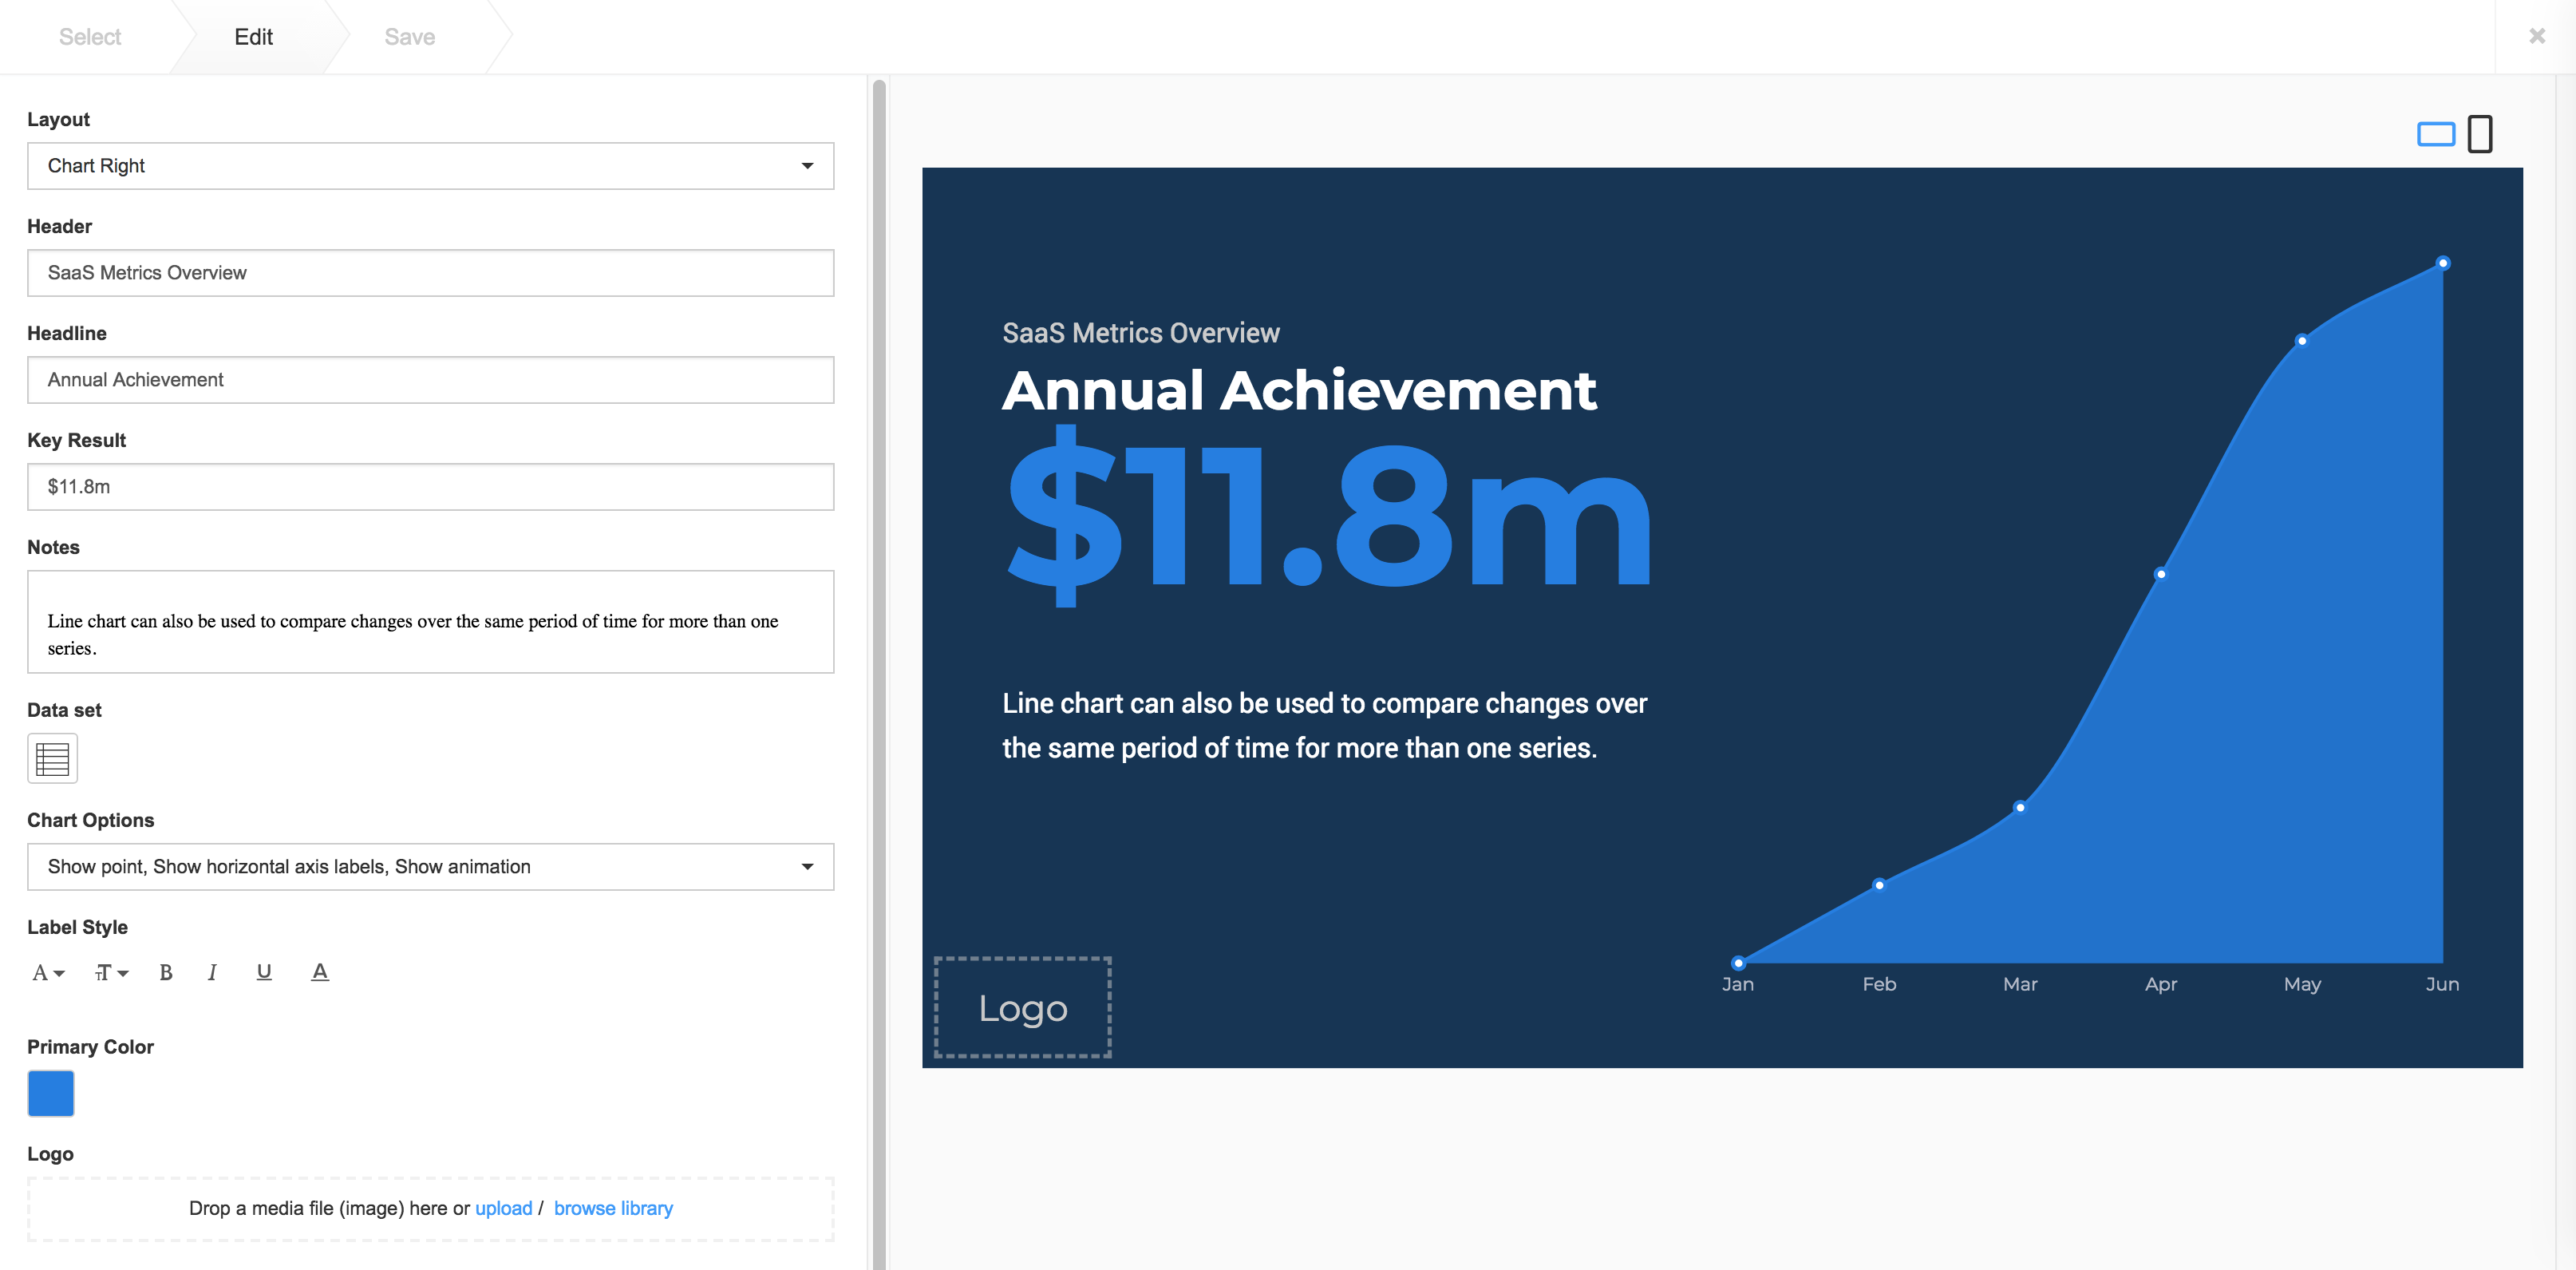
The Line chart can be used to compare changes over the same period of time for more than one series, or plot a graph from statistical data.
Enter in the Header, Headline, Key Result, and Notes. The Text Editor can be used to customize the text styles.
Click the Import Data button, and populate the cards table using one of the following methods:
- Manually enter the data.
- Copy and paste data from an external table.
- Import data from an Excel spreadsheet (.xlsx).
Data populated in rows represent the X Axis, and data populated in columns represent the Y Axis.
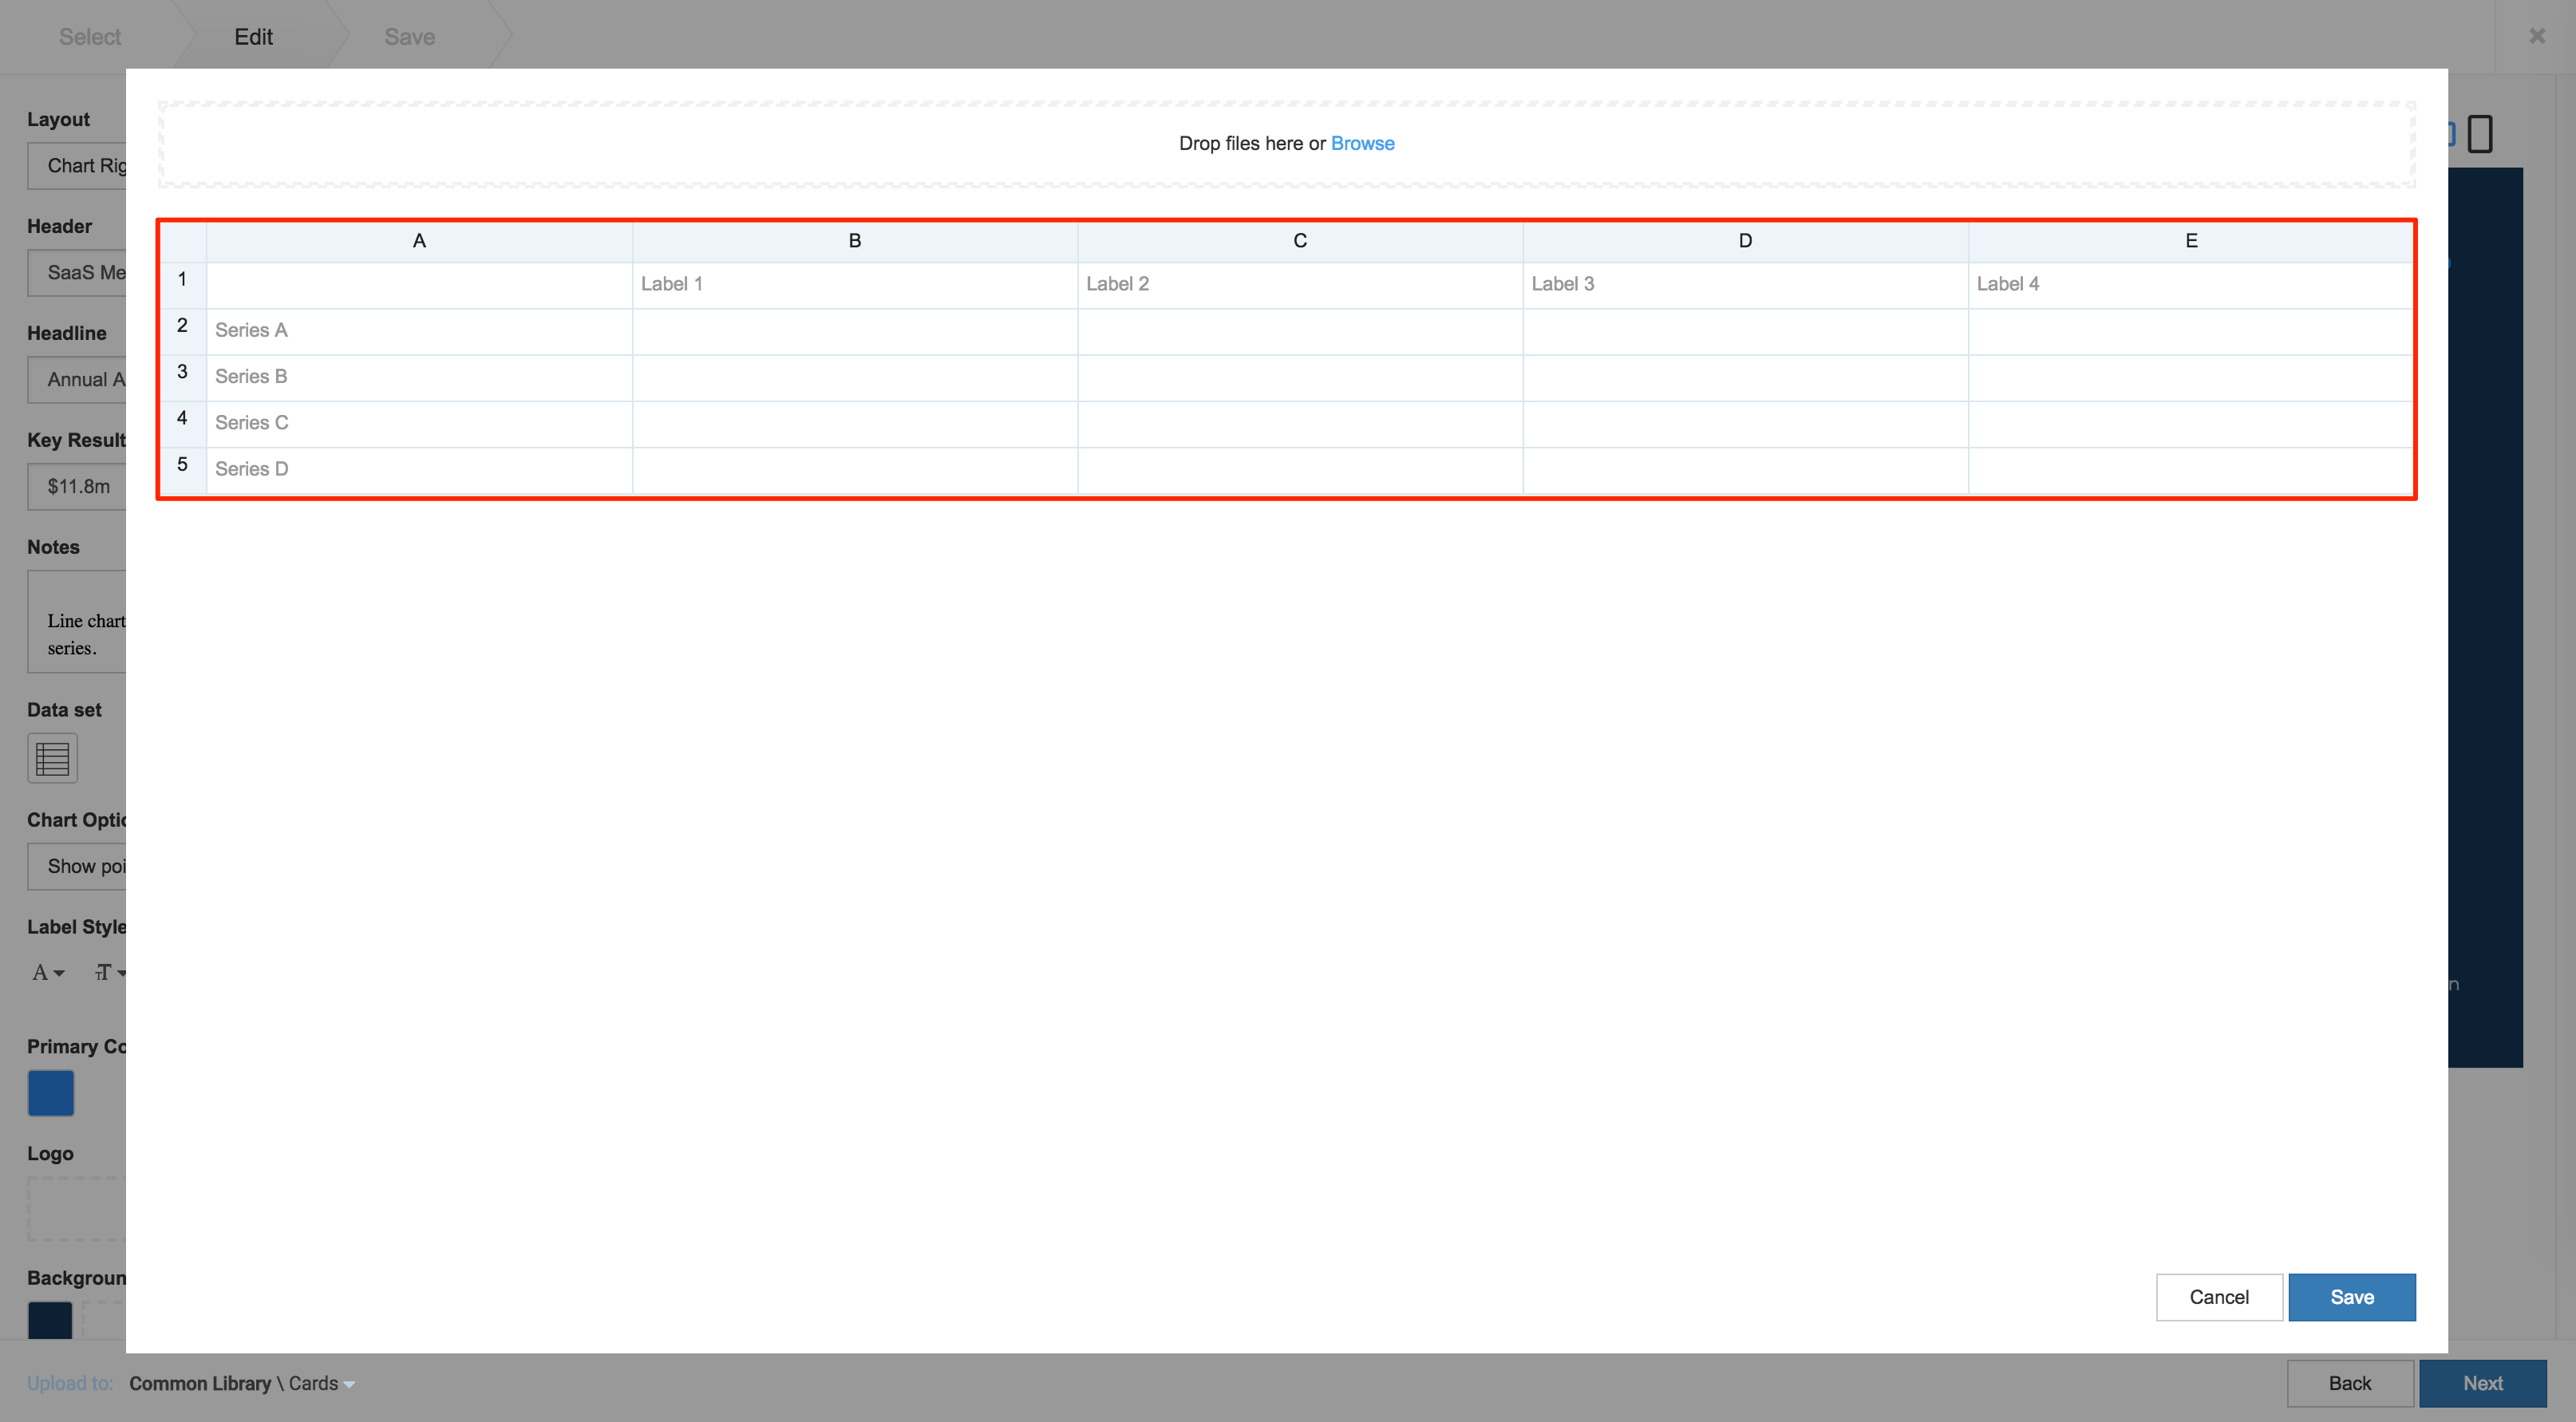
Click Save once done.
The following card customization options can be done:
Select the Layout.
Select the Chart Options:
- Show point
- Show as line
- Show vertical axis gridlines
- Show horizontal axis gridlines
- Show vertical axis labels
- Show horizontal axis labels
- Show animation
Customize Primary Color, Background color or image.
Upload a Logo.
Click Next.
Fill in the Title, as this is a mandatory field. Optionally, you may fill in the Article, Caption, Content Expiry, Content Tags and even upload a custom thumbnail for the content.
Click the Save button.
You may now create a playlist channel and add the card to it.