Migrate Appspace 6.2.4 on-prem from Windows 2008 to Windows 2012 R2 with an easy migration tool
This article provides the instructions to easily migrate your Appspace 6.2.4 on-prem server running Windows 2008, to a new server running Windows 2012 R2 using our built-in migration tool.
Important
This tool is only applicable for new installations of Appspace, and not upgrades. However, you may also use the tool when archiving or restoring Appspace data between server instances (e.g. transitioning between different server machines).
Prerequisites
Please ensure you meet all the requirements listed in the On-prem system requirements article.
Identical license key(s) for the backup server.
HTTPS is required for communication to the Appspace on-prem server.
Configure DNS FQDN and install a valid SSL certificate for the Appspace on-prem server.
Ensure the KB2999226 patch has been installed on your Windows Server 2012 R2.
If not, install the Universal C Runtime update as per instructions on the Microsoft website: https://support.microsoft.com/en-us/help/2999226/update-for-universal-c-runtime-in-windows
If Shared IIS Configuration is enabled, you must disable it and install the IIS URL Rewrite feature manually on each web server, by following the instructions here: https://social.technet.microsoft.com/wiki/contents/articles/25762.how-to-install-and-configure-iis-url-rewrite-over-iis-shared-configuration-feature.aspx
The Appspace Installation Center may not be able to install the IIS URL Rewrite feature correctly if the Shared IIS Configuration is enabled.
Turn off anti-virus software prior to installation. If unable to turn off anti-virus software due to company policies, configure the anti-virus software to exclude all Appspace folders and databases.
Important
When not turned off, anti-virus software blocks installer processes from running, which prevents the installation of some Appspace files. Overall installation time is also slower.
Contact Appspace Support to obtain the latest version of the Appspace Installer, and the Appspace Migration tool.
Important
- All devices must be re-registered on the new server after the migration.
- SSO settings will not be copied over to the new server after the migration.
- Users whose invitations are pending must be deleted on the existing server, and re-invited again on the new server after migration.
Back up and create a recovery file
Important
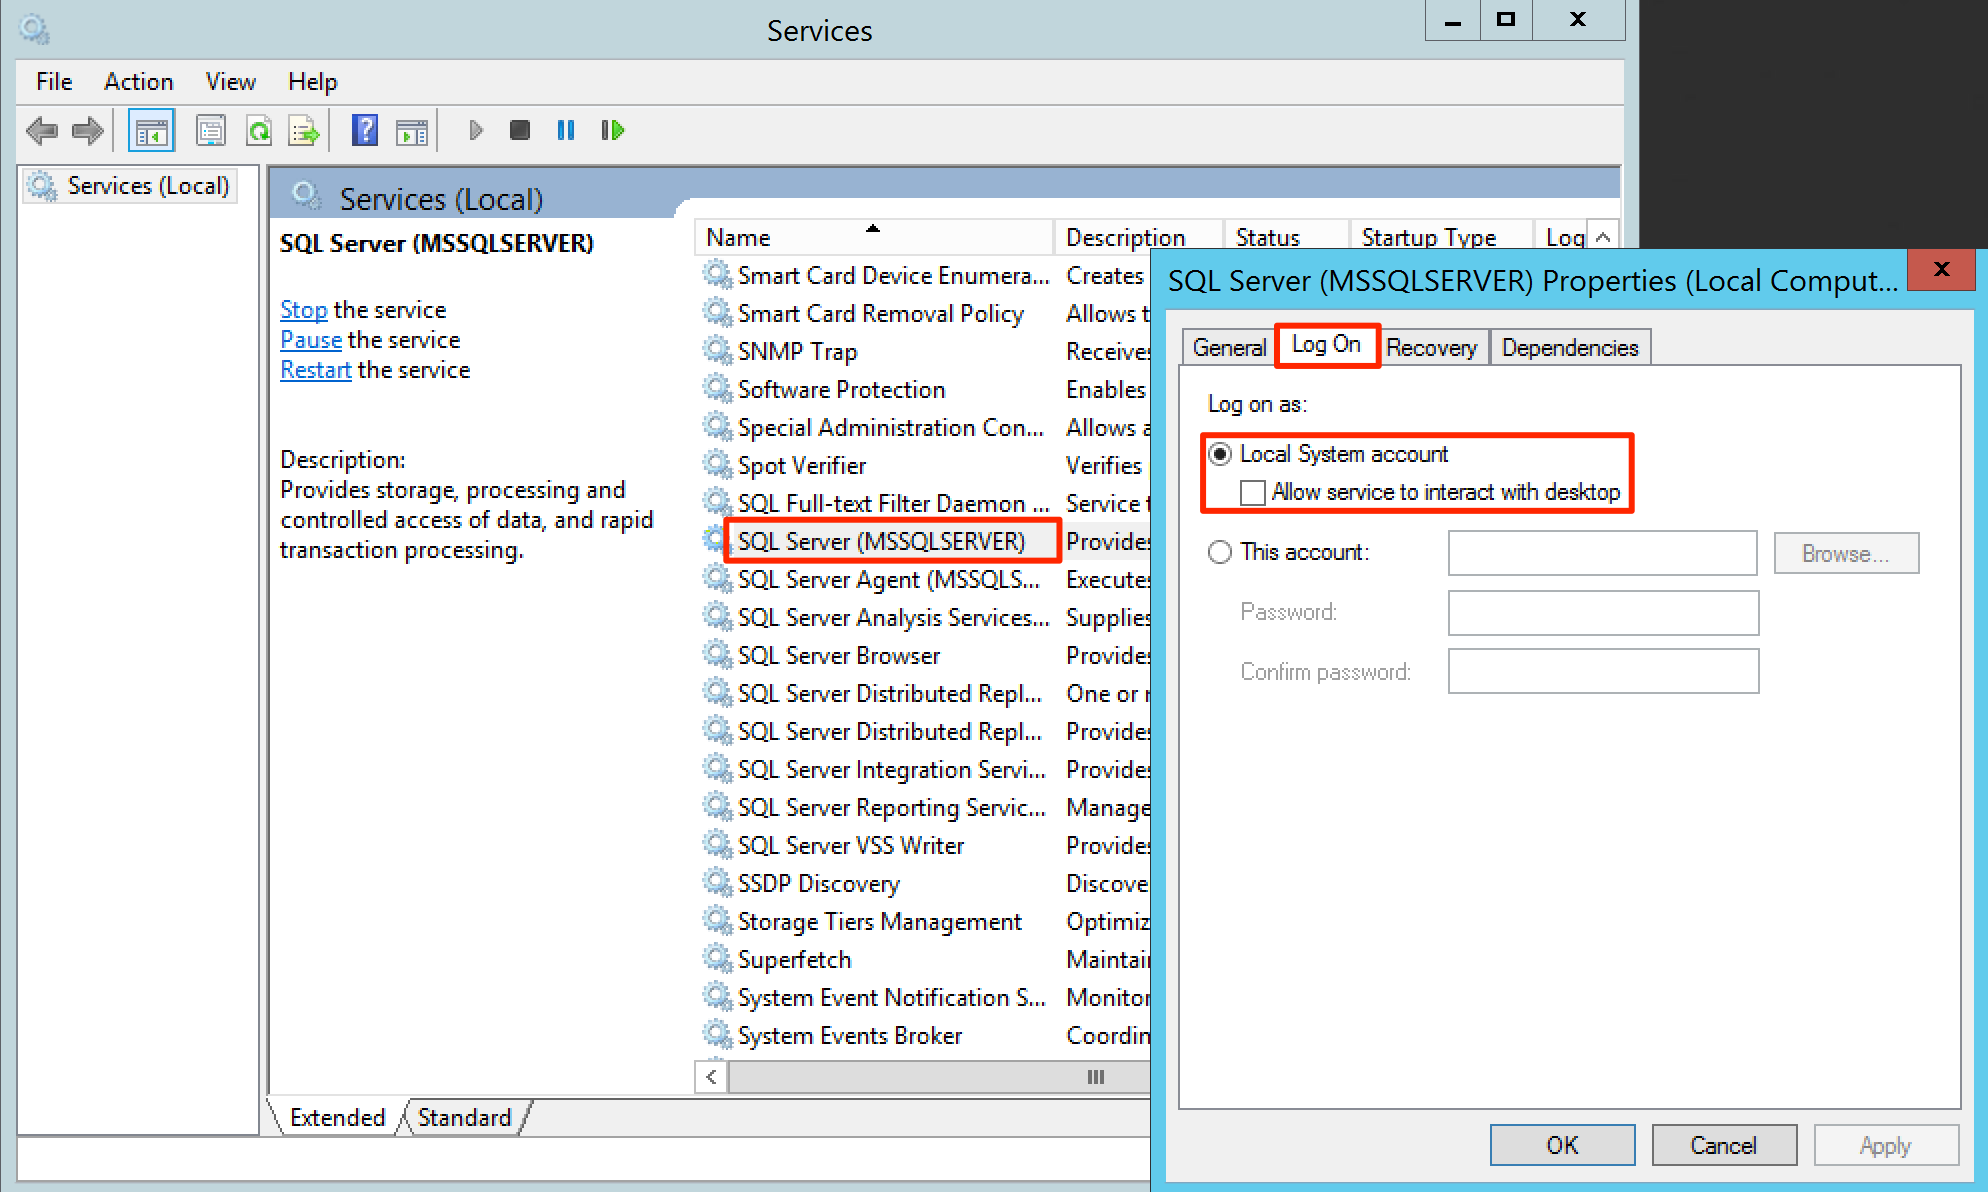
If you are using MS SQL, before proceeding with the steps below, please change the SQL Server (MSSQLSERVER or SQLSERVER) permission to Local System Account from the Services window, to provide the installer with access to the file path.
This is due to a known Microsoft issue where the system permission is lower than the MS SQL permission level.
Warning
This migration tool does not support the backup and recovery of a MS SQL database located on a remote server.
On the Windows Server 2008, double-click and install the Appspace Migration tool.
If your SQL server database is located on the same server as Appspace, follow the instructions below. If the SQL database is on a remote server, proceed to Step 3.
MySQL
Launch the MySQL Workbench, and insert the below query:
SHOW VARIABLES WHERE Variable_Name = 'basedir';
Navigate to the path shown in the result. Example: C:\Program Files\MySQL\MySQL Server 5.7
Double-click the ‘bin’ folder, and copy the ‘mysqldump.exe’ file.
Paste the ‘mysqldump.exe’ file to the “C:\Appspace\Content\Tools\MySqlBin” folder.
MS SQL
Go to Windows Control Panel > Administrative Tools, and launch the Services console.
Locate and right-click the ‘SQL Server (MSSQLSERVER)’ service, and select ‘Properties’.
Click the ‘Log On’ tab, and select ‘Local System account’.
Launch the command prompt in Administrator mode, and enter the following command to switch to the Appspace migration tool directory:
cd c:\program files (x86)\Appspace\Appspace CLI
Run the tool and create a recovery file with the following commands:
If the SQL server is located within the same server:
appspace recovery --db-engine=mysql --db-username=<username> --db-password=<password> --db-host=<localhost>
--output-file=<file path>
Example:
appspace recovery --db-engine=mysql --db-username=root --db-password=g56*k9lp --db-host=localhost
--output-file=C:\temp
If the SQL server is located on another server, skip the database backup:
appspace recovery --skip-backup-db --db-engine=mysql --db-username=<username> --db-password=<password>
--db-host=<server ip> --output-file=<file path>
Example:
appspace recovery --skip-backup-db --db-engine=mysql --db-username=root --db-password=g56*k9lp
--db-host=192.168.5.5 --output-file=C:\temp
Parameter Value description appspace This is the executable file recovery Option to start the recovery mode –db-username Database user name –db-password Database password –db-host Database server.
- Use ‘localhost’ for local database.
- Define the IP address for remote database.
–db-engine - Use ‘mysql’ for MySQL.
- Use ‘mssql’ for SQL Server.
–output-file Folder path to generate the recovery file. –skip=backup-db Option to skip the database backup, for remote database.
Once the migration process completes, the recovery file containing the following files will be created:
- appspace.sql - the database backup file
- appspace.config - the Appspace configuration backup file
- manifest.json - the latest media file IDs (mediaID, userGroupID, AppspaceVersion)
Navigate to the output folder determined in Step 4 (C:Temp), copy the recovery file, and paste it to any location on the new Windows Server 2012 R2 machine.
Copy the Appspace content folder (C:\Appspace\Content\), and paste it to any location on the new Windows Server 2012 R2 machine.
On the current Windows Server 2008 machine, restart the IIS service and agents stopped during the migration process.
Install Appspace and restore files
Install Apspspace 6.2.4 on your new Windows 2012 R2 server. Please refer to the Installing Appspace on-prem article.
In Step 4 of the Install Appspace section, click Install.
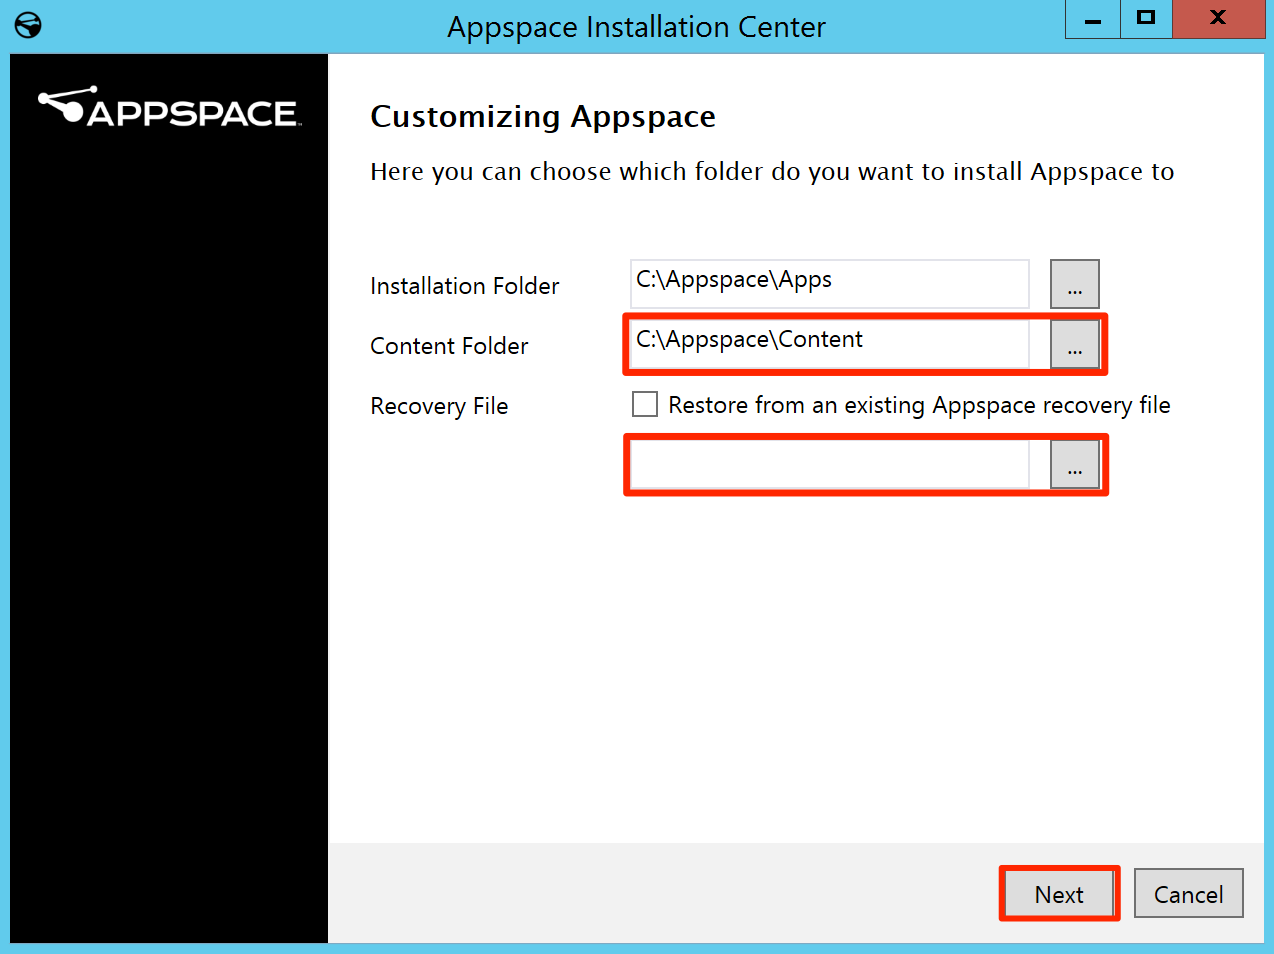
In Step 5 of the Install Appspace section, make the following edits in the Customizing Appspace window:
Content Folder - Browse and select the Appspace Content folder pasted in Step 7 above.
Recovery File - Check the ‘Restore from an existing Appspace recovery file’ option, browse and select the recently copied recovery file.
Continue with Step 6 in the Installing Appspace on-prem section.
Activate Appspace
Proceed to activate the new license. Please refer to the Activating Appspace on-prem article.