Configure digital signage in conference rooms for Crestron AirMedia/Mercury
This article provides instructions to configure and register Crestron with AirMedia 2.0 devices, such as AirMedia presentation systems; AM-200, AM-300, and Crestron Mercury, with the Appspace App.
The Crestron AirMedia 2.0 solution combines conferencing and collaboration tools all in one console. Thus, Appspace provides you with an avenue to display playlist channels as digital signage in the background on Crestron’s HDMI display while the room is in conference or otherwise.
The Appspace App is handled by Crestron’s built-in admin console, and is configured to run on its PPUX browser. The Appspace App downloads all content and data via browser caching or streaming only, and does not have a local cache on the Crestron device(s).
You can configure to run the digital signage in one or both the modes listed below:
Signage as a Background: The signage is turned on when the room is occupied and the Crestron conference collaboration tools are in use. When this mode is enabled, the Appspace App is displayed on the larger part of the screen, while the Crestron information is maintained at the bottom.
Signage in Standby: The signage is displayed in full screen while the conference room is empty and the device is asleep.
You may then choose to use one playlist channel for both implementations, or two different playlist channels for each implementation.
Important
The Appspace App for Crestron AirMedia 2.0 is only designed and tested for playlist channels; thus we do not support:
- Room scheduling cards
- Advanced channels or live stream channels
- Videos, alerts, device tasks, or playout metrics
- All Community cards
Prerequisites
Appspace 7.0 or higher.
-
Create one playlist channel for both display modes (Signage as a Background and Signage in Standby). You can name the channel as desired.
Create two different playlist channels for each display mode:
- The channel that runs in the background must be named: crestron-occupied
- The channel that runs in standby must be named: crestron-unoccupied
Note
Please also refer to the Content Best Practices below.
An active Appspace account, with sufficient Device IDs to register the device.
An active Internet connection.
Ensure your network/firewall/anti-virus software on your computer is configured to allow access to the following:
- Google Chrome web browser
- Network port 80 (HTTP)
- Network port 443 (HTTPS)
Supported Crestron AirMedia 2.0 devices:
- Crestron AM-200
- Crestron AM-300
- Crestron Mercury
The device must meet the manufacturer’s minimum hardware and technical specifications, as well as the Appspace App’s minimum requirements. Please refer to Appspace App requirements.
Important
To maintain the integrity of the local storage on the device, the registration information is written to the permanent storage on a timer. After a device is registered to Appspace, please do not remove power or reboot it for at least one (1) hour.
Content Best Practices
To ensure smooth playback, and device stability when using Crestron AirMedia 2.0 devices, we recommend the following, which serve as a guideline only:
Images added to the playlist should be 1920x1080 or smaller in size, and should be saved in either JPG or PNG format.
Announcement cards added to the playlist should use an image size of 1920x1080 or smaller.
Important
You may add only one (1) background image to the card.
Content in a playlist channel should ideally not exceed more than 15 content items in total. Example in table below:
Content Type No. of Cards No. of Images Card only 15 0 Image only 0 15 Card and Image with 20/80 ratio 5 20 Card and Image with 50/50 ratio 10 10
Note
- We recommend using JPGs over PNGs if alpha transparency is not required, as although image quality remains the same, the JPG file size will be much smaller making it ideal for storage conservation.
Configure Crestron AirMedia 2.0 devices
Follow the instructions below to enable Appspace App on the Crestron devices:
Enter in the Crestron device IP address in your web browser to access the Crestron web console.
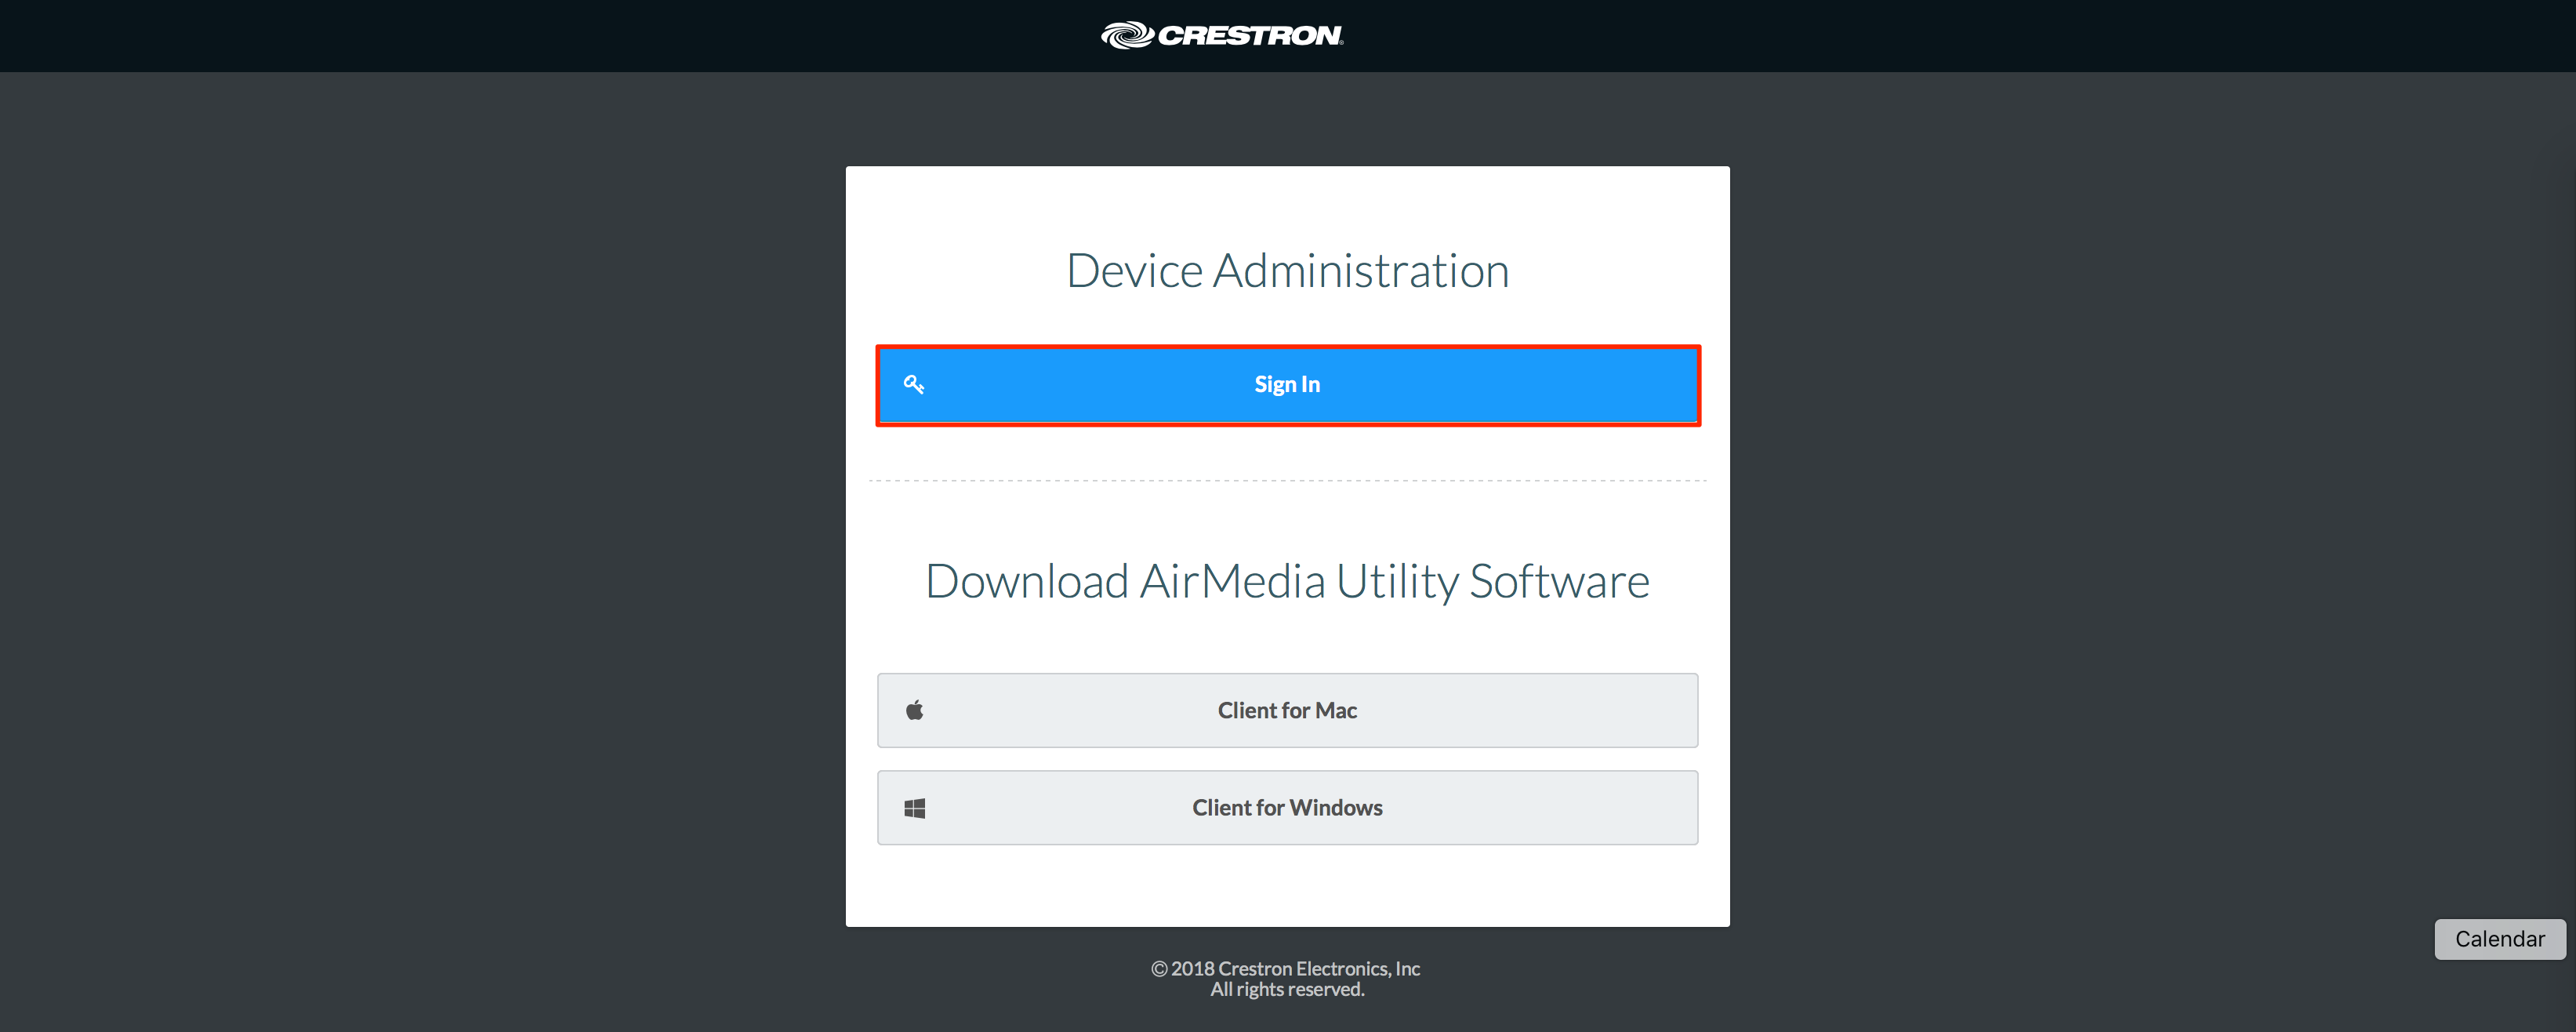
Click the Settings icon on the top right corner, and select Device Administration.
Note
Skip this step if you’re using a Crestron Mercury device, or if the login screen is displayed immediately after the IP address is entered in your web browser.

Click Sign In and enter in the Crestron device credentials.
In the side panel menu, click APPSPACE, and enable the Appspace Integration.
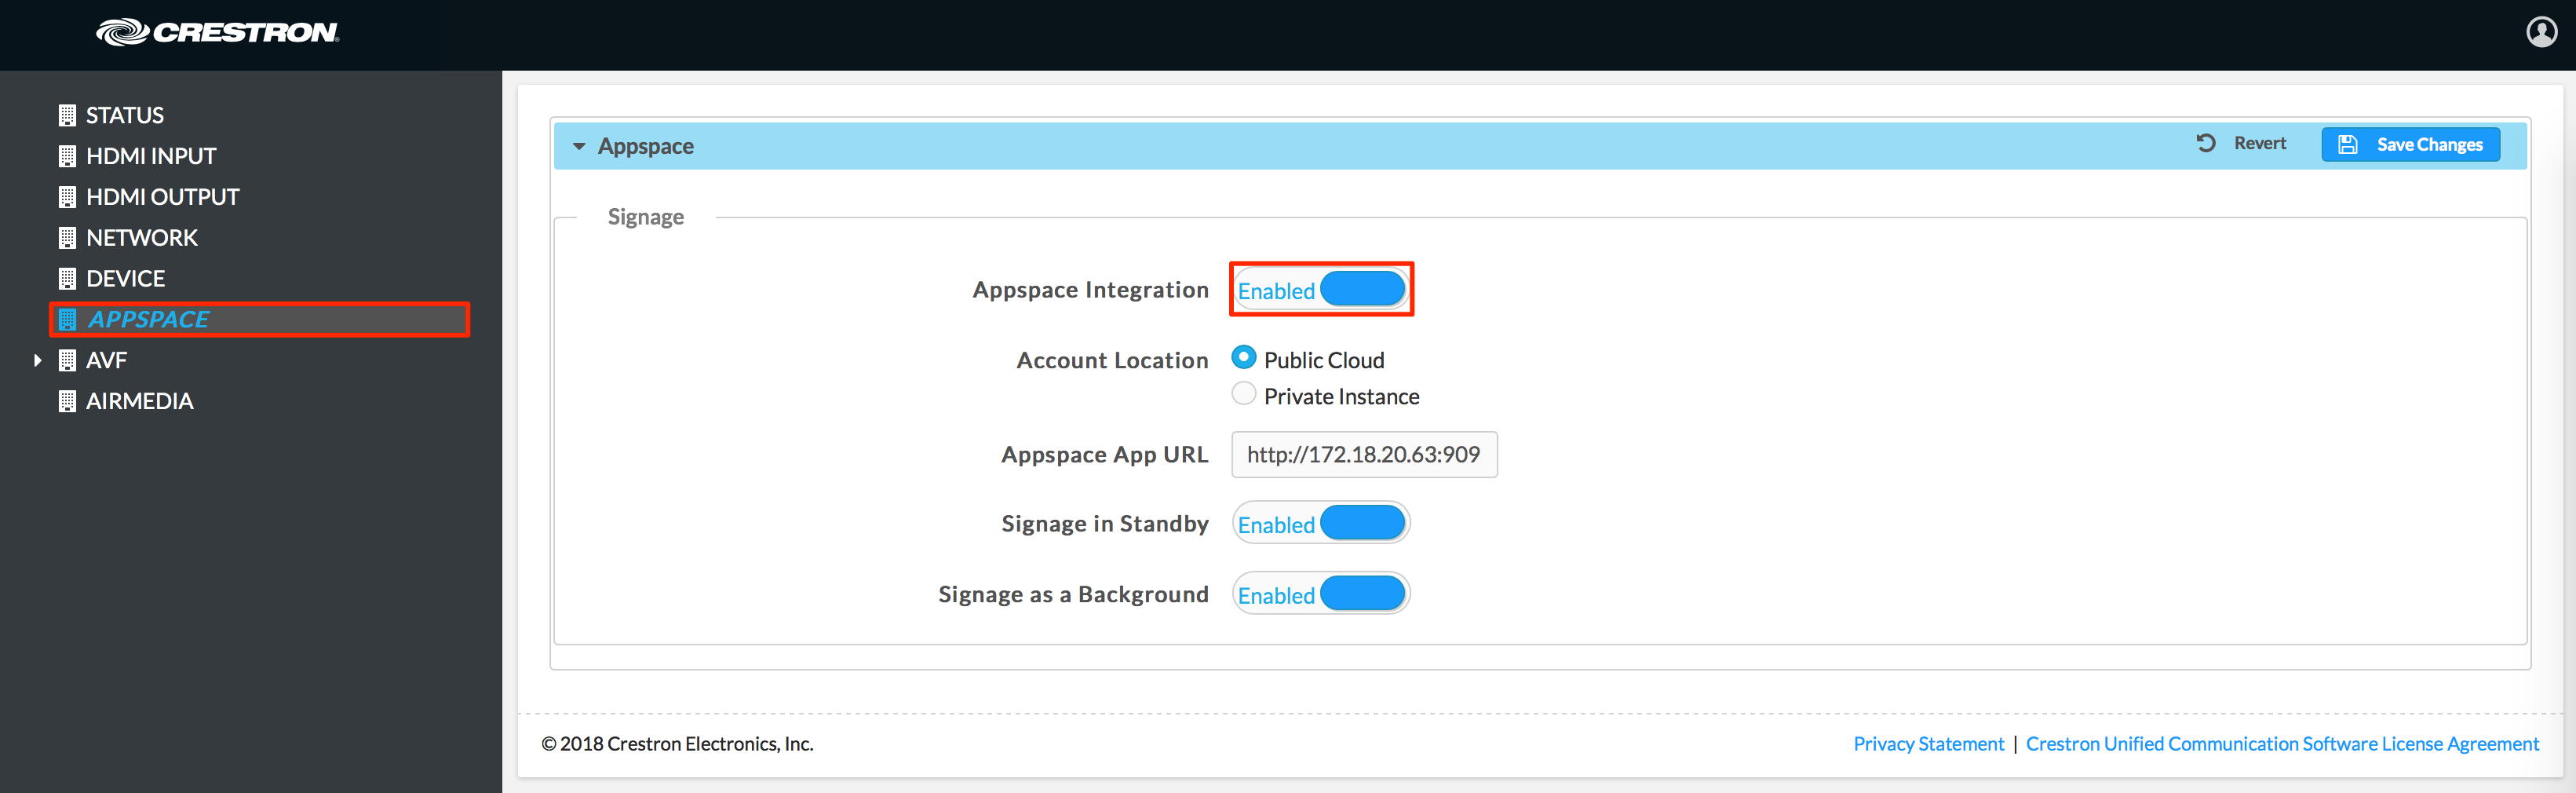
Select your Account Location:
- Public Cloud - Select this if you are on Appspace cloud.
- Private Instance - Select this if you are on Appspace private cloud.
Note
Users on private cloud may use the cloud option, or contact Appspace if you would like a privately hosted URL.
Enable one or both the following signage display modes:
Signage in Standby:
In this mode the Appspace App runs full screen while the device sleeps.
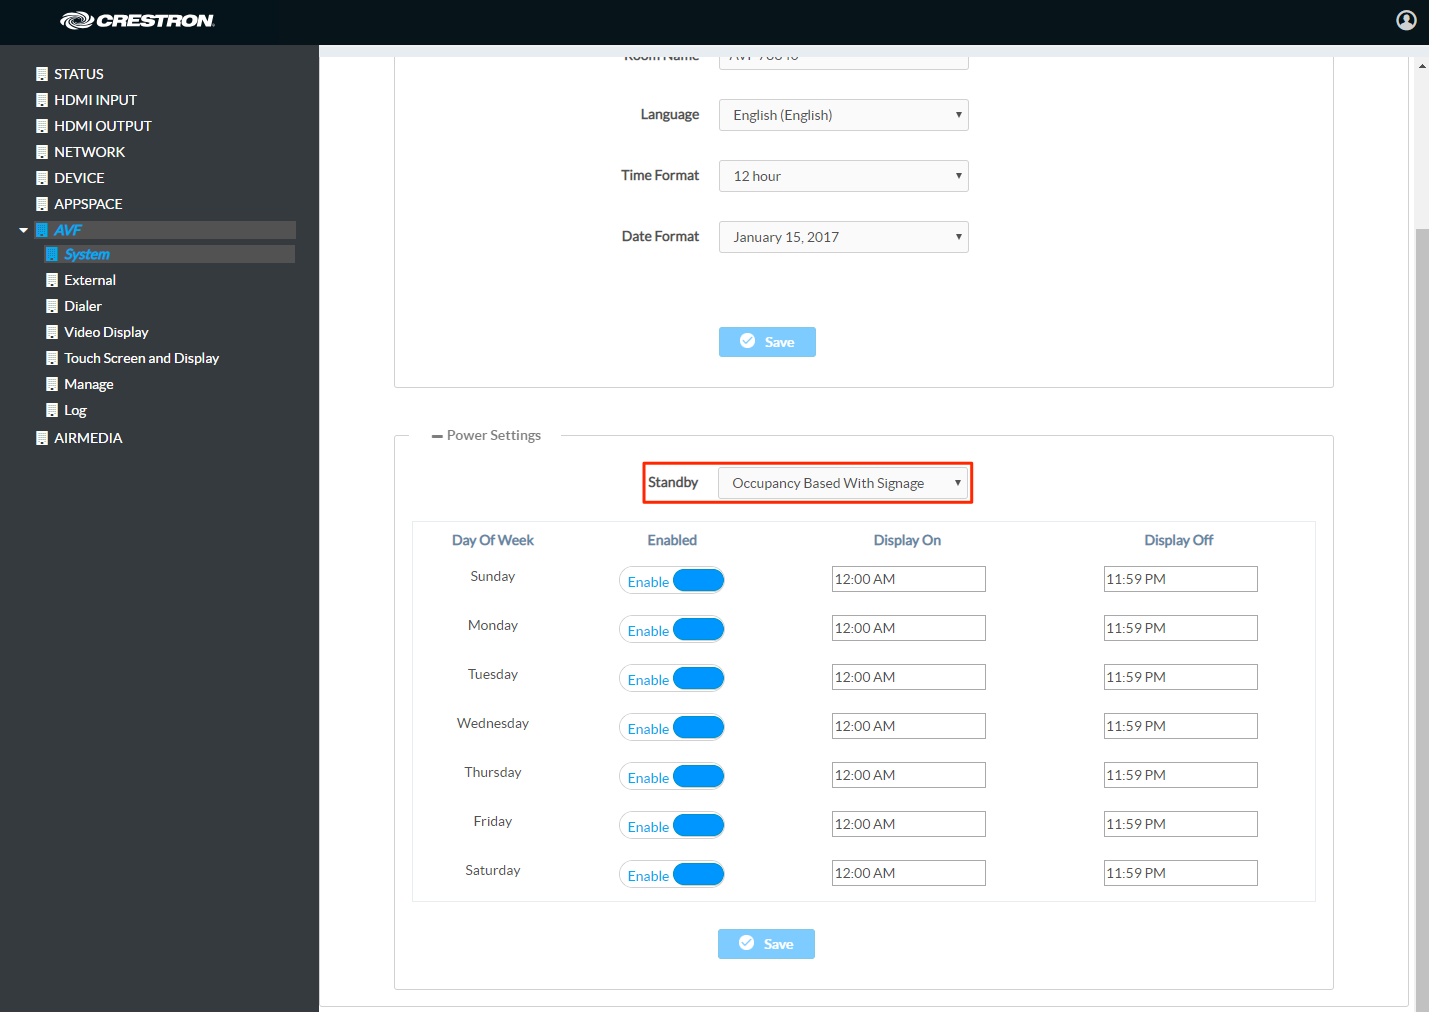
Ensure the correct standby mode, Occupancy Based With Signage, is selected for signage in standby to work properly.
To configure the standby mode, navigate to AVF > System > Power Settings, and select Occupancy Based with Signage from the Standby dropdown menu.
Signage as a Background:
In this mode the Appspace App takes over the majority of the screen, while the Crestron conference collaboration tool is maintained at the bottom.
Note
By default there is a gray overlay on screen above the Appspace content, this is to provide better visibility for the Crestron conference meeting room information on display.
The gray overlay can be disabled in the Crestron with web console, by disabling the Show Background Overlay option in AVF > Touch Screen and Display > Display Customization.

Click Save Changes to reboot the device.
Once successfully connected, the Appspace App device registration page is displayed. Follow the instructions in the Register a device article (from Step 2 onwards) to register your device.
If you are using only one playlist channel for both display modes (Background and Standby), select the playlist channel created earlier in the Assign a channel field.
If you are using two different playlist channels for each display mode, select Users can browse published channels in the Assign a channel field.
Important
To maintain the integrity of the local storage on the device, the registration information is written to the permanent storage on a timer. After a device is registered to Appspace, please do not remove power or reboot it for at least one (1) hour.
Publish and assign the Crestron device to your playlist channel(s). Please refer to the Publish a channel article.
Note
- Once registered, the device health will show as offline in the Appspace console because the Appspace App is only online when called upon.