Install Appspace App on BrightSign
This article provides the instructions to configure and register BrightSign devices for Appspace.
- Configure BrightSign
- Configure BrightSign with Local Policy File
- Using DHCP Option 43 provisioning for BrightSign
- Update Appspace App on BrightSign via Device Tasks
- Update BrightSign firmware via Device Tasks
- Enable Closed Captioning on BrightSign
- Enable Text Overlay over Video
- Configure Device Rotation Settings
Important
- If you wish to upgrade existing BrightSign devices running the Appspace App to OS version 8.0, the Appspace App must be updated to version 1.46 first, before the device firmware is updated to version 8. This is crucial to prevent the local storage from being wiped off due to the architectural changes on the location of the local storage for BrightSign OS 8.
- BrightSign devices are unable to update the Appspace App versions automatically. Please refer to the `Update Appspace App on BrightSign`_ section below for workarounds.
- DHCP Option 43 is supported on Appspace App 1.36 and above.
Prerequisites
The device must meet the manufacturer’s minimum hardware and technical specifications, as well as the Appspace App’s minimum requirements. Please refer to Appspace App requirements.
Ensure the device has been installed with the latest firmware (v 6.1.76 or higher). Download here: https://www.brightsign.biz/downloads/overview.
A BrightSign compatible SD card/USB drive/SSD storage device.
Important
BrightSign devices with SSD storage are only compatible with Appspace App 1.33 and above, and BrightSign firmware 7.0.60 is required.
An active Appspace account, with sufficient Device IDs to register the device.
An active Internet connection.
Note
To connect to a wireless network, ensure your BrightSign device is fitted with the WS103 wireless module. More info can be found on the BrightSign website: https://www.brightsign.biz/digital-signage-products/accessories/wifi-modules
To configure BrightSign to connect to a wireless network, follow the instructions here: http://docs.brightsign.biz/display/DOC/Device+Setup#DeviceSetup-WirelessSetup
To configure security certificates on to the BrightSign device, follow the instructions here: http://docs.brightsign.biz/display/DOC/BrightSign+Network+Setup#BrightSignNetworkSetup-Wired/Wireless
A USB keyboard for activation.
It is recommended that the device clock is set to automatically retrieve time from a Network Time Protocol (NTP) server, with the correct time zone, in order for it to sync correctly with the Appspace server.
Note
Appspace cloud servers by default retrieve time from a NTP server. If an Appspace on-premises server is used, ensure the server time is automatically retrieved by a NTP server.
Appspace has updated the timezone configurations, which now includes timezones other than GMT. This enables users with daylight savings to adjust the time accordingly.
For more information, please refer to the
Appspace 7.1-ac.8 Release Notes
Please ensure your network is configured to allow Appspace whitelist URLs and the relevant network ports.
Note
- If you need to reset the device to the default factory settings, please refer to the vendor’s Support forum here: http://support.brightsign.biz/entries/21796878-How-do-I-restore-reset-a-unit-to-Factory-Default-settings-
- On your proxy server, whitelist the hostnames listed in the ‘How to set up networks with SSL content filters’ section in the following article: https://support.google.com/chrome/a/answer/3504942#sslinspection.
Configure BrightSign
Follow the instructions below to setup the BrightSign device:
Click System > Downloads in the Appspace menu, and download the Appspace App for BrightSign client (autorun.zip).
Copy the autorun.zip file to an SSD storage, an SD card, or a USB drive according to your preference. If using an SD card or a USB drive, plug in the devices into the BrightSign device.
Warning
BrightSign devices with SSD storage are only compatible with Appspace App 1.33 and above, and BrightSign firmware 7.0.60 is required.
The Appspace App installation package will be automatically extracted to the storage device.
Note
The autorun.zip file is automatically deleted from the storage device after the extraction.
Connect the BrightSign device to a display screen.
Ensure network connectivity is active, and switch on the BrightSign device. Wait for the device to boot-up and display the Device registration page.
Note
The BrightSign device may need to be restarted a couple of times if the device registration page does not show up.
Launch the Appspace App.
If using an SSD, once the initial installation and registration process is complete, you may remove the SD card or USB drive, as the Appspace App will operate solely from the SSD storage hereafter.
Configure BrightSign with Local Policy File
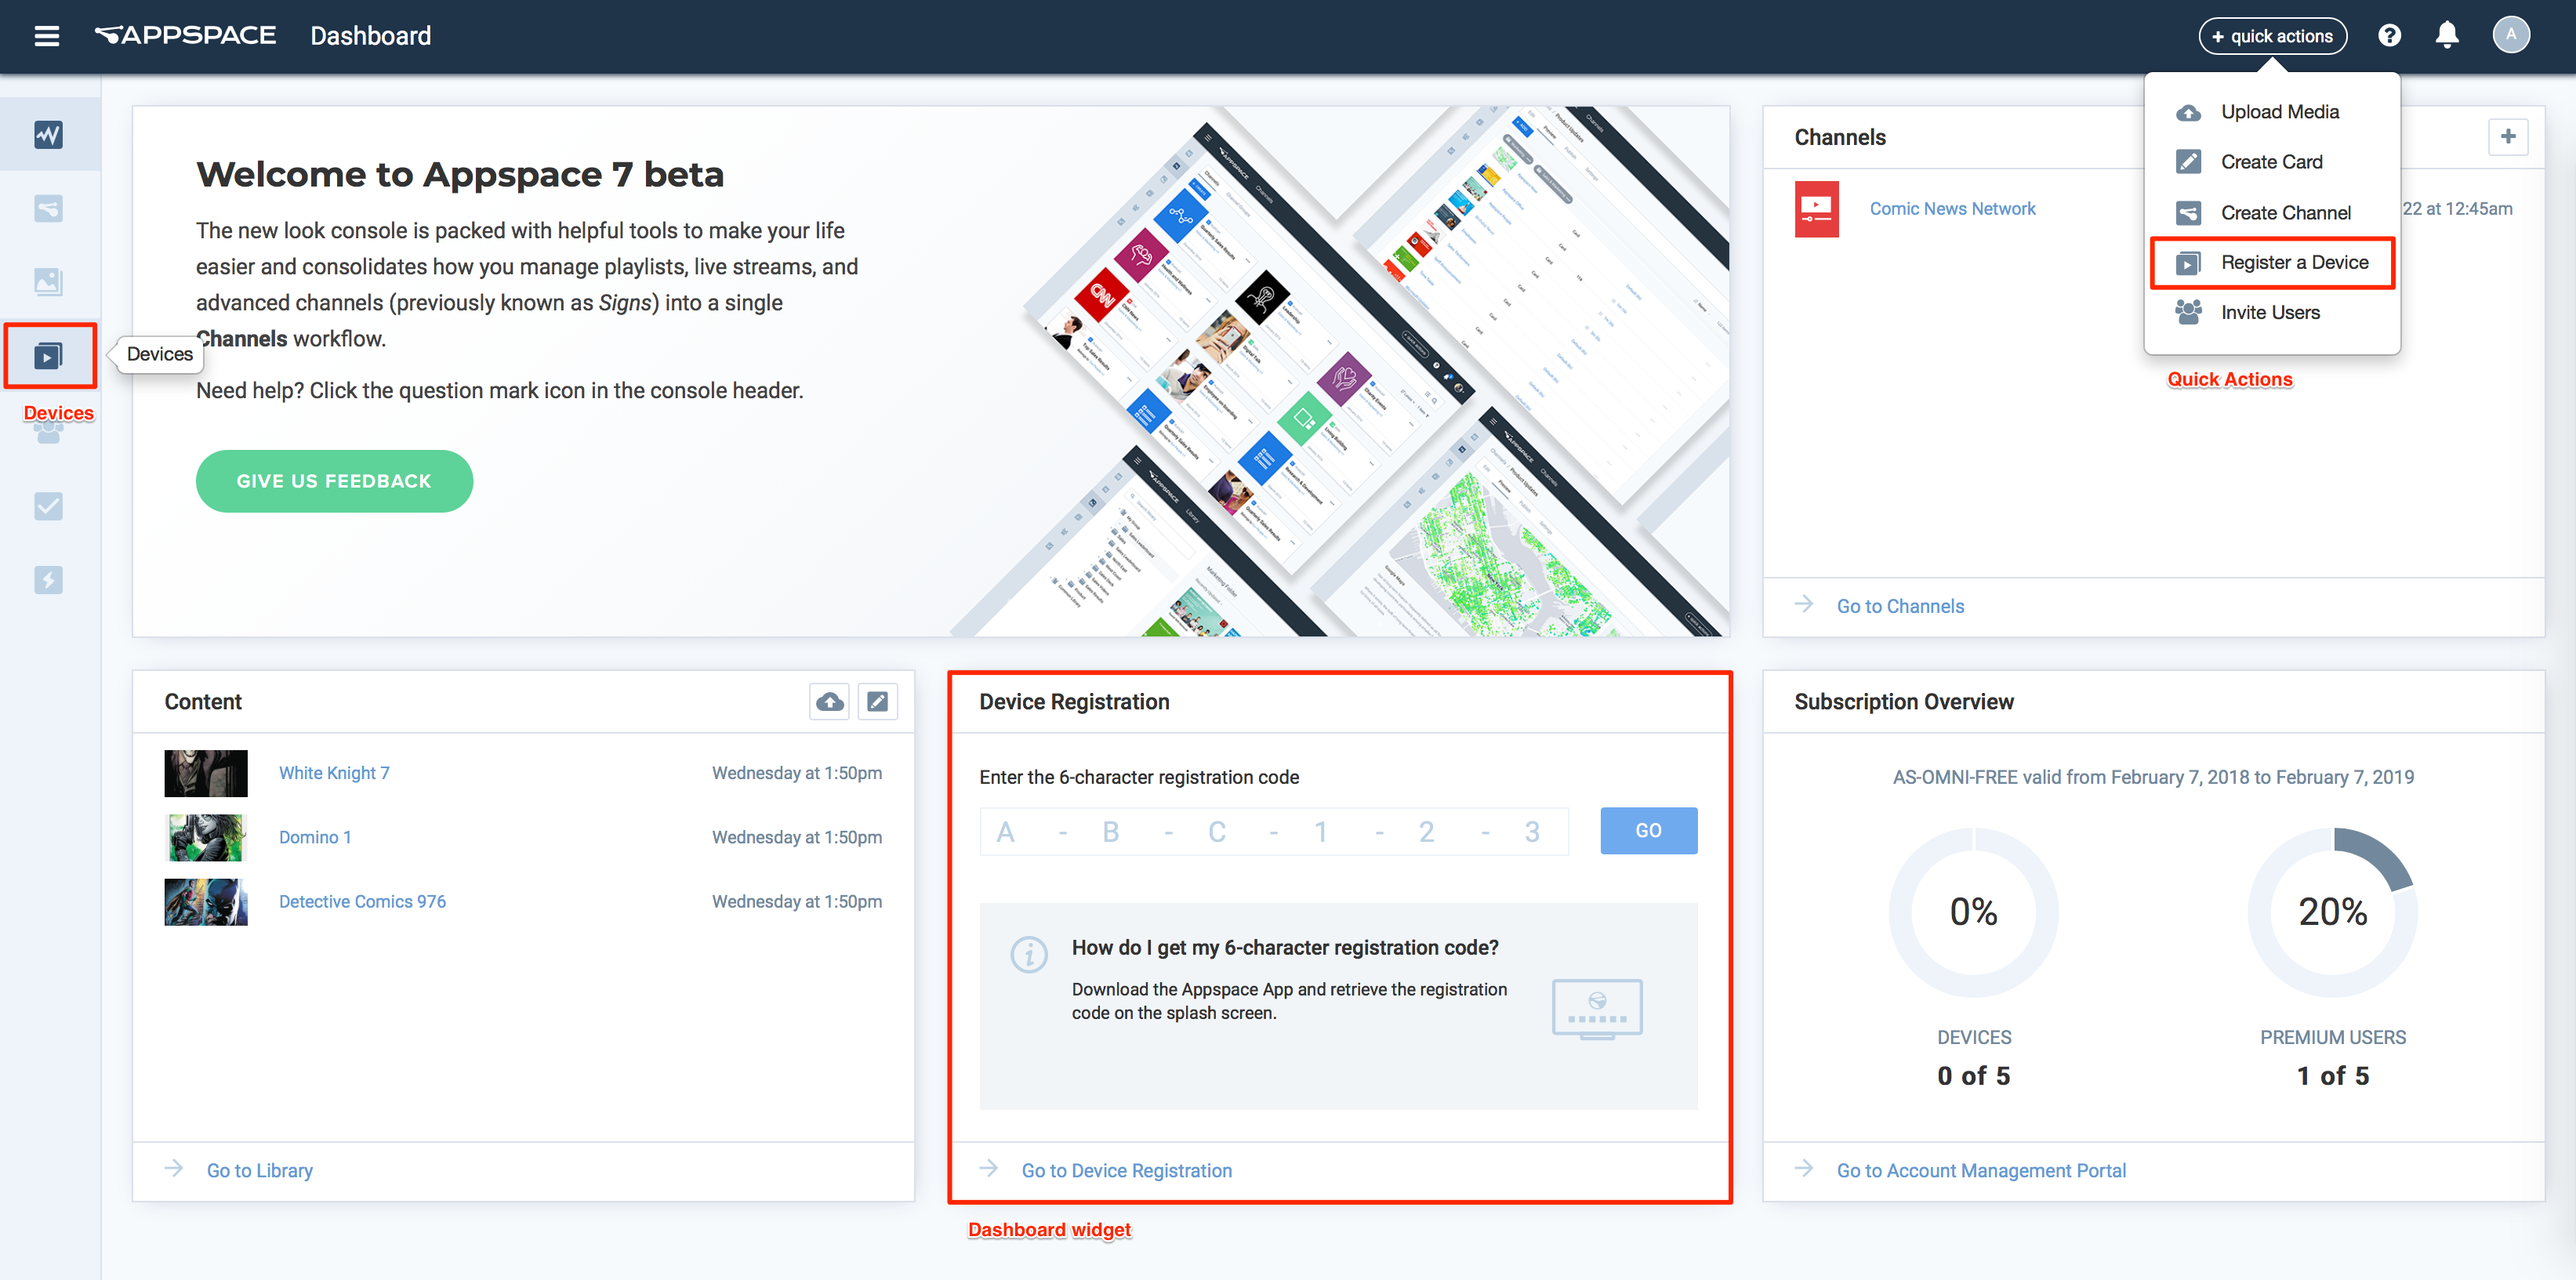
Login to Appspace Cloud at cloud.appspace.com, and launch the device registration page via one of the following methods:
- Click the Quick Actions menu and select Register a Device.
- Go to the Device Registration widget on the Dashboard.
- Click the Appspace menu, select Devices, and click the Add button in the Devices tab.
In the Register a New Device window, click the advance device registration link
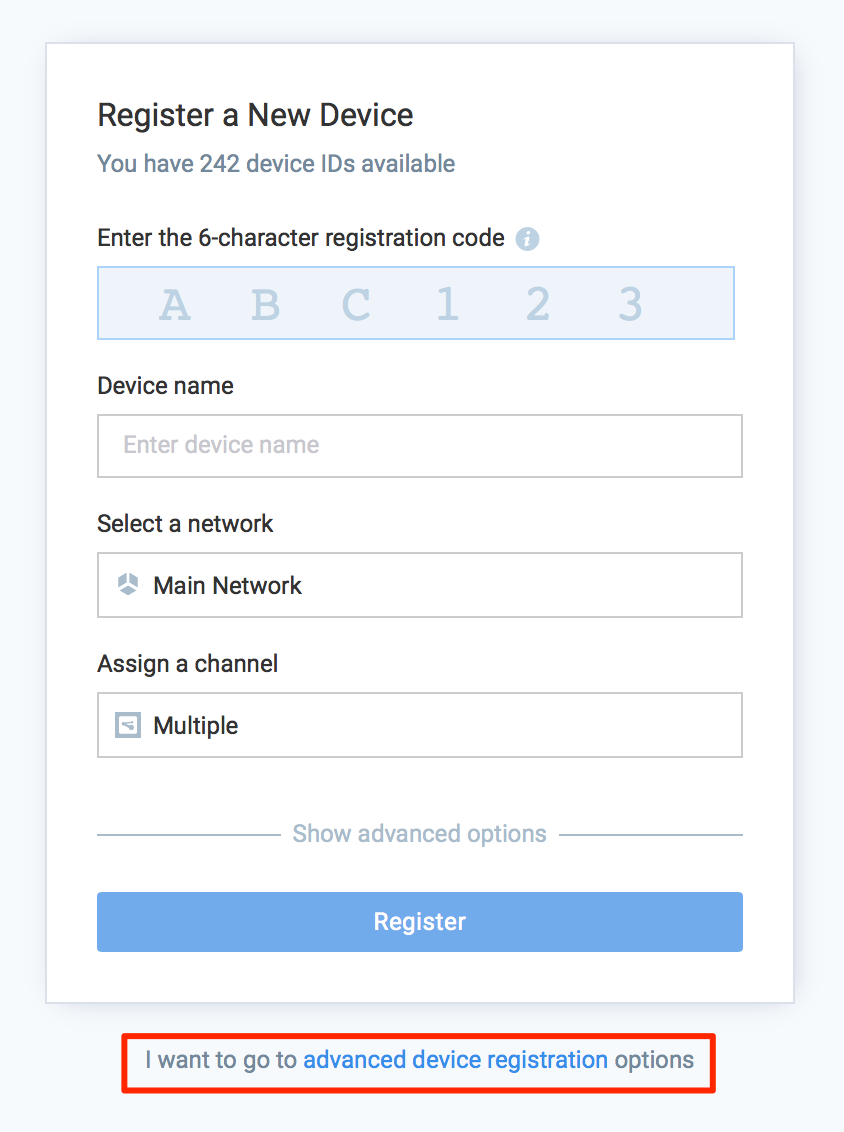
In the Configure Advanced Registration window, select BrightSign Package in the Deployment method drop-down menu.
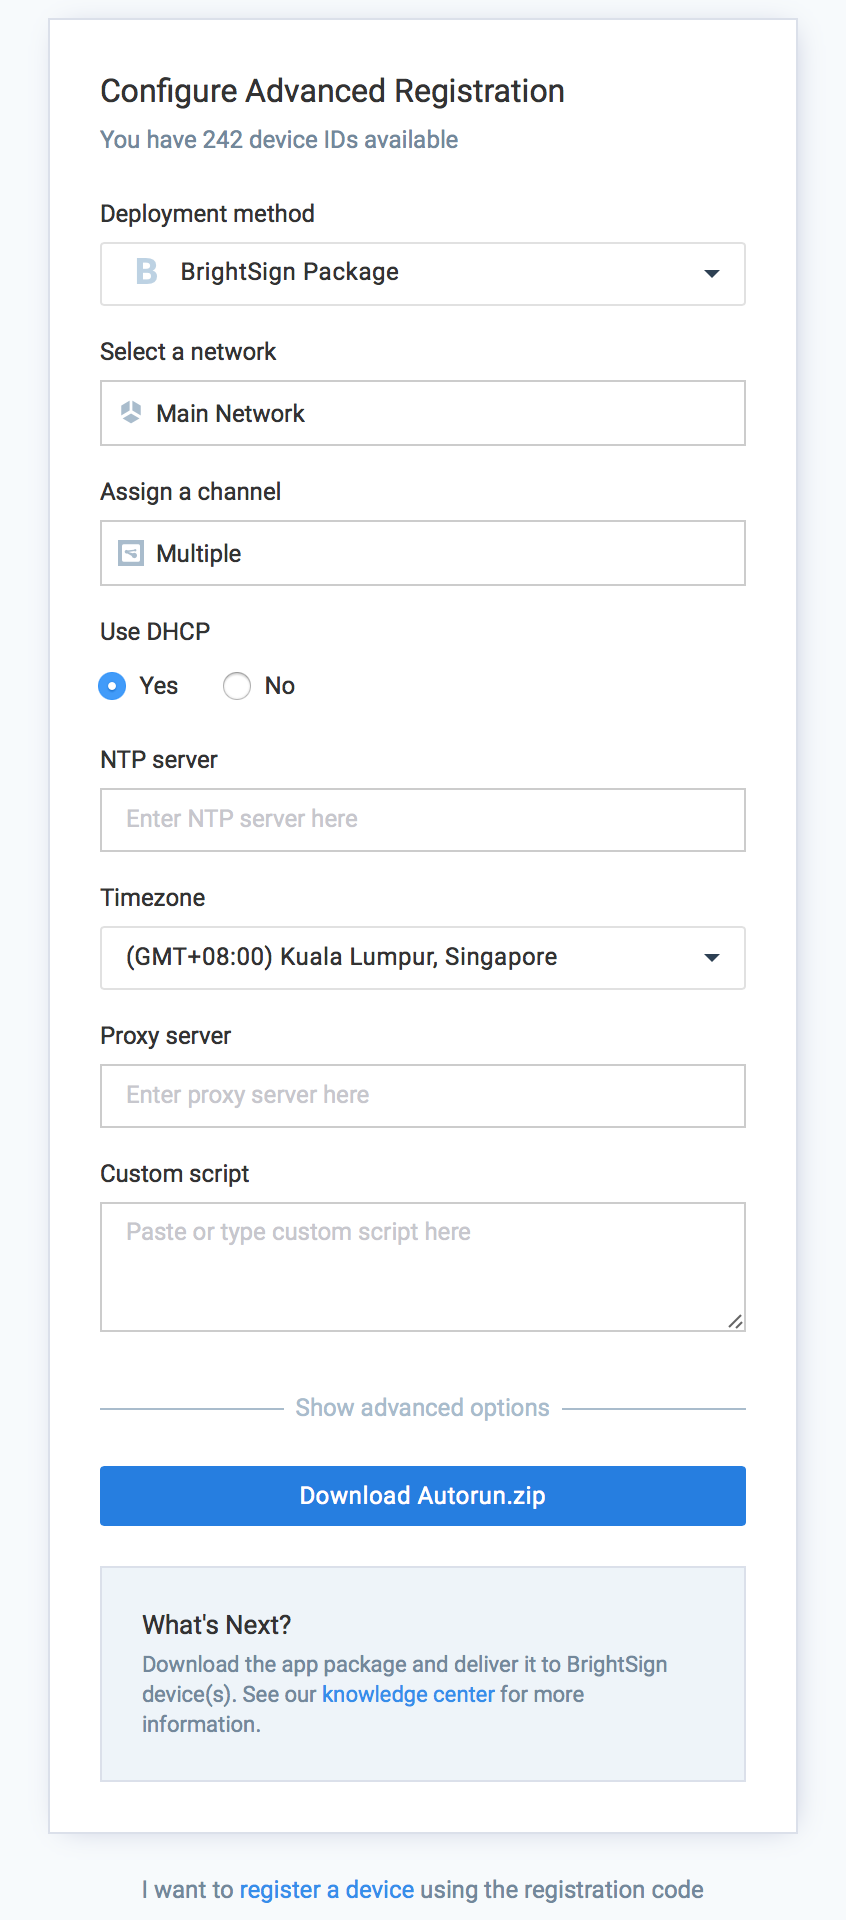
Select the network the device is in, and assign a channel for the device.
Additionally you can configure fields such as DHCP, NTP server, Timezone, and Proxy Server. You can also perform custom scripting in the Script Configuration section.
Optionally, clicking the Show advanced options allows you to configure the Device Description, Device Group and Device tags for the device.
Note
Appspace has updated the timezone configurations, which now includes timezones other than GMT. This enables users with daylight savings to adjust the time accordingly.
For more information, please refer to the
Appspace 7.1-ac.8 Release NotesClick Download Autorun.zip.
Save the autorun.zip file to a SSD storage, SD card or a USB drive according to your preference. If using SD card or USB drive, plug in the devices into the BrightSign device.
Warning
BrightSign devices with SSD storage are only compatible with Appspace App 1.33 and above, and BrightSign firmware 7.0.60 is required.
The Appspace App installation package will be automatically extracted to the storage device.
Note
The autorun.zip file is automatically deleted from the storage device after the extraction.
Connect the BrightSign device to a display screen.
Ensure network connectivity is active, and switch on the BrightSign device.
Wait for the BrightSign device to boot-up. The Appspace App will begin registering the device, and the selected channel will be displayed.
If using an SSD, once the initial installation and registration process is complete, you may remove the SD card or USB drive, as the Appspace App will operate solely from the SSD storage hereafter.
Using DHCP Option 43 provisioning for BrightSign
Typically, we download and store the autorun.zip file that contains a policy file on a SSD or SD card and manually register each device. If you have DHCP Option 43 enabled on your network, you can now leverage this option to allow all devices plugged in to the network, to auto-register the devices and begin playing the assigned channels, without user intervention via a provisioning script.
Prerequisites
A DHCP server on the local network configured with DHCP Option 43.
A provisioning server to handle the recovery request from the device.
A provisioning script that will download the autorun.zip file and reboot the device.
Note
For help configuring the above scripts and server, please contact BrightSign.
Follow the instructions below to setup the device for automatic registration with DHCP Option 43:
Follow steps 1-4 in the Configure BrightSign with Local Policy File section above to configure the policy file.
Click Download to download the autorun.zip file.
Place the autorun.zip file on any desired web server.
Define the URL path to the autorun.zip file in your provisioning script.
Connect the BrightSign device to a display screen.
Ensure network connectivity is active, and switch on the BrightSign device. Once the device boots-up, the device will automatically install, and register the Appspace App.
Note
The BrightSign device will restart a couple of times to complete this process.
If you did not select a channel during the policy file configuration in step 1 above, you may:
Update Appspace App on BrightSign via Device Tasks
Note
This is applicable to Appspace App version 1.13 and above.
To update Appspace App on all supported BrightSign devices in the network, follow the instructions below:
Prerequisites
Ensure the network allows devices to be updated.
How To
- Navigate to Devices in the Appspace menu, and select the Networks > Properties tab.
- Ensure the Software.SoftwareUpdates device property value is set to TRUE.
Ensure the BrightSign device is configured to receive updates automatically.
How To
- Navigate to Devices in the Appspace menu.
- Select the desired BrightSign device, and click the Settings tab.
- Ensure the Software updates option is set to Automatic Update.
Update Appspace App
Navigate to System > Downloads in the Appspace menu, download the latest Appspace App for BrightSign package, and save it to a hosted folder.
Navigate to Device Tasks in the Appspace menu, and click the Advanced Tasks tab.
Click the ADD button, and select the Appspace App : Brightsign App Updater task.
Configure the advanced task, and deploy it to the network where the BrightSign devices are registered.

Click Save.
Update BrightSign firmware via Device Tasks
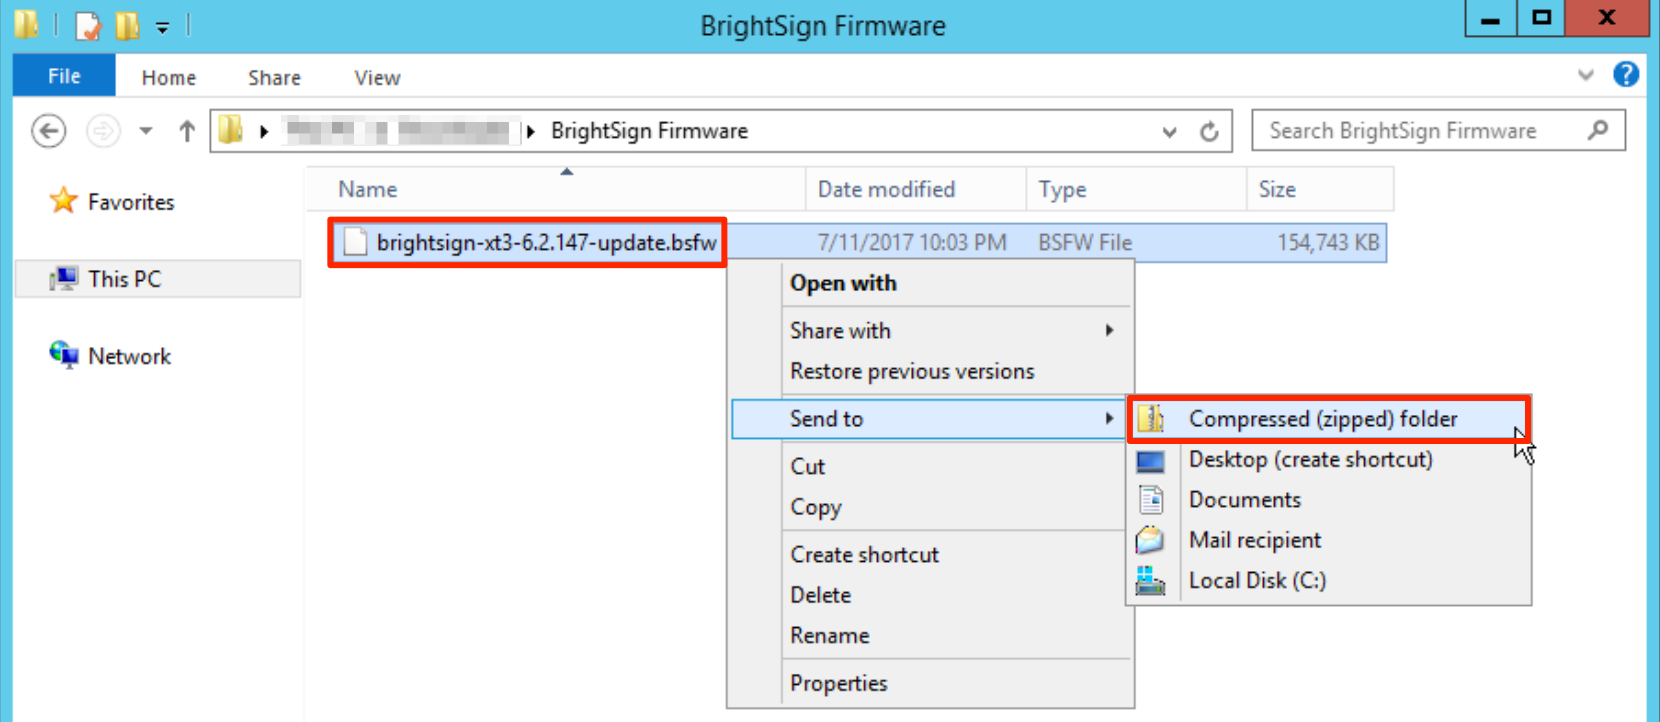
Download the BrightSign firmware of your device from the BrightSign Downloads site at: https://www.brightsign.biz/downloads/overview
Extract the BrightSign firmware .zip file.
Copy only the .bsfw file and paste it in a folder on the local web server.
Right-click and compress the .bsfw file.
On the Appspace console, navigate to Admin > Device Tasks, and click the Advanced Tasks tab.
Click the Add button, and select the Appspace App : Device Firmware Update task.

In the Common Parameters section, enter in the URL to the BrightSign firmware package on your local web server (from Step 3 above).
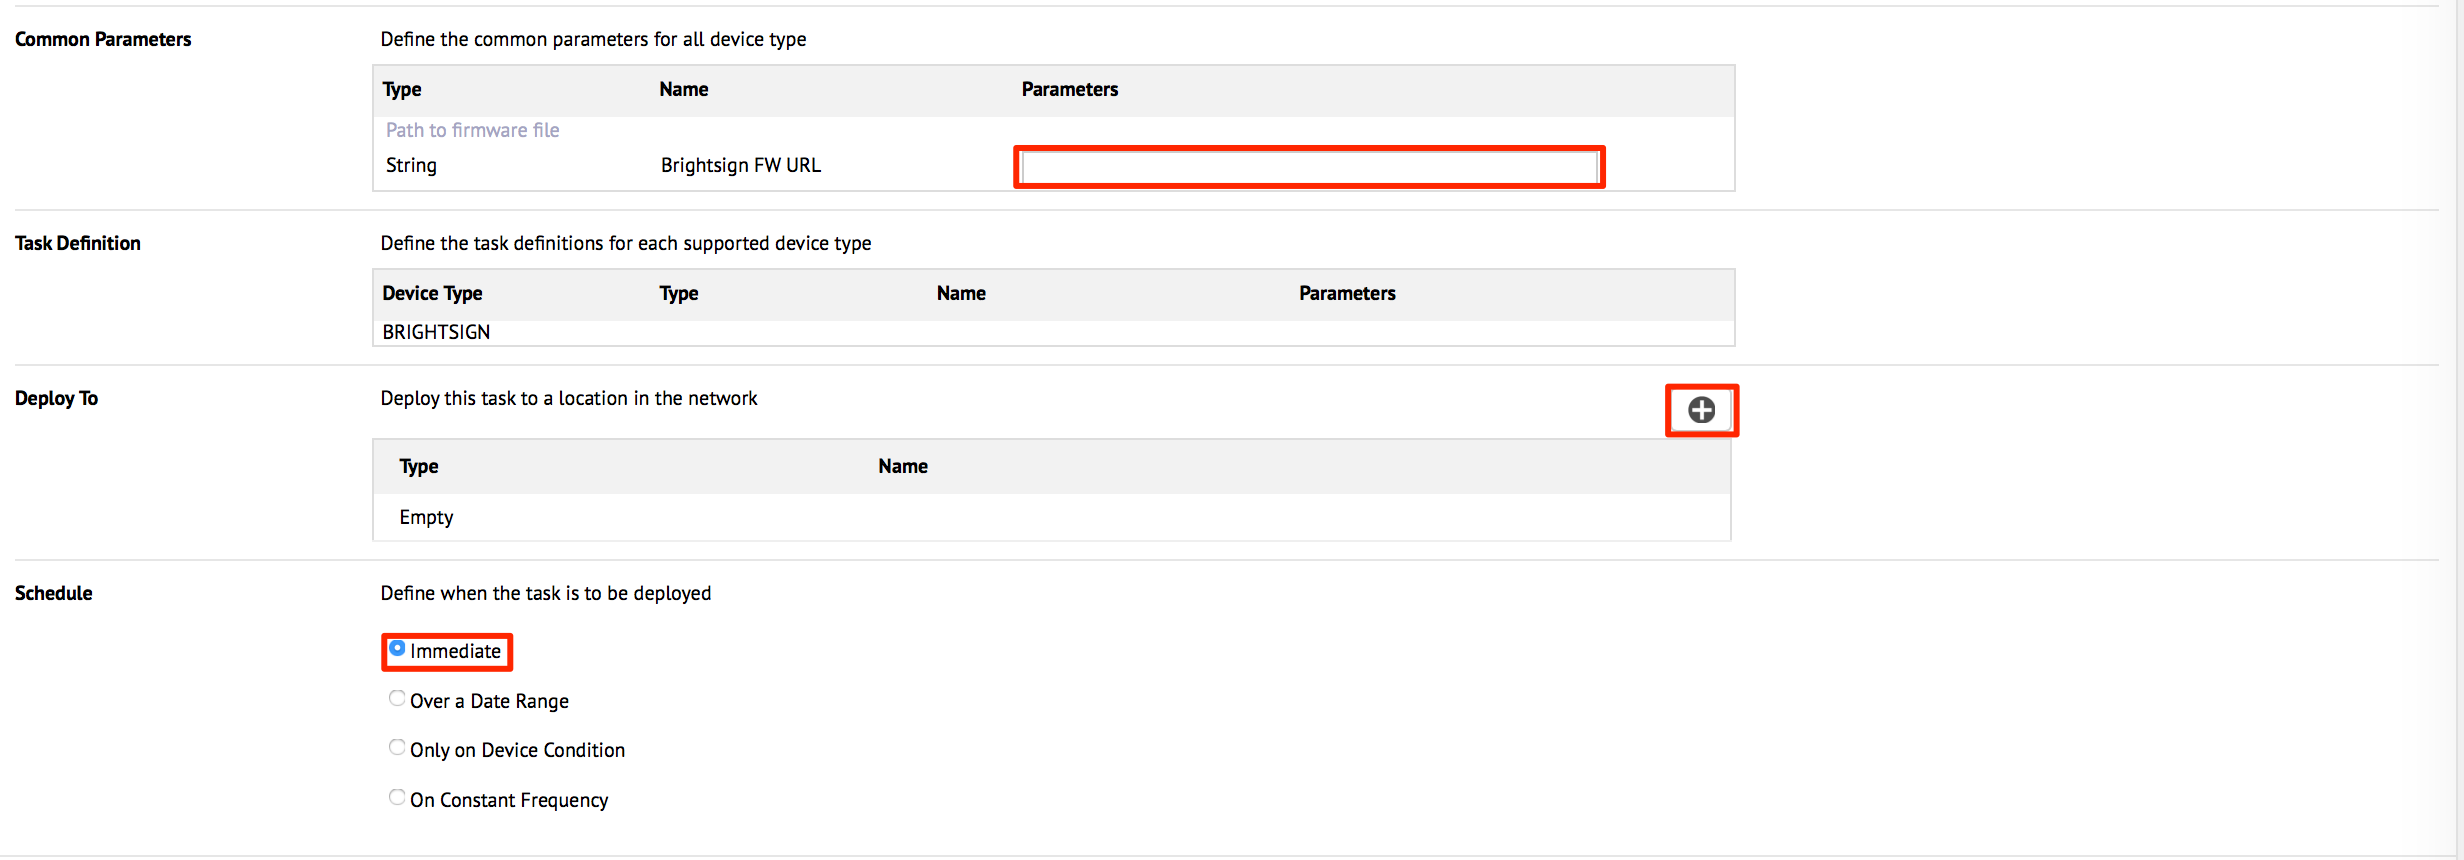
In the Deploy To section, select the desired network to deploy the task to.
In the Schedule section, select the desired deployment option.
Click Save.
Enable Closed Captioning on BrightSign
To enable Closed Captioning or subtitles manually, follow the instructions below.
Login to the Appspace console, and select Channels on the Appspace menu.
Select the desired advanced channel, and select the Edit tab.
Click the edit button for the layout containing the Media Zone widget.
In the editing window, select the Media Zone widget, and click the Properties button.
Select the Properties tab, and click the Edit button.
Enter in the following widget property:
Widget Property Value Description custom.media.video.cc True Enable Closed Captioning / Subtitles False Disable Closed Captioning / Subtitles 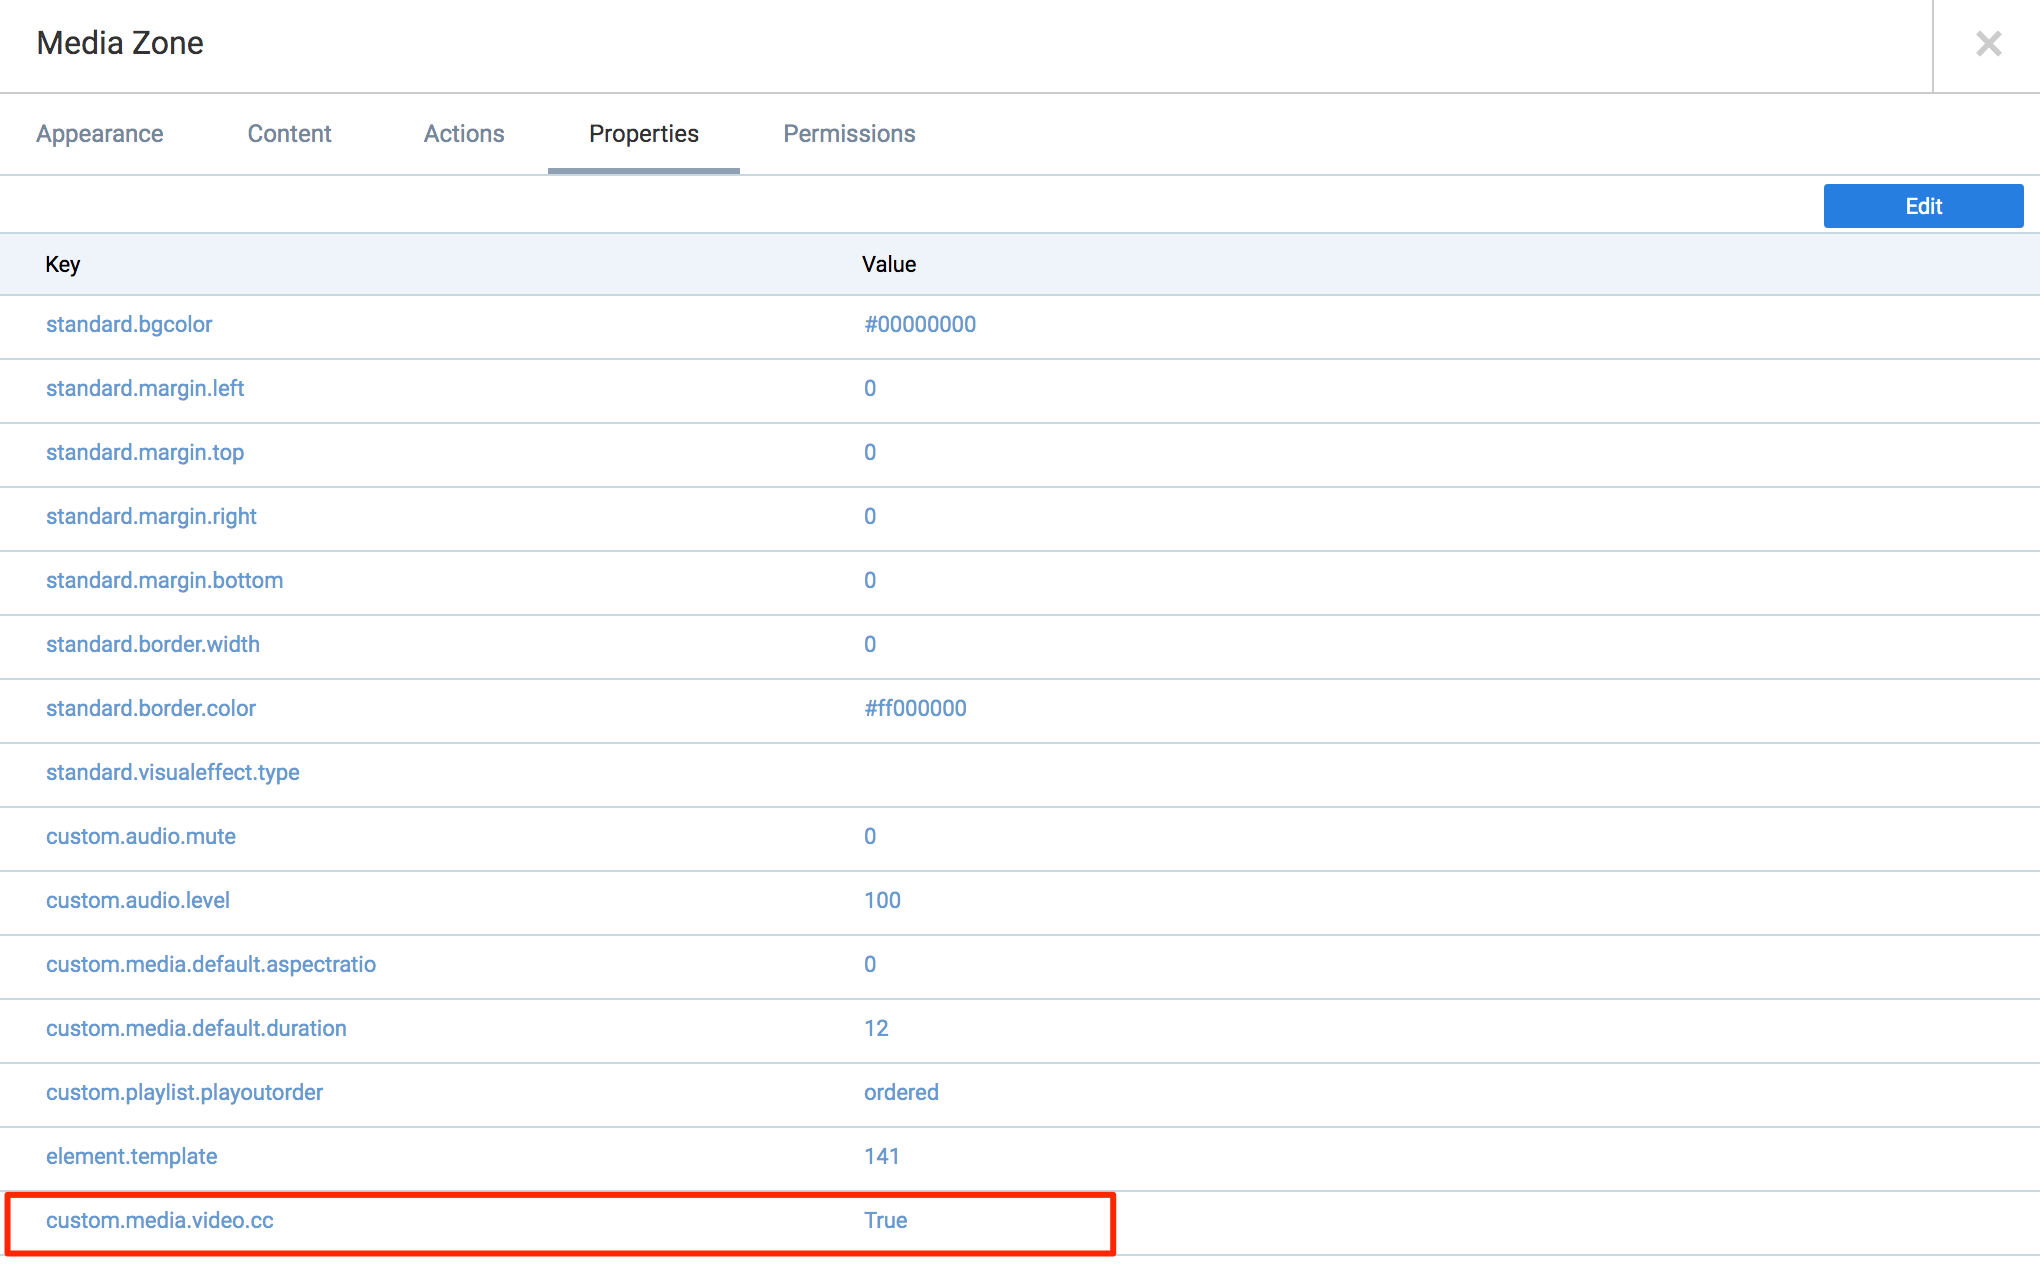
Once done, click Finish.
Select the Appearance tab, and ensure that Background Color is set to the default value of #000000 with the OPACITY of 0.
You may also click the None button to return to the default value.
Click Apply, and close the window once changes have been made.
Back on the editing window, change the layout Background Color to #010203 with the OPACITY of 100, or edit the following widget property:
Widget Property Value Description standard.bgcolor #ff010203 Change the background color to black 
Click Apply, and Save once done.
Enable Text Overlay over Video
To enable text overlay over video for viewing in interactive mode (user mode on a web browser or mobile device), add a device property, while to enable it on a sign channel, add a widget property to the Media Zone widget instead.
Please see instructions below.
Enable Text Overlay over Video in interactive mode
To enable text overlay over video in interactive mode on BrightSign devices, add the following device property:
Custom.media.video.layerindex
Value Range:
- -1: Places the video behind all graphics.
- 0: Disables “hwz” mode completely.
- 1: Places the video in front of all graphics (the default setting).
- 2: Places the video in front of all graphics, as well as a second video element.
Note
When “hwz” is enabled, the video is rendered as a video element, ensuring the highest possible frame rate and video quality. When “hwz” is disabled, the video is rendered as a graphics element.
For instruction to add a device property, please refer to Adding New Device Properties.
Enable Text Overlay over Video in an advanced channel (sign)
To enable text overlay over video in a sign on BrightSign devices, add the following property to your Media Zone widget:
Custom.media.video.layerindex
Value Range:
- -1: Places the video behind all graphics.
- 0: Disables “hwz” mode completely.
- 1: Places the video in front of all graphics (the default setting).
- 2: Places the video in front of all graphics, as well as a second video element.
Note
When “hwz” is enabled, the video is rendered as a video element, ensuring the highest possible frame rate and video quality. When “hwz” is disabled, the video is rendered as a graphics element.
For instruction to add a widget property, please refer to Adding Widget Property.
Change the Sign channel layout Background Color to #010203, and set the Opacity slider value between 1 and 100 (non-zero value).
Configure Device Rotation Settings
In Appspace 7.0, a single playlist channel automatically rotates based on the natural orientation of the device. However, BrightSign does not by default have a device orientation setting to support this feature, and instead follows the current, or the last orientation setting of a device.
Note
The default orientation settings for all devices is Landscape.
To play a single playlist channel in the desired orientation, set the device orientation in the BrightSign device settings, as per the following instructions:
Navigate to Devices from the Appspace menu.
Select the desired BrightSign device, and click the Settings tab.
Select the desired Display orientation option.

Click Save.