Single Sign-On (SSO) for Appspace cloud
This article provides instructions to enable the Single Sign-On (SSO) feature for Appspace Cloud.
With SSO, Appspace Cloud accounts can now be configured to integrate with Security Assertion Markup Language (SAML) 2.0 compliant identity providers, allowing for seamless and secure connections using a single set of credentials, simplifying username and password management.
When you login to Appspace, your credentials are authenticated by the identity provider, and a SAML assertion is sent to Appspace via the web browser to allow the login access to Appspace. The instructions in this article use the Active Directory Federation Services (AD FS) as the identity provider, with Appspace as the service provider. Follow the instructions below to setup SSO for Cloud.
- Setup Active Directory Federated Services (AD FS) server
- Enable Single Sign-On (SSO)
- Configure AD FS Relying Party Trust
- Log in with SSO
Prerequisites
- An Identity Provider that is SAML 2.0 compliant.
- IdP metadata, or the SSO Url and x.509 certificate.
- You must be an Account Owner.
- Contact Support to enable SSO on cloud.
Setup Active Directory Federated Services (AD FS) server
Note
Installation can be performed on the Active Directory server or on a separate server.
- Install the Active Directory Federated Services (AD FS) server role. Follow the instructions here: https://msdn.microsoft.com/en-us/library/azure/dn151310.aspx
- Configure the ADFS. Follow the instructions here: https://msdn.microsoft.com/en-us/library/azure/dn151319.aspx
Enable Single Sign-On (SSO)
Download the IdP metadata by navigating to the following URL: https://<ADFSFQDN or IP>/FederationMetadata/2007-06/FederationMetadata.xml.
Note
This metadata is used by the Identity Provider (AD FS) to recognize the service provider (Appspace).
Login to your Appspace Cloud account.
Select Admin > Settings from the Appspace menu.
Click the Account Authentication tab, and select Custom SSO in the Authentication Method menu.

Note
Cloud users, please contact Appspace Support to turn on SSO and enable this tab.
Set the desired SSO Settings to either Optional or Required, depending on the authentication implementation.
- Optional - Users can login with their Appspace credentials, or Single Sign-On credentials (AD credentials).
- Required - Users must log in with Single Sign-On credentials (AD credentials). Only administrators can log in with an Appspace credential.

In the IdP Information section, select the ‘Use IdP metadata’ option, and upload the IdP Metadata XML file that was downloaded in Step 1 above.

Alternatively, select the Manual option, and enter in the SSO URL and X.509 Certificate data manually in the fields.
In the Appspace User Profile Mapping section, check the ‘Enable User Profile mapping’ check box to map the Appspace user fields to the corresponding fields existing in the Identity Provider. This is to ensure the user details on both providers match.
Note
If the IdP Metadata uploaded initially contained fields to be mapped, a drop-down menu of the fields available is displayed. A maximum of only 20 characters are allowed in each field.
In the ‘Generate SP metadata’ section, select your preferred options, as follows:
- Data Binding: Redirect – Users will be redirected to the Identity Provider. SSO details will be passed in a query string with “?SAMLRequest=……” as part of the URL.
- Data Binding: Post – SSO details will be passed using the POST method. For this method to work, you must ensure that the Identity Provider has direct access to the Appspace Server.
- Metadata Signing - When enabled, the metadata file is generated in an encrypted format.

Click Save & Download to download the Service Provider XML file, which will be used to configure the Identity Provider.
Note
Pass-through Authentication is disabled by default on cloud. To enable it, please contact Appspace Support.
Configure AD FS Relying Party Trust
Note
This section is performed on the Identity Provider (AD FS) server.
On the AD FS server, create a Relying Party Trust by following the instructions here: https://technet.microsoft.com/en-us/library/dd807132(v=ws.11).aspx
Please note the specific configurations required for Appspace, as listed below.
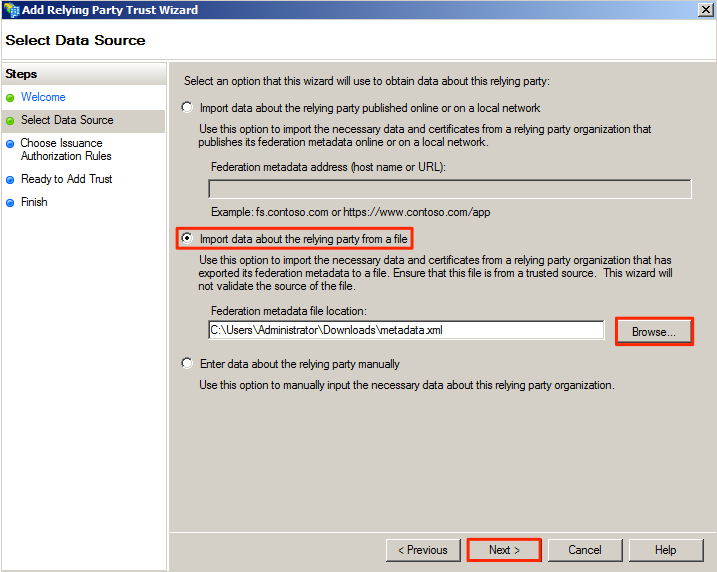
In the Select Data Source page, select “Import data about the relying party from a file” option, and click the browse button to select the metadata.xml file downloaded previously.
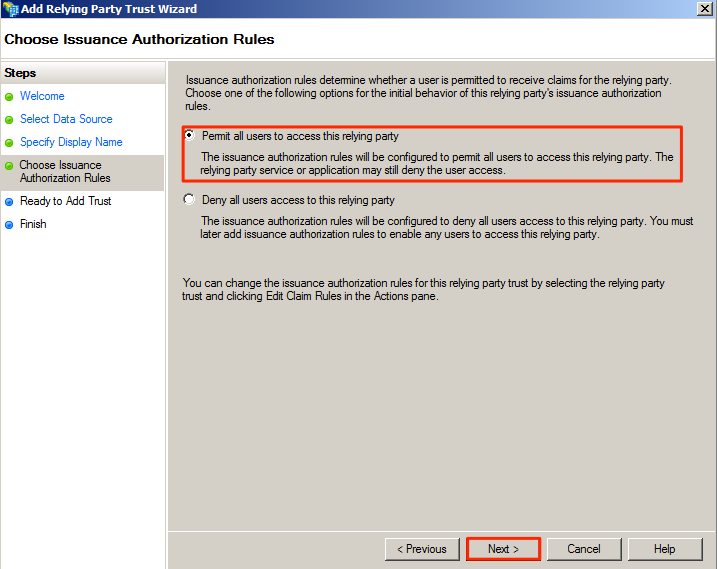
Select the “Permit all users to access this relying party” option, and click Next.
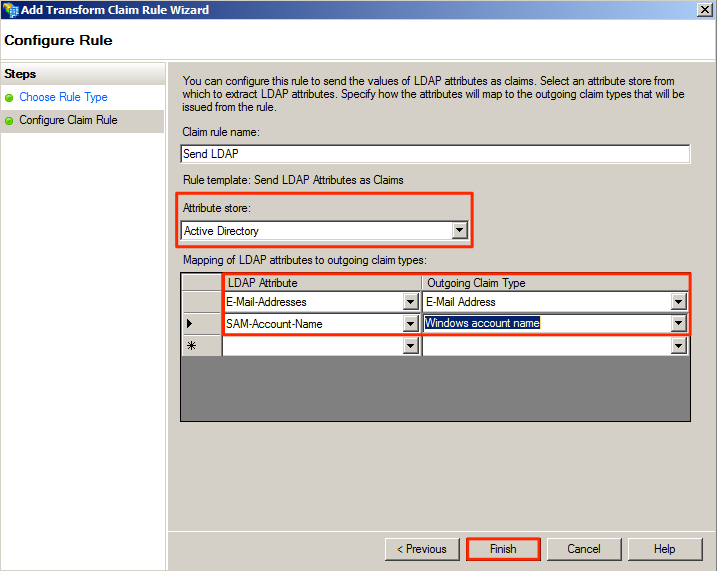
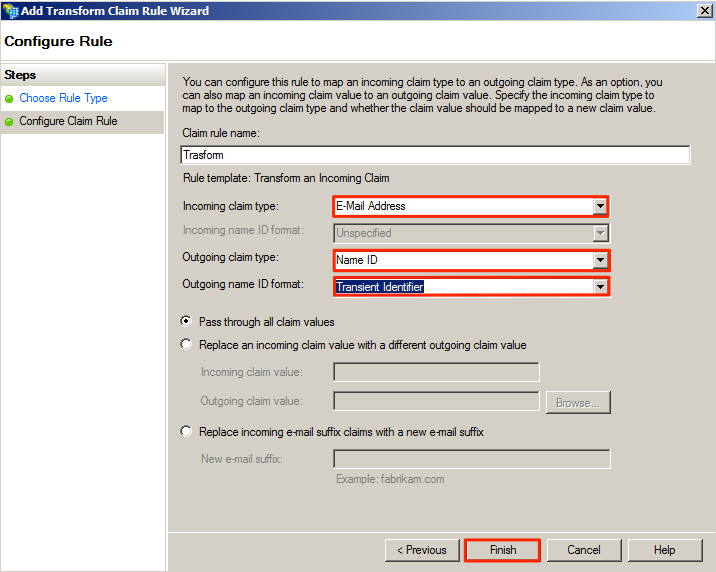
In the Edit Claim Rule window, add the following claim rules:
Add a ‘Send LDAP Attributes as Claims’ rule by following the instructions here: https://technet.microsoft.com/en-us/library/dd807115(v=ws.11).aspx
Note
This step mandates that all Appspace users (authenticating via SSO) are required to have email addresses that can be used as the usernames as well.
Add a ‘Transform an Incoming Claim’ rule by following the instructions here: https://technet.microsoft.com/en-us/library/dd807068(v=ws.11).aspx
Click Apply, and click OK.
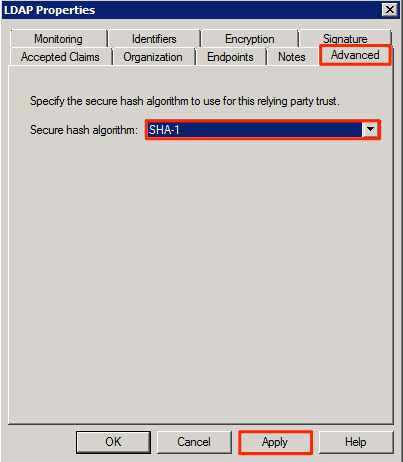
In the AD FS 2.0 folder tree, click the Relying Party Trusts folder, and select your Relying Party Trust display name.
Click Advanced, and select ‘SHA-1’ from the Secure hash algorithm drop-down menu. Click Apply to make changes.
Log in with SSO
Warning
You must use HTTPS for SSO to work.
Log in to Appspace Cloud with your credentials, and you will be redirected to the SSO login page provided by your Identity Provider.
Enter your AD credentials.
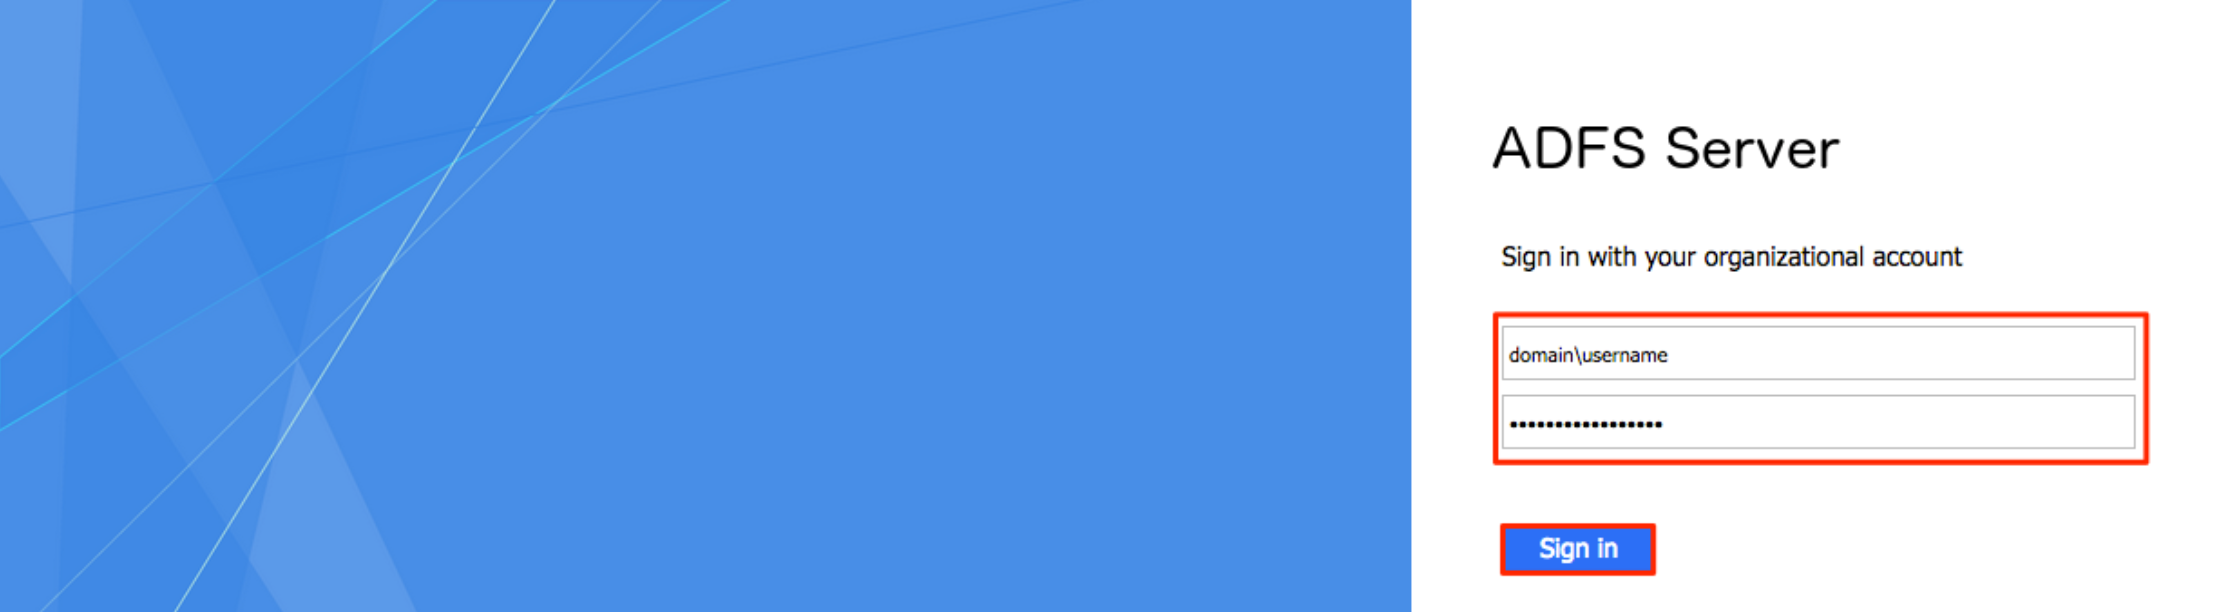
Upon successful authentication, you will be redirected back to your Appspace Dashboard.
Disable SSO Authentication
Follow the instructions below if you wish to disable SSO:
Click the Appspace menu, and select Admin > Settings.
Click the Account Authentication tab, and select Default in the Authentication Method drop-down menu.

Click Save.