Installing/Using System Fonts (Edge 300/340)
Overview
This guide will show you the steps to install and use system fonts on the Edge 300 or 340.
Pre-requisites
- The font file in .ttf or .otf format
- Root/admin credentials for the device (Edge 300 or 340)
- A PC within the same network to access the device(s)
- USB flash drive (FAT32 format)
Installing and Using System Fonts on Edge 300
Step 1
Attach a USB flash drive into one of the USB ports on the device and SSH into the device using PuTTy (on a Windows PC) or Terminal (on a Mac). Input the root password = cisco.
ssh root@(device IP address)
root@(device Ip address)'s password: cisco
Step 2
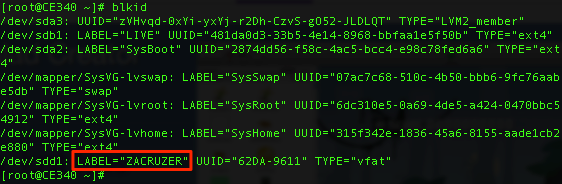
Key in blkid to find the block ID of the USB flash drive by looking for the LABEL of the USB flash drive.

Step 3
Mount the USB flash drive to /tmp/mnt. (Create /tmp/mnt by typing in mkdir /tmp/mnt if it doesn’t exist).
# mount dev/sdb1 /tmp/mnt
Step 4
Locate the font file on the USB flash drive and copy the font file to /.fonts.
# cp amerd.tff /.fonts
Step 5
Install the font.
# fc-cache
# su user -c "fc-cache"
Step 6
Check if the font has been successfully installed by listing all installed system fonts.
# fc-list
Step 7
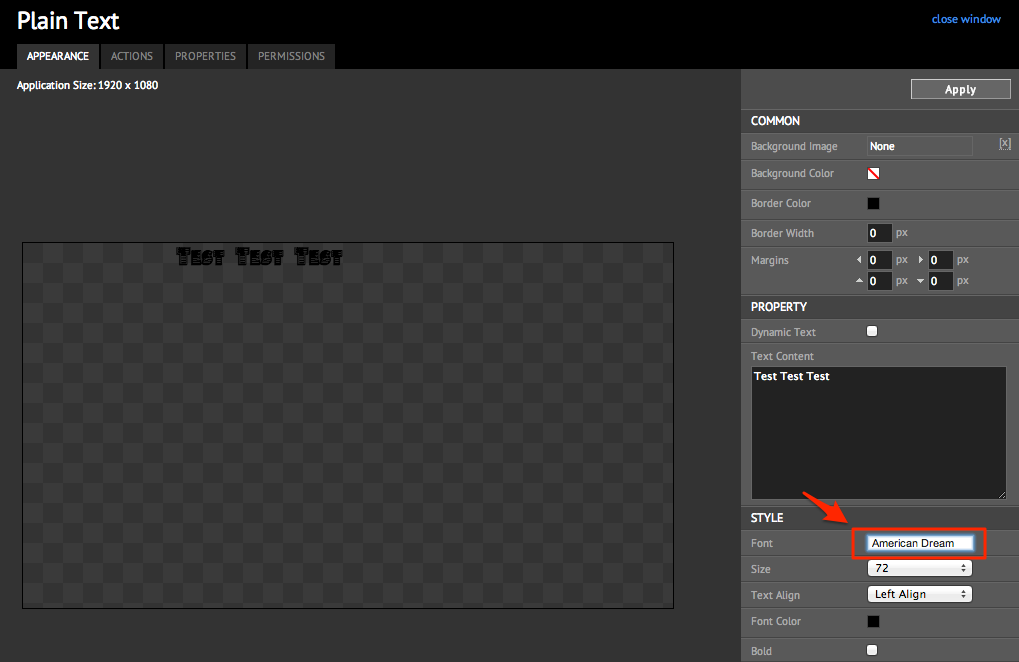
To utilize the installed font, open the plain text widget’s properties and set the font to the name of the font installed.

Step 8
Allow the player to update changes.
Step 9
Reboot the device either from Putty or Terminal.
# reboot
Step 10
The new icons will be displayed on the player.

Installing and Using System Fonts on Edge 340
Step 1
Attach a USB flash drive into one of the USB ports on the device and SSH into the device using PuTTy (on a Windows PC) or Terminal (on a Mac). Input the root password = aDMIN123#.
ssh root@(device IP address)
root@(device Ip address)'s password: aDMIN123#
Step 2
Key in blkid to find the block ID of the USB flash drive by looking for the LABEL of the USB flash drive.
Step 3
Mount the USB flash drive to /tmp/mnt. (Create /tmp/mnt by typing in mkdir /tmp/mnt if it doesn’t exist).
# mount dev/sdb1 /tmp/mnt
Step 4
Locate the font file on the USB flash drive and copy the font file to /.fonts.
# cp amerd.tff /usr/share/fonts
Step 5
Install the font.
# fc-cache
# su user -c "fc-cache"
Step 6
Check if the font has been successfully installed by listing all installed system fonts.
# fc-list
Step 7
To utilize the installed font, open the plain text widget’s properties and set the font to the name of the font installed.
Step 8
Allow the player to update changes.

Step 9
Reboot the device either from Putty or Terminal.
# reboot
Step 10
The new icons will be displayed on the player.
